
MO-2 - Document Camera Elmo - Free user manual and instructions
Find the device manual for free MO-2 Elmo in PDF.


| Product Type | Document Camera |
| Brand | Elmo |
| Model | MO-2 |
| Dimensions (Set Up) | W: 220 mm, D: 115 mm, H: 343 mm |
| Dimensions (Folded) | W: 220 mm, D: 115 mm, H: 57 mm |
| Weight | Approx. 950 g |
| Power Source | DC 5V (via supplied AC adapter) |
| Power Consumption | 15 W (when in use and charging) |
| Image Sensor | 1/3.2 inch CMOS, 8,000,000 pixels |
| Effective Pixels | H: 3280, V: 2464 |
| Lens | F=2.0 |
| Focus | Auto (One-push) |
| Digital Zoom | Max. 16x |
| Shooting Area | 329 mm × 439 mm (at height 328 mm, 4:3) |
| Output Resolutions | Auto, FHD 1920×1080, HD 1280×720, UXGA 1600×1200, XGA 1024×768 |
| Frame Rate | 30 fps |
| Illumination | White LED |
| Interfaces | USB 2.0 Type A (×2), USB 2.0 Type B, HDMI IN/OUT, RGB OUT, AUDIO OUT, LAN, SD card slot |
| WiFi | IEEE 802.11 a/b/g/n, 2.4 GHz / 5 GHz |
| Battery | Lithium-ion rechargeable; operating time approx. 2h50min, charging time approx. 2h30min to 80% |
| Supported Media | SD card (FAT32, SDHC up to 32 GB), USB flash drive (FAT32 up to 32 GB), internal storage |
| File Formats | JPEG, PNG, BMP, MP4, PDF, Excel, PowerPoint, Word |
| Operating Temperature | 0°C to +40°C |
| Operating Humidity | 30% to 85% (no condensation) |
| Special Features | Auto deskew, annotation (pen, highlighter), freeze, capture, video recording, split screen, QR code reader, Miracast |
Frequently Asked Questions - MO-2 Elmo
User questions about MO-2 Elmo
0 question about this device. Answer the ones you know or ask your own.
Ask a new question about this device
Download the instructions for your Document Camera in PDF format for free! Find your manual MO-2 - Elmo and take your electronic device back in hand. On this page are published all the documents necessary for the use of your device. MO-2 by Elmo.
USER MANUAL MO-2 Elmo
All the safety and operating instructions should be read before the appliance is operated.
■ Retain Instructions
The safety and operating instructions should be retained for future reference.
■ Heed Warnings
All warnings on the product and in the operating instructions should be adhered to.
■ Follow Instructions
All operating and use instructions should be followed.
■ Cleaning
Unplug this product from the wall outlet before cleaning. Do not use liquid cleaners or aerosol cleaners. Use a damp cloth for cleaning.
■ Attachments
Do not use attachments not recommended by the product manufacturer as they may cause hazards.
■ Water and Moisture
Do not use this product near water - for example, near a bath tub, wash bowl, kitchen sink, or laundry tub, in a wet basement, or near a swimming pool, and the like.
- Placement
Do not place this product on an unstable cart, stand, tripod, bracket, or table. The product may fall, causing serious injury to a child or adult, and serious damage to the product. Use only with a cart, stand, tripod, bracket, or table recommended by the manufacturer, or sold with the product. Any mounting of the product should follow the manufacturer's instructions, and should use a mounting accessory recommended by the manufacturer.
■ Ventilation
Slots and openings in the cabinet are provided for ventilation and to ensure reliable operation of the product and to protect it from overheating, and these openings must not be blocked or covered. The openings should never be blocked by placing the product on a bed, sofa, rug, or other similar surface. This product should not be placed in a built-in installation such as a bookcase or rack unless proper ventilation is provided or the manufacturer's instructions have been adhered to.
■ Power Sources
This product should be operated only from the type of power source indicated on the marking label. If you are not sure of the type of power supply to your home consult your appliance dealer or local power company. For products intended to operate from battery power, or other sources, refer to the operating instructions.
■ Grounding or Polarization
This product may be equipped with either a polarized 2-wire AC line plug (a plug having one blade wider than the other) or a 3-wire grounding type plug, a plug having a third (grounding) pin. If the 2-Wire polarized plug will not fit in the outlet, try reversing the plug. If the plug still fails to fit, contact your electrician to replace your obsolete outlet. Do not defeat the safety purpose of the polarized plug. The 3-wire grounding type plug will fit into a grounding type power outlet.
This is a safety feature. If you are unable to insert the plug into the outlet, contact your electrician to replace your obsolete outlet. Do not defeat the safety purpose of the grounding type plug.
■ Power-Cord Protection
Power-supply cords should be routed so that they are not likely to be walked on or pinched by items placed upon or against them, paying particular attention to cords at plugs, convenience receptacles, and the point where they exit from the product.
■ Lightning
For added protection for this product during a lightning storm, or when it is left unattended and unused for long periods of time, unplug it from the wall outlet and disconnect the antenna or cable system. This will prevent damage to the product due to
lightning and power-line surges.
■ Overloading
Do not overload wall outlets, extension cords, or integral convenience receptacles as this can result in a risk of fire or electric shock.
■ A product and cart combination should be moved with care. Quick stops, excessive force, and uneven surfaces may cause the product and cart combination to overturn.

■ Object and Liquid Entry
Never push objects of any kind into this product through openings as they may touch dangerous voltage points or short-out parts that could result in a fire or electric shock. Never spill liquid of any kind on the product.
■ Servicing
Do not attempt to service this product yourself as opening or removing covers may expose you to dangerous voltage or other hazards. Refer all servicing to qualified service personnel.
■ Damage Requiring Service
Unplug this product from the wall outlet and refer servicing to qualified service personnel under the following conditions:
- When the power-supply cord or plug is damaged.
- If liquid has been spilled, or objects have fallen into the product.
- If the product has been exposed to rain or water.
- If the product does not operate normally by following the operating instructions. Adjust only those controls that are covered by the operating instructions as an improper adjustment of other controls may result in damage and will often require extensive work by a qualified technician to restore the product to its normal operation.
- If the product has been dropped or damaged in any way.
- When the product exhibits a distinct change in performance - this indicates a need for service.
■ Replacement Parts
When replacement parts are required, be sure the service technician has used replacement parts specified by the manufacturer or have the same characteristics as the original part. Unauthorized substitutions may result in fire, electric shock or other hazards.
■ Safety Check
Upon completion of any service or repairs to this product, ask the service technician to perform safety checks to determine that the product is in proper operating condition.
■ Heat
The product should be situated away from heat sources such as radiators, heat registers, stoves, or other products (including amplifiers) that produce heat.

SA 1965
The lightning flash with arrowhead symbol, within an equilateral triangle, is intended to alert the user to the presence of uninsulated “dangerous voltage” within the product’s enclosure that may be of sufficient magnitude to constitute a risk of electric shock to persons.

SA 1966
The exclamation point within an equilateral triangle is intended to alert the user to the presence of important operating and maintenance (servicing) instructions in the literature accompanying the product.

This symbol [crossed-out wheeled bin WEEE Annex IV] indicates separate collection of waste electrical and electronic equipment in the EU countries.
Please do not throw the equipment into the domestic refuse.
Please use the return and collection systems available in your country for the disposal of this product.
WARNING
TO REDUCE THE RISK OF FIRE OR ELECTRIC SHOCK, DO NOT EXPOSE THIS PRODUCT TO RAIN OR MOISTURE.
The connection of a non-shielded equipment interface cable to this equipment will invalidate the FCC Certification or Declaration of this device and may cause interference levels which exceed the limits established by the FCC for this equipment. It is the responsibility of the user to obtain and use a shielded equipment interface cable with this device. If this equipment has more than one interface connector, do not leave cable connected to unused interfaces. Changes or modifications not expressly approved by the manufacturer could void the user's authority to operate the equipment.
FOR UNITED STATES USERS:
INFORMATION
This equipment has been tested and found to comply with the limits for a Class A digital device, pursuant to Part 15 of the FCC Rules. These limits are designed to provide reasonable protection against harmful interference when the equipment is operated in a commercial environment.
This equipment generates, uses, and can radiate radio frequency energy and, if not installed and used in accordance with the instruction manual, may cause harmful interference to radio communications. Operation of this equipment in a residential area is likely to cause harmful interference in which case the user will be required to correct the interference at his own expense.
USER-INSTALLER
CAUTION:
Your authority to operate this FCC verified equipment could be voided if you make changes or modifications not expressly approved by the party responsible for compliance to Part 15 of the FCC rules.
USAGE PRECAUTIONS
■ Be sure to use the AC adapter.
■ The supplied AC adapter is designed for exclusive use with this product. Do not use it with other products.
- Do not press the touchscreen strongly by finger or sharp objects. This can cause damage or malfunction.
■ Be careful not to pinch your finger when you move the arm or touchscreen.
A protective sheet is attached to the surface of the touchscreen. Remove it before you use the product.
The AC adapter appropriate for the country where it is used is supplied with the product. If the product was sold in Japan, use the AC adapter sold with the product with 100 VAC and 50 or 60 Hz.
■ When storing the product, do not leave it under direct sunlight or by heaters. It may be discolored, deformed, or damaged.
■ Do not place the product in any humid, dusty, salt bearing wind, or vibrating locations.
■ Use it under the following environmental conditions:
Temperature : 0°C\~ 40°C Humidity : 30%\~ 85%(No condensation)
- Do not use the product in an environment where the temperature of the product becomes too hot, such as under direct sunlight or by heaters. The product will automatically stop the operation to protect the battery when the internal temperature reaches 65°C.
■ Use a soft, dry cloth for cleaning. Do not use any volatile solvent such as thinner or benzene.
■ Luminescent and Black Spots
There may be some pixels that do not properly operate due to the use of CMOS Area Image Sensors made-up of many pixels.
Though luminescent or black spots may be found on the screen, it is a phenomenon peculiar to the CMOS Area Image Sensors and is not a malfunction.
■ Follow the guidelines below to prevent the product from dropping or overturning.
- Use the product on a stable base, desk, or table. Do not place the product on an unstable base or slanted location.
- Place or wire the product so as to prevent the cables from being pulled or drawn.
■ Do not point the lens directly to the sun. It could degrade the imaging capability.
- Do not look directly into the LED light. If you look directly into it at pointblank range, your eyes may be injured.
■ Some type of SD card/USB flash drive can be used.
■ Transfer the data saved in the recording media (such as the internal storage, SD card and USB flash drive) to a device such as a PC to save a backup copy. Malfunction of the product or repairs to it may cause the data to be deleted.
■ ELMO is not liable for any damage caused by the loss or damage of the data in the recording media.
■ Disposal of battery
This product uses Lithium Ion rechargeable and recyclable battery.
When disposing of the battery, contact the dealer from whom you purchased the product. Do not try to remove the battery by yourself.
If the product is used for longer than the warranty period, its performance and quality may deteriorate due to the lifetime of its parts. For parts replacement (on chargeable
basis), consult the dealer from whom you purchased this product or our branch/office near your location.
The built-in lithium-ion battery has its own life span. Along with the temperature, frequency of use, time of use and the time passed, battery capacity decreases gradually. If operation time becomes substantially short at normal temperature (between 10°C and 30°C), the battery life seems to have come near its end. Replace it with a new battery. Contact your dealer or ELMO Customer Service for battery replacement (fee applies).
Copyright
Unless used for personal use, it is prohibited strictly under copyright law to use any photo files without the prior consent of the copyright holder. Even if using for personal use, be careful that there could be a situation where video or audio recording is restricted or illegal.
■ About WiFi (Wireless LAN)
- This product and the wireless device in this product have been certified under the Radio Law for 2.4GHz and 5GHz band. Using this product in countries other than the country where you purchased it may infringe the radio wave laws of the country where it is used.
- In case of communication problem change location. Depending on the using environment (e.g., there are many obstacles) the wireless communication may be adversely affected. Especially the wireless communication is not available under the following conditions.
-There are metal and/or concrete between the product and monitor.
- Do not use this product under the following conditions.
-Near industrial, scientific, and medical devices, such as a pacemaker
-Near in-plant radio station for mobile equipment identifier (license required and being used in factory line; etc.)
-Near low power wireless base station (license not required)
- There are conditions to be met before using 5GHz wireless LAN outdoor.
■ Precautions for using the product in 2.4GHz band
This product shares a frequency band with a wide range of equipment (e.g. industrial, scientific, and medical equipment such as microwave ovens), in-plant radio station for mobile equipment identifier (radio stations requiring licenses), and specified low-power radio stations (radio stations not requiring licenses) used for factory production lines as well as amateur radio stations (radio stations requiring licenses).
- Before use, confirm that no in-plant radio station for mobile equipment identifier and specified low-power radio stations or amateur radio stations operate in your vicinity.
- In the event that this equipment causes harmful interference to any in-plant radio station for mobile equipment identifier, immediately change frequencies or halt radio wave emission and contact the dealer from whom you purchased the product for consultation on interference avoidance measures (e.g., partition installation).
- Please contact the dealer from whom you purchased the product if this equipment causes harmful interference to any specified low-power radio stations or amateur radio stations, or if other problems arise.
■ Connectivity with all wireless LAN (WiFi) compatible devices is not guaranteed.
The contents of this document are subject to change without notice. The latest version is available from the following official websites:
https://www.elmousa.com https://www.elmoeurope.com
It is prohibited under copyright law to use or copy any part or the whole of this document without our prior written consent.
■ ELMO shall not be liable for any claim for damage or loss of earnings or any claim raised by a third person due to the use, malfunction or repair of the product.
HANDLING PRECAUTIONS
The followings are special precautions against mishandling of the product. Pay close attention to them.
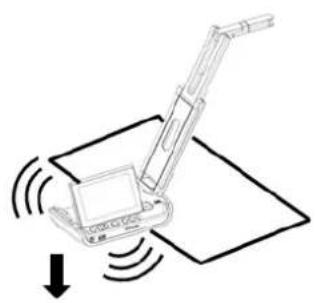
①Installation
Do not place the product on an unstable place or slanted surface
natural_image
Diagram of a robotic arm interacting with a laptop, showing motion lines and a downward arrow (no text or symbols)②Setting up
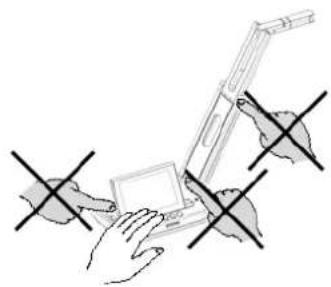
When setting up the product, hold the body around the operating panel.
Be careful not to pinch your fingers
natural_image
Illustration of hands holding a laptop with a stand, crossed out by a diagonal line (no text or symbols)③Carrying the product
Carry the product by folding the arm so as not to damage the camera.
Do not carry by holding the arm or camera head.

natural_image
Line drawing of hands inserting a device into a tray (no text or symbols)TABLE OF CONTENTS
■IMPORTANT SAFEGUARDS 1
USAGE PRECAUTIONS 4
HANDLING PRECAUTIONS 6
■ TABLE OF CONTENTS 7
① BEFORE YOU USE 8
◆CHECKING PACKAGE CONTENTS 8
◆CHECKING NAME OF EACH PART 9
◆OPERATING PANEL 10
◆FRONT PANEL 12
◆REAR PANEL AND CABLE CONNECTION 12
■START SCREEN 13
■STATUS AREA 14
■ZOOM AREA 14
■PEN MENU FOR DRAWING 15
◆CHECKING MOVING PARTS OF THE PRODUCT 18
② PREPARATION AND CONNECTION 19
◆SETTING UP 19
◆CONNECTING TO A PROJECTOR OR MONITOR 20
◆CONNECTING TO A PC 20
♦ TURNING ON OR OFF THE POWER 21
③ USING THE PRODUCT 22
◆OPERATING MA-1 22
■ADJUSTING THE IMAGE SIZE 22
■ADJUSTING THE FOCUS 22
The items below are included with the product. If any item is missing, contact the dealer from whom you purchased the product.

natural_image
Line drawing of a mechanical component with no visible text or symbolsMA-1
natural_image
Line drawing of a cassette tape holder with no text or symbolsMO-2

natural_image
Line drawing of a mechanical device with attached wires (no text or symbols)
natural_image
Three technical line drawings of electrical connectors or modules (no text or symbols)AC adapter

Quick Start Guide

Warranty Card
(For Japan
/ North America only)

IMPORTANT SAFEGUARDS
● About AC adapter
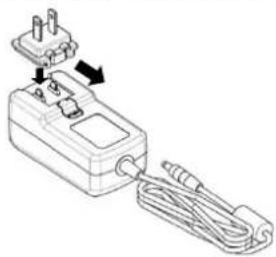
Press and slide the plug into the groove of the AC adapter as shown in the drawing.
※Slide it until it clicks.
※Choose the correct plug according to the outlet.
When removing the plug from the AC adapter, slide and pull the plug in the opposite direction while pressing the lock button.
natural_image
Line drawing of a small electrical device with plug and cable, no text or symbols presentCAUTION
Do not wrap the power cable tightly around the AC adapter while the power cable connected to the AC adapter. The cable could be damaged (disconnected) or the inside of the cable could be exposed and result in an accident.
◆ CHECKING NAME OF EACH PART
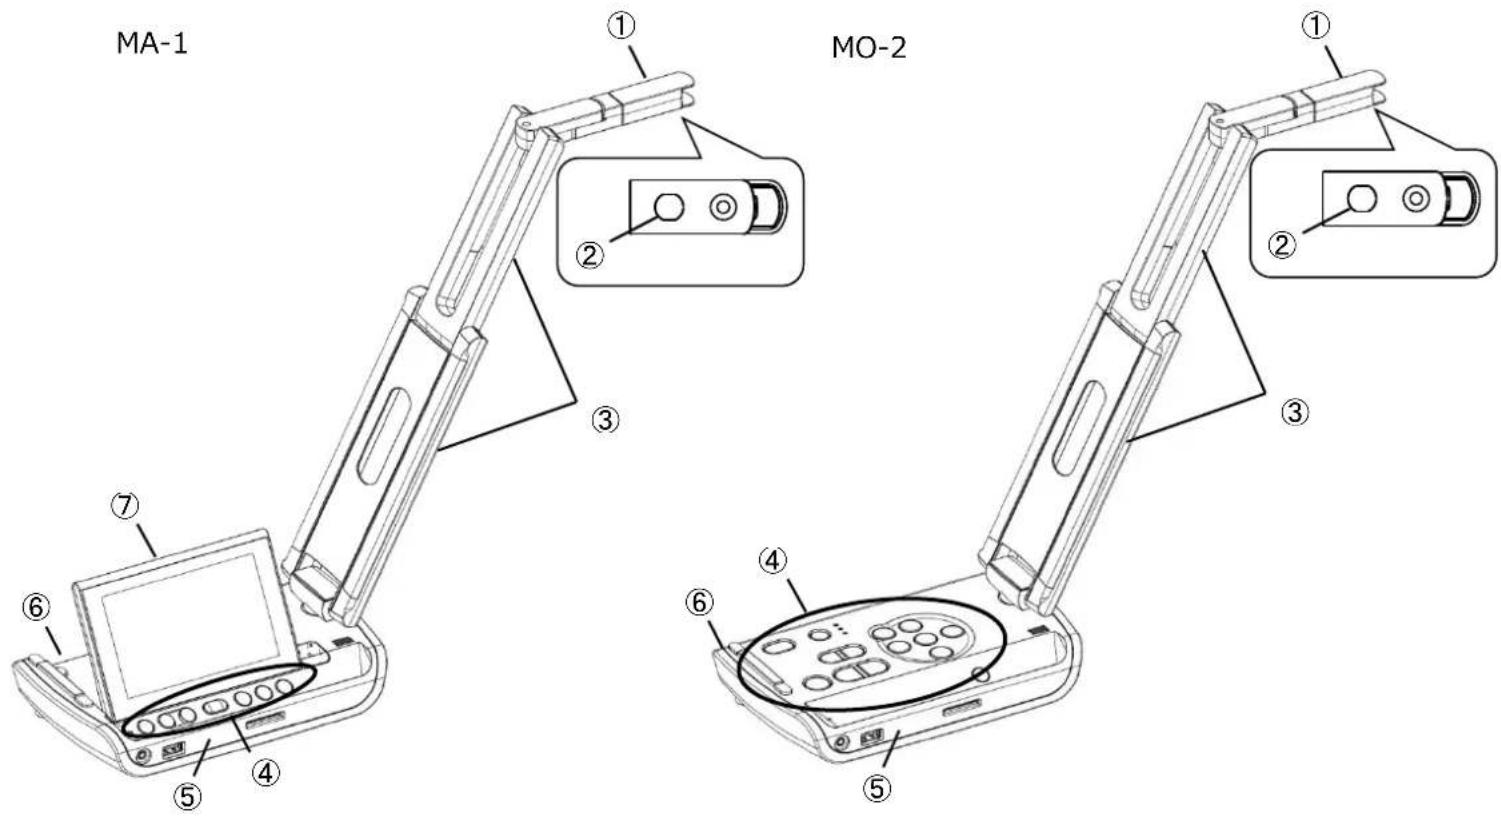
MA-1/MO-2

| Name | |
| 1 | Camera head |
| 2 | LED lighting |
| 3 | Arm |
| 4 | Operating panel |
| 5 | Front panel |
| 6 | Rear panel |
| 7 | Touchscreen |
◆OPERATING PANEL
■ MA-1

⑧ ⑦ ⑥ ⑤ ④ ③ ② ①
| Name | Description | |
| 1 | Power | Long press=To turn on or off the power.Short press=To enter or cancel the standby mode. (⇒P.21)Power LEDPower on:Turns bluePower off:Off (※When charging: Tums red)Standby:Off (※When charging: Turns red) |
| 2 | Freeze | To pause the currently displayed image. Press this button again to cancel the pause. (⇒P.24) |
| 3 | Capture | To save the currently displayed image as a still picture. (⇒P.24) |
| 4 | Home | To switch to the Home screen. (⇒P.30) |
| 5 | Zoom + | To enlarge the image. (⇒P.22) |
| 6 | Zoom - | To shrink the image. (⇒P.22) |
| 7 | AF | To adjust the focus automatically when the button is pressed.(One-push AF). (⇒P.22) |
| 8 | Built-in microphone | To record the surrounding audio. |
| 9 | Speaker | To output the audio. (⇒P.33) |
| 10 | Touchscreen | To display the Document camera image or menus.Various settings can be configured by touching the screen. |
■MO-2

| Name | Description | |
| 1 | Power | Long press = To turn on or off the power.Short press = To enter or release the standby mode. (⇒P.21)Power LEDPower on : Turns bluePower off : Off (※When charging: Turns red)Standby : Off (※When charging: Turns red) |
| 2 | AF | To adjust the focus automatically when the button is pressed.(One-push AF). (⇒P.26) |
| 3 | Zoom - | To shrink the image. (⇒P.26) |
| 4 | Zoom + | To enlarge the image. (⇒P.26) |
| 5 | Camera | To display the camera image. (⇒P.29) |
| 6 | External input | To switch between the HDMI IN-image and the camera image.(⇒P.29) |
| 7 | Status LED | To indicate each status.HDMI: External input (⇒P.42)WiFi: WiFi connection (⇒P.50)Miracast: Miracast connection (⇒P.52) |
| 8 | Brightness - | To darken the image. (⇒P.26) |
| 9 | Brightness + | To brighten the image. (⇒P.26) |
| 10 | Home | To switch to the Home screen. (⇒P.30) |
| 11 | Capture | To save the currently displayed image as a still picture. (⇒P.28) |
| Direction button: Up | ||
| 12 | LED lighting | To turn on or turn off the LED lighting. (⇒P.27) |
| Direction button: Enter | ||
| 13 | Image rotation | To rotate the camera image. (0°/90°/180°/270°) (⇒P.26) |
| Direction button: Left | ||
| 14 | Freeze | To pause the currently displayed image. Press this button again to cancel the pause. (⇒P.27) |
| Direction button: Right | ||
| 15 | Video | To record the camera image as a video. (⇒P.28) |
| Direction button: Down | ||
| 16 | Built-in microphone | To record the surrounding audio. |
| 17 | Speaker | To output the audio. (⇒P.33) |
◆FRONT PANEL

| Name | Description | |
| 1 | Audio input | To connect the microphone. (⇒P.33)Use the electret condenser microphone. |
| 2 | USB2.0 (Type A) | To connect the mouse or the USB flash drive. (⇒P.41) |
| 3 | SD card | To insert the SD card. (⇒P.41) |
CAUTION
Connecting the microphone other than the electret condenser microphone (a microphone for a PC) may cause malfunction.
◆ REAR PANEL AND CABLE CONNECTION
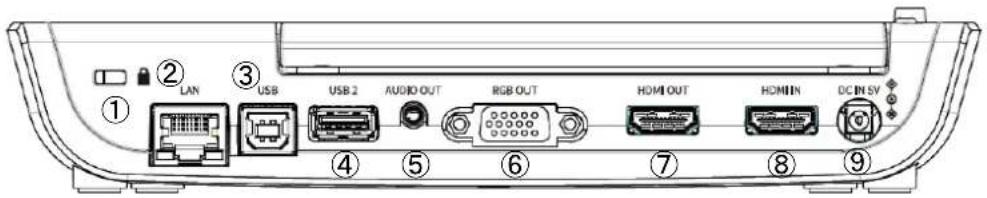

| Name | Description | |
| 1 | Security slot | To connect a security cable. (Size of the slot: 7 x 3 mm) |
| 2 | LAN | To connect the product to the network. (⇒P.35, P.50) |
| 3 | USB2.0(TypeB) | To connect the product to a PC to use UVC (USB Video Class). (⇒P.49) |
| 4 | USB2.0(TypeA) | To connect the mouse or the USB flash drive. (⇒P.41) |
| 5 | AUDIO OUT | To output audio. ※1 |
| 6 | RGB OUT | To output analog RGB images by connecting to a monitor which has an analog RGB input port. (⇒P.20) |
| 7 | HDMI OUT(TypeA) | To output digital images and audio by connecting to a monitor which has an HDMI input port. (⇒P.20) ※1 |
| 8 | HDMI IN(TypeA) | To input HDMI images and audio. (⇒P.42) |
| 9 | DC IN 5V | To connect the supplied AC adapter. |
| 10 | Reset | To reset the system and return to the factory settings. Press this button with a sharp object such as a pin. When the product freezes, reset it using this button. |
| 11 | Fixing screw holes | To secure the product to a table. Use a M3 screw, with 0.5mm thread pitch, and 7 - 12mm long. (Screws are not included.) |
※1 The priority order for the audio output: AUDIO OUT > HDMI OUT > speaker
■ START SCREEN
At start up, the Document camera screen will be displayed. The Pen menu for drawing ( P.15) can be displayed by the following operations:
For MA-1: Press the left tab or right tab on the touchscreen or click the left tab or right tab on the external monitor with the mouse.
For MO-2: Click the left tab or right tab on the external monitor with the mouse.
(The same Pen menu will be displayed no matter which tab is selected. Use the tab you like according to the subject.)

Screen (B)

The Menu area ( P.17), the Status area ( P.14) and the Zoom area ( P.14) will be displayed.
Press the Home button on the operating panel t move to the Home screen.
$$ (\Rightarrow \mathrm{P}. 3 0) $$
If you want to open other app after start-up, select the app from the Home screen.
The Menu area can be hidden by swiping it down. (The Drawing screen will be displayed.)
Screen (A) or (C)

The Pen menu will be displayed either at the left-end or the right-end of the screen.
Select a pen to perform the drawing. (⇒P.39)
※The Menu area will not appear while the Pen menu for drawing is displayed. Close the Drawing menu to display the Menu area.
■ STATUS AREA
The status of the camera will be displayed with icons.

| Icon | Name | Function |
 | WiFi ※1 | To display the WiFi status. |
 | LAN ※1 | This icon will be displayed when the LAN cable is connected. |
 | Battery | To display the battery level and the charging status. (⇒P.62) |
 | SD card ※2 | This icon will be displayed when the recording destination is set to SD card. |
 | USB flash drive ※2 | This icon will be displayed when the writing destination is set to USB flash drive. |
 | Freeze | This icon will be displayed during freeze. |
 | Image rotation | This icon will be displayed during image rotation.(The icon changes according to the rotation angle.) |
 | Recording | This icon will be displayed during recording. |
 | Speaker mute | This icon will be displayed when the speaker is muted.(This icon will not appear when the speaker mute setting is off.) |
 | Miracast | This icon will be displayed during Miracast communication. |
※1 Either WiFi icon or LAN icon will be displayed depending on the network connection status.
※2 The currently set recording destination will be displayed. (⇒P.41)
(The priority order for the recording destination: USB flash drive > SD card > internal storage)
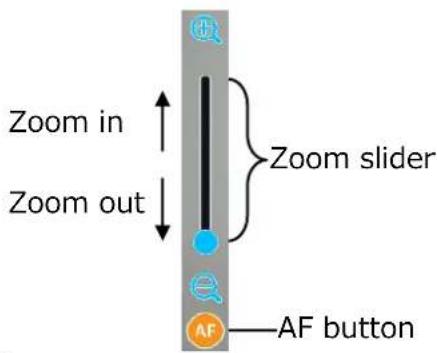
■ ZOOM AREA
The Zoom area will be displayed when zoom operated is performed in the Document camera screen or when the Menu area is displayed.
The Zoom slider and the AF button will be displayed.
※The Zoom area does not appear during video playback as no zoom operation can be performed during video playback.
Zoom slider: Adjust the zoom by moving the round tab up and down.
AF button : Press once. (One-push)
※The AF button will be displayed only when the camera image is displayed.
■ PEN MENU FOR DRAWING
When either tab is selected in the Document camera screen ( P.13), the Pen menu, the Highlighter menu, the Eraser menu and the Hand tool menu will be displayed.
Select the menu you want to use.
Press or long press the menu to display the sub menu. You can change the type of Pen or Eraser from the sub menu.
※The selected icon will be highlighted. (Background: Dark blue)
※Performing a capture operation or recording operation during the drawing process will record the image with all added drawings.

| Pen | ||
| Type | Icon | Function |
| Pen | To draw a line. | |
| Highlighter | To draw a line with opacity 50%. | |
| Pen color | To draw a red line. | |
| To draw a green line. | ||
| To draw a blue line. | ||
| To draw a black line. | ||
| To draw a magenta line. | ||
| To draw a cyan line. | ||
| To draw a yellow line. | ||
| To draw a white smoke line. | ||
| Thickness | To draw a thin line. | |
| To draw a middle thickness line. (Default setting) | ||
| To draw a thick line. (Default setting for Highlighter) | ||
| Eraser | ||
| Type | Icon | Function |
| Eraser |  | To delete a line drawn by Pen or Highlighter.(A continuously drawn line can be erased.)Press the line or swing the finger while pressing the line to erase it. |
| Delete all |  | To delete all the lines that are drawn on the screen. |
 | This icon will be displayed when the Eraser menu is pressed after performing “Delete all”.To cancel the last “Delete all” action and recover deleted lines. (Only lines deleted by the last action can be recovered.) | |
| ※After deleting the selected line, the Eraser becomes deselected and the last selected Pen becomes selected again. | ||
| Hand tool | ||
| Hand tool |  | To move the display area by dragging when the image is enlarged.※When displaying the camera image, this function is available only when the Scroll mode setting is enabled. (⇒P.33)The display area cannot be moved when the Scroll mode setting is disabled. |
■ Menu area
The Menu area will be displayed by selecting the bottom tab in the Document camera screen. (⇒P.13)
The Menu area can be hidden by swiping a finger from inside the screen to the outside or selecting the bottom tab displayed on the external monitor with the mouse.
※The recording destination can be changed by long pressing the Capture icon or Recording icon.
(SD card [ ] / USB [ USB ] / internal storage [ ↓ ])

natural_image
Row of eight white icons on a blue background, including camera, snowflake, refresh, video camera, sun, lamp, QR code, and house (no text or symbols)| Icon | Main menu | Sub menu | Function |
 | Capture | - | To capture the camera image and save it as a still picture. |
| ○(Long press) | To select the destination media. | ||
 | Freeze※1 | - | To pause or restart the camera image. |
 | Image rotation | - | To rotate the camera image. (0^/90^/180^/270^) |
 | Record | - | To record a video to the specified media. |
| ○(Long press) | To select the destination media. | ||
 | Brightness※1 | - | To display the Brightness adjustment menu.The brightness can be adjusted by moving the Brightness adjustment slider. |
 | LED lighting※1 | - | To turn on or turn off the LED lighting. |
 | QR code reader※1 | - | To enter the QR code reader mode. (⇒P.48) |
 | Home | - | To display the Home screen. (⇒P.30) |
※1 The Freeze icon, Brightness icon, LED lighting icon and QR code reader icon will only be displayed in the Document camera screen.
◆ CHECKING MOVING PARTS OF THE PRODUCT
This product can be moved as shown below.

② PREPARATION AND CONNECTION
♦ SETTING UP
STEP1. Raise the camera head while holding the operating panel.
STEP2. Raise the arm as indicated by an arrow.
STEP3. Raise the camera head. Set it horizontally.
STEP4. Raise the touchscreen monitor as indicated by an arrow. (For MA-1 only)
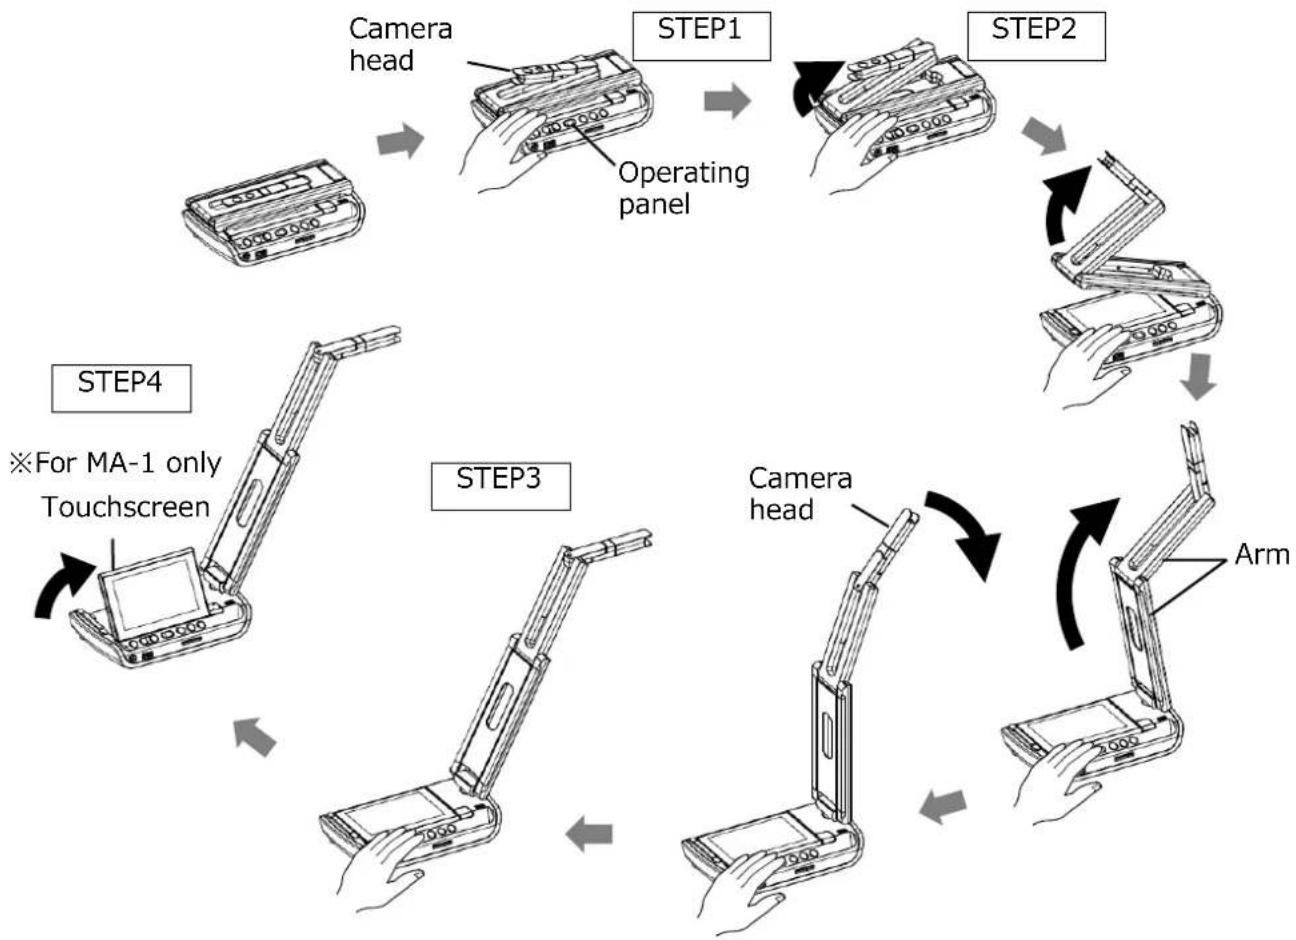
flowchart
graph TD
    A["Camera head"] --> B["STEP1"]
    B --> C["STEP2"]
    C --> D["STEP3"]
    D --> E["Arm"]
    E --> F["Camera head"]
    F --> G["STEP4"]
    G --> H["For MA-1 only Touchscreen"]
    H --> I["Operating panel"]
STEP5. Rotate the camera head according to the shooting direction.

CAUTION
- Be careful not to pinch your fingers when moving the arm.
- Do not hold the arm or camera head when carrying the product.
- Be careful not to give an impact to the camera head.
• This product uses static electricity sensitive components.
In order to avoid malfunction from static electricity, hold the edge of the camera head to rotate the camera head. Do not touch the rotating part.
◆CONNECTING TO A PROJECTOR OR MONITOR

-
Connect the product to a projector or monitor with the HDMI cable or the RGB cable.
-
Long press the Power button to turn on the product. (Power LED : Blue)
◆CONNECTING TO A PC
The product is compliant with UVC (USB video class) standard. You can transfer the image via USB.

- Connect the Type B terminal of the USB cable to [ ] connector in the back of the product.
- Connect the Type A terminal of the USB cable to the USB port of the PC.
- Turn on the product. (Power LED : Blue)
- Turn on the PC. Launch the app and check the image.
The app (ELMO Interactive Toolbox) can be downloaded from the following website:
⇒ https://www.elmousa.com/software/
⇒ https://www.elmoeurope.com/index.php/en/products/software-choice
For details about the app (ELMO Interactive Toolbox), refer to the Instruction Manual in the website above.
CAUTION
• This product does not support USB power supply.
- When the battery is not fully charged or when the remaining battery level is low, supply power by connecting the AC adapter to a wall outlet.
• The frame rate may be decreased depending on the PC used.
♦ TURNING ON OR OFF THE POWER
Connect the supplied AC adapter to the product. Connect the AC adapter to a wall outlet. Long press (for about 3 seconds) the Power button [ ⏻ ] to turn on the power. When the Power button [ ⏻ ] is long pressed again (for about 8 seconds) while the power is on, the power will go off.
※When the product is used for the first time or when the battery level is low, charge the battery by connecting the AC adapter before pressing the Power button.
※The color of the Power LED changes to blue from red after the power is on.
※When the Power button is short pressed while the power is on, the product will enter the standby mode (power saving mode). The standby mode will be cancelled when the Power button is short pressed again.
※The functions of the product will be off or paused in standby mode. (LED lighting, touchscreen, HDMI, RGB, External input pass-through, audio output, WiFi)
※The product can be turned on without connecting to a wall outlet when the battery is fully charged.
※The power of the product can be turned off by pressing the Power button for about 20 seconds. Reset the product by this way if the product freezes.
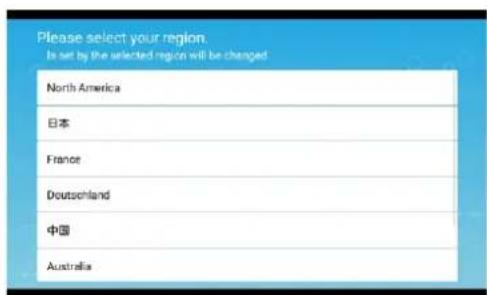
※When the product is turned on for the first time, the Destination select screen will be displayed over the camera image. Select the country where the product is being used. (The Destination select screen will also be displayed when the product is turned on for the first time after being reset.)
POWER LED STATUS
| Model | Status | AC adapter | Charging status | LED | |
| MA-1 | Power ON | Disconnected | - | On | Blue |
| Connected | Charging | On | Blue | ||
| Fully charged | On | Blue | |||
| Power OFF | Disconnected | - | Off | ||
| Connected | Charging | On | Red | ||
| Fully charged | Off | ||||
| Standby | Disconnected | - | Off | ||
| Connected | Charging | On | Red | ||
| Fully charged | Off | ||||
| MO-2 | Power ON | Disconnected | - | On | Blue |
| Connected | Charging | On | Blue | ||
| Fully charged | On | Blue | |||
| Power OFF | Disconnected | - | Off | ||
| Connected | Charging | On | Red | ||
| Fully charged | Off | ||||
| Standby | Disconnected | - | Off | ||
| Connected | Charging | On | Red. | ||
| Fully charged | Off | ||||
◆SETTING THE DESTINATION
The Destination select screen will be displayed over the camera image when the power is turned on for the first time or when the initialization ( P.37) is performed. Select the country where the product is being used.
③ USING THE PRODUCT
Various functions or settings can be operated or configured from the menu (texts or icons) displayed on the touchscreen or external monitor or using the buttons on the operating panel.
For MA-1: Button operations on the operating panel / touchscreen operations / mouse operations on the external monitor via USB
For MO-2: Button operations on the operating panel / mouse operations on the external monitor via USB
◆OPERATING MA-1
MA-1 can be operated by either one of the following ways: touchscreen operations or mouse operations on the external monitor via USB or button operations on the operating panel ( P.12)
■ ADJUSTING THE IMAGE SIZE
The size of the image can be adjusted using [⊖ / ⊕ ] buttons on the operating panel.

: To enlarge the camera image.

: To shrink the camera image.
The zoom ratio can also be adjusted by using the Zoom slider in the Zoom area, which will be displayed on the touchscreen by selecting the bottom tab in the Document camera screen. (⇒P.14)
NOTE
- The maximum zoom ratio is 16x (digital zoom). The image quality will be degraded when using the digital zoom.
- The zoom ratio can also be adjusted by performing a pinch gesture on the touchscreen.
Enlarge : Pinch out = Spread the distance between two fingers
Shrink : Pinch in= Shorten the distance between two fingers
■ ADJUSTING THE FOCUS
Press the AF button [AF] on the operating panel to automatically focus on the subject. The AF can also be operated by using the AF button [AF] in the Zoom area, which will be displayed on the touchscreen by selecting the bottom tab in the Document camera screen. (⇒P.14)
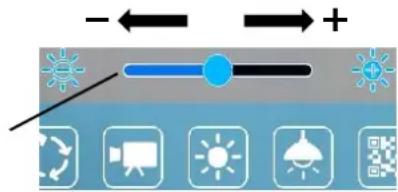
The Brightness adjustment slider [ ] will be displayed when the Brightness icon [ ] in the Menu area (⇒P.17) is tapped.
The brightness of the image can be adjusted by moving the slider left and right.
The Brightness adjustment slider will disappear when outside area of the Brightness adjustment slider is tapped.
※Brightness adjustment slider : 7 levels (-3\~+3)
※Default value : 0
Brightness adjustment slider
■ ROTATING THE IMAGE
Tap the Image rotation icon [ ] in the Menu area ( P.17) to rotate the image.
The image will rotate by 90^ each time the icon is tapped. ( 0^/90^/180^/270^ )
※The rotation angle can be selected between 90° and 180°. (⇒P.33 Camera settings "Image rotation angle".)
※The camera image with drawings does not rotate.
※Default value : 0
※The Image rotation icon will be displayed in the Status area (⇒P.13) during image rotation.
| Rotation status | Icon |
| 0° | — |
| 90° | |
| 180° | |
| 270° |
■ TURNING ON OR OFF THE LED LIGHTING
Tap the LED lighting icon [ ] in the Menu area (⇒P.17) to turn on the LED lighting. (ON: )
Tapping the icon again will turn off the LED lighting.
CAUTION
- To take shots of people, turn off the LED lighting.
- Make sure that the light from the LED lighting does not shine directly into your eyes.
- This product is equipped with a high-brightness LED. You can safely use it to light up the subject. The brightness will gradually decrease with long-term use. This is not a malfunction but a characteristic of the LED.
- Do not touch the LED lighting while it is on as it may become very hot.
■ PAUSING THE IMAGE
Pressing the Freeze button [ ] on the operating panel to pause the camera image. Press the button again to restart.
※Long press To perform the Automatic Deskew function.
(The product will automatically detect the skew angle of the document such as a printing paper and a textbook in the shooting area and correct it to fit the screen.) (⇒P.56)
※If the product is turned off during freeze, the setting will not be saved the next time the product is turned on.
※The Freeze icon will be displayed in the Status area (⇒P.14) during freeze.
| Status | Icon |
| Live | - |
| Freeze |
■ CAPTURING STILL PICTURES
Press the Capture button [ ] on the operating panel or tap the Capture icon [ ] in the Menu area (⇒P.17) on the touchscreen to capture the camera image.
(Captured still pictures will be saved as JPEG file in the recording media.)
※To change the destination for captured still pictures, long press (for about 1 second) the button or icon. The sub menu will be displayed and you can change the destination. The image capture will be performed once the destination is changed.
※The drawings on the image can also be saved. (⇒P.15)
Captured still pictures can be saved in the following destination: SD card / USB flash drive / internal storage
(The currently selected device will be displayed as destination in the Status area.)
■ RECORDING VIDEOS
Press the Record icon [ ] in the Menu area (⇒P.17) to start recording of the camera image.
To stop recording, press the icon again. (Recording: 📄)
※To temporarily change the destination for recorded videos, long press the button or icon. The sub menu will be displayed and you can change the destination.
※The camera image and the added drawings can be recorded as video. (⇒P.15, P.39)
※The recording will be performed at the set recording quality. (⇒P.33 Camera settings "Recording quality".)
Recorded videos can be saved in the following destination: SD card / USB flash drive / internal storage
As the capacity of the internal storage is limited, it is recommended to set the destination to either SD card or USB flash drive.
Recording status (to be displayed in the Status area)
| Not recording | ---- | |
| Recording |  | |
 | ||
※This icon will be displayed when the Status area (⇒P.14) is hidden.
NOTE
No matter whether the destination storage is external or internal, recorded videos will be saved with the following file name:
MOV_record date_record time (MOV_yyyyMMdd_hhmmss_ff.mp4)
■ SELECTING THE IMAGE SOURCE
The source of the image to be displayed can be switched easily.
Camera image :
Press the Home button [ ] to open the Home screen. Then tap the Document camera icon [ ].
Images being input to HDMI IN :
Press the Home button [ ] to open the Home screen. Then tap the External input select icon [ ].
Images saved in the SD card or the USB flash drive :
Press the Home button [ ] to open the Home screen. Then tap the Gallery icon [ ] to display a list of content items.
◆OPERATING MO-2
■ ADJUSTING THE IMAGE SIZE
The size of the image can be adjusted using [ ☑ / + ] buttons on the operating panel.

: To enlarge the camera image.

: To shrink the camera image.
NOTE
- The maximum zoom ratio is 16x (digital zoom). The image quality will be degraded when using the digital zoom.
The zoom ratio can also be adjusted by using the Zoom slider in the Zoom area, which will be displayed on the connected external monitor by selecting the bottom tab in the Document camera screen using the mouse. ( P.14)
■ ADJUSTING THE FOCUS
Press the AF button [ ] on the operating panel to automatically focus on the subject. The AF can also be operted by using the AF button in the Zoom area, which will be displayed on the connected external monitor by selecting the bottom tab in the Document camera screen using the mouse. (⇒P.14)
The brightness can be adjusted by using [-/+] buttons on the operating panel. The brightness adjustment can also be performed by using the Brightness adjustment slider displayed on the connected external monitor.
The Brightness adjustment slider [ ] will be displayed when the Brightness icon [ ] in the Menu area (⇒P.17) is clicked by the mouse.
The brightness of the image can be adjusted by moving the slider left and right.
The Brightness adjustment slider will disappear when outside area of the Brightness adjustment slider is clicked.
※Brightness adjustment slider : 7 levels (-3\~+3)
※Default value : 0
Brightness adjustment slider

■ ROTATING THE IMAGE
Press the Image rotation button [ ] on the operating panel to rotate the image.
The image will rotate by 90^ each time the icon is tapped.
(0^/90^/180^/270^)
The image rotation can also be performed by using the Image rotation icon displayed on
the connected external monitor.
The Image rotation icon will be displayed on the connected external monitor in the Menu area, which will be displayed by selecting the bottom tab in the Document camera screen using the mouse. (⇒P.17)
※The rotation angle can be selected between 90° and 180°. (⇒P.33 Camera settings "Image rotation angle".)
| Rotation status | Icon |
| 0° | - |
| 90° |  |
| 180° |  |
| 270° |  |
■ TURNING ON OR OFF THE LED LIGHTING
Press the LED lighting button [ ] on the operating panel to turn on the LED lighting.
Pressing the button [ ] again will turn off the LED lighting.
On or off the LED lighting can also be performed by clicking the LED lighting icon [icon] in the Menu area (⇒P.17) displayed on the external monitor using the mouse.
CAUTION
- To take shots of people, turn off the LED lighting.
- Make sure that the light from the LED lighting does not shine directly into your eyes.
- This product is equipped with a high-brightness LED. You can safely use it to light up the subject. The brightness will gradually decrease with long-term use. This is not a malfunction but a characteristic of the LED.
- Do not touch the LED lighting while it is on as it may become very hot.
■ PAUSING THE IMAGE
Pressing the Freeze button [ ✉ ] on the operating panel to pause the camera image. Press the button again to restart.
The image freeze can also be performed by clicking the Freeze icon [⚙️] in the Menu area (⇒P.17) displayed on the external monitor using the mouse.
※Long press To perform the Automatic Deskew function.
(The product will automatically detect the skew angle of the document such as a printing paper and a textbook in the shooting area and correct it to fit the screen.) (⇒P.56)
※If the product is turned off during freeze, the setting will not be saved the next time the product is turned on.
※The Freeze icon will be displayed in the Status area (⇒P.14) during freeze.
| Status | Icon |
| Live | - |
| Freeze |  |
■ CAPTURING STILL PICTURES
Press the Capture button [ ] on the operating panel to capture the camera image. (Captured still pictures will be saved as JPEG file in the recording media.)
The image capture can also be performed by clicking the Capture icon [ ] in the Menu area (⇒P.17) displayed on the external monitor using the mouse.
※To change the destination for captured still pictures, long press the button or icon.
The sub menu will be displayed and you can change the destination.
The image capture will be performed once the destination is changed.
※The drawings on the image can also be saved. (⇒P.15)
Captured still pictures can be saved in the following destination: SD card / USB flash drive / internal storage
(The currently selected device will be displayed as destination in the Status area.)
■ RECORDING VIDEOS
Press the Record button [ ] on the operating panel to start recording of the camera image.
To stop recording, press the button again. (Recording: 📄)
The image recording can also be performed by using the Record icon displayed on the connected external monitor.
The Record icon will be displayed on the connected external monitor in the Menu area, which will be displayed by selecting the bottom tab in the Document camera screen using the mouse. (⇒P.17)
※To temporarily change the destination for recorded videos, long press the button or icon. The sub menu will be displayed and you can change the destination.
※The camera image and the added drawings can be recorded as video. (⇒P.15)
※The recording will be performed at the set recording quality. (⇒P.33 Camera settings "Recording quality".)
Recorded videos can be saved in the following destination: SD card / USB flash drive / internal storage
As the capacity of the internal storage is limited, it is recommended to set the destination to either SD card or USB flash drive.
Recording status (to be displayed in the Status area)
| Not recording | ---- |
| Recording |  |
 |
※This icon will be displayed when the Status area (⇒P.13) is hidden.
NOTE
No matter whether the destination storage is external or internal, recorded videos will be saved with the following file name:
MOV_record date_record time (MOV_yyyyMMdd_hhmmss_ff.mp4)
The recorded files saved in the SD card or USB flash drive can be found in the "Movie" folder.
■ SELECTING THE IMAGE SOURCE
The source of the image to be displayed on the external monitor can be switched easily.
Camera image :
Press the Home button [ ] to open the Home screen. Then click the Camera icon [ ] or press the Camera button [ ] on the operating panel.
Images being input to HDMI IN :
Press the Home button [ ] to open the Home screen. Then click the External input select icon [ ] or press the External input button [ ] on the operating panel.
Images saved in the SD card or the USB flash drive :
Press the Home button [ ] to open the Home screen. Then click the Gallery icon [ ] to display a list of content items.
Press the Home button [icon] on the operating panel to display the Home screen on the touchscreen or the connected external monitor.
Select the item to operate by tapping the touchscreen or by clicking with the mouse.
MO-2
Press the Home button [ ] on the operating panel to display the Home screen on the connected external monitor.
Move the cursor by using the mouse or by using the Four-way control buttons on the operating panel as shown to the right. Press the LED lighting button to execute.
Press the Home button [ ] to return.

The installed apps will be displayed in the Home screen.
You can select a desired app to launch.
You can hide or display apps from the Home screen.
■Home screen
The icon of the installed app will be added to the list of installed apps.
(Icons will be displayed in the order in which they are added.)
※ If the number of apps becomes large, the icons will be added to the bottom and cannot be displayed in one screen. To view such icons, scroll down the screen.
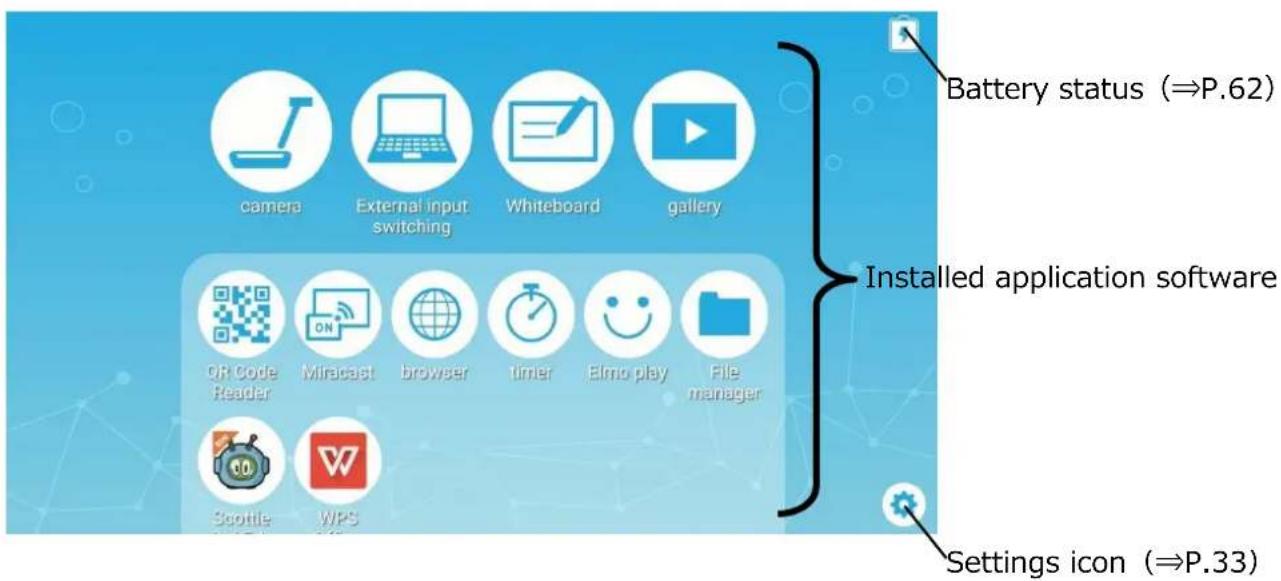
| Icon | App. name | Function | Reference |
 | Camera | To display the camera image. | ⇒P.13 |
  | External input switching | To switch between the camera image and the HDMI IN image. | ⇒P.25⇒P.29 |
| [Y0YD] | Whiteboard | To display the Whiteboard screen. (In case that the Whiteboard app has not been used before, a new whiteboard will be created.) | ⇒P.38 |
 | gallery | To display a list of content items.Files such as still pictures, videos, PDF files and Excel files stored in the internal storage, SD card or USB flash drive can be opened. | ⇒P.43 |
 | QR Code Reader | To enter the QR code reader mode.After reading the QR code, the product will start the browser and access the Internet. | ⇒P.48 |
  | Miracast | To connect a device which supports Miracast. | ⇒P.52 |
 | browser | To start the browser to access the Internet.※The network configuration needs to be completed in advance.※The product needs to be connected to the Internet via WiFi or LAN. | ⇒P.40 |
 | timer | To sound an alarm at a set time. | ⇒P.54 |
 | Elmo Play | To access the portal run by ELMOApps on the portal can be downloaded. | ⇒P.55 |
 | File manager | To open folders of the internal storage, SD card or USB flash drive. | ⇒P.55 |
 | Scottie Go!Edu | This is an educational app for learning programming.Contact us for further information. | - |
 | WPS Office | To open the files such as PDF files, Word files, Excel files and PowerPoint files stored in the internal storage, SD card or USB flash drive. | ⇒P.46 |
 | Settings | To display the Settings screen. | ⇒P.35 |
 | Digital textbook | To access the server for the digital textbook to open the digital textbook. | ⇒P.49 |
※To open PDF files or Excel files in the Gallery, the app "WPS" will be needed. (WPS is installed in the MA-1 as default. For MO-2, install it from ELMO Play. (⇒P.55))
■How to uninstall the installed app
Long press the icon of the app you want to uninstall to display the Trash can icon. Drag and drop the selected icon onto the Trash can icon to delete the app or hide the icon.
※Icons of the pre-installed apps will be hidden.
To re-display the hidden icon, press the Recover icon [ ] displayed above the Settings icon at the bottom right of the screen.

Long press

Trash can
◆ CHECKING THE CAMERA SETTINGS
Select the Settings icon [ ] in the Home screen. The Settings screen will be displayed and you can configure various settings. (⇒P.30)
| Camera settings | |||
 | Resolution | Auto | To set the output resolution. |
| FullHD 1920x1080 | |||
| HD 1280x720 | |||
| UXGA 1600x1200 | |||
| XGA 1024x768 | |||
 | Angle of view | 16:9 | The image will be displayed in 16:9 format. |
| 4:3 | The image will be displayed in 4.3 format.※When shooting A3 size document, select 4:3. | ||
| [ZDS2] | Speaker volume | 0~15 | To adjust the volume of the speaker. |
 | Mic mute | Enable | To enable or disable the microphone. When using the microphone, set this setting to “Disable”. |
| Disable | |||
 | Flicker mode | 50Hz | If flickering occurs due to indoor lighting, set this mode correctly according to the area where the product is being used. |
| 60Hz | |||
| Auto | |||
| Off | |||
 | Recording quality | High | To set the recording quality of the video. |
| Normal | |||
| Low | |||
 | Image rotation angle | 90 | To set the rotation angle during image rotation. |
| 180 | |||
 | Automatic Miracast connection | Enable | To set whether to perform the Miracast connection automatically. (⇒P.52) |
| Disable | |||
 | Digital textbook | Server URL | To set the URL of the server for the digital textbook. (⇒P.49) |
 | Scroll mode | Enable | To set the scroll function. When this setting is enabled, the enlarged image can be scrolled to show any portion of the image. |
| Disable | |||
 | Keystone correction | Enable | To set whether to add Keystone correction to Auto deskew function. |
| Disable | |||
| Camera quality settings | |||
 | Brightness | 0~6 | The brightness of the camera image can be changed. |
 | White balance | Auto | The white balance adjustment constantly works.To ensure a more natural color, the white balance is adjusted automatically according to the shooting environment. |
| Cloudy | The white balance is adjusted for shooting indoor. | ||
| Sunny | The white balance is adjusted for shooting outdoor. | ||
| Fluorescent light | The white balance is adjusted for shooting under fluorescent lighting. | ||
| Incandescent light | The white balance is adjusted for shooting under incandescent lighting. | ||
| Shade | The white balance is adjusted for shooting in dark environment. | ||
| Product information | ||
 | Application version | To display the application version of the product. |
| [xxDX] | Application update | To check whether the latest update version of the app is available.When the latest update version is available, a notice will be displayed. Install the latest version accordingly.※This function is available when the product is connected to the Internet via LAN or WiFi. |
 | Android version | To display the Android version of the product. |
| License | To display the license information of the product. | |
 | WiFi MAC address | To display WiFi MAC address. |
 | Ethernet MAC address | To display Ethernet MAC address. |
 | Serial number | To display the serial number of the product. |
| [6ST6] | Product version | To display the version information of the product. |
◆ CHECKING THE SYSTEM SETTINGS
The System settings menu will be displayed when the System settings icon [ ] in the Settings screen is pressed.
To return to the previous screen, press the Return icon [ ← ].
| Icon | Name | Selection item | Function | |
| WiFi and network | ||||
 | Wifi | ON | - | A list of network will be displayed.Select the SSID for the network to be connected. Enter the password if requested. |
| OFF | - | To disable the Wifi connection. | ||
 | Data usage | Overview | - | To display the data usage.(Today/Total) |
| Wifi | - | To display the data usage. (Date can be specified.) | ||
 | Ethernet | dhcp | ON | A unique IP address will be assigned automatically. |
| OFF | To set the IP address manually.The following settings can be configured if this item is set to OFF. | |||
| static ip | - | To set the IP address manually.Enter the information required for each item.※Operation procedure for MO-2:⇒Enter the information using the keyboard displayed. For typing the keyboard, use the mouse. | ||
| gate way | - | |||
| mask | - | |||
| dns | - | |||
| Proxy | To connect to the Internet via the proxy server.When “Proxy” is selected, “Proxy host” and “Proxy port” will be selectable and you can enter the host name (IP address) and port number of the proxy server. | |||
| Proxy host | To enter the address of the proxy server. Type the IP address after “http://”. | |||
| Proxy port | To enter the port number of the proxy server. | |||
| Device | ||||
| [820A] | Storage | Total capacity of internal storage | Available capacity | To display the total capacity for each item. |
| Apps (Data and content item) | ||||
| Still picture and video | ||||
| Audio (Music, ringtone, podcast etc.) | ||||
| Download | ||||
| Cache data | ||||
| Other | ||||
| Mount the SD card | To insert the SD card. | |||
 | Battery | - | - | To reduce the battery consumption by restricting certain function or to check the battery usage. |
| [1008] | Apps | - | - | To display a list of downloaded apps, list of running apps, RAM usage and list of all apps. |
| User settings | ||||
| [kyxs] | Language and input | Language | Japanese | To set the display language. |
| English | ||||
| German | ||||
| French | ||||
| Chinese | ||||
| Spelling correction | Language | To select the language subject to the Spelling correction. | ||
| Word list | - | To display a list of words added to the user dictionary.Words can be added with the “Add” icon. | ||
| Current keyboard | - | To display the currently selected keyboard. Type of the keyboard and input method can be selected. | ||
| Gboard | Language | To select the language to be used for the keyboard and its layout. | ||
| Settings | To configure details of keys, layout and operation method. | |||
| Theme | To change the design of the Input screen. | |||
| Text correction | To configure how to display word suggestions during text input or to configure how to perform the spelling correction to the word being input. | |||
| Glide typing | To configure details of Glide typing which a user can input words by sliding a finger across the letters. | |||
| Word list | To add words or shortcut letters to the word list. | |||
| Search | To configure whether to display suggestions for Google search during typing. | |||
| Advanced settings | To configure the display of pictograms on the keyboard or to configure whether to display app icons in the Home screen. | |||
| Pointer speed | - | To set the pointer speed using the slider. | ||
 | Backup and reset | Data initialization | - | To delete all data stored in the interna storage, such as Google account, system data, app data and setting information. A confirmation window will be displayed. Select "Reset" to initialize the system. ※Note that installed apps will also be deleted. |
| System | ||||
 | Date and time | Automatic date and time setting | To select a source to obtain the time information. - Use the time information received through the Internet - OFF ※If this setting is set to OFF, "Date setting" and "Time setting" will be enabled. | |
| Date setting | To select a date from the calendar displayed. | |||
| Time setting | To select a time from the clock displayed. | |||
| Timezone | To select the area where the product is being used from the list of timezone names. | |||
| 24-hour display | To select the way to display the time. | |||
| Date format | To select the way to display the date. | |||
| Legal information | - | Important legal information between the Customer and Elmo is described here. Be sure to read it. | ||
◆USING A WHITEBOARD
A white blank screen will be displayed. You can draw on the white blank screen by using Pen or Highlighter.
Step 1. Select the Home button to display the Home screen. (⇒P.30)
Step 2. Select the Whiteboard icon [ ] to display a whiteboard.

natural_image
Blank white canvas with light blue border and control icons at bottom (no text or symbols)Step 3. Swipe downward or drag the mouse downward to display the Drawing screen.

natural_image
Blank white image with faint blue circular marks at corners (no text or symbols)Step 4. Start drawing using the Pen menu for drawing.
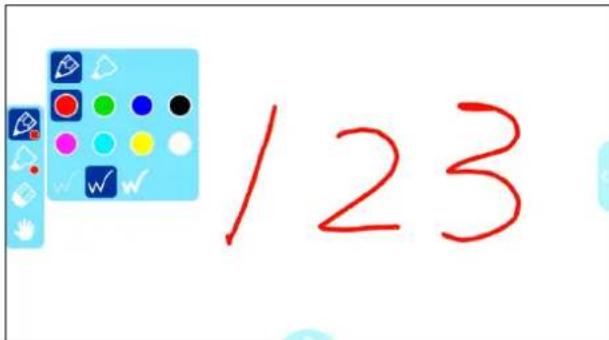
Select the Pen icon to open the Pen menu to start drawing.
For details, refer to "PEN MENU FOR DRAWING". (⇒P.15)
The drawings added to each whiteboard will be maintained while the Camera app is running.
•MA-1
Add drawings on the touchscreen. The drawn content will also be displayed on the external monitor.
Drawings can also be added on the external monitor by using the mouse.
•MO-2
Add drawings on the external monitor by using the mouse.
When the whiteboard is opened from the Home screen, you can return to the Home screen with the Home button [ ].
| Icon | Name | Function |
 | Return | To return to the Home screen. (⇒P30) |
 | Initialize | To return to a white blank screen. |
 | Capture | To capture the Whiteboard screen. |
 | Record | To record the operations on the Whiteboard screen. |
 | Exit | To close the Whiteboard menu. |
◆USING THE DRAWING FUNCTION
You can also draw over the live camera image.
Step 1. Select the Home button to display the Home screen. (⇒P30)
Step 2. Select the Camera icon [ ] to display the camera image.
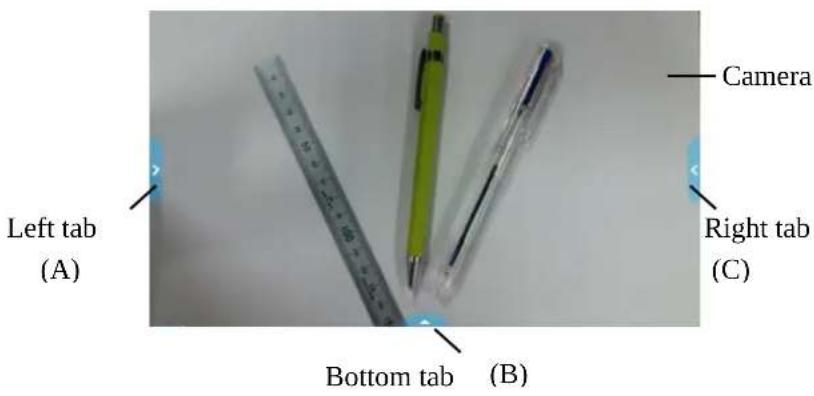
Step 3. Select either the left tab or right tab to open the Pen menu for drawing.

Step 4. Start drawing.
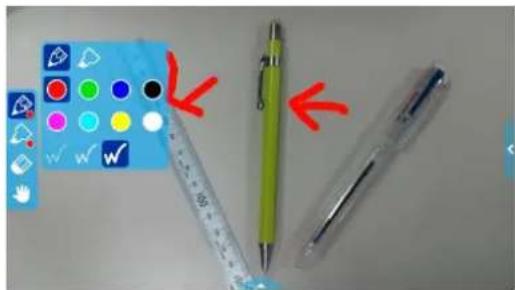

By selecting the Pen icon, you can start drawing over the live camera image. For details, refer to "PEN MENU FOR DRAWING" (⇒P.15)
The drawings added to the camera image will be maintained while the Camera app is running.
◆USING THE BROWSER
After the WiFi configuration is completed, start the browser [ ] in the Home screen to connect to the Internet.
※If the LAN cable is connected and the Ethernet configuration is completed, the LAN connection has the priority over the WiFi connection. (⇒P.35 : Ethernet)
If the dhcp is set to ON, the system will connect the network automatically. Set it to OFF if you need to enter the IP address manually.
Step 1. Select the Home button to display the Home screen. (⇒P.30) Step 2. Select the Settings icon (⇒P.30) to display the Settings screen. Select "WiFi" [ ◆ ] in the "System settings" [ ⚙ ]. (⇒P.35)

Step 3. A list of SSID will be displayed. Select the SSID to connect.
Step 4. When the security setting is enabled, a password setting window will be displayed. Enter the password and press "Enter".

Step 5. Press "Connect" to connect to the Internet.

◆USING SD CARD OR USB FLASH DRIVE
By using this product, you can save or record still pictures or videos of the camera image onto the SD card, the USB flash drive or the internal storage.
The saved or recorded still pictures or videos can be displayed. (⇒P.43)
Insert the external memory device (the SD card or the USB flash drive) into the SD slot or the USB connector in the front panel before using it.
After the external memory device (the SD card or the USB flash drive) is properly recognized by the product, an icon of the external memory device will be displayed in the Status area (⇒P.13).

NOTE
When the SD card and the USB flash drive are both inserted, the USB flash drive has tl priority over the SD card as the saving destination.
About SD card
Supported format : up to FAT32,SDHC
| Status | Icon |
| Not inserted | — |
| When SD is set as the destination to save content |  |
About USB flash drive
Supported format : up to FAT32
※USB flash drive cannot be formatted with the product.
| Status | Icon |
| Not inserted | - |
| When USB is set as the destination to save content |  |
NOTE
- About SD card
-SDXC card cannot be used.
-For video recording, we recommend to use the SD card.
-We recommend to use the SD card class 6 or higher.
- About USB flash drive
-Use the USB flash drive up to 32GB.
- It may take some time to recognize the SD card or the USB flash drive when the SD card or the USB flash drive is inserted. It may take some time to record an image file to the SD card or the USB flash drive.
- Do not remove the SD card or the USB flash drive while the product is accessing it for recording or playback or operation.
◆DISPLAYING THE EXTERNAL INPUT IMAGE
The image being input to the HDMI IN port can be output from the HDMI OUT port. ( P.12)
For information about switching the image source from the camera image, refer to "SELECTING THE IMAGE SOURCE (⇒P.25, P.29)".
The product will indicate as shown below that the image currently displayed on the monitor is the image being input to the HDMI IN port.
MA-1
The External input select icon in the Home screen will change as shown below. ( P.30)
MO-2
The status will be indicated by the Status LED.
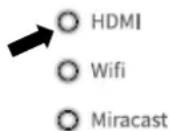

| Status | LED |
| HDMI Pass-Through | Blue |
| HDMI MO-2 out | Off |
◆LIST OF CONTENT ITEMS
A list of all available content items in the active media (such as the SD card and the USB flash drive) will be displayed. For information about supported file extensions, refer to "⑦SPECIFICATION".
Press the Gallery icon in the Home screen (⇒P.30) to display the List of content items screen.
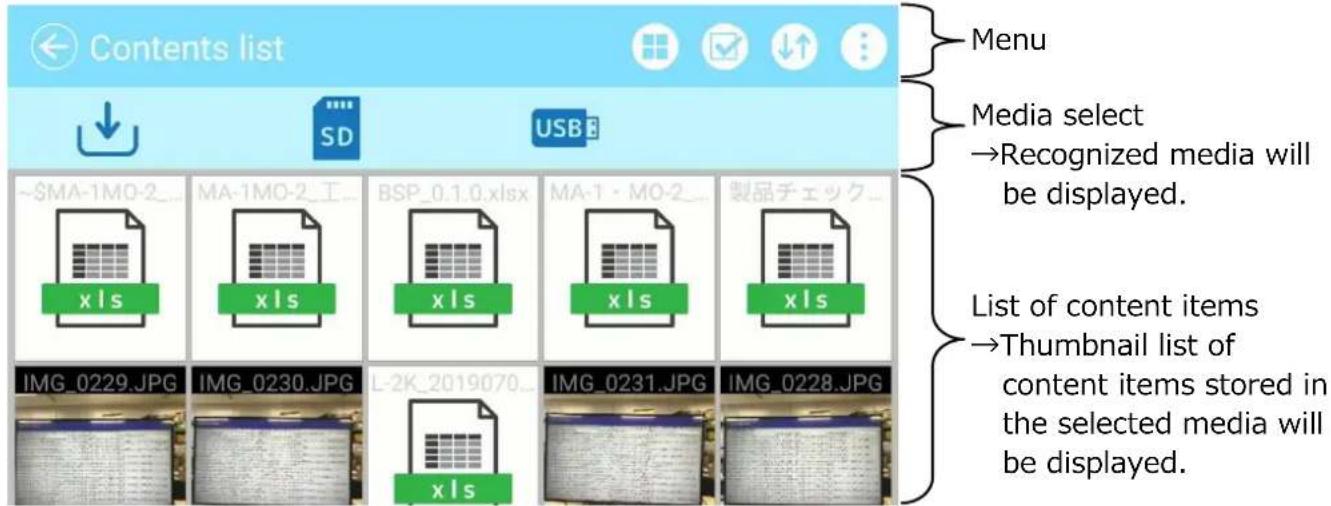
| Menu | ||
| Icon | Name | Function |
 | Split screen | To enter the Split screen select mode. Select the content items to compare. (⇒P.46) |
 | Content item select | To enter the mode that multiple content items can be selected. (⇒P.44) |
 | Change order | To display the sub menu to change the order for displaying content items. [Date / Name] |
 | Sub menu | To display each function indicated by icons or recognized storage by text. |
 | Return | To return to the last screen before the List of content items screen. |
| Media select | ||
| Icon | Name | Function |
 | Internal storage | To display the content items stored in the internal storage in the List of content items screen. |
 | SD card | To display the content items stored in the SD card in the List of content iter screen. |
 | USB flash drive | To display the content items stored in the USB flash drive in the List of content items screen. |
edia select
The thumbnails of the content items of the selected media will be displayed in the List of content items screen.
If the selected content items cannot be displayed in one screen, scroll the screen by flicking it to see all the content items.
NOTE
A list of still pictures, videos, Word files and Excel files will be displayed in the List of conter items screen.
For videos, the Play icon will be displayed in the center of the thumbnail.
■ Selecting a content item
Select a content item by pressing the Content item select icon [ ] in the List of content items screen (⇒P.43) or by long pressing a content item in the List of content items screen.
Press a content item to select.
(A check mark will be displayed at the top right of the selected thumbnail.) The menu will change when a content item is selected.

| Menu | ||
| Icon | Name | Function |
 | Share | This icon will be displayed when a content item is selected. Pressing this icon will display a dialog to copy the selected content item to other media or share it with someone. (⇒P.50) |
 | Trash can | This icon will be displayed when a content item is selected. Pressing this icon will display a dialog “Delete a file”. Select “OK” to delete the file completely. |
 | Sub menu | To display each function indicated by icons or recognized storage by text. |
 | Return | To return to the List of content items screen. |
◆ PLAYBACK OF A CONTENT ITEM
Pressing a thumbnail in the List of content items screen will display the Content item playback screen to play the selected content item.
■ Still picture
The screen will change to the Still picture playback screen.
The selected still picture will be displayed in 16:9. You can draw on the picture.
※If the aspect ratio of the selected picture is not 16:9, it will be displayed according to the following rules ① or ②.
①For landscape picture, horizontal position will be adjusted and black bars will appear on the top and bottom of the screen.
②For portrait picture, vertical position will be adjusted and black bars will appear on the left and right of the screen.


natural_image
Child wearing a medical cap and red armband sitting at a desk, holding a small object (no visible text or symbols)■ Video
The screen will change to the Video playback screen. (The paused image of the video will be displayed.)

natural_image
Three stationery items on a plain surface: ruler, pen, and digital timer (no visible text or symbols)| Icon | Name | Function | |
 | Play | To start video playback.This icon will change to the Pause icon during playback. | |
 | Pause | To pause the video. This icon will change to the Play icon during pause. Press this icon again to restart the video. | |
| Seek bar | To change the playback position as desired by moving this bar. | ||
 | Playback time | To display the elapse time during playback. | |
 | Maximum playback time | To display the maximum playback time of the selected video. | |
 | Previous video | To move to the previous video. | |
 | Next video | To move to the next video. | |
 | Speaker | To adjust the speaker volume by using the Volume adjustment ba | |
 | Repeat | To playback the selected video repeatedly. ON or OFF can be set to each selected video. | |
 | Return | To return to the List of content items screen (⇒P.43). | |
 | Hide Playback menu | To hide the Playback menu and display the video full screen.※Press the bottom tab to display the Playback menu. | |
■ Displaying digital documents
Digital documents such as PDF, Word, Excel and PowerPoint files stored in the memory device such as the internal storage, the SD card and the USB flash drive can also be viewed.
From the List of content items screen, press a desired digital document. The selected document will be displayed by the app "WPS Office" installed in the product.
※For MO-2, you need to install WPS Office from ELMO Play (chargeable).

◆USING SPLIT SCREEN
Press the Split screen icon [ ] in the List of content items screen (⇒P.43) to display the Split screen select screen. Max. 4 selected content items can be displayed in a single screen. (Video content cannot be selected.)
■ Split screen select mode
Select the content items to display in the split screen by pressing the thumbnail of the content items. (Number is displayed on the selected thumbnail. To cancel the selection, press the thumbnail again.)
Also, the Camera icon will be added to the left top of the screen. When this icon is pressed, the Camera image will be displayed in the split screen.
※When the Media select icon is pressed while a content item is selected, the list of content items of the selected recording media will be displayed, while the content item selection is maintained.

Press the check mark [ ↑ ] of the Check menu. The selected content items will be displayed in the split screen.
※The check mark does not appear when no content item is selected.
■ Displaying the split screen
The selected content items will be displayed in the order selected in the Split screen select mode. (In the order ①\~④ as shown below.)
To return to the List of content items screen, press [←].
※A portrait content item will be displayed after being adjusted to fit the 16:9 aspect ratio. (⇒P.45)
4-split screen

2-split screen
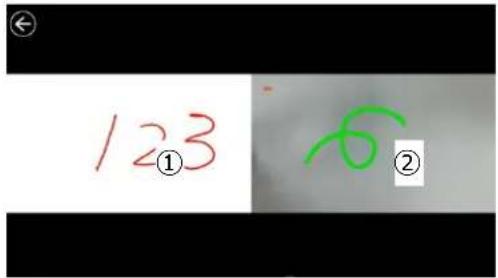
■ Maximizing the split screen
In the Split screen view, press the content item. The selected content item will be displayed enlarged.
Press the enlarged content item again and it will return to the previous size.
■ Changing screen positions
You can change the positon of the content items in the Split screen view.
Long press the content item and move the selected content item by drag and drop action.
NOTE
It is not possible to draw on the video stream.
※If you need to draw on the video, capture a still picture of the video first. Then you can draw on the captured still picture.
◆USING THE QR CODE READER
Using the Camera app, you can read the QR code to access the specified website. The WiFi configuration or the Ethernet configuration needs to be completed in advance to connect to the Internet. ( P.40)
Step 1. Select the QR code icon [ ] in the Menu area. The product will enter the QR code reader mode and the camera image will be displayed. (⇒P.31)

Step 2. Adjust the position so that the QR code comes to the center. Step 3. A dialog to confirm whether to open the relevant URL will be displayed.
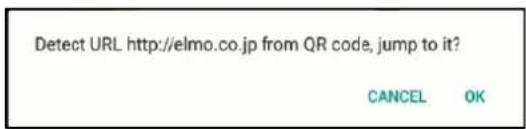
Step 4. Select "OK". The browser will open and the relevant website will be displayed.

Step 5. To return to the Document camera screen, press the Return icon [←] displayed on the top left of the screen.
CAUTION
It is not possible to draw in the QR code reader mode. (The added drawings will be hidden during the QR code reader mode.)
◆USING THE DIGITAL TEXTBOOK
You can access the Digital textbook server to read the digital textbook.
Select "Digital textbook" from the Camera settings menu to display the Server URL input screen. Enter the information by using the keyboard. (⇒P.33)
※The Digital textbook app does not appear on the Home screen if the Digital textbook configuration is not completed. (⇒P.30)
The Digital textbook app will be displayed after the Digital textbook configuration is completed.
◆USING BY CONNECTING TO A PC WITH USB CABLE
This product is compliant with UVC (USB video class) and troublesome installing of a driver is not required.
You can transfer the camera image to a PC by simply connecting the USB cable to the USB port of a PC. (Operation is not guaranteed on all application software.)
CAUTION
- Do not disconnect or connect the USB cable during the operation of the operating panel. By doing so may result in malfunction.
- We recommend to use the USB cable compliant with USB2.0.
- While distributing the image from the USB, it is not possible to record the camera image, display thumbnails or playback of still picture or video.
- The UVC function is available only when the Camera app is running.

NOTE
- Depending on the USB environment of the PC or due to the influences of surrounding devices, the image transfer may be interrupted.
• Operation is not guaranteed in all environment.
◆CONNECTING TO THE NETWORK
This product can be connected to the network via WiFi or Ethernet.
※WiFi and Ethernet cannot be used at the same time.
→Ethernet has a priority over WiFi.
(When the product is connected to Ethernet while it is connected to WiFi, the WiFi connection will be disconnected automatically.)
For MO-2 only
The connection status will be indicated by the Status LED during WiFi connection.
| Status | LED |
| WiFi connected | Blue |
| WiFi connecting | Flash blue |
| WiFi disconnected | Off |

■How to connect to WiFi
Select WiFi [▼] from the "System settings"[★] in the Settings screen. (⇒P.35)
A list of network will be displayed. Select the SSID to connect.
Enter the password using the keyboard. Press "Connect" to connect to WiFi
For details about the setting procedure, refer to "♦USING THE BROWSER (⇒P.40)".
◆USING THE SHARE MENU
Select the Share menu [ ] from the menu in the Content item select screen (⇒P.44) to copy the selected content item to other media or share it with someone.
Press "Cancel" to return to the list of content items.

Select the media to copy a content item. The Copy screen will be displayed.
Type the file name or select the destination folder.
(Default destination folder: MyDrive)

Press the area around the folder and a dialog for specifying the destination folder will open.
Specify or select the folder and press "Save". The selected content item will be copied to that folder with the specified file name.
※If the entire sub folders cannot be displayed in one screen, scroll the screen by flicking it to view the entire sub folders.
Dialog for specifying the destination folder

The product can be connected to a device which supports Miracast to perform Miracast output or Miracast input.
By connecting the product to a display device with a receiver attached, you can transmit the image between the product and the display device wirelessly.
※It is not possible to perform Miracast output and Miracast input at the same time.
※If either of them is enabled, the other cannot be enabled.
When the Automatic Miracast connection setting is set to "enable", the product will connect to the Miracast device automatically after the product is turned on. (⇒P.33)
During Miracast connection, the connection status can be checked with the Status LED. (For MO-2 only)
| LED | Status |
| On | Miracast connected |
| Flash | Miracast connecting |
| Off | Miracast disconnected |
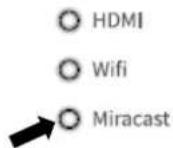
■ Selecting a device to connect
Before connecting a Miracast device to the product for the first time, you will need to select a device to connect.
①Select Miracast from the Home screen. (⇒P.30)
②A list of available Miracast supporting devices will be displayed.
※When there is no Miracast device which was connected to the product in the past available near the product, it is not possible to select a device.
③Select a device to connect.
※If you want to connect the product to a Miracast device automatically at power-on, set the Automatic Miracast connection setting in the Camera settings to "enable".
■ Miracast output
When the Miracast icon in the Home screen ( P.30) is pressed, the product will search the Miracast device set in the Connection device select screen and start mirroring automatically.
To finish mirroring, press the Miracast icon again.
When the Connection device selection setting is completed, the product will connect to the device automatically.
※In case the connection device is not found during the search, the product will continue the automatic connection process until the device is found, while displaying the camera image.
NOTE
■ When the Miracast icon is pressed before the connection device is selected, the Connection device select screen will be displayed automatically.
Then after the connection device is selected, the product will search and connect to the device automatically and return to the Miracast image display.
■ If no connection device is found after the Miracast icon is pressed, an error occurs and the Connection device select screen will be displayed.
Then after the connection device is selected, the product will search again and connect to the device automatically and return to the Miracast image display.
■ Miracast input
The screen of the Miracast supporting device can be displayed on the screen of the product. (Mirroring)
①Display the Home screen and select Miracast [ ]
②Select the icon of the device to connect.
③Select the product from the menu of the connected Miracast device after the Connection device search screen is displayed.
④The image of the connected Miracast device will be displayed on the screen of the product once the connection is successfully established.

To finish Mirroring, press the External input button of the product.
For MA-1: External input select icon (⇒P.31)
For MO-2: External input button ( P.11) or External input switching ( P.31)
◆USING THE TIMER
Open the Home screen and select "timer". (⇒P.31)
You can set the timer at the desired time.
The alarm will sound at the set time.
※The maximum time that can be set is 59 minutes and 50 seconds.
※The gauge will decrease over time.
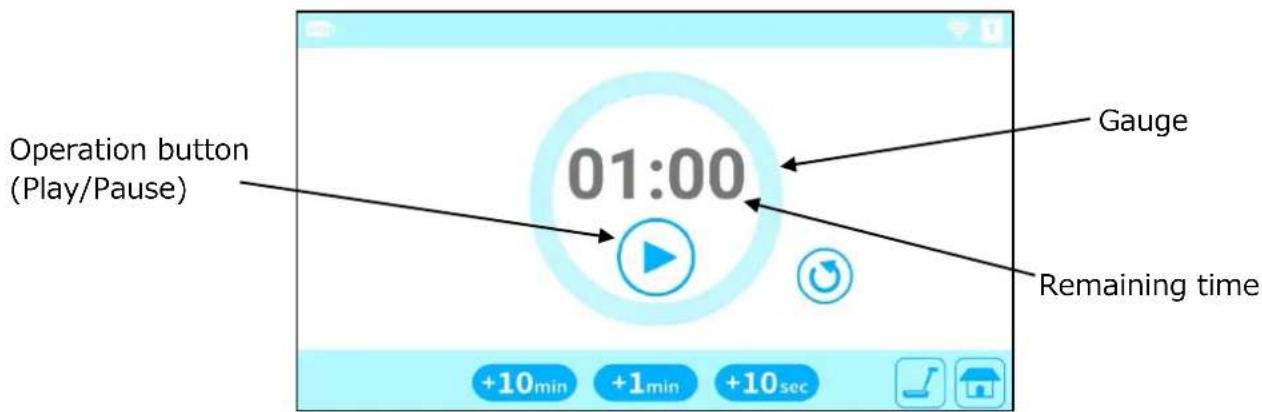
| Icon | Name | Function |
 | Reset | The timer will be reset to [00:00]. |
 | Time select | To set the time to sound the alarm.Adjust the time by selecting the icon.Time will increase each time the icon is tapped. (+10sec/+1min/+10min) |
 | Home | To return to the Home screen. |
 | Camera | To display the camera image. |
Step 1. Tap the Time select icon (when using MA-1) or click the Time select icon with the mouse (when using MO-2) to set the time.
Step 2. Press the Operation button (Play). The timer will start counting down and the gauge will decrease.
Step 3. When the set time is elapsed, the timer will sound.
Step 1. Press the Operation button (Pause) to pause the timer.
Step 2. Press the Operation button (Play) again to restart.
The alarm volume can be set from the Speaker volume menu in the Camera settings menu. (⇒P.33)
◆USING ELMO PLAY
You can download apps from the portal run by ELMO.
The selected apps will be downloaded and installed automatically, which can be used with the product.
For further information, visit the ELMO portal.
◆USING THE FILE MANAGER
By selecting the File Manager [ ] (⇒P.30) in the Home screen, you can access the storage devices such as the internal storage, the SD card and the USB flash drive.
Open the desired storage and a list of folders will be displayed.
You can view files in the folder or open them.

Select the storage device

By using this function the product will automatically detect the skew angle of the document such as a printing paper and a textbook in the shooting area and correct it to fit the screen.
※The image will be rotated, enlarged, reduced or placed in the center.
※If the "Keystone correction" (⇒P.33) is enabled, the product will also correct the trapezium distortion when correcting the skew of the image.
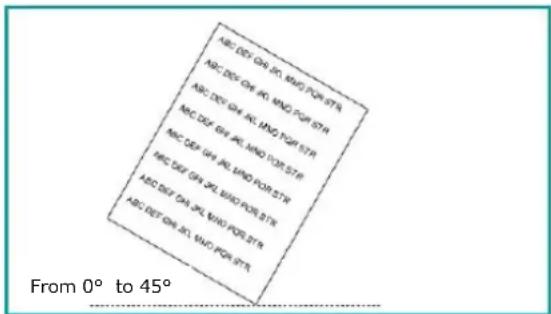

| ABC DEF GHI JKL MNO PQR STR ABC DEF GHI JKL MNO PQR STR ABC DEF GHI JKL MNO PQR STR ABC DEF GHI JKL MNO PQR STR ABC DEF GHI JKL MNO PQR STR ABC DEF GHI JKL MNO PQR STR ABC DEF GHI JKL MNO PQR STR ABC DEF GHI JKL MNO PQR STR ABC DEF GHI JKL MNO PQR STR |
①Place a document in the shooting area.
②Long press the Freeze button.
③Release the Freeze button and the skew correction will be performed.
The document will be displayed straight.
Press the Freeze button again. The skew correction will be cancelled and the original image will be displayed.
CAUTION
- Depending on the using environment or the shooting condition, the Auto deskew function may not work properly.
◆USING WITH WIRELESS TABLET OR PORTABLE IWB (BOTH SOLD SEPARATELY)
By using the Wireless tablet or the Portable IWB (both items sold separately) with the product, you can draw over the camera image directly or record the drawing process. Also, you can operate the product (such as zooming in or out) from the Wireless tablet or the Portable IWB.
For details, visit our Official website:
For Wireless tablet (CRA-1)
⇒ https://www.elmousa.com/product/cra-1/
⇒ https://www.elmoeurope.com/index.php/en/products/elmo-interactiv/cra-1
For Portable IWB (CRB-1/CRB-2)
→ https://www.elmousa.com/product/crb-2/
⇒ https://www.elmoeurope.com/index.php/es/productos/elmo-interactivo/crb-1
⑤ LIST OF ERROR MESSAGES
| Error item | Error message | Possible cause |
| SD card | Could not play file. | ·The file is broken.·The file extension is not supported.·The SD card was removed.Check if the file is broken.Check if the file extension is supported by the product. (⇒P.66) |
| USB flash drive | Could not play file. | ·The file is broken.·The file extension is not supported.·The USB flash drive was removed.Check if the file is broken.Check if the file extension is supported by the product. (⇒P.66) |
| Internal storage | Could not play file. | ·The file is broken.·The file extension is not supported.Check if the file is broken. |
| Image capture | Could not capture image. | ·The SD card or the USB flash drive is not recognized.·There is a malfunction in the internal storage.Check if the recording media is inserted properly. |
| Not enough capacity in SD card or USB flash drive. | ·There is not enough capacity in the SD card or the USB flash drive.Check the remaining capacity.“Settings” → “System settings” → “Storage” | |
| Video recording | Could not record video. | ·The SD card or the USB flash drive is not recognized.·There is a malfunction in the internal storage.Check if the recording media is inserted properly. |
| Not enough capacity in SD card or USB flash drive. | ·There is not enough capacity in the SD card or the USB flash drive.·The data amount of the destination device reached its limit.Check the remaining capacity.“Settings” → “System settings” → “Storage” | |
| Battery | Battery is low. | ·The remaining battery level is low and the battery is not charged.Use the AC adapter. |
| Playback of | Could not play content item. | ·The content item is not supported. |
| content item | • The file is broken.• The file size is too large.Check if the file is broken.Check if the file extension is supported by the product.Check if the file size is too large.(⇒P.66) | |
| Browser | Not connected to internet. | • The product is not connected to WiFi or Ethernet.Check if WiFi configuration or Ethernet configuration is completed.(⇒P.35, P.40) |
⑥ TROUBLE SHOOTING
◆SYMPTOMS AND CONFIRMATION
Check the following items. If any abnormality is found, consult the dealer from whom you purchased this product or our nearest branch/office.
| Symptom | Possible cause/ remedy |
| Cannot turn on the product. | The battery is not fully charged.You cannot turn on the product even by using the AC adapter when the battery is empty. Charge the battery for about 30 seconds and retry. |
| No image is displayed. | The cable is not correctly connected.The AC adapter is disconnected from the power supply socket of the product or the wall outlet.The battery is empty.Zoom is set at the TELE side, displaying only the white or black part of the document.If you turn on the power immediately after turning it off, the product may not start. Wait for several seconds after turning off the power, and then turn it on.The output cable is disconnected.The output setting does not match the output cable connected to the product. Set the correct output setting.Reconnect the AC adapter and the power cable.The display monitor is not turned on.The input source of the display monitor is not set correctly.Reset the product by pressing the Reset button on the bottom of the product. |
| The output image (resolution) changes automatically. | When the HDMI monitor is connected to the product, the output image (resolution) of the product will be automatically changed based on the information from the connected monitor. |
| The image is out of focus. | The document (subject) is too close to the lens. Move the document (subject) slightly away from the lens.Adjust the focus by pressing the AF button on the operating panel. |
| The image is too dark. | The intensity of the lighting is insufficient.MA-1:Press the LED lighting icon in the Menu area to turn on the LED lighting.MO-2:Press the LED lighting button on the operating panel or click the LED lighting icon in the Menu area on the external monitor to turn on the LED lighting.·Adjust the brightness from the Camera quality settings. MA-1:Press the Brightness icon in the Menu area to adjust the brightness by moving the Brightness adjustment slider.MO-2:Press the Brightness button (+) on the operating panel or click the Brightness icon in the Menu area on the external monitor to adjust the brightness. |
| The image does not move. | ·The Freeze function is activated by pressing the Freeze button Cancel the freeze.MA-1 :To cancel the freeze, press the Freeze icon in the Menu area or press the Freeze button on the operating panel.MO-2:Press the Freeze button on the operating panel or click the Freeze icon in the Menu area on the external monitor to cancel the freeze.Reconnect all the cables. |
| The image is striped. | ·This may be interference fringes between dots of printed matter and TV scanning lines or CMOS pixels. Changing the shooting range may improve the problem.The image may be distorted when shooting a monitor screen while the live image feed is displayed.Vertical stripes may appear on an LCD projector image.Manually adjusting the dot clock at the projector side may help the problem.Vertical stripes may appear when shooting in dark conditions.Making the shooting environment brighter may reduce the vertical stripes.The flickering can be reduced by setting the Flicker mode in the Camera settings menu correctly according to the area where the product is being used. |
| The UVC video stream is upside down. | ·Verify that the graphic driver and other device drivers of your PC are the latest version. You can download the latest version of device drivers from the official website of the manufacturer of your PC. |
| Other image than the camera image overlaps on the UVC video stream. | ·Depending on your software, OS or the connection status, other images than the camera image may be overlapped on the camera image. This can be solved by reconnecting the product or restarting the software. |
| No UVC video stream is displayed. (An error message appears.) | ·The software may recognize it as error when it takes time to prepare the image output. Restart the product and reconnect it to your PC. Then restart the software. |
| Fails to output the UVC video stream. | ·Disconnect the USB cable and restart the software. Then connect the USB cable again. |
| The UVC video stream sometimes freezes. | · The displayed image may pause for a brief second when the object moves quickly. In that case, adjusting the brightness manually may improve the problem. |
| There is a distortion of the image. | · Use a high-spec PC. Also, reducing the resolution or frame rate may improve the distortion of the image. |
About the light (LED lighting)
The brightness of the LED lighting will diminish with long-term use. If its brightness has significantly diminished, consult the dealer from whom you purchased this product or our nearest branch/office for replacement (subject to charge).
About long-term usage of this product
Due to the lifetime of its parts, if this product is used for longer than the warranty period, its performance and quality may deteriorate. In this case, we will replace the parts for a charge. Consult the dealer from whom you purchased this product or our nearest branch/office.
About the battery
The built-in battery has its own life span. Along with frequency of use, time of use and the time passed, battery capacity decreases gradually.
If the battery quickly runs out of power, contact your dealer or our nearest branch/office.

SPECIFICATION
◆ RESOLUTION
The output resolution of the product (RGB / HDMI) can be set as shown to the right.
The output resolution can be changed from the Resolution menu in the Camera settings menu. ( P.33)
| RGB/HDMI |
| Auto |
| FHD 1920x1080 |
| HD 1280x720 |
※When this setting is set to Auto, the output resolution will be automatically set based on the information from the connected monitor.
※Default setting: Auto
◆RESTRICTIONS ON THE IMAGE OUTPUT
■ Simultaneous output specification
The camera image can be simultaneously output from RGB port, HDMI port, USB port (UVC), to the touchscreen and via WiFi (Miracast).
However, the frame rate may be decreased if the recording function or UVC (USB Video Class) function or Miracast function is used while the image is being output from multiple output ports simultaneously.
■UVC
UVC streaming is possible only when the Camera app is running.
UVC streaming is not possible when the camera image is not displayed, such as in the Whiteboard mode. (⇒P.38)
It is not possible to move from the Camera app to other mode in which the camera image is not displayed.
◆BATTERY
The battery of the product is charged by using the AC adapter.
You can use the product while charging the battery. In that case, the charging time will be longer. Charge the battery when the remaining battery level becomes 30%.
When Power is ON: The icon indicating the remaining battery level will be displayed in the Status area. (When charging, the "Charging" icon will be displayed.)
When Power is OFF: The Power LED indicates the remaining battery level. (Fully charged: OFF / Charging: Red)
※When the AC adapter is used, the "Charging" icon will be displayed. When the built-in battery is used, the remaining battery level will be displayed.
| Remaining battery level | Icon |
| Charging |  |
| 70% or more |  |
| 70% |  |
| 50% |  |
| 30% |  |
| 10% or less |  |
| N/A |  |
■ Battery operating time
When the remaining battery level is 80%: about 2 hours
When the battery is fully charged: about 2 hours and 50 minutes
※When only transmitting the image to the external monitor via WiFi using Miracast function with MA-1
※The battery operating time may vary depending on the operating condition.
■ Battery charging time
When the remaining battery level is 10% or less and charging without turning the power off: about 2 hours and 30 minutes to reach 80%
NOTE
- When the product is used for the first time or when the battery level is low, wait for 30 seconds after connecting the AC adapter and then press the Power button.
- When the remaining battery level is lower than 30% , the icon to indicate the remaining battery level will always be displayed, even when the Status area is hidden. (The icon will not be displayed during charging.)
- The product will be shut down automatically when the remaining battery level becomes less than 10% . Pay attention to the remaining battery level.
- Due to the internal loss of battery, the actual available remaining capacity may be different from the indicated figure.
◆HOW TO USE THE FIXING SCREWS
When installing the product to a desk
Use a M3 screw, with 0.5mm thread pitch, and 7-12mm long.
■ Installation image
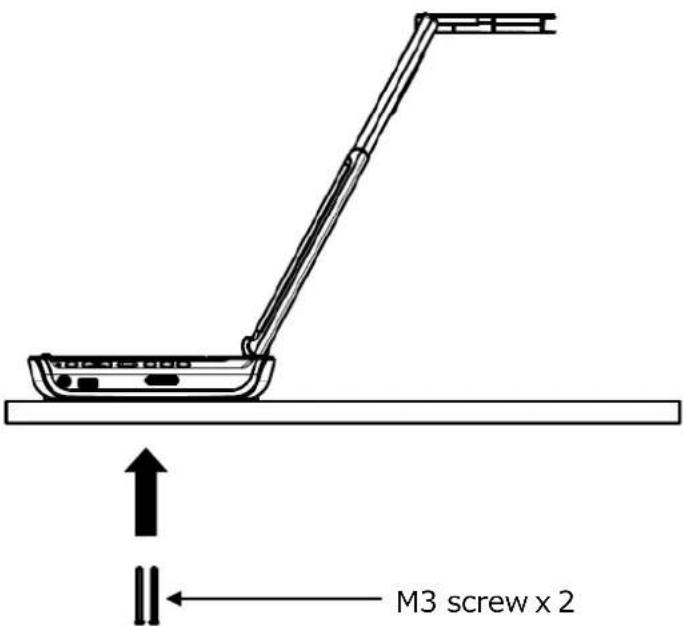
■Mounting dimension

NOTE
Select an appropriate screw according to the thickness of the desk.
If the screw is too short, it is not possible to secure the product to the desk properly. For example, when the thickness of the desk is 20mm, the screw length should be 27-32mm.
♦ MAIN CAMERA
| Item | Specification |
| Power source | DC5V |
| Power consumption | 15W (when in use and charging) |
| Outside dimensions | W : 220mm D : 115mm H : 343mm (When setup) |
| W : 220mm D : 115mm H : 57mm (When folded) | |
| Weight | MA-1 : Approx.1,100g MO-2 : Approx.950g |
| Ext. control terminal | USB2.0 Type A × 2 |
| USB | USB2.0 Type B × 1 |
| Lens | F=2.0 |
| Frame rate | 30fps |
| Focus working range | From lens surface : 100mm ~∞ |
| Focus | Auto (One-push) |
| Exposure | Auto (Possible to adjust exposure level) |
| Image pick-up element | 1/3.2 inch CMOS 8,000,000 pixels |
| Effective pixels | H: 3280, V: 2464 |
| Resolution | H: 1000TVlines or more V: 1000TVlines or more |
| Digital zoom | Max. 16x |
| Shooting area | 329mm×439mm (Height : 328mm) 4 : 3 |
◆ILLUMINATION DEVICE
| Item | Specification |
| Illumination | White LED |
◆FUNCTIONAL SPECIFICATION
| Item | Specification |
| USB | USB 2.0 compliant |
| Transfer speed | USB2.0 High Speed (480Mbps)※The actual transfer speed may vary depending on the performance of your PC and the status of the USB bus. |
| WiFi | Radio standard : IEEE802.11 a/b/g/nCommunication frequency : 2.4GHz/ 5GHz |
| Operating temperature | 0°C~+40°C |
| Humidity | 30~85% (No condensation) |
♦VIDEO QUALITY
| Resolution | Bit rate | |
| High | 1280x720 | 2M |
| Normal | 1280x720 | 1M |
| Low | 1280x720 | 500K |
◆SUPPORTED MEDIA FORMAT
| Extension | Media type | Description |
| JPG | Still picture | Jpeg file |
| PNG | Still picture | Png file |
| BMP | Still picture | Bmp file |
| MP4 | Video | MP4 file |
| PDF file ※ | ||
| xlsx,xls | Excel | Excel file ※ |
| pptx,ppt | PowerPoint | PowerPoint file ※ |
| docx,doc | Word | Word file ※ |
※For MO-2, the app "WPS" will be needed.
(WPS is installed in the MA-1 as default. For MO-2, install it from ELMO Play. (⇒P.55))
◆ SETTINGS
| Function | Setting item/Setting value | Default setting | Note |
| Display resolution | Auto / FHD1920x1080 / HD1280x720 / UXGA1600x1200 / XGA1024x768 | Auto | Appropriate resolution will be set according to the display monitor. |
| Angle of view | 16 : 9 / 4 : 3 | 16 : 9 | |
| Speaker volume | 0(Mute)~15 | 5 | |
| Flicker mode | 50Hz / 60Hz / Auto / Off | Auto | |
| Recording quality | High / Normal / Low | Normal | |
| Image rotation angle | 90° / 180° | 90° | |
| Automatic Miracast connection | Enable / Disable | Disable | |
| Scroll mode | Enable / Disable | MA-1: Enable MO-2: Disable | |
| Brightness | 0~6 | 3 | |
| White balance | Auto / Cloudy / Sunny / Fluorescent light / Incandescent light / Shade / Twilight / Fluorescent light (warm color) | Auto | |
| Ethernet | Dhcp / Static ip / Gateway / Mask / Dns / Proxy / Proxy host / Proxy port | - | |
| Language | Japanese / English / German / French / Chinese | To be set according to the destination | |
| WiFi | On / Off | Off |
■ TRADEMARKS AND LICENSES
ELMO and Image Mate are registered trademarks of ELMO Co., Ltd.
HDMI, High and High-Definition Multimedia interface are
trademarks or registered trademarks of HDMI Licensing LLC.
Windows and/or other Microsoft products referenced herein are either registered trademarks or trademarks of Microsoft Corporation in the United States and/or other countries.
Google, Google Chrome, Android, are registered trademarks of Google Inc.
Miracast is a trademark or registered trademark of Wi-Fi Alliance.
QR code is a registered trademark of DENSO WAVE INCORPORATED.
All other company/product names described in this manual are trademarks or registered trademarks of their respective companies.
This product is licensed under the AVC Visual Patent Portfolio License (AVC Video) for the personal and non-commercial use of a consumer to (i) play AVC Video that was recorded by a consumer engaged in a personal and a non-commercial activity and/or, (ii) play AVC Video that was obtained from a video provider licensed from MPEG-LA, LLC. Additional information including that relating to promotional and commercial uses may be obtained from MPEG-LA, LLC.
ATTENTION
- Unless used for personal use, it is prohibited by copyright law to record slides, books and photos without the prior consent of copyright holder.
- This product is designed to be used in industrial environment. If it is used in a residential area or in an adjacent area thereto, harmful interference to radio or television reception may occur.
- Repair parts
Repair parts are the items which are needed to maintain product functionality.
The holding period of such repair parts is 5 years after the product discontinuation, which is equal to the repair period we will accept.
- Any image, which is obtained by this product, and which can be identified, is considered to be private information. Be forewarned that the person who makes use of such images shall be liable for disclosing of such images.
OVERSEAS SUBSIDIARY COMPANIES
ELMO USA CORP.
□Headquarters
6851 Jericho Turnpike
Suite 145
Syosset, NY 11791
Tel. (516) 501-1400
Fax.(516) 501-0429
E-mail : elmo@elmousa.com
Web : https://www.elmousa.com/
ELMO Europe SAS
□Headquarters
40549 Düsseldorf Germany
Tel. +49 (0) 211 544756 40
Fax. +49 (0) 211 544756 60
E-mail : info@elmo-germany.de
Web : https://www.elmo-germany.de/
□Middle East Branch
5WA-129, Dubai Airport Free Zone,
P.O Box 371556, Dubai,
United Arab Emirates
Tel. +971-(0)4-260-2390
Fax. +971-(0)4-260-2392
Web : https://www.elmoeurope.com
ELMO COMPANY, LIMITED.
1-3-4, Shioya-Cho, Minami-ku,
Nagoya-Shi, Aichi Pref., Japan


- ■ Overloading
- ■ Object and Liquid Entry
- ■ Servicing
- ■ Damage Requiring Service
- ■ Replacement Parts
- ■ Safety Check
- ■ Heat
- WARNING
- TO REDUCE THE RISK OF FIRE OR ELECTRIC SHOCK, DO NOT EXPOSE THIS PRODUCT TO RAIN OR MOISTURE.
- FOR UNITED STATES USERS:
- INFORMATION
- USER-INSTALLER
- CAUTION:
- USAGE PRECAUTIONS
- HANDLING PRECAUTIONS
- TABLE OF CONTENTS
- ■IMPORTANT SAFEGUARDS 1
- ① BEFORE YOU USE 8
- ● About AC adapter
- CAUTION
- ◆ CHECKING NAME OF EACH PART
- ◆OPERATING PANEL
- ◆FRONT PANEL
- ◆ REAR PANEL AND CABLE CONNECTION
- ■ START SCREEN
- ■ STATUS AREA
- ■ ZOOM AREA
- ■ PEN MENU FOR DRAWING
- ■ Menu area
- ◆ CHECKING MOVING PARTS OF THE PRODUCT
- ② PREPARATION AND CONNECTION
- ♦ SETTING UP
- ◆CONNECTING TO A PROJECTOR OR MONITOR
- ◆CONNECTING TO A PC
- ♦ TURNING ON OR OFF THE POWER
- ◆SETTING THE DESTINATION
- ③ USING THE PRODUCT
- ◆OPERATING MA-1
- ■ ADJUSTING THE IMAGE SIZE
- NOTE
- ■ ADJUSTING THE FOCUS
- ■ ROTATING THE IMAGE
- ■ TURNING ON OR OFF THE LED LIGHTING
- ■ PAUSING THE IMAGE
- ■ CAPTURING STILL PICTURES
- ■ RECORDING VIDEOS
- ■ SELECTING THE IMAGE SOURCE
- ◆OPERATING MO-2
- MO-2
- ■Home screen
- ◆ CHECKING THE CAMERA SETTINGS
- ◆ CHECKING THE SYSTEM SETTINGS
- ◆USING A WHITEBOARD
- ◆USING THE DRAWING FUNCTION
- ◆USING THE BROWSER
- ◆USING SD CARD OR USB FLASH DRIVE
- ◆DISPLAYING THE EXTERNAL INPUT IMAGE
- MA-1
- ◆LIST OF CONTENT ITEMS
- ◆ PLAYBACK OF A CONTENT ITEM
- ■ Video
- ◆USING SPLIT SCREEN
- ◆USING THE QR CODE READER
- ◆USING THE DIGITAL TEXTBOOK
- ◆USING BY CONNECTING TO A PC WITH USB CABLE
- ◆CONNECTING TO THE NETWORK
- For MO-2 only
- ◆USING THE SHARE MENU
- ■ Miracast input
- ◆USING THE TIMER
- ◆USING ELMO PLAY
- ◆USING THE FILE MANAGER
- ◆USING WITH WIRELESS TABLET OR PORTABLE IWB (BOTH SOLD SEPARATELY)
- ⑤ LIST OF ERROR MESSAGES
- ⑥ TROUBLE SHOOTING
- ◆SYMPTOMS AND CONFIRMATION
- About the light (LED lighting)
- About long-term usage of this product
- About the battery
- SPECIFICATION
- ◆ RESOLUTION
- ◆RESTRICTIONS ON THE IMAGE OUTPUT
- ◆BATTERY
- ◆HOW TO USE THE FIXING SCREWS
- ♦VIDEO QUALITY
- ◆SUPPORTED MEDIA FORMAT
- ◆ SETTINGS
- ■ TRADEMARKS AND LICENSES
- ATTENTION
- OVERSEAS SUBSIDIARY COMPANIES
- ELMO USA CORP.
- ELMO Europe SAS
- ELMO COMPANY, LIMITED.
Brand : Elmo
Model : MO-2
Category : Document Camera