
PX-10E - Document Camera Elmo - Free user manual and instructions
Find the device manual for free PX-10E Elmo in PDF.


| Product Type | Document Camera |
| Brand | Elmo |
| Model | PX-10E |
| Image Sensor | 5 Megapixel CMOS |
| Optical Zoom | 10x |
| Maximum Resolution | 2592 x 1944 pixels |
| Video Output | HDMI, VGA, Composite |
| Light Source | LED |
| Dimensions (W x D x H) | 30 x 25 x 15 cm |
| Weight | 1.2 kg |
| Power Supply | AC 100-240V, 50/60Hz |
| Power Consumption | 20 W |
| Connectivity | USB 2.0, HDMI, VGA, RS-232C |
| Capture Modes | Still image, video |
| Supported Media | SD card up to 32GB |
| Image Rotation | 180° |
| Freeze Function | Yes |
| Maintenance | Clean lens with soft, dry cloth. Avoid liquids. |
| Safety | Use only supplied AC adapter. Keep away from water. |
| Repairability | Contact Elmo support for spare parts. Do not disassemble. |
Frequently Asked Questions - PX-10E Elmo
User questions about PX-10E Elmo
0 question about this device. Answer the ones you know or ask your own.
Ask a new question about this device
Download the instructions for your Document Camera in PDF format for free! Find your manual PX-10E - Elmo and take your electronic device back in hand. On this page are published all the documents necessary for the use of your device. PX-10E by Elmo.
USER MANUAL PX-10E Elmo
All the safety and operating instructions should be read before the appliance is operated.
■ Retain Instructions
The safety and operating instructions should be retained for future reference.
■ Heed Warnings
All warnings on the product and in the operating instructions should be adhered to.
■ Follow Instructions
All operating and use instructions should be followed.
■ Cleaning
Unplug this product from the wall outlet before cleaning. Do not use liquid cleaners or aerosol cleaners. Use a damp cloth for cleaning.
■ Attachments
Do not use attachments not recommended by the product manufacturer as they may cause hazards.
■ Water and Moisture
Do not use this product near water - for example, near a bath tub, wash bowl, kitchen sink, or laundry tub, in a wet basement, or near a swimming pool, and the like.
- Placement
Do not place this product on an unstable cart, stand, tripod, bracket, or table. The product may fall, causing serious injury to a child or adult, and serious damage to the product. Use only with a cart, stand, tripod, bracket, or table recommended by the manufacturer, or sold with the product. Any mounting of the product should follow the manufacturer's instructions, and should use a mounting accessory recommended by the manufacturer.
■ Ventilation
Slots and openings in the cabinet are provided for ventilation and to ensure reliable operation of the product and to protect it from overheating, and these openings must not be blocked or covered. The openings should never be blocked by placing the product on a bed, sofa, rug, or other similar surface. This product should not be placed in a built-in installation such as a bookcase or rack unless proper ventilation is provided or the manufacturer's instructions have been adhered to.
■ Power Sources
This product should be operated only from the type of power source indicated on the marking label. If you are not sure of the type of power supply to your home consult your appliance dealer or local power company. For products intended to operate from battery power, or other sources, refer to the operating instructions.
■ Grounding or Polarization
This product may be equipped with either a polarized 2-wire AC line plug (a plug having one blade wider than the other) or a 3-wire grounding type plug, a plug having a third (grounding) pin. If the 2-Wire polarized plug will not fit in the outlet, try reversing the plug. If the plug still fails to fit, contact your electrician to replace your obsolete outlet. Do not defeat the safety purpose of the polarized plug. The 3-wire grounding type plug will fit into a grounding type power outlet.
This is a safety feature. If you are unable to insert the plug into the outlet, contact your electrician to replace your obsolete outlet. Do not defeat the safety purpose of the grounding type plug.
■ Power-Cord Protection
Power-supply cords should be routed so that they are not likely to be walked on or pinched by items placed upon or against them, paying particular attention to cords at plugs, convenience receptacles, and the point where they exit from the product.
■ Lightning
For added protection for this product during a lightning storm, or when it is left unattended and unused for long periods of time, unplug it from the wall outlet and disconnect the antenna or cable system. This will prevent damage to the product due to lightning and power-line surges.
■ Overloading
Do not overload wall outlets, extension cords, or integral convenience receptacles as this can result in a risk of fire or electric shock.
■ A product and cart combination should be moved with care. Quick stops, excessive force, and uneven surfaces may cause the product and cart combination to overturn.

■ Object and Liquid Entry
Never push objects of any kind into this product through openings as they may touch dangerous voltage points or short-out parts that could result in a fire or electric shock. Never spill liquid of any kind on the product.
■ Servicing
Do not attempt to service this product yourself as opening or removing covers may expose you to dangerous voltage or other hazards. Refer all servicing to qualified service personnel.
■ Damage Requiring Service
Unplug this product from the wall outlet and refer servicing to qualified service personnel under the following conditions:
- When the power-supply cord or plug is damaged.
- If liquid has been spilled, or objects have fallen into the product.
- If the product has been exposed to rain or water.
- If the product does not operate normally by following the operating instructions.
Adjust only those controls that are covered by the operating instructions as an improper adjustment of other controls may result in damage and will often require extensive work by a qualified technician to restore the product to its normal operation.
- If the product has been dropped or damaged in any way.
- When the product exhibits a distinct change in performance - this indicates a need for service.
■ Replacement Parts
When replacement parts are required, be sure the service technician has used replacement parts specified by the manufacturer or have the same characteristics as the original part. Unauthorized substitutions may result in fire, electric shock or other hazards.
■ Safety Check
Upon completion of any service or repairs to this product, ask the service technician to perform safety checks to determine that the product is in proper operating condition.
■ Heat
The product should be situated away from heat sources such as radiators, heat registers, stoves, or other products (including amplifiers) that produce heat.

CAUTION
RISK OF ELECTRIC SHOCK DO NOT OPEN

CAUTION:
TO REDUCE THE RISK OF ELECTRIC SHOCK, DO NOT REMOVE COVER (OR BACK). NO USER-SERVICEABLE PARTS INSIDE. REFER SERVICING TO QUALIFIED SERVICE PERSONNEL.
SA 1965
The lightning flash with arrowhead symbol, within an equilateral triangle, is intended to alert the user to the presence of uninsulated "dangerous voltage" within the product's enclosure that may be of sufficient magnitude to constitute a risk of electric shock to persons.

SA 1966
The exclamation point within an equilateral triangle is intended to alert the user to the presence of important operating and maintenance (servicing) instructions in the literature accompanying the product.

This symbol [crossed-out wheeled bin WEEE Annex IV] indicates separate collection of waste electrical and electronic equipment in the EU countries.
Please do not throw the equipment into the domestic refuse. Please use the return and collection systems available in your country for the disposal of this product.
WARNING
TO REDUCE THE RISK OF FIRE OR ELECTRIC SHOCK, DO NOT EXPOSE THIS PRODUCT TO RAIN OR MOISTURE.
The connection of a non-shielded equipment interface cable to this equipment will invalidate the FCC Certification or Declaration of this device and may cause interference levels which exceed the limits established by the FCC for this equipment. It is the responsibility of the user to obtain and use a shielded equipment interface cable with this device. If this equipment has more than one interface connector, do not leave cables connected to unused interfaces. Changes or modifications not expressly approved by the manufacturer could void the user's authority to operate the equipment.
FOR UNITED STATES USERS:
INFORMATION
This equipment has been tested and found to comply with the limits for a Class A digital device, pursuant to Part 15 of the FCC Rules. These limits are designed to provide reasonable protection against harmful interference when the equipment is operated in a commercial environment.
This equipment generates, uses, and can radiate radio frequency energy and, if not installed and used in accordance with the instruction manual, may cause harmful interference to radio communications. Operation of this equipment in a residential area is likely to cause harmful interference in which case the user will be required to correct the interference at his own expense.
USER-INSTALLER
CAUTION:
Your authority to operate this FCC verified equipment could be voided if you make changes or modifications not expressly approved by the party responsible for compliance to Part 15 of the FCC rules.
BEFORE YOU USE
■ Be sure to use the supplied power cord and the AC adapter.
■ The power cord and AC adapter that come with this product are for this product only. Do not use them with another product.
■ Be sure to use the power cord applicable to your local power specifications. If the product was sold in Japan, use the AC adapter sold with the product with 100 VAC and 50 or 60 Hz.
■ When storing the product, do not leave it under direct sunlight or by heaters. It may be discolored, deformed, or damaged.
■ Do not place this product in any humid, dusty, salt bearing wind, or vibrating locations. Use it under the following environmental conditions:
Temperature : 0°C\~ 40°C Humidity : 30%\~ 85%(No condensation)
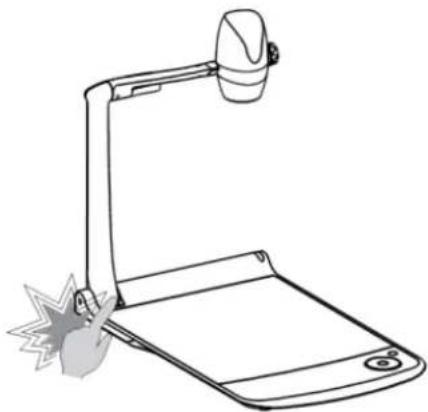
■ Do not put your finger between the arms when moving the arm. You may pinch your finger and result in injury.
It is recommended to attach the supplied caution sticker to the product.
■ Use a soft, dry cloth for cleaning.
Do not use any volatile solvent such as thinner or benzene.
■ Do not point the lens directly to the sun. It could degrade the imaging capability.
■ Luminescent and Black Spots
There may be some pixels that do not properly operate due to the use of CMOS Area Image Sensors made-up of many pixels.
Though luminescent or black spots may be found on the screen, it is a phenomenon peculiar to the CMOS Area Image Sensors and is not a malfunction.
A protection sheet is attached to the touchscreen at the factory to avoid damage during transportation. Remove the sheet before use.
Do not strongly press the touchscreen or press it with sharp objects. This may result in damage or malfunction to the touchscreen.
■ Follow the guidelines below to prevent the unit from dropping or overturning.
- Use the product on a stable base, desk, or table. Do not place the product on an unstable base or slanted location.
- Place or wire the product so as to prevent the cables from being pulled or drawn.
■ Never hold the product by the arm or the camera head. Carry the product by holding the lower part of the main unit in both hands after folding the arm and the camera head.
■ Pay careful attention when using (including setting-up and storing) or carrying the product to prevent the camera head from receiving any shocks.
■ After folding the product, do not place heavy object on the arm.
■ Do not look directly into the LED light. If you look directly into it at pointblank range, your eyes may be injured.
■ The LED may get hot after using it for long hours. Do not touch it directly.
It is recommended to attach the supplied caution sticker to the product.
■ Depending on the type of the SD card or USB flash drive, it may not be used with the product.
■ Transfer the data from the SD card or USB flash drive onto a device such as a PC to save a backup copy. Malfunction of the product or repairs to it may cause the data saved in the SD card or USB flash drive to be deleted.
If this product is used for longer than the warranty period, its performance and quality may deteriorate due to the lifetime of its parts. For parts replacement (on chargeable basis), consult the dealer from whom you purchased this product or our branch/office near your location.
■ Battery precautions:
- Remove the battery from the remote control when not in use for an extended period of time.
- Do not use a rechargeable battery.
- Do not charge or short-circuit the battery.
- Follow the regulations of the city or town when disposing of the battery.
- Pay attention to the polarity (+ / - ) of the battery.
- Children may ingest small batteries; always keep batteries safe and out of reach. If a battery is swallowed, consult a doctor immediately as this could result in asphyxiation or be an obstacle to digestion, etc.
- If any liquid from a battery leaks onto your skin or clothes, flush the area with clean water immediately. If it gets into your eye, flush immediately with clean water and then contact a doctor.
■ Microphone
Connecting a microphone other than an electret condenser microphone (a microphone for a computer) may cause malfunction.
■ Audio input port
The power is supplied to the audio input port (dedicated for the microphone input). Do not connect any audio line-output devices such as a CD/MP3 player to the audio input port.
■ Menu and Icons
Some functions of this product may not be set or used depending on the operation mode or menu settings.
■ Recording / Playback
- Before recording an important scene, make sure to do a test recording to confirm that the camera is working properly.
- The recording time varies depending on the resolution setting, recording quality setting or type of SD card.
- Video files that are recorded with this product or converted by the proprietary software can only be played with this product.
- Be careful not to operate the touchscreen or touch any buttons during the recording. The operation noise may be recorded.
■ Whiteboard Sheet
- Use a proper whiteboard marker. If you use a permanent parker on the board, you may not be able to erase it.
- When writing, write on the whiteboard sheet. If you write directly on the stage, You may not be able to erase it.
It is recommended to attach the supplied caution sticker to the product. - Do not leave writing or drawings on the writing surface for an extended period of time. It may stick to the surface and will be difficult to erase.
- It may be difficult to erase writing or drawings on the surface with a whiteboard eraser. We recommend you used a melamine sponge.
■ Remote control
The receivable range may be reduced when the product is placed in direct sunlight or near an inverter fluorescent light.
Depending on the surrounding environment, the receivable range may be shorter or the sensor may fail to receive any infrared light. In such cases, relocate the product or shield the light source.
■ Network Function (For PX-30E only)
We do not guarantee the performance when the product is connected to the Internet directly. For details of the network settings, consult with your network administrator.
Copyright
Unless used for personal use, it is prohibited strictly under copyright law to use any photo files without the prior consent of the copyright holder. Even if using for personal use, be careful that there could be a situation where video or audio recording is restricted or illegal.
HANDLING PRECAUTIONS
The followings are special precautions against mishandling of the product. Pay close attention to them.
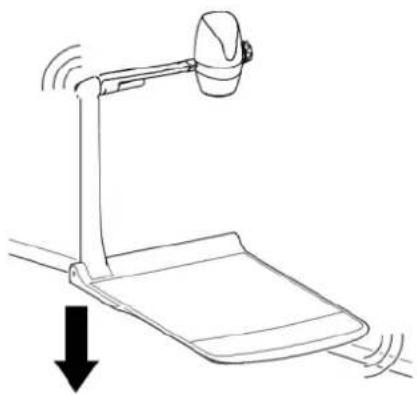
①Installation
Do not place the product on an unstable place or slanted surface.
natural_image
Line drawing of a mechanical device with a lever and base, showing motion direction (no text or symbols)②Carrying the product
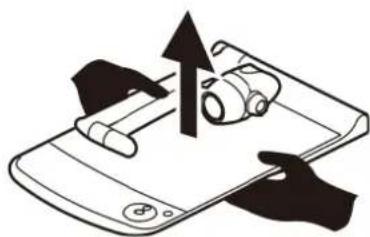
To avoid malfunction of the camera, fold the arm before carrying the product.
Never hold the product by the arm or the camera head when carrying the product.
natural_image
Illustration of a hand holding a smartphone with a magnifying glass and upward arrow (no text or symbols)③Setting Up
When setting up the product, pay attention not to pinch fingers between moving parts.
natural_image
Line drawing of a desktop desk lamp with a hand touching its base, emitting a starburst effect (no text or symbols)④Cabling of the AC adapter
Do not wrap the power cable tightly around the AC adapter. By doing so may cause cable disconnection.

natural_image
Illustration of a coiled electrical component with a starburst effect (no text or symbols)TABLE OF CONTENTS
■ IMPORTANT SAFEGUARDS....2
BEFORE YOU USE....6
HANDLING PRECAUTIONS 8
TABLE OF CONTENTS 9
① PREPARATION....11
◆PACKAGE CONTENTS 11
② BASIC OPERATIONS....12
②-1 ABOUT THE DOCUMENT CAMERA 12
◆PART NAMES....12
◆OPERATING PANEL 13
◆ REAR PANEL 14
◆SIDE PANEL 15
♦MOVING PARTS OF THE DOCUMENT CAMERA 15
◆SETTING UP 16
◆FOLDING THE DOCUMENT CAMERA....16
②-2 SUPPLIED ACCESSORIES 17
◆REMOTE CONTROL 17
◆WHITEBOARD SHEET....18
◆CAUTION STICKER 18
②-3 SHOOTING IMAGES....20
◆CONNECTING TO A PROJECTOR OR MONITOR 20
◆DETAILS ABOUT FUNCTIONS 32
③ ADVANCED OPERATIONS 34
③-1 USING SD CARD/USB FLASH DRIVE 34
◆RECORDING....35
◆DISPLAYING RECORDED FILES 37
③-2 ABOUT RS-232C 42
◆CONNECTION VIA RS-232C 42
③-3 ABOUT NETWORK FUNCTION (FOR PX-30E ONLY) 44
③-4 FIRMWARE UPDATE PROCEDURE 44
3-5 ABOUT EIT(ELMO INTERACTIVE TOOLBOX) 45
③-6 ABOUT SECURITY SLOT 45
③-7 USING AUTO LOCK 45
③-8 USING WOL [WAKE ON LAN] FEATURE (FOR PX-30E ONLY) 46
③-9 USING IN MASS STORAGE MODE 46
③-10 Using the MF mode 47
③-11 Using the AV control mode (for PX-30E only) 47
④ ERROR MESSAGES 49
⑤ TROUBLE SHOOTING....50
⑥ SPECIFICATIONS 53
■TRADEMARKS AND LICENSES 55
MAIN FEATURES
★High-Definition 4K Image
With the 12Mega pixels CMOS sensor, the PX-10E/30E can produce high-definition images with max 4K resolution.
※The PX-10E cannot output 4K images. The max output resolution is 2K.
★Natural, Smooth Image
The PX-10E/30E can output 2K images at 60fps.
High definition and smooth video images can be fully displayed without degrading the image quality
★Maximum excitement generated by state-of-the-art zoom – Optical zoom, Digital zoom, Sensor zoom
The PX-10E/30E are equipped with 12x Optical zoom and 2x Sensor zoom. 24x zooming without image degradation is possible.(Total 288x zooming together with 12x digital zoom.)
★Both A4 portrait image and A3 landscape image can be captured, respectively, in HDMI output mode
By changing the settings of the angle of view and resolution of the output image, you can capture full A4 portrait image and A3 landscape image respectively.
★Easy to store and carry
Thanks to its thin and lightweight design, the PX-10E/30E can be easily stored and carried.
★Possible to record HDMI input
The PX-10E/30E can record or capture HDMI signals being sent to the unit.
The HDMI signals being sent to the unit can be output as HDMI signals, RGB signals, and HDBasetT signals (for PX-30E only).
★ Extendable with HDBaseT (for PX-30E only)
Using the LAN cable, the PX-30E can transmit uncompressed 2K video signals up to 100m at high frame rate, without delay.(For 4K video signals, up to 70m.)
★HDMI1.4 compliant (4K)
The PX-10E/30E support HDMI1.4, which allows the transfer of 4K/2K video signals and the network connection in a single cable.
★USB3.0 compliant (4K)
The PX-10E/30E support USB3.0, which allows the high-speed data transfer of max.5Gbps (10 time faster than USB2.0). Suitable for the transmission of large volumes of data such as high resolution image data, audio data, and video data.
★Recording and playback of 4K videos (for PX-30E only)
It is possible to record or playback 4K videos.
★Possible to draw on the stage (can be used as a whiteboard)
By placing the supplied whiteboard sheet on the stage, you can draw directly on the sheet with a whiteboard marker and shoot it.
★Bright LED lighting
The small LED lighting of the PX-10E/30E is designed to reduce glare to a minimum by focusing light with lenses.
It delivers bright and even illumination to the entire stage.
① PREPARATION
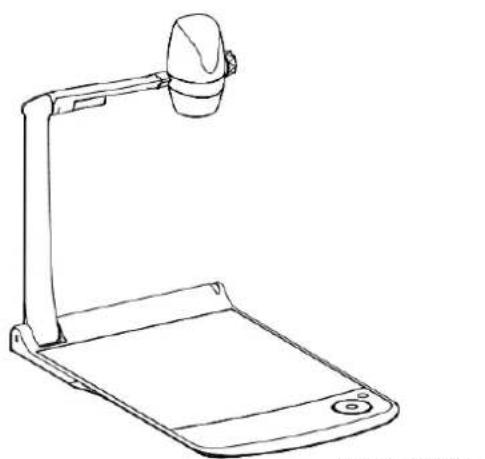
◆PACKAGE CONTENTS
The items below are included with this product. If any item is missing, contact the dealer from whom you purchased this product.
natural_image
Line drawing of a desktop computer with a head-mounted screen and tray (no text or symbols)Document Camera
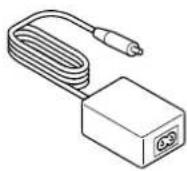
AC adapter
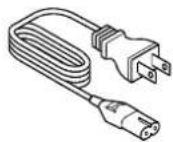
AC power cord
(The shape of the plug differs according to the region in which the product is sold.)
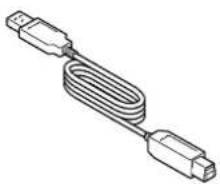
natural_image
Illustration of a USB cable with connector port (no text or symbols)USB3.0 cable (1.5m)

Lithium coin battery for remote control (CR2025)
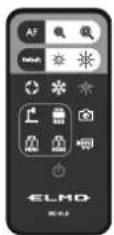
Remote control
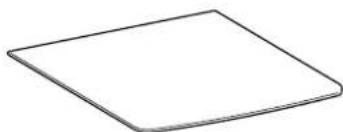
natural_image
Simple geometric shape: a tilted square with rounded edges (no text or symbols)Whiteboard sheet

Melamine sponge (For Whiteboard sheet)
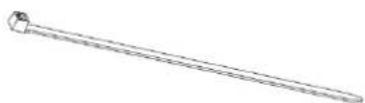
Cable tie ×3

Screw ×3
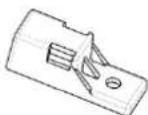
HDMI cable fixture ×3
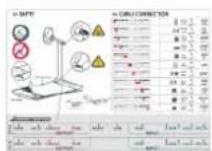
Caution sticker
Quick Start Guide
Warranty Card
(For Japan / North America only)
② BASIC OPERATIONS
②-1 ABOUT THE DOCUMENT CAMERA
PART NAMES
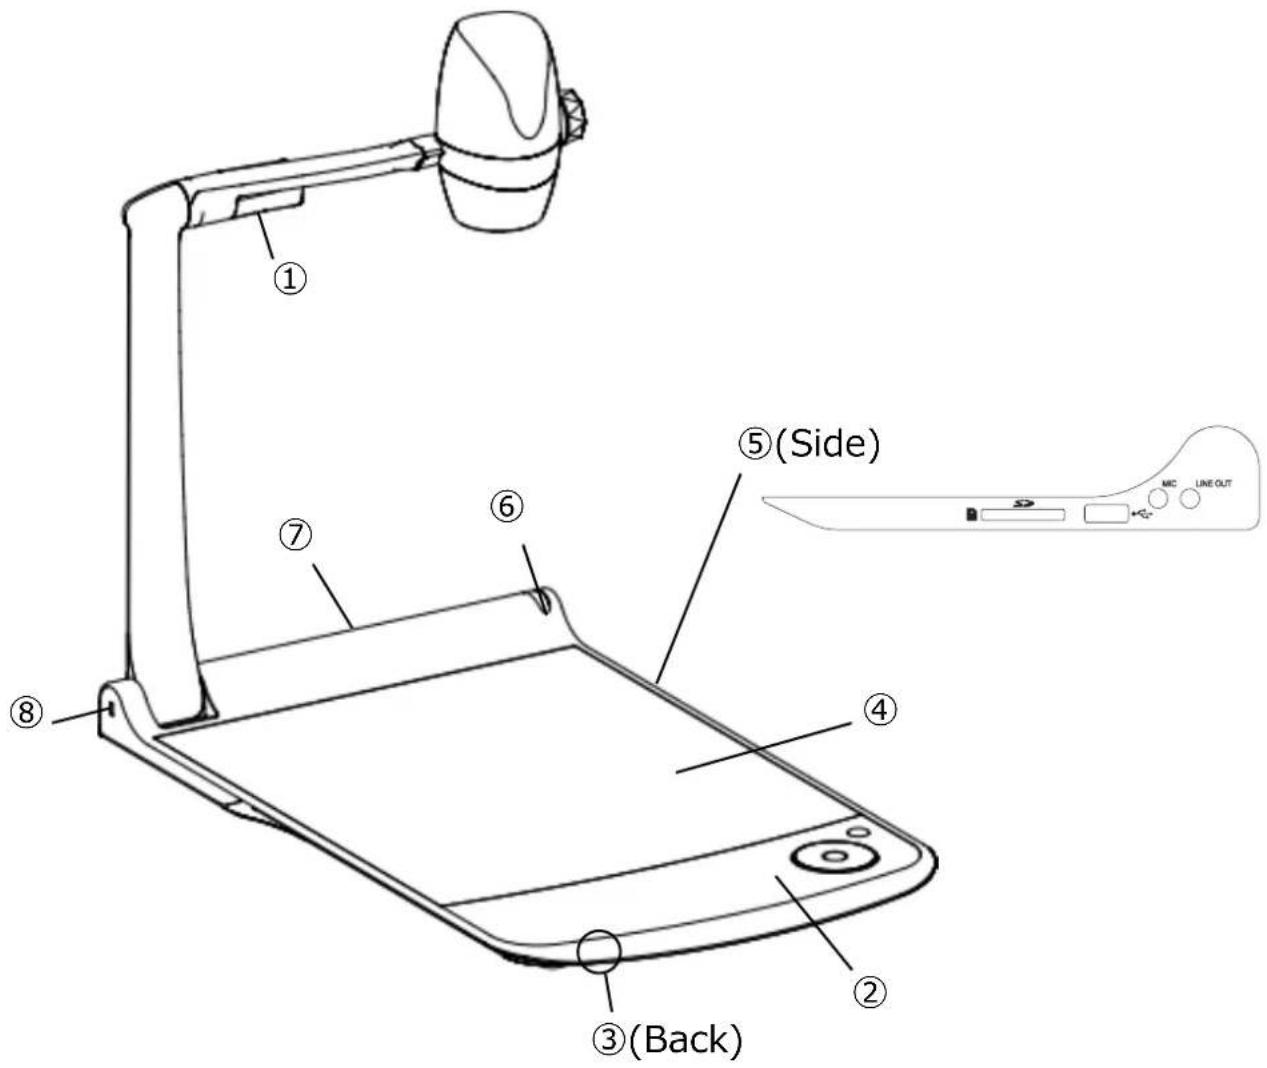
| Name | |
| 1 | LED lighting |
| 2 | Operating panel |
| 3 | Speaker |
| 4 | Stage |
| 5 | Side panel |
| 6 | IR receiver |
| 7 | Rear panel |
| 8 | Security slot |
◆OPERATING PANEL
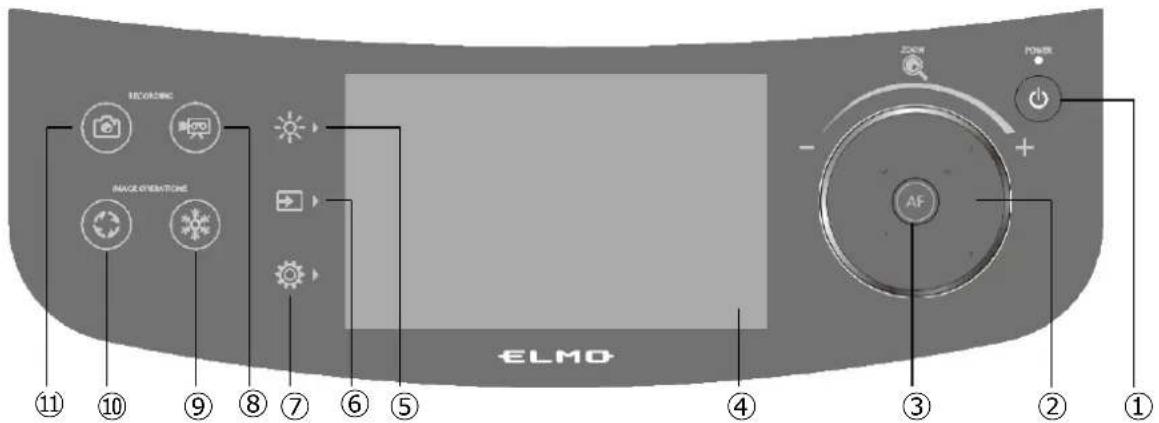
| Mark | Name | Function | |
| 1 |  | Power | To ON/OFF the power. (⇒P.21) |
| 2 |  | Zoom jog dial | Rotating counter clockwise: Zoom out.Rotating clockwise: Zoom in. (⇒P.21) |
| 3 |  | AF | The auto focus works once when the AF button is pressed. (⇒P.22) |
| 4 |  | LCD touchscreen | Images being output is displayed with the OSD menu for configuration of various settings. (⇒P.23)When displaying video, the focus is on the point you tapped. |
| 5 |  | Brightness | To display the menu for brightness settings. (⇒P.24) |
| Lighting | To ON/OFF the LED lighting. | ||
| Anti-reflection | To ON/OFF the anti-reflection function. | ||
| Iris | To adjust the brightness. Slide bar: 0~18 (Default value : 11) | ||
| Default | To initialize the brightness settings. | ||
| 6 |  | Select image | To display the Select image menu. (⇒P.26) |
| Camera | To display the camera image. | ||
| USB/SD | To display the USB/SD menu for displaying still images or playing video files. | ||
| HDMI - 1 | To display images being input to the HDMI in 1 port. | ||
| HDMI - 2 | To display images being input to the HDMI in 2 port. | ||
| RGB | To display images being input to the RGB in port. | ||
| 7 |  | Settings | To display the menu for configuration of various settings. (⇒P.27) |
| System | To display the menu for configuration of the system. | ||
| Image Quality | To display the menu for configuration of the camera image. | ||
| Network | To display the menu for configuration of the network function. | ||
| Product Information | To display the information of the version and license of the camera. | ||
| 8 |  | Recording | To start and stop recording. (⇒P.36) |
| 9 |  | Freeze | To pause and restart the camera image. (⇒P.32) |
| 10 |  | Image rotation | To rotate the camera image. (0°/90°/180°/270°)※In the System Setting menu, the rotation angle can be selected between 90°and 180°. (⇒P.29) |
| 11 |  | Capture | To save the currently displayed image as a still image. (⇒P.35) |
※An operation sound is heard when the operating panel is pressed down.
The operation sound can be adjusted in the Op. sound vol. setting. (⇒P.28)
CAUTION
The touchscreen is made of glass. Pay attention to the followings to avoid glass breakage and injury.
- Do not rub or press the touchscreen with a sharp object such as a knife.
- Do not press the touchscreen strongly by finger or do not apply weight to the touchscreen.
- Do not rub the touchscreen with a hard object.
- Do not hit the touchscreen with a hard object or do not drop it onto the touchscreen.
- Do not put an object on the touchscreen.
- Gently wipe the surface with a soft cloth to remove dirt.
Pay attention to the followings in order to maintain the performance of the touchscreen.
- Do not stick adhesive tape on the touchscreen.
- A protective sheet is attached to the surface of the touchscreen to avoid scratches during transportation. Remove the sheet gently before use.
◆REAR PANEL
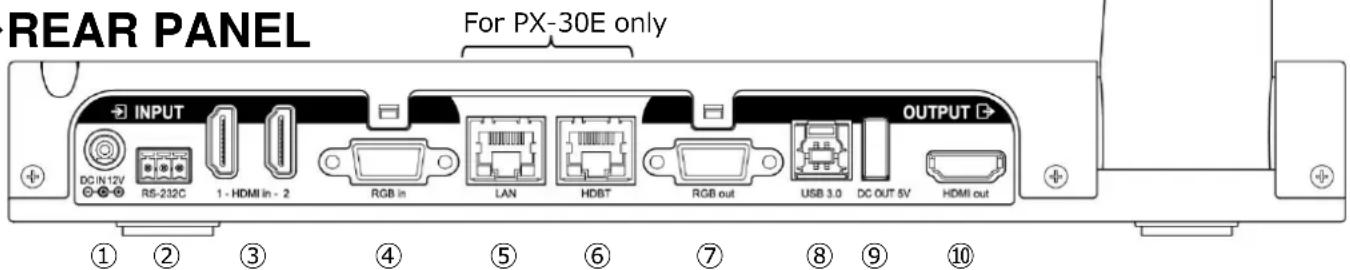
| Name | Function | ||
| Input | 1 | DC IN 12V | To connect the DC plug of the supplied AC adapter. (DC12V) |
| 2 | RS-232C | To connect the RS-232C cable (commercially available) to control the PX-10E/30 from a PC. | |
| 3 | HDMI in 1 | To connect the HDMI cable (commercially available) to input HDMI images and audio. [HDMI TYPE-A] | |
| HDMI in 2 | |||
| 4 | RGB in | To connect the RGB cable (commercially available) to input analog RGB images. [mini DSUB15pin] | |
| Output | 5 | LAN (for PX-30E only) | To connect the LAN cable (commercially available) to control the PX-10E /30E from a PC or transfer images over the network. [RJ45] |
| 6 | HDBaseT (for PX-30E only) | To connect the LAN cable (commercially available) to connect the PX-30E and a device which has the HDBaseT port. [RJ45] ※1 | |
| 7 | RGB out | To output RGB images. [mini DSUB15pin] | |
| 8 | USB3.0B | To connect the USB cable compliant to USB3.0 (super speed USB) to connect the PX-10E/30E and a device which supports USB3.0. [USB Standard-B (USB device)]※ USB 2.0 cable can also be connected. | |
| 9 | DC OUT 5V | To supply power to other devices. Use this port for connecting a WHDI dongle or charging a tablet. [USB TYPE-A (USB power supply)] ※2 | |
| 10 | HDMI out | To output HDMI images and audio. [HDMI TYPE-A (HDMI1.4 compliant)] |
※1 The maximum transmit distance for 4K video signals at 30fps will be 70m when using the cat 5e LAN cable.
The maximum transmit distance for video signals of less than 1080 resolution will be 100m when using the cat 5e LAN cable.
The maximum transmit distance for 4K video signals at 30fps will be 100m when using the cat 6a (or higher) LAN cable.
※2 The maximum current available from the ⑨[DC OUT 5V] port in the rear panel and the ②[USB2.0] port in the side panel is 1.2[A] in total.
SIDE PANEL
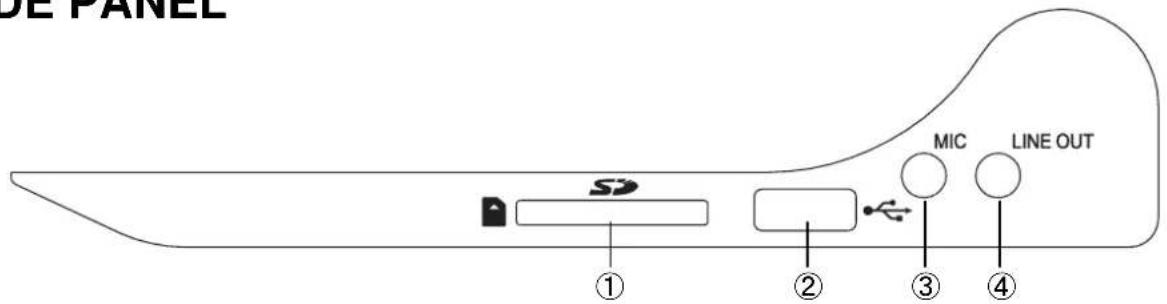
| Name | Function | |
| 1 | SD | To insert an SD card (commercially available).Push the card again to remove the SD card. |
| 2 | USB2.0A | To connect a USB flash drive (commercially available).[USB TYPE-A (USB host)] |
| 3 | MIC | To connect a microphone. [Φ3.5mm jack (monaural)]※Plug-in power type electret condenser microphone supported. |
| 4 | LINE OUT | To output audio line. (The audio cable is not supplied and should be purchased separately.) [Φ3.5mm jack (stereo)] |
CAUTION
Connecting a microphone other than an electret condenser microphone (a microphone for a computer) may cause malfunction.
◆MOVING PARTS OF THE DOCUMENT CAMERA
The PX-10E/30E can be moved as shown below.
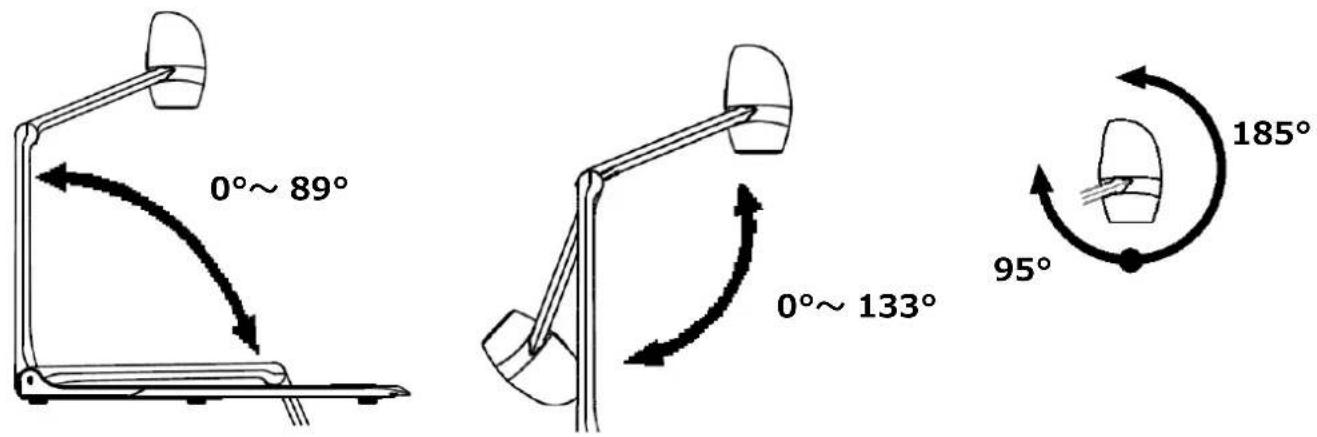
◆SETTING UP
Place the PX-10E/30E on an even, flat surface. Then set up the PX-10E/30E as shown in the figures below.
STEP1
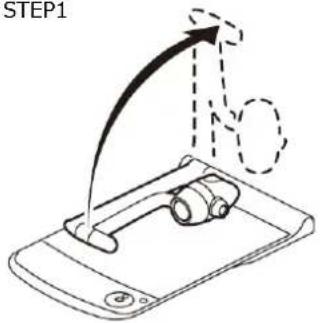
STEP2
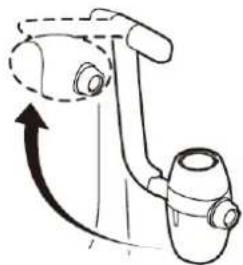
natural_image
Diagram of a robotic arm with motion arrows indicating movement (no text or symbols)STEP3
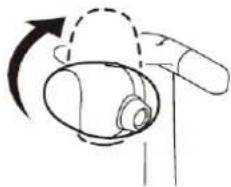
natural_image
Diagram of a hand holding a device with an arrow indicating rotation (no text or symbols)STEP4
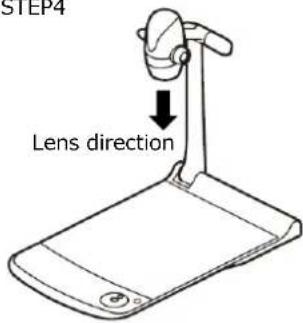
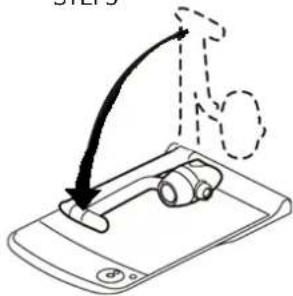
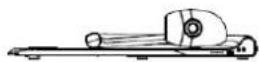
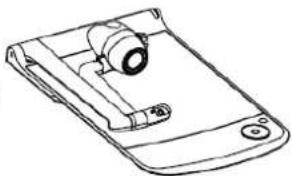
◆FOLDING THE DOCUMENT CAMERA
After using the PX-10E/30E, fold it as shown in the figures below.
STEP1
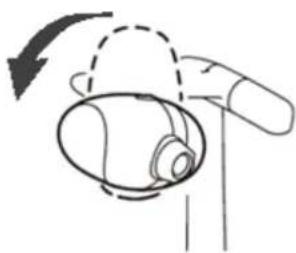
natural_image
Simple line drawing of a hand holding an object with motion arrows indicating movement (no text or symbols)STEP2
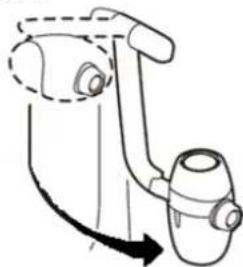
natural_image
Line drawing of a mechanical device with a curved arrow indicating motion (no text or symbols)STEP3
natural_image
Line drawing of a handheld electronic device with a circular lens and scroll (no text or symbols)CAUTION
- Be careful not to pinch your fingers when moving the arm or camera head during setup.
- Be careful not to damage the lens when folding the camera arm.
- Rotate the camera head by 64^ and rotate the camera arm before folding it. Otherwise, the camera head may hit the stage and damage the lens.
- When folding the camera arm, do not press the camera head.
②-2 SUPPLIED ACCESSORIES
◆REMOTE CONTROL
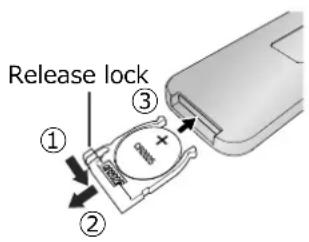
PREPARATION OF THE REMOTE CONTROL
Remove the battery case by squeezing the release lock.
Insert the coin battery into the battery case, so you see the positive (+) side facing up.
Then insert the battery case into the remote control.
WARNING
Children may ingest small batteries; always keep batteries safe and out of reach.
If a battery is swallowed, consult a doctor immediately as this could result in asphyxiation or be an obstacle to digestion, etc.
RECEIVING IR FROM THE REMOTE CONTROL
Point the IR transmitter of the remote control to the IR receiver of the PX-10E/30E, and press the desired button. ( P.12)
Receivable range: within approx. 5m
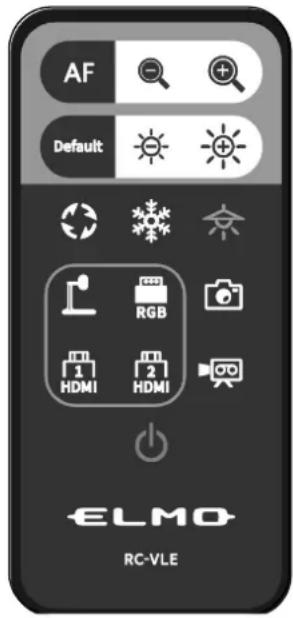
| Button | Name/Function | Button | Name/Function |
 | AF | LED lighting | |
| To focus automatically. | To ON/OFF the LED lighting. | ||
 | Zoom out | Camera | |
| To shrink the camera image. | To display the camera image. | ||
 | Zoom in | RGB in | |
| To enlarge the camera image. | To display images being input to the RGB in port. | ||
 | Default | HDMI in 1 | |
| To initialize the brightness settings. | To display images being input to the HDMI in 1 port. | ||
 | Brightness DOWN | HDMI in 2 | |
| To darken the camera image. | To display images being input to the HDMI in 2 port. | ||
 | Brightness UP | Capture | |
| To brighten the camera image. | To save the currently displayed image as a still image. | ||
 | Image rotation | Recording | |
| To rotate the camera image.※1 | To start and stop recording. | ||
 | Freeze | Power | |
| To pause and restart the camera image. | To ON/OFF the power. |
※1 In the System Setting menu, the rotation angle can be selected between 90° and 180°. (⇒P.29)
◆WHITEBOARD SHEET
By placing the supplied whiteboard sheet on the stage, you can draw directly on the sheet with a whiteboard marker. As the camera can shoot the annotation made on the whiteboard sheet, you can use the whiteboard sheet like a normal whiteboard.
It may be difficult to erase writings or drawings on the surface with a whiteboard eraser. We recommend you to use the supplied melamine sponge.
The melamine sponge is consumable. When the supplied melamine sponge needs to be replaced, purchase a commercially available melamine sponge.
Be sure to strictly observe the precautions provided when using the stage of the PX-10E/30E as a writing board.
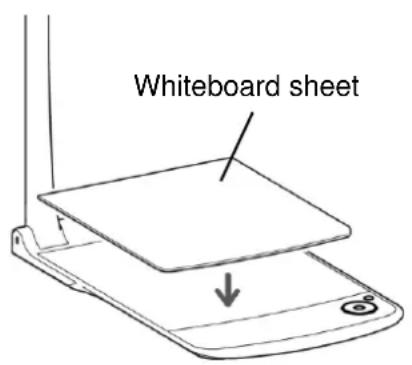
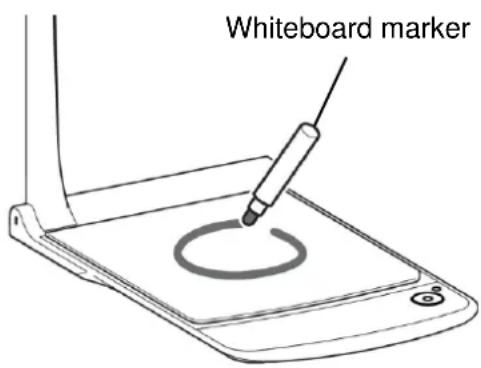
CAUTION
- When drawing, always use a whiteboard sheet. If you draw directly on the stage, you may not be able to erase it. It is recommended to attach the supplied caution sticker to the PX-10E/30E. ( P.19)
- Use a proper whiteboard marker. If you use a permanent marker on the board, you may not be able to erase it. It is recommended to attach the supplied caution sticker to the unit. (⇒P.19)
- Do not leave the whiteboard sheet under strong sun light or within humid condition or near a heater as it may change the shape or color.
- Do not leave drawings on the writing surface for an extended period of time. It may stick to the surface and will be difficult to erase.
- When stains cannot be removed by wiping with a dry cloth, wipe with a soft cloth with diluted neutral detergent. Then wipe off the water and remaining detergent with a dry cloth.
◆CAUTION STICKER
A caution sticker which contains the folding instructions of the camera arm and other precautions is supplied with the PX-10E/30E. Follow the instructions when using the PX-10E/30E.
Attach the sticker to the unit as indicated in the sticker.
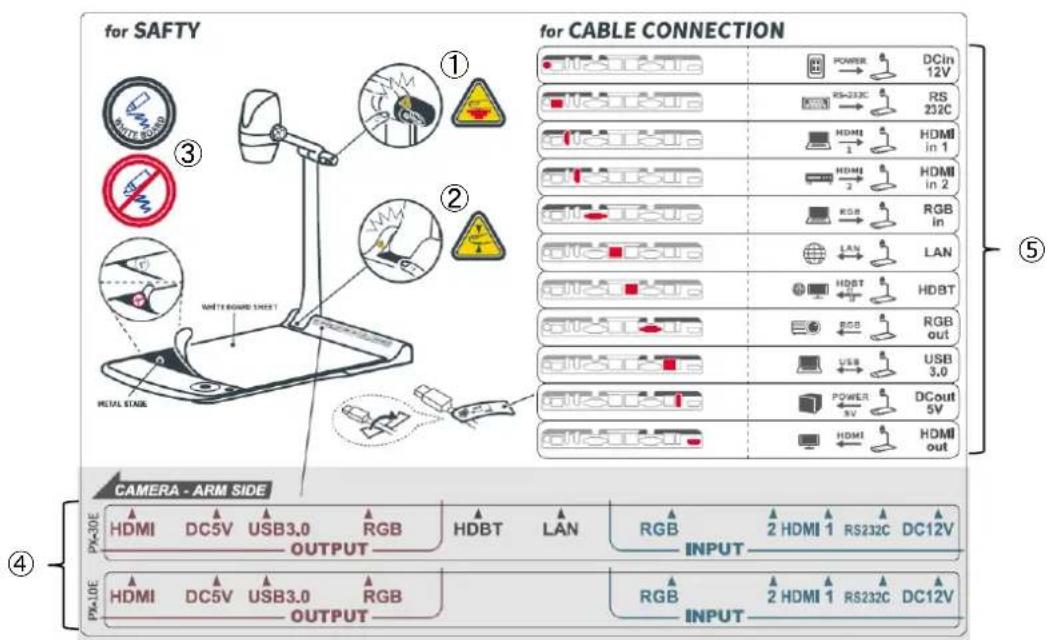
① The LED lighting may get hot during use. Do not touch the LED lighting directly when it is on or right after it is turned on.
② Be careful not to pinch your fingers when folding the PX-10E/30E.
③ Make sure to draw on a whiteboard sheet. If you draw directly on the stage, you may not be able to erase it.
④ Attach to the product according to the position of the ports in the back panel.
⑤ Attach to the cable according to the name of the port to be connected.
②-3 SHOOTING IMAGES
◆CONNECTING TO A PROJECTOR OR MONITOR
Connect the PX-10E/30E to a projector or monitor with the HDMI cable (commercially available) or the RGB cable (commercially available). Then connect the supplied AC power cord to the AC adapter.
Connect the AC adapter to the unit and connect the AC power cord to the wall outlet. The LED of the Power button lights up red.
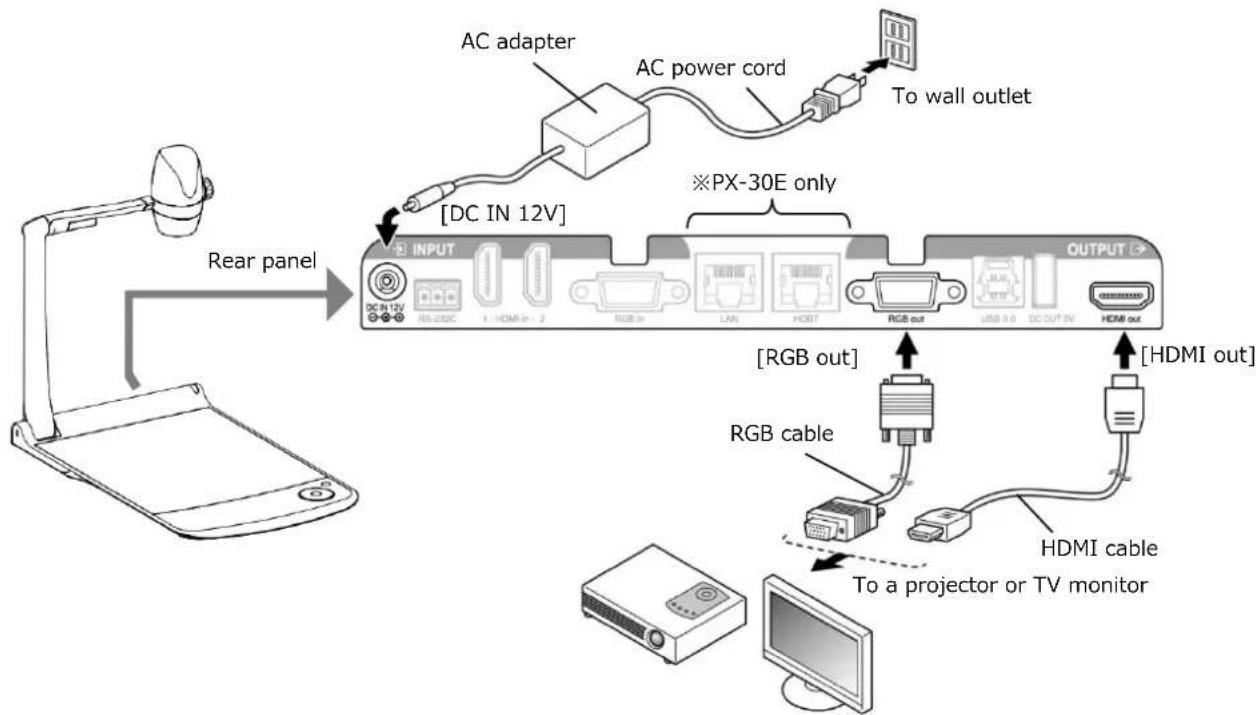
flowchart
graph TD
    A["Monitor"] -->|Rear panel| B["PC Monitor"]
    B --> C["AC adapter"]
    C --> D["AC power cord"]
    D --> E["To wall outlet"]
    B --> F["[DC IN 12V"]]
    F --> G["×PX-30E only"]
    G --> H["OUTPUT"]
    H --> I["[HDMI out"]]
    I --> J["HDMI cable"]
    J --> K["To a projector or TV monitor"]
    B --> L["[RGB out"]]
    L --> M["RGB cable"]
    M --> N["Output"]
CAUTION
Before connecting the unit to other devices, be sure to turn off the power of all the devices. If the image is not displayed correctly after the resolution setting is set to Auto, change the resolution setting according to the connected device. ( P.27)
NOTE
- Zoom ratio: Optical zoom 12x + Sensor zoom 2x, Digital zoom 12x (Total 288x zooming) ※Sensor zoom 2X can be set only when FHD output is used.
- When the optical zoom reaches 12x, it automatically shifts to the sensor zoom. When the sensor zoom reaches 2x, it automatically shifts to the digital zoom.
- Within the digital zoom range, the image quality is degraded.
- ON/OFF of the digital zoom can be set in the System Setting menu. (⇒P.30)
- When the digital zoom is set to OFF, only the optical zoom is available. (The sensor zoom is not available.)
- Press the Power button [ ⏻ ] on the operating panel or the Power button [ ⏻ ] on the remote control to turn on the power.
The color of the LED of the Power button [ ⏻ ] on the operating panel changes from red to blue. (During start up: flashes blue)
- Press the Power button [ ⏻ ] on the operating panel or the Power button [ ⏻ ] on the remote control to turn off the power.
Press longer for the Power button on the operating panel.
The color of the LED of the Power button [ ⏻ ] on the operating panel changes to red.
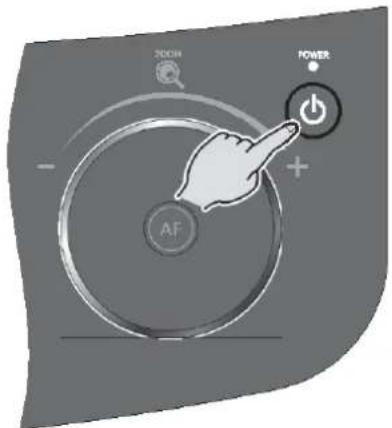
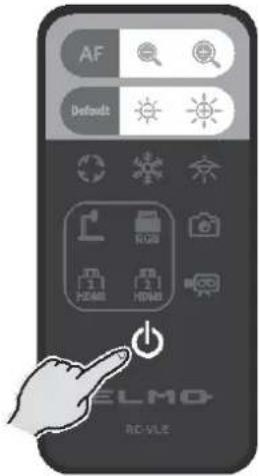
Power OFF (LED turns red)
↓↑
Power ON (LED turns blue)

CAUTION
Do not operate the PX-10E/30E while the LED is flashing.
◆ADJUSTING THE SIZE
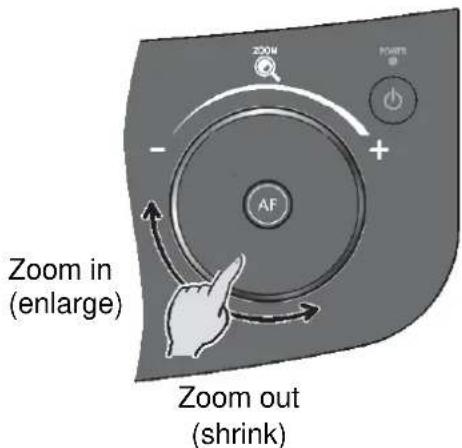
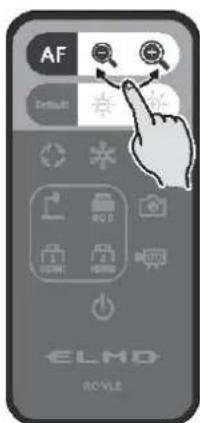
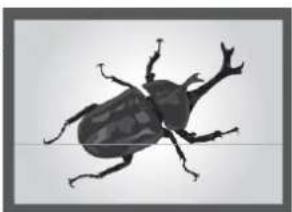
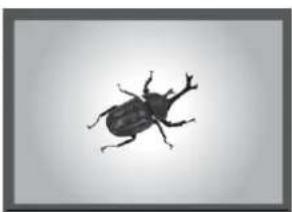
The size of the image displayed can be adjusted by rotating the zoom jog dial on the operating panel or by pressing the zoom buttons [ + / - ] on the remote control.
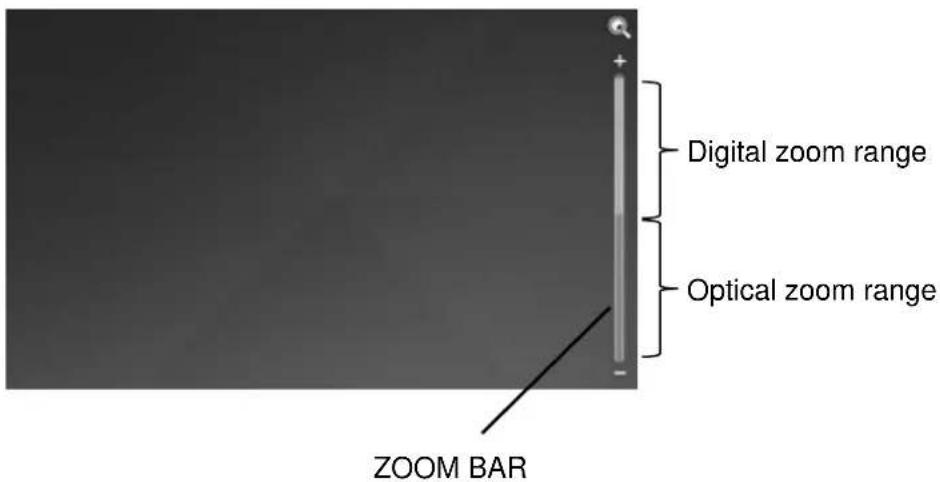
※A zoom bar indicating the zoom position appears on the LCD touchscreen during zoom operation. (Touch operation is disabled during zoom operation.)
Zoom in : To enlarge the subject.
Rotate the Zoom jog dial clockwise or press the [+] button on the remote control or rotate the Zoom head dial in the direction of ZOOM-IN.
Zoom out : To shrink the subject.
Rotate the Zoom jog dial counterclockwise or press the [ ] button on the remote control or rotate the Zoom head dial in the direction of ZOOM-OUT.
natural_image
Silhouette of a beetle with visible legs and antennae (no text or symbols)[NO TEXT]
natural_image
Silhouette of a beetle (no text or symbols visible)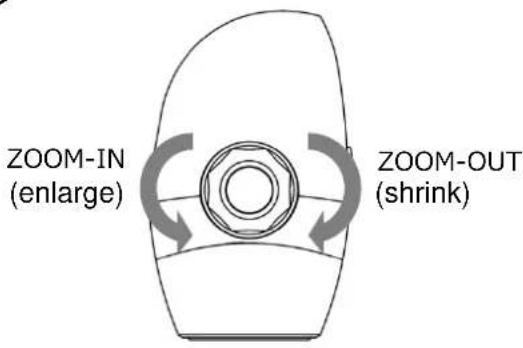
A zoom bar indicating the zoom position appears on the LCD touchscreen during zoom operation. The upper part indicates the digital zoom range and the lower part indicates the optical zoom range.
※The zoom bar appears only on the LCD touchscreen of the PX-10E/30E.
◆ AF (AUTO FOCUS)
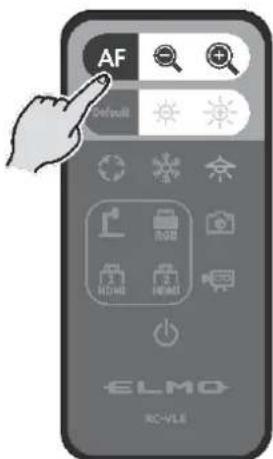
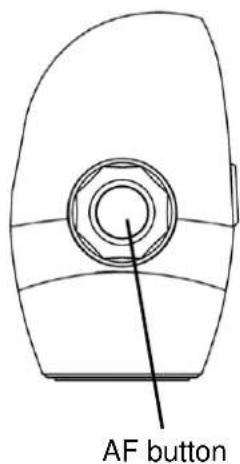
The AF (Auto Focus) works once when the AF button [AF] on the Operating panel or AF button [AF] on the remote control or AF button in the Zoom head dial is pressed. The AF icon appears on the LCD touchscreen AF operation.

◆USING THE LCD TOUCHSCREEN
The PX-10E/30E can be controlled using the LCD touchscreen.

STARTUP SCREEN
When the PX-10E/30E is started, the startup screen appears on the LCD touchscreen, and then the camera image appears.
HOW TO USE THE LCD TOUCHSCREEN
①Tap
By tapping an icon on the LCD touchscreen, you can select a function and operate. The color of the touched icon changes.
②Drag
By sliding your finger across the LCD touchscreen surface while touching the item, you can operate it. When the Presentation function (Mask) is in use, you can move the area.
③Flick
By quickly moving your finger or flicking on the LCD touchscreen, you can move pages or files.
④Slide
Horizontal bar: You can change the setting value by sliding the bar left and right while touching the icon of the current setting value.
Vertical bar: You can change the setting value by sliding the bar up and down while touching the icon of the current setting value.
CAUTION
- A protective sheet is attached to the surface of the LCD touchscreen to avoid scratches during transportation. Remove the sheet gently before use.
- Do not press the LCD touchscreen strongly by finger or sharp objects. This can cause damage or malfunction.
- Do not put a thing on the LCD touchscreen.
- The LCD touchscreen may not work properly if you operate it with a wet finger or with two fingers.
- Do not use the product near equipment that generates electrical noise. This can cause malfunction.
Press the Brightness button [ ✉ ] on the operating panel to display the menu for brightness adjustment. The image brightness can be adjusted by sliding the bar to the right or left, or by using the [ ✉ / ✉ ] buttons on the remote control. Press the Default button [ ✉ ] on the operating panel or the Default button [ Default ] on the remote control to initialize the brightness settings.
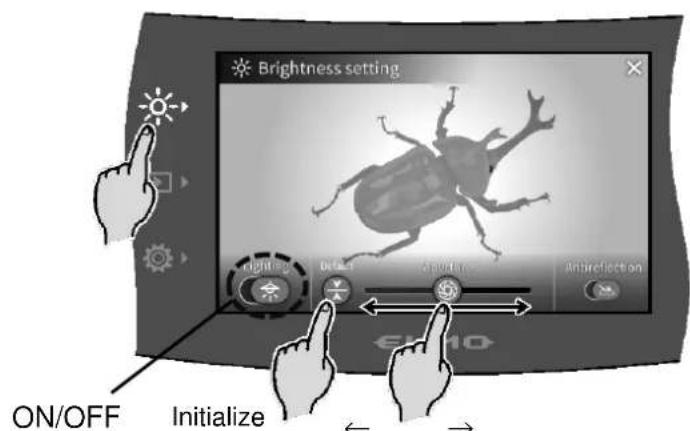
ON/OFF
the LED
lighting
Darken Brighten
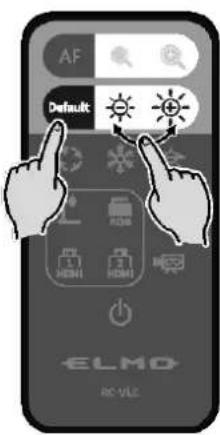
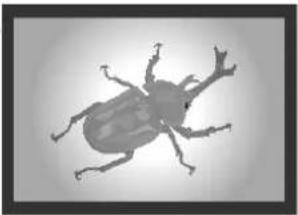
natural_image
Silhouette of a beetle with visible legs and antennae (no text or symbols)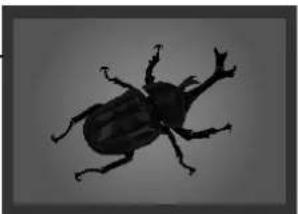
natural_image
Silhouette of a beetle with visible legs and antennae (no text or symbols)| Icon | Name | Function | |
| LCD touchscreen | Remote control | ||
 |  | Lighting | To ON/OFF the LED lighting.OFF ← → ON |
 | - | Iris (brightness) | To adjust the iris with a slide bar to change the brightness.Iris close (dark) ← → Iris open (bright) |
| - |  | Brightness | To change the brightness of the camera image. |
 |  | Default | To initialize the brightness settings. |
 | - | Anti-reflection | To ON/OFF the anti-reflection function.(Reduce light reflection)OFF : Disable ← → ON : Enable |
 | - | Return | To return to the camera image. |
NOTE
- In places where the subject is exposed to bright sunlight (e.g. near a window), or extremely bright lights, the brightness of the screen may not dim sufficiently, even when the iris is closed from the touchscreen or the [icon] button on the remote control is pressed.
In such cases, to adjust the amount of light, close the curtains or move the subject away from the light.
- The brightness adjustment is not possible when the external input is selected in the input selection menu.
◆ TURNING ON/OFF THE LED LIGHTING
Press the Brightness button [ ] on the operating panel to display the brightness settings menu, and press the lighting icon [ ] to turn on the LED lighting.
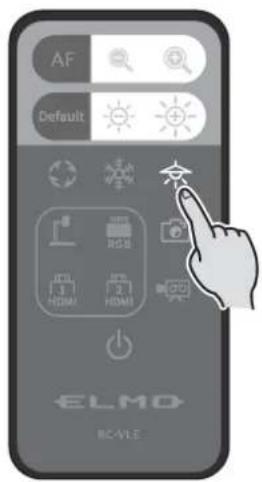
ON/OFF the LED lighting can also be performed from the remote control by pressing the LED lighting button [ ].
The LED lighting can be rotated by 90°. Adjust the angle according to the subject.
Use the anti-reflection function when there is too much reflection of the light. (⇒P.24)
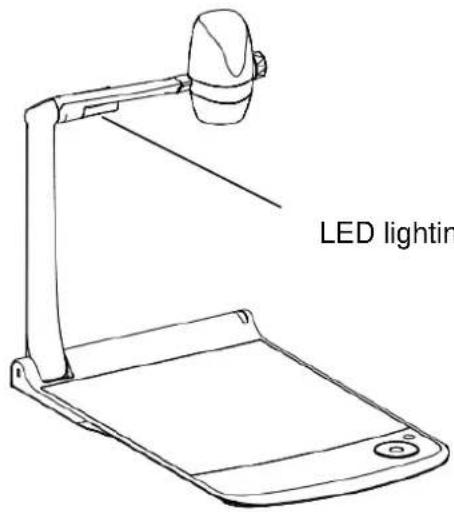
LED lighting (possible to rotate by 90°)
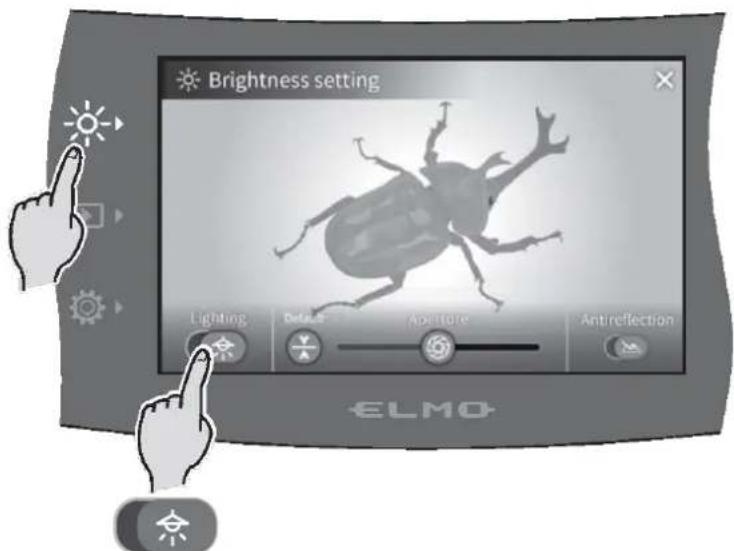
←OFF ON→
CAUTION
- When you take a picture of a person, turn off the LED lighting.
- The PX-10E/30E is equipped with high-brightness LED. You can safely use it to light up subjects.
Make sure that the light from the LED does not shine directly into your eyes. - The brightness of the LED will gradually diminish with long-term use. This is not a malfunction of the LED lighting, but a characteristic of the LED.
◆SELECTING THE IMAGE SOURCE
Press the Select image button [→] on the operating panel to display the Select image menu. The image of the selected device is displayed on the LCD touchscreen and external monitor. The input selection can also be performed from the remote control using the input source select buttons. (⇒P.17)
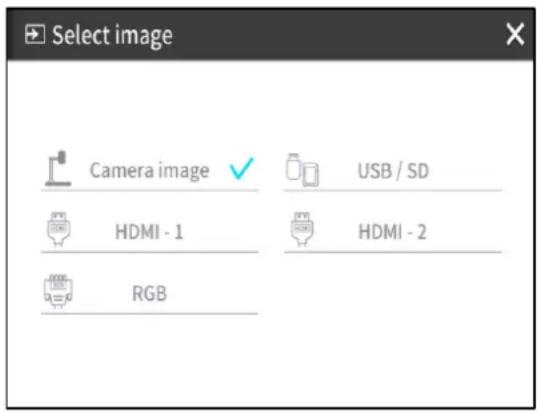
| Menu | Function | Pages |
| Camera image | To display the camera image. | - |
| USB / SD | To display the USB/SD menu for displaying still image or playing video files. | ⇒P.26 |
| HDMI - 1 | To display images being input to the HDMI in 1 port. | ⇒P.14 |
| HDMI - 2 | To display images being input to the HDMI in 2 port. | ⇒P.14 |
| RGB | To display images being input to the RGB in port. | ⇒P.14 |
Press [X] button to go back to the screen being displayed previously.
※When RGB is selected, the image being input is not displayed on the LCD touchscreen.
※When HDMI 1 or HDMI 2 is selected, the signals being sent to the unit can be output as USB signals, HDMI signals, RGB signals, and HDBasetT signals (for PX-30E only), and can be recorded or captured.
NOTE
- When using a PC with output mode selection feature, setup according to the following instruction:
- Connect a PC to the PX-10E/30E.
- Set the output mode of the PC to "EXTERNAL OUTPUT".
- Press the Select image button and select either "HDMI-1", "HDMI-2", or "RGB".
- Do not change the resolution of the image being input while selecting the external input.
- No image will be displayed when HDCP signals are input.
USB/SD menu
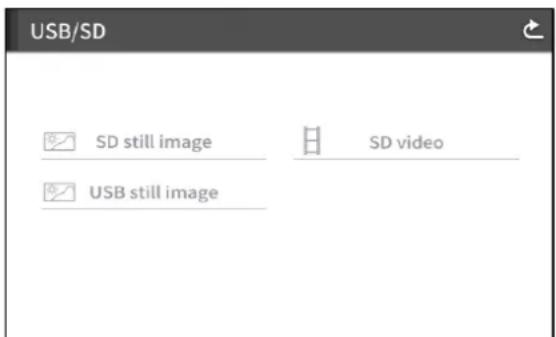
| Menu | Function |
| SD still image | To display the menu to playback still image saved in the SD card. |
| SD video | To display the menu to play videos saved in the SD card. |
| USB still image | To display the menu to playback still image saved in the USB flash drive. |
②-4 CONFIGURING THE SETTINGS
Each setting of the PX-10E/30E can be configured through the menu (texts or icons) displayed on the screen.
◆HOW TO CONFIGURE THE SETTINGS
Press the Settings button [💡] on the operating panel.
The settings menu appears. "System Setting", "Image Quality Setting",
"Network Settings", and "Product Information" can be selected from the menu.
[✓ : Default setting (default value)]
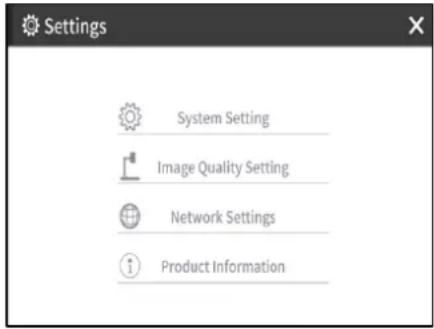
| Menu | Function | Pages |
| System Setting | To display the menu for configuration of the system. | ⇒P.27 |
| Image Quality Setting | To display the menu for configuration of the camera image. | ⇒P.30 |
| Network Settings | To display the menu for configuration of the network function.(For PX-30E only) | ⇒P.31 |
| Product Information | To display the information of the version and license of the camera. | ⇒P.31 |
System Setting (1/5 page)
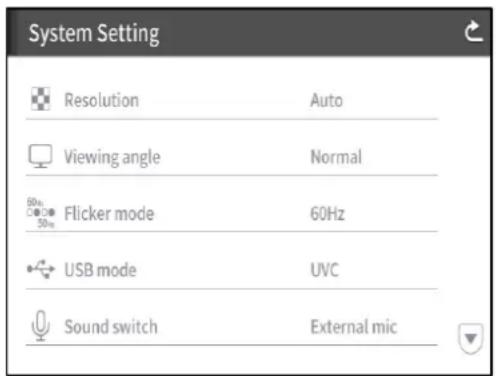
| Name | Selection item | Function |
| Resolution | Auto√ | To set the resolution of the output image.※The PX-10E does not support UHD(3840 x 2160). |
| UHD(3840 x 2160) | ||
| FHD(1920 x 1080) | ||
| HD(1280 x 720) | ||
| UXGA(1600 x 1200) | ||
| XGA(1024 x 768) | ||
| Vlewing angle ※1 | Normal (16:9)√ | To set the viewing angle of the output image. |
| Full (4:3) | ||
| Flicker mode | 50Hz | When there is flickering in the image due to the fluorescent light, set to the same value as the power supply frequency of the location where the PX-10E/30E is used.50Hz: Europe60Hz: Japan/USA |
| 60Hz√ | ||
| OFF | ||
| ND Filter | Select this item when there is halation due to flickering.(For example, when shooting outside or when the surrounding environment is too bright.)Flickering may be reduced. | |
| USB mode | To configure actions when the PX-10E/30E is connected to a PC through the USB3.0 port. | |
| UVC √ | To control the PX-10E/30E from a PC. | |
| Mass storage | To transfer the data from the SD card to a PC. | |
| Sound switch | To select the source of the audio input. | |
| External mic√ | To set the audio source to external microphone. | |
| HDMI sound | To set the audio source to HDMI in. | |
| Sound OFF | To mute the audio. | |
※1 For details about the video output, refer to ⑥ Specifications. (⇒P.53)
(2/5 page)
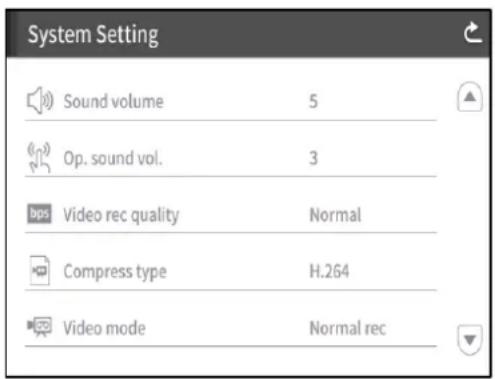
| Sound volume | 0~10(Default value: 5) | To configure the HDMI sound volume and the external microphone volume. |
| Op.sound vol. | 0~5(Default value: 3) | To configure the speaker volume. |
| Video rec quality | Excellent Quality / High Quality/ Normal✓ / Economy / Fast Economy | To configure the recording bitrate.※When Excellent Quality or High Quality is selected, the recording time becomes shorter. |
| Compress type | To select the video compression method. ※1 | |
| H.264✓ | To set the video compression method to H.264. | |
| HEVC | To set the video compression method to H.265. | |
| Video mode | Normal rec✓ | To continuously record the video. |
| Time-lapse rec (⇒P.33) | To create a video by combining multiple photos taken at certain intervals.The recording interval can be configured from “Time-lapse”. | |
※1 HEVC(H.265) can achieve image quality equivalent to that of H.264 at half bit rate and half data size. However, it may take longer to process data due to its high compression ratio.
(3/5 page)
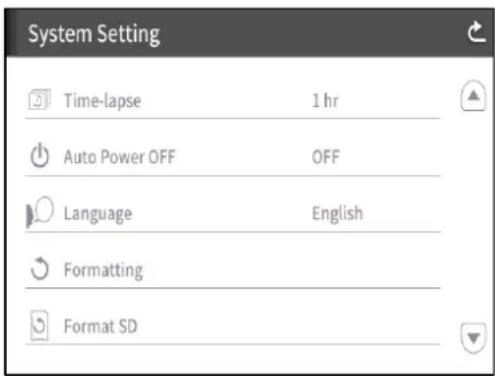
| Time-lapse | 1min / 10min / 30min / 1hr✓ / 3hrs / 6hrs | To create a 1 second video by combining 30 photos taken at set intervals.(⇒P.33) |
| Auto Power OFF | OFF✓ / 30min / 1hr / 2hrs / 3hrs | To automatically turn off the power after no operation for a specific period of time. |
| Language | 日本語 / English✓ / Deutsch /Frencais /العربية | To set the language of the OSD menu. |
| Formatting | YES / NO | To initialize all the settings. |
| Format SD | YES / NO | To perform a quick format of the SD card. |
(4/5 page)
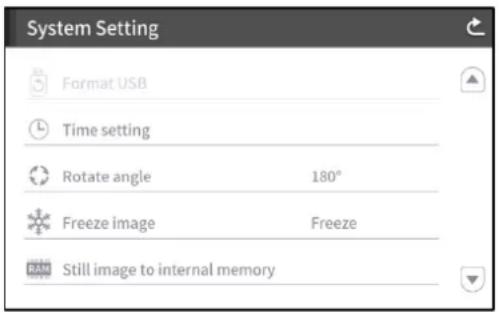
| Format USB | YES / NO | To perform a quick format of the USB flash drive. |
| Time setting | YEAR / MONTH / DAY / HOUR / MINIUTES / SECOND | To configure the time setting of the PX-10E/30E.Touch the desired item and configure by using the up and down cursors. |
| Rotate angle | 90° / 180°√ | To set the rotation angle of the image. |
| Freeze image | Move / Freeze √ | To set whether to freeze the image on the LCD touchscreen when Freeze function is activated.※When this setting is set to Move, the image on the LCD touchscreen does not freeze when Freeze function is activated. |
| Still image to internal memory | Save / Play | To record a still image to the internal memory.Tap “Save” to save. |
(5/5 page)
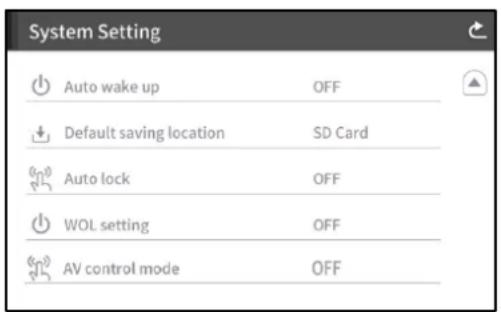
| Auto wake up | ON / OFF√ | When this setting is set to ON, the PX-10E/30E automatically starts up after the AC power is supplied. |
| Default saving location | SD Card√ / USB Memory Stick | To set the primary destination for saving still image or videos. |
| Auto lock | ON / OFF√ | To disable the functions of buttons on the operating panel or the LCD touchscreen. (⇒P.45) |
| WOL setting (for PX-30E only) | ON / OFF√ | To turn on the PX-30E remotely from a PC via the LAN cable. (⇒P.46) |
| AV control mode (for PX-30E only) | ON / OFF√ | By connecting the HDBaseT cable, you can control a projector easily. (⇒P.47) |
NOTE
- Some versions do not have the Time setting function.
Image Quality Setting
(1/2 page)
(2/2 page)
| Name | Selection item | Function |
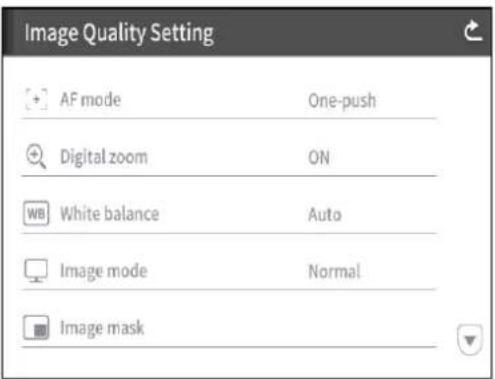
| AF mode | Zoom sync | To perform auto focus only once after zooming. |
| One-push√ | To perform auto focus only once when [ AF ] on the operating panel or [ AF ] on the remote control is pressed. | |
| Digital zoom | ON √ | To enable the digital zoom. |
| OFF | To disable the digital zoom. | |
| White balance | Auto √ | To always adjust the white balance automatically. The white balance is adjusted automatically to ensure a more natural color according to the characteristics of the object. |
| One-push | To automatically adjust the white balance only once when this setting is selected. | |
| Flourescent | To adjust the white balance according to the environment under fluorescent light. | |
| Indoors | To adjust the white balance according to indoor environment. | |
| Outdoors | To adjust the white balance according to outdoor environment. | |
| Image mode | Normal √ | Suitable for displaying documents. |
| Emphasis | To emphasize the image. | |
| Color emphasis | Suitable for displaying colorful subjects. | |
| Black/white | To display black and white images. | |
| DLP projector | Suitable for projecting images with a projector. | |
| Image mask (⇒P.32) | To mask a part of the image selected by dragging on the screen with your finger. | |
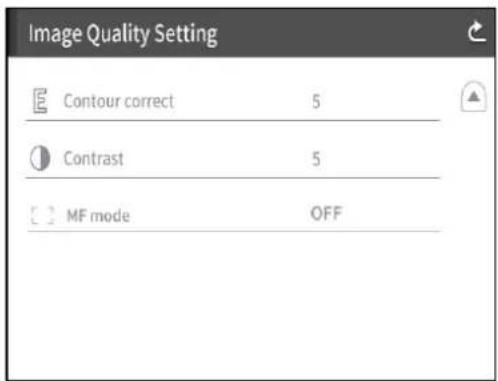
| Contour correct(⇒P.33) | 0~10(Default value: 5) | To adjust the level of edge enhancement. |
| Contrast (⇒P.33) | 0~10(Default value: 5) | To adjust the contrast of the image. |
| MF mode (⇒P.47) | ON | By rotating the jog dial on the Operating panel, you can manually adjust the focus. |
| OFF√ | ||
Network Settings (for PX-30E only)
To display the network configuration area as well as the network information assigned to a connected device. Connect the LAN port on the back panel to the network with the LAN cable. ( P.14)
By connecting to the network, the following actions are possible.
- To operate the PX-30E with commands. (You can control the PX-30E from your PC.)
| MAC Address | MAC address set in the PX-30E |
| inet | To select between static and DHCP. |
When selecting "DHCP", a unique IP address is assigned to the PX-30E automatically.
If you need to configure the IP address manually, select "static".
When performing the operation with commands, connect your PC to the PX-30E with the LAN cable after installing a serial communication software on your PC.
Tap the item to display the on-screen keyboard with numeric keypad. Then enter the necessary information manually.
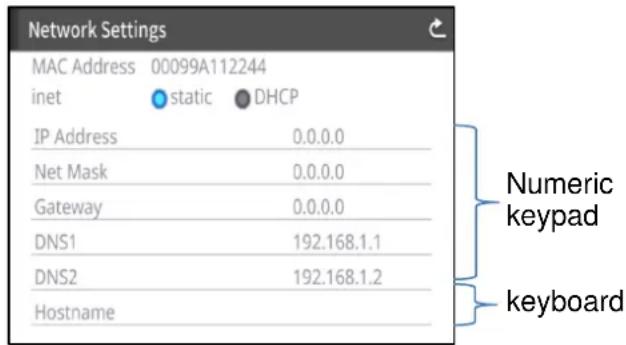
| IP Address | IP Address |
| Net Mask | Net Mask |
| Gateway | Gateway |
| DNS1 | DNS1 |
| DNS2 | DNS2 |
| Host Name | Host Name |
CAUTION
For details about the commands, contact our branch/office near your location.
Product Information
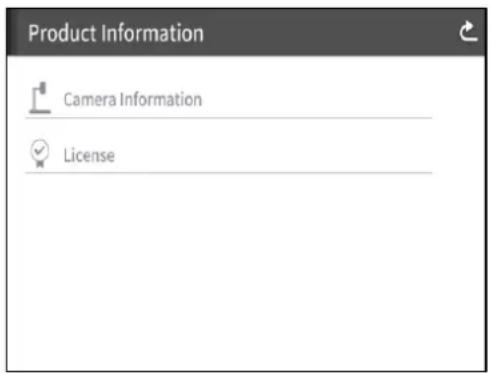
| Camera Information | Production Name | Product name (e.g. PX-30E) |
| Serial Number | Serial number of the PX-10E/30E | |
| Production Version | Version of the PX-10E/30E | |
| CMOS | Version of CMOS FPGA | |
| MAIN | Version of MAIN FPGA | |
| PANEL | Version of PANEL FPGA | |
| HDBaseT (for PX-30E only) | Version of HDBaseT | |
| Production Date | Production date of the PX-10E/30E | |
| License | The license information used for the PX-10E/30E is displayed. | |
◆DETAILS ABOUT FUNCTIONS
FREEZE
To pause the camera image.
Press the Freeze button [ ] on the operating panel or [ ] on the remote control to pause the image.
You can set whether to freeze the image on the LCD touchscreen when Freeze function is activated from the System Setting. (⇒ [Move/Freeze] : P.29)
IMAGE ROTATION
To rotate the camera image.
Press the Image rotation button [ ] on the operating panel or [ ] on the remote control to rotate the image. (⇒P.13, P.17)
You can set the angle of image rotation from the System Setting. [90^/180^] ( P.29)
MASK
To mask a part of the image.
How to use MASK
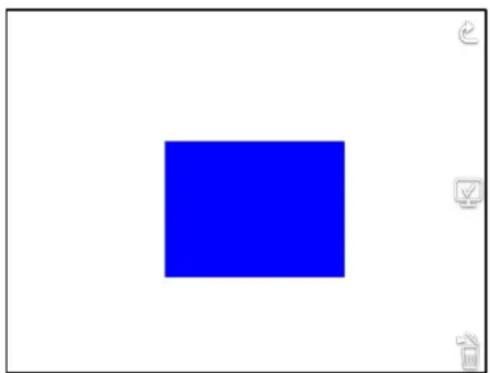
Press the Settings button [💡] on the operating panel while the camera image or a playback image is displayed on the monitor. Select "Image mask" from the "Image Quality Setting". (⇒ P.30)
By pressing "Image mask", you can setup the mask tool on the LCD touchscreen.
Select the area to be masked by dragging on the screen with your finger. (The color of the mask is blue.)
Tap [ √ ] to apply. (The color of the mask is black.)
The number of mask that can be applied to the image is one. When [ ] is tapped after creating a new mask, a previously created mask disappears.
Tap [ ] to remove the applied mask.
natural_image
Solid blue square centered on white background with no text or symbols| RETURN | To return to the previous screen. | |
| APPLY | To output the contents of the LCD touchscreen to the connected device. | |
| DELETE | To remove the created mask. |
NOTE
- The mask function is available only when the "Camera image" is selected in the Select image menu.
- It is not possible to record the image with a mask.
- The mask does not follow the change of the lens (zoom in/ zoom out, lens direction). It is advisable not to use the mask function for the purpose of hiding confidential information.
CONTOUR CORRECT
To enhances the edge of the image. (0\~10: 11 levels) Default value 5 ( P.30)
As the value gets smaller, the image becomes softer. As the value gets larger, the image becomes sharper.
While the image gets sharper by setting to a larger value, it may take more time to process the image or the file size may become large.
※This function is available only when [Camera image] is selected in the Select image menu. (⇒P.26)
How to use CONTOUR CORRECT
Press the Settings button [ ] on the operating panel while the camera image or a playback image is displayed on the monitor. Select "CONTOUR CORRECT" from the "Image Quality Setting".
(⇒P.30)
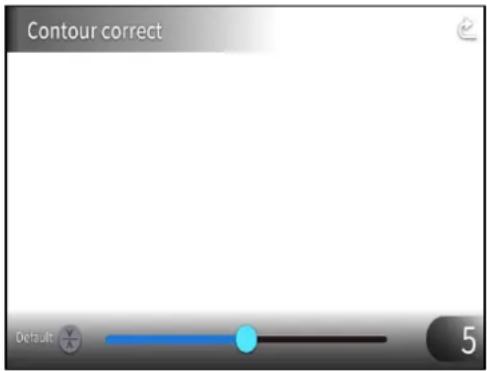
 | RETURN | To return to the Image Quality Setting menu. | |
 | DEFAULT | To return the setting value to 5 (default value). | |
 | SLIDE BAR | To set the edge enhancement value by moving the slider. (0~10) | |
 | SETTING VALUE | To display the current setting value. |
CONTRAST
To increase the contrast of the image. (0\~10: 11 levels) Default value 5
While the image gets sharper and becomes more vivid by setting to a larger value, the glare on the image may increase.
How to use CONTRAST
Press the Settings button [ ] on the operating panel while the camera image or a playback image is displayed on the monitor. Select "Contrast" from the "Image Quality Setting".(⇒P.30)
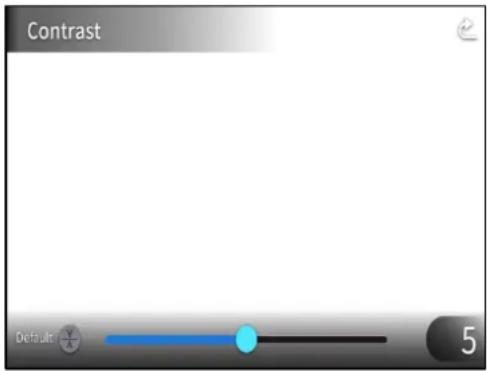
 | RETURN | To return to the Image Quality Setting menu. | |
 | DEFAULT | To return the setting value to 5 (default value). | |
 | SLIDE BAR | To set the contrast value by moving the slider. (0~10) | |
 | SETTING VALUE | To display the current setting value. |
TIME-LAPSE
To create a 1 second video by combining 30 photos taken at set intervals (1 minute, 10 minutes, 30 minutes, 1 hour, 3 hours, 6 hours).
For example:
When setting to 1 minute Record 30 minutes = 30 frames of images = Video length: 1 second
When setting to 1hour Record 1 week (168hours) = 168frames of images
= Video length: 5.6 seconds
CAUTION
- If the video file length exceed 2 hours or video file size exceeds 4 GB, a new file will be created automatically in the same project.
③ ADVANCED OPERATIONS
③-1 USING SD CARD/USB FLASH DRIVE
With the PX-10E/30E, you can record the camera image as a still picture to an SD card, USB flash drive, or internal memory. Also, you can record the camera image as a video to an SD card.
The image data recorded in an SD card, USB flash drive, or internal memory can be displayed on the monitor.
Insert the SD card (SD/SDHC/SDXC, commercially available) or USB flash drive (commercially available) into the slot on the side panel before starting the operation. (⇒P.15)
※Recording is not possible if either an SD card or USB flash drive is inserted.
• Video recording (HEVC (H.265) / H.264): SD
- Still image recording (JPEG): SD / USB flash drive / internal memory
※For video recording, an SD card with class10 speed or above is required.
※You can select the video compression method (HEVC (H.265) / H.264) from the System Setting.(⇒P.28)
NOTE
- About SD card
- We recommend you to format the SD card with the PX-10E/30E before using it.
- Video recording is only possible to an SD card (SD / SDHC / SDXC) with class10 speed or above.
- We recommend you to use an SD card with class 10 speed or above.
- About USB flash drive
- Use a USB flash drive up to 32GB.
- We recommend you to format the USB flash drive with the PX-10E/30E before using it. (⇒P29: FORMAT USB FLASH DRIVE)
- It may take some time to recognize the memory card after inserting the SD card / USB flash drive or to record images to the memory card.
- Do not remove the memory card (SD card / USB flash drive) when the PX-10E/30E is accessing the memory card (during recording or playback).
- Formatting the SD card/USB flash drive.
When you need to format the SD card/USB flash drive, insert it into the PX-10E/30E and perform formatting.(⇒P.29)
①Press the Settings button [ ] on the operating panel and select "Format SD" or "Format USB" from the "System Setting".
②Select a media to be formatted and select "YES" to format it. If you do not want to format, select "NO".
◆RECORDING
STILL IMAGE
Recording using the operating panel
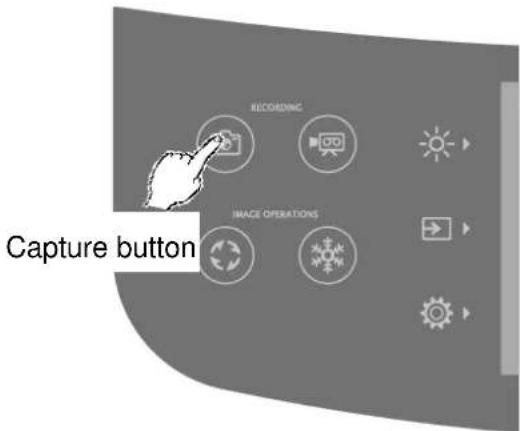
①Press the Capture button [图标] on the operating panel to record a still image.
②Recording is performed when a mark appears on the preview image displayed on the LCD touchscreen.
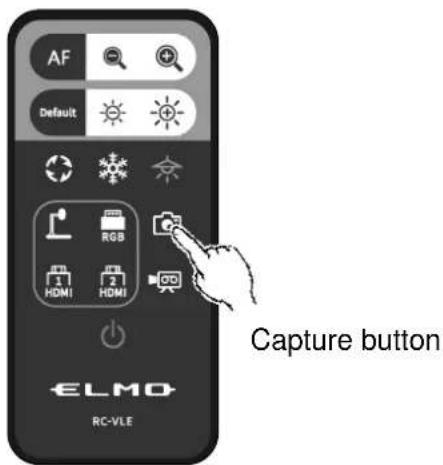
Recording using the remote control
①Press the Capture button [ ] on the remote control.
②Recording is performed when a mark appears on the output image.
VIDEO
Recording using the operating panel
①Press the Record button [ ] on the operating panel.
②Video recording begins when a mark appears on the LCD touchscreen.
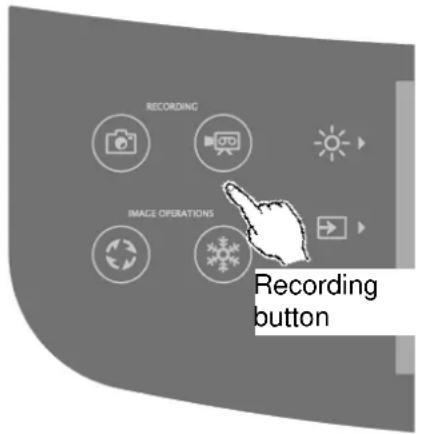
③When the Recording button [ ] on the operating panel is pressed again, video recording stops and the mark disappears.
Recording using the remote control
①Press the Recording button [ ] on the remote control.
②Video recording begins when a mark appears on the LCD touchscreen.
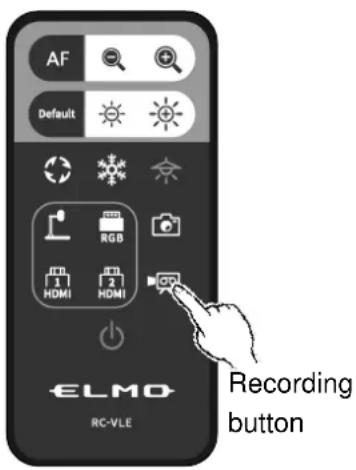
③When the Recording button [ ] on the remote control is pressed again, video recording stops and the mark disappears.
NOTE
- When recording video onto an SD card, use an SD card that has fast read and write speeds (class 10 or above). If you use an SD card that has slow read and write speeds, the video quality may be degraded.
- When both SD card and USB flash drive are inserted into the PX-10E/30E, the primary recording destination is SD card. When recording a still picture to a USB flash drive, go to the System Setting and select "USB Memory Stick" from the "Default saving location". (⇒P.29)
RECORDING SPECIFICATIONS (STILL PICTURE / VIDEO)
| Recording media | SD card, USB flash drive, internal memory |
| Recording size | Determined according to the settings of Resolution and Viewing angle. (⇒P.27) |
| Image type | JPEG |
| File format | DCF 2.0 compliantA thumbnail is created each time a still picture is recorded.(Extension: jpg) |


- ■ Lightning
- ■ Overloading
- ■ A product and cart combination should be moved with care. Quick stops, excessive force, and uneven surfaces may cause the product and cart combination to overturn.
- ■ Object and Liquid Entry
- ■ Servicing
- ■ Damage Requiring Service
- ■ Replacement Parts
- ■ Safety Check
- ■ Heat
- CAUTION
- WARNING
- FOR UNITED STATES USERS:
- INFORMATION
- USER-INSTALLER
- CAUTION:
- BEFORE YOU USE
- ■ Microphone
- ■ Audio input port
- ■ Menu and Icons
- ■ Recording / Playback
- ■ Whiteboard Sheet
- ■ Remote control
- ■ Network Function (For PX-30E only)
- Copyright
- HANDLING PRECAUTIONS
- ①Installation
- ②Carrying the product
- ③Setting Up
- ④Cabling of the AC adapter
- TABLE OF CONTENTS
- MAIN FEATURES
- ★High-Definition 4K Image
- ★Natural, Smooth Image
- ★Maximum excitement generated by state-of-the-art zoom – Optical zoom, Digital zoom, Sensor zoom
- ★Both A4 portrait image and A3 landscape image can be captured, respectively, in HDMI output mode
- ★Easy to store and carry
- ★Possible to record HDMI input
- ★ Extendable with HDBaseT (for PX-30E only)
- ★HDMI1.4 compliant (4K)
- ★USB3.0 compliant (4K)
- ★Recording and playback of 4K videos (for PX-30E only)
- ★Possible to draw on the stage (can be used as a whiteboard)
- ★Bright LED lighting
- ① PREPARATION
- ◆PACKAGE CONTENTS
- ② BASIC OPERATIONS
- ②-1 ABOUT THE DOCUMENT CAMERA
- PART NAMES
- ◆MOVING PARTS OF THE DOCUMENT CAMERA
- ◆SETTING UP
- ◆FOLDING THE DOCUMENT CAMERA
- ②-2 SUPPLIED ACCESSORIES
- ◆REMOTE CONTROL
- PREPARATION OF THE REMOTE CONTROL
- RECEIVING IR FROM THE REMOTE CONTROL
- ◆WHITEBOARD SHEET
- ◆CAUTION STICKER
- ②-3 SHOOTING IMAGES
- ◆CONNECTING TO A PROJECTOR OR MONITOR
- NOTE
- ◆ADJUSTING THE SIZE
- ◆ AF (AUTO FOCUS)
- ◆USING THE LCD TOUCHSCREEN
- STARTUP SCREEN
- HOW TO USE THE LCD TOUCHSCREEN
- ①Tap
- ②Drag
- ③Flick
- ④Slide
- ◆ TURNING ON/OFF THE LED LIGHTING
- ◆SELECTING THE IMAGE SOURCE
- USB/SD menu
- ②-4 CONFIGURING THE SETTINGS
- ◆HOW TO CONFIGURE THE SETTINGS
- Image Quality Setting
- Network Settings (for PX-30E only)
- ◆DETAILS ABOUT FUNCTIONS
- FREEZE
- IMAGE ROTATION
- MASK
- CONTOUR CORRECT
- CONTRAST
- TIME-LAPSE
- ③ ADVANCED OPERATIONS
- ③-1 USING SD CARD/USB FLASH DRIVE
- ◆RECORDING
- STILL IMAGE
- Recording using the remote control
- VIDEO
- Recording using the operating panel
- RECORDING SPECIFICATIONS (STILL PICTURE / VIDEO)
- ◆DISPLAYING RECORDED FILES
- THUMBNAIL DISPLAY (LIST OF STILL IMAGE / VIDEOS)
- BASIC OPERATIONS
- Supported file format
- DELETING FILES
- EXPLANATION OF ICONS
- DISPLAYING STILL IMAGE
- PLAYING VIDEOS
- PLAYBACK SPECIFICATIONS (STILL PICTURE / VIDEO)
- ③-2 ABOUT RS-232C
- ◆ CONNECTION VIA RS-232C
- For setting up
- Transfer of the packet data to the HDBaseT serial port
- ③-3 ABOUT NETWORK FUNCTION (FOR PX-30E ONLY)
- ③-4 FIRMWARE UPDATE PROCEDURE
- ③ -5 ABOUT EIT(ELMO INTERACTIVE TOOLBOX)
- ③ -6 ABOUT SECURITY SLOT
- ③ -7 USING AUTO LOCK
- ③ -8 USING WOL [WAKE ON LAN] FEATURE (FOR PX-30E ONLY)
- ③ -9 USING IN MASS STORAGE MODE
- ③ -10 Using the MF mode
- ③-11 Using the AV control mode (for PX-30E only)
- Preparation
- ERROR MESSAGES
- ⑤ TROUBLE SHOOTING
- ◆ SYMPTOMS AND CONFIRMATION
- About the light (LED lighting)
- About long-term usage of this product
- About USB connection with xSyncBoard
- Electronic zoom during UVC streaming
- About UVC streaming with xSyncBoard
- ⑥ SPECIFICATIONS
- ■TRADEMARKS AND LICENSES
- ELMO, VISUAL PRESENTER are registered trademarks of TECHNO HORIZON
- ATTENTION
- テクノホライゾン株式会社
- OVERSEAS SUBSIDIARY COMPANIES
- TECHNO HORIZON CO., LTD.
Brand : Elmo
Model : PX-10E
Category : Document Camera