
E2 NDI - Audio/video converter Kiloview - Free user manual and instructions
Find the device manual for free E2 NDI Kiloview in PDF.


| Product Type | Audio/Video Converter (NDI Encoder) |
| Model | E2 NDI |
| Video Input | HDMI (1x) |
| Video Output | NDI|HX, RTMP, TS-UDP, HLS, SRT, Motion JPEG |
| Video Resolution | Up to 1080p60 (including 1080p50, 1080i, 720p) |
| Video Encoding | H.264/AVC High/Main/Baseline Profile (up to Level 5.3), Motion-JPEG, NDI HX |
| Audio Encoding | AAC, G.711 |
| Latency | ~150 ms (end-to-end over cable) |
| Network Interface | 1x RJ-45 Ethernet (10/100/1000?) |
| Network Protocols | NDI|HX, RTMP, RTMPS, TS-UDP, HLS, SRT |
| Recording | Local with microSD/TF card or USB, NAS network storage |
| Image Overlay | Custom text, image, time overlay (JPEG/PNG) |
| Management | Web interface (HTTP/HTTPS), Android App |
| Power Supply | DC 12V, 1A (included adapter); Consumption ~4W |
| Dimensions (WxDxH) | 125 x 89 x 28 mm |
| Weight | 380 g |
| Operating Temperature | -20°C to 60°C |
| Maintenance & Cleaning | Keep dry, use soft cloth; avoid liquids and solvents. Ensure ventilation. |
| Safety | Use only supplied power adapter. Do not open device. Avoid extreme temperatures. |
| Spare Parts & Repairability | Contact manufacturer for repairs; no user-serviceable parts inside. |
| Box Contents | Encoder, DC 12V/1A power adapter, quick start guide, warranty card |
Frequently Asked Questions - E2 NDI Kiloview
User questions about E2 NDI Kiloview
0 question about this device. Answer the ones you know or ask your own.
Ask a new question about this device
Download the instructions for your Audio/video converter in PDF format for free! Find your manual E2 NDI - Kiloview and take your electronic device back in hand. On this page are published all the documents necessary for the use of your device. E2 NDI by Kiloview.
USER MANUAL E2 NDI Kiloview
E Series NDVideo Encoder
USER MANUAL
Changsha KILOVIEW Electronics CO., LTD.
Legal Notices
Subject to the receiving of this document from Changsha Kiloview Electronics Co., Ltd., (Hereinafter referred to “Kiloview”), the following terms are understood and agreed. Or else, please stop using this document.
This document is copyright of Kiloview, all rights reserved. The document covers the proprietary information of the company. No company or individual may copy, transmit, distribute, use or disclose the document and any images, forms, data and other information contained in the document without the prior written permission of the company.

is the registered trademark of Kiloview. The name and logo are the trademarks or registered
trademarks of the company. Other products or company names mentioned in this document may be the trademarks or registered trademarks of their respective owners. The reading of this document without the prior written consent of the company or the third party rights holder does not imply that the reader is given any right to use any of the marks appearing in this document by implication, non-evidence or otherwise.
This product complies with the design requirements related to environmental protection and personal safety. The storage, usage and disposal of the product shall be in accordance with the product manual, relevant contract or relevant national laws and regulations.
This document is provided "as is" and "only in this state". Products and technical updates are subject to change without priornotice.
For matters not covered in this document, please visit our website www.kiloview.com for information and technical support.
NDI® is a registered trademark of NewTek, Inc..
CONTENTS
1 PRODUCT INTRODUCTION....1
1.1 ADVANTAGES....1
1.2 PARAMETERS....2
3 PACKING LIST AND INTERFACE DESCRIPTION....4
3.1 PACKING LIST....4
3.2 INTERFACE DESCRIPTION....4
3.3 SIGNAL INDICATOR....5
4 INSTALLATION AND CONNECTION....6
4.1 POWER CONNECTION....6
4.2 VIDEO SIGNAL CONNECTION....6
4.3 NETWORK CONNECTION....6
5 LOGIN AND NETWORK CONFIGURATION....7
5.1 BGIN TO THE DEVICE THROUGHETHERNET....7
5.2 NETWORK CONFIGURATION....8
5.3 CONVENIENT MANAGEMENT FUNCTIONS....9
5.4 ANDROID APP....10
6 NDI....12
6.1 NDI|HX RIVERINSTALLATION....12
6.2 NDIDISCOVER AND CONNECTION....13
6.3 MODIFY NDI DEVICE NAME AND CHANNEL NAME 14
6.4 MODIFYING NDI BT RATE....14
7 PARAMETERS CONFIGURATION....15
7.1 DASHBOARD....15
7.2 BASIC SETTINGS....16
7.3 CHANGE WEB LOGIN PASSWORD....16
7.3.1 Location and time....17
7.3.2 Restore factory settings....18
7.3.3 Firmware upgrading....18
7.4 VIDEO & AUDIO ADJUSTMENTS....19
7.4.1 Video source choice and adjustments....19
7.4.2 Video preprocessing....19
7.4.3 Audio signal source 20
7.5 ENCODING & STEAM....21
7.5.1 Audio encoding parameter setting....21
7.5.2 Encoding and stream settings....22
7.5.3 Streaming media service....24
7.10.1 Serial Ports....39
7.10.2 PTZ Setting....39
7.10.3 Control Panel 40
7.11 QUICK RESET ANDREBOOT....40
7.11.1 Quick Reset....40
7.11.2 Reboot 40
7.12 LOGS AND DEBUG....40
1 Product introduction
E series NDI video encoder is a professional device designed for NDI video production field. It compresses and encodes SDI or HDMI video source into NDI stream, transmit video via wired for any compatible systems, device and software on your network.
1.1 Advantages
- High bandwidth adaptability, makes it possible to transmit high- definition, low-latency, non-padding image under low bit network.
With branded chips solution together with video dynamic noise reduction and image enhancement technology, it can realize good encoding image under low bit transmission. Good video image can be achieved at 1Mbps@720p, 1.5Mbps@1080p network.
Advanced video buffering technology and FEC technology ensures video encoding low delay and stable and smooth transmission.
Adjustable bit rate from 64kbit/s40Mbit/s.
- Authorized by NewTek, compatible with other NDI® hardware and software products
Available as sources for other NDI compatible systems and software, no cables everywhere anymore. Ultra low-latency, mutual identification and communication of multiple data streams.
Smart connection, discovered and connected by other NDI devices automatically
● Powerful encoding function, dual stream output, customized graphic overlay, voice intercom, local recording
Wide adjustable code rate (64kbit/s to 40Mbit/s).
Dual stream output, the main code rate up to 1080p60Hz, and the sub-stream supports 720p60Hz video encoding.
Capable with customized text and image overlay function, which can be at any position on the screen.
With SD/TF card slot, it supports local recording, and supports NAS network storage.
1.2 Parameters
| Model No. E1-NDI.E2-NDI | |
| Input | SDI (E1-NDI) .HDMI (E2-NDI) |
| Network Support RJ-45 Ethernet | |
| Media transmission protocols | NDI-HX/RTMP/TS over UDP/HLS/SRT |
| Video resolution | Up to 1080P60Hz: 1080p23.98/24/25/29.97/30; 1080p50/59.94/60; 1080i50/59.94/60; 720p23.98/24/25/29.97/30; 720p50/59.94/60 |
| Video encoding | H.264/ AVC High/ Main/ Baseline profile (up to Level 5.3) ; Motion-JPEG ; NDI HX |
| Audio encoding AAC/G.711 | |
| Latency End-to-end by cable is about 150 ms | |
| Image and text overlay | Custom text, image overlay function, can be superimposed to any position on the screen |
| Recording Micro | SD/TF card , local recording,NAS network storage |
| Management Web | /Android APP |
| Power supply/Consumption | DC 12V 1A / 4W |
| Size/ Weight 125*89*28mm/380g | |
| Working temperature | -20°C~60°C |
2 Operation guidance
● Installation and connection of the device
Connect the power and video input source correctly, power on the device.
● Network Connection and Configuration
The simplest way is that the encoder accesses the network via Ethernet, and the device automatically gets an IP address from the network. Without any settings for the device, the encoder can be automatically found and pulled by other NDI devices in the network.
If you want to set up the network manually, you can use the device failsafe IP address (192.168.1.168) 1 login the WEB page for setting up(default username and password is :admin/admin).
- NDI Pulling stream
NDI has the function of automatic discovery. After the encoder is normally connected to the network, other NDI-supporting tools (such as Newtek studio monitor, OBS, vMix) can be used to automatically discover the encoder and pull its NDI video stream directly.
● Other streaming service
If necessary, you can also configure the device to push video streams such as RTMP, RTMPS, UDP, HLS, SRT, etc..
3 Packing list and interface description
3.1 Packing list
Please check the parts and accessories you received are exactly
| Name Unit Quantity Note | |||
| NDI® Encoder SET | 1 E1-NDI:SDI | Input; E2 | -NDI: HDMI Input |
| DC12V/1A power adaptor | PCS 1 | ||
| Quick start guide | PCS 1 | ||
| Certificate/Warranty card | PCS 1 | ||
3.2 Interface description
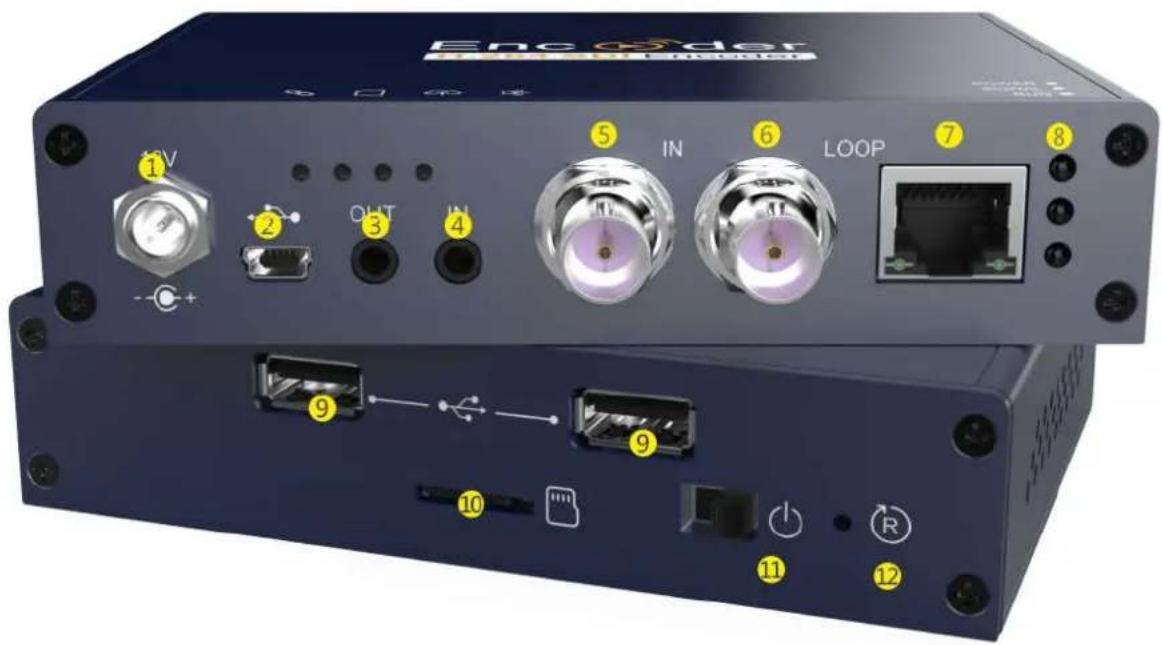
1.Power
-
Mini USB
-
Audio out
-
Audio in
5.SDI IN/ HDMI LOOP
6.SDI LOOP/HDMI IN
7.Ethernet
-
Indicator
-
USB extend
10.TF card
11.Power Switch
- Reset
3.3 Signal indicator
| Name color Status Description | ||
| Power Red | Always on Power supply is connected | |
| Off Power supply is not connected | ||
| Signal Green | Always on SDI/HDMI signal is connected | |
| Flashing Restore device to factory settings | ||
| Off SDI/HDMI signal is not connected | ||
| Run Green | Always on Device is starting | |
| Flashing Working | ||
| Off Working abnormal/not started | ||
4 Installation and connection
4.1 Power connection
Using the power adapter (DC 12v) to connect to the power connector of the device. After connected, turn on the power switch (Interface No.12) on the device. After the device is powered on, it starts working
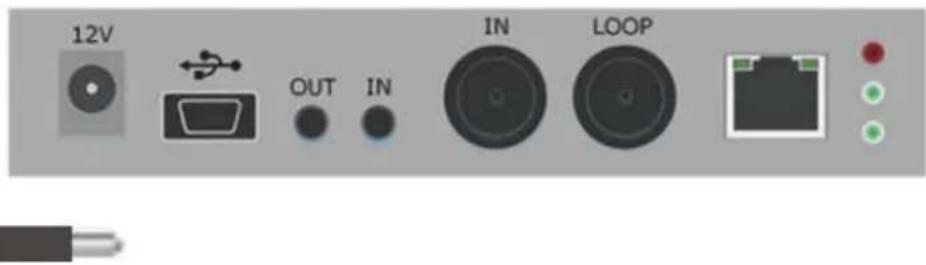
⚠️Note: Please use the standard power adapter provided. Using other unqualified supplies may damage the device.
4.2 Video signal connection
Connect the SDI/HDMI signal from a source (such as a camera) to the input port of the device through cable, make sure the connection is tightened.
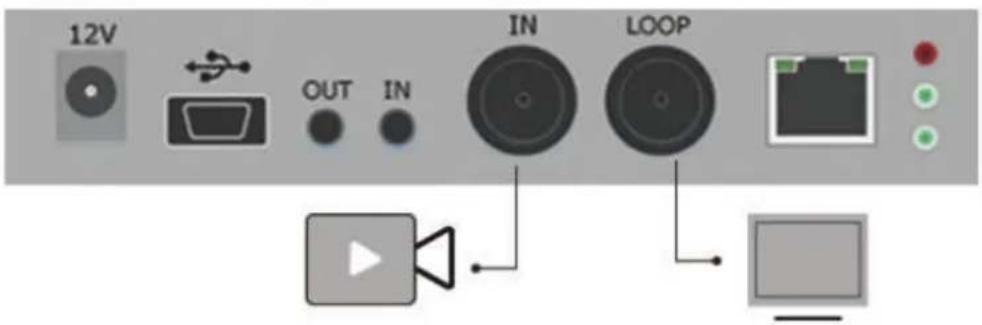
4.3 Network connection
Connect the network cable to the Ethernet port of the device, and connect the other end to the network switch or directly to the network port of the computer.
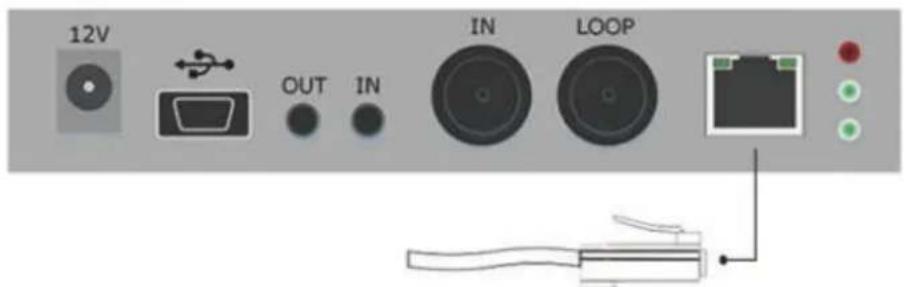
5 Login and network configuration
5.1 Login to the device through Ethernet
First connect the Ethernet port of the NDI encoder and the computer to the same switch, or connect the encoder directly to the computer network port. Then configure the encoder and computer to the same network segment so that the computer can access to the web page of the encoder.
The default management IP address of the encoder is 192.168.1.168This is the failsafe address of the device. Generally, do not modify this IP addressIf the IP address of the computer is not in the network segment of 192.168.1.*, please set the IP address of the computer network port to 192.168.1.*.
Open the WEB browser, directly input the encoder's IP address (default is 192.168.1.168) or the URL http://192.168.1.168 and press Enter to open the login interface. After opening the page, an authentication dialog will pop up, please fill in the username and password, the default username is admin, the default password is admin, and then click "Login".
⚠️Note: Due to the browser compatibility issues, it may cause the web page display abnormal, it recommended to use Chrome and Firefox.
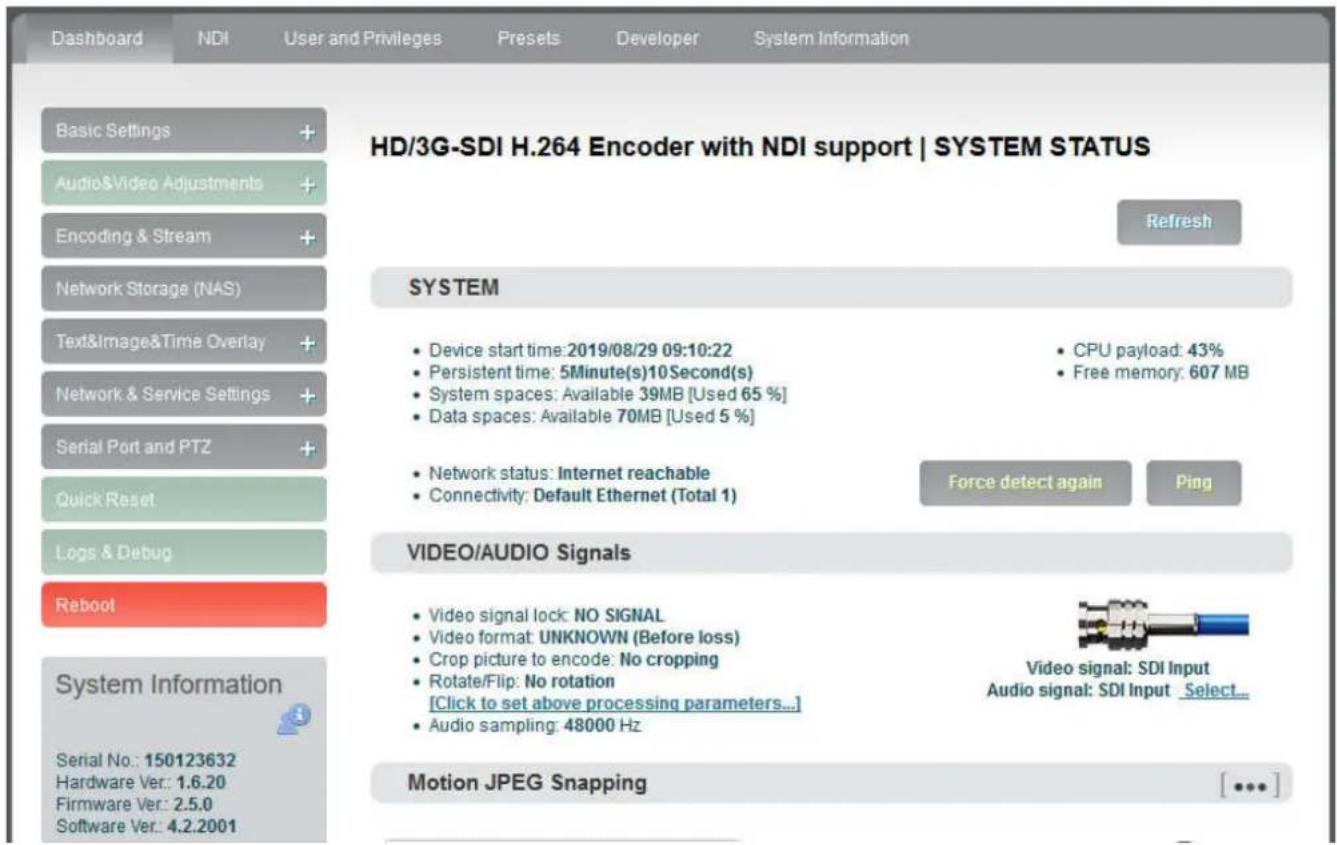
After login, the encoding and function parameters can be set on the encoder management web page. The page is shown as below:
5.2 Network configuration
The Ethernet port can be configured with an IP address and default setting is DHCP . It will automatically get a complete IP address,Netmask, Gateway and DNS according to this LAN.
Click "Network & Service Settings", click "Network Manager" to enter the following interface, you can see the IP address with Ethernet.
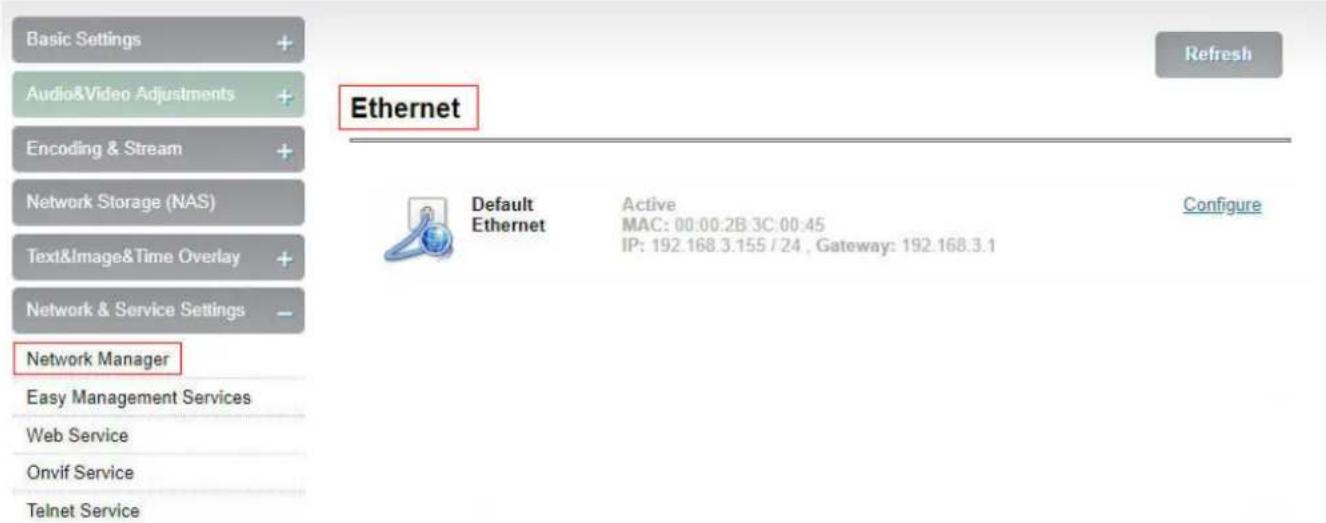
In addition to the way of DHCP, the encoder also supports manual IP assignment. To change the IP of the wired network, click “Configure” button in the Ethernet to enter the interface for configuring the IP. There are two ways to get the address, one is DHCP, and the other is to manual. To use DHCP to automatically obtain IP, you must first ensure that the router or switch has enabled the DHCP service. This method is simple and convenient, but the IP obtained by DHCP changes continuously, and you cannot directly know what IP address the encoder gets. To use manual, you need to enter a fixed IP to the encoder, and this IP address is fixed as long as the encoder does not restore the factory settings, this method is more stable. Therefore, the two methods have their own advantages, and can be selected accordingly.
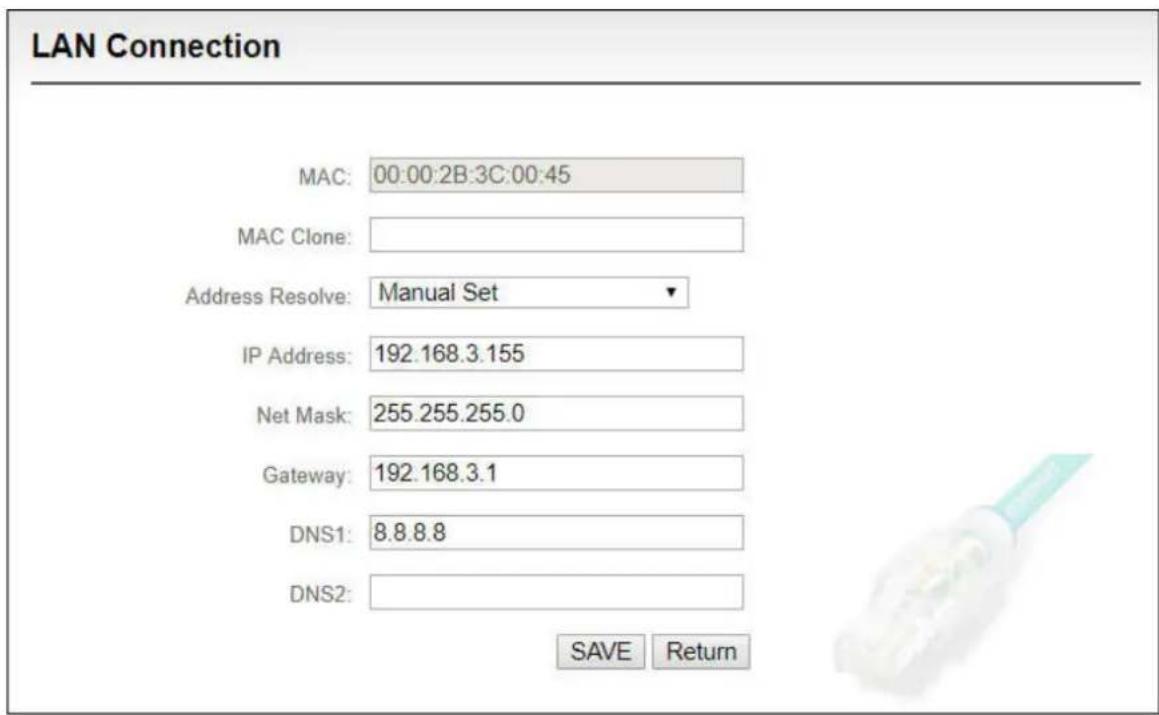
After Ethernet is configured correctly, you can see that the connection status is “Internet reachable” and the Internet connection is the default Ethernet port on the Dashboard.
Note: Because the device writes the configuration file to the system regularly for saving, the data can not power off immediately after the IP address is manually configured or modified, otherwise the IP address may be lost. If you want the IP address configuration to be saved immediately, you can restart the device once on the WEB page.
5.3 Convenient management functions
The "Local Link" is configured with a dedicated IP address on Ethernet (This is the failsafe IP address (the Ethernet port.Generally, do not modify this IP address). In this way, even if you forget the IP setting of the Ethernet, or if the IP cannot be learned because DHCP gets the address, you can still connect and access the device through the configured private IP address.
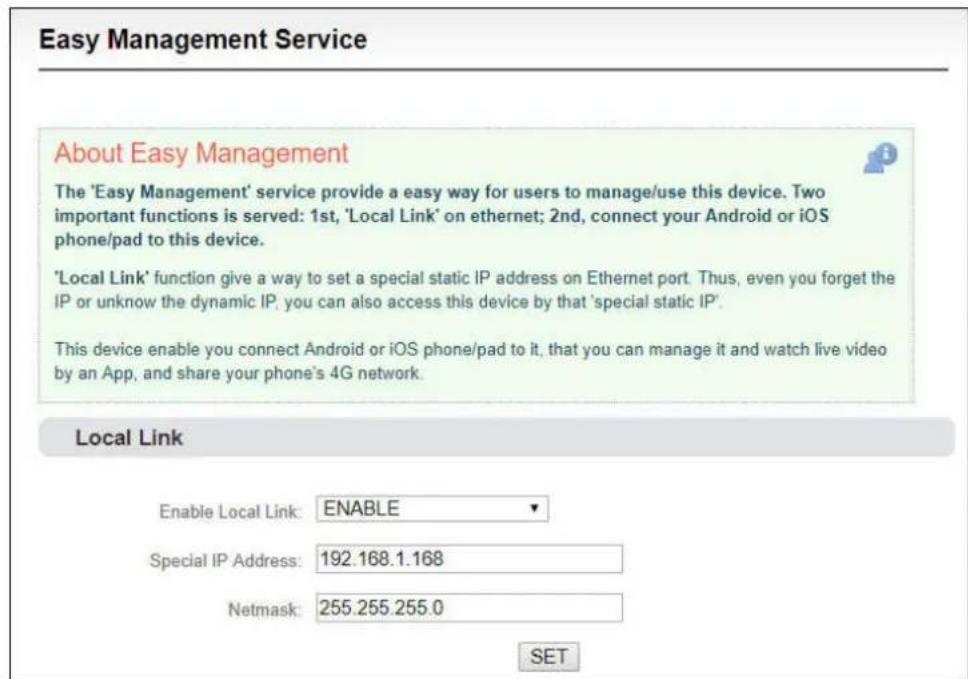
"Local Link" is to bind the encoder to a separate IP address, this IP address does not affect the use of other network cards, in special cases, it can play a role to manage encoder, this address can be manually changed, the default address is 192.168.1.168.
Note: When accessing the device through a convenient managed IP address, your computer must have an IP address on the same network segment.
5.4 Android APP
- Please download the Android APP from Kiloview website, then install it.
( http://www.kiloview.com/companyfile/shi-pinbian-ma-qi-Android-APP-45.html)
- Connect the phone to the same network segment of the WIFI that the device connects. (You can share the hotpots while using P and G series encoder). Open the APP and search the connected devices under the same network segment automatically in the device list.
● The device information shown in the list includes device interface information, device serial number, device IP address, etc. - Click the device from the device list to enter into management page.
| Device list | EN |
| NewTek HD/3G-SDI Encoder 150123632 | 192.168.3.25 |
| HDMI Professional Wireless Encod 190903057 | 192.168.3.32 |
| NewTek HD/3G-SDI Encoder 150402296 | 192.168.3.31 |
| HD/3G-SDI Professional Wireless E 190902057 | 192.168.3.63 |
| HDMI Professional Wireless Encod 15110419233 | 192.168.3.202 |
| HDMI/VGA Professional Encoder 150326 | 192.168.3.203 |
| HD/3G-SDI Professional Wireless E 15080925 | 192.168.3.101 |
| HDMI/VGA Professional Encoder 160906645 | 192.168.3.103 |
| HD/3G-SDI Professional Wireless E 123654789 | 192.168.3.147 |
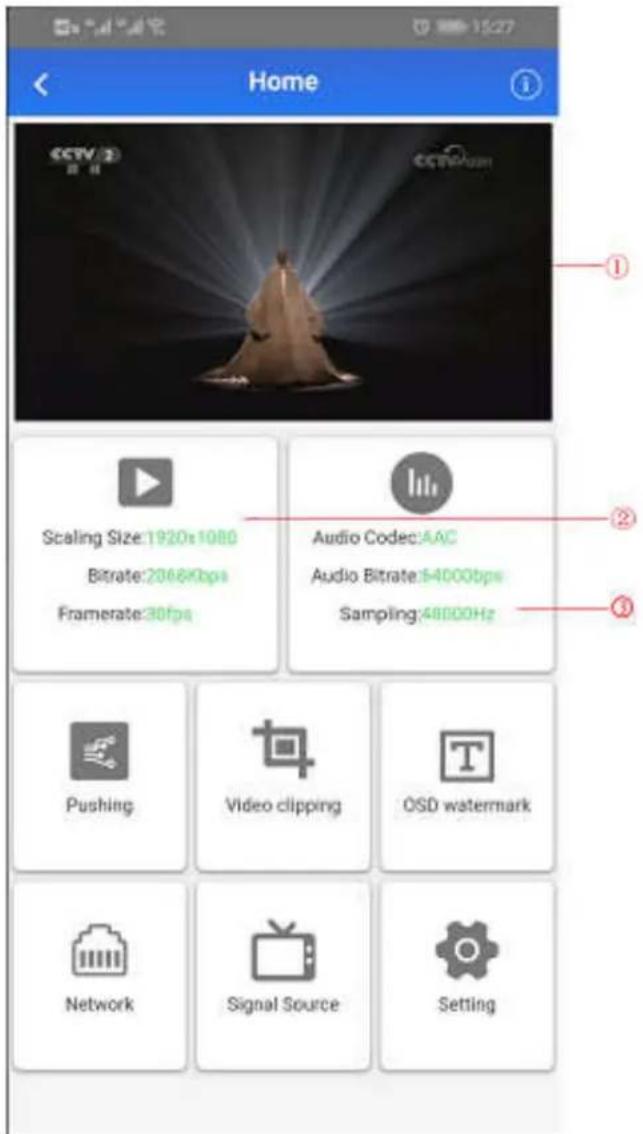
- On the configuration page, it shows video source image on the area of ① to monitor whether video source is normal. This image stream is refreshed in three seconds.
- Click②for main stream configuration.
- Click③for audio encoding configuration.
- Click"Pushing"for stream service configuration.
- Click "Video Clipping" for video clipping function.
- Click "OSD watermark" for image overlay function configuration. APP only supports text and time overlay configuration, image overlay is configured on Web page.
- Click "Network" for network configuration.
- Click "Signal Source" for audio and video source choice page.
- "Setting" are used for quick reset, device reboot, restoring factory settings and device name modifications.
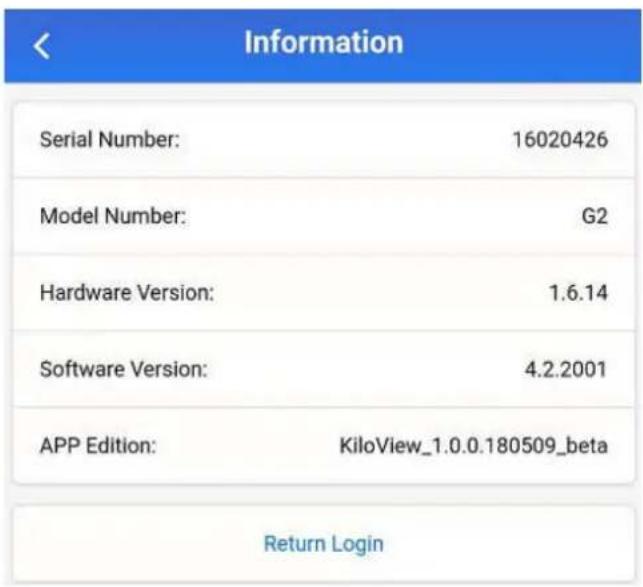
Click and enter into device information page.
6 NDI
E series NDI video encoder is a professional video encoding device for NDI video production. It can compress SDI or HDMI video source coding into NDI protocol stream and transmit video through wired network for any compatible system, device or software in the network.
Note: NDI encoder cannot support RTSP protocol transmission currently. When the encoder is connected using the NDI tool, the RTSP stream obtained is encrypted and displayed in a mosaic s
6.1 NDI|HX Driver Installation
At present, the encoder uses a compressed NewTek NDI|HX technology. Before using other tools to connect, you need to download and install the NDI|HX driver from the NEWTEK website (https://www.newtek.com/ndi/tools), NDI Tools contains the following:
NewTek NDI® Tools
Windows
NDI ® Tools for Windows
NDI Studio Monitor
NDI Scan Converter
NDI Virtual Input
NDI VLC Plugin
NDI for Adobe Creative Cloud
NDI Access Manager
NDI Test Patterns
NDI|HX Driver
Download

MAC
NDI ® Tools for Mac
NDI Video Monitor
NDI Scan Converter
NDI for Adobe Creative Cloud
Access Manager
Download

Note: The NDI|HX driver does not support installation on Mac series terminals, so Mac termin cannot play NDI videos. However, Mac terminals can support NDI functions after installing the NI tools, such as using NDI scan converter to select any active window such as: (IM chat window or browser or any software), and then can make these windows into NDI signals for output.
For the NDI|HX version, only the NDI|HX driver can be successfully installed to connect to the encoder NDI stream using other tools.
For other products that support NDI 4.0, it can be automatically discovered without installing the NDI|HX driver.
6.2 NDI discover and connection
Note: NDI discover is realized via multicast, so it is required to put NDI encoder and other N devices in the same subnet, and configured with the IP address of the same subnet and can communicate with each other (can be obtained automatically). Otherwise, the NDI encoder cannot be automatically discovered.
When the device configured with network and NDI|HX driver installed on the PC side, other NDI-enabled tools of the same subnet can discover the encoder automatically. Currently the tools that support the NDI protocol are widely. The following is an example of how to automatically discover and pull NDI video streams by using NewTek studio monitor and VMIX.
- Open NewTek studio monitor software, click the icon in the upper left corner to display the list of device names that have been discovered. The device list will be displayed according to different channel names. Select the device you want to connect, and then you can pull the current video strea of the encoder.
NDI NewTek NDI Studio Monitor
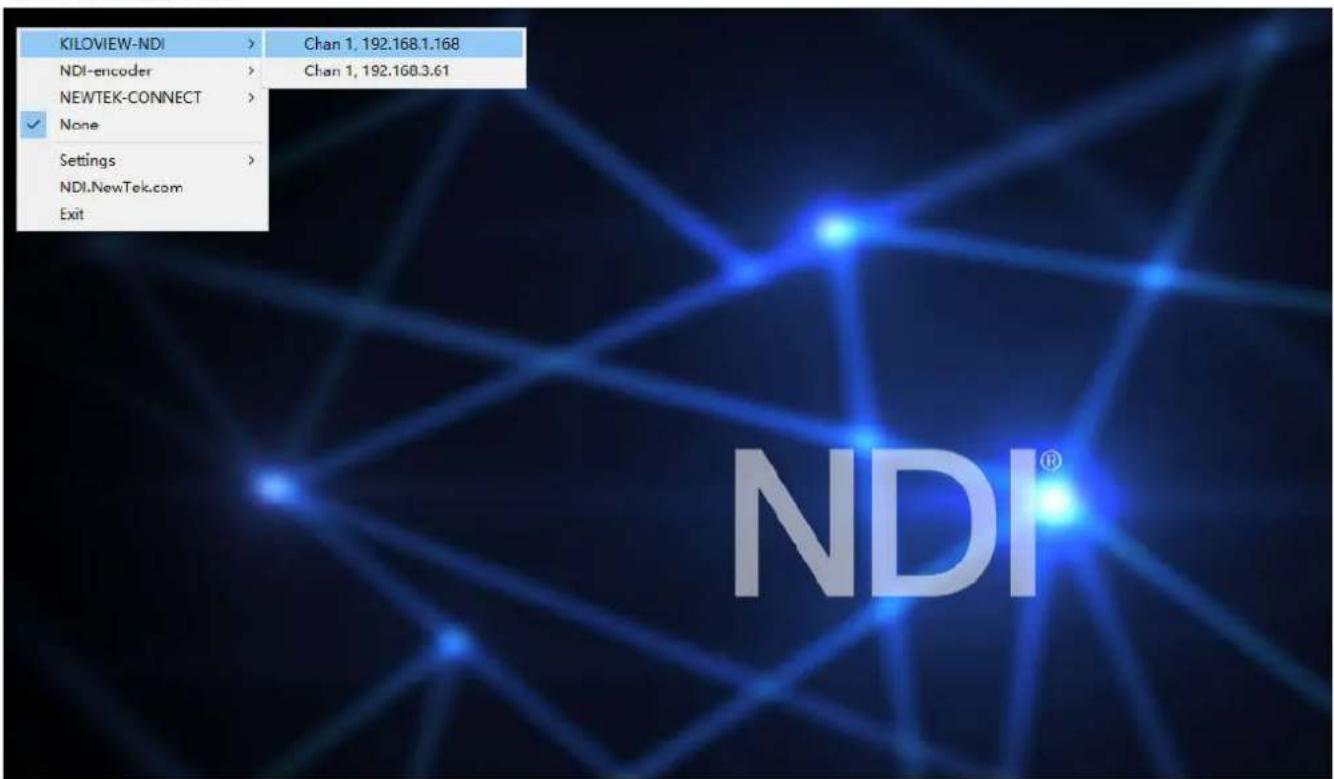
Note: After opening the selected video of the encoder by Studio Monitor, click in the lower right corner of the player to open the Web page of the encoder directly, which is convenient for the management of the encoder.
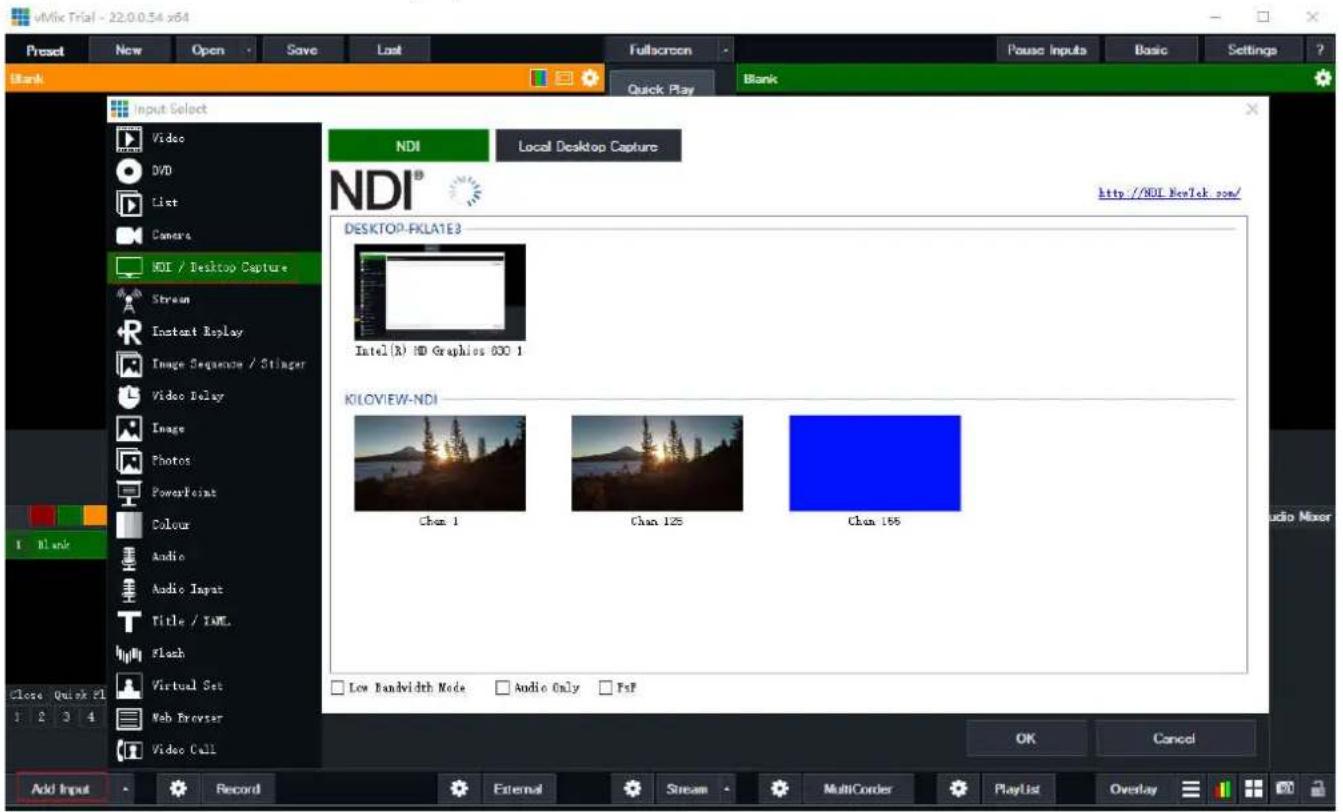
- Open vMIX software, click “add input” of the left corner, select “more”, which shows it can add various sources. Click “NDI/desktop capture”, it shows NDI devices list. According to device names and channel names, you could select the device you want to add, then click “OK”, the video source will be added into vMIX play source list.
6.3 Modify NDI device name and channel name
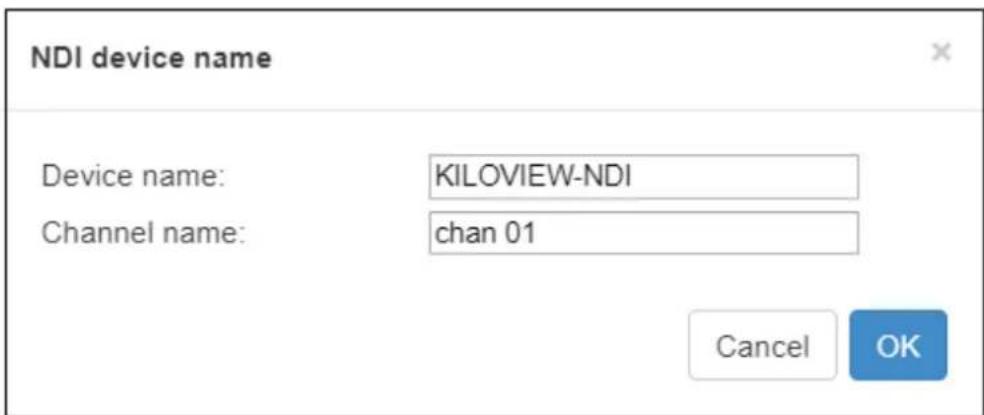
When there are multiple NDI encoders in the same network, as default device name and channel name are same, it is required to modify device name and channel name to identify different devices.
Click on the NDI option at the top of the menu to modify the parameters:
6.4 Modifying NDI Bit Rate
On the dashboard, click SET at H.264 Main Stream to set the bit rate, which is also the bit rate of ND stream.
7 Parameters configuration
7.1 Dashboard
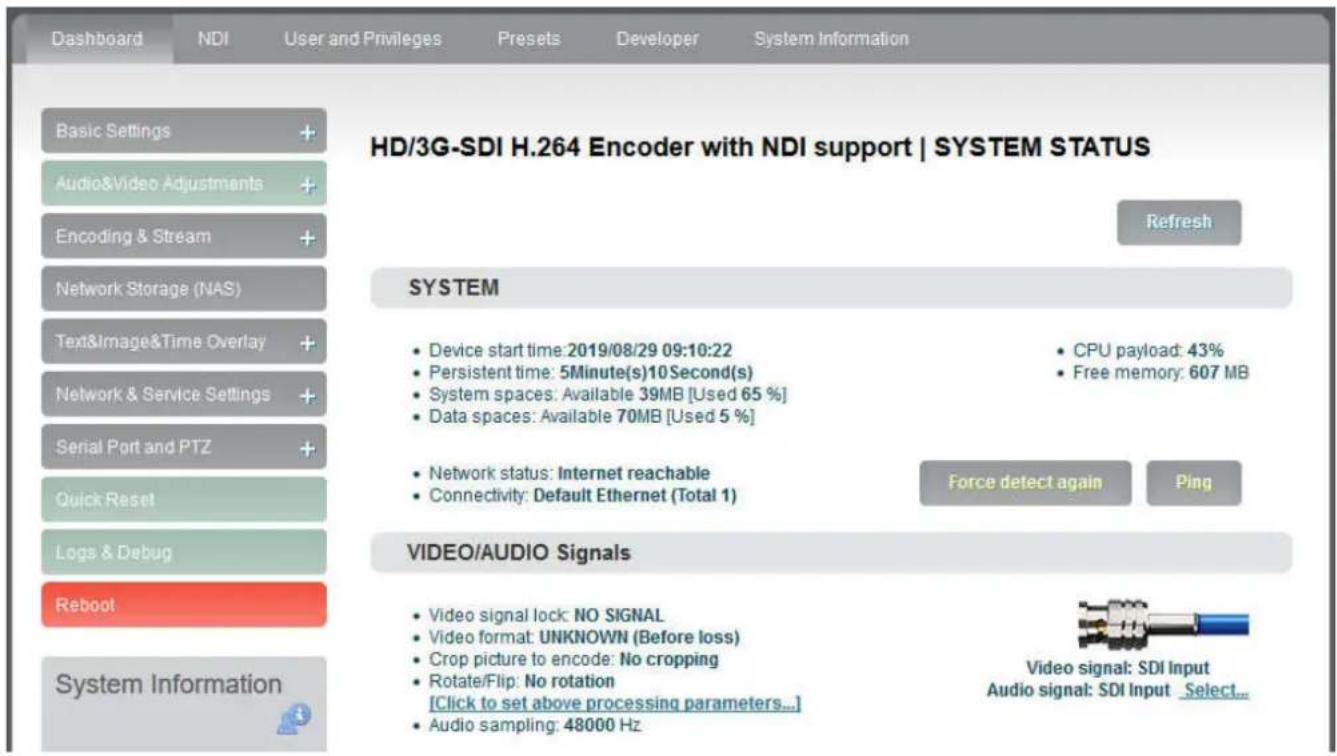
“Dashboard” is an overview of the current running status of the device and the status of audio and video streams. Users can click the “Refresh” button to refresh in real time, which can greatly help the encoder setting and troubleshooting.
- System
Click “Basic Setting”, users can know information including “device start time”, “persistent time”, “system spaces”, “data spaces”, “network status” and “connectivity” of the device, and go for “Ping” testing. If users need to push to Internet platforms, network status should be “Internet reachable”, or it cannot push streams.
The “Ping” provides a simple function to test whether the network is reachable. Open the “Ping” button, enter the test address, click “Ping”, wait for 3s, and “Connectivity” is displayed as “reachable, packet los rate 0%” means the network is good and streams can be pushed to the Internet normally.
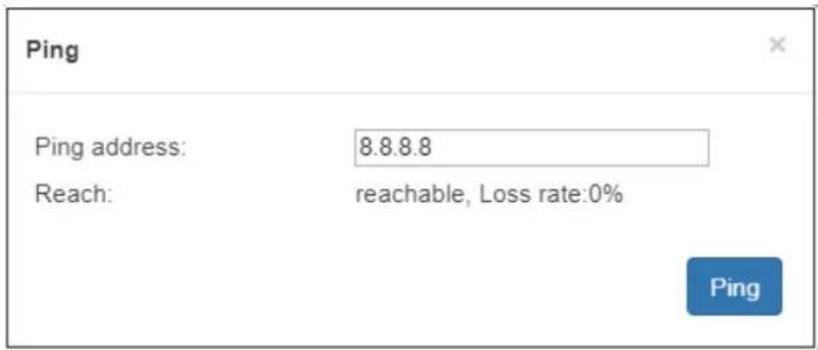
Note: If Ping public IP address is reachable, but Ping domain name is unreachable. Generally, is because the DNS server configuration is incorrect.
- Video/Audio signals
It can show “Video/audio signal”, “video format”, “preprocessing”, “audio sampling” as below:
VIDEO/AUDIO Signals
• Video signal lock: LOCKED
• Video format: 1080p 60Hz
• Crop picture source: No cropping
• Scale before encoding: Default/No set
• Crop picture to encode: No cropping
- Rotate/Flip: No rotation
[Click to set above processing.parameters...]
• Audio sampling: 48000 Hz
Video signal: SDI Input Audio signal: SDI Input Select...
If “video signal lock” displayed as “no signal (display blue screen)”, it means the video input source is not detected by the device. Please check if the input cable is plugged in. If “Audio sampling” is displayed as “0Hz”, the audio signal is not collected on the device. Please check if the audio of the input source is normal.
7.2 Basic settings
Users can go for some basic functions settings here.
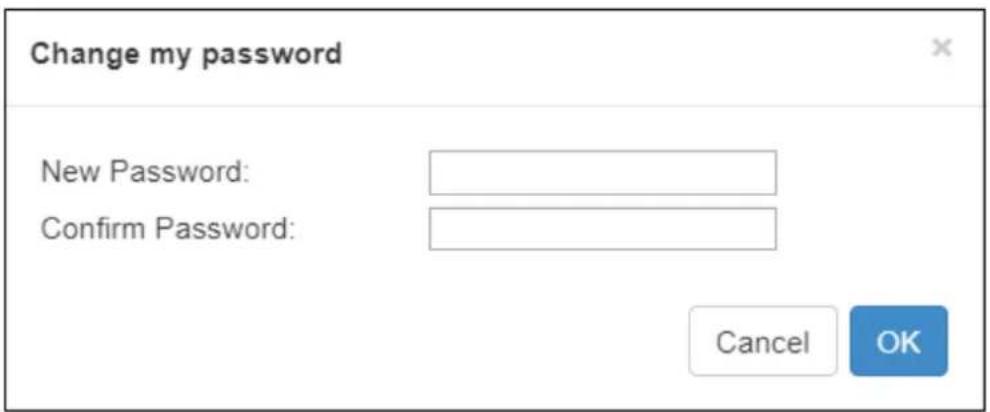
7.3 Change WEB login password
Click “Change Password”, an option box will pop up, users can modify the WEB login password, the default password is admin.
7.3.1 Location and time
Click “location and time”, then users can modify system time of the encoder, or just select “Synchronize from this PC”.
Location & Time Setting

Current time of device: 2019-07-03 19:31:18 Universal Coordinated Time in Device: 2019-07-03 11:31:18
Location/Time zone: Asia/Shanghai NTP Time Synchronization Enable: yes NTP Synchronization Status: yes
Select Your Location

Location/Time zone: Asia/Shanghai, Beijing Detect Location
Country/Area: China
Change My Location
Date & Time Setting
Set Synchronize From NTP Server
NTP Server: NTP Server on Internet - China
SET
7.3.2 Restore factory settings
If users change parameters that lead encoder couldn't work (Typical situation is that encoder couldn't be visited by network after modifying network address), users could restore factory settings to default value.
Two methods for restoring factory settings:
-
Via the WEB interface, "Basic Setup > restore factory settings" function;
-
Through RESET button:
On the dashboard, there is a button of. Pressing on RESET button for 3 seconds, device will restore factory settings. Restoring factory setting will lead to the device hard restart, restarting course will last 1 minute.
Please note: after restoring factory setting, below parameters will be changed to default value:
- Login username and password will be admin;
- IP address will be restored as 192.168.1.168, subnet mask will be 255.255.255.0;
- All encoding parameters of video and audio will be restored to factory default value;
- Media transmission parameters will be restored as factory default value.
7.3.3 Firmware upgrading
The encoder supports online firmware upgrading. Through the “Basic Settings-Update Firmware” of the Web page, users can upload the firmware online.Click “Choose file” to select the upgrade file, and click “Upgrade” to upgrade the device. The upgrade process is slow, around 30s to 1 minute, please be patient.
Firmware and software upgrading

Current Firmware Version: 2.5.0
Current Software Version: 4.1.1997
Device Serial No: 15110419233
Please check the device type and software/firmware version is correct before upgrading. Upload the firmware bellow.
NOTE: It need reboot the device to finish the upgrading while firmware uploaded!

Upload Firmware: Choose file No file chosen
Upgrade
After upgrading, kindly check whether the version information of the latest firmware is consistent with the expected status through the System Status-Software Version of the Web page.
7.4 Video&Audio adjustments
7.4.1 Video source choice and adjustments
Users can choose video source, adjust brightness, contrast, saturation and hue parameters of the video here.
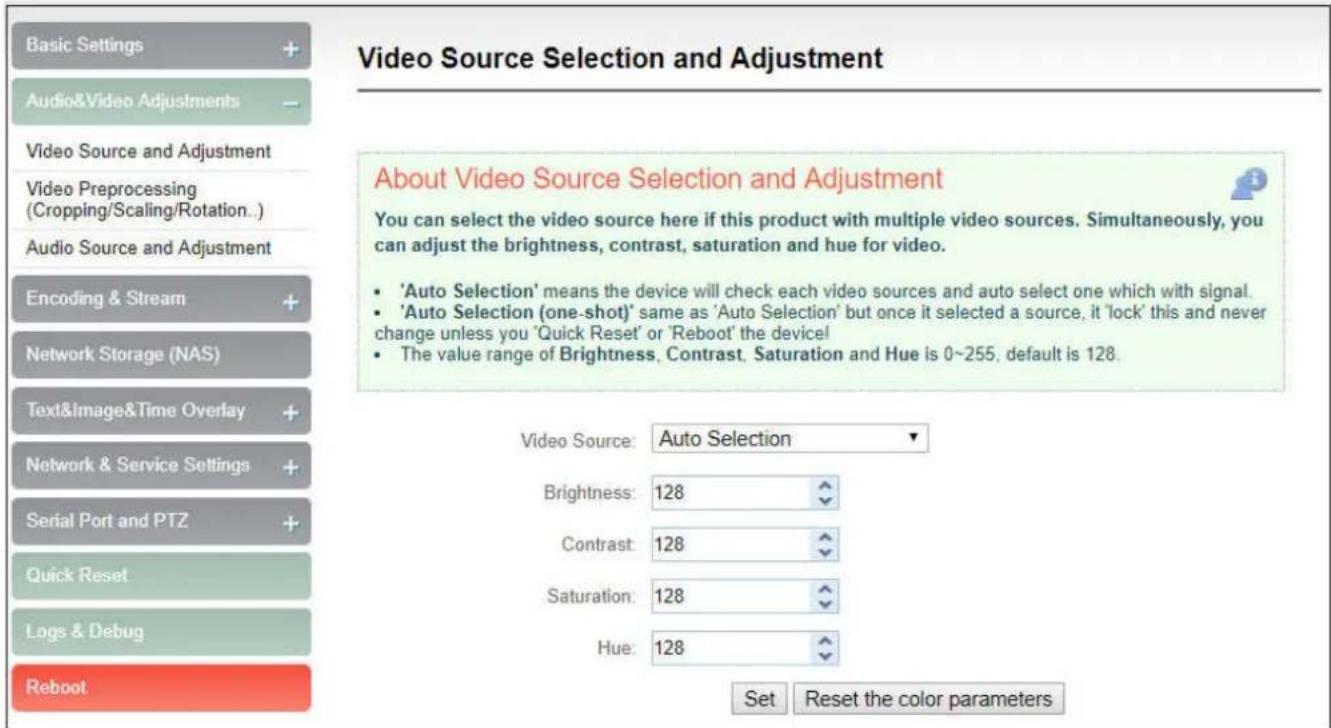
"Auto Selection" means the device will check each video sources and automatically select the one which has signal.
"Auto Selection (one-shot)"same as "Auto Selection" but once it selected a source, it 'lock' this and neve change unless you 'Quick Reset' or 'Reboot' the device!
The value range of Brightness, Contrast, Saturation and Hue is 0\~255, default is 128. Based on the median value, the increase/decrease value corresponds to the increase/decrease in brightness/contrast/saturation. The default value of Hue is 128, which represents phase 0; the value range is 0-255.
7.4.2 Video preprocessing
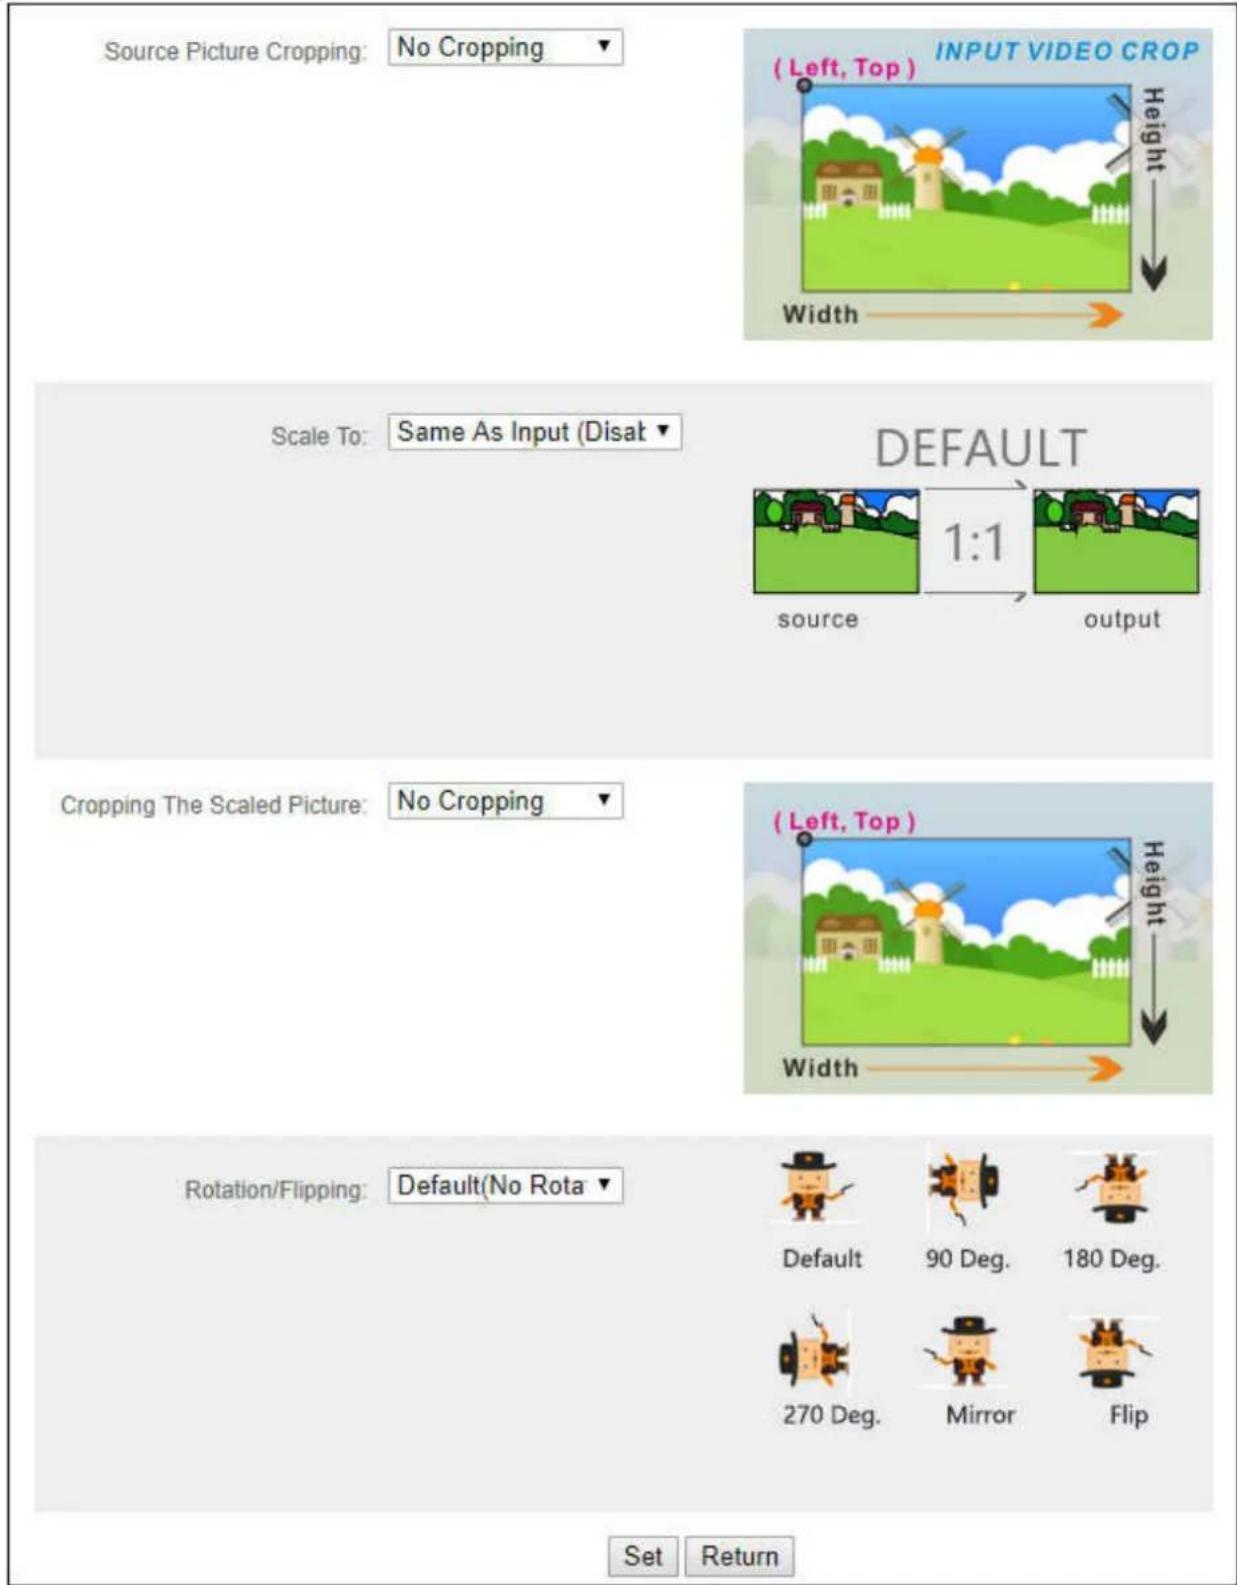
Before video captured and sent to encoder, we can make some necessary preprocessing:
(1) Source picture cropping: Crop a part of the original picture for encoding.
(2) Scaling: After step 1 cropping (or not cropping), video can be scaled up/down to certain format. (E.g Input video is 1080p60, scaling down to 720p30 for encoding.)
(3) Second cropping: After the step 2, you can continue cropping the size you want for encoding. (It's almost the same with step 1, but necessary in specific application.)
(4) Rotation or flipping: It's the last step before encoding, you can rotate the video with 90/180/270 degrees, horizontal mirror or vertical flip.
Above process is a pipeline from step 1 to step 4. You could choose to open, or prohibit it about each step.
7.4.3 Audio signal source
Audio source “Auto selection” mode is automatically to select the embedded audio of the input video source.
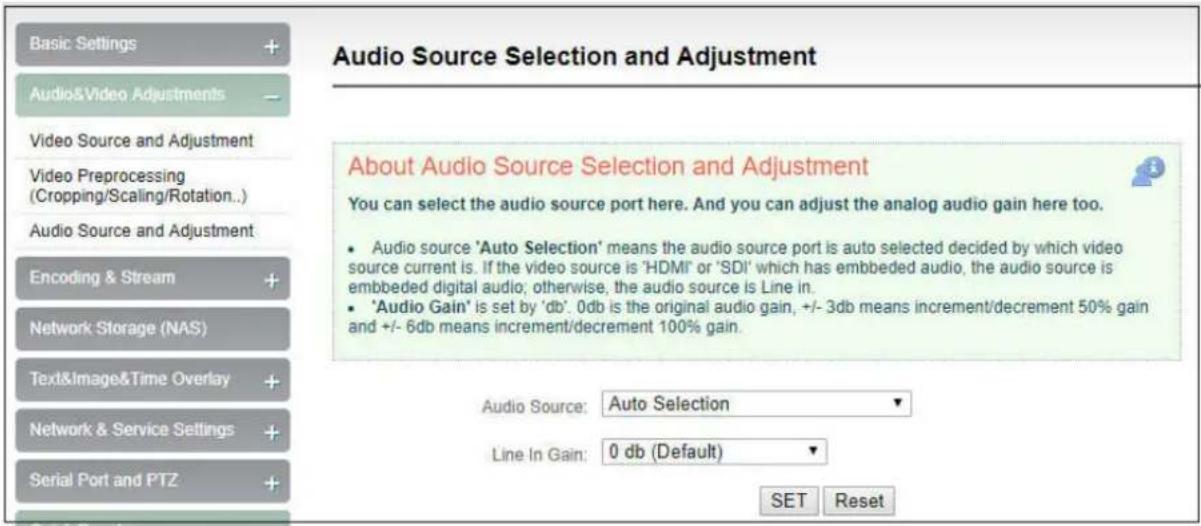

Note: E series products are without Analog Line in and doesn't support adjust analog input ga
7.5 Encoding & Steam
7.5.1 Audio encoding parameter setting
Encoders can set audio encoding parameters. Click “Encoding &stream”, pull downward “Audio Encoding Engine”, then entering into audio parameters setting. Audio encoding channel is forced to enable. Audio encoding modes include AAC and G.711, optional. Audio sampling is chosen according to actual situation. Channels consist of “Stereo” and “Mono”. Encoding bitrate is adjustable between 16K-256K, default is 64Kbps. One more detail: if encoder using TS-UDP protocol or needs using recording, then it needs to choose “With ADTS header” under AAC format.
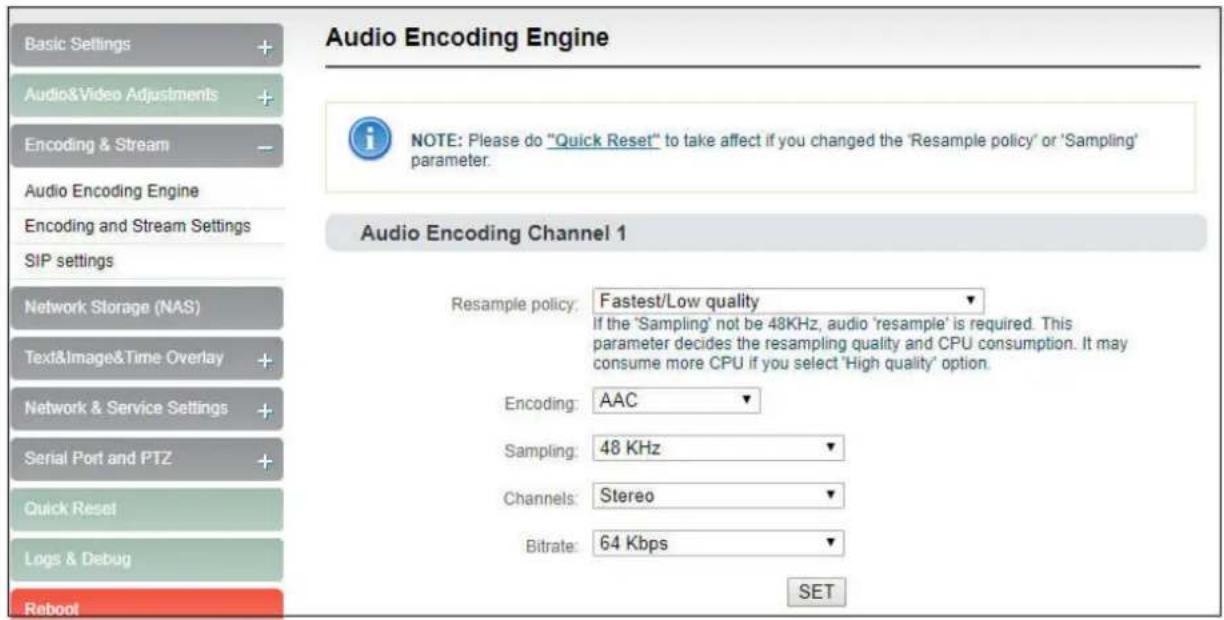

Note: Please do "Quick Reset" to take affect if you changed the 'Resample policy' or 'Sampling'
parameter.
7.5.2 Encoding and stream settings
Video encoding parameters are adjustable. Click “Encoding &Stream”, pull downward “Encoding and stream settings” to enter below interface. We generally set parameters of “H.264 main stream”, click “Setting”.

Note: It is H.264 Main stream, the second setting, not Motion JPEG setting.
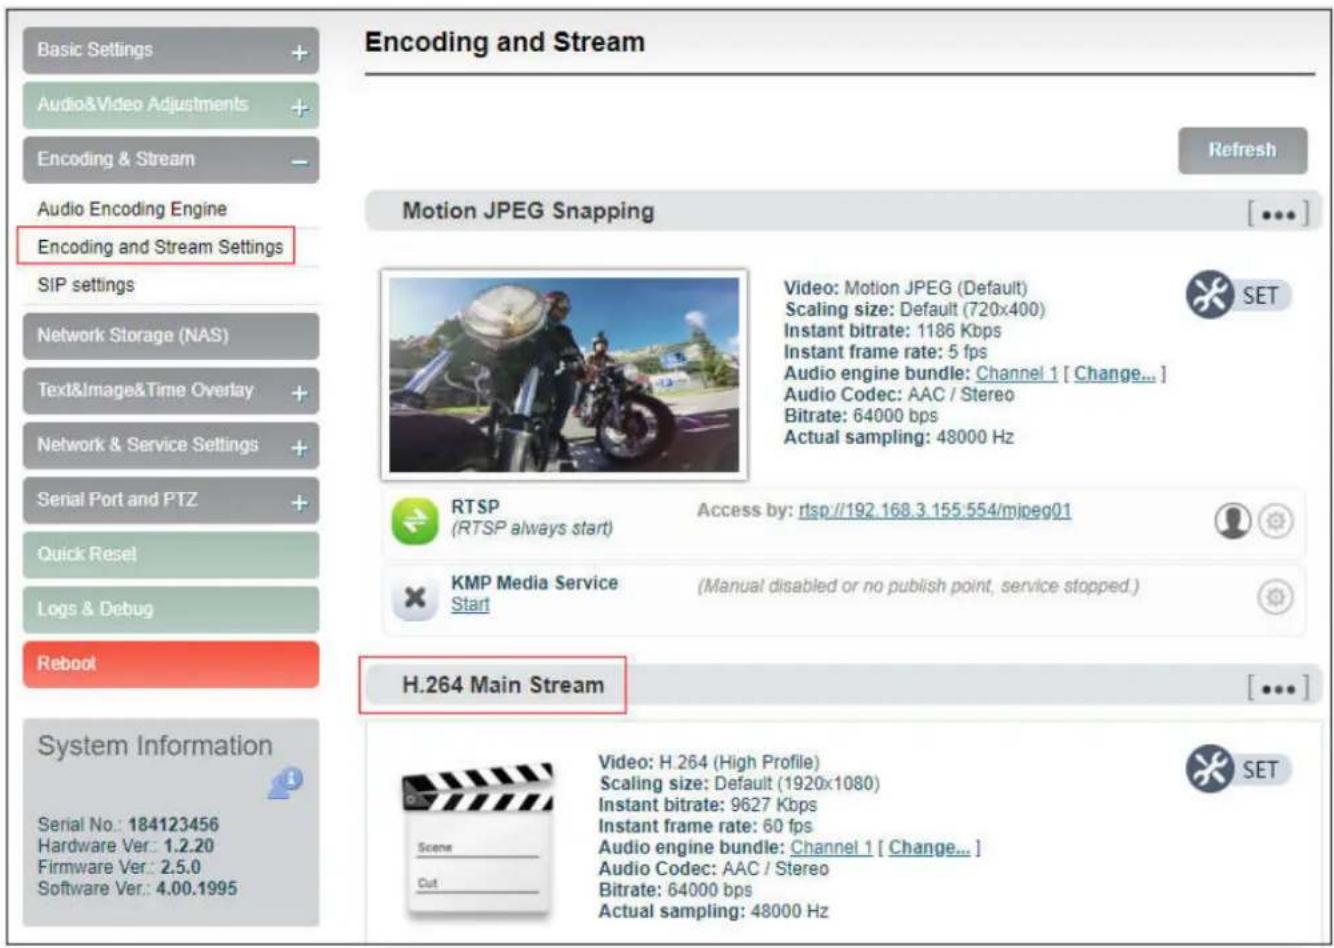

Note: For NDI, the sub-stream of the encoder must always be in the running state, otherwise may cause the NDI stream to have no audio.
Click SET, entering into below interface for main streaming encoding parameters setting, as follows:
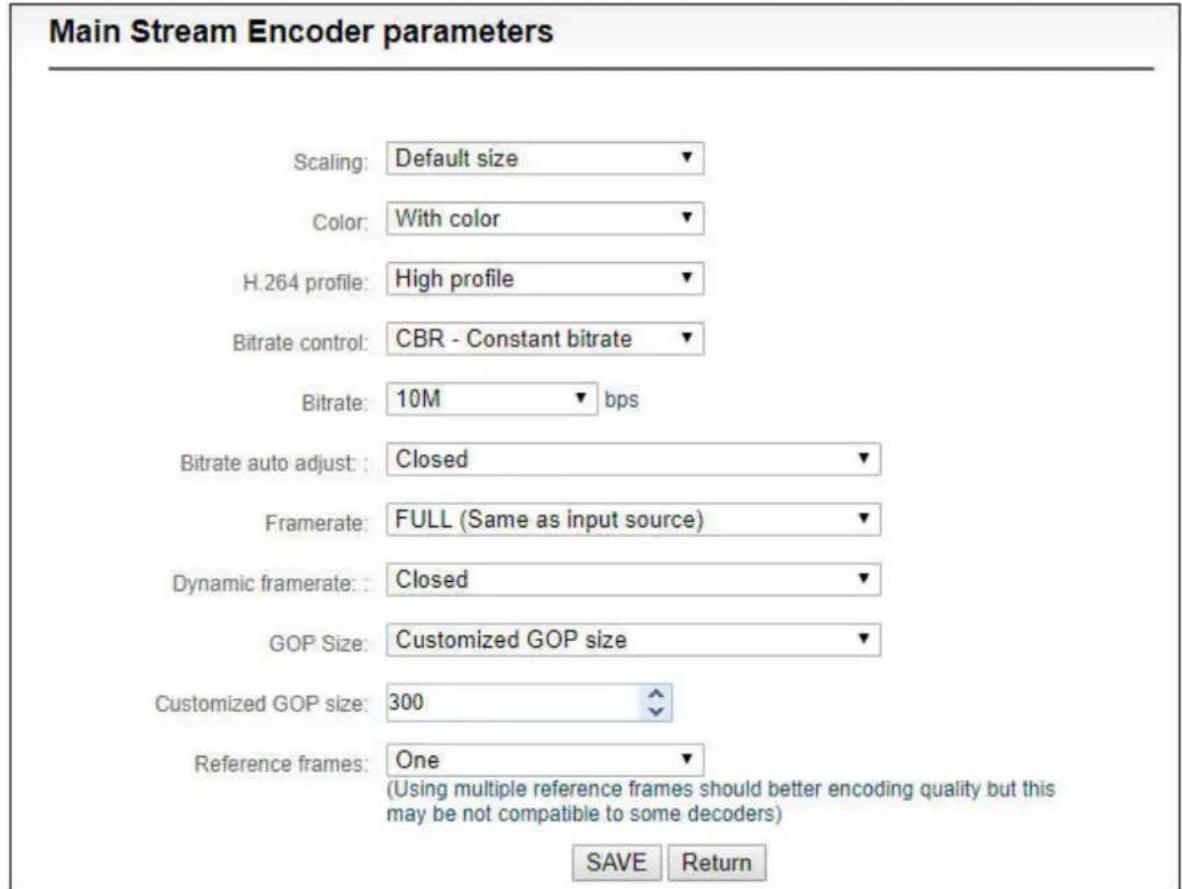
“Scaling” has 9 options for choice. Default setting is “Default size”, that is, the video size after encoding is the same as the input video size.
“Color” has two options: “With color and monochrome”. Monochrome is black and white color, “with color” remains the original color. Default setting is “With color”.
“H.264 Profile” supports High profile, main profile, baseline, which is set according to platform supported encoding profile. High Profile is the highest compression efficiency, that is, under the same bitrates, image quality is the best; Baseline is the most widely supported; default setting is High Profile.
“Bitrate control” has two ways: CBR-Constant bitrate and VBR-Variant bitrate. From literal meaning, CBR is stable and unchanged bitrate, while VBR is constantly changing according to actual content. Generally, network transmission adopts CBR to guarantee transmission quality, while file storage uses VBR to guarantee file quality. Default setting is CBR-Constant bitrate.
“Bitrate” supports adjustable 64K-25M. Users could choose default setting, or self-define bitrate size. The higher bitrates, video quality after encoding is better. But specific setting should be based on actual network situation, couldn’t be higher than your own upstream bandwidth.
“Framerate” has three options: FULL (same as input source, HALF (half when source framerate>=50 and customized framerate. “FULL” means framerate after encoding is the same as the framerate of input source; “HALF” means if input video is 1920*1080P50, video framerate after encoding will be 25. This will be a good saving on the consumption of network bandwidth; customized framerate is user assigning framerate after encoding, in theory, it shouldn’t be higher than original framerate.
“GOP size” has five options and supports user-defined adjustment. It is adjustable according to actual situation, default is 60, and normally it could meet the most majority of needs.
“Reference frames” has two options: one and multiframe. Theoretically using multiframe can improve encoding quality, but some decoders and players may not support multiframe.
Substream parameter setting refers to Main stream configuration
7.5.3 Streaming media service
E series NDI encoder currently support streaming services include: NDI stream, RTMP push, TS-UDP push,HLS service, SRT service (not support RTSP pull stream currently).
One code stream can run up to 8 stream services at the same time for the encoder, which means it can push the video stream to 8 different live platforms. There are two code streams (the main stream and substream) for the encoder, so the encoder can stream up to 16 different live platforms at the same time. In general, the main stream is enough, and the sub stream is mainly used in the security monitoring field to achieve the docking usage with the NVR.
- Motion JPEG stream
Encoder has a Motion JPEG stream, it keeps running without stop. It is blank with blue color if without video access. If with a video signal access, Motion JPEG stream will display the content of current flow “the video signal lock” displays locked and it will display the current video signal format.
![Motion JPEG Snapping Video: Motion JPEG (Default) Scaling size: Default (720x400) Instant bitrate: 1603 Kbps Instant frame rate: 5 fps Audio engine bundle: Channel 1 [ Change... ] Audio Codec: AAC / Stereo Bitrate: 64000 bps Actual sampling: 48000 Hz](/content/2026/05/813354/images/747e58fc3d15d7c04a23e06a9eff225a5a50bdbd15ca4b2a41e10f8d68e69f99.jpg)
Note: Motion JPEG stream is a picture preview, refresh every 3 seconds, or click the mouse to refresh, so it is normal to see it is not fluent on the page.
● RTMP Pushing (Live streaming)
Using RTMP pushing, the first thing is to make sure platform providing RTMP pushing address, otherwise our encoders couldn't do RTMP pushing (Currently some live streaming APP couldn't provide RTMP pushing address.)
Note: The principle of RTMP push stream is that it must be pushed from the encoder to the platform. The computer/decoder then pulls the RTMP stream from the platform for playback. The encoder cannot directly push the RTMP stream to the computer/decoder for playback.
YouTube live streaming
“Streaming point” is RTMP address given by platform (Take YouTube as an example). (Other platforms are similar, if any questions please contact platform technical support for help).
1) Login to YouTube, get below address:
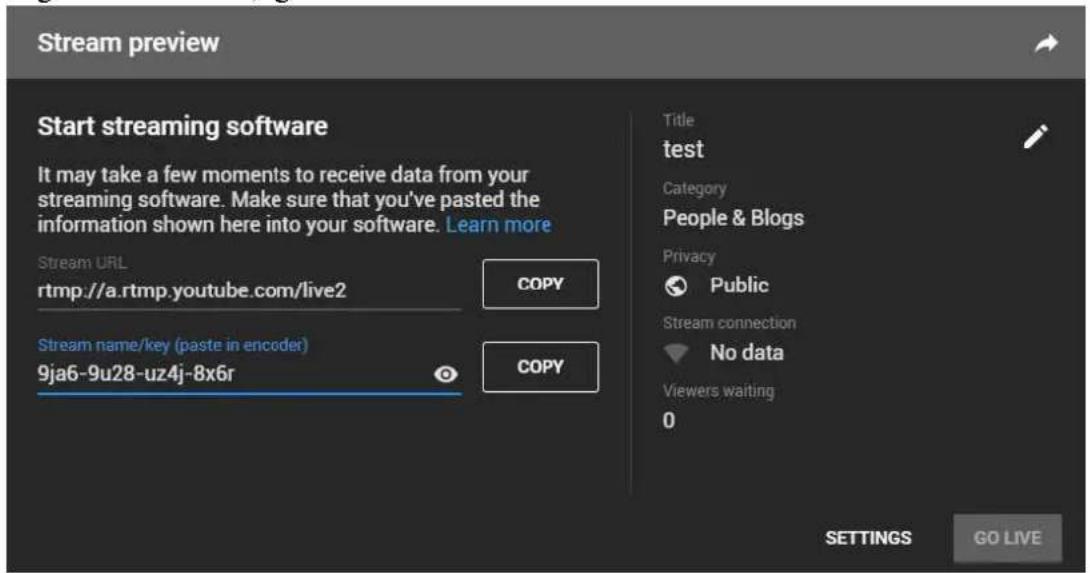
Streaming point should be like Server URL+Stream name/key, for example: rtmp://a.rtmp.youtube.com/live2/9ja6-9u28-uz4j-8x6r
2) After you get the RTMP URL address, you need to set it up in the encoder. In the main stream of H there is a stream service option to be added. By adding a RTMP push, you can get a RTMP push option. Click the settings button on the right side of the RTMP push, and you will enter the interface to fill in RTMP push configuration. The push address on YouTube platform is filled in the "push point", and set "Enable pushing" to "Yes". Click "Save", then RTMP will stream to YouTube.
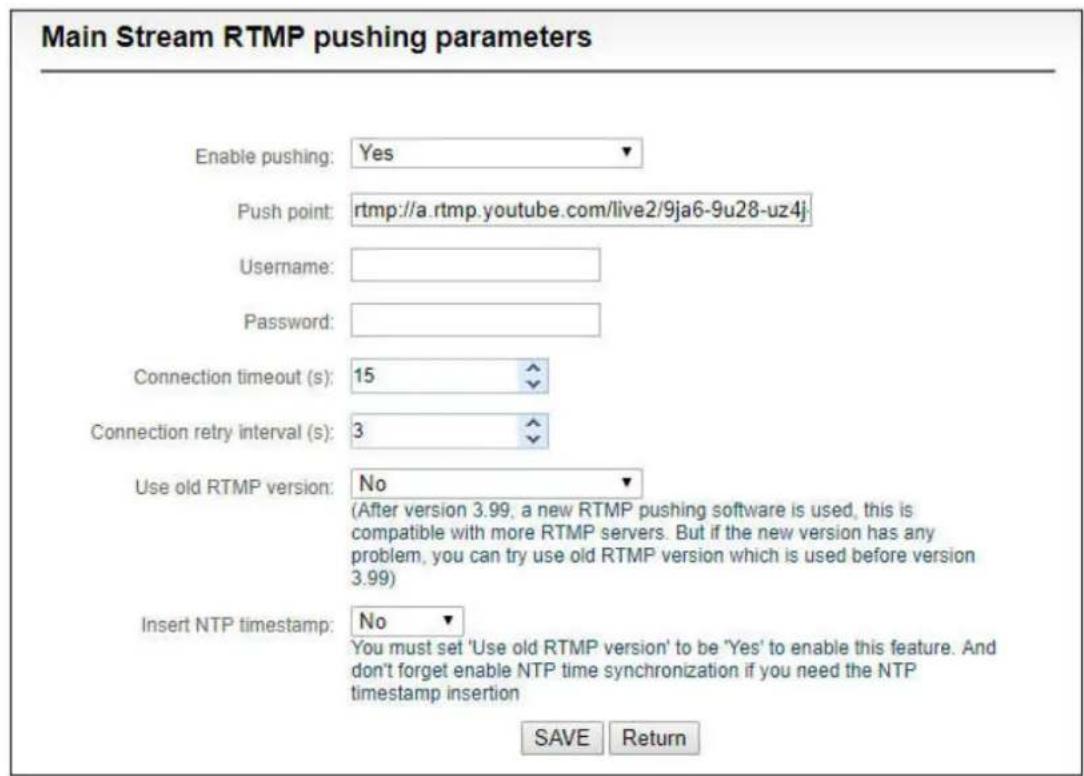
If the platform requires user name and password verification, you also need to fill in the corresponding parameters in the encoder.
3) On YouTube platform, if the video can be displayed, the push stream is successful, otherwise you need to check the network and other configurations.
Note: In the case of RTMPS push mode, fill in rtmps URL at Push point and set 'Use old Version' to yes, so that it can be supported.
• TS-UDP Pushing (unicast and multicast)
Click to select TS-UDP Pushing, then entering into TS-UDP setting interface.
TS-UDP pushing divides into unicast and multicast. If using unicast, “pushing target address” is device IP address of receiving TS streaming. “Target port” is any port, but it is better not conflicted with other service port. No need to change Multicast TTL; If using multicast, “pushing target address” needs to write a correct multicast address (224.x.x.x \~ 239.x.x.x). “Target port” is any port, but it is better not conflicted with other service port.
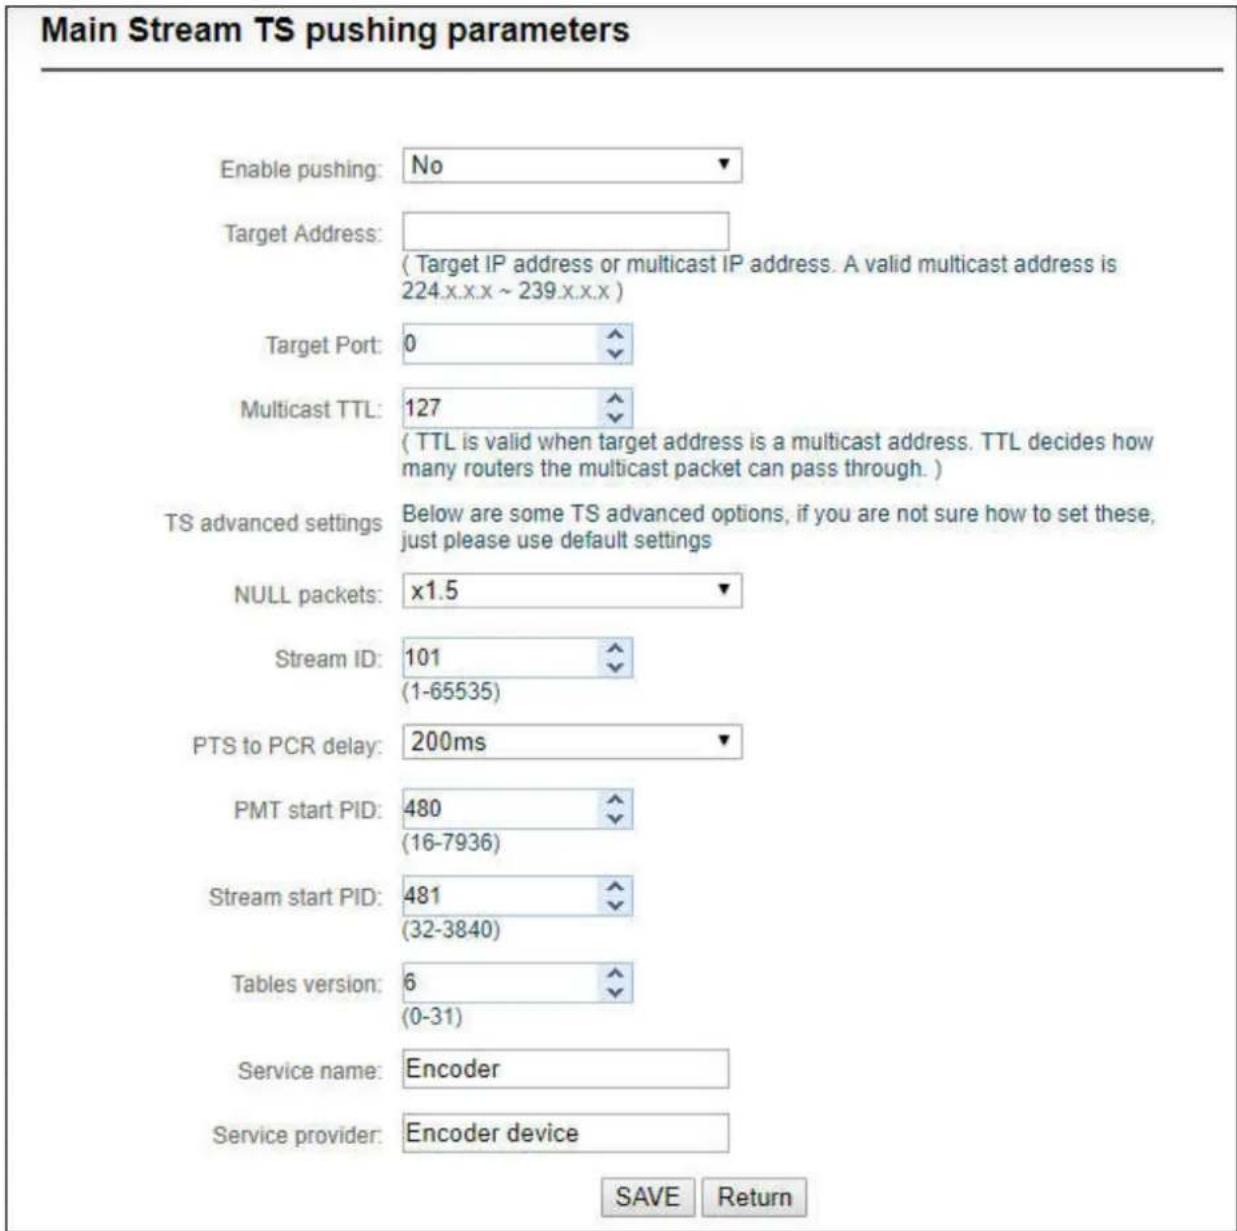
After finishing setting, it will come up an URL address from TS-UDP pushing, which could be decoded through VLC or other decoding player. If it is multicast, please remember to close Windows firewall.
![H.264 Main Stream Video: H.264 (High Profile) Scaling size: Default (1920x1080) Instant bitrate: 9384 Kbps Instant frame rate: 60 fps Audio engine bundle: Channel 1 [ Change... ] Audio Codec: AAC / Stereo Bitrate: 64000 bps Actual sampling: 48000 Hz Record Start Record Stopped RTSP (RTSP always star…](/content/2026/05/813354/images/f739f6189b72baa485a46d875c69ce4ee27f240a92b72d7ba4815178dfd9f827.jpg)
- HLS service
Using HLS service, the first thing is to “add a stream service”, then click right-side SET icon of “HLS service” for setting.
Below is setting interface of HLS service. Very simple, if no special requirements, no need setting, only enable service.
Main Stream HLS service parameters
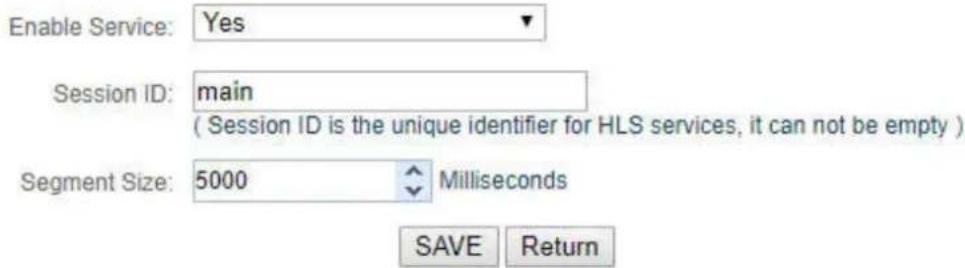
Once enabling service, it will get one HLS Publish point. You could watch it through VLC and other players using this address.
![H.264 Main Stream Video: H.264 (High Profile) Scaling size: Default (1920x1080) Instant bitrate: 9759 Kbps Instant frame rate: 60 fps Audio engine bundle: Channel 1 [ Change... ] Audio Codec: AAC / Stereo Bitrate: 64000 bps Actual sampling: 48000 Hz SET Record Start Record Stopped i RTSP (RTSP alway…](/content/2026/05/813354/images/dbf47bf625e5acccbf2cafe61f7aa10cbe30c905487033b6576e579d9ac3e8fc.jpg)
- SRT service
Click "Encoding & Stream"--"Encoding and Stream Settings"--"H.264 main stream"--"Add a stream". Choose "SRT-TS pushing", click "OK" and add a SRT service.
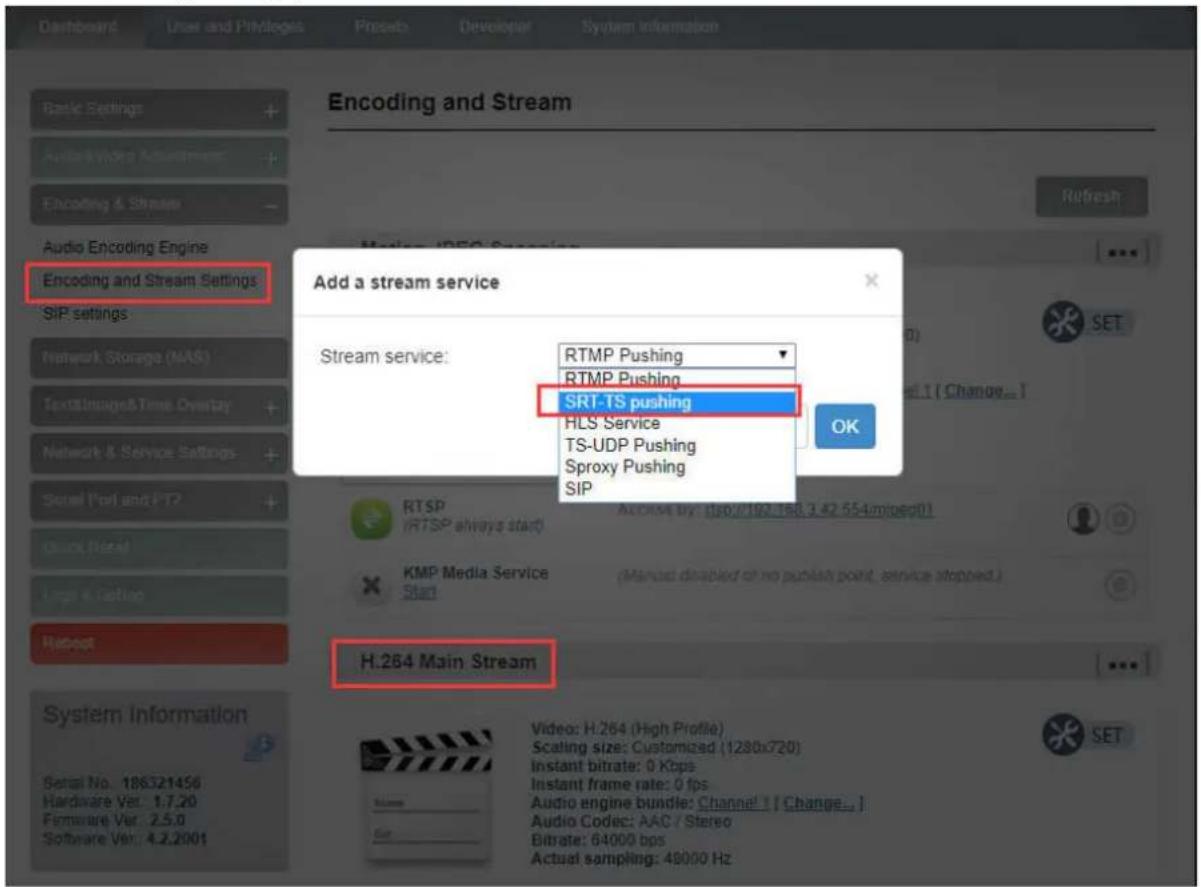
Click the icon for SRT configuration.

SRT-TS pushing Stop
Publish point: srt://192.168.3.139:6001

Fill in the pushing address and port, click “Save”. Then SRT pushing is working.
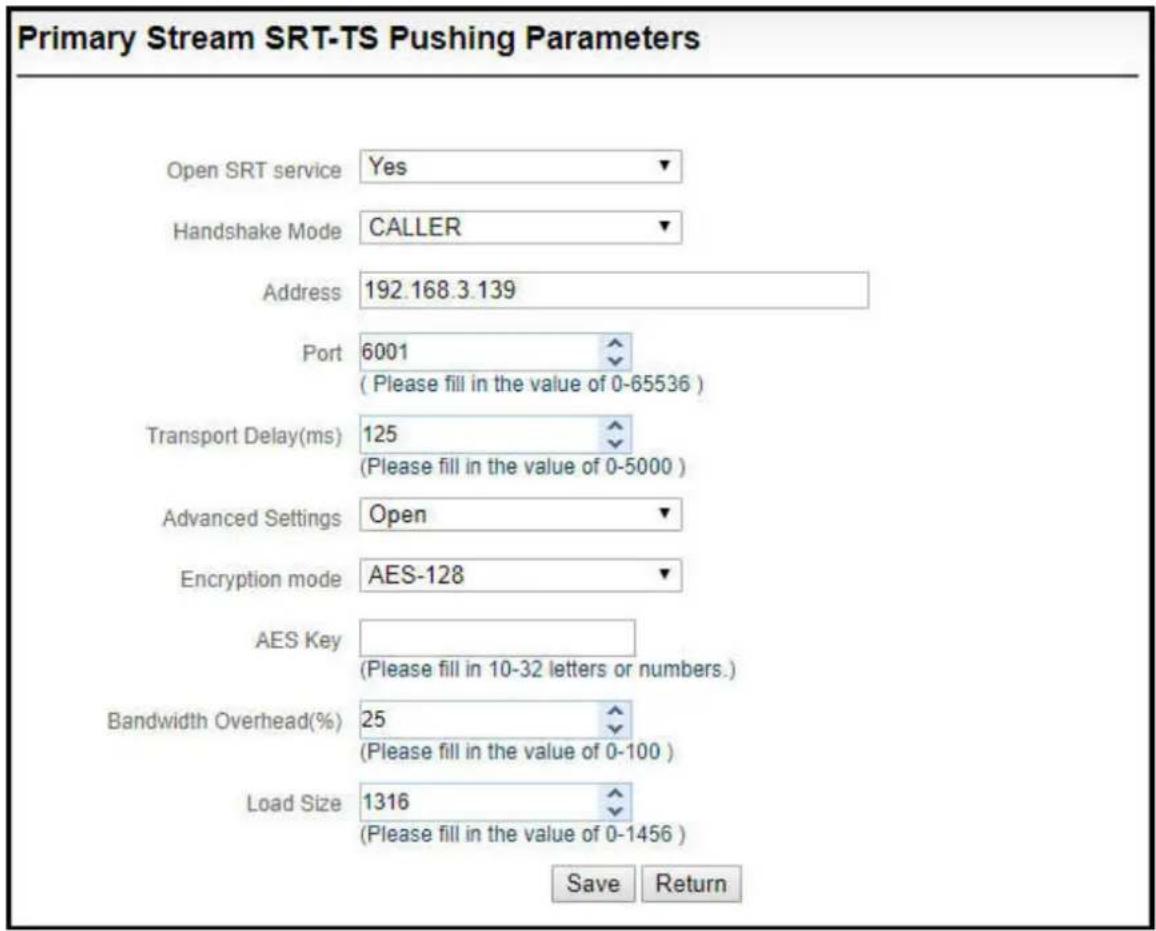
Setting parameters means the following:
▶ Open SRT service:yes or no;
➢ Handshake mode: The device set as CALLER mode will act as the caller of SRT session;
Address: Set IP address of the receiver;
➢ Port: Set the listening port corresponding to thereceiver;
➢ Transport delay: Set it based on the performance of the current network, the delay value can be set on both the SRT source device and the SRT target device. The final SRT transmission delay will be the larger one of the two values. Default is 125ms;
▶ Advanced settings: Open and Close;
Encryption mode: AES-128, AES-192, AES-256;
➢ AES key: Encryption key can be 10-32 letters or numbers combination;
Bandwidth overhead: It is set as the percentage value based on network link quality. Using this value to multiply the total bitrate of the audio and video encoded by the encoder, this will get the occupie maximum bandwidth allowed by Bandwidth Overhead. This value plus the total of video and audio bitrate is the threshold of the current SRT transmission bandwidth, and also the maximum bandwidth that SRT stream can be used. From the perspective of "overhead", it is the extra "invalid" bandwidth to be used in addition to the media content required for transmission (which can be understood as the payload), but it is different from our common protocol overhead, TCP header overhead, UDP header
overhead. The bandwidth overhead here is not a fixed 20\~60 bytes TCP header overhead or 8 bytes UDP header overhead. It changes in real time according to the network conditions. The worse the network link conditions are, the more overhead needs for normal transmission. The range is 5%\~100%, and the default overhead is 25%;
Load size: Sending data packet size, it is optimal that the receiver should equip with the same size. The default size is 1316, which is the optimal packet for the encoder.
Note: Below format is the reference delay value under different packet loss. Wa20nRTTit requires to increase the delay appropriately.
| Network highest packet loss rate(%) | RTT Multiplier | BW Overhead | The lowest SRT delay (when RTT≤20ms) |
| ≤1 | 3 | 33 | 60 |
| ≤3 | 4 | 25 | 80 |
| ≤7 | 5 | 20 | 100 |
| ≤10 | 6 | 17 | 120 |
Save the settings, then a SRT-TS pushing address will be added. The encoder starts to initiate a handshake connection to the receiver.

SRT-TS pushing Stop
Publish point: srt://192.168.3.139:6001

7.6 Local recording
E series NDI encoders support local recording function. Encoder with TF card-slot can support TF recording and meanwhile it supports USB disk inserted into USB port of encoder for recording. The recording operation is as follows:
1) Click “Record” below “H.264 Main Stream” under “Dashboard” or “Encoding and stream setting”.
![H.264 Main Stream Video: H.264 (High Profile) Scaling size: Default (1920x1080) Instant bitrate: 9759 Kbps Instant frame rate: 60 fps Audio engine bundle: Channel 1 [ Change... ] Audio Codec: AAC / Stereo Bitrate: 64000 bps Actual sampling: 48000 Hz Record Start Record Stopped](/content/2026/05/813354/images/c4ad979cbbcc0a1c817c28ab6eb23f530c7bc73e24ddc8c5aedc7b6e33b5bae8.jpg)
2) Click "Record settings" icon for setting
Main Stream Record Settings
About Record

Set the record parameters here.
Why the default format is 'TS': If you removed USB or SD/MMC disk while recording, a terrible thing may happen that is the recored file may be wrong and can not play anything, if the file format is '.avi' or '.mp4', etc. But 'TS' format can avoid this, also, the 'TS' format is compatible with almost mordern media players.

DON'T use the NTFS! This device can support NTFS file system, but no suggest to use it! The NTFS filesystem can cause high CPU using and affect other streaming functions. If you force to use NTFS, please set the encoding bitrate lower than 8Mbps.
After changed the record settings, it can only take effect in next starting record time!
(Plug in disks) Auto record:
ENABLED

Disk Selection:
Largest disk

Use the largest disk to record files, never care what disk type it is.
Record Format:
.ts file

Filename Prefix:
REC
File Limitation:
Size limited, split to multiple files

Size Limitation
4000000

Overwrite:
Overwrite old records if no space

SAVE
Note: A real challenge for recording by removable disks: If you remove the storage disk while recording, the recorded file may be wrong and can not be played if the file format is '.avi' or '.mp4', etc. But 'TS' format can avoid this, also, the 'TS' format is compatible with almost all the main media players.
If recording is performed in a non-TS format, when the recording is completed, stop the recording manually, and then remove the storage device to ensure the recording can be played normally.
3) By default, it automatically starts recording when storage disks inserted, regardless its storage type. It will record to the biggest available storage area. Recording format is TS file by default. Users could set recording for automatic cutting based on specified size. And when storage space is insufficient, it will automatically overwrite the old video file to achieve redundant storage.
4) Click to check recording status and record list.
- When no disks inserted or NAS network storage not set, the status will be as follows, dashboard will show “Stopped”
![H.264 Main Stream Video: H.264 (High Profile) Scaling size: Default (1920x1080) Instant bitrate: 18 Kbps Instant frame rate: 25 fps Audio engine bundle: Channel 1 [ Change... ] Audio Codec: AAC / Stereo Bitrate: 64000 bps Actual sampling: 48000 Hz Record Start Record Stopped i](/content/2026/05/813354/images/a2f42c66ba716a4c09d5c2e641db850b5d01d8720f77b3e5c3e5f4b12a275b79.jpg)
Record status shows "No valid disks" and "No records".
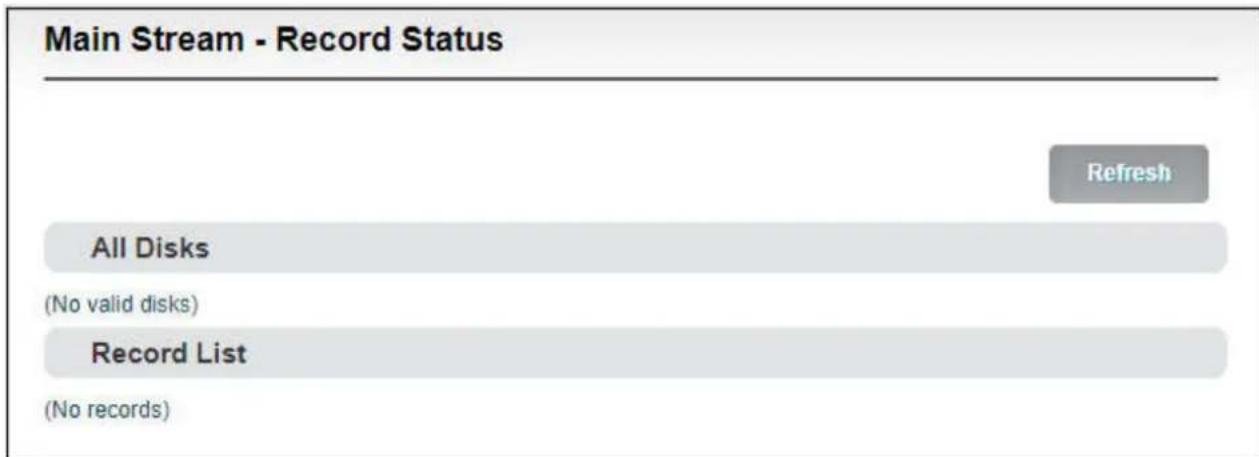
- After inserted disks, the encoder will start recording automatically and the dashboard shows "Recording".
![H.264 Main Stream Video: H.264 (High Profile) Scaling size: Default (1920x1080) Instant bitrate: 18 Kbps Instant frame rate: 25 fps Audio engine bundle: Channel 1 [ Change... ] Audio Codec: AAC / Stereo Bitrate: 64000 bps Actual sampling: 48000 Hz Record Stop Record Recording (TO: USB Storage, FORMA…](/content/2026/05/813354/images/068245025186736e6c5e7b2de395e608b338700023798473143b99ea48706ace.jpg)
The "Video Status" is shown below, where you can view the usage of the memory or download the video files that have been stored in the memory to the computer.
![Main Stream - Record Status Refresh All Disks WIN10 [vfat] Total: 29.46 GB, Free: 25.7 GB Used: 13% Record List FILE: REC-20190704151459.ts 291.51 MB Download Sequence: M-20190704_151459_0000 [CURRENT RECORDING] Start time: 2019-07-04 15:15:11, End time: 2019-07-04 15:18:41; FILES: 1, Total Size: 29…](/content/2026/05/813354/images/c4f7e23300aeb1eebe94cb70abc269095d54d58bd6a6c445fc85377bfa5ed0ab.jpg)
- When it is recording, users can stop the recording manually and it can be restarted again.
Note: When recording with TF card, it only supports formats of NTFS.FAT32 or vfat. For TF cards over 64G, the default formatting is exFAT under the formatting program of Windows system, which may lead to the TF card unrecognizable.
Sometimes, due to the influence of some files or programs in the TF card, the TF card can not recognized. You need to format the TF card once.
7.7 Network Storage(NAS)
NAS is a Disk Arrays connected by network, it has all the main characteristics of disk arrays: high capacity, high efficiency and high reliability.
Open NAS Manager, click "add NAS", then fill in the corresponding parameters.
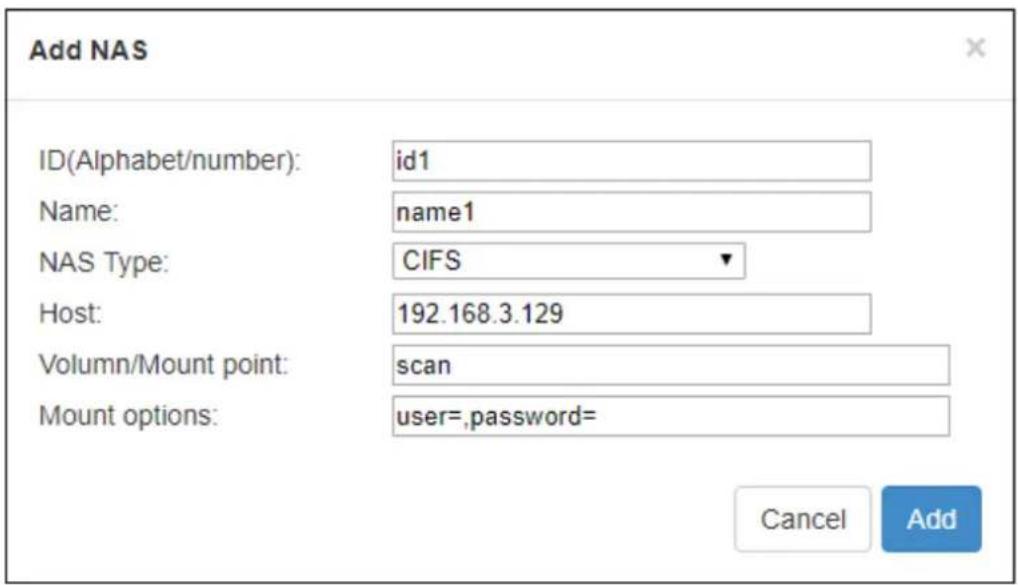
ID/ Name: Any Alphabet/number
- NAS Type: NFS or CIFS (CIFS is a shared protocol for network connection, which requires high reliability of network transmission, TCP/IP is usually adopted; NFS is transport-independent, TCP or UDP is adopted; One of the disadvantage of NFS is, it requires the user to install a special software while CIFS is integrated inside the OS, and no additional software is needed.)
- Host: IP address of the Host
● Volumn/Mount point: Storage location on the host
- Mount options: Settings about the user name and password.
NAS manager will show “Mounted” if NAS connection has been established, and there is a RECORD file under the Mount point. If the connection is abnormal, it will be displayed as “Mounting”.
![NAS Manager Refresh asdf | af [Mounting] cifs 192.168.2.6:scan (no options) id1 | name1 [Mounted] cifs 192.168.3.129:scan (user=,password=) Add NAS ...](/content/2026/05/813354/images/bf88eb059f87d88fecaf7c12fb583c7ece946f58d1da65359766a43b513c6ef2.jpg)
7.8 Text/ Image/Time overlay
Please open the “Overlay image management” to upload an image first if you want to make image overlay; if text or time overlay, you can set the overlay function directly.
7.8.1 Overlay Image Management
Enter “Image Management” --- fill in “ Image ID-- Choose the image file that you want-- click” Add”, then image is uploaded to the Encoder storage. You can check the image and information listed under the Image list.
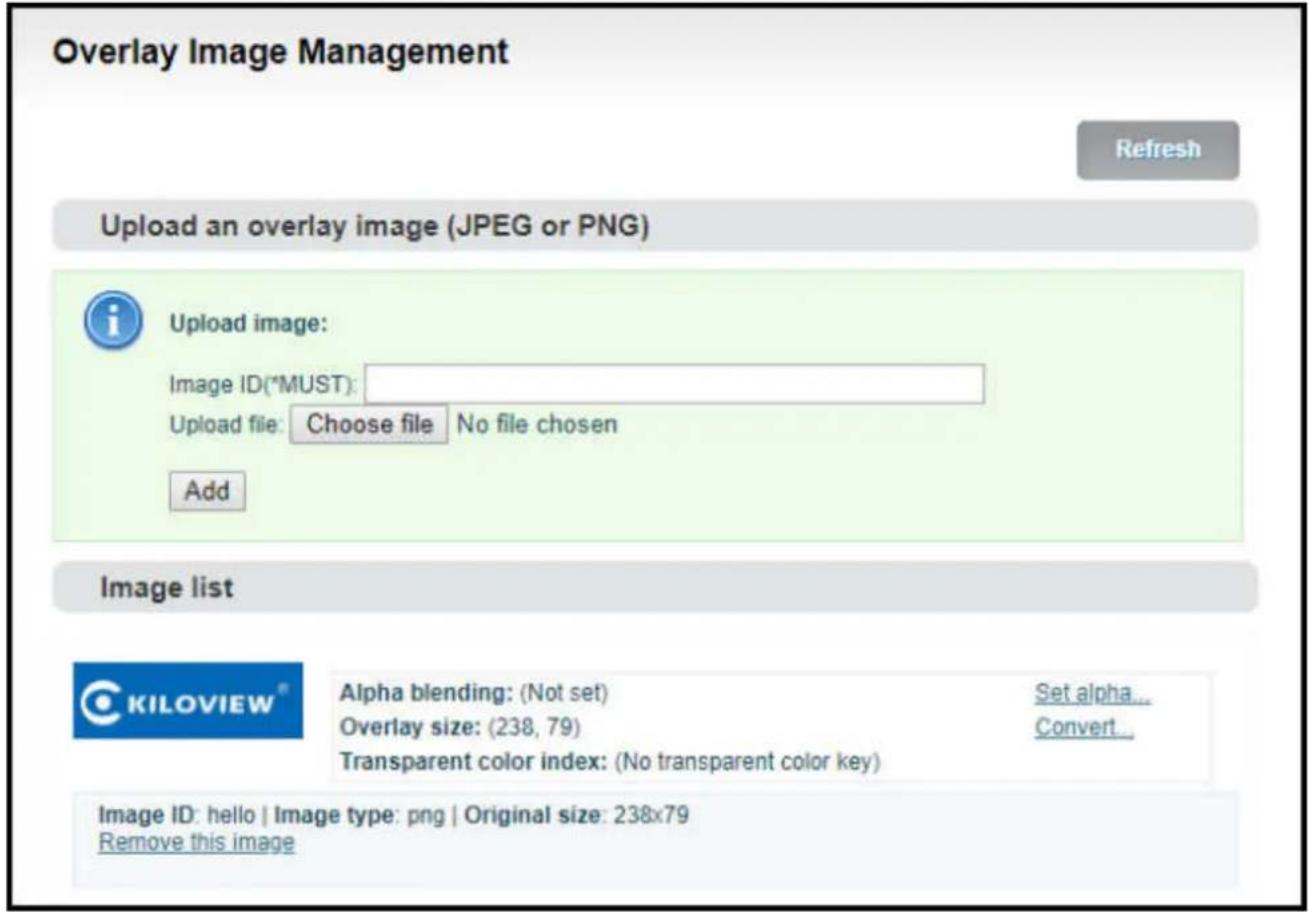
You can change the parameters after uploading the image
Set alpha blending: Value range is 0-255, 0 is full transparent and 255 is no alpha blending.
Convert:
● Image size: If width/height set to 0, it will overlay the image as original size.
● PNG transparent threshold: If the original PNG transparent level is less than the threshold value, overlay that area as full transparent. Set a reasonable value can make the image border be smooth.
- Transparent color index: Manually specify an index color to erase background. Set tolerance (0%\~100%) to control the similar color range selection. In most cases, transparent PNG images do not need to be processed manually.
7.8.2 Overlay function
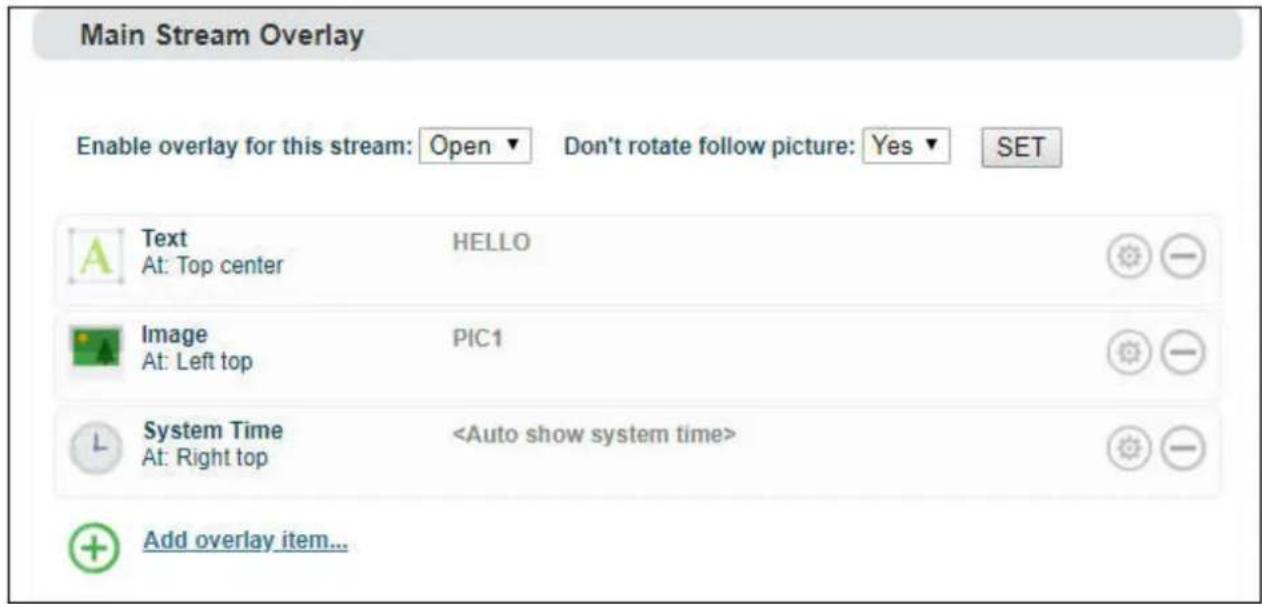
Go to the overlay settings page, in the settings of "Main stream", please choose "open" to enable overlay, for "Don't rotate follow picture", please choose yes or no. Then choose "Add overlay item" to set overla functions for "Text", "Time" and "Image" respectively. You can set multiple overlays at the same time
Text and Time Overlay
Refresh

NOTE: If you require more fonts/languages support, please contact our technical support. We can customize more fonts/languages, by upgrading a language patch firmware.
Main Stream Overlay
Enable overlay for this stream:
Open ▼
Don't rotate follow picture:
Yes ▼
SET

Add overlay item...
Add overlay item ( text)
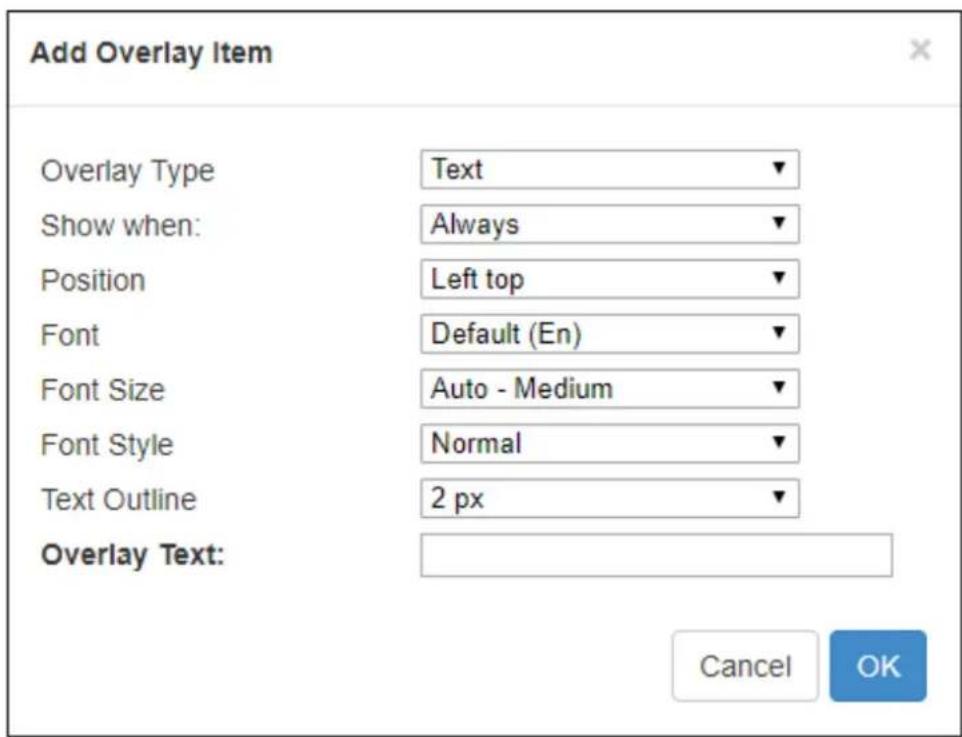
For every overlay, you can set the terms of overlay, position, font and font size, Image or text content also on. After adding that, it will be shown as follows:
After encoding, the overlay will be shown as follow:
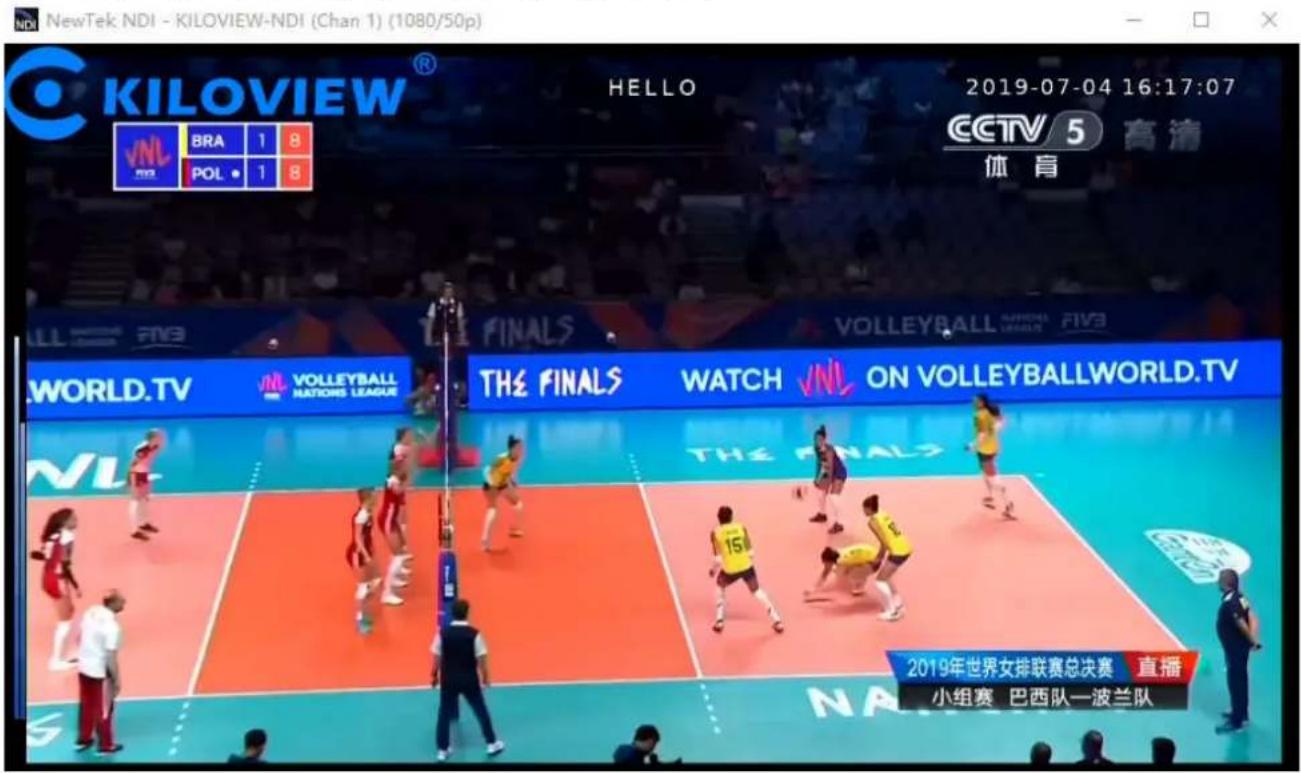
- The resolution of uploaded image can not be over the video. If the resolution of the video is 1920*1080, and the uploaded image is 3840*2160, then the image overlay will fail to display.
- Please pay attention to the overlay position, if you add image, text and time with the same position, then some overlay may fail to display.
- If the added image occupies the majority of the video screen, the actual bitrate and the set bitrate will be greatly reduced due to the low screen dynamic fluctuation.
- For the image format, only JPEG and PNG supported.
7.9 Service Configuration
7.9.1 Web Service Configuration
The default web service port is 80 (https port is 443). You can change it (range: 1-65535) accordingly.
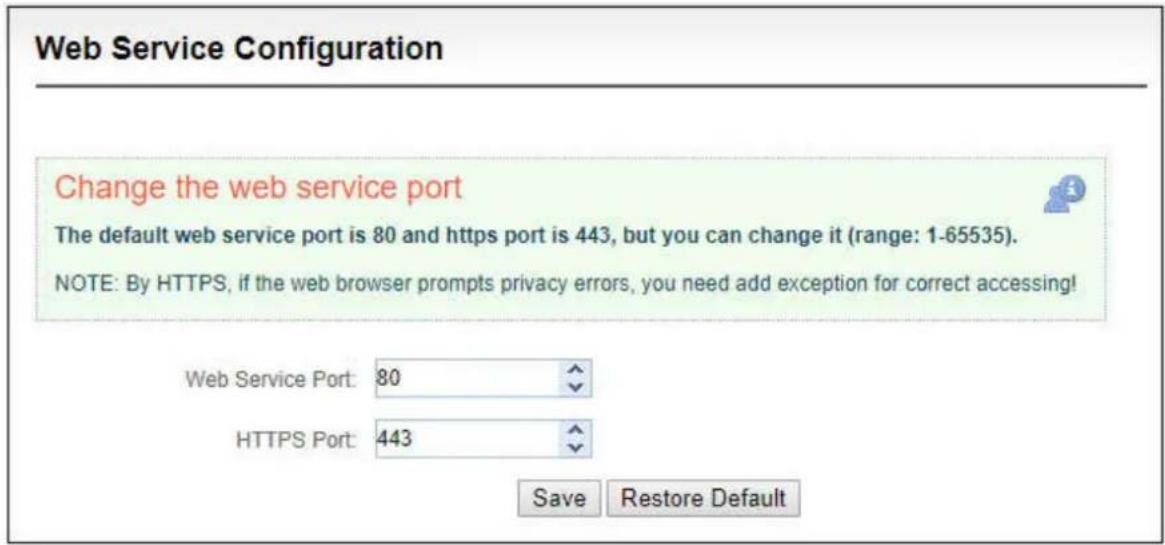
Note: By HTTPS, if the web browser prompts certificate errors which is caused by the browser certificate security authentication, you will need to add it to the safe list of the browser.
7.9.2 Onvif Service Configuration
Note: Since the NDI discovery function of NDI device use similar principle of onvif, onvif discovery is not supported on E series devices currently.
7.9.3 Telnet Service Configuration
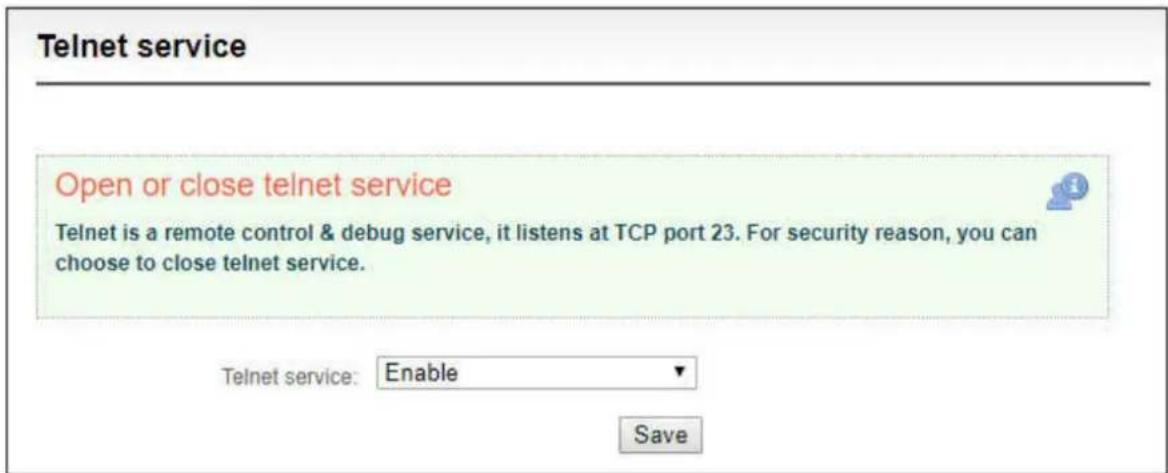
Telnet service listens on port 23 for remote connection and debugging of devices. For security reasons, you can choose to close telnet services.
7.10 Serial Ports and PTZ
7.10.1 Serial Ports
With USB to RS232/RS422/RS485 adaptor (cable), after connecting to USB port, if the device and identify the serial port correctly, USB port will be listed at "Device", then you can set the corresponding serial port parameters.
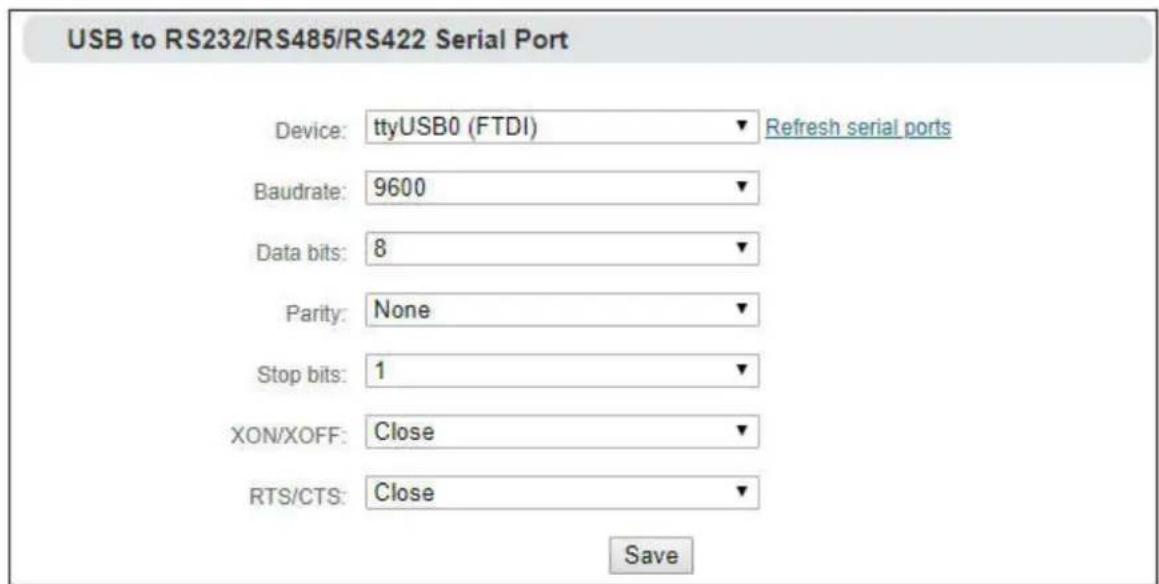
Note: The encoder can automatically identify the USB serial port conversion device of universal USB to Serial/FDTI chip/PL2303 chip. If the USB to RS232/RS422/RS485 converter (line) you inserted cannot be recognized and the converter chip is not supported by default, please replace the serial line.
7.10.2 PTZ Setting
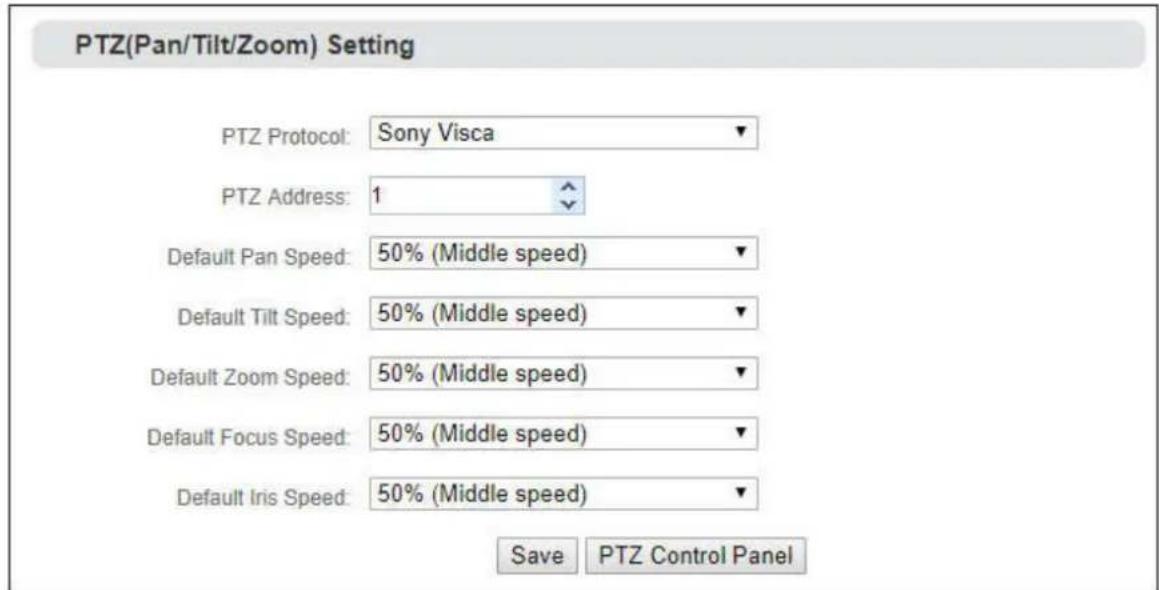
The encoder can control the PTZ camera via Sony Visca.Pelco-D.Pelco-P protocols, you can also set the control speed.
7.10.3 Control Panel
Through the web page of the encoder, you can control the movement, zoom and focus of the camera in all directions.
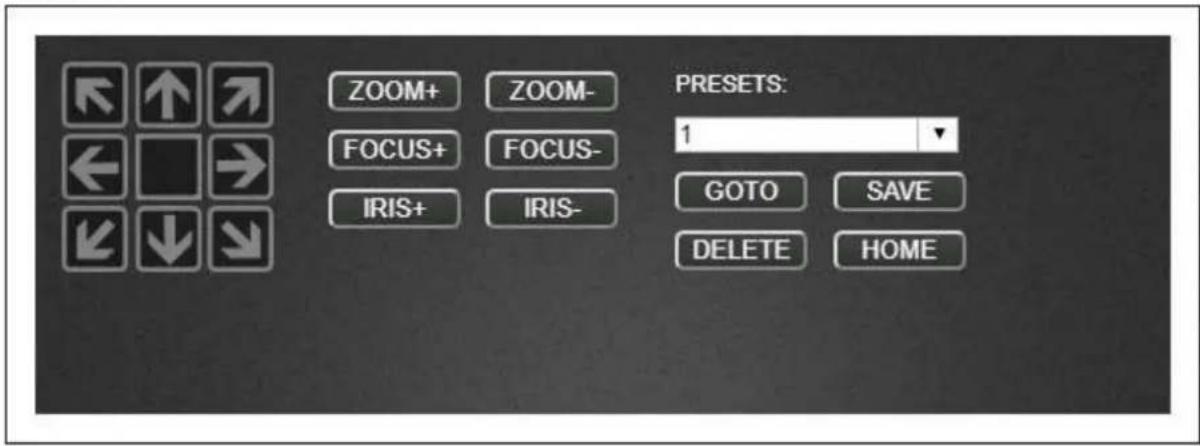
Note: In the future, the PTZ function of Newtek Studio Monitor, ONVIF Device Manager and other software can be docked with the encoder control panel through product function docking, so to realize the direct control of the front-end camera.
7.11 Quick Reset and Reboot
7.11.1 Quick Reset
"Quick Reset" is used to quickly reset the video encoding service of the encoder, normally it's used to parameters come into force after modification or encoding abnormal, the current encoding service will be stopped and it will take about 3 seconds.
7.11.2 Reboot
"Reboot" is used to restart the device software, it will take about 3 minutes.
7.12 Logs and Debug
System logs are available for download, which can be provided to technical service engineers for technical analysis.
![Logs Codec Streaming Web Buttons/Leds/Display Kernel History Logs Pack Current Logs Refresh [07-04 16:48:37] (L3) StopSession (258) RECORD-GROUP: Stop session of 0x1b59420 [07-04 16:48:37] (L3) doStopGettingFrames (322) video: Stopped get frames. [07-04 16:48:37] (L3) doStopGettingFrames (322) audio…](/content/2026/05/813354/images/da428f7f7ea5685e71f53d184ec5cb25f2068c80f577de4e473e2db65f0dc33d.jpg)
Thank you for reading.
Changsha KILOVIEW Electronics CO.,LTD.
Service Hotline: 86-731-88315979
Website : en.kiloview.com
Technical support Email: support@kiloview.com
WhatsApp: +86-18573195156/18573195256
Skype:kiloview-support/keqiu wang
Address: 188#, Middle Huanbao Rd, Yuhua District, Changsha, Hunan Province, China
- E SERIES NDVIDEO ENCODER
- USER MANUAL
- LEGAL NOTICES
- CONTENTS
- 1 PRODUCT INTRODUCTION....1
- 3 PACKING LIST AND INTERFACE DESCRIPTION....4
- 4 INSTALLATION AND CONNECTION....6
- 5 LOGIN AND NETWORK CONFIGURATION....7
- 6 NDI....12
- 7 PARAMETERS CONFIGURATION....15
- 7.4 VIDEO & AUDIO ADJUSTMENTS....19
- 7.5 ENCODING & STEAM....21
- 1 PRODUCT INTRODUCTION
- 1.1 ADVANTAGES
- 1.2 PARAMETERS
- 2 OPERATION GUIDANCE
- 3 PACKING LIST AND INTERFACE DESCRIPTION
- 3.1 PACKING LIST
- 3.2 INTERFACE DESCRIPTION
- 3.3 SIGNAL INDICATOR
- 4 INSTALLATION AND CONNECTION
- 4.1 POWER CONNECTION
- 4.2 VIDEO SIGNAL CONNECTION
- 4.3 NETWORK CONNECTION
- 5 LOGIN AND NETWORK CONFIGURATION
- 5.1 LOGIN TO THE DEVICE THROUGH ETHERNET
- 5.2 NETWORK CONFIGURATION
- 5.3 CONVENIENT MANAGEMENT FUNCTIONS
- 5.4 ANDROID APP
- 6 NDI
- 6.1 NDI|HX DRIVER INSTALLATION
- NEWTEK NDI® TOOLS
- WINDOWS
- MAC
- 6.2 NDI DISCOVER AND CONNECTION
- 6.3 MODIFY NDI DEVICE NAME AND CHANNEL NAME
- 6.4 MODIFYING NDI BIT RATE
- 7 PARAMETERS CONFIGURATION
- 7.1 DASHBOARD
- SYSTEM
- VIDEO/AUDIO SIGNALS
- 7.2 BASIC SETTINGS
- 7.3 CHANGE WEB LOGIN PASSWORD
- 7.3.1 LOCATION AND TIME
- LOCATION & TIME SETTING
- DATE & TIME SETTING
- 7.3.2 RESTORE FACTORY SETTINGS
- 7.3.3 FIRMWARE UPGRADING
- FIRMWARE AND SOFTWARE UPGRADING
- 7.4 VIDEO&AUDIO ADJUSTMENTS
- 7.4.1 VIDEO SOURCE CHOICE AND ADJUSTMENTS
- 7.4.2 VIDEO PREPROCESSING
- 7.4.3 AUDIO SIGNAL SOURCE
- 7.5 ENCODING & STEAM
- 7.5.1 AUDIO ENCODING PARAMETER SETTING
- 7.5.2 ENCODING AND STREAM SETTINGS
- 7.5.3 STREAMING MEDIA SERVICE
- YOUTUBE LIVE STREAMING
- HLS SERVICE
- MAIN STREAM HLS SERVICE PARAMETERS
- SRT SERVICE
- 7.6 LOCAL RECORDING
- MAIN STREAM RECORD SETTINGS
- ABOUT RECORD
- 7.7 NETWORK STORAGE(NAS)
- 7.8 TEXT/ IMAGE/TIME OVERLAY
- 7.8.1 OVERLAY IMAGE MANAGEMENT
- 7.8.2 OVERLAY FUNCTION
- TEXT AND TIME OVERLAY
- MAIN STREAM OVERLAY
- 7.9 SERVICE CONFIGURATION
- 7.9.1 WEB SERVICE CONFIGURATION
- 7.9.2 ONVIF SERVICE CONFIGURATION
- 7.9.3 TELNET SERVICE CONFIGURATION
- 7.10 SERIAL PORTS AND PTZ
- 7.10.1 SERIAL PORTS
- 7.10.2 PTZ SETTING
- 7.10.3 CONTROL PANEL
- 7.11 QUICK RESET AND REBOOT
- 7.11.1 QUICK RESET
- 7.11.2 REBOOT
- 7.12 LOGS AND DEBUG
- THANK YOU FOR READING
Brand : Kiloview
Model : E2 NDI
Category : Audio/video converter