
P820 - Microphone AKG - Free user manual and instructions
Find the device manual for free P820 AKG in PDF.


| Product Type | Tube Condenser Microphone |
| Brand | AKG |
| Model | P820 |
| Dimensions (microphone) | 54 mm (diameter) x 212 mm (length) |
| Weight (microphone) | 765 g |
| Power Supply | Via remote control unit, mains 210-240 V or 110-120 V selectable |
| Polar Pattern | 9 selectable polar patterns (cardioid, omnidirectional, figure-8, and six intermediate characteristics) |
| Frequency Response | 20 Hz to 20 kHz |
| Sensitivity (cardioid) | 20 mV/Pa (-34 dBV) |
| Maximum Sound Pressure Level | 135 / 155 dB SPL (0 / -20 dB pre-attenuation) |
| Signal-to-Noise Ratio | 78 dB(A) (ref. 1 Pa) |
| Electrical Impedance | ≤ 200 ohms |
| Low-cut Filter | 80 Hz, 12 dB/octave, switchable |
| Pre-attenuation | -20 dB, switchable |
| Microphone Connector | Dedicated 7-pin male XLR |
| Audio Output (control unit) | Balanced 3-pin male XLR |
| Included Accessories | Control/audio cable, spider mount, power cords (US, UK, Europe) |
| Cleaning | Soft slightly damp cloth, disconnect before cleaning |
| Safety | Use only with supplied power supply; mandatory grounding; do not open the housing |
| Operating Temperature | -10 °C to +60 °C |
| Primary Fuse | 125 mA / 250 V, time-lag |
Frequently Asked Questions - P820 AKG
User questions about P820 AKG
0 question about this device. Answer the ones you know or ask your own.
Ask a new question about this device
Download the instructions for your Microphone in PDF format for free! Find your manual P820 - AKG and take your electronic device back in hand. On this page are published all the documents necessary for the use of your device. P820 by AKG.
USER MANUAL P820 AKG
Please read the manual before using the equipment!
MODE D'EMPLOI 34
1 Safety and the environment....19
Environment....20
2 Description....21
Introduction 21
Contents 21
Optional accessories....21
Microphone 22
Remote Control Unit....23
3 Connecting to Audio Equipment 25
Connecting the Microphone....25
Connecting the Remote Control Unit to Power 26
Powering Up....26
Powering Down 26
4 Operation....27
General Hints....27
Selecting Polar Patterns 28
5 Cleaning 29
6 Troubleshooting....30
Replacing Fuses 31
7 Technical data....32
Microphone 32
Remote Control Unit....32
1 Safety and the environment

ATTENTION
Risk of damage
Please make sure that the piece of equipment your microphone will be connected to fulfills the safety regulations in force in your country and is fitted with a ground lead.
- Do not spill any liquids on the equipment and do not drop any objects through the ventilation slots in the equipment.
- Use the equipment in dry rooms only. Do not expose the equipment to rain or splash water. Never place objects containing liquids (e.g., vases) on or near the equipment.
- There are no user-serviceable parts inside the equipment. Do not attempt to service the equipment yourself. Refer all servicing to qualified personnel. Opening the chassis for any reason will void the manufacturer's warranty.
- Before connecting the equipment to power, check that the AC mains voltage stated on the power supply included with the equipment is identical to the AC mains voltage available where you will use the equipment. Also check that the power outlet is a standard type with a protective ground connection. Disconnecting the protective ground lead or using non-standard power plugs or non-standard power outlets is illegal.
- Operate the equipment with the power supply included with the equipment only. Using a different power supply may cause serious damage to the unit.
- If any solid object or liquid penetrates into the equipment, shut down the sound system immediately. Disconnect the equipment from power immediately and have the equipment checked by AKG service personnel.
- If you will not use the equipment for a long period of time, disconnect the equipment from power. Please note that the equipment will not be fully isolated from power when you set the power switch to OFF.
- Disconnect the equipment from power during storms to prevent damage.
- Make sure to route power supply cords so that they are not likely to be walked on or pinched by items placed upon or against them, paying particular attention to cords at plugs, convenience receptacles, and the point where they exit from the equipment.
- To avoid hum or interference, route all audio lines, particularly those connected to microphone inputs, away from power lines of any type. If you use cable ducts, be sure to use separate ducts for the audio lines.
- Make sure to replace the built-in fuse with a standard fuse of the same type and rating only. Using any other type of fuse may cause excessive heating and/or a risk of fire.
- Do not place the equipment near heat sources such as radiators, heating ducts, or amplifiers, etc. and do not expose it to direct sunlight, excessive dust, moisture, rain, mechanical vibrations, or shock.
Environment
- Clean the equipment with a moistened (not wet) cloth only. Be sure to disconnect the equipment from power before cleaning the equipment! Never use caustic or scouring cleaners or cleaning agents containing alcohol or solvents since these may damage the enamel and plastic parts.
- Use the equipment for the applications described in this manual only. AKG cannot accept any liability for damage resulting from improper handling or misuse.

- At the end of the lifetime of the product, disconnect the housing, electronics and cable from each other and discard all components according to applicable disposal regulations.
- The packaging is recyclable. Dispose of the packaging via an appropriate collection system provided for this purpose.
2 Description
Introduction
Thank you for your decision to buy an AKG product. Please read the user instructions carefully before using the unit and keep them in a safe place so that you can refer to them in the future at any time. We wish you a lot of fun and success!
Contents
• P820 TUBE microphone
- Remote Control Unit
- Audio/control cable
- Spider-type shock mount
- US type power cord
- UK type power cord
• European type power cord
Check that the packaging contains all of the items listed for your system. If anything is missing, please contact your AKG dealer.
Optional accessories
Optional accessories can be found in the current AKG catalogue at www.akg.com. Your dealer will be happy to advise you.
Microphone
The P820 TUBE is a high quality, true condenser microphone with a 1" dual large-diaphragm transducer.
What sets it apart from other condenser microphones is that it uses a vacuum-tube preamplifier. Unlike conventional solid-state electronics, a tube preamplifier adds even-order harmonics to the signal. Although these are low in level, they create a rich, warm, three-dimensional sound. This characteristic in conjunction with the typical response of the large-diaphragm transducer will give your recordings a degree of warmth and "musicality" that is difficult to achieve with solid-state microphones.
The microphone incorporates a carefully selected ECC 83 tube. If the tube needs replacing, you may alternatively use a 12AX7 tube. This type is similar to the ECC 83.
Other features of the P820 TUBE include:
- Selectable polar patterns: The microphone's transducer uses a dual diaphragm. This sophisticated technology allows you to select the optimum polar pattern (cardioid, omnidirectional, figure eight, and six intermediate patterns) for every application.
- Gold-sputtered diaphragm: The diaphragm is made of a plastic foil that is gold-sputtered on one side only to prevent shorting to the back electrode even at extremely high sound pressure levels.
- All-metal body: The all-metal body adds to the rejection of RF interference so you can use the microphone near transmitter stations and along with wireless microphones or other communications equipment. The extremely rugged, heavy body and sturdy front grill protect the microphone from damage from tough handling on stage.
- High headroom: Capable of handling sound pressure levels up to 155 dB and built to resist high temperatures and humidity, the microphone will give excellent results in a wide range of applications.
Remote Control Unit
The Remote Control Unit delivered with your microphone
• provides the filament and plate voltages for the vacuum tube,
• supplies the polarization voltage for the transducer,
- lets you select one of nine different polar patterns,
- provides a 20-dB preattenuation pad, and
- allows you to switch in a bass cut filter.
Front Panel
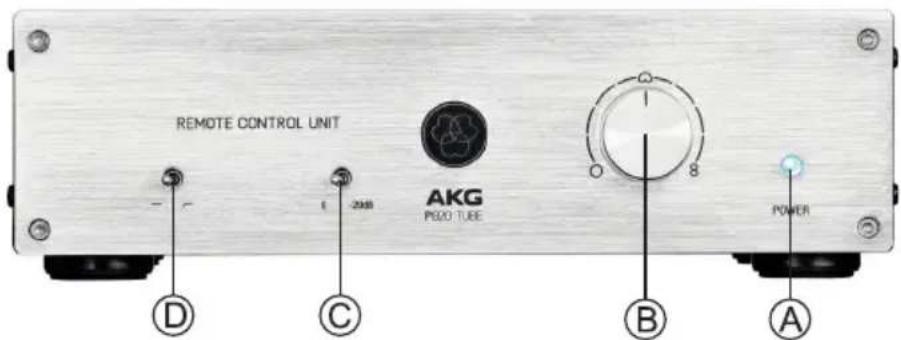
Figure 1: Controls on the Remote Control Unit front panel
A POWER LED: This blue LED is lit to indicate that power to the Remote Control Unit is ON.
B Polar pattern selector: This rotary switch lets you select the microphone's polar pattern from omnidirectional (fully CCW) to cardioid (center) to figure eight (fully CW). Between these settings, there are six intermediate patterns. All switch positions are detented, so all settings are easily and unambiguously reproducible.
C Preattenuation switch: This toggle switch lets you increase the microphone's headroom by 20 dB for close-in recording with extremely low distortion. The preattenuation pad prevents the microphone's output level, particularly at low frequencies, from overloading the miniature transformers used in many mixer input stages, etc.
D Bass cut switch: This toggle switch lets you reduce low-end distortion caused by footfall or wind noise, etc. The bass cut filter also minimizes the proximity effect that close-in miking from less than 4 inches causes in any unidirectional microphone. The filter rolls off at 12 dB/octave from 80 Hz downward.
Rear Panel
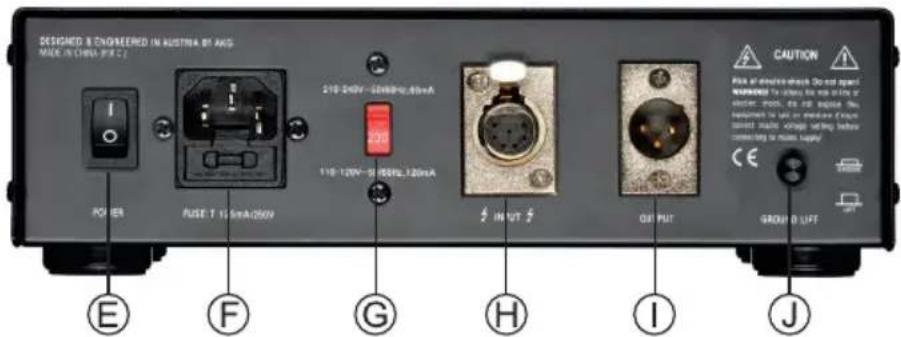
Figure 2: Controls, inputs, and outputs on the Remote Control Unit rear panel
E POWER switch: Turns power to the unit ON (position "I") and OFF (position "0"). The front panel POWER LED is lit while power is ON and goes out when you turn power to the unit OFF.
F AC input: Standard IEC power receptacle with integrated fuse holder.

NOTE
To avoid damage, use replacement fuses of the same type and rating (125 mA/250 V, slow-blow) only.
G Power voltage selector: Sets the input power voltage to 210 - 240 VAC ("210-240V" position) or 110 - 120 VAC ("110-120V" position).

NOTE
To avoid damage, always make sure that the power voltage selector is set to the same voltage as the power voltage available where you are going to use the unit.
H INPUT: 7-pin female XLR connector for connecting the dedicated audio/control cable for the microphone.
I OUTPUT: This balanced 3-pin XLR connector provides the microphone output signal.
J GROUND LIFT: This pushbutton switch allows you to remove hum caused by ground loops.
To open the chassis ground connection, press the GROUND LIFT button OUT ("LIFT" position).
To restore the chassis ground connection, press the GROUND LIFT button IN ("GROUND" position).
3 Connecting to Audio Equipment

To avoid damage or electric shock, mount the microphone on a suitable stand and make all audio connections before connecting the Remote Control Unit to power.
Connecting the Microphone
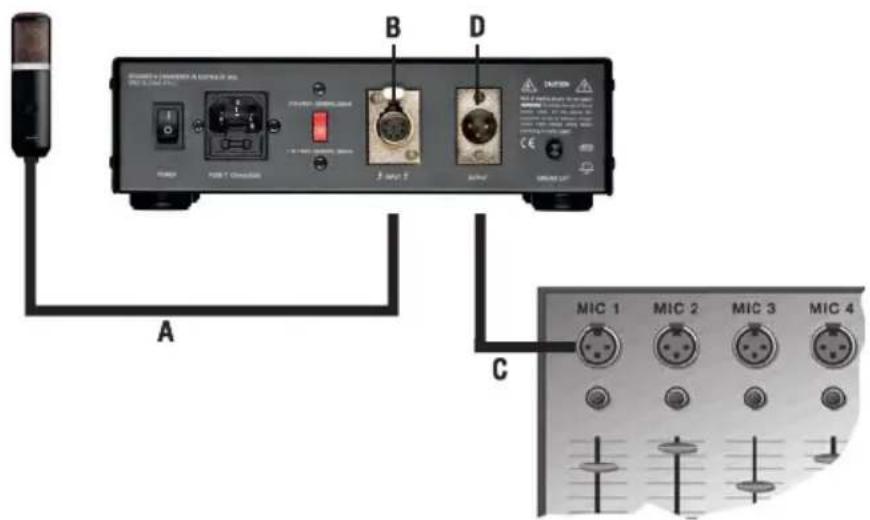
Figure 3: Connecting the microphone to the Remote Control Unit and mixer
1) Use the supplied audio/control cable (A) to connect the microphone output to the INPUT connector(B) on the Remote Control Unit rear panel.
2) Use a standard balanced XLR cable (C) (optional) to connect the OUTPUT connector (D) on the Remote Control Unit rear panel to the desired microphone input on your mixer.
Connecting the Remote Control Unit to Power
1) Prior to connecting the Remote Control Unit to power, check what power voltage is available where you are going to use the microphone.
2) Set the power voltage selector (G) on the rear panel to the correct position as shown in Table below.
3) Referring to Table below, use the correct power cord to connect the Remote Control Unit to a grounded power outlet.
| Power voltage | Selector setting | Power cord |
| 210 to 240 VAC, 50/60 Hz | 210-240V | UK or European type |
| 110 to 120 VAC, 50/60 Hz | 110-120V | US type |

When on tour, you may encounter power outlets that do not match the power plug on any of the supplied power cords.
- Purchase a suitable power cord locally that complies with IEC and local safety standards and has a power plug with a chassis ground pin.
- To avoid damage or electric shock, connect the Remote Control Unit to a grounded power outlet only.
- If in doubt about the power connection, consult a local electrician.
Powering Up
- Set the power switch on the Remote Control Unit rear panel to "I".
After about ten seconds, the heating voltage will have reached the specified level and the front panel POWER LED will be lit. About twenty seconds later, the microphone will be ready to operate.

You may not get the full splendor of the tube sound before the electrodes have reached the required operating temperature. Therefore, we recommend powering up at least five minutes before starting to record. This will allow the tube inside the microphone to heat up properly.
Powering Down
1) Set the power switch on the Remote Control Unit rear panel to "0". The front panel POWER LED will go out.
2) Wait for five minutes to allow the tube to cool down to room temperature before moving the microphone. A hot tube will be more susceptible to mechanical damage than a cold one.
4 Operation
General Hints
Using vacuum-tube electronics and a large-diaphragm transducer, the P820 TUBE is suited for a wide range of applications. It will add the typical warmth and richness tube microphones are famous for to female and male voices as well as many instruments.
The following sections contain general hints on using the microphone and suggestions on how to place the microphone for voices and various instruments.

NOTE
Please remember that vacuum tubes with their heater filaments are more delicate than solid-state components. Even a drop from moderate height may cause the filament to break and the microphone to fail. So always handle the microphone with extreme care.
- Whichever polar pattern you select, it may be good to know which way the transducer axis is facing: the front of the microphone is the side of the body with the AKG logo on it.
- When recording wind instruments or vocals, make sure not to blow or sing directly into the microphone.
To get professional sounding results with no unwanted wind and pop noise (exaggerated "p" and "t" sounds), place an optional PF80 pop screen from AKG between the microphone and vocalist/instrument.
- Keep the microphone dry. Moisture from blowing or singing directly at the capsule from a short distance, or extremely high humidity may cause the microphone to start crackling or go very quiet due to partial short circuits in the polarization voltage.
- If you use the microphone in the open, use an optional AKG W4000 windscreen to protect the microphone from moisture and reduce wind noise.
- Loud instruments: You can use this microphone for close-in recording of very loud instruments (brass instruments, kick drum, etc.). Just switch the preattenuation pad in to increase the microphone's capability of handling sound pressure levels to 155 dB.
To switch the preattenuation pad in, set the preattenuation switch on the Remote Control Unit front panel to "-20 dB".
To switch the preattenuation pad out of circuit, set the preattenuation switch to "0".
- Low-frequency noise: The supplied spider type shock mount reduces footfall or other mechanical noise to a minimum.
The switchable bass cut filter at 80 Hz will effectively suppress any remaining low-frequency noise such as fan noise from air conditioning systems, etc., or floor vibrations, handling noise, etc. without affecting the sound of the recorded voice or instrument on tape.
Selecting Polar Patterns
To switch the filter in, set the bass cut filter switch on the Remote Control Unit front panel to the " /" position.
To switch the filter out of circuit, set the bass cut filter switch on the Remote Control Unit front panel to the "-"position.
Each of the P820 TUBE's selectable polar patterns is virtually frequency independent so that reflected sound, too will be reproduced accurately and uncolored.
- Cardioid (center setting): This is a standard setting for recording and gives excellent results on all kinds of voices and a wide range of instruments. Remember to aim the microphone front at the sound source.
- Figure eight (right-hand setting): The microphone will pick up sounds arriving from the front and rear with equal sensitivity. Use this mode to mic up the side signal in M/S stereo recording or to record two sound sources (talkers, instruments) facing each other. It is also a good choice for cymbal overhead miking.
- Omnidirectional (left-hand setting): This is the preferred setting for "all around the mic" recording, high quality ambience (audience sound) miking, or far-field recording in exceptionally good-sounding large or small recording rooms, etc.
5 Cleaning

To avoid electric shock, make sure to disconnect the Remote Control Unit from power before cleaning the microphone or the Remote Control Unit.
1) Disconnect the power cord from the Remote control Unit.
2) To clean the surfaces of the microphone body and Remote Control Unit, use a soft cloth moistened with water.
6 Troubleshooting
| Problem Possible Cause | Remedy | |
| No sound Power to mixer and/or recording device is off. | Switch power to mixer and/or recording device on. | |
| Channel or master fader on mixer or recording device is at zero. | ||
| Microphone is not connected to mixer or recording device. | ||
| Cable connectors are seated loosely. | ||
| Audio cable or audio/control cable is defective. | ||
| No supply voltage | ||
| Vacuum tube inside microphone is defective | ||
| Fuse blown | ||
| Distortion Channel gain control on mixer set too high. | Turn gain control down CCW. | |
| Microphone too close to sound source. | ||
| Microphone sensitivity set too high. | ||
| Crackling noises or low output | Partial short circuits due to excessive humidity. | Place microphone in warm, dry room and allow to dry. |
Replacing Fuses

Dangerous voltages may be present inside the Remote Control Unit. To avoid electric shock, injury, and fire, UNDER ALL CIRCUMSTANCES disconnect the power cord from the Remote Control Unit before replacing a fuse. To avoid damage, replace blown fuses with new fuses of the same type and rating only.
The fuse protecting the primary circuit is located in the marked fuse compartment below the AC input connector on the Remote Control Unit rear panel.
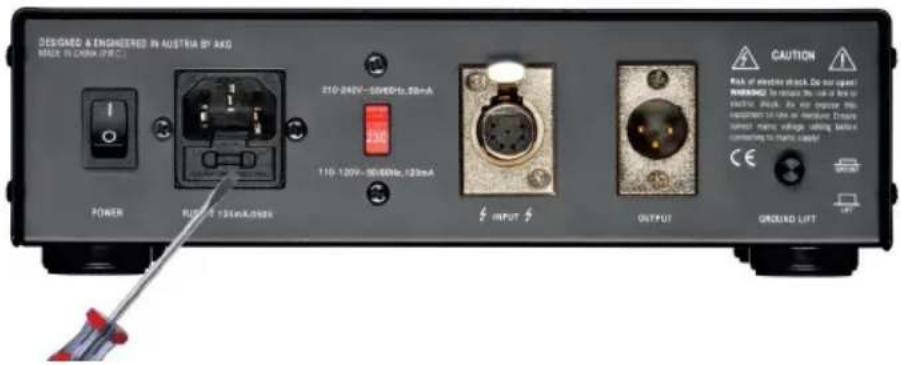
Figure 4: Opening the fuse compartment
To replace the fuse,
1) Use a flat-blade screwdriver to open the fuse compartment lid.
2) Remove the blown fuse.
3) Insert a new fuse of the same type and rating (125 mA/250 V slow-blow).
4) Close the fuse compartment lid.
7 Technical data
Microphone
Type: 1" dual-diaphragm, tube microphone
| Polar pattern: 9 selectable polar patterns (selectable on remote control unit) | |
| Sensitivity: | (cardioid) 20 mV/Pa (-34 dBV) |
| Frequency response: | 20 Hz to 20 kHz(see frequency response trace) |
| Electrical impedance: | ≤200 ohms |
| Recommended load impedance: | ≥1000 ohms |
| Equivalent noise level to IEC 60268-4: | 16 dB(A) |
| Signal to noise: | 78 dB(A) re 1 Pa |
| Max. SPL for 0.5% THD: | 135 / 155 dB SPL (0 / -20 dB) |
| Temperature range: | -10 °C to +60 °C (14 °F - 140 °F) |
| Phantom powering: via Remote Control Unit only | |
| Connector: dedicated 7-pin male XLR | |
| Diameter: | 54 mm (2.13 in.) |
| Length: | 212 mm (8.3 in.) |
| Net weight: | 765 g (27 oz.) |
| Bass cut pad: | 80 Hz, 12 dB/octave (switchable on Remote Control Unit) |
| Preattenuation pad: | -20 dB (switchable on Remote Control Unit) |
Remote Control Unit
| Audio &control input connector: | dedicated 7-pin female XLR |
| Audio output connector: standard 3-pin male XLR (balanced, pin 2 hot) | |
| Polar pattern selector: 9-position detented rotary switch | |
| Bass cut filter switch: 2-position toggle switch | |
| Preattenuation switch: 2-position toggle switch | |
| Power voltage: | 210-240 VAC or 110-120 VAC, selectable |
| Primary fuse: | 125 mA / 250 V slow-blow |
Frequency Response (cardioid)
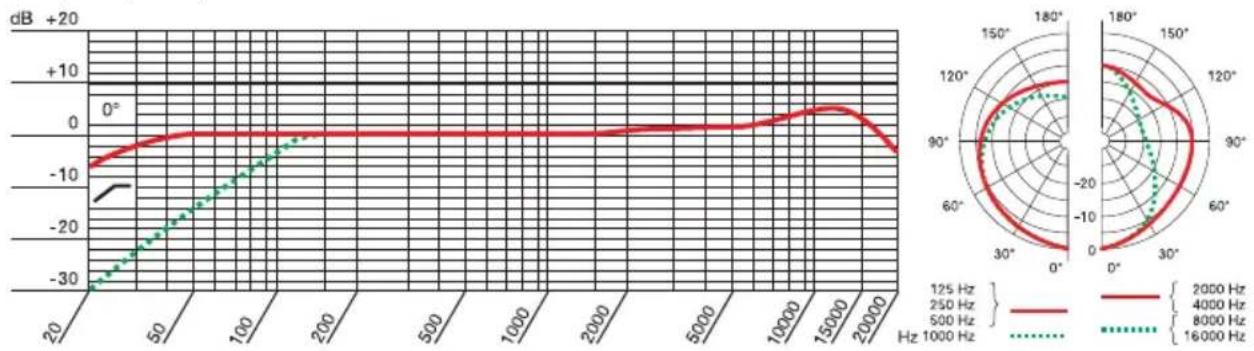
Polar
Frequency Response (omnidirectional)
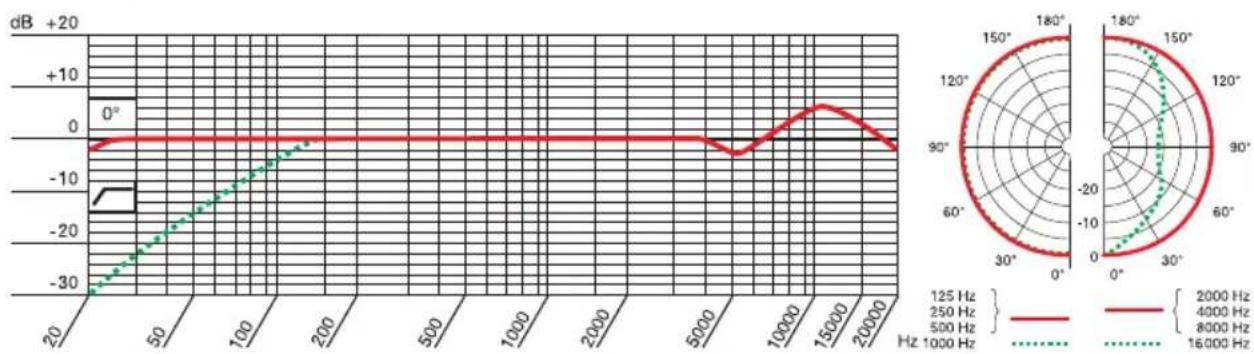
line
| Frequency Range | Frequency (Hz) | Frequency (Hz) | | --------------- | -------------- | -------------- | | 125 | 2000 | 4000 | | 250 | 2500 | 5000 | | 500 | 5000 | 8000 | | 1600 | 10000 | 12000 |Pc
Frequency Response (figure eight)
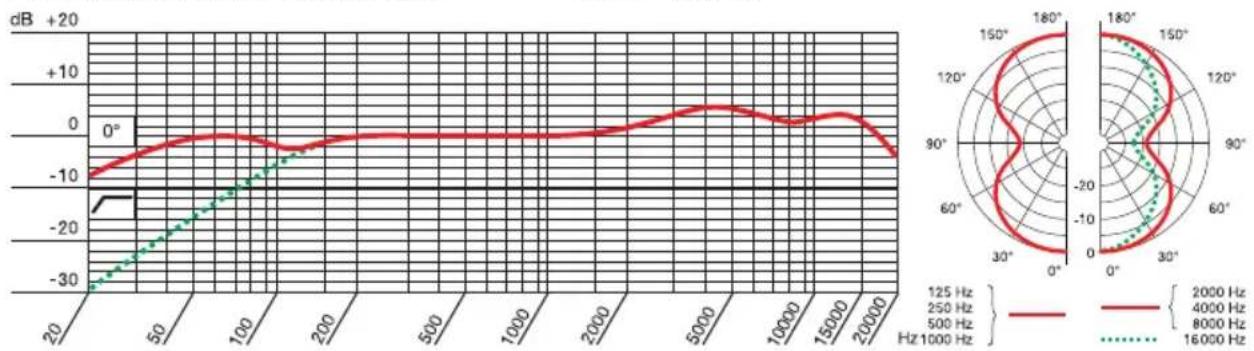
line
| Frequency | Frequency (Hz) | | --------- | -------------- | | 125 | 4000 | | 250 | 4000 | | 500 | 4000 | | 800 | 4000 | | 1600 | 4000 |This product corresponds to the standards stated in the Declaration of Conformity. You can request the Declaration of Conformity by e-mail from sales@akg.com
Sommaire
Raccordement du microphone....41

- Safety and the environment
- Risk of damage
- Environment
- Description
- Introduction
- Contents
- Optional accessories
- Microphone
- Remote Control Unit
- Connecting to Audio Equipment
- Connecting the Remote Control Unit to Power
- Powering Up
- Powering Down
- Operation
- General Hints
- Selecting Polar Patterns
- Cleaning
- Replacing Fuses
- Technical data
- Sommaire
Brand : AKG
Model : P820
Category : Microphone