iD14 - Hi-Fi System Audient - Free user manual and instructions
Find the device manual for free iD14 Audient in PDF.


User questions about iD14 Audient
0 question about this device. Answer the ones you know or ask your own.
Ask a new question about this device
Download the instructions for your Hi-Fi System in PDF format for free! Find your manual iD14 - Audient and take your electronic device back in hand. On this page are published all the documents necessary for the use of your device. iD14 by Audient.
USER MANUAL iD14 Audient
Welcome to your new Audient iD14 Audio Interface
To help get you started please visit audient.com/products/iD14
to download the latest software and firmware.
Inside the box:
• iD14
- USB-C to USB-C cable
- Quick Start Guide
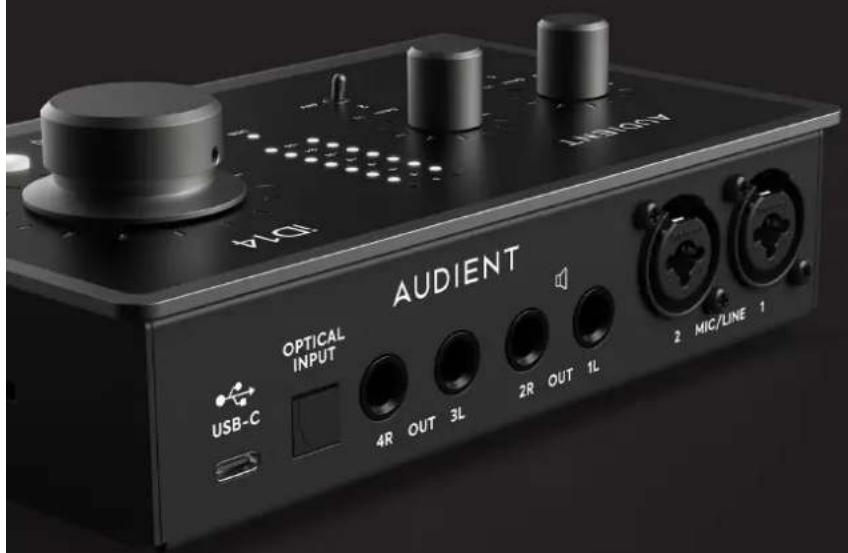
Features include:
• 2 x Audient Console Mic Pre's
• Class Leading Converters
• 1 x JFET Instrument Input
- 4 x Line Outputs
• Dual Headphone Outputs
• ADAT Input for Expandability
• Ultra Low Latency Software Mixer
• Advanced Monitor Control
- Scrollcontrol
• True Phantom Power over USB
- USB3.0 Bus Powered
- All Metal Design
• Free Software + Plugins
text_image
AUDIENT OPTICAL INPUT USB-C 4R OUT 3L 2R OUT 1L 2 MIC/LINE 1Contents
iD14 Overview 4
Safety Information 5
Declaration of Conformities 7
Mac Installation 9
Windows Installation 11
iD App & Firmware Update 13
Hardware Features: 14
Microphone & Line Input 15
Instrument Input 16
Headphone Output 16
Digital Inputs 17
Loudspeaker Outputs 18
Monitor Control 18
Metering 19
Kensington Lock 19
iD Mixer Application: 20
Input Channel Types 21
Channel Features 23
Mastering Section Features 24
System Panel Features 27
Setting Up & Using Talkback 30
Save & Load Mixer Presets 31
Menu/Task Bar Icon 32
Audio Loop-back 34
Keyboard Shortcuts 36
Daw Setups 37
Pro Tools Setup 38
Logic Pro Setup 39
Cubase/Nuendo Setup 41
Ableton Setup 42
Troubleshooting & FAQ 43
Technical Specifications 46
Dimensions 47
Warranty & Contact 48
Service 49
Glossary 50
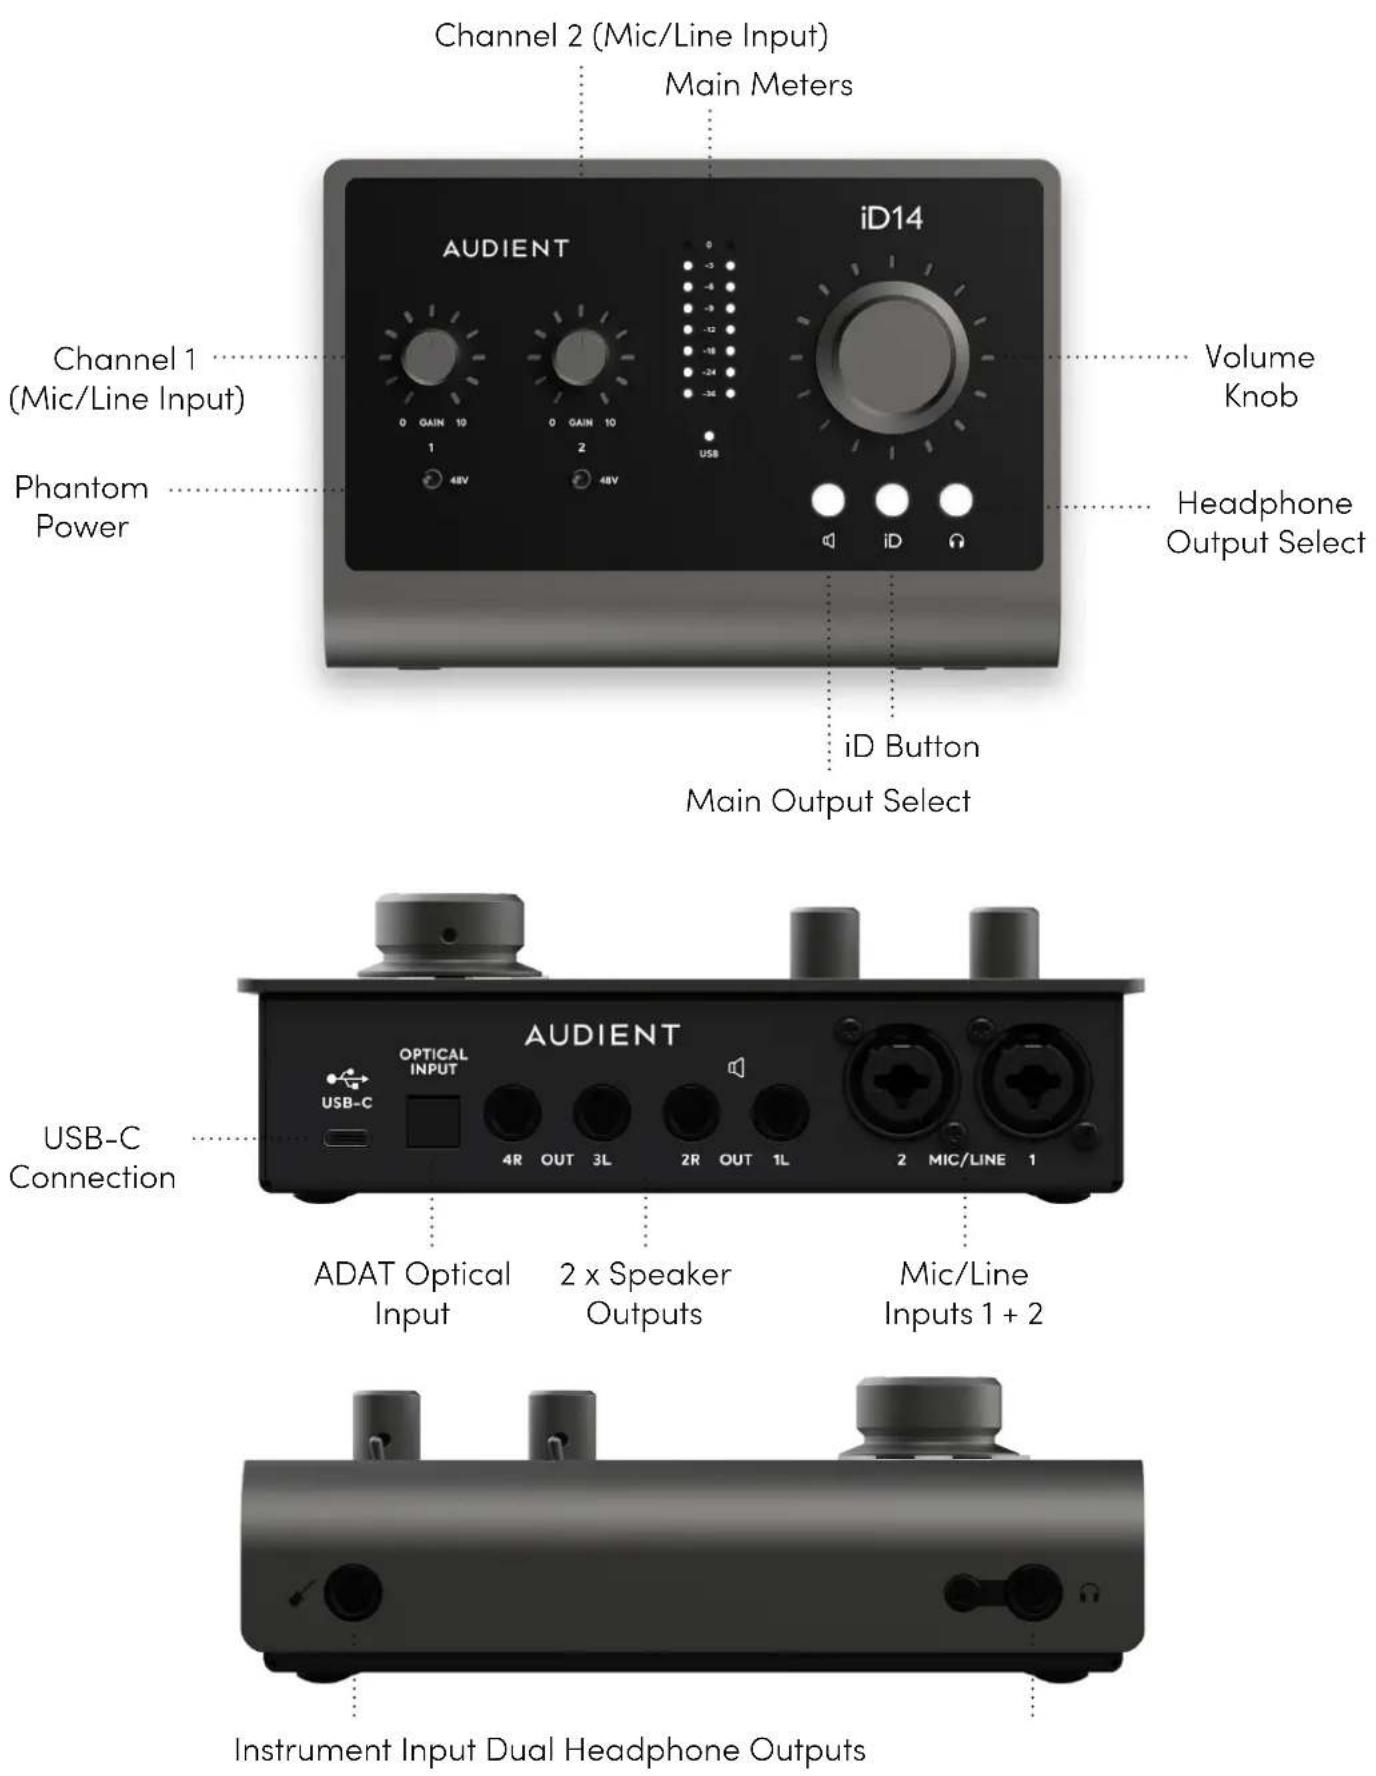
iD14 Overview
text_image
Channel 2 (Mic/Line Input) Main Meters iD14 Audient Volume Knob Channel 1 (Mic/Line Input) Phantom Power 1 0 GAIN 10 0 GAIN 10 2 48V 48V USB Headphone Output Select iD Button Main Output Select AUDIENT OPTICAL INPUT USB-C 4R OUT 3L 2R OUT 1L 2 MIC/LINE 1 USB-C Connection ADAT Optical Input 2 x Speaker Outputs Mic/Line Inputs 1 + 2 Instrument Input Dual Headphone OutputsSafety Information
Important Safety Instructions
Please read all of these instructions and save them for later reference before connecting the USB and powering up iD14.
The iD14 itself does not operate with any high voltage mains supply inside the unit but appropriate safety measures should still be adhered to regarding the USB supply.
audient.com/support
Consult a qualified technician if you suspect difficulties. Do not attempt to tamper with the power supply or mains voltages - HAZARDOUS TO HEALTH. Ensure that the appropriate international pin adapter is fitted to the power supply before insertion into the mains socket.
WARNING!
To reduce risk of fire or electrical shock, DO NOT expose this apparatus to rain or moisture.
No user serviceable parts inside. Please refer servicing to qualified service personnel.
Safety Information
Important Safety Instructions
- Read these instructions
- Keep these instructions
- Heed all warnings
- Follow all instructions
- Do not use this equipment near water
- Clean only with dry cloth
- Do not install near any heat sources such as radiators, heat registers, stoves, or other equipment (including amplifiers) that produce heat
- Do not defeat the safety purpose of the polarized or grounding-type plug. A polarized plug has two blades with one wider than the other. A grounding type plug has two blades and a third grounding prong. The wide blade or the third prong are provided for your safety. If the provided plug does not fit into your outlet, consult an electrician for replacement of the obsolete outlet
- Protect power cords from being walked on or pinched particularly at plugs, convenience receptacles, and the point where they exit from the equipment
- Only use attachments/accessories specified by the manufacturer
- Unplug this equipment during lightning storms or when unused for long periods of time
- Refer all servicing to qualified service personnel. Servicing is required when the equipment has been damaged in any way, such as power supply cord or plug is damaged, liquid has been spilled or objects have fallen into the equipment, the equipment has been exposed to rain or moisture, does not operate normally, or has been dropped
- For products that are a mains powered device: The equipment shall not be exposed to dripping or splashing and no objects filled with liquids (such as vases) shall be placed on the equipment
Declaration of Conformities
FCC Part 15B
This apparatus has been tested and found to comply with the limits of a class-A digital device, pursuant to Part 15B of the FCC Rules. These limits are designed to provide reasonable protection against harmful interference in a residential installation. This equipment generates, uses and can radiate radio frequency energy and, if not installed and used in accordance with the instructions, may cause harmful interference to radio communications. If this equipment does cause harmful interference to radio or television reception, which can be determined by turning the equipment off and on, the user is encouraged to try to correct the interference by one or more of the following measures:
- Re-orient or relocate the receiving antenna
- Increase the separation between the equipment and receiver
- Connect the equipment into an outlet on a different circuit from that to which the receiver is connected
- Consult the dealer or an experienced radio/TV technician for help
We, Audient Ltd, Aspect House, Herriard, Hampshire, RG25 2PN, UK, 01256 381944, declare under our sole responsibility that the product iD14 complies with Part 15 of FCC Rules.
Operation is subject to the following two conditions:
- This device may not cause harmful interference,
- This device must accept any interference received, including interference that may cause undesired operation

We, Audient Ltd, declare that the product, the iD14, to which this declaration relates, is in material conformity with the appropriate CE standards and directives for an audio product designed for consumer use.

Audient Ltd has conformed where applicable, to the European Union's Directive 2002/95/EC on Restrictions of Hazardous Substances (RoHS) as well as the following sections of California law which refer to RoHS, namely sections 25214.10, 25214.10.2, and 58012, Health and Safety Code; Section 42475.2, Public Resources
Installation
Mac Installation
System Requirements
macOS 10.11.6 (El Capitan) or later Mac: Intel or Apple Silicon CPU, 1GB RAM Minimum
1. Download the latest iD Software
Head to our website for the latest version of our iD Mixer:
audient.com/products/downloads/iD14
Drag the downloaded app into your application folder to install it.
2. Connect iD14
Using the USB cable provided, connect iD14 to your computer's USB port.

natural_image
Laptop connected to an audio recorder device labeled 'USB-C' (no text on device or background)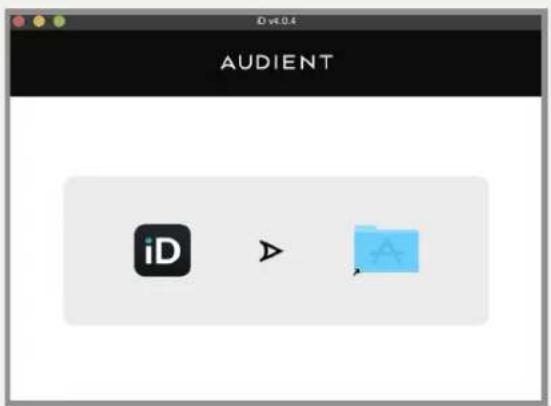
text_image
Dv4.0.4 AUDIENT iD > AMac Installation
3. Status LED
Once connected to your computer and powered on, the white USB LED on iD14 will illuminate.
If at any time the status LED turns off during normal operation please check all connections and if further problems develop please contact Audient support.
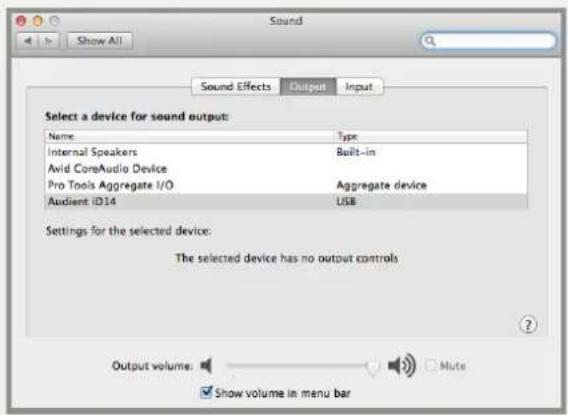
4. Double Checking Connectivity
To ensure iD14 has been detected by your computer and correct clocking sources are set-up, navigate to:
Macintosh HD > Applications > System Preferences
Check that iD14 is set as your i/o device. It's recommended to disable system sounds.
text_image
Sound Show All Sound Effects Output.Input Select a device for sound output: Name Type Internal Speakers Built-in Avid CoreAudio Device Pro Tools Aggregate I/O Aggregate device Audient iD14 USB Settings for the selected device: The selected device has no output controls Output volume: Mute Show volume in menu bar5. Open the iD Mixer
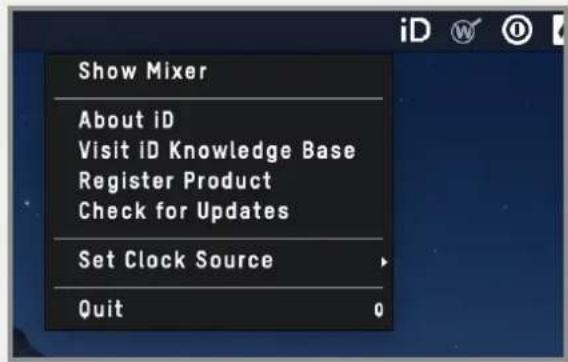
Run the iD software. It will appear as an icon in the Menu bar of MacOS. Click on this and select "Open Mixer Software".
text_image
Show Mixer About iD Visit iD Knowledge Base Register Product Check for Updates Set Clock Source Quit 0Windows Installation
Windows System Requirements:
• Windows 10 or later (32 or 64 bit)
- Intel Core 2 @ 1.6 GHz, or AMD equivalent
• 1 GB RAM Minimum
1. Download the iD14 Software
Head to our website for the latest version of our iD Windows Installer:
audient.com/products/downloads/iD14
2. Connect iD14
Using the USB cable provided, connect iD14 to your computer's USB port.
3. Run iD Mixer Setup
Double click on the installer to run the iD mixer setup and follow the onscreen instructions.
4. Reboot PC
Reboot your PC to make sure that all the drivers have been applied.

natural_image
Blue Windows logo with four square panes (no text or symbols)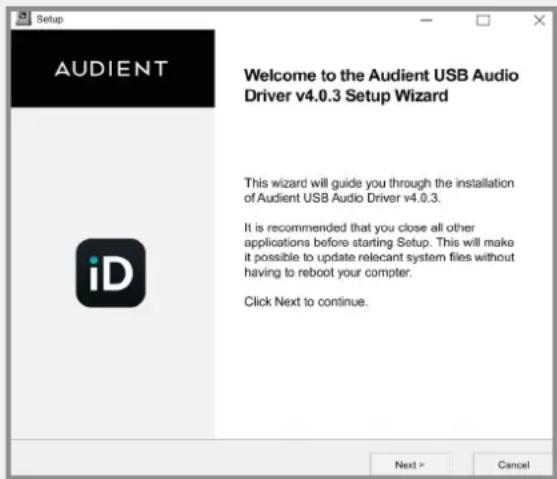
text_image
Setup AUDIENT Welcome to the Audient USB Audio Driver v4.0.3 Setup Wizard This wizard will guide you through the installation of Audient USB Audio Driver v4.0.3. It is recommended that you close all other applications before starting Setup. This will make it possible to update relevant system files without having to reboot your compter. Click Next to continue. Next > CancelWindows Installation
4. Check Connectivity
The USB status LED will illuminate as soon as iD14 has achieved stable communication and should remain solidly lit during operation of the unit until power down.
To double check the connection, go to PC sound settings by following:
PC Settings > Control Panel > Hardware and Sound > Sound
Here you can see whether iD14 is visible to the PC and you can make it the computers default sound device by pressing 'Set Default'.
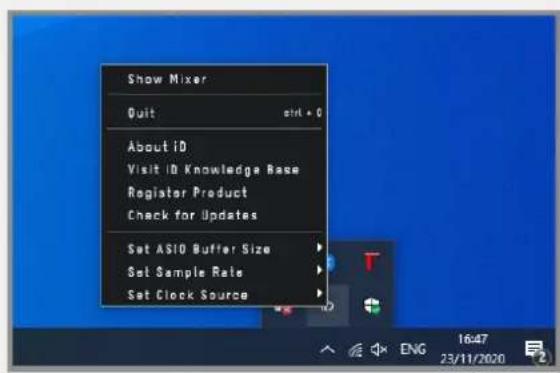
iD Icon
Once installed, the iD icon can be found in the Windows system tray (it may be in the hidden icons area):
- Double-click to open iD14 mixer window when iD14 is connected
- Right-click to quit or change sample rate and buffer size.
text_image
Show Mixer Quit About ID Visit ID Knowledge Base Register Product Check for Updates Set ASIO Buffer Size Set Sample Rate Set Clock SourceFor mixing, buffer size of 256 should be perfect. For tracking, experiment with lower buffer size values. How powerful your computer is, and how processor hungry your project is, will affect how low you can get the buffer size settings before you get audio instability.
Mixer App & Firmware Update
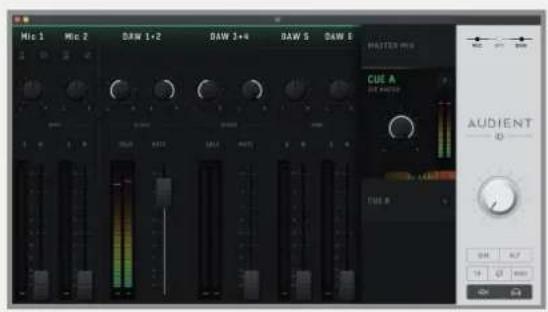
Launch the iD Mixer Application
Launch the iD14 mixer application by finding it in the following folder:
Macintosh HD > Applications > iD Start > All Programs > Audient > iD
For more information on the mixer application feature set, please refer to page 21 of this manual onwards.
text_image
Mio 1 Mio 2 DAW 1+2 DAW 3+N DAW 5 DAW E PATTER MOS CUE A DIA B AUDIENT ID CUE B 0.00 0.00 10 0 0000Check for Firmware Updates
If your computer is connected to the internet, the iD app will check for firmware updates whenever a unit is connected. If there is a firmware update available then the iD app will notify you.
You can manually check for updates by going to the Help menu and selecting 'Check for Updates'. It will notify you if you're on the latest version of firmware.
Firmware Update
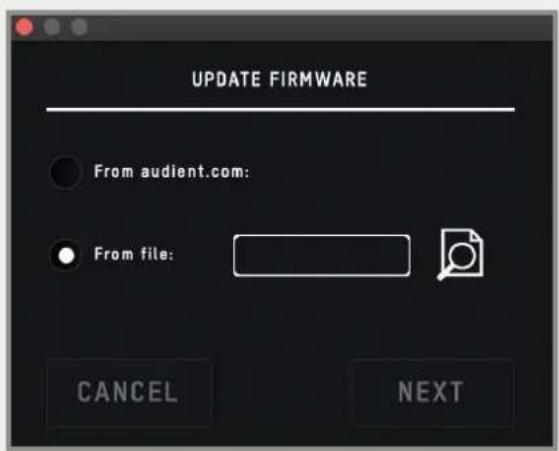
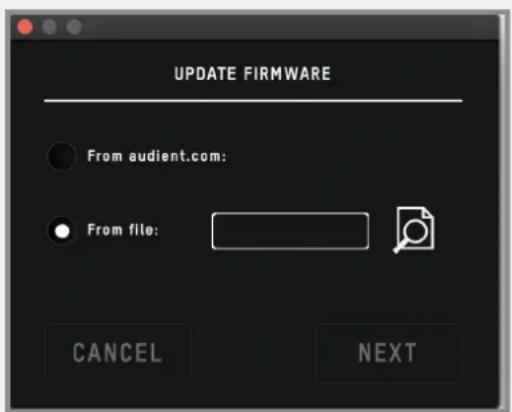
When there is a firmware update, you can select 'From audient.com' to download the latest version automatically (or select 'From file' to install a local firmware file).
text_image
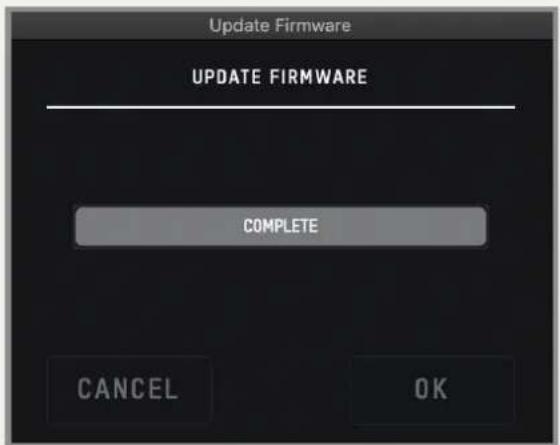
UPDATE FIRMWARE From audient.com: From file: CANCEL NEXTThe latest version number will be retrieved from our servers and will be displayed (as shown above). Press next to continue with the firmware update. Press 'update' to install it.
text_image
Update Firmware UPDATE FIRMWARE COMPLETE CANCEL OKHardware Features
Microphone Preamplifiers & Line Inputs
iD14 features two classic Audient Console microphone preamplifiers. These preamps are based on designs from Audient's classic consoles and are the same that are used across our entire 'iD interface range'.
The design features discrete Class-A circuitry providing exceedingly low distortion and noise performance. From a sonic point of view, iD14 is fast, open and detailed.
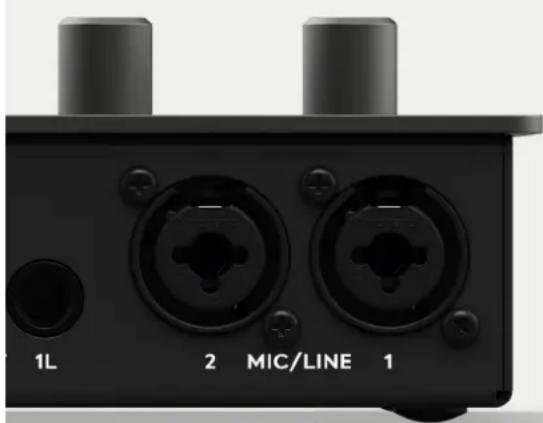
Amphenol™ XLR/TRS Jack combi-connectors provide microphone and line inputs. The line inputs are padded through the microphone preamplifiers.
text_image
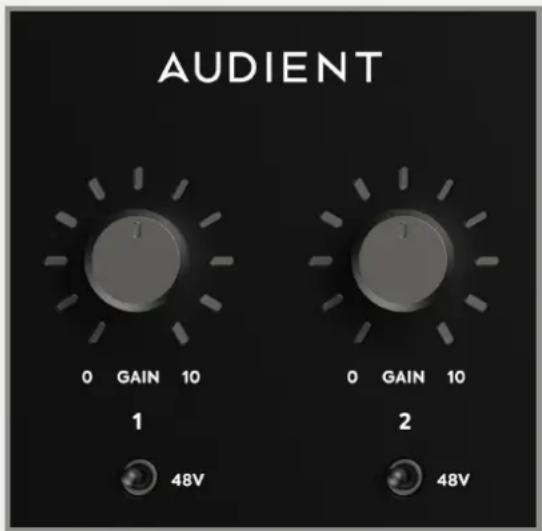
AUDIENT 0 GAIN 10 1 48V 0 GAIN 10 2 48VThe microphone preamplifiers feature:
- 58 dB of clean gain
• 48v (±4V) phantom power rated at 10mA/channel -
2.8kΩ input impedance which provides a punchy tone from any microphone transducer type
Extra features such as a +10dB boost and polarity reverse can be accessed via the iD App (See page 23).
natural_image
Close-up of a black electronic device front panel with two labeled ports (1L, 2 MIC/LINE, 1) and two cylindrical tops (no additional text or symbols visible)Instrument Input
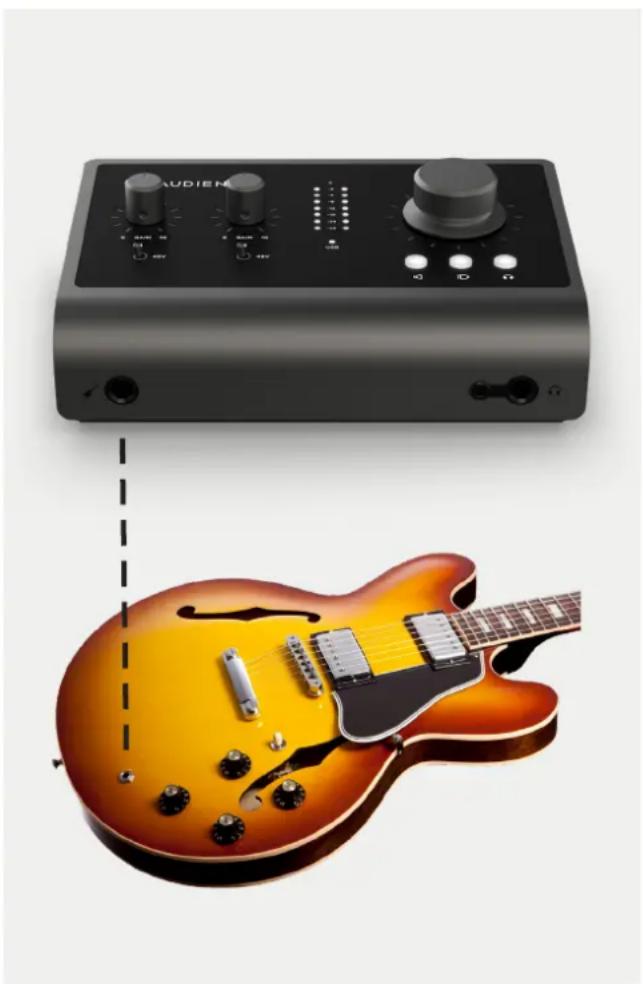
iD14 employs a discrete class-a JFET instrument (D.I) input on channel one which is easily accessible on the front of the unit.
The JFET circuitry adds a tiny bit of colour and distortion to the signal, making it sound great on guitars and basses.
Plugging in a TS (tip-sleeve unbalanced) jack will override the mic signal and turn channel one into a fully fledged, fantastic sounding instrument input with access to the polarity reverse (useful for phase alignment between a mic and D.I) and the +10dB boost for quiet inputs.
natural_image
Audio amplifier device connected to an electric guitar, showing control knobs and dials (no text or symbols on main components)Headphone Output
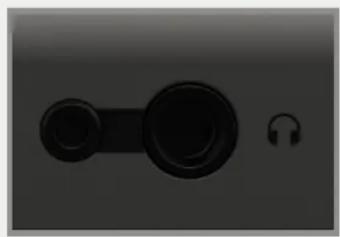
iD14 features an independent high-current headphone amplifier. This can be accessed using both the 3.5mm and 6.35mm sockets found on the front of the unit. The same audio signal comes out of both connectors simultaneously, so it does not matter which you plug your headphones into. You can also plug in two pairs at the same time.
natural_image
Close-up of a black electronic device with a circular handle and a small ear icon, no visible text or symbols.The headphone output can comfortably drive a wide range of headphone impedances meaning that you will get great sounding audio no matter what model of headphones you have.
Digital Inputs
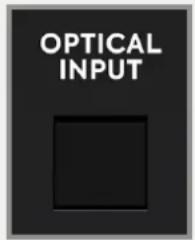
iD14 features an optical input connection. This can be set to operate as stereo optical S/PDIF or 8-channel ADAT (SMUX) via the System Panel in the iD mixer application. Both formats will operate at up to 96kHz sample rate.
text_image
OPTICAL INPUTRunning in S/PDIF mode allows 2 channels of audio up to 96KHz.
Running in ADAT mode, the optical input provides a great way to expand to 10 inputs for recording via an external mic preamp such as an Audient ASP800. When using 88.2kHz and 96kHz as a sample rate, you only have access to 4 channels of digital input (due to the way ADAT works at higher sample rates).
For more information about system clocking please refer to pages 28 onwards.
Speaker Outputs
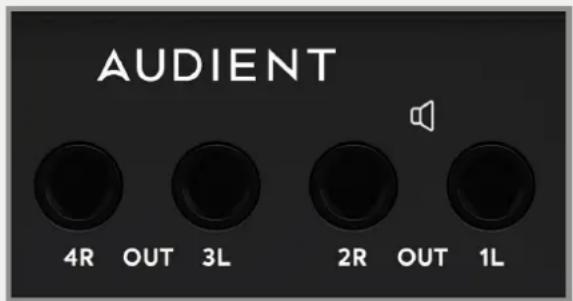
iD14 has two pairs of stereo speaker outputs on the back panel in the form of balanced TRS jack connectors. The outputs are impedance balanced using the same topology as our flagship console, the ASP8024.
The outputs are fed from high quality DACs (Digital to Analogue Convertors) sending clean, linear audio to your speakers, perfect for critical listening.
text_image
AUDIENT 4R OUT 3L 2R OUT 1LYou can use these outputs for more than just speakers. A good example of this is if you want to use a dedicated headphone amplifier for multiple musicians, you can connect this up to one or more of these outputs, This is configured in the iD mixer software.
Monitor Control
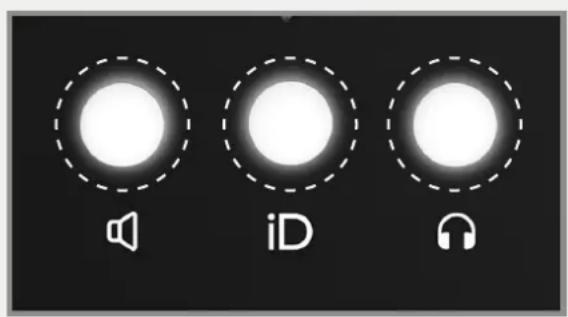
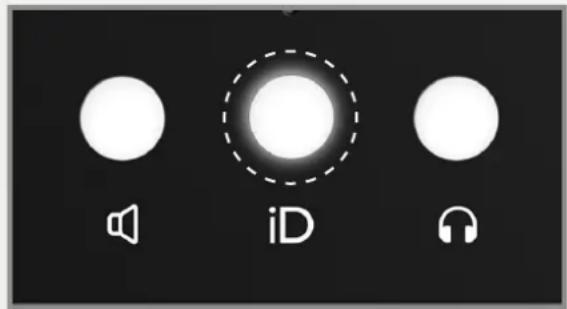
iD14 provides excellent monitor control functionality using the large aluminium encoder and the encoder buttons.
As such, it is possible to control main loudspeaker and headphone volumes with a perfectly matched stereo volume control on the main unit.
The three encoder mode buttons allow you to change what the encoder controls. The button that is selected will be illuminated.
text_image
Three circular icons labeled with speaker, iD, and headphones symbols, likely representing media control or app interface elements.Loudspeaker and Headphone Buttons
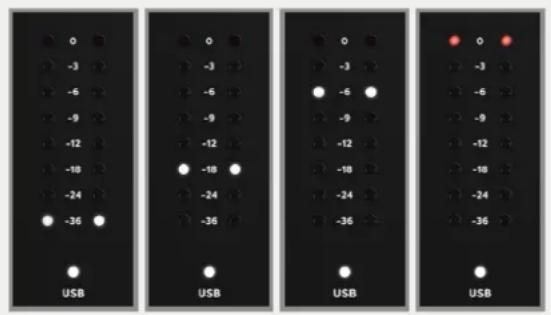
Pressing the speaker or headphone button allows the encoder to control the level of the selected output. The volume of the output is displayed on the meter LEDs and a press of the encoder will mute the output.
When a selected output is muted, the corresponding encoder button will flash, repeatedly until unmuted.
text_image
USB USB USB USB USBiD Button
text_image
iDThe iD button provides extra functionality in the form of an assignable function button, or it can be used to activate iD14's ScrollControl which turns the encoder into a virtual scroll wheel allowing you to control compatible parameters within your DAW or plugins.
When the iD button is set as a function button, the encoder will continue to control the output that was previously selected. The iD button is assigned in the iD app.
Hardware Metering
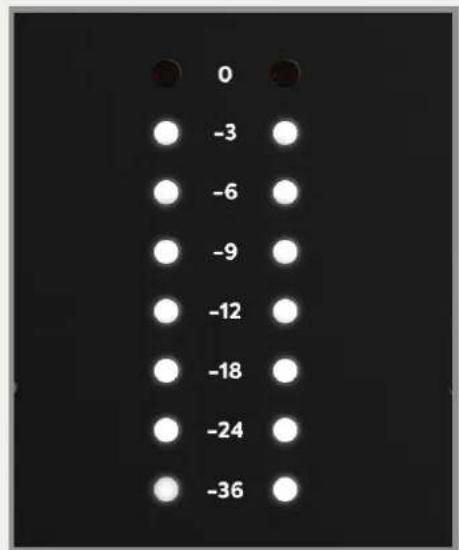
The 8-segment hardware meters indicate playback level of the iD mixer app, so it is suggested that end users observe their DAW metering for input levels.
text_image
0 -3 -6 -9 -12 -18 -24 -36Kensington Lock
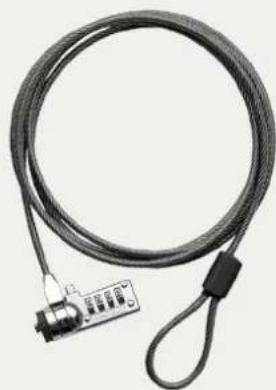
For those who work in educational establishments or in situations where your equipment is public facing and subject to possible theft opportunities, we have provided a Kensington lock hole to enable you to protect your iD14.
natural_image
Coiled cable with a small connector and a hanging hook, no visible text or symbolsStatus LED
The status LED indicates connection via USB to your computer. A solidly lit light means that there is stable communication between iD14 and your computer.
text_image
USBiD Mixer App
Input Channels - Channel Types
The iD mixer application features three types of input channels:
- Mic Inputs
These are the inputs where you will see the signal from the iD14's two analogue inputs.
- Digital Inputs
These are the inputs from the iD's optical inputs. The number of digital inputs present on the iD mixer application depends on the digital input type (S/PDIF or ADAT) and the sample rate being used.
- Daw Returns
These are the signals being played back from your DAW. The iD14 has 6 Daw Return Channels allowing you set up multiple cue mixes or sends to hardware outboard gear.
Using these three channel types, you can build up your main monitor mix and up to two additional cue mixes.
Its important to note that the iD mixer application only controls the monitoring of the iD14. Changes made to the iD mixer application won't affect the level present in your DAW or audio software.
text_image
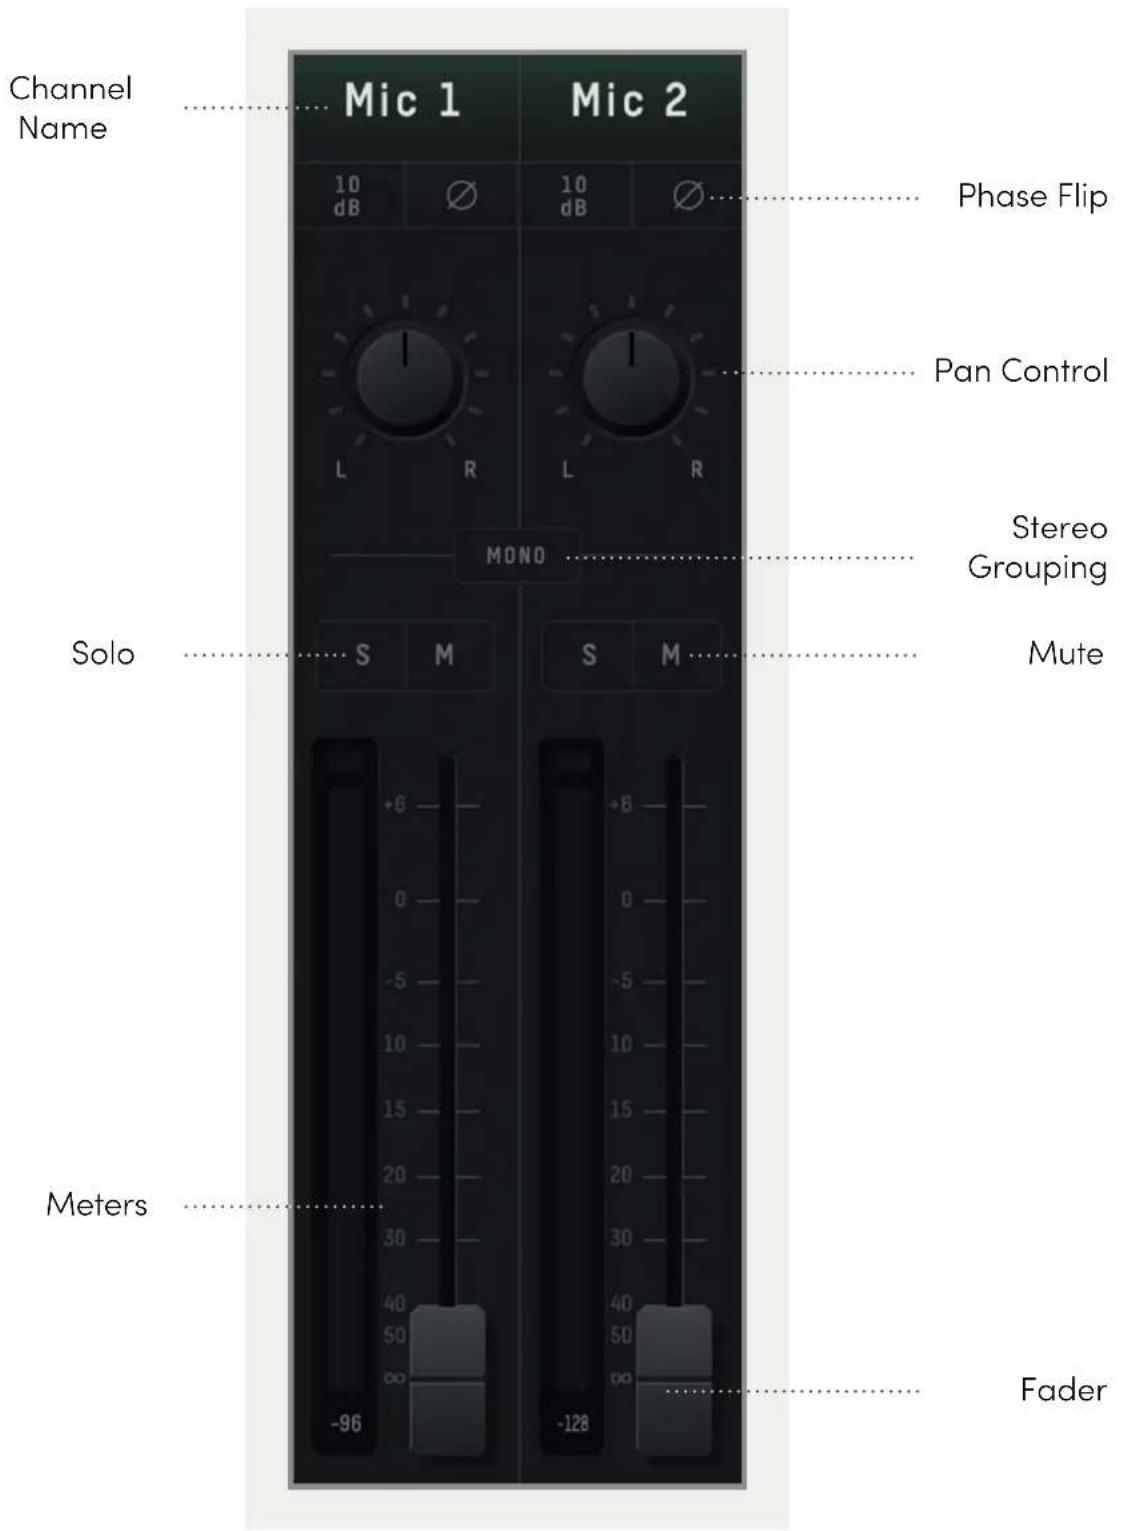
Channel Name Mic 1 10 dB 10 dB Phase Flip Pan Control Sono MUNO Stereo Grouping Solo S M S M Mute Meters -96 -128 FaderChannel Features
Channel Name
By double clicking on the name of the channel you can rename it to help you organise your iD mixer application. You could name a channel 'Kick' or 'Snare' for example.
Phase Flip
Inverts the polarity of the signal by 180^ to stop phase cancellation. This is useful if you are micing the rear of a guitar amplifier or the underside of a snare drum.
Pan Control
Allows you to send the audio to the left, to the right or anywhere between on your Main Monitor Mix or Cue Mixes.
Stereo Grouping
Allows you to group two adjacent channels together into a stereo channel with a single fader controlling the level of both channels. When a channel is stereo grouped, the pans will automatically be set to far left and far right.
+10dB Boost
Selecting this will boost the incoming signal by +10dB for recording quiet sources. This will also affect the audio being fed into your DAW.
Solo
The Solo button mutes all other channels other than the one that is currently solo'd. Multiple channels can be solo'd at one time.
Mute
The Mute button stops this channel from outputting audio whilst it is engaged.
Fader
The fader controls the amount of signal that is sent to currently selected mix. This can be set to anywhere between -inf dB to +6dB.
Meter
The meter shows the current signal level in dBFS. Should the signal level exceed 0dBFS then the peak indicators will illuminate red to indicate a peak. The peak indicators can be turned off by clicking in them. You can also turn off all peak indicators using Alt + Click.
Master Section Features
text_image
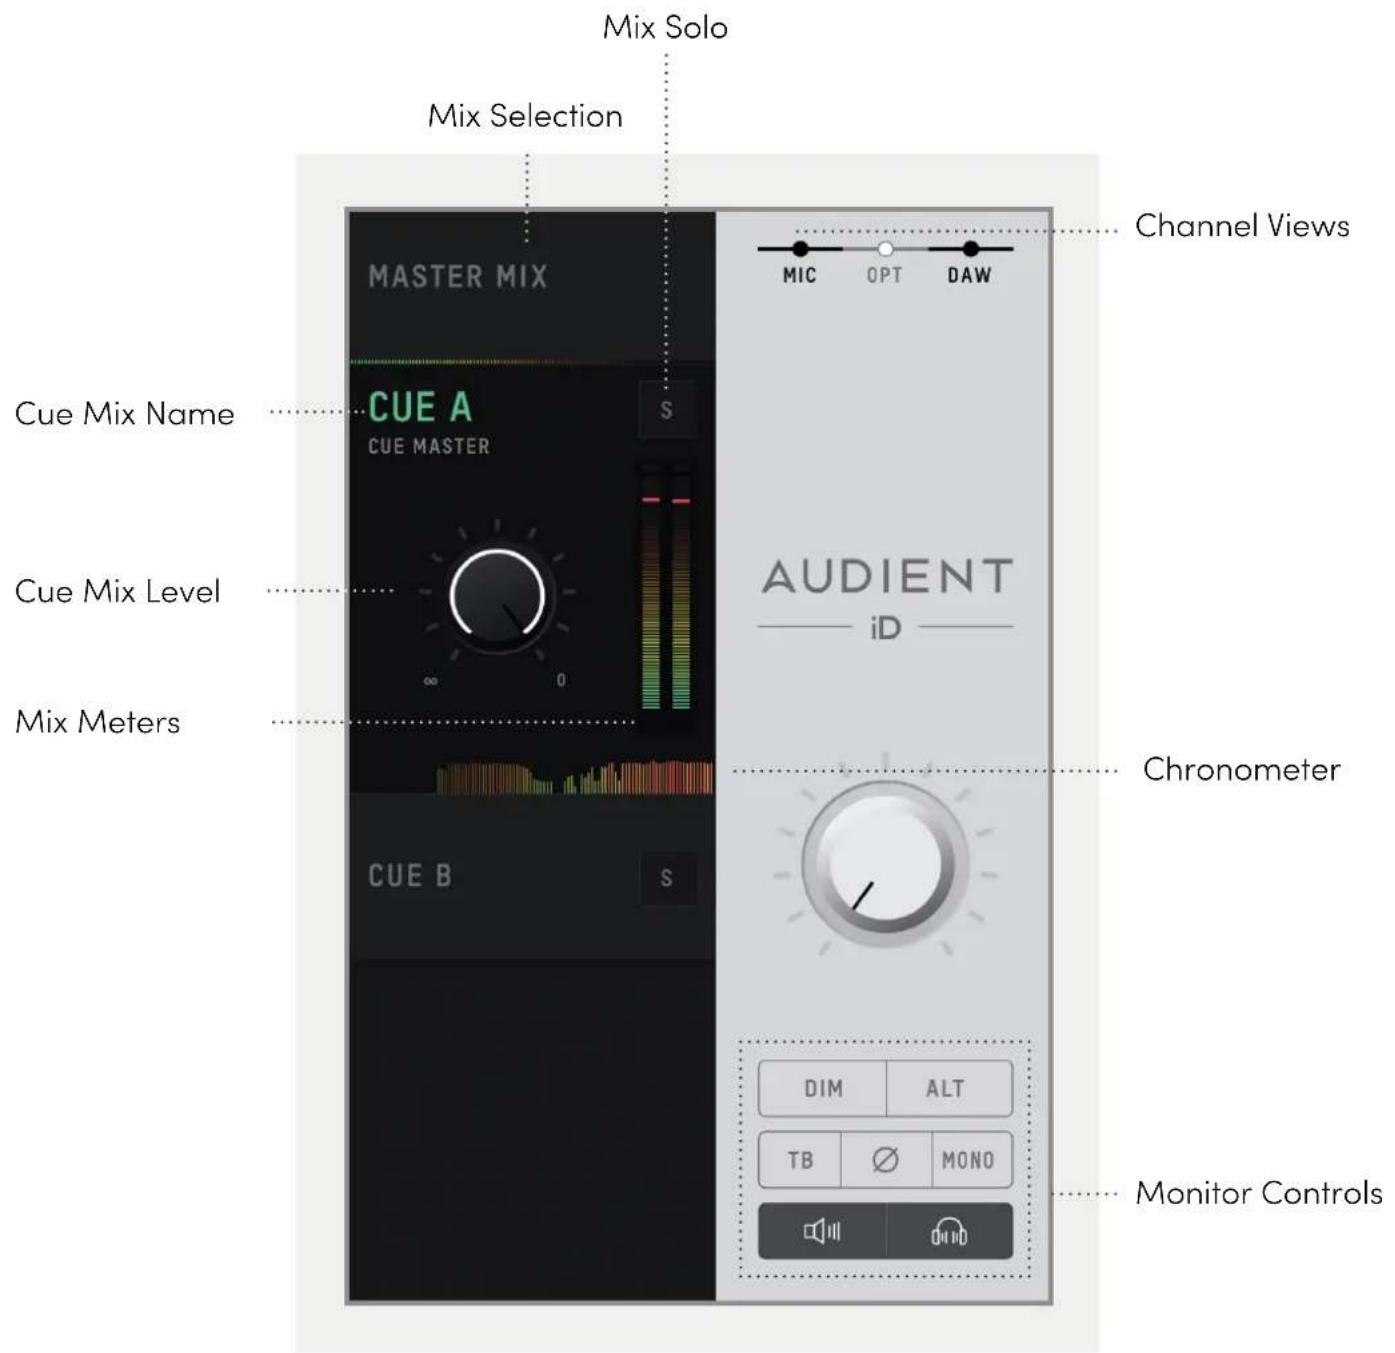
Mix Solo Mix Selection Cue Mix Name CUE A CUE MASTER S Cue Mix Level Mix Meters CUE B S Channel Views MIC OPT DAW AUDIENT iD Chronometer DIM ALT TB MONO Monitor ControlsMix Selection
Clicking on one of mixes allows you to make changes to that mix. When a mix is selected, it expands to reveal additional controls for that mix.
Cue Mix Name
Double clicking on a Cue Mixes name allows you to rename the Cue Mix. If for example you were creating mixes for four separate band members, you could name them 'Drummer', 'Guitarist', 'Bassist'... etc.
Mix Solo
The Solo button allows you to audition each of the Cue mixes through your monitors.
Mix level
The Mix level allows you to control the overall level of the Cue mix that is sent to the outputs.
Mix Meters
The Mix meters show the master signal level of the selected mix.
Chronometer
The Chronometer allows you to see not only the current signal level but also the signal level from a few seconds previously.
This can be great to track down a sudden loud transient on a particular cue mix or to monitor the change in level over time as you make changes to a mix.
Channel Views
These three buttons allow you control which of the three channel types are shown in the mixer. If for example you weren't using the digital inputs for a particular project, you can simply hide the optical channels by clicking on the OPT control.
Monitor Controls
These six buttons control various aspects of the iD14's monitor controller capability. The function of each control can be found below:
- TB (Talkback)
The talkback button switches talkback on and off. More information regarding talkback and its various settings can be found in the 'System Panel' section of this manual.
- (Phase Flip)
Pressing this switch flips the phase of one side of the stereo field. Used in conjunction with the mono button, this can be a great way to remove centred elements from a mix in order to hear the hidden elements of a mix.
- Mono
The mono button sums the stereo outputs down to mono. This can be used to quickly check the mono compatibility of your mix to make sure it'll sound great almost anywhere!
• Alt
Alt allows you to quickly switch your monitor path to a secondary set of monitors to let you check how your mix translates on various speakers.
You can select which outputs the 'ALT' monitor control flips to in the System Panel.
- Dim
Reduces the output level by a preset amount which can be great if you get a call or need to quickly chat to someone during a session.
natural_image
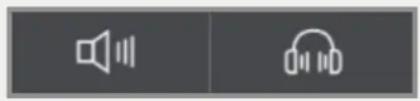
Two gray rectangular buttons with white speaker and ear icons, no text or symbols presentMonitor and Headphone Mute
This allows you to mute either the monitor outputs or the Headphone outputs from the software. A cross will show through the icon to indicate that an output is muted.
System Panel Features
text_image
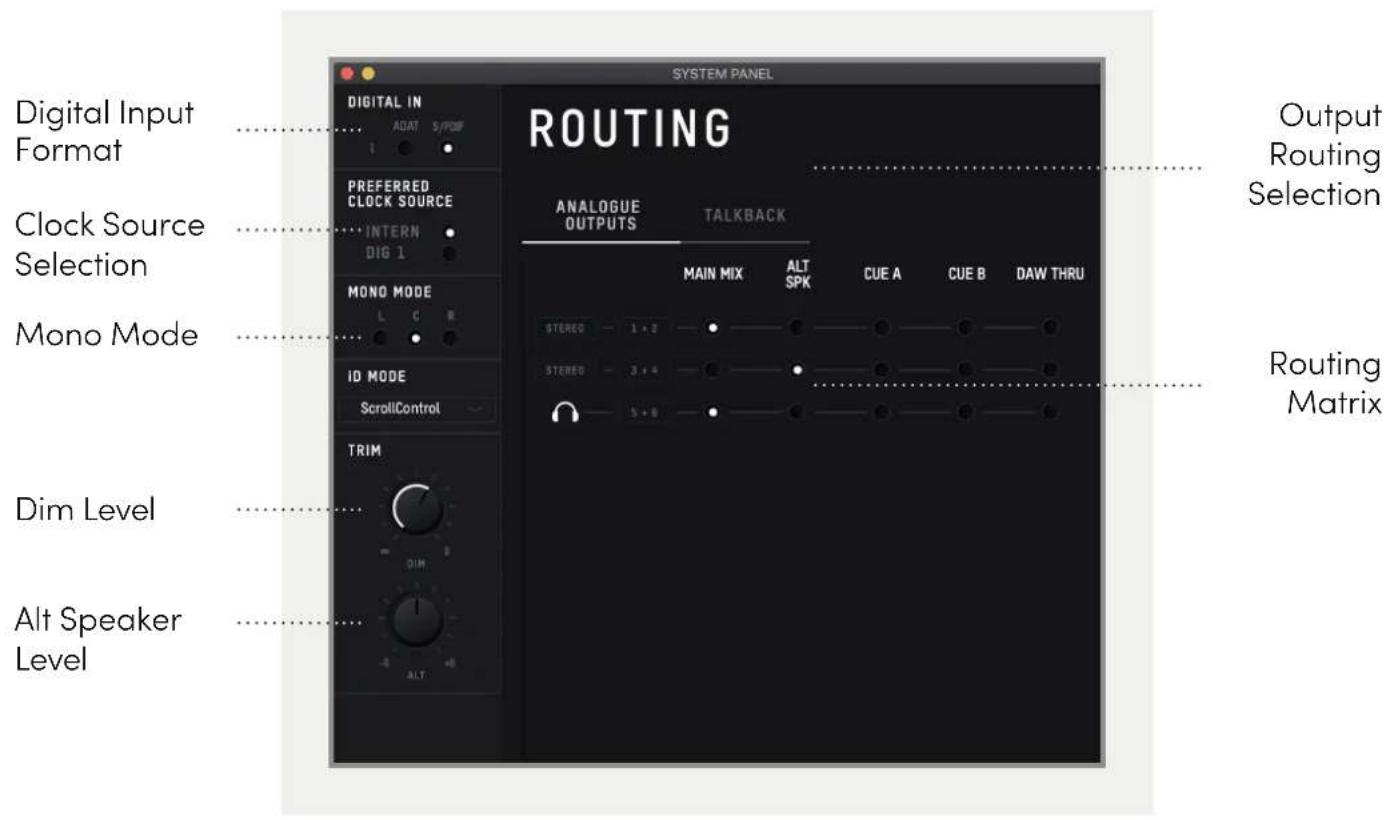
Digital Input Format Clock Source Selection Mono Mode Dim Level Alt Speaker Level DIGITAL IN ADAT S/PDF PREFERRED CLOCK SOURCE INTERN DIG 1 MONO MODE L C R ID MODE ScrollControl TRIM ROUTING ANALOGUE OUTPUTS TALKBACK MAIN MIX ALT SPK CUE A CUE B DAW THRU STEREO 1 + 2 STEREO 3 + 4 5 + 8 Output Routing Selection Routing Matrix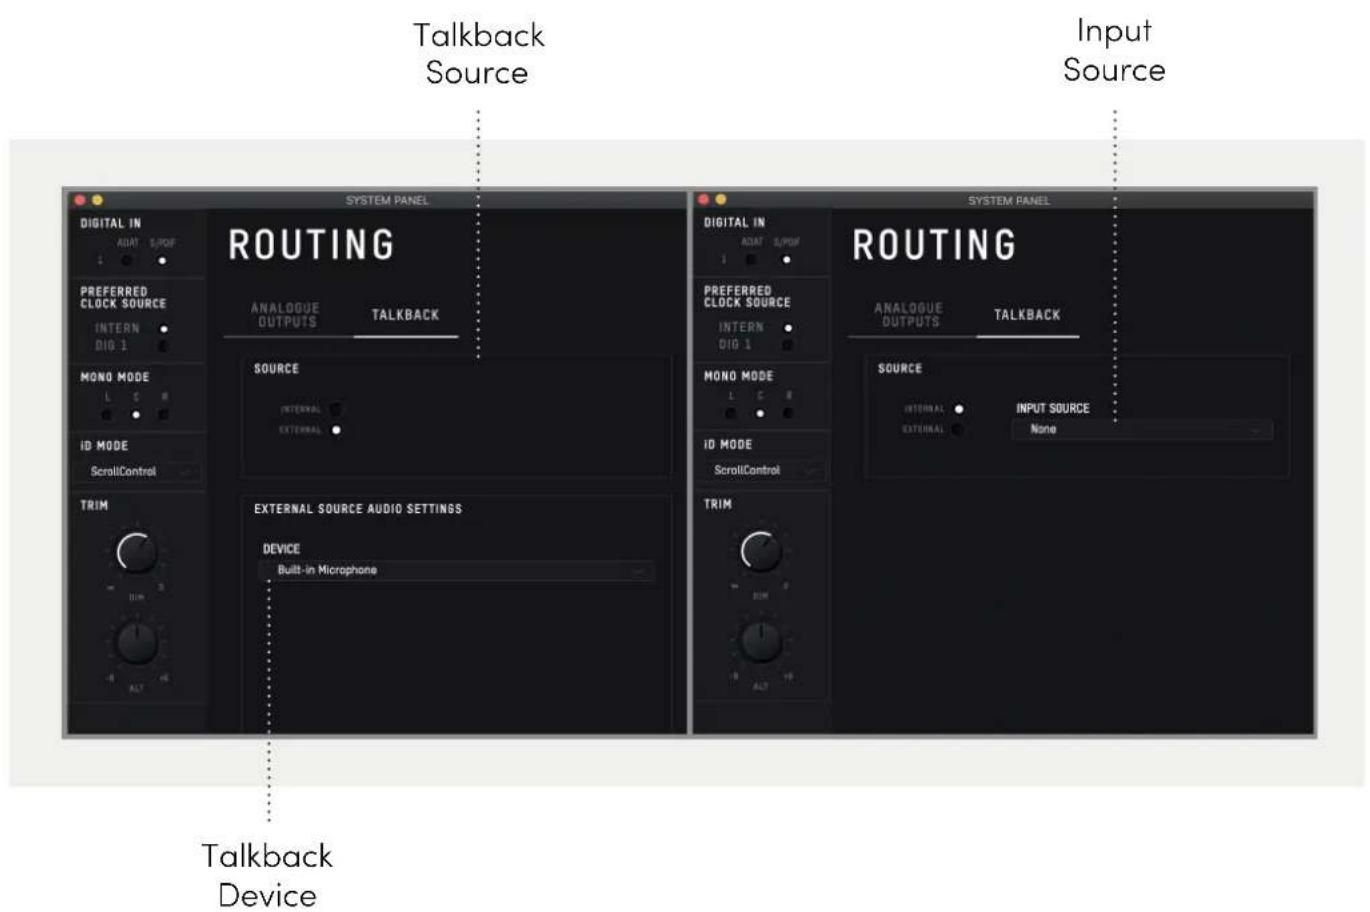
text_image
Talkback Source Input Source SYSTEM PANEL DIGITAL IN ADAT S/POF PREFERRED CLOCK SOURCE INTERN DIG 1 MONO MODE L C H ID MODE ScrollControl TRIM ROUTING ANALOGUE OUTPUTS TALKBACK SOURCE INTERNAL EXTERNAL EXTERNAL SOURCE AUDIO SETTINGS DEVICE Built-in Microphone TABLET SYSTEM PANEL DIGITAL IN ADAT S/POF PREFERRED CLOCK SOURCE INTERN DIG 1 MONO MODE L C H ID MODE ScrollControl TRIM ROUTING ANALOGUE OUTPUTS TALKBACK SOURCE INTERNAL OUTPUTS INPUT SOURCE EXTERNAL NONE TABLET Talkback DeviceDigital Input Format
Allows you to select whether the optical input uses ADAT or S/PDIF digital format.
Preferred Clock Source
The Clock source can be selected from either the internal clock or the optical input. More information about choosing a clock source can be found in the clocking section of this manual.
When using an external clock source the indicator beside the selector shows the current status of the clock on that input.
- Red - No clock signal detected on input
- Amber - A clock signal is detected but at a different sample rate to iD14
- Green - A clock signal is detected and is at the correct sample rate.
For an external clock source to be working correctly you would want the indicator to be green. If the indicator isn't green, iD14 will default back to the internal clock until it detects a valid clock input.
Mono Mode
When the iD14's Mono feature is engaged this option controls whether the mono signal is sent to the left, right or both monitors.
Dim Level
When the iD14's dim function is engaged, this control defines how much the level is reduced by.
Alt Speaker Level
This control defines the level drop/boost when the iD14 is switched to ALT speaker mode. This is used to balance levels between different speaker brands.
Output Routing Selection
Opens the routing matrix for either the Analogue Outputs, Digital Output 1 or the Talkback channel.
iD Mode
Controls whether the iD button engaged Scroll Control or one of the Monitoring functions.
Routing Matrix
The Routing Matrix allows you to control the audio source for each of the iD14's outputs from the following options:
- Main Mix - This takes signal from the Master Mix of the iD mixer. This is what is usually used for most standard playback.
- Alt - This takes signal from the Master Mix but only when the Alt speaker mode. is active.
- Cue A & B - This takes signal from the two cue mixes which can be created using the iD mixer. Please note that the hardware volume control does not affect these mixes and the Cue's have separate trims which can be adjusted when the cue mix is selected in the Main Mixer Window.
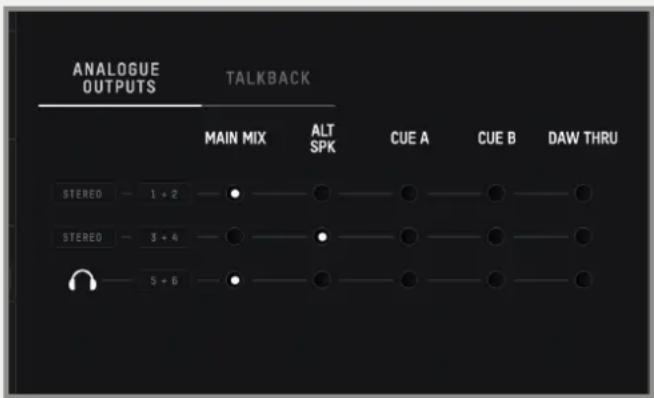
text_image
ANALOGUE OUTPUTS TALKBACK MAIN MIX ALT SPK CUE A CUE B DAW THRU STEREO — 1 + 2 ● ● ● ● ● ● STEREO — 3 + 4 ● ● ● ● ● ● 5 + 6 ● ● ● ● ● ●DAW THRU - This allows you to route to outputs exactly as they would appear in your DAW. For example, if you set Analogue out 1+2 to DAW THRU, anything your DAW sends out to Outputs 1+2 will be sent directly to Analogue outputs 1+2.
Please note that in DAW THRU, the channel in question will bypass any volume control and audio will be passed at full scale. If this output is sent to a set of monitors without inline attenuation, this may be very loud.
The only exception to this is the headphone outputs where the volume control will still function.
Talkback Source
The Talkback source allows the talkback input to be taken from one of the iD14's internal inputs or from a device connected to the host computer (such as a built-in microphone or USB microphone).
When you select an input as your Talkback channel, the channel for this channel in the iD mixer will be changed to a talkback channel which will have a TB button in the centre.
If using an external device, the talkback signal will appear on channel DAW 6.
Faders will only appear for these channels on the Cue mixes, not on the Main Mix.
Talkback Device
If an external device is selected then this allows you to select which connected device is used.

text_image
DAW 6 TALKBACK TB -128Saving & Loading Mixer Presets
To allow you to quickly setup your iD mixer during a session you can save and quickly load various presets. This is great if you are moving between recording scenarios quite often.
Mixer presets can be saved and loaded in two ways:
- Using the File menu and selecting either Save or Open.
• Using standard keyboard shortcuts :
Save: Mac - Cmd + S
Windows - Ctrl + S
Load: Mac - Cmd+ O
Windows - Ctrl + O
Saving a Preset
To save a preset, simply setup your mixer the way that you'd like to save. Then select File > Save as explained above. The mixer window should then show the Save dialog.
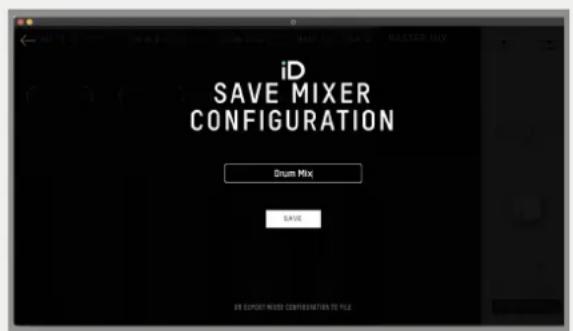
text_image
iD SAVE MIXER CONFIGURATION Drum Mix SAVE DO SUPPORT MIXED CONFIGURATIONS TO FILESimply enter the name of your preset and press save.
It is also possible to export your preset files in order to send them to friends or to simply save them within your DAW session files for easy recall later on. To do this, select Export Mixer Configuration at the base of the Save screen.
Loading a Mixer Configuration
To load a previously saved preset, select File > Open to bring up the Load screen.
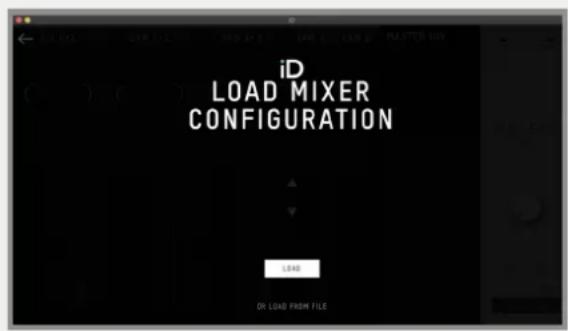
text_image
iD LOAD MIXER CONFIGURATION LOAD DI LOAD FROM FILEThe previously saved configuration will appear in a list. Select the configuration you wish to use and click Load.
You can also open a mixer configuration directly from a file by selecting Load From File.
Menu/Task Bar Icons
MacOS
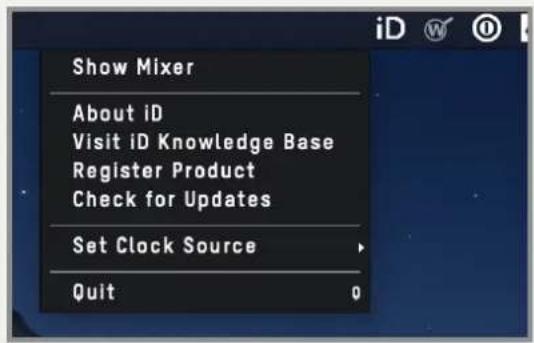
On MacOS, the iD icon appears in the menu bar in the top right hand corner of the screen. This gives you quick access to various functions of the iD14.
text_image
Show Mixer About iD Visit iD Knowledge Base Register Product Check for Updates Set Clock Source Quit 0Quit
Fully closes the iD mixer application.
About iD
Displays information regarding the current version of the iD mixer application.
Visit iD Knowledge Base
Opens a browser window for the Audient Helpdesk with helpful articles and FAQ's.
Set Clock Source
Allows you to quickly adjust the clock source between the internal and optical clocks
Check for Updates
The iD app will check with the Audient update server for any available firmware updates for iD14.
Windows
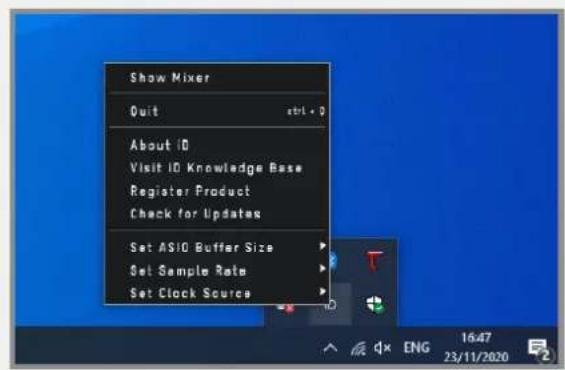
The Windows taskbar Icon has all the options of the MacOS menu bar icon but also includes some Windows Specific options.
text_image
Show Mixer Quit ctrl - 0 About ID Visit ID Knowledge Base Register Product Check for Updates Set AS10 Buffer Size Set Sample Rate Set Clock SourceSet Sample Rate
Sets the operating sample rate of iD14. 44.1, 48, 88.2 and 96kHz are the four options available.
Set ASIO Buffer Size
Sets the buffer size of the iD14 between 16 and 4096 samples. Higher sizes will take processing load off your computer but will cause increased latency.
Firmware Update
Occasionally, Audient will release a firmware update for the iD14 in order to address bugs, improve compatibility and add new features. Therefore you may wish to check occasionally for any updates.
This can be done by navigating to the Window menu and selecting Check for Updates.
The iD mixer application will then check with our update server if any updates for the iD14 are currently available. If there are then you will prompted to install them onto the iD14.
text_image
UPDATE FIRMWARE From audient.com: From file: CANCEL NEXTIf you then click next, you'll be prompted to stop any playback through the iD14. Click Update and the update will begin. The iD14 may turn off a number of times.
Audio Loop-back
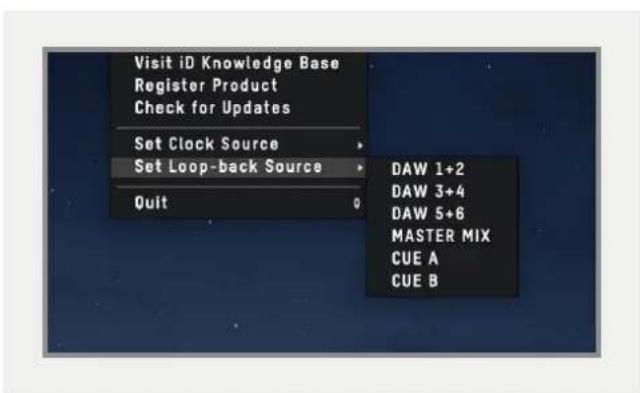
As part of the software mixer of iD14, you also have the ability to loop-back audio so you can record or stream audio from different applications on your computer. To give you additional flexibility the iD Mixer gives a number of sources for your loop-back audio which can be adjusted in the iD menu:
text_image
Visit iD Knowledge Base Register Product Check for Updates Set Clock Source Set Loop-back Source Quit DAW 1+2 DAW 3+4 DAW 5+6 MASTER MIX CUE A CUE BThe sources are as follows:
DAW 1+2 - Any audio being sent to outputs 1+2 of the iD14
DAW 3+4 - Any audio being sent to outputs 3+4 of the iD14
DAW 5+6 - Any audio being sent to outputs 5+6 of the iD14
Master Mix - The audio mix created in the iD mixer on the Main Mix panel
Cue A - The audio mix created in the iD mixer on the CUE A panel
Cue B - The audio mix created in the iD mixer on the CUE B panel
Using the Loop-back Mix
To record or stream your loop-back mix, simply select either Input 11+12 (Inputs 3-10 are preserved for the additional ADAT inputs) or Loop-back 1+2 in your audio software. The input name you will see is dependent on your DAW or audio software.
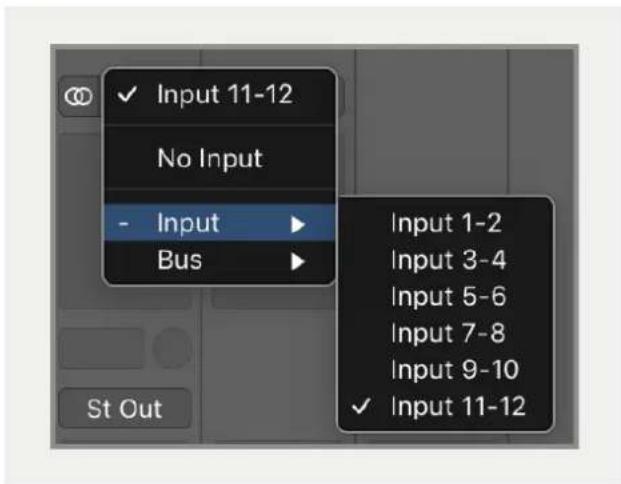
text_image
Input 11-12 No Input - Input ► Bus ► St Out Input 1-2 Input 3-4 Input 5-6 Input 7-8 Input 9-10 ✓ Input 11-12Sending Audio to the Loop-back Outputs
Most DAW's and audio software will allow you to select your audio output as part of the audio preferences or in a mixer. Again, for details on how to do this, check the manual or documentation for your software.
However, for applications that don't give you this option you can simply adjust the system settings.
MacOS
To adjust your output channels, you'll need to go to the Audio MIDI setup utility. This can be found by going to:
Finder > Applications > Utilities > Audio MIDI Setup
You should now see a list of audio devices currently connected to the Mac. Select the iD14, go to the 'Output' panel and click "Configure Speakers". Now set the Outputs to Loop-back 1 and Loop-back 2.
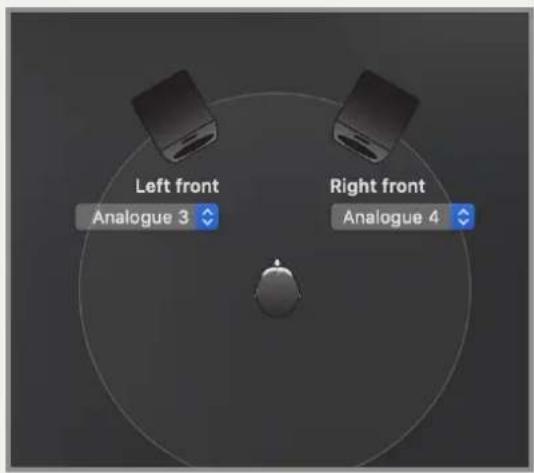
text_image
Left front Analogue 3 Right front Analogue 4Click 'Apply' and all audio on your computer will now be sent to these channels in the iD Mixer allowing you to set up a loop-back mix that is separate to your Main Output, which you would continue to use for monitoring.
Windows
On Windows you can simply change your output channel by going to the 'Sound' settings found in the 'Control Panel'. Go to the 'Playback' device list and select 'Output 3+4' or 'Output 5+6' as your Output Device.
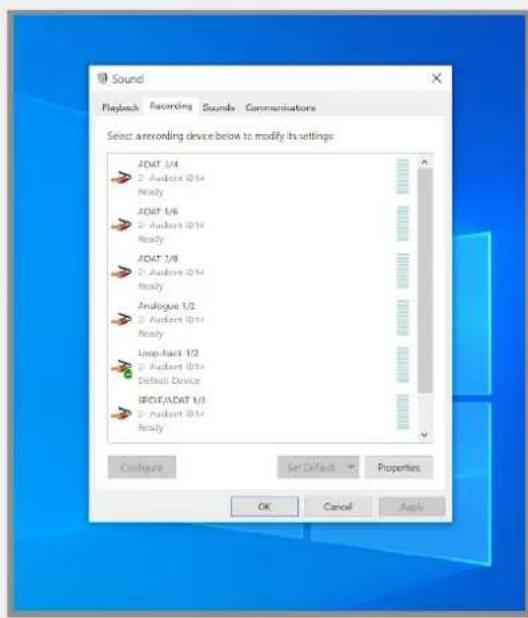
text_image
Sound Playback Recording Sounds Commensations Select according device below to modify its settings ADMT 1/4 2 Audent @14 Ready ADMT 1/6 2 Audent @14 Ready ADMT 1/8 2 Audent @14 Ready Analogue 1/2 2 Audent @14 Ready Loop-back 1/2 3 Audent @14 Default Device SPDT/ADMT 1/3 2 Audent @14 Ready Configure Sat Default Properties OK Cancel ApplyKeyboard Shortcuts
Keyboard Shortcut Index
To allow you to find all shortcuts for the mixer application in one place without having to go through each page of this manual please refer to this table:
Location
Mac
Windows
Description
Faders Alt + Click Alt + Click Resets fader to unity gain (0 dB)
Pans Alt + Click Alt + Click Resets pan pots to central
position
Solos Cmd + Click Ctrl + Click Clears all solos if clicking on a solo'd
channel
Overrides all other solos
exclusive) if clicking on
channel
Meters Alt + Click Alt + Click Clicking on peak hold indicator will
clear all clip indicators
System Panel Cmd + S Ctrl + S Save mixer configuration
Cmd + O Ctrl + 0 Load mixer configuration
View Modes Cmd + 1 Ctrl + 1 View Mic/Line Input
Cmd + 2 Ctrl + 2 View Optical (Digital) Inputs
Cmd + 3 Ctrl + 3 View DAW Mix Inputs
Cmd + 4 Ctrl + 4 View System Panel
Please check the iD14 page online at audient.com/products/iD14
for the latest mixer application updates.
More shortcuts may be added without notification.
DAW Setup

Pro Tools Setup
Operation with Pro Tools
If using Windows, ensure that you have followed the installation instructions found on page 11.
With iD14 connected, launch Pro Tools and ensure that a new session is created at the desired sample rate. If you are using Windows, make sure that you have already set your Latency and Buffer Size settings in the iD System Tray before opening a project. Changing these mid session will result in Pro Tools needing to restart.
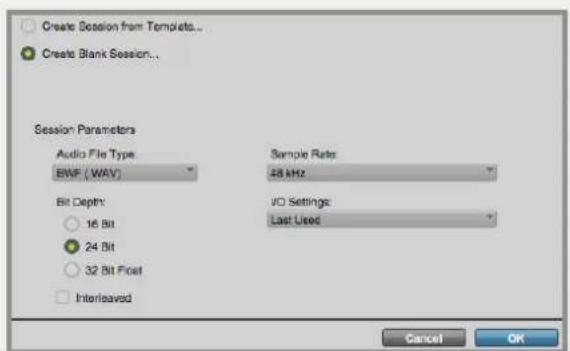
text_image
Create Session from Templates... Create Blank Session... Session Parameters Audio File Type BWF ( WAV ) Bit Depth: 16 Bit 24 Bit 32 Bit Float Interleaved Sample Rate: 48 kHz VO Settings: Last Used Cancel OKPlayback Engine
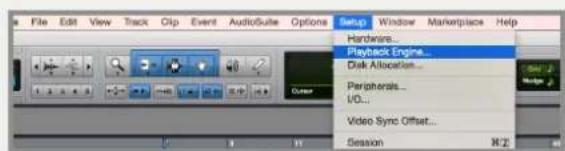
Go to Setup > Playback Engine... and ensure that iD14 is set as the active playback device.
text_image
File Edit View Track Clip Event AudioSuite Options Setup Window Marketplace Help Hardware... Playback Engine... Disk Allocation... Peripherals... I/O... Video Sync Offset... Session N 2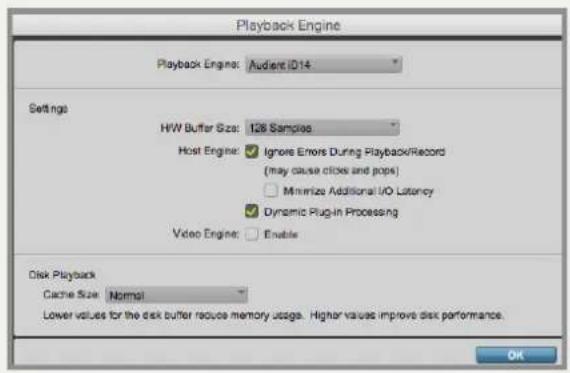
text_image
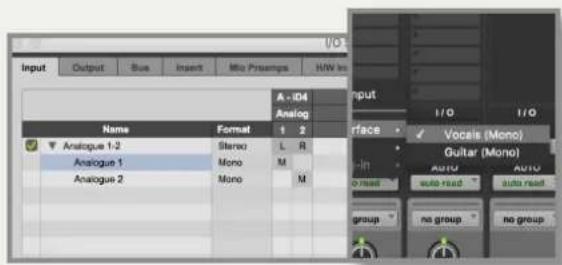
Playback Engine Playback Engine: Audent ID14 Settings H/W Buffer Size: 128 Samples Host Engine: ✓ Ignore Errors During Playback/Record (may cause clicks and pops) ☐ Minimize Additional I/O Latency ✓ Dynamic Plug-in Processing Video Engine: ☐ Enable Disk Playback Cache Size: Normal Lower values for the disk buffer reduce memory usage. Higher values improve disk performance. OKGo to Setup > I/O... to label your inputs and outputs and ensure that iD14 is correctly reporting 10-inputs and 6-outputs to and from Pro Tools.
text_image
Input Output Bus Insert Mio Prasemps HW In Name Format 1 2 Analog 1-2 Stereo L R Analog 1 Mono M Analog 2 Mono M A - ID4 Analog face Vocals (Mono) Guitar (Mono) Auto Auto read Auto read group no group no groupFor more Pro Tools information consult your Avid user manuals & documentation.
Logic Pro Setup
Operation with Logic Pro
Once iD14 has been successfully installed following the steps detailed after page 11 of this manual, launch Logic Pro and check the following:
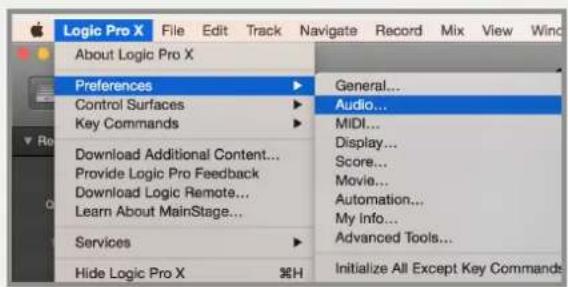
Logic Pro > Preferences > Audio
text_image
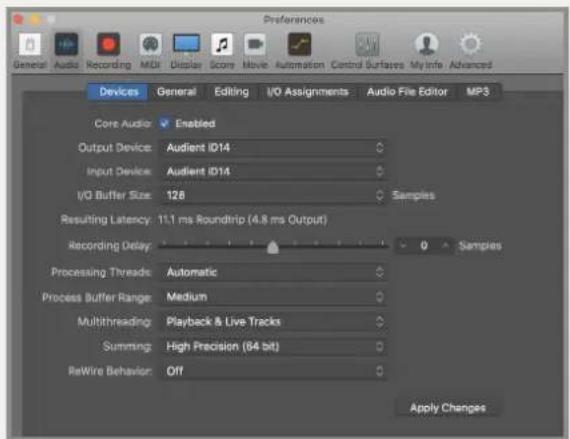
Logic Pro X File Edit Track Navigate Record Mix View Wind About Logic Pro X Preferences General... Control Surfaces Audio... Key Commands MIDI... Download Additional Content... Display... Provide Logic Pro Feedback Score... Download Logic Remote... Movie... Learn About MainStage... Automation... Services My Info... Hide Logic Pro X ⬊H Advanced Tools... Initialize All Except Key CommandsEnsure that iD14 is selected as the active audio device and set the buffer size (to affect system latency). If you are experiencing issues with playback stability and CPU loading, try increasing the buffer size. This appears with "overload" errors and/or pops and clicks and distortion in the audio.
text_image
Preferences General Audio Recording MDI Display Score Movie Automation Control Surfaces My Info Advanced Devices General Editing I/O Assignments Audio File Editor MPS Core Audio Enabled Output Device: Audient ID14 Input Device: Audient ID14 I/O Buffer Size: 128 Samples Resulting Latency: 11.1 ms Roundrip (4.8 ms Output) Recording Delay Processing Threads: Automatic Process Buffer Range: Medium Multithreading: Playback & Live Tracks Summing: High Precision (64 bit) ReWire Behavior: Off Apply ChangesIf you are using the iD mixer to monitor input signals while recording, be sure to disable Logic's software monitoring to avoid phasing as the same source will be heard twice with a short delay between the low latency DSP signal and the delayed software monitoring signal.
Assigning I/O
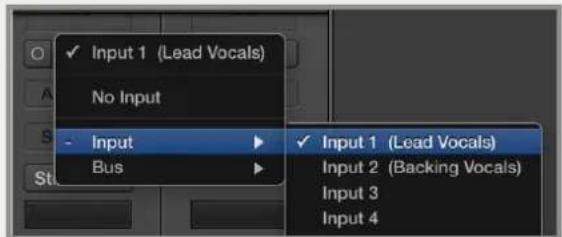
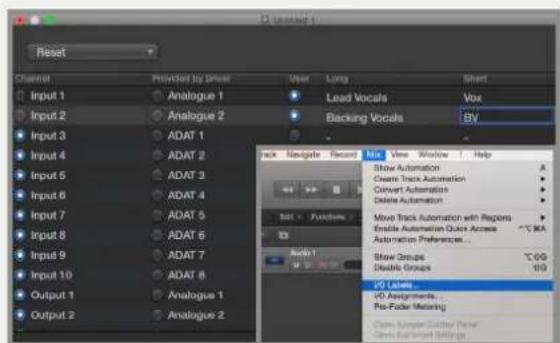
All of iD14's input and output channels will be available to Logic for routing. There are a total of 10-inputs and 6-outputs reported from the driver. You can rename input and output channels to whatever you wish using the I/O label function. This is a great way to keep things organised.
text_image
Input 1 (Lead Vocals) No Input - Input Bus Input 1 (Lead Vocals) Input 2 (Backing Vocals) Input 3 Input 4Mix > I/O Labels
text_image
Reset Channel Input 1 Input 2 Input 3 Input 4 Input 5 Input 6 Input 7 Input 8 Input 9 Input 10 Output 1 Output 2 Provided by Driver Analogue 1 Analogue 2 ADAT 1 ADAT 2 ADAT 3 ADAT 4 ADAT 5 ADAT 6 ADAT 7 ADAT 8 Analogue 1 Analogue 2 User Long Lead Vocals Backing Vocals BV Back Navigate Record Mini View Window Help Show Automation Create Track Automation Convert Automation Delete Automation Move Track Automation with Regions Enable Automation Quick Access Automation Preferences... Show Groups Disable Groups UO Labels... UO Assignments... Pre-Fader Matching Open Unique Control Panel Open Selected SettingsOperation with Logic Pro
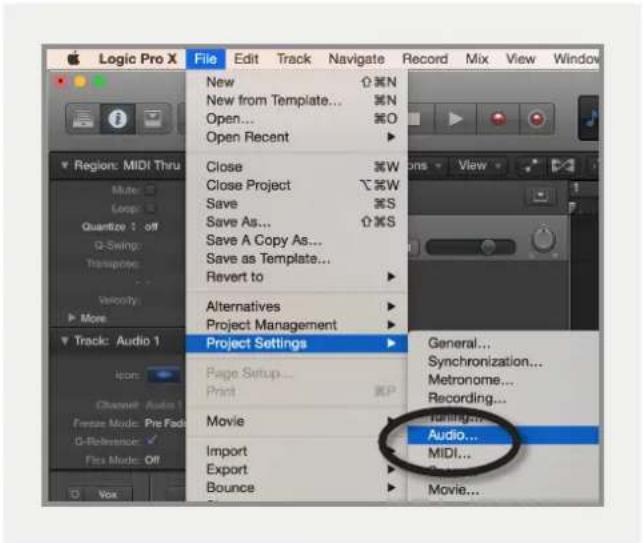
If you are using an external clock source (ADAT or S/PDIF) to clock iD14, please ensure that your Logic Pro project is set to the same sample rate when recording and playingback in a session, otherwise things may sound a bit sharp or flat!
File > Project Settings > Audio
text_image
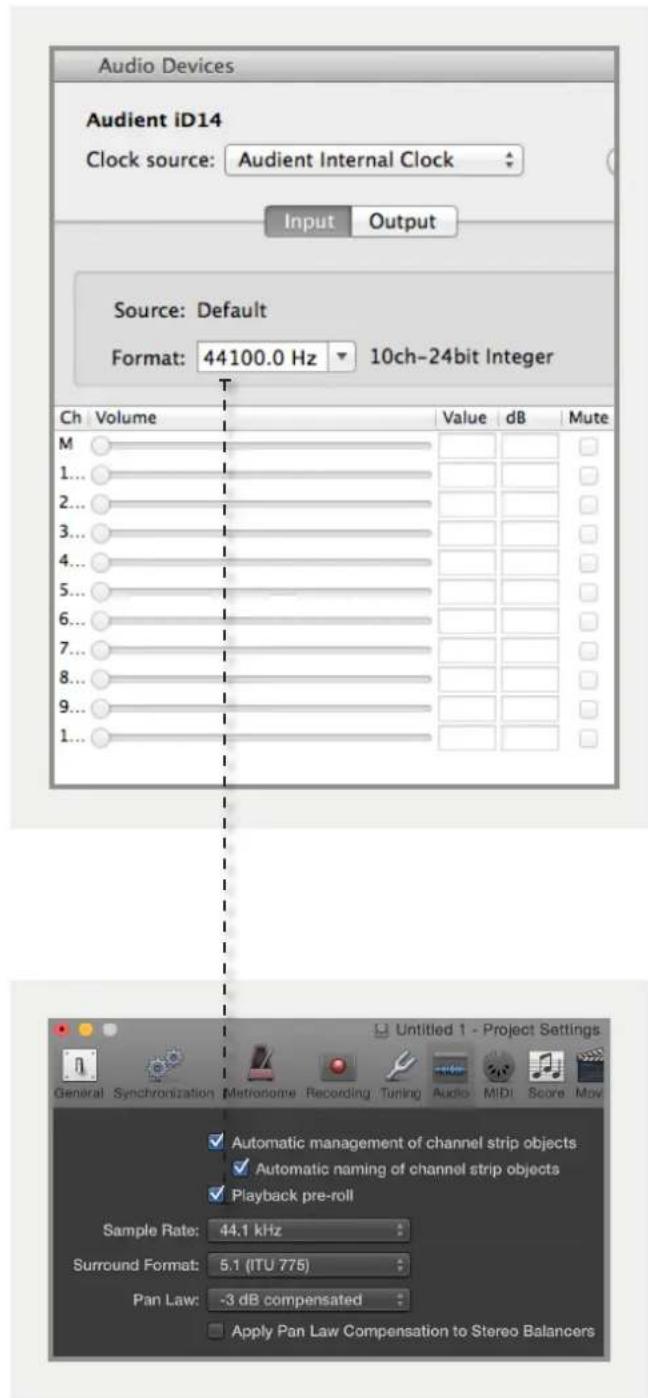
Logic Pro X File Edit Track Navigate Record Mix View Window New ⓍN New from Template... ⓍN Open... ⓍO Open Recent ▶ Close ⓍW Close Project ⓍW Save ⓍS Save As... ⓍS Save A Copy As... Save as Template... Revert to ▶ Alternatives ▶ Project Management ▶ Track: Audio 1 Project Settings ▶ General... Synchronization... Metronome... Recording... Page Setup... Print ⓍP Movie 📊 Audio... Import 📊 MIDI... Export 📊 Movie... BounceIf you are using the internal clock in iD14, setting the sample rate via Logic Pro will update the iD14 sample rate to follow your session.
There may be a slight pause as the system re-clocks. This is normal.
This can be verified in Audio MIDI Setup.
Macintosh HD > Applications > Utilities
text_image
Audio Devices Audient iD14 Clock source: Audient Internal Clock Input Output Source: Default Format: 44100.0 Hz 10ch-24bit Integer Ch Volume Value dB Mute M 1... 2... 3... 4... 5... 6... 7... 8... 9... 1... Untitled 1 - Project Settings General Synchronization Metronome Recording Tuning Audio MIDI Score Mov Automatic management of channel strip objects Automatic naming of channel strip objects Playback pre-roll Sample Rate: 44.1 kHz Surround Format: 5.1 (ITU 775) Pan Law: -3 dB compensated Apply Pan Law Compensation to Stereo BalancersFor more Logic Pro information please consult your Apple user manuals & documentation.
Cubase/Nuendo Setup
Operation with Cubase / Nuendo
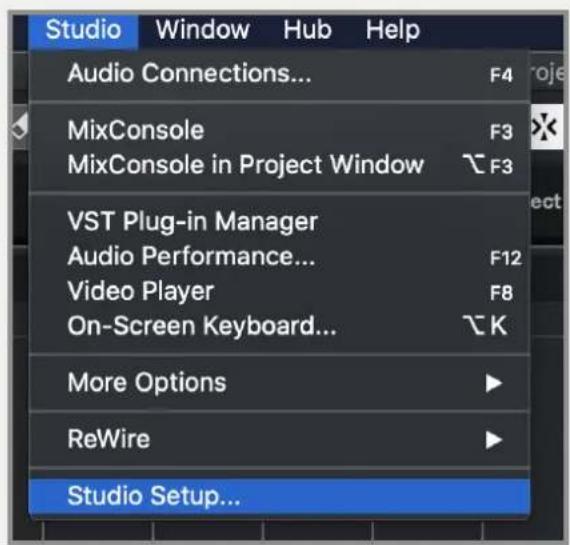
If using Windows, ensure that you have followed the installation instructions found on page 11. With the iD14 plugged into your computer, Launch Cubase or Nuendo and once a session is open, go to:
Studio > Studio Setup...
text_image
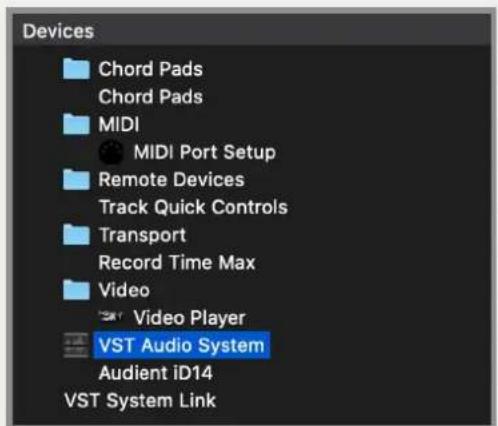
Studio Window Hub Help Audio Connections... F4 MixConsole F3 MixConsole in Project Window F3 VST Plug-in Manager Audio Performance... F12 Video Player F8 On-Screen Keyboard... K More Options ▶ ReWire ▶ Studio Setup...Select VST Audio System from the list of options
text_image
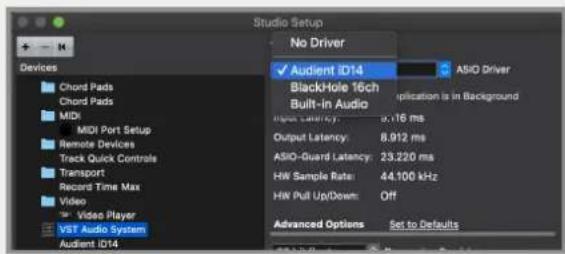
Devices Chord Pads Chord Pads MIDI MIDI Port Setup Remote Devices Track Quick Controls Transport Record Time Max Video Video Player VST Audio System Audient iD14 VST System LinkThen select the Audient iD14 from the dropdown menu. You will be asked if this is okay, select "Switch".
text_image
Studio Setup + - K Devices Chord Pads Chord Pads MIDI MIDI Port Setup Remote Devices Track Quick Controls Transport Record Time Max Video Video Player VSR Audio System Audient ID14 No Driver ✓ Audient ID14 BlackHole 16ch Built-In Audio Output Latency: 8.912 ms ASIO Guard Latency: 23.220 ms HW Sample Rate: 44.100 kHz HW Pull Up/Down: Off Advanced Options Set to DefaultsClose the VST device setup panel and navigate to the Audio connections panel:
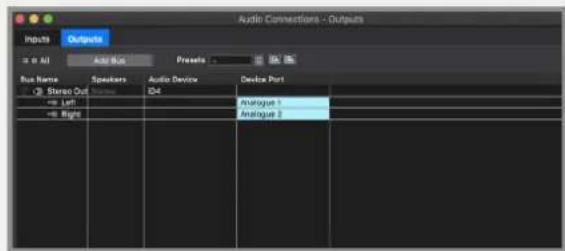
Devices > Audio Connections (F4)
Here you can ensure that all buses have been created in Cubase / Nuendo and therefore all ports are addressable in your session. Add new buses and assign them to the necessary I/O if required.
text_image
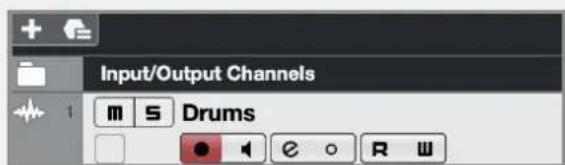
Audio Connections - Outputs Inputs Outputs in All Add Bus Presets Bus Name Speakers Audio Device Device Port @ Stereo Out @ Left Analogue 1 @ Right Analogue 2If using the iD14 Mixer App to monitor your inputs, ensure that input monitoring is turned off on the track.
text_image
Input/Output Channels m S Drums
natural_image
Abstract geometric pattern with vertical lines and horizontal bars (no text or symbols)Ableton Live Setup
Operation with Ableton Live
If using Windows, ensure that you have followed the installation instructions found on page 11.
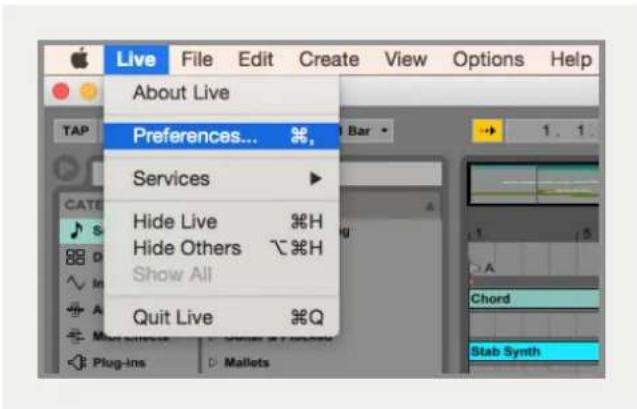
With iD14 plugged into your computer, launch Ableton Live and head straight to:
Live > Preferences > Audio
text_image
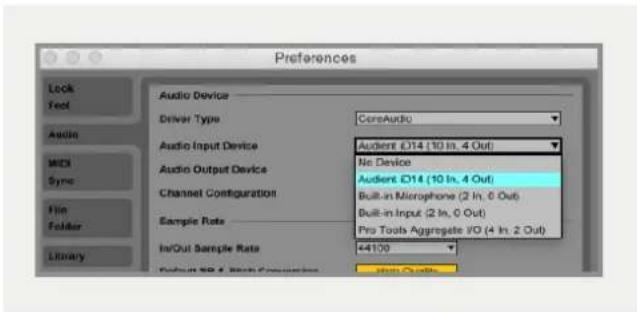
Live File Edit Create View Options Help About Live Preferences... Services Hide Live %H Hide Others %H Show All Quit Live %Q Plug-ins Mallets Chord Stab SynthHere navigate to the Audio tab and make sure that iD14 is assigned as the playback device.
text_image
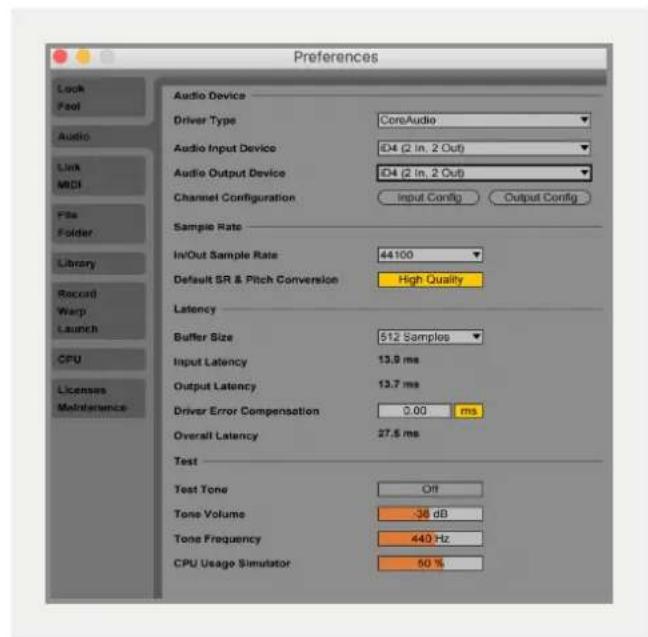
Preferences Audio Device Driver Type CoreAudio Audio Input Device Audio Output Device Channel Configuration Sample Rate In/Out Sample Rate Audent E14 (10 In. 4 Out) No Device Audent E14 (10 In. 4 Out) Built-in Microphone (2 In. 6 Out) Built-in Input (2 In. 0 Out) Pro Tools Aggregate I/O (4 In. 2 Out) Audio Input SE & Block Conversion Audio OutputsIn the Live Audio Preference panel you can set an appropriate buffer size (this can be kept high if you are monitoring input signals for recording via the iD mixer. Ensure that iD14 reports as a 10-in, 4-out device to Live.
If necessary you can limit the number of i/o channels reported as active inputs (from the driver) in Live by using the input and output config tabs. This is an excellent feature to help reduce CPU loading if all channels are not required.
text_image
Preferences Audio Device Driver Type CoreAudio Audio Input Device ID4 (2 In. 2 Out) Audio Output Device ID4 (2 In. 2 Out) Channel Configuration Input Config Output Config Sample Rate In/Out Sample Rate 44100 Default SR & Pitch Conversion High Quality Latency Buffer Size 512 Samples Input Latency 13.9 ms Output Latency 13.7 ms Driver Error Compensation 0.00 ms Overall Latency 27.5 ms Test Test Tone Off Tone Volume -36 dB Tone Frequency 440 Hz CPU Usage Simulator 50 %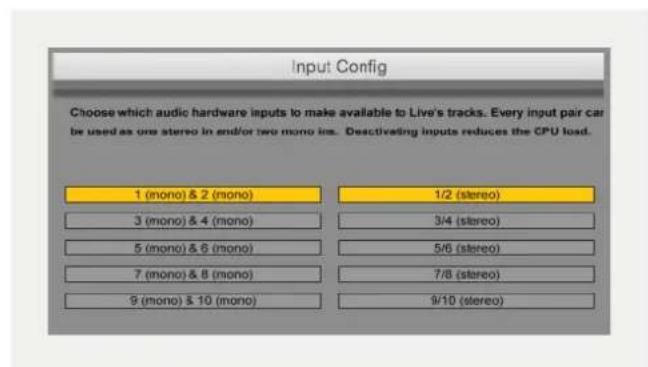
text_image
Input Config Choose which audio hardware inputs to make available to Live's tracks. Every input pair can be used as one stereo in end/or two mono ins. Desactivating inputs reduces the CPU load. 1 (mono) & 2 (mono) 3 (mono) & 4 (mono) 5 (mono) & 6 (mono) 7 (mono) & 8 (mono) 9 (mono) & 10 (mono) 1/2 (stereo) 3/4 (stereo) 5/6 (stereo) 7/8 (stereo) 9/10 (stereo)Troubleshooting & FAQ
Troubleshooting
"The unit will not power on"
Double check that the USB cable is plugged in. If it still won't power on, try using a different USB port on the computer and possibly even a different USB cable. If you are using a USB hub, please try plugging iD14 directly into the computer.
"I get clicks and pops on DAW playback"
This is most likely to do with setting the buffer size too low for your computer. This can be caused by running very large projects with a lot of plugins and virtual instruments. Experiment with higher buffer sizes. Typically you want small buffer sizes for tracking or recording software synths to keep the latency low. However when mixing it is fine to set a slightly higher buffer size as latency is not so much of a problem.
"When I connect to my computer, I cannot play any audio out from iD14"
Firstly double check that the USB cable connecting iD14 to your computer is functional and attached at both ends.
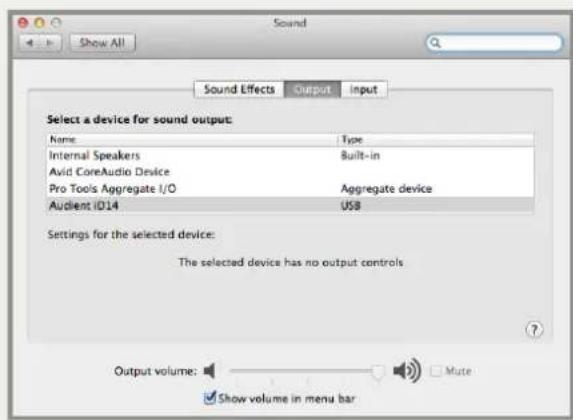
Double check that iD14 is set as the active playback device in your DAW and computer:
System Preferences > Sound > Output Tab > Audient iD14 (macOS)
Control Panel > Hardware and Sound > Sound > Manage Audio Devices > Audient iD14 (Windows)
Launch the iD mixer application to activate communication between your computer and iD14. This only needs to be done once straight after power up. Once iD14 is set to the operational state you desire, you can quit the iD application and it will continue to function as intended.
In the software mixer, locate the DAW channels by pressing the DAW view button and increase the level of DAW 1+2 fader.
text_image
Sound Show All Sound Effects Output.Input Select a device for sound output: Name Type Internal Speakers Built-in Avid CoreAudio Device Pro Tools Aggregate I/O Aggregate device Audient ID14 USB Settings for the selected device: The selected device has no output controls Output volume: Mali Show volume in menu barTroubleshooting
"I have clocking issues which include iD14 not locking to external ADAT or SPDIF devices or operating at the incorrect rate compared to my session"
If there is an issue with syncing of an external device, the Status LED in the System Panel will be red or yellow. If the status light is red then iD14 cannot detect a clock signal from an external device, and yellow if it can detect a signal at the wrong sample rate.
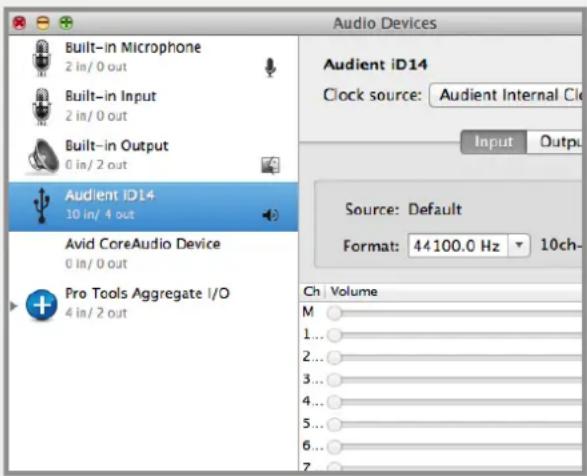
To change sample rate in OSX go to Audio MIDI Setup found by navigating to the folder:
Macintosh HD > Applications > Utilities > Audio MIDI Setup
Ensure that Audient iD14 is seen as an audio device (Window Menu > Show Audio Window).
text_image
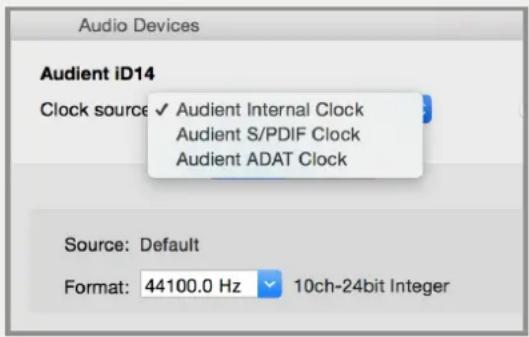
Audio Devices Built-in Microphone 2 in/ 0 out Built-in Input 2 in/ 0 out Built-in Output 0 in/ 2 out Audient ID14 10 in/ 4 out Avid CoreAudio Device 0 in/ 0 out Pro Tools Aggregate I/O 4 in/ 2 out Audient iD14 Clock source: Audient Internal Cl Input Output Source: Default Format: 44100.0 Hz 10ch- Ch Volume M 1... 2... 3... 4... 5... 6... 7Double check that an appropriate clock source is selected (Internal for master operation), ADAT or S/PDIF clock for external slave operation. Ensure that you see the correct sample rate displayed in the Format drop-down menu.
text_image
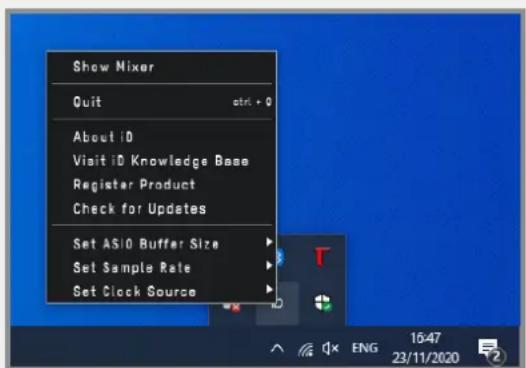
Audio Devices Audient iD14 Clock source ✓ Audient Internal Clock Audient S/PDIF Clock Audient ADAT Clock Source: Default Format: 44100.0 Hz 10ch-24bit IntegerIf you are using Windows, go to the iD icon in the system tray and right click on it. This will bring up some settings including sample rate. Alternatively you can alter these settings in the Setup tab of the iD app.
Change the sample rate to match that of the external ADAT device and session.
text_image
Show Mixer Quit About iD Visit iD Knowledge Base Register Product Check for Updates Set ASIO Buffer Size Set Sample Rate Set Clock SourceTroubleshooting
"How do I reset the iD mixer application to its default state?"
To reset the mixer application, quit the iD app completely, then navigate to the following folder and delete the state.xml file (it will replenish upon a fresh launch of the application)
Macintosh HD > User > Library > Application Support > Audient > iD > state.xml
(C:) > Users > yourusername > AppData > Roaming > Audient > iD > state.xml
Do not delete the parent folder as this will also contain your iD mixer presets.
"How do I make sure I have the latest version of iD firmware/software?"
To check for the latest updates to the iD desktop mixer application please visit: audient.com/products/id14/downloads and download and install the latest driver.
You will be made aware of firmware releases from the iD app when connected to the internet. Please refer to page 13 in this user manual for more information regarding firmware update.
FAQs
For more information and bug support, please search our online Help Centre which can be found here:
support.audient.com
For technical support please create a ticket in our online support system, which can also be found in the support section of our website (see link above).
Technical Specifications
text_image
AUDIENNT ID14D.I / Instrument Input:
RANGE: 40dB
LINEUP: 12dBu = 0dBFS
MAX LINEUP: +10dBu
THD+N @ 0dBu: 0.1%
SNR: 100dBu A-Weighted
FREQUENCY RESPONSE - MIN GAIN ±0.5dB 10Hz to 20kHz
1/4" TS JACK: Tip (Hot) & Sleeve (Shield)
Analogue to Digital Converter:
THD+N @ -1dBFS: 0.001%
DYNAMIC RANGE: 120dB A-Weighted
CMRR: >80dB
FREQUENCY RESPONSE: ±0.5dB 10Hz to 40kHz
Digital Input:
8-CHANNEL ADAT: 44.1kHz to 48.0kHz
4-CHANNEL ADAT: 88.2kHz to 96.0kHz SMUX
STEREO S/PDIF / TOSLINK: 44.1kHz to 96.0kHz (Stereo)
Headphone Outputs:
(Measurements with 100k load)
LINEUP: 18.5dBu = 0dBFS
THD+N @ -1dBFS: 0.0009%
DYNAMIC RANGE: 125.5dB A-Weighted
CROSSTALK: >116dB
FREQUENCY RESPONSE: ±0.25dB 10Hz to 40kHz
MAXIMUM LEVEL @ 30R: 2.59V Peak, 1.827V RMS, 223mW
MAXIMUM LEVEL @ 62R: 4.18V Peak, 2.95V RMS, 280mW
MAXIMUM LEVEL @ 600R: 7.72V Peak, 5.46V RMS, 100mW
1/4" TRS JACK: Tip (Left), Ring (Right) & Sleeve (Shield)
Microphone/Line Input:
GAIN RANGE: 58dB
LINEUP: 12dBu = CdBFS
MIC MAX INPUT LEVEL: 12dBu
MAX INPUT LEVEL: 21dBu
INPUT IMPEDANCE (Mic): 2.8k
INPUT IMPEDANCE (Line): >8k
THD+N @ 0dBu 0.00170%
SNR: 101dBu A-Weighted
EIN: -129dB A-Weighted
CMRR @ 1k: >-75dB
CROSSTALK: >-100dB
FREQUENCY RESPONSE - MIN GAIN ±0.5dB 10Hz to 40kHz
XLR COMBI FEMALE:
Pin 2 (Hot), Pin 3 (Cold) &
Pin 1 (Shield)
1/4" TRS JACK:
Tip (Hot), Ring (Cold) &
Sleeve (Shield)
Line Outputs (DAC):
LINEUP: 12dBu = 0dBFS
THD+N @ -1dBFS: 0.0006%
DYNAMIC RANGE: 125.5dB A-Weighted
CROSSTALK: >120dB
FREQUENCY RESPONSE: ±0.1dB 10Hz to 40kHz
1/4" TRS JACK: Tip (Hot), Ring (Cold) & Sleeve (Shield)
USB-C High Speed:
BUS POWER:
MIN REQUIREMENT: 0.9A @ 5V >=USB 3.0 Port
MAX REQUIREMENT: 1.5A @ 5V USB-C Provides higher headphone outputs levels
No. of INPUT CHANNELS: 2 (2 Analogue)
No. of OUTPUT CHANNELS: 2 (2 Analogue)
DSP MIXER LATENCY: ROUND TRIP (in-to-out)
44.1kl/z 0.65mS
48.0kHz 0.6mS
88.2kHz 0.33mS
96.0kHz 0.31mS
Dimensions

text_image
AUDIENT iD14 0 GAIN 10 1 48V 0 GAIN 50 2 48V USB 173mm 120mm 173mm 40mm 61.1mm 62.1mm AUDIENT OPTICAL INPUT USB-C 4R OUT 3L 2R OUT 1L 2 MIC/LINE 1Warranty
Warranty Statement
Your iD14 comes with a manufacturer's warranty for one year (12 months) from the date of despatch to the end user.
The warranty covers faults due to defective materials used in manufacture and faulty workmanship only.
During the warranty period Audient will repair at its discretion or replace the faulty unit provided it is returned carriage paid to an authorised Audient service centre. We will not provide warranty repair if in our opinion the fault has resulted from unauthorised modification, misuse, negligence or accident.
We accept liability to repair or replace your iD14 as described above. We do not accept any additional liability. This warranty does not affect any legal rights you may have against the person who supplied this product - it is additional to those rights.
Warranty Limitations
This warranty does not cover damage resulting from accident or misuse. The warranty is void unless repairs are carried out by an authorised service centre. The warranty is void if the unit has been modified other than at the manufacturer's instruction. The warranty does not cover components which have a limited life, and which are expected to be periodically replaced for optimal performance. We do not warrant that the unit shall operate in any other way than as described in this manual.
Audient Ltd
Aspect House
Herriard
Hampshire
RG25 2PN
United Kingdom
Tel: +44 (0) 1256 381944
audient.com
Service
Service Information
iD14 contains no user-serviceable components, please refer to qualified service personnel for diagnosis and repair. Your warranty will be void if you tamper with the device at component level. If you have any questions with regard to the repair, please contact Audient Ltd.
If your unit is in warranty, please contact your dealer directly for a repair or replacement (at the discretion of the dealer).
For out of warranty repairs, please contact Audient Ltd, after which a Return Materials Authorization (RMA) number will be assigned. This number will serve as a reference for you and helps facilitate and expedite the return process. When the unit is returned please include this RMA number along with a description of the fault inside the packaging box.
To request an RMA, access technical support & FAQs, ask for troubleshooting assistance or make an enquiry, please visit: support.audient.com
Glossary
A Amperes
ADAT Alesis Digital Audio Tape
ADC Analogue to Digital Converter
DAW Digital Audio Workstation
ASP Analogue Signal Processing
CPU Central Processing Unit
CUE Artist Headphone Mix
DAC Digital to Analogue Converter
dB Decibel
dBu Decibel referenced to 0.775Vrms = 0 dBu
dBFS Decibel Full Scale
DC Direct Current
D.I Direct Injection (Instrument Input)
DoC Declaration of Conformity
DSP Digital Signal Processing
EQ Equaliser
FAQ Frequently Asked Questions
FCC Federal Communications Commission
GB Gigabyte
GUI Graphical User Interface
HPF High Pass Filter
HV High Voltage
i/o Input / Output
JFET Junction Field Effect Transistor
LED Light Emitting Diode
RoHS Restriction of Hazardous Substances
RAM Random Access Memory
S/PDIF Sony Philips Digital Interface Format
THD+N Total Harmonic Distortion + Noise
TRS Tip Ring Sleeve (1/4" Jack Balanced)
TS Tip Sleeve (1/4" Jack Unbalanced)
USB Universal Serial Bus
V Volts
XLR Extra Live Return, Extremely Low Resistance, Canon X Series, Latching,
Resilient Rubber Compound... or make up your own!