iD22 - Hi-Fi Audient - Free user manual and instructions
Find the device manual for free iD22 Audient in PDF.


User questions about iD22 Audient
0 question about this device. Answer the ones you know or ask your own.
Ask a new question about this device
Download the instructions for your Hi-Fi in PDF format for free! Find your manual iD22 - Audient and take your electronic device back in hand. On this page are published all the documents necessary for the use of your device. iD22 by Audient.
USER MANUAL iD22 Audient
natural_image
iD 22 logo icon with stylized lettering (no text or symbols beyond the graphic design)USER MANUAL v1.8
connect with us.
Thank you for purchasing this audient product!
iD22 is the culmination of years of experience in high-performance analogue and digital circuit design.
iD22 will transform your DAW into a world-class recording system by connecting directly to your microphones, computer and monitors.
iD22 provides two classic audient [class-a] microphone preamplifiers, ALL NEW pristine AD/DA converters that have been designed to deliver impeccable detail and impressive depth during both tracking & mixing.
iD22 is expandable via ADAT i/o - perfect for partnering with an ASP880 for 10-ch recording (total 10-in, 12-out + headphones).
Our console-style monitor controller functionality and USB2.0 connectivity complete the ergonomic desktop package.
Features include:
• 2-in, 6-out high performance 24-bit/96kHz AD/DA converters
- 2 x superb class-a mic preamplifiers & 1 x discrete JFET instrument input
• Fully balanced insert points for integrating outboard gear
• High current headphone amplifier fed by an independent DAC
- 4 assignable line outputs for monitoring & processing
- User defined monitoring functionality with hardware control
- USB2.0 class compliant connectivity with integrated DSP mixer
- Ergonomic desktop package featuring all metal construction and solid aluminium control knobs
natural_image
Black industrial audio workstation with control knobs and buttons (no visible text or labels)Box Contents
iD22 Overview
Safety Information
Declaration of Conformities 5
Quick Start Installation: 6
System Requirements 6
Connection to Computer 6
Installation on Mac OSX 6
USB Status LED 7
Audio MIDI Setup (OSX) 7
Installation on Windows 8
Updating Firmware 10
Hardware Features:
Microphone & Line Inputs 11 Instrument Input 12
Balanced Inserts 12
Direct ADC Access 13
Input Stage Block Diagram 14
Assignable Line Outputs & DAC 15
Output Routing Ideas 16 Headphone Output 17
Digital Inputs / Outputs 18
Monitor Control Section 19 Switch Operation 20
Metering & Kensington Lock 20
Output Stage Block Diagram 21
iD Mixer Application: 22
Input Channel Types 22
Channel Naming Tape 22
Channel Strip Features 23 Stereo Linking 24
Master Section Features 24 Channel Views 25 Volume Control 25
Programming F Keys 26
1 System Panel - Settings Module 27
2 Digital I/O Formats 27
3 Clock Source & Lock 27
Talkback Assign 27
Mono Monitoring Modes 27
Dim & Alt. Speaker Trims 27
Setting Up & Using Talkback 28
Output Routing Matrix 29
Analogue Outputs 29
Digital Outputs 29
Save & Load Mixer Presets 30
11 iD DSP Mixer Block Diagram 31
Keyboard Shortcuts 32
Operation with Pro Tools 33
Operation with Logic Pro 34
Operation with Cubase / Nuendo 36
Operation with Ableton Live 38
Troubleshooting 39
FAQ 41
Specifications 42
Dimensions 43
Warranty & Contact 44
Service 45
Glossary 46
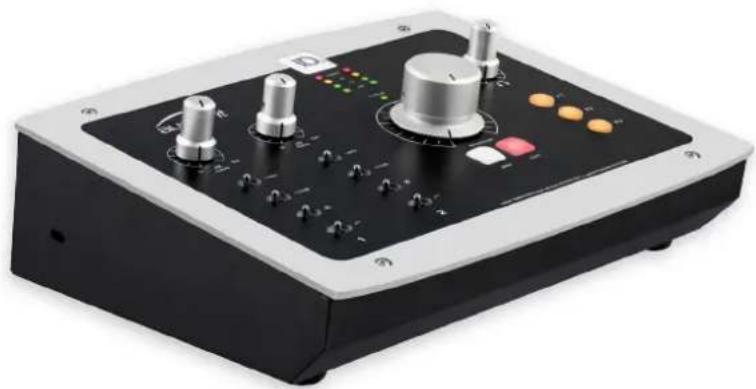
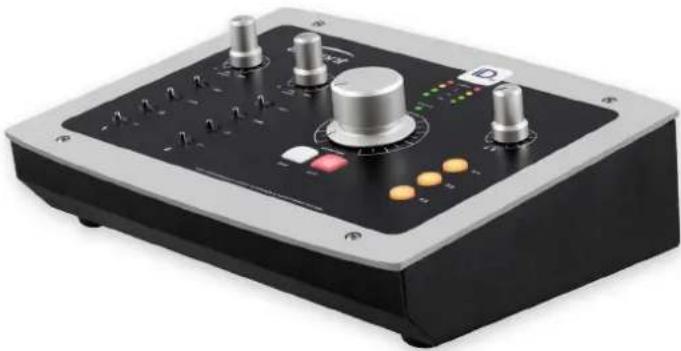
In your iD22 packaging you should find the following items:
• iD22
• 12VDC PSU with regional adapters
• USB Type A-to-B Cable
Please visit:
www.audient.com/products/iD22
to download the latest iD software
(firmware and mixer application), supporting documentation (including this manual) and brochures for our product range.
The 12VDC (centre-positive) power supply comes with interchangeable UK, EU, US and Australian socket adapters and will work across a broad range of line voltages making iD22 globally portable.
We hope that you enjoy using iD22 wherever you are and may it aid you in making great sounding music!
natural_image
Close-up of a black audio workstation with knobs and buttons (no visible text or symbols)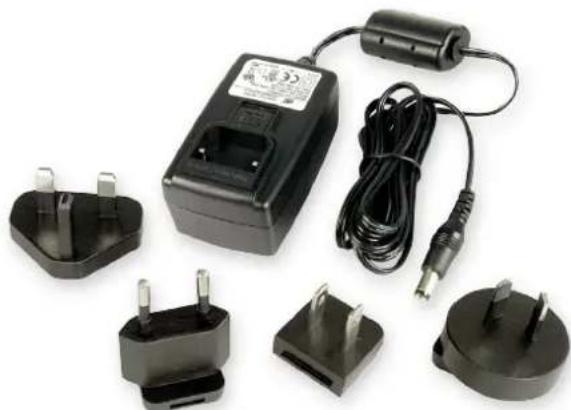
natural_image
Electric power adapter kit with terminal blocks and cable, no visible text or symbols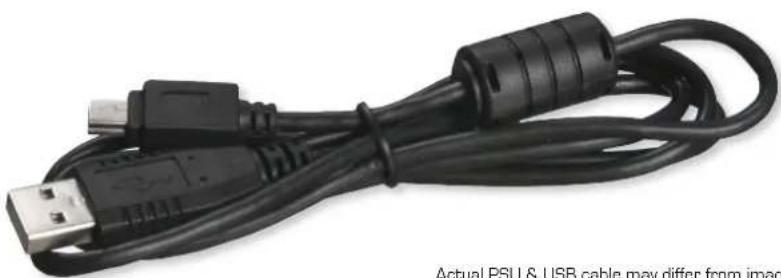
natural_image
Close-up of a black USB cable with two connectors, no text or symbols visibleActual PSU & USB cable may differ from images.
text_image
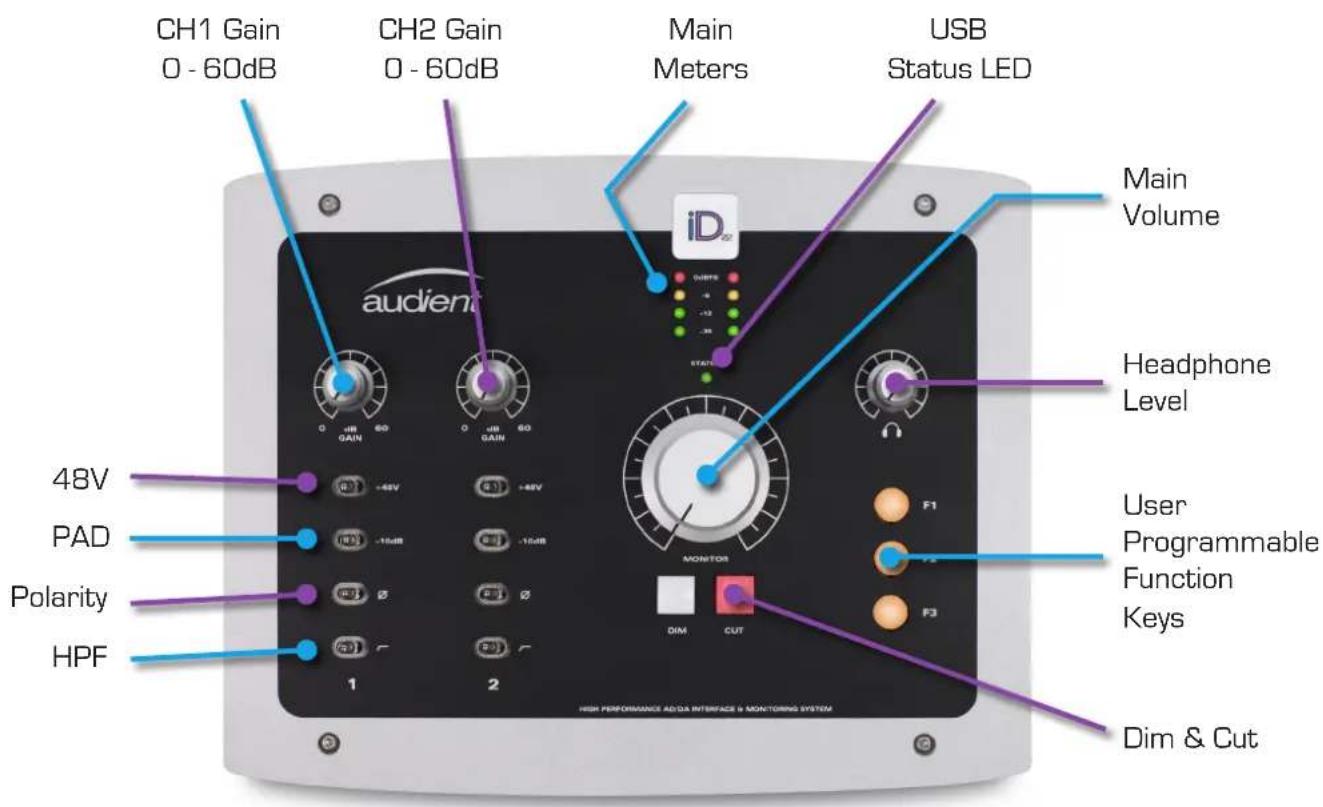
CH1 Gain 0 - 60dB CH2 Gain 0 - 60dB Main Meters USB Status LED iD2 audient 0 - 60 GAIN 60 0 - 60 GAIN 48V PAD Polarity HPF 1 2 Headphone Level F1 User Programmable Function Keys DIM CUT Dim & Cut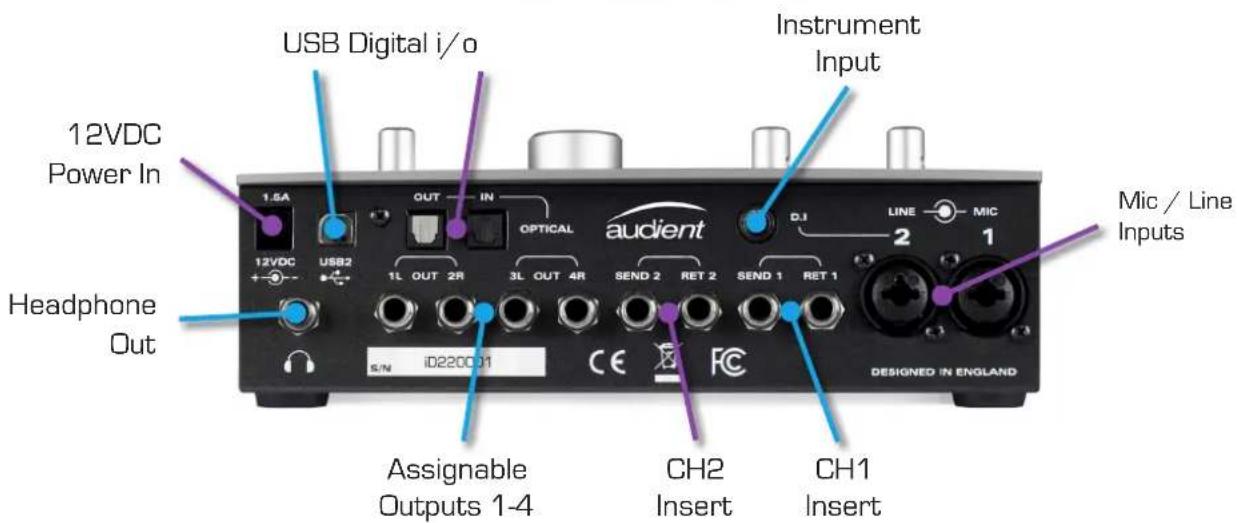
text_image
USB Digital i/o Instrument Input 12VDC Power In 1.5A OUT IN OPTICAL audient Line 2 MIC 1 12VDC USB2 1L OUT 2R 3L OUT 4R SEND 2 RET 2 SEND 1 RET 1 Headphone Out S/N ID2200J1 Assignable Outputs 1-4 CH2 Insert CH1 Insert DESIGNED IN ENGLAND Mic / Line Inputs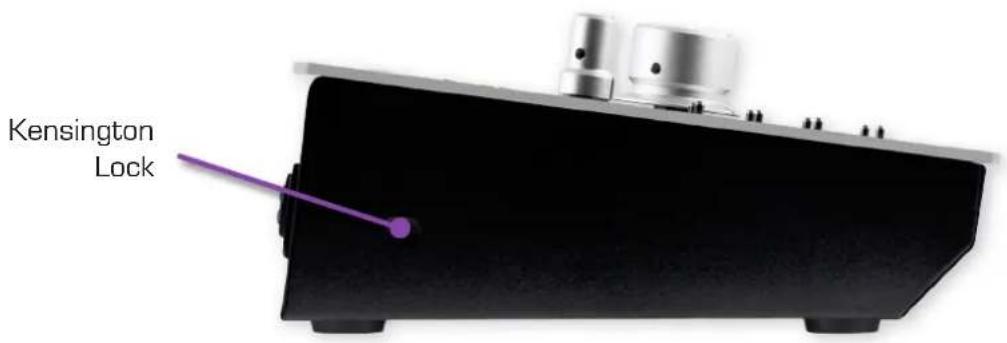
text_image
Kensington LockImportant Safety Instructions
Please read all of these instructions and save them for later reference before connecting the DC power adapter to the mains and powering up iD22.
To prevent electrical shock and fire hazard follow all instructions on the 12VDC power supply. iD22 itself does not operate with any high voltage mains supply inside the unit but appropriate safety measures should still be adhered to regarding the AC/DC supply.
In the event of a power supply failure do not open the 12VDC supply. Please contact audient support so that a suitable replacement can be recommended or purchased.
www.audient.com/support
iD22 utilises an external switch-mode power supply that is very quiet and rated at 1.5A (2A maximum, 24 Watts). This switch-mode design will accept any A.C line voltage from 90v to 264v @ 47-63Hz. Therefore the unit will work happily anywhere in the world but please ensure your A.C mains line voltage is within this specification.
Consult a qualified technician if you suspect difficulties. Do not attempt to tamper with the power supply or mains voltages - HAZARDOUS TO HEALTH. Ensure that the appropriate international pin adapter is fitted to the power supply before insertion into the mains socket.
! WARNING !
TO REDUCE RISK OF FIRE OR ELECTRIC SHOCK, DO NOT EXPOSE THIS APPARATUS TO RAIN OR MOISTURE.
NO USER SERVICEABLE PARTS INSIDE. PLEASE REFER SERVICING TO QUALIFIED SERVICE PERSONNEL.
Important Safety Instructions
- Read these instructions
- Keep these instructions
- Heed all warnings
- Follow all instructions
- Do not use this equipment near water
-
Clean only with dry cloth
-
Do not block any ventilation openings. Install in accordance with the manufacturer's instructions
-
Do not install near any heat sources such as radiators, heat registers, stoves, or other equipment (including amplifiers) that produce heat
-
Do not defeat the safety purpose of the polarized or grounding-type plug. A polarized plug has two blades with one wider than the other. A grounding type plug has two blades and a third grounding prong. The wide blade or the third prong are provided for your safety. If the provided plug does not fit into your outlet, consult an electrician for replacement of the obsolete outlet
-
Protect power cords from being walked on or pinched particularly at plugs, convenience receptacles, and the point where they exit from the equipment
-
Only use attachments/accessories specified by the manufacturer
-
For products that are not rack-mountable: Use only with a cart, stand, tripod, bracket, or table specified by the manufacturer, or sold with the equipment. When a cart is used, use caution when moving the cart/equipment combination to avoid injury from tip-over
-
Unplug this equipment during lightning storms or when unused for long periods of time
-
Refer all servicing to qualified service personnel. Servicing is required when the equipment has been damaged in any way, such as power-supply cord or plug is damaged, liquid has been spilled or objects have fallen into the equipment, the equipment has been exposed to rain or moisture, does not operate normally, or has been dropped
-
For products that are a mains powered device: The equipment shall not be exposed to dripping or splashing and no objects filled with liquids (such as vases) shall be placed on the equipment
FCC Part 15B
This apparatus has been tested and found to comply with the limits of a class-a digital device, pursuant to Part 15B of the FCC Rules. These limits are designed to provide reasonable protection against harmful interference in a residential installation. This equipment generates, uses and can radiate radio frequency energy and, if not installed and used in accordance with the instructions, may cause harmful interference to radio communications. If this equipment does cause harmful interference to radio or television reception, which can be determined by turning the equipment off and on, the user is encouraged to try to correct the interference by one or more of the following measures:
- Re-orient or relocate the receiving antenna
- Increase the separation between the equipment and receiver
- Connect the equipment into an outlet on a different circuit from that to which the receiver is connected
- Consult the dealer or an experienced radio/TV technician for help
We, Audient Ltd, Aspect House, Herriard, Hampshire, RG25 2PN, UK, 01256 381944, declare under our sole responsibility that the product iD22 complies with Part 15 of FCC Rules.

- This device may not cause harmful interference, and
- This device must accept any interference received, including interference that may cause undesired operation
We, Audient Ltd, declare that the product, the iD22, to which this declaration relates, is in material conformity with the appropriate CE standards and directives for an audio product designed for consumer use.
Audient Ltd has conformed where applicable, to the European Union's Directive 2002/95/EC on Restrictions of Hazardous Substances (RoHS) as well as the RoHS sections of California law which refer to RoHS, namely sections 25214.10, 25214.10.2, and 58012, Health and Safety Code; Section 42475.2, Public Resources
System Requirements
• OSX: 10.6.8 (Snow Leopard) or later
• Mac: Intel CPU, 1GB RAM Minimum
1. Download the Latest iD Software
Head straight to our website for the latest version of our iD mixer Mac Installer:
www.audient.com/products/downloads/iD22
Run the installer and simply drag the iD22 application into your Applications folder.
2. Connect iD22
Using the USB cable provided, connect iD22 to your computer's USB port.
Next power on iD22 by connecting the supplied 12VDC power adapter.
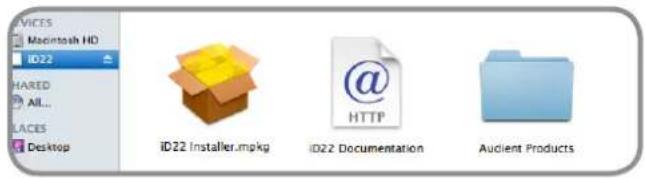
text_image
VICES Macintosh HD ID22 HARED ALL... LACES Desktop ID22 Installer.mpkg ID22 Documentation Audient Products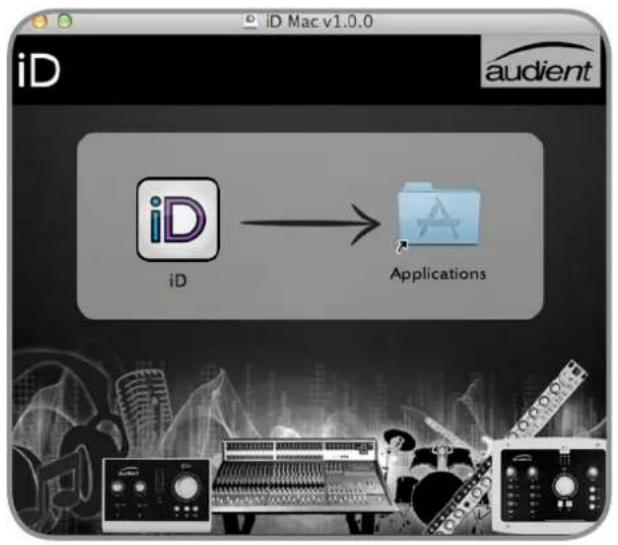
text_image
iD Mac v1.0.0 audient iD Applications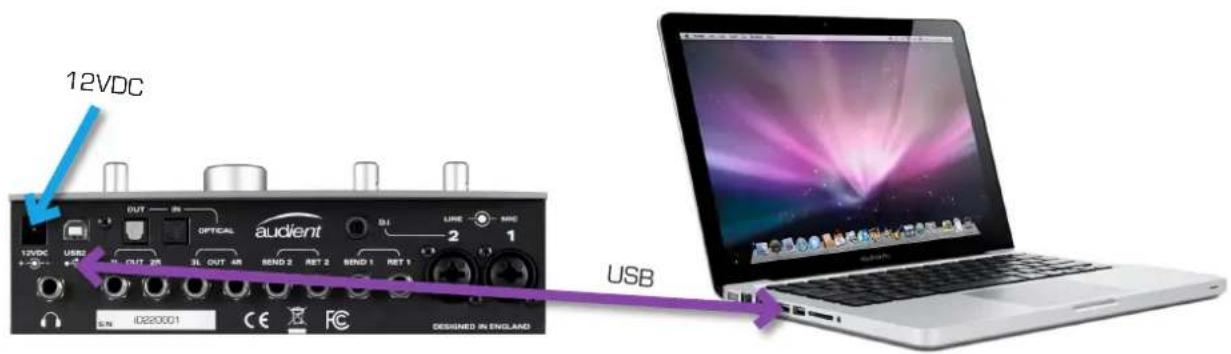
text_image
12VDC OUT OFFICIAL audient USB 3L OUT 4R SEND 2 SEND 1 2 LINE MAC 1 12VDC USB 3L OUT 4R 3L OUT 4R SEND 2 SEND 1 2 USB USD ID220001 CE FC DESIGNED IN ENGLAND3. Status LED
Once powered on and connected to your computer via USB, the green status LED on iD22 will flash for a few seconds as the unit stabilises and establishes communications.
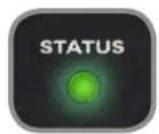
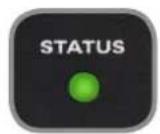
This LED will become solidly lit as soon as iD22 has achieved stable communication and should remain solidly lit during operation of the unit until power down. Once solidly lit you can launch the iD mixer application without issue.
If at any time the status LED begins to flash during normal operation please check all connections and if further problems develop please contact audient support.
4. Double Checking Connectivity
To ensure iD22 has been detected by your computer and correct clocking sources are set-up, navigate to:
Macintosh HD > Applications > System Preferences
Check that iD22 is set as your i/o device. It is recommended to disable system sounds.
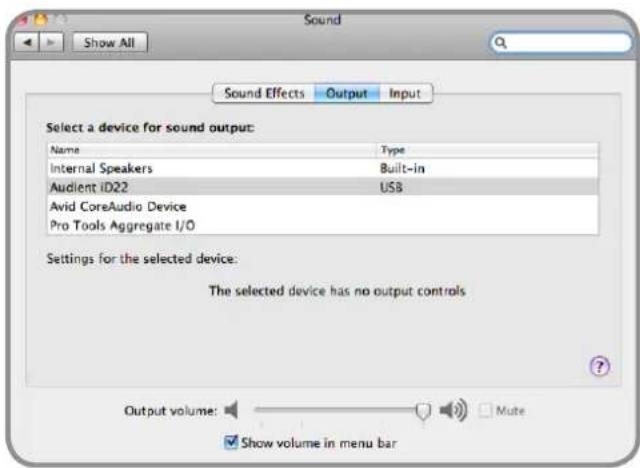
text_image
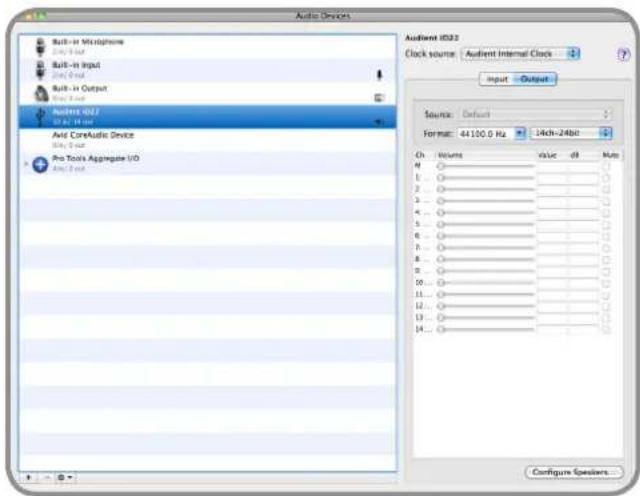
Sound Show All Sound Effects Output Input Select a device for sound output: Name Type Internal Speakers Built-in Audient iD22 USB Avid CoreAudio Device Pro Tools Aggregate I/O Settings for the selected device: The selected device has no output controls Output volume: Mute Show volume in menu barIt is also worth checking Audio MIDI Setup (found in Mac HD > Applications > Utilities).
Window > Show Audio Window
Here you should see iD22 report with 10 inputs and 14 outputs. Clock source should be set to Audient Internal Clock unless you are connecting an external digital device acting as master to the digital input in iD22.
System Requirements:
- Windows 7 or later (32 and 64 bit)
• PC or laptop manufactured after January 2006 - Intel Core 2 @ 1.6 GHz, or AMD equivalent
• 1 GB RAM Minimum
1. Download the latest iD22 Software
Head straight to our website for the latest version of our iD Windows Installer:
www.audient.com/products/downloads/iD22
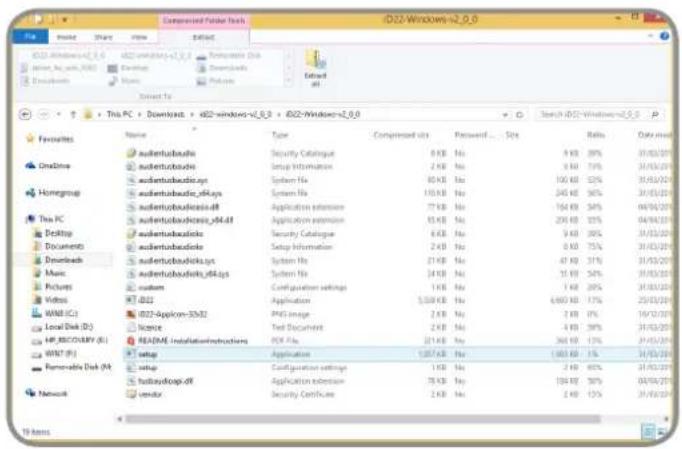
Extract the Zip into a temporary location on the computer.
2. Connect iD22
Using the USB cable provided, connect iD22 to your computer's USB port.
Next power on iD22 by connecting the supplied 12VDC power adapter.
3. Run iD22 Setup
Locate setup.exe in the extracted folder and open it to start the installation wizard. Follow the onscreen instructions.
text_image
Compressed Folder Tech iD22-Windows-v2.0.0 File Edit View Edit iD22-Windows-v2.0.0 Download Exchange Browse Edit To This PC | Download | iD22 Windows-v2.0.0 | iD22-Windows-v2.0.0 Favorites OneTime HomeGroup This PC Desktop Documents Downloads Music Pictures Videos WMT (C) Local Disk (D) HP, MSCI/MPV (R) WMT (P) Remove Disk (A) Network Type Compressed site Password... Sites Ratios Data mod audentubacide Security Catalogue 8 KB Ns 9 KB 39% 31/03/2015 audentubacide Setup Information 2 KB Ns 9 KB 79% 31/03/2015 audentubacide_iq System File 80 KB Ns 100 KB 53% 31/03/2015 audentubacide_4kLys System File 110 KB Ns 245 KB 96% 31/03/2015 audentubacide_iq.df Application extension 77 KB Ns 164 KB 54% 04/04/2015 audentubacide_iq.df d.f Application extension 85 KB Ns 206 KB 33% 04/04/2015 audentubacide iq System File 6 KB Ns 9 KB 30% 31/03/2015 audentubacide Setup Information 2 KB Ns 8 KB 75% 31/03/2015 audentubacide_iq.s System File 21 KB Ns 47 KB 31% 31/03/2015 audentubacide_iq.df iq System File 34 KB Ns 31 KB 54% 31/03/2015 system Configuration settings 1 KB Ns 1 KB 20% 31/03/2015 iD22 Application 5,509 KB Ns 6,665 KB 17% 29/03/2015 iD22-AppIcon-30-02 PPG image 2 KB Ns 2 KB 0% 19/10/2015 licnce Test Document 2 KB Ns 4 KB 38% 31/03/2015 README installation instructions PCR file 21 KB Ns 368 KB 13% 21/03/2015 setup Application 1,957 KB Ns 1,663 KB 1% 31/03/2015 setup Configuration settings 1 KB Ns 2 KB 90% 31/03/2015 hutuzebapi.df Application extension 78 KB Ns 194 KB 36% 09/04/2015 render Security Certificate 2 KB Ns 2 KB 15% 31/03/2015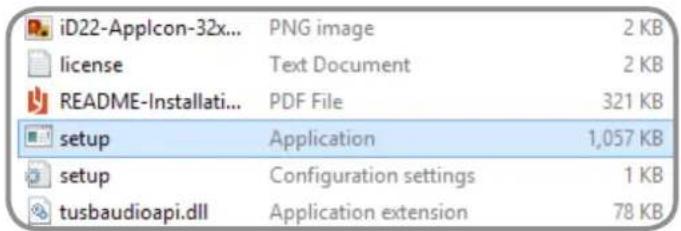
text_image
iD22-Applcon-32x... PNG image 2 KB license Text Document 2 KB README-Installati... PDF File 321 KB setup Application 1,057 KB setup Configuration settings 1 KB tusbaudioapi.dll Application extension 78 KB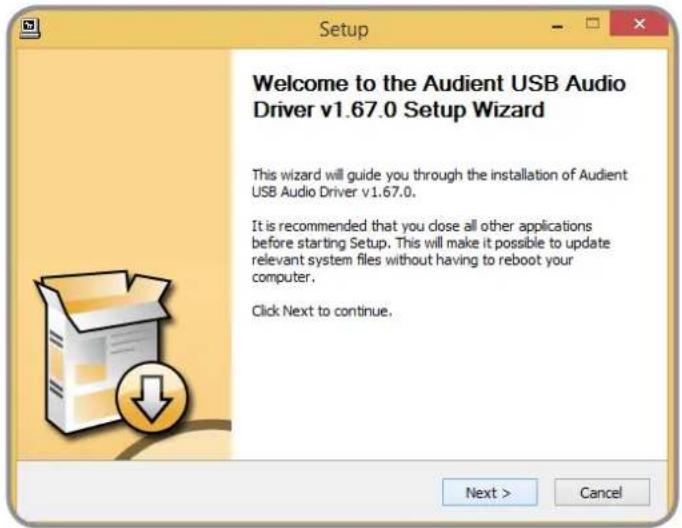
text_image
Setup Welcome to the Audient USB Audio Driver v1.67.0 Setup Wizard This wizard will guide you through the installation of Audient USB Audio Driver v1.67.0. It is recommended that you close all other applications before starting Setup. This will make it possible to update relevant system files without having to reboot your computer. Click Next to continue. Next > Cancel4. Check Connectivity

The status LED will become solidly lit as soon as iD22 has achieved stable communication and should remain solidly lit during operation of the unit until power down.
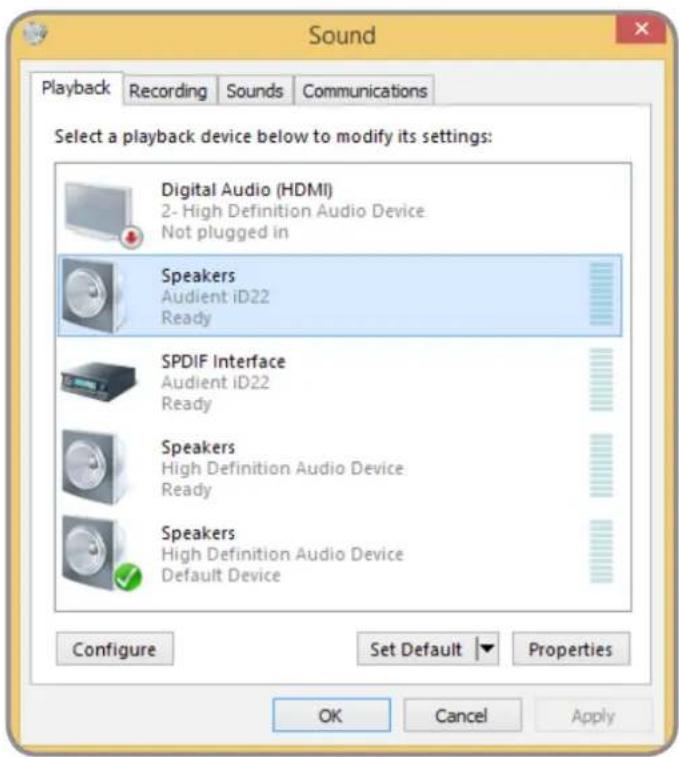
To double check go to PC sound settings by following:
PC Settings > Control Panel > Hardware and Sound > Sound
Here you can see whether iD22 is visible to the PC and you can make it the computers default sound device by pressing Set Default.
iD Icon
Once installed, the iD icon can be found in the Windows system tray (it may be in the hidden icons area):
- Double-click to open iD22 mixer window when iD22 is connected
- Right-click to quit or change sample rate, buffer size and latency settings
Latency Modes:
Minimum 1ms
Low 2ms
Standard 4 ms
Relaxed 8ms
Safe 16ms
Extra Safe 32ms
text_image
Sound Playback Recording Sounds Communications Select a playback device below to modify its settings: Digital Audio (HDMI) 2- High Definition Audio Device Not plugged in Speakers Audient iD22 Ready SPDIF Interface Audient iD22 Ready Speakers High Definition Audio Device Ready Speakers High Definition Audio Device Default Device Configure Set Default Properties OK Cancel Apply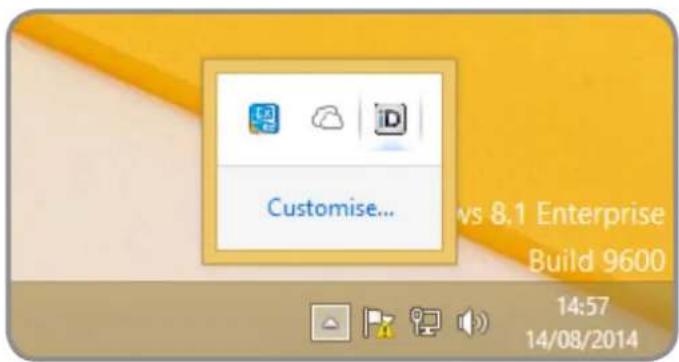
text_image
Customise... vs 8.1 Enterprise Build 9600 14:57 14/08/2014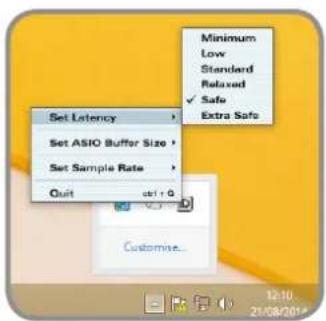
text_image
Set Latency Set ASIO Buffer Size Set Sample Rate Quit Minimum Low Standard Relaxed Safe Extra Safe Customise...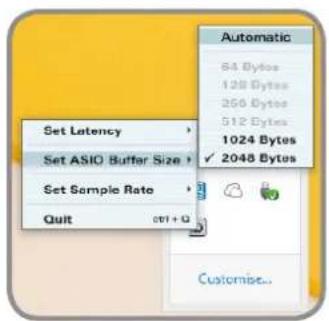
text_image
Automatic 64 Bytes 128 Bytes 256 Bytes 512 Bytes 1024 Bytes ✓ 2048 Bytes Set Latency Set ASIO Buffer Size Set Sample Rate Quit 071 + Q Customise...Launch the iD Mixer Application
Launch the iD mixer application by finding it in the following folder:
Macintosh HD > Applications > iD Start > All Programs > Audient > iD
If the iD mixer application icon is not in your dock, just drag it onto the dock from the applications folder.
For more information on the mixer application feature set, please refer to page 22 of this manual onwards.
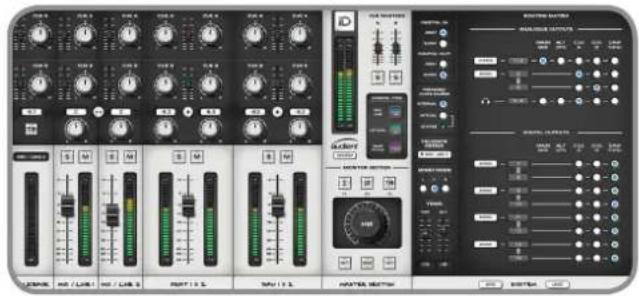
text_image
Screenshot of an audio editing software interface with multiple audio input channels, control knobs, and a multi-channel output panel.Check for Firmware Updates
It is essential that you regularly (especially on a fresh installation) check for new updates. To make it simple, providing you have an internet connection, the iD mixer application itself provides the functionality to check for firmware updates.
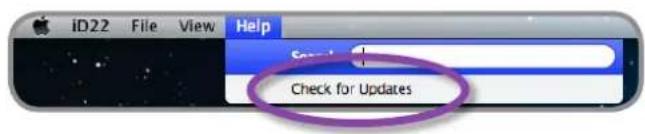
text_image
iD22 File View Help Check for UpdatesFirmware Update
If your firmware is already up to date you will be notified. Otherwise, You can either select to update the iD firmware from disk using the load from file (browse button) or you can use the internet to search for the latest version.
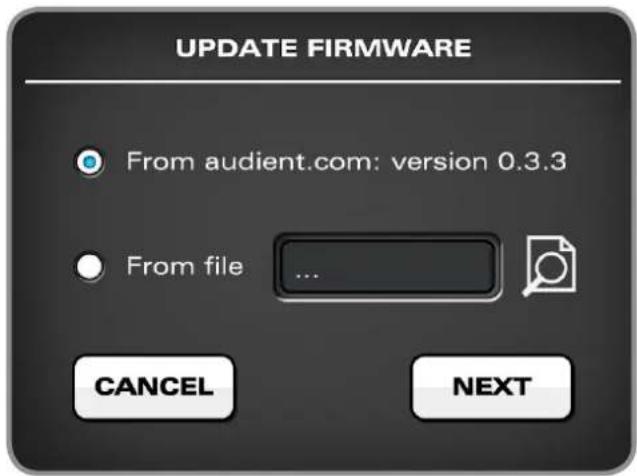
text_image
UPDATE FIRMWARE From audient.com: version 0.3.3 From file ... CANCEL NEXTThe latest version number will be retrieved from our servers and will be displayed (as shown above). Press next to continue with the firmware update. Press update to program and once complete close the window. iD22 is now ready to use.
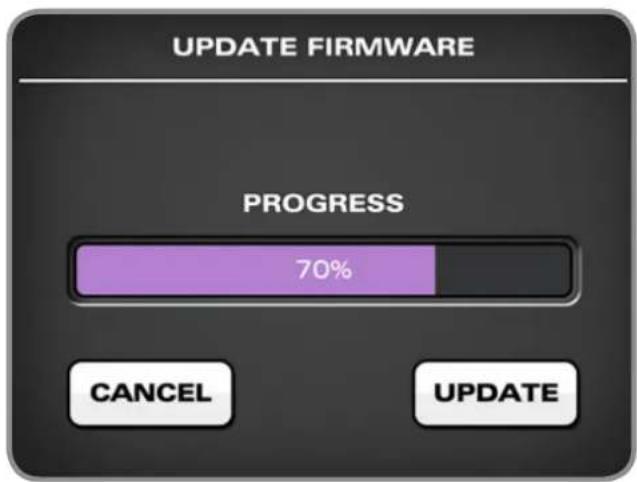
text_image
UPDATE FIRMWARE PROGRESS 70% CANCEL UPDATEMicrophone Preamplifiers & Line Inputs
iD22 features two classic audient microphone preamplifiers.
The design features an 8-transistor discrete class-a front-end providing exceedingly low distortion and noise performance. From a sonic point of view, iD22 is fast, open and detailed.
All analogue circuitry runs on +/-15V (30V rails) and provides high headroom and class leading drive capability compared to other similar interface products.
The microphone preamplifiers feature:
- 60 dB of clean gain
- 48v phantom power rated at 10mA/channel
-
3kΩ input impedance which provides apunchytonefromanymicrophone transducer type
- -10 dB pad for increasing input headroom
- Polarity reverse (always check phase when recording with multiple microphones)
- Switchable(fixedfrequency)100Hz 12 dB/octave high pass filter for rumble removal
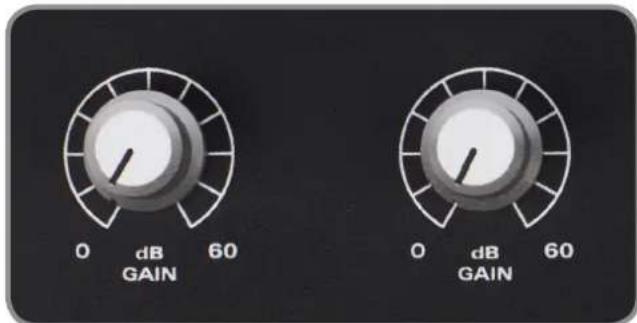
text_image
0 dB 60 GAIN 0 dB 60 GAIN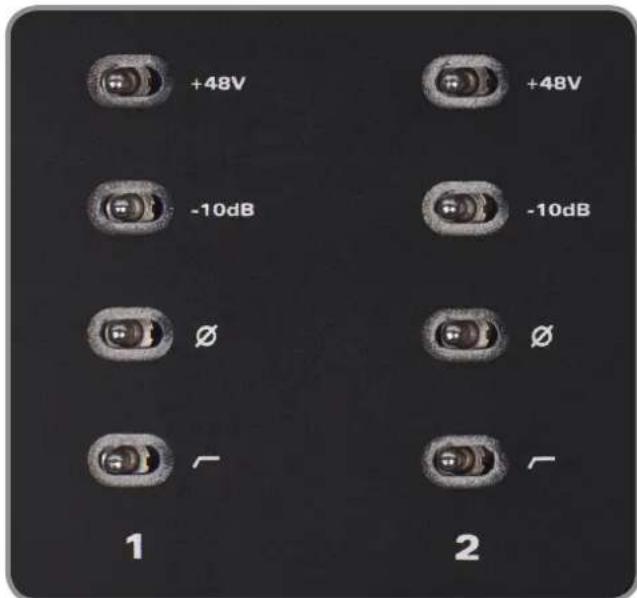
text_image
+48V -10dB Ø 1 +48V -10dB Ø 2Neutrik™ XLR/TRS Jack combi-connectors provide microphone and line inputs. The line inputs are padded through the microphone preamplifiers and have access to the pad, polarity reverse & HPF functions, therefore accommodating a huge range of input levels with freedom from overload.
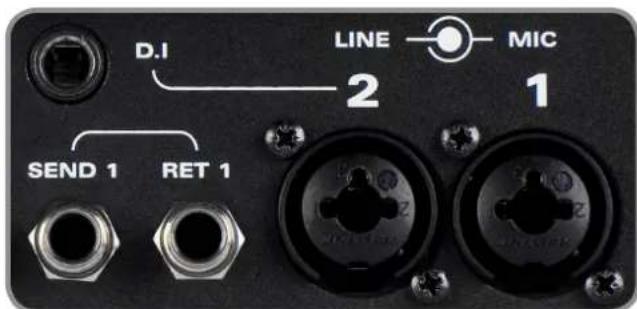
text_image
D.I LINE MIC 2 1 SEND 1 RET 1Instrument Input
iD22 employs a discrete class-a JFET instrument (D.I) input on channel two.
Plugging in a TS (tip-sleeve unbalanced) jack will override the mic signal and turn channel two into a fully fledged, fantastic sounding instrument input with access to a -10 dB pad (for hot output instruments such as active basses, drum machines and synthesizers), polarity reverse (useful for phase alignment between a mic and D.I) and the HPF (useful for taming unruly low frequency content).
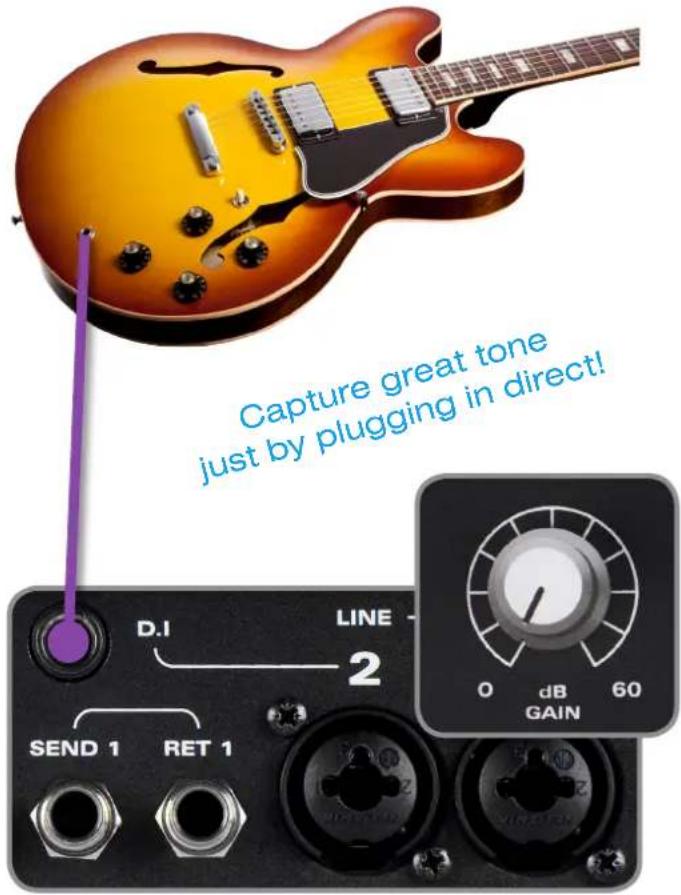
text_image
Capture great tone just by plugging in direct! D.I LINE 2 SEND 1 RET 1 0 dB 60 GAINBalanced Inserts Send & Return
Once signal has passed through the microphone preamplifier and input conditioning stage - it is provided at a balanced insert send jack.
Both input channels feature impedance balanced insert sends and electronically balanced insert returns before the AD converter.
These console-style insert points make it very easy to add your favourite processing prior to conversion - setting iD22 apart from much of the competition.
Insert your favourite compression and EQ here to build vocal chains that rival the very best. Rest assured the mic pre in iD22 will stand up to many outboard units costing several times more than the entire unit!
Insert Normalling
Insert send & return jacks use normalling connectors and therefore do not need to be patched when not in use.
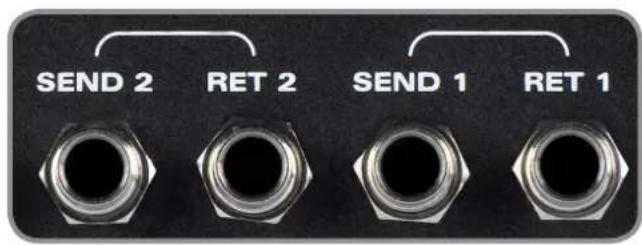
text_image
SEND 2 RET 2 SEND 1 RET 1Patching Inserts
To incorporate your favourite processing prior to conversion, simply patch the iD22 insert send into your processing chain and take the output of the last device in the chain and patch back into the insert return on iD22.
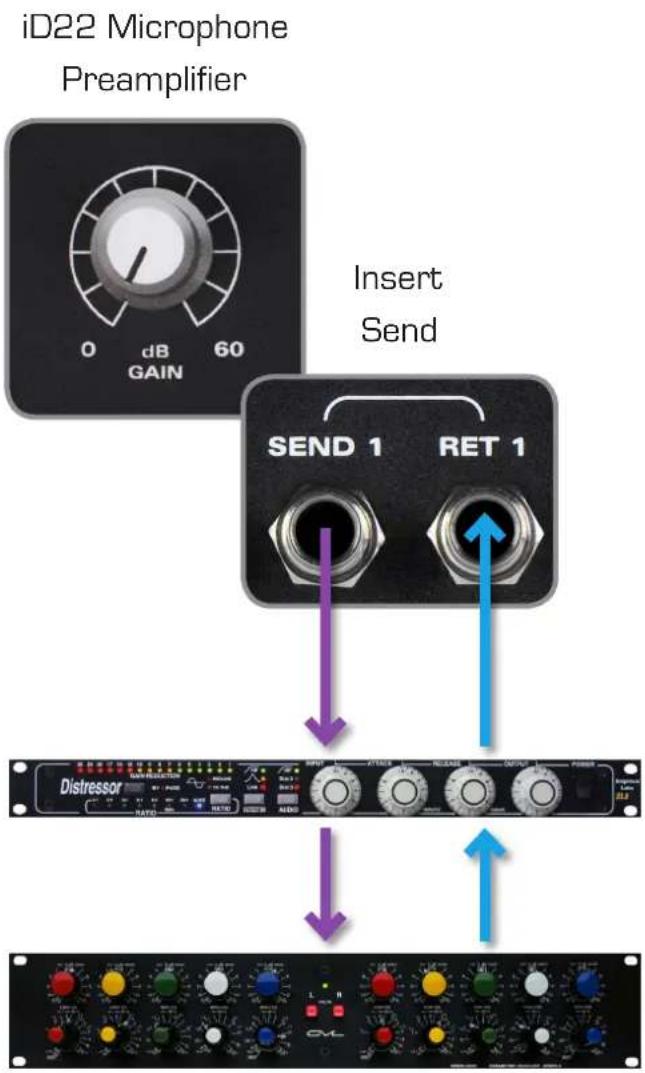
text_image
iD22 Microphone Preamplifier 0 dB 60 GAIN Insert Send SEND 1 RET 1 Distressor CYLProcessing Chain
Direct Access to ADC
The insert return connection on iD22 is a very pure electronically balanced input stage that directly drives the analogue to digital converter stage (ADC).
As such this is a great place to return signals directly into the ADC ensuring minimal signal path colouration.
Calibration Level: OdBFS = +18dBu
This is a great place to patch the outputs of your existing outboard mic pres or indeed to bypass the iD22 mic pres and use as a very pure unity gain line level ADC input for incorporating hardware inserts or using a mastering style process path.
Great for using DAC outputs 3+4 to drive a hardware mix bus compressor and printing back via the pure signal path of the insert returns.
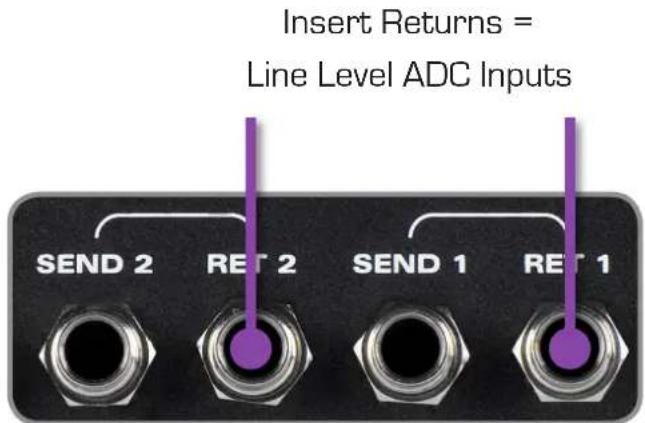
text_image
Insert Returns = Line Level ADC Inputs SEND 2 RET 2 SEND 1 RET 1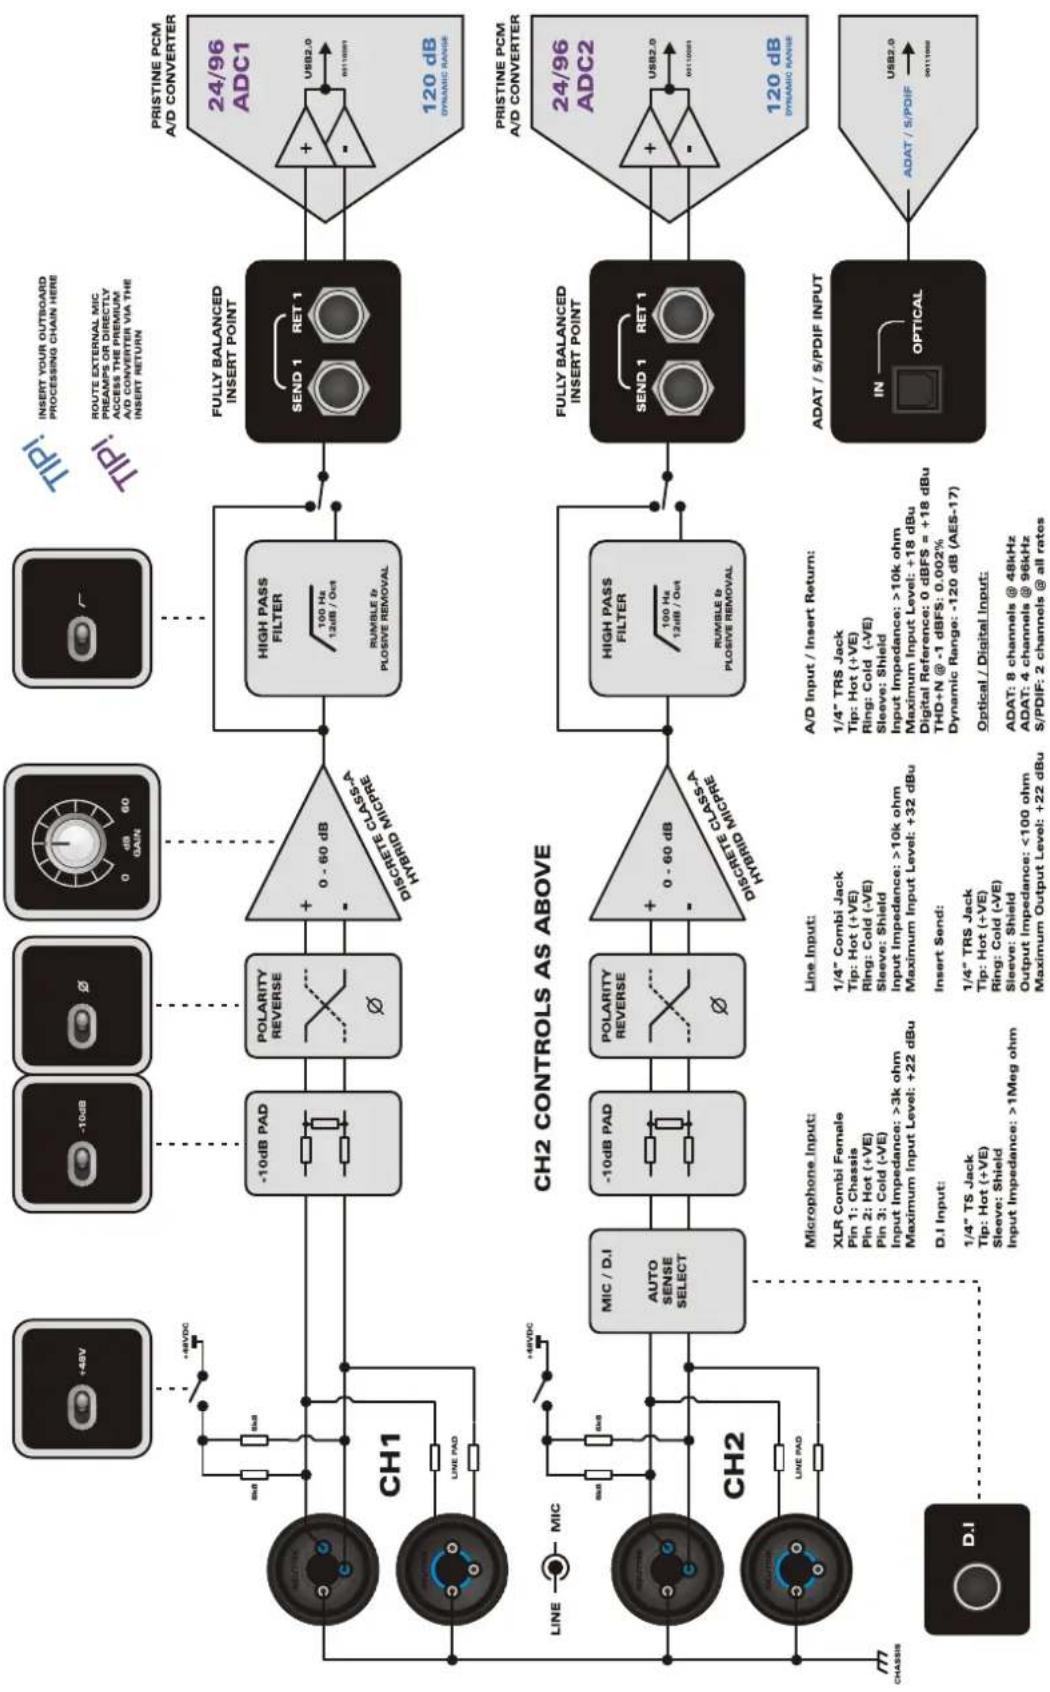
flowchart
graph TD
    subgraph CH1
        A["+48V"] --> B["Line PAD"]
        B --> C["CH1"]
        C --> D["Sub"]
        D --> E["Sub"]
        E --> F["Line"]
        F --> G["Sub"]
        G --> H["Sub"]
        H --> I["Line PAD"]
        I --> J["Sub"]
        J --> K["Line PAD"]
        K --> L["Sub"]
        L --> M["Line PAD"]
        M --> N["Sub"]
        N --> O["Line PAD"]
        O --> P["Sub"]
        P --> Q["Line PAD"]
        Q --> R["Sub"]
        R --> S["Line PAD"]
        S --> T["Sub"]
        T --> U["Line PAD"]
        U --> V["Sub"]
        V --> W["Line PAD"]
        W --> X["Sub"]
        X --> Y["Line PAD"]
        Y --> Z["Sub"]
        Z --> AA["Line PAD"]
        AA --> AB["Sub"]
        AB --> AC["Line PAD"]
        AC --> AD["Sub"]
        AD --> AE["Line PAD"]
        AE --> AF["Sub"]
        AF --> AG["Line PAD"]
        AG --> AH["Sub"]
        AH --> AI["Line PAD"]
        AI --> AJ["Sub"]
        AJ --> AK["Line PAD"]
        AK --> AL["Sub"]
        AL --> AM["Line PAD"]
        AM --> AN["Sub"]
        AN --> AO["Line PAD"]
        AO --> AP["Sub"]
        AP --> AQ["Line PAD"]
        AQ --> AR["Sub"]
        AR --> AS["Line PAD"]
        AS --> AT["Sub"]
        AT --> AU["Line PAD"]
        AU --> AV["Sub"]
        AV --> AW["Line PAD"]
        AW --> AX["Sub"]
        AX --> AY["Line PAD"]
        AY --> AZ["Sub"]
        AZ --> BA["Line PAD"]
        BA --> BB["Sub"]
        BB --> BC["Line PAD"]
        BC --> BD["Sub"]
        BD --> BE["Line PAD"]
        BE --> BF["Sub"]
        BF --> BG["Line PAD"]
        BG --> BH["Sub"]
        BH --> BI["Line PAD"]
        BI --> BJ["Sub"]
        BJ --> BK["Line PAD"]
        BK --> BL["Sub"]
        BL --> BM["Line PAD"]
        BM --> BN["Sub"]
        BN --> BO["Line PAD"]
        BO --> BP["Sub"]
        BP --> BQ["Line PAD"]
        BQ --> BR["Sub"]
        BR --> BS["Line PAD"]
        BS --> BT["Sub"]
        BT --> BU["Line PAD"]
        BU --> BV["Sub"]
        BV --> BW["Line PAD"]
        BW --> BX["Sub"]
        BX --> BY["Line PAD"]
        BY --> BZ["Sub"]
        BZ --> CA["Line PAD"]
        CA --> CB["Sub"]
        CB --> CC["Line PAD"]
        CC --> CD["Sub"]
        CD --> CE["Line PAD"]
        CE --> CF["Sub"]
        CF --> CG["Line PAD"]
        CG --> CH1
    end

    subgraph CH2
        D["MIC / D.I AUTO SENSE SELECT"] --> E["Polarity Reverse +0 - 60 dB DISCRETE CLASS-A HYBRID MICPRE"]
    end

    subgraph CH2 CONTROLS AS ABOVE
        D --> F["Polarity Reverse +0 - 60 dB DISCRETE CLASS-A HYBRID MICPRE"]
    end

    subgraph CH2 CONTROLS AS ABOVE
        F --> G["Polarity Reverse +0 - 60 dB DISCRETE CLASS-A HYBRID MICPRE"]
    end

    subgraph CH2 CONTROLS AS ABOVE
        G --> H["Polarity Reverse +0 - 60 dB DISCRETE CLASS-A HYBRID MICPRE"]
    end

    subgraph CH2 CONTROLS AS ABOVE
        H --> I["Polarity Reverse +0 - 60 dB DISCRETE CLASS-A HYBRID MICPRE"]
    end

    subgraph CH2 CONTROLS AS ABOVE
        I --> J["Polarity Reverse +0 - 60 dB DISCRETE CLASS-A HYBRID MICPRE"]
    end

    subgraph CH2 CONTROLS AS ABOVE
        J --> K["Polarity Reverse +0 - 60 dB DISCRETE CLASS-A HYBRID MICPRE"]
    end

    subgraph CH2 CONTROLS AS ABOVE
        K --> L["Polarity Reverse +0 - 60 dB DISCRETE CLASS-A HYBRID MICPRE"]
    end

    subgraph CH2 CONTROLS AS ABOVE
        L --> M["Polarity Reverse +0 - 60 dB DISCRETE CLASS-A HYBRID MICPRE"]
    end

    subgraph CH2 CONTROLS AS ABOVE
        M --> N["Polarity Reverse +0 - 60 dB DISCRETE CLASS-A HYBRID MICPRE"]
    end

    subgraph CH2 CONTROLS AS ABOVE
        N --> O["Polarity Reverse +0 - 60 dB DISCRETE CLASS-A HYBRID MICPRE"]
    end

    subgraph CH2 CONTROLS AS ABOVE
        O --> P["Polarity Reverse +0 - 60 dB DISCRETE CLASS-A HYBRID MICPRE"]
    end

    subgraph CH2 CONTROLS AS ABOVE
        P --> Q["Polarity Reverse +0 - 60 dB DISCRETE CLASS-A HYBRID MICPRE"]
    end

    subgraph CH2 CONTROLS AS ABOVE
        Q --> R["Polarity Reverse +0 - 60 dB DISCRETE CLASS-A HYBRID MICPRE"]
    end

    subgraph CH2 CONTROLS AS ABOVE
        R --> S["Polarity Reverse +0 - 60 dB DISCRETE CLASS-A HYBRID MICPRE"]
    end

    subgraph CH2 CONTROLS AS ABOVE
        S --> T["Polarity Reverse +0 - 60 dB DISCRETE CLASS-A HYBRID MICPRE"]
    end

    subgraph CH2 CONTROLS AS ABOVE
        T --> U["Polarity Reverse +0 - 60 dB DISCRETE CLASS-A HYBRID MICPRE"]
    end

    subgraph CH2 CONTROLS AS ABOVE
        U --> V["Polarity Reverse +0 - 60 dB DISCRETE CLASS-A HYBRID MICPRE"]
    end

    subgraph CH2 CONTROLS AS ABOVE
        V --> W["Polarity Reverse +0 - 60 dB DISCRETE CLASS-A HYBRID MICPRE"]
    end

    subgraph CH2 CONTROLS AS ABOVE
        W --> X["Polarity Reverse +0 - 60 dB DISCRETE CLASS-A HYBRID MICPRE"]
    end

    subgraph CH2 CONTROLS AS ABOVE
        X --> Y["Polarity Reverse +0 - 60 dB DISCRETE CLASS-A HYBRID MICPRE"]
    end

    subgraph CH2 CONTROLS AS ABOVE
        Y --> Z["Polarity Reverse +0 - 60 dB DISCRETE CLASS-A HYBRID MICPRE"]
    end

    subgraph CH2 CONTROLS AS ABOVE
        Z --> AA["Polarity Reverse +0 - 60 dB DISCRETE CLASS-A HYBRID MICPRE"]
    end

    subgraph CH2 CONTROLS AS ABOVE
        AA --> AB["Polarity Reverse +0 - 60 dB DISCRETE CLASS-A HYBRID MICPRE"]
    end

    subgraph CH2 CONTROLS AS ABOVE
        AB --> AC["Polarity Reverse +0 - 60 dB DISCRETE CLASS-A HYBRID MICPRE"]
    end

    subgraph CH2 CONTROLS AS ABOVE
        AC --> AD["Polarity Reverse +0 - 60 dB DISCRETE CLASS-A HYBRID MICPRE"]
    end

    subgraph CH2 CONTROLS AS ABOVE
        AD --> AE["Polarity Reverse +0 - 60 dB DISCRETE CLASS-A HYBRID MICPRE"]
    end

    subgraph CH2 CONTROLS AS ABOVE
        AE --> AF["Polarity Reverse +0 - 60 dB DISCRETE CLASS-A HYBRID MICPRE"]
    end

    subgraph CH2 CONTROLS AS ABOVE
        AF --> AG["Polarity Reverse +0 - 60 dB DISCRETE CLASS-A HYBRID MICPRE"]
    end

    subgraph CH2 CONTROLS AS ABOVE
        AG --> AH["Polarity Reverse +0 - 60 dB DISCRETE CLASS-A HYBRID MICPRE"]
    end

    subgraph CH2 CONTROLS AS ABOVE
        AH --> AI["Polarity Reverse +0 - 60 dB DISCRETE CLASS-A HYBRID MICPRE"]
    end

    subgraph CH2 CONTROLS AS ABOVE
        AI --> AJ["Polarity Reverse +0 - 60 dB DISCRETE CLASS-A HYBRID MICPRE"]
    end

    subgraph CH2 CONTROLS AS ABOVE
        AJ --> AK["Polarity Reverse +0 - 60 dB DISCRETE CLASS-A HYBRID MICPRE"]
    end

    subgraph CH2 CONTROLS AS ABOVE
        AK --> AL["Polarity Reverse +0 - 60 dB DISCRETE CLASS-A HYBRID MICPRE"]
    end

    subgraph CH2 CONTROLS AS ABOVE
        AL --> AM["Polarity Reverse +0 - 60 dB DISCRETE CLASS-A HYBRID MICPRE"]
    end

    subgraph CH2 CONTROLS AS ABOVE
        AM --> AN["Polarity Reverse +0 - 60 dB DISCRETE CLASS-A HYBRID MICPRE"]
    end

    subgraph CH2 CONTROLS AS ABOVE
        AN --> AO["Polarity Reverse +0 - 60 dB DISCRETE CLASS-A HYBRID MICPRE"]
    end

    subgraph CH2 CONTROLS AS ABOVE
        AO --> AP["Polarity Reverse +0 - 60 dB DISCRETE CLASS-A HYBRID MICPRE"]
    end

    subgraph CH2 CONTROLS AS ABOVE
        AP --> AQ["Polarity Reverse +0 - 60 dB DISCRETE CLASS-A HYBRID MICPRE"]
    end

    subgraph CH2 CONTROLS AS ABOVE
        AQ --> AR["Polarity Reverse +0 - 60 dB DISCRETE CLASS-A HYBRID MICPRE"]
    end

    subgraph CH2 CONTROLS AS ABOVE
        AR --> AS["Polarity Reverse +0 - 60 dB DISCRETE CLASS-A HYBRID MICPRE"]

    subgraph CH2 CONTROLS AS ABOVE
        AS --> AT["Polarity Reverse +0 - 60 dB DISCRETE CLASS-A HYBRID MICPRE"]

    subgraph CH2 CONTROLS AS ABOVE
        AT --> AU["Polarity Reverse +0 - 60 dB DISCRETE CLASS-A HYBRID MICPRE"]

    subgraph CH2 CONTROLS AS ABOVE
        AU --> AV["Polarity Reverse +0 - 60 dB DISCRETE CLASS-A HYBRID MICPRE"]

    subgraph CH2 CONTROLS AS ABOVE
        AV --> AW["Polarity Reverse +0 - 60 dB DISCRETE CLASS-A HYBRID MICPRE"]

    subgraph CH2 CONTROLS AS ABOVE
        AW --> AX["Polarity Reverse +0 - 60 dB DISCRETE CLASS-A HYBRID MICPRE"]

    subgraph CH2 CONTROLS AS ABOVE
        AX --> AY["Polarity Reverse +0 - 60 dB DISCRETE CLASS-A HYBRID MICPRE"]

    subgraph CH2 CONTROLS AS ABOVE
        AY --> AZ["Polarity Reverse +0 - 60 dB DISCRETE CLASS-A HYBRID MICPRE"]

    subgraph CH2 CONTROLS AS ABOVE
        AZ --> BA["Polarity Reverse +0 - 60 dB DISCRETE CLASS-A HYBRID MICPRE"]

    subgraph CH2 CONTROLS AS ABOVE
        BA --> BB["Polarity Reverse +0 - 60 dB DISCRETE CLASS-A HYBRID MICPRE"]

    subgraph CH2 CONTROLS AS ABOVE
        BB --> BC["Polarity Reverse +0 - 60 dB DISCRETE CLASS-A HYBRID MICPRE"]

    subgraph CH2 CONTROLS AS ABOVE
        BC --> BD["Polarity Reverse +0 - 60 dB DISCRETE CLASS-A HYBRID MICPRE"]

    subgraph CH2 CONTROLS AS ABOVE
        BD --> BE["Polarity Reverse +0 - 60 dB DISCRETE CLASS-A HYBRID MICPRE"]

    subgraph CH2 CONTROLS AS ABOVE
        BE --> BF["Polarity Reverse +0 - 60 dB DISCRETE CLASS-A HYBRID MICPRE"]

    subgraph CH2 CONTROLS AS ABOVE
        BF --> BG["Polarity Reverse +0 - 60 dB DISCRETE CLASS-A HYBRID MICPRE"]

    subgraph CH2 CONTROLS AS ABOVE
        BG --> BH["Polarity Reverse +0 - 60 dB DISCRETE CLASS-A HYBRID MICPRE"]

    subgraph CH2 CONTROLS AS ABOVE
        BH --> BI["Polarity Reverse +0 - 60 dB DISCRETE CLASS-A HYBRID MICPRE"]

    subgraph CH2 CONTROLS AS ABOVE
        BI --> BJ["Polarity Reverse +0 - 60 dB DISCRETE CLASS-A HYBRID MICPRE"]

    subgraph CH2 CONTROLS AS ABOVE
        BJ --> BK["Polarity Reverse +0 - 60 dB DISCRETE CLASS-A HYBRID MICPRE"]

    subgraph CH2 CONTROLS AS ABOVE
        BK --> BL["Polarity Reverse +0 - 60 dB DISCRETE CLASS-A HYBRID MICPRE"]

    subgraph CH2 CONTROLS AS ABOVE
        BL --> BM["Polarity Reverse +0 - 60 dB DISCRETE CLASS-A HYBRID MICPRE"]

    subgraph CH2 CONTROLS AS ABOVE
        BM --> BN["Polarity Reverse +0 - 60 dB DISCRETE CLASS-A HYBRID MICPRE"]

    subgraph CH2 CONTROLS AS ABOVE
        BN --> BO["Polarity Reverse +0 - 60 dB DISCRETE CLASS-A HYBRID MICPRE"]

    subgraph CH2 CONTROLS AS ABOVE
        BO --> BP["Polarity Reverse +0 - 60 dB DISCRETE CLASS-A HYBRID MICPRE"]

    subgraph CH2 CONTROLS AS ABOVE
        BP --> BQ["Polarity Reverse +0 - 60 dB DISCRETE CLASS-A HYBRID MICPRE"]

    subgraph CH2 CONTROLS AS ABOVE
        BQ --> BR["Polarity Reverse +0 - 60 dB DISCRETE CLASS-A HYBRID MICPRE"]

    subgraph CH2 CONTROLS AS ABOVE
        BR --> BS["Polarity Reverse +0 - 60 dB DISCRETE CLASS-A HYBRID MICPRE"]

    subgraph CH2 CONTROLS AS ABOVE
        BS --> BT["Polarity Reverse +0 - 60 dB DISCRETE CLASS-A HYBRID MICPRE"]

    subgraph CH2 CONTROLS AS ABOVE
        BT --> BU["Polarity Reverse +0 - 60 dB DISCRETE CLASS-A HYBRID MICPRE"]

    subgraph CH2 CONTROLS AS ABOVE
        BU --> BV["Polarity Reverse +0 - 60 dB DISCRETE CLASS-A HYBRID MICPRE"]

    subgraph CH2 CONTROLS AS ABOVE
        BV --> BW["Polarity Reverse +0 - 60 dB DISCRETE CLASS-A HYBRID MICPRE"]

    subgraph CH2 CONTROLS AS ABOVE
        BW --> BX["Polarity Reverse +0 - 60 dB DISCRETE CLASS-A HYBRID MICPRE"]

    subgraph CH2 CONTROLS AS ABOVE
        BX --> BY["Polarity Reverse +0 - 60 dB DISCRETE CLASS-A HYBRID MICPRE"]

    subgraph CH2 CONTROLS AS ABOVE
        BY --> BZ["Polarity Reverse +0 - 60 dB DISCRETE CLASS-A HYBRID MICPRE"]

    subgraph CH2 CONTROLS AS ABOVE
        BY --> BWZ["Polarity Reverse +0 - 60 dB DISCRETE CLASS-A HYBRID MICPRE"]

    subgraph CH2 CONTROLS AS ABOVE
        BWZp["Polarity Forward to ADAT"] & BWZq["VOLTATION"] & BWZR["VOLTATION"] & BWZS["VOLTATION"] & BWZT["VOLTATION"] & BWZU["VOLTATION"] & BWZW["VOLTATION"] & BWZX["VOLTATION"] & BWZY["VOLTATION"] & BWZZ["VOLTATION"] & BWZX["VOLTATION"] & BWZY["VOLTATION"] & BWZX["VOLTATION"] & BWZX["VOLTATION"] & BWZX["VOLTATION"] & BWZX["VOLTATION"] & BWZX["VOLTATION"] & BWZX["VOLTATION"] & BWZX["VOLTATION"] & BWZX["VOLTATION"] & BWZX["VOLTATION"] & BWZX["VOLTATION"] & BWZX["VOLTATION"] & BWZX["VOLTATION"] & BWZX["VOLTATION"]

    style CH1 fill:#f9f,stroke:#333,stroke-width:1px,stroke-width:1px,stroke-dasharray:5px,stroke-width:1px,stroke-dasharray:5px,stroke-width:1px,stroke-dasharray:5px,stroke-dasharray:5px,stroke-width:1px,stroke-dasharray:5px,stroke-width:1px,stroke-dasharray:5px,stroke-width:1px,stroke-dasharray:5px,stroke-width:1px,stroke-dasharray:5px,stroke-width:1px,stroke-dasharray:5px,stroke-width:1px,stroke-dasharray:5px,stroke-width:1px,stroke-dasharray:5px,stroke-width:1px,
    end

    style CH2 CONTROLS AS ABOVE
Class-A Mic Preamplifiers, Inserts, A/D Converter & Optical Input Block Diagram
Assignable Line Outputs & DACs
iD22 features four assignable line / DAC outputs. These can be used to create many useful routing options for both tracking and mixing.
Output assigns take place in the iD mixer application System Panel (see page 27 for details accessed in the Master Section).
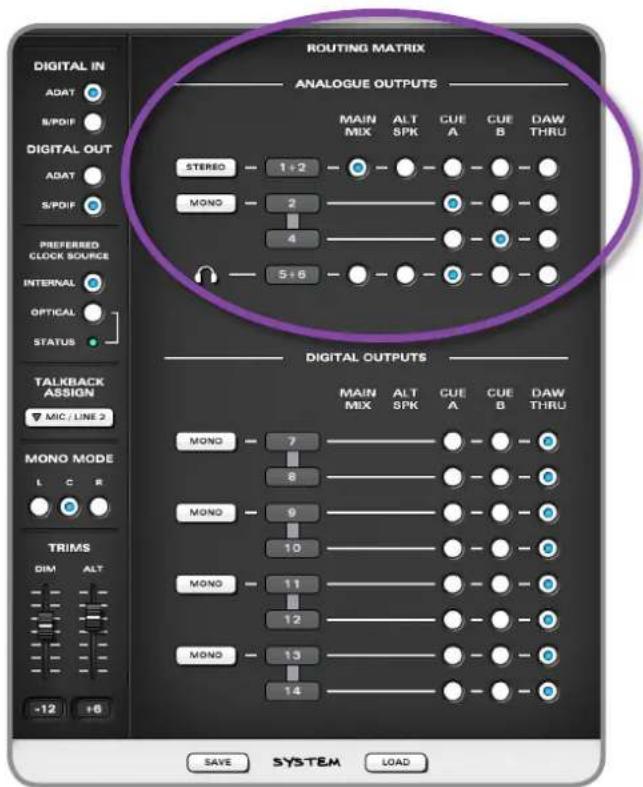
Here a selection of radio buttons allow outputs to be fed from either the iD DSP mixer main output, the iD mixer cue outputs (A or B), an alternative loudspeaker output or directly from your DAW (bypassing the iD DSP mixer by paralleling the input straight to the DACs).
text_image
ROUTING MATRIX ANALOGUE OUTPUTS DIGITAL IN ADAT B/PDIF DIGITAL OUT ADAT B/PDIF PREFERRED CLOCK SOURCE INTERNAL OPTICAL STATUS TALKBACK ASSIGN MIC / LINE 2 MONO MODE L C R TRIMS DIM ALT -12 +6 DIGITAL OUTPUTS MAIN MIX ALT SPK CUE A CUE B DAW THRU STEREO 1+2 MONG 2 4 5+6 MONG 7 8 9 10 11 12 13 14 SAVE SYSTEM LOADTypical Output Routing
In traditional style tracking situations with separate engineer and artist(s) mixes, outputs 1+2 would likely be set to Main Mix to provide output to control room speakers.
Outputs 3+4 can be set to feed a cue mix (from Cue A or B) to external headphone amplifiers in either ganged stereo or dual mono.
iD22's built in headphone output (5+6) could be used as a 2nd reference for the engineer (set to monitor the Main Mix) or as an alternative and independent headphone mix for an artist (set to Cue A or B).
If you prefer to balance all headphone mixes from inside your DAW (at low buffer sizes to minimise latency) then selecting DAW Mix for outputs 3+4 and 5+6 would allow your DAW to directly address the DA converters and outputs without passing through the iD DSP mixer (note the mixer is still active).
In traditional mixing situations, outputs 1+2 would be set to monitor the Main Mix (taking advantage of the DSP monitor controller functionality in iD22. Outputs 3+4 can be set-up as an alternative speaker destination (main/mini etc) and headphones [5+6] can also be fed for reference.
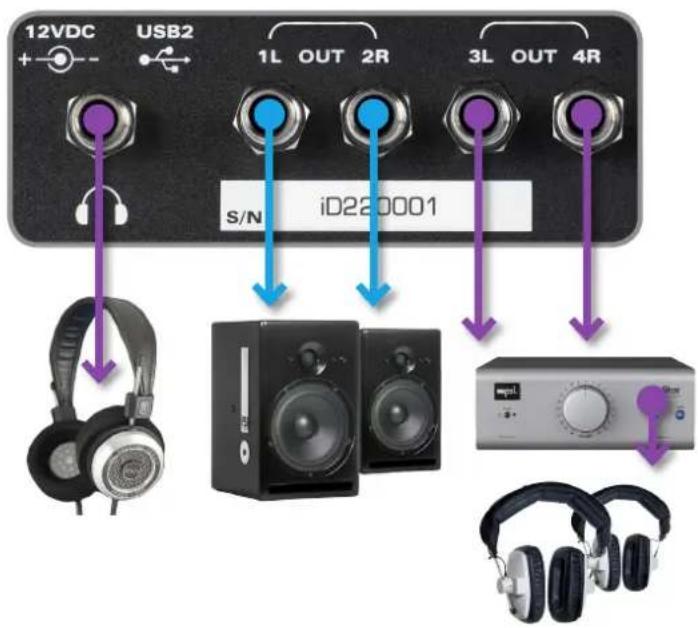
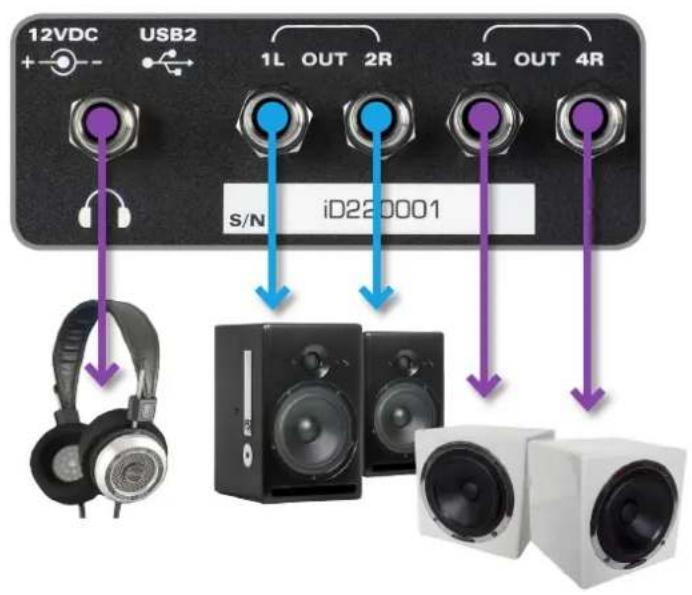
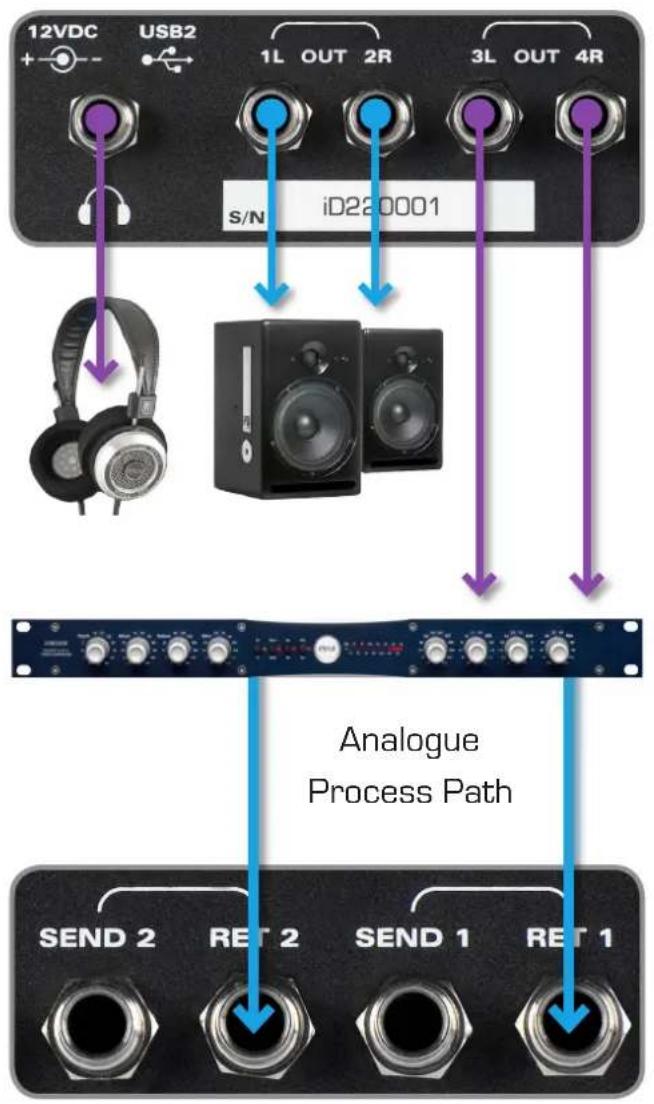
DAC & Line Output Routing Ideas
iD22 provides some very flexible output routing and these are best demonstrated in diagram form.
Using iD22 for Monitoring & Tracking:
text_image
12VDC USB2 1L OUT 2R 3L OUT 4R S/N iD220001Using iD22 for Mixing & Alt. Monitoring:
text_image
12VDC USB2 1L OUT 2R 3L OUT 4R S/N iD220001All four line outputs are electronically balanced using the same topology as our famous console, the ASP8024.
Expect plenty of output drive [>18 dBu], good noise rejection and a balanced output impedance of <100Ω.
Using iD22 with Hardware Process Path:
flowchart
graph TD
    A["12VDC"] --> B["USB2"]
    B --> C["1L OUT 2R"]
    C --> D["3L OUT 4R"]
    D --> E["S/N iD220001"]
    F["Headphones"] --> G["Speaker"]
    H["Analog Process Path"] --> I["Switch"]
    J["SEND 2"] --> K["RET 2"]
    L["SEND 1"] --> M["RET 1"]
Example Output Routings - iD Mixer
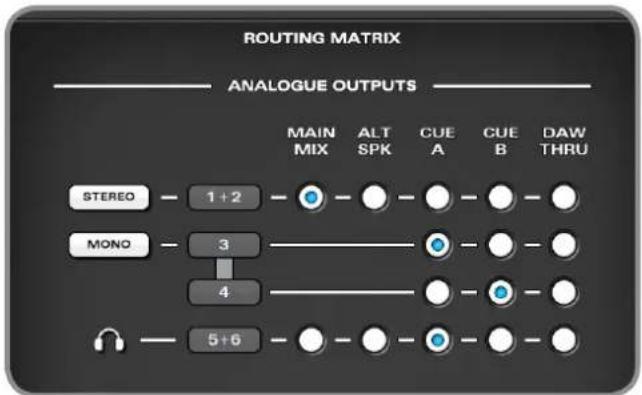
Using iD22 for Monitoring & Tracking:
• Outputs 1+2: Main Mix to C/R
• Output 3: Mono Cue Mix A
• Output 4: Mono Cue Mix B
• Outputs 5+6 Phones Cue Mix A
flowchart
graph LR
    A["STEREO"] --> B["1 + 2"]
    C["MONO"] --> D["3"]
    E[" headset"] --> F["5 + 6"]
    B --> G["●"]
    D --> H["●"]
    F --> I["●"]
    G --> J["ALT SPK"]
    H --> K["CUE A"]
    I --> L["CUE B"]
    J --> M["DAW THRU"]
    K --> N["DAW THRU"]
    L --> O["DAW THRU"]
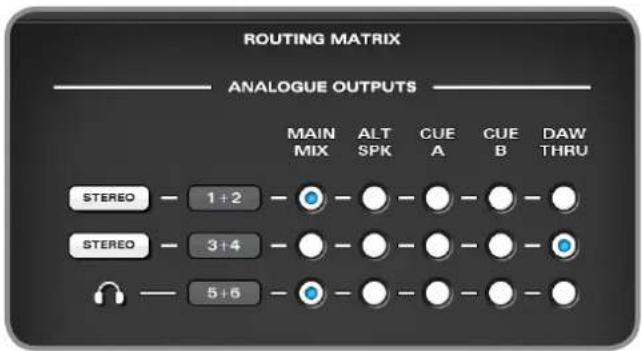
Using iD22 with ITB Headphone Mixes (send DAW headphone mix to iD22 3+4):
• Outputs 1+2: Main Mix to C/R
• Outputs 3+4: DAW Mix (ITB Phones)
• Outputs 5+6 Main Mix (Engineer)
text_image
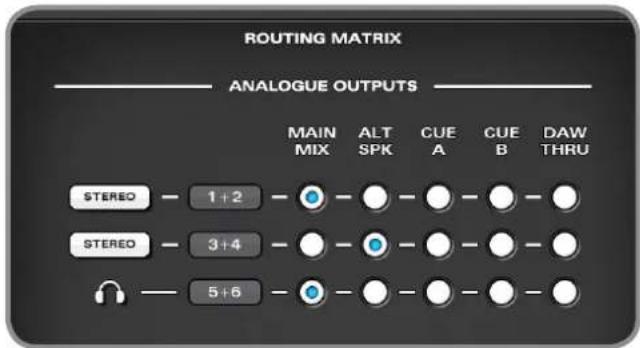
ROUTING MATRIX ANALOGUE OUTPUTS MAIN MIX ALT SPK CUE A CUE B DAW THRU STEREO 1+2 - STEREO 3+4 - 5+6 -Using iD22 for Mixing & Alt. Monitoring:
• Outputs 1+2: Main Mix to C/R
• Outputs 3+4: Alt. Loudspeaker
• Outputs 5+6 Headphone Reference
text_image
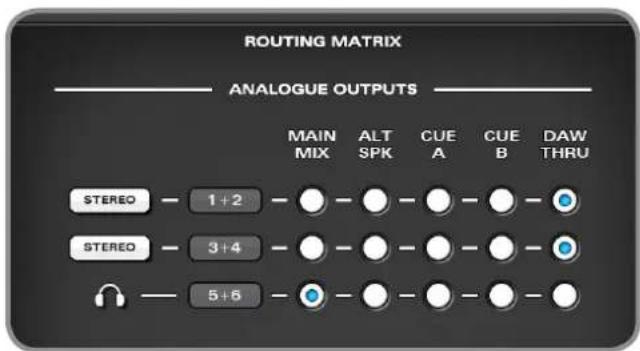
ROUTING MATRIX ANALOGUE OUTPUTS MAIN MIX ALT SPK CUE A CUE B DAW THRU STEREO 1+2 STEREO 3+4 5+6Using iD22 with Hardware Process Path (bypassing iD mixer & monitor controller, using with existing analogue monitor control):
• Outputs 1+2: DAW Mix (Direct)
• Outputs 3+4: DAW Mix (To Outboard)
• Outputs 5+6 Headphone Reference
- Outboard sent back to Insert Returns
text_image
ROUTING MATRIX ANALOGUE OUTPUTS MAIN MIX ALT SPK CUE A CUE B DAW THRU STEREO 1+2 ----- ----- ----- ----- ----- ----- ----- ----- ----- ----- ----- ----- ----- ----- ----- ----- ----- ----- ----- ----- ----- ----- ----- ----- ----- ----- ----- ----- ----- ----- ----- ----- ----- ----- ----- ----- ----- ----- ----- ----- ----- ----- ----- ----- ----- ----- ----- ----- ----- ----- ------Headphone Output
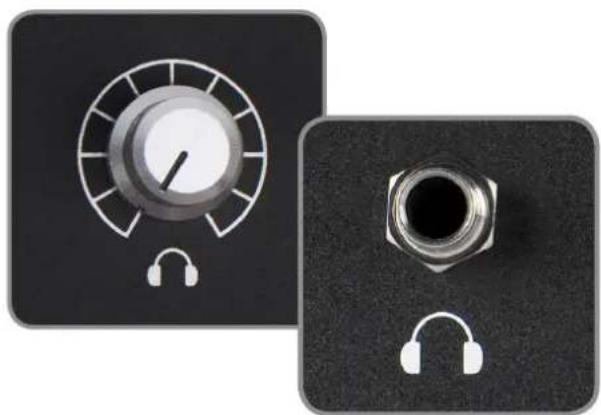
iD22 features a high current headphone amplifier which is fed by it's own separate DAC. This can be used for reference monitoring, to provide artist headphone mix or to drive a small set of active loud-speakers from an unbalanced Y-split cable (please note the headphone output will not drive passive speakers nor act as a form of small power amplifier).
The headphone amplifier can be fed from a number of sources as set in the Routing Matrix found in the System Panel of the iD mixer application (see previous pages or the section found on page 29 for more info).
A front panel potentiometer provides digitally calibrated and perfectly matched stereo volume control over the headphone output.
natural_image
Close-up of a black square electronic device with a dial and ear cap, showing front and side views (no text or symbols)Digital Inputs / Outputs
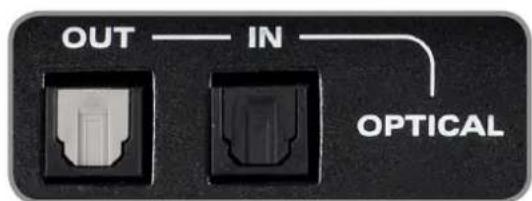
To complete the i/o package, iD22 features an optical input and output connection. These can be set to operate as stereo optical S/PDIF or 8-channel ADAT via the System Panel in the iD mixer application. Both formats will operate at up to 96kHz sample rate, with ADAT dropping to 4-channels at rates above 48kHz.
Running in S/PDIF mode, the optical i/o provides the option to integrate an audient MiCO™ for 4-channels of audient micpre, or an external reverb for monitoring.
Running in ADAT mode, the optical i/o provides a great way to expand to 10-inputs via an audient ASP880 ^TM for recording. The ADAT outputs could also be connected to headphone distribution systems such as a Hearback ^TM HUB or to an 8-channel DAC for summing purposes. We designed iD22 to grow with your needs.
For more information about setting up sample rates and system clocking please refer to pages 27 and 33 onwards.
text_image
OUT — IN — OPTICALMonitor Control
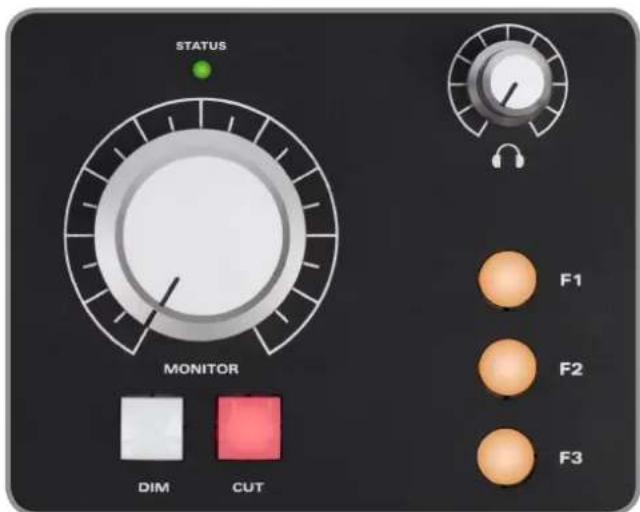
iD22 provides all of the excellent monitor control functionality as found on one of our consoles.
As such, it is possible to control main and alternative loudspeaker volumes with a perfectly matched stereo volume control on the main unit.
The MONITOR knob is solid aluminium andfeels expensive - which is just the way itshould be when you will touch it every day.
There is no signal degradation in this volume control and stereo image will not wander about at various listening levels - the image will be rock solid.
Accompanied by this monitor volume knob are permanently assigned hardware DIM & CUT switches.
The level of DIM and ALT. Loudspeaker trim can be adjusted in the iD mixer application (System Panel).
Alongside these functions, three user programmable 'F' keys provide access to several useful monitoring features.
Monitor Control Features
• Volume control (perfectly matched)
- Alt. Loudspeaker with programmable level (assignable to an 'F' key)
• DIM with programmable level
- CUT
• Mono Sum (assignable to an 'F' key)
- Polarity reverse (assignable to an 'F' key)
• Talkback (assignable to an 'F' key)
By using polarity reverse and mono sum it is possible to listen in sum or difference [mid or side] modes. This provides an excellent way to check mono compatibility and to also learn spatial tricks from your favourite reference material. Please see this audient blog for more information on sum & difference monitoring:
http://blog.audient.com/ post/29826572065/sumdifference
text_image
STATUS MONITOR DIM CUT F1 F2 F3Hardware Metering
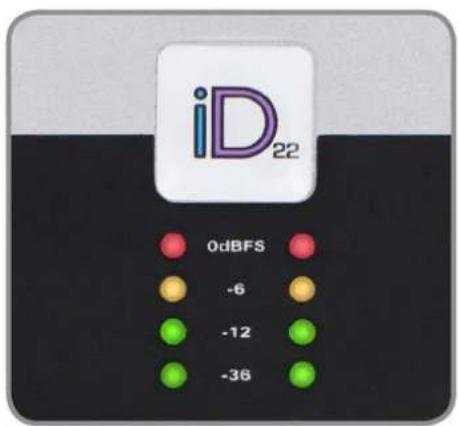
4-segment hardware LED metering can be found on the main panel of iD22.
This meter is peak reading and calibrated to the digital recording medium.
iD22 converters use a standard calibration level of 0dBu = -18dBFS, or perhaps more importantly +18 dBu = 0dBFS.
It is suggested that end users observe their DAW metering for recording levels, hence currently the iD22 hardware meters indicate playback level in the main mix bus of the iD mixer application.
text_image
iD 22 0dBFS -6 -12 -36Status LED

The status LED indicates connection via USB to your computer. Please see page 7 for more information.
Switch Operation
All hardware push switches (DIM, CUT etc) feature momentary operation if pressed and held or latching operation if pressed and released quickly - very useful!
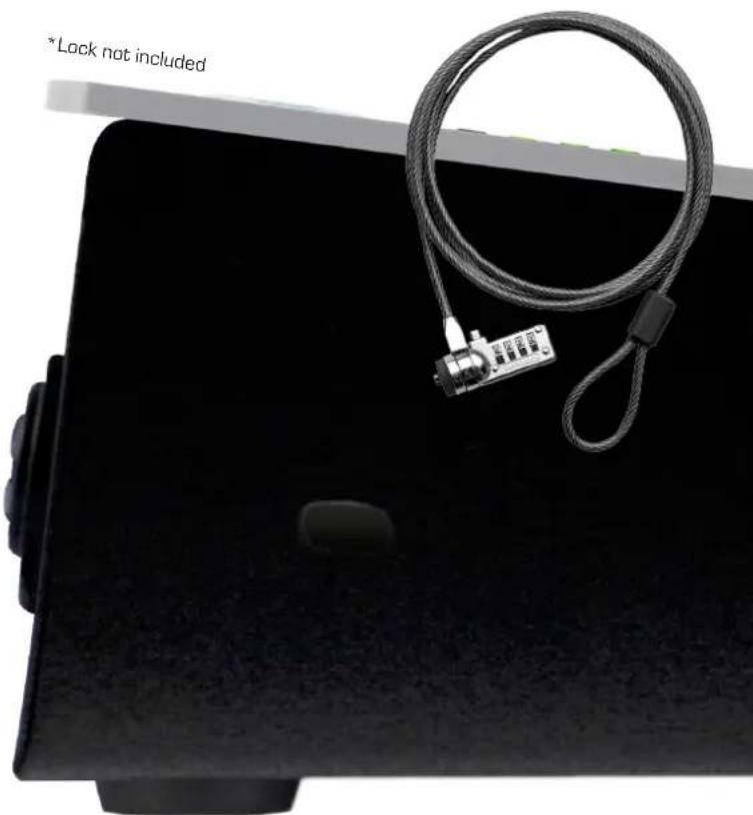
Kensington Lock
For those of you who work in educational establishments or in situations where your equipment is public facing and subject to possible theft opportunities, we have added a Kensington lock hole to the chassis to enable you to protect your iD22.
natural_image
Close-up of a black electronic device with a coiled cable and a small sensor attached, no visible text or symbols on the device itself.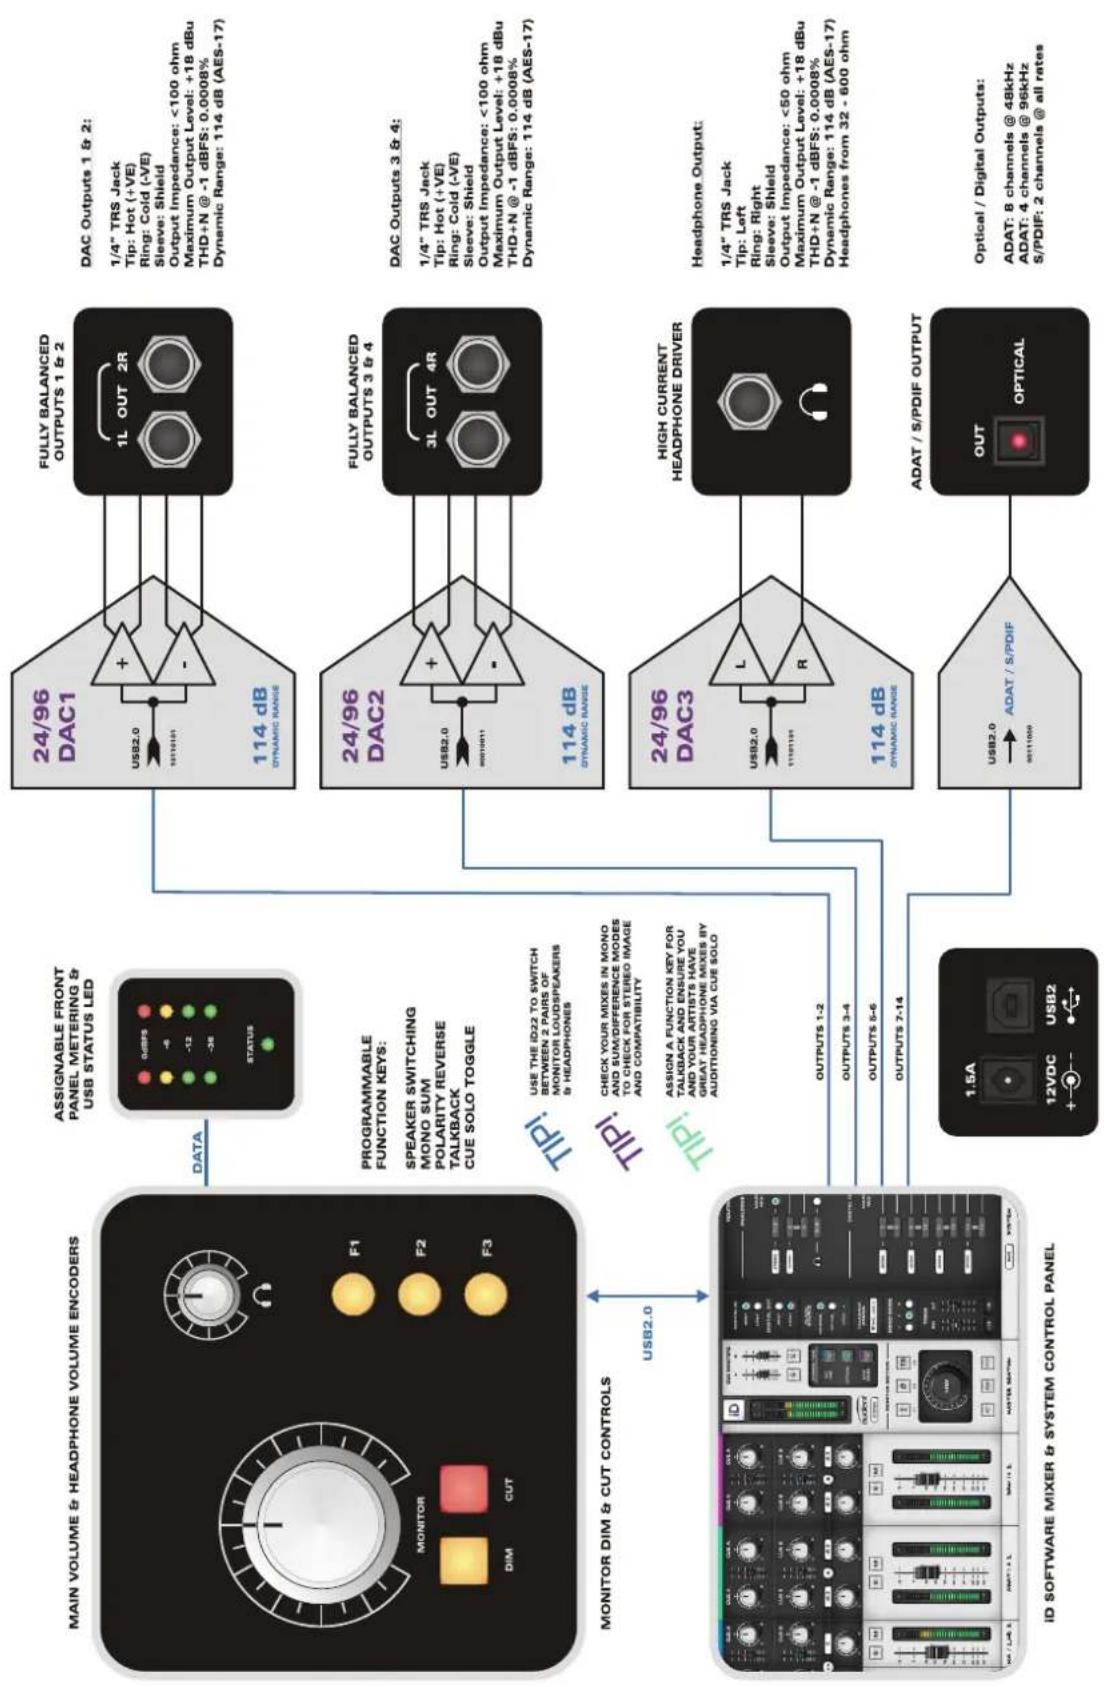
flowchart
graph TD
    A["MAIN VOLUME & HEADPHONE VOLUME ENCODERS"] --> B["ASSIGNABLE FRONT PANEL METERING & USB STATUS LED"]
    B --> C["PROGRAMMABLE FUNCTION KEYS: SPEAKER SWITCHING MONO SUM POLARITY REVERSE TALKBACK CUE SOLO TOGGLE"]
    C --> D["TIP! USE THE ID22 TO SWITCH BETWEEN 2 PAIRS OF MONITOR LOUDSPEAKERS & HEADPHONES"]
    C --> E["TIP! CHECK YOUR MIXES IN MONO AND SUM/DIFFERENCE MODES TO CHECK FOR STEREO IMAGE AND COMPATIBILITY"]
    C --> F["TIP! ASSIGN A FUNCTION KEY FOR TALKBACK AND ENSURE YOU AND YOUR ARTISTS HAVE GREAT HEADPHONE MIXES BY AUDITONING VIA CUE SOLO"]
    G["ID SOFTWARE MIXER & SYSTEM CONTROL PANEL"] --> H["OUTPUTS 1-2"]
    G --> I["OUTPUTS 3-4"]
    G --> J["OUTPUTS 5-6"]
    G --> K["OUTPUTS 7-14"]
    L["24/96 DAC1"] --> M["FULLY BALANCED OUTPUTS 1 & 2"]
    L --> N["FULLY BALANCED OUTPUTS 3 & 4"]
    L --> O["HIGH CURRENT HEADPHONE DRIVER"]
    L --> P["ADAT / S/PDIF OUTPUT"]
    Q["1L OUT 2R"] --> R["FULLY BALANCED OUTPUTS 1 & 2"]
    Q --> S["FULLY BALANCED OUTPUTS 3 & 4"]
    Q --> T["FULLY BALANCED OUTPUTS 3 & 4"]
    U["114 dB"] --> V["FULLY BALANCED OUTPUTS 1 & 2"]
    U --> W["FULLY BALANCED OUTPUTS 3 & 4"]
    X["114 dB"] --> Y["FULLY BALANCED OUTPUTS 3 & 4"]
    X --> Z["FULLY BALANCED OUTPUTS 3 & 4"]
    AA["114 dB"] --> AB["FULLY BALANCED OUTPUTS 3 & 4"]
    AA --> AC["FULLY BALANCED OUTPUTS 3 & 4"]
    AD["114 dB"] --> AE["FULLY BALANCED OUTPUTS 3 & 4"]
    AD --> AF["FULLY BALANCED OUTPUTS 3 & 4"]
    AG["114 dB"] --> AH["FULLY BALANCED OUTPUTS 3 & 4"]
    AG --> AI["FULLY BALANCED OUTPUTS 3 & 4"]
    AJ["114 dB"] --> AK["FULLY BALANCED OUTPUTS 3 & 4"]
    AJ --> AL["FULLY BALANCED OUTPUTS 3 & 4"]
    AM["ADAT / S/PDIF OUTPUT"] --> AN["FULLY BALANCED OUTPUTS 3 & 4"]
    AN --> AO["FULLY BALANCED OUTPUTS 3 & 4"]
    AP["ADAT / S/PDIF OUTPUT"] --> AQ["FULLY BALANCED OUTPUTS 3 & 4"]
    AQ --> AR["FULLY BALANCED OUTPUTS 3 & 4"]
    AS["ADAT / S/PDIF OUTPUT"] --> AT["FULLY BALANCED OUTPUTS 3 & 4"]
    AT --> AU["FULLY BALANCED OUTPUTS 3 & 4"]
    AV["ADAT / S/PDIF OUTPUT"] --> AW["FULLY BALANCED OUTPUTS 3 & 4"]
    AW --> AX["FULLY BALANCED OUTPUTS 3 & 4"]
    AY["1.5A"] --> AZ["OUTPUTS 7-14"]
    BA["12VDC"] --> BB["OUTPUTS 7-14"]
    BC["SPT0"] --> BD["OUTPUTS 7-14"]
High Performance D/A Converters, High Current Headphone Amplifier & Optical Output Block Diagram
Input Channels - Channel Types
The iD mixer application features three types of input channels, these are colour coded and are as follows:
- Analogue (Inputs 1+2) - BLUE
• Digital [S/PDIF or ADAT] - GREEN - DAW Mixes (Playback 1-6) - PURPLE
DAW inputs are provided as three stereo pairs and are designed as 'virtual' playback channels from your DAW.
These can be monitored via the onboard DSP mixer, routed to cue mixes or hard assigned to DAC outputs.
Addressing outputs in your DAW will feed signals into these channels. Therefore iD22 can sum all three signals together for monitoring and access to cue mix buses.
Channel Naming Strip
Harking back to our large format console heritage - the iD mixer application allows you to label your channels via the editable marker pen text on console tape!
Analogue input channels are taken directly from the two ADC (insert returns,) signals available here are; microphone, line, D.I (channel two) or unity gain line input at the return jack.
Digital inputs are provided as two channels in S/PDIF mode and eight channels in ADAT mode (four at >48kHz).
MIC/L INE 1 or KICK for example
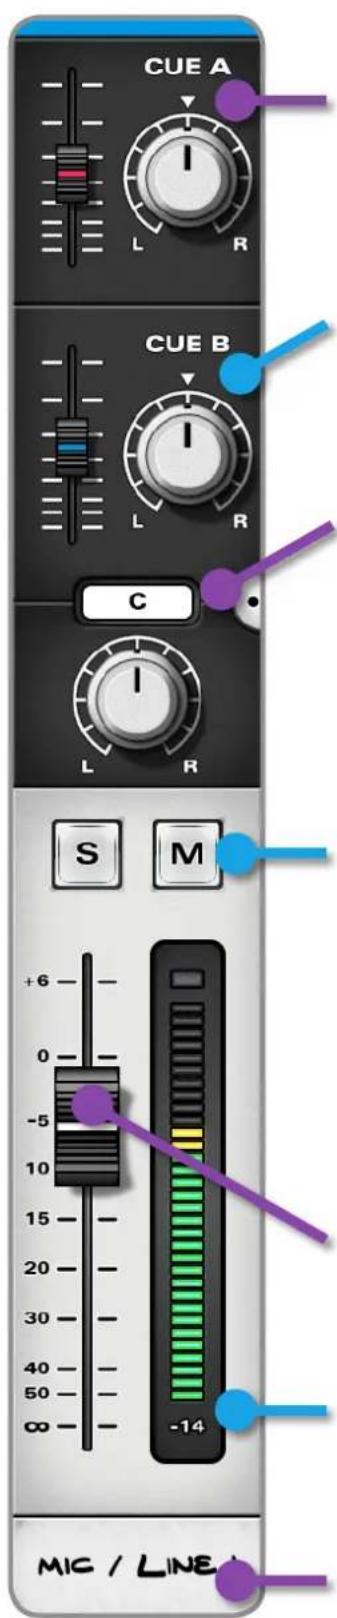
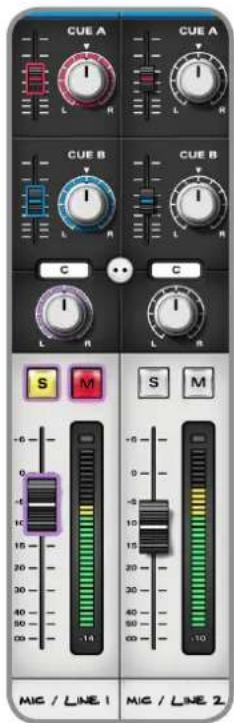
Channel Strip Controls
text_image
CUE A L R CUE B L R C L R S M +6 - 0 -5 10 15 20 30 40 50 ∞ -14 MIC / LINECue A Send Controls Level (0 dB to off) Pan (if using stereo cue)
Alt + click to zero
Cue B Send Controls Level (0 dB to off) Pan (if using stereo cue)
Alt + click to zero
Parameter Info Box Normally displays main channel pan value but if you hover the mouse over any control - it will display that parameter's value so you can see what's what
Channel Solo & Cut Latching operation
Command (⌘) + click (Ctrl + click on Windows) on a solo switch, while on an un-solo'd channel will override any previously solo'd channel
Command (⌘) + click (Ctrl + click on Windows) on an already activated solo switch will clear all solo'd channels
Channel Fader +6dB to off Alt + click to zero
Channel Meter 66dB Range Separate Peak Hold Indicator Click on peak indicator to clear Alt + click to clear all
Channel Tape Label EDITABLE - 8 characters
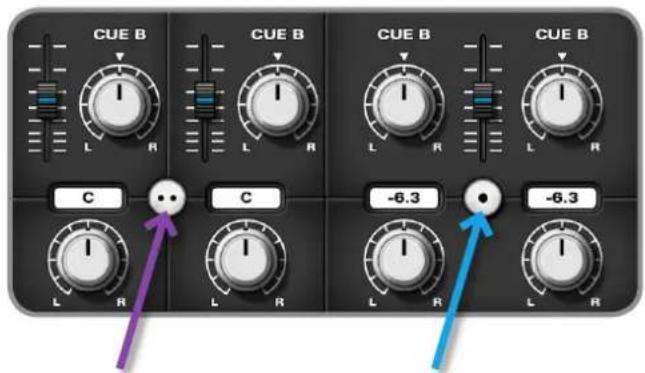
Stereo Linking
All channels can be linked or un-linked for stereo or mono operation. Level controls are ganged in stereo operation but stereo panoramic positioning control remains individual for left and right channels.
text_image
CUE B L R CUE B L R CUE B L R CUE B L R C C -6.3 -6.3 L R L R L R- Unlinked
- Individual Level
-
Individual Pan
-
Linked
- Ganged Level
- Individual Pan
Useful Functionality
Every active control (buttons, pots or faders) in the iD mixer application feature colour coded mouse over indicators to help you quickly navigate and make adjustments.
All controls are also scroll-wheel enabled in the iD mixer application.
text_image
CUE A CUE A CUE B CUE B C S M S M -6 0 -5 10 15 20 25 30 35 40 45 50 55 60 65 70 75 80 85 90 95 100 MIG / LINE 1 MIG / LINE 2Master Section
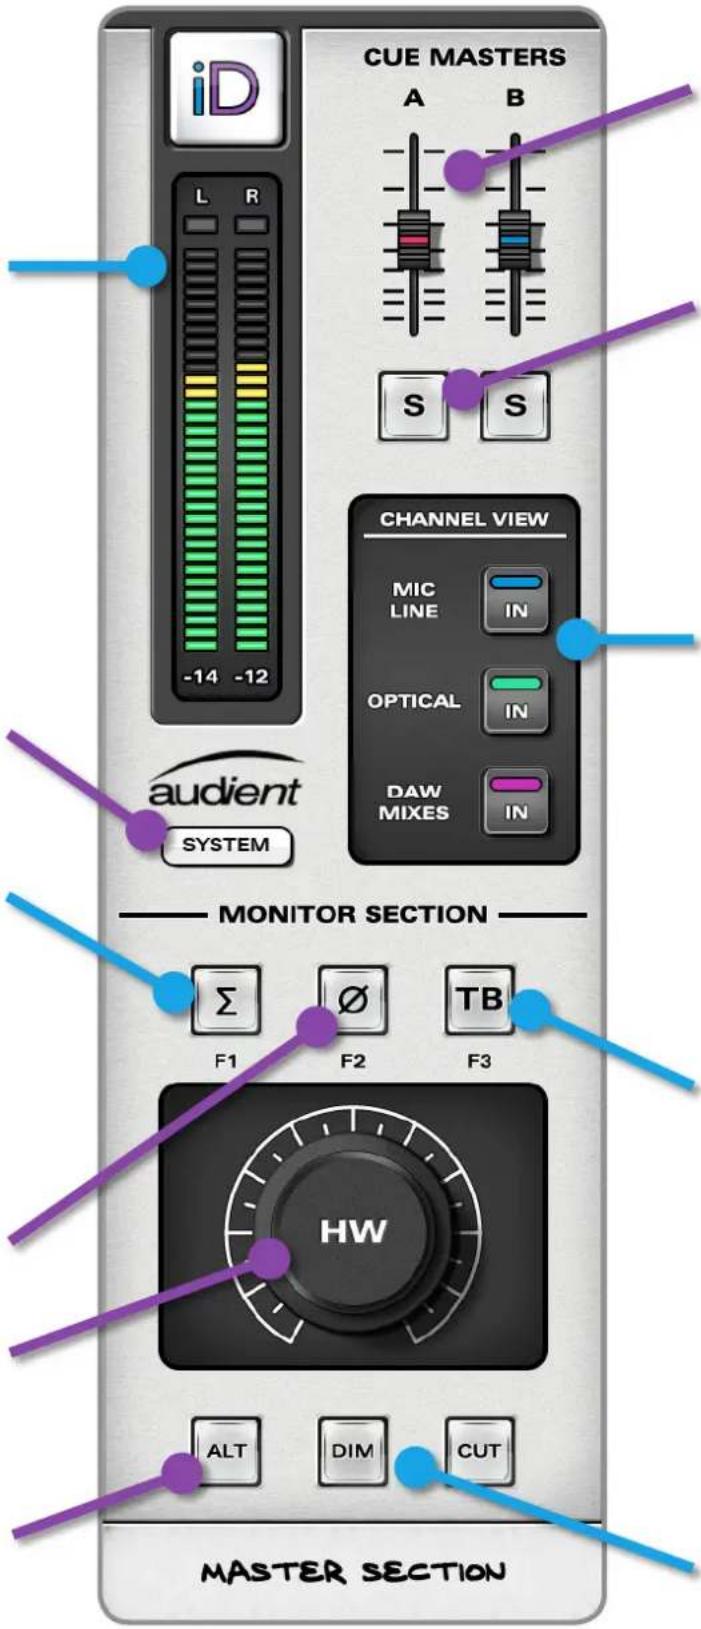
Main Meters 66 dB Range
These meters indicate the output levels of the DSP mix bus within iD22. They are mirrored by the 4-segment hardware LED meters on the main unit
1dB steps from 0 to -6dBFS 2dB steps from -8 to -56dBFS
Separate Peak Hold Indicator Click on peak indicator to clear Alt + click peak to clear
System Panel Button Opens the iD22 set-up and routing matrix panel (see page 29)
Mono Sum Button Monitor the output of the iD22 DSP mixer summed to mono
Assign to 'F' key > right click & select F1, F2 or F3
Polarity Reverse Button Invert polarity of one side of the stereo monitor output for stereo difference checks
Assign to 'F' key > right click & select F1, F2 or F3
HardwareVolume Control Only
Alt. Loudspeaker Button Switch to alternative monitors if set-up in system panel matrix as out 3+4
Assign to 'F' key > right click & select F1, F2 or F3
text_image
iD L R -14 -12 CUE MASTERS A B S S CHANNEL VIEW MIC LINE IN OPTICAL IN DAW MIXES IN audient SYSTEM MONITOR SECTION Σ F1 F2 F3 TB HW ALT DIM CUT MASTER SECTIONCue Masters
Level (0 dB to off) Controls output level of all summed cue sends
Alt + click to zero
Cue Master Solos
Use these cue solos to audition artist mixes quickly. They operate in a interlocked fashion so only one can be solo'd at a time
Channel View Buttons
Customise your mixer layout by including only the channels you are using
Not using the digital i/o? Hide it
Mixing / listening back and want to hide most of the GUI? You can
Show / hide when required
Talkback Button
Operating the talkback switch routes whichever input has been selected as talkback (in system panel) to both cue A & B (level set by talkback channel cue send levels) and to your DAW. This way talkback can be sent directly to artists or via the DAW to a record enabled or input monitored track (SLATE mode)
Monitor Dim & Cut Buttons
DIM auto-triggered by talkback. Level programmed in system panel. Permanently controlled by hardware switches
Channel View Settings
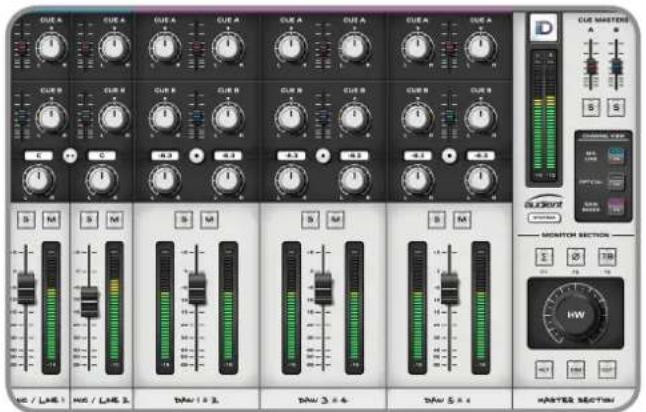
When tracking (without using a digitally expanded iD22) it is most likely that the following channel view (Analogue + DAW) would be the most useful, enabling you to see mic/line inputs and DAW returns:
text_image
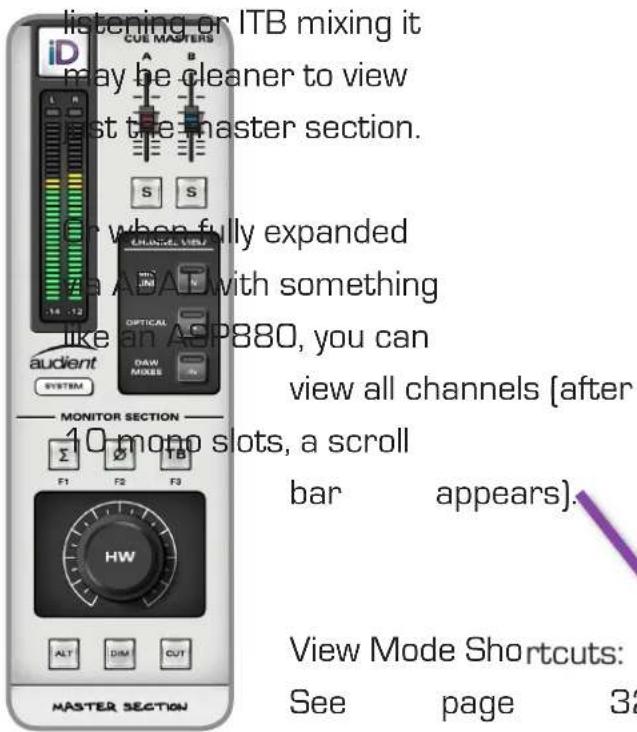
CUE A CUE B CUE C CUE D CUE E CUE F CUE G CUE H CUE I CUE J CUE K CUE L CUE M CUE N CUE O CUE P CUE Q CUE R CUE S CUE T CUE U CUE V CUE W CUE X CUE Y CUE Z CUE AA CUE AB CUE AC CUE AD CUE AE CUE AF CUE AG CUE AH CUE AI CUE AJ CUE AK CUE AL CUE AM CUE ANA CUE AO CUE AP CUE AQ CUE AR CUE AS CUE AT CUE AU CUE AV CUE AW CUE AX CUE AY CUE AZY CUE BAZY CUE BZBZY CUE BCZBZY CUE BDZBZY CUE BEZBZY CUE BFZBZY CUE BGZBZY CUE BHZBZY CUE BIZBZY CUE BJZBZY CUE BKZBZY CUE BLZBZY CUE BMZBZY CUE BNZBZY CUE BOZBZY CUE BPZBZY CUE BPAZBZY CUE CAZBZY CUE CBZBZY CUE CDZBZY CUE CEZBZY CUE CFZBZY CUE GFZBZY CUE GFABZY CUE GFACZY CUE GFACZY CUE GFACZY CUE GFACZY CUE GFACZY CUE GFACZY CUE GFACZY CUE GFACZY CUE GFACZY CUE GFACZY CUE GFACZY CUE GFACZY CUE GFACZY CUE GFACZY CUE GFACZYT CUE GFACZYT CUE GFACZYT CUE GFACZYT CUE GFACZYT CUE GFACZYT CUE GFACZYT CUE GFACZYT CUE GFACZYT CUE GFACZYT CUE GFACZYT CUE GFACZYT CUE GFACZYT CUE GFACZYT CUE GFACZYT N/A / LNE 1 N/A / LNE 2 N/A 3 N/A 4 N/A 5 N/A 6 N/A 7 N/A 8 N/A 9 N/A 10 N/A 11 N/A 12 N/A 13 N/A 14 N/A 15 N/A 16 N/A 17 N/A 18 N/A 19 N/A 20 N/A 21 N/A 22 N/A 23 N/A 24 N/A 25 N/A 26 N/A 27 N/A 28 N/A 29 N/A 30 N/A 31 N/A 32 N/A 33 N/A 34 N/A 35 N/A 36 N/A 37 N/A 38 N/A 39 N/A 40 N/A 41 N/A 42 N/A 43 N/A 44 N/A 45 N/A 46 N/A 47 N/A 48 N/A 49 N/A 50 N/A 51 N/A 52 N/A 53 N/A 54 N/A 55 N/A 56 N/A 57 N/A 58 N/A 59 N/A 60 N/A 61 N/A 62 N/A 63 N/A 64 N/A 65 N/A 66 N/A 67 N/A 68 N/A 69 N/A 70 N/A 71 N/A 72 N/A 73 N/A 74 N/A 75 N/A 76 N/A 77 N/A 78 N/A 79 N/A 80 N/A 81 N/A 82 N/A 83 N/A 84 N/A 85 N/A 86 N/A 87 N/A 88 N/A 89 N/A 90 N/A 91 N/A 92 N/A 93 N/A 94 N/A 95 N/A 96 N/A 97 N/A 98 N/A 99 N/A 100 N/AFor simple monitoring /
text_image
listening or ITB mixing it may be cleaner to view first the master section. S S Or when fully expanded the AAD with something like an AEP880, you can view all channels (after 10 mono slots, a scroll bar appears). View Mode Shortcuts: See page 32 MASTER SECTIONVolume Control
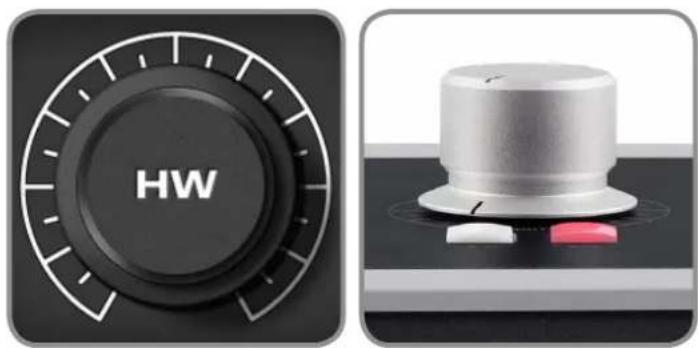
The output of the iD DSP mix bus is sent to whichever output is set-up as Main Mix in the Routing Matrix. This is your monitor destination and should be connected to your main studio loudspeakers.
To control the monitor volume of this output, use the hardware knob on the main unit.
natural_image
Two industrial control knob designs: a black dial labeled 'HW' and a metallic top with red buttons (no text or symbols beyond branding)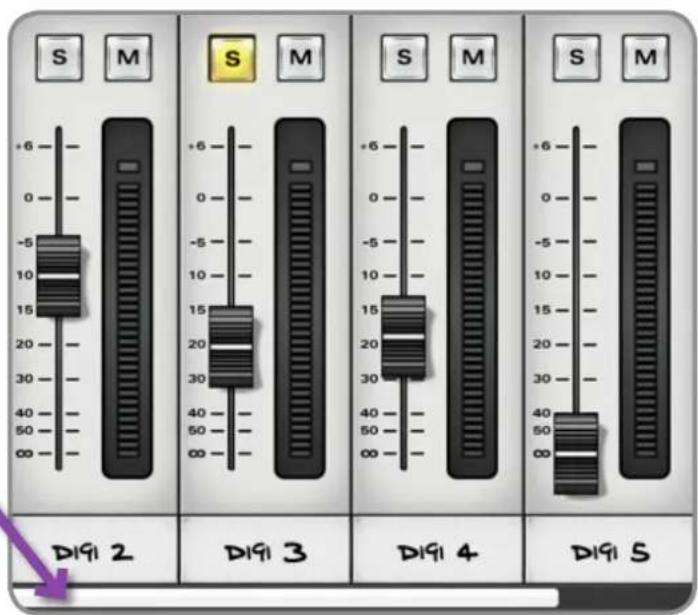
text_image
S M +6 0 -5 10 15 20 30 40 50 00 DIGI 2 S M +6 0 -5 10 15 20 30 40 50 00 DIGI 3 S M +6 0 -5 10 15 20 30 40 50 00 DIGI 4 S M +6 0 -5 10 15 20 30 40 50 00 DIGI 5Programming 'F' Keys [Monitor Control Functionality]
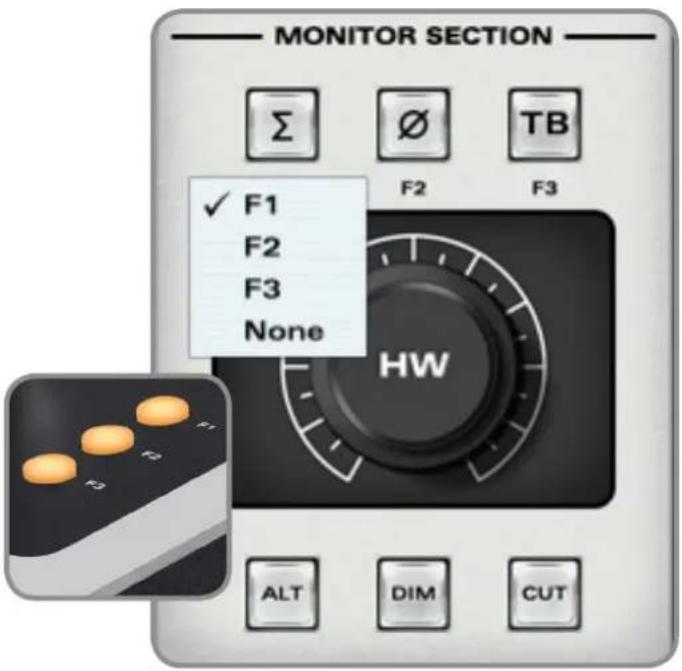
There are several functions that can be assigned to the hardware 'F' keys.
Σ Mono Sum
In order to check your mix for mono compatibility (still important for DAB radio and laptop / ipad users) either use the Mono Sum button in the iD software or assign it to an 'F' key by right clicking.
Polarity Reverse
By pressing the polarity reverse button, the left channel of the stereo mix is inverted. When combining this with the right channel using the mono sum feature in conjunction with the polarity reverse function - a L-R sum is created instead of an L+R sum. This will cancel the centre (sum) of the stereo signal and leave behind the difference signal (L-R). Monitoring this provides a great way to listen to stereo content such as reverbs and also pick up tricks from your favourite mix engineers. It is a very useful and different perspective of the mix balance.
Talkback - see page 28 for more information.
text_image
MONITOR SECTION Σ Ø TB F2 F3 ✓ F1 F2 F3 None HW ALT DIM CUTALT Alternative Loudspeaker
To set-up an alternative loudspeaker for greater monitoring flexibility - a pair of outputs must be assigned as a source to the alternative pair in the System Panel.
These outputs can be digital via S/PDIF or ADAT or indeed analogue via DAC3+4 or DAC5+6.
ALT can be used to turn on headphones if DAC5+6 is selected as the headphone source, alternatively you can feed loudspeakers with DSP control and digital inputs via optical S/PDIF.
However in most standard set-ups, DAC3+4 would be the most likely source.
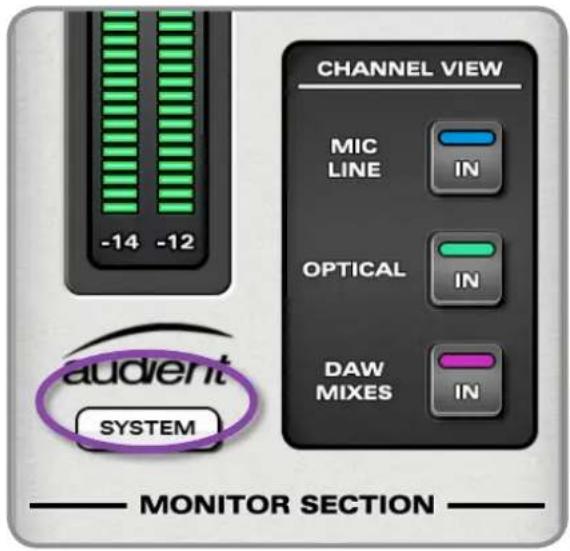
System Panel
To open the system panel, press the SYSTEM button found in the master section or use Command (⌘) + 4 in OSX, or Ctrl + 4 in Windows.
text_image
-14 -12 audient SYSTEM CHANNEL VIEW MIC LINE IN OPTICAL IN DAW MIXES IN MONITOR SECTIONThe full system panel contains two sections:
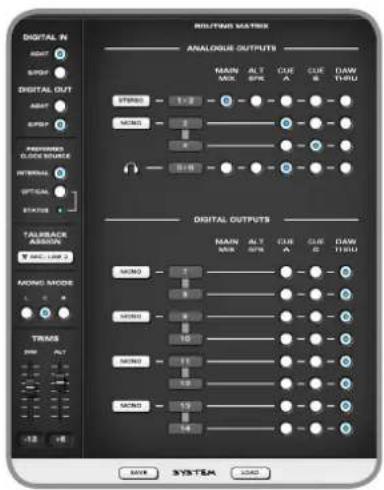
- Setup Strip
- Routing Matrix
text_image
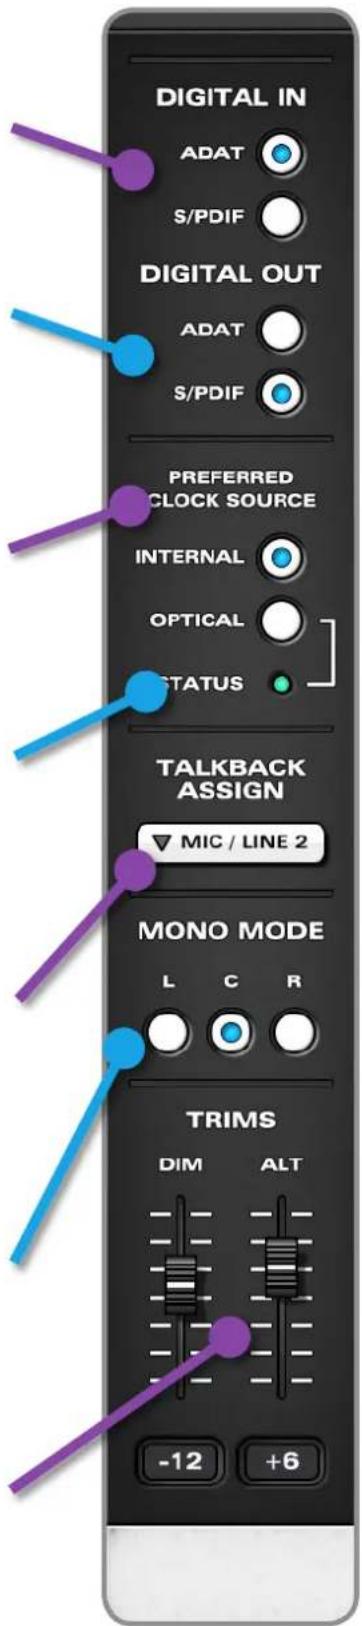
DIGITAL IN RESET 0 S/PSP 0 DIGITAL OUT RESET 0 S/PSP 0 FASHION OUTPUT INTERNAL 0 OPTIONAL 0 STATUS 0 TALBBACK ASSIGN MAC LINK 2 RONG MODE L 0 TRANS BRP PLT -12 -8 RUTFINUM MATRIX ANALOGUE OUTPUTS MAIN MIX ALT SPIE CUE A CUE B DAW THRU SPRING 1.2 5 MNG 3 4 5.16 Digital OUTPUTS MAIN MIX ALT 7 SPIE A CUE B DAW THRU MNG 7 4 5.16 MNG 10 11 12 13 14 15 16 17 18 19 20 21 22 23 24 25 26 27 28 29 30 31 32 33 34 35 36 37 38 39 40 41 42 43 44 45 46 47 48 49 50 51 52 53 54 55 56 57 58 59 60 61 62 63 64 65 66 67 68 69 70 71 72 73 74 75 76 77 78 79 80Setup Strip
Digital Input Format Select 8-ch ADAT or 2-ch S/PDIF input modes for the optical input here. ADAT 8-ch 44.1 - 48kHz, 4-ch 88.2kHz - 96kHz. S/PDIF 2-ch all rates
Digital Output Format Select 8-ch ADAT or 2-ch S/PDIF input modes for the optical output here. ADAT 8-ch 44.1 - 48kHz, 4-ch 88.2kHz - 96kHz. S/PDIF 2-ch all rates
Preferred Clock Source Select internal or optical input as the default clock source allowing easy set-up with external devices such as ASP800 or ASP880. Ensure sample rates match DAW.
Status LED Indicates a valid external clock source. Red indicator means you have a clocking issue and should check source device, amber means incorrect sample rate on external device
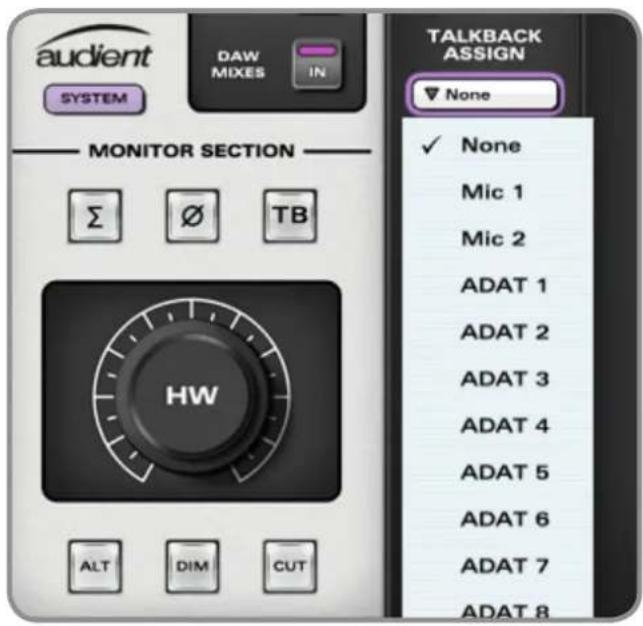
Talkback Assign Select any available iD22 input (analogue or digital) to be the source for talkback as routed to cues. Mixer channel becomes talkback with no feedback possibility
Mono Mode Set whether sum-to-mono creates a mono sum in one loudspeaker (one acoustic source) or creates a 'phantom centre' sum (two acoustic sources) - they sound different
DIM & ALT Trims
Set DIM level: 0 to -30 dB Set ALT loudspeaker level: +/-15 dB
text_image
DIGITAL IN ADAT S/PDIF DIGITAL OUT ADAT S/PDIF PREFERRED CLOCK SOURCE INTERNAL OPTICAL STATUS TALKBACK ASSIGN ▼ MIC / LINE 2 MONO MODE L C R TRIMS DIM ALT -12 +6Assigning Talkback
When a channel is assigned as talkback source in the iD mixer application system panel, the equivalent mixer channel strip updates to become a talkback channel.
text_image
audient SYSTEM DAW MIXES IN MONITOR SECTION Σ Ø TB HW ALT DIM CUT TALKBACK ASSIGN None ✓ None Mic 1 Mic 2 ADAT 1 ADAT 2 ADAT 3 ADAT 4 ADAT 5 ADAT 6 ADAT 7 ADAT 8Channels will be presented in the talkback assign menu as per their labelling in the mixer scribble (console tape) strip. As such they are easy to identify.
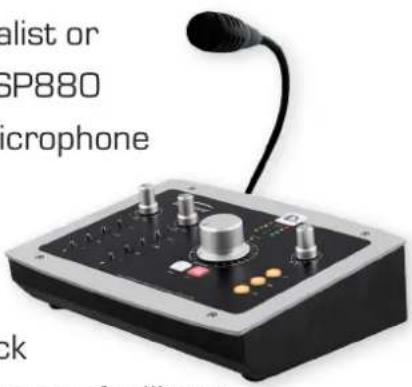
No talkback microphone has been included within iD22 as these small electret contact microphone often pickup lots of switch press and handling noise. For many who record vocalists, one input for the artist will be enough so we suggest using a talkback microphone in Input 2, however any of the digital inputs could also be used.
Gooseneck Microphone Use
If recording a vocalist or drummer (with ASP880 expansion) one microphone channel on theiD22 providesthe perfect place to use a gooseneck talkback microphone to facilitate desktop communication & monitor control.
text_image
alist or SP880 microphone ckTalkback Channel Strip
When an assigned channel converts to talkback operation, cue A & B send level and pan remain, allowing you to route talkback signal to artists via the cue mixes. A channel info box shows adjusted parameter values and a routing box shows which active channel is set as talkback.
A secondary talkback button is located on the talkback channel which can be used to trigger talkback whilst setting up the software mixer. You can assign the talkback switch to an 'F' key in the master section.

text_image
CUE A L R CUE B L R -8.1 TB MIC / LINE 2 ∞ TALKBACKOutput Routing Matrix
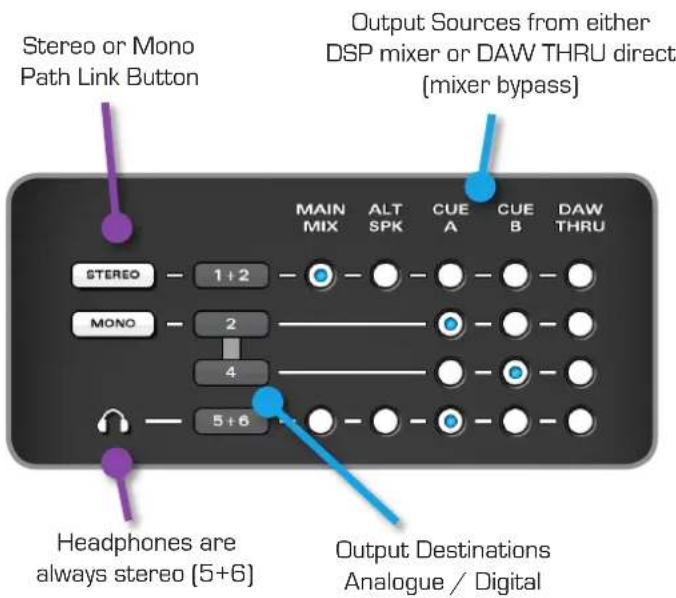
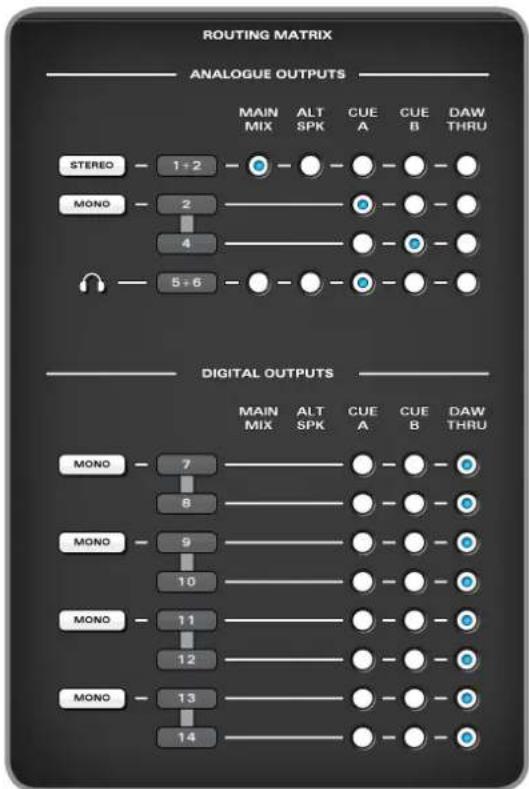
The routing matrix allows you to patch the following iD DSP mixer outputs to the physical DAC outputs (1-6) or the optical digital outputs (1-8 in ADAT mode or 1-2 in S/PDIF mode).
text_image
Stereo or Mono Path Link Button Output Sources from either DSP mixer or DAW THRU direct [mixer bypass] STUDIO 1+2 CUE A CUE B DAW THRU MONO 2 4 5+6 Headphones are always stereo (5+6) Output Destinations Analogue / DigitalIn the above example, DAC outputs 1+2 are setup as a stereo pair fed from the iD DSP mixer main output. This is the default main monitor path and would feed your loudspeakers. The iD mixer main output passes through all monitor control functionality (mono sum, polarity reverse, dim, cut and monitor volume).
DAC outputs 3+4 are set as two mono paths and fed individually by mono Cue A and B mixes. In this scenario note that cue pans controls have no effect
flowchart
graph TD
    subgraph ROUTING MATRIX
        A["STEREO"] --> B["1+2"]
        C["MONO"] --> D["2"]
        E["Wireless Head Icon"] --> F["4"]
        G["Analogoules"] --> H["Main Mix"]
        I["Main Mix"] --> J["ALT SPK"]
        K["ALT SPK"] --> L["CUE A"]
        M["ALT SPK"] --> N["CUE B"]
        O["ALT SPK"] --> P["DAW THRU"]
    end
    subgraph DIGITAL OUTPUTS
        Q["MONO"] --> R["7"]
        S["MONO"] --> T["8"]
        U["MONO"] --> V["9"]
        W["MONO"] --> X["10"]
        Y["MONO"] --> Z["11"]
        AA["MONO"] --> AB["12"]
        AC["MONO"] --> AD["13"]
        AE["MONO"] --> AF["14"]
        AG["DIGITAL OUTPUTS"] --> AH["MAIN MIX"]
        AI["DIGITAL OUTPUTS"] --> AJ["ALT SPK"]
        AK["DIGITAL OUTPUTS"] --> AL["CUE A"]
        AM["DIGITAL OUTPUTS"] --> AN["CUE B"]
        AO["DIGITAL OUTPUTS"] --> AP["DAW THRU"]
    end
(cue masters are mono summed prior to routing to the DAC outputs). This would be used to feed an external headphone amplifier to provide two mono artist mixes.
Naturally a stereo cue mix could be created by clicking on the stereo/mono path button and selecting Cue A or B as a source.
Note the flexibility here, as a stereo Cue A mix is feeding the iD22 headphone output (DAC 5+6). Alternative speakers can also be set-up here (typically DAC 3+4).
By selecting DAW THRU the iD DSP mixer is bypassed and signals are effectively 'hard-wired' from DAW to DAC.
Saving & Loading Mixer Presets
Mixer presets can be saved and loaded in two ways:
• Using the buttons at the bottom of the system panel
• Using standard keyboard shortcuts
- Save: Command (⌘) + S Ctrl + S [Windows]
- Load: Command (⌘) + O
Ctrl + O (Windows)
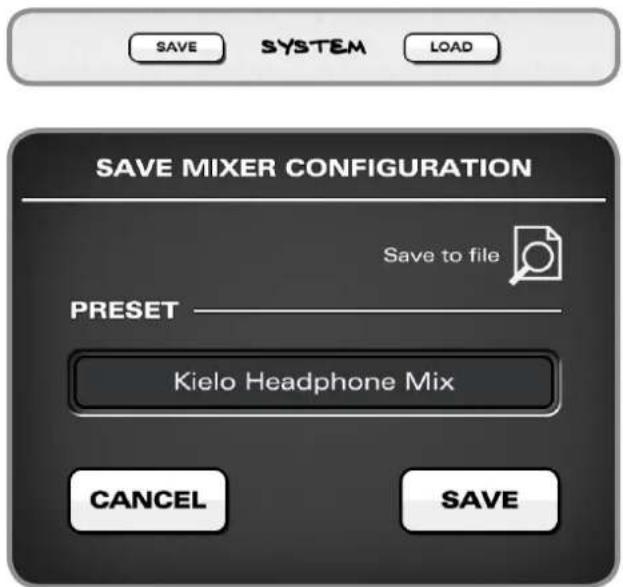
Saving a Mixer Configuration
Presets can be named when saving from within the system panel, just double click the name box to add.
text_image
SAVE SYSTEM LOAD SAVE MIXER CONFIGURATION Save to file PRESET Kielo Headphone Mix CANCEL SAVEFor information on where preset files are automatically saved, please visit our help desk.
By using the browse button you can save preset files to any

folder you desire - allowing you to contain them within your DAW session folder for example (making recall easier).
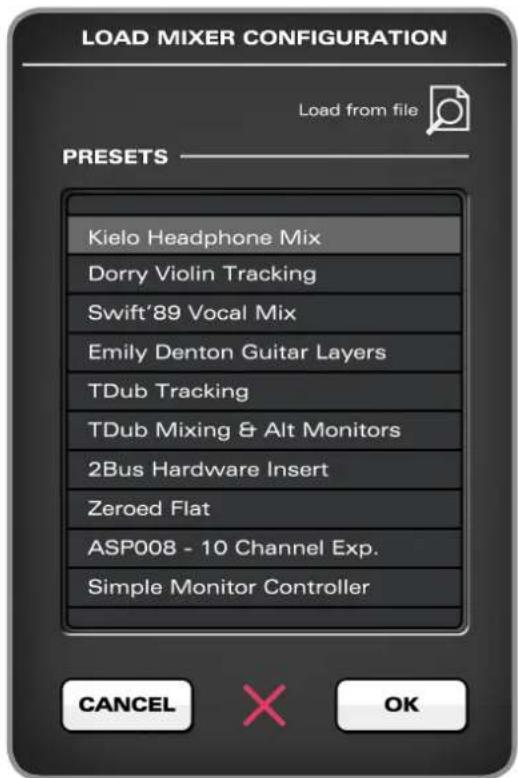
Loading a Mixer Configuration
Loading a preset is very simple, just click on the load button in the System Panel and select one of your previously named files, double clicking will also load a preset. To rename a preset, click to highlight and then after a pause, click again to rename. To delete, click to highlight and then click on the X (delete) button at the bottom.
text_image
LOAD MIXER CONFIGURATION Load from file PRESETS Kielo Headphone Mix Dorry Violin Tracking Swift'89 Vocal Mix Emily Denton Guitar Layers TDub Tracking TDub Mixing & Alt Monitors 2Bus Hardware Insert Zeroed Flat ASP008 - 10 Channel Exp. Simple Monitor Controller CANCEL OK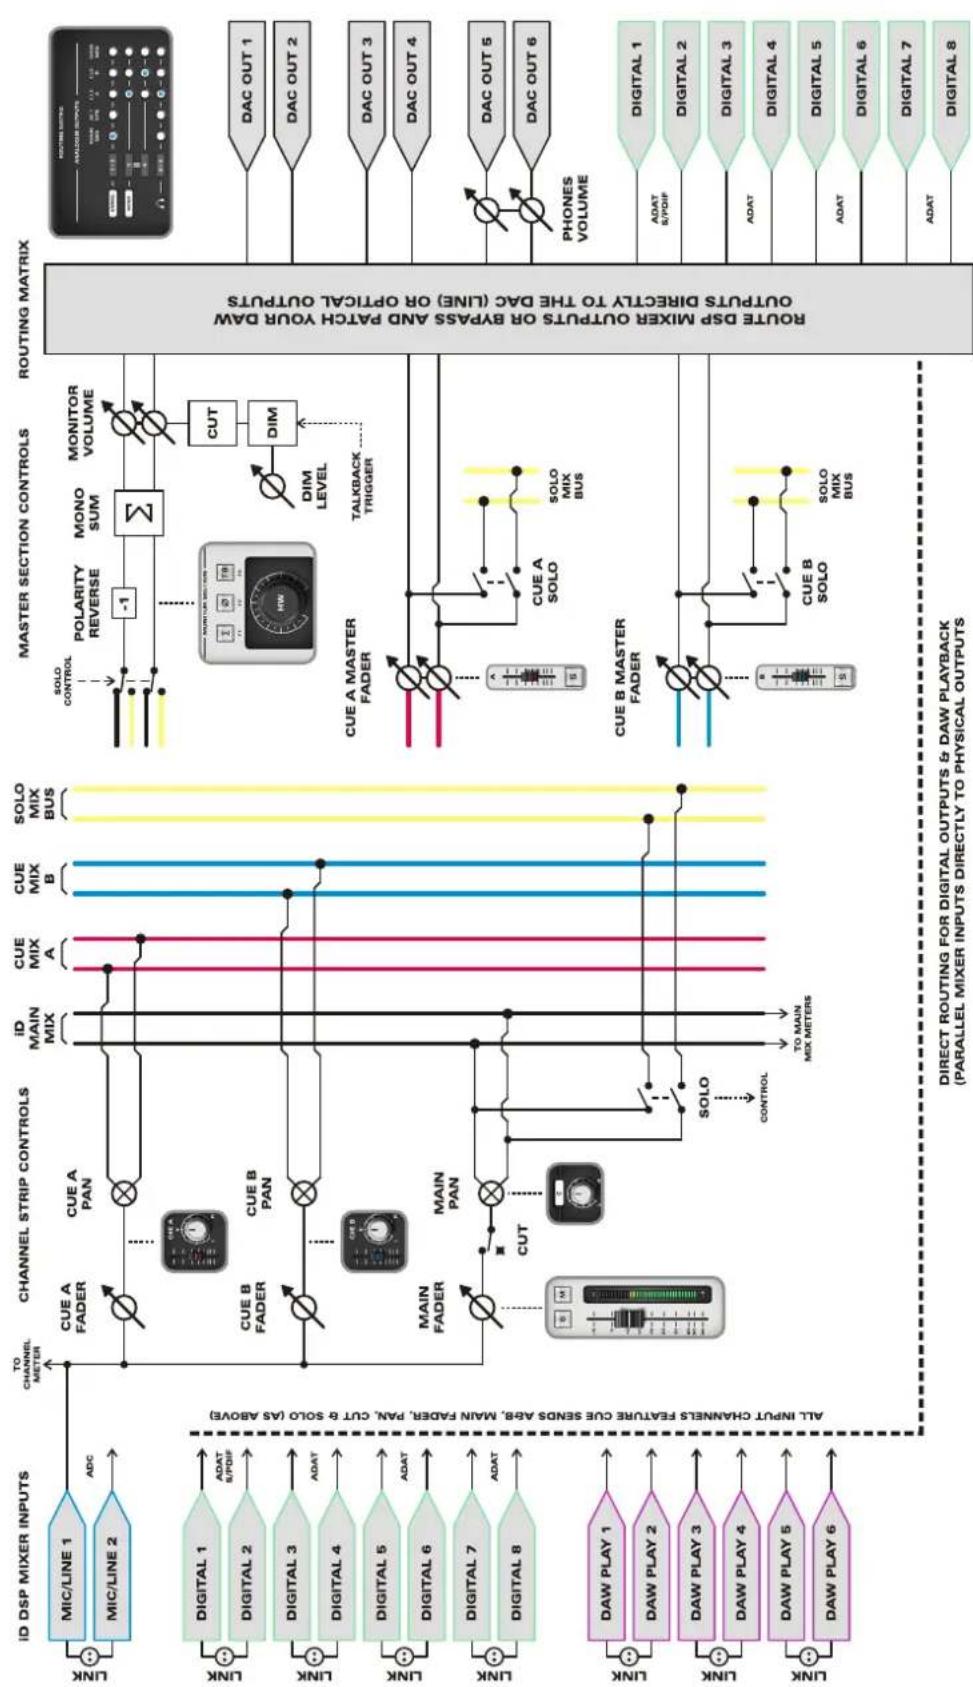
flowchart
graph TD
    A["ID DSP MIXER INPUTS"] --> B["TO CHANNEL METER"]
    B --> C["CUE A FADER"]
    C --> D["CUE A PAN"]
    D --> E["iD MAIN MIX"]
    E --> F["CUE MIX A"]
    F --> G["CUE MIX B"]
    G --> H["SOLO MIX BUS"]

    I["ALL INPUT CHANNELS FEATURE CUE Sends ASB, MAIN FADER, PAN, CUT & SOLO (AS ABOVE)"] --> J["Digital 1"]
    J --> K["ADAT S/PDIF"]

    L["ALL INPUT CHANNELS FEATURE CUE Sends ASB, MAIN FADER, PAN, CUT & SOLO (AS ABOVE)"] --> M["Digital 2"]
    M --> N["ADAT S/PDIF"]

    O["ALL INPUT CHANNELS FEATURE CUE Sends ASB, MAIN FADER, PAN, CUT & SOLO (AS ABOVE)"] --> P["Digital 3"]
    P --> Q["ADAT S/PDIF"]

    R["ALL INPUT CHANNELS FEATURE CUE Sends ASB, MAIN FADER, PAN, CUT & SOLO (AS ABOVE)"] --> S["Digital 4"]
    S --> T["ADAT S/PDIF"]

    U["ALL INPUT CHANNELS FEATURE CUE Sends ASB, MAIN FADER, PAN, CUT & SOLO (AS ABOVE)"] --> V["Digital 5"]
    V --> W["ADAT S/PDIF"]

    X["ALL INPUT CHANNELS FEATURE CUE Sends ASB, MAIN FADER, PAN, CUT & SOLO (AS ABOVE)"] --> Y["Digital 6"]
    Y --> Z["ADAT S/PDIF"]

    AA["ALL INPUT CHANNELS FEATURE CUE Sends ASB, MAIN FADER, PAN, CUT & SOLO (AS ABOVE)"] --> AB["Digital 7"]
    AB --> AC["ADAT S/PDIF"]

    AD["ALL INPUT CHANNELS FEATURE CUE Sends ASB, MAIN FADER, PAN, CUT & SOLO (AS ABOVE)"] --> AE["Digital 8"]
    AE --> AF["ADAT S/PDIF"]

    AG["DIRECT ROUTING FOR DIGITAL OUTPUTS & DAW PLAYBACK (PARALLEL MIXER INPUTS DIRECTLY TO PHYSICAL OUTPUTS)"] --> AH["CUE B MASTER FADER"]
    AH --> AI["SOLO MIX BUS"]
    AI --> AJ["CUE B SOLO"]
    AJ --> AK["SOLY MIX BUS"]

    AL["MASTER SECTION CONTROLS"] --> AM["SOLY CONTROL"]
    AM --> AN["-1"]
    AN --> AO["MONO SUM"]
    AO --> AP["MONITOR VOLUME"]
    AP --> AQ["CUT"]
    AQ --> AR["TALBACK TRIGGER"]
    AR --> AS["DIM LEVEL"]
    AS --> AT["CUE A MASTER FADER"]
    AT --> AU["CUE A SOLO"]
    AU --> AV["SOLY MIX BUS"]

    AW["ROUTING MATRIX"] --> AX["ROUTE DSP MIXER OUTPUTS OR BYPASS AND PATCH YOUR DAW OUTPUTS DIRECTLY TO THE DAC (LINE) OR OPTICAL OUTPUTS"]

    A0["ADAT S/PDIF"] --> AX
    A1["ADAT"] --> AX
    A2["ADAT"] --> AX
    A3["ADAT"] --> AX
    A4["ADAT"] --> AX
    A5["ADAT"] --> AX
    A6["ADAT"] --> AX
    A7["ADAT"] --> AX
    A8["ADAT"] --> AX

    subgraph ROUTING MATRIX
        X1["DAC OUT 1"] --> X2["DAC OUT 2"] --> X3["DAC OUT 3"] --> X4["DAC OUT 4"] --> X5["DAC OUT 5"] --> X6["DAC OUT 6"] --> X7["DAC OUT 7"] --> X8["DAC OUT 8"]
        X1 --> X2
        X2 --> X3
        X3 --> X4
        X4 --> X5
        X5 --> X6
        X6 --> X7
        X7 --> X8
        X8 --> X9
    end
iD22 ONBOARD DSP MIXER APPLICATION BLOCK DIAGRAM
Keyboard Shortcut Index
To allow you to find all shortcuts for the mixer application in one place without having to go through each page of this manual please refer to this table:
| Location | Mac | Windows | Description |
| Faders | Alt (↖) + Click | Alt + Click | Resets fader to unity gain [O dB] |
| Pans | Alt (↖) + Click | Alt + Click | Resets pan pots to central position |
| Solos | Cmd (↖) + Click | Ctrl + Click | Clears all solos if clicking on a solo'd channelOverrides all other solos exclusive) if clicking on channel |
| Meters | Alt (↖) + Click | Alt + Click | Clicking on peak hold indicator will clear all clip indicators |
| System Panel | Cmd (↖) + S | Ctrl + S | Save mixer configuration |
| Cmd (↖) + O | Ctrl + O | Load mixer configuration | |
| View Modes | Cmd (↖) + 1 | Ctrl + 1 | View Mic/Line Inputs |
| Cmd (↖) + 2 | Ctrl + 2 | View Optical [Digital] Inputs | |
| Cmd (↖) + 3 | Ctrl + 3 | View DAW Mix Inputs | |
| Cmd (↖) + 4 | Ctrl + 4 | View System Panel |
Please check the iD22 page online at www.audient.com/iD22 for the latest mixer application updates.
More shortcuts may be added without notification.
Operation with Pro Tools
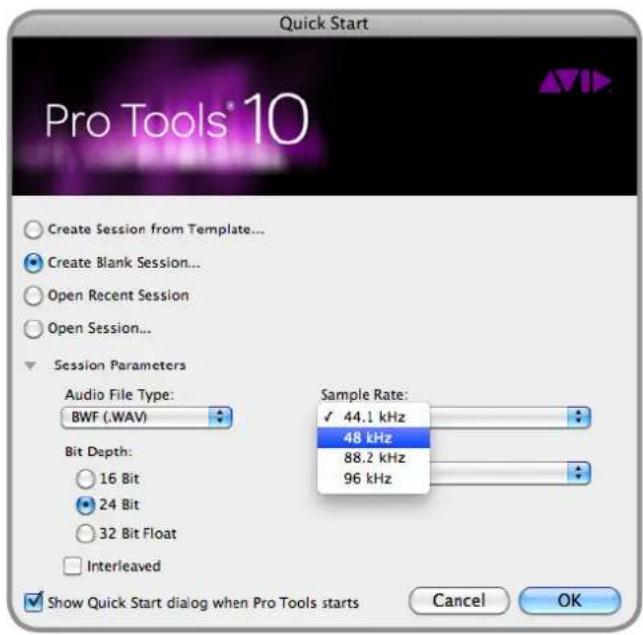
Once iD22 has been successfully installed following the steps detailed on page 6 of this manual, launch Pro Tools and ensure that a new session is created at the desired sample rate (if clocking internally) or at the rate of the clock source (if clocking externally).
text_image
Quick Start Pro Tools®10 Create Session from Template... Create Blank Session... Open Recent Session Open Session... Session Parameters Audio File Type: BWF (.WAV) Bit Depth: 16 Bit 24 Bit 32 Bit Float Interleaved Sample Rate: ✓ 44.1 kHz 48 kHz 88.2 kHz 96 kHz Show Quick Start dialog when Pro Tools starts Cancel OKPlayback Engine
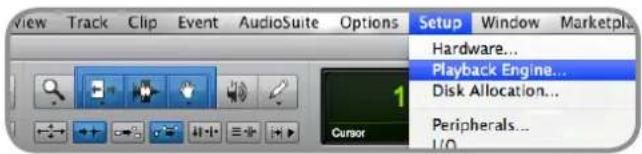
Go to Setup > Playback Engine... and ensure that iD22 is set as the active playback device. Appropriate buffer sizes can also be set here. Please bear in mind that Pro Tools will reboot if the playback device is changed.
For more Pro Tools information consult your Avid user manuals & documentation.
text_image
View Track Clip Event AudioSuite Options Setup Window Marketplace Hardware... Playback Engine... Disk Allocation... Peripherals... UO 1 Cursor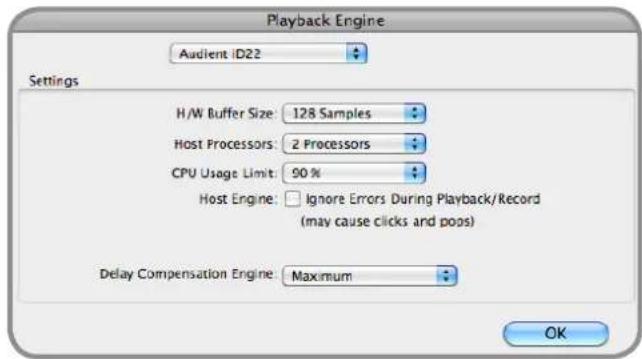
text_image
Playback Engine Audient: ID22 Settings H/W Buffer Size: 128 Samples Host Processors: 2 Processors CPU Usage Limit: 90 % Host Engine: Ignore Errors During Playback/Record (may cause clicks and poos) Delay Compensation Engine: Maximum OKGo to Setup > I/O... to label your inputs and outputs and ensure that iD22 is correctly reporting 10-inputs and 14-outputs to and from Pro Tools. Note that analogue outputs 1-6 are in fact the DAW virtual playback channels in the iD DSP mixer and can either be routed through the iD mixer or hard-wired directly from Pro Tools to the DAC stages.
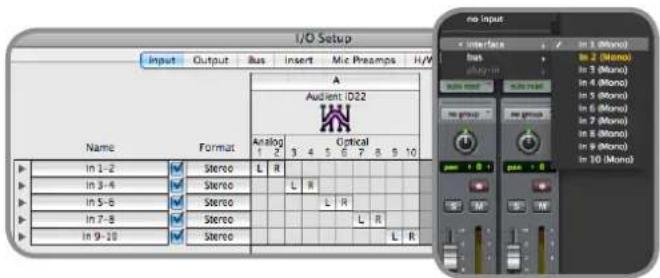
text_image
I/O Setup Input Output Bus Insert Mic Preamps H/Y A Audient ID22 Analog Optical 1 2 3 4 5 6 7 8 9 10 in 1-2 Stereo L R in 3-4 Stereo in 5-6 Stereo in 7-8 Stereo in 9-10 Stereo no input x interface bus in 1 (Mono) in 2 (Mono) in 3 (Mono) in 4 (Mono) in 5 (Mono) in 6 (Mono) in 7 (Mono) in 8 (Mono) in 9 (Mono) in 10 (Mono)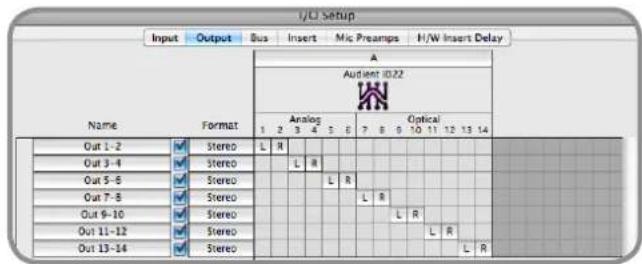
text_image
I/D Setup Input Output Bus Insert Mic Preamps H/W Insert Delay Name Format A Audient ID.22 Analog Optical 1 2 3 4 5 6 7 8 9 10 11 12 13 14 Out 1-2 Stereo L R N/A Out 3-4 Stereo L R N/A Out 5-6 Stereo L R N/A Out 7-8 Stereo L R N/A Out 9-10 Stereo L R N/A Out 11-12 Stereo L R N/A Out 13-14 Stereo N/A L R N/AOperation with Logic Pro
Once iD22 has been successfully installed following the steps detailed on page 6 of this manual, launch Logic Pro and check the following:
Logic Pro > Preferences > Audio
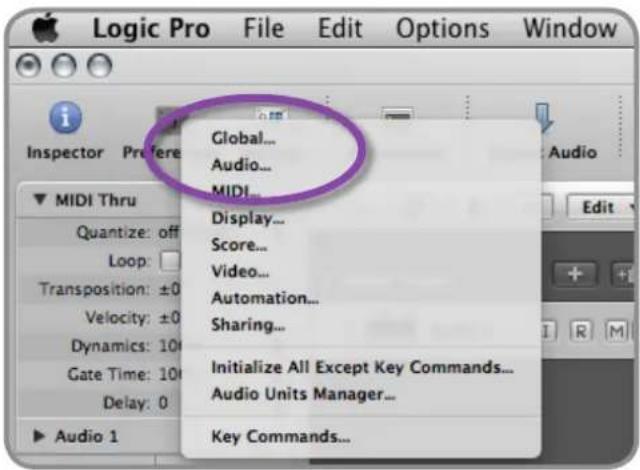
text_image
Logic Pro File Edit Options Window Global... Audio... MIDI... Display... Score... Video... Automation... Sharing... Initialize All Except Key Commands... Audio Units Manager... Key Commands...Ensure that iD22 is selected as the active audio device and here you can set buffer sizes to affect system latency. If you are experiencing issues with playback stability and CPU loading, try increasing the buffer size to > 256 samples.
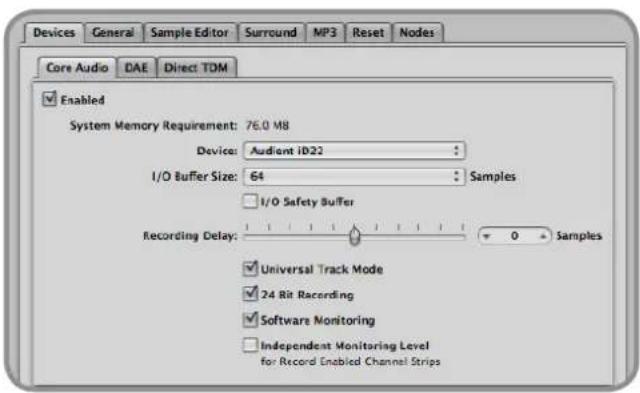
text_image
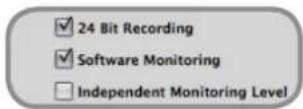
Devices General Sample Editor Surround MP3 Reset Nodes Core Audio DAE Direct TDM Enabled System Memory Requirement: 76.0 MB Device: Audient iD22 I/O Buffer Size: 64 Samples I/O Safety Buffer Recording Delay: 0 Samples Universal Track Mode 24 Bit Recording Software Monitoring Independent Monitoring Level for Record Enabled Channel StripsIf you are using iD22's onboard DSP mixer to monitor input signals while recording, be sure to disable Logic's software monitoring to avoid phasing as the same source will be heard twice with a short delay between the low latency DSP signal and the delayed software monitoring signal.
Assigning I/O
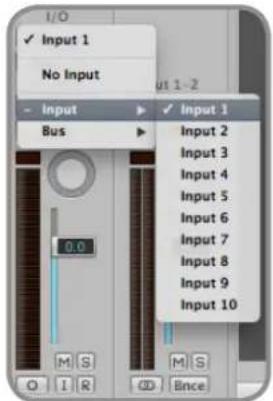
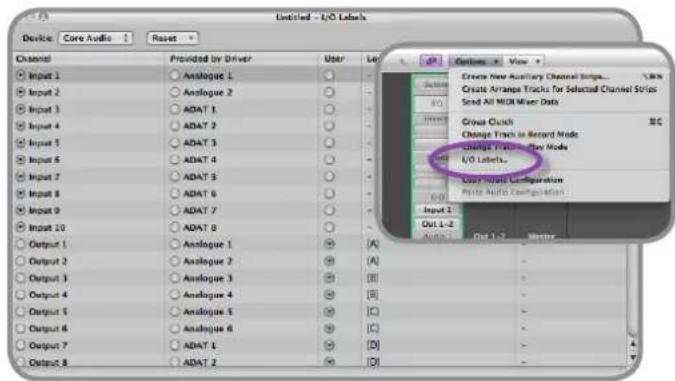
All of iD22's input and output channels will be available to Logic for routing. There are a total of 10-inputs and 14-outputs reported from the driver.
You can rename input and output channels to whatever you wish using the I/O label function. This is a great way to keep things organised.
text_image
Input 1 No Input Input 1 Bus Input 2 Input 3 Input 4 Input 5 Input 6 Input 7 Input 8 Input 9 Input 10Options > Audio > I/O Labels
text_image
Device Core Audio Reset Channel Provided by Driver User Lo Input 1 Analogue 1 Input 2 Analogue 2 Input 3 ADAT 1 Input 4 ADAT 2 Input 5 ADAT 3 Input 6 ADAT 4 Input 7 ADAT 5 Input 8 ADAT 6 Input 9 ADAT 7 Input 10 ADAT 8 Output 1 Analogue 1 Output 2 Analogue 2 Output 3 Analogue 3 Output 4 Analogue 4 Output 5 Analogue 5 Output 6 Analogue 6 Output 7 ADAT 1 Output 8 ADAT 2 Options View Create New Auxiliary Channel Strips... Create Arrange Tracks for Selected Channel Strips Send All MDR Mixer Data Glow Quick Change Track in Record Mode Change Track in Play Mode L/O Labels... User Audio Configuration Play Audio Configuration Input 1 Out 1-2 Audio 1 Audio 2 Audio 3 Audio 4 Audio 5 Audio 6 Audio 7 Audio 8Operation with Logic Pro
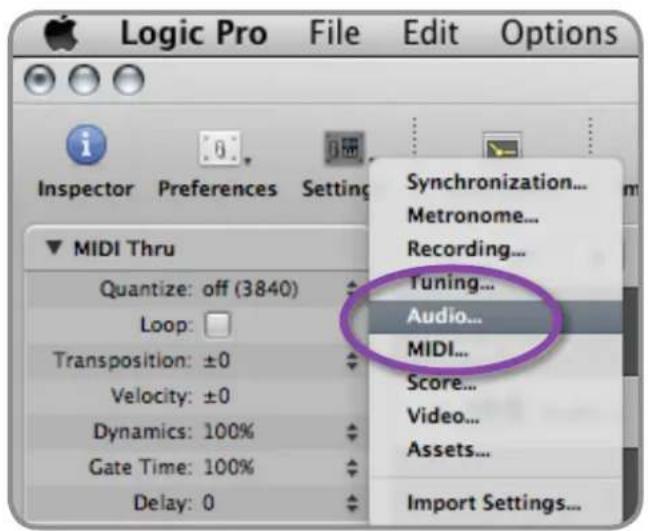
If you are using an external clock source (ADAT or S/PDIF) to clock iD22, please ensure that Logic Pro is set to the same sample rate when recording and playing back in a session, otherwise things may sound a bit sharp or flat!
Settings > Audio > Sample Rate
text_image
Logic Pro File Edit Options Inspector Preferences Setting MIDI Thru Quantize: off (3840) Loop: Transposition: ±0 Velocity: ±0 Dynamics: 100% Gate Time: 100% Delay: 0 Synchronization... Metronome... Recording... Tuning... Audio... MIDI... Score... Video... Assets... Import Settings...If you are using internal clock on iD22, setting the sample rate via Logic Pro will update the iD22 sample rate to follow your session.
There may be a slight pause as the system re-clocks. This is normal.
This can be verified in Audio MIDI Setup.
Macintosh HD > Applications > Utilities
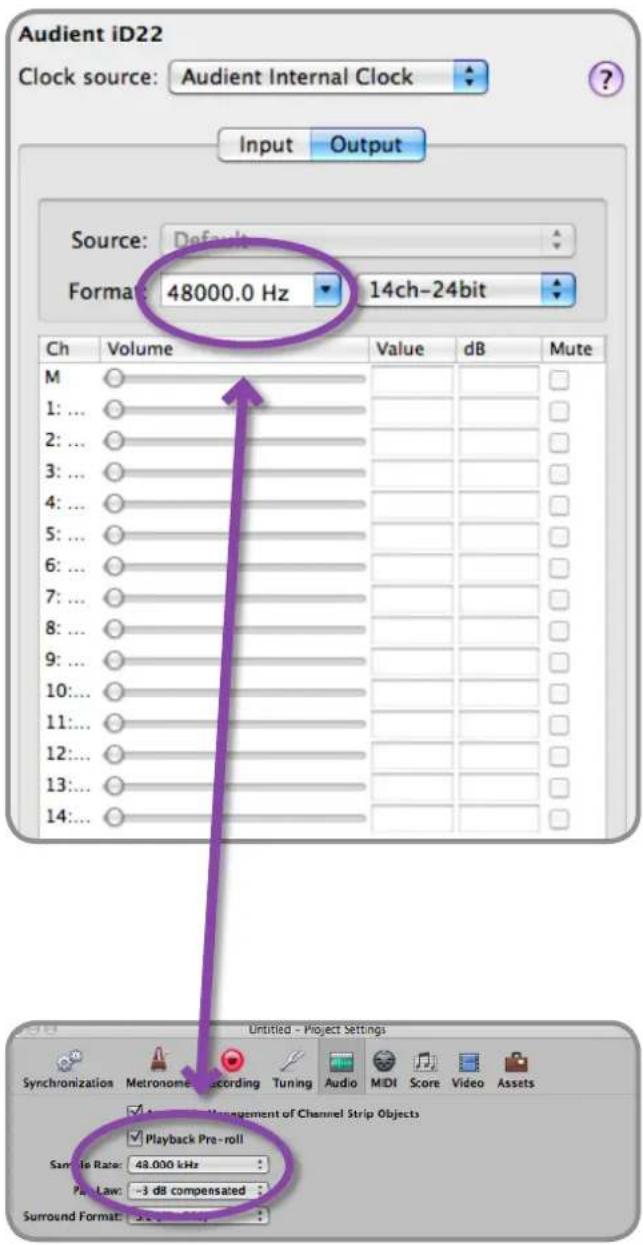
text_image
Audient iD22 Clock source: Audient Internal Clock Input Output Source: Default Format: 48000.0 Hz 14ch-24bit Ch Volume Value dB Mute M ○ 1: ... ○ 2: ... ○ 3: ... ○ 4: ... ○ 5: ... ○ 6: ... ○ 7: ... ○ 8: ... ○ 9: ... ○ 10: ... ○ 11: ... ○ 12: ... ○ 13: ... ○ 14: ... ○ Untitled - Project Settings Synchronization Metronome Recording Tuning Audio MIDI Score Video Assets ✓ Playback Pre-roll Sample Rate: 48.000 kHz Play Law: ~3 dB compensated Surround Format: 3.000 MHzFor more Logic Pro information please consult your Apple user manuals & documentation.
Operation with Cubase / Nuendo
Once iD22 has been successfully installed following the steps detailed on page 6 of this manual, launch Cubase or Nuendo and head straight for the Devices menu:
Devices > Device Setup...
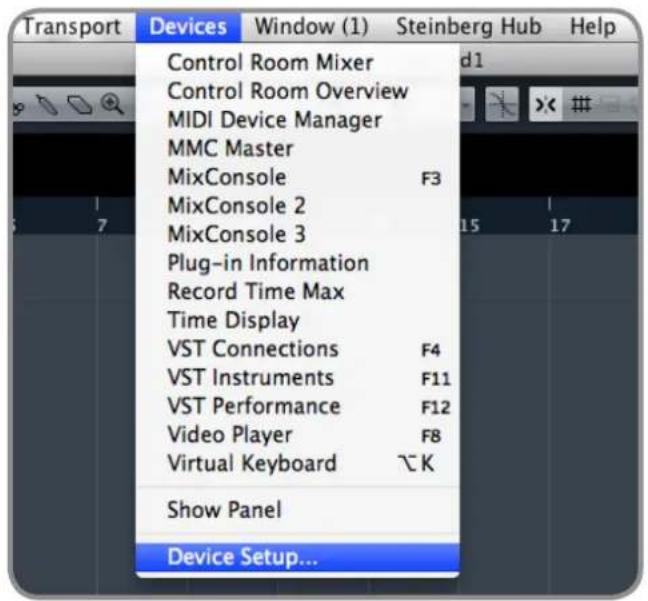
text_image
Transport Devices Window (1) Steinberg Hub Help Control Room Mixer Control Room Overview MIDI Device Manager MMC Master MixConsole F3 MixConsole 2 MixConsole 3 Plug-in Information Record Time Max Time Display VST Connections F4 VST Instruments F11 VST Performance F12 Video Player F8 Virtual Keyboard K Show Panel Device Setup...Select VST Audio System in the devices menu.
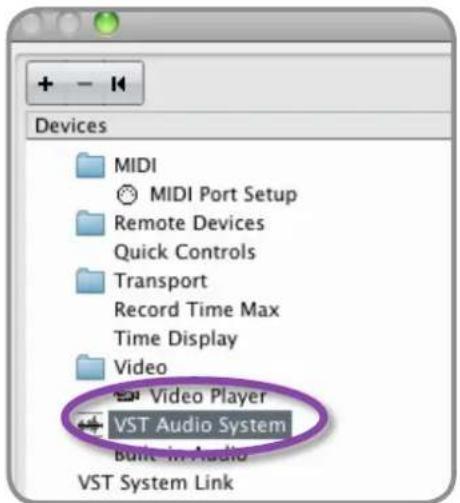
text_image
Devices MIDI MIDI Port Setup Remote Devices Quick Controls Transport Record Time Max Time Display Video Video Player VST Audio System Built-in Audio VST System Link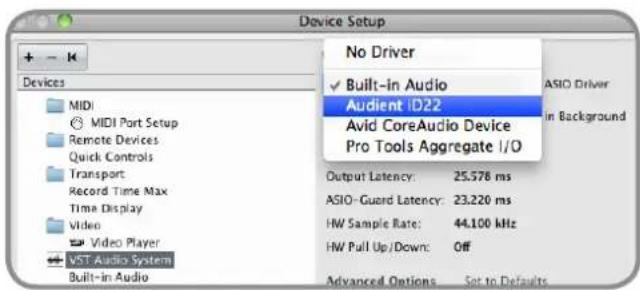
text_image
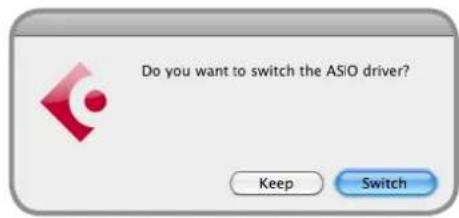
Device Setup + - K Devices MIDI MIDI Port Setup Remote Devices Quick Controls Transport Record Time Max Time Display Video Video Player VST Audio System Built-in Audio No Driver Built-in Audio Audient ID22 Avid CoreAudio Device Pro Tools Aggregate I/O Output Latency: 25.578 ms ASIO-Guard Latency: 23.220 ms HW Sample Rate: 44.100 kHz HW Pull Up/Down: Off Advanced Options Set to DefaultsSelect Audient iD22 in the menu to ensure that Cubase / Nuendo addresses the iD22 device driver. You will be asked if this is OK, select 'switch'.
text_image
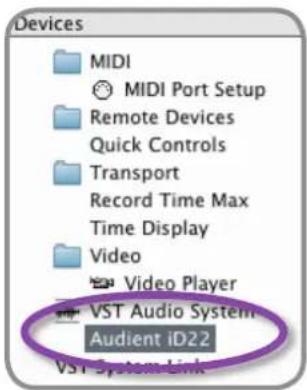
Do you want to switch the ASIO driver? Keep SwitchSelect Audient iD22 in the devices menu...
Here you will see the main iD22 information, where clock sources can be set as well as activating i/o ports. Be sure to click
Externally Clocked if clocking from another digital device via ADAT / SPDIF.
text_image
Devices MIDI MIDI Port Setup Remote Devices Quick Controls Transport Record Time Max Time Display Video Video Player VST Audio System Audient iD22 VST System Link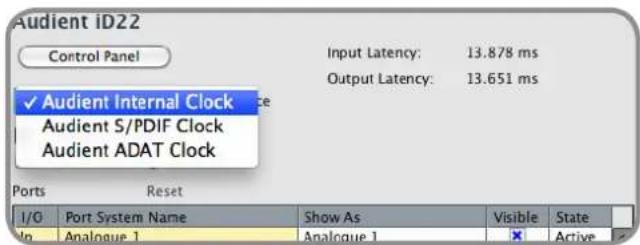
text_image
Audient iD22 Control Panel Input Latency: 13.878 ms Output Latency: 13.651 ms ✓ Audient Internal Clock Audient S/PDIF Clock Audient ADAT Clock Ports Reset I/O Port System Name Show As Visible State In Analogue 1 Analogue 1 ActiveOperation with Cubase / Nuendo
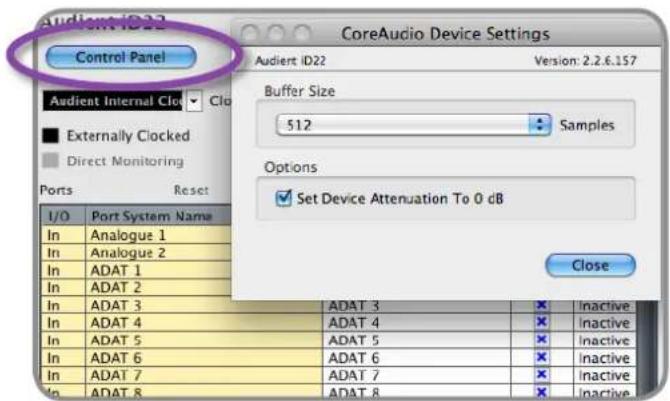
Buffer sizes can be set in the control panel within the VST devices display. It would be ideal to keep them quite high to reduce CPU loading if you use the iD22 mixer as the input monitoring device while recording.
text_image
Control Panel Audient ID22 Version: 2.2.6.157 Buffer Size 512 Samples Options Set Device Attenuation To 0 dB Port System Name In Analogue 1 In Analogue 2 In ADAT 1 In ADAT 2 In ADAT 3 In ADAT 4 In ADAT 5 In ADAT 6 In ADAT 7 In ADAT 8 ADAT 3 ADAT 4 ADAT 5 ADAT 6 ADAT 7 ADAT 8 Inactive Inactive Inactive Inactive InactiveI/O ports can be renamed in the device panel such that they better represent what you connect to them (for example Main Monitors, Alt. Monitors, Hardware Process Loop). This is useful as any names chosen here will be those displayed when assigning i/o on track input/output channel routing.
| I/O | Port System Name | Show As | Visible | State |
| In | Analogue 1 | Analogue 1 | ✘ | Active |
| In | Analogue 2 | Analogue 2 | ✘ | Active |
| In | ADAT 1 | ADAT 1 | ✘ | Inactive |
| In | ADAT 2 | ADAT 2 | ✘ | Inactive |
| In | ADAT 3 | ADAT 3 | ✘ | Inactive |
| In | ADAT 4 | ADAT 4 | ✘ | Inactive |
| In | ADAT 5 | ADAT 5 | ✘ | Inactive |
| In | ADAT 6 | ADAT 6 | ✘ | Inactive |
| In | ADAT 7 | ADAT 7 | ✘ | Inactive |
| In | ADAT 8 | ADAT 8 | ✘ | Inactive |
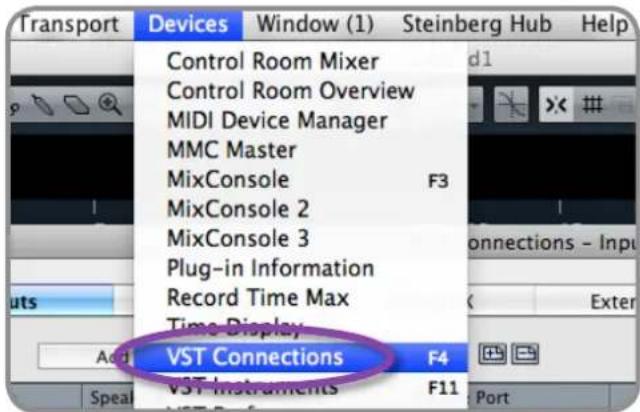
Close the VST device setup panel and navigate to the VST connections panel:
Devices > VST Connections [F4]
text_image
Transport Devices Window (1) Steinberg Hub Help Control Room Mixer Control Room Overview MIDI Device Manager MMC Master MixConsole F3 MixConsole 2 MixConsole 3 Plug-in Information Record Time Max Time Display VST Connections F4 VST Instruments F11 PortHere you can ensure that all buses have been created in Cubase / Nuendo and therefore all ports are addressable in your session. Add new buses and assign them to the necessary i/o if required.
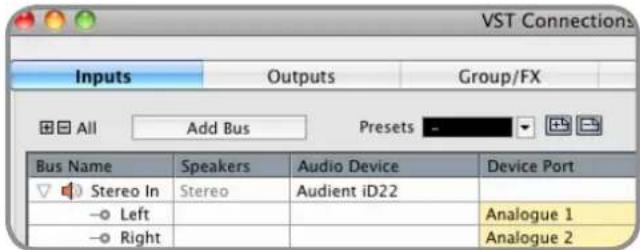
text_image
VST Connections Inputs Outputs Group/FX All Add Bus Presets Bus Name Speakers Audio Device Device Port Stereo In Stereo Audient iD22 Left Analogue 1 Right Analogue 2
text_image
Add Input Bus Count Configuration Speakers Bus Name 1 None M Cancel Add Bus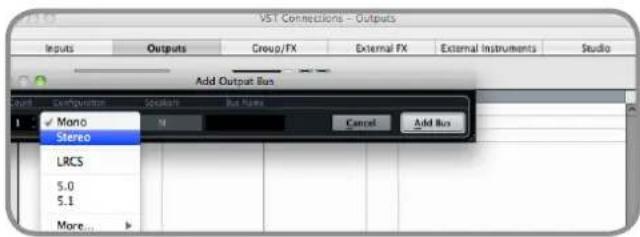
text_image
VST Connections - Outputs Inputs Outputs Croup/FX External FX External Instruments Studio Add Output Bus Count Configuration Socials Bus Name ✓ Mono N Cancel Add Bus Stereo LRC5 5.0 5.1 More...Bus types can be set (mono / stereo) and the VST control room section can also be used. For more information regarding setup please consult your Steinberg user manuals and documentation.
Operation with Ableton Live
Once iD22 has been successfully installed following the steps detailed on page 6 of this manual, launch Ableton Live and head straight to:
Live > Preferences
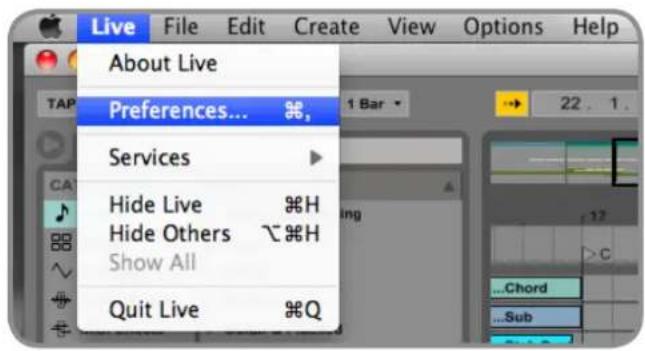
text_image
Live File Edit Create View Options Help About Live Preferences... %, Services Hide Live %H Hide Others %H Show All Quit Live %QHere navigate to the Audio tab and make sure that iD22 is assigned as the playback device.
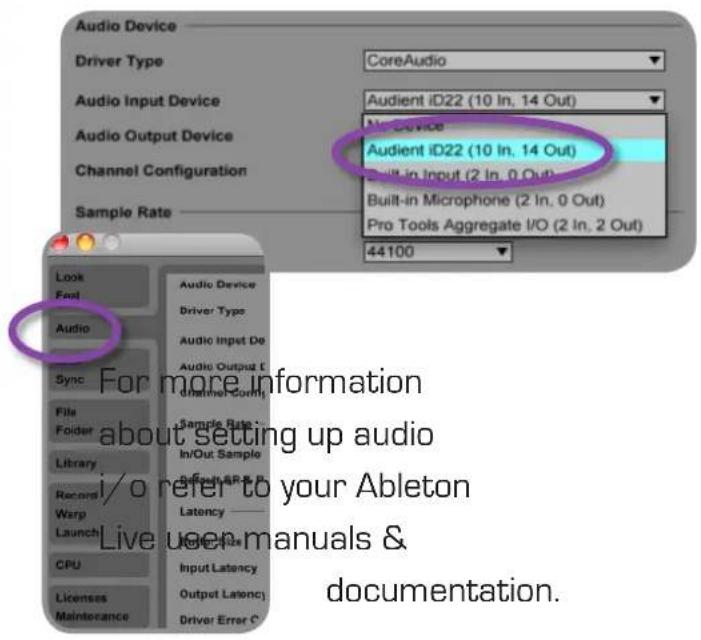
text_image
Audio Device Driver Type CoreAudio Audio Input Device Audio Output Device Channel Configuration Sample Rate Audient iD22 (10 In, 14 Out) No Device Audient iD22 (10 In, 14 Out) Built-in Input (2 In, 0 Out) Built-in Microphone (2 In, 0 Out) Pro Tools Aggregate I/O (2 In, 2 Out) 44100 Look Feat Audio Sync File Folder Library Record Warp Launch CPU Licenses Maintenance Audio Device Driver Type Audio Input De Audio Output E channel Compt. Sample Rate: In/Out Sample Output GRP Latency —— Audio Size Input Latency Output Latency Driver Error C For more information about setting up audio i/o refer to your Ableton Live user manuals & documentation.In the Live Audio Preference panel you can set an appropriate buffer size (this can be kept high if you are monitoring input signals for recording via the iD22 low latency DSP mixer. Ensure that iD22 reports as a 10-in, 14-out device to Live.
If necessary you can limit the number of i/o channels reported as active inputs (from the driver) in Live by using the input and output config tabs. This is an excellent feature to help reduce CPU loading if all channels are not required.
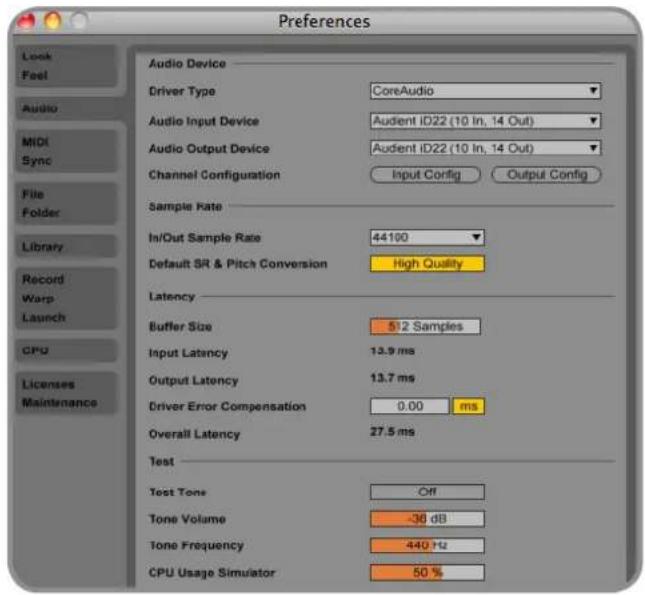
text_image
Preferences Audio Device Driver Type CoreAudio Audio Input Device Audient iD22 (10 In, 14 Out) Audio Output Device Audient iD22 (10 In, 14 Out) Channel Configuration Input Config Output Config Sample Rate In/Out Sample Rate 44100 Default SR & Pitch Conversion High Quality Latency Buffer Size 512 Samples Input Latency 13.9 ms Output Latency 13.7 ms Driver Error Compensation 0.00 ms Overall Latency 27.5 ms Test Test Tone Off Tone Volume -36 dB Tone Frequency 440 Hz CPU Usage Simulator 50 %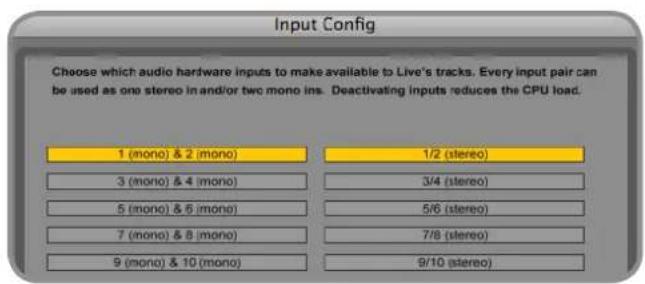
text_image
Input Config Choose which audio hardware inputs to make available to Live's tracks. Every input pair can be used as one stereo in and/or two mono ins. Deactivating inputs reduces the CPU load. 1 (mono) & 2 (mono) 1/2 (stereo) 3 (mono) & 4 (mono) 3/4 (stereo) 5 (mono) & 6 (mono) 5/6 (stereo) 7 (mono) & 8 (mono) 7/8 (stereo) 9 (mono) & 10 (mono) 9/10 (stereo)Troubleshooting
• The unit will not power on:
Double check the 12VDC power supply is plugged into iD22 and into an operational mains wall outlet.
To verify the supply is functional, use a multimeter (set to volts DC) and safely measure output DC voltage between centre pin and shield of DC output connector, it should be 12VDC +/-0.5V)
AT NO TIME SHOULD UNQUALIFIED PERSONNEL ATTEMPT TO MEASURE MAINS VOLTAGES OR INTERNAL SWITCHING SUPPLY VOLTAGES
- When I connect to my computer, I cannot play any audio out from iD22:
Firstly double check that the USB cable connecting iD22 to your computer is functional and attached at both ends.
Launch the iD22 mixer application to activate communication between your computer and iD22. This only needs to be done once straight after power up. Once iD22 is set to the operational state you desire, you can quit the iD22 application and it will continue to function as intended.
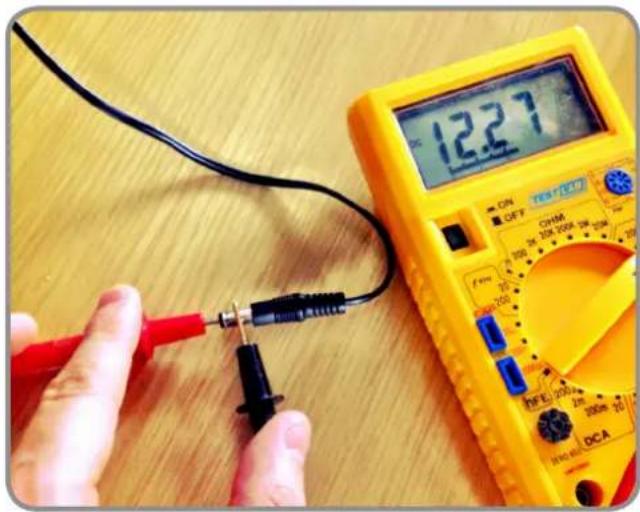
text_image
12.27 ON OFF TESTLOT CHWR 24 20KΩ 200Ω 30Ω 100Ω 100Ω 100Ω 100Ω 100Ω 100Ω 100Ω 100Ω 100Ω 100Ω 100Ω 100Ω 100Ω 100Ω 100Ω 100Ω 100Ω 100Ω 100Ω 100Ω 100ΩIn the software mixer, locate the DAW channels by pressing the DAW view button and increase the level of DAW 1+2 fader.
Double check that iD22 is set as the active playback device in your DAW and computer:
System Preferences > Sound > Output Tab
Audient iD22 (OSX)
Control Panel > Hardware and Sound > Sound > Manage Audio Devices > Audient iD22 [Windows]
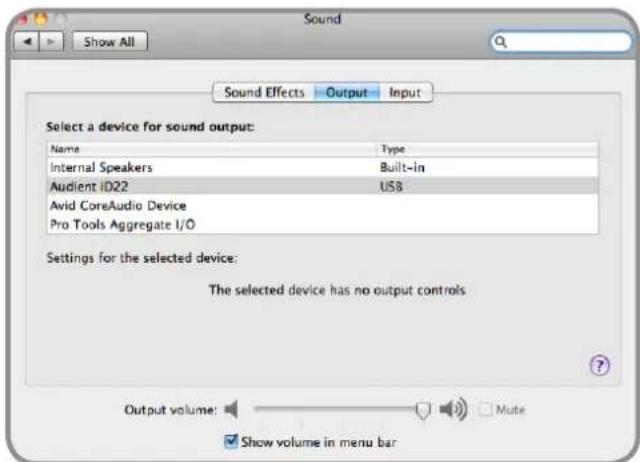
text_image
Sound Show All Sound Effects Output Input Select a device for sound output: Name Type Internal Speakers Built-in Audient ID22 USB Avid CoreAudio Device Pro Tools Aggregate I/O Settings for the selected device: The selected device has no output controls Output volume: Mute Show volume in menu barTroubleshooting
- I have clocking issues which include iD22 not locking to external ADAT devices or operating at the incorrect rate compared to my Pro Tools session:
Go to Audio MIDI Setup in OSX, found by navigating to the folder:
Macintosh HD > Applications > Utilities > Audio MIDI Setup
Ensure that Audient iD22 is seen as an audio device (Window Menu, Show Audio Window).
Double check that an appropriate clock source is selected (Internal for master operation), ADAT or S/PDIF clock for external slave operation. Ensure that you see the correct sample rate displayed in the Format drop-down menu.
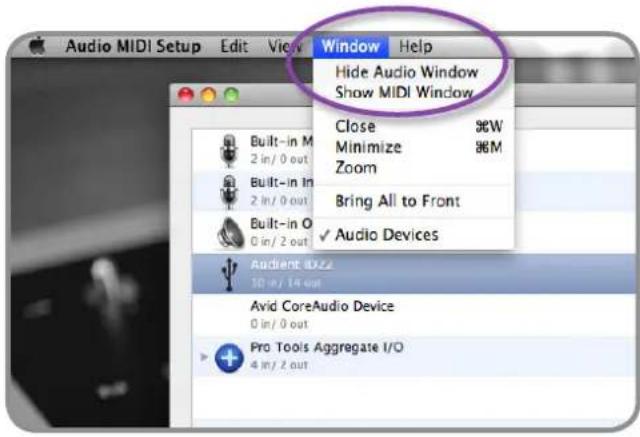
text_image
Audio MIDI Setup Edit View Window Help Hide Audio Window Show MIDI Window Close 96W Minimize 96M Zoom Bring All to Front ✓ Audio Devices Audient d0.2 10 in / 14 out Avid CoreAudio Device 0 in / 0 out Pro Tools Aggregate I/O 4 in / 2 out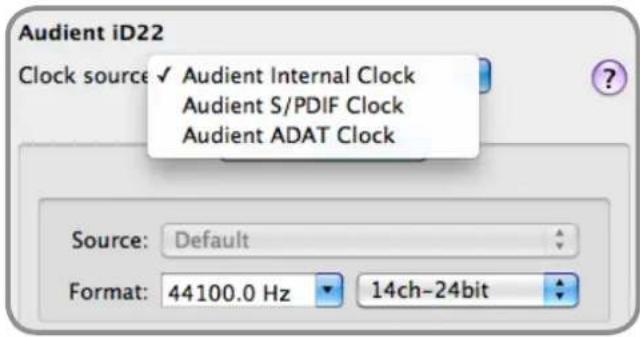
text_image
Audient iD22 Clock source ✓ Audient Internal Clock Audient S/PDIF Clock Audient ADAT Clock Source: Default Format: 44100.0 Hz 14ch-24bitIf using Windows, go to the iD icon in the system tray and right click on it. This will bring up some settings including sample rate. Change the sample rate to match that of the external ATAT device and ProTools session.
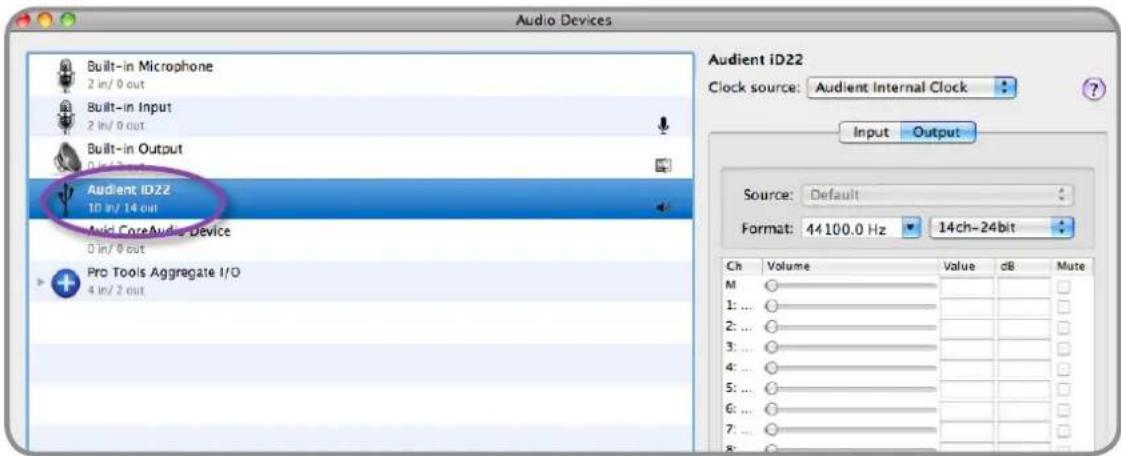
text_image
Audio Devices Built-in Microphone 2 in/ 0 out Built-in Input 2 in/ 0 out Built-in Output 0 in/ 0 out Audient ID22 10 in/ 14 out Auid CoreAudio Device 0 in/ 0 out Pro Tools Aggregate I/O 4 in/ 2 out Audient iD22 Clock source: Audient Internal Clock Input Output Source: Default Format: 44100.0 Hz 14ch-24bit Ch Volume Value dB Mute M 1: ... 2: ... 3: ... 4: ... 5: ... 6: ... 7: ... 8:Troubleshooting
- How do I reset the iD22 mixer application to it's default state?
To reset the mixer application, close the mixer and then navigate to the following folder and delete the state.xml file (it will replenish upon a fresh launch and closure of the application, storing your default setup):
Macintosh HD > User > Library > Application Support > Audient > iD22 > state.xml
Do not delete the parent folder as this will also contain your iD22 mixer presets.
- I'm getting random crashes and bugs, how do I make sure I have the latest version of iD firmware/software?
To check for the latest updates to the iD desktop mixer application please visit: www.audient.com/iD22 download the package and install.
To update the iD22 firmware to the latest version please use the Help menu in the application bar and select Check for Updates, refer to page 8 in this user manual for more information regarding firmware update.
FAQs
For more information and bug support, please search our online Knowledge Base which can be found here:
www.audient.com/support

text_image
Knowledge Base SearchFor technical support please create a ticket in our online support system, Zendesk which can also be found in the support section of our website (see link above).
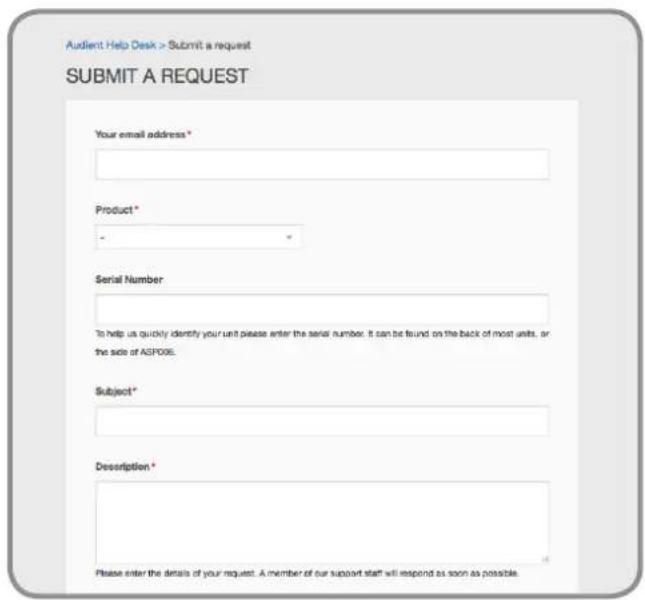
text_image
Audient Help Desk > Submit a request SUBMIT A REQUEST Your email address * Product * Serial Number To help us quickly identify your unit please enter the serial number. It can be found on the back of most units, or the side of ASP006. Subject* Description * Please enter the details of your request. A member of our support staff will respond as soon as possible.
text_image
iD22 File View Help Search | Check for Updates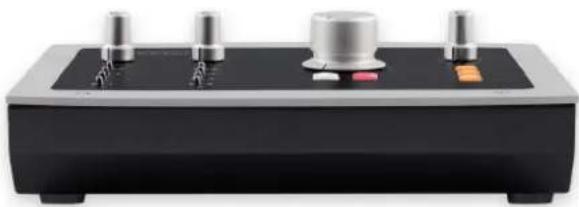
natural_image
Black rectangular electronic device with four metallic buttons and a central knob (no visible text or symbols)MICROPHONE PREAMPLIFIERS:
(measured to insert send)
MIC GAIN: -10 to +60 dB (-10dB Pad)
LINE GAIN: -20 to +40 dB [-10dB Pad]
PHANTOM POWER: 48v +/-4v @ 10mA/Channel
MIC EIN: <-125dBu
CMRR: >80dB @ 1kHz
MAXIMUM INPUT LEVEL: +22dBu (+32dBu with Pad)
INPUT IMPEDANCE [Mic]: >3kΩ Balanced
INPUT IMPEDANCE (Line): >10kΩ Balanced
FREQUENCY RESPONSE: +/-0.5dB 10Hz to 100kHz
CROSSTALK: <-90dBu @ 1kHz & 10kHz
THD+N @ 0dBu [1kHz]: 0.0015% [-96dBu]
SNR: 96dB
HPF: -3dB @ 100Hz, 2nd Order
(12dB/Octave)
XLR: Pin 2 (Hot), Pin 3 (Cold) & Pin 1 (Shield)
1/4" JACK: TIP [Hot], RING [Cold] & SLEEVE [Shield]
D.I [Channel 2]:
(measured to insert send)
D.I GAIN: -16 to +54 dB [-10dB Pad]
MAXIMUM INPUT LEVEL: +16dBu [typical], +22dBu
INPUT IMPEDANCE: 1MegΩ Unbalanced
FREQUENCY RESPONSE: +/-0.5dB 10Hz to 50kHz
THD+N @ OdBu [1kHz]: <0.03% (-70dBu)
SNR: 93dB
1/4" JACK: TIP [Hot] & SLEEVE (Shield)
INSERT SENDS (Mic Pre Out):
MAXIMUM OUTPUT LEVEL: +22dBu
OUTPUT IMPEDANCE: <100Ω Balanced
1/4" JACK: TIP [Hot], RING [Cold] & SLEEVE [Shield]
POWER SUPPLY:
12VDC Centre Positive DC Adapter ->1.5Amps
Internally conditioned to provide +48VDC, +/-15VDC &
low voltage rails for digital processing core & converters.
iD22 cannot be bus powered for quality reasons.
ADC LINE INPUTS (Insert Returns):
(measured at optical output under AES-17)
MAXIMUM INPUT LEVEL: +18dBu
DIGITAL REFERENCE LEVEL: 0dBFS = +18dBu
INPUT IMPEDANCE: >10kΩ Balanced
FREQUENCY RESPONSE: +/-0.5dB 10Hz to Fs/2
CROSSTALK: -100dBu @ 1kHz & 10kHz
THD+N @-1dBFS (1kHz): <0.002% (-94dB)
THD+N @ -6dBFS [1kHz]: <0.0015% [-97dB]
DYNAMIC RANGE: 117dB un-weighted
120dB
A-weighted
1/4" JACK: TIP [Hot], RING [Cold] & SLEEVE [Shield]
DAC OUTPUTS (1-4):
(measured from optical input under AES-17)
MAXIMUM OUTPUT LEVEL: +18dBu
DIGITAL REFERENCE LEVEL: 0dBFS = +18dBu
OUTPUT IMPEDANCE: <100Ω Balanced
FREQUENCY RESPONSE: +/-0.5dB 5Hz to Fs/2
CROSSTALK: -110dBu @ 1kHz & 10kHz
THD+N @ -1dBFS [1kHz] : <0.0008% [-101dB]
DYNAMIC RANGE: 110dB un-weighted
114dB
A-weighted
1/4" JACK: TIP (Hot), RING (Cold) & SLEEVE (Shield)
HEADPHONE OUTPUT [5&6]:
(measured from optical input under AES-17)
MAXIMUM OUTPUT LEVEL: +18dBu
DIGITAL REFERENCE LEVEL: 0dBFS = +18dBu
OUTPUT IMPEDANCE: <100Ω Balanced
FREQUENCY RESPONSE: +/-0.5dB 5Hz to Fs/2
CROSSTALK: -110dBu @ 1kHz & 10kHz
THD+N @ -1dBFS [1kHz] :<0.0008% [-101dB]
DYNAMIC RANGE: 110dB un-weighted
114dB
A-weighted
1/4" JACK: TIP [Hot], RING [Cold] & SLEEVE [Shield]
DIGITAL i/o:
ADAT 8 CHANNELS 44.1 - 48kHz
ADAT 4 CHANNELS 88.2 - 96kHz
STEREO S/PDIF 44.1 - 96kHz
USB2.0 HIGH SPEED:
No. of INPUT CHANNELS 10
(2 Analogue, 8 Digital)
No. of OUTPUT CHANNELS 14
(6 Analogue, 8 Digital)
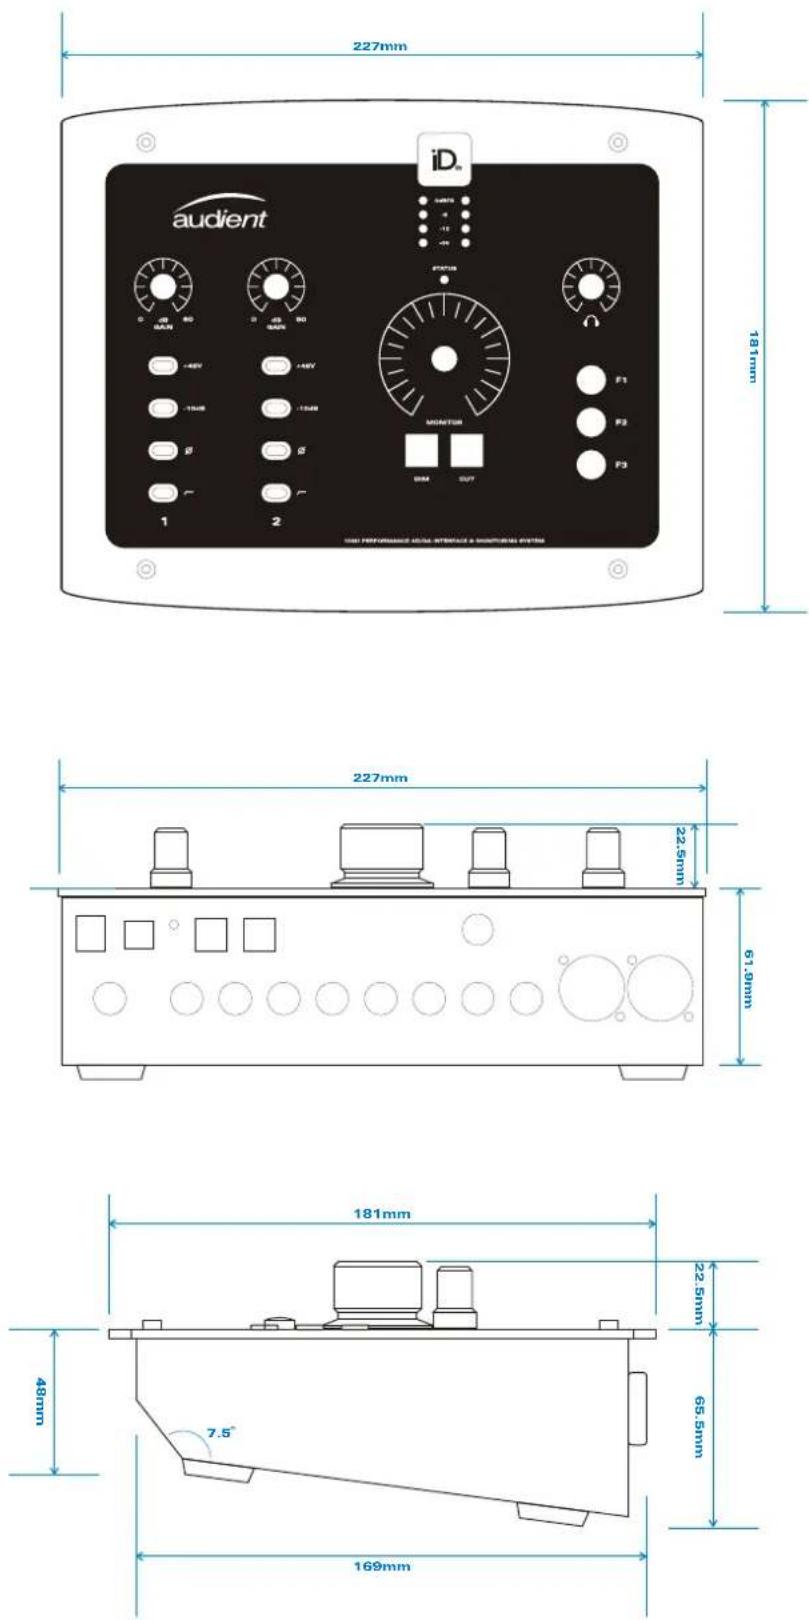
Warranty Statement
Your iD22 comes with a manufacturer's warranty for one year (12 months) from the date of despatch to the end user.
The warranty covers faults due to defective materials used in manufacture and faulty workmanship only.
During the warranty period audient will repair at its discretion or replace the faulty unit provided it is returned carriage paid to an authorised audient service centre. We will not provide warranty repair if in our opinion the has resulted from unauthorised modification, misuse, negligence or accident.
We accept liability to repair or replace your iD22 as described above. We do not accept any additional liability. This warranty does not affect any legal rights you may have against the person who supplied this product - it is additional to those rights.
Warranty Limitations
This warranty does not cover damage resulting from accident or misuse. The warranty is void unless repairs are carried out by an authorised service centre. The warranty is void if the unit has been modified other than at the manufacturer's instruction. The warranty does not cover components which have a limited life, and which are expected to be periodically replaced for optimal performance. We do not warrant that the unit shall operate in any other way than as described in this manual.
Audient Ltd
Aspect House
Herriard
Hampshire
RG25 2PN
United Kingdom
Tel: 0044 1256 381944
www.audient.com
Service Information
iD22 contains no user-serviceable components, please refer to qualified service personnel for diagnosis and repair. Your warranty will be void if you tamper with the device at component level. If you have any questions with regard to the repair, please contact Audient Ltd.
In the event your iD22 needs to be repaired, it is necessary to contact Audient Ltd prior to shipping, and a Return Materials Authorization (RMA) number will be assigned. This number will serve as a reference for you and helps facilitate and expedite the return process. When the unit is returned please include this RMA number along with a description of the fault inside the packaging box. Audient requires that shipments be pre-paid (for in-warranty repairs we will cover the return shipping).
To request an RMA, access technical support & FAQs, ask for troubleshooting assistance or make an enquiry, please visit: www.audient.com/support
text_image
audient Audient Help Desk WELCOME TO AUDIENT HELP DESK Thanks for visiting the Audient Help Desk. We'll be adding to the Knowledge Base regularly with useful hints, trouble shooting guides and FAQs. You can also submit a request or send us an email at support@audient.zendesk.com or call us in office hours (0900-1700 GMT Mon-Fri) on →44 (0)1256 381944. Search Or Submit a request General ID22 ASP880A Amperes
ADAT Alesis Digital Audio Tape
ADC Analogue to Digital Converter
DAW Digital Audio Workstation
ASP Analogue Signal Processing
ALT Alternative
CPU Central Processing Unit
CUE Artist Headphone Mix
DAC Digital to Analogue Converter
dB Decibel
dBu Decibel referenced to 0.775Vrms = 0 dBu
dBFS Decibel Full Scale
DC Direct Current
D.I Direct Injection (Instrument Input)
DoC Declaration of Conformity
DSP Digital Signal Processing
EQ Equaliser
FAQ Frequently Asked Questions
FCC Federal Communications Commission
GB Gigabyte
GUI Graphical User Interface
HPF High Pass Filter
HV High Voltage
i/o Input / Output
JFET Junction Field Effect Transistor
LED Light Emitting Diode
RoHS Restriction of Hazardous Substances
RAM Random Access Memory
S/PDIF Sony Philips Digital Interconnect Format
THD+N Total Harmonic Distortion + Noise
TRS Tip Ring Sleeve (1/4" Jack Balanced)
TS Tip Sleeve [1/4" Jack Unbalanced]
USB Universal Serial Bus
V Volts
XLR Extra Live Return, Extremely Low Resistance,
Canon X Series, Latching, Resilient Rubber Compound... or make up your own!