Sono - Hi-Fi System Audient - Free user manual and instructions
Find the device manual for free Sono Audient in PDF.


User questions about Sono Audient
0 question about this device. Answer the ones you know or ask your own.
Ask a new question about this device
Download the instructions for your Hi-Fi System in PDF format for free! Find your manual Sono - Audient and take your electronic device back in hand. On this page are published all the documents necessary for the use of your device. Sono by Audient.
USER MANUAL Sono Audient
text_image
audient Sono MIC → 2 10 10 10 70 VOLTAGE -80V -40V INPUT BAN MONITOR MIX 7 HORN VOLTAGE: 12AX? - BASS - MID EQ - TREBLE - INPUT DRIVE OUTPUT POWERED BY Two notes and/or Engineering RADI MOT GOOD SOME BITDAS A C C.A.BSono
Guitar Recording Interface
User Manual V1.0
ContentsWelcome and Thank You

Thank you for choosing this Audient Product
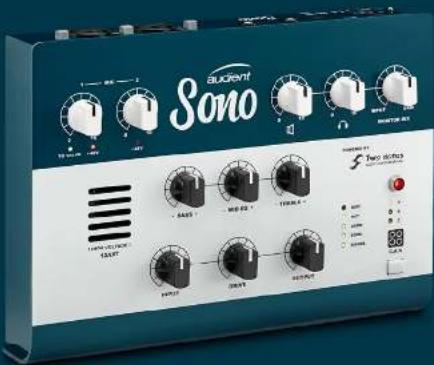
Sono was designed to be the ultimate audio interface for guitarists.
Sono provides a valve Guitar channel featuring a real high voltage 12AX7 and classic 3-band tone controls, plus power amp and cabinet simulation from Two Notes.
There is also two Audient console mic pre's for great sounding recordings and optical inputs to expand your setup using ADAT or S/PDIF.
We're sure Sono will become the centre of your guitar rig, whether you're recording at the studio, practising at home or playing on the road.
Features Include:
• Classic Valve Guitar Preamp
• Two Console Mic Preamps
• Two Notes Power Amp and Cab Simulation
• 3 Band Tone Control
• 3 Customisable Hardware Presets
- Re-amp Output
• Optical Inputs via ADAT or S/PDIF
• Integrated Low Latency DSP Mixer
• High Quality Monitor and Headphone Outputs
USB2.0 Connectivity
| Welcome and Thank you 2 | Two notes Remote Software 40 | ||||
| Sono Overview | 4 | ||||
| Box Contents 6 | Overview | 41 | |||
| Saftey Information 7 | Initial Setup | 42 | |||
| Declaration of Conformities 9 | Cabinets | 43 | |||
| Device Setup: | 11 | Microphones | 44 | ||
| Installation on Mac 12 | Rooms | 45 | |||
| Installation on Windows 14 | Effects Rack | 46 | |||
| Hardware Features: | Saving Presets | 47 | |||
| Cabinet Manager | 48 | ||||
| Guitar Pre-amp Channel 17 | |||||
| Mic Pres | 21 | DAW Setup | 49 | ||
| Monitor and Headphone 22 | Pro Tools Setup 50 | ||||
| Monitor Mix | 22 | Logic Pro X Setup 51 | |||
| Optical Input | 22 | Cubase/Nuendo Setup | 53 | ||
| Speaker Outputs | 22 | Other DAWs | 55 | ||
| Headphone Output | 23 | ||||
| To-Amp Output | 23 | Support & ARC | |||
| Signal Flow Diagrams 24 | Specifications | 56 | |||
| Sono Application 30 | Warranty & Contact 57 | ||||
| Getting Started | 29 | Service | 59 | ||
| Sono Application Menu 30 | Glossary | 60 | |||
| Mixer Overview | 31 | ||||
| Channel Strips | 32 | ||||
| Master Section | 34 | ||||
| System Panel | 35 | ||||
| Clocking | 36 | ||||
| Routing Matrix 36 | |||||
| Talkback Setup | 37 | ||||
| Firmware Update 38 | |||||
| Saving/Opening Presets | 38 | ||||
| Keyboard Shortcuts | 39 | ||||
text_image
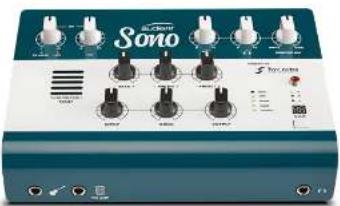
Mic Pre Gain 'Smic Input To Valve' Indicator Speaker Output Level Headphone Output Level Monitor Mix Control Sono Status Light Three Band Tone Control Phantom Power Indicator Guitar Preamp Input Gain Power Amp Drive Control Guitar Preamp Output Meter Cab Simulation Present Selector Guitar Preamp Output Volume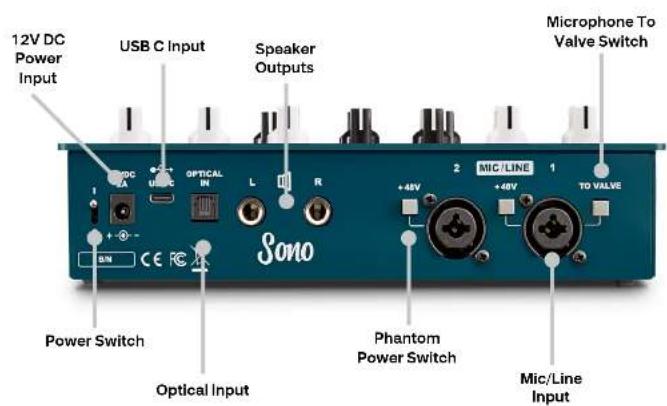
text_image
12V DC Power Input USB C Input Speaker Outputs Microphone To Valve Switch Optical IN L R MIC/LINE TO VALVE Power Switch Optical Input Phantom Power Switch Mic/Line Input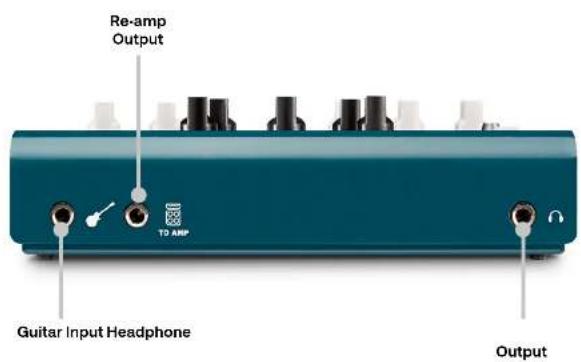
text_image
Re-amp Output TO AMP Guitar Input Headphone OutputSafety InformationBox Contents and Setup Sono
In your Sono packaging you should find the following items:
- Sono
- 12V DC Power Supply with Regional Adaptors
- USB Type C cable
- USB Type C to Type A Cable
- Quick Start Guide
Please visit www.audient.com/products/ sono to download the latest Sono software supporting documentation and brochures for our product range.
The 12V DC power supply comes with interchangeable UK, EU, US and Australian Socket Adaptors and will work across a broad range of Mains Voltages, making Sono globally portable.
We hope that you enjoy using Sono!
Important Safety Instructions
Please read all of these instructions and save them for later reference before connecting the DC power adapter to the mains and powering up Sono.
To prevent electrical shock and fire hazard follow all instructions on the 12VDC power supply. Sono itself does not operate with any high voltage mains supply inside the unit but appropriate safety measures should still be adhered to regarding the AC/DC supply.
Please ensure you only use the included Sono power supply. We cannot recommend the usage of third party power supplies. In the event of a power supply failure do not open the 12VDC supply. If required, please contact Audient support so that a suitable replacement can be sourced.
Sono utilises an external switch-mode power supply that is very quiet and rated at 2A. This switch-mode design will accept any A.C line voltage from 100v to 240v @ 50/60Hz. Therefore the unit will work anywhere in the world but please ensure your A.C mains line voltage is within this specification.
Consult a qualified technician if you suspect difficulties. Do not attempt to tamper with the power supply or mains voltages. HAZARDOUS TO HEALTH. Ensure that the appropriate international pin adapter is fitted to the power supply before insertion into the mains socket.
Valves must be replaced by a qualified technician.
audient.com/support
natural_image
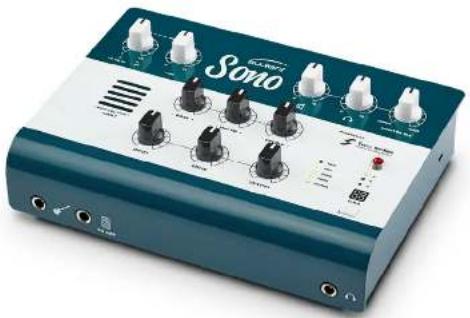
Blue Sono audio amplifier device with multiple knobs and buttons (no visible text or symbols on body)! WARNING !
TO REDUCE RISK OF FIRE OR ELECTRIC SHOCK, DO NOT EXPOSE THIS APPARATUS TO RAIN OR MOISTURE.
NO USER SERVICEABLE PARTS INSIDE.
PLEASE REFER SERVICING TO QUALIFIED SERVICE PERSONNEL.
Declaration of Conformities Safety Information
Important Safety Instructions
- Read these instructions
- Keep these instructions
- Heed all warnings
- Follow all instructions
- Do not use this equipment near water
- Clean only with dry cloth
- Do not install near any heat sources such as radiators, heat registers, stoves, or other equipment (including amplifiers) that produce heat
- Do not defeat the safety purpose of the polarized or grounding-type plug. A polarized plug has two blades with one wider than the other. A grounding type plug has two blades and a third grounding prong. The wide blade or the third prong are provided for your safety. If the provided plug does not fit into your outlet, cosult an electrician for replacement of the obsolete outlet
- Protect power cords from being walked on or pinched particularly at plugs, convenience receptacles, and the point where they exit from the equipment. Only use attachments/accessories specified by the manufacturer
-
Unplug this equipment during lightning storms or when unused for long periods of time
-
Refer all servicing to qualified service personnel. Servicing is required when the equipment has been damaged in any way, such as power supply cord or plug is damaged, liquid has been spilled or objects have fallen into the equipment, the equipment has been exposed to rain or moisture, does not operate normally, or has been dropped
- For products that are a mains powered device: The equipment shall not be exposed to dripping or splashing and no objects filled with liquids (such as vases) shall be placed on the equipment.
FCC Part 15B
This apparatus has been tested and found to comply with the limits of a class-A digital device, pursuant to Part 15B of the FCC Rules. These limits are designed to provide reasonable protection against harmful interference in a residential installation. This equipment generates, uses and can radiate radio frequency energy and, if not installed and used in accordance with the instructions, may cause harmful interference to radio communications. If this equipment does cause harmful interference to radio or television reception, which can be determined by turning the equipment off and on, the user is encouraged to try to correct the interference by one or more of the following measures:
- Re-orient or relocate the receiving antenna
- Increase the separation between the equipment and receiver
- Connect the equipment into an outlet on a different circuit from that to which the receiver is connected.
- Consult the dealer or an experienced radio/TV technician for help
Declaration of Conformities
We, Audlent Ltd, Aspect House, Herrlard, Hampshire, RG25 2PN, UK, 01256 381944, declare under our sole responsibility that the product Sono complies with Part 15 of FCC Rules.

ion is subject to the following two conditions:
- This device may not cause harmful interference,
- This device must accept any interference received, including interference that may cause undesired operation

dient Ltd, declare that the product, Sono, to which this declaration is in material conformity with the appropriate CE standards and directives audio product designed for consumer use.

Audient Ltd has conformed where applicable, to the European Union's Directive 2002/95/EC on Restrictions of Hazardous Substances (RoHS) as well as the following sections of California law which refer to RoHS, namely sections 25214.10, 25214.10.2, and 58012, Health and Safety Code; Section 42475.2, Public Resources

Please note that Audient Sono is exempt from the EC 1275/2008 power management requirement for the following reason:
Sono is designed with the musical instrument input being the primary functional input of the device. When a musical instrument is connected, Sono must be active to wait for a signal. During a recording session it can take a long time until a musical instrument is actually played. If Sono would go into a standby mode or similar, this will cause a disruption to a recording session as the user would expect the unit to be operational even if the musical instrument input is not being actively used.
Sono
Device Setup
text_image
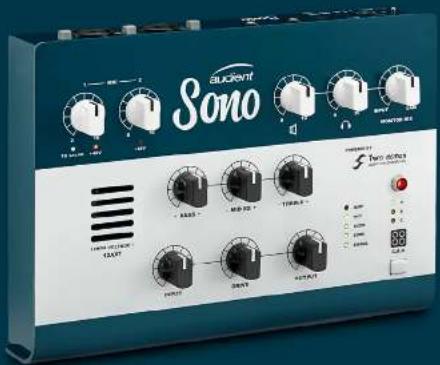
BUCRENT Sono T100000 2.5V -300V -100V MOS 200 V TURUS 200 V TURUS 200 V TURUS 200 V TURUS 200 V TURUS 200 V TURUS 200 V TURUS 200 V TURUS 200 V TURUS 200 V TURUS 200 V TURUS 200 V TURUS TURUS TURUS TURUS TURUS TURUS TURUS TURUS TURUS TURUS TURUS TURUS TURUS TURUS TURUS TURUS TURUS TURUS TURUS TURUS TURUS TURUS TURUS TURUS TURUS TURU TURU TURU TURU TURU TURU TURU TURU TURU TURU TURU TURU TURU TURU TURU TURU TURU TURU TURU TURU TURU TURU TURU TURU TURU TUR UMacOS Installation MacOS Installation

System Requirements
- MacOS: 10.7.5 (Lion) or later (64 Bit)
- Mac: Intel CPU, 1GB RAM Minimum
Download the Latest Sono Software
Head to our website for the latest version of our Sono Software:
audient.com/products/downloads/sono
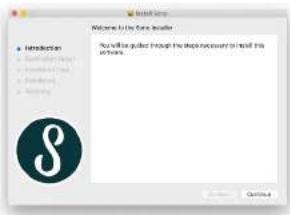
Open the downloaded .pkg file to start the installer. Follow the installer process through, heeding any instructions from the installer.
text_image
Welcome to Web Explorer You will go out through the web necessary to install this website. Introduction SConnect Sono
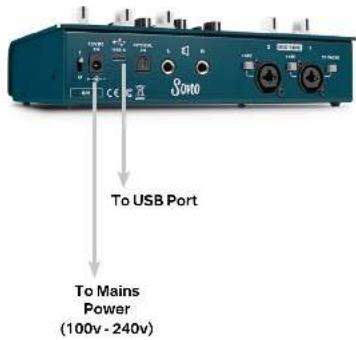
Using the USB cable provided, connect Sono to your computer's USB port. Then connect the included 12v DC power adaptor.
text_image
To USB Port To Mains Power (100v - 240v)Status Light
Once connected, the status light of the Sono will illuminate.
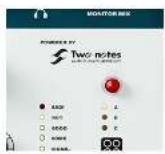
If at any time the status LED turns off during normal operation please check all connections and if further problems develop please contact Audient support.
4. Double Checking Connectivity
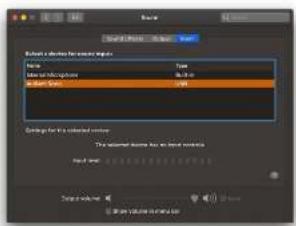
To ensure Sono has been detected by your computer, navigate to:
Macintosh HD > Applications > System Preferences
Check that Sono is set as your audio device for both the input device and the output device. It's also recommended to disable system sounds so you don't get annoying dlings while you are recording.
text_image
Balance Balance is checked for the source image. Name: Type Date to subscription: 10.00 In order: 10.00 Balance for the selected version. This is a custom name that is based on the Date of this file. Cancel volume: 0 OK? Save volume to any location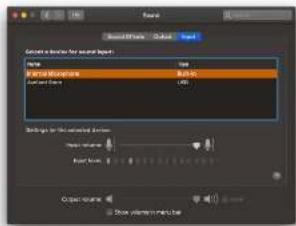
text_image
Create a video for audio format Name: 100 Duration: 30.0% Frame Rate: 100 Settings for the audio format: Frequency: 0 Rate: 0 Export volume: 0 Show volume in image fileMenu/Task Bar Icons
On MacOS, the Sono icon appears in the menu bar in the top right hand corner of the screen. This gives you quick access to various functions of the Sono.

text_image
Show Mixer Quit About Sono Visit ID Knowledge Base Check for Updates ✓ Software Controlled Mixer ModeShow Mixer
If the mixer window has been hidden, this will bring it back to the forefront.
Quit
Fully closes the Sono mixer application.
About Sono
Displays information regarding the current version of the Sono mixer application.
Opens a browser windows for the Audient Helpdesk with helpful articles and FAQ's.
Check for Updates
The Sono app will check with the Audient update server for any available firmware updates for Sono.
Windows Installation Windows Installation Sono
System Requirements
- Windows 7 or later (64 bit)
- Intel Core 2 @ 1.6 GHz, or AMD equivalent
- 1 GB RAM Minimum
Connect Sono
Using the USB cable provided, connect Sono to your computer's USB port. Then connect the included 12v DC power adaptor.
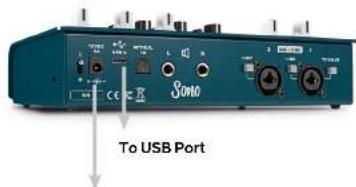
Head to our website for the latest version of our Sono software:
audient.com/products/downloads/sono
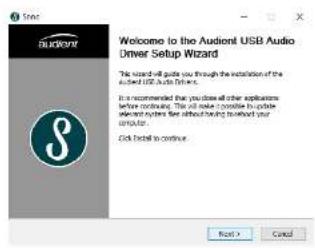
Open the downloaded .exe file to start the installer. Follow the installer process through, heeding any instructions from the installer.
Once the installer has completed, we would recommend rebooting both the Computer and the Sono before use.
text_image
Welcome to the Audient USB Audio Driver Setup Wizard This wizard will guide you through the installation of the Audient USB Audio Drivers. It is recommended that you close all other applications before continuing. This will make complete to update select different system files without having continued your software. Click this will continue.Status Light
Once connected, the status light of the Sono will illuminate.
If at any time the status LED turns off during normal operation please check all connections and if further problems develop please contact Audient support.
4. Double Checking Connectivity
To double check the connection, go to PC sound settings by following:
PC Settings > Control Panel > Hardware and Sound > Sound
Here you can see whether Sono is visible to the PC and you can make it the computers default sound device by pressing 'Set Default'. You would need to do this for both the 'Playback' and the 'Recording' Device to use both the inputs and the outputs of Sono
Sono Icon
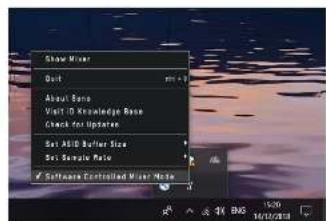
Once installed, the Sono icon can be found in the Windows system tray (it may be in the hidden icons area).
Please note, on Windows, the Sono icon will only appear when the Sono is connected and powered on.
text_image
Show Mixer Out About Bars Visit ID Knowledge Base Check for Updates Set Asset Buffer Size Set Sample Note ✓ Software Controlled Mixer NoteMore details regarding the system tray menu can be found on page 33.
Sono
Hardware Features
text_image
aucient Sono TWO 100 MHz -2.5V -3.5V -4.5V -5.5V -6.5V -7.5V -8.5V -9.5V -10.5V -11.5V -12.5V -13.5V -14.5V -15.5V -16.5V -17.5V -18.5V -19.5V -20.5V -21.5V -22.5V -23.5V -24.5V -25.5V -26.5V -27.5V -28.5V -29.5V -30.5V -31.5V -32.5V -33.5V -34.5V -35.5V -36.5V -37.5V -38.5V -39.5V -40.5V -41.5V -42.5V -43.5V -44.5V -45.5V -46.5V -47.5V -48.5V -49.5V -50.5V -51.5V -52.5V -53.5V -54.5V -55.5V -56.5V -57.5V -58.5V -59.5V -60.5V -61.5V -62.5V -63.5V -64.5V -65.5V -66.5V -67.5V -68.5V -69.5V -70.5V -71.5V -72.5V -73.5V -74.5V -75.5V -76.5V -77.5V -78.5V -79.5V -80.5V -81.5V -82.5V -83.5V -84.5V -85.5V -86.5V -87.5V -88.5V -89.5V -90.5V -91.5V -92.5V -93.5V -94.5V -95.5V -96.5V -97.5V -98.5V -99.5V -100.5VHardware Features
Sono
Guitar Preamp Channel
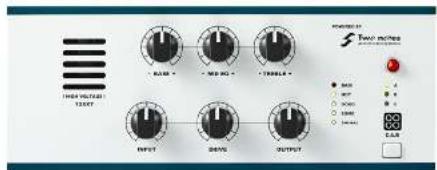
Sono includes a dedicated guitar channel utilising a High Voltage 12AX7 valve and can be treated just like the input of a classic valve amplifier. This section will explain the stages of the Guitar Preamp channel and how they can all be used to dial in your perfect tone.
The Signal Chain of the Guitar Channel can be seen to the left.
Each part of this chain is then discussed in more detail in the next few pages.
text_image
TWO OUTPUT 1200T INPUT OUTPUT TWO OUT TWO OUT TWO OUT TWO OUT TWO OUT TWO OUT TWO OUT TWO OUT TWO OUT TWO OUT TWO OUT TWO OUT TWO OUT TWO OUT TWO OUT TWO OUT TWO OUT TWO OUT TWO OUT TWO OUT TWO OUT TWO OUT TWO OUT TWO OUT TWO OUT TWO IN TWO IN TWO IN TWO IN TWO IN TWO IN TWO IN TWO IN TWO IN TWO IN TWO IN TWO IN TWO IN TWO IN TWO IN TWO IN TWO IN TWO IN TWO IN TWO IN TWO IN TWO IN TWO IN TWO IN TWO IN TWOIN TWOIN TWOIN TWOIN TWOIN TWOIN TWOIN TWOIN TWOIN TWOIN TWOIN TWOIN TWOIN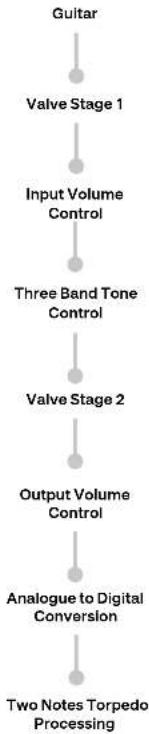
flowchart
graph TD
    A["Guitar"] --> B["Valve Stage 1"]
    B --> C["Input Volume Control"]
    C --> D["Three Band Tone Control"]
    D --> E["Valve Stage 2"]
    E --> F["Output Volume Control"]
    F --> G["Analogue to Digital Conversion"]
    G --> H["Two Notes Torpedo Processing"]
Hardware Features
Hardware Features

Guitar Channel
Sono is designed to work with a wide variety of Guitars, including bases. The high impedance valve input means that regardless of whether you're using a Classic Single Coil Blues Guitar, a humbucker equipped Rock Axe or a Modern Active Pickup Metal Machine, you'll still get the same response and feel as you would get from a valve amplifier.
Experimenting with the Volume and Tone control of the Guitar itself can often give great results. For example, changing the volume during a solo can change the amount of saturation you get from the Valve stages, adding another dimension of dynamics to your performance.
Valve Stages 1 & 2
The 12AX7 valve used in Sono is made up of two separate amplification stages inside a single glass envelope.
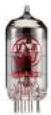
The first of these two valve stages is found directly after the guitar input of Sono. The Second stage is located after the three band Tone control, just before the output volume control.
These valves stages can both be pushed into harmonic saturation by increasing the level that is fed into them, giving you break-up or distortion.
The input valve stage can be pushed into harmonic saturation by simply increasing the level being fed into Sono. This can be done by
increasing the volume of your guitars output as explained above or through the use of pedals such as Boost's or Overdrives.
The second stage can be distorted in the same manner, however, you can further control this saturation using the Input Gain and Tone Controls. This is explained in more detail in the sections below.
However, pristine clean tones can still easily be achieved with Sono by simply keeping the levels a little lower.
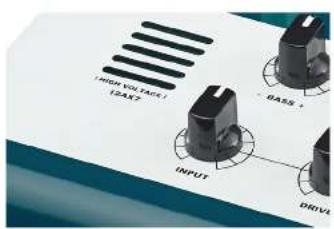
Input Control
The Input controls how volume is provided after the first valve stage. This then affects the amount of level being fed into the three band tone control and the second valve stage which will affect the tone achieved through these stages.
As explained previously, cranking this up to full can result in saturation whereas keeping it low will give you sparkling clean tones.
text_image
HIGH VOLTAGE (2.4x3) BASS + INPUT DRIVEThree Band Tone Control
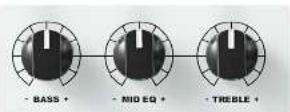
The Three Band control allows you to boost or attenuate your Bass, Mids and Treble by roughly ±15 dB
How you set these depends massively on the guitar you are using and the genre you are playing.
If you are using a guitar with single coil pick-ups for example, rolling off a little treble can remove some of the harshness, or even turn it up to really cut through a dense mix.
Likewise, for a metal tone, adding Bass and Mids can help thicken up a tone and give a heavier sound.
Output Control
The Output control allows you to attenuate the signal after the second valve stage before the signal is fed into the A/D converter.
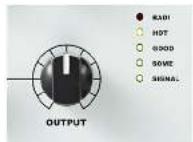
This means that if you've been really driving the input with lots of gain to cause saturation. You can then dial back the volume slightly so that you don't clip the A/D converter which will cause unpleasant sounding hard clipping.
The meter to the right of the Output control can be used to gauge how much volume is being sent to the A/D converter. You would want to adjust the Output volume until the signal is peaking around the 'Good' light on the meter.
Two Notes Torpedo Processing
Finally, the guitar signal passes through Sono's on-board Two notes power amp and cabinet simulation.
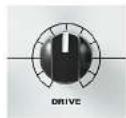
The drive control on Sono controls the amount of saturation given by the power amplifier simulation. This allows you to get the massive tones from a guitar amp turned up to 11, but at much more manageable levels.
Likewise, a small amount of Drive can give a subtle crunch to spice up a blues or jazz tone.
The Torpedo processing also offers a wealth of cabinets, microphones and tonal adjustments to fine tune your tone which can be adjusted using the Torpedo Remote application
More information about this can be found on page 39 of this manual.
Hardware Features
Hardware Features

Sono offers three hardware presets which allow you to store your three favourite Two notes settings.
These can be selected by pressing the C.A.B button and cycling through the A, B and C settings, indicated by the three lights above the buttons.
These are stored on the device itself meaning you don't need to be connected to a computer to use these tones. Great for playing on the road or on the stage!
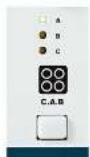
The Torpedo processing can be turned on or off at any time by simply pressing and holding the C.A.B button.
Recording With Sono
Whilst playing through Sono, two copies of your incoming signal can be captured, this will be the signal that has been passed through the Two notes Torpedo processing and a version that has not.
The clean signal appears on input 3 in your DAW which is also known as the No C.A.B channel.
This would allow you to add processing later in your DAW. Furthermore, should the situation arise, you can also pass the dry signal out to a real amplifier to be captured by a microphone, also known a re-amping. While the cabinet simulation on Sono sounds great, sometimes you may just want the real thing!
Sono includes a re-amp output to facilitate this which is explained in more depth on page 24.
Mic Pres
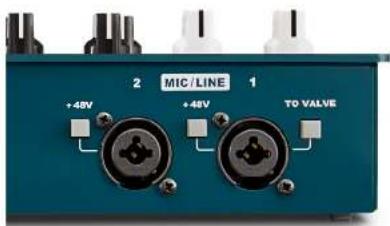
Sono also offers two Audient console mic pres for connecting microphones to the device.
These are the same mic pres as used on our renowned large format consoles so whether you're recording vocals or capturing a guitar amp, you're sure to get a pristine sound.
natural_image
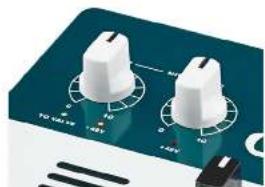
Close-up of a blue electronic device with two white rotary knobs and a power supply (no visible text or symbols)The Gain controls allows to set the amount of input gain anywhere between 0 and 60dB which is more than enough for even the quietest of microphones.
Should your microphone require phantom power. This can be engaged by pressing the +48V buttons found on the rear of Sono.
Phantom power is independently switched for each channel, allowing you to use a condenser style microphone in one channel, whilst also using a ribbon microphone, which may be damaged by +48V phantom power, in the second channel.
Please note that Sono can only accept two inputs at one time. When a Guitar is plugged into the guitar input, Mic 1 is switched out of the signal path.
However, it is also possible for the signal from Mic/Line 1 to be sent to the Guitar channel by simply pressing the 'To Valve' button on the rear of the unit.
This allows you to add valve warmth, use the tone controls and utilise the Torpedo Processing on a microphone or line signal.
This, for example, could be used to add grit to a vocal or to add distortion to a synth.
Connecting External Pre-amps
If you wish to use an external guitar preamp for a different tone than the one provided by Sono then this can be connected to line input 1.
Torpedo CAB processing can then be applied to this input by pressing and holding the C.A.B button for three seconds.
text_image
2 MIC/LINE 1 +48V +48V TO VALVEHardware Features Hardware Features

Monitor and Headphone Controls
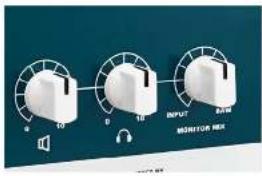
Sono gives you independent control over the monitor and headphone outputs.
text_image
0 10 0 10 INPUT BPM MONITOR MAXMonitor Mix Control
The Monitor Mix control allows to you to choose whether you listen solely to the inputs (Far Left), the playback from your Computer (Far Right) or a blend of the two.
Please note that the monitor mix control will become inactive when the 'Software Controlled Mixer Mode' is selected. For more information about the software mixer please see page 29.
Optical Input
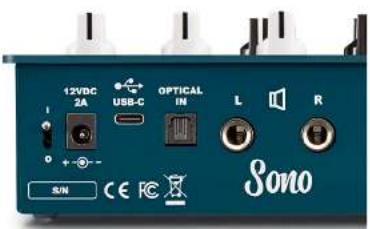
The optical input is a standard TOSlink connector and supports both ADAT and S/PDIF inputs.
The optical connection will also carry the signal required to clock Sono from an external source. More information about clocking can be found later in this manual
Speaker Outputs
The rear outputs are designed to send audio out to a set of active monitors or to an amplifier powering a pair of passive monitors.
The outputs are balanced so we would strongly recommend the use of balanced cables (XLR or TRS) when connecting monitors to Sono.
As these outputs are line level, they can also be used to feed outboard gear such as hardware compressors or EQ's, although you would have to sacrifice your monitor outputs to do so.
text_image
12VDC 2A USB-C OPTICAL IN L R SUN CE SONOHeadphone Output
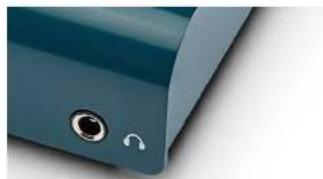
Sono includes a powerful, semi-discrete class AB headphone amplifier which will happily drive any headphone with a nominal impedance within the range of 8-600 Ω.
natural_image
Close-up of a teal-colored electronic device with a circular button and a small circular symbol (no readable text or labels)
natural_image
Interior scene of a person operating a vintage television set with a computer, surrounded by equipment and plants (no visible text or symbols)To Amp Output
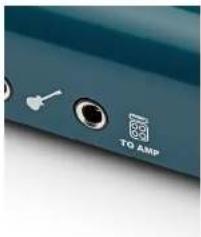
The To Amp output allows you to send audio from your DAW out to an amplifier or pedal board in order to re-amp your signal.
The signal from the re-amp output is padded down to an instrument level as to not overload your amp or pedal inputs.
natural_image
Close-up of a blue electronic device panel with icons for buttons, lens, and amplifier (no readable text or symbols)To send audio to the To Amp output, simply send the audio to Output 3 (To Amp) in your DAW and connect a jack to the To Amp output.
The To Amp output has built in sensing so that when a jack is plugged in, the routing will be changed automatically.
Any routing in the application will be ignored whilst To Amp is being used and the Sono will revert to being controlled by the hardware Monitor Mix control.
Signal Flow Diagrams
Signal Flow Diagrams

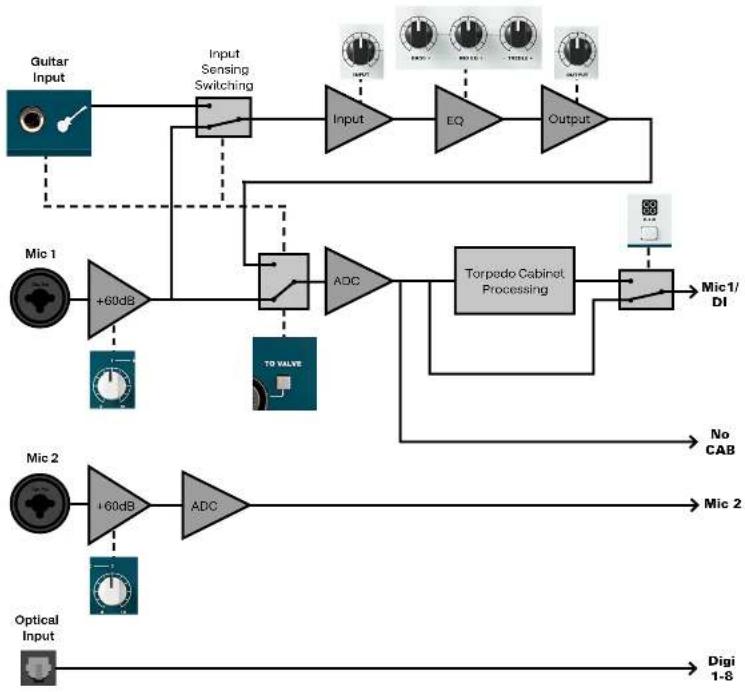
The below diagram shows how the input signal is routed through Sono.
The Guitar Input will automatically sense when a jack is connected and when a jack is present. The Mic 1 input will be switched out and the 'To Valve' button overridden.
When the C.A.B button is illuminated, the Torpedo Processing is active. Pressing and holding the C.A.B button will bypass the processing and the switch will become unlit.
flowchart
graph TD
    A["Guitar Input"] --> B["Input Sensing Switching"]
    B --> C["Input"]
    C --> D["EQ"]
    D --> E["Output"]
    F["Mic 1"] --> G["+60dB"]
    G --> H["TO VALVE"]
    H --> I["ADC"]
    I --> J["Torpedo Cabinet Processing"]
    J --> K["Mic1/DI"]
    L["Mic 2"] --> M["+60dB"]
    M --> N["ADC"]
    N --> O["No CAB"]
    P["Optical Input"] --> Q["Digi 1-8"]
    style A fill:#4CAF50,stroke:#333
    style F fill:#2196F3,stroke:#333
    style L fill:#2196F3,stroke:#333
    style P fill:#2196F3,stroke:#333
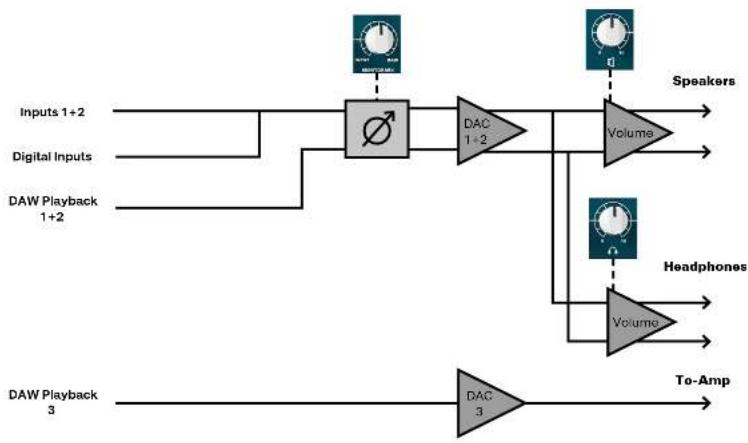
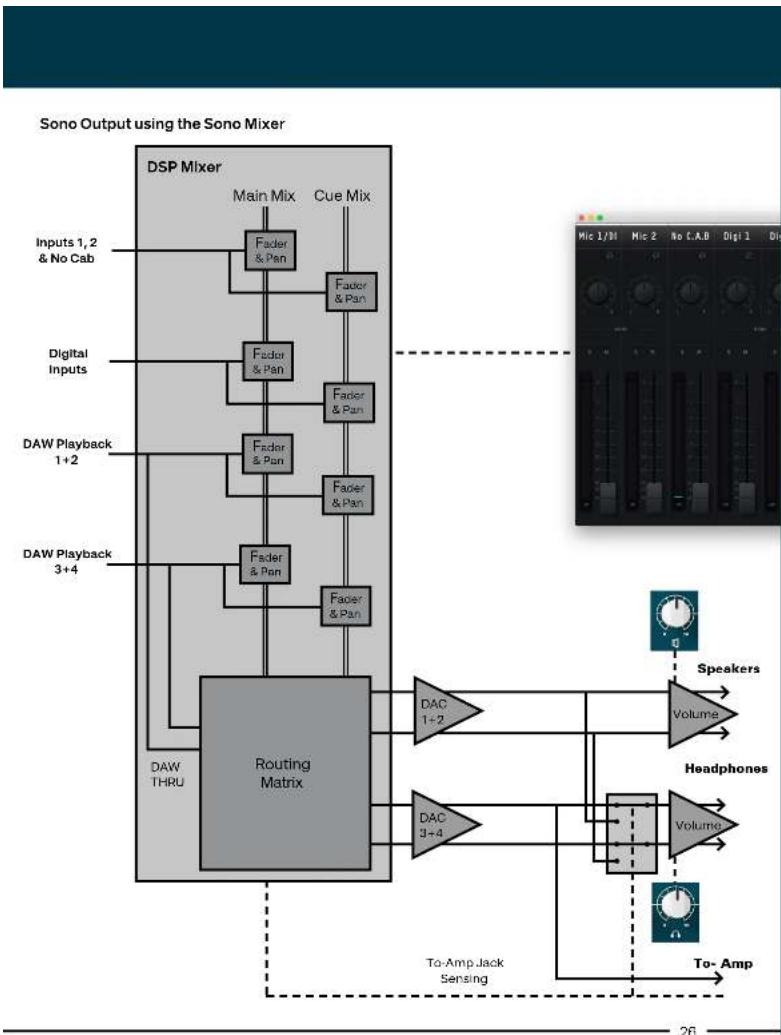
There are two ways in which the Sono outputs can be controlled, either using the Monitor Mix Control on Sono Itself, or using the Sono Mixer.
Both modes of operation can be seen below. More information about the mixer can be found later in this manual.
The To-Amp output on Sono automatically senses when a jack is connected and will re-route DAC output 3 to the To-Amp output and the headphones output will instead be fed from DAC 1+2 instead.
Sono Output using Monitor Mix
flowchart
graph LR
    A["Inputs 1+2"] --> B["Ø"]
    C["Digital Inputs"] --> B
    D["DAW Playback 1+2"] --> B
    B --> E["DAC 1+2"]
    E --> F["Volume"]
    F --> G["Speakers"]
    H["DAW Playback 3"] --> I["DAC 3"]
    I --> J["To-Amp"]
    K["Headphones"] --> L["Volume"]
    L --> F
    M["Speaker"] --> F
flowchart
graph TD
    A["DSP Mixer"] --> B["Main Mix"]
    A --> C["Cue Mix"]
    B --> D["Fader & Pan"]
    C --> E["Fader & Pan"]
    D --> F["Fader & Pan"]
    E --> G["Fader & Pan"]
    F --> H["Fader & Pan"]
    G --> I["Fader & Pan"]
    H --> J["Fader & Pan"]
    I --> K["Fader & Pan"]
    J --> L["Fader & Pan"]
    K --> M["Fader & Pan"]
    L --> N["Fader & Pan"]
    M --> O["Fader & Pan"]
    N --> P["Fader & Pan"]
    O --> Q["Fader & Pan"]
    P --> R["Fader & Pan"]
    Q --> S["Fader & Pan"]
    R --> T["Fader & Pan"]
    S --> U["Fader & Pan"]
    T --> V["Fader & Pan"]
    U --> W["Fader & Pan"]
    V --> X["Fader & Pan"]
    W --> Y["Fader & Pan"]
    X --> Z["Fader & Pan"]
    Y --> AA["Fader & Pan"]
    Z --> AB["Fader & Pan"]
    AA --> AC["Fader & Pan"]
    AB --> AD["Fader & Pan"]
    AC --> AE["Fader & Pan"]
    AD --> AF["Fader & Pan"]
    AE --> AG["Fader & Pan"]
    AF --> AH["Fader & Pan"]
    AG --> AI["Fader & Pan"]
    AH --> AJ["Fader & Pan"]
    AI --> AK["Fader & Pan"]
    AJ --> AL["Fader & Pan"]
    AK --> AM["Fader & Pan"]
    AL --> AN["Fader & Pan"]
    AM --> AO["Fader & Pan"]
    AN --> AP["Fader & Pan"]
    AO --> AQ["Fader & Pan"]
    AP --> AR["Fader & Pan"]
    AQ --> AS["Fader & Pan"]
    AR --> AT["Fader & Pan"]
    AS --> AU["Fader & Pan"]
    AT --> AV["Fader & Pan"]
    AU --> AW["Fader & Pan"]
    AV --> AX["Fader & Pan"]
    AW --> AY["Fader & Pan"]
    AX --> AZ["Fader & Pan"]
    AY --> BA["Fader & Pan"]
    AZ --> BB["Fader & Pan"]
    BA --> BC["Fader & Pan"]
    BB --> BD["Fader & Pan"]
    BC --> BE["Fader & Pan"]
    BD --> BF["Fader & Pan"]
    BE --> BG["Fader & Pan"]
    BF --> BH["Fader & Pan"]
    BG --> BI["Fader & Pan"]
    BH --> BJ["Fader & Pan"]
    BI --> BK["Fader & Pan"]
    BJ --> BL["Fader & Pan"]
    BK --> BM["Fader & Pan"]
    BL --> BN["Fader & Pan"]
    BM --> BO["Fader & Pan"]
    BN --> BP["Fader & Pan"]
    BO --> BQ["Fader & Pan"]
    BP --> BR["Fader & Pan"]
    BQ --> BS["Fader & Pan"]
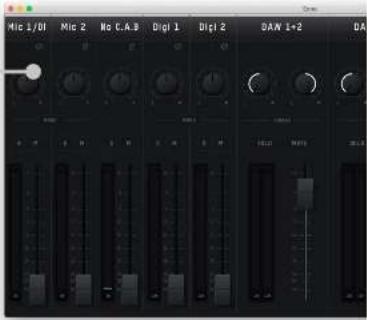
Sono is controlled with two pieces of software, which this section of the manual will explain in depth:
Sono Application
Pages 27-37
The Sono application allows you to control more advanced functions of Sono such as cue mixes and use of the optical input.
text_image
Mic 1/01 Mic 2 No C.A.3 Digi 1 Digi 2 DAC 1+2 DAC 0 1 2 3 4 5 6 7 8 9 10 11 12 13 14 15 16 17 18 19 20 21 22 23 24 25 26 27 28 29 30 31 32 33 34 35 36 37 38 39 40 41 42 43 44 45 46 47 48 49 50 51 52 53 54 55 56 57 58 59 60 61 62 63 64 65 66 67 68 69 70 71 72 73 74 75 76 77 78 79 80Getting Started With Sono Mixer Application
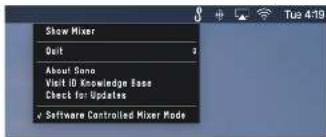
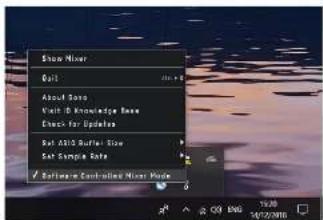
When first launched, Sono Application will run in the background. On MacOS, this can be found in the menu bar in the top right-hand corner of the screen, next to the clock.
text_image
Show Mixer Quit About Song Visit ID Knowledge Base Check for Updates ✓ Software Controlled Mixer ModeOn Windows, the System Tray is found in the bottom right hand corner of the screen unless the Start Bar has been moved. The Sono icon may be amongst the hidden icons which can be found by clicking the small triangle in the System Tray.
Use of the Sono software mixer is entirely optional, allowing you to access more advanced features such as cue mixes and setup of the optical input.
If you simply want to plug-in and play, with minimal setup, the Monitor Mix control on the Sono gives you a basic way to blend between your input signal and the signal being played back from your DAW such as a backing track or click track
This will only affect your monitoring mix and won't affect the signal being fed into your DAW
natural_image
Interior view of a large auditorium with red carpet and stage lighting (no visible text or symbols)Two notes Torpedo Remote
Pages 38 - 48
Torpedo Remote from Two notes allows you to adjust the cabinet simulation found on Sono with various parameters such as the cabinet, microphones, power amplification and much more.
text_image
Show Mirror Call About Store Vault & Knowledge Base Check for Update Set A105 Buffer Size Set Sample Rate ✓ Settings Controlled Mirror Mode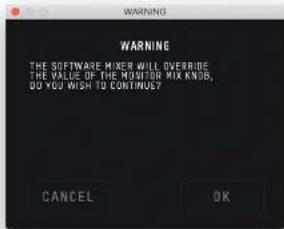
text_image
WARNING THE SOFTWARE MIXER WILL OVERBEE THE VALUE OF THE MONITOR MIX KNOW, DO YOU WISH TO CONTINUE? CANCEL OKTo start using the Sono Mixer application, simply click Show Mixer. A notification will appear to inform that you that the Hardware Monitor Mix Control on the Sono will be overridden and will not function whilst the application is in use.
text_image
Show Mixer Quit About Sono Visit ID Knowledge Base Check for Updates Set ASIO Buffer Size Set Sample Rate ✓ Software Controlled Mixer ModeThe system tray menu gives you quick access to various functions you may need whilst using Sono directly
Show Mixer
If the mixer window has been hidden, this will bring it back to the forefront.
Quit
Fully closes the Sono mixer application.
About Sono
Displays information regarding the current version of the iD mixer application.
Opens a browser windows for the Audient Helpdesk with helpful articles and FAQ's.
Check for Updates
The Sono app will check with the Audient update server for any available firmware updates for Sono.
Set ASIO Buffer Size (Windows Only)
Allows you to set the buffer size used by your DAW to increase/decrease latency.
Set Sample Rate (Windows Only)
Allows you to select the operating sample rate for Sono.
Software Controlled Mixer Mode
This allows you to select between controlling the Sono monitor mix either from the hardware knob, or using the Son software mixer.
When the Software Controlled Mixer Mode is selected, please note that the Monitor Mix control on Sono itself will not function.
text_image
Analogue Input Channels DAW Return Channels Mix Selection Pane Channel View Options Mic 1/Di Mic 2 No C.A.B Digi 1 Digi 2 DAW 1+2 DAW 3+4 MASTER MIX Digital Input Channels Monitor ControlsSono Application
Sono Software Mixer

Sono Mixer Channel Strips
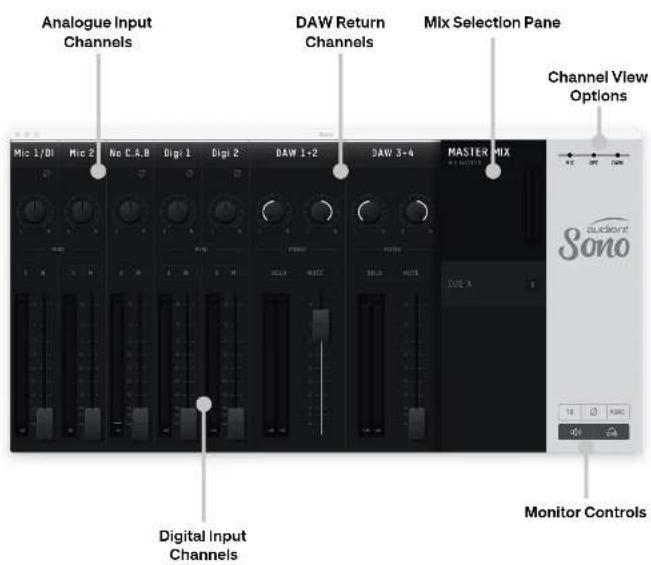
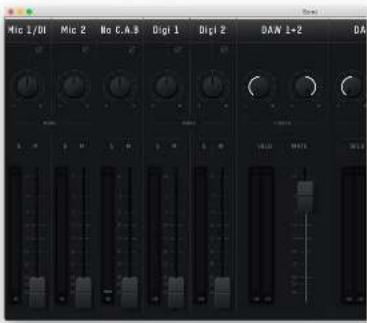
The Sono Mixer app is made up of a number of channel strips which each control the monitoring of a particular Input or DAW Return.
The channel strips of the Mixer are as follows:
Mic 1/DI
This channel contains the signal for either the Mic/Line 1 input on the rear of Sono or the Guitar input on the front of Sono. If a jack is connected to the guitar input, The Mic/Line input is switched out.
Mic 2
Mic 2 contains the signal present from the Mic/Line 2 connector on the rear of Sono,
No C.A.B
This channel is a clone of the Mic 1/DI channel but does not pass through any of the Two Notes Torpedo Processing. This is useful should you also want to capture a clean guitar signal for re-amping or processing later
Digi 1-8
These channels are the inputs from the Optical connector which can be used to add upto 8 extra input channels. The number of Digi channels will vary based on whether you are using S/PDIF or ADAT, and your sample rate.
DAW 1+2
DAW 1+2 is the output 1+2 from your DAW software, it is also the output that most audio applications will default to for playback
DAW 3+4
DAW 3+4 is the output 3+4 from your DAW. This allows you to have multiple sends from your DAW for more complex monitor mixes. DAW 3 is also the channel you would use for the To Amp output.
text_image
Mic 1/01 Mic 2 No C.A.B Digi 1 Digi 2 DAN 1+2 DAChannel Strip Features
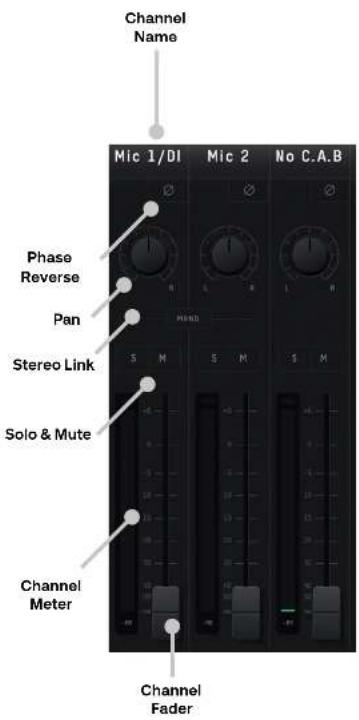
Channel Name
Shows the Name of the channel. To adjust the name of the channel, simply double click and type in a name of your choice.
Phase Reverse
This flips the polarity of the signal by 180 ^c which is extremely useful if you find two signals to be phase cancelling such as micing the front and rear of a guitar cab.
Pan
Allows you to send the channel to either the left channel of your monitor mix, the right channel or anywhere in-between.
Stereo Link
This will link a pair of channels together so that they act as a single stereo channel. In this state, the pans of these two channels will be set to hard left and hard right and the two fader will combine into one.
Solo & Mute
Solo will stop all monitoring from other channels except those that are also solo'd
Mute stops all monitoring from this channel.
Channel Meter
Shows the current input level in dBFS
Channel Fader
Controls how much signal from this channel is sent to Mix between -inf dB and +6dB
text_image
Channel Name Mic 1/DI Mic 2 No C.A.B Phase Reverse Pan Stereo Link Solo & Mute Channel Meter Channel FaderAt the far right of the mixer is the master section. This part of the mixer will affect things on a more global scale.
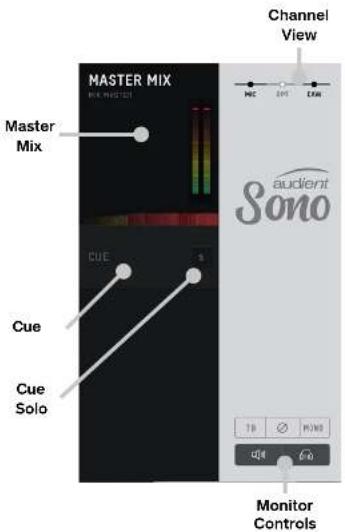
Master Mix
When selected, this changes the currently active mix to the Main Mix. This would be the mix for the engineer to send to the main speakers
Cue
When selected this selects the Cue mix as the currently active mix. The mixer will have green glow to indicate this.
This would typically be used as the Artists mix to be listened to via headphones
Cue Solo
The cue solo allows you to listen to the cue mix via your normal monitoring path. This can be used to quickly check a cue mix before your send it to an artist via headphones.
Channel View
Channel View allows you to hide groups of faders to remove channels you may not be using. You can choose to remove the analogue input channels (MIC), the optical inputs (OPT) or the DAW returns (DAW).
Monitor Controls.
These allow you to control your monitoring to get the best sound possible.
TB - Enable and Disabled Talkback, more information regarding Talkback setup can be found at Page 38
- Sums the output to mono and flips the phase of one channel, this will cancel out and audio found in the centre of the stereo field, allowing you to concentrate on the sides and hear parts which may normally be hidden when played in full stereo.
Mono - Sums the output down to Mono to allow you to check the mono compatibility of your mixes.
Speaker & Headphone Mute - Allows you to cut all audio being sent to either the headphone or monitor outputs. A small 'x' is shown if the output has been muted.
text_image
Master Mix CUE Cue Solo Channel View aucient Sono Monitor ControlsSystem Panel
The final part of the mixer application is the System Panel. This contains advanced functions of the Sono application and allows you to change some behaviours of the device.
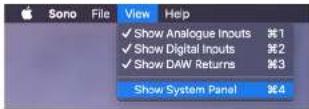
This can be opened by going to:
View > Show System Panel
System Panel Overview:
text_image
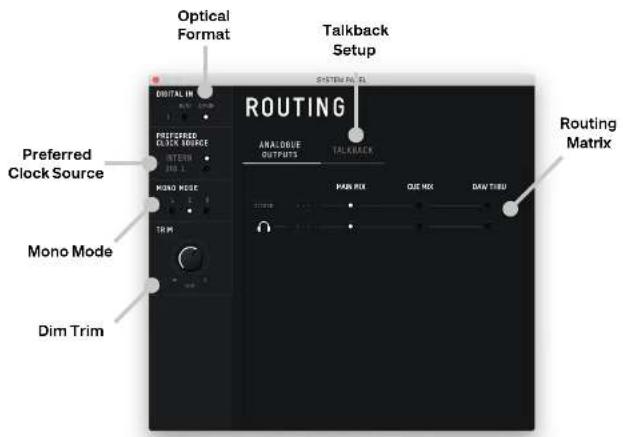
Optical Format Talkback Setup ROUTING SYSTEM PANEL ONIONAL MODE PREFERRED CLOCK SOURCE INTERNATIONAL MODE TALKBACK Analogoue OUTPUTS MAN MIX QUE MIX DAV TINU Routing Matrix Preferred Clock Source Mono Mode Dim TrimThis allows you to select between using ADAT or S/PDIF protocols for the optical input depending on what device you wish to connect.
Preferred Clock Source
Allow you to select where the Sono takes its clock source from. By default this will be set to Internal, however if using a device connected via the optical port, you would instead wish to clock Sono from the external device by selecting DIG 1.
When you select the external device a status indicator will appear with it's colour indicating the current clock status.
Red - No valid clock detected, check connections and that the correct optical format is selected
Amber - A valid clock is detected but an incorrect sample rate. Either adjust the sample rate of Sono or the external device.
Green - A valid clock is detected at the correct sample rate. You're good to go!
Mono Mode
Allows you to select which monitor outputs are used when Mono mode is turned on. Both is the default.
Dim Trim
This allows you select by how much the main monitor outputs will dim when Talkback is enabled
Routing Matrix
The Routing Matrix allows you to select the audio source for the Monitor and Headphone outputs. Choose from the following options:
Main Mix - This is the main mix which you create within the mixer. This will be the default setting for most Sono users
Cue Mlx - This is the output the Cue mix created in the mixer window. This is useful for setting up a second mix for an artist using headphones.
DAW THRU - This routes the audio directly from your computer to the output without any routing or attenuation. For example, sending audio to Outputs 1+2 from your DAW whilst in DAW THRU mode would result in this being sent directly to these outputs
This setting is ideal or working with an external monitor controller or outboard equipment.
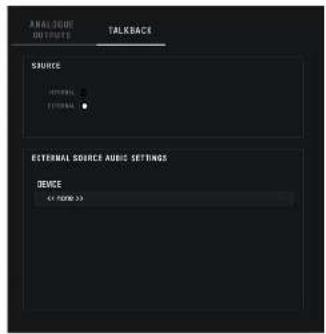
Talkback Setup
Sono gives you the ability to use talkback, allowing you to easy communicate to an artist between takes to help encourage them or give direction.
You are able to use any of Sono's inputs, including the digital inputs, to connect a talkback microphone. Otherwise an external microphone such as a computers built-in mic or USB microphone connected to the computer can also be used.
This can be selected in the Talkback menu of the System Panel.
text_image
ANALOGUE OUTPUTS TALKBACK SOURCE INTERNAL INTERNAL EXTERNAL SOURCE AUDIO SETTINGS DEVICE << FROM >>
natural_image
Two men sitting on a sofa with a laptop and a small object, near a window (no visible text or symbols)Source
Allows you to choose between one of the built-in inputs or an external microphone source.
External Source Audio Settings
Allows you to select which external device is used from a list of currently connected devices.
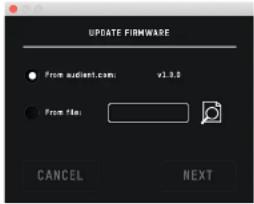
Audient will release firmware updates for Sono in order to add new features, improve compatibility and address any bugs. Therefore you may wish to periodically check for updates.
This can be done by navigating to the Setup menu and selecting Check for Updates.
The Sono mixer application will then check with our update server if any updates for the Sono are currently available. If there are then you will prompted to install them onto the Sono.
text_image
UPDATE FIRMWARE From audit.com: v1.0.0 From File: CANCEL NEXTIf you then click next, you'll be prompted to stop any playback through the Sono.
Click Update and the update will begin. The Sono may turn off a number of times during the process. Once the update has completed, fully reboot the Sono by flicking the power switch off, waiting for a few seconds and then flicking it back on again.
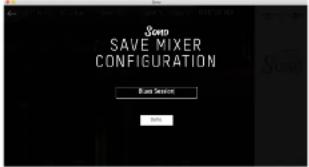
Saving and Recalling Mixer Presets
If you have a Mixer setup you use a lot then you can save this as a preset.
To do this, go to File > Save.
text_image
Sound SAVE MIXER CONFIGURATION Sound Service OKNow simply give your preset a name and click Save. You can also export your setup to send to a friend by clicking Export Mixer Configuration to File.
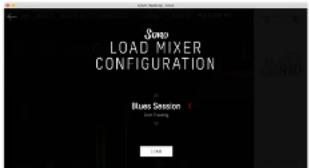
To recall a Mixer setup, go to File > Open.
text_image
Sound LOAD MIXER CONFIGURATION Blues Season 1 2 3Then select the preset you wish to use. Clicking Load from File allows you to find presets saved anywhere on your computer.
Keyboard Shortcut Index
To allow you to find all shortcuts for the mixer application in one place without having to go through each page of this manual please refer to this table:
| Location | Mac | Windows | Description |
| Faders | Alt + Click | Alt + Click | Resets fader to unity gain (0dB) |
| Pans | Alt + Click | Alt + Click | Resets pan pots to central position |
| Solos | Cmd + Click | Ctrl + Click | Clears all solos if clicking on a solo'd channel |
| exclusive) if clicking on an unsolo'd | Overrides all other solos (for solo channel | ||
| Meters | Alt + Click will clear all clip indicators | Alt + Click | Clicking on peak hold indicator |
| Mixer Screen | Cmd + S | Ctrl + S | Save mixer configuration |
| Cmd + O | Ctrl + O | Load mixer configuration | |
| View Modes | Cmd + 1 | Ctrl + 1 | View Mic/Line Inputs |
| Cmd + 2 | Ctrl + 2 | View Optical (Digital) Inputs | |
| Cmd + 3 | Ctrl + 3 | View DAW Mix Inputs | |
| Cmd + 4 | Ctrl + 4 | View System Panel | |
Sono
Two notes Remote Software
text_image
aucient Sono TWO 100 MHz -5V -4V -3V -2V -1V 0V 0.5V 1.0V 1.5V 2.0V 2.5V 3.0V 3.5V 4.0V 4.5V 5.0V 5.5V 6.0V 6.5V 7.0V 7.5V 8.0V 8.5V 9.0V 9.5V 10.0V 10.5V 11.0V 11.5V 12.0V 12.5V 13.0V 13.5V 14.0V 14.5V 15.0V 15.5V 16.0V 16.5V 17.0V 17.5V 18.0V 18.5V 19.0V 19.5V 20.0V 20.5V 21.0V 21.5V 22.0V 22.5V 23.0V 23.5V 24.0V 24.5V 25.0V 25.5V 26.0V 26.5V 27.0V 27.5V 28.0V 28.5V 29.0V 29.5V 30.0V 30.5V 31.0V 31.5V 32.0V 32.5V 33.0V 33.5V 34.0V 34.5V 35.0V 35.5V 36.0V 36.5V 37.0V 37.5V 38.0V 38.5V 39.0V 39.5V 40.0V 40.5V 41.0V 41.5V 42.0V 42.5V 43.0V 43.5V 44.0V 44.5V 45.0V 45.5V 46.0V 46.5V 47.0V 47.5V 48.0V 48.5V 49.0V 49.5V 50.0VTorpedo Remote Application
Sono
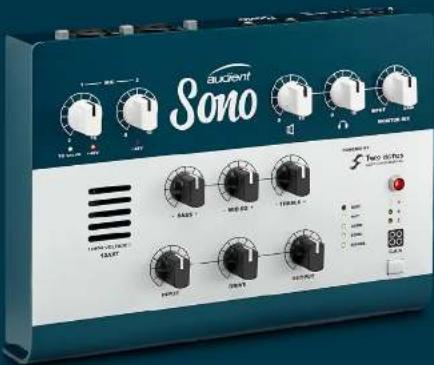
Built into Sono is Two notes Torpedo cabinet simulation. Allowing you to dial in realistic, punchy tones from the comfort of your desktop.
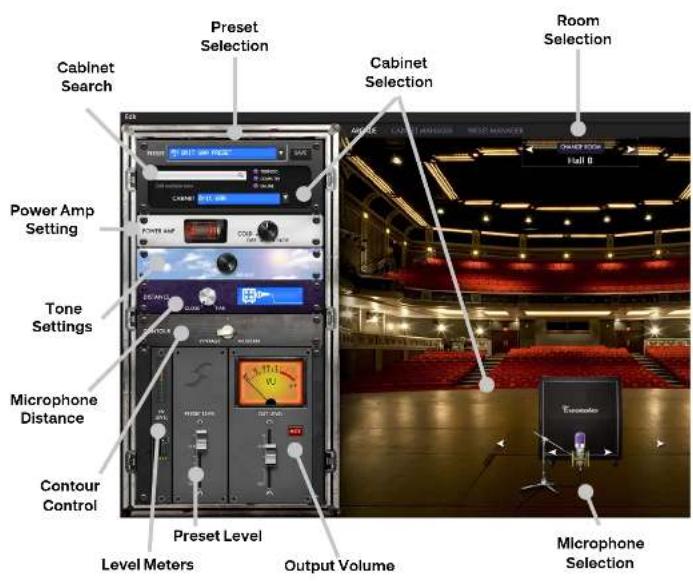
The Torpedo Remote application allows you to adjust numerous parameters such as the cabinet, the microphone used, the room it's been recorded in and much more.
Torpedo Remote Application Overview:
text_image
Preset Selection Cabinet Search Power Amp Setting Tone Settings Microphone Distance Contour Control Preset Level Level Meters Output Volume Room Selection Cabinet Selection Held 0 Encounter Microphone SelectionTorpedo Remote Application
Torpedo Remote Application

Initial Setup
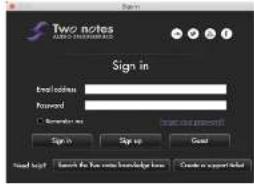
Upon opening the Torpedo Remote software for the first time, you'll see the Log-in Screen.
If you already have an existing Two Notes Account, then simply log in using your current email address and password.
Otherwise, press the Sign up button process to begin creating your Two notes account
text_image
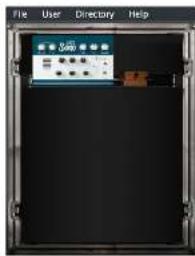
Two notes AIDS INFORMATION Sign in Email address Password ■ Remember me Sign in Sign up Cancel Read log? Search the New content knowledge loss Create a support toolOnce you have signed into your account, the Audient Sono will appear in your Device Rack. If the Sono isn't appearing check your Sono's power and USB connections.
text_image
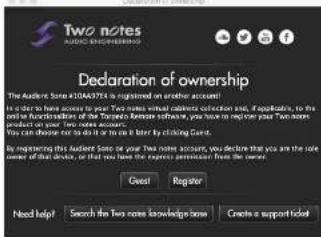
File User Directory HelpSimply click on the Sono to start using the remote software. At this point, you will need to register your Sono to your account.
text_image
Two Notes AUDIO-NEWMEMBER Declaration of ownership The Auditors Note 41043974 is registered on another account! Is to be here aware to your Two notes virtual calendar selection site, if applicable, to the social function of the Toronto Service website, you have to replace your Two notes product or your Two note accounts. You can choose this site in any time to enter by clicking Card. By replacing this Auditors Note we your Two note account, you declare that you are the sole owner of that device, or that you have the express permission from the owner. Good Register Need help? Search the Two notes knowledge base. Create a support ticket!Click register and then follow the registration process through. Once the device has been registered to your account, you will then receive the 20 cabinets which are included with Sono. These will be downloaded via the Torpedo remote software, this may take a few moments depending on your internet connection.
You should now be able to use the remote to start building your perfect tone!
natural_image
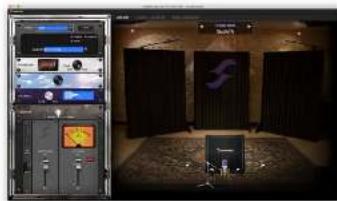
Interior view of a audio editing studio with audio equipment and a central display (no visible text or symbols)Choose Your Cab
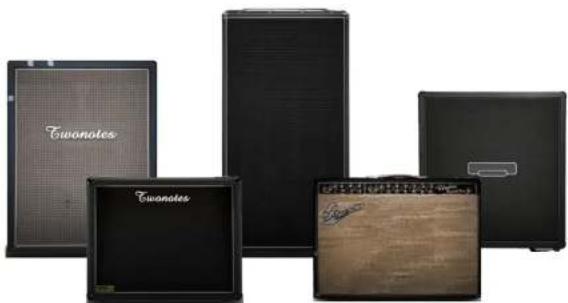
Cabinets come in all shapes and sizes, from small, single speaker boxes to huge monolith containing upwards of 8 speakers.
The construction style and the speakers used in the cab can drastically alter its sound and the way the cab interacts with its environment so there's plenty to experiment with.
To select your cab, you can either use the Cabinet Selection Menu, or simply click the arrows beside the cab to cycle through the selection.
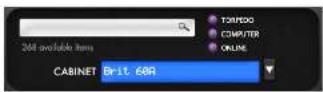
Cabinets are split into their speaker size and the number of speakers used in that cabinet. You can also select between Guitar cabinets and Bass cabinets, Bass Cabs being more optimised for low frequencies.
You can also use the search function to help filter out the cabs you wish to find
Sono comes with a variety of cabinets to suit all styles but if you want to push your tone further, more cabinets can be purchased from the Two notes Store.
https://store.two-notes.com/en/
Cabinets you don't own can be selected as a preview but a few seconds of silence will be added to your audio every minute.
natural_image
Five black audio equipment units with engraved names, arranged in a row (no visible text beyond labels)Torpedo Remote Application Torpedo Remote Appoli
Choose Your Mic
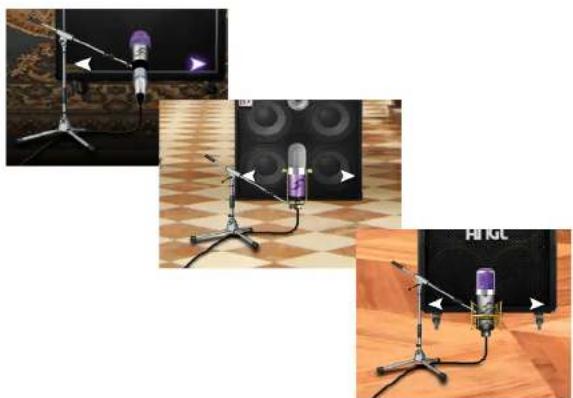
To capture the sound of the Cabinet, you'll need a microphone! Therefore, Two notes Torpedo gives you a variety of microphones to capture your virtual cabinet with.
Choose a vintage ribbon microphone for a warm loose sound, a dynamic for a punchy tone or a condenser style microphone for a precise capture of your playing.
Cycle through the selection of microphones using the arrows next to the microphone in the Torpedo Remote software.
You can also adjust the distance of the microphone from the front of the cabinet. This allows you to get more of the direct sound from the cabinet by placing the microphone close or more of the reverb from the room by placing it far away.
This is adjusted using the Distance option in the effects rack.

natural_image
Three-panel image showing a recording setup with a purple microphone on a tripod, against a checkered floor and patterned background (no text or symbols visible)Choose Your Room
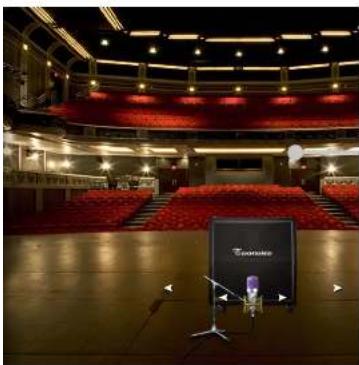
Once you've chosen the cabinet and the microphone to capture it, you can place your setup in an acoustic environment to give a realistic sound.
Choose the room your cab is placed by pressing the 'Change Room' arrows found at the top of the Screen.
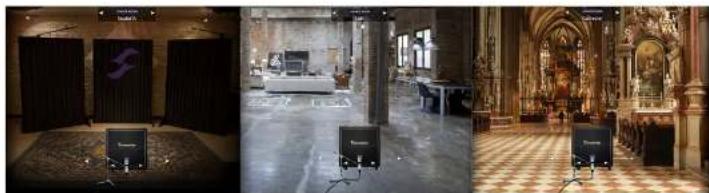
You can choose from the following options:
Studio A
A small live room with some sound absorption for a short, dull reverb.
Studio B
A larger live room with more reflective walls and a longer reverb time.
Basement
A room with stone walls to give plenty of reflections with minimal dampening
Loft
A medium sized room with some dampening and early reflections.
Hall A
A small live venue with a medium reverb time
Hall B
A larger venue with a long reverb but dampening from curtains and seats
Crypt
A cavernous space with hard stone walls for long reverb times with lots of early reflection
Cathedral
A large space with a long reverb with a longer pre-delay on the initial reflections
natural_image
Interior view of a grand hall with three distinct scenes: dark curtains, a modern kitchen, and ornate ceiling (no visible text or symbols)Torpedo Remote Application Torpedo Remote Application
Choose Your Tone
Finally, you can make adjustments to your overall tone using the Effects Rack.
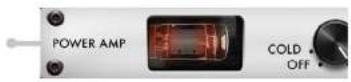
Power Amp
First you have the power amplifier saturation setting which allows you to control the saturation of the simulated power amplifier.
This is controlled using the Drive knob on the Sono itself and whilst Sono is in use, the Power Amp Knob will be locked.
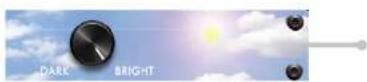
Tone
After this you have the Tone setting which allows you to select between a bright tone, with sparkling treble, a dark tone with rumbling low-end or anywhere in-between.
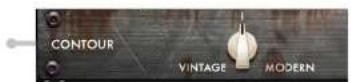
Contour
The Contour control allows you to select between a 'Vintage' tone with more emphasis on mids, a 'Modern' Tone with scooped mids and extra bass and treble, or again, somewhere in-between.
text_image
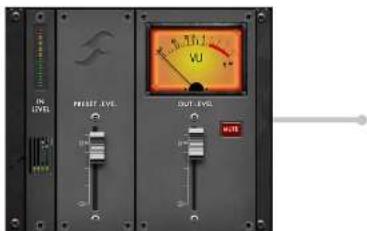
ON LVD RESET LVD OUT LVD 35.1V 20V MΩPreset & Output Level
After this, you can set your preset and output levels. The preset level allows you to balance the current settings with your other presets as some cab setups will be slightly louder than others. The Output level allows you to dial things back a little if you feel your playback is a little on the hot side and you find yourself clipping in the DAW.
Saving Presets
Once you have got your perfect tone dialled in, you can save it to one of the C.A.B preset slots on Sono itself.
The C.A.B presets are stored on the Sono's on-board memory so even if you're not connected to a computer, you can still use your three favourite Cab setups.
To store a reset, setup the Torpedo app the way you like it and then hit SAVE in the top right hand corner of your Rack.
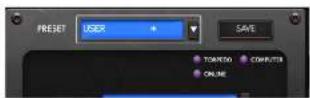
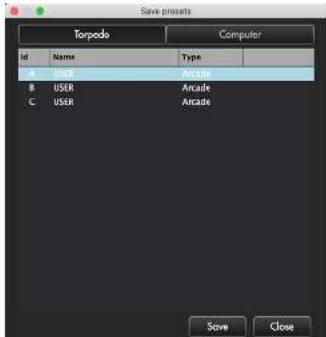
You can then select one of three slots to save this to. Please be aware that once a preset has been overwritten, it cannot be recalled.
text_image
Save presets Torpedo Computer id Name Type A USER Arcade B USER Arcade C USER Arcade Save CloseYou are also able to store presets to your computer if you need to store more than the three presets. To do this, simply click the 'Computer' tab, type in your preset name and hit save.
You can also view and manage your presets using the preset manager window of the Torpedo Remote application.
In this window, presets can be dragged from your computer onto one the three preset slots of Sono.
Similarly, presets can be removed from Sono by dragging and dropping them into the Bin.
Torpedo Remote Application
Cabinet Manager
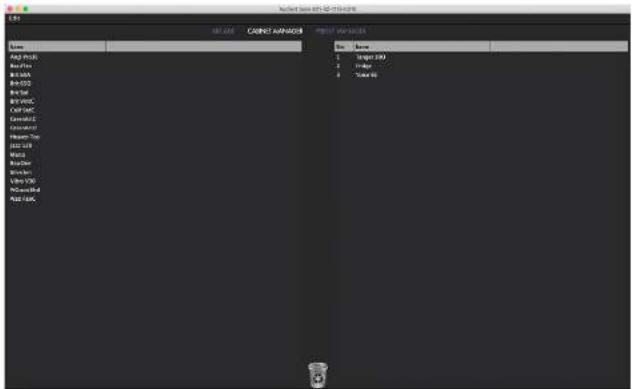
The cabinet manager screen can be accessed from the top of the Torpedo Remote and allows you to view your list of available cabinets and store up to three onto the Sono itself.
To save a cabinet to Sono, simply drag and drop the cabinet onto one of the three slots available on the left hand of the screen. Please note that if all three slots are full, you will need to remove one cab first to free up a slot.
Please note that in order for a cabinet to be used within one of Sono's three preset slots, this cabinet must be stored on Sono itself using the cabinet manager. Otherwise a generic cabinet will be used in place of the cabinet selected.
text_image
Current Manager 01-52-7143-078 Current Manager File Name: Single 200 Bridge Total Start End Start Menu Start Menu Start Menu Start Menu Start Menu Start Menu Start Menu Start Menu Start Menu Start Menu Start Menu Start Menu Start Menu Start Menu Start Menu Start Menu Start Menu Start Menu Start Menu Start Menu Start Menu Start Menu Start Menu Start Menu Start Menu Start Menu Start Menu Start Menu Start Menu Start Menu Start Menu Start Menu Start Menu Start MenuSono
DAW Setup Guides
text_image
Bucrevt Sono T1 200V +5V -5V +5V +5V +5V +5V +5V +5V +5V +5V +5V +5V +5V +5V +5V +5V +5V +5V +5V +5V +5V +5V +5V +5V +5V +5V +5V + - - - - - - - - - - - - - - - - - - - - - - - - - - - - - - - - - - - - - - - - - - - - - - - - - - - - - - - - - - - - - - - - - - - - - - - - - - - - - - - - - - - - - - - - - - - - - - - - - - - - + - + + + + + + + + + + + + + + + + + + + + + + + + + + + + + + + + + + + + + + + + + + + + + + + + + + + + + + + + + + + + + + + + + + + + + + + + + + + + + + + + + + + + + + + + + + + + + + + + + + + + + + + + + + + + + + + + + + + + + + + + + + + + + + + + + + + + + + + + + + + + + + + + + + + + + + + + + + + + + + + + + + + + + + + + + + + + + + + + + + + + + + + + + + + + + + + + + + - + - + - + - + - + - + - + - + - + - + - + - + - + - + - + - + - + - + - + - + - + - + - + - + - + - + - + - + - + - + - + - + - + - + - + - + - + - + - + - + - + - + - + - + - + - + - + - + - + - + -Logic Pro SetupPro Tools Setup
Sono
Operation with Pro Tools
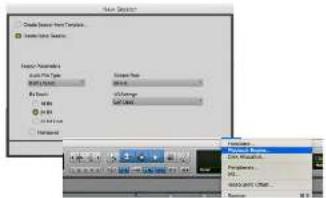
Once Sono has been successfully installed following the steps detailed in this manual, launch Pro Tools and ensure that a new session is created at the desired sample rate (if clocking internally) or at the rate of the clock source (if clocking externally).
If using Windows, make sure that you have set the correct latency and buffer size settings in the Sono app before opening a project. Changing these settings will result in Pro Tools needing to restart.
text_image
File Setup Create New Text Files Save New Text Files Import New Text Size: 100 px Size: 100 px Size: 100 px Size: 100 px Size: 100 px Size: 100 px Size: 100 px Size: 100 px Size: 100 px Size: 100 px Size: 100 px Size: 100 px Size: 100 px Size: Not Applicable Not Applicable Not Applicable Not Applicable Not ApplicablePlayback Engine
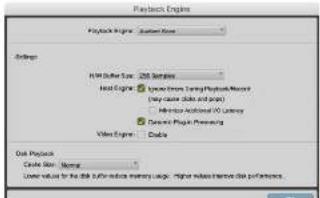
Go to Setup > Playback Engine and ensure that Sono is set as the active playback device.
text_image
Playback Engine Project Engine: Active Home Settings File Size: 200 Samples Host Engine: Dynamic Input (PlayBlock Memory) (Play button mode and path) Membrane Additional VD Latency Dynamic Project Programming Video Engine: Cable Disk Project Drive Size: Normal Lower value for the disk buffer reduce memory usage. Higher values improve disk performance.I/O Setup
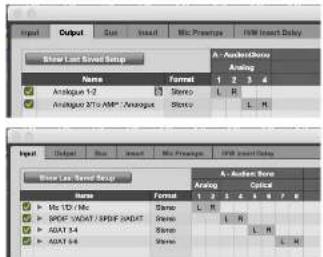
Go to Setup > I/O to label your inputs and outputs and ensure that Sono is correctly reporting 11 inputs and 4 outputs to and from Pro Tools.
Note that analogue outputs 1-4 are the DAW playback channels in the Sono mixer and can either be routed through the Sono mixer or hard-wired directly from Pro Tools to the physical outputs.
text_image
Input Output Giant Insert Mio Preampie HW Insert Delay Show Last Wave Setup Name Format A - Audio/Show Analog 1 2 3 4 Antique 1-2 Stereo L R Antique 30000000000000000000000000000000000000000000000000000000000000000000000000000000 Input Output Blue Insert Mio Preampie HW Insert Delay Show Last Wave Setup Name Format A - Audio/Show Analog Optical 1 2 3 4 5 6 7 8 Mic TD / Mic Stereo L R SPOFF / SPOFF / SPOFF / SPOFF Stereo L R AGAT 3-4 Stereo L R AGAT 4-4 Stereo L RFor more Pro Tools information consult your Avid user manuals & documentation.
The No CAB input which bypasses the Torpedo Processing comes in via channel 11. This can be used to record a duplicate clean signal for re-amping later on.
It is recommended that Input monitoring in the DAW is turned off as monitoring of the inputs can be done using Sono itself with almost zero latency.
Operation with Logic Pro
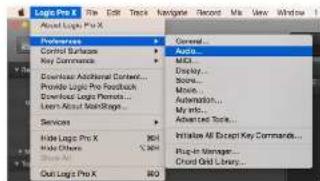
Once Sono has been successfully installed following the steps detailed earlier in this manual, launch Logic Pro and check the following:
Logic Pro > Preferences > Audio
text_image
Logic Pro X About Logic Pro X Preferences Control Subfields Key Commands Download Additional Context... Promote Logic Pro Feedback Download Logic Parents... Learn About Modifiers... Services Hide Logic Pro X Hide Options Out Logic Pro X General... Audio... METH... Display... Show... Music... Automatically... My etc... Advanced Tools... Initialize All Except Key Commands... Plug or Manager... Chond Grid Library...Ensure that Sono is selected as the active audio device and set the buffer size (to affect system latency). If you are experiencing issues with playback stability and CPU loading, try increasing the buffer size. This appears with "overload" errors and/or pops and clicks and distortion in the audio.

text_image
Close Close Close C:\Documents MIL Soft Mode: 0.0000 Object Size: Object Size Target Size: 1 Background Size: 0 Background Mode: 0.0000 (or 0.0000 to 0.0000) Normal Mode: 0 Normal Mode: 0 Normal Mode: 0 Normal Mode: 0 Normal Mode: 0 Normal Mode: 0 Normal Mode: 0 Normal Mode: 0 Normal Mode: 0 Normal Mode: 0 Normal Mode: 0 Normal Mode: 0 Normal Mode: 0 Normal Mode: 0 Normal Mode: 0 Normal Mode: 0 Normal Mode: 0 Normal Mode: Normal Mode: Normal Mode: Normal Mode: Normal Mode: Normal Mode: Normal Mode: Normal Mode: Normal Mode: Normal Mode: Normal Mode: Normal Mode: Normal Mode: Normal Mode: Normal Mode: Normal Mode: Normal Mode: Normal Mode: Normal Mode: Normal Mode: Normal Mode: Normal Mode: Normal Mode: Normal Mode: Normal Mode: Normal Mode:If you are using Sono's zero latency monitoring while recording, be sure to disable Logic's software monitoring to avoid phasing as the same source will be heard twice with a short delay between the low latency DSP signal and the delayed software monitoring signal.
Assigning I/O
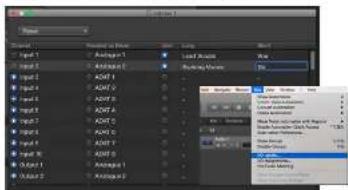
All of Sono's input and output channels will be available to Logic for routing. There are a total of 12 inputs and 4 outputs reported from the driver.
The No CAB Input which bypasses the Torpedo Processing comes in via channel 11. This can be used to record a duplicate clean signal for re-amping later on.
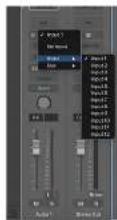
You can rename input and output channels to whatever you wish using the I/O label function This is a great way to keep things organised.
text_image
Add Add1 Add2 Add3 Add4 Add5 Add6 Add7 Add8 Add9 Add10 Add11 Add12 Add13 Add14 Add15 Add16 Add17 Add18 Add19 Add20 Add21 Add22 Add23 Add24 Add25 Add26 Add27 Add28 Add29 Add30 Add31 Add32 Add33 Add34 Add35 Add36 Add37 Add38 Add39 Add40 Add41 Add42 Add43 Add44 Add45 Add46 Add47 Add48 Add49 Add50 Add51 Add52 Add53 Add54 Add55 Add56 Add57 Add58 Add59 Add60 Add61 Add62 Add63 Add64 Add65 Add66 Add67 Add68 Add69 Add70 Add71 Add72 Add73 Add74 Add75 Add76 Add77 Add78 Add79 Add80 Add81 Add82 Add83 Add84 Add85 Add86 Add87 Add88 Add89 Add90 Add91 Add92 Add93 Add94 Add95 Add96 Add97 Add98 Add99 Add100Cubase SetupLogic Pro Setup
Sono
Operation with Logic Pro
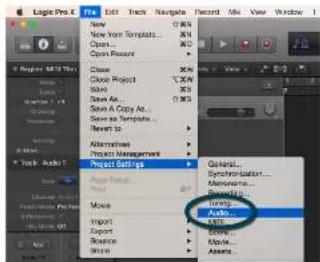
If you are using an external clock source (ADAT or S/PDIF) to clock Sono, please ensure that your Logic Pro project is set to the same sample rate when recording and playing back in a session, otherwise things may sound a bit sharp or flat!
File > Project Settings > Audio
text_image
Logic Pro 6 File Edit Track Navigate Record Mix View Window 1 New New from Templates... Open... Open Record Close Close Project Save As... Save As Copy As... Save as Templates... Recent to Alternations Project Management Project Grids General... Synchropix... Memorality... Drawing... Auto... Audio... Preview... Preview... Movie... Import... Export... Browse... Share...If you are using the internal clock in Sono, setting the sample rate via Logic Pro will update the Sono sample rate to follow your session.
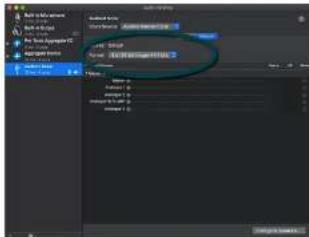
There may be a slight pause as the system re-clocks. This is normal.
This can be verified in Audio MIDI Setup.
Macintosh HD > Applications > Utilities
text_image
Add to Settings Add to Settings Add to Settings Add to Settings Add to Settings Add to Settings Add to Settings Add to Settings Add to Settings Add to Settings Add to Settings Add to Settings Add to Settings Add to Settings Add to Settings Add to Settings Add to Settings Add to Settings Add to Settings Add to Settings Add to Settings Add to Settings Add to Settings Add to Settings Add to Settings Add to Settings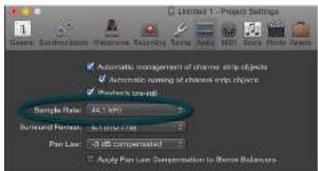
text_image
L found 1 - Project Settings Automatic management of channel into objects Automatic ranking of channel into objects Parameters created Sample Rate: ACI 100 Background Patterns: Active Data Plan Line: MS Compensated Apply Plan Line Compensation to Store Balances.For more Logic Pro information please consult your Apple user manuals & documentation.
Operation with Cubase / Nuendo
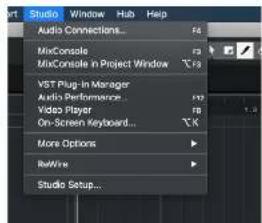
Once Sono has been successfully installed following the steps detailed earlier in this manual, launch Cubase and head straight for the Studio menu:
Studio > Studio Setup
text_image
Studio Window Hub Help Audio Connections... MixConsole MixConsole in Project Window VST Plug-in Manager Audio Performance... Video Player On-Screen Keyboard... More Options Retire Studio Setup...Select VST Audio System in the devices menu.
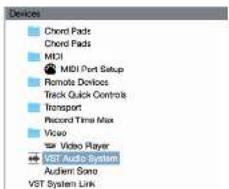
text_image
Chord Pads Chord Pads MIDI MIDI Port Setup Remote Devices Track Quick Controls Transport Record Time Max Video Video Player VST Audio System Audience Sono VST System Link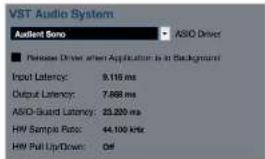
text_image
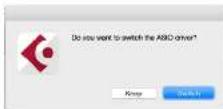
VST Audio System Audient Sono ASIO Driver ■ Release Driver when Application is in Background Input Latency: 9.119 ms Output Latency: 7.888 ms ASIO-Standard Latency: 23.220 ms HV Sample Rate: 44.100 kHz HV Pull Up/Down: OffSelect Audient Sono in the menu to ensure that Cubase / Nuendo addresses the Sono device driver. You will be asked if this is OK, select 'switch'.
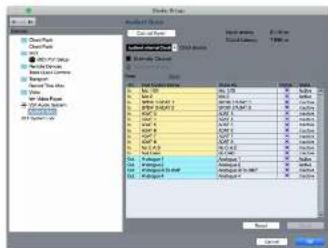
Select Audient Sono in the devices menu. Here you will see the main Sono information, where clock sources can be set as well as activating I/O ports.
Be sure to click Externally Clocked if clocking from another digital device via ADAT or S/PDIF.
text_image
New Item Add Items New Item Add Items Delete New Item Add Items Delete New Item Add Items Delete New Item Add Items Delete New Item Add Items Delete New Item Add Items Delete New Item Add Items Delete New Item Add Items Delete New Item Add Items Delete New Item Add Items Delete New Item Add Items Delete New Item Add Items Delete New Item Add Items Delete New ItemSupport & ARCCubase Setup
Sono
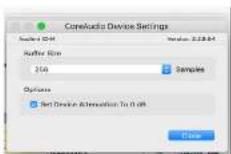
Buffer sizes can be set in the control panel within the VST devices display. It is ideal to keep them quite high to reduce CPU loading if you use the Sono app as the input monitoring device while recording.
I/O ports can be renamed in the device panel such that they better represent what you connect to them (for example Main Monitors, Headphones). This is useful as any names chosen here will be those displayed when assigning I/O on track input/output channel routing.
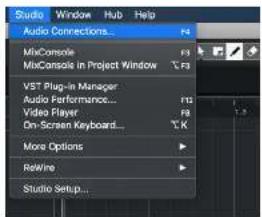
Close the device setup panel and navigate to the Studio connections panel:
Studio >Studio Connections (F4)
text_image
Studio Window Hub Help Audio Connections... MixConsole MixConsole in Project Window VST Plug-in Manager Audio Performance... Video Player On-Screen Keyboard... More Options Rewire Studio Setup...Here you can ensure that all buses have been created in Cubase / Nuendo and therefore all ports are addressable in your session. Add new buses and assign them to the necessary I/O if required.
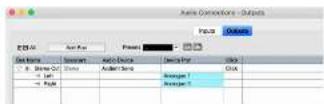
Bus types can be set (mono / stereo) and the VST control room section can also be used. For more information regarding set-up please consult your Steinberg user manuals and documentation.
Setup in Other DAWs
There are too many DAW's for us to list setup process for here so if you are unsure how to setup Sono in your DAW, we would recommend reading the manual for your DAW which should explain the setup process for an audio interface.
If you do require further assistance however, please check our online help centre or contact our support team:
audient.com/support
Audient Help Desk
Further information regarding Sono, including FAQs and troubleshooting can be found on our online help centre.
audient.com/support
Our Help centre is regularly updated with information to give tips and tricks on how to use Sono, as well as guides on how to avoid or resolve common issues.
If further assistance is required then you can also submit a support ticket through our help centre and one of our support team will be happy to assist you.
text_image
Grid of eight product photos with visible brand logos and labels, likely from a retail or e-commerce website interface.
text_image
Two notes AUDIO ENGINEERING Loop waldorf PRODUCERTECH LANDR steinbergAudient ARC - Free Software
At Audient ARC, you will find a comprehensive range of software & offers from some of the industry's leading innovators. All you have to do is register your product and take advantage of these great offers for free!
Make your account and register your Sono at:
arc.audient.com
Technical Specifications
Warranty
Sono
MICROPHONE PREAMPLIFIER:
MIC GAIN: 0 to +60 dB
LINE GAIN: -10 to +50 dB
PHANTOM POWER: 48v +/-4v @ 10mA/Channel
MIC EIN: 120dBu
CMRR: >80dB @1kHz
MAXIMUM INPUT LEVEL: +16dBu
INPUT IMPEDANCE (Mio): >3kΩ Balanced
INPUT IMPEDANCE (Line): >10kΩ Balanced
FREQUENCY RESPONSE: +/-0.5dB 10Hz to 22kHz
CROSSTALK: <-90dB @ 1kHz & 10kHz
THD+N@0dBu(1kHz):0.003%(-05dBu)
SNR: 96dB A-Weighted
XLR: Pin 2 (Hot), Pin 3 (Cold) & Pin 1 (Shield)
1/4* JACK; TIP (Hot), RING (Cold) & SLEEVE (Shield)
D.上:
DJ MAX GAIN: 20 dB
MAXIMUM INPUT LEVEL (at unity gain): +4dBu
INPUT IMPEDANCE: 1McgΩ Unbalanced
FREQUENCY RESPONSE: 13dB - 10Hz to 22kHz
THD+N @ 0dBu (1kHz): 1.50%
SNR: 90dB
1/4* JACK: TIP (Hot) & SLEEVE (Shield)
ADC INPUTS:
MAXIMUM INPUT LEVEL: 16dBu
DIGITAL REFERENCE LEVEL: 0dBRS = +16dBu
EREQUENCY RESPONSE: +/(0.5*19.10Hz) n.Es/2
CROSSLALK: < 115dB × 1kHz & 10kHz
CROSSIALE: <113GB/TM12 & 10KM2 THD: N = 14RES (1kHz): <0.0015%
THD+N@-TGBFS (1kHz): <0.0015% DYNAMIC RANGE: 1.5g/ft, 4-weighted
DYNAMIC RANGE 1105A-Weighted
SPEAKER OUTPUTS:
MAXIMUM OUTPUT LEVEL: +16dBu
DIGITAL REFERENCE LEVEL: 0dBPS = +16dBu
OUTPUT IMPEDANCE: <100 Balanced
FREQUENCY RESPONSE: +/-0.5dB 10Hz to Fs/2
CROSSTALK: < -120dB @ 1kHz & 10kHz
GROSS/ALR: -120GB (TH 12 & 10) THD-N 0.14BFS (1kHz): <0/2015>
THD+N(P-TUBFS (1kHz): <0.50/15% DYNAMIC RANGE: 1.4dB, 4-weight
DYNAMIC RANGE: 1405 A-Weighted 3/47 JACK: TIR (Hot) BING (Cold) & SLFEVE (Ebleed)
HEADPHONE OUTPUT:
MAXIMUM OUTPUT LEVEL: +16dBu
DIGITAL REFERENCE LEVEL: 0dBPS - +18dBu
OUTPUT IMPEDANCE: <500 Balanced
EQUENCY RESPONSE: +0.5dB 10Hz to Fr/2
FREQUENCY RESPONSE: 1/43.5171 CROSETALK: 90dB @ 1kHz & 10kHz
GROSTALK: Mailing (1984) 100
THD+N@-TUBFS (TKHZ): 0.01024 DYNAMIC RANGE: 1.4dB A upiah
DYNAMIC RANGE: THIS A-WEIGHT
MAX LEVEL INTO 300nm: +10dBU, 0.0015% THD+N, 3.7V/8K POWER
456mW or Pavg 228mW
MAX LEVEL INTO 60ohms: +13.5dBu, 0.0015% THB+N, 5.17Vpk
Power: 445mW or Pavg 222mW
MAX LEVEL INTO 600ohms: +15.8dBu, 0.0015% THD+N, 0.77Vpk
Power: 76mW or Pavg 38mW
1/4* JACK: TIP (Hot), RING (Cold) & SLEEVE (Shield)
TO-AMP OUTPUT:
MAXIMUM OUTPUT LEVEL: -12dBu
DIGITAL REFERENCE LEVEL: 0dBFS = -12dB
OUTPUT IMPEDANCE: <510 Balanced
EREQUENCY RESPONSE: +1.05dB 1GHz In Fr2
THP: N = 1 dBFS (1kHz) = 0.000%
THD+N@-TabRS (TKHZ): <0.002% DYNAMIC RANGE OF ID: 4-weighting
DYNAMIC RANGE: 95dB A-Weighted
1/4" JACK: TIP (Hot and SLEEVE (Shield)
DIGITAL (TOSLINK) INPUT:
ADAT8CHANNELS 44.1-48kHz
ADATA CHANNELS (SMUX) 832-95kHz
STEREO S/PDF 44.1-90kHz
USB 2.0 HIGH SPEED
No. of INPUT CHANNELS 10 (2 Analogue, 6 Digital)
No. of OUTPUT CHANNELS 4 (4 Analogue)
Connector: USB Type-C
Included Cables: 1.5m USB 2.0 Type-C to USB Type-C
1.5m USB 2.0 Type-C to USB Type-A
Sono DSP Mixer Round-trip (In to out) Latency:
Without Torpedo Processing
44.1 kHz 0.677ms
48.0 kHz 0.625ms
89.2 kHz 0.354GHz
98.0 kHz 0.3226ms
80.0 KHz 0.325GHz
With Torpedo Processing
44.1 kHz 4.63ms
48.0 kHz 4.18ms
68.2 kHz 3.28ms
96.0 kHz 250ms
POWER SUPPLY:
12VDC Centre Positive DC Adapter - 2Amps
Internally conditioned to provide +49VDC, +/-12VDC & low voltage
rails for digital processing core & converters.
Sono cannot be bus powered for quality reasons.
WEIGHTS & DIMS:
Weights: Unit:
Packaged: 2.0kg
。
Unit Dimensions:
Packaged Dimensions:
229mm (w) x 67mm (h) x 165mm (c)
The Audient warranty period for any product purchased is 12 months from the date of the original purchase.
- The warranty is not transferable to a second user.
- Audient products are built using the latest manufacturing technology, tested to the highest possible standards and by using premium components this should result in providing you with reliable performance for many years.
- The warranty is return to base, meaning the unit must be returned, carriage paid, to the Dealer you purchased the unit from or the exclusive territory Distributor responsible for the country in which you purchased the product
- Some of the products returned under warranty are found not to exhibit any fault at all when they are retested at our Service Centre's so it's always useful to contact our Support team first to try to avoid inconvenience to you at support@audient.com
- If you suspect that your unit is suffering from a component or manufacturing defect during the warranty period please contact either Audient support or the dealer that you purchased the Audient product from
- In the event of a component or manufacturing defect becoming evident during the warranty period, Audient will ensure that the product is repaired free of charge or replaced
- Whilst this warranty is provided by Audient, the warranty obligations are fulfilled by the exclusive territory Distributor responsible for the country in which you purchased the product.
- The Dealer will advise you of the appropriate procedure for resolving the warranty issue.
- In every case it will be necessary to provide a copy of the original invoice or Dealer purchase receipt to the Distributor.
- In the event that you are unable to provide proof of purchase directly then you should contact the Dealer from whom you purchased the product and attempt to obtain proof of purchase from them. The Dealer | Distributor will then advise the procedure to follow.
- This limited warranty is offered solely to products purchased from an Authorised Audient Dealer (defined as a Dealer which has purchased the product directly from Audient in the UK, or one of our Authorised Distributors outside the UK).
Warranty
Service
Sono
Please note that if you purchased the product from outside of your country of residence you must return the unit to the original point of purchase for repair.
The Audient warranty term is additional to any statutory rights in the country of purchase or as offered by the dealer at the time of purchase.
What is meant by a Manufacturing Defect?
We define this as a defect in the performance or specification of the product as described and published by Audient.
A Manufacturing Defect does not include damage caused by post-purchase shipping, storage or careless handling, nor damage caused by misuse.
Tel: 0044 1256 381944
audient.com
natural_image
A person playing a guitar at a desk with audio equipment, set against a stone wall (no visible text or symbols)Service Information
Sono contains no user-serviceable components, please refer to qualified service personnel for diagnosis and repair. Your warranty will be void if you tamper with the device at component level. If you have any questions with regard to the repair, please contact Audient Ltd.
If your unit is in warranty, please contact your dealer directly for a repair or replacement (at the discretion of the dealer).
For out of warranty repairs, please contact Audient Ltd, after which a Return Materials Authorization (RMA) number will be assigned. This number will serve as a reference for you and helps facilitate and expedite the return process. When the unit is returned please include this RMA number along with a description of the fault inside the packaging box.
To request an RMA, access technical support & FAQs, ask for troubleshooting assistance or make an enquiry, please visit: www.audient.com/support
text_image
AUDIENT HELP DESK ARC ARIC ARIC ARIC ARIC ARIC ARIC ARIC ARIC ARICGlossary
Below are a list of common words you may encounter in this manual or whilst using Sono.
A Amperes
ADAT Alesis Digital Audio Tape
ADC Analogue to Digital Converter
DAW Digital Audio Workstation
CPU Central Processing Unit
CUE Artist Headphone Mix
DAC Digital to Analogue Converter
dB Decibel
dBu Decibel referenced to 0.775Vrms = 0 dBu
dBFS Decibel Full Scale
DC Direct Current
D.I Direct Injection (Instrument Input)
DoC Declaration of Conformity
DSP Digital Signal Processing
EQ Equaliser
FAQ Frequently Asked Questions
FCC Federal Communications Commission
GB Gigabyte
GUI Graphical User Interface
HPF High Pass Filter
HV High Voltage
I/O Input / Output
LED Light Emitting Diode
RoHS Restriction of Hazardous Substances
RAM Random Access Memory
S/PDIF Sony Philips Digital Interface Format
THD+N Total Harmonic Distortion + Noise
TRS Tip Ring Sleeve (1/4" Jack Balanced)
TS Tip Sleeve (1/4" Jack Unbalanced)
USB Universal Serial Bus
V Volts
XLR Extra Live Return, Extremely Low Resistance,
Canon X Series, Latching, Resilient Rubber Compound... or make up your own!