
VM-210 - Lighting Bolt - Free user manual and instructions
Find the device manual for free VM-210 Bolt in PDF.


| Type | On-camera LED flexible macro light |
| Compatible Cameras | All cameras with a standard hot shoe |
| Light Output | 970 lx at 12"; 4,200 lx at 6" |
| Color Temperature | 5,500 K |
| Power Source | 4 AA lithium, NiMH, or alkaline batteries |
| Dimensions | 18" × 2.9" × 1.5" (45.7 × 7.4 × 3.8 cm) |
| Weight (without batteries) | 8 oz (227 g) |
| Light Modes | Light (continuous), Flash (approx. 0.5 sec), Left-Only, Right-Only |
| Brightness Adjustment | -3.0 to +3.0 in seven levels |
| Automatic Power-Saving | Enters power-saving mode after 30 minutes of inactivity |
| LCD Display | Shows battery level, mode, power output |
| Mounting | Hot shoe with locking wheel |
| Flexible Arms | Twin LED arrays with flexible arms for positioning |
| Flash Mode Activation | Requires mounting on camera hot shoe |
| Battery Indicator | 4-level indicator on LCD; blinks when low |
| Cleaning | Soft, dry cloth only |
| Safety Precautions | Keep away from water, flammable gases/liquids; do not disassemble; do not stare at lights; use correct battery orientation |
| Warranty | One-year limited warranty |
Frequently Asked Questions - VM-210 Bolt
User questions about VM-210 Bolt
0 question about this device. Answer the ones you know or ask your own.
Ask a new question about this device
Download the instructions for your Lighting in PDF format for free! Find your manual VM-210 - Bolt and take your electronic device back in hand. On this page are published all the documents necessary for the use of your device. VM-210 by Bolt.
USER MANUAL VM-210 Bolt
Inspiration strikes Inspiration strikes
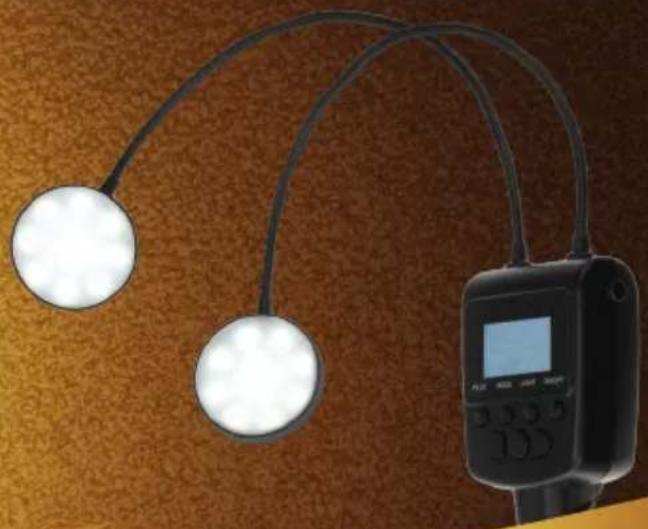
natural_image
Medical imaging device with two white circular components connected by black cables against a textured brown background (no visible text or symbols)VM-210
FLEXIBLE MACRO LIGHT
User's Manual
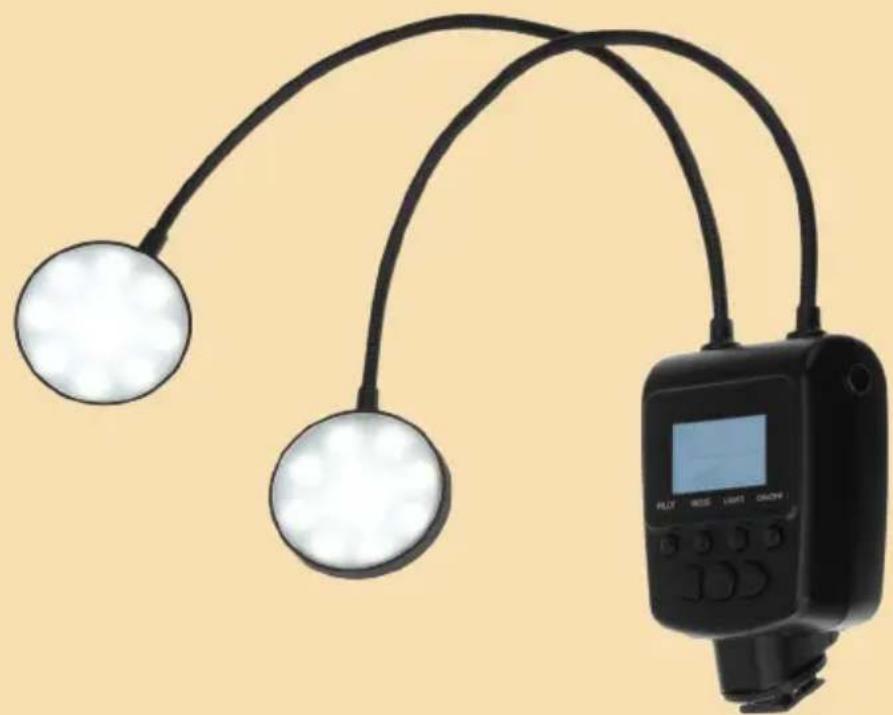
natural_image
Medical device with three lenses and a digital display showing a screen (no text or symbols visible)Copyright © 2016 Gradus Group.
Bolt and other names of Bolt products are trademarks of Gradus Group. Other product and corporate names mentioned herein are trademarks of their respective holders.
Introduction
Thank you for choosing Bolt. The Bolt VM-210 Flexible Macro Light combines a compact design with versatile features. Offering great ease of use and creative lighting control, it's perfect for macro photography and video. Among the benefits you'll enjoy:
- Powerful twin LED lights with flexible arms
- Smaller apertures and wider depth-of-field due to increased light
- Seven levels of brightness adjustment
- Left- and Right-Only illumination modes
- Flash mode
• Automatic power-saving function
Precautions
- Please read and follow these instructions, and keep this manual in a safe place.
- Keep this product away from water and any flammable gases or liquids.
- Do not attempt to disassemble or repair this product. There are components inside that can produce a hazardous electric shock.
- Always install AA batteries of the same type and age. Do not combine different types or old and new batteries. This can cause the batteries to leak, overheat, or explode.
- Install the batteries in the proper orientation, as indicated by the markings in the battery compartment. Installing batteries in the reverse orientation can cause them to leak, overheat, or explode.
- Do not stare at the lights when they are powered on.
- Remove all power sources from the unit before long-term storage in order to prevent the product from igniting or leaking corrosive liquids.
- Clean this product with only a soft, dry cloth.
- Keep this product away from children.
- Make sure that this product is intact and that there are no missing parts.
- All images are for illustrative purposes only.
Contents
Overview 6-9
Installing Batteries....10–11
Mounting the VM-210 12–13
Turning on the VM-210 and Firing a Test....14
Light Mode 15
Flash Mode....15
Left and Right Mode 16
Brightness Adjustment....16
Troubleshooting 17
Specifications....18
Warranty....19
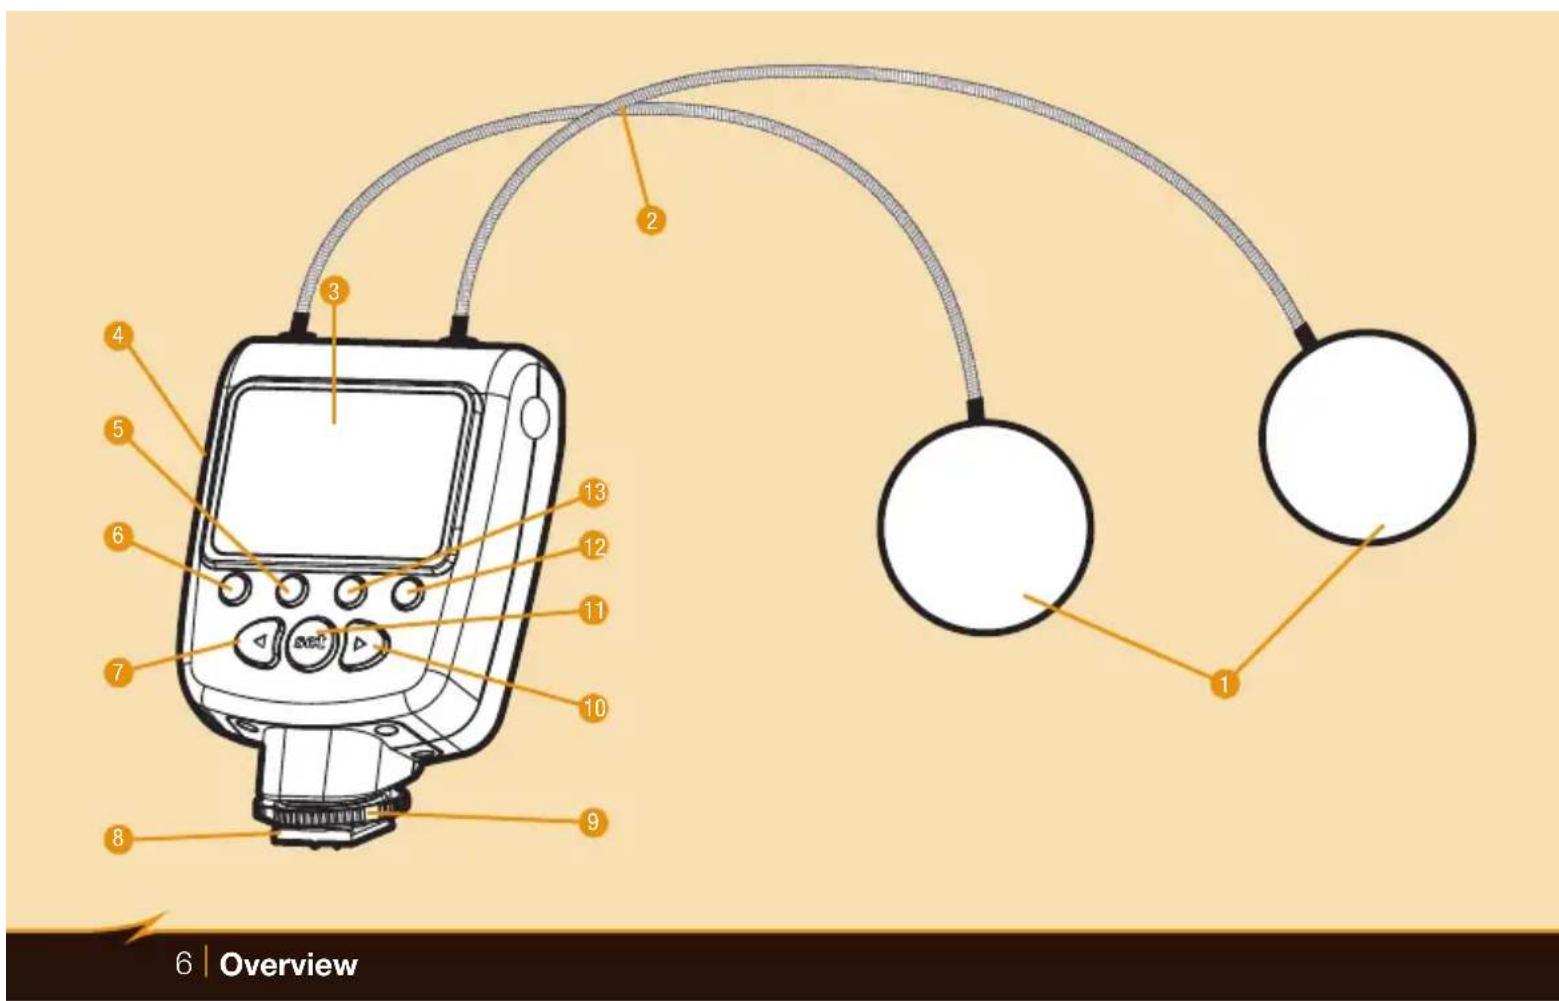
Overview
Flexible LED Lights:
- Twin LED arrays
- Flexible arms
Power Control Unit:
- LCD
- Battery compartment cover
- Mode button
- Pilot button
- Left navigation button
- Mounting foot
- Locking wheel
- Right navigation button
- Set button
- Power button
- Light button

LCD
- Battery level indicator
- Light mode
- Flash mode
- Left mode
- Right mode
- Dot indicator
- Power output value
- Power output level indicator
Installing Batteries
The VM-210 can be powered by four AA batteries of several types:
- Lithium (1.5 V)
• Nickel-metal hydride (Ni-MH) (1.2 V) - Alkaline (1.5 V)
Note: For the longest battery life, lithium or Ni-MH batteries are recommended.
To install batteries, make sure the VM-210 is turned off and follow these steps:
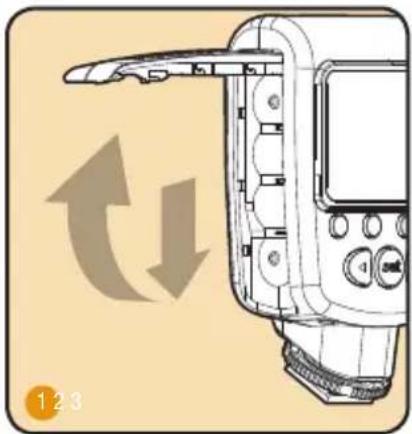
- Press on the battery compartment cover and slide it in the direction of the arrow to open it.
- Insert batteries in the orientations indicated by the illustrations inside the compartment.
- Close the battery compartment cover by pressing and sliding it into place, in the opposite direction of the arrow on the cover.
Important!
When battery power is low, the battery level indicator will blink on the LCD. Replace all four batteries at the same time. Do not mix battery types or brands, or use old and new batteries together.
natural_image
Illustration of a handheld device with directional arrows indicating motion (no text or symbols)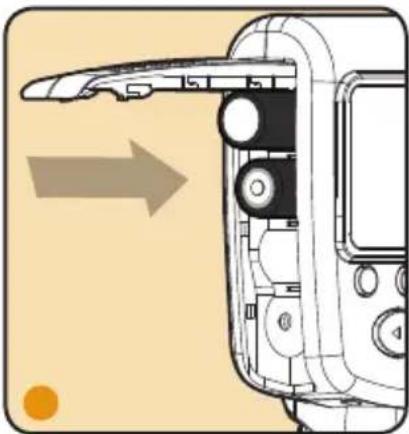
natural_image
Diagram of a camera module with an arrow indicating left-side motion (no text or symbols present)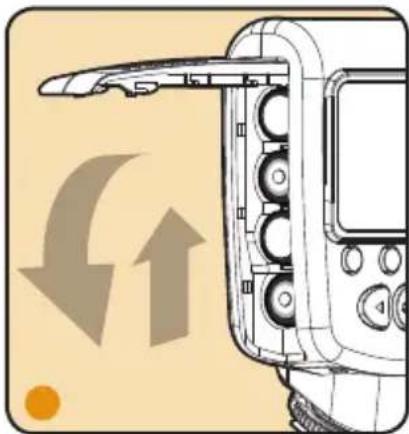
natural_image
Illustration of a camera with directional arrows indicating movement or change (no text or symbols present)Mounting the VM-210
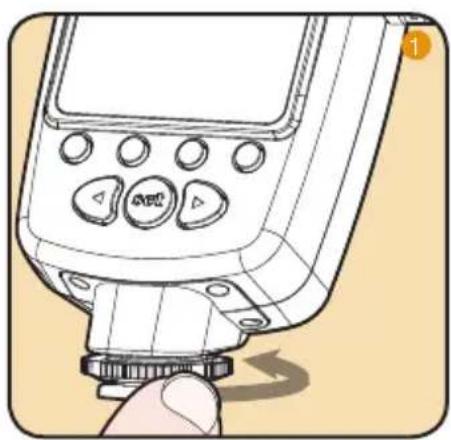
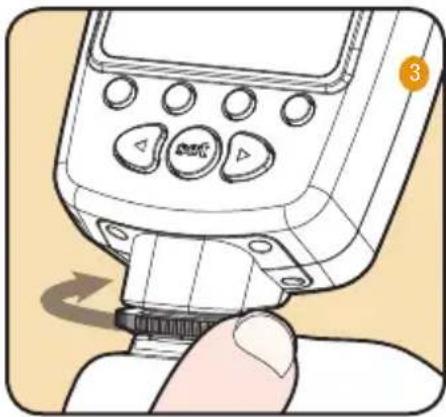
To mount the VM-210 on your camera, make sure the unit is turned off and follow these steps:
- Rotate the locking wheel counterclockwise to loosen it.
- Slide the mounting foot all the way into your camera's hot shoe.
- Rotate the locking wheel clockwise until secure.
natural_image
Illustration of a handheld electronic device with control buttons and a finger pressing a button (no text or symbols visible)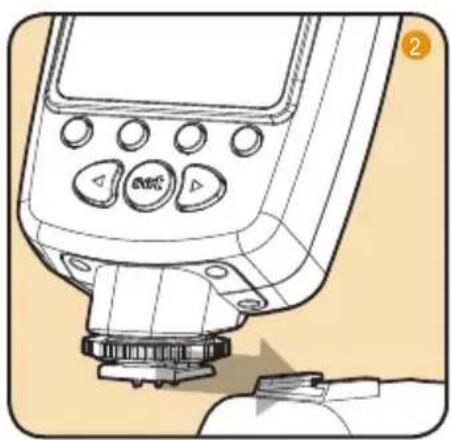
natural_image
Technical line drawing of a mechanical device with control buttons and a base component (no text or symbols)To dismount the VM-210 from your camera, make sure it's turned off and follow these steps:
- Rotate the locking wheel counterclockwise to release the unit.
- Slide the mounting foot out of your camera's hot shoe.
natural_image
Illustration of a handheld device with control buttons and a finger inserted (no text or symbols visible)Turning On the VM-210 and Firing a Test
To turn the VM-210 on, press and hold the power button until the LCD light up. To fire a test, press the Pilot button.
Automatic power-saving function: After thirty minutes of inactivity, the VM-210 will automatically enter power-saving mode to conserve battery life. To reactivate the VM-210, press the Power button. During long periods of inactivity, it is recommended that you use the power button to turn the LED off completely.
LCD illumination: When you turn on the VM-210 or press any button, the LCD will be illuminated for about twenty seconds.
Battery level indicator: The battery level indicator on the LCD shows the remaining battery power.
| LCD Display Status Battery Level | |
| 70%-100% | |
| 40%-69% | |
| 10%-39% | |
| 0%-9% | |
Light Mode
During Light mode, the light will be on continuously. This is ideal for seeing exactly where the light will fall, as well as for shooting video. Press the Light button to turn on the LEDs for constant lighting. The dot indicator on the LCD will switch to Light mode.
Flash Mode
To save battery power, you can engage the Flash mode so the LED turns on for approximately half a second when the camera shutter is released. To engage the Flash mode, press the Mode button repeatedly until the dot indicator on the LCD switches to Flash mode.
Note: When switching to Flash mode from Light mode, the power level indicator may rise to a higher level. This happens when the battery power is very low and indicates that the batteries will have a longer effective life in Flash mode. Note that the Flash mode will work only if theVM-210 is mounted on the camera's hot shoe.
Left- and Right-Only Mode
For more dramatic lighting in Flash mode, you can set your VM-210 to illuminate only from the left or right LED array. To set your VM-210 to Left- or Right-Only mode, press the Mode button repeatedly until the dot indicator on the LCD switches to the desired setting.
Brightness Adjustment
You can adjust the brightness output of your VM-210 from -3.0 to +3.0. To adjust the brightness output, press the right or left navigation buttons to increase or decrease the brightness. The onscreen power output level indicator displays the current brightness output.
Troubleshooting
| Problem Solution | |
| The battery indicator fluctuates between full and empty when repeatedly reinstalling the same batteries. | This is normal and may happen when the batteries are nearly exhausted. Replace the batteries. |
| The VM-210 is stuck in the camera hot shoe. | Make sure that the locking wheel is released. |
| The VM-210 is turned on and is in light mode but won’t light up. | Make sure that fresh batteries are installed and are in the proper orientation. |
| The VM-210 is turned on and is in Flash mode but won’t fire. | Make sure that fresh batteries are installed and are in the proper orientation.Make sure the control unit is securely attached to the camera.Make sure that the electrical contact on the foot of the control unit is not dirty. Clean it and try again. |
Specifications
| Type On-camera LED flexible macro light | |
| Compatible cameras All cameras with a standard | hot shoe |
| Light output | 970 lx at 12"; 4,200 lx at 6" |
| Color temperature 5,500 K | |
| Power source 4 AA lithium, NiMH, or alkaline batteries | |
| Dimensions | 18" × 2.9" × 1.5" (45.7 × 7.4 × 3.8 mm) |
| Weight without batteries 8 oz. (227 g) |
One-Year Limited Warranty
This BOLT product is warranted to the original purchaser to be free from defects in materials and workmanship under normal consumer use for a period of one (1) year from the original purchase date or thirty (30) days after replacement, whichever occurs later. The warranty provider's responsibility with respect to this limited warranty shall be limited solely to repair or replacement, at the provider's discretion, of any product that fails during normal use of this product in its intended manner and in its intended environment. Inoperability of the product or part(s) shall be determined by the warranty provider. If the product has been discontinued, the warranty provider reserves the right to replace it with a model of equivalent quality and function.
This warranty does not cover damage or defect caused by misuse, neglect, accident, alteration, abuse, improper installation or maintenance. EXCEPT AS PROVIDED HEREIN, THE WARRANTY PROVIDER MAKES NEITHER ANY EXPRESS WARRANTIES NOR ANY IMPLIED WARRANTIES, INCLUDING BUT NOT LIMITED TO ANY IMPLIED WARRANTY OF MERCHANTABILITY OR FITNESS FOR A PARTICULAR PURPOSE. This warranty provides you with specific legal rights, and you may also have additional rights that vary from state to state.
To obtain warranty coverage, contact the BOLT Customer Service Department to obtain a return merchandise authorization ("RMA") number, and return the defective product to BOLT along with the RMA number and proof of purchase. Shipment of the defective product is at the purchaser's own risk and expense. For more information or to arrange service, visit www.boltflashes.com or call Customer Service at 212-594-2353.
Product warranty provided by the Gradus Group.
www.gradusgroup.com
BOLT is a registered trademark of the Gradus Group.
© 2016 Gradus Group LLC. All Rights Reserved. GG1

BOLT ^TM
A Gradus Group Brand
Limited Warranty

Bolt™
www.boltflashes.com
- VM-210
- FLEXIBLE MACRO LIGHT
- Introduction
- Precautions
- Contents
- Overview
- Flexible LED Lights:
- Power Control Unit:
- LCD
- Installing Batteries
- To install batteries, make sure the VM-210 is turned off and follow these steps:
- Important!
- Mounting the VM-210
- Turning On the VM-210 and Firing a Test
- Light Mode
- Flash Mode
- Left- and Right-Only Mode
- Brightness Adjustment
- One-Year Limited Warranty
Brand : Bolt
Model : VM-210
Category : Lighting