
Elite K2 Power - Car hands-free kit FOCAL - Free user manual and instructions
Find the device manual for free Elite K2 Power FOCAL in PDF.

| Product Type | Car Hands-Free Kit |
| Brand | Focal |
| Model | Elite K2 Power |
| Dimensions (HxWxD) | 4.8 x 9.2 x 2.3 cm |
| Weight | 95 g |
| Power Supply | Built-in rechargeable battery, USB charging (5V/1A) |
| Connectivity | Bluetooth 5.0 |
| Microphone | Dual noise-canceling microphones |
| Speaker | Full-range, 40mm diameter |
| Frequency Response | 100 Hz – 20 kHz |
| Impedance | 4 ohms |
| Battery Life | Up to 15 hours talk time |
| Charging Time | 2 hours |
| Hands-Free Calling | Yes, with voice control support |
| Music Streaming | Yes, A2DP support |
| Voice Assistant | Compatible with Siri and Google Assistant |
| Mounting | Clip-on sun visor or dashboard adhesive |
| Material | ABS plastic with rubberized coating |
| Color | Black |
| Warranty | 2 years |
| Maintenance & Cleaning | Wipe with a soft, dry cloth; avoid liquids and abrasives. |
| Safety Precautions | Use only approved charger; do not expose to extreme temperatures. |
| Spare Parts & Repairability | Not user-repairable; contact Focal support for service. |
| General Information | Designed for clear communication in vehicle environments. |
Frequently Asked Questions - Elite K2 Power FOCAL
User questions about Elite K2 Power FOCAL
0 question about this device. Answer the ones you know or ask your own.
Ask a new question about this device
Download the instructions for your Car hands-free kit in PDF format for free! Find your manual Elite K2 Power - FOCAL and take your electronic device back in hand. On this page are published all the documents necessary for the use of your device. Elite K2 Power by FOCAL.
USER MANUAL Elite K2 Power FOCAL
natural_image
Technical line drawing of a speaker cone with concentric rings and base mount (no text or symbols)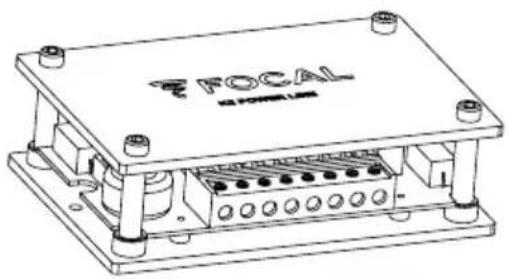
natural_image
Technical line drawing of a mechanical or electronic device with labeled components (no readable text or symbols)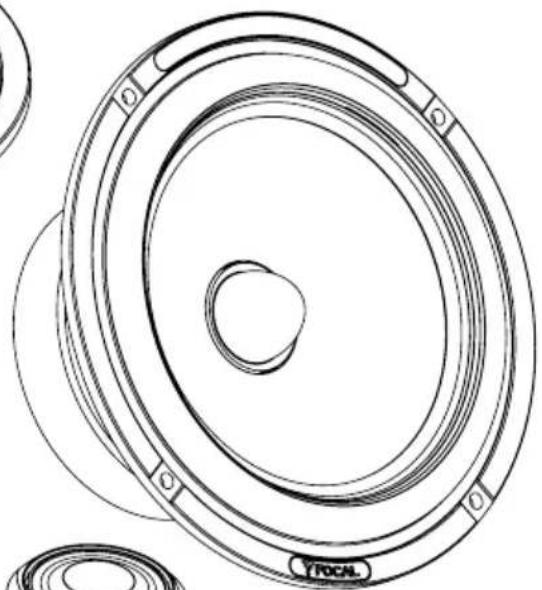
natural_image
Technical line drawing of a speaker cone with concentric rings and a central hole (no text or symbols)
Français page 10
English page 13
Deutsch p 16
Italiano p 19
Español p 22
Português p 25
Nederlands p 28
Русский р 31
中文第34页
日本語 第37页
한국어 페이지(40)
ELITE K2 POWER
natural_image
Technical line drawing of a mechanical assembly with a central component labeled 'BI AMP' (no text or symbols beyond label)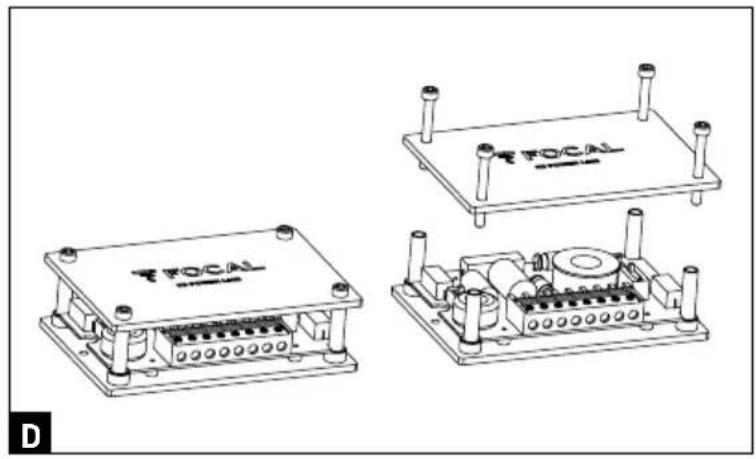
natural_image
Technical line drawings of three electronic components with mounting holes and connectors (no text or symbols)ES 165K2, ES 165KX2
natural_image
Technical line drawing of a TFOCAL electronic device with labeled components (no readable text or symbols beyond branding)natural_image
Technical line drawing of a mechanical or electrical enclosure with no visible text or symbols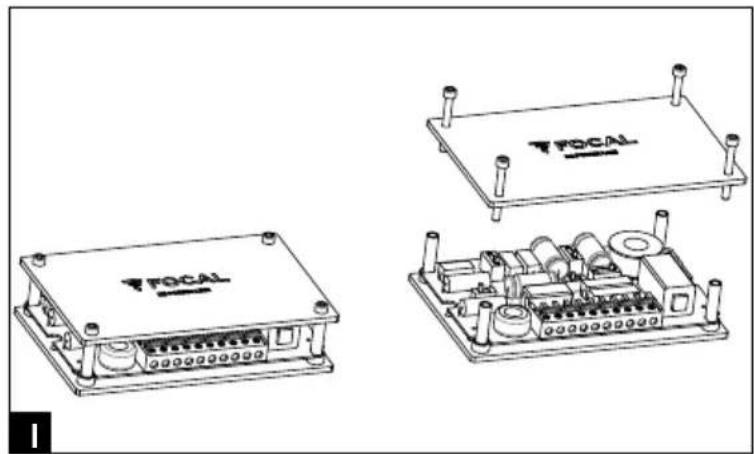
natural_image
Technical line drawings of three electronic device modules with no visible text or symbols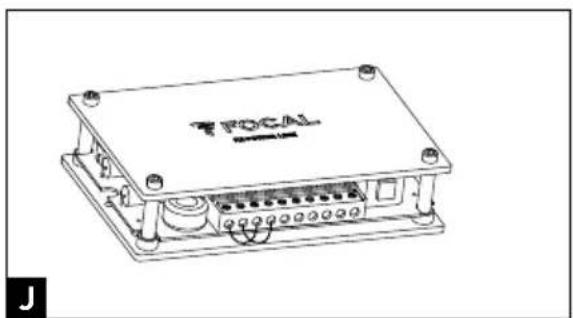
natural_image
Line drawing of a Focal device with ports and wiring (no text or symbols)flowchart
graph LR
    A["Top View"] --> B["Bottom View"]
    B --> C["Step 1: Top View with 3.0° cutout"]
    C --> D["Step 2: Top View with 5.0° cutout"]
    D --> E["Step 3: Top View with 5.0° cutout"]
    E --> F["Final Close-up"]
ES 165KX2, ES 165KX3
ELITE K2 POWER
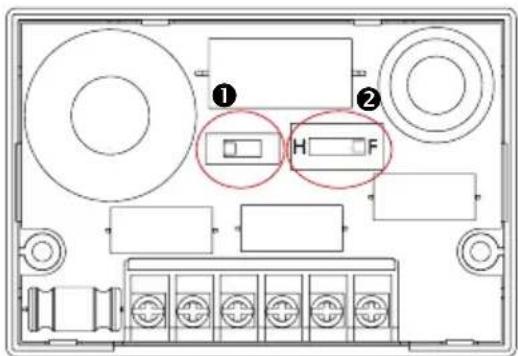
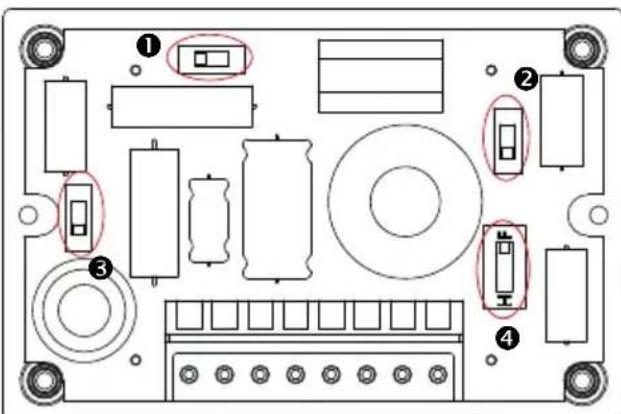
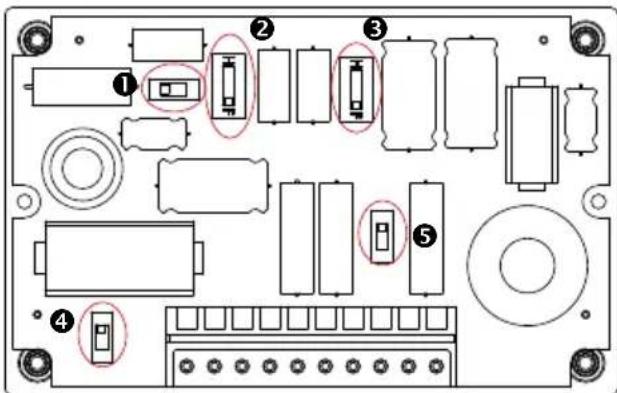
Woofer high pass / full adjustment
N
Réglage des switch du filtre / Crossover settings - ES 130K, ES 165K
1
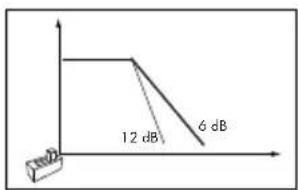
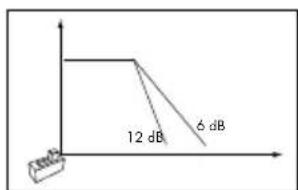
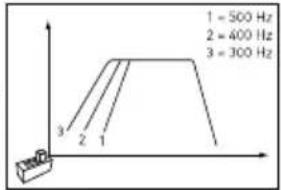
Pente de coupure du Woofer Woofer low pass slope
2
line
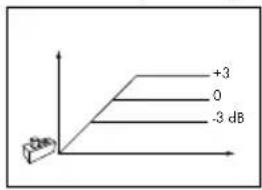
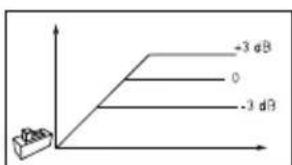
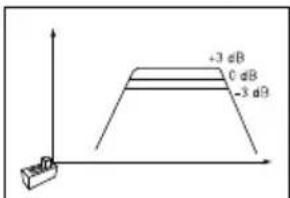
| X-Axis Label | Y-Axis Value | |---|---| | +3 | 0 | | 0 | 3 | | -3 dB | 0 |0
ELITE K2 POWER
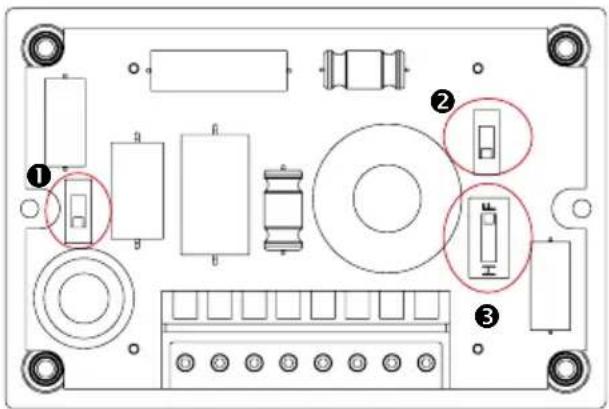
② Pente de coupure du Woofer
Woofer low pass slope
3
Pente de coupure du Woofer
Woofer low pass slope
P
2
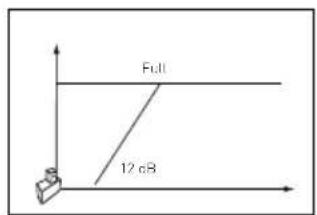
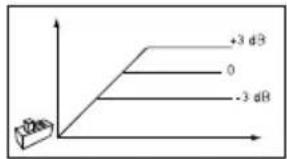
Réglage du niveau tweeter
Tweeter level adjustment
3
Réglage du passe haut médium
Midrange high pass adjustment
natural_image
Technical line drawing of a speaker component with concentric rings and central hub (no text or symbols)Avertissement
Kit coaxial EC165 K (Fig S)
Register your product online at www.focal.com/garantie and get your certificate of guaranty.

Warning
Listening for a prolonged period at a high volume level over 110 dB may result in hearing loss. Exposure, even brief, to sound at over 130 dB may result in irreparable hearing loss.
Important recommendations
First of all, check the space available for the loudspeakers (see the plans on the packaging) and then start cutting. If the loudspeakers are to be mounted in their original place, check whether there is enough space between the loudspeaker and the protective grating.
- Keep the loudspeakers away from metal chips and dust.
- Clean carefully prior to mounting the loudspeakers.
Warranty conditions
If you encounter problems, contact your Focal distributor first. For all Focal equipment, the warranty applicable to France covers a 2-year period as of the purchase date and is non-transmissible in case of resale. In the event of faulty equipment, it should be sent, at your own expense, in its original packaging to your distributor, who will then check the equipment and determine the nature of the problem. If it is under warranty, the equipment will be returned to you or replaced "postage paid". Otherwise, a quote for repair will be sent to you. The warranty does not cover damage arising from improper use or incorrect connection (e.g. burned voice coils...)
Environmental information
Your Focal-JMlab product has been designed and manufactured using high quality materials and components, which can be recycled and reused. This symbol signifies that the electrical and electronic devices, at the end of their life, should be disposed of separately from household waste. Please take this device to the local collection point or to a recycling centre. You will thus contribute to environmental conservation.
2-channel connection Kit (Fig A)
- ES 100K, ES 130K, ES 165K
2-channel connection Kit (Fig B)
- ES 165K2, ES 165KX2
These filters have been designed for use in "bi amplification".
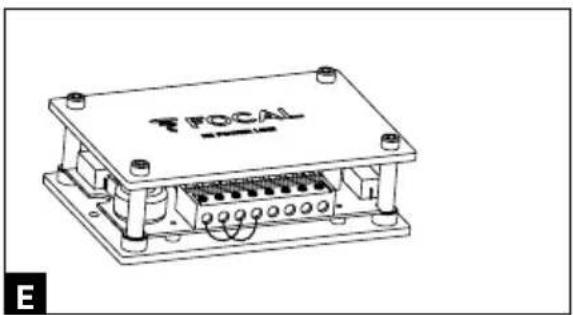
For "conventional" use, with the help of 2 short wires, connect the "input" terminals (IN W+ to IN T+ & IN W- to IN T-) (Fig C & E)
2-channel Kit connections in the case of bi amplification / BI AMP using (4-channel amp): (Fig F)
- ES 165K2, ES 165KX2
3-channel connection Kit
- ES 165KX3
3-channel Kit connections in the case of bi amplification (Fig K)
- ES 165KX3
These filters have been designed for use in "bi amplification".
For "conventional" use, with the help of 2 short wires, connect the "input" terminals (IN W+ to IN T+ & IN W- to IN T-) (Fig H & J)
Mounting of the filter
- ES 100K, ES 130K, ES 165K,
- ES 165KX, ES165KX2, ES 165KX3
The filters should be mounted (using the screws provided or with the help of double sided tape), preferably in a dry and ventilated area.
To open the casing, unclip the cover (ES100/130/165K models) or unscrew the 4 screws (ES165K2/165KX2/165KX3 models) (Fig D & I): Warning: for this filter model please keep the 4 aluminium spacers.
Note: If access to the filters is difficult, please implement the cabling and adjustments prior to final mounting.
Installation of the tweeter (ES100K/130K/165K/165K2 kits)
There are three mounting options
1 - Mounting on the inclined pod: choose the desired tilt according to the selected place. (Fig L1) Make a hole for the cables and screws, mount the stand with the help of the screws included in the kit, thread the 2 wires and then mount the tweeter in its housing (adjusted mounting). These tasks can be performed when the grating is assembled.
Warning: To remove the tweeter from this accessory, please act on the edge and, using a fine-blade tool as a lever, remove the tweeter/plastic collar/grille assembly.
2 - Mounting in the original place: Remove the grating, disassemble the plastic collar exerting pressure in order to remove this spare part from the tweeter body, remount the dome protective washer. (Fig L2) The dome of the tweeter should not enter into contact with a surface or a spare part of the vehicle: Respect the mounting of this important protective washer; this is required for all mountings without a grating in original places.
3 - Flush mounting: cut out a 40 mm in diameter hole. "Tight" adjustment (Fig L3)
Note: To mount the plastic collar, please respect the guide that ensures sound assembly of the 2 parts.
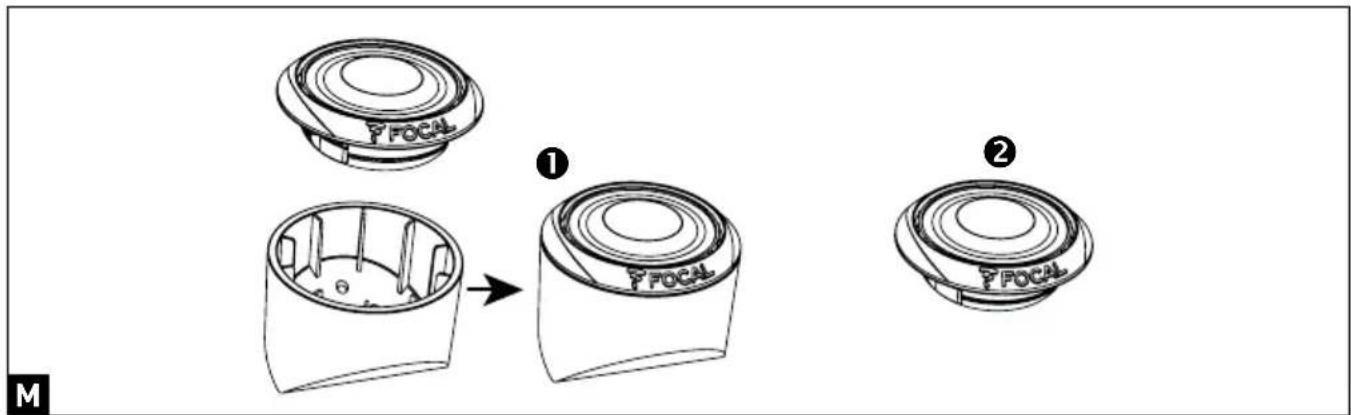
Installation of the tweeter (Kits ES165KX2 and 165KX3)
There are two mounting options:
1 - Mounting on the inclined pod: choose the desired tilt according to the selected place. (Fig M1) Mount the stand using the screws provided, thread the wires and then mount the tweeter in its housing (adjusted mounting). Reinstall the grille.
2 - Flush mounting: cut out a 51 mm in diameter hole: "Tight" adjustment. (Fig M2)
The serrated steel washer (provided) maintains the pressure of the tweeter after it has been mounted in its housing.
Coaxial kit EC165 K (Fig S)
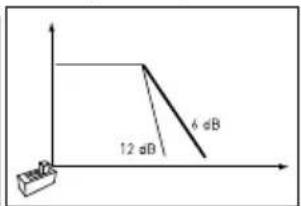
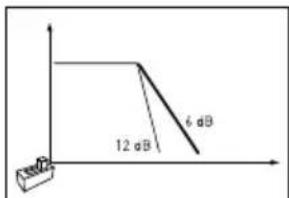
This coaxial kit is equipped with an integrated tweeter crossover (6 db/oct); please observe the general recommendations for installation.
Warning: The tweeter post is not adjustable or rotative: it has been designed to be as compact as possible and thus compatible with as many spaces as possible.
Warnung
Avvertenza
Aviso
Kit coaxial EC165 K (Fig S)
Aviso
Instalação do tweeter (kits ES100K/130K/165K/165K2)
Kit coaxial EC165 K (Fig S)
Waarschuwing
Coaxiale kit EC165 K (Fig S)
Предупреждение
警告
警告
경고

- ELITE K2 POWER
- P
- Avertissement
- Kit coaxial EC165 K (Fig S)
- Warning
- Important recommendations
- Warranty conditions
- Environmental information
- 2-channel connection Kit (Fig A)
- 2-channel connection Kit (Fig B)
- 2-channel Kit connections in the case of bi amplification / BI AMP using (4-channel amp): (Fig F)
- 3-channel connection Kit
- 3-channel Kit connections in the case of bi amplification (Fig K)
- Mounting of the filter
- Installation of the tweeter (ES100K/130K/165K/165K2 kits)
- There are three mounting options
- There are two mounting options:
- Coaxial kit EC165 K (Fig S)
- Warnung
- Avvertenza
- Aviso
- Instalação do tweeter (kits ES100K/130K/165K/165K2)
- Waarschuwing
- Coaxiale kit EC165 K (Fig S)
- Предупреждение
- 警告
- 경고
Brand : FOCAL
Model : Elite K2 Power
Category : Car hands-free kit