
Contact Sensor - Security Camera RING - Free user manual and instructions
Find the device manual for free Contact Sensor RING in PDF.


| Product type | Contact Sensor (part of Ring Alarm system) |
| Brand | Ring |
| Model | Contact Sensor |
| Dimensions (sensor) | Approximately 2.5 x 1.5 x 0.5 inches (63.5 x 38.1 x 12.7 mm) |
| Dimensions (magnet) | Approximately 1.5 x 0.5 x 0.5 inches (38.1 x 12.7 x 12.7 mm) |
| Weight (sensor + magnet) | Approximately 1.1 oz (31 g) |
| Power source | 1 x CR123A battery (included) |
| Battery life | Up to 3 years (typical usage) |
| Connectivity | Z-Wave (communicates with Ring Alarm Base Station) |
| Maximum gap between sensor and magnet | 0.5 inches (1.27 cm) |
| Installation | Surface mount using included adhesive tape or screws |
| Primary function | Detects when a door or window is opened or closed |
| Additional features | Tamper detection, bypass support, adjustable placement (door/window) |
| Operating temperature | -4°F to 140°F (-20°C to 60°C) |
| Compatibility | Requires Ring Alarm system (Base Station) and Ring app |
| What's in the box | Contact Sensor, magnet, mounting brackets, adhesive tape, screws, CR123A battery |
| Reparability | Battery replaceable; otherwise non-serviceable |
| Maintenance | Clean with a soft, dry cloth; avoid moisture |
| Safety | Tamper alert via Ring app; low battery notifications |
Frequently Asked Questions - Contact Sensor RING
User questions about Contact Sensor RING
0 question about this device. Answer the ones you know or ask your own.
Ask a new question about this device
Download the instructions for your Security Camera in PDF format for free! Find your manual Contact Sensor - RING and take your electronic device back in hand. On this page are published all the documents necessary for the use of your device. Contact Sensor by RING.
USER MANUAL Contact Sensor RING
1. What's included with your Ring Alarm?
Ring Alarm Base Station: The central hub of your Ring Alarm system. Connects all of your Alarm devices to the Ring app, so you'll always stay in control of your home, wherever you are. Connects to power with the included power supply.

natural_image
White square with a blue circular pattern and grid texture, no text or symbols visible.Ring Keypad: Gives you hands-on control of your Ring Alarm system. Mount it on a wall or place it on a table near a door you use often. Connects to power using the USB power supply and cable.

Ring Contact Sensor: Alerts you when a door or window is opened. Uses the Sensor magnet and mounting hardware included with the Contact Sensor Install Kit.

Ring Motion Detector: Alerts you to movement inside your home. Mounts using hardware included with the Motion Detector Install Kit.

Ring Range Extender: Extends the Z-Wave wireless network to reach distant Alarm devices.

2. Your Home and Ring Alarm
This sample house shows how Ring Alarm can be set up in a home. You should customise your Ring Alarm setup to meet your own needs.

3. Set up your Ring account
- First, download the Ring app for your iOS or Android device.
- Before setting up your Ring Alarm, make sure you have the latest version of the Ring app from the app store.
2. Next, create your account.
- If you're new to Ring, tap Create Account. The app will ask you to enter your home or property address, your name, and email address, then ask you to create a password.
- If you already have a Ring account used for other Ring devices or Ring.com, use it to log in to the Ring app.
3. Now you're ready to begin setting up your Ring Alarm.
• From the Menu, tap Set up a device.
- Then tap Security Devices.
- Then tap Base Station.
4. Set up your Alarm Base Station
The mobile app will now guide you through the setup process.
To allow the app to communicate with the Base Station during setup, you'll be prompted by the app to press the Pairing button on the back of the Base Station until the blue ring begins spinning.
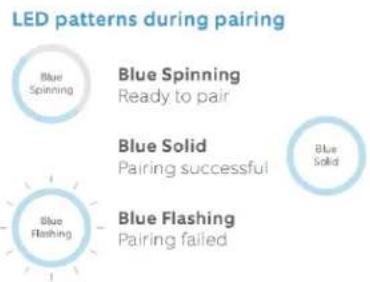
flowchart
graph TD
    A["Blue Spinning"] --> B["Blue Spinning Ready to pair"]
    C["Blue Solid"] --> D["Blue Solid Pairing successful"]
    E["Blue Flashing"] --> F["Blue Flashing Pairing failed"]
The first time your Base Station connects to the internet, it will automatically begin a software update, which may take a few minutes. The Base Station LED light should show a blue ring with yellow spinning around.
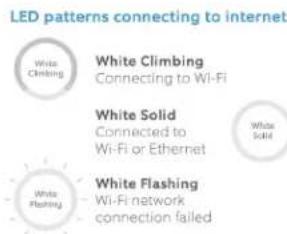
When it's complete, the LED will be solid blue. Once your Base Station is set up, the LED light ring will use colour to tell you the status. Click here for an explanation of Base Station LED light patterns. Follow the app to continue the setup process.
5. Set up Assisted Monitoring
What is Assisted Monitoring? Assisted Monitoring sends automated calls to you and your emergency contacts whenever your Ring Alarm detects a security issue and sounds the alarm. A subscription to Ring Protect Plus is needed before you can sign up for Assisted Monitoring. Your subscription will also give you Cellular Backup in case your internet goes down.
Click here to find out more about Assisted Monitoring.
What is self monitoring?
If you skip Assisted Monitoring, your Ring Alarm will be self monitored. In an emergency, your Alarm will sound, but it won't signal the monitoring service, and your emergency contacts won't receive automated calls notifying them about the emergency. If you choose self monitoring now, you can go back and sign up for Assisted Monitoring at any time.
Emergency Contacts (Assisted Monitoring only)
When an alarm signal is received, the monitoring service will call your list of emergency contacts - people you trust to answer the call and take care of your home in case you can't be reached.
Your emergency contacts should be able to:
- Answer their phone and handle Alarm emergencies.
- Respond to your home if assistance is needed.
- Unlock your home to give emergency responders access to your home if necessary.
- Use your Ring Alarm and disarm it, if asked by authorities.
Note: Save our number as a contact! If we call during an emergency, you'll know it's us. Ring Alarm: +44 800 802 1205
6. Set up your Alarm devices
Setting up your Ring Alarm security devices involves three steps:

Connect
the device to your Ring Alarm.

Configure
any unique settings as needed.

Install
the device
in your home.
For the easiest setup, complete all three steps for each device before moving on to the next one. Using the app and this guide, we'll help you position your Alarm to improve the security of your home.
Tip: Don't pull out all of the tabs at once! It can make setting up your Ring Alarm a lot more complicated. Wait until you're ready to set up a certain device, then only pull its tab when the app prompts you.
Understanding Ring Alarm device codes:
Your Ring Alarm kit comes with a lot of devices. Each device has a unique QR code and a 5-digit code on the back. When working in the app, you can use this code to identify the device you're working with. These sample images show you where you will find QR codes on your Ring Alarm devices.

6.1 Range Extender
Range Extenders expand the range of your Ring Alarm network and enable your devices to communicate with the Base Station.
- Connect: To connect your Range Extender, plug it into any socket for pairing
-
Configure: Using the app, give it a unique name and assign it to a room.
-
Install: Plug the Range Extender into a socket between your Base Station and one or more Alarm devices.
Tip: The Range Extender works best when it's placed between your Base Station and your most distant Alarm devices. You may need to move this around to different sockets within your home to find the best placement.

natural_image
Floor plan diagram of a residential area with room layouts and pathways (no text or labels)6.2 Contact Sensor
Contact Sensors can be installed on any door or window. It doesn't matter which direction you install them or whether the Sensor or magnet goes on the trim, as long as the notches on the Sensor and magnet line up and are no more than 1.27cm (1/2") apart.
We recommend installing Contact Sensors on every door and window that could be used to gain access to your home. This includes all first floor windows, and any second floor windows above a garage, porch, or large tree.
-
Connect: To connect a Contact Sensor, pull the tab out of the back.
-
Configure: Using the app, choose the Sensor placement (Door or Window), give it a unique name describing the location, and assign it to a room. Door and Window Settings: If you're using the Contact Sensor on a door, remember to configure the Placement setting to "Door", then decide if it's a primary or secondary door. Primary doors have Entry and Exit Delays to prevent you from accidentally triggering the alarm.
3. Install:
• Find the brackets for the back of the Sensor and magnet in the accessory bag.
- Choose a mounting location (on the non-hinged side of the door) where the Sensor and magnet will be no more than 1.27cm (1/2") apart, and the notches on the side of the two parts will be aligned (see right).
- Mount the brackets using the included tape or screws.
- Snap the Sensor and magnet onto their brackets. Tampering a Sensor: Opening a Sensor cover will show that the Sensor is "tampered" within the Ring app. When you close the cover, the Sensor should return to normal. If you need to arm your Alarm while a Sensor is tampered, you will be prompted to bypass it to continue arming.

6.3 Motion Detector
Motion Detectors are designed to be smart. They detect movement through rooms and hallways which an intruder would be likely to pass through, while allowing you and your family to move freely through your home.
In Normal Mode, your sensor detects motion constantly, but will only notify you to the first detection. After three minutes of no activity, it will restore and be ready to notify you again.
In Test Mode, your sensor detects motion constantly and will notify you about every 15 seconds. This can help you test for blind spots, pets, and other environmental triggers.
What you need to know about your Motion Detector:
- Should be installed 2.1m (7') above the floor.
- Can be placed in a corner or on a flat wall (see illustrations).
- Requires a line of sight view of the room or area with no obstacles or blind spots.
- Should never face a heat source such as a stove, fireplace or windows with direct sun.
- Designed to ignore pets under 22kg (50lbs) when set to the lowest motion sensitivity settings.
Motion Detector on a wall

natural_image
Floor plan outline of a residential area with room layouts and furniture placement (no text or labels)Motion Detector in a corner

natural_image
Floor plan diagram of a residential area with furniture layout (no text or labels)-
Connect: To connect your Motion Detector, pull the tab out of the back.
-
Configure: Using the app, decide if this Motion Detector will be used in an entryway or a room, then give it a unique name and assign it to a room.
-
Install:
-
Locate the bracket for the back of the Detector in the accessory bag.
- Securely mount the bracket using the included tape or screws.
- Snap the Motion Detector onto its bracket.
6.4 Keypad
You'll use your Keypad to arm and disarm your Alarm, so we recommend that you place it in the hallway or near the door you most often use to exit and enter. Some people install a second Keypad in their bedroom for easy access at night.
-
Connect: Using the steps shown in the app, plug the Keypad into a socket with the included USB cable and wall adapter.
-
Configure: Give your Keypad a unique name and add it to a room. Don't forget, you must create a personal access code, which is used to arm and disarm your Alarm.
-
Install: The Keypad can be mounted flush on a wall or placed on a table using the reversible bracket, and can be left plugged in or unplugged. Follow the instructions on the next page.
To use the Ring Keypad on a table:
-
Slide the bracket off the Keypad.
-
Flip the bracket over, then slide it back onto the Keypad.
To install the Ring Keypad on a wall:
-
Slide the bracket off the Keypad.
-
Place the mounting bracket on the wall, then use the wall anchors and screws from your kit to fasten the bracket to the wall. (If using anchors, you should pre-drill holes.)
-
Slide the Keypad onto the bracket.

7. Learn to use Ring Alarm
Alarm Modes: Your Alarm system has three Security Modes to choose from: Disarmed, Away, and Home. You can switch between them using the Keypad and the Ring app.
Away Mode
When you arm in Away Mode, by default all Sensors are armed. This Mode should be used when you go out and there's no one at home.


natural_image
Circular object with blue ring and numbered corners (no text or symbols)

Home Mode
When you arm in Home Mode, only door and window Sensors are armed by default. This Mode should be used when someone wants to stay home and feel safe.
Disarmed Mode
No Sensors inside your home are armed. This is useful when you're at home and want the freedom to go in and out easily.
How to Arm and Disarm your Ring Alarm
Using the Keypad, enter your personal access code, and then press the Disarmed, Away, or Home Mode button. Using the app, simply tap the Mode of your choice.
Disarming will cancel your alarm signal:
If you have Assisted Monitoring, disarming the system during an alarm cancels the alarm signal sent to the monitoring service. If you disarm within 60 seconds of the alarm sounding, you may not receive calls from the monitoring service. In an emergency, you can allow the alarm to continue sounding without disarming until you're sure it's not needed.
Bypassing Sensors
The bypass feature allows you to arm your Alarm and ignore a Sensor until the next time you arm your Alarm. It's most often used when you want to arm your Alarm and need to leave a window open or ignore a device issue now and resolve it at a later time.
Using your Keypad: When you try to arm and need to bypass a Sensor, your Keypad will prompt you "Sensors require bypass." The ! icon in the top right corner will turn on, and the √ button will blink. You can press the √ button to accept or do nothing to cancel arming.
Using the app: If you try to arm your Alarm and a Sensor needs to be bypassed, you'll get a notification.
Choosing which Sensors are armed in each mode
Each Security Mode arms specific groups of Sensors. By default, Away Mode arms all Sensors and Home Mode arms only Contact Sensors used on doors and windows. You can customise which Sensors are armed in Home and Away Mode.
For example, if you want to avoid arming a specific door while in Home Mode, you can adjust this using Mode Settings.
Understanding Entry & Exit Delay
Exit Delay gives you a short period of time to leave your home once you've armed Ring Alarm. You'll hear a series of chirps to remind you that there is only a few seconds to exit your home and close the door. When your Exit Delay ends, your Alarm is in Armed Mode. Opening your door will trigger the Entry Delay to begin counting down. Entry Delay gives you a short time to disarm your Ring Alarm when entering your home. You'll hear reminder chirps during the delay, and when the delay ends, if you don't disarm, your Ring Alarm siren will sound.
To use Entry and Exit Delays, set the Contact Sensor Placement setting to Main Door. Customise each delay for any time between 0 seconds (no delay) and 180 seconds (3 minutes). Just make sure you have enough time to arm and disarm your Alarm.
What happens when your Ring Alarm begins to sound?
Your Ring Alarm experience may differ depending on whether or not you've signed up for Assisted Monitoring. Assisted Monitoring is only available with a subscription to Ring Protect Plus.
| Assisted Monitoring with Ring Protect Plus | Self Monitoring | |
| When a security threat is detected, the Sensor sends a signal to your phone or email (if turned on). | √ | √ |
| Ring Alarm sends a notification to your phone, and email (if turned on). Shared Users on your account also get notifications. | √ | √ |
| Ring Alarm sends the signal to the monitoring service. | √ | ✕ |
| Cellular backup sends the signal if your internet is down. | √ | ✕ |
| The monitoring service calls your list of emergency contacts, leaving voicemail messages until a contact answers. | √ | ✕ |
| The monitoring service continues calling emergency contacts every 15 minutes if Ring Alarm is not disarmed. | √ | ✕ |
Owners and Shared Users
You can invite trusted people to use your Ring Alarm, and provide them with limited access
| OwnersThe Owner is the master account used to set up your Ring Alarm. | Shared UsersBest for family members, trusted friends, caregivers, and pet sitters. | Guest UsersBest used for short-term visitors and contractors. | |
| Arm and disarm via Keypad with access code | √ | √ | √ |
| Arm and disarm via app | √ | √ | ✕ |
| View cameras | √ | √ | ✕ |
| Change device settings | √ | ✕ | ✕ |
| Add and delete users | √ | ✕ | ✕ |
| Access billing and account settings | √ | ✕ | ✕ |
| Requires an email address for account setup | √ | √ | ✕ |
Adding Shared and Guest Users To add users to your account
-
Open the side menu in the Ring app.
-
Tap Settings, then tap Users.
-
Add a user:
- Android: Tap the icon in the bottom right corner.
- iOS: Tap the Add User button at the bottom of the screen.
- Web: Tap the button in the blue header bar.
- Tap the user type you want to add.
- Shared Users: Choose a unique access code to arm and disarm via the Keypad, then tap Send Invite. (If a Shared User doesn't accept your invitation via email within seven days, it's cancelled. You can always resend it using the app.)
- Guest Users: Choose an access code they can use with the Keypad, tap Done, then give the access code to your Guest User. To delete a Shared or Guest User from your Ring account, tap on the user's name, then tap Remove User. To remove only Alarm access without deleting the user, tap the user's name, then tap checkmark next to Alarm Base Station.
How to trigger Panic alarm:
Ring Alarm features a Panic alarm just in case an emergency occurs while you're at home. To trigger it, press and hold the X and √ buttons on the Keypad at the same time for three seconds.

Triggering the Panic alarm will sound the siren. If you have Assisted Monitoring, it will send a signal to the monitoring service, which will call your emergency contacts, one at a time, until someone is reached.
Managing your alerts
Your Ring Alarm system can send notifications to your phone and email
- When a device goes offline
- When the alarm begins to sound
- If a device has a low battery and for a variety of other events.
To adjust which notifications you receive, open the side menu, tap Settings, and select Alarm Alerts. You and your Shared Users can turn your preferred notifications on and off.
Preventing False Alarms
Click here to read more about preventing False Alarms.
Family Safety Plans
Click here to read more about Family Safety Planning
Need help installing?
Contact our support team.





- What's included with your Ring Alarm?
- Your Home and Ring Alarm
- Set up your Ring account
- Next, create your account.
- Now you're ready to begin setting up your Ring Alarm.
- Set up your Alarm Base Station
- Set up Assisted Monitoring
- What is self monitoring?
- Emergency Contacts (Assisted Monitoring only)
- Set up your Alarm devices
- Understanding Ring Alarm device codes:
- Range Extender
- Contact Sensor
- Install:
- Motion Detector
- What you need to know about your Motion Detector:
- Keypad
- To use the Ring Keypad on a table:
- To install the Ring Keypad on a wall:
- Learn to use Ring Alarm
- Away Mode
- Home Mode
- Disarmed Mode
- How to Arm and Disarm your Ring Alarm
- Disarming will cancel your alarm signal:
- Bypassing Sensors
- Choosing which Sensors are armed in each mode
- Understanding Entry & Exit Delay
- What happens when your Ring Alarm begins to sound?
- Owners and Shared Users
- Adding Shared and Guest Users To add users to your account
- How to trigger Panic alarm:
- Managing your alerts
- Preventing False Alarms
- Family Safety Plans
- Need help installing?
Brand : RING
Model : Contact Sensor
Category : Security Camera