
Spotlight Cam Hardwired Kit - Security Camera RING - Free user manual and instructions
Find the device manual for free Spotlight Cam Hardwired Kit RING in PDF.


| Product Type | Wired Security Camera with Spotlights |
| Brand | Ring |
| Model | Spotlight Cam Hardwired Kit |
| Dimensions | 8.5 x 6.9 x 4.7 inches |
| Weight | 1.5 pounds |
| Power Source | Hardwired (120V AC) |
| Video Resolution | 1080p HD |
| Field of View | 140° horizontal |
| Night Vision | Infrared LEDs (up to 30 ft) |
| Spotlights | Two adjustable LED spotlights, motion-activated |
| Two-Way Audio | Yes, with noise cancellation |
| Siren | Built-in, remotely activatable |
| Motion Detection | Customizable motion zones, adjustable sensitivity |
| Weather Resistance | IP65-rated, suitable for outdoor use |
| Connectivity | Wi-Fi 802.11 b/g/n (2.4 GHz) |
| App Compatibility | Ring app (iOS and Android) |
| Smart Home Integration | Works with Amazon Alexa |
| Mounting | Wall mount (hardware included) |
| Color | White or Black (depending on variant) |
| Warranty | 1 year limited warranty |
| Maintenance | Clean lens and spotlights with soft cloth; check connections annually |
| Safety | Designed for use with GFCI outlet; installation by qualified electrician recommended |
| Repairability | Not user-serviceable; contact Ring support for replacements |
| What's Included | Camera, mounting bracket, screws, screw anchors, security sticker, user manual |
Frequently Asked Questions - Spotlight Cam Hardwired Kit RING
User questions about Spotlight Cam Hardwired Kit RING
0 question about this device. Answer the ones you know or ask your own.
Ask a new question about this device
Download the instructions for your Security Camera in PDF format for free! Find your manual Spotlight Cam Hardwired Kit - RING and take your electronic device back in hand. On this page are published all the documents necessary for the use of your device. Spotlight Cam Hardwired Kit by RING.
USER MANUAL Spotlight Cam Hardwired Kit RING
Spotlight Cam Hardwired Kit

natural_image
White ring-mounted security camera with a camera lens on its side, mounted on a wall (no text or symbols visible)IMPORTANT PRODUCT INFORMATION
Use Responsibly. Read all instructions and safety information before use. SAFETY INFORMATION: FAILURE TO FOLLOW THESE SAFETY INSTRUCTIONS COULD RESULT IN FIRE, ELECTRIC SHOCK, OR OTHER INJURY OR DAMAGE.
⚠️ Small parts contained in the Spotlight Cam Hardwire Kit may present a choking hazard to small children. Keep small parts away from children.
Terms of Service and Warranty
Use of the product is subject to your registration with Ring and your agreement with the Terms of Service found at www.ring.com/terms.
To review your warranty coverage, please refer to the enclosure inside this box or visit www.ring.com/warranty.
RECYCLING YOUR DEVICE PROPERLY
In some areas, the disposal of certain electronic devices is regulated. Make sure you dispose of, or recycle, your device in accordance with your local laws and regulations. For information about recycling your device, go to www.amazon.com/devicesupport.
⚠️ RENSEIGNEMENTS IMPORTANTS CONCERNANT LE PRODUIT
WARNING: Risk of electrical shock.
Disconnect power at the fuse or circuit breaker before installing.
Verify that the supply voltage is correct. Connect fixture to a 100 VAC\~240 VAC 50/60 Hz power source.
Always follow electrical code standards when installing wired connections.
If you are outside of North America, installation and wiring must be performed by a licensed electrician.
CAUTION: Risk of fire.
Do not install near combustible or flammable surfaces.
NOTICE
Do not connect this light fixture to a dimmer switch or timer.
Must be installed on a UL listed weatherproof electrical box.
What's in the box?

Screwdriver & Phillips Bit
Use to install the box cover and tighten the security screw.
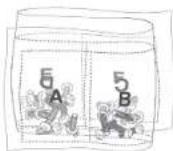
Bag o' Screws & Washers
Use four screws when mounting to a round electrical box, or two when mounting to a rectangular box.

Wire Nuts
Use to secure and protect wire connections.
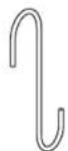
Hanging Hook
Use to hold the weatherproof box cover in position as you install.
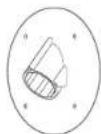
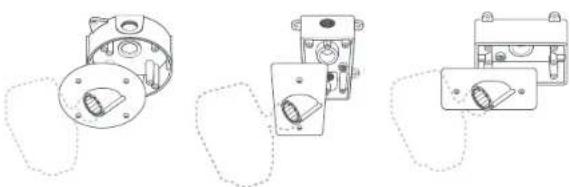
Round Weatherproof Box Cover
Use to mount your Spotlight Cam on a round weatherproof electrical box.
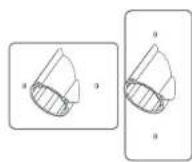
Rectangular Weatherproof Box Covers (Vertical & Horizontal)
Use to mount your Spotlight Cam on a 1-gang rectangular weatherproof electrical box.

Wiring Harness and Mounting Nut
Use to attach your Spotlight Cam to your chosen weatherproof box cover, and connect it to your household wiring.

Security Screw
Use to secure your Spotlight Cam to the box cover.
How it all fits together...

Remove your Spotlight Cam from its base.
While holding the mounting base, turn Spotlight Cam to the left to disengage it, and set the camera aside for now.


natural_image
Diagram of a mechanical device with a bracket and directional arrow, no text or symbols presentMounting Styles: Wall
When mounting to a vertical wall, you'll usually want the mounting port to face downwards.
4" Round 2x4 Vertical 2x4 Horizontal

natural_image
Pure electrical circuit lines without any symbolsMounting Styles: Ceiling
If mounting to a horizontal surface, face the port in the direction you want the camera to see.
natural_image
Three technical line drawings of mechanical components with no visible text or symbolsi Ensure that the electrical box you use is weatherproof, including threaded plugs. Use sealant if necessary
Installation Height and Motion Detection
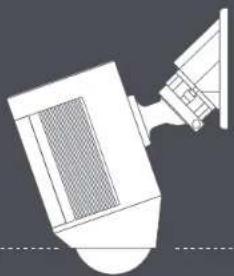
When mounted at the recommended height (9 feet up, with the motion sensor parallel to the ground), your Spotlight Cam is optimized to detect human-sized objects at up to 30 feet.
Parallel to ground
natural_image
Simple line drawing of a mechanical component or device with no visible text, numbers, or symbols.
natural_image
Silhouette of a person walking with a dog on grass, no text or symbols present
9 feet (3 meters)
30 feet (10 meters)
Shut power off at the breaker.
If you don't know where your breaker is or how to turn off power to your electrical box, consult with a licensed electrician.

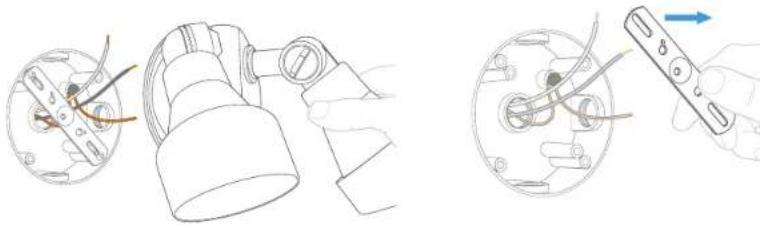
Remove your existing light or camera. (if applicable)
With power off at the breaker, remove your existing floodlight or camera from the electrical box and disconnect the wires. If there is a bracket attached to your electrical box, remove that as well.
natural_image
Technical line drawing showing three different mechanical or electrical components with no visible text or symbolsHang the box cover.
Inspect the box to make sure water can't get in.
Then use the included hanging hook to hold the weatherproof box cover in place as you wire it in.

natural_image
Hand installing or repairing a mechanical component with wires and wiring (no text or symbols visible)Connect the power wires.
Connect the black and white wires on the wiring harness to the black (hot) and white (neutral) wires coming out of your electrical box.

natural_image
Technical diagram of an electrical component with wires and connectors, no text or symbols presentUse the included wire nuts to secure and protect the connections.
The red wire is optional, and should only be connected if you wish to control other lights with your Spotlight Cam.

If you don't have clearly colored black and white wires coming out of your electrical box, consult with a licensed electrician.
Auxiliary Light Control
Your Spotlight Cam has an advanced motion detection system. If you'd like other lights (such as floodlights) to be triggered by the motion detector in your Spotlight Cam, wire them according to this diagram.
Your connected lights also turn on when you manually enable your Spotlight Cam lights in the Ring app.

natural_image
Pure electrical wiring diagram showing connections between components (no text or symbols)To Auxiliary Light Fixtures

Total power draw of connected lights must not exceed 150 watts.
Screw in the box cover.
Use the included screws to secure the box cover to the electrical box. Be sure to add a metal washer, then a rubber washer to each screw before inserting.

Add the Security Screw.
Insert and tighten the security screw to lock your Spotlight Cam into the box cover.

Some round boxes may only take two screws. Seal unused holes in the cover with the included screws and nuts. Add a metal washer backed by a rubber washer to each side before tightening the nut.
Mount your Spotlight Cam.
Insert your Spotlight Cam into the box cover. Once it's fully sealed, turn to the right to lock it in.

natural_image
Diagram showing a device interacting with a wall-mounted device, no text or symbols present
Turn on power at the breaker.
Once your Spotlight Cam is installed, it's time to turn power back on at the breaker.
If the lights on your Spotlight Cam turn on, you're all set!
If not, turn power off at the breaker and check your connections.
Try it out!
After setup, tap the Live View button in the Ring app to see video from your Spotlight Cam.
If you have any problems, visit ring.com/help.

Adjust the camera angle.
To ensure accurate motion detection, position your Spotlight Cam so the border of the motion detector is parallel with the ground.
Tighten the side screw to secure the camera position.
White light flashing?
If the light on the bottom of your Spotlight Cam flashes or stays illuminated after setup, this means it's updating its internal software.
This update can take up to a few minutes. The light turns off when the update is complete.

natural_image
Line drawing of hands assembling a ring device with a tool, showing mechanical components and parts (no text or symbols)For additional help, visit: ring.com/help
Or give us a call...
US 1 800 656 1918
Canada 1 855 300 7289
Worldwide +1 310 929 7085
For a list of all our customer support numbers, visit: ring.com/callus

1523 26th St. Santa Monica, CA 90404
To review your warranty coverage, please visit www.ring.com/warranty.
© 2020 Ring LLC or its affiliates.
Ring, Always Home, and all related logos are trademarks of Ring LLC or its affiliates.




- Spotlight Cam Hardwired Kit
- IMPORTANT PRODUCT INFORMATION
- Terms of Service and Warranty
- RECYCLING YOUR DEVICE PROPERLY
- ⚠️ RENSEIGNEMENTS IMPORTANTS CONCERNANT LE PRODUIT
- NOTICE
- What's in the box?
- Screwdriver & Phillips Bit
- Bag o' Screws & Washers
- Wire Nuts
- Hanging Hook
- Round Weatherproof Box Cover
- Rectangular Weatherproof Box Covers (Vertical & Horizontal)
- Wiring Harness and Mounting Nut
- Security Screw
- Remove your Spotlight Cam from its base.
- Mounting Styles: Wall
- Mounting Styles: Ceiling
- Installation Height and Motion Detection
- Shut power off at the breaker.
- Remove your existing light or camera. (if applicable)
- Hang the box cover.
- Connect the power wires.
- Auxiliary Light Control
- Screw in the box cover.
- Add the Security Screw.
- Mount your Spotlight Cam.
- Turn on power at the breaker.
- Try it out!
- Adjust the camera angle.
- White light flashing?
Brand : RING
Model : Spotlight Cam Hardwired Kit
Category : Security Camera