
Alarm Panic Button - Security Camera RING - Free user manual and instructions
Find the device manual for free Alarm Panic Button RING in PDF.


| Product Type | Security Camera |
| Brand | Ring |
| Model | Alarm Panic Button |
| Power Source | Battery (CR123A, 3V) |
| Communication Protocol | Z-Wave |
| Compatibility | Ring Alarm Base Station |
| Setup Method | Ring mobile app (iOS/Android) |
| Activation | Press and hold for 3 seconds |
| LED Indicators | Blue for pairing/success, red for failure/tamper, alternating red/blue for alarm triggered |
| Siren Trigger | Activates Ring Alarm Base Station siren |
| Professional Monitoring | Available with Ring Protect Plus subscription |
| Mounting Options | Screw mount or adhesive tape |
| Included Accessories | Mounting bracket, screws, adhesive tape, CR123A battery (installed) |
| Color | White |
| Device Tamper Detection | Yes (3 red blinks) |
| Factory Reset | Press and hold Setup button for 10 seconds |
| Battery Replacement | Twist lid counter-clockwise, replace with CR123A |
| Regulatory Compliance | FCC Part 15, IC RSS, WEEE |
| Warranty | See ring.com/warranty |
| Patents | ring.com/patents |
Frequently Asked Questions - Alarm Panic Button RING
User questions about Alarm Panic Button RING
0 question about this device. Answer the ones you know or ask your own.
Ask a new question about this device
Download the instructions for your Security Camera in PDF format for free! Find your manual Alarm Panic Button - RING and take your electronic device back in hand. On this page are published all the documents necessary for the use of your device. Alarm Panic Button by RING.
USER MANUAL Alarm Panic Button RING
natural_image
White circular device with a warning symbol on the top surface (no readable text or symbols beyond the label)Protection at the press of a button.
Ring Panic Button is an instant trigger for Ring Alarm.
In case of emergency, Panic Button can be used to signal your Ring Alarm Base Station to sound its siren. If you're subscribed to Ring Protect Plus, our 24/7 professional monitoring center is notified and emergency responders can be dispatched.*
Before you proceed...
The Panic Button can trigger an alarm as soon as you add it to your system. To prevent false alarms, continue with setup only when ready.
* For more info on Ring Protect Plus and 24/7 professional monitoring, visit ring.com/protect-plans.
If you've recently set up a Ring Alarm, professional monitoring won't be available until after the seven-day Practice Mode runs out.
Contents
- Diagram
-
In-app Setup
-
Physical Installation
-
Additional Information
1.
Say hello to your Ring Panic Button.
How it looks...
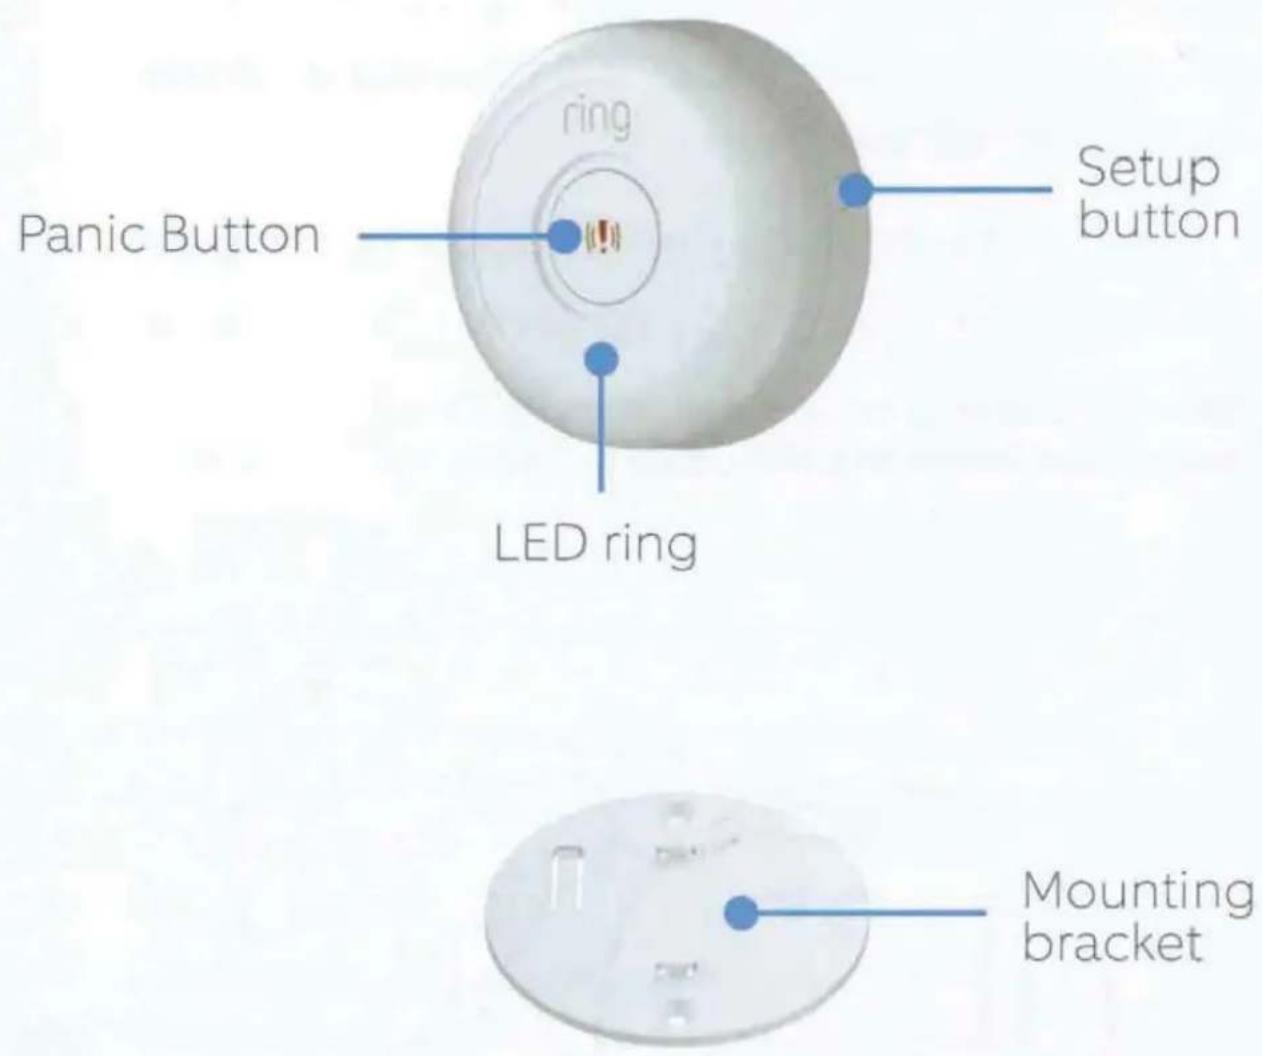
How it works...

To signal your Ring Alarm, press and hold the Panic Button for 3 seconds. The LED ring will turn blue.
As the Panic Button signals your Base Station, the LED ring will rapidly pulse blue.

Once your Panic Button successfully signals your Alarm, the LED will alternate between red and blue five times.
The siren will sound and, if subscribed to Ring Protect Plus, we will notify the monitoring center and emergency responders may be dispatched.
2.
Set up your Panic Button in the Ring app.
Begin the setup process near your Ring Alarm Base Station.
To add devices to your Ring Alarm, it must be disarmed. If your Ring Alarm is armed, please disarm it now.
In the Ring app, tap Set Up a Device and find Panic Button in the Security Devices menu.
To complete the setup process, follow the in-app instructions.
When prompted, scan the QR Code or enter the PIN.
This begins the pairing process.
The QR Code and PIN are on the back of your Panic Button and in the product packaging.

When prompted, pull out the clear tab.
This turns the Panic Button on. Your Base Station then finds it automatically.

The Panic Button can trigger an alarm as soon as you add it to your system. If pressed, it will immediately trigger your Alarm.
As the Panic Button pairs to your Base Station, its LED ring will blink. Once it pairs, the LED glows blue for three seconds.
If the Panic Button does not pair successfully, the LED ring glows red. To try the pairing process again, remove and reinstall the battery inside the Panic Button.

natural_image
Line drawing of a hand holding a circular object with a tool inserted (no text or symbols)3.
Install your Panic Button.
Choose a location.
You can place your Panic Button just about anywhere inside your home. You may want to put it on a desk in your office, or mount it on a wall in your bedroom. You can even put it in the bathroom, but be sure not to get it wet.
Also, verify it's close enough to connect with your Base Station. (We'll explain how to test your location on the next page.)
Preventing false alarms.
Wherever you put your Panic Button, just be sure to place it somewhere that it won't be triggered accidentally, especially out of reach of small children and pets. And don't put it in a drawer - it's more likely to get pressed and trigger a false alarm.
Test your Panic Button's Connection.
Now that you've picked a spot, you should test your Panic Button's connection with the Base Station.
To do so, simply press the Setup button located on the side of the device. Don't worry, the test will not set off your Alarm.
When Base Station has detected the signal from Panic Button, the LED will blink blue. If it blinks red, your Panic Button cannot signal your Base Station. Try the test again. You may find that repositioning the Panic Button (even just a few inches) can improve reception.

If it still cannot connect, try installing a Ring Range Extender between the Panic Button and your Base Station.

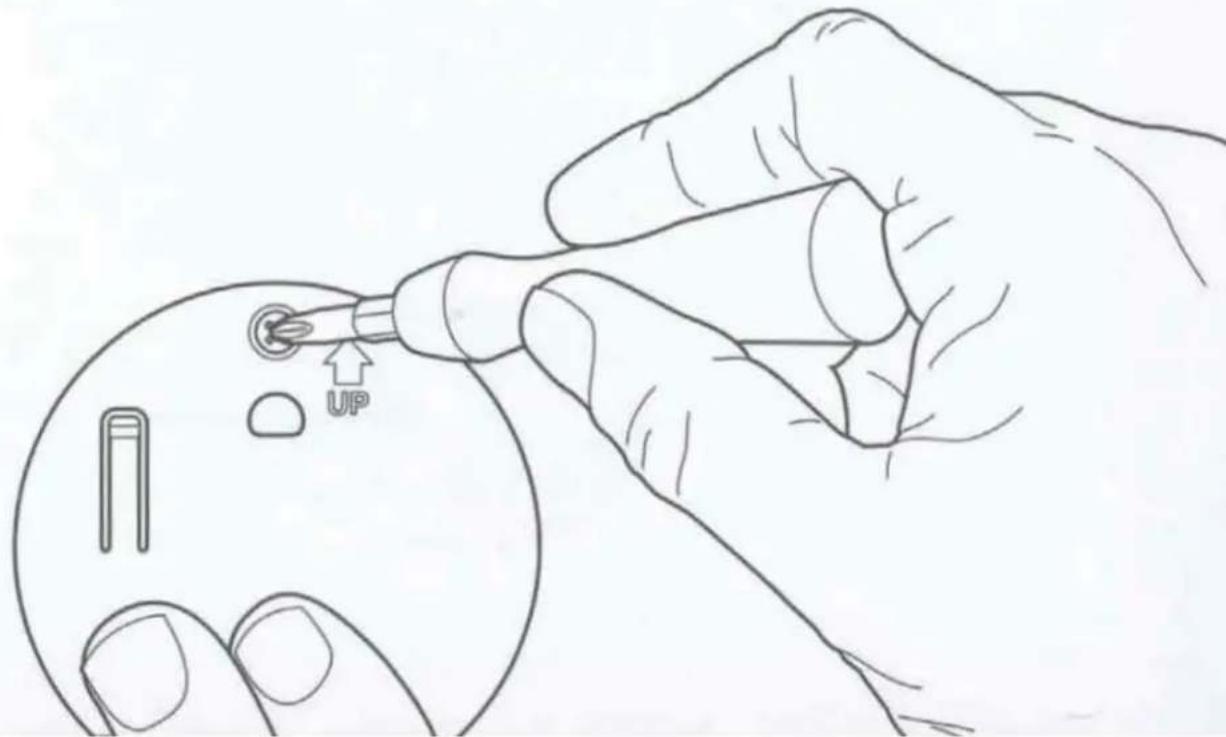
Secure the mounting bracket and mount Panic Button.
Once you've decided on a location, secure the mounting bracket with either the included screws or the double-sided tape.
Place Panic Button on the bracket posts, then slide to lock it in place.

When mounting on drywall, pre-drill the holes and insert the included anchors.
4.
Additional information.
How to replace the battery:
If you get a "Low Battery" notification in the app, it's time to replace the battery. Twist the lid on your Panic Button counter-clockwise and lift to remove. Replace the battery with a new CR123A cell. The Panic Button then reconnects to your Base Station automatically.
Place the lid back on the Panic Button, taking care to line up the semi-circle on the rim of the lid with the "open" semi-circle on the base. Twist the lid clockwise to lock it in.

How to remove Panic Button from your system:
Open the side menu in the Ring app and tap Devices, then Base Station. Select your Panic Button and tap the gear-shaped icon. Then tap Remove Device.
When prompted, open the Panic Button and remove and reinstall the battery to complete the removal.
Having trouble with your Panic Button?
If your Panic Button stops working or will not connect (even with a good battery), try a factory reset.
To do this, press and hold the Setup button for 10 seconds. When the LED ring stops blinking, your Panic Button has reset.

A factory reset disconnects the Panic Button from your Ring Alarm. To begin using the Panic Button again, repeat the setup process in the Ring app.
More LED patterns:
Failed to trigger Alarm

5 Red Blinks
Because the signal failed, the siren will not sound. Even if you've subscribed to Ring Protect Plus, the monitoring center and emergency responders will not be notified. Remember, in an emergency, calling 9-1-1 is a safe option.
Pairing in process

Blue LED blinks until process completes
Paired successfully

Blue LED lights up for 3 seconds
Pairing unsuccessful/ Device removed

Red LED lights up for 3 seconds
Device tampered

3 Red Blinks
For info on other LED patterns, visit ring.com/help.
ring
1523 26th St. Santa Monica, CA 90404
This device complies with Part 15 of the FCC Rules. Operation is subject to the following two conditions: (1) This device may not cause harmful interference, and (2) this device must accept any interference received, including interference that may cause undesired operation.
This device complies with Industry Canada's licence-exempt RSSs. Operation is subject to the following two conditions: (1) This device may not cause interference; and (2) This device must accept any interference, including interference that may cause undesired operation of the device.
The FCC ID of the device in this package can be found on the back or bottom of the device.
CAUTION
Danger of explosion if battery is incorrectly replaced. Replace only with the same of equivalent type recommended by the manufacturer. Dispose of the used batteries according to the manufacturer's instructions.
WARNING: Changes or modifications to this unit not expressly approved by the party responsible for compliance could void the user's authority to operate the equipment.
NOTE: This equipment has been tested and found to comply with the limits for a Class B digital device, pursuant to Part 15 of the FCC Rules. These limits are designed to provide reasonable protection against harmful interference in a residential installation. This equipment generates, uses, and can radiate radio frequency energy and, if not installed and used in accordance with the instructions, may cause harmful interference to radio communications.
However, there is no guarantee that interference will not occur in a particular installation. If this equipment does cause harmful interference to radio or television reception, which can be determined by turning the equipment off and on, the user is encouraged to try to correct the interference by one or more of the following measures:
- Reorient or relocate the receiving antenna.
- Increase the separation between the equipment and receiver.
- Connect the equipment into an outlet on a circuit different from that to which the receiver is connected.
- Consult the dealer or an experienced radio/TV technician for help.
Protect the device from direct sunlight. Install the device at dry locations, and protect it against rain and humidity. The device may not get in contact to salt water or other conductive liquids. The device must be charged only within a building in a dry state.
This device may not be disassembled and used for any other purpose. This unit, and all the components are configured for the sole purpose of providing a security system. They are not approved for individual cellular use, battery use or other mishandling.
2012/19/EU (WEEE directive):
Products marked with this symbol should not be mixed with general household waste. For proper recycling, return this product to your local supplier upon the purchase of equivalent new equipment, or dispose of it at designated collection points.
A mobile app must be used to set up the device.
This device is not an Access point or Hotspot and should not be used as one.
For additional information, visit www.ring.com/regulatory
To review your warranty coverage, please visit www.ring.com/warranty
Patents: www.ring.com/patents

natural_image
Simple line drawing of a trash bin with crossed lines indicating no waste or prohibition (no text or symbols)Ring Panic Button Z-Wave Device Specific Key (DSK)
DSK:





- Contents
- 1.
- Say hello to your Ring Panic Button.
- 2.
- Set up your Panic Button in the Ring app.
- 3.
- Install your Panic Button.
- Choose a location.
- Preventing false alarms.
- Test your Panic Button's Connection.
- 4.
- Additional information.
- How to replace the battery:
- More LED patterns:
- Failed to trigger Alarm
- ring
- 26th St. Santa Monica, CA 90404
- CAUTION
Brand : RING
Model : Alarm Panic Button
Category : Security Camera