
Alarm Pro - Security Camera RING - Free user manual and instructions
Find the device manual for free Alarm Pro RING in PDF.


| Product Type | Security Alarm Base Station with Wi-Fi Router |
| Model Number | 5AT3T3 |
| Power Input | 12V DC, 3.0A (via USB-C adapter) |
| Operating Temperature | 32°F to 104°F (0°C to 40°C) |
| Indoor Use Only | Yes |
| Wireless Connectivity | Wi-Fi 6 (eero), Z-Wave |
| Ethernet Port | 1x Gigabit Ethernet |
| Backup Battery | Internal rechargeable lithium-ion; optional Ring Power Pack for extended backup |
| Cellular Backup | 24/7 Backup Internet (requires Ring Protect subscription) |
| Smart Home Integration | Works with Alexa |
| Professional Monitoring | Available with Ring Protect plan |
| Mounting Options | Tabletop or wall mount (screw spacing 58mm) |
| Compatible Apps | Ring app and eero app |
| Expandable | Supports eero 6 Extenders and Ring Alarm devices |
| Power Adapter Model | DSA-36PDB FUS |
Frequently Asked Questions - Alarm Pro RING
User questions about Alarm Pro RING
0 question about this device. Answer the ones you know or ask your own.
Ask a new question about this device
Download the instructions for your Security Camera in PDF format for free! Find your manual Alarm Pro - RING and take your electronic device back in hand. On this page are published all the documents necessary for the use of your device. Alarm Pro by RING.
USER MANUAL Alarm Pro RING
Welcome to Ring Alarm Pro

natural_image
White Xiaomi phone with circular speaker grille and blue inner ring (no visible text or symbols)Getting Started
05 Set up your Ring Alarm Pro using the Ring and eero apps.
Customize Your Alarm Pro
Add extra Ring products, services, and accessories anytime for added security and connectivity.
Physical home security
12 Ring Video Doorbells and cameras
13 Ring Alarm security devices
25 24/7 Professional monitoring
28 Arming and disarming Alarm Pro
Digital security
07 Manage your wifi network
09 Expand your internet with eero 6 Extenders
12 Using Alexa
Add layers of backup
08 External battery backup with a Ring Power Pack
10 Cellular internet options for Alarm Pro
11 Subscribe to Ring Protect
Need more help?
Visit ring.com/alarm-pro
Where should you install Alarm Pro?
Ring Alarm Pro can be placed on a table or mounted on a wall near your modem. If you're planning to use this with your local internet provider, you'll need to run an ethernet cable from your modem to your Alarm Pro, and it will need to be plugged into an outlet.
When choosing a spot, keep this in mind:
- Don't block air vents on the side of the Alarm Pro.
• There should be enough space in the back for the power and ethernet cables. - If you're going to add Power Packs, tabletop installation is recommended, with enough space to stack them under or next to the Alarm Pro.

flowchart
graph LR
    A["Internet"] --> B["Modem"]
    B --> C["Ring Alarm Pro"]
    C --> D["Ring Doorbell"]
    C --> E["Ring Security Cam"]
    C --> F["Computer"]
    C --> G["Phone"]
We don't recommend using Alarm Pro as a wifi extender, as it will prevent you from using certain Ring Protect features.
Alarm Pro uses two apps
You will use the Ring app to set up Alarm Pro and other Ring devices and features, and you use the eero app to set up and manage your wifi network.
If you already have an account with Ring and/or eero, gather your account logins and passwords, and check that you're using the latest version of each app.

If you're new to Ring, download the Ring – Always Home app, and create your Ring account.

If you're new to eero, download the eero app.
If you need help while setting up your Alarm Pro, visit ring.com/alarm-pro.
Setting up Ring Alarm Pro
- Open the Ring app, and tap on the upper left corner to open the menu.
- Tap Set Up a Device.
- Tap Security.
- Tap Alarm Pro Base Station.
- Select a Location, or add a new one.
The first time your Ring Alarm Pro is plugged in, it will automatically begin a software update which may take a few minutes. Follow the steps in the Ring app, and watch the video.
Note: If you already have a Ring Alarm at this location and want to upgrade your base station to Ring Alarm Pro, you'll be prompted to complete those steps first.
Connecting to the Internet
After you finish adding Alarm Pro to your Ring account, you'll be prompted to choose your preferred internet connection.
If you have an internet connection at your home or business (through your cable company or internet provider), you will use that internet connection to set up your eero wifi network using the eero app.
If you need internet service or it's not available, we can help you set up 24/7 Backup Internet using cellular data as your primary internet connection. With a Ring Protect plan you'll get a monthly data allowance, and you can opt in to Extra Data just in case you need more. Don't worry, you'll only pay for data you use.
Learn more about 24/7 Backup Internet and Ring Protect plans on page 10.
Start with your 30-Day free trial of Ring Protect, and visit ring.com/protect-pro to sign up for a plan before it expires.
You can use our internet service with your existing internet connection too. If you have an internet outage, Alarm Pro will begin to use Ring Protect's 3GB of data to keep your wifi connected until your regular internet service comes back online.
Note: A Ring Power Pack is required to use 24/7 Backup Internet during power outages. See page 08 to learn more.
Set up your wifi
The Ring app will direct you to the eero app.
- If you're new to eero, create an account and follow the eero setup instructions to create a new network.
- If you already have an eero account, log in and follow the eero setup instructions to set up a wifi network.
Note: Be sure to set up your Ring Alarm Pro as a Gateway, not an extender.
When you're done, eero will guide you back to the Ring app to complete your setup.
Managing your wifi network
You can manage your wifi network and settings right from the eero app.
You can also choose which non-Ring devices can use wifi and control data usage by pausing wifi connectivity for individual devices if needed.
Get external battery backup with a Ring Power Pack
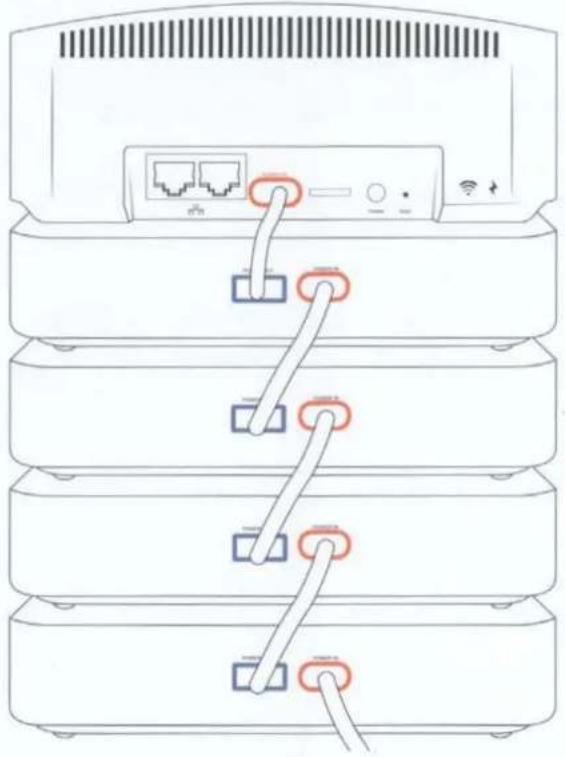
Keep your wifi network and compatible security devices online when the power goes out. Add up to 4 Power Packs to your Alarm Pro. If the power goes out, a Power Pack is required to use 24/7 Backup Internet.
Note: Only Power Packs should be used to provide external battery backup for Alarm Pro.
natural_image
Line drawing of a multi-tiered server rack with connected ports and cables (no text or symbols)Add eero 6 Extenders
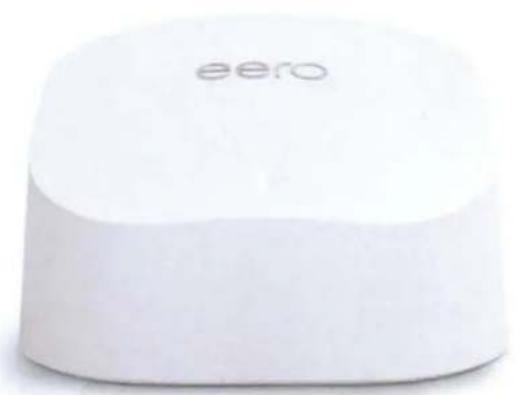
Expand your wifi coverage by adding eero 6 Extenders to your network.
If you don't want to lose wifi when there's a power outage, you can add an extra Power Pack to each eero 6 Extender, and keep your entire wifi network online using your internet connection or 24/7 Backup Internet.
If you already have eero in your home, visit ring.com/alarm-pro to learn how to use it with Alarm Pro.
Cellular internet options for Alarm Pro
We've got you covered, even if there's no internet connection. Sign up for the Ring Protect plan that includes cellular internet options, and you'll get multiple layers of backup to help keep you connected.
Here's what you can expect.
24/7 Backup Internet
When there's no broadband internet connection available, your Alarm Pro gets 3GB of cellular data each month to stay online and keep your Alarm Pro wifi network connected to the internet. You can opt in to Extra Data in case you need more. Don't worry, you'll only pay for cellular data you use.
When using 24/7 Backup Internet, you'll have Ring app access to your Ring cameras and alarm, and everything else using your Alarm Pro wifi will stay connected to the internet (when enabled in the eero app).
Note: If the power is out too, a Ring Power Pack is needed to use 24/7 Backup Internet.
Alarm Cellular Backup
If you run out of 24/7 Backup Internet data, Alarm Pro will automatically switch to Alarm Cellular Backup. This service is designed to provide a cellular internet connection to send alarm signals when your alarm is triggered. Alarm Cellular Backup is included in select Ring Protect plans at no extra cost.
When using Alarm Cellular Backup, you'll have access to some alarm security features, like arming and disarming using the Ring app. Wifi and internet connectivity are not available, so Ring cameras and non-Ring devices will not be connected to the internet.
Subscribe to Ring Protect
If you need Backup Internet, Alarm Cellular Backup, professional monitoring, video storage for your cameras and more, you'll need to subscribe to a Ring Protect plan to help keep everything connected and secure. To subscribe, visit ring.com/protect-pro and choose the Ring Protect plan that includes these features. You can find Extra Data fees online too.
Add Ring Cameras and Video Doorbells
You can set up Ring Video Doorbells and Ring Cameras at your location using the wifi from your Alarm Pro.
All Ring cameras and doorbells will work with your Ring Alarm Pro's wifi network. Ring cameras that run on batteries can stay connected to the internet, even during a power outage.
Add a Ring Protect plan and Power Packs for external battery power. Cameras that have battery power will continue to record and save videos even if your primary internet connection goes down.
Using Alexa with Alarm Pro
Link Alexa to your Ring Alarm Pro and get a variety of helpful features that you can control with the sound of your voice or a tap of the app.
• Arm and disarm using voice commands
• Watch Live View for your Ring cameras on compatible Echo Show devices
- Add Alexa Guard and get alerted if it detects the sound of glass breaking
- Set up Alexa routines to turn on lights when your motion detector senses motion
Visit ring.com/alarm-pro to learn more.
Setting up your alarm system
To set up your alarm system, simply add Ring Alarm security devices and enroll in professional monitoring (optional). It's easy to help keep the people, pets and property in your home or business secure.
When adding Ring Alarm security devices, you'll first add each device to your Ring account using the Ring app, then configure your settings, and finally, install the device in your home.
Ring Alarm security devices have plastic battery tabs used to power them on. Do not pull them all out at once! To avoid setup problems, only pull out each tab, one at a time, when the app prompts you to.

natural_image
Illustration of a two-story house with interior layout and windows, surrounded by trees and furniture (no text or symbols)Understanding device codes
Each device has a unique QR code and 5-digit number used to identify devices in the app. Sometimes you may need to scan a code when adding a new device to your Alarm Pro. You'll find these codes on the side, back, or inside devices, as shown below.
Back of Motion Detector

Back of Keypad
natural_image
White electronic device with two side panels and a small QR code on top panel (no visible text or symbols)Range Extender
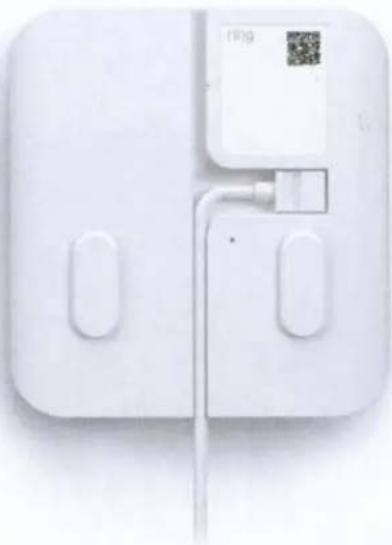
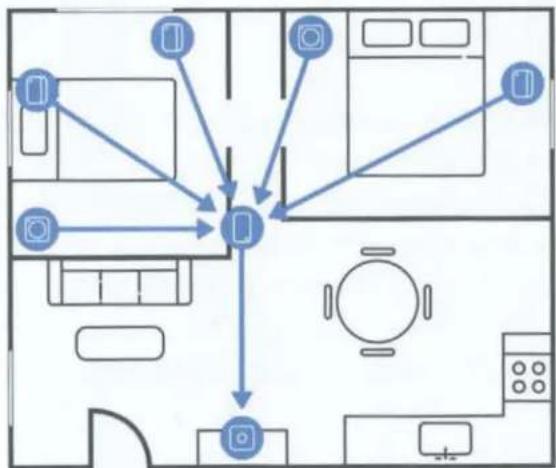
Ring Alarm Range Extenders expand your Z-Wave network to help all of your Z-Wave devices communicate, even the ones that are farther away from your Alarm Pro. The Range Extender works best when placed between your base station and your most distant Ring Alarm devices.
Install steps:
• Follow the steps in the Ring app.
• Plug it into an outlet.
• Using the app, give it a unique name and assign it to a room.
flowchart
graph TD
    A["Device 1"] --> B["Central Device"]
    C["Device 2"] --> B
    D["Device 3"] --> B
    E["Device 4"] --> B
    F["Device 5"] --> B
    G["Device 6"] --> B
    H["Device 7"] --> B
    I["Device 8"] --> B
    J["Device 9"] --> B
    K["Device 10"] --> B
natural_image
Plain white rectangular object with a small circular hole at the bottom (no text or symbols)Contact Sensor
Ring Alarm Contact Sensors can be installed on any door or window. It doesn't matter which direction or orientation you use, as long as the Sensor and magnet are no more than 1" apart. We recommend installing Contact Sensors on every door and window that offers easy access to your home.
Install steps:
- Follow the steps in the Ring app. When the app prompts you, pull out the battery tab to power it on.
- In the Ring app, select the correct Sensor placement option to avoid false alarms. Always choose the Main Door setting to get Entry and Exit Delays, required for Contact Sensors on the doors you use most often.
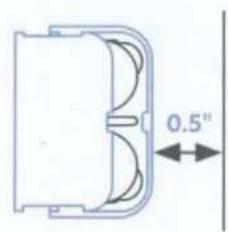
- Choose where you'd like to install your Sensor and magnet. Line them up with no more than 1" between them. If installing it on a door, choose a side without hinges. (See images)
- Clean the wall or window surface, then peel the backing from the attached tape and press the Sensor and magnet into place. Press and hold for 20 seconds.
Need Contact Sensor help?
Visit ring.com/alarm-pro for an installation video.


Bypassing Sensors
The bypass feature allows you to temporarily ignore a Sensor so you can arm your system. Use this if there's an open window or a device has an issue.
To bypass a sensor:
Using your Keypad: Your Keypad will announce "Sensors require bypass" and the (checkmark) button will blink.
Press the (checkmark) button to bypass, or do nothing and arming will be canceled.
Using the app: You will get an in-app notification.
What if your Contact Sensor is tampered?
The Ring app might show "Tampered" if your Contact Sensor cover isn't closed. If you opened it recently, check the device and fix the cover - this should fix the issue. If you need to arm your system while a Sensor is in this "tampered" state, you will need to bypass it to continue arming.

Understanding Entry & Exit Delays
Exit Delay gives you a short period of time to leave once you've armed your system. After you arm, you'll hear a series of chirps reminding you that there are only a few seconds to exit and close the door. When your Exit Delay ends, your alarm system is in an armed mode. Opening your door will trigger the Entry Delay to begin counting down.
Entry Delay gives you a short time to disarm your alarm system after you open the door. You'll hear chirp sounds during the delay, and when the delay ends, if you don't disarm, your Ring Alarm siren will sound.
To use Entry and Exit Delays, open the Ring app and check that the Contact Sensor placement is set to Main Door. You can customize each delay, choosing between 0 seconds (no delay) and 180 seconds (3 minutes). Just make sure you give yourself enough time to arm and disarm your alarm.
Motion Detector
Ring Alarm Motion Detectors are designed to detect intruders by monitoring your spaces for changes in heat and movement over time. By default, when armed in Away mode, motion will set off the alarm.
Test Mode is designed to help you test for blind spots, pets, and other environmental triggers that can trigger false alarms. By adjusting Motion Detector settings in the app, you can set the device to ignore your pets and only detect humans, or to detect everything. In Test Mode, motion is constantly detected, and when motion stops, it will clear every few seconds.
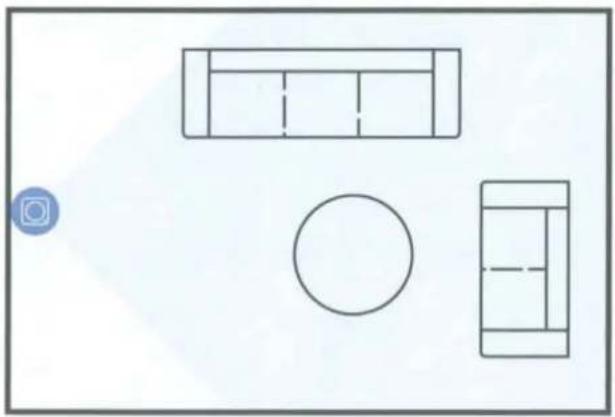
Where should you place your Motion Detector?
• Install 7' 6" above the floor, if possible.
• Install in a corner or on a flat wall (see illustrations).
- Choose a location with a clear line of sight, with no obstacles or blind spots.

natural_image
Simple white circular shape on a light background, no text or symbols presentHow do you reduce false alarms?
- The Detector should not face a heat source such as a stove, fireplace or windows with direct sun.
• Never install a Motion Detector facing stairs. - Make sure your pets can't get close to the Motion Detector by climbing on furniture.
• Use the app to adjust pet sensitivity settings. - Keep the default settings. Only arm the Motion Detector in Away Mode.
natural_image
Simple line drawing of four geometric shapes: a rectangle, a circle, and a window-like shape with dashed internal lines (no text or symbols)Motion Detector on a wall
Install steps:
- Follow the steps in the Ring app. To connect your Motion Detector, pull the battery tab.
- Using the app, specify where you will place your Motion Detector; then give it a unique name and assign it to a room.
- If you're mounting the Motion Detector on a wall, clean the wall, then peel the backing off the 2 pieces of tape located on the back. If mounting it in a corner, peel the backing off the tape on each of the corners. Press and hold for 20 seconds.

natural_image
Simple line drawing of three geometric shapes: a rectangle, a circle, and a rectangular prism (no text or symbols)Motion Detector in a corner
Keypad
Your Ring Alarm Keypad is used to arm, disarm and change alarm modes. We recommend placing a Keypad near the door you most often use to exit and enter, and maybe a second one in a bedroom or office for easy access.

Setup and install steps:
- Follow the directions in the app. When prompted, plug the Keypad into an outlet with the included USB cable and wall adapter.
- Give your Keypad a unique name and add it to a room. Don't forget, you must create a personal access code to arm and disarm your Alarm.
- The Keypad can be mounted flush on a wall or placed on a table, and can be left plugged in or run on its internal battery.
Note: If using the Keypad unplugged, charge it fully before first use.
To place the Keypad on a table, slide the bracket off of the Keypad, then flip the bracket over, and slide it back on to elevate the Keypad.
To install the Keypad on a wall, slide the bracket off the Keypad. Place the mounting bracket on the wall, then use the wall anchors and screws from your kit to fasten the bracket to the wall. (If using anchors, you should pre-drill holes.) Slide the Keypad onto the bracket.

natural_image
White electronic device with two side panels and a small QR code on top panel (no readable text or symbols)ring


Using the Keypad emergency buttons
(Professional monitoring only)
In the event of an emergency, the Keypad (2nd gen) offers one-touch access to the help you need. Press and hold any button for three seconds to send a signal to the monitoring center and request emergency help.
The Police button will send a panic signal to request police dispatch to your address and sound the siren.
The Fire button will request fire department dispatch to your address and sound the siren.
The Medical button will request an emergency medical response to your address.
TIP If you are self-monitored, pressing the Police or Fire button will simply sound the siren. No emergency services will be requested.
24/7 Professional Monitoring
Professional monitoring is a service that can alert the authorities and notify you and your emergency contacts when Ring Alarm Pro detects a security threat. A Ring Protect subscription is required in order to get professional monitoring.
How does it work?
When a threat is detected, your Alarm Pro sends a signal to the monitoring center. The monitoring center calls you to verify that the emergency is real, and can dispatch emergency responders to your home if needed.
For more information, see page 31.
Customize your police response
After you enroll in professional monitoring, use the Ring app to choose when you want the monitoring center to request police dispatch if the burglar alarm is triggered.
One-Touch Emergency Response with SOS
Instantly request police, fire or medical services using the Ring app dashboard or Ring camera Live View when you enroll in professional monitoring.
How do you get professional monitoring?
First, visit ring.com/protect-pro and subscribe to Ring Protect. Then, use the Ring app to enroll in professional monitoring.
Permits and Registrations
Many local jurisdictions require an alarm permit or registration for professionally monitored alarms. For more on permits, see page 35.
7-Day Practice Mode
7-Day Practice Mode helps you learn how to use your alarm system and reduce false alarms. For the first seven days of professional monitoring, if you set off your alarm, you'll get a call with an automated message but emergency responders are not requested. After seven days, your alarm will automatically enter full professional monitoring. Setting off your alarm system will trigger a live call from the monitoring center and may result in an emergency response.
Download your insurance certificate.
If you have a professionally monitored alarm system, you may qualify for an insurance discount. To download a certificate for your insurance company, open the Ring app or log into Ring.com. From the menu tap Settings, tap Monitoring, then tap Certificate.
What is self monitoring?
If you skip professional monitoring, your alarm system will be self monitored. In an emergency, your siren will sound but it won't signal the monitoring center, and emergency responders won't be dispatched unless you call them yourself.
If you choose self monitoring now, you can go back and sign up for professional monitoring at any time. Find a comparison chart for professional and self monitoring on page 31.
Verbal Password
(Professional monitoring only)
If the monitoring center calls, you and your emergency contacts will be asked to verify your identity. To do this quickly, we use a verbal password.
Choose a verbal password you'll remember and store it in a safe place. It should be:
• A single word (no spaces) or a number.
- Different from any Keypad access codes used to arm and disarm.
If you forget your verbal password, use the Ring app to create a new one.
Important! Share your verbal password with all of your emergency contacts.
Emergency Contacts
(Professional monitoring only)
When your Alarm Pro sends an alarm signal to the monitoring center, they call your list of
emergency contacts—people you trust to take care of your home if you can't be reached. We suggest giving emergency contacts Shared or Guest User access to your Alarm Pro.
Emergency contacts need to:
• Answer their phone and handle emergencies
- Respond to your address if assistance is needed and disarm the alarm
- Unlock your home to give emergency responders access
If your emergency contacts change or get a new phone number, don't forget to update the Ring app.
Make sure your emergency contacts save our number!
When we call during an emergency, everyone needs to answer the call.
Ring Monitoring: 833-209-2159
Arming and disarming Alarm Pro
ring

Understanding Modes
Your system has three Security Modes to choose from: Disarmed, Home, and Away. Modes will determine how your Ring devices work when you're at home and away.
Ring Alarm security devices use Modes to actively monitor sensors at your location.
Ring Cameras can use Modes to prevent video recording on specific cameras when you're home, and only record when you're away. Any Ring cameras that don't use Modes will detect motion and record video 24/7.
You can change modes using the Ring app and the Ring Alarm Keypad.

Disarmed Mode
Disarm when you're at home and want the freedom to go in and out easily. By default:
• Alarm: No sensors inside your home are armed.
• Ring Video Doorbells will always detect and record motion.
- Ring cameras set to "outdoors" detect and record motion, "indoor" cams do not detect or record motion.

Home Mode
Arm in Home Mode when you're at home and want to feel safe. By default:
• Alarm: Only door and window Contact Sensors are armed.
• Ring Video Doorbells will always detect and record motion.
- Ring cameras set to "outdoors" detect and record motion, "indoor" cams do not detect or record motion.

Away Mode
Use Away Mode when you go out and there's no one at home. By default,
• Alarm: By default all Sensors are armed.
• All Ring Video Doorbells and cams will detect motion and record video.
Use the Ring App to enable mode settings for cameras and select which Ring Alarm sensors are armed in Home and Away Mode. Open the Ring app menu, tap Settings, then tap Modes to customize your setup.
How to Arm and Disarm
Using the Keypad
Enter your personal access code, and then press the Disarmed, Away, or Home Mode button.
Using the app
Open the app and tap the Mode of your choice.
TIP Disarming will cancel your alarm signal. If you're professionally monitored, disarming during an emergency alarm event cancels the signal sent to the monitoring center. If it's a real emergency, tap the Silence Siren button in the app instead. This will silence the siren but still send the alarm signal to the monitoring center.
Owners, Shared Users, and Guest Users
You can invite trusted people to use your Alarm Pro, and provide them with limited access to your alarm system or cameras.
| OwnersThe Ownver is the master account used to set up your system. | Shared UsersBest for family members, trusted friends, caregivers, and pet sitters. | Guest UsersBest used for short-term visitors and contractors. | |
| Arm and disarm via Keypad with access code | √ | √ | √ |
| Arm and disarm via app | √ | √ | ✕ |
| View cameras | √ | √ | ✕ |
| Change device settings | √ | ✕ | ✕ |
| Add and delete users | √ | ✕ | ✕ |
| Access billing and account settings | √ | ✕ | ✕ |
| Can have access limited by a schedule | ✕ | ✕ | √ |
| Requires an email address for account setup | √ | √ | ✕ |
When your Alarm Pro alarm system is triggered
| Self Monitoring | Professional Monitoring with Ring Protect | |
| When a security threat is detected, the sensor sends a signal to Ring Alarm Pro. | √ | √ |
| The system sends an alert to your phone and email (if alerts are turned on). Shared Users on your account also get alerts. | √ | √ |
| Ring Alarm Pro sends the signal to the monitoring center. | ✕ | √ |
| If your internet is not available, 24/7 Backup Internet or Alarm Cellular Backup sends the signal to the monitoring center. | ✕ | √ |
| The monitoring center calls emergency contacts, asks for the verbal password, and checks if help is needed. | ✕ | √ |
| Emergency responders can be requested to your address.* | ✕ | √ |
*If local laws require alarm verification, the monitoring center first dispatches Guard Response if you've opted-in to this service.
Adding Shared Users and Guest Users
To add users to your account, open the Ring app and tap the menu. Then tap Settings, Users, and tap the + icon or Add User.
Managing alerts
Your Alarm Pro can send notifications to your phone and email you when the alarm begins to sound, when a device has a low battery, and for a variety of other events.
To adjust your alerts, open the menu, tap Settings, and select Alarm Alerts. Each Shared User can turn on and off alerts without impacting other users. Note that Emergency Alarming alerts can never be turned off.
Getting emergency alerts in Do Not Disturb Mode
You can set your mobile device to ignore your device's settings and send you Alarm Pro emergency alerts right away, even if your phone is in Do Not Disturb Mode.
To override Do not Disturb mode, open the Ring app, open the menu, tap Settings, and select Alarm Alerts. Each Shared User can turn on and off alerts without impacting other users
Preventing false alarms
A "false alarm" occurs when someone or something accidentally triggers your alarm system and the siren sounds, but there is no real emergency. False alarms divert emergency responders from true emergencies. Home and business owners may be charged fines for false alarms.
Ways to prevent false alarms
• Make sure emergency contacts know your verbal password.
- Provide everyone at your location with Shared or Guest User access. Make sure Shared Users download the RIng app.
- Save the Ring Monitoring phone number 833-209-2159 as a phone contact.
• Make sure all users know when to arm and disarm, and when to use Home and Away Modes.
- Check that your Motion Detectors are not aimed at heat sources, stairs or windows
- Check that your Motion Detector coverage doesn't have any blind spots. Adjust sensitivity settings in the app so pets don't trigger the alarm.
• Test your Exit and Entry Delays and make sure they give you enough time.
Alarm Permits and Registration
(Professional monitoring only)
We work hard to provide you with up-to-date information about your local permit and registration laws, but sometimes jurisdictions change their permit requirements and applications. You can always reach out to your local municipality directly to ask about alarm system permit requirements.
We will email you to let you know if you need a permit and send you the details. Each jurisdiction has different rules and forms, and sometimes there is a small annual fee to get the permit. If you don't get a permit email from Ring within five business days (and it's not in your Spam folder), contact Ring Support for more information.
Adding permit information to the Ring app
In some locations, emergency responders may not be dispatched unless your permit or registration number is on file. If your alarm permit includes a number and expiration date, add these to your account.
- Using the Ring app, open the menu, tap Settings, tap Monitoring, then tap Permit.
- Choose your Permit type to add the permit number and date. If your permit does not have a number, type the word "Registered" in the app.
ring
Need more information? Visit ring.com/alarm-pro
To download this manual, visit ring.com/alarm-manual
For technical Z-Wave information, visit ring.com/z-wave
© 2021 Ring LLC or its affiliates.
Ring and all related marks are trademarks of Ring LLC or its affiliates.
22-003431
Important Product Information
How to mount your Ring Alarm Pro on a wall (optional)
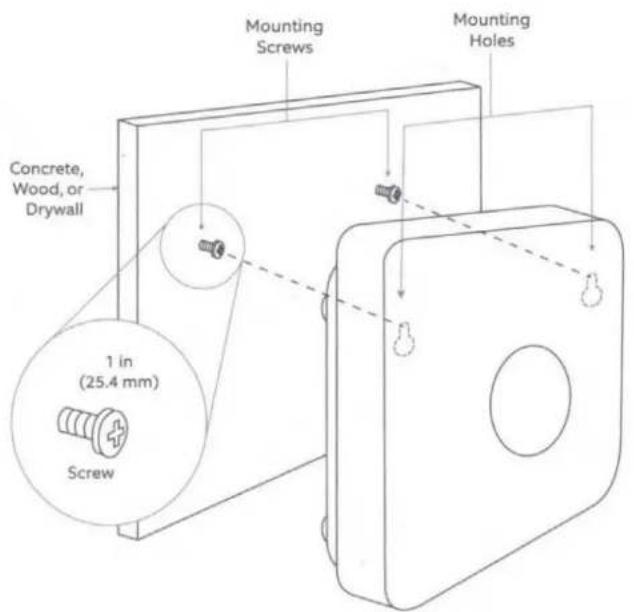
You can mount your Ring Alarm Pro on a wall using two wall anchors, two screws, and the mounting slots located on the unit. It is only suitable for mounting at heights ≤ 2m. If you plan to use Ring Power Packs with your Alarm Pro, wall mounting is not supported.
Note: Ring Alarm Pro is for indoor use only.
Before you begin, choose a wall mounting spot that is ≤ 2m high, free of obstruction on all sides, and where the cables can reach the outlet and the modem. The wall can be made of cement, wood, or drywall. Make sure you can access the cables easily. You will also need the following items:
• Two wall anchors for #8 x 1-inch screws
• Two #8 x 1-inch pan head screws
Installation:
- Drill two holes with a 3/16" wood or masonry bit (as needed) for the anchors.
- These holes should be 58mm apart to fit the slots on the back of the Alarm Pro.
- Insert the anchors into the wall, then insert the screws.
- Mount the Ring Alarm Pro.
See illustrations for details.

ENGLISH

IMPORTANT PRODUCT INFORMATION
SAFETY INFORMATION
Use Responsibly. Read all instructions and safety information before use.
FAILURE TO FOLLOW THESE SAFETY INSTRUCTIONS COULD RESULT IN FIRE, ELECTRIC SHOCK, OR OTHER INJURY OR DAMAGE.
Do not expose your device or adapter to liquids. If your device or adapter gets wet, carefully unplug all cables without getting your hands wet and wait for the device and adapter to dry completely before plugging them in again. Do not attempt to dry your device or adapter with an external heat source, such as a microwave oven or a hair dryer. If the device or adapter appear damaged, discontinue use immediately. Use only accessories supplied with the device to power your device. To avoid risk of electric shock, do not touch your device or any wires connected to your device during a lightning storm.
Your Ring Alarm Pro may get hot during normal use. To reduce the effect of the warming, place your Ring Alarm Pro on a heat resistant surface. If you find the device has become hot to the touch, unplug power and let it cool down for a few minutes before handling. Your device should only be powered using the Ring USB-C power adapter Model: DSA-36PDB FUS included with the device, unless powered by a Ring Power Pack (sold separately).
Small parts contained in your device and its accessories may present a choking hazard to small children.
Your device is shipped with a Ring Power Adapter. If the Ring Power Adapter or cable appears damaged, discontinue using the supplied Ring Power Adapter. Install your power adapter into an easily accessible socket-outlet located near the equipment that will be plugged into or powered by the adapter.

BATTERY SAFETY
HANDLE WITH CARE. Your device contains a rechargeable lithium-ion battery and should be replaced only by a qualified service provider. Do not disassemble, open, crush, bend, deform, puncture, shred or attempt to access the battery in your device. Do not modify or remanufacture the battery, attempt to insert foreign objects into the battery, or immerse or expose it to water or other liquids, expose to fire, explosion or other hazard. Only use the battery for the system for which it is specified. Use of an unqualified battery or charger may present a risk of fire, explosion, leakage or other hazard. Do not short-circuit a battery or allow metallic conductive objects to come into contact with battery terminals. Avoid dropping the device or battery. If the device or battery is dropped, especially on a hard surface, and the user suspects damage, do not attempt repair. Do not subject the battery to extremely low air pressure that may result in an explosion or the leakage of flammable liquid or gas.
Keep the device and its power adapter in a well-ventilated area and away from heat sources, especially when in use or charging. Do not charge your device near water or in extremely humid conditions. Contact Ring Customer Service for assistance.
Maintaining Your Ring Alarm Pro
Only handle your device with clean hands. Clean your device only with a soft cloth that is slightly damp with water and a touch of rubbing alcohol; be careful not to wipe it with anything abrasive or to use any harsh chemicals. Don't expose your device to steam or extreme heat or cold. For example, do not install your device near any heat sources such as space heaters, heater vents, radiators, stoves, or other things that produce heat. Store your Ring Alarm Pro in cool, dust-free areas out of direct sunlight.
Use of third-party accessories may impact your devices' performance. In limited circumstances, use of third-party accessories may void your devices' limited warranty. In addition, use of incompatible third-party accessories may lead to damage to device or the accessory. Read all safety instructions for any accessories before using with your Ring Alarm Pro.
PRODUCT SPECIFICATIONS
Device Name: Ring Alarm Pro
Model Number: 5AT3T3
Electrical Rating: 12V DC, 3.0A
Temperature Rating: 32°F to 104°F (0°C to 40°C)
RECYCLING YOUR DEVICE PROPERLY
In some areas, the disposal of certain electronic devices is regulated. Make sure you dispose of, or recycle, your device in accordance with your local laws and regulations. For information about recycling your device, go to amazon.com/devicesupport.
TERMS OF SERVICE
By purchasing or using the product, you agree to the Terms of Service found at ring.com/terms. By using the wifi router incorporated in the product, you agree to eero's Terms of Service found at eero.com/legal.
For information on our warranty and Ring Protect Plans, visit ring.com/legal.
LIMITED WARRANTY
Your new or Certified Refurbished Ring Alarm Pro device is covered by a one-year Limited Warranty. Details are available at ring.com/warranty.
Supplier's Declaration of Conformity – Compliance Information Statement
Unique Identifier: Ring Alarm Pro Model Number: 5AT3T3 FCC ID: 2AEUPBHAXN001
This device complies with part 15 of the FCC Rules. Operation is subject to the following two conditions: (1) This device may not cause harmful interference, and (2) This device must accept any interference received, including interference that may cause undesired operation.
Responsible Party and Party issuing Supplier's Declaration of Conformity: Ring LLC, 1523 26th Street, Santa Monica, CA 90404 U.S.A. www.ring.com / legal@ring.com
NOTE: This equipment has been tested and found to comply with the limits for a Class B digital device, pursuant to part 15 of the FCC Rules. These limits are designed to provide reasonable protection against harmful interference in a residential installation. This equipment generates, uses and can radiate radio frequency energy and, if not installed and used in accordance with the instructions, may cause harmful interference to radio communications.
However, there is no guarantee that interference will not occur in a particular installation. If this equipment does cause harmful interference to radio or television reception, which can be determined by turning the equipment off and on, the user is encouraged to try to correct the interference by one or more of the following measures:
• Reorient or relocate the receiving antenna.
- Increase the separation between the equipment and receiver.
- Connect the equipment to a socket on a circuit different from that to which the receiver is connected.
- Consult the dealer or an experienced radio/TV technician for help.
Pursuant to Section 15.21 of the FCC rules, changes or modifications to a Product by the user that are not expressly approved by the party responsible for compliance could void the user's authority to operate the equipment.
The device meets the FCC Radio Frequency Emission Guidelines. Information on the product is on file with the FCC and can be found by inputting such Product's FCC ID (which can be found on the device) into the FCC ID Search form available at fcc.gov/oet/ea/fccid.
This device complies with radio frequency radiation exposure limits set forth for an uncontrolled environment. The antenna(s) used for this transmitter must be installed to provide a separation distance of at least 20 cm from all persons and must not be co-located or operating in conjunction with any other product antenna or transmitter.
Innovation, Science and Economic Development Canada (ISED) Compliance
This device contains licence-exempt transmitter(s)/receiver(s) that comply with Innovation, Science and Economic Development Canada's licence-exempt RSS(s). Operation is subject to the following two conditions: (1) This device may not cause interference. (2) This device must accept any interference, including interference that may cause undesired operation of the device.
Information Regarding Exposure to Radio Frequency Energy
This equipment complies with IC RSS-102 RF exposure limits set forth for an uncontrolled environment. This device for operation in the band 5150-5250 MHz is only for indoor use to reduce the potential for harmful interference to co-channel mobile satellite systems. This equipment should be installed and operated with a minimum distance of 20 cm between the radiator and your body.
FRANÇAIS

INFORMATIONS IMPORTANTES SUR LE PRODUIT
INFORMATIONS SUR LA SÉCURITÉ
Ring LLC 1523 26th St. Santa Monica, CA 90404
© 2021 Ring LLC or its affiliates. Ring and all related
marks are trademarks of Ring LLC or its affiliates.
For Z-Wave technical information, visit ring.com/z-wave.
22-003432-02
Protected by
ring
Audio/Video Recording





- Getting Started
- Customize Your Alarm Pro
- Physical home security
- Digital security
- Add layers of backup
- Need more help?
- Where should you install Alarm Pro?
- Alarm Pro uses two apps
- Setting up Ring Alarm Pro
- Connecting to the Internet
- Set up your wifi
- Managing your wifi network
- Get external battery backup with a Ring Power Pack
- Add eero 6 Extenders
- Cellular internet options for Alarm Pro
- 24/7 Backup Internet
- Alarm Cellular Backup
- Subscribe to Ring Protect
- Add Ring Cameras and Video Doorbells
- Using Alexa with Alarm Pro
- Setting up your alarm system
- Understanding device codes
- Range Extender
- Install steps:
- Contact Sensor
- Bypassing Sensors
- What if your Contact Sensor is tampered?
- Understanding Entry & Exit Delays
- Motion Detector
- Where should you place your Motion Detector?
- How do you reduce false alarms?
- Keypad
- Setup and install steps:
- Using the Keypad emergency buttons
- 24/7 Professional Monitoring
- How does it work?
- Customize your police response
- One-Touch Emergency Response with SOS
- How do you get professional monitoring?
- Permits and Registrations
- 7-Day Practice Mode
- Download your insurance certificate.
- What is self monitoring?
- Verbal Password
- Emergency Contacts
- Make sure your emergency contacts save our number!
- Arming and disarming Alarm Pro
- Understanding Modes
- Disarmed Mode
- Home Mode
- Away Mode
- How to Arm and Disarm
- Using the Keypad
- Using the app
- Owners, Shared Users, and Guest Users
- Adding Shared Users and Guest Users
- Managing alerts
- Getting emergency alerts in Do Not Disturb Mode
- Preventing false alarms
- Ways to prevent false alarms
- Alarm Permits and Registration
- Adding permit information to the Ring app
- How to mount your Ring Alarm Pro on a wall (optional)
- Installation:
- ENGLISH
- IMPORTANT PRODUCT INFORMATION
- SAFETY INFORMATION
- FAILURE TO FOLLOW THESE SAFETY INSTRUCTIONS COULD RESULT IN FIRE, ELECTRIC SHOCK, OR OTHER INJURY OR DAMAGE.
- BATTERY SAFETY
- Maintaining Your Ring Alarm Pro
- PRODUCT SPECIFICATIONS
- RECYCLING YOUR DEVICE PROPERLY
- TERMS OF SERVICE
- LIMITED WARRANTY
- Supplier's Declaration of Conformity – Compliance Information Statement
- Innovation, Science and Economic Development Canada (ISED) Compliance
- Information Regarding Exposure to Radio Frequency Energy
- FRANÇAIS
- INFORMATIONS IMPORTANTES SUR LE PRODUIT
- INFORMATIONS SUR LA SÉCURITÉ
- Protected by
- ring
- Audio/Video Recording
Brand : RING
Model : Alarm Pro
Category : Security Camera