On-Lap 1102E - Screen GeChic - Free user manual and instructions
Find the device manual for free On-Lap 1102E GeChic in PDF.


User questions about On-Lap 1102E GeChic
0 question about this device. Answer the ones you know or ask your own.
Ask a new question about this device
Download the instructions for your Screen in PDF format for free! Find your manual On-Lap 1102E - GeChic and take your electronic device back in hand. On this page are published all the documents necessary for the use of your device. On-Lap 1102E by GeChic.
USER MANUAL On-Lap 1102E GeChic
text_image
QR code with a central logo containing the letter 'f'GeChic Global

On-Lap 1102
User Manual
ユーザーガイド
Table of Contents
Notices, Cautions & Warranty Exclusions
Lithium Polymer Battery Safety Caution
LCD Pixel Statement II
FCC & CE Statement III
WEEE Symbol Information III
Chapter 1 Parts of On Lap Monitor & Accessories 1
Section 1 Parts Description 1
Section 2 Accessories Description 2
Chapter 2 Installation Instructions 3
Section 1 Installation of Horizontal Display 3
Section 2 Installation of Vertical Display (Only for 1102E/H) 4
Section 3 Store the Monitor in the Protective Cover 5
Section 4 Connect to Headphone or Speaker (Only for 1102H/I) 5
Section 5 Connect to Camera or Mount on Tripod (Only for 1102H) 6
Section 6 Lay Touch Monitor Flat with 1102 Multi-Mount Kit 7
Section 7 Mount On-Lap 1102 to VESA 75 Monitor Arm or Wall Mount (with 1102 Multi-Mount Kit)
Section 8 Installation of Rear Dock 7
Section 9 Plug Proprietary HDMI-A & USB-A to Dock Port Cable 8
Chapter 3 Hot Keys, LED and OSD Instructions 8
Section 1 Hot Keys & LED Indications 8
Section 2 OSD Description 9
Section 3 Battery Use & Charge Guideline (Only for 1102H) 11
Chapter 4 Settings of Extended Display 12
Section 1 Settings of Extended Display on Windows 10 12
Section 2 Settings of Extended Display on Mac (OS X) 13
Chapter 5 Using of Touch Monitor (Only for 1102I) 14
Section 1 Notices 14
Section 2 Windows 10/7 Touchscreen Settings 14
Chapter 6 Product Specification 15
Section 1 General Specification 15
Section 2 Supported Operating Modes 16
Section 3 Supported Video Modes 16
Chapter 7 Troubleshooting 16
目次
Notices, Cautions & Warranty Exclusions
Warning: The sign ⚠ alerts you to potential hazards that can hurt you or damage the product.

- On-Lap1102H contains lithium polymer battery. Please do not place it in your check-in baggage. According to airline regulations, please place the 1102H monitor in your carry-on baggage and proceed to customs inspection.

- When carrying On-Lap Monitor, please put it into the protective cover with glass side inward and avoid pressing the monitor violently and rubbing the glass surface by any sharp objects.

- When plugging in/out the cables, do make sure the force exerts in horizontal direction - do not shake the port or plug it in vertical direction. Any damage caused by wrong plug urging is not included in the warranty coverage.

- The power input specification for On-Lap monitor is 5V 2A DC current. Inputting On-Lap Monitor more than 5V can cause shortages, and this will void the GeChic Manufacturer's Warranty. We suggest you to connect both connectors of the USB power cable to your desktop's USB ports or use GeChic 5V-2A charger.

- Part of On-Lap Monitor or its protective Cover contains magnets, please put On-Lap Monitor away from hard drive or any device that may be effected or damaged by magnets. Please put the magnetic buckle of protective cover away from your desktop when the PC is in sleep mode or boosting.

- Cleaning On-Lap Monitor : Unplug the power input before cleaning. Please use soft cloth to clean touch screen. For stubborn stains, please use lightly-dampened cloth to wipe again. Do not use benzene, alcohol, thinner, ammonia, abrasive cleaners, compressed air or other corrosive solvents. These solvents may cause permanent damage on the screen or leave unremovable stain.

- Please do not place the monitor on a shaky or unstable table, cupboard or trolley and do not use the On-Lap Monitor on a moving vehicle. The Product may be severely damaged from overturning or falling.

- The product is not waterproof. Do not use this product in or near water.

- Do not insert any object into the Product's slots or gaps. Do not disassemble the monitor in any way.

- High Volume Warning: High volume can lead to lasting damage to your hearing. Please check the volume settings before reproducing any sound.

-
Overuse of the monitor may result in vision damage. For every 30 minutes with the monitor, give your eyes 10 minutes break. Avoid children under age 2 to watch with the monitor; prevent children over age 2 from watching with the monitor over 1 hour per day.
-
Exclusions from Warranty Service
Please read the warranty terms below carefully, and follow the usage guide and precautionary notes. Please keep this manual for future reference. GeChic does not warrant uninterrupted or error-free operation of this Product. The warranty only covers failure /malfunction under normal use conditions during warranty period. The warranty does not apply to the following conditions:
(1)The bar code has been removed or worn down, and cannot be identified.
(2)This product has been modified, disassembled, or refitted.
(3) Display and touch function working normally; only variation in appearance (i.g., ageing, attrition, scratch, color changing and etc.).
(3) Display and touch function working normally; only variation in appearance (i.e., ageing, attrition, scratch, color changing and etc.).
(4) Any breakdown caused by power supply. (i.e., inputting power over 5V or unsteady current)
(5) Any damage caused by disoperation or failure to follow this manual. (i.e., Plug or unplug the cable in wrong direction and causing damage on cable or monitor.)
(6) Any damage caused by hitting or cracking monitor accidentally or purposely, or collapsing or overturning monitor.
● Built-in Battery Exclusions from Warranty (Only for 1102H)
The warranty doesn't apply to the following situations;
1) The battery capacity loss caused by aging.
2) The Battery inside or connector is oxidized or rusted caused by seeped liquid.
3) Any abnormal use by man made.
Lithium Polymer Battery Safety Cautions
- On-Lap 1102H equips a built-in Li-polymer battery. Please keep away from any flame. Do NOT use the monitor near heating sources over 60^ C( 140^ F), such as stove, microwave, steam cooker or any heating devices, otherwise it may lead to battery leakage or explosion. Please do NOT store the product in a car under sun heat or any environment above 60^ C( 140^ F).
- Avoid storing the monitor in a humid environment, or it may cause the effect of high self-discharge. Low temperature could damage chemical materials inside the battery; high temperature may cause explosion.
- When the monitor is turned off, the lithium polymer battery could be self-discharge, and the power will be slowly consumed. It is recommended to charge the lithium battery to three bars before storage. If stored for a long period, the battery may over-discharge, and lead to charging failure. Do charge the battery full before its storage. The battery discharges its power slowly even not in use. Please check the power regularly and charge it in time.
- According to ICAO regulations, you need to transport all electric devices with built-in battery in the luggage. Do pack the monitor in a box or with cushion materials to avoid accidentally turning on the monitor. (Please check the details of battery transportation regulation to your airline company)
- Do NOT pierce the battery with sharp objects.
- Do NOT disassemble the monitor, replace or disassemble the battery.
- Do NOT dispose of this product with your other household waste.
LCD Pixel Statement
There is slightly uneven brightness on the screen when displaying different screen pattern. The LCD screen has 99.99% or more effective pixels. 0.01% of pixels or less may not light or may light incorrectly. The On-Lap monitor uses a high quality LCD panel. Nevertheless, pixels on the LCD screen may not light or appear as red or black dots. All the above are normal with the LCD monitor and will not affect the normal usage of the product.
Avoid placing the monitor against sun-light, or it may damage the monitor. An afterimage of the previous screen may remain, when the same image is displayed for hours. In this case, the screen is recovered slowly by turning off the power for a few hours.
III
Federal Communications Commission (FCC) Class B Statement
Notice: This equipment has been tested and found to comply with the limits for a class B digital device, pursuant to part 15B of the FCC Rules. These limits are designed to provide reasonable protection against harmful interference in a residential installation.
If this equipment does cause harmful interference to radio or television reception, which can be determined by turning the equipment off and on, the user is encouraged to try to correct the interference by one or more of the following measures:
● Reorient or relocate the receiving antenna.
- Increase the separation between the equipment and receiver.
- Connect the equipment into an outlet on a circuit different from that to which the receiver is connected.
- Consult the dealer or an experienced radio/TV technician for help.
Caution:
- Changes or modifications not expressly approved by GeChic Corp. could void the user's authority to operate the equipment.
- Shielded interface cables and AC power cord, if any, must be used in order to comply with the emission limits.
- The manufacturer is not responsible for any radio or TV interference caused by unauthorized modification to this equipment. It is the responsibilities of the user to correct such interference.
CE Declaration of Conformity
This product complies with the following standards:
● EN60950-1:2006 and A11+A1 (Safety requirement of Information Technology Equipment).
● EN 55032:2006+A1: 2007 (Radio Disturbance requirement of Information Technology Equipment).
● EN55024:1998+A1:2001+A2:2003 (Immunity requirement of Information Technology Equipment).
● N 61000-3-2:2006+A1: 2009+A2: 2009 (Harmonic current emissions).
● EN 61000-3-3:2008 (Voltage fluctuations & flicker) following provisions of directives applicable.
● 2006/95/EC (Low Voltage Directive).
● 2004/108/EC (EMC Directive).
● 2005/32/EC (ÉuP Directive, ÉC No. 1275/2008 implementing Directive for Standby and Off mode power consumption) and is produced by a manufacturing organization on ISO9000 level.
WEEE Symbol Information
This symbol on the product, accessories or literature indicates that this product and its electronic accessories (e.g., adapter, cables, and Rear Dock) must not be disposed of with your other household waste. Instead, it is your responsibility to dispose of these items by handing it over to a designated collection point for the recycling of waste electrical and electronic equipment.
For more information about where you can drop off your waste equipment for recycling, please contact your local city office, your household waste disposal service or the shop where you purchased the product.
For Disposal in Countries Outside of the European Union If you wish to discard this product and its accessories in other area and countries, please contact your local government for applicable laws and regulations governing the disposal of this product.
Chapter 1 Parts of On Lap Product & Accessories Section 1 Parts Description
text_image
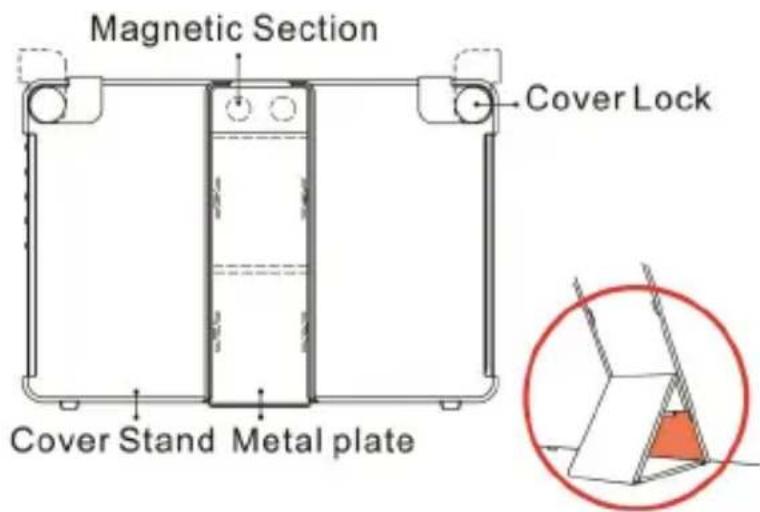
Magnetic Section Cover Lock Cover Stand Metal plateFig.: Part description of 1102 Cover Stand
text_image
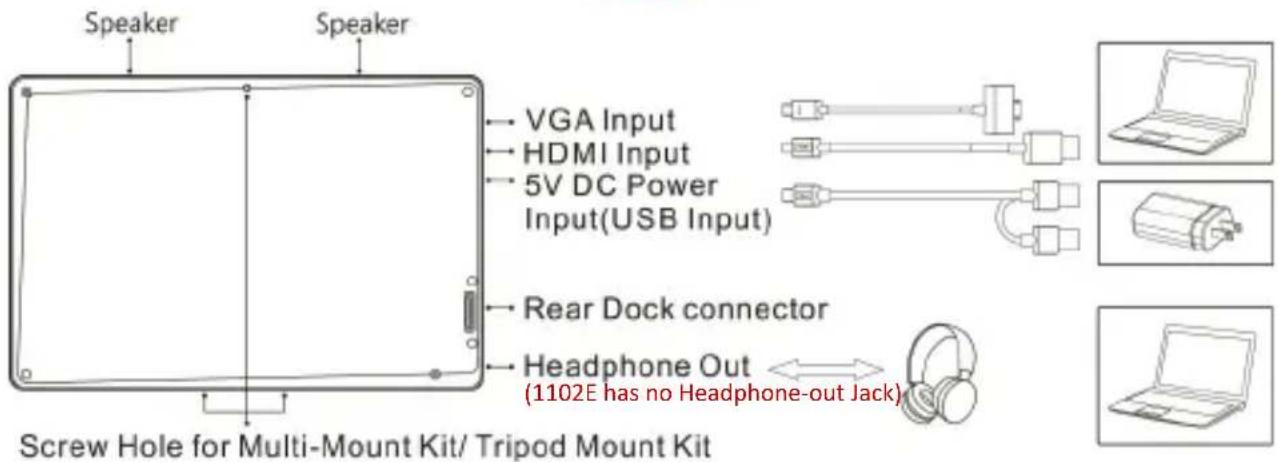
Speaker Speaker VGA Input HDMI Input 5V DC Power Input(USB Input) Rear Dock connector Headphone Out (1102E has no Headphone-out Jack) Screw Hole for Multi-Mount Kit/ Tripod Mount KitFig: 1102E/H/I Monitor & Connection Ports

text_image
Standby Power On Power Off Kensington Slot Power On/Off Indicator Exit/Auto Menu/Select Volume Down/Down Volume Up/UpFig.: 1102E/I Buttons, LED Lights & Kensington Slot Description
2
text_image
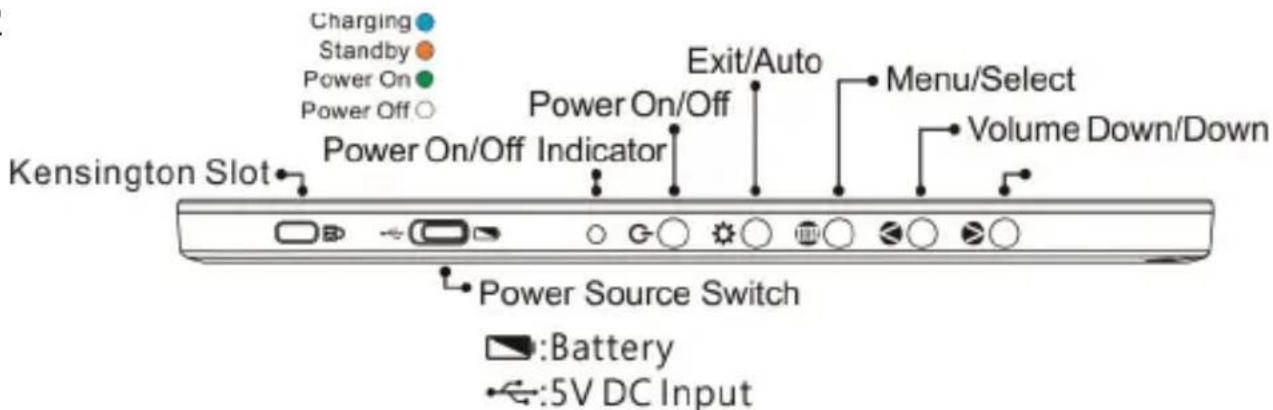
Charging Standby Power On Power Off Power On/Off Indicator Exit/Auto Menu/Select Volume Down/Down Kensington Slot Power Source Switch Battery 5V DC InputFig.: 1102H Buttons, LED Lights & Kensington Slot Description
Section 2 Accessories Description
1. Accessories in Package
| Standard Accessory | 1102E | 1102H | 1102I |
| USB-A to micro USB power & touch cable(1.2m) 1 pcs | Yes Yes | Yes | |
| HDMI-A to micro-HDMI video cable(1.2m) 1 pcs | Yes Yes | Yes | |
| Mini HDMI to micro-HDMI video cable(0.6m) 1 pcs | Yes | ||
| 5V,Max.2A Adapter 1 pcs | Yes Yes | ||
| Protective Cover Stand 1 pcs | Yes Yes | Yes | |
| 1102 Tripod Mount Kit (1/4”screw hole) | Yes | ||
| Screw (M2 x5mm) 4 pcs | Yes | ||
| Manual 1 pcs | Yes Yes | Yes |
2. Optional Accessories
| Product Name Description | |
| USB-A to micro USB power & touch cable(2.1m) 1 pcs | One plug is USB-A (male) for adapter/computer USB port; the other is Micro-USB (male) for On-Lap monitor. |
| On-Lap Proprietary VGA video cable (2.1m) | Proprietary cable for On-Lap products.One plug is D-sub (male) for computer's VGA port; the other plug is micro-HDMI (male) for On-Lap monitor. |
| HDMI-A to Micro-HDMI Video Cable (2.1m) | One plug is HDMI-A (male) for connecting to computer's HDMI-A port; the other plug is micro-HDMI (male) for connecting to On-Lap monitor. |
| Mini-HDMI to Micro-HDMI Video Cable (2.1m) | One plug is mini-HDMI (male) for camera's mini-HDMI port; the other plug is micro-HDM (male) connecting to On-Lap monitor. |
| Micro-HDMI to Micro-HDMI Video Cable (1.2m) | One plug is micro HDMI (male) for camera's micro HDMI port; the other plug is micro-HDMI (male) for connecting to On-Lap monitor. |
| On-Lap proprietary HDMI-A&USB-A to dock port cable (1.2m/2m) | Proprietary cable for On Lap1503/1102. One plug is Gechic proprietary connector for plugging into Rear Dock's port; the other two plugs are HDMI-A (male) and USB-A (male). Please refer to Chapter 2>Section 9. |
| Rear Dock | The Rear Dock shall be installed on the backside connector of 1102/1503. It equips with HDMI-A input and USB-A input for installing Computer Stick or HDMI wireless display. For the usage of Rear Dock, please refer to Chapter 2>Section 8. |
| 1102 Multi Mount Kit | Proprietary for On-Lap1102 . Can be used as a stand of touch monitor for varies viewing angles; can be installed on wall mount or arm of VESA 75. Please refer to Chapter 2. |
| 1102 Tripod Mount Kit (1/4"screw hole) | Proprietary for On-Lap1102. A 1/4" screw hole allows you to install On-Lap1102 on a camera tripod. Please refer to Chapter 2. |
Chapter 2 Installation Instructions Section 1 Installation of Horizontal Display
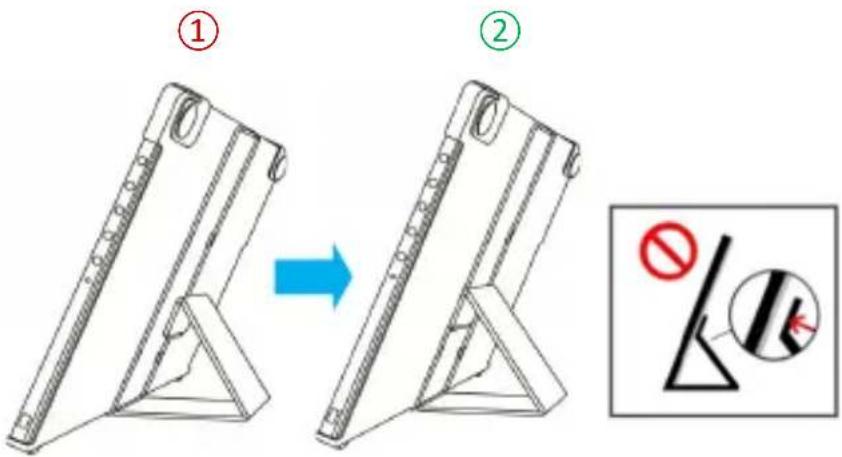
Refer to the Fig., ① take the magnetic buckle off firstly, ② fold and attach the rubber side of the magnetic buckle on the mental plate. Adjust the position of the magnet buckle to change the viewing angles.
text_image
Diagram illustrating the step-by-step modification of a flat-panel device, showing change from ① to ② with a prohibition symbol.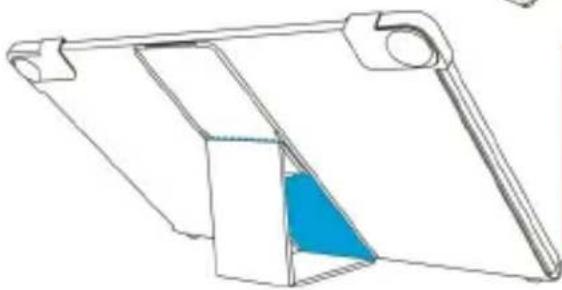
natural_image
Line drawing of a mechanical device with a blue highlighted section (no text or symbols)The min. viewing angle of horizontal display is 40 degrees. Do not attach the magnetic buckle higher than the blue line, otherwise it may cause the monitor overturning.
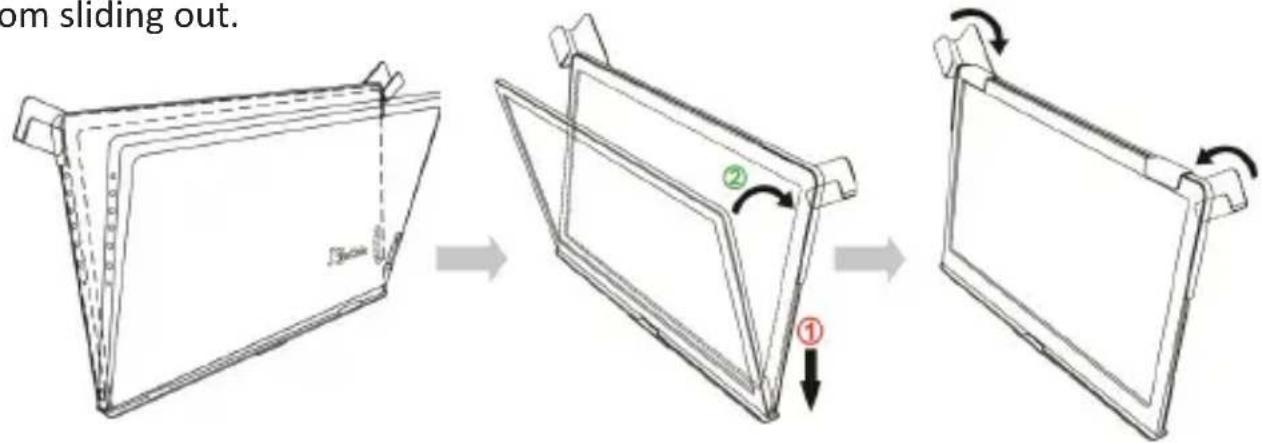
As the fig. below, rotate aside the Cover Locks firstly, and take the monitor out. Then turn the monitor's backside to the Protective Cover:①Put the bottom half of the monitor into the Protective Cover, and②Put the top half of the monitor into the Protective Cover. Rotate down the Cover Locks to prevent the monitor from sliding out.
text_image
om sliding out.4
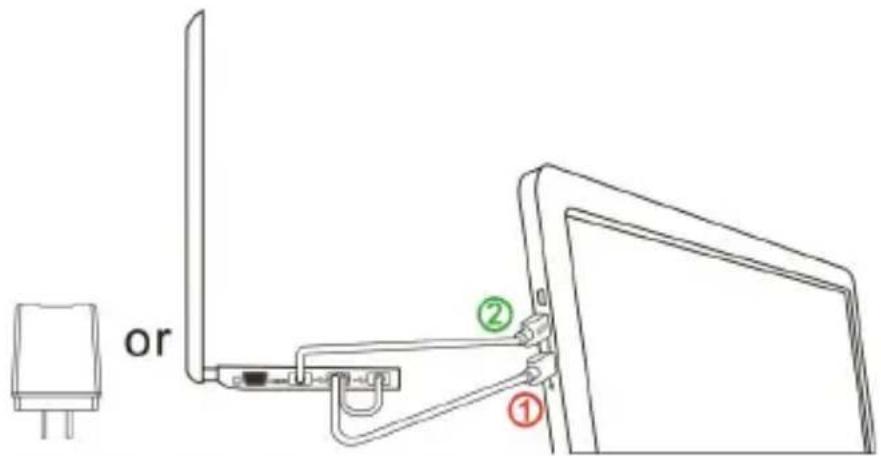
As the fig. , connect On-Lap 1102 to a laptop. On-Lap 1102 can be powered on through two USB ports or a 5V-2A adapter. The video input source is "HDMI1".
text_image
or ② ①P.S. If the monitor does not get enough power from a single USB port, it may cause splash screen or display interruption. Please connect to two USB ports on your PC or the 5V-2A adapter.
Section 2 Installation of Vertical Display (Only for On-Lap 1102E/H)
As the fig. below, rotate aside the Cover Lock firstly, and take out the monitor, then turn the monitor's back side to the Protective Cover. Do keep the buttons on the topside. ① Put the bottom half of the monitor into the Protective Cover, ② Put the top half of the monitor into the Indentation of the Protective Cover. Rotate down the Clover Lock.
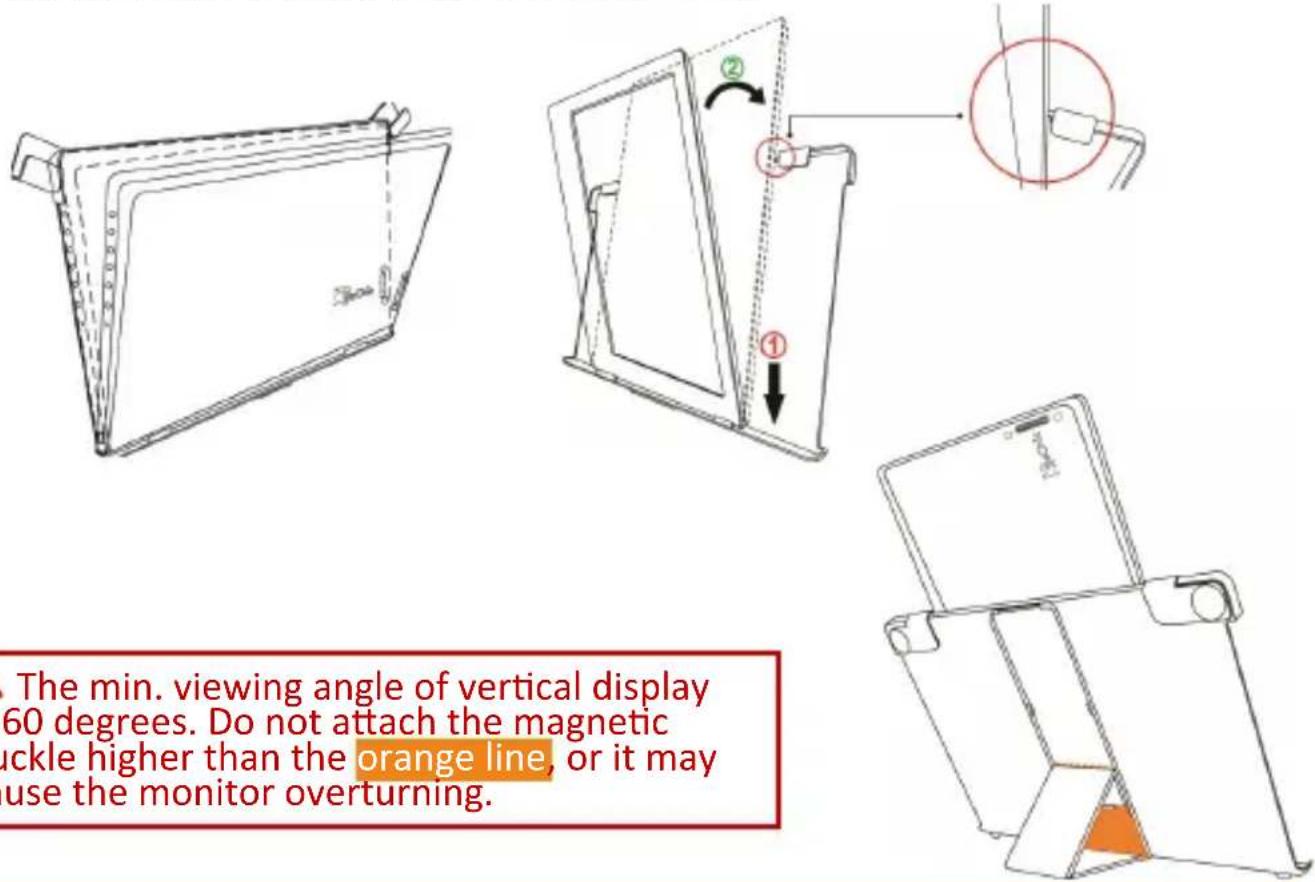
text_image
The min. viewing angle of vertical display 60 degrees. Do not attach the magnetic uckle higher than the orange line, or it may use the monitor overturning.The min. viewing angle of vertical display is 60 degrees. Do not attach the magnetic buckle higher than the orange line, or it may cause the monitor overturning.
As the fig. on next page, connect On-Lap 1102 to a laptop. On-Lap 1102 can be powered on through two USB ports on your PC or a 5V2A adapter.

text_image
HOME BOXIt is recommended to install 1102I touch monitor on VESA75 arm or wall mount for its Vertical Display. If you put 1102I in Cover Stand vertically, it may tilt down.
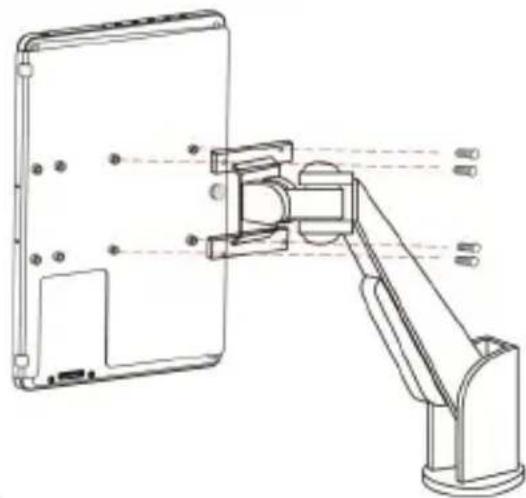
natural_image
Technical line drawing of a robotic arm mounted on a tablet device (no text or symbols present)Section 3 Store the Monitor in the Protective Cover
Warning: When not in use, please put the monitor back in the Protective Cover with its backside outward. Please also rotate down the Cover Lock to prevent the monitor from sliding out.
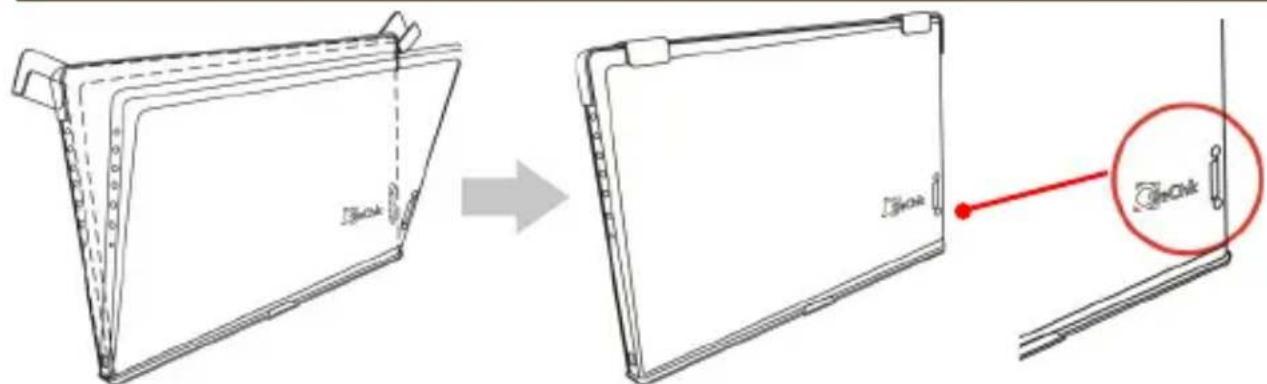
text_image
Diagram illustrating the process of inserting a blank document into a device, with a magnified inset showing the device's internal structure.Fig.: Put the monitor into the Protective Cover.
Warning: Please keep the "Rear Dock Port" downward in the Protective Cover. If the monitor is put upside down in the Protective Cover, it may cause the scratches and the Cover Locks cannot be locked on.
Section 4 Connect to Headphone or Speaker (Only for On-Lap 1102H/I)
On-Lap 1102's audio jack supports analog audio outputs. It is able to output analog audio to the devices which equipped with analog audio input. Please refer to the fig.
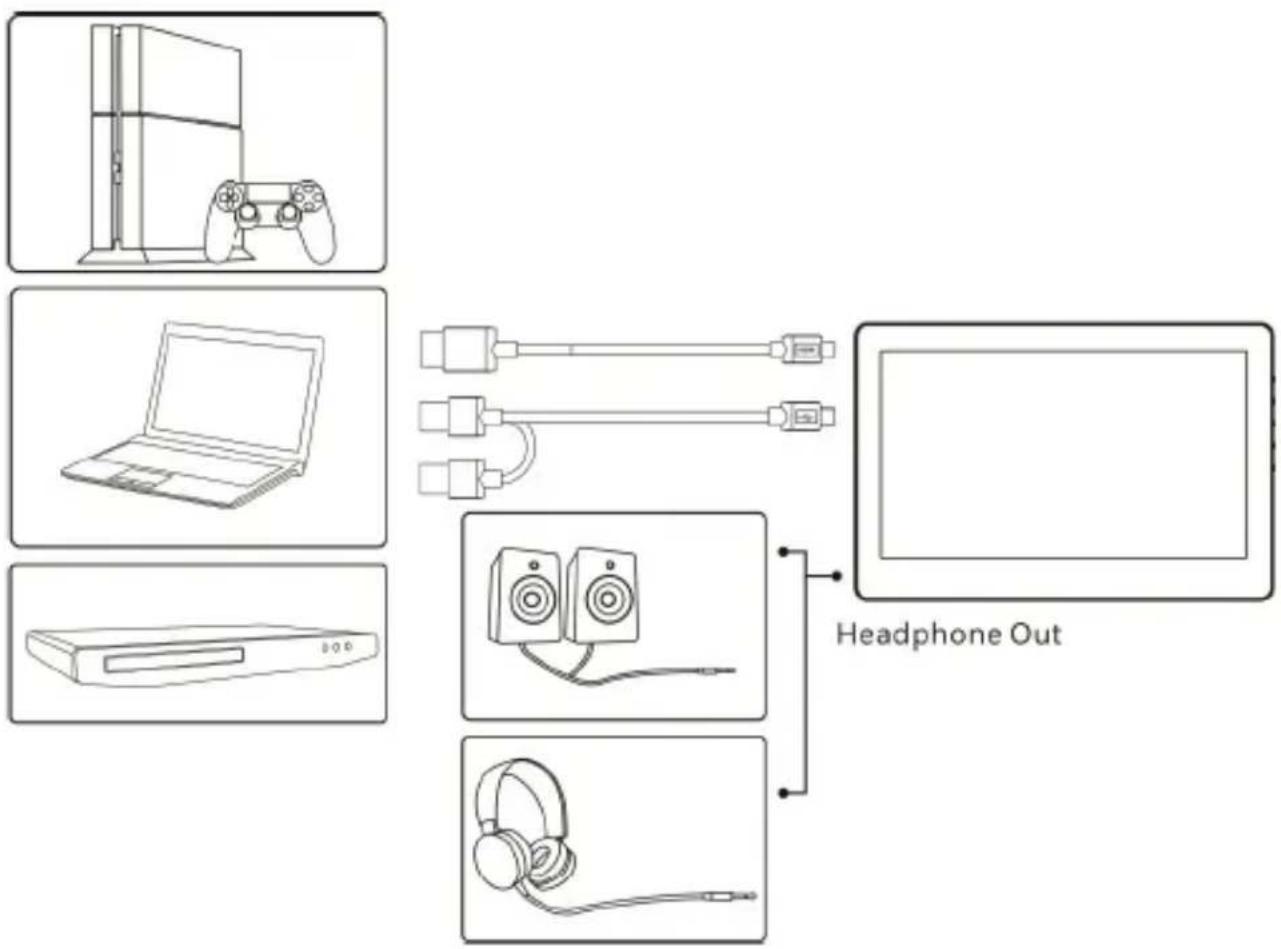
flowchart
graph TD
    A["Game Console"] --> B["Laptop"]
    C["Play Console"] --> D["Laptop"]
    E["Desktop Computer"] --> F["Laptop"]
    G["Headphone Out"] --> H["Headphone Out"]
Fig.: Analog audio output
Section 5 Connect to Camera/ Mount on Tripod (Only for On-Lap 1102H)
As the fig., firstly use three M2x5mm screws to fix the monitor to 1102 Tripod Mount Kit (1/4" screw hole). Then, fasten the 1/4" screw on the camera tripod to the 1/4" screw hole at the button of the Tripod Mount Kit.
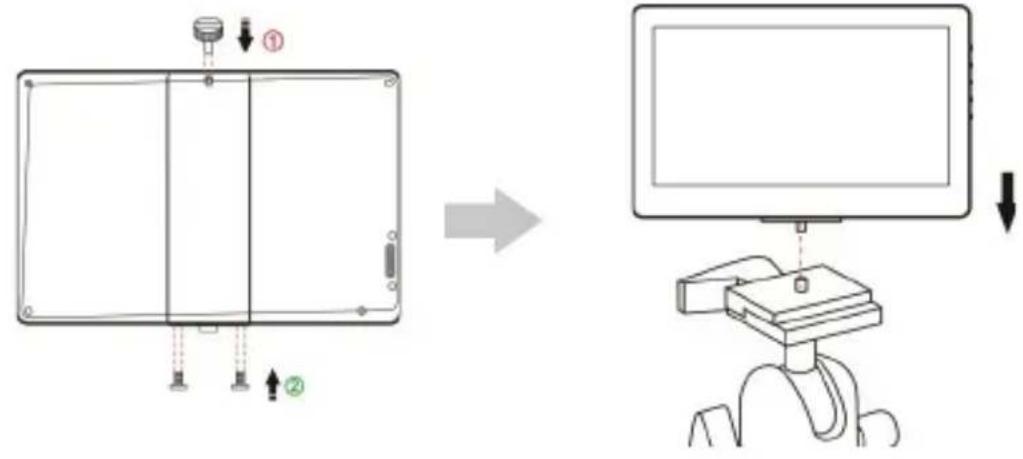
text_image
Diagram showing a device panel before and after adjustment, with labeled components and directional arrows.Section 6 Lay Touch Monitor Flat with 1102 Multi Mount Kit
As the fig., firstly use three M2x5mm screws to fix the monitor to the Monitor Bracket. After selecting the viewing angle of 75°, 62°, 42° or 25°, use two M4x5mm screws to fix Bracing Plate to the Monitor Bracket.
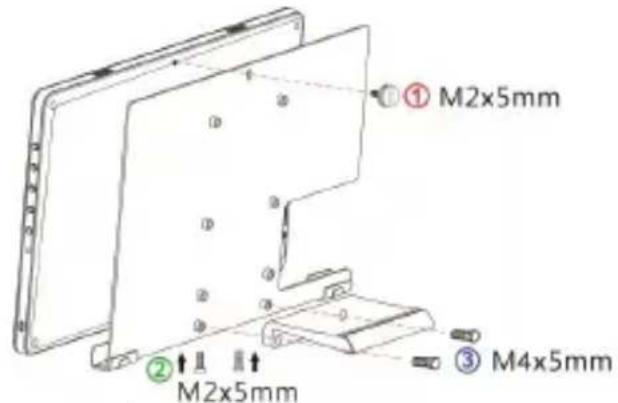
text_image
① M2x5mm ② M2x5mm ③ M4x5mm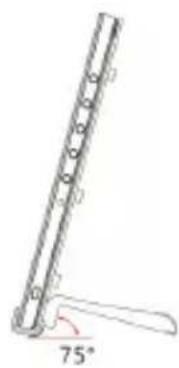
natural_image
Technical line drawing of a mechanical support or bracket with a 75-degree angle标注 (no text or symbols beyond the angle marker)
natural_image
Technical line drawing of a mechanical support with a 62-degree angle标注 (no text or symbols beyond the angle marker)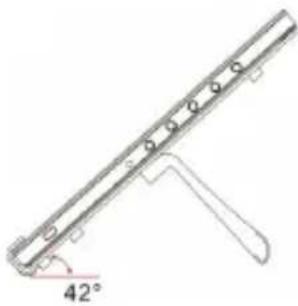
natural_image
Technical line drawing of a mechanical component with a 42-degree angle标注 (no text or symbols beyond the angle marker)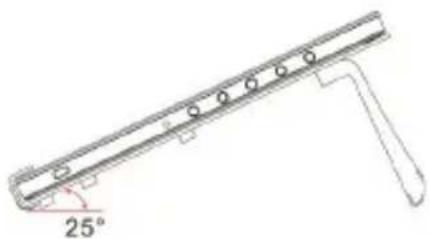
natural_image
Technical line drawing of a mechanical component with a 25° angle标注 (no text or symbols beyond the angle marker)Section 7 Mount On-Lap 1102 to VESA 75 Monitor Arm or Wall Mount (With 1102 Multi Mount Kit)
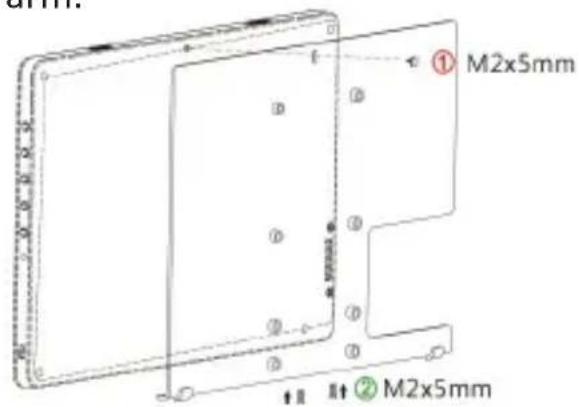
As the fig., firstly use three M2x5mm screws to fix the monitor to the Monitor Bracket. Then use four M4x5mm screws to fix the Monitor Bracket to the arm.
text_image
M2x5mm ① ② ③ ④ ⑤ ⑥ ⑦ ⑧ ⑨ ⑩ ⑪ ⑫ ⑬ M2x5mm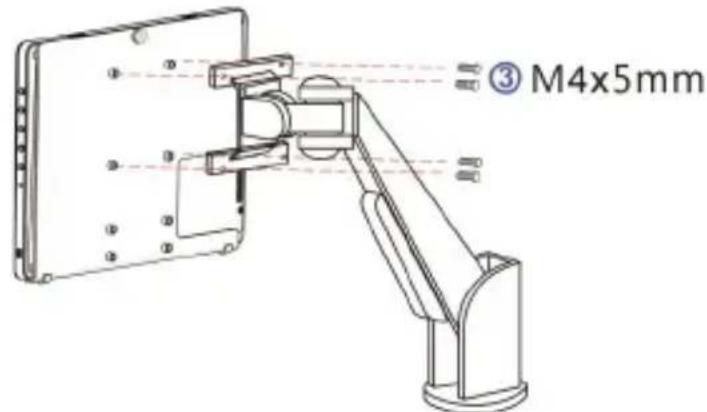
text_image
③ M4x5mmSection 8 Install Rear Dock
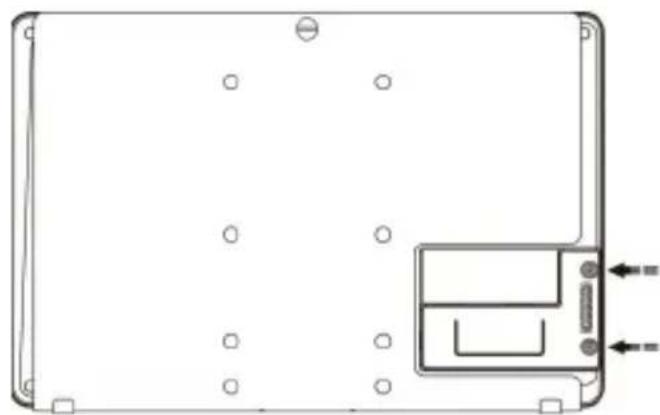
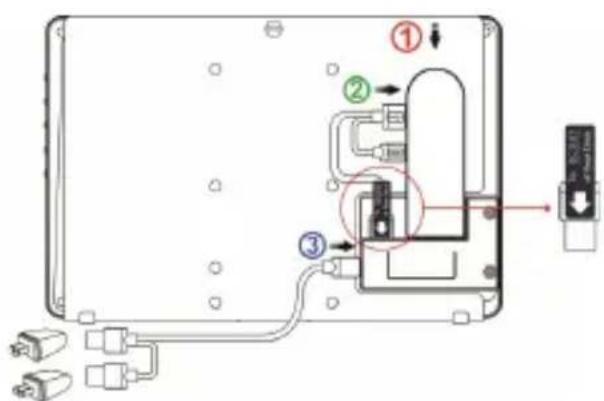
As the fig., remove the rubber bung at the rear of the monitor.
Insert "Rear Dock" to the rear port on the 1102 and screws it up. Users can plug in computer stick (such as Intel ^ Compute Stick) or HDMI wireless display adapter (such as Microsoft ^ Wireless Display Adapter) to the HDMI-A port of Rear Dock. Please press the menu button on the monitor to enter OSD menu and choose "HDMI 2" as "Input Source."
Warning: The 1102H built-in battery only powers 1102 monitor. The battery can't power Rear Dock or the devices installed on it, such as Wireless Display Adapter.
natural_image
Top-down schematic of a device casing with mounting holes and a rectangular component (no text or symbols)Fig.: Install Rear Dock
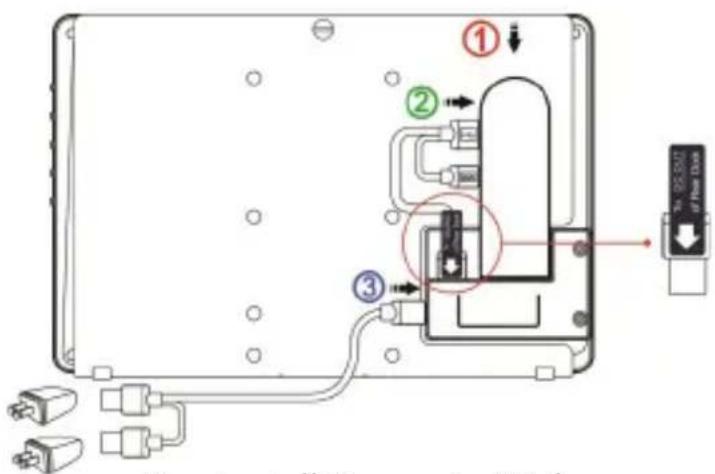
text_image
Diagram of a device internal structure with labeled components and connections, including ports, connectors, and a USB port.Fig.: Install Compute Stick
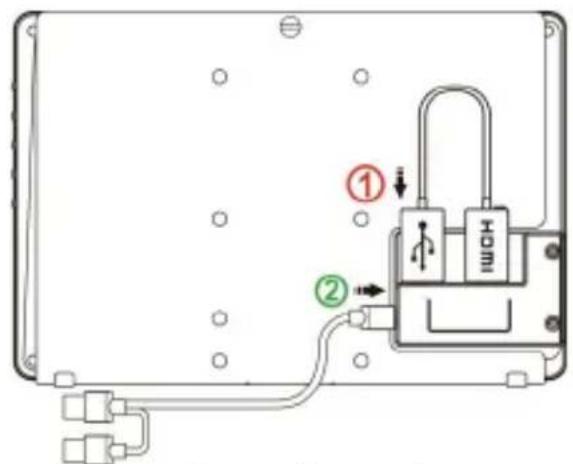
text_image
Diagram of a home control panel with labeled components and directional arrows indicating connection pointsFig.: Install Wireless Adapter
Section 9 Install On-Lap Proprietary HDMI-A & USB-A to Dock Port Cable
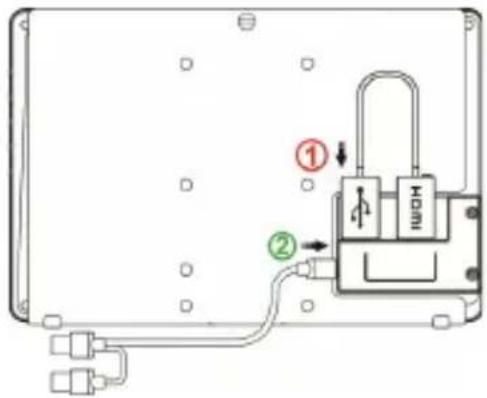
As the fig., remove the rubber bung at the rear of the monitor firstly. Insert "On-Lap Proprietary HDMI-A & USB-A to Dock Port Cable" to the rear port of 1102, and then screw it up. Plug in USB-A connector to computer's USB port; HDMI-A connector to computer's HDMI port. Please press the menu button of the monitor to enter OSD menu and choose "HDMI 2" as "Input Source."
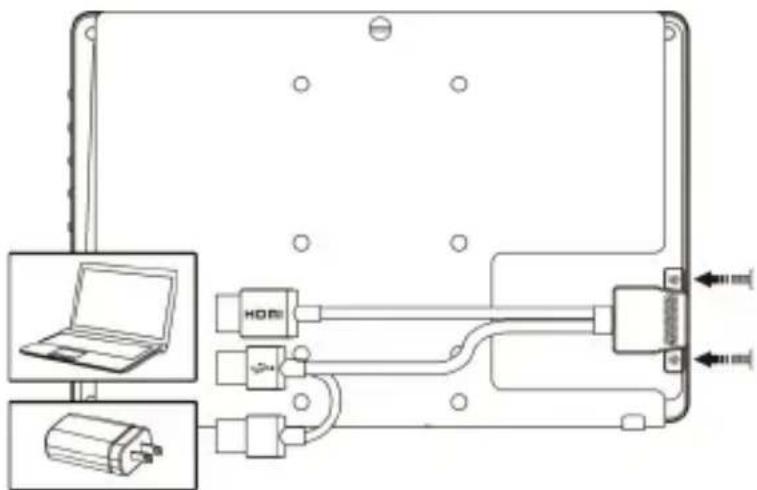
text_image
Diagram of a device interface showing connections between a laptop and two devices via USB interfaces, with directional arrows indicating data flow.Fig.: Install On-Lap Proprietary HDMI -A & USB-A to Dock Port Cable
Chapter 3 Hot Keys, LED and OSD Instructions Section 1 Hot Keys & LED Indications
Notice: If need to adjust "Increase/up" or "Decrease/down" continuously, press the button and don't release. Do not press two buttons at the same time, or it may cause no response or fault response.
LED Light Description :
9
LED Light: It shows green light when turning on On-Lap Monitor and shows Orange light when stand by. There is no light when the monitor is off. When charging to 1102H's battery, it shows blue.

text_image
Standby Power On Power Off Kensington Slot Power On/Off Indicator Exit/Auto Menu/Select Volume Down/Down Volume Up/UpFig.: 1102E/I Buttons, LED Lights & Kensington Slot Description
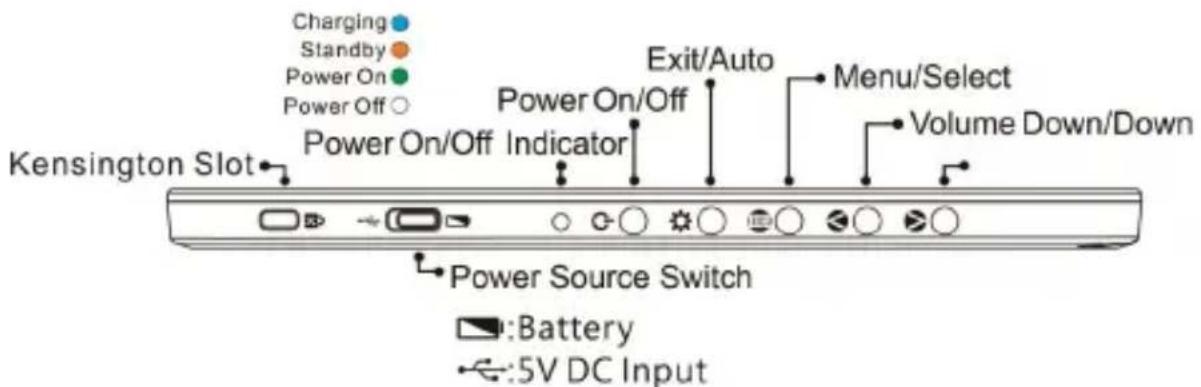
text_image
Charging Standby Power On Power Off Kensington Slot Power On/Off Indicator Exit/Auto Menu/Select Volume Down/Down Power Source Switch Battery 5V DC InputFig.: 1102H Buttons, LED Lights & Kensington Slot Description
Hot Keys Description:
Increase Volume/UP: Press this Button to show "Volume bar." In the OSD menu, pres button to move up or to the left. Press and hold this button to increase the volume ously.
Decrease Volume/Down: Press this Button to show "Input Source." In the OSD menu, this button to move down or to the right. Press and hold this button to decrease the continuously.
Menu/Select: Press the Menu Button to launch OSD panel. In OSD panel, press this button to select and enter the next page.
Exit: In the OSD panel, press the Exit Button to exit and back to the previous page.
Power: Press the Power Button to power on/off the Monitor.
If press both "Increase Volume/Down" and "Exit" at the same time, OSD will be reset as the factory settings.
If press both "Increase Volume/Up" and "Decrease Volume/Down" at the same time, you can enable "Mute" mode. Press these two buttons again to release mute mode. If press both "Menu" and "Decrease Volume/Down" at the same time, you can lock the power button. Press these two buttons again to unlock power button.
If press both" Menu " and "Increase Volume/Up " at the same time, you can lock the OSD buttons. Press these two buttons again to unlock OSD buttons.
Section 2 OSD Description
When turning on On-Lap monitor at the first time, the "Language Select" menu appears on the left top. Please press "Menu/Select" button to choose the language you like, then the "Language Select" menu won't appear next time. If press "Exit" button to disable the "Language Select" menu, it will appear again when powering on the monitor next time.
1. Basic Button Operation
Press 📄 button to launch the OSD panel. Press ⚠ or Ⓧ to view the items. Press 📋 to launch the selected item. If the selected item has sub-items, press 📋 again to launch the sub-items, and press ⚠ or Ⓧ to select the settings of sub-items. To exit, press Ⓧ . Repeat the steps above to adjust the
other settings.
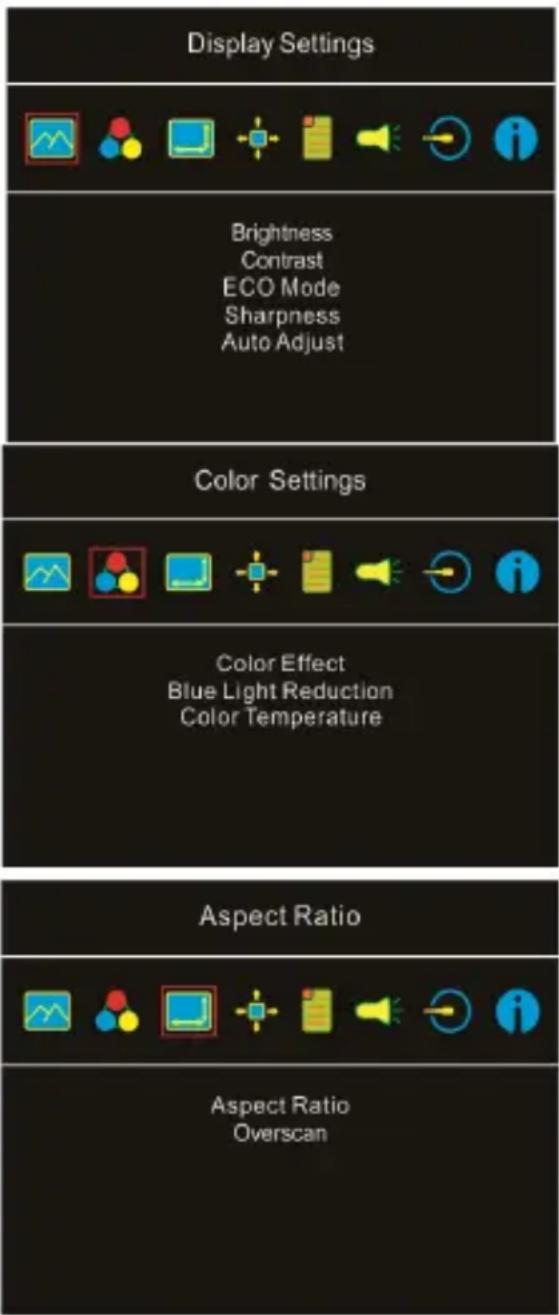
2. Display Settings
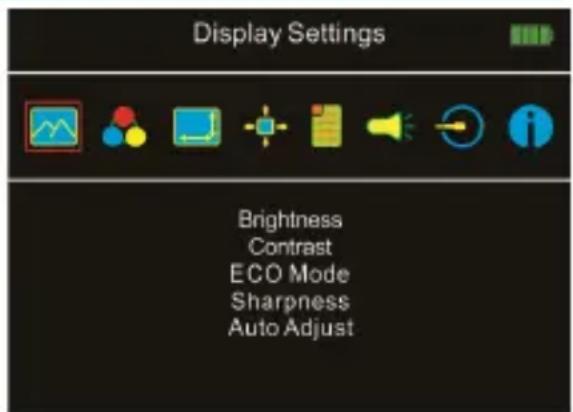
As the fig. shown, enter "Display Settings" to adjust "Brightness", "Contrast", "Sharpness", and the other functions.
1) ECO Mode: The maximum brightness is at 50 in Eco Mode.
2) Auto Adjust: Launch "Auto Contrast Adjust" and "Auto Brightness Adjust" to adjust brightness and contrast automatically to ensure the highest quality when displaying moving images.
3. Color Settings
1) Color Effect: In Color Effect, there are 4 modes: "Standard", "Photo", "Game", and "Movie" offered to be selected.
2) Blue Light Reduction: Select "On" to reduce the screen's blue light automatically.
3) Color Temperature: Select "Cool" to increase the blue color of the image; Select "Warm" to increase the red color of the image. Select "User" to adjust the RGB color settings manually.
4. Aspect Ratio
1) Aspect ratio: When select "16:9 Full Screen", the monitor displays a 16:9 image in full screen. When select 4:3, the monitor displays a 4:3 image with left-right side black borders to fill the 16:9 screen. When select "Original", the monitor displays the image in its original size.
2) Overscan: only available when inputting HDMI video signal (ex:1080P/720P). Enabling this function allows you to calibrate the display area.
5. Manual Image Adjust
1) Auto Adjust: Adjust image settings automa Only available when inputting VGA video si
2) H. Position: Move screen image to left/right
3) V. Position: Move up/down screen image.
4) Clock: Adjust the pixel clock for horizontal sweep. If the frequency is not correct, the shows vertical stripes and the image is not portional.
5) Phase: Adjust the phase of the pixel clock with a wrong phase adjustment, the screen shows horizontal disturbances.
text_image
Display Settings Brightness Contrast ECO Mode Sharpness Auto Adjust Color Settings Color Effect Blue Light Reduction Color Temperature Aspect Ratio Aspect Ratio Overscan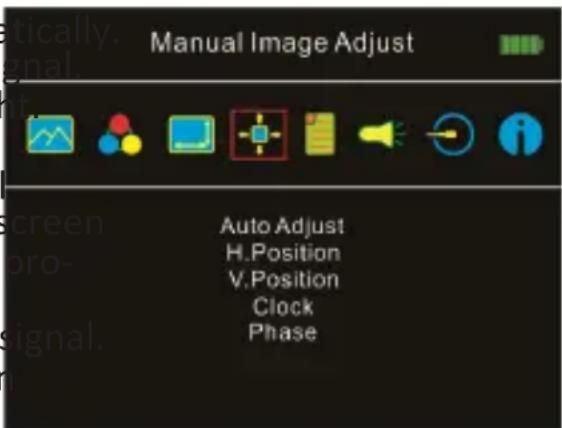
text_image
tically. Manual Image Adjust Auto Adjust H.Position V.Position Clock Phase- OSD menu:
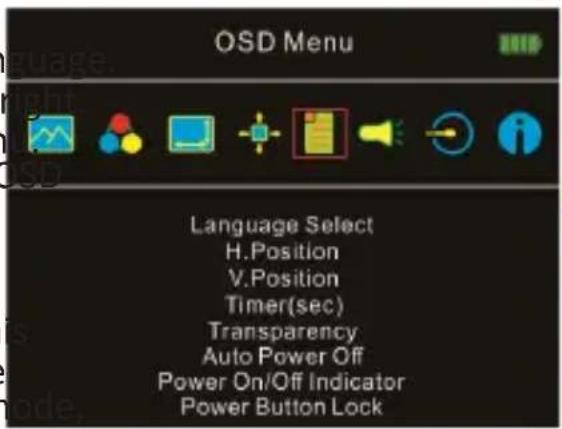
1) Language Select: Change to the other lan
2) H. Position: Move the OSD menu to left/
3) V. Position: Move up/down the OSD men
4) OSD Timer(sec): Adjust idle time before 0 menu disappears.
5) OSD Transparency: Make the OSD menu transparent to show the background.
6) Auto Power Off: Select "On" to launch the function, when no image displayed on the screen, the monitor will enter Stand -by m and power off itself after 15 minutes.
text_image
OSD Menu Language Select H.Position V.Position Timer(sec) Transparency Auto Power Off Power On/Off Indicator Power Button LockSelect "Off" to disable this function. The monitor will stay in Stand-by mode and will not power off.
7) Power On/Off Indicator: Select "Off" to turn off the Power On/Off Indicator.
8) Power Button Lock: Select "On" to lock the Power Button.
-
Audio Settings: Adjust audio volume or select silent mode.
-
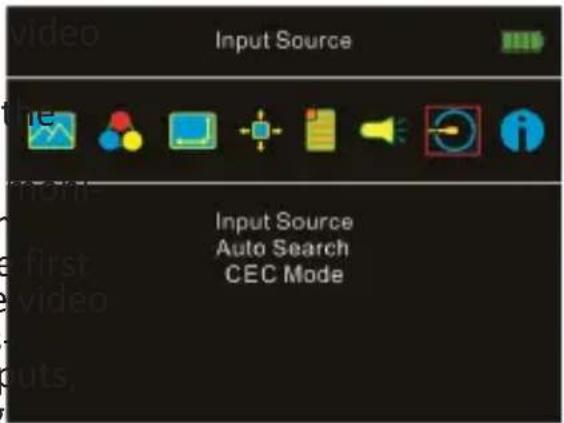
Input Source:
1) Select Analog VGA source, HDMI1 digital signal (from the left HDMI port) or HDMI 2 digital video signal (from the HDMI port on Rear Dock).
2) Auto Search: When "On" is selected, the tor will detect three video input sources in sequence, and the monitor will display the one read. When "Off" is selected, only the source selected in Input Source will be displayed. If no such selected video signal in the monitor will show "no signal" warning message, and won't check other video sources.
text_image
Input Source Input Source Auto Search CEC Mode3) CEC Mode: When "On" is selected, users can turn on or off the monitor by connected to the device with HDMI CEC function such as DVD player, camera, or PlayStation game console.
- Information: Show the frequency of the input image, On-Lap model, firmware version ...etc.
1) Reset: Select "Yes" to reset to defaults.
Section 3 Battery Usage & Charging Guide (Only for On-Lap 1102H)
1. Power Source Switch Description
(1) When switching the button to the battery symbol , the monitor will be powered by the built-in battery; however, the battery power will gradually decrease even when shut off. If switching the button to the USB symbol , the monitor will be powered by external DC power. The monitor will then need to connect to a USB cable to an ext power supply before use.
(2) When the 1102H is carried out or not in use, please switch the button to the USB symbol in order to reduce battery drain.
2. Charging the Battery
Please connect On-Lap 1102H to the 5V-2A adapter, and press "Power ⏻" button to turn off the monitor. When the 1102H is connected to an external power source, and it is off or under sleep mode, the built-in battery will be charged no matter which position the Power Source Switch is set.
The power indicator shows blue light while charging. After about five hours, the battery can be fully charged. The power indicator light will extinguish automatically, indicating that the battery has saturated. Please then unplug the 5V 2A adapter.
3. Battery Usage
(1)When not connected with the USB power cable, press the power button ⏻, and On-Lap1102H will boot automatically and use the battery power. The power indicator will show "green light".
(2)Battery Bar Icon: After turning on the monitor (power indicator shows green light), entering OSD menu, the upper right corner will show the Battery Power icon. When the icon drops to or zero battery, it means the battery power is too low. Please turn off monitor and charge battery.
PS. When the monitor is off, lithium battery will self-discharge power gradually. It is suggested to store 1102H with battery capacity more than 3 bars
4. Battery Charging Bar Description
| Power Bar Icon | Power Status | Remaining Time |
| About 100% | About 4.5 hrs. | |
| About 75% | About 3.3 hrs. | |
| About 50% | About 2.5 hrs. | |
| About 25% | About 0.8 hrs. |
text_image
Display Settings Brightness Contrast ECO Mode Sharpness Auto AdjustFig.: Charging Bar Icon at the upper right corner of OSD menu
The remaining time is estimated based on brightness 70 and Volume 50. The power consumes quicker if the brightness and volume is set higher.
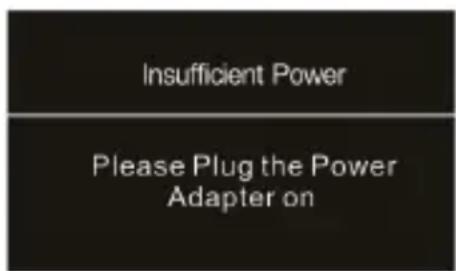
When there is only one bar left [icon], the power voltage drops quickly and the monitor will appear "Insufficient Power" caution on the screen. Then the monitor enters ECO Mode or cannot work normally. please shut down the monitor right away.
text_image
Insufficient Power Please Plug the Power Adapter onFig.: Insufficient Power caution
Chapter 4 Settings of Extended Display Section 1 Settings of Extended Display on Windows 10
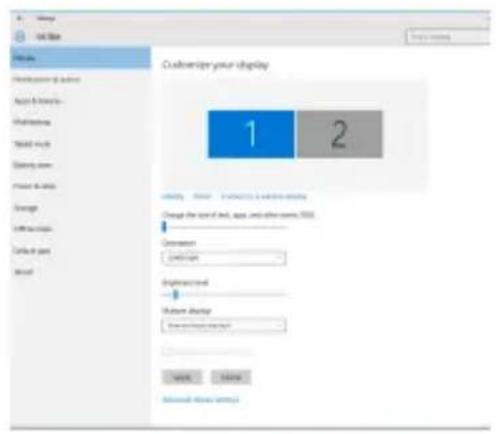
Click 📄, then select 【Settings】→ select 【System】→ Select 【Display】→
Choose "Extend these displays" at Multiple displays.
Select "1920x1080" at Resolution; Select "Landscape" at Orientation for horizontal display, select "Portrait" for vertical display. Click Apply and exit.
text_image
Customize your display 1 2 Importing Change the size of web, app, and other items, XXXX Conversion <|vision_start|> Implementation Pattern Shutout Save... Save... Show all these items.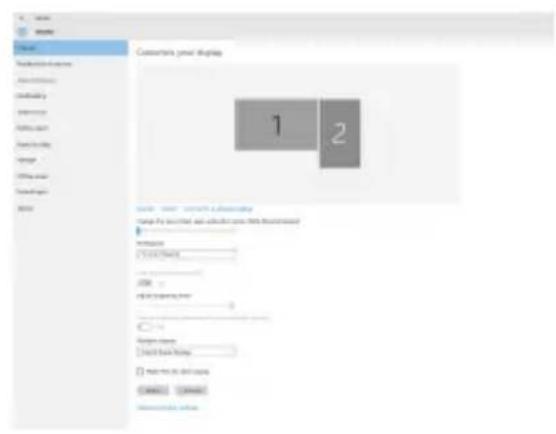
text_image
Customize your display 1 2 Name: user software architecture range by controller on editor you this document Image: 100% 100% 100% 100% 100% 100% 100% 100% 100% 100% 100% 100% 100% 100% 100% 100% 100% 100% 100% 100% 100% 100% 100% 100% 100% 100%13

Section 2 Settings of Extended Display on Mac (OS X)
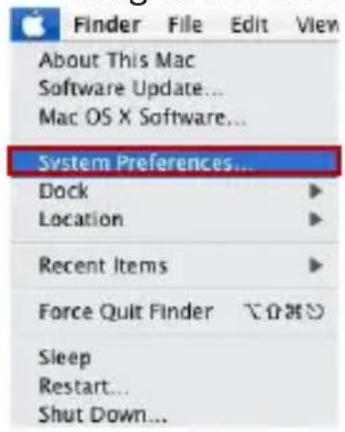
Click 📄, then select 【System Preference】→ choose 【Arrangement】tab, and uncheck "Mirror Displays". Select one of the blue rectangles, and drag to the desired position.
text_image
Finder File Edit View About This Mac Software Update... Mac OS X Software... System Preferences... Dock Location Recent Items Force Quit Finder Sleep Restart... Shut Down...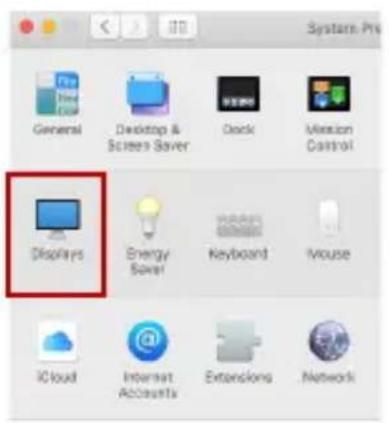
text_image
System-Pr General Desktop & Screen Saver Deck Mission Control Displays Energy Save Keyboard Mouse iCloud Internet Accounts Extensions Network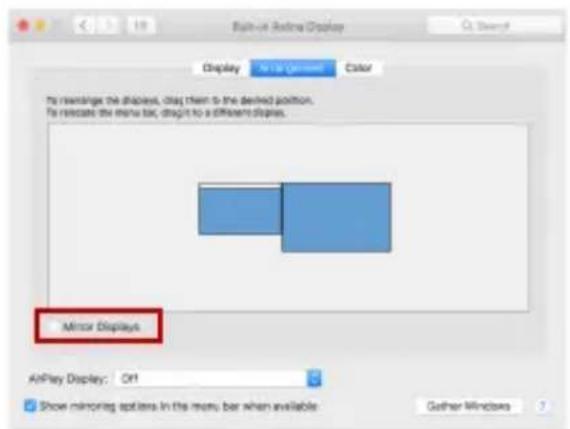
text_image
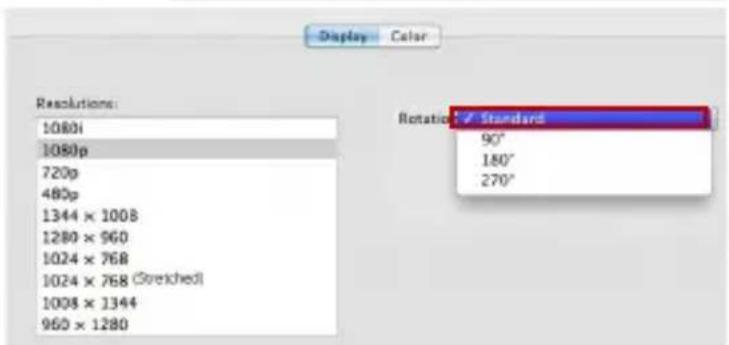
File Edit Display Display File Edit View Color My stretching the shapes, drag them to the desired position. To release the menu bar, drag it to a different display. Mirror Displays AirPlay Display: On1 Show mirroring options in the menu bar when available Goher WindowsClick【Display】tab, select resolution of the laptop firstly, then click "Gather Windows", and select resolution to "1080p" for On-Lap 1102. For vertical display, select 90^ at "Rotation"
text_image
Display Color Resolutions: 1080l 1080p 720p 480p 1344 × 1008 1280 × 960 1024 × 768 1024 × 768 (Stretched) 1008 × 1344 960 × 1280 Rotation: ✓ Standard 90° 180° 270°If you connect On-Lap monitor to the Macbook by Apple USB-C Digital AV Multiport Adapter, please power the On-Lap monitor with 5V-2A charger or power bank rather than the USB-A (female) port of adapter. The USB-A(female) port won't supply enough current to On-Lap monitor.
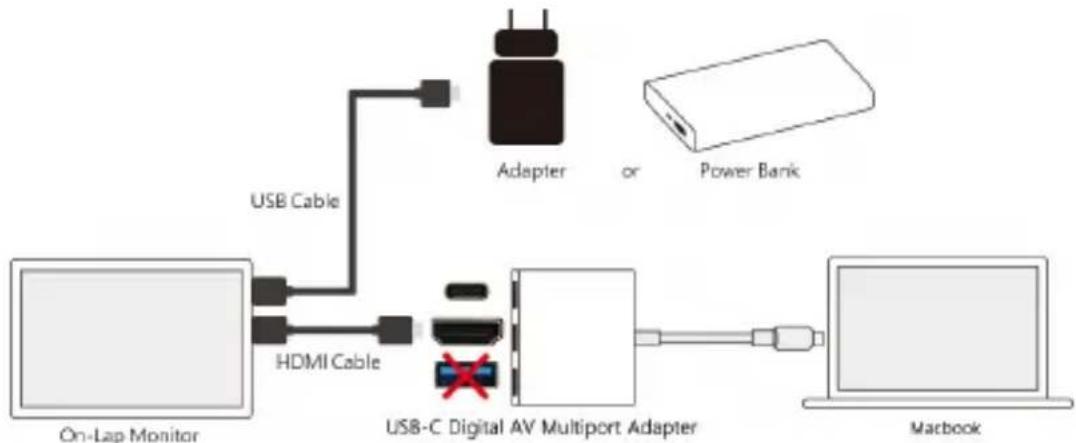
flowchart
graph LR
    A["On-Lap Monitor"] -->|USB Cable| B["Adapted USB Cable"]
    A -->|HDMI Cable| C["Analog HDMI Cable"]
    B --> D["Power Bank"]
    C --> E["USB-C Digital AV Multiport Adapter"]
    E --> F["Macbook"]
Notice: Please check the USB-C port on your laptop/ smartphone supports HDMI video output (USB Type C alt mode) before using the adapter.
Chapter 5 Using Touch Monitor (Only for 1102I)
Section 1 Notices
- Computer with operating system of Windows 10/7 supports On-Lap 1102I's touch function. If computer does not be equipped with Windows 10/7, it may not be able to use On-Lap 1102I's touch function. Please be noticed whether the computer's operating system supports an external touch monitor.
text_image
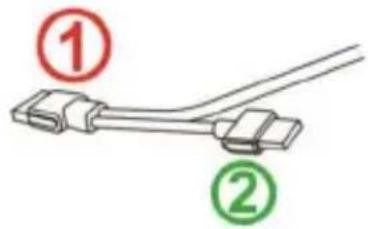
Diagram showing two labeled connectors (① and ②) connected by a cable or connector, with red and green circles indicating positions.- As the fig., USB power & touch cable ① can transmit both power and touch signal at the same time; ② only can transmit power. If ① connector does not connect to computer's USB port, then touch function will be no longer available.
Section 2 Windows 10/7 Touchscreen Settings
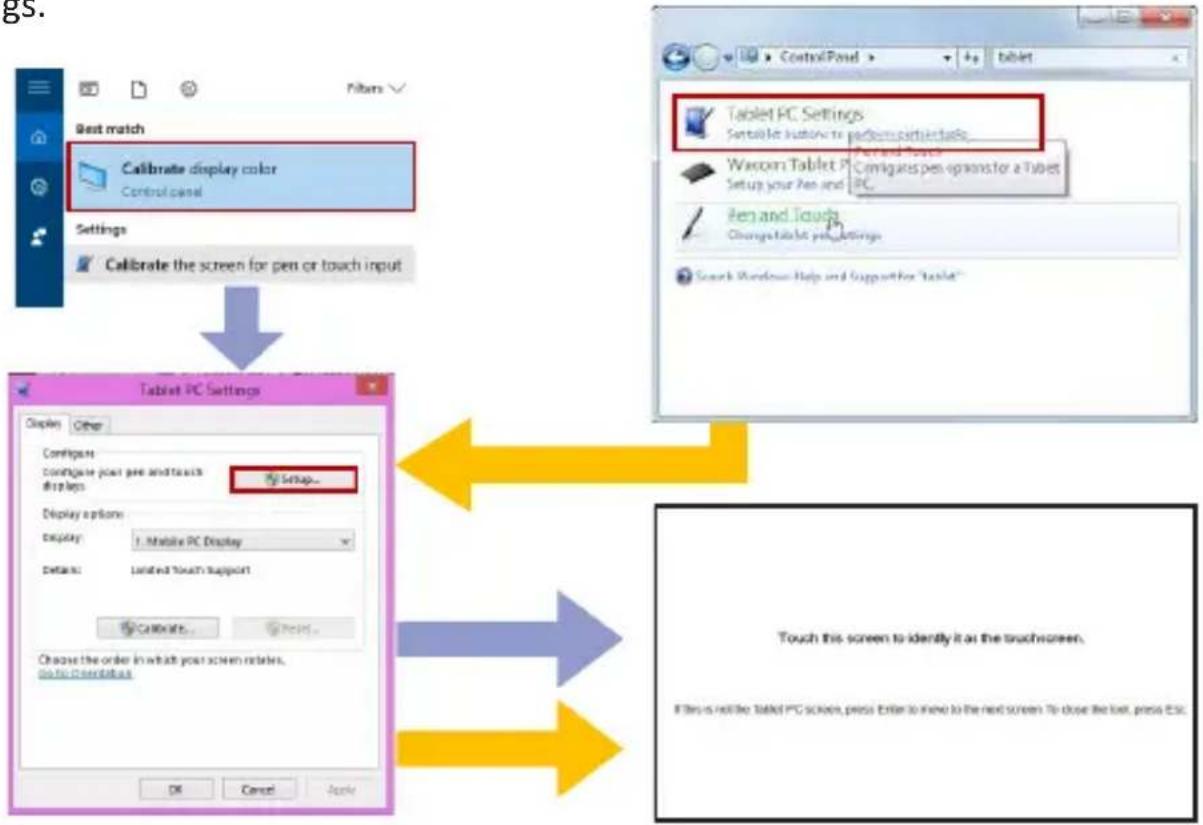
If your computer does not enable touch screen function automatically or recognize multi-screen, then touch screen will not sense touch position accurately. Please use Windows 10/7 "Tablet PC Settings" of Control Panel to start touch screen settings.
In Windows 10, search "Calibration" at 'Settings', then select "Calibrate the screen for pen or touch input." In Windows 7, select "Tablet PC Settings" at Control Panel to start touch settings.
As the fig. below, please select "Settings (S)", and follow Windows on-screen instructions to calibrate the touch points on On-Lap 1102 to complete touch settings.
flowchart
graph TD
    A["Best match"] --> B["Calibrate display color"]
    B --> C["Control panel"]
    D["Tablet PC Settings"] --> E["Set table for a keyboard, Format PC, Wexom Tablet PC, Pen and Touch, Change table pin settings"]
    E --> F["Calculate your pen and touch screen"]
    G["Display options"] --> H["Display: Mobile PC Display"]
    H --> I["Details: Limited Touch Support"]
    I --> J["Calculate the order in which your screen rotates, no to complete"]
    K["Touch this screen to identify it as the touchscreen."] --> L["File is not the Tablet PC screen, press Enter to menu to the next screen. To close the next, press ESC."]
Chapter 6 Product Specification
Section 1 General Specification
| Item | On-Lap1102E | On-Lap1102H | On-Lap1102I |
| Panel | Wide screen 11.6"(16:9) | Wide screen 11.6"(16:9) | Wide screen 11.6"(16:9) |
| True Resolution | 1920x1080 | 1920x1080 1920x1080 | |
| Color Depth | 16.7M colors | 16.7M colors 16.7M colors | |
| Brightness | 300(cd/m2) (Typ.) | 350 (cd/m2) (Typ.) 250 (cd/m2) (Typ.) | |
| Contrast Ratio | 1000:1(Typ.) | 1000:1(Typ.) | 1000:1(Typ.) |
| Viewing Angle | 178°(H)/178°(V)(CR>10) | 178°(H)/178°(V)(CR>10) | 178°(H)/178°(V)(CR>10) |
| Response Time | 12.5 (ms) (Typ.) | 12.5 (ms) (Typ.) 12.5 (ms) (Typ.) | |
| Type of Touchscreen Operating System | No Touch Function | Projective capacitive touch screen 10 points multi-touch Support Windows10/7 | |
| Connectivity | HDMI*2, VGA*1 | HDMI*2, VGA*1 | HDMI*2, VGA*1 |
| Audio output - | Earphone jack Earphone jack | ||
| Speaker | 1.0W(Max.)*2 | 1.0W(Max.)*2 1.0W(Max.)*2 | |
| HDCP Support Yes | Yes Yes | ||
| HDMI CEC Support | Yes | Yes Yes | |
| Plug and Play | VESA DDC2B/C1 | VESA DDC2B/C1 VESA DDC2B/C1 | |
| Battery Type | - | Li-Polymer | - |
| Battery Capacity | - | 6900mAh | - |
| Charge Time | - | 3.5hr | - |
| Power Consumption Standby Mode Off Mode | ≤8.5W | ≤8.5W | ≤8.5W |
| <0.5W | <0.5W | <0.5W | |
| <0.5W | <0.5W | <0.5W | |
| Rating Power | 5V 1.7A | 5V 1.7A | 5V 1.7A |
| Environment Condition | Operation: 0~50°CStorage: -20~60°C | ||
| Dimensions (W*H*D) | 294mm*194mm*11mm (monitor)299mm*209mm*21mm (monitor&cover) | 294mm*194mm*11mm (monitor)299mm*209mm*21mm (monitor&cover) | 294mm*194mm*12mm (monitor)299mm*209mm*21mm (monitor&cover) |
| Weight (typical) | 490g(monitor)740g(monitor&cover) | 590g(monitor)840g(monitor&cover) | 670g(monitor)920g(monitor&cover) |
| Certification |       RoHS RoHS | ||
| - |  |   | |
Section 2 Supported Operating Modes
| Resolution Refresh Rate | Horizontal Frequency(kHz) | Vertical Frequency(Hz) | |
| 640x480 | 60Hz | 31.469 | 59.940 |
| 720x480 | 60Hz | 29.855 | 59.710 |
| 800x600 | 60Hz | 37.879 | 60.317 |
| 848x480 | 60Hz | 31.02 | 60.000 |
| 960x600 | 60Hz | 37.212 | 59.635 |
| 1024x768 | 60Hz | 48.363 | 60.004 |
| 1152x864 | 60Hz | 53.783 | 59.959 |
| 1280x600 | 60Hz | 37.377 | 59.900 |
| 1280x720 | 60Hz | 45.000 | 60.000 |
| 1280x768 | 60Hz | 47.776 | 59.870 |
| 1280x800 | 60Hz | 49.702 | 59.810 |
| 1280x960 | 60Hz | 60.000 | 60.000 |
| 1280x1024 | 60Hz | 63.981 | 60.020 |
| 1360x768 | 60Hz | 47.712 | 60.015 |
| 1366x768 | 60Hz | 47.712 | 59.790 |
| 1360x1024 | 60Hz | 63.606 | 59.836 |
| 1400x1050 | 60Hz | 65.317 | 59.978 |
| 1440x900 | 60Hz | 55.935 | 59.887 |
| 1600x900 | 60Hz | 55.990 | 59.946 |
| 1600x1024 | 60Hz | 63.675 | 59.901 |
| 1680x1050 | 60Hz | 65.290 | 59.954 |
| 1920x1080 | 60Hz | 67.500 | 60.000 |
Section 3 Supported Video Modes
| Supported Operating Modes | |
| 1920x1080P (50Hz/59.94Hz/60Hz) 1280x720P(50Hz/59.94Hz/60Hz) | |
| 720x480P(59.94Hz/60Hz) 640x480P(59.94Hz/60Hz) |
Chapter 7 Troubleshooting
| Problem Solutions | |
| Touch On-Lap 1102I in the extended display, but the cursor appears only on the main display, not 1102I. | Please refer to Chapter 5, Section 2 "Windows 10/7 Touchscreen Settings" to start touch settings. |
| No response on the touch screen?No image shown or "No Signal" warning, or Power On/Off Indicator won't turn on. | Please refer to Chapter 5, Section 1 to check whether the USB cable is connected correctly to the computer, and whether the operating system supports external touch screen or not. (Ex: Most of smartphones, Apple's computers do not support external touch screen.1. Check whether if the Power On/Off Indicator showing green light or not. If not, it indicates there is no power inputted, please connect to power.2. Check whether if the HDMI cable has been firmly connected to On-Lap monitor's HDMI port.3. Please press the hot key to select the corresponding video input source, or enter "Input Source" in OSD menu and select "On" in Auto Search. |
| Randomly no display or go blank Or showing "Insufficient Power Warning" on the monitor | 1. Please avoid pulling the cables.2. Please connect to a 5V-2A adapter to ensure the power supply is enough.3. Lower the volume and the brightness. High volume and brightness may increase power consumption and cause the monitor going off.4. Please connect to 5V 2A adapter in case the possibility of insufficient power of On-Lap 1102H. |
| Why my monitor shows Out of Range? | It means the video source inputted is not in On-Lap's supported video input formats, and the monitor cannot display the resolution or the frequency normally. Please check On-Lap's supported operating modes. |
| On-Lap 1102H's charging bar does not increase; not be fully charged; battery takes too long to charge; the power indicator does not on. | Please turn off the monitor and connect to GeChic USB cable and 5V 2A adapter. When the "blue" light is on, the charging begins. (Please refer to Chapter 3, Section 3.) |
| I use Apple USB-C Digital AV Multiport Adapter to connect my Macbook and On-Lap monitor but the monitor doesn't work and just turn on and off repeatedly. | 1. Use GeChic USB cable to power On-Lap monitor by connecting to 5V-2A charger or power bank.2. Connect On-Lap monitor to Macbook with the Micro HDMI to HDMI-A video cable.※ The USB-A (female) port on Apple USB-C Digital AV Multiport Adapter cannot supply enough power to On-Lap monitor, monitor won't turn on without sufficient power. |
| Monitor has image but no sound coming out. | The earphone jack only outputs analog audio to a headphone or speaker. On-Lap monitor can't accept the audio signal from the computer's audio output. |
| When I connect On-Lap monitor to DVD player or game console, it only plays background music but no human voice. | On-Lap 1102 has dual channel speakers. Please select 2 ch. audio output rather than 5.1 ch. in game console or DVD player. |
IV
natural_image
Simple line drawing of a trash bin with crossed lines indicating no waste or discharge (no text or symbols)text_image
Diagram showing a folding or retraction process of a device, labeled with steps ① and ②.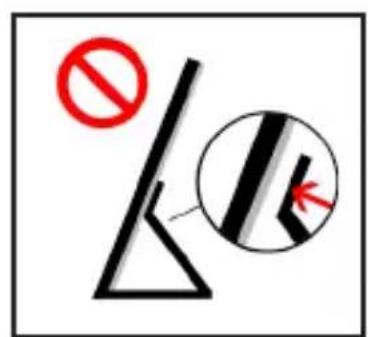
text_image
Safety warning symbol showing no prohibition sign and a magnified view of a mechanical component with red arrows indicating dislocation.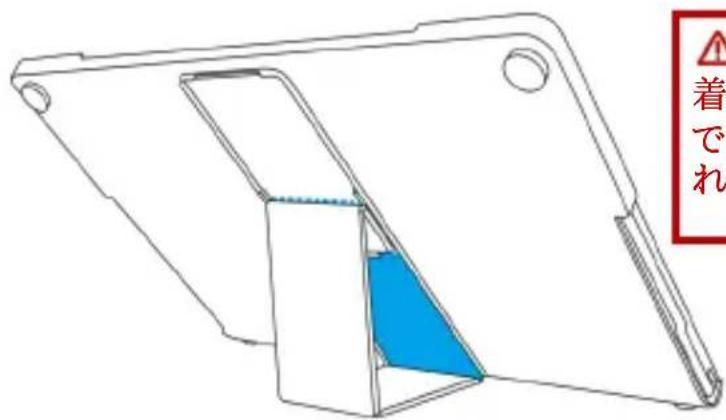
text_image
着 で れtext_image
Diagram illustrating three-step folding or assembly process of a flat-panel device, labeled with steps ① and ②.text_image
Diagram showing a device panel before and after assembly, with labeled components and directional arrows indicating assembly steps.text_image
① M2x5mm ② ↑ ↑ ↑ M2x5mm ③ M4x5mm
text_image
75° 62° 42° 25°26
text_image
M2x5mm ① ② M2x5mm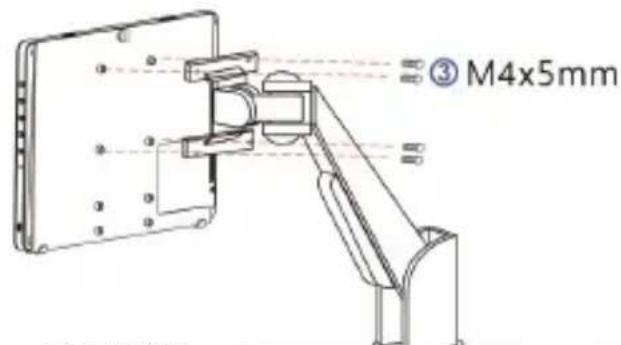
text_image
③ M4x5mmnatural_image
Pure technical diagram of a rectangular device with mounting holes and a central internal component (no text or symbols)図:背面拡張ドックの取り付け説明
text_image
Diagram of a device panel with labeled components and wiring, showing connections between ports and connectors.図: スティック型 PC の取り付け
text_image
Diagram of a device with labeled components including an HDMI padlock and numbered parts ① and ②text_image
Diagram showing device connection with laptop and USB port, including zoomed-in views of device detailstext_image
Insufficient Power Please Plug the Power Adapter on図:低電圧警告