
DA-1000 Pro - Karaoke Vocopro - Free user manual and instructions
Find the device manual for free DA-1000 Pro Vocopro in PDF.


User questions about DA-1000 Pro Vocopro
0 question about this device. Answer the ones you know or ask your own.
Ask a new question about this device
Download the instructions for your Karaoke in PDF format for free! Find your manual DA-1000 Pro - Vocopro and take your electronic device back in hand. On this page are published all the documents necessary for the use of your device. DA-1000 Pro by Vocopro.
USER MANUAL DA-1000 Pro Vocopro
• Professional Digital Echo with Separate Repeat and Delay Controls
• 3 Mic Inputs with Individual Volume Controls and Echo On/Off Switches
- Vocal Cancel and Vocal Partner features to delete/add guide vocals on Multiplex Karaoke Tapes and CD's
• Music Master/Bass/Treble controls
- Mic Master/Bass/Treble controls
- Source/Left/Right Level Output Displays
• 2 sets of A/V Input/Output jacks
• Excellent add-on to any Karaoke system
- Component/Rack Mountable with single space use
CAUTIONS AND WARNINGS
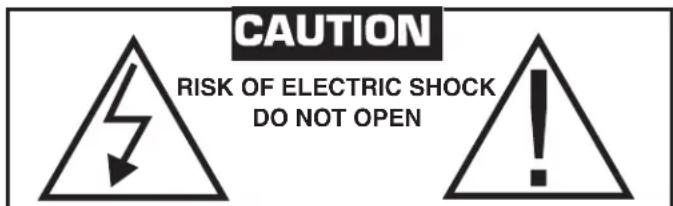
CAUTION: To reduce the risk of electric shock, do not remove cover (or back). No user-serviceable parts inside. Only refer servicing to qualified service personnel.

The lightning flash & arrowhead symbol, within an equilateral triangle, is intended to alert you to the presence of danger.

The exclamation point within an equilateral triangle is intended to alert you to the presence of important operating and servicing instructions.
WARNING
To reduce the risk of fire or electric shock, do not expose this unit to rain or moisture.
- Read Instructions - All the safety and operating instructions should be read before the appliance is operated.
- Retain Instructions - The safety and operating instructions should be retained for future reference.
- Heed Warnings - All warnings on the appliance and in the operating instructions should be adhered to.
- Follow Instructions - All operating and use instructions should be followed.
- Attachments - Do not use attachments not recommended by the product manufacturer as they may cause hazards.
- Water and Moisture - Do not use this unit near water. For example, near a bathtub or in a wet basement and the like.
- Carts and Stands - The appliance should be used only with a cart or stand that is recommended by the manufacturer.
7.A. An appliance and cart combination should be moved with care. Quick stops, excessive force, and uneven surfaces may cause an overturn.

-
Ventilation - The appliance should be situated so its location does not interfere with its proper ventilation. For example, the appliance should not be situated on a bed, sofa, rug, or similar surface that may block the ventilation slots.
-
Heat - The appliance should be situated away from heat sources such as radiators, heat registers, stoves, or other appliances (including amplifiers) that produce heat.
-
Power Sources - The appliance should be connected to a power supply only of the type described in the operating instructions or as marked on the appliance.
-
Grounding or Polarization – Precautions should be taken so that the grounding or polarization means of an appliance is not defeated.
-
Power-Cord Protection – Power-supply cords should be routed so that they are not likely to be walked on or pinched by items placed upon or against them, paying particular attention to cords at plugs, convenience receptacles, and the point where they exit from the appliance.
-
Cleaning – Unplug this unit from the wall outlet before cleaning. Do not use liquid cleaners or aerosol cleaners. Use a damp cloth for cleaning.
-
Power lines – An outdoor antenna should be located away from power lines.
-
Nonuse Periods – The power cord of the appliance should be unplugged from the outlet when left unused for a long period of time.
-
Object and Liquid Entry – Care should be taken so that objects do not fall and liquids are not spilled into the enclosure through openings.
-
Damage Requiring Service – The appliance should be serviced by qualified service personnel when:
A. The power supply cord or plug has been damaged; or
B. Objects have fallen into the appliance; or
C. The appliance has been exposed to rain; or
D. The appliance does not appear to operate normally or exhibits a marked change in performance; or
E. The appliance has been dropped, or the enclosure damaged.
- Servicing – The user should not attempt to service the appliance beyond that described in the operating instructions. All other servicing should be referred to
Note:
To CATV system installer's (U.S.A.):
This reminder is provided to call the CATV system installer's attention to Article 820-40 of the NEC that provides guidelines for proper grounding and, in particular, specifies that the cable ground shall be connected as close to the point of cable entry as practical.
SAFETY INSTRUCTIONS
FCC INFORMATION (U.S.A.)
1. IMPORTANT NOTICE: DO NOT MODIFY THIS UNIT!
This product, when installed as indicated in the instructions contained in this manual, meets FCC requirements. Modifications not expressly approved by Vocopro may void your authority, granted by the FCC, to use this product.
-
IMPORTANT: When connecting this product to accessories and/or another product use only high quality shielded cables. Cable(s) supplied with this product MUST be used. Follow all installation instructions. Failure to follow instructions could void your FCC authorization to use this product in the U.S.A.
-
NOTE: This product has been tested and found to comply with the requirements listed in FCC Regulations, Part 15 for Class "B" digital devices. Compliance with these requirements provides a reasonable level of assurances that your use of this product in a residential environment will not result in harmful interference with other electronic devices. This equipment generates/uses radio frequencies and, if not installed and used according to the instructions found in the owner's manual, may cause interference harmful to the operation of other electronic devices. Compliance with FCC regulations does not guarantee that interference will not occur in all installations. If this product is found to be the source of interference, which can be determined by turning the unit "Off" and "On", please try to eliminate the problem by using one of the following measures:
Relocate either this product or the device that is being affected by the interference.
Use power outlets that are on different branch (circuit breaker or fuse) circuits or install AC line filter(s).
In the case of radio or TV interference, relocate/reorient the antenna. If the antenna lead-in is 300-ohm ribbon lead, change the lead-in to coaxial type cable.
If these corrective measures do not produce satisfactory results, please contact your local retailer authorized to distribute Vocopro products. If you can not locate the appropriate retailer, please contact Vocopro, 1728 Curtiss Court, La Verne, CA 91750.
CAUTION
The apparatus is not disconnected from the AC power source so long as it is connected to the wall outlet, even if the apparatus itself is turned off. To fully insure that the apparatus is indeed fully void if residual power, leave unit disconnected from the AC outlet for at least fifteen seconds.
CAUTION: READ THIS BEFORE
OPERATING YOUR UNIT
- To ensure the finest performance, please read this manual carefully. Keep it in a safe place for future reference.
- Install your unit in a cool, dry, clean place – away from windows, heat sources, and too much vibration, dust, moisture or cold. Avoid sources of hum (transformers, motors). To prevent fire or electrical shock, do not expose to rain and water.
- Do not operate the unit upside-down.
- Never open the cabinet. If a foreign object drops into the set, contact your dealer.
- Place the unit in a location with adequate air circulation. Do not interfere with its proper ventilation; this will cause the internal temperature to rise and may result in a failure.
- Do not use force on switches, knobs or cords. When moving the unit, first turn the unit off. Then gently disconnect the power plug and the cords connecting to other equipment. Never pull the cord itself.
- Do not attempt to clean the unit with chemical solvents: this might damage the finish. Use a clean, dry cloth.
- Be sure to read the "Troubleshooting" section on common operating errors before concluding that your unit is faulty.
- This unit consumes a fair amount of power even when the power switch is turned off. We recommend that you unplug the power cord from the wall outlet if the unit is not going to be used for a long time. This will save electricity and help prevent fire hazards. To disconnect the cord, pull it out by grasping the plug. Never pull the cord itself.
- To prevent lightning damage, pull out the power cord and remove the antenna cable during an electrical storm.
- The general digital signals may interfere with other equipment such as tuners or receivers. Move the system farther away from such equipment if interference is observed.
NOTE:
Please check the copyright laws in your country before recording from records, compact discs, radio, etc. Recording of copyrighted material may infringe copyright laws.
Voltage Selector (General Model Only)
Be sure to position the voltage selector to match the voltage of your local power lines before installing the unit.
Voltage Selector
220v
110v

Welcome....
And thank you for purchasing the DA-1000 Pro from VocoPro, your ultimate choice in Karaoke entertainment! With years of experience in the music entertainment business, VocoPro is a leading manufacturer of Karaoke equipment, and has been providing patrons of bars, churches, schools, clubs and individual consumers the opportunity to sound like a star with full-scale club models, in-home systems and mobile units. All our products offer solid performance and sound reliability, and to further strengthen our commitment to customer satisfaction, we have customer service and technical support professionals ready to assist you with your needs. We have provided some contact information for you below.

1728 Curtiss Court
La Verne, CA 91750
Toll Free: 800-678-5348
TEL: 909-593-8893
FAX: 909-593-8890
VocoPro Company Email Directory
Customer Service & General Information
info@vocopro.com
Tech Support
techsupport@vocopro.com
Remember Our Website
Be sure to visit the VocoPro website, WWW.VOCOPRO.COM, for the latest information on new products, packages and promo's. And while you're there don't forget to check out our Club VocoPro for karaoke news and events, chat rooms, club directories and even a KJ Service directory!
We look forward to hearing you sound like a PRO, with VocoPro, your ultimate choice in Karaoke entertainment!
FOR YOUR RECORDS
Please record the model number and serial number below, for easy reference, in case of loss or theft. These numbers are located on the rear panel of the unit. Space is also provided for other relevant information.
Model Number
Serial Number
Date of Purchase
Place of Purchase
CONTENTS
DA-1000 Pro Features 1
Specifications 1
Listening for a life time 2
Front Panel Description and Functions.... 3\~4
Rear Panel Description and Functions.... 5
Advanced Operation....6
Mounting....7
Getting Connected....8
Troubleshooting....9
Glossary of Terms....10
Other Recommended VocoPro Gear....11\~13
DA-1000Pro FEATURES
• Professional Digital Echo with Separate Repeat and Delay Controls
- 3 Mic Inputs with Individual Volume Controls and Echo On/Off Switches
- Vocal Cancel and Vocal Partner features to delete/add guide vocals on Multiplex Karaoke Tapes and CD's
• Music Master/Bass/Treble controls
- Mic Master/Bass/Treble controls
- Source/Left/Right Level Output Displays
• 2 sets of A/V Input/Output jacks
• Excellent add-on to any Karaoke system
- Component/Rack Mountable with single space use
SPECIFICATIONS
Graphic Equalizer Section
Connector RAC / Unbalanced
Input Impedance 47kΩ
Input Sensitivity 150mV
Bass Control +/- 15dB (100Hz)
Treble Control +/- 15dB (100Hz)
T.H.D <0.01%
Frequency Response 10Hz\~20KHz -1dB
Noise Ratio >95dB
Microphone Section
Connector 1/4" TRS / Unbalanced
Input Impedance 1.5kΩ
T.H.D <0.1%
Frequency Response 20Hz\~15KHz -3dB
Noise Ratio >85dB >80dB
High +/- 15dB (10KHz)
Low +/- 15dB (80 KHz)
Digital Echo Up to 300 ms
Power Source 115V/60Hz 230V/50Hz 5W
Dimension 19"(W) x 6"(D) x 2.5"(H)
Selecting fine audio equipment such as the unit you've just purchased is only the start of your musical enjoyment. Now it's time to consider how you can maximize the fun and excitement your equipment offers. VocoPro and the Electronic Industries Association's Consumer Electronics Group want you to get the most out of your equipment by playing it at a safe level. One that lets the sound come through loud and clear without annoying blaring or distortion and, most importantly, without affecting your sensitive hearing.
Sound can be deceiving. Over time your hearing “comfort level” adapts to a higher volume of sound. So what sounds “normal” can actually be loud and harmful to your hearing. Guard against this by setting your equipment at a safe level BEFORE your hearing adapts.
To establish a safe level:
- Start your volume control at a low setting.
- Slowly increase the sound until you can hear it comfortably and clearly, and without distortion.
Once you have established a comfortable sound level:
- Set the dial and leave it there.
- Pay attention to the different levels in various recordings.
Taking a minute to do this now will help to prevent hearing damage or loss in the future. After all, we want you listening for a lifetime.
Used wisely, your new sound equipment will provide a lifetime of fun and enjoyment. Since hearing damage from loud noise is often undetectable until it is too late, this manufacturer and the Electronic Industries Association's Consumer Electronics Group recommend you avoid prolonged exposure to excessive noise. This list of sound levels is included for your protection.
Some common decibel ranges:
Level Example
30 Quiet library, Soft whispers
40 Living room, Refrigerator, Bedroom away from traffic
50 Light traffic, Normal Conversation
60 Air Conditioner at 20 ft., Sewing machine
70 Vacuum cleaner, Hair dryer, Noisy Restaurant
80 Average city traffic, Garbage disposals, Alarm clock at 2 ft.
The following noises can be dangerous under constant exposure:
Level
Example
90 Subway, Motorcycle, Truck traffic, Lawn Mower
100 Garbage truck, Chainsaw, Pneumatics drill
120 Rock band concert in front of speakers
140 Gunshot blast, Jet plane
180 Rocket launching pad
-Information courtesy of the Deafness Research Foundation
flowchart
graph TD
    A["POWER"] --> B["1"]
    A --> C["2"]
    A --> D["3"]
    A --> E["4"]
    B --> F["Source"]
    C --> G["Voutier Cancel"]
    D --> H["Vocal Dither"]
    E --> I["RightLevel"]
    I --> J["+25 -10 -5 0 +3 +8 +15"]
    J --> K["+15 Bass +15 Treble +15 Master 10"]
    K --> L["6"]
    M["DA-1000pro Professional Digital Kinetic Mixer"] --> N["Mic Master 10 Delay 10 Repeat 10 Digital Echo 10 Mic 1 Pinput 10 Mic 2 Pinput 10 Mic 3 Pinput"]
    N --> O["-15 Bass +15 Treble +15 Highness on 0 10 Digital Echo 0 10 Mic 1 Pinput 10 Mic 2 Pinput 10 Mic 3 Pinput"]
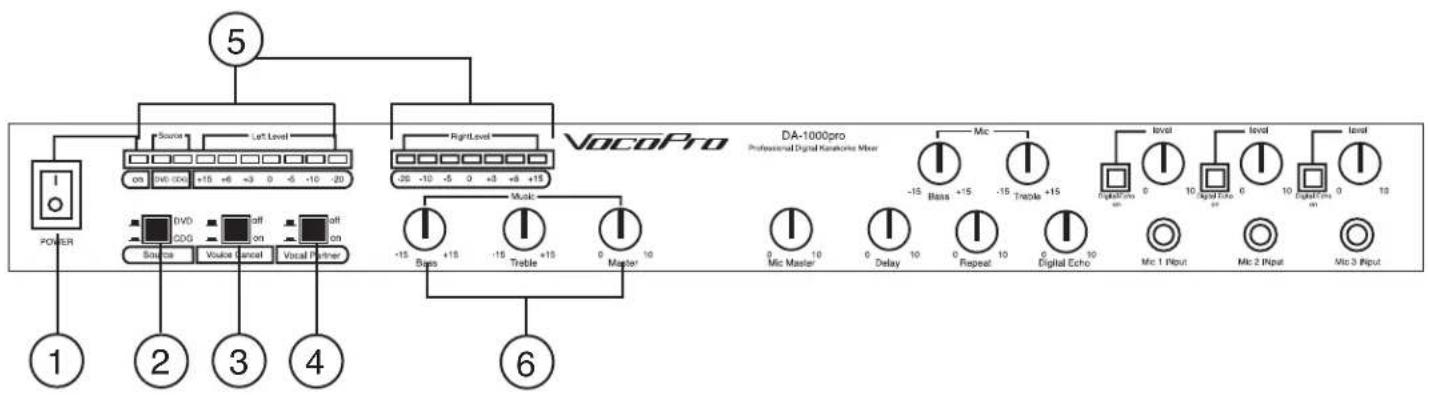
- Power - This button is the main power switch to the DA-1000 Pro.
- Source - This button toggles between the two available A/V channels that can be connected to the DA-1000 Pro. Common A/V peripherals include CD+G players, DVD players and VCD players.
Note: Though the A/V channels have been labeled "CD+G" and "DVD" on the front and rear panels, it is possible to have other compatible digital A/V device(s) connected to the DA-1000 Pro.
- Voice Cancel - This feature is used to cancel out the vocal layer on a 2-channel multiplexed CD+G, VCD or cassette. In order for this feature to work properly, the disc should be "multiplexed". When a multiplexed disc is playing, press the VOICE CANCEL button once to remove the vocal layer. Press a second time, and the vocal layer will be reestablished.
Note: If you try to utilize this feature while a standard or non-multiplexed disc is playing, it will not work as this feature is designed to work with multiplexed discs only. - Voice Partner - This feature acts very similar to the Voice Cancel feature, but with an added voice activation feature that acts like a vocal "auto-pilot". When you utilize the VOICE PARTNER feature, the vocal layer will be removed as long as you are singing into the microphone. When you stop singing into the microphone, the vocal layer will automatically be added back into the music. To activate VOICE PARTNER, press button once. To remove VOICE PARTNER, press a 2nd time.
Note: If you have both the Voice Cancel and the Voice Partner buttons pressed in at the same time, the Voice Cancel feature will override the Voice Partner feature. - Power, Source and Left/Right Channel Output Displays - These lighted displays are visual representations of the DA-1000 Pro's real-time activity. The POWER and SOURCE displays tell you if the unit is turned on, and which source the DA-1000 Pro is recognizing as it's current source (amber for A/V 1, green for A/V 2). The LEFT and RIGHT LEVEL output displays reflect the output levels from the source unit i.e. DVD, CD+G. They measure from green (low) to red (high). When you see the levels reaching the red, that is known as "peaking", and means you should probably lower the Master Volume or Master Mic levels to avoid distortion and possible damage to speakers.
- Master Music, Bass and Treble - These knobs control VOLUME, BASS and TREBLE levels from the MASTER MUSIC device. The MASTER MUSIC control knob, adjusts the overall VOLUME level from the current playing source, while the BASS and TREBLE control knobs adjust the Bass and Treble levels from the source.
Note: Microphone levels are not adjusted with these knobs as they have their own separate controls
flowchart
graph LR
    A["POWER"] --> B["Source"]
    B --> C["On"]
    B --> D["Down CDG"]
    B --> E["Down Source"]
    B --> F["Down Vascual Cancel"]
    B --> G["Down Vocal Partner"]
    H["VocoPro"] --> I["Right Level"]
    I --> J["+20 -10 -5 0 +3 +6 +10"]
    I --> K["Music"]
    K --> L["-15 Bass +15 0 Master 10"]
    I --> M["Trouble"]
    M --> N["0 10"]
    O["DA-1000pro Professional Digital K��钟器 Mixer"] --> P["8"]
    O --> Q["12"]
    O --> R["11"]
    O --> S["9"]
    O --> T["10"]
    U["7"] --> V["Mic Master"]
    W["9"] --> X["Dplay"]
    X --> Y["Repeat"]
    Y --> Z["Digital Echo"]
    AA["Digital Echo on"] --> AB["0 10"]
    AC["Digital Echo on"] --> AD["0 10"]
    AE["Digital Echo on"] --> AF["0 10"]
    AG["Digital Echo on"] --> AH["0 10"]
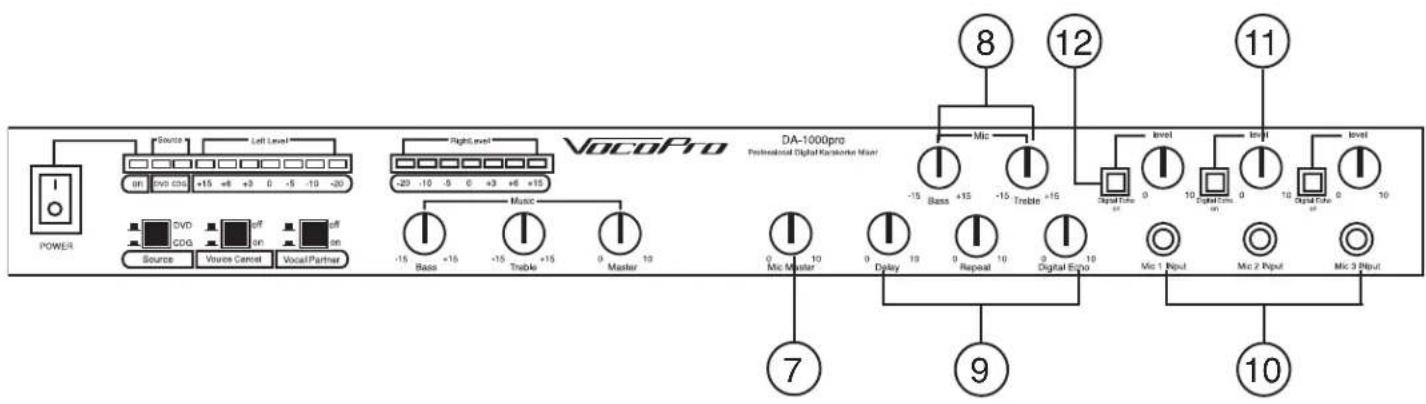
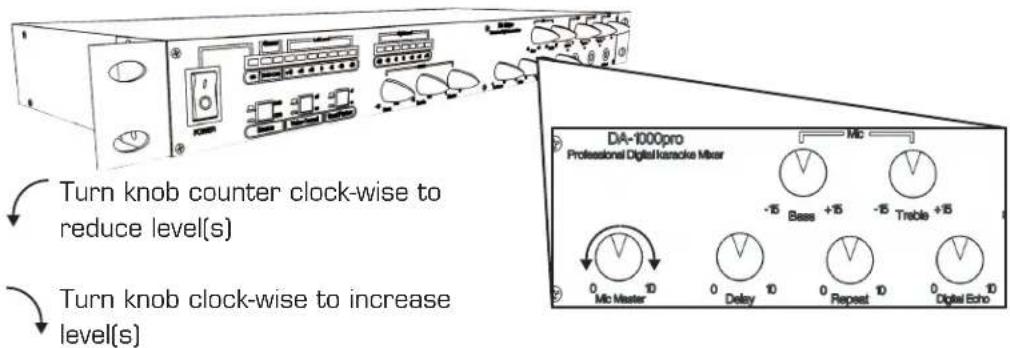
- Mic Master - The MIC MASTER control knob serves as a single output level control for all 3 MIC channels (irrespective of their individual setting). This allows you to increase or decrease MIC output levels with one turn of the knob.
Note: If you desire to adjust the output level of just one Mic channel in particular, it is recommended to use that Mic's individual output level control instead of the MIC MASTER control because all Mic channels will be adjusted with the intended channel.
- Mic Bass and Treble - The MIC BASS and TREBLE control knobs serve as a MASTER BASS and TREBLE control for all 3 Mic channels. To add more BASS or TREBLE to the Mic channels, simply turn either of the knobs clockwise to increase levels or counter-clockwise to decrease levels.
Note: BASS and TREBLE levels for each of the Mic channels cannot be adjusted individually.
-
Digital Echo, Delay and Repeat -The DIGITAL ECHO, DELAY and REPEAT knobs control the DA-1000 Pro's effects processing levels. As with the Mic master, bass and treble controls, the DIGITAL ECHO, DELAY and REPEAT knobs will alter the levels of effects on all 3 Mic channels simultaneously. The DIGITAL ECHO knob controls the overall echo applied to the 3 Mic channels, the DELAY knob controls the interval time between each echo and the REPEAT knob controls the # of times the echo will repeat. For all 3 effects knobs, turn clockwise to increase and counter-clockwise to decrease.
-
1/4" in. Mic Jacks - These jacks for microphones or instruments. The DA-1000 Pro supports 3 Mic channels, and can transmit sound though all 3 simultaneously or duo's and trio's.
-
Mic Channel Level Controls - These knobs control the MIC CHANNELS output levels individually. This makes it possible to adjust just one Mic channel without affecting the other 2 channels. This can be useful when one person or [Mic channel] might be overpowering others in a duo or trio. Turn clockwise to increase output levels, and counter-clockwise to decrease output levels.
-
Mic Channel Digital Echo Controls - Each Mic channel has one of these buttons. By pressing it, you activate the DIGITAL ECHO for that channel. By depressing it, you remove the DIGITAL ECHO from that channel. This is handy when performing live due to the ease of a "one-touch" cancellation, instead of the turning of several knobs.
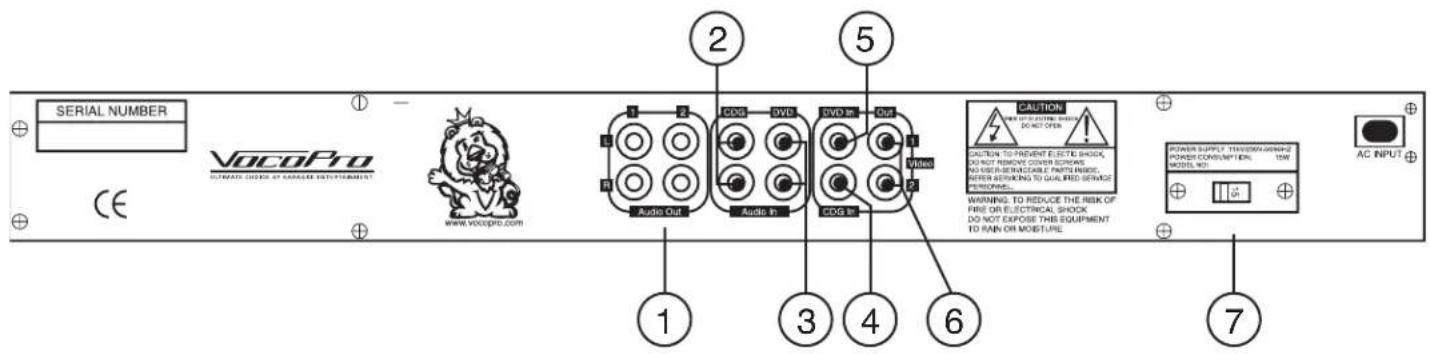
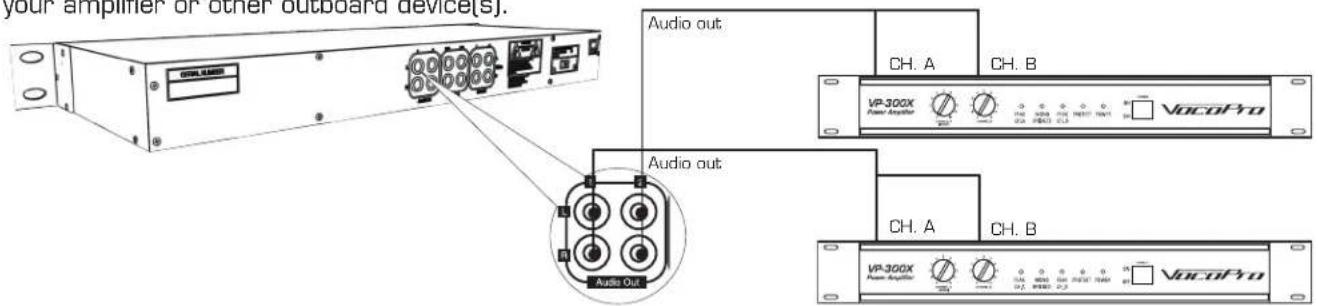
- Audio Out (2) - The DA-1000 Pro has 2 sets of RCA style AUDIO OUT jacks. These jacks are typically used to supply output to power amplifiers, however, effects processors, key controllers and other compatible equipment may be connected to these jacks. Connect the cables from the AUDIO IN jacks of you external device(s) to these AUDIO OUT jacks.
- CD+G Audio In - This set of RCA jacks are for connecting the audio component from A/V device 1 (CD+G) to the DA-1000 Pro. Connect the cables from the AUDIO OUT jacks on A/V device 1 to these AUDIO IN jacks.
- DVD Audio In - This set of RCA jacks are for connecting the audio component from A/V device 2 to the DA-1000 Pro. Connect the cables from the AUDIO OUT jacks on A/V device 2 to these AUDIO IN jacks.
- CD+G Video In - This RCA jack is for connecting the video component from A/V device 1 to the DA-1000 Pro. Connect the cable from the VIDEO OUT jack on A/V device 1 to this VIDEO IN jack.
- DVD Video In - This RCA jack is for connecting the video component from A/V device 2 to the DA-1000 Pro. Connect the cable from the VIDEO OUT jack on A/V device 2 to this VIDEO IN jack.
- Video Out [2] - The DA-1000 Pro has 2 RCA style VIDEO OUT jacks. These jacks are used to supply video to monitors, TFT displays and compatible TV's. Connect the cable(s) from the VIDEO IN jack(s) on the display device(s) to the VIDEO OUT jack(s).
- Voltage Selector - The VOLTAGE SELECTOR is a switch that can change the voltage from 115V to 230V. Before your DA-1000 Pro is shipped from the factory, the switch is set to 115V. If you live in a country that has 230-240V voltage requirements, you MUST change the voltage setting to 230V.
Note: Compatible fuse(s) 0.1 A and 0.05 A.
When to use Voice Cancel
First off, you must have a multiplexed disc. If you are playing a standard CD+G, CD or VCD that is not multiplexed, nothing will happen when you press the VOICE CANCEL button. When a multiplex disc is in use the VOICE CANCEL can be a very versatile feature. Lets' say you want to practice singing to a particular song, but without the vocal layer, simply press the VOICE CANCEL button.
Note: If you are playing DVD's, which are recorded in a "multi-track" format, Please use the audio feature on the DVD itself to accomplish this task.
When to use Voice Partner
As with Voice Cancel, VOICE PARTNER only works with multiplex discs. This feature acts very similar to the Voice Cancel feature, but with an added voice activation feature that acts like a vocal “auto-pilot”. When you utilize the VOICE PARTNER feature, the vocal layer will be removed as long as you are singing into the microphone. When you stop singing into the microphone, the vocal layer will automatically be added back into the music. This feature is especially handy if you are performing solo and want to sing a duet. In this case, when you finish singing your verse, the “other singer” will automatically enter to sing his/her part! This is also very useful for learning new songs.
Note: There may be a 1 second delay time before the vocals are brought back in if the song is in the middle of a verse.
Switching A/V Channels
Since the DA-1000 Pro has 2 A/V inputs, you can switch between them via the SOURCE button. Let's say you are performing live, and want to do 2 songs back to back, but they are on different discs! Instead of stopping to switch CD's between songs (not very good for live performances), have a disc cued in A/V 2, and simply hit the SOURCE button and PLAY, You are back in action!
Balancing the Music with the Vocals
Have you ever been to a musical performance where the music was so loud that you could barely hear the singer?
Or maybe to a performance where the singer was so loud that the music was drowned out? Those situations are created with poor musical balancing. To avoid these situations the DA-1000 Pro has a MASTER, BASS and TREBLE control for both the music and the Mic levels. If you find that music is too loud, simply adjust the MASTER MUSIC control knob for the music. Also, keep in mind that BASS and TREBLE levels also affect the overall “sound” and can be adjusted to correct sound balancing problems.
Balancing Microphone Levels
When adjusting Mic levels, it is recommended to do so in this order:
1) First adjust the MASTER MIC control knob to an appropriate level without background music and test.
2) Then balance the BASS and TREBLE levels for fine tuning.
3) Start background music and adjust each MIC CHANNEL accordingly.
4) Remember to compensate if the background music has striking volume changes.
5) Do a complete song for complete balancing success.
Using Digital Echo
The DA-1000 Pro has a built-in, adjustable Digital Echo effects processor that can really add a spacious feeling to the vocals. You can adjust the ECHO in several ways. First off, you can adjust the overall ECHO applied to the Mic channels via the DIGITAL ECHO control knob. This limits the echo to all 3 channels together. Once you have your master ECHO level established, you can start customizing the nature of the echo via the DELAY and REPEAT controls. The DELAY knob controls the interval time between each echo and the REPEAT knob controls the # of times the echo will repeat. By fine tuning these controls, you can achieve the "perfect" echo effect. Each Mic channel has its own DIGITAL ECHO ON/OFF switch to add/remove echo individually. To add, press button in. To remove, depress button out.
Tools required:
• Phillips Screwdriver (not included)
- 7 Mounting Screws (included) (if rack mounting)
- 2 Mounting Brackets (included) (if rack mounting)
• 19" Rack Case (not included)
Screws: 7

Brackets: 2
natural_image
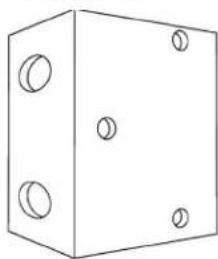
Simple line drawing of a 3D cube with four circular holes on its faces (no text or symbols)For mounting versatility, the DA-1000 Pro can be installed as a stand alone component in a home entertainment system or mounted to a compatible rack case via the included mounting brackets.
To install to a pre-existing entertainment system:
- Place unit in desired space and make appropriate connections.
To install unit to a rack case, complete the steps below:
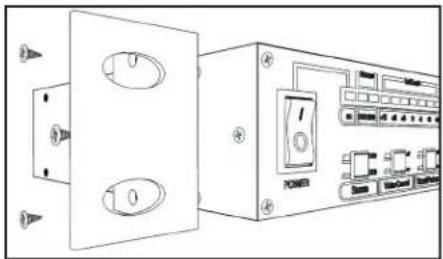
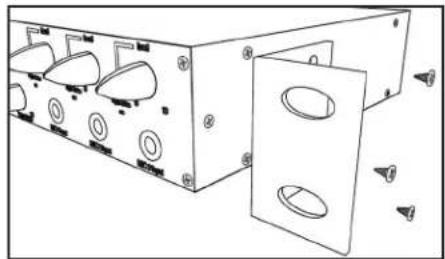
- Attach mounting brackets to the DA-1000 Pro via the mounting screws.(There is one bracket for each side).
Figure: 1 Left Bracket
natural_image
Line drawing of an electronic device with two ports and a power strip, no text or symbols presentFigure:2 Right Bracket
natural_image
Technical line drawing of a mechanical housing with mounting holes and internal components (no text or symbols)- Align the DA-1000 Pro with desired space in rack and slide in slowly, rear panel first.
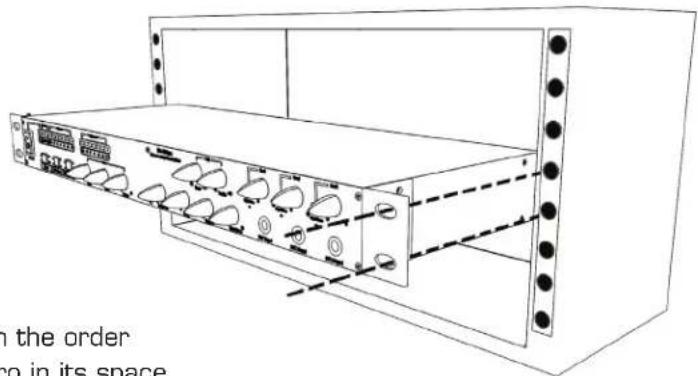
- While aligned use rack case screws (not included) in the order shown in below diagram to stabilize the DA-1000 Pro in its space.
Using the "X" rotation (numbered below) will ensure even tension and plush alignment.
Note: Do not tighten screws firmly till all screws are in place.

If you purchased the DA-1000 Pro, it is likely you have other Karaoke equipment, such as a CD+G player, Mic's etc, and know your connectivity options. If you do not, and this is your 1st piece of gear for your Karaoke system, we have provided a connectivity diagram and step by step instruction set for you below.
Step 1 - Connecting A/V device(s):
The DA-1000 Pro has two A/V channels for external devices to provide audio and video. These devices can be CD+G, DVD and/or VCD players. Each A/V channel has a set of L/R AUDIO IN jacks and a VIDEO IN jack. For each external A/V device, connect a stereo RCA cable from the L/R AUDIO OUT jacks to a L/R AUDIO IN jacks on the DA-1000 Pro. Then connect an RCA video cable from a VIDEO OUT jack on the A/V device to the VIDEO IN jack on the DA-1000 Pro.

Step 2 - Connecting amplifiers and/or outboard devices:
There are two AUDIO OUT channels for power amplifier(s), sound processor(s), effects board(s) or other compatible equipment. Connect a stereo RCA cable from the AUDIO OUT jacks on the DA-1000 Pro to the AUDIO IN jacks on your amplifier or other outboard device(s).
Step 3 - Connecting video display device(s):
For video, the DA-1000 Pro can output video to monitors, TFT displays and compatible TV's. Connect an RCA video cable from the VIDEO OUT jack(s) on the DA-1000 Pro to the VIDEO IN jack(s) on your display device(s).

Step 4 - Turn on power:
Before turning on the power to units, make sure the VOLUME knobs are turned down to prevent accidental blaring and then turn up as desired. Continue with checking sound levels until satisfied with all the levels.
| Problem | Possible Cause(s) | Solution(s) |
| No output is being transmitted. | The input selector (DVD/CD+G) is set to the wrong position.The output jacks of the DA-1000 Pro may not have proper cable connected.Faulty connection within external components or external component failure. | Switch source button to the correct source channel.Make sure the cables from the output jacks on the DA-1000 Pro are connected to the input jacks on external equipment.Checks overall cabling and viability of external equipment.Plug the power cord from the DA-1000 Pro to a wall outlet. |
| Unable to connect the DA-1000 Pro to my television monitor with the RCA cable provided. | The power cord to the DA-1000 Pro is not plugged in.Your TV does not have RCA style A/V input jacks. | Use an external RF Modulator. |
| There is a loud “squealing” noise coming from the speakers. | Microphone is too close to the speakersMicrophone volume is too high. | Increase space between microphone and speakers.Turn down microphone volume.Lower the treble levels. |
Digital Echo: Digital echo is a synthetically processed sound effect that mimics natural echo. Echo in general is the “bouncing” of waves back and forth between 2 surfaces. This effect gives a spacious or ambient feeling that works great with vocals.
Repeat: Repeat is facet of the echo process. Repeat refers to the frequency of echoes within a period of time.
Delay: Delay is also a facet of the echo process. Delay refers to the amount of time that exists between echoes.
Voice Cancel: Voice Cancel is a feature that removes vocals from songs. This can only be done when the disc is formatted for it. To be formatted (multiplexed) a disc must have the vocals coded to the right channel and the music to the left channel. When you select Voice Cancel, the unit will remove the right channel (vocals) and split the left channel (music) to both sides.
Voice Partner: Voice Partner is a feature that acts much in the same way as Voice Cancel. The main difference is that Voice Partner will only remove vocals when there is activity going through the microphone (singing). When you are not singing, the vocals from the song will be added back.
CD+G: A CD+G is a specially formatted disc that has an additional line of sub-code on the CD that is responsible for the lyrics that play on video screen for karaoke systems. CD+G stands for Compact Disc + Graphics.
Multiplex Disc: A Multiplex Disc is a specially formatted Disc common in Karaoke. To be formatted for multiplex use, a disc must have the vocals coded to the right channel and the music to the left channel. When you select a multiplex mode, the unit will remove the right channel (vocals) and split the left channel (music) to both sides.
Rack Mountable: Rack Mountable refers to the ability to place unit into professional or travel rack cases. Such cases are great for building complete systems and protect them during transportation. The standard rack size for MOST cases is 19".
VCD: VCD is a disc formatted in MPEG-1. These discs are good candidates for Karaoke use as they have an audio and a video layer to them. VCD stands for Video Compact Disc.
A/V: A/V is an abbreviation for Audio/Visual.
RF Modulator: This is an adapter device used to connect the video output of audio/video equipment to TV's that do not have compatible RCA style A/V jacks.
CDG-4000

Professional CD/CD + Graphic Player
FEATURES:
• Pro CD Player W/ CD + Graphics Decoder
- Pitch Control To 12% (+) Or (-)
- Scramble protection during pitch changes
- Single Track Mode
• Frame Search W/ Jog Dial
• 4-Speed Fast Forward/Rewind Shuttle.
- Pitch Slider, Pitch Bend and Jog Dial
• BPM (Beat Per Minute) Synchronization
- Cue Detect Function
• Professional 19" Rack Mount Chassis
- Switchable 110-240V
- NTSC/PAL
- Dimensions: 19" W X 3 1/2" H X 10" D
• Shipping Weight: 9.35 Lbs.
VP-300X

Single Space 300W Professional Power Amplifier
FEATURES:
• 150W + 150W RMS
- 300W + 300W Max
- THD: 0.05%
• Frequency Response: 20HZ-20KHZ Signal to Noise
• 1/4" or XLR Inputs
- Input Ratio: Less than 100DB
- Input Sensitivity: 1.23V
• Dimension: W x D x H 21" X 13" X 5 1/4"
• Shipping Weight: 19 Lbs
LCD-V5
natural_image
Line drawing of a vintage computer monitor with 'VocoPro' branding on the front panel (no additional text or symbols)5" TFT LCD Color Monitor
FEATURES:
- TFT LCD Color Monitor
• Audio/Video Input
• 3 Watts Stereo Speakers
• Headphone Output With Volume Control
• Color/Brightness Adjustment
- Reversible Screen Control For Both Table Top Or Auto Roof Mounting
• 12v Dc Adapter Included
DVM-100G
PERFORMANCE

VocoPro
- Connect up to 2 TVs and 1 Video Camera for Individual TV Mixes
• The DVM-100G Mixes CD+G Text With any Video Image Background
• Digitally Compresses Full-Screen CD+G Lyrics to Half-Screen - Standard Computer Keyboard Input Jack Allows User to Type Messages Directly on TV Screen! (no computer needed, key board not included)
- Record an "MTV" style Karaoke video with any VCR
- Dimensions: 5 1/4" (W) x 4 1/4" (D) x 1 1/4" (H)
• Shipping Weight: 3 lbs
SV-420
natural_image
Top-down schematic of a speaker or audio device with five circular components and mounting holes (no text or labels)Professional 8" 3 Way Vocal Speakers
FEATURES:
• 3 Way 8" Karaoke Vocal Speakers (Sold in Pair)
- Design for Karaoke Studio or Singers Monitor
• Power Rating: 180 Watts Peak / 90 Watts RMS
- Metal Grill
- Impedance: 8 OHM
- Sensitivity: 92 DB
• Frequency Response: 20HZ-20KHZ
- Dimensions H x W x D: 19" x 12" x 11.25" (each)
• Shipping Weight: 50 Lbs. (pair)
• (Dimensional Weight: 60 Lbs. Due to Oversize)
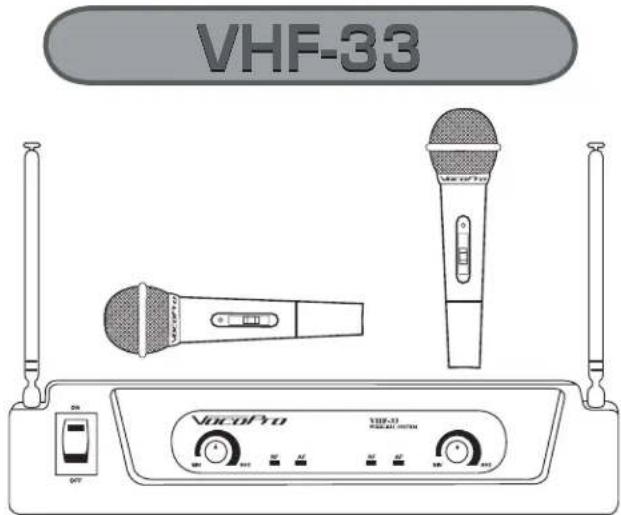
Wireless Microphone System
FEATURES:
- Two VHF Wireless Mic Receivers in one cool unit.
- Two Outputs and two individual color coded output level controls.
• Audio Mute Circuitry Provides Noiseless On/Off Switching - Anti-Roll Grill Ring
• 19" Rack Mount Brackets Included - Enjoy the Freedom of Wireless Performance in One Small Compact Unit
- Dimensions: (Receiver) 14 " [W] x 9" (D) X 3" (H)
• Shipping Weight: 4 lbs
- CAUTIONS AND WARNINGS
- WARNING
- Note:
- SAFETY INSTRUCTIONS
- FCC INFORMATION (U.S.A.)
- IMPORTANT NOTICE: DO NOT MODIFY THIS UNIT!
- CAUTION
- CAUTION: READ THIS BEFORE
- OPERATING YOUR UNIT
- Voltage Selector (General Model Only)
- Welcome....
- Remember Our Website
- FOR YOUR RECORDS
- CONTENTS
- DA-1000Pro FEATURES
- SPECIFICATIONS
- Graphic Equalizer Section
- Microphone Section
- To establish a safe level:
- Once you have established a comfortable sound level:
- Some common decibel ranges:
- Level Example
- The following noises can be dangerous under constant exposure:
- Level
- Example
- When to use Voice Cancel
- When to use Voice Partner
- Switching A/V Channels
- Balancing the Music with the Vocals
- Balancing Microphone Levels
- Using Digital Echo
- Tools required:
- To install to a pre-existing entertainment system:
- To install unit to a rack case, complete the steps below:
- Step 1 - Connecting A/V device(s):
- Step 2 - Connecting amplifiers and/or outboard devices:
- Step 3 - Connecting video display device(s):
- Step 4 - Turn on power:
- CDG-4000
- FEATURES:
- VP-300X
- LCD-V5
- DVM-100G
- SV-420
- Professional 8" 3 Way Vocal Speakers
- Wireless Microphone System
Brand : Vocopro
Model : DA-1000 Pro
Category : Karaoke