
U10230SBI - Range hood BEST - Free user manual and instructions
Find the device manual for free U10230SBI BEST in PDF.


| Product Type | Under Cabinet Range Hood |
| Brand | Best |
| Model | U10230SBI |
| Available Width | 76.2 cm (30 in) or 91.5 cm (36 in) |
| Required Cabinet Dimensions (30 in) | Width 76.2 cm, depth 48.3 cm, bottom opening 72.4 cm x 38.1 cm |
| Required Cabinet Dimensions (36 in) | Width 91.5 cm, depth 48.3 cm, bottom opening 87.6 cm x 45.7 cm |
| Power Supply | 120 VAC, 60 Hz |
| Lighting Power | 2 halogen bulbs 12 V, 20 W max, type T3, base G4 |
| Motor Power | Variable speed motor, HEAT SENTRY thermostat |
| Fan Speeds | 4 speeds: low, medium-low, medium-high, high |
| Functions | 10 min timer, light dimmer, LED speed indicator, filter alert (30h), safety thermostat |
| Control Type | 5 push buttons on sliding visor |
| Venting Modes | External venting (8 in/20.3 cm duct) or recirculation with ANKU10 kit |
| Material | Stainless steel, glass |
| Minimum Distance Above Cooktop | 57.1 cm (22-1/2 in) |
| Grease Filters | Metal, dishwasher safe, clean every 30h |
| Charcoal Filter (recirculation) | Replace every 120h, model ANKU10 |
| Fuse | 5 x 20 mm, 4 A, 125 V |
| Warranty | 1 year parts and labor (excluding bulbs, filters, accessories) |
| Weight (estimated) | Approximately 20-25 kg (3-person installation recommended) |
Frequently Asked Questions - U10230SBI BEST
User questions about U10230SBI BEST
0 question about this device. Answer the ones you know or ask your own.
Ask a new question about this device
Download the instructions for your Range hood in PDF format for free! Find your manual U10230SBI - BEST and take your electronic device back in hand. On this page are published all the documents necessary for the use of your device. U10230SBI by BEST.
USER MANUAL U10230SBI BEST
natural_image
3D diagram of a rectangular electronic component with a base and mounting base, showing internal circuit lines (no text or symbols)Model U102I
ENGLISH....2
FRANÇAIS......15
ESPAÑOL......28
In USA - BEST Hartford, Wisconsin
In CANADA - BEST Drummondville, QC, Canada
REGISTER YOUR PRODUCT ONLINE AT : www.BestRangeHoods.com/register For additional Information visit www.BestRangeHoods.com
READ AND SAVE THESE INSTRUCTIONS
- Use this unit only in the manner intended by the manufacturer. If you have questions, contact the manufacturer at the address or telephone number listed in the warranty.
- Before servicing or cleaning unit, switch power off at service panel and lock service panel to prevent power from being switched on accidentally. When the service disconnecting means cannot be locked, securely fasten a prominent warning device, such as a tag, to the service panel.
- Installation work and electrical wiring must be done by a qualified person(s) in accordance with all applicable codes and standards, including fire-rated construction codes and standards.
- Sufficient air is needed for proper combustion and exhausting of gases through the flue (chimney) of fuel burning equipment to prevent backdrafting. Follow the heating equipment manufacturer's guidelines and safety standards such as those published by the National Fire Protection Association (NFPA), and the American Society for Heating, Refrigeration and Air Conditioning Engineers (ASHRAE), and the local code authorities.
- When cutting or drilling into wall or ceiling, do not damage electrical wiring and other hidden utilities.
- Ducted fans must always be vented to the outdoors.
- Do not use this unit with any separate solid-state speed control device.
- To reduce the risk of fire, use only metal ductwork.
- This unit must be grounded.
TO REDUCE THE RISK OF A RANGE TOP GREASE FIRE:
A. Never leave surface units unattended at high settings. Boilovers cause smoking and greasy spillovers that may ignite. Heat oils slowly on low or medium settings.
B. Always turn hood ON when cooking at high heat or when flambeing food (i.e. Crepes Suzette, Cherries Jubilee, Peppercorn Beef Flambe').
C. Clean ventilating fans frequently. Grease should not be allowed to accumulate on fan or filter.
D. Use proper pan size. Always use cookware appropriate for the size of the surface element.
WARNING
TO REDUCE THE RISK OF INJURY TO PERSONS IN THE EVENT OF A RANGE TOP GREASE FIRE, OBSERVE THE FOLLOWING:\*
- SMOTHER FLAMES with a close-fitting lid, cookie sheet, or metal tray, then turn off the burner. BE CAREFUL TO PREVENT BURNS. If the flames do not go out immediately, EVACUATE AND CALL THE FIRE DEPARTMENT.
- NEVER PICK UP A FLAMING PAN - You may be burned.
- DO NOT USE WATER, including wet dishcloths or towels - violent steam explosion will result.
- Use an extinguisher ONLY if:
A. You know you have a Class ABC extinguisher and you already know how to operate it.
B. The fire is small and contained in the area where it started.
C. The fire department is being called.
D. You can fight the fire with your back to an exit.
* Based on "Kitchen Fire Safety Tips" published by NFPA.

CAUTION
- For indoor use only.
- To reduce risk of fire and to properly exhaust air, be sure to duct air outside. Do not vent exhaust air into spaces within walls or ceilings or into attics, crawl spaces, or garages.
- Take care when using cleaning agents or detergents.
- Avoid using food products that produce flames under the Range Hood.
- For general ventilating use only. Do not use to exhaust hazardous or explosive materials and vapors.
- To avoid motor bearing damage and noisy and/or unbalanced impellers, keep drywall spray, construction dust, etc. off power unit.
- Your hood motor has a thermal overload which will automatically shut off the motor if it becomes overheated. The motor will restart when it cools down. If the motor continues to shut off and restart, have the hood serviced.
- For best capture of cooking impurities, the bottom of the hood should be a minimum of 22-1/2" above the cooking surface.
- Three installers are recommended because of the large size and weight of this hood.
- This product is equipped with a thermostat which may start blower automatically. To reduce the risk of injury and to prevent power from being switched on accidentally, switch power off at service panel and lock or tag service panel.
- Use with approved cord-connection kit only.
- Please read specification label on product for further information and requirements.
- Automatically operated device. To reduce the risk of injury, disconnect power before servicing.
For quiet operation and best capture of smoke, steam and other cooking impurities, always operate this unit with the slide-out visor fully open.
Controls
The hood is operated using the (5) push buttons located on the slide-out visor.
The Light Off/On switch turns the lights on to low intensity and turns them off.
The Light Dimmer switch alternates light intensity from low to high.
The Blower Off/Speed switch turns the blower off and changes blower speed to four different speed settings: high, medium-high, medium-low and low speed. Depress and hold the button for 2 seconds to turn the blower off.
The Blower On/Speed switch turns the blower on to four different speed settings: Low, medium-low, medium-high and high speed. The visor must be open for the blower to be operational.
The LED Display:
Indicates blower speed selection from 1 (lowspeed) to 4 (high speed).
Flashes the blower speed when the 10-minutes delay off has been activated. After 30 hours of operation, the center segment of the display blinks and remains lit, indicating that filters need to be cleaned.
The Time Delay switch activates a delay off feature. When pushed, the blower will continue to operate at the current speed setting for 10-minutes before automatically turning itself off.
The Filter Alarm Reset switch is used to reset the 30-hour filter timer. After filters are cleaned or replaced, press this switch once to reset the filter clean alarm.

HEAT SENTRY™
Your hood is equipped with a HEAT SENTRY™ thermostat. This thermostat is a device that will turn on or speed up the blower if it senses excessive heat above the cooking surface.
1) If blower is OFF - it turns blower ON to HIGH speed.
2) If blower is ON at a lower speed setting - it turns blower up to HIGH speed.
When the temperature level drops to normal, the blower will return to its original setting.

WARNING : The HEAT SENTRY thermostat can start the blower even if the hood is turned OFF. When this occurs, it is impossible to turn the blower OFF with its switch. If you must stop the blower, do it from the main electrical panel.
HALOGEN BULBS
This range hood requires two halogen bulbs (Type T3, 12Volt, 20Watt Max, G-4 Base).

WARNING: Always switch off the electricity supply before carrying out any operations on the appliance.
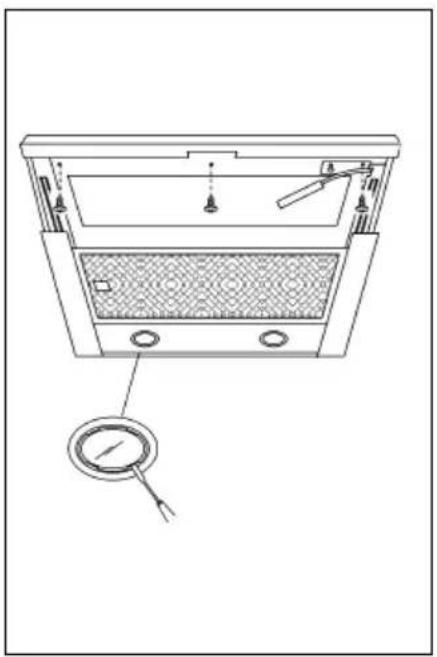
To change bulbs:
- Open the cover by prying from the proper slots.
- DO NOT ROTATE.

CAUTION: Bulb may be hot.
- Replace with a Type T3, 12Volt, 20Watt Max, G-4 Base bulb. Do not touch replacement bulb with bare hands!
DO NOT use bulbs greater than 20 Watts. Bulbs greater than 20 Watts will cause the fuse to open.
natural_image
Technical line drawing of a mechanical or electrical component with no visible text or symbolsFUSE REPLACEMENT
IF LIGHTS FAIL TO OPERATE, DISCONNECT POWER AT THE SERVICE ENTRANCE. CHECK THE FUSE AND REPLACE IF NECESSARY.
- Remove the grease filter and pull the visor open.
- Locate the fuse holder on the top right hand side of the light housing.
- Unscrew the fuse holder cap and remove the fuse.
- Replace the fuse with the same size and amperage (5 x 20mm, 4 amp, 125 volt).
DO NOT use fuses greater than 4 Amps. Fuses greater than 4 Amps may damage the transformer.
- Reinstall the fuse cap and grease filter.
- Reconnect power at the service entrance.

natural_image
Technical line drawing of a mechanical device with a magnified inset showing a connector detail (no text or symbols)Proper maintenance of the Range Hood will assure proper performance of the unit.
Grease Filters
The grease filters should be cleaned when the LED Display flashes when the blower is off (i.e. 30 hours of operation). Use a warm detergent solution to clean filters. Filters are dishwasher safe. See page 12 for filter removal and installation instructions.
Non-ducted Recirculation Filters
The non-ducted recircualtion filters should be changed when the LED display flashes when the blower is off (i.e. 120 hours of operation). See page 11 for filter removal and installation instructions.
Hood Cleaning
Stainless steel is one of the easiest materials to keep clean. Occasional care will help preserve its fine appearance.
Cleaning tips:
- Hot water with soap or detergent is all that is usually needed.
- Follow all cleaning by rinsing with clear water. Wipe dry with a clean, soft cloth to avoid water marks.
- For discolorations or deposits that persist, use a non-scratching household cleanser or stainless steel polishing powder with a little water and a soft cloth.
- For stubborn cases, use a plastic scouring pad or soft bristle brush together with cleanser and water. Rub lightly in direction of polishing lines or "grain" of the stainless finish. Avoid using too much pressure which may mar the surface.
- DO NOT allow deposits to remain for long periods of time.
- DO NOT use ordinary steel wool or steel brushes. Small bits of steel may adhere to the surface causing rust.
- DO NOT allow salt solutions, disinfectants, bleaches, or cleaning compounds to remain in contact with stainless steel for extended periods. Many of these compounds contain chemicals which may be harmful. Rinse with water after exposure and wipe dry with a clean cloth.
Painted surfaces should be cleaned with warm water and mild detergent only.
Unpack hood and check contents.
You should receive:
1 - Hood
1 - 8" Damper / Duct Connector
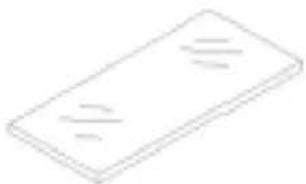
1 - Glass Visor
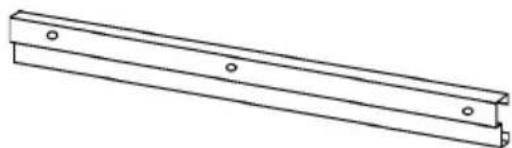
1 - Decorative Spacer
1 - Parts Bag containing:
2 - Mounting Brackets
4 - Machine Screws (M4 x 30mm Pan Head)
7 - Mounting Screws (3.9 x 9.5mm Pan Head)
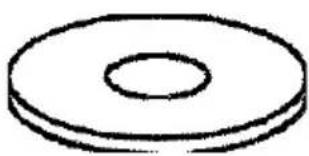
4 - Flat Washers (4 mm diameter)
8 - Screws (4.2 x 15mm Pan Head)
1 - Installation Instructions

natural_image
Technical line drawing of a circular component mounted on a base plate (no text or symbols)8" DAMPER/DUCT CONNECTOR

natural_image
Simple line drawing of a rectangular object with no text or symbolsGLASS VISOR

natural_image
Two identical metal bracket plates with mounting holes, shown in line drawing style (no text or symbols)2 MOUNTING BRACKETS
natural_image
Simple line drawing of a circular ring or washer (no text or symbols)4 FLAT WASHERS
natural_image
Technical line drawing of a metal beam with mounting holes (no text or symbols)DECORATIVE SPACER

4 MACHINE SCREWS (M4 x 30mm PAN HEAD)

natural_image
Simple line drawing of a screw with a circular head and threaded shaft (no text or symbols)8 MOUNTING SCREWS (4.2 x 15mm PAN HEAD)
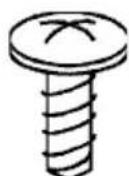
7 MOUNTING SCREWS (3.9 x 9.5mm PAN HEAD)
PREPARE WALL CABINET
- Prior to wall cabinet installation, remove doors and door mounting hardware.
- Cut an opening into the bottom panel to the dimensions shown.
- Cut out openings for the duct and electrical wiring.
- Install cabinet on the wall and secure per cabinet manufacturer's recommendations. The cabinet must be securely fastened to studs and framing behind the drywall prior to hood installation.
| Cabinet-Widht | “A” | “B” |
| 30” | 28-1/2” | 15” |
| 36” | 34-1/2” | 18” |
PREPARE THE HOOD
- Loosley assemble both mounting brackets to the hood using M4 x 30mm machine screws and flat washers.
- Place the 8" damper/duct connector on top of the range hood discharge opening. Remove tape from damper flaps. Secure with (4) 3.9 x 9.5mm screws.
NOTE: If the hood is used in the non-ducted recirculation configuration, remove and discard the aluminum damper flaps. - Assemble wall spacer to the hood with (3) 3.9 x 9.5mm screws.
NOTE: The spacer is designed to fill a 5/8" gap between the wall and the back of the hood. If the gap is larger, a non-combustible material that is in compliance with local building codes must be used to fill this gap. - Remove foam block located between blower and housing.


INSTALL THE HOOD
(DUCTED AND NON-DUCTED HOODS)
NOTE: At least three people will be required to mount the hood.
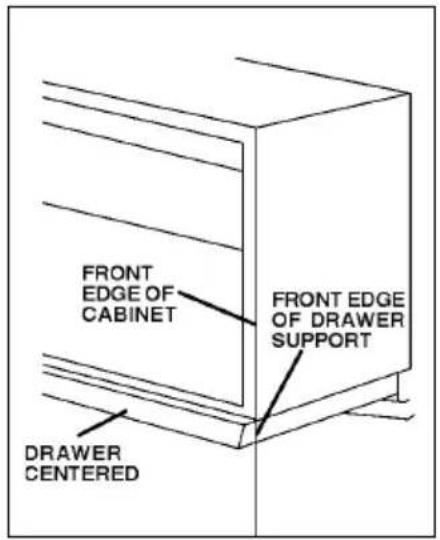
- Raise the hood up into the wall cabinet. Adjust brackets to contact inside walls of the cabinet.
- Make sure the front edge of the hood drawer support is aligned with the front of the wall cabinet. Center the hood on the wall cabinet.
- Tighten the (4) mounting bracket machine screws previously installed.
- Fasten the hood to the cabinet with (8) 4.2 x 15mm pan head screws.
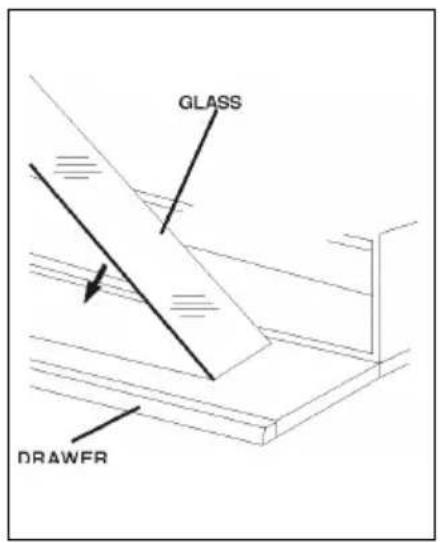
Make sure that screws will not penetrate finished cabinet side walls. - Open the slide out drawer. Place the glass panel into the open recessed area of the drawer.
- Slide glass left or right until it is centered in the opening and securely retained.

INSTALL THE DUCTWORK
(DUCTED HOODS ONLY)
NOTE: To reduce the risk of fire, use only metal ductwork.
- Decide where the ductwork will run between the hood and the outside.
- A straight, short duct run will allow the hood to perform most efficiently.
- Long duct runs, elbows, and transitions will reduce the performance of the hood. Use as few of them as possible. Larger ducting may be required for best performance with longer duct runs.
- Install a roof or wall cap. Connect round metal ductwork to cap and work back towards hood location. Use duct tape to seal the joints between ductwork sections.

INSTALL THE DUCTWORK
(NON-DUCTED HOODS ONLY)
NOTE: The following material must be purchased separately for non-ducted recirculation installations.
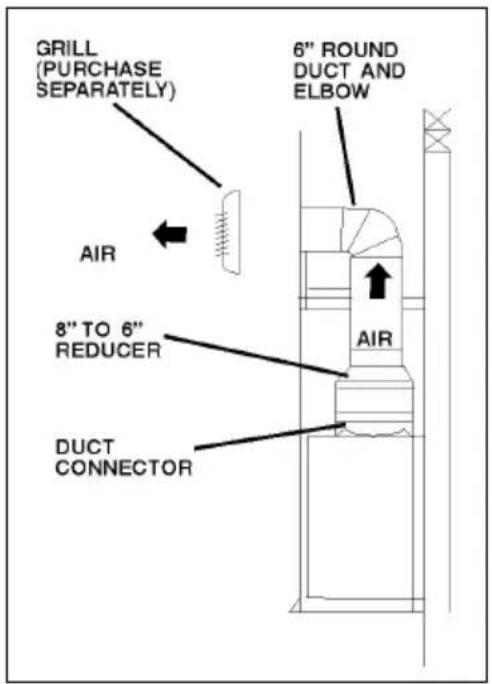
- Non-ducted Recirculation Kit Model ANKU10 (contains 8" to 6" reducer and two charcoal filters).
-
6" round metal ductwork and fittings.
-
Remove and discard the aluminum damper flaps from the 8" duct connector.
- Attach the 8" to 6" reducer to the 8" duct connector.
- Attach 6" round metal ductwork and fittings.
- Run ductwork to the location where it is discharged back into the room.
- Duct tape all joints to make them secure and air tight.
INSTALL ELECTRICAL

WARNING: All electrical wiring should done by a qualified person (s) in ordance with all applicable codes and ndards. This range hood must be perly grounded.
- Run 120 VAC electrical power cable to the hood's wiring box.
- From inside the hood, remove the wiring box cover.
- Secure the conduit to the wiring box through a conduit connector.
- Make electrical connections at the hood. Connect white-to-white, black-to-black and green to ground.
- Replace the wiring box cover and screws. Make sure the wires are not pinched between the cover and box.
- Connect power at the service entrance and check hood for operation.

natural_image
Technical line drawing of a mechanical assembly with an inset showing a close-up of a component (no text or symbols present)INSTALL FILTERS
(NON-DUCTED HOODS ONLY)
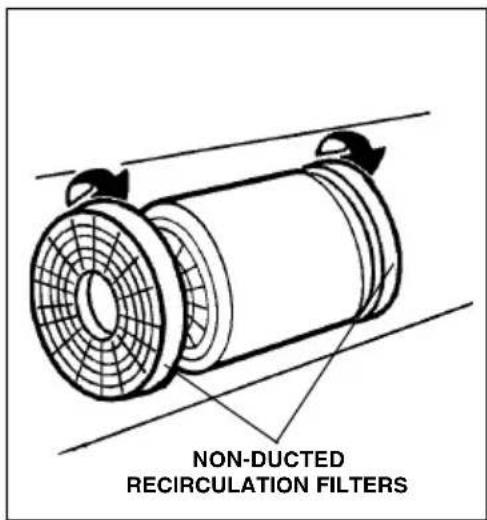
- Install a charcoal filter on each side of the blower (included with Nonducted Recirculation Kit Model ANKU10).
- To install the charcoal filter, align two keyhole slots on the filter with locking tabs on the blower. Rotate to lock filter into place.
- To remove the charcoal filter, rotate the filter until it disengages from the blower.
(DUCTED AND NON-DUCTED HOODS)
To remove the GREASE filter, grip the latch tab and pull it down. This will disengage the filter from the hood.
To install the GREASE filter, align filter tabs on the side of the filter with slots in the hood drawer. Pull latch tab down, push filter up into place and release the tab.
Make sure the filter is securely engaged after assembly.

WARRANTY
ONE YEAR LIMITED WARRANTY FOR BEST PRODUCTS
Broan-NuTone LLC (Broan-NuTone) warrants to the original consumer purchaser of Best products that such products will be free from defects in materials or workmanship for a period of one year from the date of original purchase. THERE ARE NO OTHER WARRANTIES, EXPRESS OR IMPLIED, INCLUDING, BUT NOT LIMITED TO, IMPLIED WARRANTIES OR MERCHANTABILITY OR FITNESS FOR A PARTICULAR PURPOSE.
During this one-year period, Broan-NuTone will, at its option, repair or replace, without charge, any product or part which is found to be defective under normal use and service.
THIS WARRANTY DOES NOT EXTEND TO FLUORESCENT LAMP STARTERS, TUBES, HALOGEN AND INCANDESCENT BULBS, FUSE, FILTERS, DUCTS, ROOF CAPS, WALL CAPS AND OTHER ACCESSORIES FOR DUCTING. This warranty does not cover (a) normal maintenance and service or (b) any products or parts which have been subject to misuse, negligence, accident, improper maintenance or repair (other than by Broan-NuTone), faulty installation or installation contrary to recommended installation instructions.
The duration of any implied warranty is limited to the one-year period as specified for the express warranty. Some states do not allow limitation on how long an implied warranty lasts, so the above limitation may not apply to you.
BROAN-NUTONE'S OBLIGATION TO REPAIR OR REPLACE, AT BROAN-NUTONE'S OPTION, SHALL BE THE PURCHASER'S SOLE AND EXCLUSIVE REMEDY UNDER THIS WARRANTY. BROAN-NUTONE SHALL NOT BE LIABLE FOR INCIDENTAL, CONSEQUENTIAL OR SPECIAL DAMAGES ARISING OUT OF OR IN CONNECTION WITH PRODUCT USE OR PERFORMANCE. Some states do not allow the exclusion or limitation of incidental or consequential damages, so the above limitation or exclusion may not apply to you.
This warranty gives you specific legal rights, and you may also have other rights, which vary from state to state. This warranty supersedes all prior warranties.
To qualify for warranty service, you must (a) notify Broan-NuTone at the address stated below or telephone number stated below, (b) give the model number and part identification and (c) describe the nature of any defect in the product or part. At the time of requesting warranty service, you must present evidence of the original purchase date.
In USA - Best®, 926 W. State Street, Hartford, WI 53027 (800-558-1711)
In Canada - Best®, 550 Lemire Blvd., Drummondville, QC J2C 7W9 (866-737-7770)
www.BestRangeHoods.com
MODEL U102I

SERVICE PARTS
MODEL U102I- Parts for stainless steel models shown. For service parts for black, white, polished brass, or brushed copper models, call Broan Customer Service.
| KEY NO. | PART NO. | DESCRIPTION |
| 9 B08 | 087077 Grease filter (36" model) | |
| 9 B08 | 087016 Grease filter (30" model) | |
| 14 B02 | 300233 Motor capacitor | |
| 17 BE3 | 347241 Halogen Support (36" model) | |
| 17 BE3 | 347372 Halogen Support (30" model) | |
| 30 BE3 | 347340 Control Cover (36" model) | |
| 30 BE3 | 347370 Controls Cover (30" model) | |
| 36 BE3 | 403716 Filter Frame (36" model) | |
| 37 B02 | 300804 Heat Sentry | |
| 38 B03 | 292357 Electrical Box | |
| 39 B03 | 294033 Electrical Box Cover | |
| 73 B02 | 005069 Glass Visor (36" model) | |
| 73 B02 | 005070 Glass Visor (30" model) | |
| 84 B00 | 3185707 Visor Frame (36" model) | |
| 84 B00 | 3185708 Visor Frame (30" model) | |
| 112 B03 | 294746 Wiring Access Cover | |
| 115 BE3 | 334250 Wiring Box | |
| 116 BE3 | 334252 Wiring Box Cover | |
| 130 B00 | 3101208 Front Panel (36" model) | |
| 130 B00 | 3101220 Front Panel (30" model) | |
| 144 B03 | 292287 Wire Clamp | |
| 165 B03 | 295008 Motor Capacitor Box | |
| 166 B08 | 086700 Control Board | |
| 208 B02 | 300783 Transformer | |
| 223 B03 | 294171 Switch Button | |
| 233 B03 | 294740 Closure | |
| 252 B03 | 292349 Limit Switch Box | |
| 253 B02 | 300620 Limit Switch | |
| 254 B03 | 292350 Limit Switch Box Cover | |
| 288 B02 | 0111650 Drawer Slide | |
| 309 BE3 | 403730 Wall Spacer (36" model) | |
| 309 BE3 | 403755 Wall Spacer (30" model) | |
| 353 BE3 | 403713 Drawer(36" model) | |
| 353 BE3 | 403751 Drawer (30" model) | |
| 367 B03 | 294747 Handle | |
| 472 BE3 | 347252 Right Bracket | |
| 473 BE3 | 347251 Left Bracket | |
| 474 B02 | 300733 Lamp Housing | |
| 476 B03 | 292203 Spacer Panel | |
| 477 B03 | 294785 Upper Closure | |
| 998 B08 | 0810599 Hardware Package | |
| ARU B08 | 092501 Damper/Duct Connector Assembly (56,57) | |
| * B06 | 108277 Switch Box Assembly: includes Key Nos. 234, 228, 223, 229, 67, 230, 92 | |
| * B06 | 002066 Blower Assembly: includes Key Nos. 68, 69, 48, 49, 53, 42 | |
| - B02 | 300782 Fuse | |
| - B02 | 300674 Fuse Holder | |
| - B03 | 300487 Non-Ducted Recirculation Filters |
* Not shown assembled.
LISEZ ET CONSERVEZ CES INSTRUCTIONS

POUR USAGE DOMESTIQUE SEULEMENT


AVERTISSEMENT
POUR REDUIRE LES RISQUES D'INCENDIE, DE DECHARGES ELECTRIQUES OU DE DOMMAGES AUX PERSONNES, OBSERVEZ LES INSTRUCTIONS SUIVANTES:
natural_image
Technical line drawing of a mechanical or electrical component with no visible text or symbolsREPLACEMENT DU FUSIBLE
SI LES LUMIÈRES NE S'ALLUMENT PAS, COUPEZ LE COURANT AU PANNEAU D'ALIMENTATION ÉLECTRIQUE. VÉRIFIEZ LE FUSIBLE ET REMPLACEZ-LE, LE CAS ÉCHÉANT.
natural_image
Technical line drawing of a mechanical assembly with a magnified inset showing a connector detail (no text or symbols)natural_image
Technical line drawing of a circular component mounted on a base plate (no text or symbols)CLAPET / RACCORD DE CONDUIT DE 20,3 CM (8 PO)
natural_image
Simple line drawing of a rectangular object with internal horizontal lines (no text or symbols)VISIÈRE DE VERRE

natural_image
Two identical metal bracket plates with mounting holes, shown in line drawing style (no text or symbols)2 BRIDES DE MONTAGE

natural_image
Simple line drawing of a circular ring or washer (no text or symbols)4 RONDELLES

natural_image
Technical line drawing of a metal beam with mounting holes (no text or symbols)CALE DÉCORATIVE
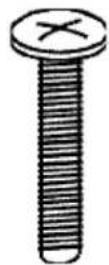
4 VIS MÉCANIQUES
(M4 X 30 MM - À TÊTE
CYLINDRIQUE)

natural_image
Simple line drawing of a screw with a flat head and threaded shaft (no text or symbols)8 VIS MÉCANIQUES (4.2 X 15 MM - À TÊTE CYLINDRIQUE)

7 VIS DE MONTAGE
(3.9 X 9.5 MM - À TÊTE
CYLINDRIQUE)
PRÉPARATION DE L'ARMOIRE
(HOTTES AVEC OU SANS CONDUIT)
natural_image
Technical line drawing of a mechanical assembly with an inset showing a close-up of a component (no text or symbols present)INSTALLATION DES FILTRES
(HOTTES SANS CONDUIT SEULEMENT)
(HOTTES AVEC OU SANS CONDUIT)
In USA - Best®, 926 W. State Street, Hartford, WI 53027 (800-558-1711)
In Canada - Best®, 550 Lemire Blvd., Drummondville, QC J2C 7W9 (866-737-7770)
www.BestRangeHoods.com
MODÈLE U102I

PIECES DE RECHANGE
natural_image
Technical line drawing of a mechanical or electrical component with no visible text or symbolsREEMPLAZO DEL FUSIBLE
SI LAS LÁMPARAS NO FUNCIONAN, DESCONECTE LA ENERGÍA EN LA ENTRADA DEL SERVICIO. REVISE EL FUSIBLE Y REEMPLÁCELO SI ES NECESARIO.
natural_image
Technical line drawing of a mechanical assembly with a magnified inset showing a connector detail (no text or symbols)natural_image
Technical line drawing of a circular component mounted on a base plate (no text or symbols)natural_image
Simple line drawing of a rectangular object with internal horizontal lines (no text or symbols)VISOR DE VIDRIO

natural_image
Two identical metal bracket plates with mounting holes, shown in line drawing style (no text or symbols)2 SOPORTES DE MONTAJE

natural_image
Simple line drawing of a circular ring or washer (no text or symbols)4 ARANDELAS PLANAS

natural_image
Technical line drawing of a metal beam with mounting holes (no text or symbols)natural_image
Simple line drawing of a screw with no text or symbols8 TORNILLOS (4.2 x 15 mm, CABEZA TRONCOCÓNICA)

7 TORNILLOS DE
MONTAJE
(3.9 x 9.5 mm, CABEZA
TRONCOCÓNICA)
PREPARE EL GABINETE DE LA PARED
natural_image
Technical line drawing of a mechanical assembly with an inset showing a close-up of a component (no text or symbols present)In USA - Best®, 926 W. State Street, Hartford, WI 53027 (800-558-1711)
In Canada - Best®, 550 Lemire Blvd., Drummondville, QC J2C 7W9 (866-737-7770)
www.BestRangeHoods.com
MODELO U102I

PIEZAS DE REPUESTO


- Model U102I
- READ AND SAVE THESE INSTRUCTIONS
- TO REDUCE THE RISK OF A RANGE TOP GREASE FIRE:
- WARNING
- TO REDUCE THE RISK OF INJURY TO PERSONS IN THE EVENT OF A RANGE TOP GREASE FIRE, OBSERVE THE FOLLOWING:\*
- CAUTION
- Controls
- The LED Display:
- HEAT SENTRY™
- HALOGEN BULBS
- FUSE REPLACEMENT
- Grease Filters
- Non-ducted Recirculation Filters
- Hood Cleaning
- Cleaning tips:
- PREPARE WALL CABINET
- PREPARE THE HOOD
- INSTALL THE HOOD
- (DUCTED AND NON-DUCTED HOODS)
- INSTALL THE DUCTWORK
- (DUCTED HOODS ONLY)
- NOTE: To reduce the risk of fire, use only metal ductwork.
- (NON-DUCTED HOODS ONLY)
- NOTE: The following material must be purchased separately for non-ducted recirculation installations.
- INSTALL ELECTRICAL
- INSTALL FILTERS
- WARRANTY
- ONE YEAR LIMITED WARRANTY FOR BEST PRODUCTS
- SERVICE PARTS
- LISEZ ET CONSERVEZ CES INSTRUCTIONS
- POUR USAGE DOMESTIQUE SEULEMENT
- AVERTISSEMENT
- POUR REDUIRE LES RISQUES D'INCENDIE, DE DECHARGES ELECTRIQUES OU DE DOMMAGES AUX PERSONNES, OBSERVEZ LES INSTRUCTIONS SUIVANTES:
- REPLACEMENT DU FUSIBLE
- PRÉPARATION DE L'ARMOIRE
- (HOTTES AVEC OU SANS CONDUIT)
- INSTALLATION DES FILTRES
- (HOTTES SANS CONDUIT SEULEMENT)
- PIECES DE RECHANGE
- REEMPLAZO DEL FUSIBLE
- PREPARE EL GABINETE DE LA PARED
- PIEZAS DE REPUESTO
Brand : BEST
Model : U10230SBI
Category : Range hood