31-1187 - Bike Off Course - Free user manual and instructions
Find the device manual for free 31-1187 Off Course in PDF.


User questions about 31-1187 Off Course
0 question about this device. Answer the ones you know or ask your own.
Ask a new question about this device
Download the instructions for your Bike in PDF format for free! Find your manual 31-1187 - Off Course and take your electronic device back in hand. On this page are published all the documents necessary for the use of your device. 31-1187 by Off Course.
USER MANUAL 31-1187 Off Course
natural_image
Close-up of a bicycle's front wheel and suspension system, showing mechanical components and wiring (no visible text or symbols)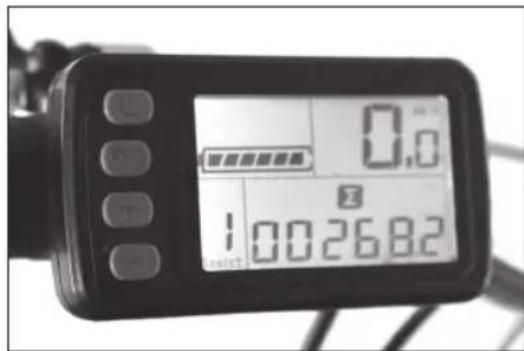
text_image
0.0 1:002682natural_image
Close-up of a bicycle's front wheel and cable, showing mechanical components and wiring (no text or symbols visible)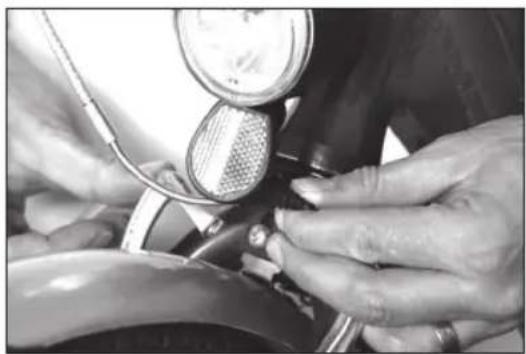
natural_image
Close-up of hands adjusting a car wheel rim with a metal clip and handle (no visible text or symbols)natural_image
Close-up of a black bicycle steering wheel with a circular dial indicator (no text or symbols visible)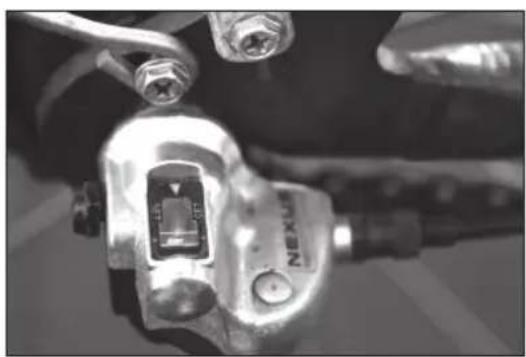
natural_image
Close-up of a mechanical brake caliper component (no visible text or symbols)Congratulations on your OFF COURSE electric bike!
You have now made an active choice that will improve your physical health and economy while contributing to a better environment, by start using an electric bike! The electric bike is like riding a bike in general, except that the small power assistance motor on your electric bike turns uphill to downhill or at least flat road and headwind to tailwind. This will make the journey to and from work / school / store or wherever you're going, a little more fun and easy.
In this manual you will find practical details on how you take care of your OFF COURSE electric bike in the best way.
The best advice I can give you is to cherish your battery with much love. By this I mean that you MUST have the battery on charge while you are not using the bike, even when you are not using it for a long time! This will give you a long life of the battery.
Good luck and enjoy your new OFF COURSE electric bike!
Best regards,
Off Course
Your first acquaintance with Off Course electric bike
Best way to get started with your Off Course electric bike, if you are familiar with regular bikes, is to turn the power on and take a test drive.
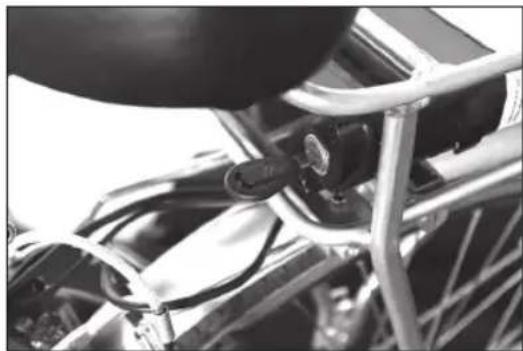
The power switch is the key by the front of the battery, under the seat. The power switch on is the top button at the display that sits on the handlebars. Always start the engine in the engine mode 1, i.e. minimum motor operation and put into first gear by turning the right handle and then start pedalling. As long as you move the pedals, you get electric assistance. When you stop pedalling or braking electric assistance automatically stops, when you move the pedals again the electrical assistance start.
Then try to increase motor assistance by pressing the + button on the display, this will increase the speed. You have engine position up to No. 6; then your bike runs at max power, approx. 25 km/h. Would you then reduce the effect from the engine, press the button - on the display. Note that it takes more than a second for the engine to start when you start pedalling. The same applies when you stop pedalling or braking.
Because the foot brake is very effective and fully enclosed, it is not affected mechanically by dirt, dust, snow, ice or cold. That means you have full function on the brakes. It is therefore important that you brake smoothly on slippery surfaces with the most force on the foot brake, just like on a regular bike.
Off Course electric bike is truly A perfect ride to go green - environmentally, economically and healthily without being a hassle! An Off Course electric bike costs about 0,20 cents/10km in operating cost based on your currency in Kw to charge the battery fully.
How far can I ride on an Off Course Electric bike with electric assistance?
A common question that comes to Off Course electric bike is how far you can ride a bike with electric assistance? The answer is not obvious, because many factors come into play, and how you ride, how hilly your bicycle path is and even on the outdoor temperature prevailing, a hot summer day you can cycle up to approx. 50 km of electric assistance at regular normal hilly road. A little less if your bicycle path contains many uphills and depending on the used engine. One very cold winter day you might only get electricity assistance for half of normal distance, it varies depending on that the battery works like any other batteries, it goes down in capacity when the temperature is low and increases when it is hot outside. Therefore, you should, during the winter both charge and store the battery indoors during the night. Remember that you can always ride your Off Course electric bike even if the battery has run out. It then works just like a standard three-speed bicycle.
With the power switch key you turn on the battery
How do the various buttons on the display work and what they show?
natural_image
Close-up of a bicycle's front wheel and suspension system, showing mechanical components and wiring (no visible text or symbols)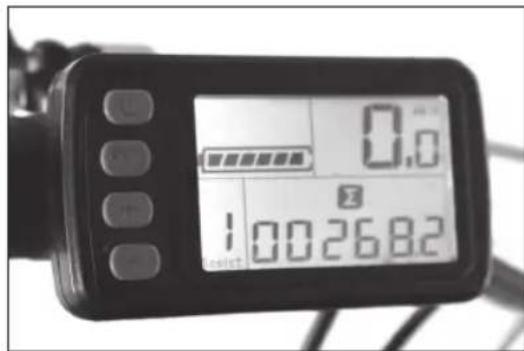
text_image
0.0 1:002682Start by put on the power of the battery. You do this with the key at the front of the battery under the seat. The key is also to battery lock, located under the battery on the bike's left side. Then turn on the power with the top button on the display. When power is on, you can see the speed, how much battery you have left, which engine you are running on (always starts at position 1, the smallest engine power) and how far the bike has gone. Press the SET button; you can also see how many minutes your last bike ride lasted, how many km you biked and your top speed. All this goes to zero by pressing the - button for about 5 seconds. The engine power change by pressing + for increased power and - to decrease engine speed. Effect modes goes from zero which means that the engine does not operate at all to level 6 when the engine runs at its fastest (up to 25km/h). You can also get the bike to push itself up to 6km/h by holding down the + button. This for example, lead bike in an uphill etc.
How do you know how much the battery is charge?
Best way to see this is to check the battery indicator on the display on the handlebars. When the light on the charger turns green, the battery is fully charged (about 6 hours). The charger charge the battery with low current, this will not harm the battery. The charger has a protection from overcharging. If the bike is not used for an extended period, leave the battery in the charger. Since it is a "smart charger", it loads the battery only up to full and then trickle charges it if the charge would fall.
Unlock the battery with the key, pull it out for charging indoors or charge the battery when it sits in your electric bike
Two ways to charge the battery
The battery charge when plugging the charger into a regular 220-volt outlet. You can charge the battery in two ways: while it remains attached to the bike or by removing it and charge at another location. If you stay at a place where you can lock your bike outdoors in a bike rack, it may be convenient to take the battery with you and charge it indoors. Are you able to store your bike in a locked room as a garage or a basement space with a power outlet; it can be convenient to charge the battery whilst in bike at these places.
Charge the battery when it's in your Off Course Electric bike
Plug the charger into the wall and connect the charger plug in the battery-charging socket. The battery is inserted in the carrier and the charging socket is located under the lid closest to the saddle of the battery left. Lift the lid by the rack and insert the charging cable from the battery charger into the charging socket on the side. A red light on the battery charger will show when the battery is charging. When the battery is fully charged, the light turns green. Charging an empty battery to fully charge takes about 6 hours.
Charge the battery when it is removed from the electric bike
Unlock the battery with the key provided with your Off Course electric bike, and pull the battery with the handle at the back under the battery. It can go a bit slow in the beginning when the bike is new, but it is just to put in a little extra effort, and it gets easier after a few times. Importantly, the base of the battery has to be fitted into the trails underneath the luggage rack; otherwise there is a risk that the connection between the bike and the battery is wrong. The advantage with removable battery is that you can charge it indoors at room temperature for example at work if you bike commute and want a fully charged battery when it's time to ride home. Is it cold out there, then an indoor charging allows you to always start with a room's temperate fully charged battery. As the power goes down the batteries in extreme cold differences can be substantial already when it is 4-5 degrees Celsius below zero or even colder, and it affects how far you can ride your bike with electric assistance.
NOTE! ALWAYS CHARGE THE BATTERY WHEN YOU DO NOT USE YOUR BIKE! EVEN IF YOU DO NOT USE IT FOR A LONG TIME, LET THE BATTERY BE CONNECTED TO THE CHARGER. IT WILL NOT DESTROY YOUR BATTERY! NEVER LOAD YOUR BATTERY IN MINUS DEGREES.
How to turn on and turn off the lights on your Off Course electric bike
The bike is equipped with efficient LED lights front and rear. Power comes from separate AA batteries sitting inside the lights. To turn on the front light, press the black button on top of the light. The light can be removed by pressing down the plastic arm that sits under the light. Turn on the rear light by pressing the power switch located to the right of the light, marked O / 1.
Changing the batteries and bulb
To replace batteries on rear light, do this; unscrew the screw located under the rear light in the light socket. Front light parts by turning the glass. Replace the bulb and then screw up the lamp and secure it back in its light fitting. New LED bulbs can be bought at your local bicycle dealer.
Learn to share the power plug to the engine correctly
How to unplug the motor when the front wheel needs to be removed
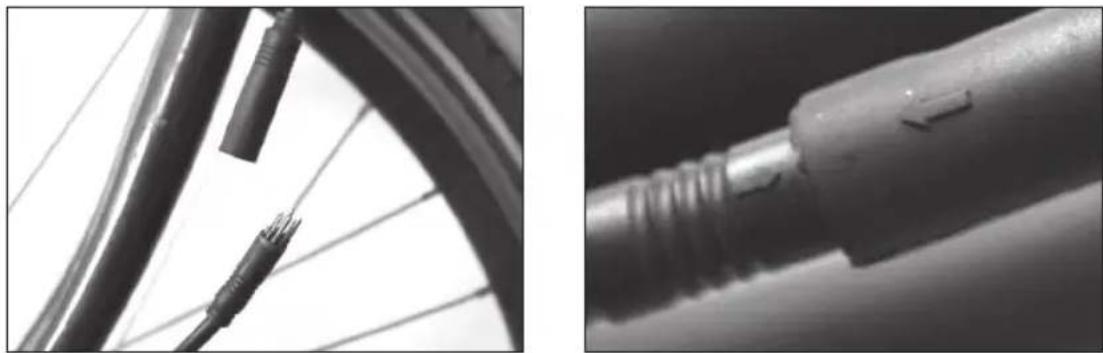
Sometimes you have to take off the front wheel to fix a flat tire or to stow your bike in a crowded luggage space.
Do this:
Start by unplugging the power cord to the electric motor in the front hub, the rubber coated plug is on the right side down to the wheel hub. To share the plug, grab the two parts of the connector and pull apart. One of the connector is in silver with 8 pins and must fit in the bottom that has 8 holes (pictured). When you put together the contact again, be careful that it fits perfectly and that the two arrows on the female and male contact come together and are firmly pushed, so that no water seeps in. The contact is very sensitive to moisture!
Wheel set-up
When replacing a wheel, you must ensure that the wheels "track" after installation, i.e., front and rear wheel is fully in line with each other. The four points that sidewalls forms, must lie in a straight line.
If the wheels are not in line becomes the cycling uncertain, since the front wheel when striving to pull to one side or the other.
Maintain Rim Brakes • Setup/Installation
Some types of brake pads are labelled for right (R) and left-hand mounting (L). When braking, the brake pad lie in the centre of wheel rims with proper contact without touching the tire. The brake pad should sit "toe-in", with 1 mm plough angle. See Figure. A certain ploughing is recommended. The distance between the brake pad and wheel rims should be 1-2 mm. The distance is controlled by the brake cable adjuster at the brake lever. The balance between the right and left brake lever is adjusted by adjusting screw for spring tension. See Figure.

natural_image
Close-up of a bicycle's front wheel and cable, showing mechanical components and wiring (no text or symbols visible)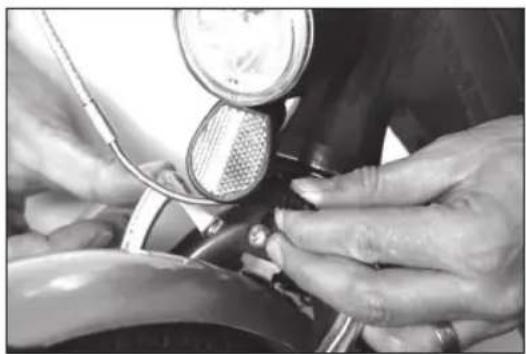
natural_image
Close-up of hands adjusting a car wheel rim with a metal clip and handle (no visible text or symbols)When the wheel is removed, e.g. by puncture; releases wire nipple from its position as the wheel is lifted from the brake arms hamper. See Figure. Be sure to reassembly the bolt correctly, and do a function test on the brakes before riding.
Shimano Nexus 3-speed hub
Check setting
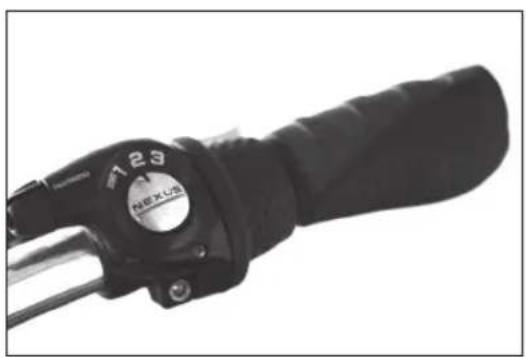
- Set the switch in position "2". See Figure
Make sure the cursor is between the yellow lines in the window on the shift arm at the hub's right side. See Figure
3rd If this is not the case, turn the adjusting screw until the cursor reaches the right.
natural_image
Close-up of a black bicycle steering wheel with a dial indicator (no visible text or symbols)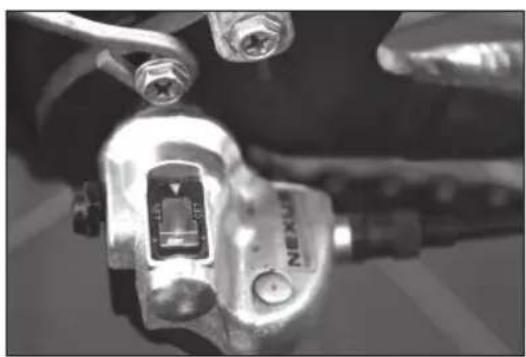
natural_image
Close-up of a mechanical brake caliper component (no visible text or symbols)Adjusting the seat and handlebar
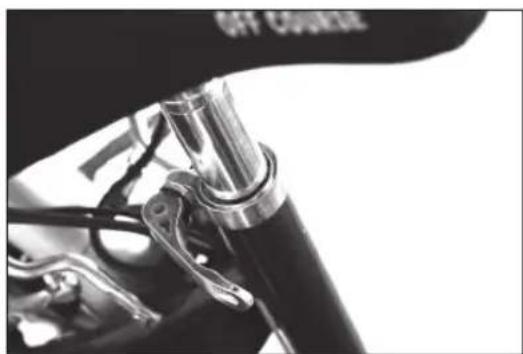
The seat can be tilted up and down, pushed forward and backward with the Allen wrench and raised and lowered with the quick fix connector under the seat.
The guidepost can be raised or lowered using the Allen key. However, we recommend that you use the quick disconnect to raise and lower the handlebars.
For adjustment required postponing lock against itself. Then, lift the handle up. In this mode you can adjust both the handlebar and handlebar stem. See Figure .Turn the handlebars, raise or lower the stem to the desired position. Then, lock the handlebar and handlebar stem by pressing the handle again.
natural_image
Close-up of a bicycle's front wheel and lever assembly (no visible text or symbols)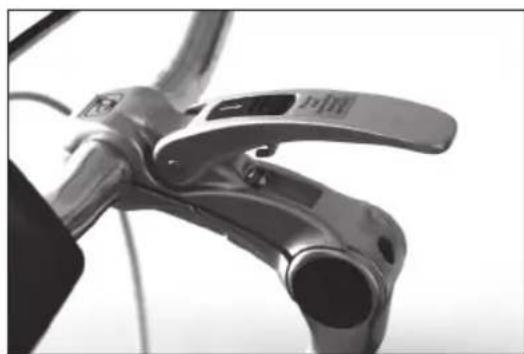
natural_image
Close-up of a bicycle steering wheel with visible blades and hub (no text or symbols)The frame number on your Off Course Electric bike is stamped under the frame
How to reduce the chance of having your Off Course electric bike stolen
First, there are two important things that you should do to make the thief not steal your bike. Obviously you lock the bike with the built-in lock but also should lock it with a clad wire or chain, when you leave it unattended. Slide the wire rope or chain, between both wheels and the frame before attaching it to a solid object, such as bike racks, around a tree trunk or similar. There are many variations on the locks at your local bicycle dealer.
An effective way to keep track of the cycle is to register it to an anti-theft record, such as Smart Safety registry. You will then receive an unrealisable decal to put on the frame with a unique number and a telephone number for Smart Safety Register. When the finder or police finds a Smart Safety Tagged Off Course Electric bike, they can contact Smart Safety thru the contact info on the sticker and then you as the owner gets contacted and may know where the bike is.
Some smart service advice
Maintenance and easier service can consist of washing/cleaning your bike regularly. Use warm water and a brush. Do not use the pressure washer as the water can get into the bearing that may then fail after a short time! Please use biodegradable agents for degreasing.
It is important to use rust preventative to protect chrome, galvanized and aluminium parts, even the paint is good for the same protection. It also facilitates your work at the next cleaning.
- Check that all screws and nuts are properly tightened
- Clean the chain and wipe with a cloth
It is also important that the chain, gears, controls, cables and other moving parts are always well lubricated. NOTE: Make sure you always have the chain properly tensioned. In the middle of the chain's free length of the game should not exceed 20 mm. Please regularly check the brakes so they work the way they should.
Replacing the brake pads when they are worn. If they are not worn it may be sufficient to stretch the brake cable to brake better.
- If the brakes are not effective, the handlebars are loose or if the wheels are warped - leave the bike at the bike dealer.
Check the lights front and rear and that all reflectors are clean and intact.
Inflate tires
Another important thing is to check the tires every time you go. Make sure that no sharp rocks or anything else are stuck to the tires and the tire does not have any other injuries. That one keeps his bike in the shelter, preferably under a roof, extend your bicycle's lifespan significantly.
Winter storage of bike
If you for some periods, such as during the winter, do not use your bike, you should have the bike rust protected before storing. Spray chrome and zinc parts with any anti-rust agent. Even the nooks on the frame and aluminium parts are protected in this way against corrosion and oxidation. The battery is put on charge in a dry and frost-free room. When the bike is being used again, be sure to wipe rim sides clean in order to achieve a safe braking.
Maintenance Schedule
| Frequency | Control Point | Check | Cleaning | Lubrication |
| Before each use | Wheels | x | x | |
| Front and rear brake | x | x | ||
| Wheel nuts | x | x | ||
| Lights and reflectors | x | x | ||
| Bell | x | x | ||
| Tyre pressure | x | x | ||
| Each month | Chain | x | x | |
| Spoke tension | x | |||
| Brake | x | |||
| As requiredAt least 1 time per year | Brake pads | x | ||
| Headset,review of the frame, | x | |||
| Fork,handlebars,stem,bottom | x | |||
| bracket,rims | x | |||
| Direction of wheel | x | |||
| Control of bottom bracket | x | |||
| Tightening cranks | x | |||
| Pedals | x | x | x | |
| Handlebar,stem | x | |||
| Fastening Brake | x | |||
| Gear cable and brake cable | x | x | ||
| Battery | x |
Warranty and reclamation
In addition to the statutory warranty OC Off Course leaves an additional two -year warranty. This two -year warranty covers all original error i.e. errors that were on the product upon delivery and can be traced back to production of the bikes. Fine adjustments and balance adjustments do not count as guarantee. This warranty does not cover defects or damages associated with improper handling, improper installation or error caused by lack of care and maintenance. The warranty is not valid if parts is changed from its original form or if parts other than original parts is used. Normal wear and tear is not covered y warranty. Examples of parts considered to have a natural wear and tear, is for example, tires, hose, valves, brake pads and lamps, spoke tension and so on. In order to be able to use the warranty it requires that all service, maintenance and repairs are performed by professionally knowledgeable person. Receipts from the servicing workshop shall upon request be presented.
Although the batteries are classed as consumables, we leave one year warranty, under conditions that the battery is charged and maintained according to instruc-
tions in this manual. If any error is or is not a warranty, is determined OC Off Course in consultation with the workshop where the electrical cycle is brought for debugging. Upon finding of a warrantable, OC Off Course will be responsible for all costs associated with remedying the error/errors. At a rejection of the complaint, the customer pays for debugging that the workshop has done on the electric bike.
Any dispute concerning the interpretation or application of this warranty, the parties shall first seek to resolve by mutual agreement. Consumers can turn to the municipal consumer guidance or let hear the case at the Consumer Complaints Board. A general court can try disputes. Swedish law is the highest order, and applies with any inquiry, interpretation and enforcement of all rights and obligations arising of or relating in any manner to the above warranty.
Technical Specification
| Battery | 36V |
| Motor | 250W |
| Weight 23 kg | |
| Maximum load 100 kg | |
| Maximum speed (electric assistance) | 25 km/h |
| Charge Charging time is about 6 hours of empty battery | |
| Power Source 220 volts AC grounded outlet | |
| Mileage with fully charged battery in summer up to 50 km depending on temperature | |
Ramnummer:
Leveransdatum:
Signatur:
Off Course AB
Golfbanevägen 17a, 302 73 HALMSTAD, SWEDEN
General questions: info@ocoffcourse.com
Service Issues: service@ocoffcourse.com
Web: www.ocoffcourse.se
natural_image
Close-up of a bicycle's front wheel and suspension system, showing mechanical components and wiring (no visible text or symbols)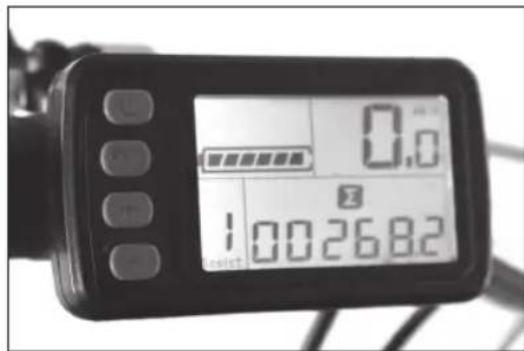
text_image
0.0 1:002682natural_image
Close-up of a bicycle wheel with cable and connector, no visible text or symbols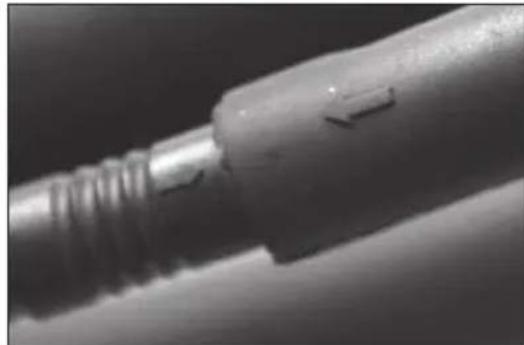
natural_image
Close-up of a metallic cylindrical connector with threaded end and internal features (no visible text or symbols)natural_image
Close-up of a bicycle's front wheel and cable, showing mechanical components and wiring (no text or symbols visible)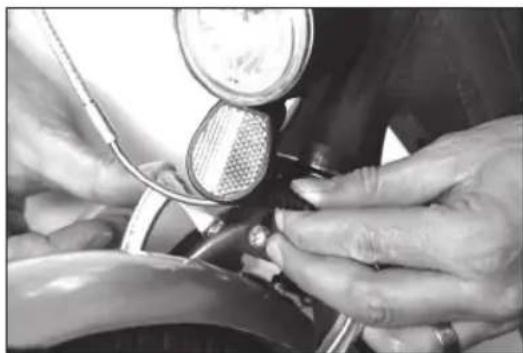
natural_image
Close-up of hands adjusting a medical or automotive component with a stethoscope (no visible text or symbols)natural_image
Close-up of a black and silver brake lever with a circular dial labeled '123' and 'NEXUS' on the handle (no additional text or symbols visible)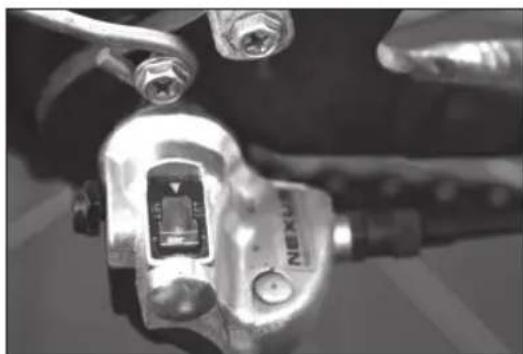
natural_image
Close-up of a mechanical tool with attached components, no visible text or symbolsJustering av sete
natural_image
Close-up of a motorcycle's front wheel and lever assembly (no visible text or symbols)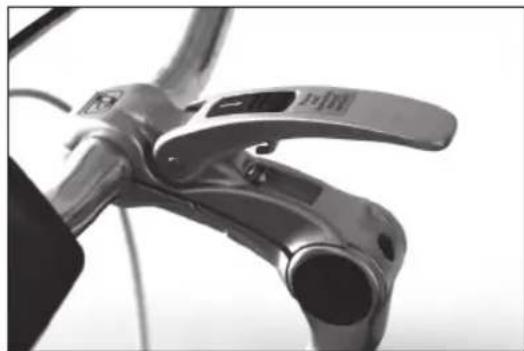
natural_image
Close-up of a bicycle steering wheel with propeller and lever mechanism (no visible text or symbols)natural_image
Close-up of a bicycle's front wheel and suspension system, showing mechanical components and wiring (no visible text or symbols)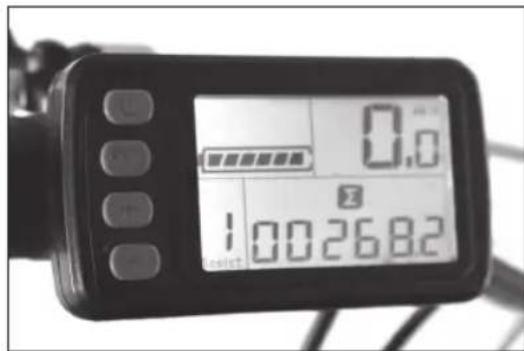
text_image
0.0 1.002682natural_image
Close-up of a bicycle wheel with cable and connector, no visible text or symbols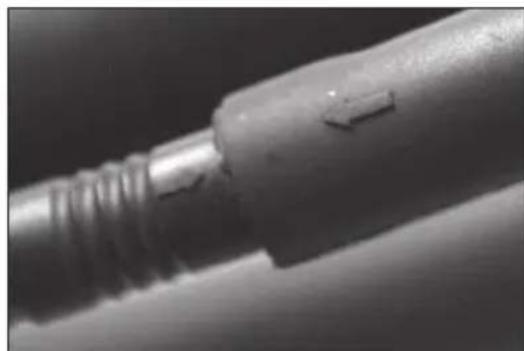
natural_image
Close-up of a metallic connector with threaded end and internal slot (no visible text or symbols)natural_image
Close-up of bicycle frame components including a black cable and metal bracket (no visible text or symbols)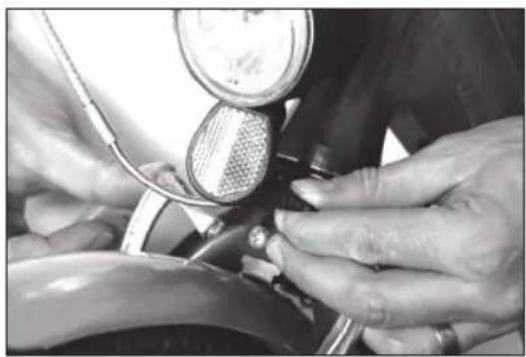
natural_image
Close-up of hands adjusting a mechanical component with a magnified inset showing a mesh detail (no visible text or symbols)natural_image
Close-up of a black brake lever handle with a circular dial labeled '12.9' and 'NECUS' on the grip (no additional text or symbols visible)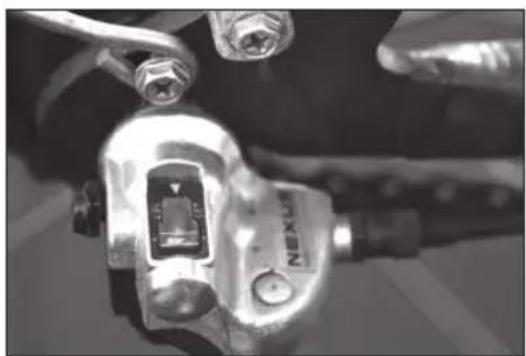
natural_image
Close-up of a mechanical tool with visible branding and control knobs (no readable text or symbols)Satulan säätäminen
natural_image
Close-up of a motorcycle's front wheel and lever mechanism (no visible text or symbols)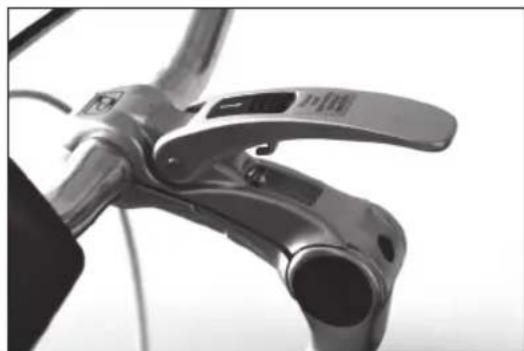
natural_image
Close-up of a bicycle steering wheel with lever handle and head (no visible text or symbols)natural_image
Black-and-white photo of a person riding a bicycle on a residential street beside a parked car, with a modern building and fence in the background (no visible text or symbols)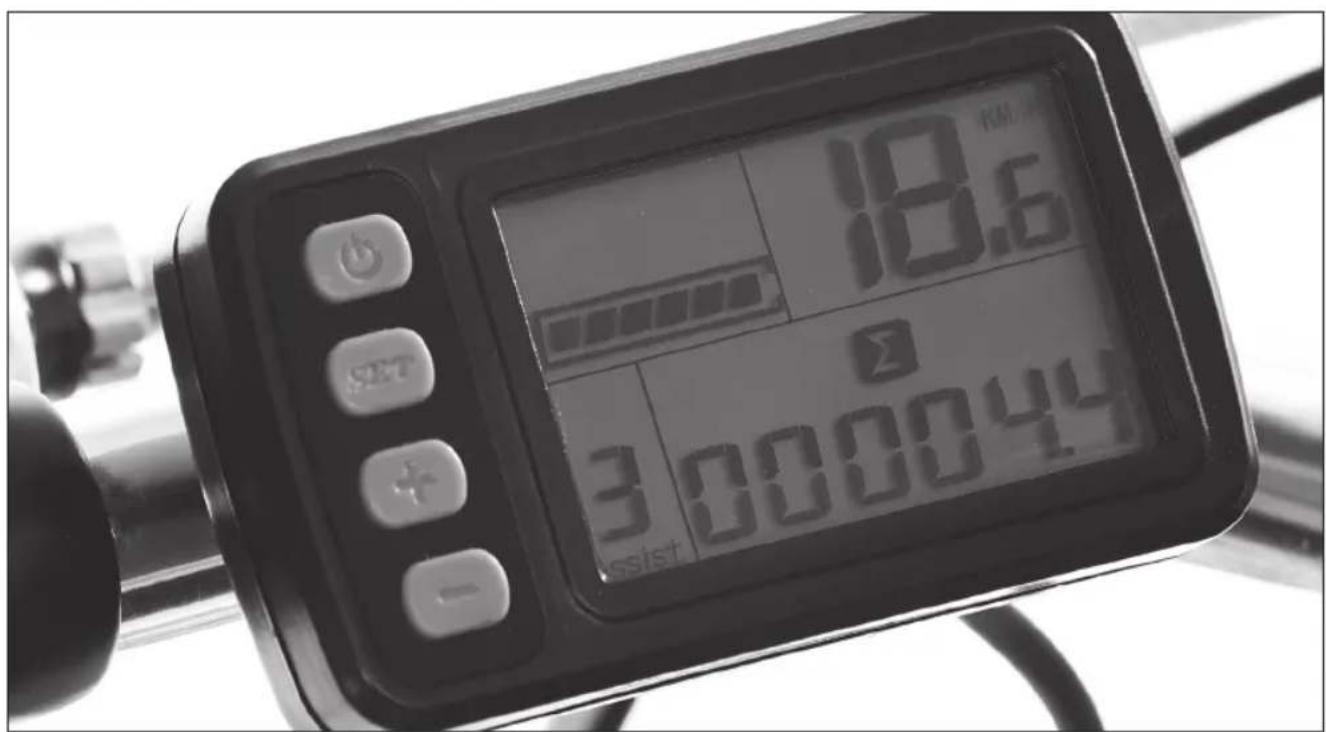
text_image
18.6 3 000044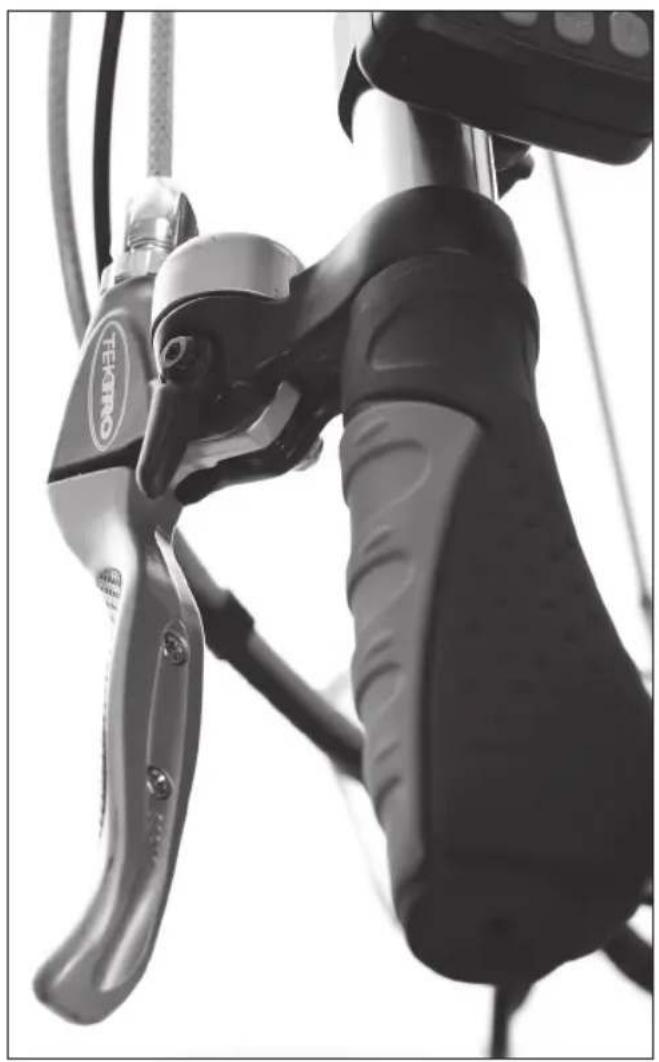
natural_image
Close-up of a person using a protractor tool, no visible text or symbols on the device itself
natural_image
Close-up of a metallic mechanical device with hexagonal cutouts and a textured surface (no visible text or symbols)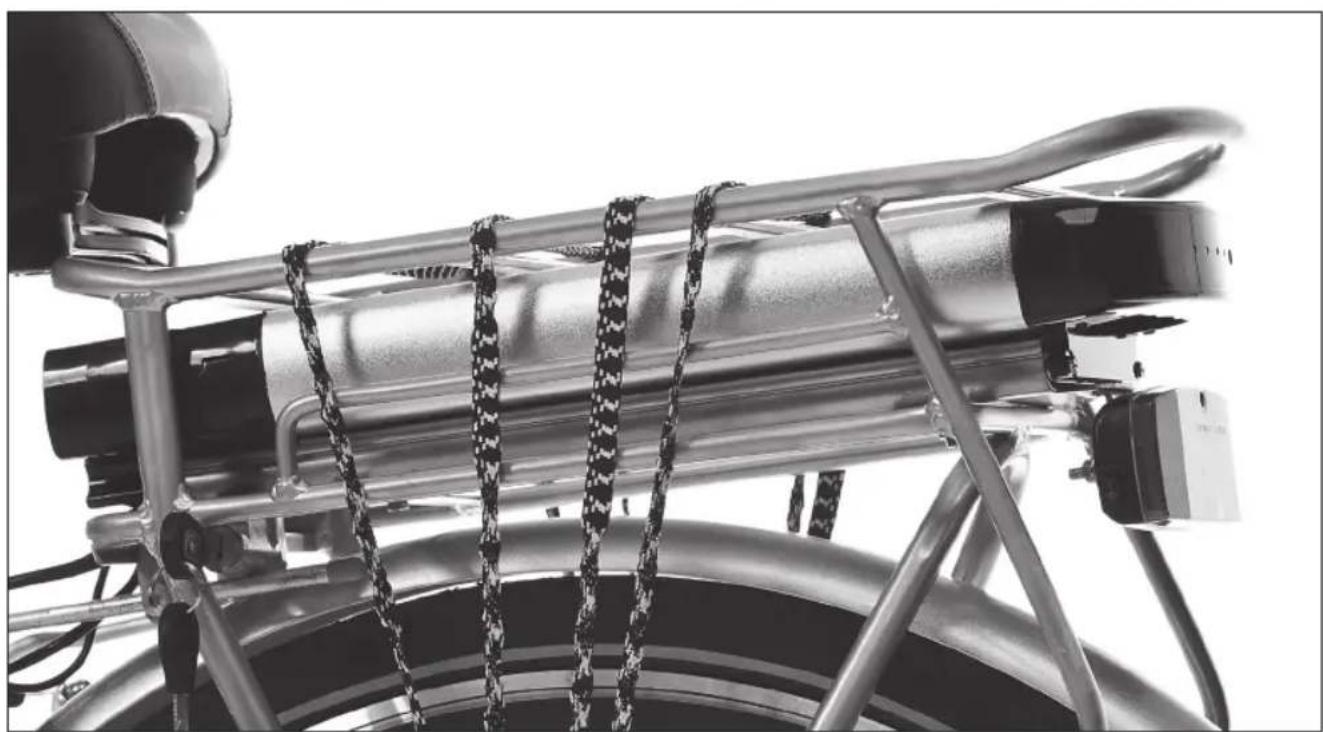
natural_image
Close-up of a metallic vehicle chassis with chains and structural components (no visible text or symbols)