
OSW1080RVS - Range hood Pelgrim - Free user manual and instructions
Find the device manual for free OSW1080RVS Pelgrim in PDF.


| Product type | Built-in extractor hood |
| Brand | Pelgrim |
| Model | OSW1080RVS |
| Suction power levels | 4 levels (including intensive for 4 min) |
| Controls | Wireless remote control with +, -, lighting, stop, timer, purification buttons |
| Lighting | LED, dimmable |
| Timer | Automatic shut-off after 10 minutes |
| Air purification function | Runs 10 min every hour at power level 1 |
| Grease filters | Metal, dishwasher safe |
| Charcoal filter (optional) | Washable and regenerable in oven at max 80°C |
| Plasma filter (optional) | Compatible, separate instructions |
| Filter saturation signal | 3 beeps for grease, 6 beeps for charcoal; resettable |
| Evacuation modes | Extraction or recirculation (selectable) |
| Remote control battery | Type 23A, accessible via screw |
| Maintenance | Clean exterior with soapy water, no abrasive products |
| Safety | Unplug before maintenance; fire risk if not followed |
| Disposal | Appliance and packaging recyclable, do not dispose with household waste |
Frequently Asked Questions - OSW1080RVS Pelgrim
User questions about OSW1080RVS Pelgrim
0 question about this device. Answer the ones you know or ask your own.
Ask a new question about this device
Download the instructions for your Range hood in PDF format for free! Find your manual OSW1080RVS - Pelgrim and take your electronic device back in hand. On this page are published all the documents necessary for the use of your device. OSW1080RVS by Pelgrim.
USER MANUAL OSW1080RVS Pelgrim
OSW1080RVS
Handleiding
Inbouwunit
Instructions for use
Built in unit
NL Handleiding NL 3 - NL 11
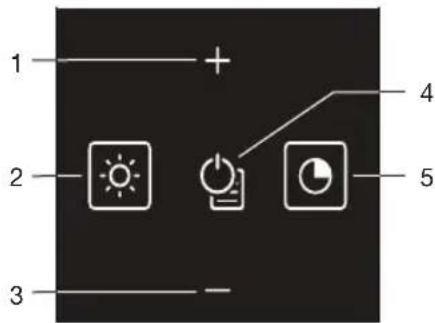
- Toets '+'
Reinigen

Let op!
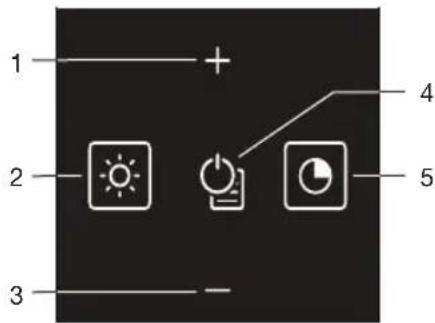
Nettoyage

Attention!
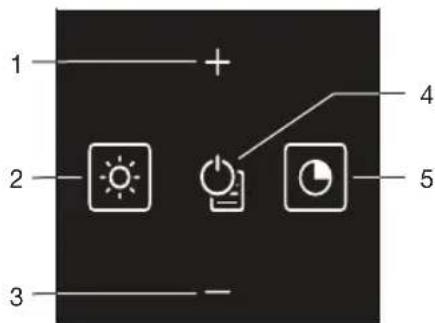
- Taste „+“
Reinigung

Achtung!
Plasmafilter [optional]
| Use | Introduction | 4 |
| Description | 4 | |
| Maintenance | Remote control 5 | |
| Controls 5 | ||
| Cleaning | 8 | |
| Grease filter 9 | ||
| Carbon odourfilter 10 | ||
| Plasma filter [optional] 10 | ||
| Lighting | 10 | |
| Appendix | Disposal | 11 |
Introduction

This user manual gives you a quick overview of all the possibilities offered by the appliance. You will find information on safety measures and maintaining the appliance.
Please read the separate safety instructions carefully before using the appliance!
Please retain this user manual and the installation guide. They may be of use to future users of the appliance.
Description
Remote control
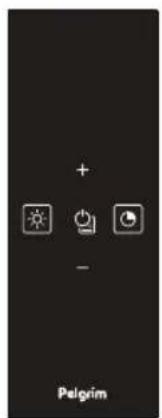
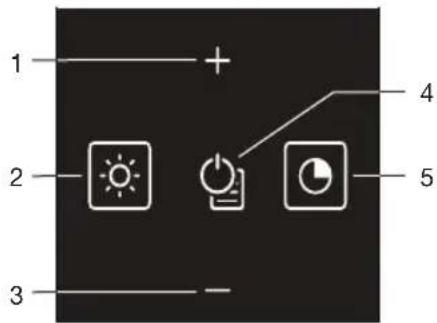
- '+' button
- Switch On the fan and increase ventilation level. - Connect remote control to the built in unit.
- On/Off Light button
▶Switch On and dim the light. ▶Switch Off the light.
- '-' button
▶Reduce ventilation level. ▶Switch Off the fan.
- Switch Off the fan and Clean air button
▶Switch On interval ventilation. ▶The fan switches On automatically for 10 minutes every hour at level 1.
- Timer button
▶Switch Off the fan automatically after 10 minutes.
Remote control

Controls
Connecting the remote control to the appliance
If the appliance cannot be operated with the remote control, e.g. after the battery has been changed, the connection between the remote control and the appliance must be re established.
- Press and hold the '+' button.
- Attach the appliance to the mains voltage.
▶A long audible signal sounds. The remote control has been connected to the appliance.
Note: If no audible signal sounds within 30 seconds, repeat this procedure.
- Press the '+' button.
The extraction level starts at second speed.
Adjusting the extractor capacity
- Press the '-' or '+' button to select a higher or lower setting.
The maximum setting you can select is the intensive setting 4.
The run time of the intensive setting is 4 minutes. Once this time has elapsed, the fan switches to a lower level.
- Press the Off button or:
Press the '-' button until the fan switches Off.
Switching lighting on and off
- Press the light button.
The lighting comes on. - Press the light button again and the lighting fades to off.
Dimming the lighting
- To dim the lighting, press and hold the light button until the dimmer function is activated.
The lighting comes on at maximum intensity and it decreases as long as you hold down the button.
At lowest dimmer setting the light will go back from dimmed light to brighter light.
Delayed shut off
- Switch on the appliance and choose the fan setting desired.
- Press the timer button.
▶One audible signal sounds to confirm setting the timer.
The extraction level remains at the selected setting for 10 minutes, after which the appliance is automatically switched Off.
- Press the timer button again to switch Off the timer setting.
▶Two audible signals sound to confirm canceling the timer.
Clean air function
- Switch off the appliance and lighting.
- Press and hold the clean air button until the light alternates between being on an off for 3 seconds. The lights will blink 2 times.
The Clean air function is activated.
The appliance will be switched On for 10 minutes every hour at level 1.
- Switch Off the clean air function by pressing the'+' or '-' button.
Filter saturation signal
- Three consecutive audible signals:
▷Clean the grease filters - Six consecutive audible signals:
▶Replace or clean the carbon filters.
Resetting the saturation signal
- Press the timer button.
▶An audible signal sounds for 3 seconds.
The saturation signal has been reset.

Note: The appliance switches Off the saturation signal automatically after 20 hours.

Switching over the appliance to air recirculation
- Switch Off the appliance.
- Press and hold the timer button for 4 seconds until an audible signal sounds.
The electronic control is switched over to air recirculation.
The appliance can be fitted with a plasma filter; in that case you must obey the instructions in the accompanying manual.
Switching over the appliance to air extraction
- Switch Off the appliance.
- Press and hold the timer button for 4 seconds until 2 audible signals sound.
The electronic control is switched over to air extraction.
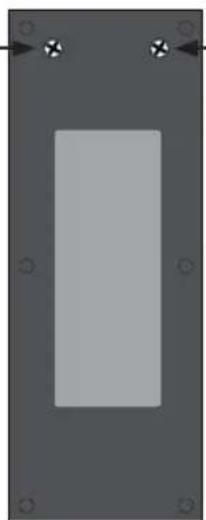
Battery replacement
- Remove the two screws from the remote control backside.
- Replace the battery (type "23A").
The battery is chemical waste and should be transported in a responsible way in accordance with government regulations.
Cleaning

Attention!
For all maintenance first switch off the mains power to the built in unit by pulling the plug out of the socket or by turning off the home's master switch.
The built in unit needs to be cleaned regularly, both inside as well as outside. Do not use abrasive cleaners. Do not use alcohol!

Attention!
If the instructions regarding cleaning the appliance or replacing the filters are not followed, this can cause a fire. These instructions should be followed! The manufacturer is not liable for damage to the built in unit or fire damage resulting from incompetent maintenance or from non-adherence to the recommendations above and delivered safety instructions.
Clean the built in unit with soapy water and a soft cloth. Then wash off with clean water. Do not use aggressive cleaning agents such as caustic soda and do not use scouring pads. Finish with a non-abrasive, non-polishing agent and buff the stainless steel in the direction of the grain.
Metal grease filters
These must be cleaned once a month (or when indicated by the filter saturation indication system, if present on your model) using non-aggressive detergents, either by hand or in the dishwasher, which must be set to a low temperature and a short cycle. The openings must be placed downwards to let the water run out of the filters. When washed in a dishwasher, aluminium grease filters may be discoloured slightly. This is normal and does not affect their filtering capacity.

The degree of saturation of the filter depends on the intensity of use, the manner of cooking and the regularity with which the grease filters are cleaned.
Grease filter
Removing cassette filter
- Switch off the motor and lighting.
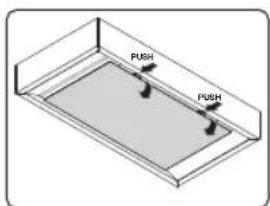
- Push in the latches and open the panel.
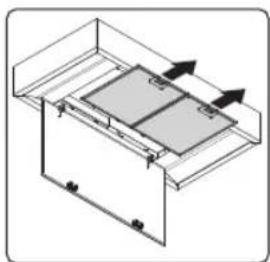
- Open the filter's access latch. Support the filter with your hand.
- Remove the filter from the built in unit.
Cleaning
The filters can be cleaned in the dishwasher. Allow the filters to drain well before replacing.
The filters can also be cleaned by hand.
Clean the filters in soapy water with washing up liquid and rinse. Allow the filters to drain well. See page 8 for instructions. The underside of the built in unit can be cleaned with a mild cleaning agent and a damp cloth. Dry off with a paper towel.
Replacing cassette filter
The filter should be placed with the locking mechanism on the front. Open the filter access latch. The notches at the front of the filter will then slot in. Hold the access latch in this position when placing the filters.
- Slot the notches at the back of the filter in the specially designed opening of the built in unit.
- Tilt the filter upwards.
- Release the filter access hatch. The notches at the back of the filter will extend outwards and slot into the specially designed openings of the built in unit. The filter is now in position again.
- Press the edge extraction panel firmly in the seal again (you will hear a click).

It is important that the grease filters are thoroughly dry before repositioning.
Carbon odourfilter [optional]
For recirculation purpose you can choose for washable carbon odour filters or for plasma odour filtering. The Carbon odourfilters can be regenerated.
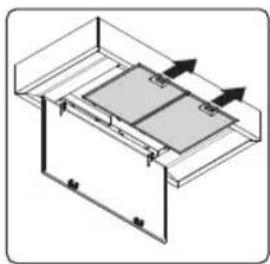
- Remove the filter matrass from the filterframe and clean the matrass in the dishwasher, without detergent.
- Dry the filtermatrass in the oven for 1 hour at a max. temperature of 80 degrees.
- Place the filters back afterwards.
![graph TD A1["Rectangle Panel A"] -->|A PUSH| B1["Rectangle Panel B"] A2["Rectangle Panel A"] -->|A PUSH| B2["Rectangle Panel B"] A3["Rectangle Panel A"] -->|A PUSH| B3["Rectangle Panel B"] style A1 fill:#f9f,stroke:#333 style A2 fill:#f9f,stroke:#333 style A3 fill:#f9f,stroke:#333 style B1 fill:#ccf…](/content/2026/05/808509/images/64473bfceaba82b8811d2d2e2213a8327c8e7123e35ca68a3eb7e6014db66fe3.jpg)
Plasma filter [optional]
Instead of using washable carbon odour filters, this built in unit can be operated with a plasma filter as well. See installation steps on how to install this. Make sure there are no carbon odourfilters installed when using a plasma filter.
Lighting

• The built in unit is fitted with LED lighting.
- LED lamps guarantee you optimum lighting, a service life of up to 10 times longer than conventional lamps and energy savings of as much as 90%.
- Contact the technical department when LED lighting needs to be replaced.
Disposal
Disposal of appliance and packaging
This appliance was manufactured using sustainable materials. It must be disposed of responsibly at the end of its life cycle. The local authorities can provide you with the relevant information.
The packaging of this appliance is recyclable. It may have been made from:
- cardboard;
• polythene film (PE);
• CFRP-free polystyrene (PS hard foam).
You need to dispose of these materials responsibly in accordance with official regulations.
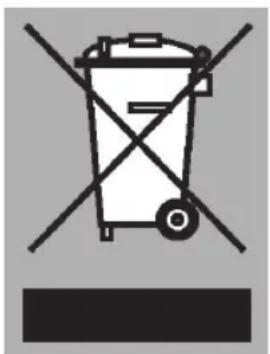
To draw attention to the fact that the segregated processing of household electrical appliances is compulsory, this appliance carries the symbol of a crossed-out dustbin. This means that you may not dispose of the appliance as household refuse at the end of its useful life. Instead, it should be taken to a special segregated refuse collection centre run by the local authority or to a dealer providing this service.
Segregated processing of household appliances prevents any negative impact on the environment and public health that might otherwise arise. It allows the recovery of the materials used to manufacture this appliance, thus generating considerable savings in terms of raw materials and energy.
CE
Declaration of conformity
We declare that our products meet the applicable European Directives, Decisions and Regulations and the requirements listed in the standards referenced.
Pelgrim

812162


- REINIGEN
- LET OP
- NETTOYAGE
- ATTENTION
- REINIGUNG
- ACHTUNG
- PLASMAFILTER [OPTIONAL]
- INTRODUCTION
- PLEASE READ THE SEPARATE SAFETY INSTRUCTIONS CAREFULLY BEFORE USING THE APPLIANCE
- DESCRIPTION
- REMOTE CONTROL
- CONTROLS
- CONNECTING THE REMOTE CONTROL TO THE APPLIANCE
- ADJUSTING THE EXTRACTOR CAPACITY
- SWITCHING LIGHTING ON AND OFF
- DIMMING THE LIGHTING
- DELAYED SHUT OFF
- CLEAN AIR FUNCTION
- FILTER SATURATION SIGNAL
- RESETTING THE SATURATION SIGNAL
- SWITCHING OVER THE APPLIANCE TO AIR RECIRCULATION
- SWITCHING OVER THE APPLIANCE TO AIR EXTRACTION
- BATTERY REPLACEMENT
- CLEANING
- METAL GREASE FILTERS
- GREASE FILTER
- REMOVING CASSETTE FILTER
- REPLACING CASSETTE FILTER
- CARBON ODOURFILTER [OPTIONAL]
- PLASMA FILTER [OPTIONAL]
- LIGHTING
- DISPOSAL
- DISPOSAL OF APPLIANCE AND PACKAGING
- DECLARATION OF CONFORMITY
Brand : Pelgrim
Model : OSW1080RVS
Category : Range hood