
PSK965 - Range hood Pelgrim - Free user manual and instructions
Find the device manual for free PSK965 Pelgrim in PDF.


| Product Type | Decorative Extractor Hood |
| Brand | Pelgrim |
| Model | PSK965 |
| Installation Type | Wall-mounted, with extendible telescopic tube |
| Modes of Operation | Exhaust (external ducting) or recirculation (with active carbon filters) |
| Minimum Distance from Hob | 66 cm |
| Motor Speeds | 4 (0, 1st, 2nd, 3rd) |
| Controls | 4-position switch for motor, separate light switch |
| Lighting | Oval bulb, max 40 W |
| Grease Filters | Removable, dishwasher-safe (monthly cleaning recommended) |
| Active Carbon Filters | Optional, replace every 3 months (depends on usage) |
| Exhaust Connection Diameter | 120 mm (supplied plastic conical outlet); 125 mm recommended for better performance |
| Electrical Connection | Plug or omnipolar switch with min. 3 mm contact opening |
| Voltage / Frequency | Refer to rating plate inside product |
| Compliance | EC Directives 76/889/EEC and 82/499/EEC on radio interference |
| Dimensions (Approx.) | Not specified; typical width 90 cm, depth 50 cm, height adjustable via telescopic tube |
| Weight | Not specified; typical ~15-25 kg |
| Maintenance | Clean external panels with mild liquid detergent; avoid abrasives |
| Safety Warnings | Do not connect to chimney or ventilation pipes; ensure adequate ventilation when used with other appliances; never leave frying unattended |
| Spare Parts | Grease filters, active carbon filters, light bulb (oval, 40W max), telescopic tube parts |
Frequently Asked Questions - PSK965 Pelgrim
User questions about PSK965 Pelgrim
0 question about this device. Answer the ones you know or ask your own.
Ask a new question about this device
Download the instructions for your Range hood in PDF format for free! Find your manual PSK965 - Pelgrim and take your electronic device back in hand. On this page are published all the documents necessary for the use of your device. PSK965 by Pelgrim.
USER MANUAL PSK965 Pelgrim
The symbol ☑ on the product or on its packaging indicates that this product may not be treated as household waste. Instead it shall be handed over to the applicable collection point for the recycling of electrical and electronic equipment. By ensuring this product is disposed of correctly, you will help prevent potential negative consequences for the environment and human health, which could otherwise be caused by inappropriate waste handling of this product. For more detailed information about recycling of this product, please contact your local city office, your household waste disposal service or the shop where you purchased the product.
NL
Use and handling instructions
Home Products Service
2
(

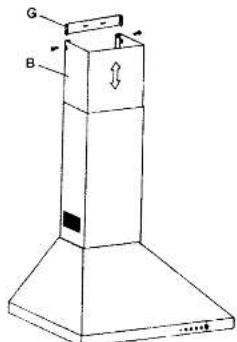
Fig.5
(

Fig.2

Fig.4

Fig.6
3
GBNGLISH
ECORATIVE EXTRACTOR HOODS ear client:
le are sure that the purchase of our extractor hood will fully satisfy all of your needs. Please read this instruction manual carefully in order to obtain the best results from the use of we hood.
STRUCTIONS FOR INSTALLATION, MAINTENANCE NO USE
ENERAL INDICATIONS
Before installing and using the hood, be sure that the voltage (V) and the frequency (Hz) indicated on the feature plate at the voltage and frequency at the installation site. The feature plate and technical data are shown on the inside of the product.
his hood is equipped with an extendible tube which allows to be adjusted to the height of the stove.
INSTALLATION
he hood can be installed to work in two different ways: there is a possibility of installing the hood with an exhaust pipe to the outside, it will be used in Exhaust mode. If this possibility does not exist, the hood will be used in Filtering mode whereby air is recirculated by active carbon filters.
[Unreadable]
the hood is to be installed as a exhaust hood, connect the plastic conical outlet piece supplied with the hood (120 mm diameter) to an exhaust pipe connected directly to the outside. (Fig. 1).
We recommend the use of the 125 mm diameter pipe for better performance and lower noise levels.
Filter
This hood can be transformed into an air purifier if there is no possibility of connecting it to the outside.
n this case, air is circulated through opening F (Figure 2). In order for the hood to function as a filtering purifier, two acti-
ve carbon filters. Which need to be ordered as Separate accessories must be used. The active carbon filters must be replaced periodically to work properly, at least once even three months (depending on the frequency with which the hood is used) (Fig. 4).
NOTE: Do not connect the hood to chimneys, ventilation pipes or hot air pipes. Before connecting any pipes, consult municipal ordinances on exhaust air and request permission from the person in charge of the building. Be sure there is adequate ventilation, even in cases where the hood is to be used simultaneously with another product.
Wall mounting
- The accessories needed to install the hood are inside the hood.
- The hood must be installed at a minimum distance of 66 cm from the stove.
- Place the attached _g in the location where the hood is to be mounted and attach with adhesive tape.
- Drill holes in the wall using a 6 mm drill bit.
- The plugs and screws needed to hang the hood are contained in the bag of accessories supplied with the hood.
Electrical connection
Connect the cord to a socket or omnipolar switch which must have a minimum contact opening distance of 3 mm.
The manufacture shall not be liable in the event that all safety regulations in force for the correct and normal operation of electrical parts are not observed.
This hood complies with European Directives EG No. 76/889 EEC and 82/499 EG on protection against radial interference.
Assembly of Decorative Extendible Tube
- Mark the wall at the location of support E (Figure 2) according to the heights and specifications shown on the attached jig.
- Drill holes in the wall, place plugs in the holes and attach support E with screws.
- Place tube A with the extendible part B hanging on the inside, making sure that flange D is correctly lodged in the support E(Fig.2).
(
- Next, secure support G to the upper end of the wall, making sure that it is properly aligned with the extendible tube. Extend the movable part of tube B until it reaches support G and connect to the support with the two side screws. (Fig. 5).
CONTROL PANEL
This panel is located on the front or bottom side of the hood and includes.
- 4 position switch controls the motor0.1st, 2nd, and 3rd speed) (Figure 6, Ref. D).
- Control lamp for motor operation (Fig. 6. Ref. E).
- Light switch (Figure 6, Ref. F).
MAINTENANCE
- Cleaning
Before any type of operation, always make sure that the electrical cord is disconnected and the switch is in the off position.
Clean the external pan with a mild, liquid detergent and avoid the use of abrasive cleaning products.
- Changing the light
Before changing the light make sure that the hood is not connected.
Remove the grease filter (Figure 3) and replace the light with an oval light bulb of no more than 40 W.
Place the filter in position.
- Cleaning the grease filter.
Depending on use, and at least once a month, the grease filters should be disassembled (Figure 3) and cleaned in a dishwasher or with hot soapy water.
If washed in a dishwasher they should be placed in an upright position to prevent food remains from fading on them.
After rinsing and drying, replace the filters by following the steps for disassembly in reverse order.
ATTENTION
when cleaning the grease filters in the dishwasher it is possible the filters change colour or become Dull. This is not covered by the warranty.
IMPORTANT
Never leave frying food unattended since grease can overheat and catch fire. The risk of fire is even greater in the case of used oil.
Never use the hood in areas where devices with exhaust pipes connected to the outside are already operating unless perfect ventilation can be guaranteed.
To avoid the possibility of fire, adhere strictly to all of the recommendations included here and to the periodic cleaning of the grease filters.
THE MANUFACTURER DECLINES ALL LIABILITY IN CASES WHERE THE INSTRUCTIONS FOR THE APPROPRIATE INSTALLATION, MAINTENANCE AND USE OF THE EXTRACTOR HOOD ARE NOT OBSERVED.
When the power supply cord is damaged it must be replaced by an official dealer.
NL NEDERLANDS
DECORATIEVE AFZUIGKAP
Geichte Ident:


