
Gazooka 2.OT 10033532 - Grill Klarstein - Free user manual and instructions
Find the device manual for free Gazooka 2.OT 10033532 Klarstein in PDF.


| Product Type | Outdoor Gas Grill |
| Brand | Klarstein |
| Model | Gazooka 2.OT 10033532 |
| Number of Burners | 2 |
| Total Power Output | 6 kW (approx) |
| Cooking Area | Approx. 2600 cm² |
| Ignition | Electronic piezo ignition |
| Temperature Control | Adjustable via control knobs |
| Warming Rack | Yes, included |
| Main Housing Material | Stainless steel / powder-coated steel |
| Cooking Grate Material | Cast iron with enamel coating |
| Dimensions (L x W x H) | 110 x 60 x 110 cm |
| Weight | Approx. 15 kg |
| Fuel Type | Propane gas (liquid petroleum gas) |
| Gas Regulator Included | Yes, 30 mbar |
| Assembly Required | Yes, with manual |
| Cleaning Method | Remove grate and burner covers; wash with warm soapy water |
| Safety Features | Gas shut-off valve, flame failure safety device |
| Spare Parts Availability | Available for order online |
| Warranty | 2 years |
Frequently Asked Questions - Gazooka 2.OT 10033532 Klarstein
User questions about Gazooka 2.OT 10033532 Klarstein
0 question about this device. Answer the ones you know or ask your own.
Ask a new question about this device
Download the instructions for your Grill in PDF format for free! Find your manual Gazooka 2.OT 10033532 - Klarstein and take your electronic device back in hand. On this page are published all the documents necessary for the use of your device. Gazooka 2.OT 10033532 by Klarstein.
USER MANUAL Gazooka 2.OT 10033532 Klarstein
bar
| Category | Value | |---|---| | Category 1 | 100 | | Category 2 | 100 | | Category 3 | 100 | | Category 4 | 100 | | Category 5 | 100 | | Category 6 | 100 | | Category 7 | 100 | | Category 8 | 100 | | Category 9 | 100 | | Category 10 | 100 | | Category 11 | 100 | | Category 12 | 100 | | Category 13 | 100 | | Category 14 | 100 | | Category 15 | 100 | | Category 16 | 100 | | Category 17 | 100 | | Category 18 | 100 | | Category 19 | 100 | | Category 20 | 100 | | Category 21 | 100 | | Category 22 | 100 | | Category 23 | 100 | | Category 24 | 100 | | Category 25 | 100 | | Category 26 | 100 | | Category 27 | 100 | | Category 28 | 100 | | Category 29 | 100 | | Category 30 | 100 | | Category 31 | 100 | | Category 32 | 100 | | Category 33 | 100 | | Category 34 | 100 | | Category 35 | 100 | | Category 36 | 100 | | Category 37 | 100 | | Category 38 | 100 | | Category 39 | 100 | | Category 40 | 100 | | Category 41 | 100 | | Category 42 | 100 | | Category 43 | 100 | | Category 44 | 100 | | Category 45 | 100 | | Category 46 | 100 | | Category 47 | 100 | | Category 48 | 100 | | Category 49 | 100 | | Category 50 | 100 | | Category 51 | 100 | | Category 52 | 100 | | Category 53 | 100 | | Category 54 | 100 | | Category 55 | 100 | | Category 56 | 100 | | Category 57 | 100 | | Category 58 | 100 | | Category 59 | 100 | | Category 60 | 100 | | Category 61 | 100 | | Category 62 | 100 | | Category 63 | 100 | | Category 64 | 100 | | Category 65 | 100 | | Category 66 | 100 | | Category 67 | 100 | | Category 68 | 100 | | Category 69 | 100 | | Category 70 | 100 | | Category 71 | 100 | | Category 72 | 100 | | Category 73 | 100 | | Category 74 | 100 | | Category 75 | 100 | | Category 76 | 100 | | Category 77 | 100 | | Category 78 | 100 | | Category 79 | 100 | | Category 80 | 100 | | Category 81 | 100 | | Category 82 | 100 | | Category 83 | 100 | | Category 84 | 100 | | Category 85 | 100 | | Category 86 | 100 | | Category 87 | 100 | | Category 88 | 100 | | Category 89 | 100 | | Category 90 | 100 | | Category 91 | 100 | | Category 92 | 100 | | Category 93 | 100 | | Category 94 | 100 | | Category 95 | 100 | | Category 96 | 100 | | Category 97 | 100 | | Category 98 | 100 | | Category 99 | 100 | | Total (Total) = [sum of two separate bars] * [sum of the bars] * [values from the 'bar' in the 'box' table] * [values from the 'box' table] * [values from the 'box' table] * [values from the 'box' table] * [values from the 'box' table] * [values from the 'box' table]. The sum of the bars is calculated by subtracting the sum of the bars from the 'box' table. Note: The total bar length is based on the sum of the bars. The sum of the bars is calculated as the sum of the bars. The sum of the bars is derived from adding the sum of the bars to the total bar length. The sum of the bars is derived from adding the sum of the bars to the total bar length. The sum of the bars is derived from adding the sum of the bars to the total bar length. The sum of the bars is derived from adding the sum of the bars to the total bar length. The sum of the bars is derived from adding the sum of the bars to the total bar length. The sum of the bars is derived from adding the sum of the bars to the total bar lengths.text_image
QR code image containing encoded data, no visible human-readable textINHALT
Technische Daten 4
natural_image
Simple line drawing of a U-shaped object with shaded sections (no text or symbols)
natural_image
Mechanical assembly diagram showing a lever mechanism with labeled components (A, B) and motion indicators (no text or symbols present)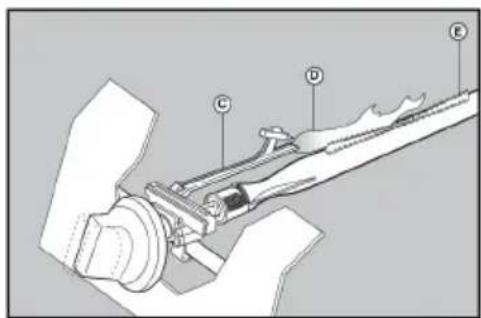
text_image
Technical diagram of a mechanical assembly with labeled parts C, D, and E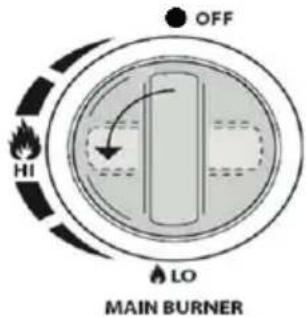
text_image
OFF HI LO MAIN BURNER
Congratulations on purchasing this equipment. Please read this manual carefully and take care of the following hints to avoid damages. Any failure caused by ignoring the items and cautions mentioned in the instruction manual are not covered by our warranty and any liability. Scan the QR code to get access to the latest user manual and other information about the product.

text_image
QR code image containing encoded data, no visible human-readable textCONTENTS
Technical Data 22
Safety Instructions 23
Installation 26
Use 29
Cleaning and Care 32
Troubleshooting 33
Installation 39
TECHNICAL DATA
| Item number | 10033532 | ||||
| Description | Outdoor gas grill | ||||
| Appliance Category | I3+(28-30/37) ☐ I3B/P(37) ☐ I3B/P(30) ☐ | I3B/P(50) ☑ | |||
| Gas type | Butane Propane Butane/Propane | Butane/Propane | Butane/Propane | ||
| Gas pressure (mbar) | 28-30 37 | 37 28-30 | 50 | ||
| Injector size (mm)Main burner | 0.86 0.8 | 6 0.82 0.86 | 0.75 | ||
| Total heat input | 6 kW(436 g/h) | 6 kW(428 g/h) | 6 kW(436 g/h) | 6 kW(436 g/h) | 6 kW(436 g/h) |
| I3 + (28-30/37) | BE, FR, IT, LU, IE, GB, GR, PT, ES, CY, CZ, LT, SK, CH, SI, LV | ||||
| I3B/P (30) | LU, NL, DK, FI, SE, CY, CZ, LT, MT, SK, SI, BG, IS, NO, TR, HR, RO, IT, HU, LV | ||||
| I3B/P(37) | PL | ||||
| I3B/P (50) | AT, DE, CH, LU, SK | ||||
| PIN number | 0063CN7292 | ||||
| Important Notes | Use Outdoors OnlyRead the instructions before using the appliance.Warning : Accessible parts may be very hot. Keep young children away. | ||||
Chal-Tec GmbH
Wallstraße 16
10179 Berlin
Germany

0063-19
a) Choose the proper regulator according to appliance category and gas pressure in the table above, for example, Use 37mbar regulator with appliance category 13+ for propane gas.
b) Marking on injector, for example, 0.82 indicates that the size of the injector is 0.82mm.
Remark: -SB means with side burner; Allow to put a pan on the side burner. (The diameter of pan is max 24cm and mix 8cm ), -BB means with back burner;
READ ALL INSTRUCTIONS AND OPERATIONS BEFORE OPERATING THIS UNIT.
FOLLOW ALL STEPS IN ORDER. NEVER ALLOW CHILDREN TO OPERATE THIS UNIT.
• Only to be used outdoors.
- Read the instructions before using the appliance.
- Accessible parts maybe very hot, keep young children away.
- Do not move the appliance during use.
- Turn off the gas supply at the gas cylinder after use.
- Any modification of the appliance may be dangerous.
- Parts sealed by the manufacturer or his agent must not be altered by the user.
- Do not modify the appliance.
- Do not store or use gasoline or mentholated fuels or any other flammable vapors and liquids in the vicinity of this or any other appliance.
- Never light a gas grill with gasoline or comparable fluids!
- Certain Liquid gas dealers may fill liquid gas cylinders for use in the grill beyond cylinder filling capacity. This "Overfilling" may create a dangerous condition. "Overfilling" tanks can build up excess pressure. As a safety device, the tanks pressure relief valve will vent gas vapor to relieve this excess pressure. This vapor is combustible and therefore can be ignited. To reduce this danger, you should take the following safety precautions:
- When you have your tank filled, be sure you tell the supplier to fill it to no more than 80% of its total capacity.
- If you own or use an extra spare tank, or have a disconnected tank, you should never store it near or under the grill unit or heat box, or near any other ignition or heat source.
- If you own or use an extra spare tank, or have a disconnected tank, you should never store it near or under the grill unit or heat box, or near any other ignition or heat source.
- When the wind speed is above 2m/s, don't use gas grill facing to the wind.
- The appliance is designed for use outdoors only.
- Warning! Accessible parts may be very hot. Keep young children away.
- Read the instructions before using the appliance.
- Do not move the appliance while in use.
- Turn off the appliance at the cylinder valve or regulator after use.
- Any modification to the appliance may be dangerous and may cause injury or property damage.
- The parts sealed by the manufacturer or his agent shall not be manipulated by the user.
- Any unauthorised modification of the appliance will invalidate the guarantee on this appliance.
- Do not modify the appliance.
- Never mount the cylinder under the barbecue on the base shelf as this could result in serious injury to the user, other people and/or property.
- Use protective gloves when handling particularly hot components.
- The appliance must not have any overhead obstruction. E.g. trees, shrubs, lean
to roofs. The appliance must be installed with a clearance of 1 m around the appliance.
- The appliance must not be used near flammable materials. (Petroleum based products, thinners or any other solid object that carries a flammable warning label.)
- Close the valve of the gas cylinder or the regulator after use.
- The use of this appliance in enclosed areas can be dangerous and is prohibited.
- Check the hose before each use, searching for cracking, cuts or any abrasions. If the hose is found to be faulty in any way do not attempt to use your gas grill.
- When changing your gas bottle ensures that there are no sources of ignition close by i.e. fires, cigarettes, naked flames etc. Make sure that the appliance is switched off.
- In the event of a gas leak, Turn off the gas supply at the gas bottle, extinguish any open flames, open lid and if leak continues, check for damages, poor connections etc. Contact your local gas dealer immediately if the problem cannot be solved.
- Do not use a naked flame to check for gas leaks.
- Care is advised when operating your gas grill, you should never leave unattended when in use. Turn off the gas supply at the gas container after use.
- The gas grill should be cleaned after use. Don't obstruct the fire opening of the container compartment. If the fire opening is obstructed, please use 1.6mm round stick to dredge.
- Take care not to enlarge burner ports or orifice/nozzle openings when cleaning the burner or valves.
- We would recommend that this gas grill should be serviced by your local gas retail outlet at least once a year by a competent engineer. Do not attempt to service this appliance yourself.
- Always test gas line for leaks at connector with soapy water after making connections.
• The top lid must always be open when lighting the burner.
- Use oven gloves and sturdy, long handled gas grill tools when cooking on the grill.
- Be prepared if an accident or fire should occur. Know where the first aid kit and fire extinguishers are and know how to use them.
- Keep any electrical supply cord and the fuel supply hose away from any heated surfaces.
• Always cook with great care.
- Do not heat any unopened glass or metal container of food on the grill. Pressure may build up and cause the container to burst, possibly resulting in serious personal injury or damage to the grill.
• This grill has been made to high quality standards.
- NOTE: The use and installation of this product must conform to local codes.
• This grill is for use with gas only.
- Do not attempt to move the grill while it is lit.
- Do not use the grill unless it is completely assembled and all parts are securely fastened and tightened.
- Keep all combustible items and surfaces at least 36 inches (91.4cm) away from grill at all times.
- DO NOT use this grill near unprotected combustible constructions.
- Do not use in an explosive atmosphere. Keep grill area clear and free from combustible materials, gasoline and other flammable vapors and liquids.
- Do not touch metal parts of grill until it has completely cooled (about 45 minutes) to avoid burns, unless you are wearing protective gear (BBQ mittens, pot holders, etc.) any other enclosed area.
- The use of alcohol, prescription or non-prescription drugs may impair the operator's ability to properly assemble or safely operate the grill.
- Always open grill lid slowly and carefully as heat and steam trapped within the grill can burn you severely.
- Always place your grill on a hard, level surface far away from combustibles. An asphalt or blacktop surface may not be acceptable for this purpose.
- Do not leave a lit grill unattended. Keep children and pets away from the grill at all times.
- Do not place this grill on any type of tabletop surface.
- Do not use the grill in high winds.
INSTALLATION
- Choose the proper regulator according to appliance category and gas pressure in the table above, for example, Use 37 mbar regulator with appliance category 13+ for propane gas.
- Marking on injector, for example, 0.82 indicates that the size of the injector is 0.82 mm.
Remark:
- SB means with side burner; Allow to put a pan on the side burner. (The diameter of pan is max ∅ 24cm and mix ∅ 8cm), -BB means with back burner.
Mounting steps
Make sure your grill is assembled properly. Detailed assembly instructions are packed with each grill giving specific assembly procedures for each model. Follow these instructions carefully to ensure the correct and safe assembly of the grill.
Caution: Although we take every effort to ensure that the assembly process is as easy as possible, it is inherent with fabricated steel parts that corners and edged can cause cuts if improperly handled during assembly procedures. Be careful while handling any parts during assembly. It is strongly recommended that you protect hands with a pair of work gloves.
3. Preparation
- You will need LPG gas bottle and proper regulators under the gas pressure to operate this gas grill. The regulators should be comply with EN12864 with current version and national regulation.
- After purchasing your gas cylinder you will then be ready to set it up with your gas grill.
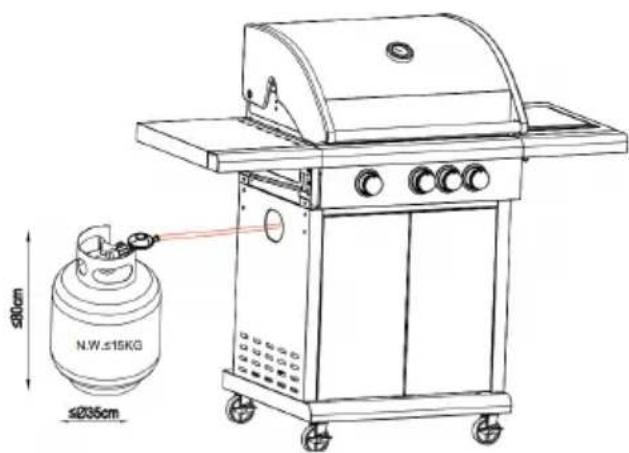
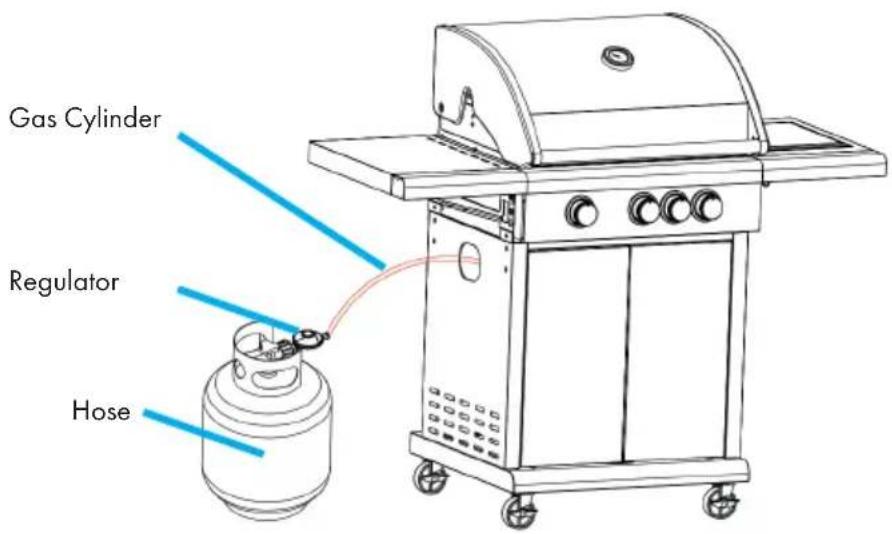
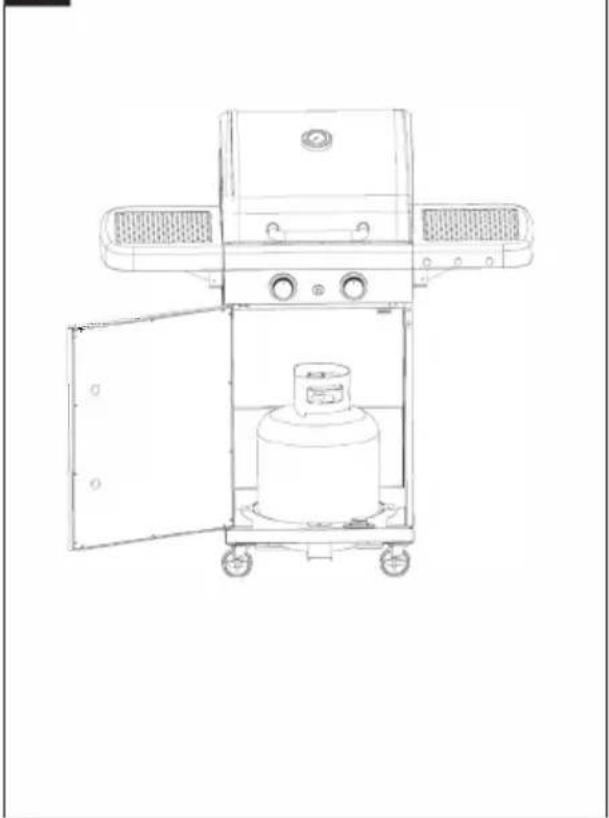
- When changing the gas cylinder which shall be carried out away from any source of ignition. Position the gas cylinder at left side or inside of your BBQ, keeping in mind that the bottle must be kept away from heat and in a safe position.
- When ready to use your gas grill insert the regulator into the gas bottle valve and tighten firmly.

Warning
Danger of fire
Before attempting to light your gas grill you must refer to your lighting instructions and warning / safety points.
Check the hose before each use, searching for cracking, cuts or any abrasions. If the hose is found to be faulty in any way do not attempt to use your gas grill.
When changing your gas bottle ensures that there are no sources of ignition close by i.e. fires, cigarettes, naked flames etc. Make sure that the appliance is switched off..
- Please choose flexible hose whose heatproof higher than 80
- Flexible tube should be changed every 2 years; It's necessary to change the flexible tube when the national conditions require it.
How to change your cylinder
Note: Turn off the switch of cylinder (No spanner is required).
If put the gas cylinder outside the grill, The height of the gas cylinder is below the 80cm, and the width is within 35 cm, Net weight of gas cylinder should not be more than 11kg.
text_image
≤30cm ≤2035cm N.W.≤15KGHow to connect a gas bottle
- Turn the orange cap so that the arrow is pointing to the gap in the shroud.
- Remove the orange safety cap by pulling the lanyard out, then out. Do not use tools. Leave the cap hanging.
- Check that the black sealing washer is fitted inside the cylinder valve. Connect the regulator to the valve.
- Turn the switch clockwise on gas bottle-then turn on the gas grill as instructed.
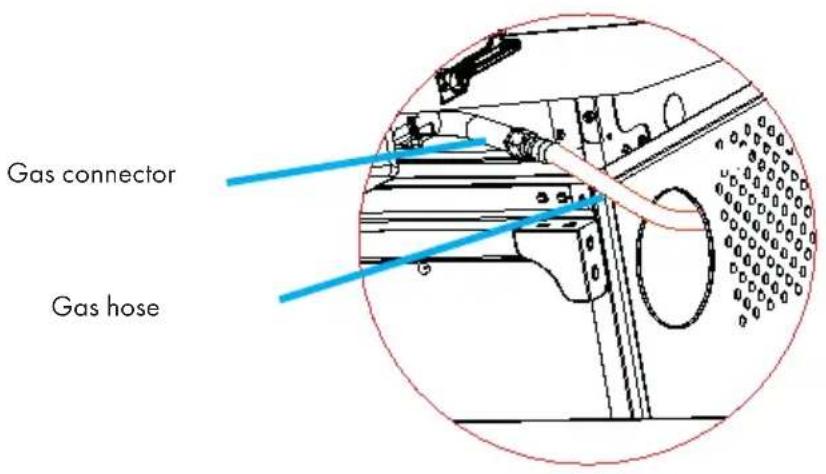
Illustration for the connection of BBQ and Hose
text_image
Gas connector Gas hoseIllustration for the connection of Gas Cylinder, Regulator and Hose
text_image
Gas Cylinder Regulator Hose
Warning Danger of burning
Always test gas line for leaks at connector with soap water finishing all connections.
How to disconnect a gas bottle
- Except for twin-cylinder installations with a changeover valve, turn off the gas tap if fitted to the appliance. Wait until the burner and pilot light have gone out. For installations with a changeover valve, it is only necessary to switch off the empty cylinder.
- Replace the orange safety cap onto the empty cylinder.

natural_image
Simple line drawing of a U-shaped object with shaded sections (no text or symbols)
Warning
Danger of scalding
The handle black area (see above picture for reference) will become hot when the gas grill in use, be careful! Do not touch the black area.
USE
Energy saving tips
- Reduce the opening time of the lid.
- Turn the grill off as soon as cooking is completed.
- Preheat the gas grill for 10 to 15 minutes only. (Except for the first use)
- Do not preheat longer then recommended.
- Do not use a higher setting than required.
- Connect the hose and regulator to the gas container at the left side of the gas grill. Keeping in mind that the gas container must be kept away from heat and in a safe position. The hose dimension is 8-10mm diameter. The Length of hose recommended which shall not exceed 1.5 m.
- The barbecue has to be installed on a secure level base prior to use.
- The barbecue shall be heated up and the fuel kept red hot for at least 30 min prior to the first cooking.
- Do not cook before the fuel has a coating of ash.
- Do not use spirit or petrol for lighting or re-lighting! Use only firelighters complying to EN 1860-3.
Lighting instructions

Warning Danger of fatal burning
The lid must be open when lighting the burner! Do not stand with your face directly over the gas grill when lighting it.
Your gas grill will have following method of ignition.
Pilot Gas Control Ignition(Main burner or main burner with side burner or main burner with side burner and back burner)
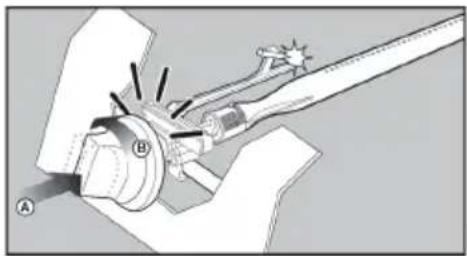
With all gas controls on the Gas grill in the "OFF" position "● OFF", turn the gas cylinder valve to the on position at the regulator. To create a spark you must press the gas control knob (A) and hold in this position for 3-5 seconds to allow gas flow and then turn anticlockwise to" HI" (B). It can spark to the burner lighting tube (C). You will hear a "snap" from the igniter and you will also see a orange flame coming from the burner lighting tube at the left side of the burner (D).
Continue to hold the gas control knob in for two seconds after the "snap", this will allow gas to flow completely down the burner tube (E) and insure ignition.
When the burner is alight, adjacent burners will cross light when their controls are turned to "HI". At "HI" setting the burner flame should be approximately 12-20mm long with a minimum of orange flame. Turn the gas control knob fully anticlockwise for minimum setting.
Should you have any difficulty lighting your gas grill following the above steps, contact your dealer for advice.
If the automatic ignition can't be used, please remove the cooking grill and heat diffuser(hotplate), and turn the valve anticlockwise to 90^ Cto light with BBQ lighter in the distance of 5mm to the burner fire hole. Replace the cooking grill and heat diffuser (hotplate), please wear the fireproof and heat resisting gloves.
natural_image
Technical diagram of a mechanical assembly with labeled parts A and B (no text or symbols beyond labels)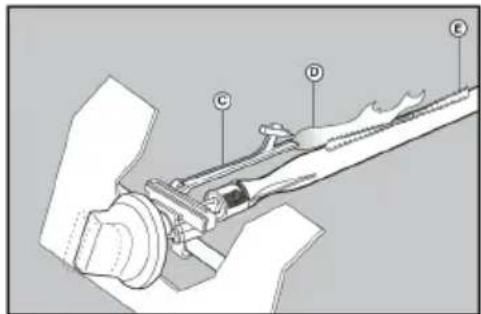
text_image
Technical diagram of a mechanical assembly with labeled components A, B, C, D, and E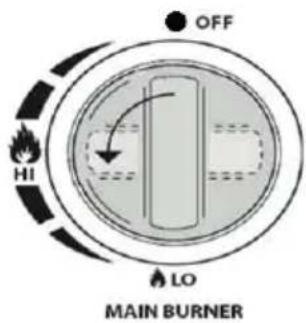
text_image
OFF HI LO MAIN BURNER
Warning
Danger of deflagration
If the burner still does not light, turn the gas control knob to "OFF" and wait for 2 minutes for the unburnt gas to evaporate before lighting again.
CLEANING AND CARE
Cleaning
- Maintenance is recommended that every 90 days for your gas grill, but it is absolutely necessary to perform maintenance at least once a year. By doing so, you will extend the life of your gas grill.
- Your gas grill is easy to clean with minimum effort, just follow these helpful hints for cleaning convenience:
- Turn the burner on for 15 to 20 minutes. Ensure appliance is cold before continuing.
- Grids should be cleaned periodically by soaking and washing in soapy water.
- The interior surfaces of the grill housing cover should also be washed with hot, soapy water. Use a wire brush, steel wool or a scouring pad to remove stubborn spots.
- Periodically check the burner to see that it is free from insects and spiders which may clog the gas system, deflecting gas flow. Ensure to clean venturi pipes on burner very carefully, make sure that there are no obstructions. We recommend that you use a pipe cleaner to clean the venturi pipe area.
- Any modifications of this appliance may be dangerous and are not permitted.
Lagerung
- Your Gas Bottle must be stored outdoors in a well ventilated area and must be disconnected from your gas grill when not being used. Ensure that you are outdoors and away from any sources of ignition before attempting to disconnect your gas bottle from your gas grill.
- When you are using your gas grill after a period of storage, please ensure to check for gas leaks and check for any obstructions in the burner etc. before using. Also follow the cleaning instructions to ensure gas grill is safe.
- If gas grill is stored outdoors ensure to check that all areas under the front panel are free from any obstructions (insects etc.) This area must be kept free as this may affect the flow of combustion or ventilation air.
TROUBLESHOOTING
| Problem Possible Reason | Solution | |
| Gas leaking from cracked/cut/burned hose | Damaged hose Turn off gas | at LP tank,if hoes is cut or cracked,replace hose.See LP tank lead test and connection regulator to the LP tank |
| Gas leaking from LP tank | Mechanical failure due to resting or mishandling | Turn off LP tank valve |
| Gas leaking from LP tank valve | .Failure or tank valve from mishandling or mechanical failure | Turn off LP tank valve. Re-turn LP tank to gas supplier |
| Gas leaking between LP tank and regulator connection | Improper installation, connection not tight,failure of rubber seal | Turn off LP tank valve,remove regulator from cylinder and visually inspect rubber seal for damage, see LP tank test and connection regulator to the LP tank |
| Fire coming through control panel | Fire in burner tube section of burner due to partial blockage | Turn off control knobs and LP tank valve.After fire is out and grill is cold, remove burner and inspect for spider nests or rust. see natural hazard and cleaning the burner assembly pages. |
| Grease fire or continuous excessive flames above cooking surface | Too much grease buildup in burner area | Turn off LP Tank. Leave lid open to allow flames to die down. After cooling,clean food particles and excess grease from inside firebox area,grease cup/pan/tray,and other surfaces |
| Burner will not light using ignitor(Gas issues) | 1.Trying to light wrong burner | 1. See instructions on control panel and section in the Use and Care. |
| 2. Burner not engaged with control valve | 2. Make sure valve are positioned inside of burner tubes. | |
| 3. Obstruction in burner 3. | Ensure burner tubes are not obstructed with spider webs or other matted, see cleaning section of use and care | |
| 4.No gas flow 4.Make sure | LP tank is not empty. If LP tank is not empty, refer to “sudden drop in gas flow. | |
| 5.Vapor lock at coupling nut to LPtank | 5.Turn off knobs and disconnect coupling nut from LP tank. Reconnect and retry. | |
| 6. Coupling nut ad LP tank valve not fully connected. | 6. Turn the coupling nut approximately one-half to three-quarters | |
| Burner will not light using ignitor (Electrical issues) | 1. Electrode cracked or broken;" sparks at crack." | 1. Replace electrode. |
| 2. Electrode tip not in proper position | 2. Tip of electrode should be pointing toward port hole in burner. The distance should be 1/8" to 3/16". Adjust if necessary. | |
| 3. Wire and/or electrode covered with cooking residue. | 3. Clean wire and or electrode with rubbing alcohol and clean swab. | |
| 4. Wires are loose or disconnected | 4. Reconnect wires or replace electrode/ wire assembly. | |
| 5. Wires are shorting (sparking) between ignitor and electrode. | 5. Replace ignitor wire | |
| 6. push button sticks at bottom sparking between ignitor and electrode | 6. Replace ignitor | |
| 7. Wire insulation might be broken | 7. Inspect wire insulation and proper connec- tion. Replace wires if insulation is broken. | |
| Burner will not mach light | 1. See "gas issues;" on previous page. 2. Improper method of match-lighting | See "Pilot Gas Con- trol Ignition" section of use and care. |
| Sudden drop in gas flow or low flame | 1. Grease buildup. . Clean burners and inside of grill/ firebox | |
| 2. Excessive fat in meat. 2. Trim fat from meat before grilling. | ||
| 3. Excessive cook- ing temperature | 3. Turn down the cook- ing temperature | |
| Flames blow out | High or gusting winds Turn front of grill to face wind or increase flame height. | |
| Low on LP gas. Refill LP tank | ||
| Excess flow valve tripped. Refer to “sudden drop in gas flow” above | ||
| Persistent grease fire | Grease trapped by food buildup around burner system. | Turn knobs to OFF. Turn gas off at LP tank. Leave lid in position and let fire burn out. After grill cools, remove and clean all parts |
| Flashback (fire in burner tube(s)) | Burner and burner tubes are blocked | Turn knobs to OFF. clean burner and/or burner tubes. See burner cleaning section of use and care manual |
| Flare-up | 1. Grease buildup. 1. Clean burners and inside of grill/ firebox | |
| 2. Excessive fat in meat. 2. Trim fat from meat before grilling. | ||
| 3. Excessive cooking temperature | 3. Adjust (lower) temperature | |
| Unable to fill LP tank | Some dealers have older fill nozzles with worn threads. | Turn worn nozzles don't have enough “bite” to engage the valve. Try a second LP dealer. |
| One burner does not light from other burner(s) | Grease buildup or food particles in end of carryover tube | Clean carry-over tube with wire brush |

Manufacturer: Chal-Tec GmbH, Wallstraße 16, 10179 Berlin. Germany
This product conforms to the following European Directives and Regulations:
2009/142/EC (appliances burning gaseous fuels)
| KLARSTEIN | 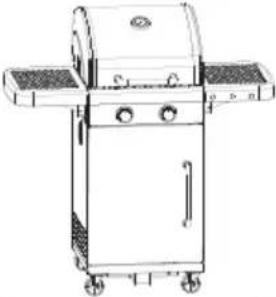 |  |  |
 |  | ||
 | [TC20] | ||
 | [OX60] | ||
| [SBXZ] | [3S40] | ||
 | [38TT] | ||
 |  | ||
| [8T22] | [DCA0] | ||
| [0CD5] | [4621] | ||
 |  | ||
 |  | ||
 | [4091] | ||
 |  | ||
| [4070] | [4027] | ||
| [XBDY] | [02C3] | ||
| [4070] | [TYX0] | ||
 |  | ||
| [4070] | [4027] | ||
| A M5-10*45 | B M4-8*2 | ||
| [4070] | [4027] | ||
| [434T] | [3YBA] | ||
 |  | ||
| [0KT3] | [K4BB] | ||
| [0165] | [4091] | ||
 |  | ||
 | [4091] | ||
 | [44WS] |
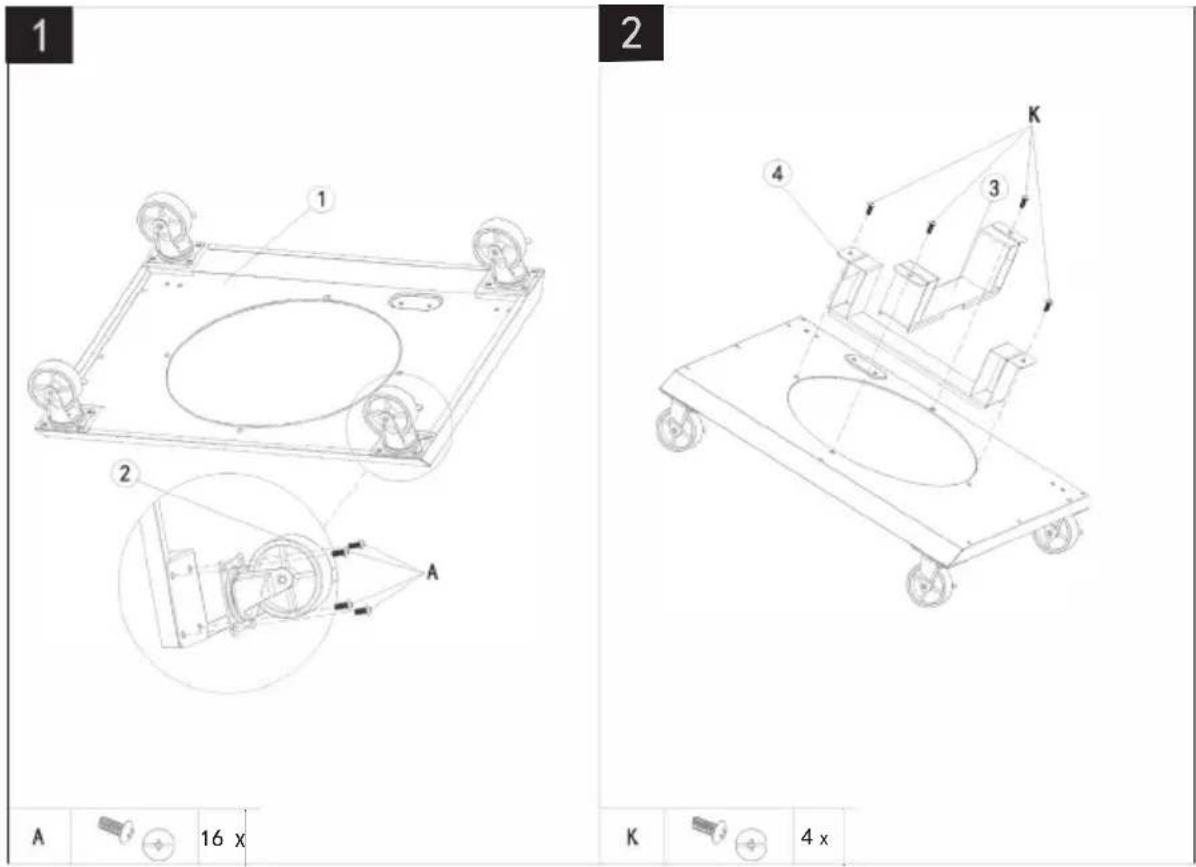
text_image
1 2 A 16 x K 4 x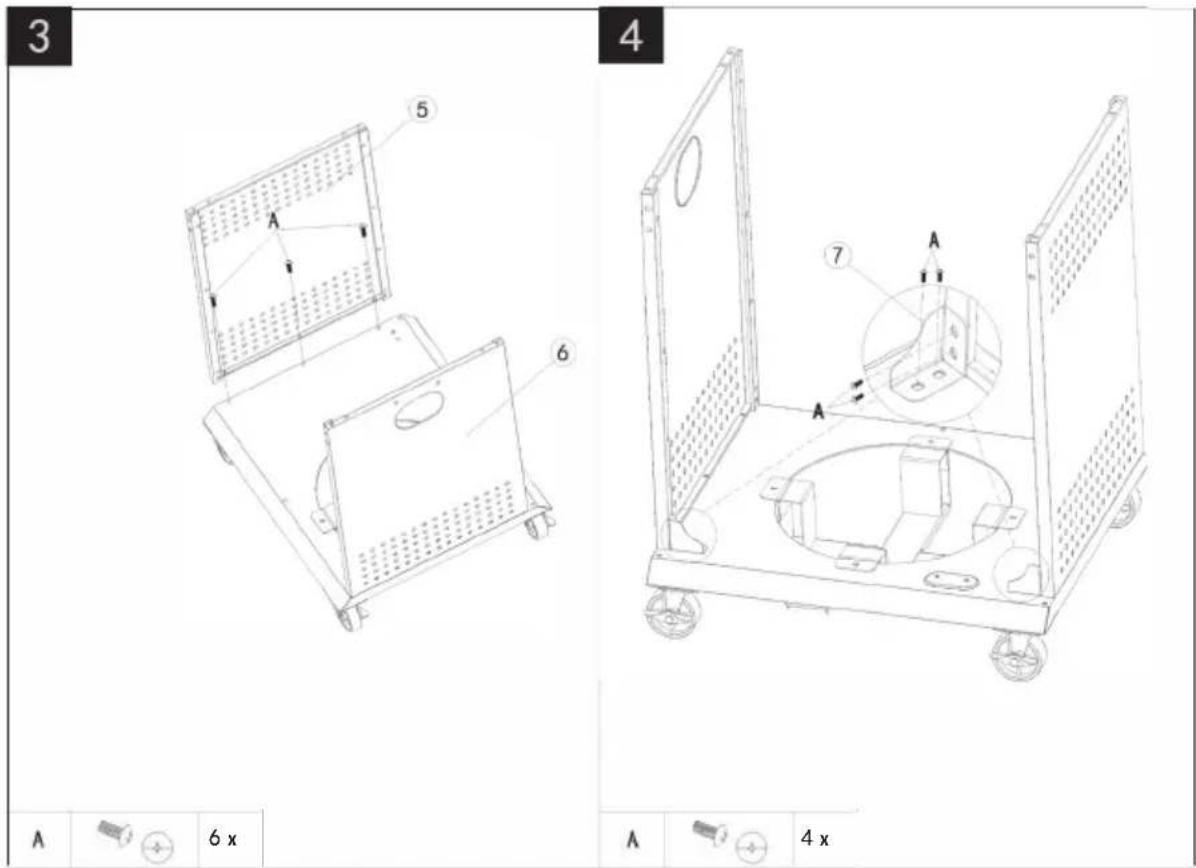
text_image
3 5 A 6 4 7 A 6 x A 4 x5
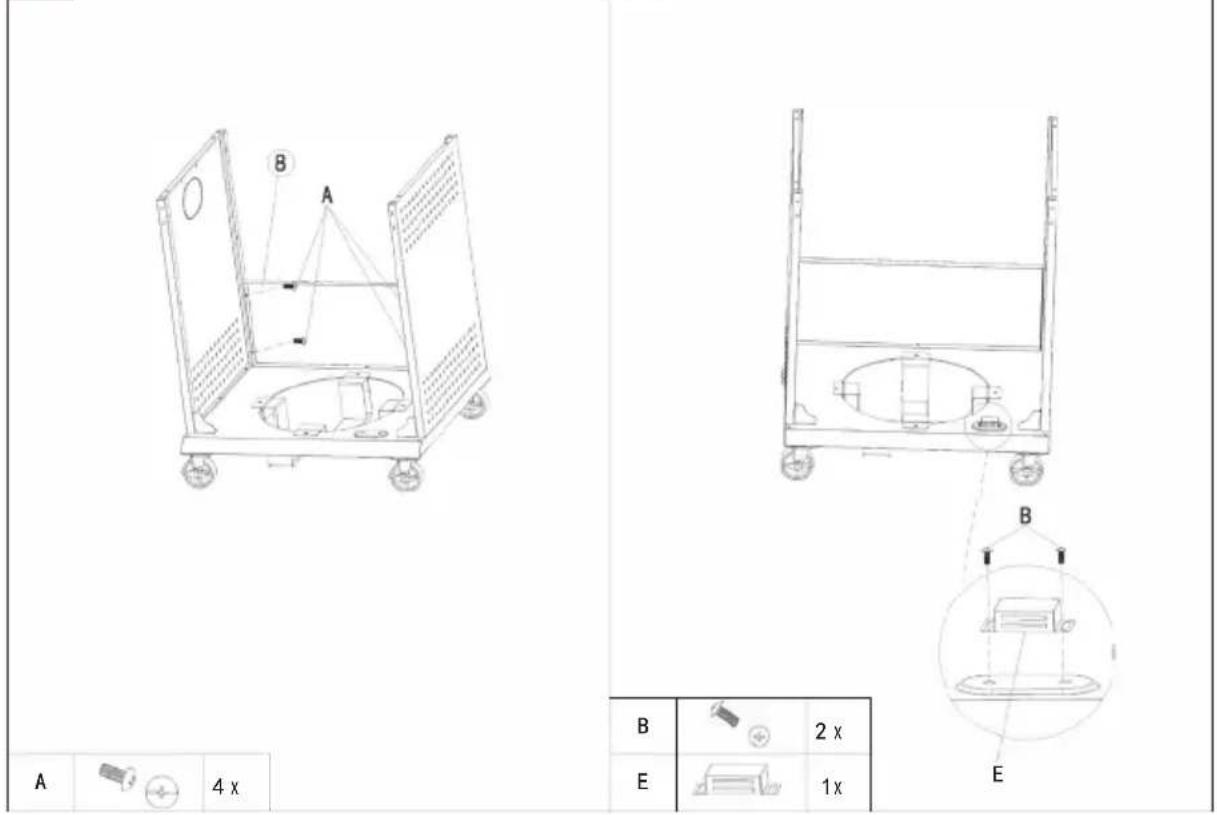
text_image
A 4 x B A B 2 x E 1 x E6
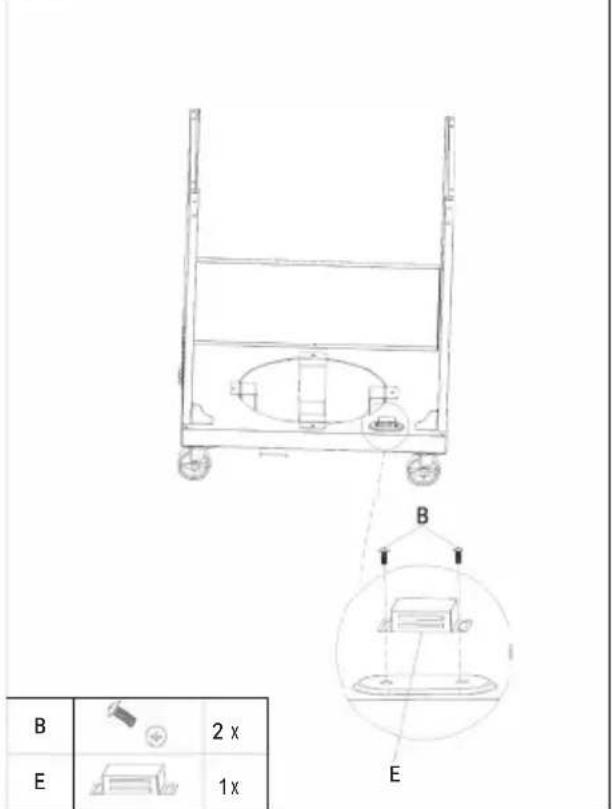
text_image
B 2 x E 1 x B E

7
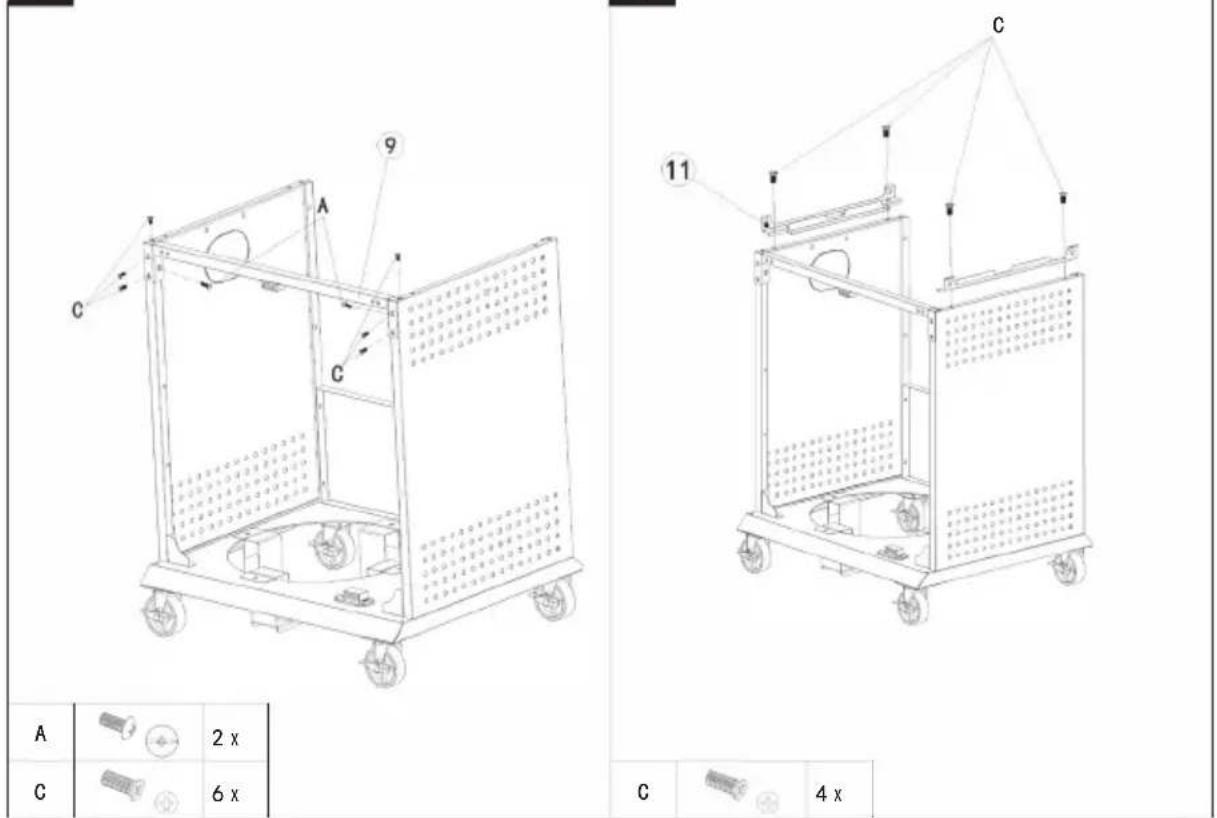
text_image
A C 2 x 6 x 9 C 11 C 4 x8
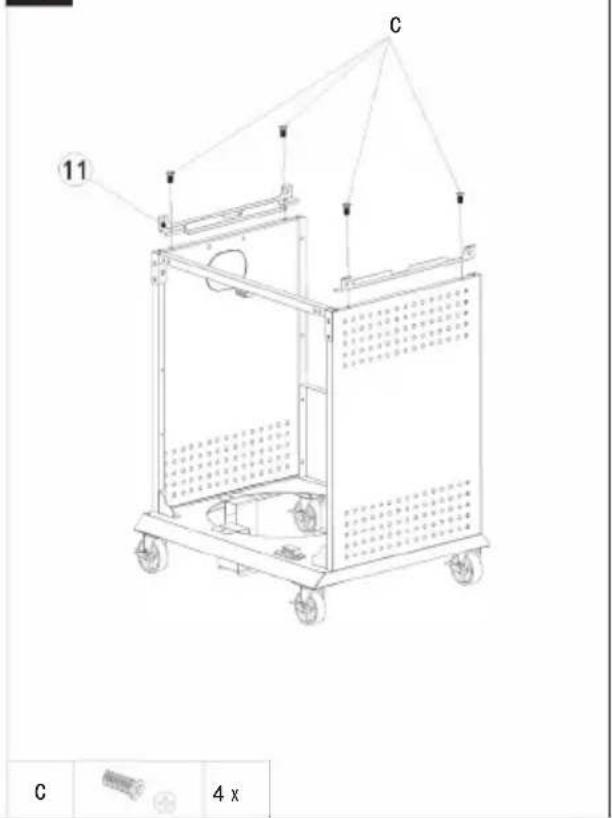
text_image
C 11 C 4 x9
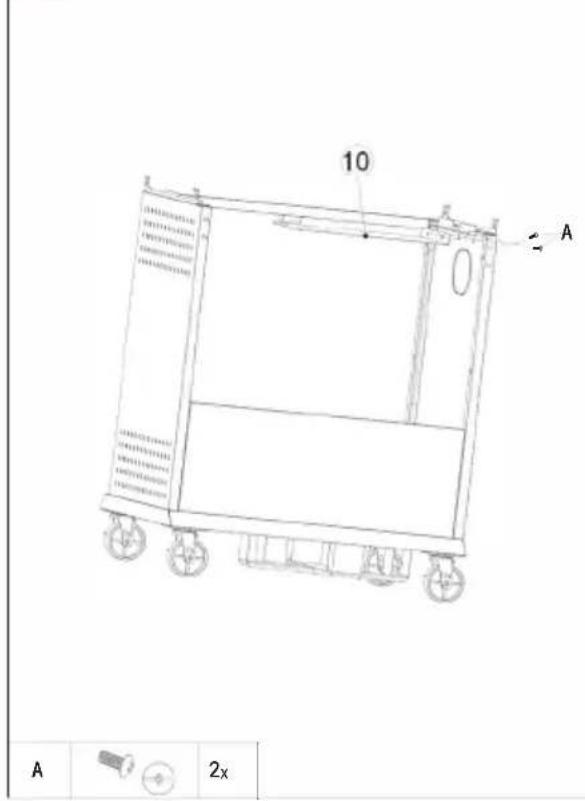
text_image
10 A A 2x10
text_image
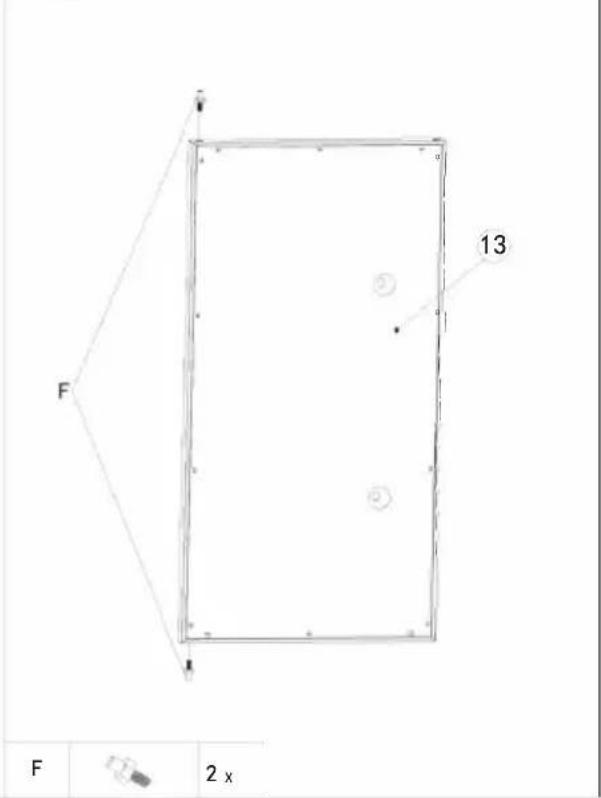
F 13 F 2 x11
text_image
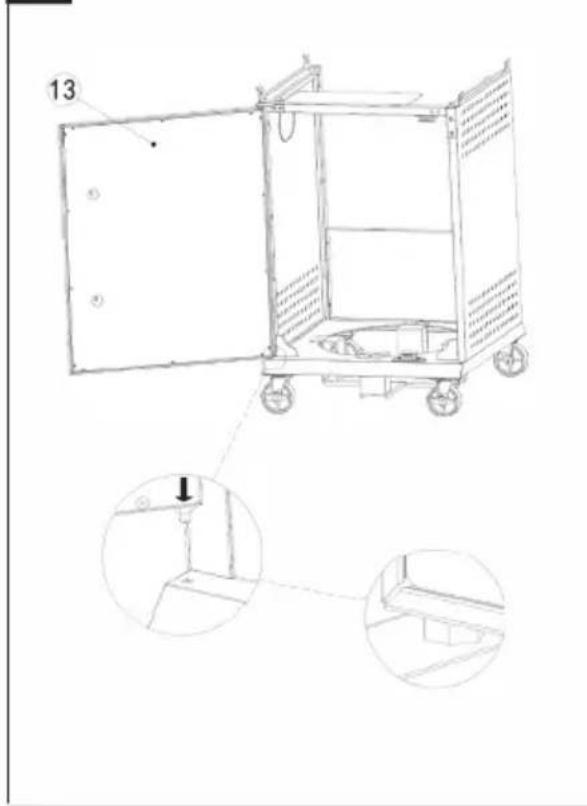
1312
text_image
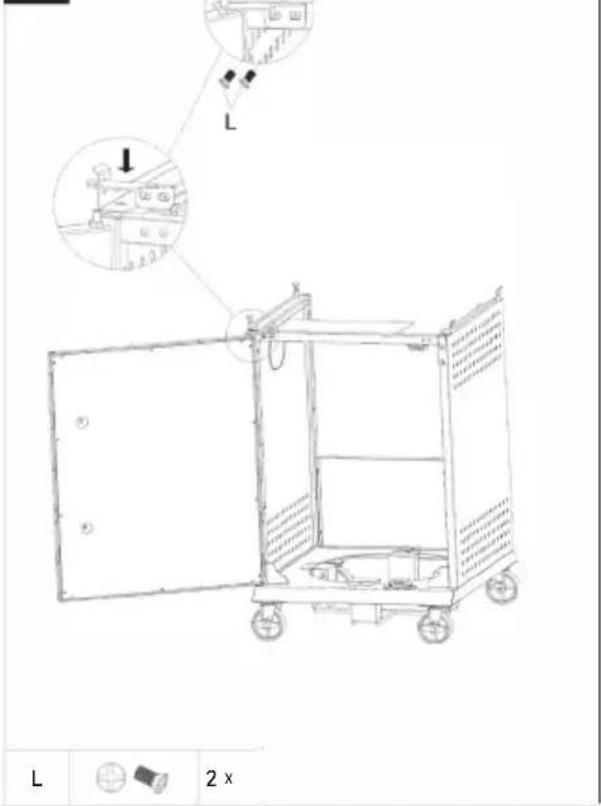
L 2 x17
natural_image
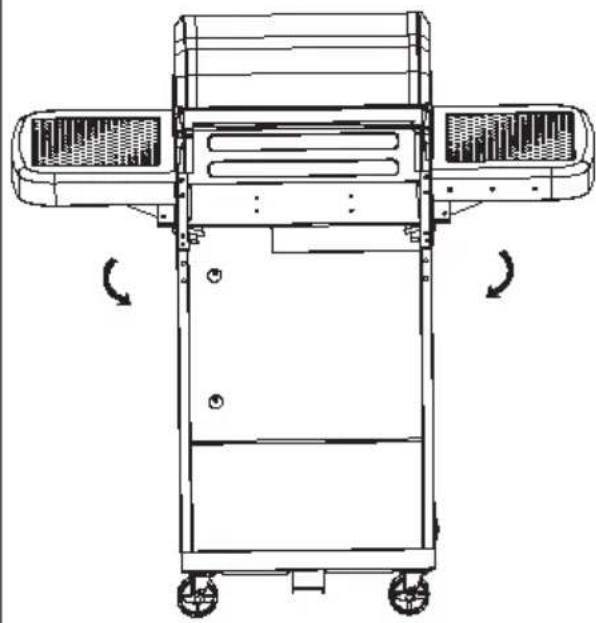
Technical line drawing of a mechanical device with wheels and side panels, showing rotational motion arrows (no text or symbols)18
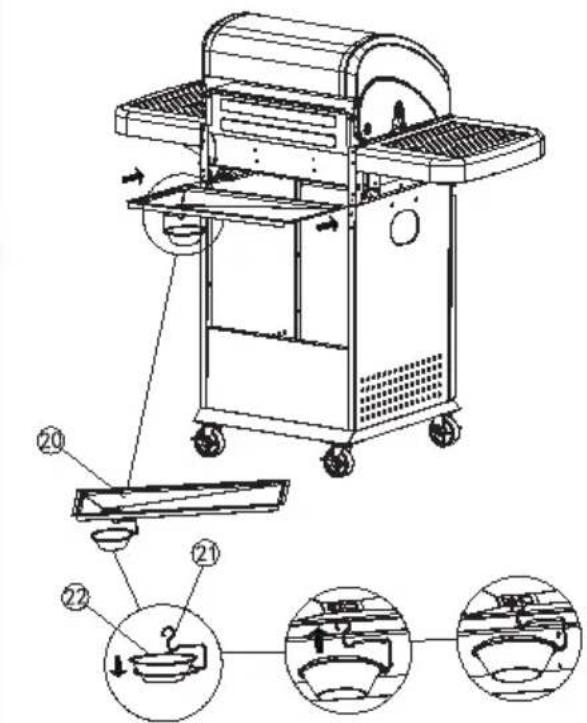
text_image
Technical diagram of a machine with numbered parts and exploded views showing internal componentsDE
EN
19
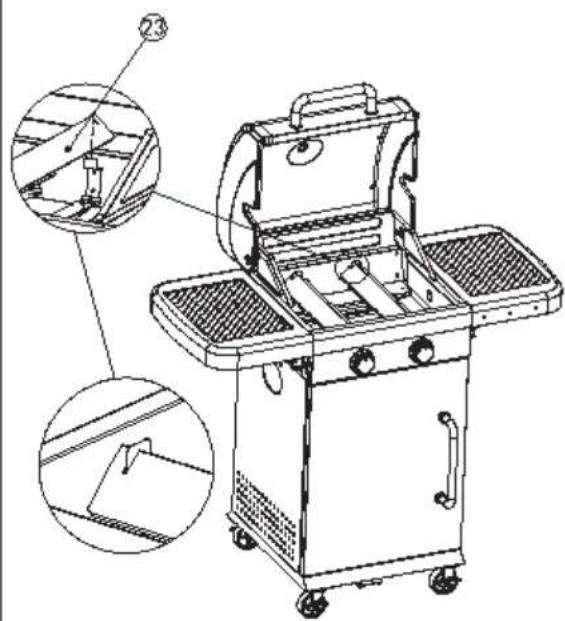
natural_image
Technical line drawing of a portable electric stove with internal components and mounting brackets (no text or symbols)20
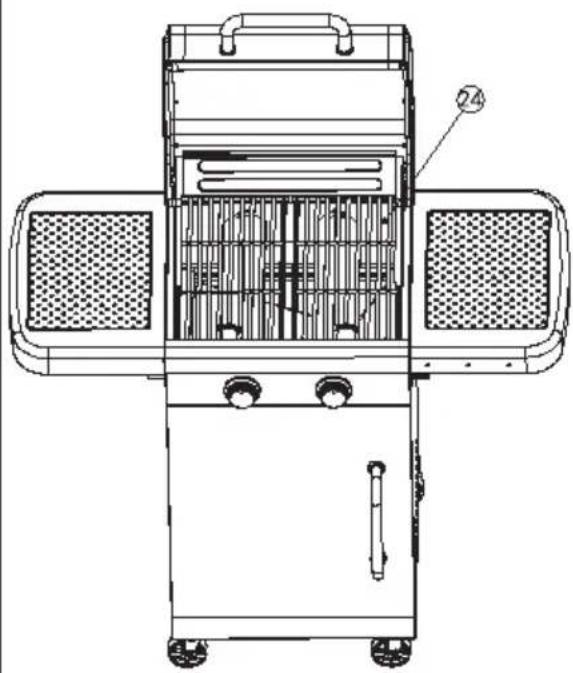
natural_image
Technical line drawing of a portable electric stove or air conditioner unit with labeled components (no text or symbols present)21
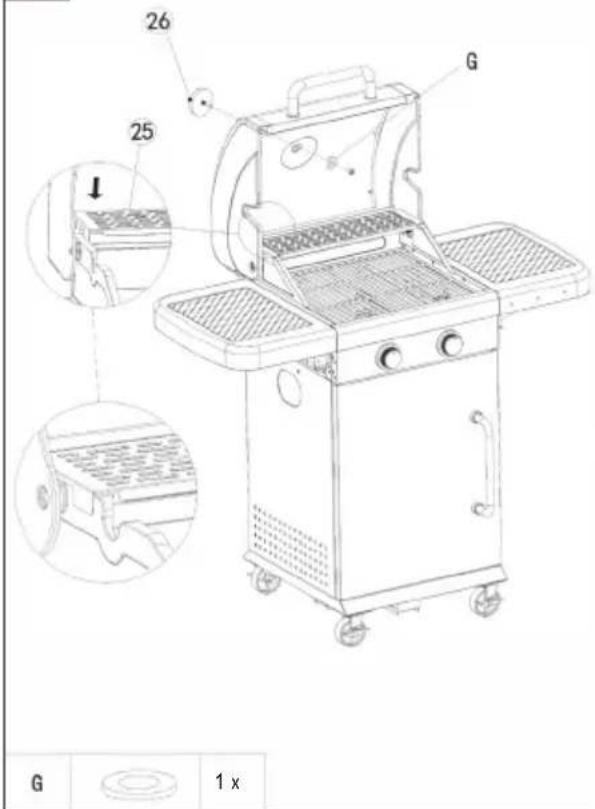
text_image
26 25 G G 1 x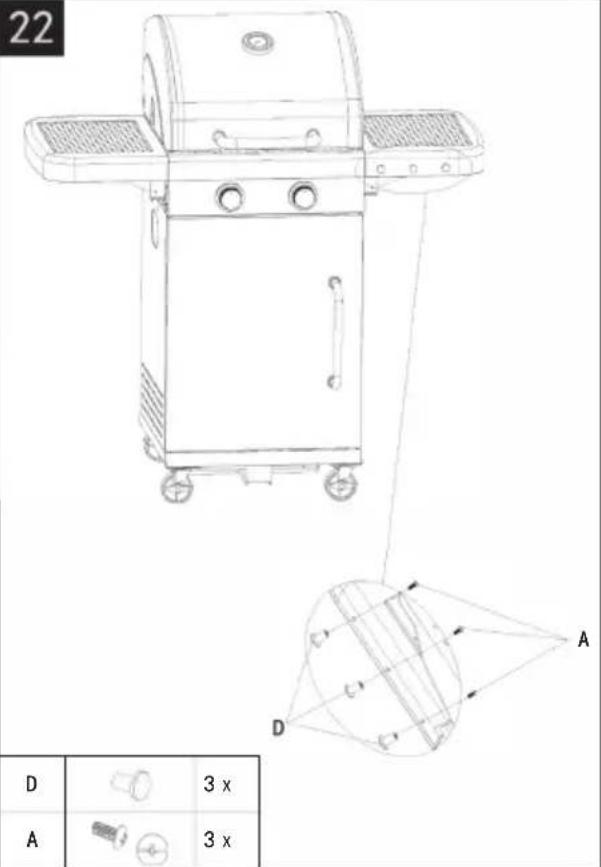
text_image
22 D A 3 x 3 x A D23
natural_image
Line drawing of a portable gas stove with open doors and wheels (no text or symbols)
bar
| Category | Value | |---|---| | Category 1 | 100 | | Category 2 | 100 | | Category 3 | 100 | | Category 4 | 100 | | Category 5 | 100 | | Category 6 | 100 | | Category 7 | 100 | | Category 8 | 100 | | Category 9 | 100 | | Category 10 | 100 | | Category 11 | 100 | | Category 12 | 100 | | Category 13 | 100 | | Category 14 | 100 | | Category 15 | 100 | | Category 16 | 100 | | Category 17 | 100 | | Category 18 | 100 | | Category 19 | 100 | | Category 20 | 100 | | Category 21 | 100 | | Category 22 | 100 | | Category 23 | 100 | | Category 24 | 100 | | Category 25 | 100 | | Category 26 | 100 | | Category 27 | 100 | | Category 28 | 100 | | Category 29 | 100 | | Category 30 | 100 | | Category 31 | 100 | | Category 32 | 100 | | Category 33 | 100 | | Category 34 | 100 | | Category 35 | 100 | | Category 36 | 100 | | Category 37 | 100 | | Category 38 | 100 | | Category 39 | 100 | | Category 40 | 100 | | Category 41 | 100 | | Category 42 | 100 | | Category 43 | 100 | | Category 44 | 100 | | Category 45 | 100 | | Category 46 | 100 | | Category 47 | 100 | | Category 48 | 100 | | Category 49 | 100 | | Category 50 | 100 | | Category 51 | 100 | | Category 52 | 100 | | Category 53 | 100 | | Category 54 | 100 | | Category 55 | 100 | | Category 56 | 100 | | Category 57 | 100 | | Category 58 | 100 | | Category 59 | 100 | | Category 60 | 100 | | Category 61 | 100 | | Category 62 | 100 | | Category 63 | 100 | | Category 64 | 100 | | Category 65 | 100 | | Category 66 | 100 | | Category 67 | 100 | | Category 68 | 100 | | Category 69 | 100 | | Category 70 | 100 | | Category 71 | 100 | | Category 72 | 100 | | Category 73 | 100 | | Category 74 | 100 | | Category 75 | 100 | | Category 76 | 100 | | Category 77 | 100 | | Category 78 | 100 | | Category 79 | 100 | | Category 80 | 100 | | Category 81 | 100 | | Category 82 | 100 | | Category 83 | 100 | | Category 84 | 100 | | Category 85 | 100 | | Category 86 | 100 | | Category 87 | 100 | | Category 88 | 100 | | Category 89 | 100 | | Category 90 | 100 | | Category 91 | 100 | | Category 92 | 100 | | Category 93 | 100 | | Category 94 | 100 | | Category 95 | 100 | | Category 96 | 100 | | Category 97 | 100 | | Category 98 | 100 | | Category 99 | 100 | | Total (Total) = [sum of two separate bars] * [sum of the bars] * [values from the 'bar' in the 'box' table] * [values from the 'box' table] * [values from the 'box' table] * [values from the 'box' table] * [values from the 'box' table] * [values from the 'box' table]. The sum of the bars is calculated by subtracting the sum of the bars from the 'box' table. Note: The total bar length is based on the sum of the bars. The sum of the bars is calculated as the sum of the bars. The sum of the bars is derived from adding the sum of the bars to the total bar length. The sum of the bars is derived from adding the sum of the bars to the total bar length. The sum of the bars is derived from adding the sum of the bars to the total bar length. The sum of the bars is derived from adding the sum of the bars to the total bar length. The sum of the bars is derived from adding the sum of the bars to the total bar length. The sum of the bars is derived from adding the sum of the bars to the total bar lengths.KLARSTEIN NIESTELK TEIN NIESTELK KLAR KLARSTEIN NIESTELK TEIN NIESTELK KLAR KLARSTEIN NIESTELK TEIN NIESTELK KLAR KLARSTEIN NIESTELK