
SBW 60 A1 - Pregnant SILVERCREST - Free user manual and instructions
Find the device manual for free SBW 60 A1 SILVERCREST in PDF.

| Product Type | Portable Bluetooth Speaker |
| Model | SBW 60 A1 |
| Brand | SilverCrest |
| Dimensions (W x H x D) | Approx. 20 x 10 x 10 cm |
| Weight | Approx. 500 g |
| Power Supply | USB 5V DC, 2A; Built-in rechargeable battery |
| Battery Capacity | 2000 mAh (typical) |
| Playback Time | Up to 6 hours at moderate volume |
| Charging Time | Approx. 3 hours |
| Bluetooth Version | Bluetooth 5.0 |
| Wireless Range | Up to 10 meters (line of sight) |
| Output Power | 10 W RMS |
| Frequency Response | 80 Hz – 20 kHz |
| Input Interfaces | Bluetooth, AUX 3.5 mm, MicroSD card slot, USB-A |
| Supported Audio Formats | MP3, WAV, WMA (via USB/SD) |
| Special Functions | Hands-free calls, TWS pairing, built-in microphone |
| Maintenance & Cleaning | Wipe with a soft, dry cloth; avoid moisture and solvents |
| Safety Precautions | Do not expose to rain or liquids; do not disassemble; keep away from heat sources |
| Spare Parts & Repairability | No spare parts available; device is not user-serviceable |
| General Information | Designed for indoor and outdoor portable use; color: black |
Frequently Asked Questions - SBW 60 A1 SILVERCREST
User questions about SBW 60 A1 SILVERCREST
0 question about this device. Answer the ones you know or ask your own.
Ask a new question about this device
Download the instructions for your Pregnant in PDF format for free! Find your manual SBW 60 A1 - SILVERCREST and take your electronic device back in hand. On this page are published all the documents necessary for the use of your device. SBW 60 A1 by SILVERCREST.
USER MANUAL SBW 60 A1 SILVERCREST
STEREO-SOUNDBAR MIT BLUETOOTH® / BLUETOOTH® STEREO SOUNDBAR / BARRE DE SON STÉRÉO BLUETOOTH® SBW 60 A1
DE AT CH
STEREO-SOUNDBAR MIT BLUETOOTH®
Operation and Safety Notes
NL BE
STEREO-SOUNDBAR MET BLUETOOTH®
GB / IE Operation and Safety Notes Page 23
natural_image
Line drawing of a remote control unit with a scroll and SmartBox (no text or symbols)natural_image
Line drawing of a coiled electrical plug with terminal connectors (no text or symbols)natural_image
Line drawing of a coiled electrical plug with terminal connectors (no text or symbols)natural_image
Coiled black cable with two connectors (no text or symbols visible)HDMI-Kabel
natural_image
Coiled audio amplifier cable with two connectors (no text or symbols visible)Cinch-zu-3,5-mm-Audiokabel
Wandhalterungen
GEFAHR VON SACHSCHÄDEN
TRAGEN SIE SCHUTZHANDSCHUHE!
Fernbedienung
(B × H × T): 805 × 62 × 62 mm
natural_image
Diagram of a hand holding a small object with a downward arrow indicating rotation or movement (no text or symbols)natural_image
Technical line drawing of a mechanical component with a tool and directional arrow (no text or symbols)natural_image
Simple line drawing of a room layout with a monitor, tablet, and cabinet (no text or symbols)Option - B
natural_image
Simple line drawing of a desk with a monitor and a cube inside a circle (no text or symbols)natural_image
Technical line drawing of a mechanical clamp or bracket assembly with a tool, no text or symbols presentnatural_image
Illustration of a hand using a hammer to measure a tool on a surface, with no text or symbols present.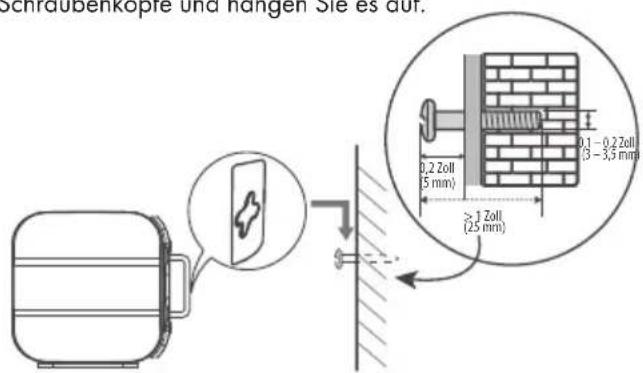
Warnings and symbols used 24
Trademark notices 25
Scope of delivery 25
General safety instructions 26
Description of parts 30
Technical data 32
Before use 32
Placement and mounting 34
Connections 35
Pairing the Wireless Subwoofer with the Main Unit 37
Operation 38
AUX / OPTICAL / HDMI ARC Operation 38
USB operation 39
Bluetooth operation 39
Storage when not in use 40
Cleaning 40
Troubleshooting 40
Disposal 41
Simplified EU declaration of conformity 42
BLUETOOTH® STEREO SOUNDBAR
Introduction
We congratulate you on the purchase of your new product. You have chosen a high quality product. The instructions for use are part of the product. They contain important information concerning safety, use and disposal. Before using the product, please familiarise yourself with all of the safety information and instructions for use. Only use the product as described and for the specified applications. If you pass the product on to anyone else, please ensure that you also pass on all the documentation with it.
Intended use
This product is a consumer electronics device.
This product may only be used privately and not for industrial or commercial purposes. Furthermore, this product may not be used in tropical climates. Any other use is considered improper. Any claims resulting from improper use or due to unauthorised modification of the product will be considered un-warranted. Any such use is at your own risk.
Warnings and symbols used
These instructions for use contain the following warnings:
DANGER!
This symbol with the signal word indicates a hazard with a high level of risk which, if not avoided, will result in serious injury or death.
WARNING!
This symbol with the signal word indicates a hazard with a medium level of risk which, if not avoided, could result in serious injury or death.
CAUTION!
This symbol with the signal word indicates a hazard with a low level of risk which, if not avoided, could result in minor or moderate injury.
Note:
This symbol with the signal word provides additional useful information.
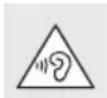
Take care when using the product. Listening at high-volume for prolonged periods of time can damage your
hearing. Before using the product, set the volume to the lowest level.
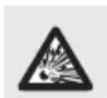
CAUTION! EXPLOSION HAZARD!
A warning with this symbol and word "CAUTION! EXPLOSION HAZARD" indicates the potential threat of explosion. Failure to observe this warning may result in serious or fatal injuries and potential property damage. Follow the instructions in this warning to prevent serious injuries, a danger to life or property damage!

This action sign indicates to wear suitable protective gloves! Follow the instructions to avoid hands striking or
being struck by objects or being in contact with thermal or chemical materials!
Trademark notices
- USB® is a registered trademark of USB Implementers Forum, Inc.
- The Bluetooth® word mark and logos are registered trademarks of Bluetooth SIG, Inc. and any use of such marks by OWIM GmbH & Co. KG is under license.
• The SilverCrest trademark and trade name is the property of their respective owners.
• Any other names and products may be trademarks or registered trademarks of their respective owners.
Scope of delivery
1 Main Unit
1 Wireless Subwoofer
1 Remote Control
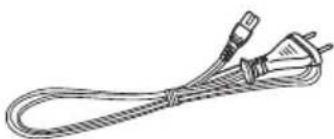
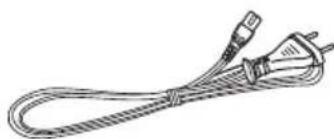
1 AC power cord (for Soundbar)
1 AC power cord (for Subwoofer)
1 HDMI Cable
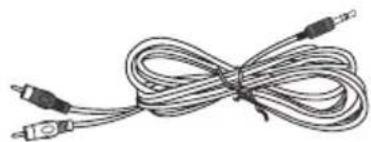
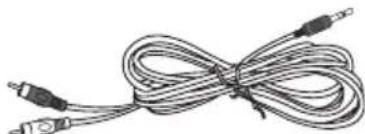
1 RCA to 3.5 mm audio Cable
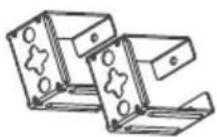
2 Wall Brackets
1 Instruction Manual

Main Unit Remote Control Instruction Manual
Wireless Subwoofer
natural_image
Line drawing of a straight electrical outlet with two leads (no text or symbols)AC power cord (for Sound Bar)
natural_image
Line drawing of a coiled electrical plug with two connectors (no text or symbols)AC power cord (for Subwoofer)

natural_image
Coiled black cable with two connectors (no text or symbols visible)HDMI Cable
natural_image
Coiled audio amplifier cable with two leads (no text or symbols visible)RCA to 3.5 mm audio Cable
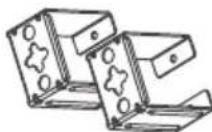
Wall Brackets
General safety instructions
Before using the product, please familiarize yourself with all of the safety instructions and instructions for use! When passing this product on to others, please also include all the documents!
CAUTION
RISK OF ELECTRIC SHOCK DO NOT OPEN

CAUTION: TO REDUCE THE RISK OF ELECTRIC SHOCK, DO NOT REMOVE COVER (OR BACK). NO USER-SERVICEABLE PARTS INSIDE. REFER SERVICING TO QUALIFIED SERVICE PERSONNEL.
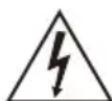
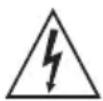
The lightning flash with arrowhead symbol, within an equilateral triangle, is intended to alert the user to the presence of uninsulated "dangerous voltage" within the product's enclosure that may be of sufficient magnitude as to constitute a risk of electric shock to persons.

The exclamation point within an equilateral triangle is intended to alert the user to the presence of important
operating and maintenance (servicing) instructions in the literature accompanying the appliance.
Safety
- Read these instructions - All the safety and operating instructions should be read before this product is operated.
- Keep these instructions – The safety and operating instructions should be retained for future reference.
- Heed all warnings - All warnings on the appliance and in the operating instructions should be adhered to.
- Follow all instructions – All operating and usage instructions should be followed.
- Do not use this apparatus near water
- The appliance should not be used near water or moisture – for example, in a wet basement or near a swimming pool and the like.
-
Clean only with a dry cloth.
-
Do not block any ventilation openings. Install in accordance with the manufacturer's instructions.
- Do not install near any heat sources such as radiators, heaters, stoves, or other apparatus (including amplifiers) that produce heat.
- Do not defeat the safety purpose of the polarized or grounding plug. A polarized plug has two blades with one wider than the other. A grounding plug has two blades and a third grounding prong. The wide blade or the third prong is provided for your safety. If the provided plug does not fit into your outlet, consult an electrician for replacement of the obsolete outlet.
- Protect the power cord from being walked on or pinched particularly at plugs, convenience receptacles, and the point where they exit from the apparatus.
- Only use attachments/accessories specified by the manufacturer.
- Use only with the cart, stand, tripod, bracket or table specified by the manufacturer, or sold with the apparatus. When a cart or rack is used, use caution when moving the cart/apparatus combination to avoid injury from tip-over.
- Unplug the apparatus during lightning storms or when unused for long periods of time.
- Refer all servicing to qualified personnel. Servicing is required when the apparatus has been damaged in any way, such as power supply cord or plug is damaged, liquid has been spilled or objects have fallen into the apparatus, the unit has been exposed to rain or moisture, does not operate normally, or has been dropped.
- This equipment is a Class II or double insulated electrical appliance. It has been designed in such a way that it does not require a safety connection to electrical earth.
-
The apparatus shall not be exposed to dripping or splashing. No objects filled with liquids, such as vases, shall be placed on the apparatus.
-
Minimum distance around the apparatus for sufficient ventilation is 5 cm.
- The ventilation should not be impeded by covering the ventilation openings with items, such as newspapers, table-cloths, curtains, etc...
- No naked flame sources, such as lighted candles, should be placed on the apparatus.
- Batteries should be recycled or disposed of as per state and local guidelines.
- The use of apparatus in moderate climates.
Caution:
- Use of controls or adjustments or performance of procedures other than those described herein, may result in hazardous radiation exposure or other unsafe operation.
- To reduce the risk of fire or electric shock, do not expose this apparatus to rain or moisture. The apparatus must not be exposed to dripping or splashing and objects filled with liquids, such as vases, must not be placed on apparatus.
- The mains plug/appliance coupler is used as the disconnect device, the disconnect device must remain readily operable.
- Danger of explosion if battery is incorrectly replaced. Replace only with the same or equivalent type.
Warning:
- The battery (batteries or battery pack) shall not be exposed to excessive heat such as sunshine, fire or the like.
- Before operating this system, check the voltage of this system to see if it is identical to the voltage of your local power supply.
- Do not place this unit close to strong magnetic fields.
- Do not place this unit on the amplifier or receiver.
- Do not place this unit close to damp areas as the moisture will affect the life of the laser head.
- If any solid object or liquid falls into the system,
unplug the system and have it checked by qualified personnel before operating it any further.
- Do not attempt to clean the unit with chemical solvents as this may damage the finish. Use a clean, dry or slightly damp cloth.
- When removing the power plug from the wall outlet, always pull directly on the plug, never yank on the cord.
- Changes or modifications to this unit not expressly approved by the party responsible for compliance will void the user's authority to operate the equipment.
- The rating label is pasted on the bottom or back of the equipment.
⚠ DO NOT INGEST BATTERY, CHEMICAL BURN
The remote control supplied with this product contains a coin/button cell battery. If the coin/button cell battery is swallowed, it can cause severe internal burns in just 2 hours and lead to death. Keep new and used batteries away from children. If the battery compartment does not close securely, stop using the product and keep it away from children. If you think batteries might have been swallowed or placed inside any part of the body, seek immediate medical attention.
⚠ WARNING! DANGER TO LIFE AND RISK OF ACCIDENT FOR INFANTS AND CHILDREN!
⚠️ DANGER! Risk of suffocation!
Never leave children unsupervised with the packaging material. The packaging material poses a suffocation hazard. Children frequently underestimate the dangers. The packaging material is not a toy.
This product may be used by children age 8 years and up, as well as by persons with reduced physical, sensory or mental capacities or lacking experience and/or knowledge, so long as they are supervised or instructed in the safe use of the product and understand the associated risks.
Do not allow children to play with the product. Cleaning and user maintenance should not be performed by children without supervision. The product is not a toy.
RISK OF PROPERTY DAMAGE
- This product does not contain any parts which can be serviced by the user.
- Keep the product away from moisture, dripping and splash water!
- Do not place burning candles or other open fire on or next to the product.
- Check the product before every use! Discontinue use if any damage to the product or the charging cable is detected!
- If you notice smoke or unusual noise or odour, switch the product off immediately.
- Sudden temperature changes may cause condensation inside the product. In this case, allow the product to acclimate for some time before using it again to prevent short circuits!
- Do not operate the product near heat sources, e.g. radiators or other devices emitting heat!
- Do not throw the product into fire and do not expose to high temperatures.

DANGER!
Do not try to open the product! It has no internal parts requiring maintenance.

DANGER! Radio interface
- Switch the product off on aeroplanes, in hospitals, service rooms, or near medical electronic systems. The wireless signals transmitted could impact the functionality of sensitive electronics.
- Keep the product at least 20 cm from pacemakers or implantable cardioverter defibrillators, as the electromagnetic radiation may impair the functionality of pacemakers.
-
The radio waves transmitted could cause interference in hearing aids.
-
Do not place the product near flammable gasses or potentially explosives areas (e.g. paint shops) with the wireless components on, as the radio waves emitted can cause explosions and fire.
- The range of the radio waves varies by environmental conditions. In the event of wireless data transmission, unauthorised third parties receiving the data cannot be excluded.
- The OWIM GmbH & Co KG is not responsible for interference with radios or televisions due to unauthorised modification of the product. The OWIM GmbH & Co KG further assumes no liability for using or replacing cables and products not distributed by OWIM. The user of the product is fully responsible for correcting interference caused by such unauthorised modification of the product, as well as replacement of such products.

DANGER! Risk of Explosion!
The product must not be thrown into a fire because the built-in battery may explode.
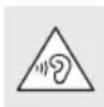
Remember that excessive sound pressure or volume from the product or earphones can lead to damage to hearing. Always adjust the volume to a pleasant, not too loud level. If you have adjusted the volume of the product too high and use that for an extended period, it can damage your hearing.

WARNING! Ensure that:
- no direct heat sources (e.g. heating) can affect the product
- the product is not exposed to bright artificial light
-
any contact with splashed and dripping water and corrosive liquids is avoided and the product is not operated in the vicinity of water. In particular, the product should never be submerged in liquid; do not place any vessels filled with liquid, for example, vases or drinks, on or near the product
-
the product is not used in the immediate vicinity of magnetic fields (e.g. speakers)
- no fire sources (e.g. burning candles) are placed on or near the product
• no foreign objects penetrate the product - the product are never subjected to extreme temperature fluctuations as this could result in condensation and electrical short circuits. However, if the product was subjected to extreme temperature fluctuations, wait (approx. 2 hours) until the product has reached ambient temperature before use
- the product is never subjected to excessive shocks and vibrations
- connected cables are always laid in such a manner that nobody can step on them or trip over them. There is a risk of injury
- no objects are placed on a connected cable and cables are not connected over sharp edges because they could be damaged otherwise.
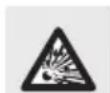
CAUTION! EXPLOSION HAZARD!
Never recharge non-rechargeable
batteries. Do not short-circuit batteries / rechargeable batteries and / or open them. Overheating, fire or bursting can be the result. Never throw batteries / rechargeable batteries into fire or water. Do not exert mechanical loads to batteries / rechargeable batteries
Risk of batteries / rechargeable batteries leakage
Avoid extreme environmental conditions and temperatures, which could affect batteries / rechargeable batteries, e.g. radiators / direct sunlight. Avoid contact with the skin, eyes and mucous membranes. In the event of contact with battery acid, thoroughly flush the affected area with plenty of clean water and seek immediate medical attention.

WEAR PROTECTIVE GLOVES!
Leaked or damaged batteries / rechargeable batteries can cause burns
on contact with the skin. Wear suitable protective gloves at all times if such an event occurs.
Description of parts
Main Unit
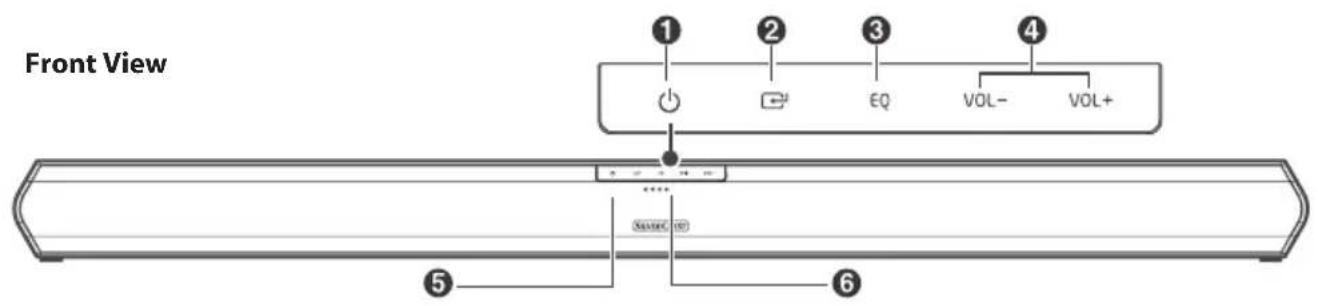
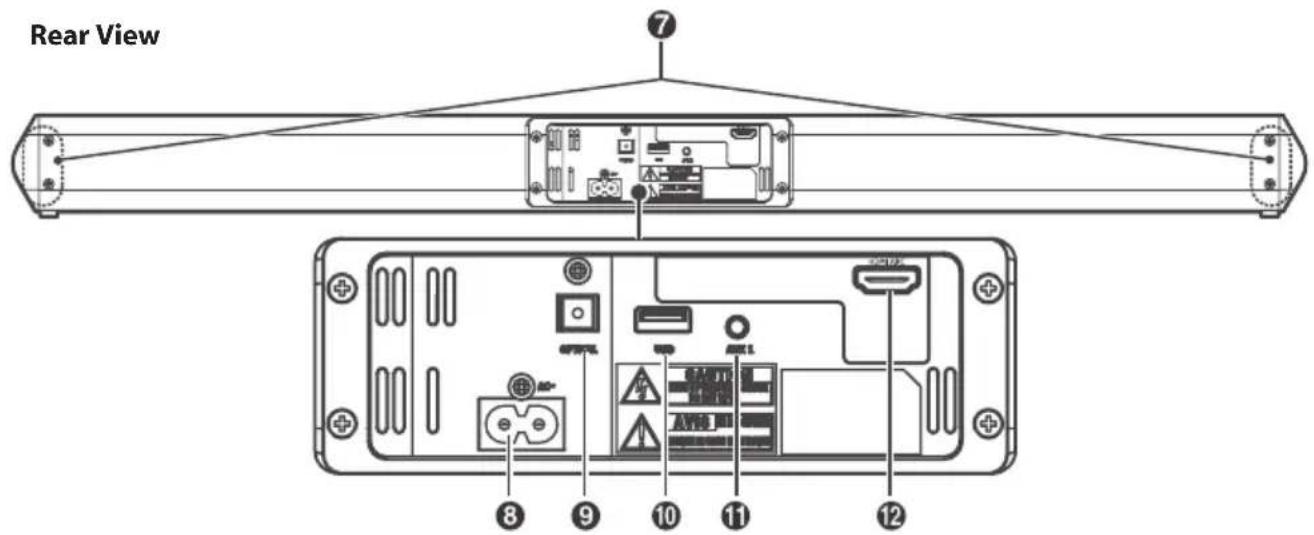
- button Switch the unit between ON and STANDBY mode.
- button Select the play function.
- EQ button Select a preset sound effect.
- VOL+/VOL- buttons Increase/decrease the volume level.
- Remote Control Sensor
- LED Indicators
-
Wall bracket screws
-
AC Socket Connect the power cord.
- OPTICAL Socket Connect to an optical cable.
- USB Socket Insert the USB device.
- AUX 1 Socket Connect to an external audio device.
- HDMI ARC Socket Connect to an HDMI cable.
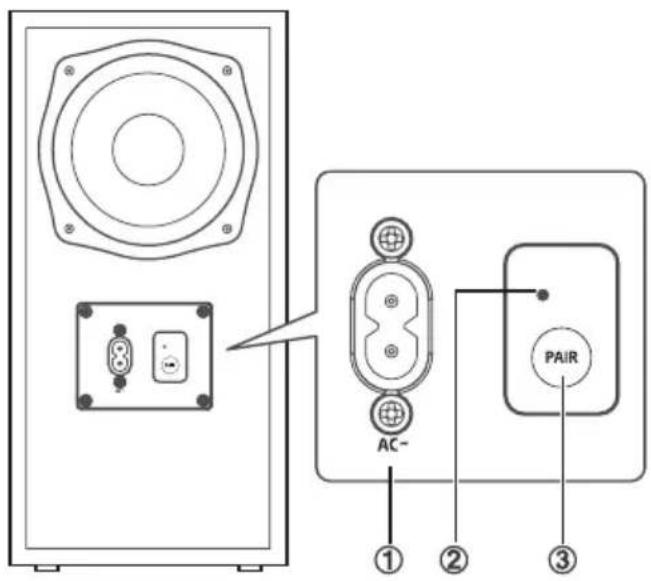
Wireless subwoofer
- AC Socket Connect to the power cord.
- PAIR Indicator Lights up solidly when pairing successful.
- PAIR button Connect to the main unit.
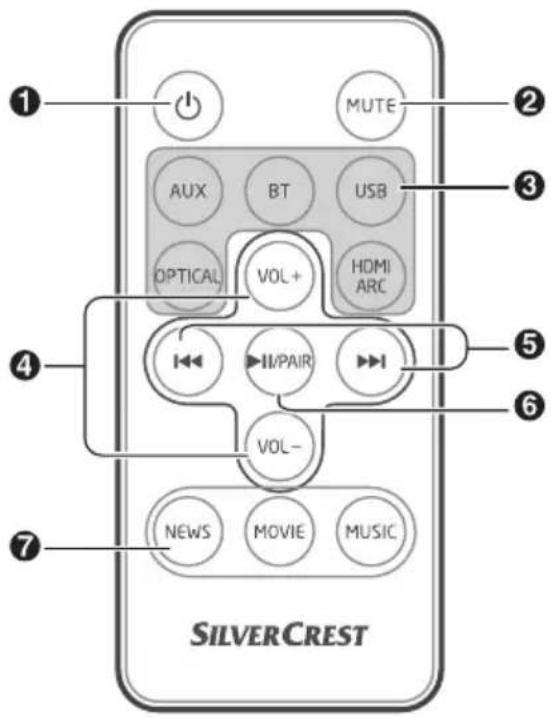
Remote control
-
⏻ Switch the unit between ON and STANDBY mode.
-
MUTE Mute or resume volume.
-
SOURCE buttons Select the play mode.
-
VOL+/VOL- Increase/decrease the volume level.
-
1◄◄/►► Skip to previous/next track in Bluetooth/USB mode.
-
▶II/PAIR Play/pause/resume playback in Bluetooth mode. Press and hold to activate the pairing function in Bluetooth mode or disconnect the existing paired Bluetooth device.
-
EQ buttons Select a preset sound effect.
Technical data
Sound Bar
Power Supply: AC 220 - 240 V\~50/60 Hz
Power Consumption: 30 W
Output Power: 15 W x 2
Audio input sensitivity: 500 mV
USB Socket: 5 V = 500 mA Max
Frequency
Response: 200 Hz - 20 kHz
Dimension (W x H x D): 805 x 62 x 62 mm
Speaker Impedance: 8 Ω x 2
Subwoofer
Power Supply: AC 220 - 240 V\~50/60 Hz
Output Power: 30 W
Power Consumption: 30 W
Frequency Response: 40 Hz - 200 Hz
Impedance: 4 Ω
Dimension (W × H × D): 150 × 303 × 220 mm
Bluetooth
Version: V 4.2
Maximum power
transmitted: <20 dBm
Frequency bands: 2402 MHz - 2480 MHz
2.4G Hz Wireless Subwoofer
Maximum power
transmitted: <10 dBm
Frequency bands: 2400 MHz - 2483 MHz
Remote Control
Distance: 6 m
Angle: 30^
Battery Type: CR2025
The specification and design may be changed without notification
Before use
① Note:
All parts have to be unpacked and the packaging material has to be removed completely.
Before use, verify the package contents are complete and undamaged!
First Time Use
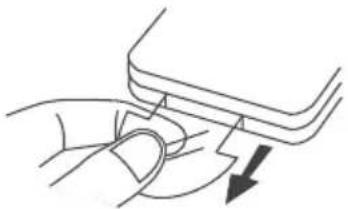
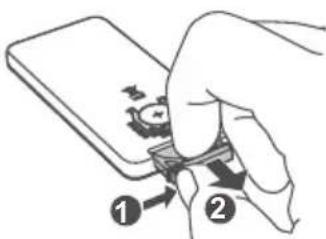
The unit has a pre-installed lithium CR2025 battery. Remove the protective tab to activate the remote control battery.
natural_image
Diagram of a hand pressing a button with a downward arrow (no text or symbols)Replace the Remote Control Battery
-
Move the tab on the side of the battery tray.
-
Pull out the battery tray and remove the old battery.
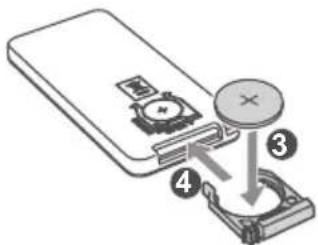
-
Place a new CR2025 battery into the battery tray with the correct polarity (+/-) as indicated.
-
Insert the battery tray back into the slot.
Prepare the remote control
The provided Remote Control allows the unit to be operated from a distance.
Even if the Remote Control is operated within the effective range (6 m), remote control operation may be impossible if there are any obstacles between the unit and the remote control.
If the Remote Control is operated near other products which generate infrared rays, or if other remote control devices using infra-red rays are used near the unit, it may operate incorrectly. Conversely, the other products may operate incorrectly.
Precautions concerning batteries
- Be sure to insert the batteries with the correct positive "+" and negative "-" polarities.
- Use batteries of the same type. Never use different types of batteries together.
-
Either rechargeable or non-rechargeable batteries can be used. Refer to the precautions on their labels.
-
When the Remote Control is not to be used for a long time (more than a month), remove the battery from the Remote Control to prevent it from leaking.
- If the batteries leak, wipe away the leakage inside the battery compartment and replace the batteries with new ones.
- Do not use any batteries other than those specified.
- Do not mix new batteries with old ones.
- Do not heat or disassemble batteries. Never throw them in fire or water.
- Do not carry or store batteries with other metallic objects. Doing so could cause batteries to short circuit, leak or explode.
- Never recharge a battery unless it is confirmed that it is a rechargeable battery.
Placement and mounting
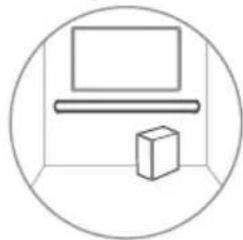
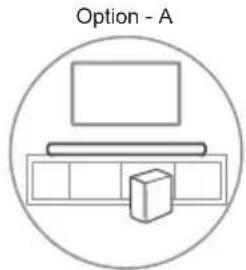
Wall Mounting (option-A)
Place Soundbar on a level surface in front of TV.
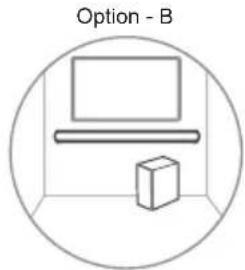
Wall Mounting (if using option-B)
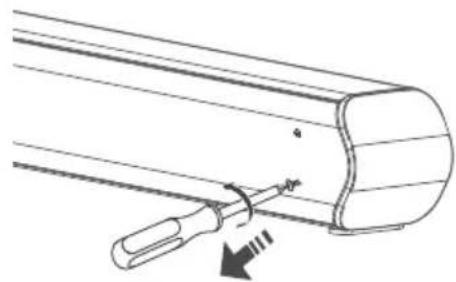
1 Remove the screws from the main unit.
natural_image
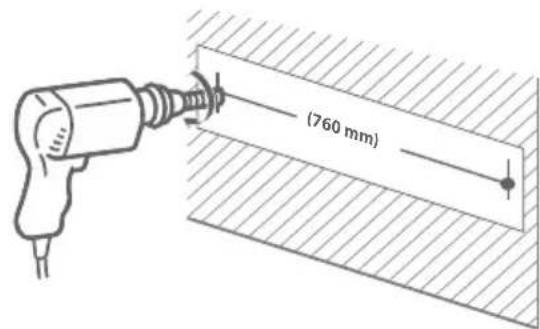
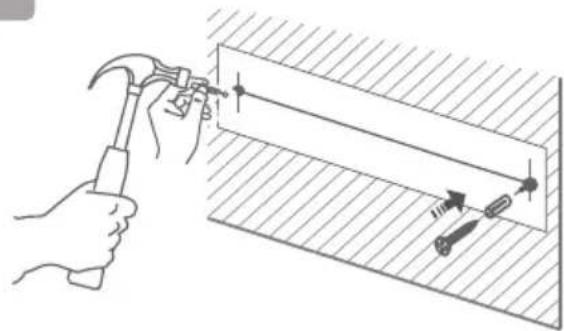
Technical line drawing of a mechanical component with a tool and arrow indicating direction (no text or symbols)3 Drill 2 parallel holes (∅ 3-8 mm each according to wall type) in the wall. The distance between the holes should be 760 mm.
natural_image
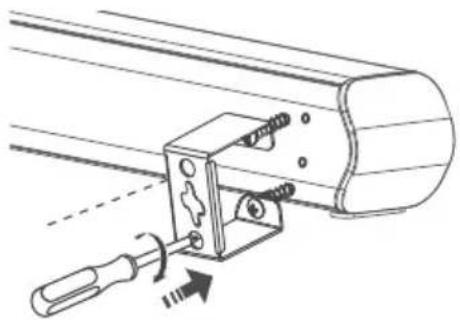
Simple line drawing of a laptop and a box inside a circular frame (no text or symbols)2 Attach the wall brackets to the main unit with the screws removed from the main unit.
natural_image
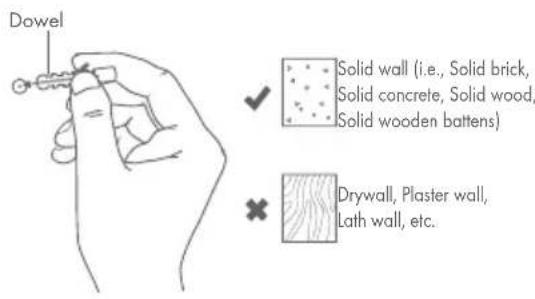
Technical line drawing of a mechanical clamp or bracket assembly with a tool, no text or symbols present4 Firmly fix 1 dowel into each hole in the wall if necessary.
5 Leave a 5 mm gap between the wall and the screw's head. Lift the unit with the attached wall brackets over the heads of the screws and slot into place.
natural_image
Illustration of a hand using a hammer to install a rectangular component with arrows indicating motion (no text or symbols)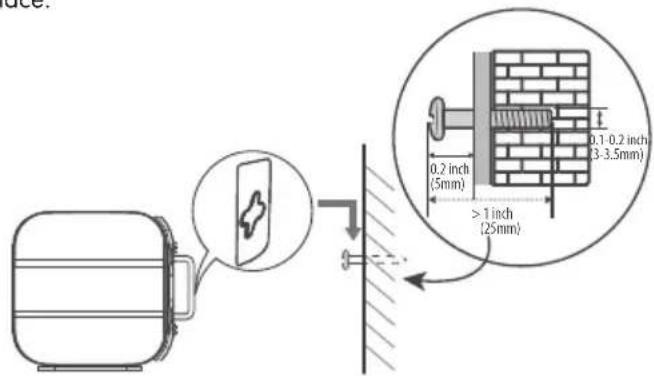

Note:
- Installation must be carried out by qualified personnel only. Incorrect assembly can result in severe personal injury and property damage (if you intend to install this product yourself, you must check for installations such as electrical wiring and plumbing that may be buried inside the wall). It is the installer's responsibility to verify that the wall will safely support the total load of the unit and wall brackets.
• Additional tools (not included) are required for the installation. - Do not overtighten screws.
- Keep this instruction manual for future reference.
- Use an electronic stud finder to check the wall type before drilling and mounting.
Connections
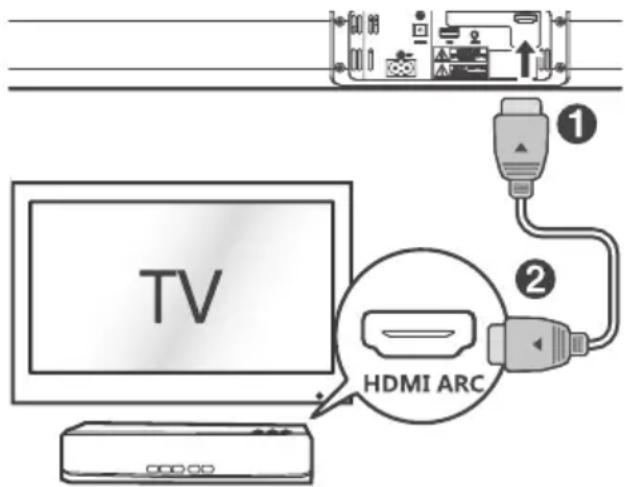
Connect to HDMI socket
Use HDMI to connect the Soundbar to AV equipment and TV:
ARC (Audio Return Channel)
The ARC (Audio Return Channel) function allows you to send audio from your ARC- compliant TV to your sound bar through a single HDMI connection. To enjoy the ARC function, please ensure your TV is both HDMI-CEC and ARC compliant and set up accordingly. When correctly set up, you can use your TV remote control to adjust the volume output (VOL +/VOL- and MUTE) of the sound bar.
Connect the HDMI cable from the unit's HDMI (ARC) socket to the HDMI (ARC) socket on your ARC compliant TV. Then press the remote control to select HDMI ARC.

Note:
- Your TV must support the HDMI-CEC and ARC function. HDMI-CEC and ARC must be set to On.
- The setting method of HDMI-CEC and ARC may differ depending on the TV. For details about ARC function, please refer to your TV owner's manual.
- Only HDMI 1.4 cables can support the ARC function.
Connect to OPTICAL socket
Remove the protective cap of the OPTICAL socket, then connect an OPTICAL cable (not included) to the TV's OPTICAL OUT socket and the OPTICAL socket on the unit.
Note:
While in OPTICAL / HDMI ARC mode, if there's no sound output and the status Indicator flashes from the unit, you may need to activate PCM Signal output on your source device (e.g. TV, DVD or Blu-ray player).

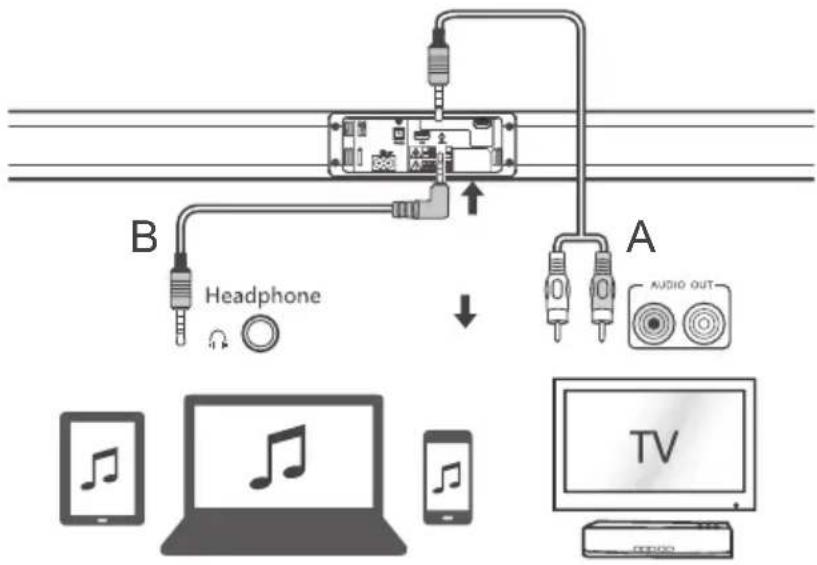
Connect to AUX socket
A: Use the RCA to 3.5mm audio cable (included) to connect the TV's audio output sockets to the AUX 1 socket on the unit.
B: Use a 3.5mm to 3.5mm audio cable (not included) to connect the TV's or external audio device headphone socket to the AUX 1 socket on the unit.
flowchart
graph TD
    A["Headphone"] -->|B| B["Audio Out"]
    B --> C["TV"]
    D["Mobile Device"] --> E["Laptop with Music Icon"]
    F["Smartphone"] --> G["Smartphone with Music Icon"]
    H["Radio Head"] --> I["Radio Head"]
    style A fill:#f9f,stroke:#333
    style B fill:#ccf,stroke:#333
    style C fill:#cfc,stroke:#333
    style D fill:#fcc,stroke:#333
    style E fill:#ffc,stroke:#333
    style F fill:#fcc,stroke:#333
    style G fill:#ffc,stroke:#333
    style H fill:#fcc,stroke:#333
Connect to subwoofer
Note:
- For optimal sound, use the supplied Subwoofer only.
- Connect only speakers with impedance that are the same or higher than the supplied speakers. Refer to the Technical data section of this manual.
- Connect the mains cable to the AC Socket of the subwoofer and then into a mains socket.
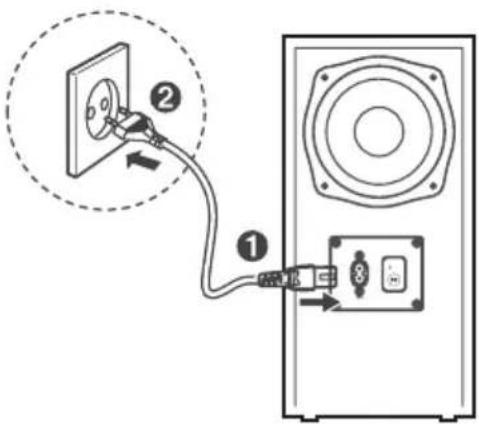
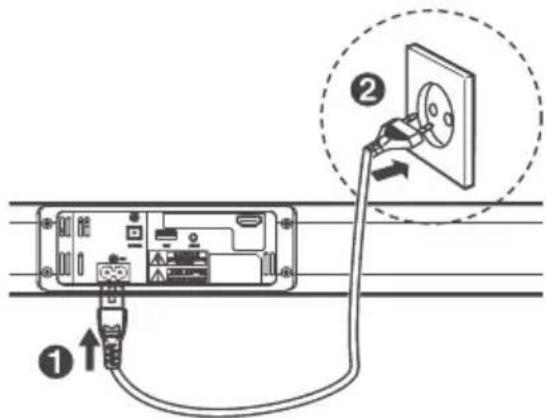
Connect to power
Risk of product damage!
Ensure that the power supply voltage corresponds to the voltage printed on the back or the underside of the unit.
Before connecting the AC power cord, ensure you have completed all other connections.
Connect the mains cable to the AC Socket of the main unit and then into a mains socket.
Pairing the Wireless Subwoofer with the Main Unit
Automatic pairing
The subwoofer and soundbar will automatically pair when both units are plugged into the mains sockets and turned on. No cable is needed for connecting the two units.
- When the subwoofer is pairing with the main unit, the Pair Indicator will flash fast.
- When the subwoofer is paired with the main unit, the Pair Indicator will light up.
① Note:
- Do not press the Pair button on the rear of the subwoofer, except for manual pairing.
- If the automatic pairing fails, pair the subwoofer with the main unit manually.
Manual pairing
- Ensure that all the cables are well connected and the main unit is in Standby mode.
- Press and hold the Pair button on the rear of the subwoofer for a few seconds. The subwoofer will enter the pairing mode and the Pair Indicator will blink quickly.
- Press the ⏻ button on the main unit or on the remote control to switch the main unit on.
- After the wireless connection is successful, the Pair Indicator will light up.
- If the Pair indicator blinks, the wireless connection has failed. Unplug the cable of the subwoofer and then reconnect the main cable after 3 minutes. Then repeat step 1-4.
① Note:
- If the wireless connection fails again, check if there is conflict or strong interference (for example, interference from an electronic device) around your location. Remove these conflicts or strong interferences and repeat the above procedures.
- The subwoofer should be within 6 m of the soundbar in an open area.
- If a TV or an external device is connected to the main unit in AUX mode it and the subwoofer will switch on automatically when the TV or the external device is switched on.
- If the main unit is not connected with the subwoofer and it is in On mode, the POWER Indicator will flash. Follow steps 1-4 above to pair the subwoofer to the main unit.
Operation
Standby/ON
When you first connect the unit to the mains socket, it will be in standby mode. The POWER indicator will light up red.
Press the ⏻ button on the unit or the remote control to switch the main unit ON or OFF.
Disconnect the mains plug from the mains socket if you want to switch the unit off completely.
Note:
- If a TV or an external device (Only for AUX socket) is connected, the unit will switch on automatically when the TV or the external device is switched on.
- When turning the system on, the system will continue in the mode it was in when it was last turned off.
- If the unit is idle for over 15 minutes, the unit will automatically switch to Standby mode.
Select modes
Press the AUX, OPTICAL, HDMI ARC and BT (Bluetooth) buttons on the remote control to select the desired mode.
- In AUX mode: the status indicator lights up Green.
- In USB mode: the status indicator will flash White.
- In Optical mode: the status indicator lights up Orange.
- In Bluetooth mode: the status indicator lights up Blue.
- In HDMI ARC mode: the status indicator lights up White.
Adjust the volume
- Press the VOL+ / VOL- buttons on the unit or on the remote control to adjust the volume.
- If you wish to turn the sound off, press the MUTE button on the remote control. Press the MUTE button again or press the VOL+ / VOL- buttons on the unit or on the remote control to resume normal listening.
- While adjusting the volume, the status indicator flashes quickly.
- When the volume level reaches its maximum level, if you press the VOL+ button again, the status indicator flashes once. When the volume level reaches its minimum level, if you press the VOL- button again, the status indicator flashes once.
Select a preset sound effect
While playing, press the EQ button on the unit or the NEWS / MOVIE / MUSIC buttons on the remote control to select from one of the following preset equalisers:
• MOVIE (recommended for viewing movies
• Music (recommended for listening to music
• NEWS (recommended for listening to NEWS)
AUX / OPTICAL / HDMI ARC
Operation
- Ensure that the unit is connected to the TV or audio device.
- Press the AUX / OPTICAL / HDMI ARC button on the remote control to select the desired mode.
- Operate your audio device directly for playback features.
- Press the VOL +/VOL- buttons to adjust the volume to your desired level.
Note:
While in OPTICAL/HDMI ARC mode, if there's no sound output and the status indicator flashes from the unit, you may need to activate PCM Signal output on your source device (e.g. TV, DVD or Blu-ray player).
USB operation
- Insert the USB device.
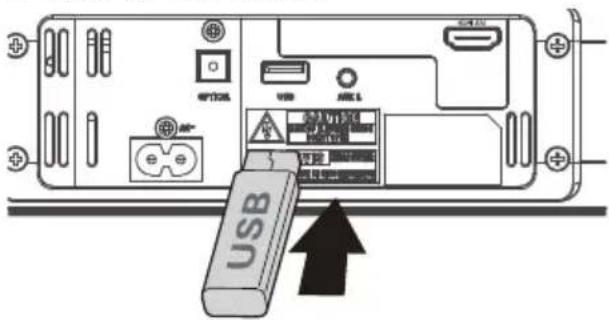
-
Press the button on the unit repeatedly or press the USB button on the remote control to select USB mode.
-
During playback:
To pause or resume play, press the
▶II/PAIR button on the remote control.
To skip to the previous/next file, press the
/ buttons on the remote control.
Bluetooth operation
Pair Bluetooth-enabled devices
The first time you connect your Bluetooth device to this unit, you need to pair your device to this unit.
Note:
- The operational range between this player and a Bluetooth device is approximately 8 meters (without any object between the Bluetooth device and the unit).
- Before you connect a Bluetooth device to this unit, ensure you know the device's capabilities.
- Compatibility with all Bluetooth devices is not guaranteed.
- Any obstacle between this unit and a Bluetooth device can reduce the operational range.
- If the signal strength is weak, your Bluetooth receiver may disconnect, but it will re-enter pairing mode automatically.
-
During ON mode, press the button repeatedly on the unit or press the BT (Bluetooth) button on the remote control to select Bluetooth mode. The Blue indicator will flash slowly.
-
Activate your Bluetooth device and select the search mode. "SBW 60 A1" will appear on your Bluetooth device.
If you cannot find the unit, press and hold the ▶II/PAIR button on the remote control. The system will enter pairing mode. You will hear "Pairing" from the unit and the Blue indicator will flash fast.
- Select "SBW 60 A1" in the pairing list.
After the "Paired" voice prompt, the system is now successfully connected and the Blue indicator will light up solidly.
- Play music from the connected device.
Disconnect Bluetooth function
- Switch to another function on the unit.
- Disable the function from your Bluetooth device. The unit will emit a "Disconnected" voice prompt.
- Press and hold the ▶II/PAIR button on the remote control.
Note:
- Enter "0000" for the password if necessary.
- If there is an existing connection, press and hold the ▶II/PAIR button on the remote control to re-activate the pairing mode, the existing connection will be interrupted and the Blue indicator will flash.
- If no other Bluetooth device pairs with the unit in 2 minutes, the unit will reconnect to the previous connection.
- The unit will be disconnected when your device is moved beyond the operational range.
- If you want to reconnect your device to the unit place it within the operational range. When it is brought back in range, check that the device is still connected to the unit.
- If the connection is lost, follow the instructions above to pair your device to the unit again.
Listen to music from Bluetooth device
If the connected Bluetooth device supports Advanced Audio Distribution Profile (A2DP), you can listen to the music stored on the device through the soundbar.
If the device also supports Audio Video Remote Control Profile (AVRCP), you can use the soundbar's remote control to play music stored on the device.
- Pair your device with the player.
- Play music via your device (if it supports A2DP).
- Use supplied remote control to control play (if it supports AVRCP).
To pause/resume play, press the ▶II/PAIR button on the remote control.
To skip to a track, press the 1◄◄/►buttons on the remote control.
Storage when not in use
Store the product in a dry location to protect it from dust and direct sunlight.
Cleaning
- Switch the product off, remove all plugs before cleaning!
- No acid, chafing or solvent cleaning agents should be used or the product can be damaged.
- Only clean the outside of the product using a soft, dry cloth!
- For persistent soiling, a mild cleaning agent can be used.
- It is necessary to repair the product if they have been damaged in any way, for example, if the housing is damaged, if liquid or objects have penetrated the device or if the product has been exposed to rain or moisture.
- Repair work is also required if the device is not working properly or has been dropped. If smoke is produced, or there are any unusual sounds or smells, turn the product off immediately. In such cases, the product should not be used until it has been inspected by
authorised service personnel. Only have the device repaired by qualified personnel. Never open the housing of the product.
- Only use a clean, dry cloth for cleaning the product and never use any corrosive liquids. Use a slightly moistened cloth and a mild cleaning agent to remove stubborn dirt.
Troubleshooting
To keep the warranty valid, never try to repair the system yourself. If you encounter problems when using this unit, review the following before requesting service.
No power
- Ensure that the AC cord is properly connected.
- Ensure that there is power at the AC outlet.
- Press the standby button on the remote control or soundbar to turn the soundbar on.
No sound
- Increase the volume. Press Volume Up on the remote control or on the right side of the soundbar.
- Press MUTE on the remote control to ensure the soundbar is not muted.
- Press source buttons to select a different input source.
- When using either of the Digital input, if there is no audio:
Try setting the TV output to PCM or connect directly to your Blu-ray/other source. Some TVs do not pass through digital audio. - Your TV may be set to variable audio output. Confirm that the audio output setting is set to FIXED or STANDARD, not VARIABLE. Consult your TV's user manual for more detailed information.
- If using Bluetooth, ensure that the volume on your source device is turned up and that the device is not muted.
Remote control does not work
- Before you press any playback control button, first select the correct source.
-
Reduce the distance between the remote control and the unit.
-
Insert the battery with its polarities (+/-) aligned as indicated.
- Replace the battery.
- Aim the remote control directly at the sensor on the front of the unit.
I hear buzzing or humming sound
- Ensure all cables and wires are securely connected.
- Connect to a different source device (TV, Blu-ray player, etc) to see if the buzzing persists. If it does not, the problem may be with the original device.
- Connect your device to a different input on the soundbar.
I cannot find the Bluetooth name of this unit on my Bluetooth device
- Ensure the Bluetooth function is activated on your Bluetooth device.
- Re-pair the unit with your Bluetooth device.
This is a 15 mins power off function, one of the ERPII standard requirement for saving power
- When the unit's external input signal level is too low, the unit will turn off automatically in 15 minutes. Please increase the volume level of your external device.
The subwoofer is idle or the indicator of the subwoofer does not light up
- Please unplug power cord from the mains socket, and plug it in again after 4 minutes to reconnect with the subwoofer.
Disposal
The packaging is made of environmentally friendly materials, which may be disposed of through your local recycling facilities.
Contact your municipality for information on how to dispose of your worn-out product.
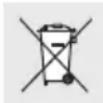
The adjacent symbol of a crossed out dustbin on wheels indicates this device is subject to Directive 2012 / 19 / EU.
This directive states at the end of the life this device must not be disposed of through regular household refuse but must be returned to special collection sites, recycling depots or waste management companies.
This disposal is free of charge to you. Protect the environment and dispose properly.
Please contact your local waste management company or the city / municipal administration for more information.
Think about the environment and your personal health. Dispose empty batteries in separate collecting boxes. These can be found in many public buildings or in shops where batteries are sold.
Improper disposal of batteries can harm the environment!
Never dispose of batteries in your household waste. They may contain toxic heavy metals and are subject to hazardous waste regulations. The chemical symbols of the heavy metals are: Cd = cadmium, Hg = mercury, Pb = lead. Therefore dispose of used batteries through your local collection site.
Simplified EU declaration of conformity
Hereby, OWIM GmbH & Co. KG, Stiftsbergstraße 1, DE-74167 Neckarsulm, GERMANY, declares that the product BLUETOOTH® STEREO SOUNDBAR HG03088, is in compliance with Directives 2014/53/EU, 2011/65/EU and 2009/125/EC.
The full text of the EU declaration of conformity is available at the following internet address:
www.owim.com
CE
OWIM GmbH & Co. KG
Stiftsbergstraße 1
DE-74167 Neckarsulm
GERMANY
Model No.: HG03088
Version: 06 / 2017
IAN 293901
8