
K3000 WET - Concrete saw HUSQVARNA - Free user manual and instructions
Find the device manual for free K3000 WET HUSQVARNA in PDF.
| Product type | Portable electric concrete saw |
| Brand | HUSQVARNA |
| Model | K3000 WET |
| Weight (without blade or cable) | 8.2 kg |
| Protection class | I |
| Rated voltage (Europe) | 230 V |
| Rated power (Europe) | 2700 W / 12 A |
| Residual-current circuit breaker | Yes |
| Water cooling | Yes, with flow limiter |
| Max blade diameter | 350 mm (14") |
| Max blade speed | 4500 rpm |
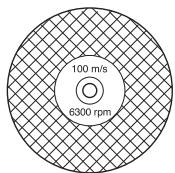
| Max peripheral speed | 100 m/s (for 350 mm blade) |
| Sound power level | 105 dB(A) |
| Sound pressure level at ear | 95 dB(A) |
| Vibration (front/rear handle) | 3.5 m/s² |
| Motor cooling | Fan, air intakes at rear handle |
| Water connection | Gardena type, max pressure 8 bar |
| Maintenance | Daily cleaning with fresh water, rinsing air intakes |
| Safety equipment | Blade guard, switch lock, overload protection |
| Spare parts | Brushes, filters, seals, clamping flanges |
| Repairability | Regular servicing at an authorized dealer |
Frequently Asked Questions - K3000 WET HUSQVARNA
User questions about K3000 WET HUSQVARNA
0 question about this device. Answer the ones you know or ask your own.
Ask a new question about this device
Download the instructions for your Concrete saw in PDF format for free! Find your manual K3000 WET - HUSQVARNA and take your electronic device back in hand. On this page are published all the documents necessary for the use of your device. K3000 WET by HUSQVARNA.
USER MANUAL K3000 WET HUSQVARNA
Please read the operator's manual carefully and make sure you understand the instructions
before using the machine.

English
Symbols on the machine:
WARNING! The machine can be a dangerous tool if used incorrectly or carelessly, which can cause serious or fatal injury to the operator or others.
Please read the operator's manual carefully and make sure you understand the instructions before using the machine.
Always wear:
Approved protective helmet
Approved hearing protection
- Protective goggles or a visor
This product is in accordance with applicable EC directives.
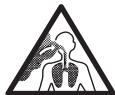
WARNING! Dust forms when cutting, which can cause injuries if inhaled. Use an approved breathing mask. Always provide for good ventilation.
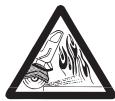
WARNING! Sparks from the cutting blade can cause fire in combustible materials such as: petrol (gas), wood, dry grass etc.
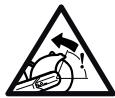
WARNING! Kickbacks can be sudden, rapid and violent and can cause life threatening injuries. Read and understand the instructions in the manual before using the machine.
Environmental marking. Symbols on the product or its packaging indicate that this product cannot be handled as domestic waste. It must instead be submitted to an appropriate recycling station for the recovery of electrical and electronic equipment.
By ensuring that this product is taken care of correctly, you can help to counteract the potential negative impact on the environment and people that can otherwise result through the incorrect waste management of this product.
For more detailed information about recycling this product, contact your municipality, your domestic waste service or the shop from where you purchased the product.
Other symbols/decals on the machine refer to special certification requirements for certain markets.


Symbols in the operator's manual:
Inspection and/or maintenance should be carried out with the motor switched off and the plug disconnected.
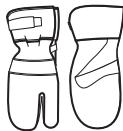
Always wear approved protective gloves.
Regular cleaning is required.
Visual check.
Protective goggles or a visor must be worn.
Contents
KEY TO SYMBOLS
Symbols on the machine: 2
Symbols in the operator's manual: 2
CONTENTS
Contents 3
WHAT IS WHAT?
What is what on the power cutter - K3000? 4
WHAT IS WHAT?
What is what on the power cutter - K3000 Wet? .. 5
GENERAL SAFETY PRECAUTIONS
Steps before using a new power cutter 6
Personal protective equipment 6
Machine's safety equipment 7
SAFETY INSTRUCTIONS
General safety warnings 9
Cutting blades 1
General working instructions 13
ASSEMBLY
Assembly 15
Fitting the cutting blade 15
Guard for the blade 15
STARTING AND STOPPING
Before starting 16
Starting 16
Stopping 16
MAINTENANCE
General 17
Cleaning 17
Electrical Feed 17
Replacing the carbon brushes 17
Bevel gear 18
Checking the drive shaft and flange washers 18
Checking water connection with flow limiter 18
Daily maintenance 18
TECHNICAL DATA
Cutting equipment 20
Recommended cable dimensions 20
EC-declaration of conformity 21
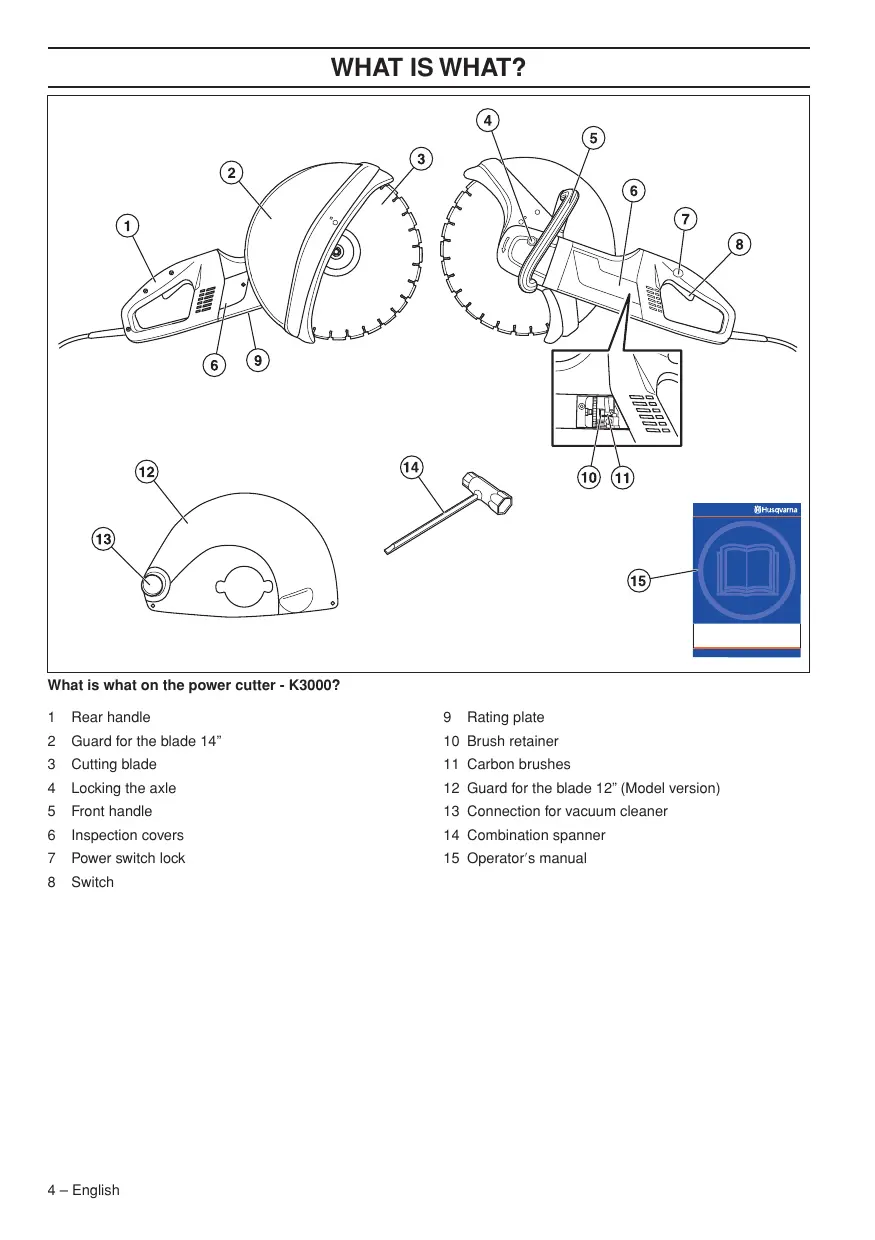
WHAT IS WHAT?
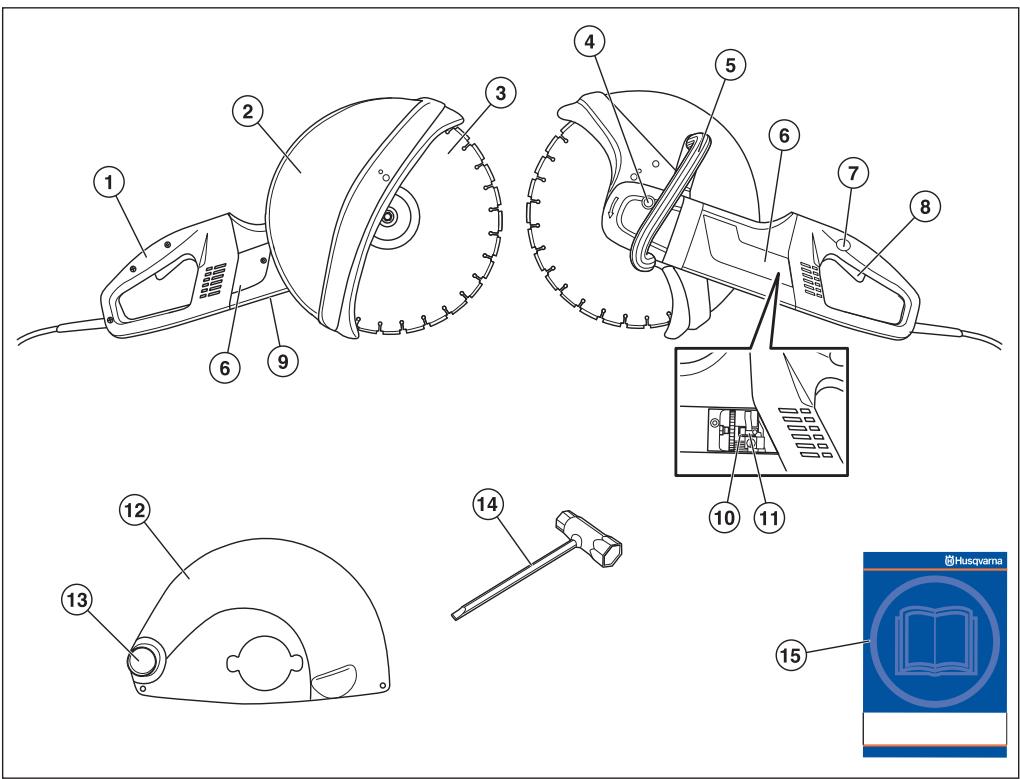
What is what on the power cutter - K3000?
1 Rear handle
2 Guard for the blade 14"
3 Cutting blade
4 Locking the axle
5 Front handle
6 Inspection covers
7 Power switch lock
8 Switch
9 Rating plate
10 Brush retainer
11 Carbon brushes
12 Guard for the blade 12" (Model version)
13 Connection for vacuum cleaner
14 Combination spanner
15 Operator's manual
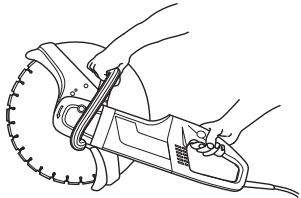
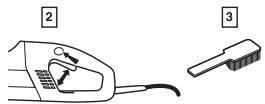
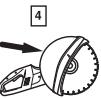
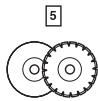
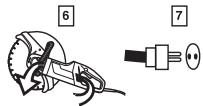
WHAT IS WHAT?
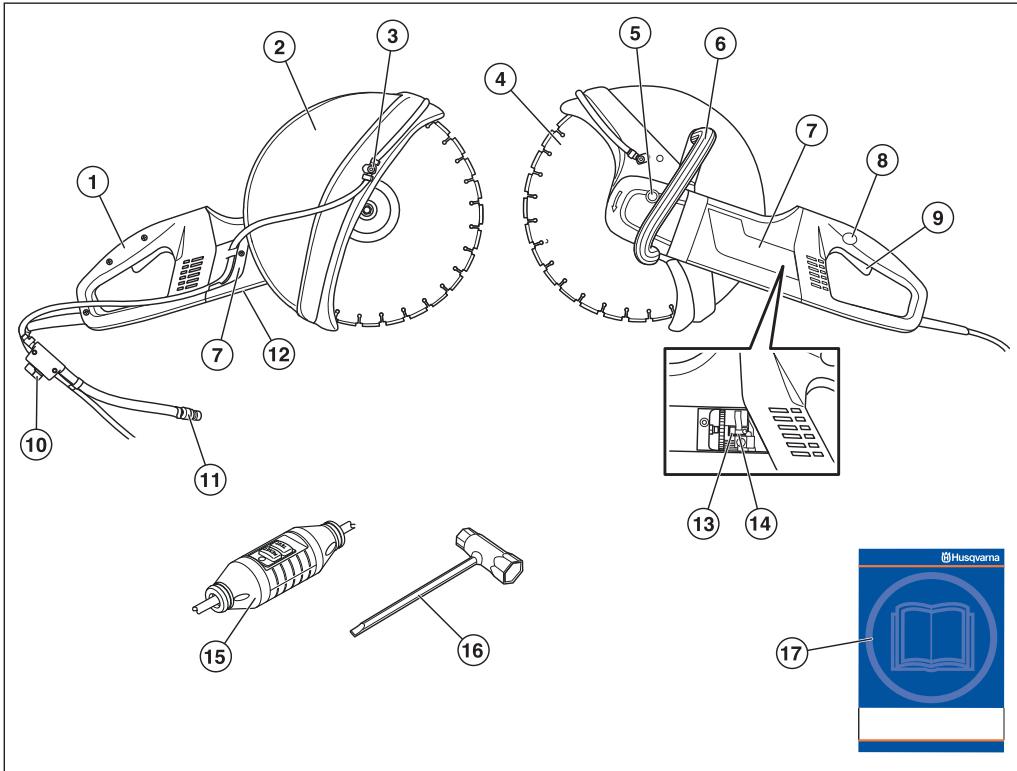
What is what on the power cutter - K3000 Wet?
1 Rear handle
2 Guard for the blade
3 Water kit
4 Cutting blade
5 Locking the axle
6 Front handle
7 Inspection covers
8 Power switch lock
9 Switch
10 Water tap
11 Water connection with flow limiter
12 Rating plate
13 Brush retainer
14 Carbon brushes
15 Ground fault circuit interrupter (not for GB)
16 Combination spanner
17 Operator's manual
Steps before using a new power cutter
- Please read the operator's manual carefully and make sure you understand the instructions before using the machine.
- The machine is only designed for cutting hard materials, such as concrete, brick, masonry as well as cast iron and cement pipes.
- Let your Husqvarna dealer regularly check the power cutter and make essential adjustments and repairs.

WARNING! Under no circumstances should you modify the original design of the machine without approval from the manufacturer. Always use original spare parts. Unauthorized modifications and/or accessories may lead to serious injury or death to the user or others.

WARNING! Use of products which cut, grind, drill, sand or shape material can generate dust and vapors which may contain harmful chemicals. Know the nature of the material being worked on and wear appropriate dust mask or respirator protection.

WARNING! A power cutter is a dangerous tool if used carelessly or incorrectly and can cause serious, even fatal injuries. It is extremely important that you read and understand the contents of this Operator's Manual.
Husqvarna Construction Products has a policy of continuous product development. Husqvarna reserves the right to modify the design and appearance of products without prior notice and without further obligation introduce design modifications.
All information and all data in the Operator's Manual were applicable at the time the Operator's Manual was sent to print.
Personal protective equipment

WARNING! You must use approved personal protective equipment whenever you use the machine. Personal protective equipment cannot eliminate the risk of injury but it will reduce the degree of injury if an accident does happen. Ask your dealer for help in choosing the right equipment.
- Protective helmet
Hearing protection - Protective goggles or a visor
- Breathing mask

Heavy-duty, firm grip gloves.
- Tight-fitting, heavy-duty and comfortable clothing that permits full freedom of movement.

Use leg-guards recommended for the material to be cut.
- Boots with steel toe-caps and non-slip sole.

Always have a first aid kit nearby.

Machine's safety equipment
This section describes the machine's safety equipment, its purpose, and how checks and maintenance should be carried out to ensure that it operates correctly. See the "What is what?" section to locate where this equipment is positioned on your machine.

WARNING! Never use a machine that has faulty safety equipment! Carry out the inspection, maintenance and service routines listed in this section.
All servicing and repair work on the machine requires special training. This is especially true of the machine's safety equipment. If your machine fails any of the checks described below you must contact your service agent. When you buy any of our products we guarantee the availability of professional repairs and service. If the retailer who sells your machine is not a servicing dealer, ask him for the address of your nearest service agent.
Switch
The power switch should be used to start and stop the machine.

Checking the power switch
- Start the machine, release the power switch and check that the engine and the cutting blade stop.
- A defective power switch should be replaced by an authorized service workshop.
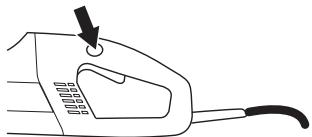
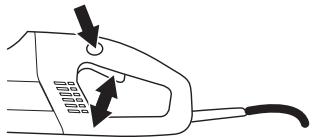
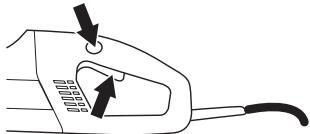
Power switch lock
The power switch lock is designed to prevent accidental operation of the switch. When the lock (A) is pressed in the power switch (B) is released.
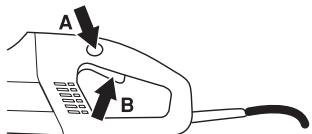
The power switch lock remains depressed as long as the power switch is depressed. When the grip on the handle is released both the power switch and power switch lock are reset. This movement is controlled by two independent return springs. This position results in the machine stopping and the power switch being locked.
Checking the power switch lock
- Make sure the power switch is locked when the power switch lock is in its original position.
- Press in the power switch lock and make sure it returns to its original position when you release it.
- Check that the power switch and power switch lock move freely and that the return springs work properly.
- Start the machine, release the power switch and check that the engine and the cutting blade stop.
Gradual start and overload protection
The machine is equipped with electronically controlled gradual start and overload protection.
The engine starts to pulsate if the machine is loaded above a specific level. If the load is reduced the engine reverts to its normal state and cutting can resume.
The electronics will cut the current after a set time if the machine continues to be run with a pulsating engine. The higher load the faster the shutoff.
The electronics cut the current immediately if the blade jams.
Guard for the blade
This guard is fitted above the cutting blade and is designed to prevent parts of the blade or cutting fragments from being thrown towards the user.
Checking the blade guard

WARNING! Always check that the guard is correctly fitted before starting the machine. Check that the cutting blade is fitted correctly and does not show signs of damage. A damaged cutting blade can cause personal injury. See instructions under the heading Assembly.
- Check that the guard is complete and without any cracks or deformations.
General safety warnings

WARNING! Read all safety warnings and all instructions. Failure to follow the warnings and instructions may result in electric shock, fire and/or serious injury.
Save all warnings and instructions for future reference.
The term "power tool" in the warnings refers to your mains-operated (corded) power tool or battery-operated (cordless) power tool.
Work area safety
- Keep work area clean and well lit. Cluttered or dark areas invite accidents.
- Do not operate power tools in explosive atmospheres, such as in the presence of flammable liquids, gases or dust. Power tools create sparks which may ignite the dust or fumes.
- Keep children and bystanders away while operating a power tool. Distractions can cause you to lose control.
- Do not use the machine in bad weather, such as dense fog, rain, strong wind, intense cold, etc. Working in bad weather is tiring and can lead to dangerous conditions, e.g. slippery surfaces.
- Ensure when cutting that no material can become loose and fall, causing operating injury. Take great care when working on sloping ground.

WARNING! The safety distance for the power cutter is 15 metres. You are responsible to ensure that animals and onlookers are not within the working area. Do not start cutting until the working area is clear and you are standing firmly.
Electrical safety
- Power tool plugs must match the outlet. Never modify the plug in any way. Do not use any adapter plugs with earthed (grounded) power tools. Unmodified plugs and matching outlets will reduce the risk of electric shock.
- Avoid body contact with earthed or grounded surfaces, such as pipes, radiators, ranges and refrigerators. There is an increased risk of electric shock if your body is earthed or grounded.
- The power tool should not be exposed to more moisture than what is supplied by the low flushing water system. Do not expose the power tool to rain. Water entering a power tool will increase the risk of electric shock.
- Do not abuse the cord. Never use the cord for carrying, pulling or unplugging the power tool. Keep cord away from heat, oli, sharp edges or moving parts. Damaged or entangled cords increase the risk of electric shock.
- When operating a power tool outdoors, use an extension cord suitable for outdoor use. Use of cord suitable for outdoor use reduces the risk of electric shock.
- Check that the cord and extension cord are intact and in good condition. Never use the machine if the cord is damaged, hand it in to an authorized service workshop for repair.
- Do not use an extension cord while it is rolled up to avoid overheating.
- When using an extension cable, use only certified extension cables with sufficient reach. For more information, see "Recommended cable dimensions" in the "Technical data" section. An undersized cable means a risk of reduced machine capacity and overheating.
- The machine should be connected to an earthed outlet socket. Check that the mains voltage corresponds with that stated on the rating plate on the machine.
- Ensure the cord is behind you when you start to use the machine so that the cord will not be damaged.

WARNING! The machine (Great Britain 110V) is not equipped with a ground fault circuit interrupter. The machine must always be used with an isolating transformer for protection in case an electrical fault should occur.
K3000

WARNING! Do not wash the machine with water, as water can enter the electrical system or the engine and cause damage to the machine or short circuit.
Personal safety
- Stay alert, watch what you are doing and use common sense when operating a power tool. Do not use a power tool while you are tired or under the influence of drugs, alcohol or medication. A moment of inattention while operating power tools may result in serious personal injury.
- Use personal protective equipment. Always wear eye protection. Protective equipment such as dust mask, non-skid safety shoes, hard hat, or hearing protection used for appropriate conditions will reduce personal injuries.
- Prevent unintentional starting. Ensure the switch is in the OFF-position before connecting to power source and/or battery pack, picking up or carrying the tool. Carrying power tools with your finger on the switch or energising power tools that have the switch on invites accidents.
- Remove any adjusting key or wrench before turning the power tool on. A wrench or a key left attached to a rotating part of the power tool may result in personal injury.
- Do not overreach. Keep proper footing and balance at all times. This enables better control of the power tool in unexpected situations.
- Dress properly. Do not wear loose clothing or jewellery. Keep your hair, clothing and gloves away from moving parts. Loose clothes, jewellery or long hair can be caught in moving parts.
If devices are provided for the connection of dust extraction and collection facilities, ensure that these are connected and properly used. Use of dust collection can reduce dust-related hazards. - Remain at a distance from the blades when the engine is running.

WARNING! Overexposure to vibration can lead to circulatory damage or nerve damage in people who have impaired circulation. Contact your doctor if you experience symptoms of overexposure to vibration. These symptoms include numbness, loss of feeling, tingling, pricking, pain, loss of strength, changes in skin colour or condition. These symptoms normally appear in the fingers, hands or wrists.
Power tool use and care
- Do not force the power tool. Use the correct power tool for your application. The correct power tool will do the job better and safer at the rate for which it was designed.
- Do not use the power tool if the switch does not turn it on and off. Any power tool that cannot be controlled with the switch is dangerous and must be repaired.
- Disconnect the plug from the power source and/or the battery pack from the power tool before making any adjustments, changing accessories, or storing power tools. Such preventive safety measures reduce the risk of starting the power tool accidentally.
- Store idle power tools out of the reach of children and do not allow persons unfamiliar with the power tool or these instructions to operate the power tool. Power tools are dangerous in the hands of untrained users.
- Maintain power tools. Check for misalignment or binding of moving parts, breakage of parts and any other condition that may affect the power tool's operation. If damaged, have the power tool repaired before use. Many accidents are caused by poorly maintained power tools.
- Keep cutting tools sharp and clean. Properly maintained cutting tools with sharp cutting edges are less likely to bind and are easier to control.
- Use the power tool, accessories and tool bits etc. in accordance with these instructions, taking into account the working conditions and the work to be performed. Use of the power tool for operations different from those intended could result in hazardous situations.
- Never use a machine that has been modified in any way from its original specification.
Make sure that no pipes or electrical cables are routed in the working area or in the material to be cut. - Always check and mark out where gas pipes are routed. Cutting close to gas pipes always entails danger. Make sure that sparks are not caused when cutting in view of the risk of explosion. Remain concentrated and focused on the task. Carelessness can result in serious personal injury or death.
- The guard for the cutting equipment must always be on when the machine is running.
Service
- Have your power tool serviced by a qualified repair person unsing only identical replacement parts. This will ensure that the safety of the power tool is maintained.
Cutting blades

WARNING! A cutting blade may burst and cause injury to the operator.
Never use a cutting blade at a lower speed rating than that of the power cutter.
Never use a cutting blade for any other materials than that it was intended for.
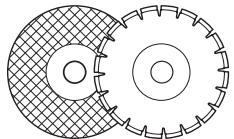
General
Cutting blades are available in two basic designs; abrasive baldes and diamond blades.
- High-quality blades are often most economical. Lower quality blades often have inferior cutting capacity and a shorter service life, which results in a higher cost in relation to the quantity of material that is cut.
- Make sure that the right bushing is used for the cutting blade to be fitted on the machine. See the instructions under the heading Assembling the cutting blade.
Suitable cutting blades
| Cutting blades | K3000 | K3000 Wet |
| Abrasive blades | Yes | Yes* |
| Diamond blades | Yes | Yes |
| Rescue blade | No | No |
*Without water
Cutting blades for different materials
| Concrete | Metal | Plastic | |
| Abrasive blades | X | X | X |
| Diamond blades | X |
Hand-held, high-speed machines
Our cutting blades are manufactured for high-speed, portable power cutters. If blades from other manufacturers are used, ensure that the blades conform to all regulations and demands that concern this type of power cutter.
Special blades
Some cutting blades are designed for stationary equipment and for use with attachments. Such cutting blades must not be used on portable power cutters.
Always contact local authorities and make sure you are following applicable directives.
Blade vibration
The blade can become out-of-round and vibrate if an excessive feed pressure is used.
A lower feed pressure can stop the vibration. Otherwise replace the blade. The blade must be of the recommended type for the material to be cut.
Abrasive blades
The cutting material on abrasive blades consists of grit bonded using an organic binder. "Reinforced blades" are made up of a fabric or fibre base that prevents total breakage at maximum working speed if the blade should be cracked or damaged.
A cutting blade's performance is determined by the type and size of abrasive corn, and the type and hardness of the bonding agent.
Check that the blade is approved for the same or higher speed according to the approval plate of the engine. Never use a cutting blade with a lower speed rating than that of the power cutter.
Ensure the blade it not cracked or damaged in any other way.
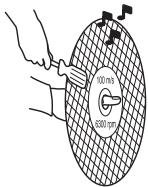
Test the abrasive blade by hanging it on your finger and tapping it lightly with a screwdriver or the like. If the blade does not produce a resonant, ringing sound it is damaged.
Abrasive blades for different materials
| Blade type | Material |
| Concrete blade | Concrete, asphalt, stone masonry, cast iron, aluminium, copper, brass, cables, rubber, plastic, etc. |
| Metal blade | Steel, steel alloys and other hard metals. |

WARNING! Avoid using abrasive blades with water. The strength is impaired when abrasive blades are exposed to moisture.
Diamond blades

WARNING! Cutting plastics with a diamond blade can cause kickback when the material melts due to the heat produced when cutting and sticks to the blade.
Diamond blades consist of a steel core provided with segments that contain industrial diamonds.
Diamond blades ensure lower costs per cutting operation, fewer blade changes and a constant cutting depth.
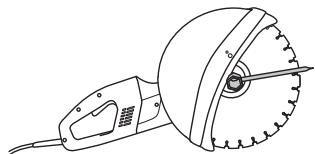
When using diamond blades make sure that it rotates in the direction indicated by the arrow on the blade.
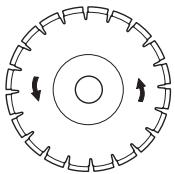
There is an arrow on the machine that indicates the axle's direction of rotation that the blade is mounted on.

Always use a sharp diamond blade.
Material
Diamond blades are ideal for masonry, reinforced concrete and other composite materials.
Diamond blades are available in several hardness classes. A "soft" diamond blade has a relatively short service life and large cutting capacity. It is used for hard materials such as granite and hard concrete. A "hard" diamond blade has a longer service life and reduced cutting capacity, and should be used for soft materials such as brick and asphalt.
Sharpening diamond blades
Diamond blades can become dull when the wrong feeding pressure is used or when cutting certain materials such as heavily reinforced concrete. Working with a blunt diamond blade causes overheating, which can result in the diamond segments coming loose.
Sharpen the blade by cutting in a soft material such as sandstone or brick.
Dry cutting with diamond blade

WARNING! Diamond blades get very hot when used. A heated blade can be deformed and cause damage to the machine as well as the user.
When dry cutting, lift the blade out from the cut every 30-60 seconds and let it rotate in the air for 10 seconds to let it cool.
Wet cutting with diamond blade (K3000 Wet)
Water cooling, which is used when cutting concrete, cools the blade and increases its service life while also reducing the formation of dust.

WARNING! Diamond blades get very hot when used. A heated blade can be deformed and cause damage to the machine as well as the user.
When wet cutting, the blade is continuously cooled to prevent overheating.
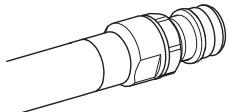
Water connection with flow limiter (K3000 Wet)
There is a flow limiter in the water connector that gives a constant flow, irrespective of the water pressure. The flow limiter may not be dismantled.
Transport and storage
- Do not store or transport the power cutter with the cutting blade fitted. All blades should be removed from the cutter after use and stored carefully.
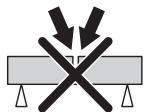
- Special care should be taken with abrasive blades. Abrasive blades must be stored on a flat, level surface. If an abrasive blades is stored in humid conditions, this can cause imbalance and result in injury.
- Inspect new blades for transport or storage damage.
General working instructions


WARNING! This section describes basic safety directions for using a power cutter. This information is never a substitute for professional skills and experience. If you get into a situation where you feel unsafe, stop and seek expert advice. Contact your dealer, service agent or an experienced power cutter user. Do not attempt any task that you feel unsure of!
Cutting technique
The technique described below is of a general character. Check information for each blade regarding individual cutting characteristics (for example, diamond blades requires less feeding pressure than an abrasive discs).
- Support the work piece in such a way that it is possible to predict what will happen, and so that the cut remains open while cutting.
- Ensure that the cutting blade is fitted correctly.
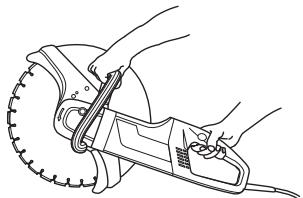
Always hold the machine in a firm grip with both hands. Hold it so that the thumbs and fingers grip round the handles.
- Check that the blade is not in contact with anything when the machine is started
- Start cutting with the machine running at maximum speed.
- Start cutting smoothly, allowing the machine to work without forcing or pressing in the blade. Always cut at maximum speed.
- Move the blade slowly forwards and backwards to achieve a small contact area between the blade and
the material to be cut. This reduces the temperature of the blade and ensures effective cutting.
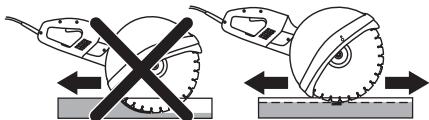
- The guard for the cutting equipment should be adjusted so that the rear section is flush with the work piece. Spatter and sparks from the material being cut are then collected up by the guard and led away from the user.
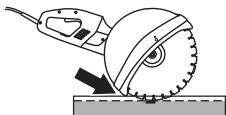
Feed down the machine in line with the blade. Pressure from the side can damage the blade and is very dangerous.

WARNING! Under all circumstances avoid grinding using the side of the blade; it will almost certainly be damaged, break and can cause immense damage. Only use the cutting section.
Do not pull the power cutter to one side, this can cause the blade to jam or break resulting in injury to people.
How to avoid kickback

WARNING! Kickback can happen very suddenly and violently; kicking the power cutter and cutting blade back at the user. If this happens when the cutting blade is moving it can cause very serious, even fatal injuries. It is vital you understand what causes kickback and that you can avoid it by taking care and using the right working technique.
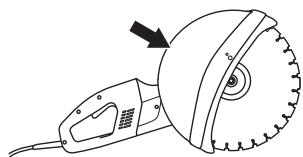
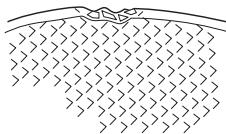
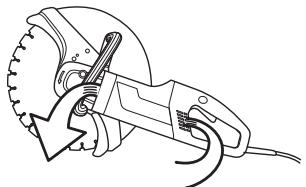
What is kickback?
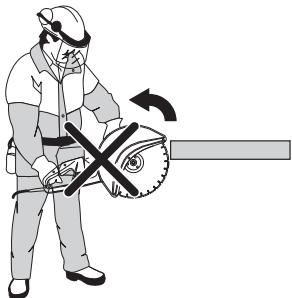
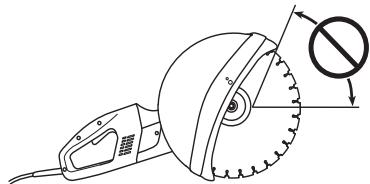
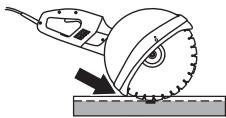
The word kickback is used to describe the sudden reaction that causes the power cutter and cutting blade to be thrown from an object when the upper quadrant of the blade, known as the kickback zone, touches an object.
General rules
- Never start to cut with the upper quadrant of the blade as shown in the figure, also known as the kickback zone.
Always hold the machine in a firm grip with both hands. Hold it so that the thumbs and fingers grip round the handles.
- Keep a good balance and a firm foothold.
Always cut at maximum speed.
- Stand at a comfortable distance from the work piece.
Take care when inserting the blade in an existing cut.
- Never cut above shoulder height.
- Be alert to movement of the work piece or anything else that can occur, which could cause the cut to close and pinch the blade.
Pull in
Pull in occurs when the disc's lower section suddenly stops or when the cut closes. (To avoid, see the heading "Basic rules" and "Jamming/rotation", here below.)
Pinching/rotation
If the cut is pressed together this can lead to jamming. The machine can be pulled down suddenly with a very powerful jerk.
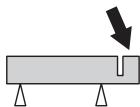
How to avoid pinching
Support the work piece in such a way that the cut remains open during the cutting operation and when the cut is finished.

Assembly


WARNING! Always pull out the plug from the outlet socket before cleaning, maintenance or assembly.
Fitting the cutting blade
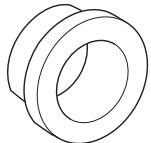
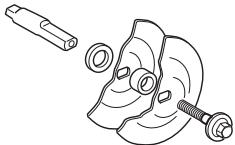
Husqvarna's blades are approved for hand-held power cutters. Blades are manufactured with three different diameters of centre holes: 20mm (0.787"), 22.2 mm (7/8") and 25.4mm (1"). Bushings can be fitted on the machine axle to adjust the machine to the centre hole of the blade. Use a bushing with the correct diameter! The blades are marked with the diameter of the centre hole.
The blade is placed on the bushing (C) between the inner flange washer (A) and the flange washer (B). The flange washer is turned so that it fits on the axle.
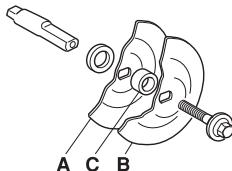
Tightening torque for the bolt holding the blade is: 15-25 Nm (130-215 in.lb).
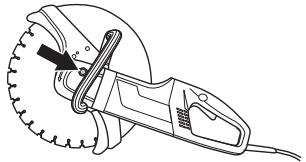
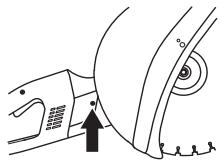
The cutting blade/axle can be locked by holding in the locking button on the rear of the machine. The button is spring-loaded and is reset when button is released.
When a diamond blade is mounted on the power cutter make sure that the diamond blade will rotate in the direction indicated by the arrow on the blade.
There is an arrow on the machine that indicates the axle's direction of rotation that the blade is mounted on.

When the blade is replaced with a new one, check the flange washers and the drive axle. See instructions under the heading Checking the drive axle and flange washers.
Checking the drive shaft and flange washers
Check that the threads on the drive shaft are undamaged. Check that the contact surfaces on the blade and the flange washers are undamaged, of the correct dimension, clean, and that they run properly on the drive axle.
Do not use warped, notched, indented or dirty flange washers. Do not use different dimensions of flange washers.
Guard for the blade
The guard must always be fitted on the machine.
The guard for the cutting equipment should be adjusted so that the rear section is flush with the work piece. Spatter and sparks from the material being cut are then collected up by the guard and led away from the user.
Before starting

WARNING! Note the following before starting:
The machine should be connected to an earthed outlet socket.
Check that the mains voltage corresponds with that stated on the rating plate on the machine.
Make sure you have a secure footing and that the cutting blade cannot touch anything.
Keep people and animals well away from the working area.
K3000 Wet

WARNING! The machine (Great Britain 120V) is not equipped with a ground fault circuit interrupter. The machine must always be used with an isolating transformer for protection in case an electrical fault should occur.
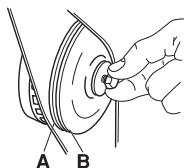
Water connector
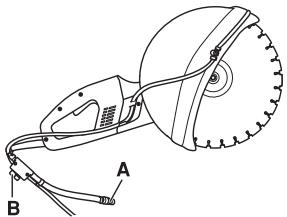
- Connect the water hose to the water supply (A). The water is switched on and off with the water tap (B).
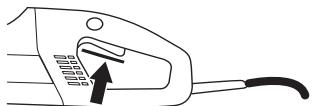
Starting
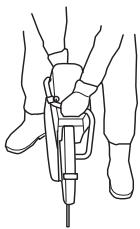
- Grip the front handle with the left hand.
- Grip the rear handle with your right hand.
- Press in the power switch lock with your right-hand thumb and press in the power switch.
- Run the machine unloaded and in a safe manner for at least 30 seconds.
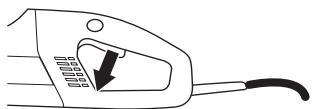
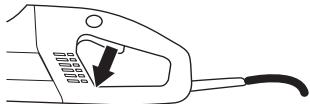
Stopping

WARNING! The cutting blade continues to rotate for some time after the motor has stopped.
Stop the motor by releasing the power switch.
General


WARNING! Inspection and/or maintenance should be carried out with the motor switched off and the plug disconnected.
Cleaning
Cooling system
The machine is equipped with an efficient fan to cool the motor. Cooling air which is drawn in through the grille by the machines rear handle passes over the stator and rotor and out through the front of the motor housing.
In order for the machine to always be cooled sufficiently the cooling air openings must be kept clear and clean. Blow down the machine regularly with compressed air.
K3000

WARNING! K3000 is not equipped with ground fault circuit interrupter. Do not wash the machine with water, as water can enter the electrical system or the engine and cause damage to the machine or short circuit.
K3000 Wet

WARNING! Do not use a high pressure washer when rinsing the inside of the machine.
The machine can withstand taking in damp air and splashes during the cutting process. Clean water does not affect the machine's function.
When cutting materials such as concrete or brick, which can contain salt, you must rinse the machine after the work is finished. The cleaning reduces the risk for accretions building up inside the engine, which can cause leakage current between electric components, which in
turn can cause the ground fault circuit interrupter to turn off without intention.
- Clean the machine daily by rinsing it with clean water after the work is finished.
- Place the machine with the rear handle facing upwards. Rinse the air intakes at the rear handle with clean water. The water will run out through the front air outlets.
- Connect the plug and run the engine dry for approx. 30 sec in order to speed up the drying of the engine.
Electrical Feed

WARNING! Never use damaged cables. They can cause serious, even fatal, personal injuries.
Check that the cord and extension cord are intact and in good condition. Never use the machine if the cord is damaged, hand it in to an authorized service workshop for repair.
Replacing the carbon brushes
Check the carbon brushes at least once a month. The carbon brushes should be replaced with new brushes if they are worn, cracked or in any other way deformed.
All carbon brushes must be replaced when the brushes are replaced.
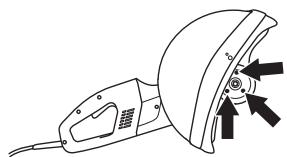
- Remove both inspection covers by loosening both screws.

- Unscrew the cable holding the carbon brush. Now lift up the spring and then lift out the carbon brush from the brush retainer.
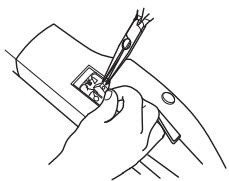
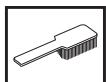
Clean the brush retainers with a dry brush.
- Carefully blow away the dust.
- Fit the new carbon brushes and, at the same time, check that they slide easily in the brush retainers.
- Fold down the springs and tighten the cable.
- New carbon brushes must be run in for approximately 40 minutes while idling.
Bevel gear
The grease in the gear housing should be changed every 4 months. Use high quality gear grease
The gear housing must not be filled completely with grease. The grease expands as the machine heats up during operation. If the gear housing was completely filled with grease it could damage the seals and lead to leakage of grease.
The gear housing should contain 90g of grease in total.
Changing the grease
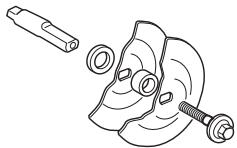
The following parts must be dismantled to change the grease in the gear housing:
1 Flange washers holding the cutting blade
2 The sealing ring
3 Support flange for the guard
4 Guard for the blade
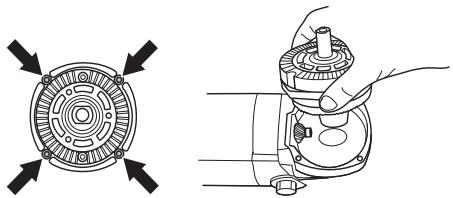
5 The four screws holding the shield. Lift the shield together with the drive wheel unit out of the gear housing.
6 Wipe out the grease and fill with new, good quality gear grease. The gear housing should contain 90g of grease in total.
CAUTION! Exercise care when dismantling so as not to damage the gaskets. These are used both as seals and spacers for the gear setting.
Checking the drive shaft and flange washers
Check that the threads on the drive shaft are undamaged. Check that the contact surfaces on the blade and the flange washers are undamaged, of the correct dimension, clean, and that they run properly on the drive axle.
Do not use warped, notched, indented or dirty flange washers. Do not use different dimensions of flange washers.
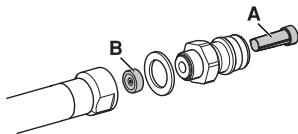
Checking water connection with flow limiter
Check and clean the filter in the connection regularly and change it when needed.
1 Unscrew the connector.
2 Press out the filter (A) using a screwdriver or the like.
3 Clean or change the filter.
4 When refitting - make sure that the flow limiter (B) is correctly adjusted, with the concave face turned towards the clutch connection.
Daily maintenance

1 Check that nuts and screws are tight.
2 Check that the power switch unit works smoothly.
3 Clean the outside of the machine.
4 Checking the blade guard
5 Check the condition of the cutting blade.
6 Check and clean the cooling air openings.
7 Check that the cord and extension cord are intact and in good condition.
TECHNICAL DATA
| Technical data | K3000 | K3000 Wet |
| Engine | ||
| Protection class | I | I |
| Ground fault circuit interrupter | No | Yes |
| Rated voltage, V | ||
| Europe | 230 | 230 |
| Great Britain | 110 | 110 |
| USA / Canada / Japan | 100-120 | 100-120 |
| Australia | 230 | 230 |
| Rated output, W | ||
| Europe | 2700/12 A | 2700/12 A |
| Great Britain | 2200/20 A | 2200/20 A |
| USA / Canada / Japan | 15 A, 50-60 Hz | 15 A, 50-60 Hz |
| Australia | 2300/10 A | 2300/10 A |
| Weight | ||
| Machine without blade and cable package, kg | 7,6 | 8,2 |
| Water cooling | ||
| Water cooling of blade | No | Yes |
| Connecting nipple | Type "Gardena" | Type "Gardena" |
| Water pressure - max, bar | - | 8 |
| Noise emissions (see note 1) | ||
| Sound power level, measured dB(A) | 104 | 105 |
| Sound power level, guaranteed dB(A) | 104 | 105 |
| Sound levels (see note 2) | ||
| Sound pressure level at the operators ear, dB(A) | 95 | 95 |
| Vibration levels (see note 3) | ||
| Front handle, m/s2 | 3,5 | 3,5 |
| Rear handle, m/s2 | 3,5 | 3,5 |
Note 1: Noise emissions in the environment measured as sound power (L_WA) in conformity with EN 60745-1.
Note 2: Noise pressure level according to EN 60745-1. Reported data for noise pressure level has a typical statistical dispersion (standard deviation) of 1.0 dB(A).
Note 3: Vibration level according to EN 60745-1. Reported data for vibration level has a typical statistical dispersion (standard deviation) of 1m / s^2
Cutting equipment
| Cutting blade, mm/inches | Max. peripheral speed, m/s |
| 300/12 | 80 |
| 350/14 | 100 |
Max. blade speed, rpm
4500
Recommended cable dimensions
| Cable area | 1,5 mm² | 2,5 mm² |
| Input voltage 100-120 V | 20 m | 40 m |
| Input voltage 220-240 V | 30 m | 50 m |
EC-declaration of conformity
(Appplies to Europe only)
Husqvarna AB, SE-433 81 Göteborg, Sweden, tel: +46-31-949000, declares under sole responsibility that the power cutter Husqvarna K3000, K3000 Wet dating from 2010 serial numbers and onwards (the year is clearly stated on the rating plate, followed by the serial number), complies with the requirements of the COUNCILIS DIRECTIVE:
of May 17, 2006 "relating to machinery" 2006/42/EC
of December 15, 2004 "relating to electromagnetic compatibility" 2004/108/EC.
of December 12, 2006 "relating to electrical equipment" 2006/95/EC.
The following standards have been applied: EN ISO 12100:2003, EN 55014-1:2006, EN 55014-2/A1:2001, EN 61000-3-2:2006, EN 61000-3-3/A1/A2:2005, EN 60745-1:2009, IEC 60745-2-22:2009.
Göteborg December 29, 2009

Henric Andersson
Vice President, Head of Power Cutters and Construction Equipment
Husqvarna AB
(Authorized representative for Husqvarna AB and responsible for technical documentation.)
1153343-26
Original instructions