TPX307 - Other kitchen appliance Coline - Free user manual and instructions
Find the device manual for free TPX307 Coline in PDF.


| Product Type | Wireless Meat Thermometer |
| Brand | Coline |
| Model | TPX307 (Set with TPR307) |
| Power Supply Receiver | 2 x AAA/LR03 batteries (not included) |
| Power Supply Transmitter | 2 x AAA/LR03 batteries (not included) |
| Temperature Range (Probe) | 0 – 300 °C (32 – 572 °F) |
| Probe Cable Length | 105 cm (41.3 in) |
| Probe Max Cable Temperature | 380 °C (716 °F) |
| Wireless Range (Open Area) | Up to 30 m (98 ft) |
| Preset Meat Types | Beef, Veal, Lamb, Pork, Chicken, Turkey, Fish, Hamburger |
| Doneness Levels | Rare, Medium Rare, Medium, Well Done |
| Timer Modes | Countdown timer (up to 23:59) and stopwatch |
| Alarm | Audible signal and flashing temperature light when target reached |
| Display | Digital LCD |
| Housing Material | Plastic |
| Cleaning | Wipe with damp cloth and mild detergent; do not immerse probe or devices |
| Safety | Not for microwave use; keep away from children; use heat-resistant gloves |
| Certification | CE (Compliant with 2014/53/EC and 2014/35/EC) |
| Included Accessories | Transmitter, Receiver, Temperature Probe, Belt Clip/Stand, Wall Mount |
Frequently Asked Questions - TPX307 Coline
User questions about TPX307 Coline
0 question about this device. Answer the ones you know or ask your own.
Ask a new question about this device
Download the instructions for your Other kitchen appliance in PDF format for free! Find your manual TPX307 - Coline and take your electronic device back in hand. On this page are published all the documents necessary for the use of your device. TPX307 by Coline.
USER MANUAL TPX307 Coline
Please read the entire instruction manual before using the product and then save it for future reference. We reserve the right for any errors in text or images and any necessary changes made to technical data. In the event of technical problems or other queries, please contact our Customer Services.
Safety
- The product is only intended for normal domestic use and only in the manner described in this instruction manual.
- Do not expose the product to rain or moisture.
- The product's temperature probe is only designed for measuring the internal temperature of foodstuffs. Never attempt to use the product for other types of temperature measurement.
- Never mix old and new batteries. Never mix rechargeable and non-rechargeable batteries.
- Do not subject the product to impacts or shocks.
- The product should never be used if it is in any way damaged or malfunctioning.
- Never immerse the product into water or other liquids. Wipe the product dry immediately if it has become wet or damp.
- Never let children play with the product.
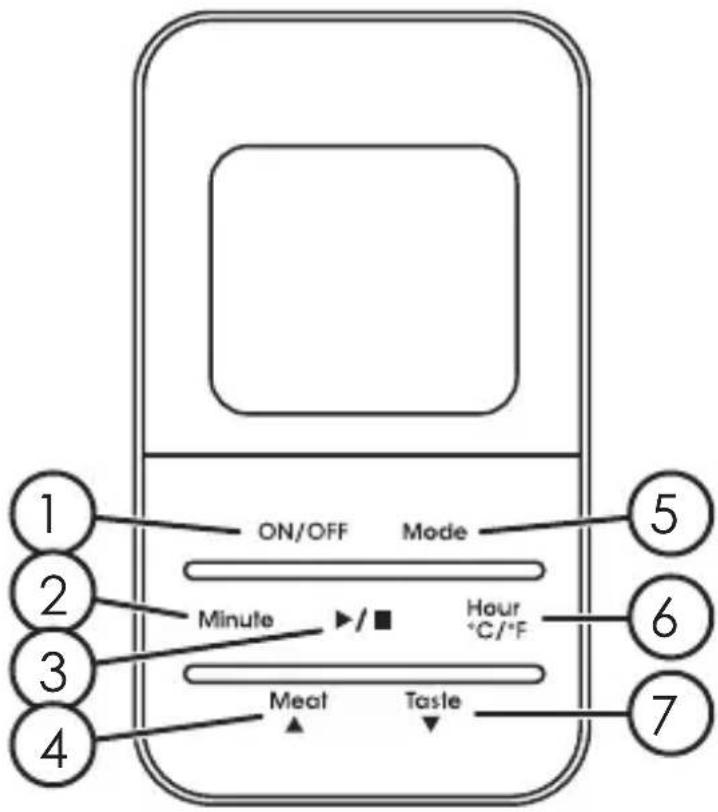
Product description Receiver
- [ON/OFF] Power button
- [Minute] Minutes setting
- [▶/■] Start/stop and resetting the timer
- [Meat ▲] Meat settings or selectable cooking temperature
- [Mode] Thermometer or timer settings
- [Hour °C/°F] Setting hours and temperature units
- [Taste ▼] Doneness levels (Well Done, Medium etc.) and selectable cooking temperature
- Belt clip/stand
- Battery cover

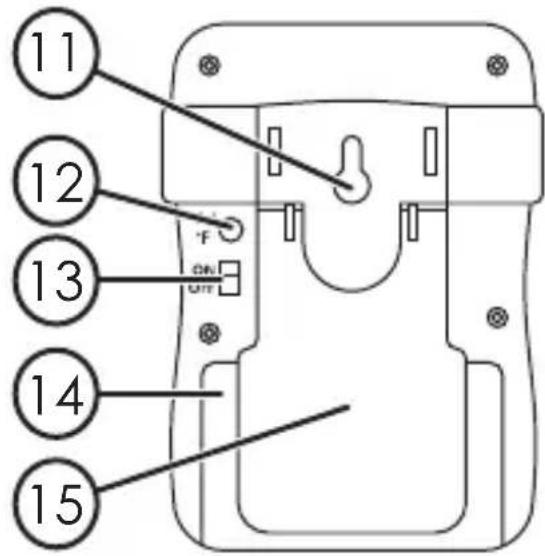
Transmitter


- Probe socket
- Wall mount
- [°C/°F] Connects the receiver to the transmitter and selects temperature units
- [ON/OFF] Switch
- Battery cover
- Stand
Before initial use
Receiver
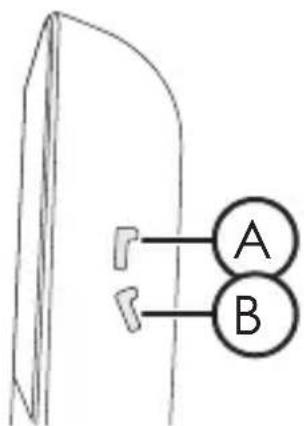
Belt clip/stand
- Belt clip and stand with multiple fastening options.
A) Used as a belt clip
B) Used as a stand
- The clip is fastened onto the thermometer securely. To remove or adjust its position, bend it slightly using an appropriate tool until it becomes loose and can be removed or repositioned.

natural_image
Line drawing of a hand holding a pen, no text or symbols presentBatteries
-
Open the receiver's battery compartment on the back and insert 2 × AAA/LR03 batteries. Note the markings on the bottom of the battery holder to ensure correct polarity.
-
Refit the battery cover.
Transmitter
Table stand
Fold out the stand on the back of the transmitter. 2-position stand.

natural_image
Line drawings of two different types of accessories (no text or symbols)Note: If the stand is over-extended it will release its grip from its mount to prevent damage. Refit the stand back into its mount and it will function normally again.
Batteries
-
Open the receiver's battery compartment on the back and insert 2 × AAA/LR03 batteries. Note the markings on the bottom of the battery holder to ensure correct polarity.
-
Refit the battery cover.
Connecting the transmitter to the receiver
Things to consider:
- Other wireless equipment using the same frequency can reduce the transmission range.
- The range of all wireless equipment depends on the type of obstacles located between the transmitter and the receiver (e.g. a concrete wall will interfere with the signal more than a plasterboard wall).
If you experience problems, try the following:
- Turn off any other existing wireless equipment to check whether this is the cause of the problem.
- Reposition the wireless equipment, shorten the distance between the transmitter and the receiver or reduce the number of obstacles (walls, furniture, etc.) between them.
- Plug the probe into the transmitter's socket (10).
- Turn the transmitter on by setting its [OFF/ON] switch (13), on the back, to the ON position.
- Turn the receiver on by holding in its [ON/OFF] button until the display comes on.
Note: The receiver must be turned on within 2 min of the transmitter being turned on for a successful connection to be established.
- Hold in the [°C/°F] button on the back of transmitter until an audible signal is heard from the receiver and the current temperature is displayed on the receiver's display. The devices are now paired.
Note:
- The max range between the devices is 30 m in optimal unobstructed conditions. Indoor environments present multiple signal obstructions such as walls, furniture, other objects, transmissions from other wireless equipment, etc.
- If the devices lose contact with each other, the receiver will emit an audible signal every 4 sec and display “---”. When the devices come back into range they will automatically be paired again. If the connection is not re-established, place the devices close to each other and repeat the pairing procedure. Start by turning off both devices and then follow the steps listed in the Connecting the transmitter to the receiver section above.
Operating instructions
Plug the temperature probe into the thermometer.
Note: Stick the tip of the probe into the centre of the thickest part of the meat. Do not stick it in so far that it comes out the other end. Avoid sticking it into any fatty areas.

Warning:
- Use heat-resistant gloves/mitts if you need to handle the probe or its cable during the cooking process.
- Keep the probe and its cable out of the reach of children.
- Clean the probe thoroughly both before and after use.
-
Don't subject the devices to rain and never immerse them in water or other liquids.
-
Don't subject the devices to excessive heat or hot surfaces.
- Don't expose the probe or its cable to live flames.
- Never use the thermometer in microwave ovens.
Using the thermometer's pre-set temperature settings
Note:
You can still set the temperature even if you have selected one of the pre-set temperature settings by following the instructions in the Selecting cooking temperature section.
- Hold in [MODE] until "Well done", "Medium", "Medium rare" or "Rare" appears on screen.
- Press [Meat ▲] to select the type of meat:
- Press [Taste ▼] to select the cooking temperature
- Once the set temperature is reached an audible signal will be emitted and the temperature light will flash.
- Press any button to turn the alarm off.
- Hold in [MODE] to reset the display.
The table below shows pre-set temperatures for different types of meat:
| Meat type | Displays | Well done | Medium | Medium rare | Rare |
| Beef BEEF | 75 °C/167 °F | 70 °C/158 °F | 60 °C/140 °F | 55 °C/131 °F | |
| Veal VEAL | 75 °C/167 °F | 70 °C/158 °F | - | - | |
| Lamb | LAMB | 75 °C/167 °F | 70 °C/158 °F | - | - |
| Pork | PORK | 77 °C/171 °F | 71 °C/160 °F | - | - |
| Chicken | CHICK | 80 °C/176 °F | - | -- | |
| Turkey | TURKY | 80 °C/176 °F | - | -- | |
| Fish | FISH | 60 °C/140 °F | - | -- | |
| Hamburger | HAMBG | 75 °C/167 °F | - | -- |
Selecting cooking temperature
- Make sure that "Well done", "Medium", "Medium rare" or "Rare" do not appear on screen.
- If any one of these doneness levels appear on screen, hold in [MODE] until the selection disappears.
- Press or hold in [Meat ▲] or [Taste ▼] to set the desired temperature.
Timer function
Press [MODE] until the timer appears on screen. The timer has two modes, timer and stopwatch.
Note: You can start the timer and then select any of the pre-set cooking temperatures mentioned above. The timer will then run in the background without showing up on screen. You can interrupt the timer at any time by pressing the [ Mode ] button.
Timer
- Press [Minute] to set the minutes and [Hour] to set the hours.
- Press [▶/■] to start the timer.
- When the set time is reached an audible signal will be emitted. Press any button to turn the alarm off.
- The timer will continue counting down even after the alarm has been turned off. To turn the timer off press [▶/■].
- Hold in [▶/■] to reset.
Stopwatch
- Press [▶/■] to start the stopwatch.
- Press [▶/■] to stop the stopwatch.
- Hold in [▶/■] to reset.
Care and maintenance
- Clean the exterior of the thermometer by wiping it with a damp cloth. Use only mild cleaning agents, never solvents or corrosive chemicals.
- Whenever the thermometer is not to be used for an extended period, the batteries should be removed and stored in a dry, dust-free environment, out of children's reach.
Note:
The probe must never be put into a dishwasher or washed in running water. It must only be cleaned by wiping it with a damp cloth. Be careful not to get any water inside the cable connection of the probe. If water gets inside the probe it might damage it and cause inaccurate temperature readings.
Troubleshooting guide
| The thermometer won’t turn on/the display is unclear. | Check that the batteries are not flat and that they are inserted correctly. Change if necessary. |
| The displayed temperature is incorrect. | · Check that the temperature probe is properly plugged into the transmitter. · Check the batteries in both devices and change if necessary. · Make sure that the probe is properly positioned into the meat. |
| The display shows “LLL” or “HHH”. | The temperature range (0–300 °C/32–572 °F) has been exceeded or is below range. Allow the probe to return to room temperature before attempting to use it again. |
| No temperature shows on the display. | The devices may have lost contact with each other. Place the devices closer to each other or repeat the pairing process according to the Connecting the transmitter to the receiver section. |
Responsible disposal
This symbol indicates that this product should not be disposed of with general household waste. This applies throughout the entire EU. In order to prevent any harm to the environment or health hazards caused by incorrect waste disposal, the product must be handed in for recycling so that the material can be disposed of in a responsible manner. When recycling your product, take it to your local collection facility or contact the place of purchase. They will ensure that the product is disposed of in an environmentally sound manner.

natural_image
Symbol of a trash bin crossed with no text or numbers, representing waste sorting or restriction (no text present)Specifications
Transmitter
Batteries 2 ×AAA/LR03
Max display temperature 300 °C/572 °F
Temperature probe
Max probe temperature range 300 °C/572 °F
Cable length 105 cm
Operating probe
cable temperature range 380 °C
Receiver
Batteries 2 ×AAA/LR03
Max display temperature 300 °C/572 °F
Alarm temperature range 0–300 °C
Max timer range 0–23 h 59 min
Trådlös stektermometer
Art.nr 44-2239 Modell TPR307+TPX307

natural_image
Line drawing of a hand holding a pen, no text or symbols presentBatterier
natural_image
Line drawings of two different types of accessories (no text or symbols)natural_image
Symbol of a trash bin crossed with a diagonal line and a horizontal bar below (no text or labels)Specifikationer
Sändare
Batterier 2 × AAA/LR03
Max visningstemperatur 300 °C/572 °F
Mätsond
Maxtemperatur 300 °C/572 °F
Kabellängd 105 cm
Maxtemperatur kabel 380 °C
Mottagare
Batterier 2 × AAA/LR03
Max visningstemperatur 300 °C/572 °F
natural_image
Line drawing of a hand holding a pen, no text or symbols presentBatterier
natural_image
Line drawings of two different types of accessories (no text or symbols)natural_image
Symbol of a trash bin crossed with no text or numbers, representing environmental restriction (no text present)Spesifikasjoner
Sender
Batterier 2 × AAA/LR03
natural_image
Line drawing of a hand holding a nail, no text or symbols presentParistot
natural_image
Line drawings of two different types of accessories (no text or symbols)natural_image
Symbol of a trash bin crossed with no text or numbers, representing waste sorting or disposal (no text present)Tekniset tiedot
Lähetin

natural_image
Line drawing of a hand holding a nail, no text or symbols presentBatterien
natural_image
Line drawings of two different types of accessories (no text or symbols)Warnung:
natural_image
Symbol of a trash bin crossed with no text or numbers, representing environmental restriction (no text present)Technische Daten
Sender
Batterien 2 × AAA/LR03
Max. Anzeigetemperatur 300 °C/572 °F
Messsonde
Höchsttemperatur 300 °C/572 °F
Kabellänge 105 cm
Höchsttemperatur Kabel 380 °C
Empfänger
Batterien 2 × AAA/LR03
Max. Anzeigetemperatur 300 °C/572 °F
Temperatureinstellung
Declaration of Conformity
CE
Hereby, Clas Ohlson AB declares that following product(s):
Wireless Meat Thermometer
44-2239
TPR307+TPX307
is in compliance with the essential requirements and other relevant provisions of Directive 2014/53/EC and 2014/35/EC.
Article 3.1a (Health): EN 62479:2010
Article 3.1a (Safety): EN 60950:2006
+A11:2009+A1:2010
+A12:2011+A2:2013
Article 3.1b (EMC): EN 301 489-1 v1.9.2
EN 301 489-3 V1.6.1
Article 3.2 (Radio): EN 300 220-1 V2.4.1
EN 300 220-2 V2.4.1
Insjön, Sweden, March 2017
Hemid Alfreds
Henrik Alfredsson
Technical Manager
Insjön, Sweden, August ,2017
CLAS OHLSON AB, SE-793 85 INSJÖN, SWEDEN
SVERIGE
KUNDTJÄNST Tel: 0247/445 00
Fax: 0247/445 09
E-post: kundservice@clasohlson.se
INTERNET
www.clasohlson.se
BREV Clas Ohlson AB, 793 85 INSJÖN
NORGE
KUNDESENTER Tlf.: 23 21 40 00
Faks: 23 21 40 80
E-post: kundesenter@clasohlson.no
INTERNETT
www.clasohlson.no
POST Clas Ohlson AS, Postboks 485 Sentrum,
0105 OSLO
SUOMI
ASIAKASPALVELU Puh: 020 111 2222
10 - 13 Market Place
Kingston Upon Thames
Surrey
KT1 1JZ
DEUTSCHLAND
KUNDENSERVICE Hotline: 040 2999 78111
E-Mail: kundenservice@clasohlson.de
HOMEPAGE
www.clasohlson.de
POSTANSCHRIFT
- Safety
- Product description Receiver
- Transmitter
- Before initial use
- Receiver
- Belt clip/stand
- Batteries
- Table stand
- Connecting the transmitter to the receiver
- Things to consider:
- If you experience problems, try the following:
- Note:
- Operating instructions
- Warning:
- Using the thermometer's pre-set temperature settings
- Selecting cooking temperature
- Timer function
- Timer
- Stopwatch
- Care and maintenance
- Troubleshooting guide
- Responsible disposal
- Specifications
- Temperature probe
- Trådlös stektermometer
- Batterier
- Specifikationer
- Sändare
- Mätsond
- Mottagare
- Spesifikasjoner
- Sender
- Paristot
- Tekniset tiedot
- Lähetin
- Batterien
- Warnung:
- Technische Daten
- Messsonde
- Empfänger
- Declaration of Conformity
- CE
- Wireless Meat Thermometer
- SVERIGE
- NORGE
- SUOMI
- DEUTSCHLAND
Brand : Coline
Model : TPX307
Category : Other kitchen appliance