004-932 - Lawn mower Meec Tools - Free user manual and instructions
Find the device manual for free 004-932 Meec Tools in PDF.


| Product Type | Robotic Lawn Mower |
| Brand | Meec Tools |
| Model | 004-932 |
| Battery Type | 28 V DC, 2.9 Ah, Li-Ion |
| Charging Time | Approx. 90 minutes |
| Run Time | Approx. 60 minutes |
| Mowing Width | 18 cm |
| Mowing Height | 2 – 6 cm (5 settings) |
| Max. Slope | 40% |
| Max. Mowing Area | 800 m² |
| Dimensions (LxWxH) | 57 x 39 x 26 cm |
| Weight (Mower) | 8.5 kg |
| Weight (Charging Station) | 1.8 kg |
| Protection Rating (Mower/Station) | IP24 / IP24 |
| Protection Rating (SMPS) | IP44 |
| Number of Blades | 3 |
| Power Consumption | 50 W |
| Sound Pressure Level (LpA) | 46.4 dB(A) |
| Sound Power Level (LwA) | 66.4 dB(A) |
| Guaranteed Sound Power Level | 67 dB(A) |
| Rain Sensor | Yes, automatic return to charging station |
| Programming | Touch screen with schedule (weekday & time intervals) |
| Safety Features | STOP button, main switch, PIN code, anti-theft lock |
| Maintenance | Clean blades & wheels; replace blades when worn; replace battery every 1-5 years |
| Spare Parts | Replacement blades and battery available |
| Manufacturer | Jula AB, Box 363, 532 24 SKARA, Sweden |
Frequently Asked Questions - 004-932 Meec Tools
User questions about 004-932 Meec Tools
0 question about this device. Answer the ones you know or ask your own.
Ask a new question about this device
Download the instructions for your Lawn mower in PDF format for free! Find your manual 004-932 - Meec Tools and take your electronic device back in hand. On this page are published all the documents necessary for the use of your device. 004-932 by Meec Tools.
USER MANUAL 004-932 Meec Tools
004932

natural_image
Exterior view of a black and white robotic lawn mower (no visible text or symbols)
SE ROBOTGRÄSKLIPPARE
Bruksanvisning i original
Operating instructions
(Translation of the original instructions)
Important! Read the user instructions carefully before use.
Save them for future reference.
Värna om miljön!
Care for the environment!
Must not be discarded with household waste! This product contains electrical or electronic components that should be recycled. Leave the product for recycling at the designated station e.g. the local authority's recycling station.
Jula reserves the right to make changes. In the event of problems, please contact our service department. www.jula.com
Tillverkare/ Produsent/ Produenci/ Manufacturer Jula AB, Box 363, 532 24 SKARA
Distributor/ Distributor/Dystrybutor/Distributor Jula Poland Sp. z o.o., ul. Malborska 49, 03-286 Warszawa, Polska Jula Norge AS, Solheimsveien 6–8, 1471 L∅RENSKOG
2018-04-24
© Jula AB
CE
EC DECLARATION OF CONFORMITY
EG FÖRSÄKRAN OM ÖVERENSSTÄMMELSE
EF SAMSVARSERKLÆRING
DEKLARACJA ZGODNOŚCI WE

Jula AB, Box 363, SE-532 24 SKARA, SWEDEN
Machinery Directive 2006/42/EC
EN 60335-1:2012+A11, EN 50636-2-107:2015; EN 62233:2008
Radio Equipment Directive 2014/53/EU
ETSI EN 303 447 V1.1.1, EN 301 489-1 V2.1.1:2017,
Final draft EN 301 489-3 V2.1.1:2017, Draft EN 303 446-1 V1.1.0:2017
EN 55014-1:2006+A1+A2, EN 55014-2:2015
Outdoor Noise Directive 2000/14/EC, amended by 2005/88/EC
RoHS Directive 2011/65/EU
EN 50581:2012
| Measured sound power level on an equipment representative for this type: Uppmätt ljudeffektinivá på en utrustning som är representativ för denna typ: Målt lydeffektinivá for utstyr som er representativt for vedkommende type: zmierzony poziom mocy akustycznej urządzenia reprezentatywnego dla danego typu: | Guaranteed sound power level: Garanterad ljudeffektinivá: Garantert lydeffektinivá: Gwarantowana moc akustyczna: | Conformity assessment procedure according to 2000/14/EC: Förfarande för badömning av överensstämmelse enligt 2000/14/EC: Framgangsmáter for samsvarsvurdering ht. 2000/14/EC: Procedura oceny zgodności na podstawie dyrektywy 2000/14/WE: |
| 66,4 dB(A) 67 dB(A) | Annex VI / Bilaga VI Vedlegg VI / Załącznik VI |
Name and address of the 2000/14/EC notified body involved: Namn och adress hos involveral 2000/14/EC kontrollorgan: Navn og adresse til det 2000/14/EC meldte organet: Nazwa i adres 2000/14/EC organu kontrolnego:
Société Nationale de Certification et d'Homologation 11, route de Luxembourg, L-5230 Sandweiler, NB0499
This product was CE marked in year -18
Name and address of the person authorised to compile the technical file:
natural_image
Line drawing of a robotic vacuum cleaner (no text or symbols)1
natural_image
Technical line drawing of a vehicle chassis with mounting bracket and perforated base (no text or symbols)2
3
4
5
6
7
8
9

10

11
2
3
natural_image
Technical illustration of a robotic lawn mower with cross symbol indicating mechanical advantage (no text or labels)4
natural_image
3D diagram of a robotic arm on a curved surface with directional arrows indicating movement or force (no text or symbols)5
6
natural_image
Diagram showing a robotic lawn with a 40 cm height measurement arrow and a small robot on the ground (no text or symbols present)7
natural_image
Line drawing of a garage with a robotic vacuum cleaner nearby (no text or symbols)8
9
10
11
12
flowchart
graph TD
    A["Central Chamber"] --> B{Radial Flow}
    B --> C["Outer Ring"]
    C --> D["Inner Ring"]
    D --> E["Outer Ring"]
    E --> F["Inner Ring"]
    F --> G["Outer Ring"]
    G --> H["Inner Ring"]
    H --> I["Outer Ring"]
    I --> J["Inner Ring"]
    J --> K["Outer Ring"]
    K --> L["Inner Ring"]
    L --> M["Outer Ring"]
    M --> N["Inner Ring"]
    N --> O["Outer Ring"]
    O --> P["Inner Ring"]
    P --> Q["Outer Ring"]
    Q --> R["Inner Ring"]
    R --> S["Outer Ring"]
    S --> T["Inner Ring"]
    T --> U["Outer Ring"]
    U --> V["Inner Ring"]
    V --> W["Outer Ring"]
    W --> X["Inner Ring"]
    X --> Y["Outer Ring"]
13
14
15
natural_image
Line drawing of three different robotic devices with a crossed X mark, no text or symbols present16
natural_image
Pure mechanical diagram of a lever mechanism without any text, numbers, or symbols17
natural_image
Line drawing of a mechanical tool interacting with a foot (no text or symbols present)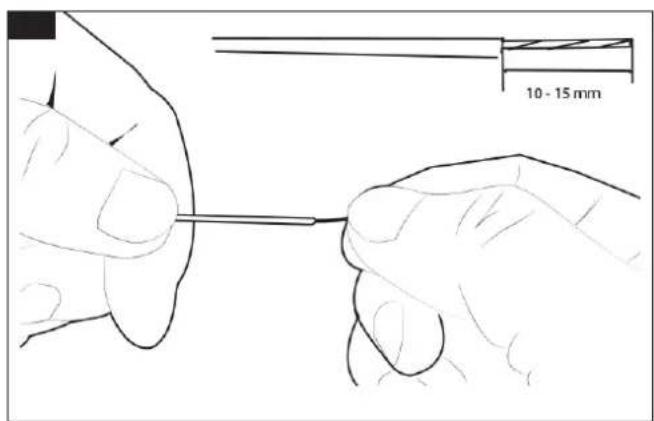
22
natural_image
Technical line drawing of a mechanical component with mounting holes and a textured base (no text or symbols)23
24
25
26
27
28
| 2 h 3 h | 5 h 5 h 7 h | 8 h 10 h | Natt 24 h | ||||||
| 09.00–11.00 | ● | ● | ● | ● | ● | ||||
| 11.00–14.00 | ● | ● | ● | ● | ● | ||||
| 14.00–19.00 | ● | ● | ● | ● | ● | ||||
| 19.00–09.00 | ● | ● |
29
30
20 15.06.19 09:30
Mon
Fri
Tue
Sat
Wed
Sun
Thu




09:00-11:00
11:00-14:00
14:00-19:00
19:00-09:00

31
natural_image
Technical line drawing of a robotic arm with open lid and internal components, showing close-up detail (no text or symbols)32
33
natural_image
Technical line drawing of a mechanical component with no visible text or symbols34
natural_image
Technical line drawing of a car interior showing internal components and a hand using a tool (no text or symbols present)35
natural_image
Pure technical line drawing of a mechanical component with no text or symbols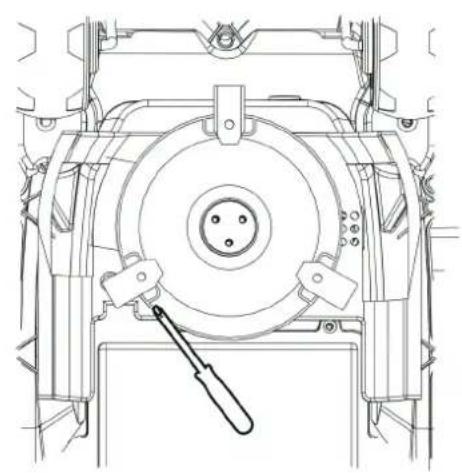
natural_image
Technical line drawing of a mechanical component with a central circular housing and a tool inserted (no text or symbols)36
natural_image
Technical line drawing of a mechanical device showing internal components and assembly (no text or symbols)SÄKERHETSANVISNINGAR
- Failure to follow all the instructions and safety instructions can result in the risk of electric shock, fire and/or serious personal injury. Save these instructions and safety instructions for future reference.
- The appliance must only be used to mow garden lawns. All other use is considered to be unsuitable.
Training
- Read these instructions carefully and familiarise yourself with the controls on the appliance and how they are used.
- The appliance is not intended to be used by persons (children or adults) with any form of functional disorders, or by persons who do not have sufficient experience or knowledge on how to use it, unless they have received instructions concerning the use of the appliance from someone who is responsible for their safety.
- There may be local regulations for the minimum age of persons allowed to use the appliance.
- The user is responsible for any accidents or risks to other persons or property.
Preparations
- Check that the border wire system is correctly installed in accordance with the instructions.
- Regularly inspect the area where the appliance is to be used and remove any stones, wires, or other foreign objects.
- Regularly inspect the appliance to make sure that the blades, blade screws and mower deck are not worn or damaged.
- If the blades or screws are worn or damaged, always replace the complete set to avoid imbalance.
- On appliances with multiple blades, all the blades can move when just one blade is turned – risk of personal injury.
Use
- Never use the appliance if the guards or covers are dismantled or damaged. Never use the appliance without the safety devices fitted.
- Never put your hands or feet near, or under, rotating parts.
- Never lift or carry the appliance when the motor is running.
- Switch off the appliance:
– before removing a blockage
– before checking, cleaning or doing any other work on the appliance.
- Start the appliance in accordance with the instructions. Keep your hands and feet away from moving parts when the main switch is in the ON position.
- Never lift or carry the appliance when the main switch is in the ON position.
- Never allow children, or anyone who is unfamiliar with the appliance and these instructions, to use it.
- Never place objects over the appliance or the charging station.
- Do not use the appliance if it is damaged or not working properly, if the blades or blade plate are damaged, or if screw unions are not properly tightened.
- Avoid using the appliance in wet grass.
NOTE:
Do not use the appliance unattended when other persons, especially children, or pets are in the vicinity.
Maintenance and storage
- Make sure that all the screw unions are tightened to keep the machine in safe condition.
- Replace damaged or worn parts.
- Only use replacement blades recommended by the manufacturer.
- Only use the supplied charging station or replacement station recommended by the manufacturer. Incorrect use can result in the risk of electric shock and/or overheating.
- Follow the manufacturer's instructions for service and maintenance.
- Keep the appliance and its wheels clean to avoid imbalance and to obtain best mowing results.
- Every over-discharging reduces the capacity and lifespan of the batteries. To prolong battery life, charge the battery every 3 months during long periods of inactivity.
Special safety instructions
- Never place heavy objects over the appliance or the charging station, neither when in use, nor during storage.
- Do not use the appliance if it cannot be switched on and off with the main switch. Never attempt to bypass the main switch. Set the power switch to OFF when the appliance is not in use, and before putting it away.
- If possible, transport the appliance in its original pack.
- Switch off the appliance with the main switch before moving it.
- Always check that the power switch is in the OFF position before lifting the appliance. A pushed in switch means that the power is ON, a released power switch means that the power is OFF.
- When moving the appliance – always carry the appliance by the handle, at the back on the underside, to keep the blades away from you.
WARNING!
- Rotating parts – risk of cut injuries.
- Keep your hands and feet away from moving parts. Never put your hands or feet near, or under the appliance when in use.
- Switch off the appliance with the main switch and wait until all moving parts have completely stopped before moving the appliance.
- Check that the power switch is in the OFF position before lifting the appliance and before inspection and/or maintenance.
- Do not attempt to ride on the appliance.
- Do not touch the blades until they have completely stopped.
- Switch off the appliance with the main switch, wait until all moving parts have completely stopped and remove the key before lifting the appliance.
- Recycle used batteries in accordance with local regulations.
Additional safety instructions
- Do not put anything heavy over the appliance or charging station, either when it is in use or in storage.
- If the main switch is damaged or out of order it must never by bypassed and the appliance must not be used.
- A pushed in switch means that the appliance is ON, a released power switch means that the appliance is OFF.
• Always switch off the main switch when the appliance it is not in use, or when it is put away for the winter. - Use the original pack if possible when transporting the appliance.
- If the appliance needs to be moved from or in the work area, press the large STOP button first to stop it.
- Make sure the main switch is in the OFF position before lifting the appliance.
Protection from thunder
To avoid thunder damaging the appliance or the charging station never place the charging station under large trees. Do not route the extension cord round large trees.
Symbols
Symbols on the robotic lawn mower
| WARNING: Read the operating instructions before use. | |
| WARNING: Keep at a safe distance from the appliance. | |
| WARNING: Rotating parts – risk of cut injuries. Keep your hands and feet away from moving parts. Never put your hands or feet near, or under the appliance when in use. | |
| WARNING: Do not ride on the appliance. | |
| WARNING: Make sure the main switch is in the OFF position before inspection or maintenance, or before lifting the appliance. | |
| Noise level. | |
| Do not wash with water. |

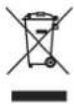
Return used batteries to the dealer or the local recycling centre.
Recycle products that have reached the end of their useful life according to local regulations.
Symbols on the charger
 | WARNING: |
 | Read the operating instructions before use. |
 | Double insulation. Safety class II. |
 | Direction of poles. |
 | Approved as per applicable directives. |
 | SMPS (switch mode power supply unit). |
 | SMPS incorporating a Short-circuit-proof safety isolating transformer (inherently or non-inherently). |
 | For indoor use only. |
Symbols on the battery
 | Do not immerse the battery. |
 | Do not burn the battery – risk of explosion. |
 | Do not expose the battery to strong sunlight or temperatures above 45°C for long period. |
 | Return used batteries to the dealer or the local recycling centre. |
 Li-Ion Li-Ion | Spent batteries must be disposed of in accordance with local regulations. |
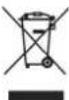 | Recycle products that have reached the end of their useful life according to local regulations. |
TECHNICAL DATA
| Input voltage, charger 100 – 240 V | ~50 Hz |
| Battery 28 V DC / 2.9 Ah / Li-Ion | |
| Power consumption 50 W | |
| Protection rating, lawn mower IP24 | |
| Protection rating, charging station IP24 | |
| Protection rating, SMPS | IP44 |
| Charging time Approx. 90 min | |
| Run time Approx. 60 min | |
| Speed (no load) 3500/min | |
| Speed 40 cm/s | |
| Mowing width 18 cm | |
| Mowing height 2 – 6 cm | |
| Number of mowing height settings 5 | |
| Number of blades 3 | |
| Max tilt | 40% |
| Mowing area | Max 800 m^2 |
| Dimensions, robotic lawn mower | 57 x 39 x 26 cm |
| Weight, robotic lawn mower | 8.5 kg |
| Weight, charging station | 1.8 kg |
| Sound pressure level, LpA | 46.4 dB(A), K = 0.6 dB |
| Measured sound power level, LwA | 66.4 dB(A), K = 0.6 dB |
| Guaranteed sound power level, LwA | 67 dB(A) |
DESCRIPTION
Contents
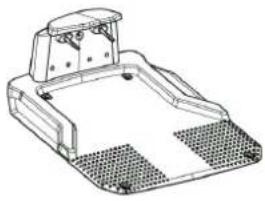
- Robotic lawn mower
- Charging station
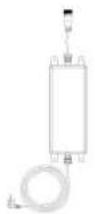
- Mains adapter
- Power cord
- Connector for border wire
- Fastener
- Spare blade
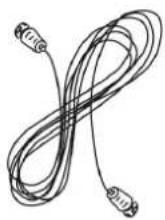
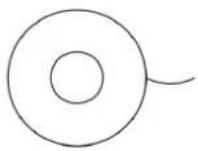
- Border wire
- Operating instructions
- Distance gauge for border wire
- Pen for touch screen
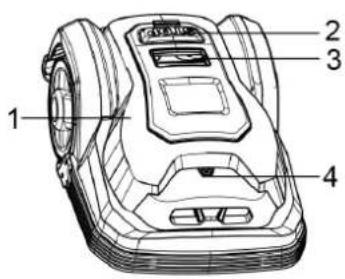
FIG. 1
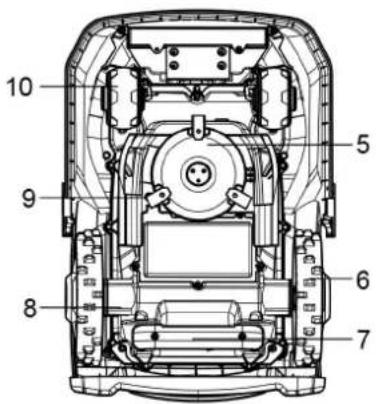
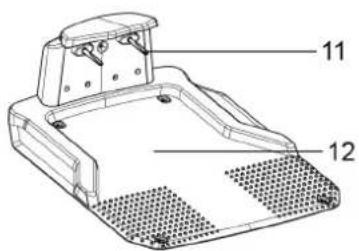
Parts
- Robotic lawn mower
- Stop button
- Touch screen
- Rain sensor
- Blade plate
- Back wheel
- Carry handle
-
Main switch
-
Blades
- Front wheel
- Charging plate
- Charging station
FIG. 2
INSTALLATION
Introduction
We recommend making sketch of the lawn, with all the obstacles and how they will be protected. This makes it easier to choose a good place for the charging station and to see how the border wire should be routed round the border and to protect bushes and flowerbeds etc. Tools needed for installation of the border wire are a hammer and cutting pliers or scissors.
Limitations
If the robotic lawn mower runs into a hard, solid obstacle higher than 100 mm, such as a wall, fence, garden furniture etc., the collision sensors react immediately. The robotic lawn mower stops, reverses, turns and mows in another direction. We still recommend that obstacles are protected with a loop of the border wire.
Trees
The robotic lawn mower handles trees like all other obstacles, but exposed roots less than 100 mm high should be protected, otherwise the roots can be damaged by the blades or back wheels.
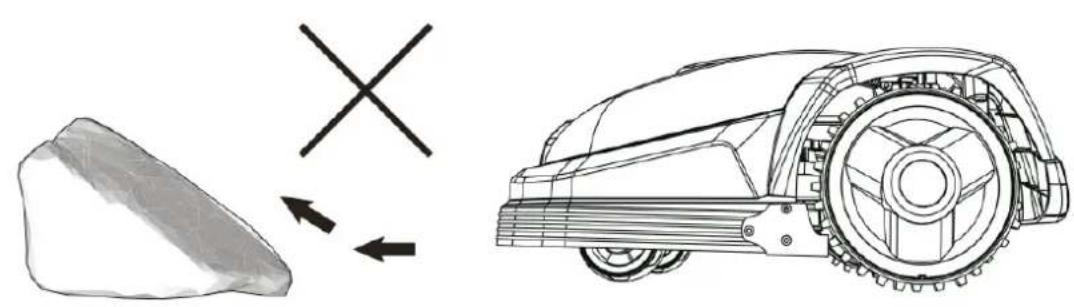
Stones
Any stones in the mowing area that the robotic lawn mower can run up on should also be protected with a loop of the border wire.
FIG. 3
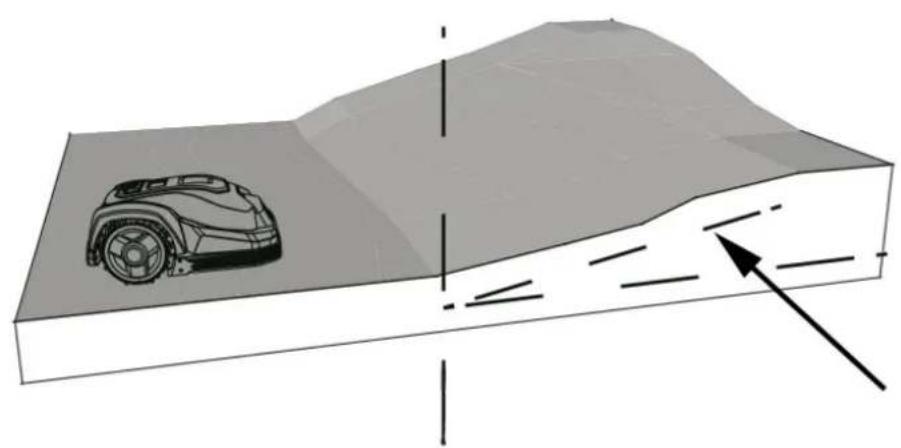
Slopes
The robotic lawn mower can manage up and down slopes with an inclination of up to 40% within the mowing area.
FIG. 4
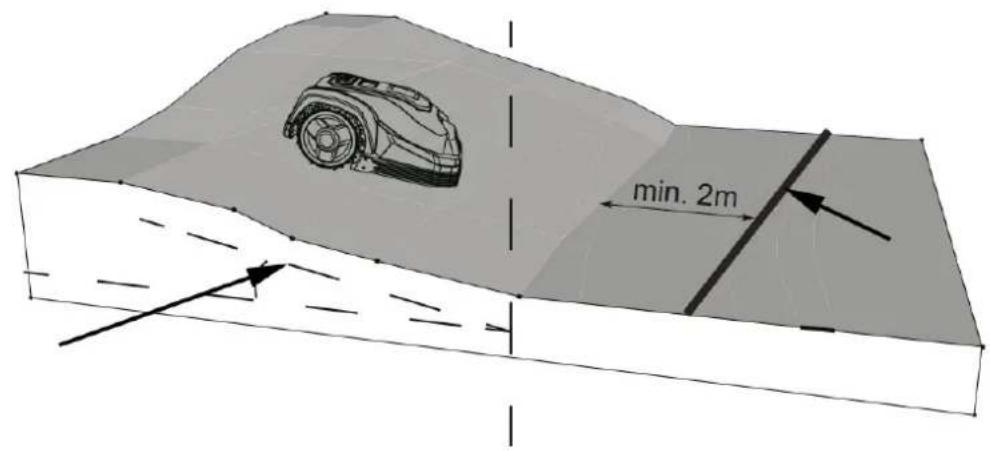
The border wire should not run across slopes steeper than 10%, otherwise there is a risk that robotic lawn mower runs over the border wire and comes outside the mowing area, especially if the grass is wet and slippery.
FIG. 5
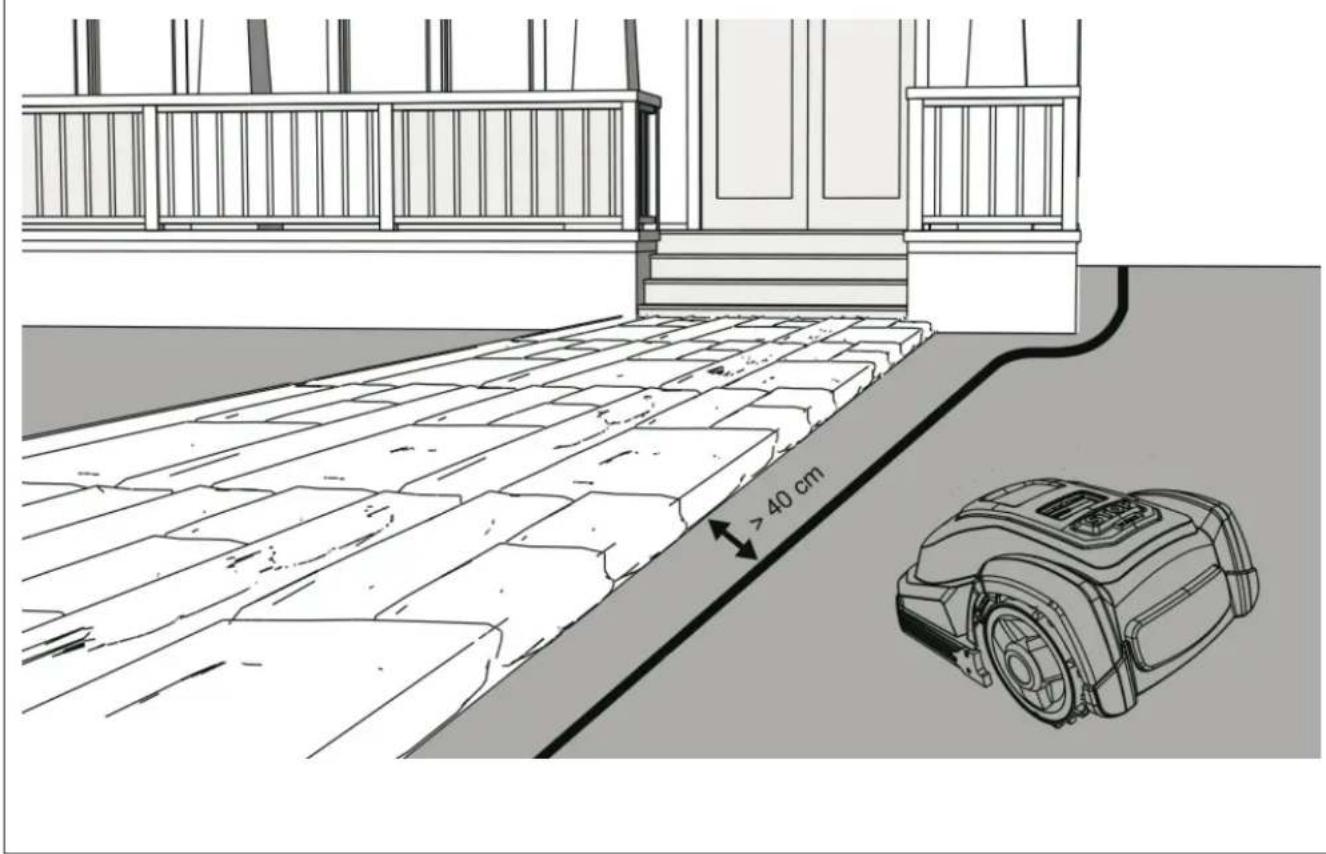
Paths, drives and roads
If the lawn borders a drive or the equivalent at a different level to the lawn, the border wire should be routed so that the robotic lawn mower does not run over the drive to get to the other side of the lawn. Leave a safe gap of 40 cm between the border wire and the edge of the drive.
FIG. 6
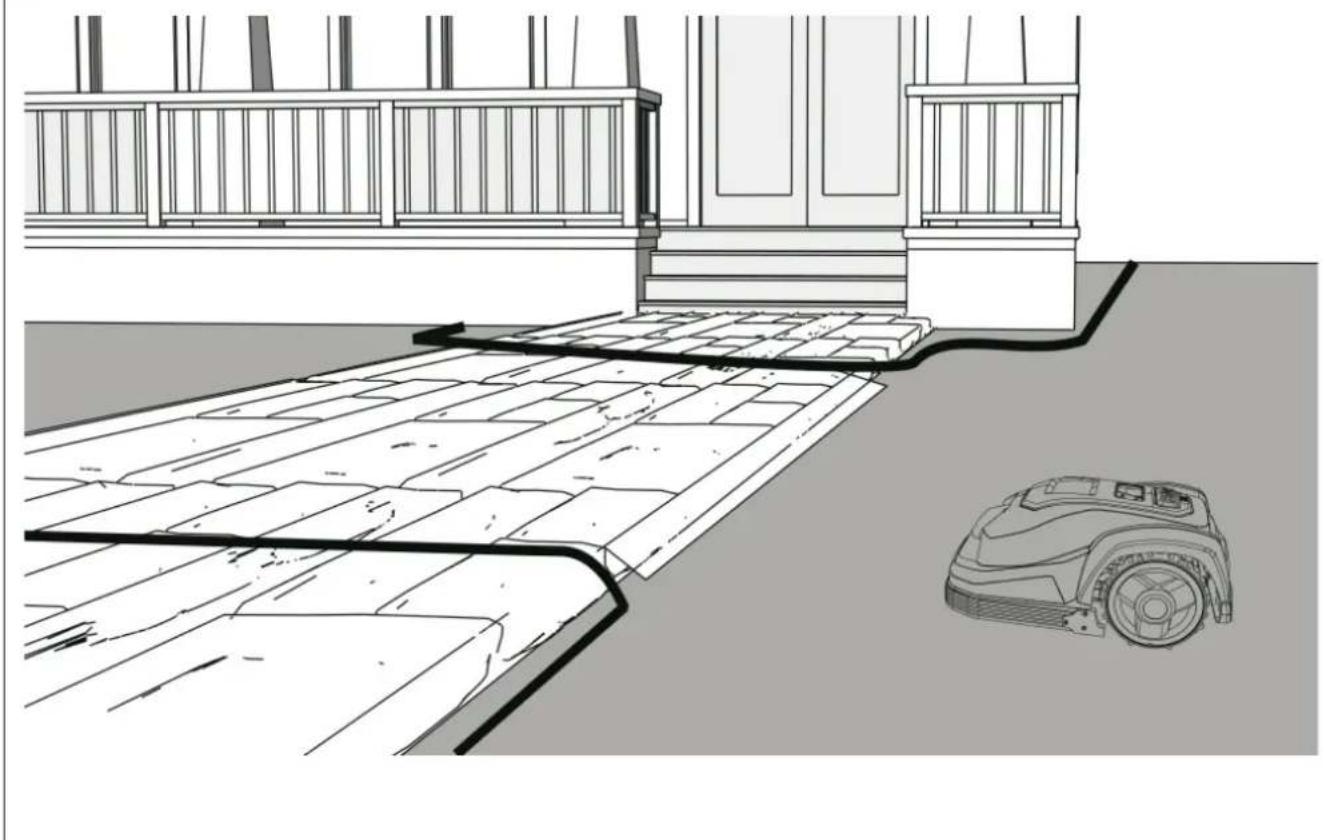
If the drive and lawn are on the same level you can allow the border wire to form a corridor across the drive for the robotic lawn mower to go through.
FIG. 7
Uneven lawns
If the lawn is very uneven the blades can come into contact with the ground during the mowing. If this is a problem this part of the lawn can be levelled, or protected with the border wire.
Flowerbeds
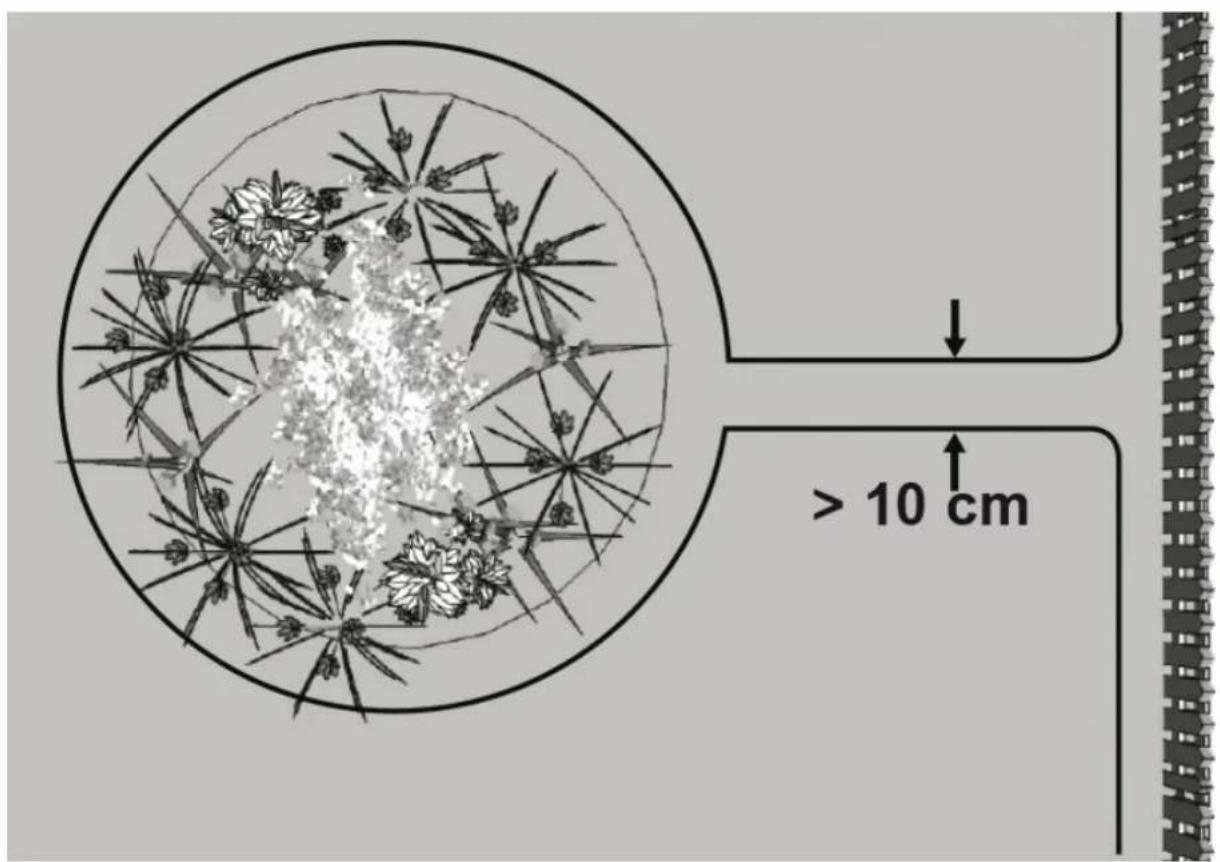
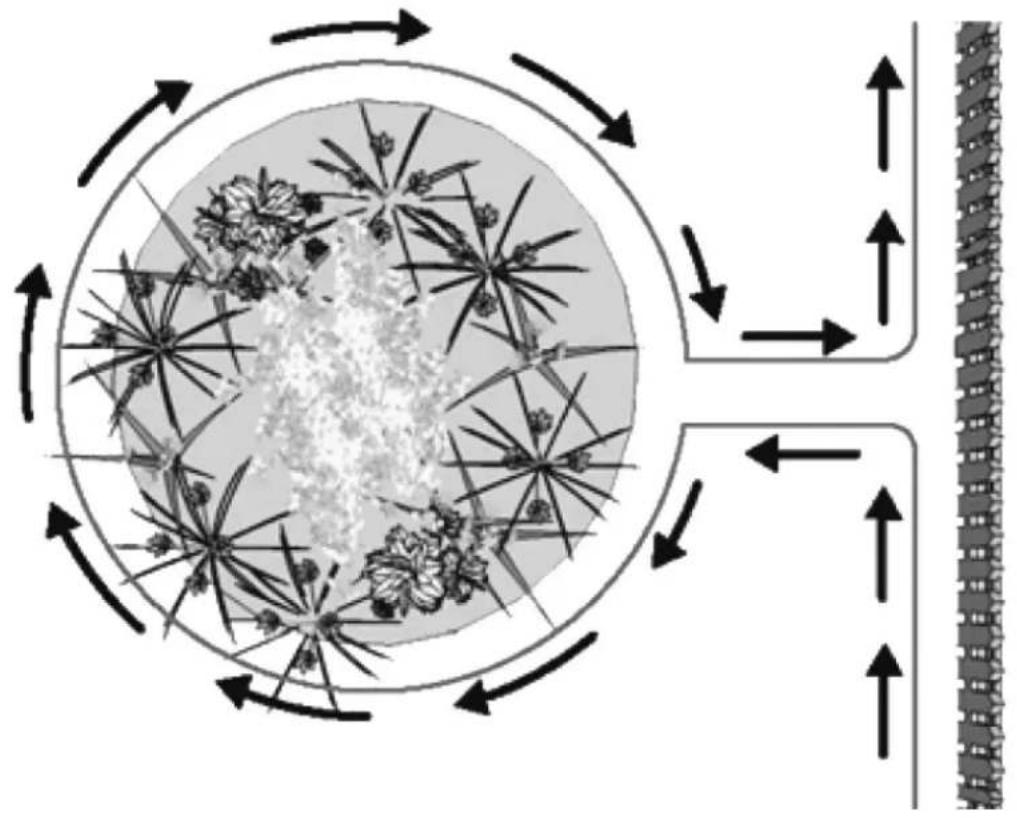
- Any flowerbeds in the mowing area must be protected with border wire loops. If the robotic lawn mower is to follow the border wire round the protected area the gap between the two parallel parts of the border wire should be more than 10 cm.
FIG. 8
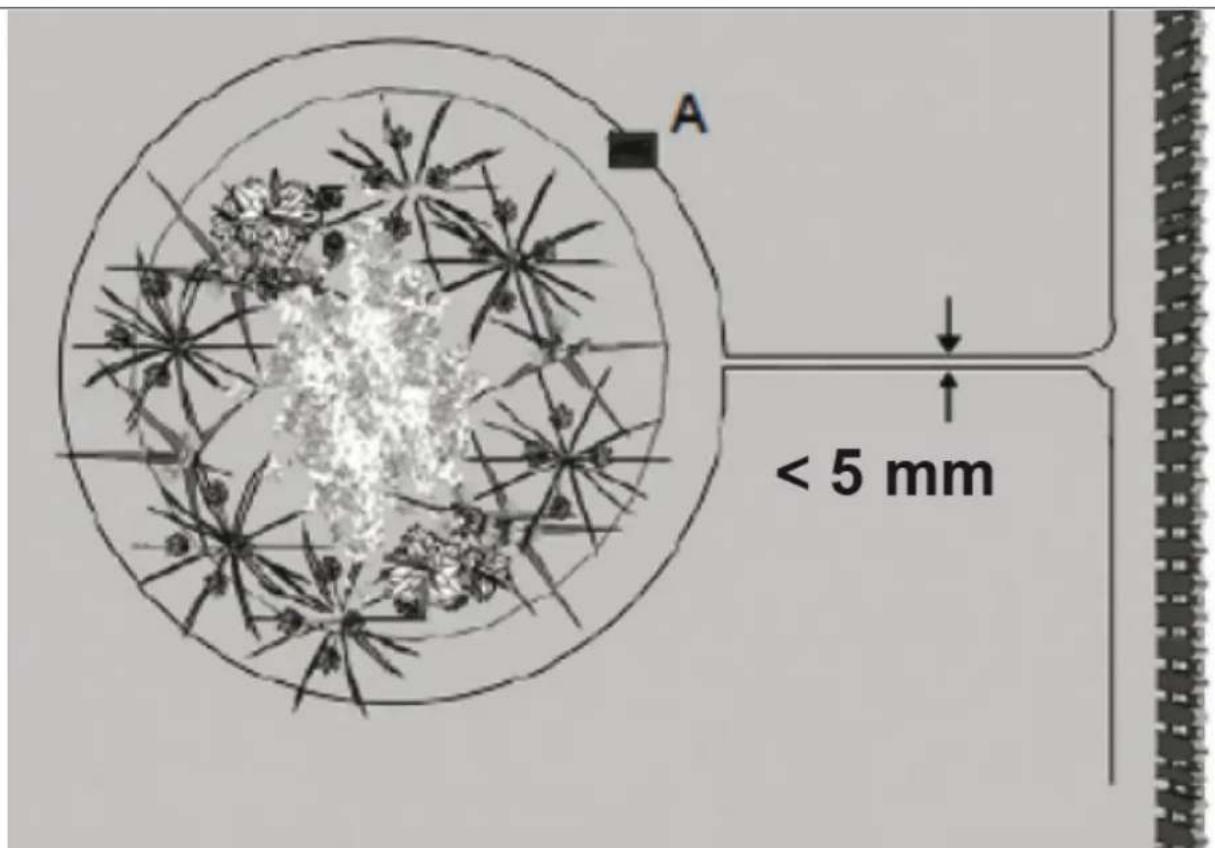
- If the robotic lawn mower is to pass over the two parallel parts of the border wire to take the quickest route to the charging station the gap between the two parallel parts of the border wires should be less than 5 mm.
- When this alternative is chosen a suitable obstacle must be placed at point A in the diagram. This is so the robotic lawn mower can change direction and follow the border wire back to the charging station.
FIG. 9
Ponds and pools
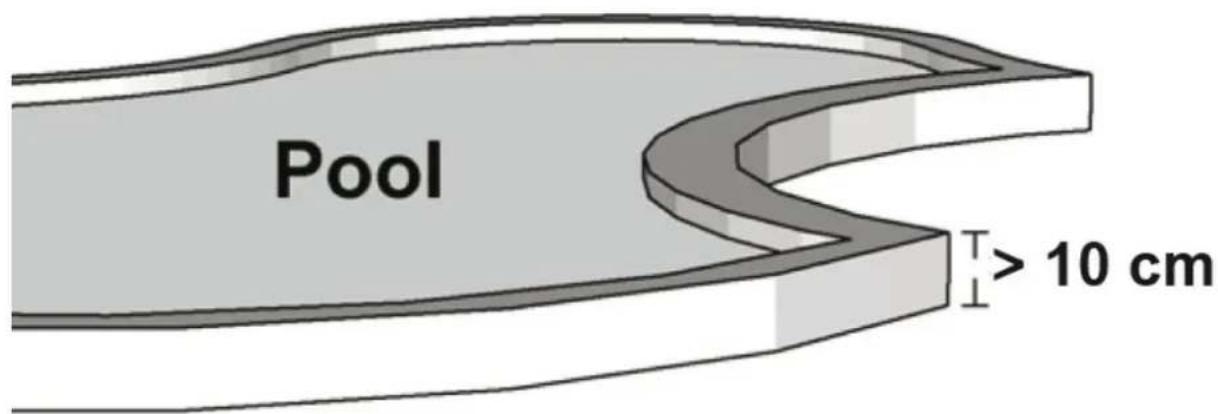
The robotic lawn mower can be damaged or destroyed if it goes into water and therefore it is very important that any ponds or pools in the mowing area are protected with a border wire loop or fence.
FIG. 10
Note:
NOTE:
The border wire must not cross itself.
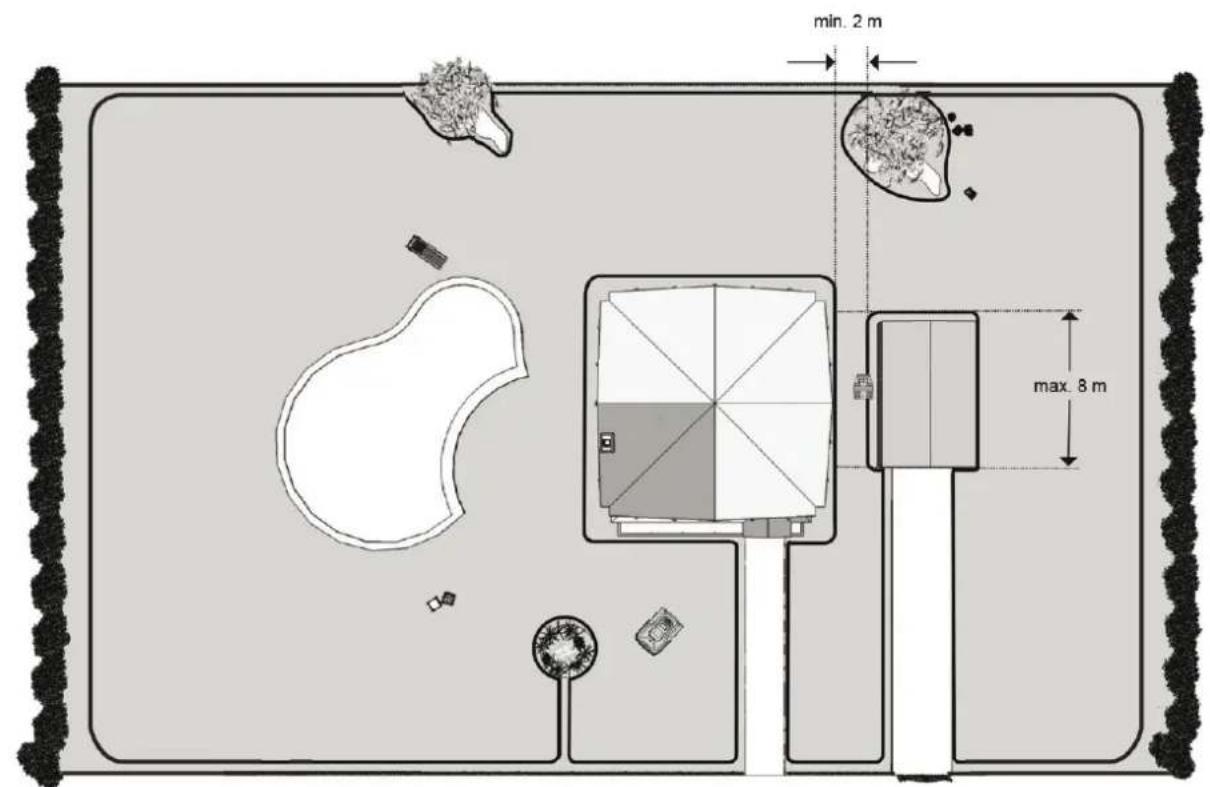
- Any corridors in the mowing area must be at least 2 metres wide and not more than 8 metres long.
FIG. 11
- If there are corridors narrower than 2 m or longer than 8 metres the robotic lawn mower must be carried through the corridor. Try to route the border wire so that too narrow or long corridors are avoided.
- Pay attention to how the border wire is routed round flowerbeds and other places that should be protected. Note that bushes and plants in flowerbeds change during the season.
FIG. 12
Marking out the routing of the border wire
- Mark out where the border wire is to be routed according to the sketch made of the garden. Make the markings accurate, this enables many problems to be avoided. The border wire must consist of one continuous loop, without interruption and without crossing, that ends by connecting both ends to the charging station.
- First decide where to place the charging station. It should be placed near an outdoor approved power point, because it must be
connected to the mains all the time the robotic lawn mower is used. The power cord to the charging station is 10 metres long.
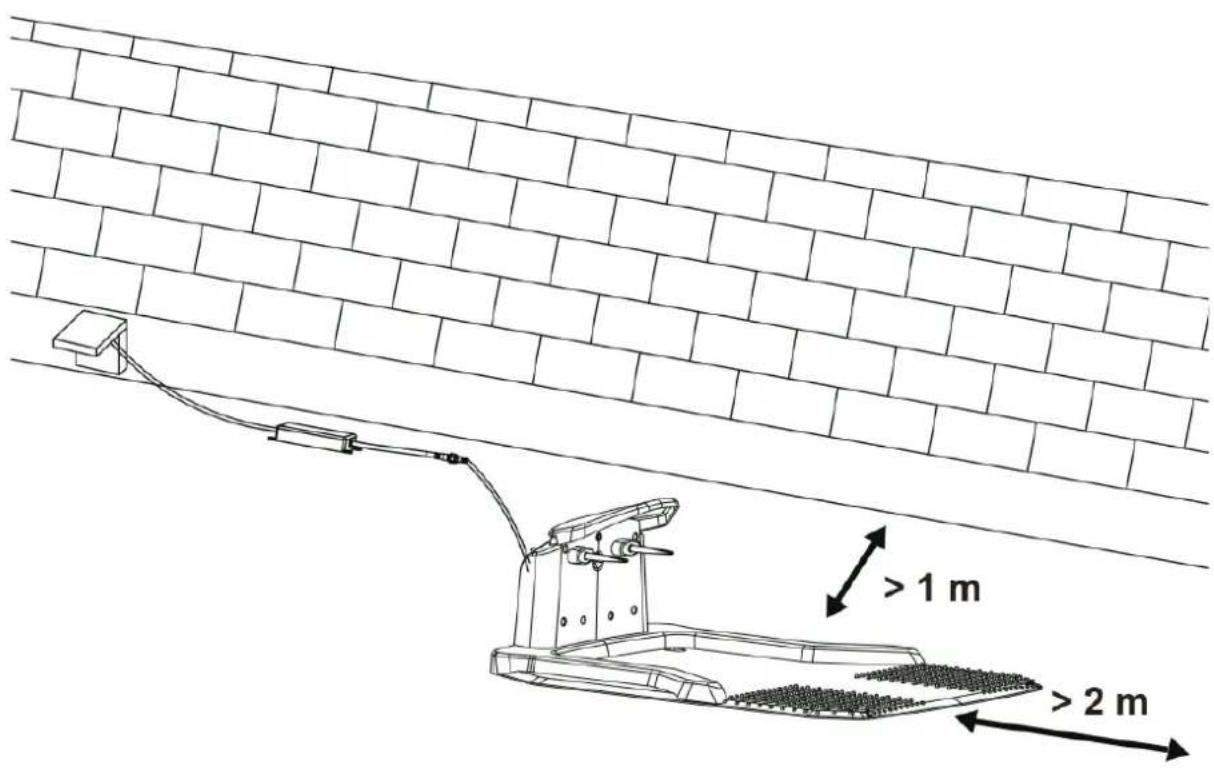
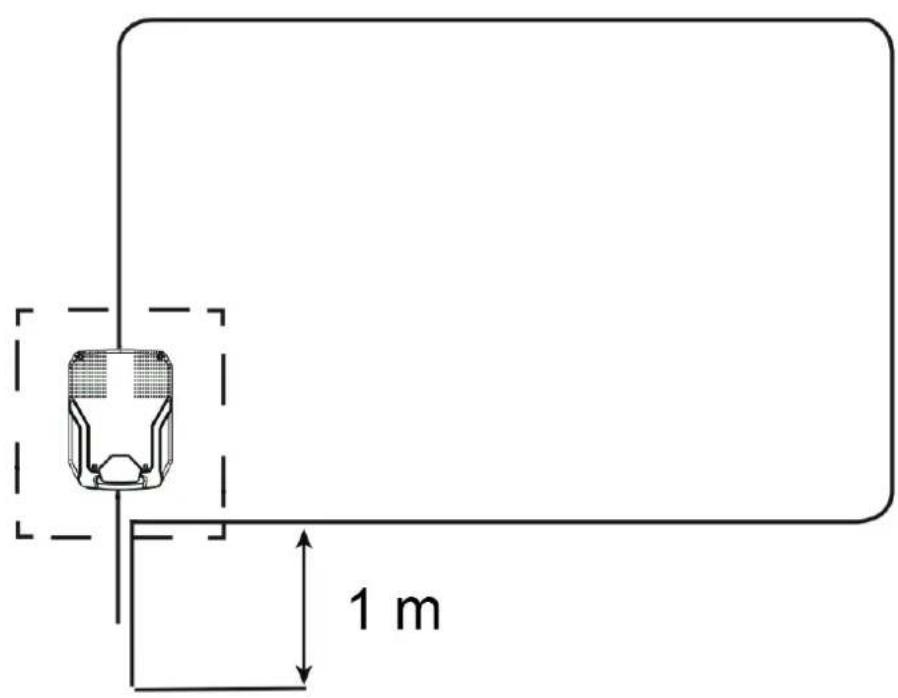
- Place the charging station on a level surface. The border wire is connected from the front and from the back. The border wire must run straight for at least 2, or ideally 3 metres in front of the charging station, so that the robotic lawn mower can follow it into the charging station without any problems. There should be 1 metre of level ground beside the charging station, so that the robotic lawn mower can if necessary reverse and try to go into the charging station again.
FIG. 13
- Place the charging station in the shade if possible – the battery charges better in a cool place.
NOTE:
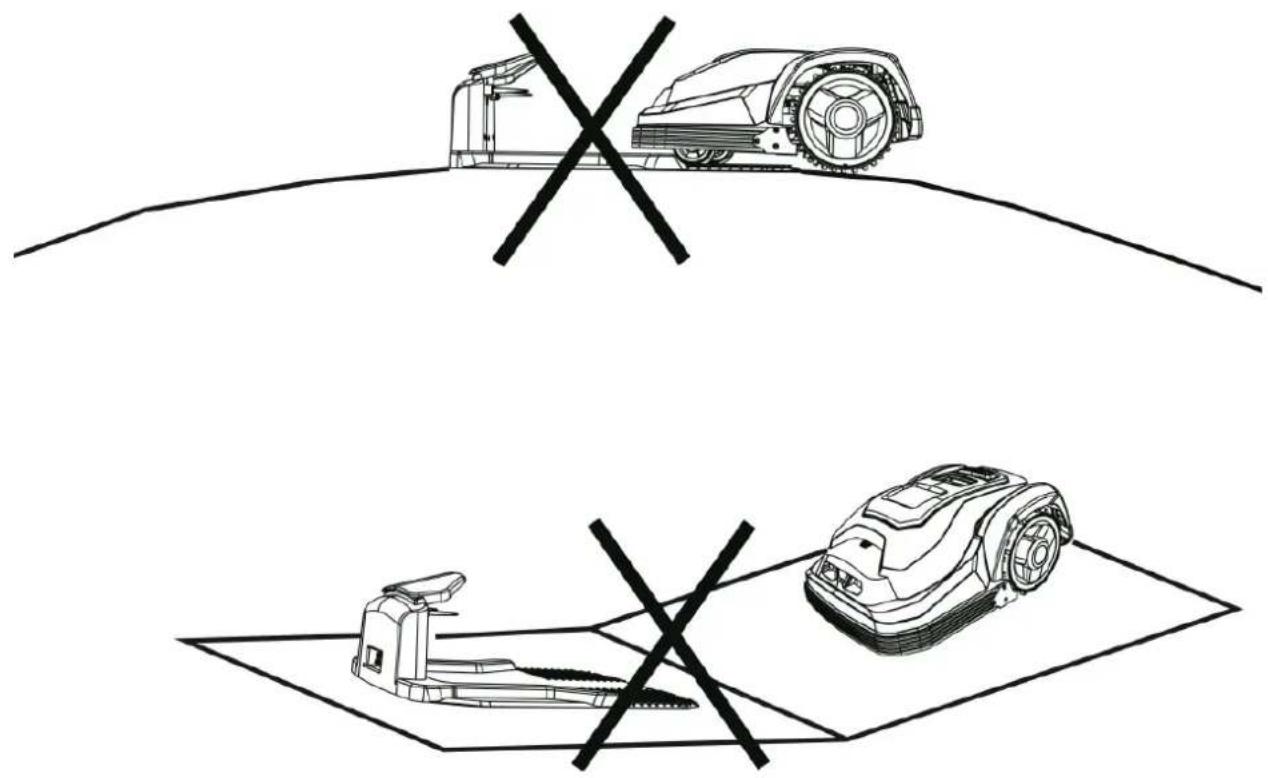
The charging station must be placed on a level surface, at a safe distance from obstacles, ponds, and dips etc.
Positioning the charging station
NOTE:
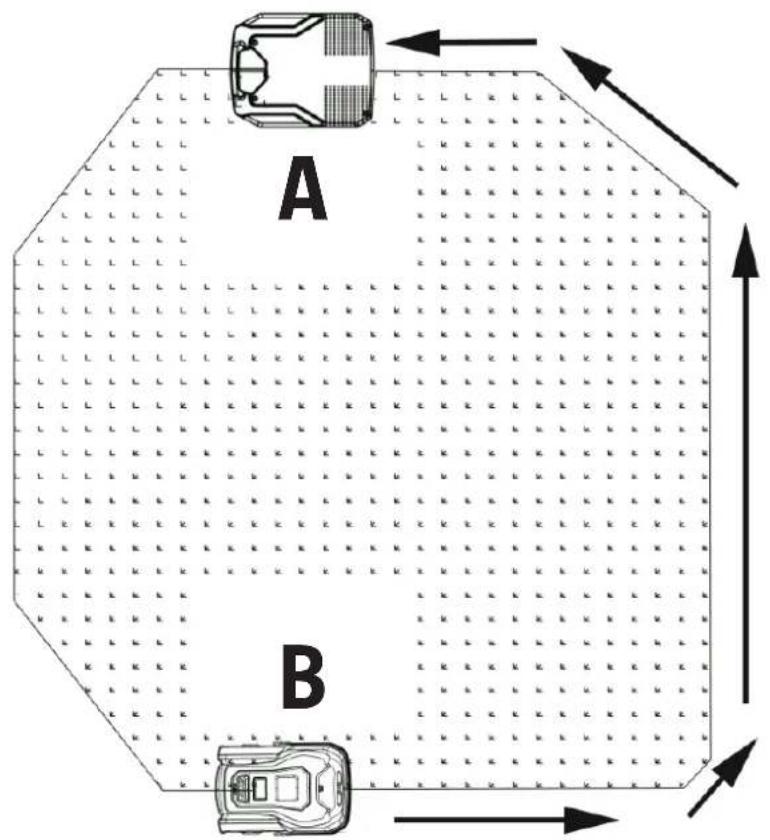
The mower follows the border wire ANTICLOCKWISE to the charging station. Make sure that the charging station is positioned with the opening in a CLOCKWISE direction so that the mower can connect with the charger.
- The charger (A) must be positioned so that the mower (B) goes in an ANTICLOCKWISE direction. The opening on the charger must therefore face in a CLOCKWISE direction.
FIG. 14
- The charging station must not be placed up on an elevation or down in a dip.
FIG. 15
- The charging station must not tilt more than 5^ sideways. We recommend that the border wire runs straight for 2 metres in front of the charging station. If the lawn is soft and/or uneven we recommend placing a plastic net, 0.5 × 1m , in front of the charging station so that the back wheels on the robotic lawn mower do not dig into the ground.
- Place the charging station on the chosen spot and check that the power cord reaches to the power point, but do not plug in yet. Finish routing the border wire before plugging in the plug.
Fastening the border wire
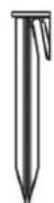
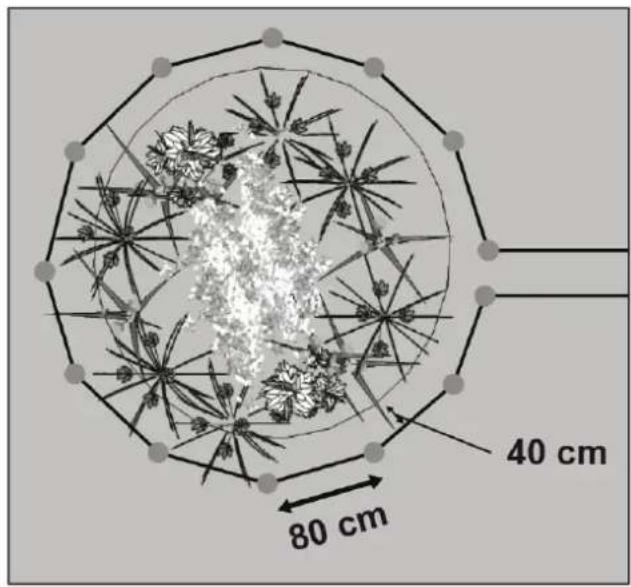
- Unpack the border wire and localise the free end. Take the fastener pins and lay them out on the lawn at the correct distance from the edges of the lawn (40 cm) and obstacles. A distance gauge is included. If necessary, cut the grass to no more than 60 mm before starting to fasten the border wire. The border wire does not need to be dug down. Try to route the border wire as close to the ground as possible, to reduce the risk of it being cut or someone tripping over it. The border wire soon becomes overgrown by grass. Because the voltage in the border wire is 32 V, it does not present any risk to people or animals.
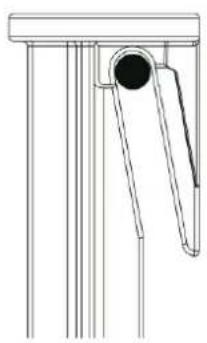
- Place the fastener pins at intervals of about 80 cm, with shorter intervals on bends. Do not press down the pins completely until all of the border wire has been laid out and fastened. Place all the fastener pins with the wire hook turned away from the area to be mowed.
FIG. 16
- Place all the fastener pins with the wire hook turned outwards, as shown in the diagram.
- When the fastener pins have been laid out all the way the border wire can be hooked in the wire hooks. Start at the charging station and leave 1 metre of extra length at both ends of the border wire in case any fastener pins need to be moved. Do not stretch the border wire too tight, this can cause it to become damaged. Remember that the border wire must run straight for 2–4 m in front of the charging station so that the robotic lawn mower can go into the charging station properly. Make sure the border wire is not bent or twisted.
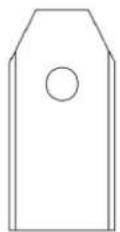
- On hard surfaces, such as concrete or paving, where it is not possible to use the pins, the border wire can be fastened with screws and plugs. Use insulating washers if the border wire is fastened with screws.
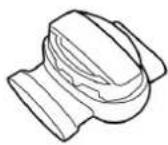
- If the border wire needs to be spliced, use the supplied connector tool.
- Start from the back of the charging station. Leave 1 m of extra length and fasten the wire with the pins at about 80 cm intervals. Leave another 1 m of extra length at the other end, when the border wire has been routed all the way round back to the charging station.
FIG. 17
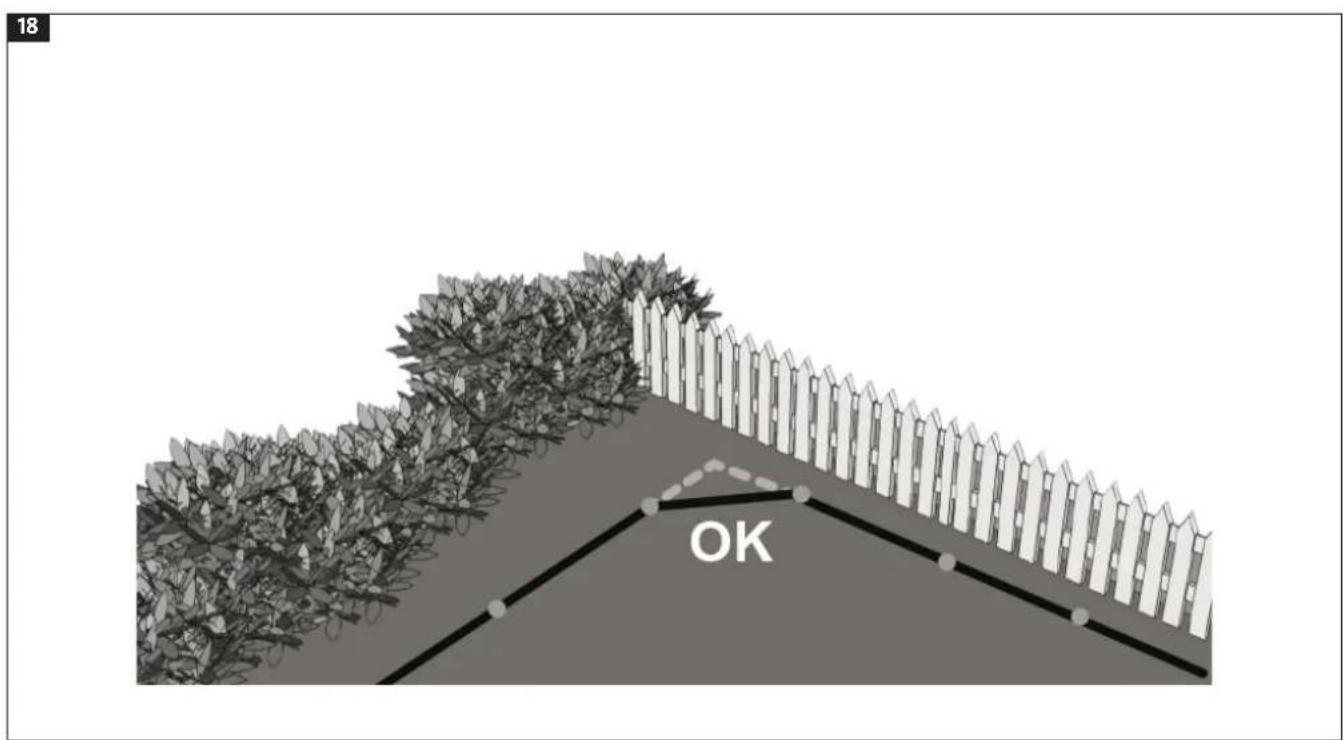
- Avoid routing the border wire with 90^ corners. The robotic lawn mower mows outside the wire when it turns. Route the border wire so that the corner is cut to an angle of 45^ as shown in the diagram.
FIG. 18
- Follow the instructions for routing the border wire round flowerbeds and other obstacles. Route the border wire at the right angle to the edge of the lawn (see diagram), round the obstacle and back to the edge of the lawn. The gap between the two parallel parts of the border wire should be as small as possible, without them crossing. The two parallel parts of the border wire can be fastened with the same pin. The robotic lawn mower will go over them without stopping or turning.
NOTE:
If the supplied border wire does not reach round all of the areas to be protected, or if other changes are to be made later on, it is easy to purchase more wire and to splice it with the supplied connector tool.
Connecting the border wire to the charging station
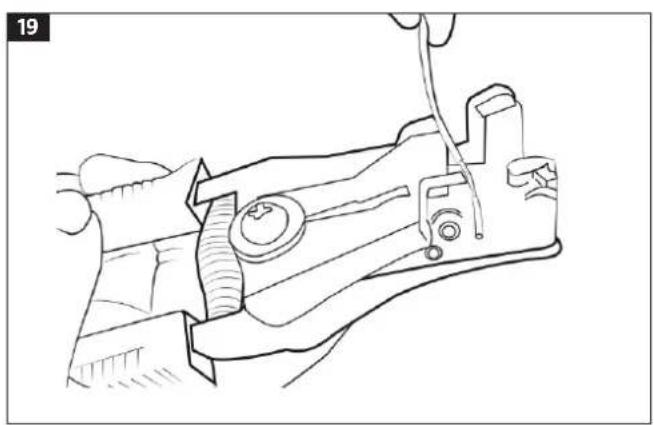
- When the border wire has been routed, strip off 10–15 mm of the insulation round the end with scissors or stripping pliers to expose the metal wires. Twist the metal wires with your fingers to make them easier to connect.
FIG. 19
FIG. 20
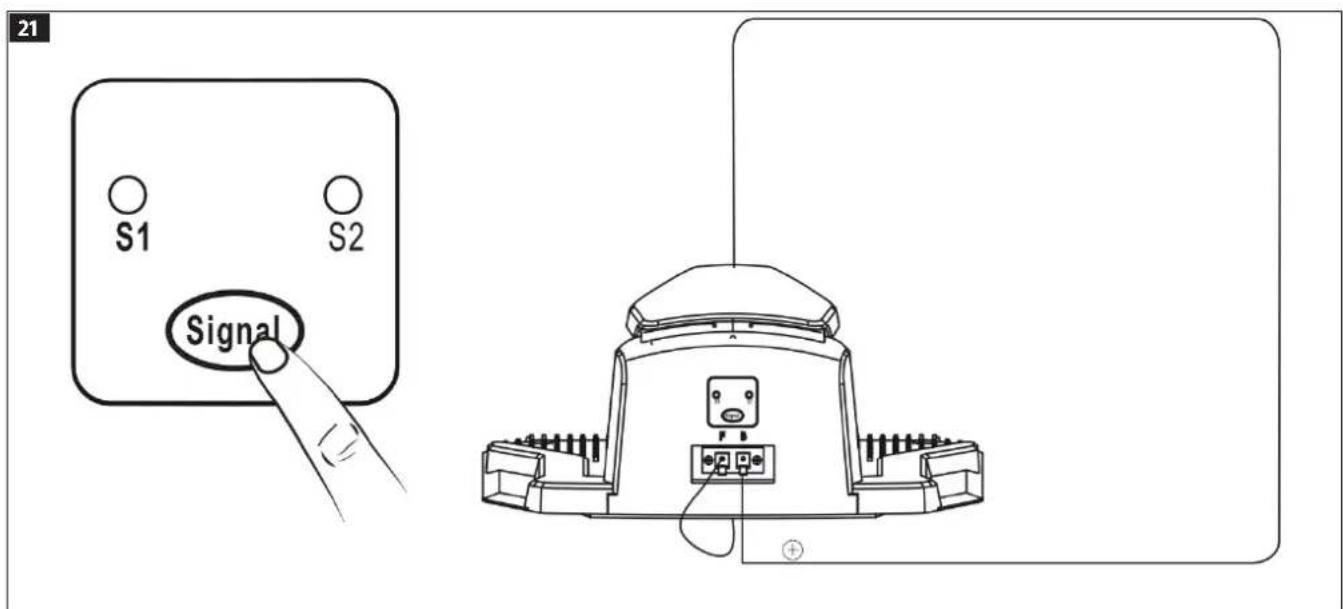
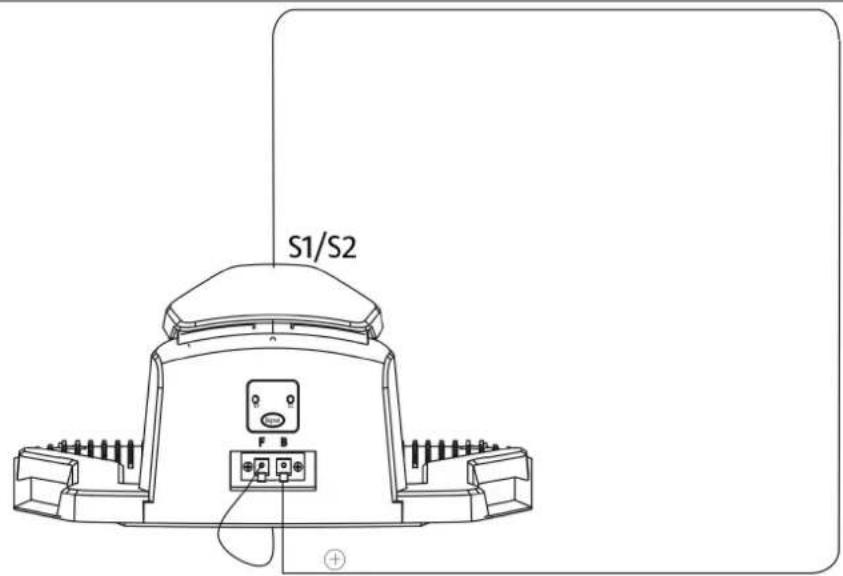
- When both ends of the border wire are ready to connect, they can be connected to the charging station. The part of the border wire that
comes in to the front of the charging station must be laid under the charging station and connected to the back of the charging station. This part of the border wire is connected to the left connection, marked F, and the part that comes in to the back of the charging station is connected to the right connection, marked B.
FIG. 21
- When signal S1 or S2 has been selected and the border wire is connected to the charging station, the charging station can be anchored with the fastener pins. Before it is anchored, check that the charging station is standing on a level surface and that the cord still reaches to the power point. Check that the border wire runs straight for at least 2 m in front of the charging station and that the extra length is inserted and protected under the charging station.
- Check that the plug is not plugged in to the power point and then connect the mains adapter cord to the charging station.
- Now plug the plug into the power point. The status lamp should first flash blue and then go a steady blue. If the status lamp does not go on, check the power point connection. If the status lamp goes on, but not with a steady blue light, see the troubleshooting table below.
FIG. 22
Troubleshooting, status lamp
| Status lamp Description | |
| Steady blue light. Normal. | |
| Flashing blue light. The | charging station's inner wire is damaged.The border wire is OK. |
| Flashing red light. The | mower is charging. Normal.The border wire is damaged. The charging station's inner wire is OK. |
| Flashing blue and red light. | Both the border wire and the charging station's inner wire are damaged. |
When the status lamp has a steady blue light to show that all the connections are correct, the fastener pins can be tapped in with a hammer. Check afterwards that the status lamp is still a steady blue to show that everything is working properly. Place the robotic lawn mower inside the mowing area, a few metres in front of the charging station.
Set the robotic lawn mower's main switch to ON. Press STOP to open the panel and get at the keypad. Press HOME (to right on the display) then close the panel. The robotic lawn mower will now start a test sequence and return automatically to the charging station by going to the nearest border wire and following it anticlockwise back to the charging station, where it docks and starts charging. If the robotic lawn mower fails to dock, you may need to the adjust the charging station sideways until is docks with problem.
After the robotic lawn mower has docked the following symbol will flash. The battery symbol shows stepwise how the battery is charging.
EN
When the robotic lawn mower is working properly and a good place has been found for the charging station, fasten the charging station with the supplied plastic spikes. Make sure not to damage the border wire.
NOTE:
- Check that the connections to the charging station are correct. If the border wire is incorrectly connected the robotic lawn mower will not work, even if the blue status lamp is on.
- If the mowing area is less than 100 m^2 , or if the total length of the border wire is shorter than 40 m, connect a ceramic resistor of 20 /2 W to the border wire.
USE
Programming
NOTE:
First set the date and the time for the basis of the rest of the programming.
Control panel
- When the robotic lawn mower is fully charged it can be programmed. Press STOP to open the panel over the display and programme the robotic lawn mower in accordance with the instructions.
- The robotic lawn mower has been programmed at the factory, but settings can be changed according to personal preferences. Familiarise yourself with the different available alternatives.
NOTE:
The display is also a touch screen.
Buttons
| Each time it is pressed the cursor moves up or to the left and different options are shown. | |
| Each time it is pressed the cursor moves down or to the right and different options are shown. | |
| Set | Set activates a function or opens a setting for adjustment. |
| Home | Pressing Homeonce makes the robotic lawn mower go straight to the charging station. |
| Start | Pressing Startonce gets the robotic lawn mower to start mowing. |
FIG. 23
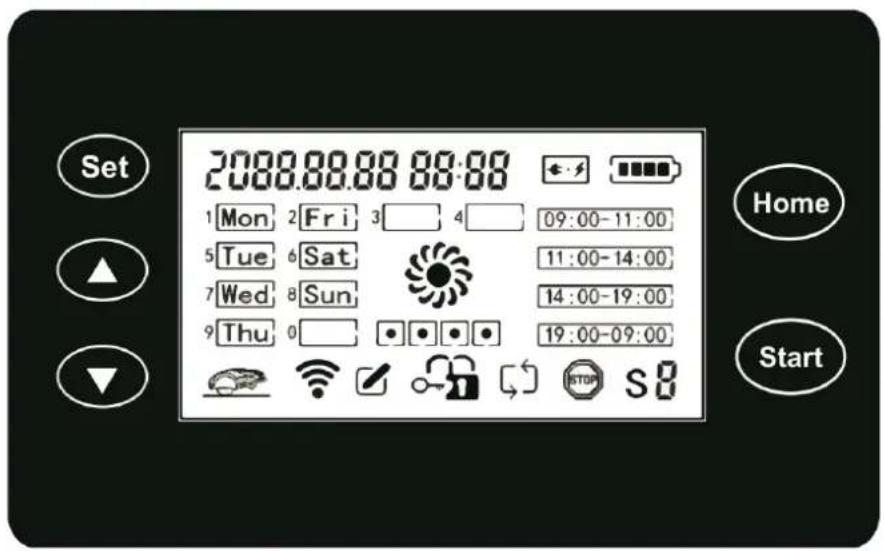
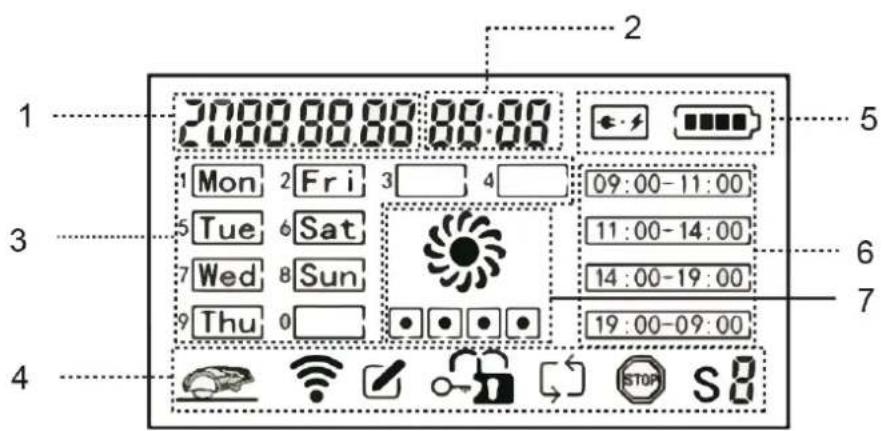
Overview of touch screen
The touch screen consists of several function areas.
| Area 1 Shows date. |
| Area 2 Shows time. Error code is also shown here in the event of a fault. |
| Area 3 Setting of weekday and keypad for entering PIN code. |
| Area 4 Shows | status of robotic lawn mower. |
| Area 5 Shows | battery and charging status. |
| Area 6 Shows | working hours. |
| Area 7 Shows | mowing and entered PIN code. |
FIG. 24
Status indication for signal strength of border wire.
The border wire emits a signal, which gets stronger the closer the robotic lawn mower comes to the border wire.
 | Strong signal. The robotic lawn mower is working normally. |
| ### | Weak signal. The robotic lawn mower is working normally. |
| ### | Flashing. No signal. The robotic lawn mower has stopped mowing. |
 | Flashing. The robotic lawn mower is outside the mowing area. The robotic lawn mower has stopped mowing. |
Status indication for uplifted mode

Flashing. Shows when the robotic lawn mower is lifted up.
If the robotic lawn mower is lifted temporarily (< 1 second) it returns to normal function. If the signal for when the robotic lawn mower is lifted lasts longer than 1 second, but less than 8 seconds, the robotic lawn mower stops and restarts automatically when the signal stops. If the signal lasts longer than 8 seconds the robotic lawn mower goes into locked anti-theft mode.
NOTE:
The symbol for uplifted robotic lawn mower can also be shown when the robotic lawn mower is exposed to vibrations.
Status indication for battery and charging
After every charging the robotic lawn mower leaves the charging station with a fully-charged battery.
 | Shows that the battery is fully charged. |
 | Shows that the battery has a 75% charge. |
 | Shows that the battery has a 50% charge. |
 | Shows that the battery has a 30% charge. |
 | Shows that the battery is discharged. |
 | The charging icon is shown continuously.The robotic lawn mower is on its way to thecharging station to be charged. |
 | The charging icon flashes. The robotic lawn mower is being charged in the charging station. |
  | The charging icon flashes and the battery icon is shown continuously. Shown when the robotic lawn mower is in the charging station and the battery is fully charged and the charging has finished. |
Touch screen and entering
 | The touch screen is locked. |
 | Enter the PIN code to unlock the touch screen. |
 | Enter new PIN code (when changing PIN code). |
| [4236] | Repeat new PIN code (when changing PIN code). |
Other
 | Border wire signal S1 is selected. |
 | Border wire signal S2 is selected. |
 | STOP has been pressed. The robotic lawn mower has stopped. |
PIN code
The first time you start the robotic lawn mower it is locked with a PIN code set at the factory.
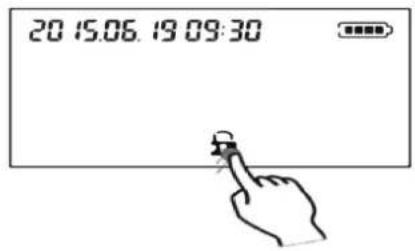
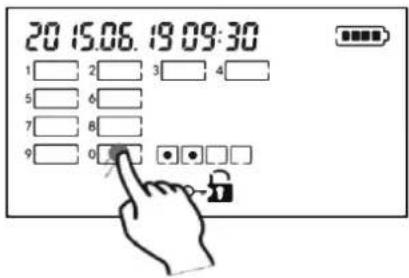
- Press the lock symbol to show the screen image to enter the PIN code. The factory set PIN code is 0000.
- Press the 0 button 4 times to enter the PIN code and unlock the robotic lawn mower.
- A black dot is shown on the display instead of the entered digit, to show which position in the PIN code should be entered.
- The normal control panel is shown on the touch screen after the entry.
FIG. 25
- To change the PIN code, see the section Changing the PIN code.
Settings
Date and time
- Press Set to the left of the touch screen and then . The digits for the date and time flash.
- Set the correct date with the buttons and .
- When the correct digits are shown, press Set and set the next digit.
FIG. 26
- If no settings are made within 15 seconds the touch screen shows the normal control panel again. The setting can be closed by pressing anywhere on the touch screen.
NOTE:
The date and time must be set for the robotic lawn mower to work properly.
Setting the mowing schedule (weekday and time)
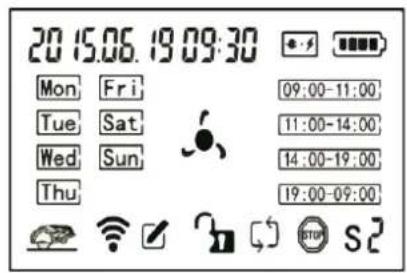
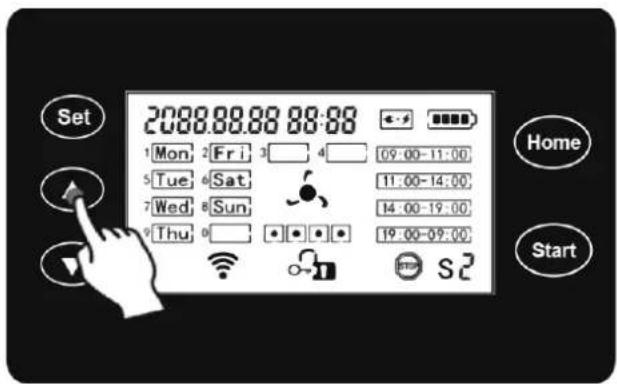
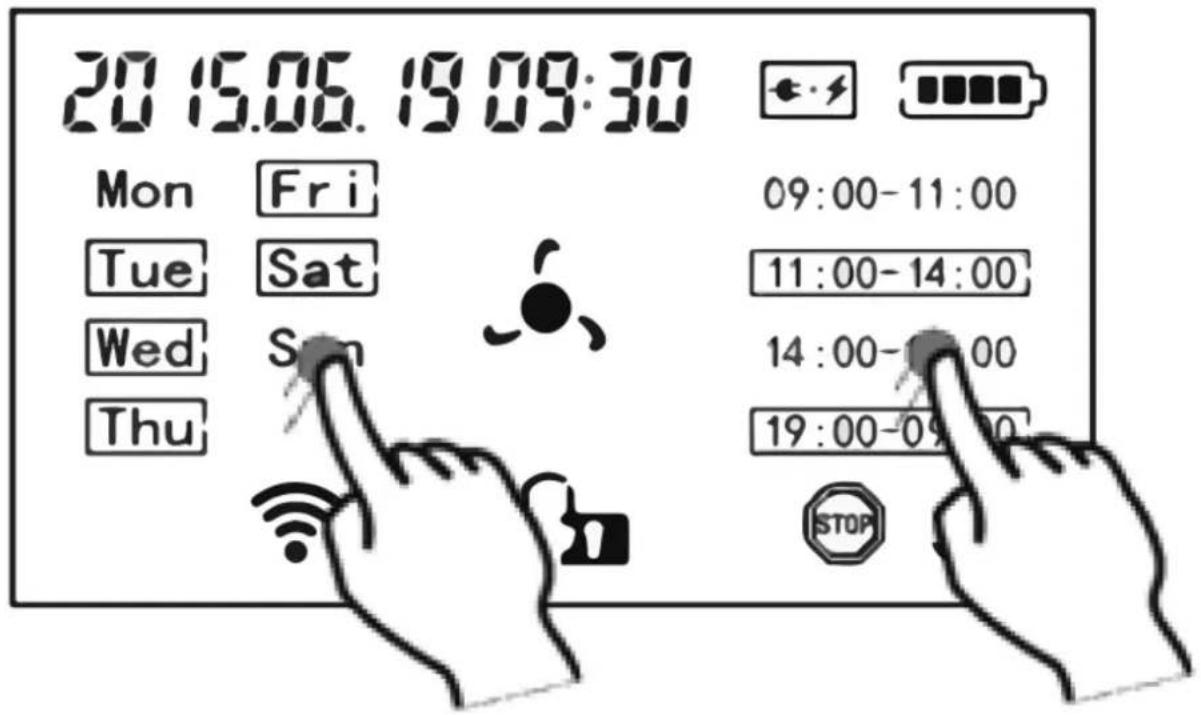
- Press the required weekday (Mon to Sun) on the touch screen. The selected weekday is shown with a frame on the display. A weekday is shown in a frame on the display to indicate that the robotic lawn mower is programmed to mow on this day.
- Press the required time interval (09:00–11:00, 11:00–14:00, 14:00–19:00, 19:00–09:00) on the touch screen. A selected time interval is shown with a frame on the display to indicate that the robotic lawn mower is programmed to mow during this time interval.
FIG. 27
- From the factory the robotic lawn mower is programmed to mow 24 hours per day every day of the week. We recommend the user sets the weekdays and times according to what is needed.
NOTE:
The times are not fully optional. It is only possible to choose between the 4 preset time intervals.
The table shows how many mowing hours per day the different settings give.
FIG. 28
| Mowing area Recommended mowing time/day | |
| 300 m^2 2 h | |
| 600 m^2 5 h | |
| 800 m^2 8 h | |
Setting the border wire signal
- The robotic lawn mower has two border wire signals, signal 1 and signal 2. If the same type of robotic lawn mower is used in adjacent gardens we strongly recommend that they are set to different signals to avoid interference.
- When the border wire is connected to the charging station check which signal (S1 or S2) the charging station issues. Press the SIGNAL button to select S1 or S2.
FIG. 29
- Press S1 or S2 on the touch screen to set the same signal on the mower as on the charging station.
FIG. 30
Mowing
- Press Start and close the panel. The robotic lawn mower starts mowing.
• The blade symbol starts rotating. - The residual battery charge is monitored and shown during the mowing.
 | Shows that the battery is fully charged. |
 | Shows that the battery has a 75% charge. |
 | Shows that the battery has a 50% charge. |
 | Shows that the battery has a 30% charge. At this level the robotic lawn mower goes to the charging station to be charged. |
 | Shows that the battery is discharged. |
 | Shows that the robotic lawn mower is searching for the charging station. |
| [Gx8C] | Stops rotating to show that the robotic lawn mower is not mowing on the way to the station. |
Mowing height
NOTE:
Always switch off the robotic lawn mower before adjusting the mowing height.
- The robotic lawn mower has 5 mowing height settings from 20 to 60 mm.
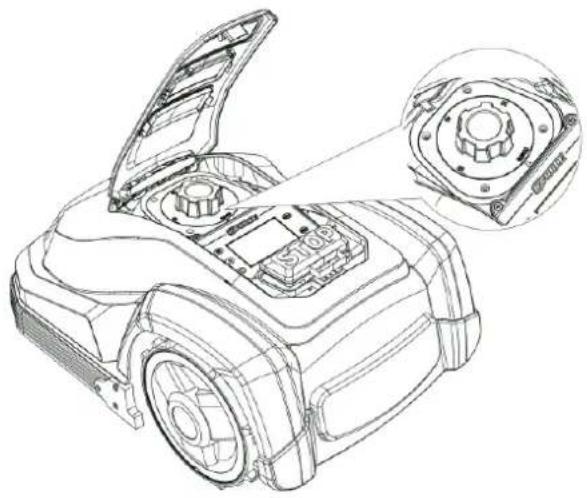
- Set the required mowing height by opening the panel and turning the large knob. When setting the first mowing height always select a high mowing height and then gradually reduce.
- If the grass is higher than 60 mm it must first be cut down to 60 mm with a normal lawn mower or trimmer, otherwise the robotic lawn mower will be overloaded.
FIG. 31
Charging
flashes when the robotic lawn mower is in the charging station. The battery symbol as shown to indicate the battery's charging status.
NOTE:
By pressing STOP on the mower and then Home on the keypad the robotic lawn mower goes to be charging station regardless off the residual battery charge.
Lock
- If the robotic lawn mower is not going to be mowing for some time, but the battery is to remain fully charged, the mower can be locked and put in the charging station.
- Press on the touch screen to lock the robotic lawn mower. The buttons Set, Home and Start are also locked.
- on the touch screen indicates that the robotic lawn mower is locked.
Unlock
NOTE:
- The touch screen unlocks and the panel opens by pressing the STOP button.
- Lock the touch screen before cleaning.
The touch screen locks automatically when the STOP button is pressed, and the panel opens. Press Symbol on the touch screen to unlock the robotic lawn mower. The PIN code is not needed.
Changing the PIN code
NOTE:
Change the PIN code when the robotic lawn mower is in ON mode.
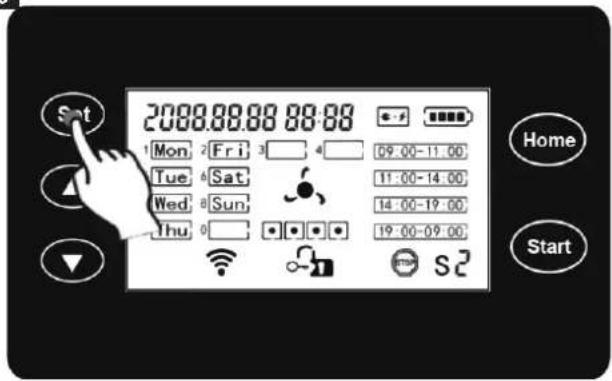
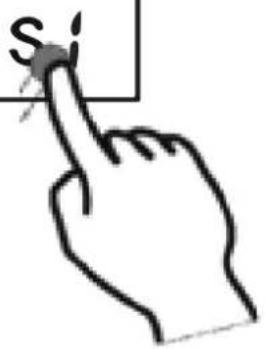
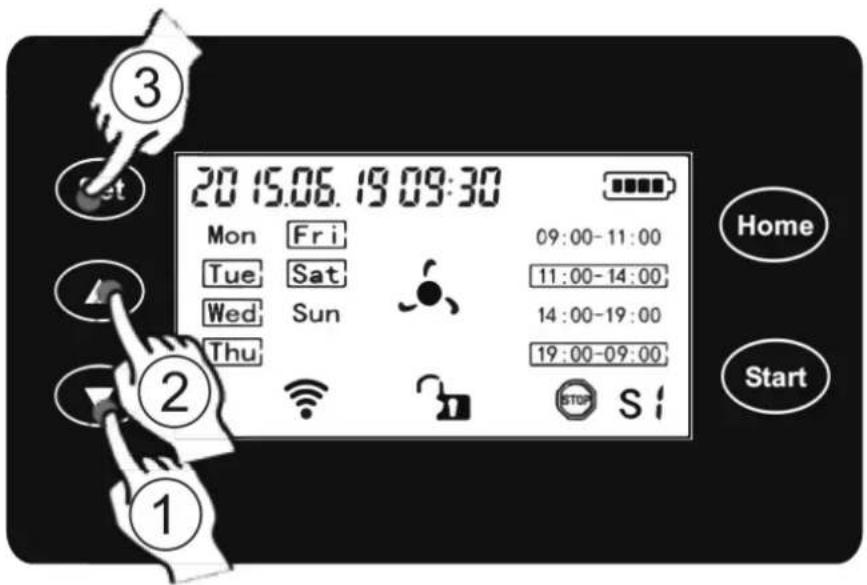
Press the STOP button. The panel over the keypad opens. Press and hold, press and hold and press SET.
FIG. 32
NOTE:
The three buttons must be pressed in the given order, and held pressed.
When all three buttons are pressed the display image for entering the PIN code is shown.
 | Enter the old PIN code. |
 | Enter the new PIN code. |
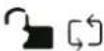 | Enter the new PIN code again. If the repeated PIN is the same as the new PIN code the new PIN will be accepted.Enter the new PIN code to unlock the touch screen. |
Error messages
If the robotic lawn mower stops inside or outside the mowing area, press the STOP button and check on the display which symbols are flashing.
| ● | No signal. |
 | The robotic lawn mower is uplifted. |
 | The battery is flat. |
If none of these three symbols are shown, press and hold and then press to show the error code:

The digits on the left show the time the fault occurred. The digits on the right in the dotted frame indicate the error code.
Rain sensor
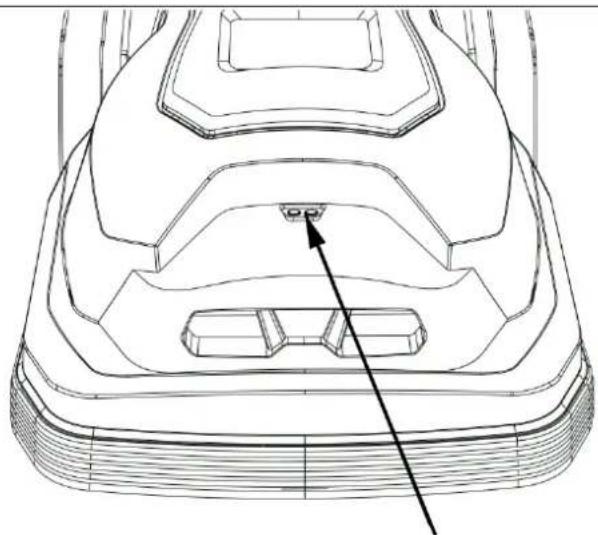
- The robotic lawn mower has a rain sensor to prevent mowing in the rain.
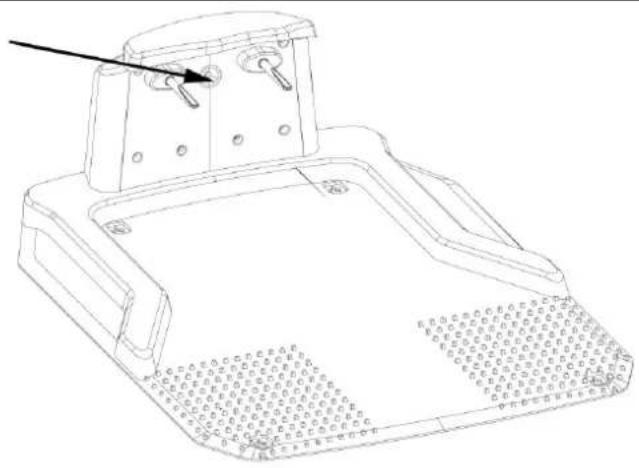
FIG. 33
- When the rain sensor detect rain the robotic lawn mower goes to the charging station. After being charged the robotic lawn mower stays in the charging station for 2 hours before it starts mowing again.
NOTE:
Do not short circuit the terminals on the rain sensor with a metal implement, this will prevent the sensors from working.
- Enable or disable the rain sensor by pressing and then pressing Start to switch between F1:1 and F1:0.
| F:1 | Shows that the rain sensor is enabled. |
| F:0 | Shows that the rain sensor is disabled. |
Charging information
The robotic lawn mower follows the border wire automatically in the following situations.
- When the Home button is pressed and the panel over the keyboard is closed the robotic lawn mower goes to the charging station and is shown continuously on the display. When the robotic lawn mower is in the charging station flashes.
- When the set mowing time is over shown continuously and the robotic lawn mower goes to the charging station.
- When the robotic lawn mower is fully charged and standing in the charging station card are shown continuously.
NOTE:
- If for some reason the robotic lawn mower cannot go to the charging station it will go back to the mowing area, localise the border wire and try again.
- If the ambient temperature at the charging station is higher than 40°C the charging will be stopped to protect the battery. The charging will resume when the temperature drops.
Note:
- Clean the blades and wheels often for best functionality and lifespan.
- Do not set longer times than necessary for the actual lawn, for best battery life and useful life of the robotic lawn mower.
- Do not mow at temperatures lower than 10^ for best battery life. At low temperatures the battery discharges quicker and must be charged more often.
- Avoid sharp turns and make sure the border wire is not bent or crossed.
- Save the packaging for future transportation.
- Do not mow the lawn shorter than 4 cm. The cuttings will not manage to decompose within 1 week.
- Keep the charging plate and pin clean for best charging functionality.
- Apply grease on the connections on the back of the charging station for better contact and to prevent corrosion.
MAINTENANCE
NOTE:
- Check and clean the robotic lawn mower regularly, with a brush or cloth.
- Repair or replace any damaged parts.
- NEVER pour water on the robotic lawn mower.
Battery life
The robotic lawn mower has a maintenance-free lithium battery with an estimated lifespan of at least 2 years, depending on usage. The battery is easy to take out from the robotic lawn mower. Fully charge the battery, take it out and store indoors during the winter. The battery should be recharged every 3 months to maintain its useful life.
CLEANING
WARNING!
- The mower must NOT be washed with water.
-
NEVER use a high-pressure washer or running water to clean the mower.
-
Keep the robotic lawn mower clean. The robotic lawn mower can handle slopes better if the wheels are clean, and the blades mow better if they are clean and sharp.
- Switch off the robotic lawn mower with the main switch before cleaning and wear safety gloves when touching the blades.
- Be careful when cleaning the casing. Use a soft brush, or wipe with a damp cloth.
WARNING!
The penetration of water can cause the electronic components to stop working.
Cleaning the underside
NOTE:
- Always switch off the robotic lawn mower with the main switch before cleaning.
- Wear safety gloves when touching the blades and blade plate.
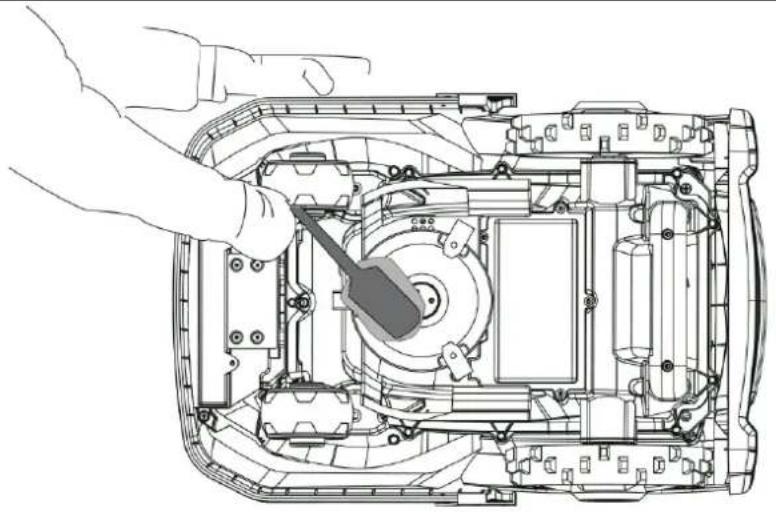
Place the robotic lawn mower on its side and clean the blade plate and chassis with a soft brush or damp cloth. Turn the blade plate to check that it rotates freely and check that the blades turn smoothly.
FIG. 34
Cleaning the contact pin and charging plate
- Remove grass, leaves and any debris round the contact pin and charging plate for best charging functionality.
- Clean the charging plate and pin with steel wool, a wire brush or fine sandpaper.
BLADES
WARNING!
- Always switch off the robotic lawn mower with the main switch before cleaning.
- Wear safety gloves when touching the blades and blade plate.
- There are three blades on the blade plate. If the blades do not strike any obstacles they will remain sharp for 5 months, even if the robotic lawn mower is programmed to mow every day. Replace the blades when they are worn. A set of spare blades is included.
- Spare blades are also sold by the dealer. If the blades or screws are worn or damaged, always replace the complete set to avoid imbalance. Only use blades and spare parts recommended by the manufacturer to ensure safe and effective mowing.
Reversing the blades
Each blade has two edges, which means they can be turned round once before they need to be replaced.
- Undo the retaining screw for each blade.
- Turn round the blade and replace.
- Tighten the retaining screw.
- Turn round, or replace all three blades at the same time. Regularly check that the blades are not blunt or damaged.
Replacing the blades
NOTE:
• Always switch off the robotic lawn mower with the main switch.
- Wear safety gloves when touching the blades.
-
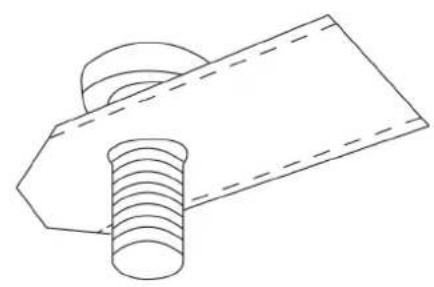
Turn the lawn mower upside down and unscrew the retaining screws with a screwdriver.
-
Fit the new blades firmly with the old screws.
-
Check that the new blades can rotate freely.
FIG. 35
BATTERY
Battery life is 1–5 years, depending on use.
Replacing the battery
- Set the lowest mowing height.
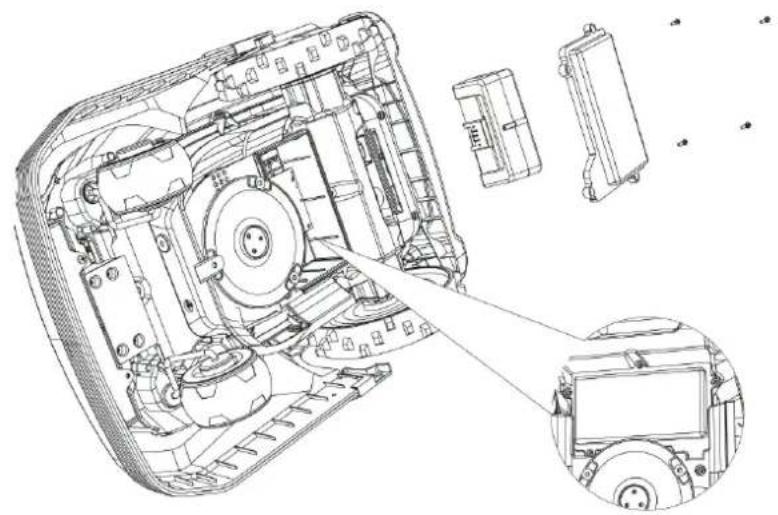
- Undo the five screws holding the battery cover. One of the screws is only accessible through a hole in the blade plate.
- Take out and disconnect the battery.
- Connect the new battery.
- Tighten the five screws that hold the battery cover.
FIG. 36
Preparations for the mowing season
Before commissioning after winter storage, clean the charging plate and pin with steel wool or fine sandpaper for best charging functionality.
Winter storage
- The robotic lawn mower and the charging station should be stored in a dry and safe place when not in use. The mains adapter and battery should be stored indoors.
- We recommend taking the robotic lawn mower to an authorised service centre before winter storage to have it cleaned, checked, upgraded, and if necessary repaired.
Preparations before winter storage
- Clean the robotic lawn mower thoroughly.
- Fully charge the battery.
- Make sure the robotic lawn mower is switched off.
- Disconnect the mains adapter from the mains.
- Disconnect the mains adapter from the charging station.
- Disconnect the border wire from the charging station.
- Disconnect the charging station and put it away.
- The border wire can be left out during the winter, but protect the ends with waterproof tape or grease to prevent corrosion.
- After cleaning and charging, store the robotic lawn mower standing on the wheels in the packaging, or in a clean place in the garage.
TROUBLESHOOTING
Error messages
| Message Type of message Event Action | |||
| Empty display. Check that the main switch is set to OFF. | |||
| The robotic lawn mower cannot go into the charging station. | Check that the border wire in front and under the charging station is straight. | ||
| Check that the charging station is positioned according to the instructions. | |||
| The robotic lawn mower goes in circles along the border wire to the charging station. | Check is there is a high tension cable near or under the border wire. If so, move the border wire to avoid this area. | ||
Flashes  | Information message. Charging. Correct function. | ||
Steady  | Information message. On way to charging station. Correct function. | ||
 | Warning message. Too low battery voltage for normal mowing. | When the battery voltage is low the robotic lawn mower normally goes back to the charging station. | |
| Carry the robotic lawn mower to the charging station if it has stopped on the lawn. | |||
| [702Z] Flashes | Warning message. The robotic lawn mower is uplifted. | Check whether the robotic lawn mower is uplifted because of long grass (longer than 60 mm). If so, mow the grass with a normal lawn mower before starting the robotic lawn mower again. | |
| Check that the robotic lawn mower is not blocked. | |||
| ● Flashes | Warning message. The appliance does not receive a signal from the border wire. | Check that the status lamp on the charging station is blue. | |
| If the status lamp is not on, check that the charging station is connected to the mains. | |||
| Om the status lamp is red, check that the border wire is connected to the charging station. | |||
| When using for the first time after a power failure, carry the robotic lawn mower to the nearest border wire. | |||
| Check that the same signal (S1 or S2) is set on the charging station and on the touch screen. | |||
Flashes  | Warning message. The robotic lawn mower is, or has been outside the border wire. | If the display shows OUTSIDE even though the robotic lawn mower is inside the mowing area, check that the border wire is correctly connected to the charging station. | |
| If the robotic lawn mower is outside the mowing area, lift it into the mowing area and restart it. | |||
| If the robotic lawn mower comes outside the mowing area at a corner, move the border wire to make the corner rounder. | |||
| If the robotic lawn mower comes outside the border wire several times at the same place, check if there is a high tension cable near or under the ground. If so, move the border wire if possible to avoid this area. | |||
Rotates  | Information message. Mowing progress. Normal function. | ||
Troubleshooting charging station
| Status lamp Description | |
| Blue lamp on. Normal. | |
| Flashing blue lamp. The charging station's inner wire is damaged. The border wire is OK. | |
| Flashing red lamp. The border wire is damaged. The charging station's inner wire is OK. | |
| Flashes blue and red lamp. Both the border wire and the charging station's inner wire are damaged. | |
Error codes
| Message Type of | message Event Action | ||
| EF 01 Warning m | message. The obstacle sensor is blocked. Check if an object has fastened between the casing and the chassis. | ||
| EF 02 | Warning message. | The robotic lawn mower is tilting. | Check if the gradient of the ground is too steep and if necessary move the border wire. The robotic lawn mower can normally handle moderate gradients without any problems. |
| EF 03 | Warning message. | The robotic lawn mower has tipped over. | Move the robotic lawn mower to level ground and restart it. |
| EF 04 | Warning message. | The robotic lawn mower has got stuck. | This message is shown when the collision sensor is activated more than 10 times in 1 minute. Check if the robotic lawn mower has got stuck between obstacles such as trees, or bushes etc. Remove the obstacles, or move the border wire to avoid this area. |
| EF 05 | Warning message. | The robotic lawn mower is uplifted. | Check whether the robotic lawn mower is uplifted because of long grass (longer than 60 mm). If so, mow the grass with a normal lawn mower before starting the robotic lawn mower again. |
| Check that the robotic lawn mower is not blocked. | |||
| EF 06 Warning m | message. The robotic lawn mower is, or has been outside the border wire. | If the display shows OUTSIDE even though the robotic lawn mower is inside the mowing area, check that the border wire is correctly connected to the charging station. | |
| If the robotic lawn mower is outside the mowing area, lift it into the mowing area and restart it. | |||
| If the robotic lawn mower comes outside the mowing area at a corner, move the border wire to make the corner rounder. | |||
| If the robotic lawn mower comes outside the border wire several times at the same place, check if there is a high tension cable near or under the ground. If so, move the border wire if possible to avoid this area. | |||
| EF 07 | Warning message. The robotic lawn mower does not receive a signal from the border wire. | Check that the status lamp on the charging station is green. | |
| If the status lamp is not on, check that the charging station is connected to the mains. | |||
| Om the status lamp is red, check that the border wire is connected to the charging station. | |||
| When using for the first time after a power failure, carry the robotic lawn mower to the nearest border wire. | |||
| EF 08 Warning m | message. Too low battery voltage for normal mowing. | When the battery voltage is low the robotic lawn mower normally goes back to the charging station. | |
| Carry the robotic lawn mower to the charging station if it has stopped on the lawn. | |||
| EF 09 | Warning message. | The drive motor is blocked. | Switch off and restart the robotic lawn mower. Contact customer service if the fault persists after restarting the robotic lawn mower. |
| EF 10 | Warning message. | The mowing motor is blocked. | Switch off and restart the robotic lawn mower. Contact customer service if the fault persists after restarting the robotic lawn mower. |
Hot keys
| Combination of hot keys Function | |
 | Show software version. |
 | Active PIN code. |
 | Active PUK code. |
 | Show time of fault and error code. |
 | Show product serial number. |
 | Activating and deactivating rain sensor |
- SE ROBOTGRÄSKLIPPARE
- CE
- EC DECLARATION OF CONFORMITY
- EG FÖRSÄKRAN OM ÖVERENSSTÄMMELSE
- EF SAMSVARSERKLÆRING
- DEKLARACJA ZGODNOŚCI WE
- This product was CE marked in year -18
- SÄKERHETSANVISNINGAR
- Training
- Preparations
- Use
- NOTE:
- Maintenance and storage
- Special safety instructions
- WARNING!
- Additional safety instructions
- Protection from thunder
- DESCRIPTION
- Contents
- Parts
- INSTALLATION
- Introduction
- Limitations
- Trees
- Stones
- Slopes
- Paths, drives and roads
- Uneven lawns
- Flowerbeds
- 8
- 9
- Ponds and pools
- 10
- The border wire must not cross itself.
- 11
- 12
- Marking out the routing of the border wire
- 13
- Positioning the charging station
- 14
- 15
- Fastening the border wire
- 16
- 17
- 18
- Connecting the border wire to the charging station
- 19
- 20
- 21
- 22
- EN
- Programming
- Control panel
- 23
- Overview of touch screen
- Status indication for signal strength of border wire.
- Status indication for uplifted mode
- Status indication for battery and charging
- PIN code
- 25
- Settings
- Date and time
- 26
- The date and time must be set for the robotic lawn mower to work properly.
- Setting the mowing schedule (weekday and time)
- 27
- The times are not fully optional. It is only possible to choose between the 4 preset time intervals.
- 28
- Setting the border wire signal
- 29
- 30
- Mowing
- Mowing height
- Always switch off the robotic lawn mower before adjusting the mowing height.
- 31
- Charging
- Lock
- Unlock
- Changing the PIN code
- 32
- Error messages
- Rain sensor
- 33
- Do not short circuit the terminals on the rain sensor with a metal implement, this will prevent the sensors from working.
- Charging information
- MAINTENANCE
- Battery life
- CLEANING
- Cleaning the underside
- 34
- Cleaning the contact pin and charging plate
- BLADES
- Reversing the blades
- Replacing the blades
- BATTERY
- Replacing the battery
- Preparations for the mowing season
- Winter storage
- TROUBLESHOOTING
Brand : Meec Tools
Model : 004-932
Category : Lawn mower