008-065 - Sandwich Press Menuett - Free user manual and instructions
Find the device manual for free 008-065 Menuett in PDF.


| Product Type | Sandwich Press |
| Brand | Menuett |
| Model | 008-065 |
| Power Consumption | 750 W |
| Voltage | 220-240 V, 50/60 Hz |
| Dimensions (L x W x H) | 25 cm x 20 cm x 10 cm |
| Weight | 1.5 kg |
| Cord Length | 0.8 m |
| Material | Plastic housing with non-stick coated plates |
| Number of Sandwiches | 2 (one large or two smaller) |
| Temperature Control | Adjustable thermostat |
| Indicator Lights | Power and ready lights |
| Floating Hinge | Yes, for thick fillings |
| Locking Latch | Yes, for compact storage |
| Non-Stick Coating | Yes |
| Heat-Resistant Handles | Yes |
| Auto Shut-Off | Not specified; manual shutdown recommended |
| Dishwasher Safe Plates | No, wipe with damp cloth |
| Cleaning Method | Unplug, let cool, wipe with damp cloth; do not immerse |
| Storage | Upright or flat with latch closed |
| Warranty | 1 year (if applicable) |
Frequently Asked Questions - 008-065 Menuett
User questions about 008-065 Menuett
0 question about this device. Answer the ones you know or ask your own.
Ask a new question about this device
Download the instructions for your Sandwich Press in PDF format for free! Find your manual 008-065 - Menuett and take your electronic device back in hand. On this page are published all the documents necessary for the use of your device. 008-065 by Menuett.
USER MANUAL 008-065 Menuett
natural_image
Modern stainless steel grating with digital display and control buttons (no visible text or symbols)
SE BORDSGRILL
Bruksanvisning i original
Operating instructions
(Translation of the original instructions)
Important! Read the user instructions carefully before use.
Save them for future reference.
Värna om miljön!
Care for the environment!
Must not be discarded with household waste! This product contains electrical or electronic components that should be recycled. Leave the product for recycling at the designated station e.g. the local authority's recycling station.
Jula reserves the right to make changes. In the event of problems, please contact our customer service. www.jula.com
Tillverkare/ Produsent/ Produenci/ Manufacturer Jula AB, Box 363, 532 24 SKARA
Distributör/ Distributør/ Dystrybutor/ Distributor Jula Poland Sp. z o.o., ul.
For latest version of operating instructions, see www.jula.com
2019-10-10
© Jula AB
1
2
3
natural_image
Technical line drawing of a vehicle chassis with ventilation grilles and a handle (no text or symbols)The image is too blurry to recognize any text content.
natural_image
Technical line drawing of a flat-screen electric motor or heat exchanger with no visible text or symbolsSÄKERHETSANVISNINGAR
• Always follow the safety instructions when using electrical products.
- Read all the instructions carefully before use.
- Do not touch hot surfaces. Use the handles and knobs.
- Check that the mains voltage corresponds to the rated voltage on the type plate.
- Do not immerse the product, the power cord or plug, in water or any other liquid – risk of fire, electric shock and/or personal injury.
- If the power cord or plug are damaged they must be replaced by an authorised service centre to ensure safe use.
- Keep the product under careful supervision when it is used by, or near children.
- This appliance can be used by children aged from 8 years and above and people with reduced physical, sensory or mental capabilities or lack of
experience and knowledge if they have been given supervision or instruction concerning use of the appliance in a safe way and understand the hazards involved. Children shall not play with the appliance. Cleaning and user maintenance tasks may not be carried out by children unless they are supervised.
- Keep children under supervision to make sure they do not play with the product.
- Pull out the plug before cleaning and when the product is not in use. Allow the product to cool before cleaning or removing parts.
- Do not use the product if it is damaged or not working properly, or if the power cord or plug are damaged. Take the product to an authorised service centre to be checked, repaired or adjusted.
- Do not use accessories other than those recommended or sold by the manufacturer. The
use of other accessories can result in fire, electric shock and/or personal injury.
- Do not use the product outdoors.
- Do not allow the power cord to hang over the edge of a table or worktop, or to come into contact with hot surfaces.
- Place the product on a level, dry, heat-resistant surface.
- Do not put the product on or near a hot stove or in a hot oven.
- The product gets hot when in use. Do not touch hot parts – risk of getting burned.
- Do not move the product when the power cord is plugged in. Allow the product to cool before handling.
- Handle the product carefully when there is hot oil or liquid in it.
- Do not use the product near water or any other liquid.
-
Switch off with the power switch and unplug the power cord.
-
Do not use the product unless both grill plates are properly fitted.
- Never use the product for anything other than the purpose it was designed for.
- Do not control the product with an external timer or remote control.
- Food cooked in the product must not be wrapped in plastic film, plastic bags or metal foil. Risk of fire and/or material damage. Take out food immediately when it is ready – do not allow it to cool in the product.
- Do not use cutlery or utensils made of metal or with sharp points or edges, this can damage the nonstick coating. Only use grill spatulas and tongs made of plastic or wood.
- Do not carry the product with the handle.
- The product is intended for household use.
- Keep the product and its power cord out of the reach
of children under eight years of age.
- Only use the product in a well ventilated area. Leave at least 10–15 cm of free space on all sides to ensure the adequate circulation of air.
- To avoid a fire risk, do not place the product near flammable objects, curtains or furniture.
- Do not put aluminium foil or other material in the drip tray.
WARNING!
- The product must not be used with charcoal or other similar sources of heat.
- The product emits heat and steam when in use. Take suitable precautions to prevent a fire, burn injuries and other personal injuries.
SYMBOLS
| Read the instructions. | |
| Approved in accordance with the relevant directives. | |
| Recycle discarded product as electrical waste. |
Warning: Hot surface.
TECHNICAL DATA
| Rated voltage 230 V | ~50 Hz |
| Output | 1800 W |
| Size W310 x H165 x D350 mm | |
| Cord length 1 m | |
| Weight 5 kg |
DESCRIPTION
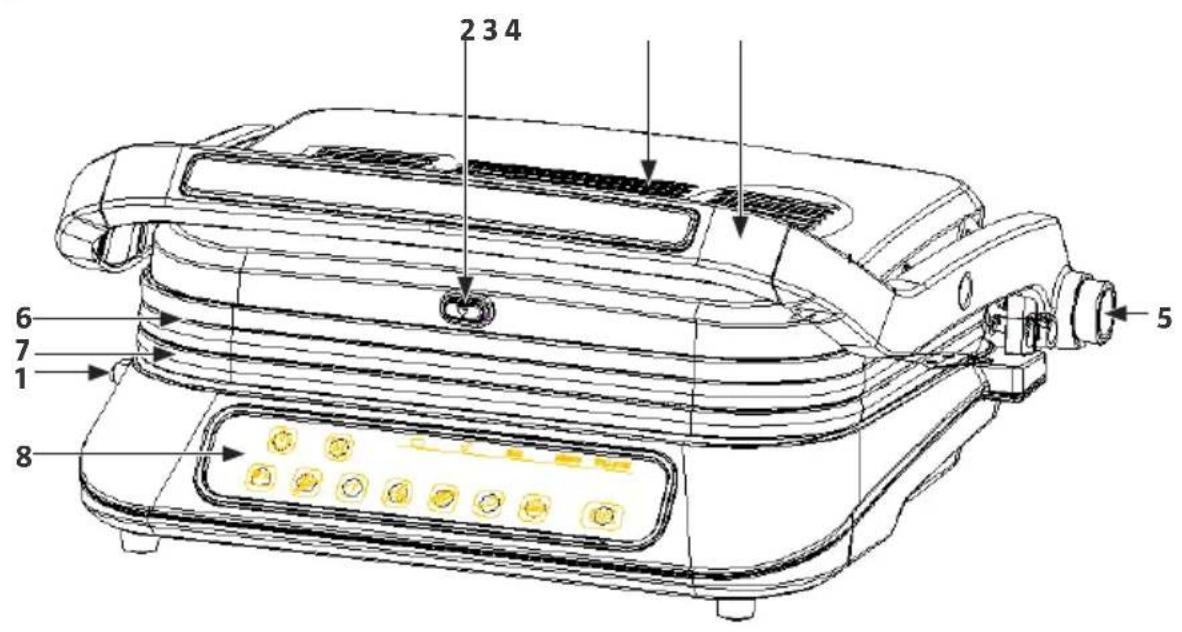
- Lock button for bottom part
- Lock button for top part
- Air holes
- Handle
- Hinge lock
- Top grill hob
- Bottom grill hob
- Control panel
FIG. 1
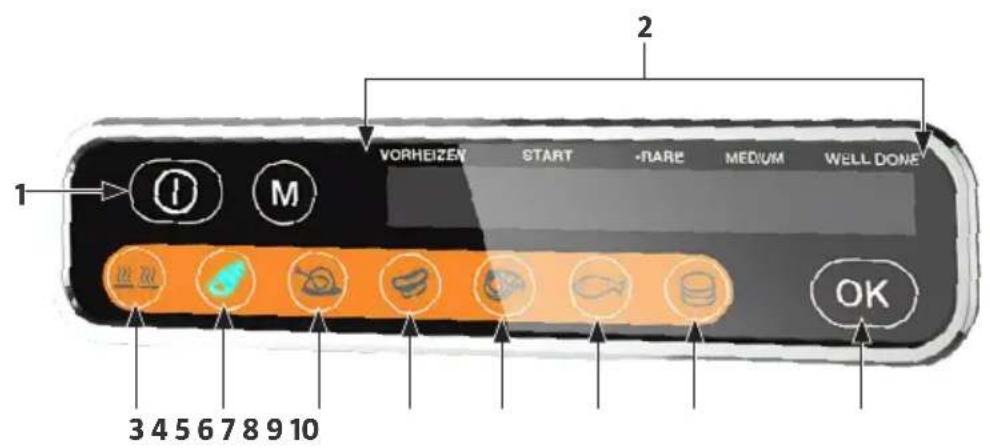
CONTROL PANEL
- Power switch
- Status lights
- Deep-frozen
- Bacon
- Chicken
- Sausages
- Beef
- Fish
- Beefburger/hamburger
- OK/confirm
FIG. 2
INSTALLATION
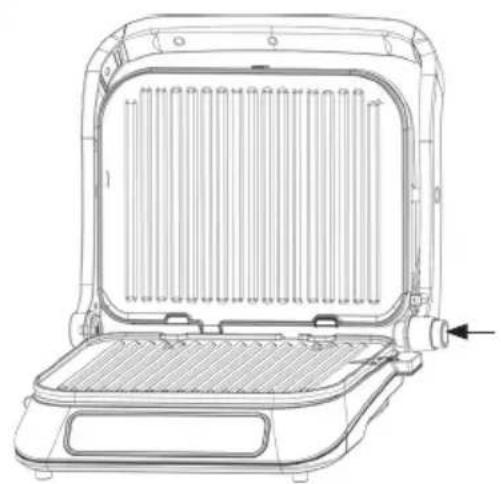
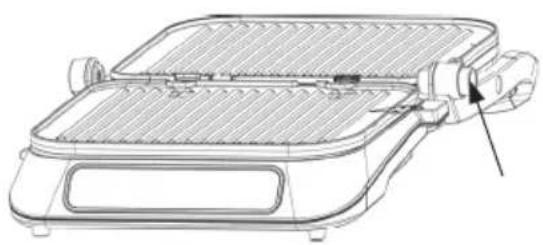
The top part of the tabletop grill is normally opened to position 1, 105°. The top part can if necessary be opened to position 2, 180°, so that the top and bottom hobs form one large, flat hob.
- Grip the handle on the top part with one hand and open the top part to position 1.
FIG. 3
- Press with the other hand on the hinge lock (5) and then open to position 2.
FIG. 4
-
Fit the grill hobs in the fasteners beside the hinges and press the front edge of each hob down with moderate force until the hobs click in place.
-
Close the top part in one motion (the hinge locks only act in the direction of opening).
USE
BEFORE USING FOR THE FIRST TIME
Unpack the tabletop grill and its accessories and clean them according to the instructions in the "Maintenance" section.
USE
Automatic mode:
- When the plug is plugged into a power point there is an audio prompt.
- The lid should be closed when selecting which food to cook, but also to activate automatic mode.
-
Press the power switch button. The status lights flash in a cyclic sequence to show that the type of food should be selected on the control panel. Press for example the "Chicken" button to grill chicken. All five status lights go on when the type of food has been selected.
-
Press the "OK" button to confirm the setting. Preheating starts and only the status light "PRE-HEATING" goes on.
- When the right temperature is reached the tabletop grill gives an audio prompt to indicate that the preheating is ready and that the food should be placed between the hobs. The status light "PRE-HEATING" flashes and the status light "START TO COOK" goes on.
- Place the food on the bottom hob and fold down the top part. The grill automatically detects the thickness of the food within three seconds and selects the right grilling process. At this stage the status lights "PRE-HEATING" and "START TO COOK" stay on and the status light "RARE" flashes.
- As the cooking continues the status lights switch from "RARE" to "WELL DONE". When one stage of the cooking is reached the corresponding status light switches from flashing to constant, and the status light for the next stage starts flashing.
- The grilling is finished when "WELL DONE" switches from flashing to constant. The grill gives an audio prompt and switches off automatically. Lift up the top part with the handle and check the result.
The instructions do not apply in 105° or 180° open mode. - When the plug is plugged into a power point there is an audio prompt.
- Press the power switch button and then press the "M" button to select manual mode. The five status lights flash one by one.
- Press the "OK" button to start the preheating. Only the status light "PRE-HEATING" flashes.
NOTE:
Manual mode
EN
- An audio prompt is given when the preheating is ready. The status light "PREHEATING" switches to constant and the other four status lights flash in succession.
- Place the food on the bottom hob and fold down the top part. The grilling starts. Thickness detection and monitoring of the cooking status are switched off in manual mode. For this reason check the cooking status after a few minutes. The grill switches off automatically after two hours.
Tips
- For best results, smear butter or cooking oil on the grill hobs before use.
- Close the grill (fold down top part) during preheating. When the preheating is ready the grill switches off automatically after a few minutes if the top part is not opened to insert the food, but only if the grill is in automatic mode. In manual mode the detection functions are switched off and the grill continues grilling for about two hours before it switches off automatically.
- Lift up the top part of the grill with the handle when the grilling is ready. Lift out the food with a grill spatula or grill tongs made of wood or heat-resistant plastic. Do not use cutlery or utensils made of metal or with sharp points or edges, this can damage the nonstick coating.
- The audio prompts for cooking status "RARE" and "MEDIUM" are only given in "Beef" mode. For other types of food an audio prompt is only given for "WELL DONE".
Using as an open grill
- Place the grill on a smooth, level and heat-resistant surface.
- When the product is open in position 1, lift up the top part a little and press the
hinge locks. The top part can now be opened to position 2, so that the top and bottom hobs form one large, flat hob.
- In this position the grill can be used for hamburgers, meat, fish and vegetables.
- To return to position 1, fold back the top part to its angled position. When the hinge locks click in place the top part is locked in position 1.
- Automatic mode is not possible when the grill is used as an open grill.
NOTE:
Do not pull out the plug immediately after grilling – the fan continues to run for three minutes to cool the grill after switching it off.
MAINTENANCE
CLEANING
- Pull out the plug from the power point and allow the grill to cool to room temperature before cleaning.
- Press the release button and take out the grill hobs.
- Wash the hobs by hand in washing-up liquid or in a dishwasher. Allow to dry before replacing in the grill.
- Wear suitable safety gloves and take out the top and bottom drip tray. Empty the trays in a heat-resistant container and wash them by hand with hot water and washing-up liquid, or in a dishwasher on the top shelf. Allow to dry before replacing.
- Wipe with the other surfaces on the grill with a clean, damp cloth. Encrusted scraps can be rubbed off with kitchen paper and a few drops of cooking oil.
- Replace the hobs in the grill.
NOTE:
- The grill is very hot after use. It takes a relatively long time to cool.
- Check that residual oil and grease in the drip trays have cooled to 40^ C before taking out the trays – risk of burn injury.
- Never immerse the grill in water or any other liquid.
- Never use solvents or abrasive detergents.
- Never use steel wool, Scotchbrite sponges or the equivalent.
STORAGE
- Clean the grill and allow it to dry before putting away.
- Fold down the top part into closed position.
- Store the grill horizontally, not upright.
- Store in a dry, cool place out of the reach of children.
WASTE DISPOSAL
Recycle used tabletop grills in accordance with local regulations.
Brand : Menuett
Model : 008-065
Category : Sandwich Press