MW820-20EB - Microwave PKM - Free user manual and instructions
Find the device manual for free MW820-20EB PKM in PDF.


| Type | Built-in Microwave Oven |
| Cooking Chamber Volume | 20 L |
| Voltage / Frequency | 230 V AC / 50 Hz |
| Maximum Power (Microwave) | 800 W |
| Power Levels | 5 (100%, 80%, 50%, 30%, 10%) |
| Auto Programmes | 8 (Pizza, Meat, Vegetables, Pasta, Potatoes, Fish, Soup/Beverages, Popcorn) |
| Defrost Settings | By weight (100-2000 g) or by time (max. 95 min) |
| Door Opening | Push button |
| LED Display | Yes |
| Acoustic End Signal | Yes |
| Child Lock | Yes |
| Timer | Digital, up to 95 minutes |
| Turntable | Yes, 245 mm diameter |
| Power Cord Length | 100 cm |
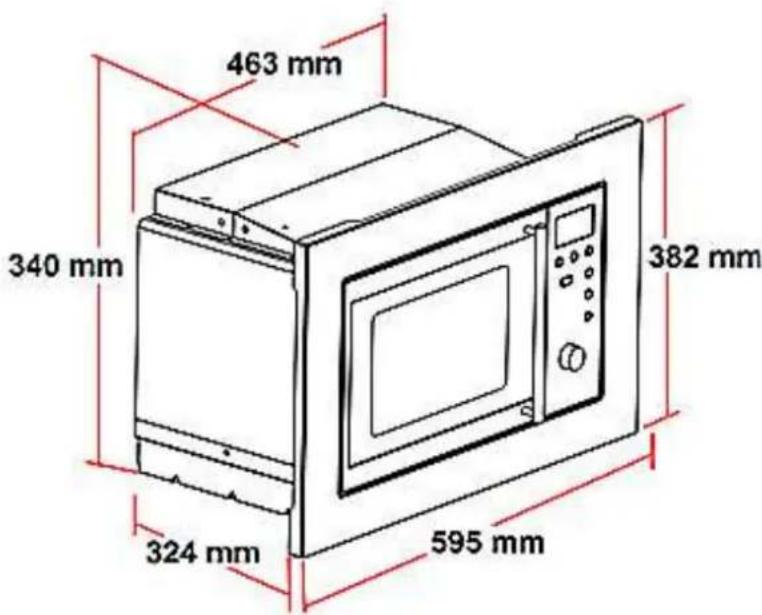
| Dimensions (without frame) H×W×D | 28.9 × 46.1 × 34.35 cm |
| Dimensions (with frame) H×W×D | 38.2 × 59.5 × 34.35 cm |
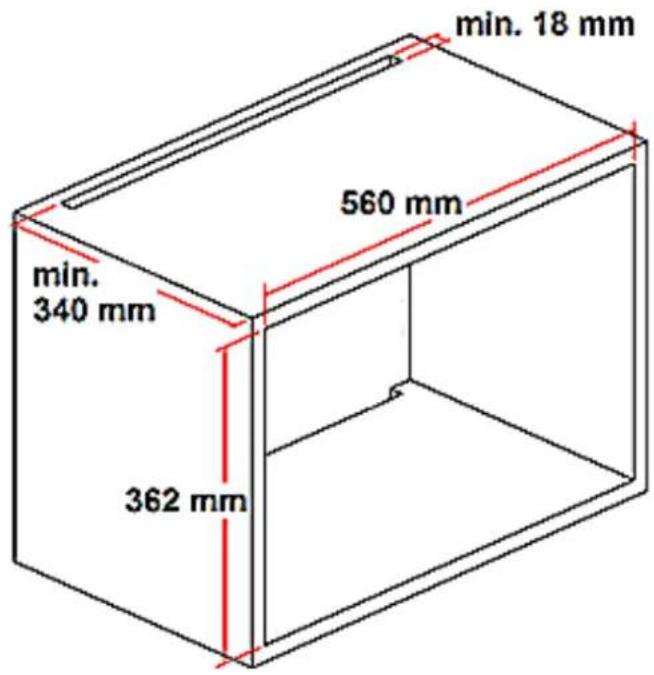
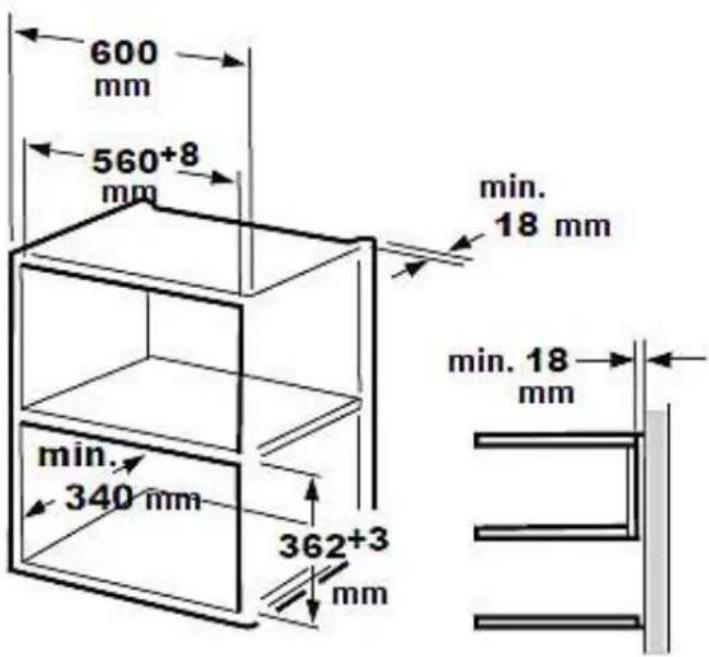
| Recess Dimensions H×W×D | 36.2 × 56.0 × 34.0 cm |
| Net / Gross Weight | 14.5 kg / 16.0 kg |
| Construction Materials | Fragile components: plastic, glass, bulbs |
| Warranty | 24 months manufacturer guarantee for consumers |
Frequently Asked Questions - MW820-20EB PKM
User questions about MW820-20EB PKM
0 question about this device. Answer the ones you know or ask your own.
Ask a new question about this device
Download the instructions for your Microwave in PDF format for free! Find your manual MW820-20EB - PKM and take your electronic device back in hand. On this page are published all the documents necessary for the use of your device. MW820-20EB by PKM.
USER MANUAL MW820-20EB PKM
Built-in Microwave Oven
MW 820-EBM
natural_image
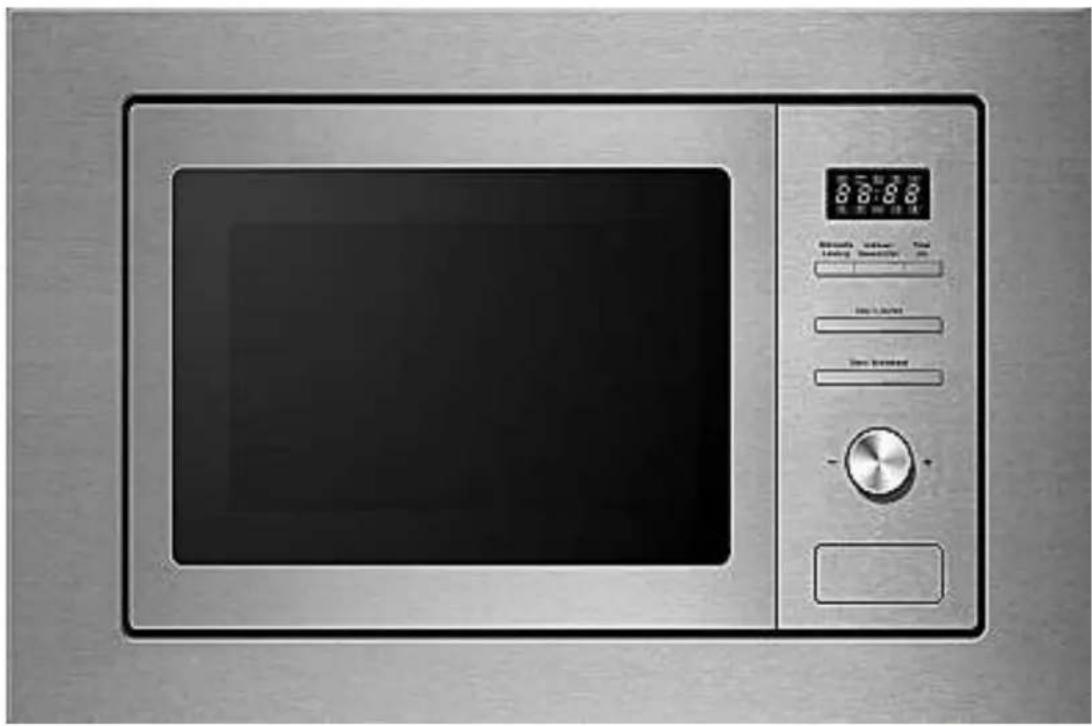
Front view of a silver microwave oven with control panel and digital display (no visible text or symbols on main body)Deutsch
English
Seite 2
Page 30
www.pkm-online.de
natural_image
Line drawing of a microwave oven with front and back views (no text or symbols)A Bedienfeld
Dear customer! We would like to thank you for purchasing a product from our wide range of domestic appliances. Read the complete instruction manual before you operate the appliance for the first time. Retain this instruction manual in a safe place for future reference. If you transfer the appliance to a third party, also hand over this instruction manual.
Index
Index....30
- Safety information .... 31
1.1 Signal words.... 32
1.2 Safety instructions.... 33
- Installation 35
2.1 Installation dimensions ...... 36
2.2 Installation 37
2.3 Device description 39
2.4 Installation of the turntable.... 39
- Operation....40
3.1 Control panel....40
3.2 Setting of the clock....41
3.3 How to cook food 41
3.3.1 Microwave - Order configuration.... 43
3.4 Start / Quick Start 43
3.5 Defrost by weight....44
3.6 Defrost by time 44
3.7 Query function....44
3.8 Multi-step operation 45
3.9 Auto-Menu....46
3.10 Timer 47
3.11 Child lock....47
3.12 Specifications....47
- Microwave cooking.... 48
4.1 Basics of microwave cooking.... 48
4.2 Suitable materials for microwave cooking 48
4.3 Unsuitable materials for microwave cooking.... 49
- Cleaning and maintenance.... 50
- Trouble shooting....51
- Technical data....52
- Waste management....52
- Guarantee conditions 53
The figures in this instruction manual may differ in some details from the current design of your appliance. Nevertheless follow the instructions in such a case. Delivery without content.
i Any modifications, which do not influence the functions of the appliance. shall remain reserved by the manufacturer. Please dispose of the packing with respect to your current local and municipal regulations.
The appliance you have purchased may be an enhanced version of the unit this manual was printed for. Nevertheless, the functions and operating conditions are identical. This manual is therefore still valid. Technical modifications as well as misprints shall remain reserved.
EU - Declaration of Conformity
★ The products, which are described in this instruction manual, comply with the harmonized regulations.
★ The relevant documents can be requested from the final retailer by the competent authorities.
1. Safety information
READ THE SAFETY INFORMATION AND THE SAFETY INSTRUCTIONS CAREFULLY BEFORE YOU OPERATE THE APPLIANCE FOR THE FIRST TIME.
All information included in those pages serve for the protection of the operator. If you ignore the safety instructions, you will endanger your health and life.
Store this manual in a safe place so you can use it whenever it is needed. Strictly observe the instructions to avoid damage to persons and property.
Check the technical periphery of the appliance! Do all wires and connections to the appliance work properly? Or are they time-worn and do not match the technical requirements of the appliance? A check-up of existing and newly-
made connections must be done by an authorized professional. All connections and energy-leading components (incl. wires inside a wall) must be checked by a qualified professional. All modifications to the electrical mains to enable the installation of the appliance must be performed by a qualified professional.
The appliance is intended for private use only as well as to be used (1) in staff kitchen areas of shops, offices and other working environments; (2) by clients in hotels, motels, B&B and other residential type environments.
i The appliance is intended for cooking only.
i The appliance is intended for indoor-use only.
The appliance is not intended to be operated for commercial purposes, during camping and in public transport.
i Operate the appliance in accordance with its intended use only.
Do not allow anybody who is not familiar with this instruction manual to operate the appliance.
Precautions to avoid possible exposure to excessive microwave energy:
1 Do not attempt to operate this appliance with the door open as open-door operating can result in harmful exposure to microwave energy. Do not break or tamper with the safety interlocks.
2 Do not place any object between the front of the appliance and the door or allow soil or cleaner residuals to accumulate on the sealing surfaces.
3 Do not operate the appliance if it is damaged. It is particularly important that the door closes properly and that there is not any damage on the:
a door (bent).
b hinges and latches ( must not be broken or loosened ).
c door seals and sealing surfaces.
4 The appliance should not be adjusted or repaired by anyone except properly qualified service personal.
1.1 Signal words
⚠️ DANGER! indicates a hazardous situation which, if ignored, will result in death or serious injury.
⚠️ CAUTION! indicates a hazardous situation which, if not avoided, may result in minor or moderate injury.
WARNING! indicates a hazardous situation which, if ignored, could result in death or serious injury.
NOTICE! indicates possible damage to the appliance.
DANGER!
To reduce the risk of electrocution:
- Do not connect the appliance to the mains if the appliance itself or the power cord or the plug are visibly damaged.
- Always check that the power cord is not placed under the appliance or damaged by moving the appliance.
- Never try to repair the appliance yourself. If the appliance does not operate properly, disconnect it from the mains and contact the shop you purchased the appliance at. Original spare parts should be used only.
- When the power cord is damaged, it must be replaced by the manufacturer or an authorized aftersales service or a qualified professional only.
- Never remove the mica-plate which covers the wave guide inside the oven.
WARNING!
To reduce the risk of burns, electrocution, fire or injury to persons:
- Operate the appliance with 220\~240 V AC / 50 Hz only. Do not use an extension cord or a multiple socket.
- Connect the appliance to a properly grounded socket only. Use a safety socket to minimize any risk of electric shock.
- The technical data of your energy supply must meet the data on the rating label. The main current circuit must be equipped with a safety shut-down device.
- Any repair or service work including the removal of any cover, which protects from exposure to microwave energy, must be performed by an qualified professional only.
- Only operate the appliance when the door is closed.
- Unattended cooking with fat or oil can be dangerous and may result in fire. NEVER try to extinguish a fire with water, but switch off the appliance and then cover flame e.g. with a lid or a fire blanket..
- Accessible parts may become hot during use. Young children should be kept away. Do not touch the hot parts of the appliance. RISK OF BURNS!
- Do not use the appliance to dry clothes or wet newspapers etc.
- Do not use the appliance when it is empty.
- In order to reduce any risk of fire in the appliance:
a. Check the appliance frequently when you use plastic or paper containers.
b. Remove wire twist-ties from paper or plastic bags before you place such a bag in the appliance.
c. Switch off or unplug the appliance if you notice any smoke. Keep the door closed to stifle any flames.
d. Do not use the appliance to store anything inside.
e. Do not leave any items, e.g. paper, cooking utensils or food, inside the appliance even when it is not running.
-
Do not fry in the appliance. Hot oil can damage parts of the appliance and result in skin-burns.
-
Never heat any food or liquids in sealed containers, because they can explode.
-
The contents of feeding bottles and baby food should be stirred or shaken and their temperature should be checked before serving to avoid burns.
-
Do not use a steam cleaner to clean the appliance. RISK OF ELECTRIC SHOCK!
-
Disconnect the appliance from the mains before cleaning or maintenance.
-
While unpacking, the packaging materials (polythene bags, polystyrene pieces, etc.) should be kept away from children and pets. CHOKING HAZARD!
-
This appliance may be operated by children aged from 8 years and above as well as by persons with reduced physical, sensory and mental capabilities or lack of experience and knowledge if they are supervised or have been instructed concerning the safe use of the appliance and do comprehend the hazards involved. Children must not play with the appliance. Cleaning and user-maintenance must not be carried out by children unless they are supervised.
-
Children must never play with the appliance. Touching the appliance during operation can cause serious burns.
-
Only allow children to use the appliance without supervision, when adequate instructions have been given before so that the child is able to use the appliance in a safe way and understands the risks of improper use.
CAUTION!
- This appliance complies with the current European safety legislation. We do wish to emphasize that this compliance does not negate the fact that the surfaces of the appliance will become hot while operating and will retain and emit heat even if it has
stopped operating.
-
Lead the power cord in such a way that you will not trip on it.
-
Microwave heating of beverages can result in delayed eruptive boiling. Be extremely careful when handling the container.
-
Do not heat eggs in their shell or hard-boiled eggs as they may explode even after microwave heating has ended.
-
Cooking utensils may become hot because of the heat transferred by the heated food. Pot-holders may be needed to handle such utensils.
NOTICE
-
Do not use the door to transport the appliance as you will damage the hinges.
-
Do not connect your appliance to the mains unless all packaging and transit protectors have been removed. Do not use any aggressive detergents to remove the transit protectors.
-
Regularly cleaning and maintenance grants proper operation and optimal performance of your appliance.
-
Check your utensils if they are suitable for use in a microwave appliance.
-
The rating plate must not be removed or made illegible, otherwise all terms of the warranty become invalid!
2. Installation
2.1 Installation dimensions
1.
2.
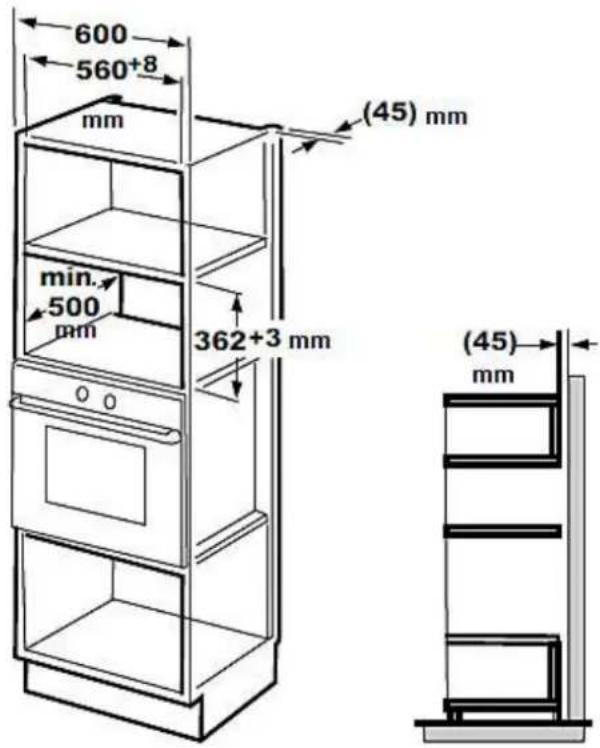
- The piece of furniture the appliance is intended to be built-in must not be equipped with a back wall behind the appliance.
- The minimum installation height is 85 cm.
- Never cover the ventilation openings and air inlet points.
2.2 Installation
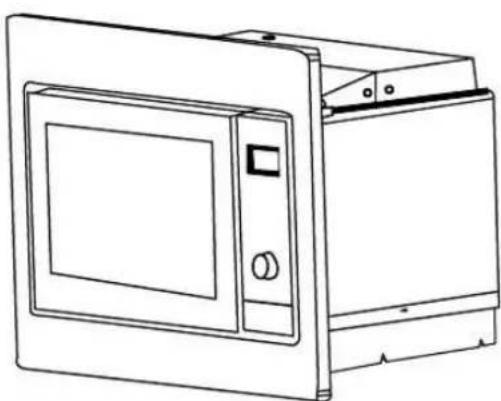
natural_image
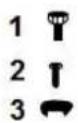
Line drawing of a microwave oven with lid and door (no text or symbols)1 Adjusting screw A
2 Screw B
3 Installation-kit / plastic cover
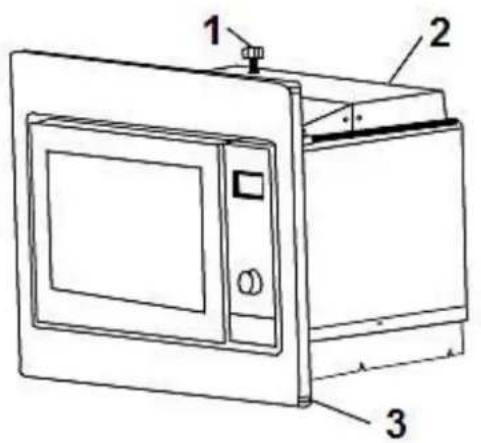
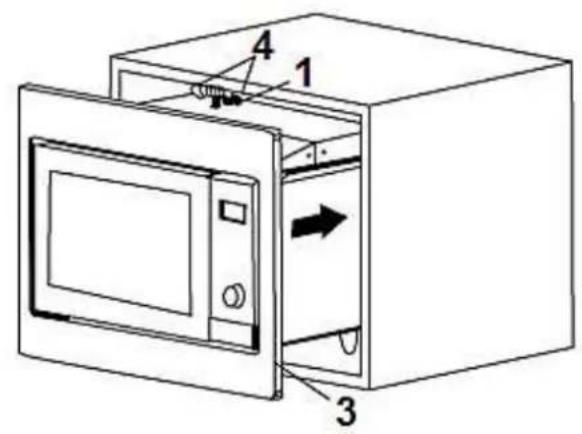
1 Adjusting screw A
2 Upper air tunnel
3 Installation-kit
4 Adjustment of height
- Fix the adjusting screw A on the upper air tunnel and install the appliance.
a. Align the adjusting screw A; there should be a gap of 1 mm between the adjusting screw A and the top cupboard panel.
b. The power cord must not be trapped or kinked.
c. Place the appliance in the centre of the cupboard.
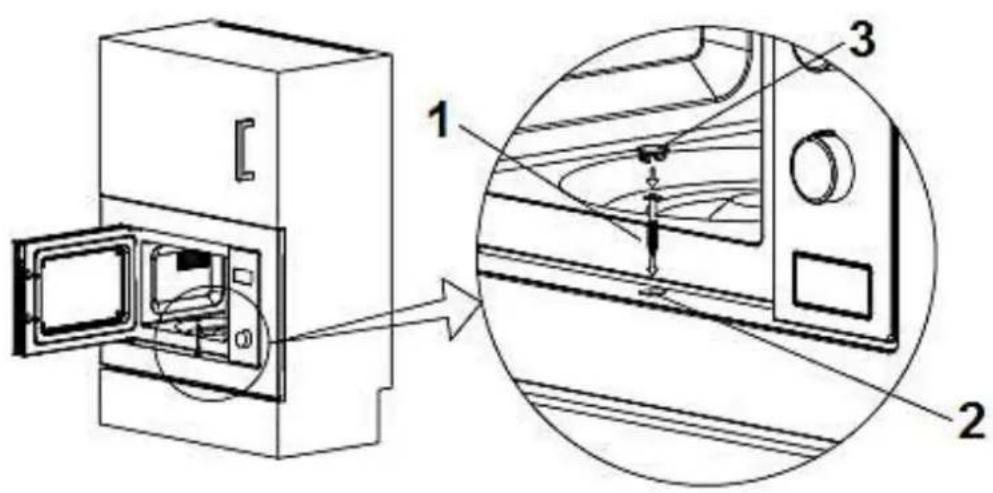
| 1 | Screw B |
| 2 | Installation hole |
| 3 | Plastic cover |
- Open the door of the appliance. Fix the appliance via the installation opening of the installation-kit using screw B; then cover the installation opening using the plastic cover.
2.3 Device description
Remove all packaging materials before installation.
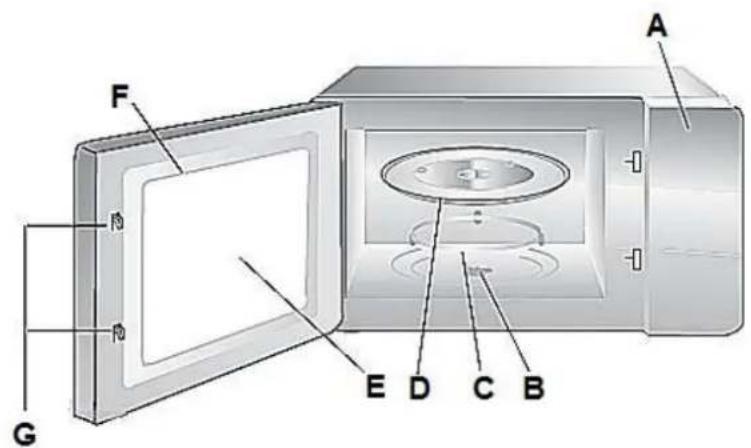
A Control panel
B Shaft / turntable
C Rotating ring / turntable
D Turntable
E Window
F Door
G Safety interlock
2.4 Installation of the turntable
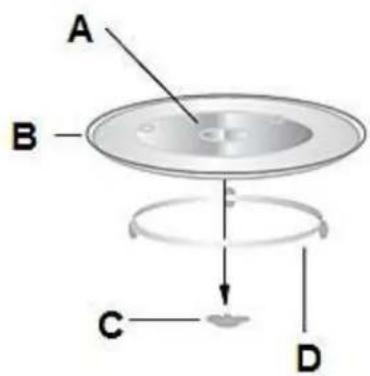
A: Hub
B: Turntable
C: Shaft / turntable
D: Rotating ring
➢ Never place the turntable upside down. The rotation of the turntable must never be restricted.
➢ Never use the appliance without the turntable and rotating ring.
All food or containers with food must be placed on the turntable.
➢ Do not operate the appliance when the turntable and/or rotating ring are damaged.
3.1 Control panel
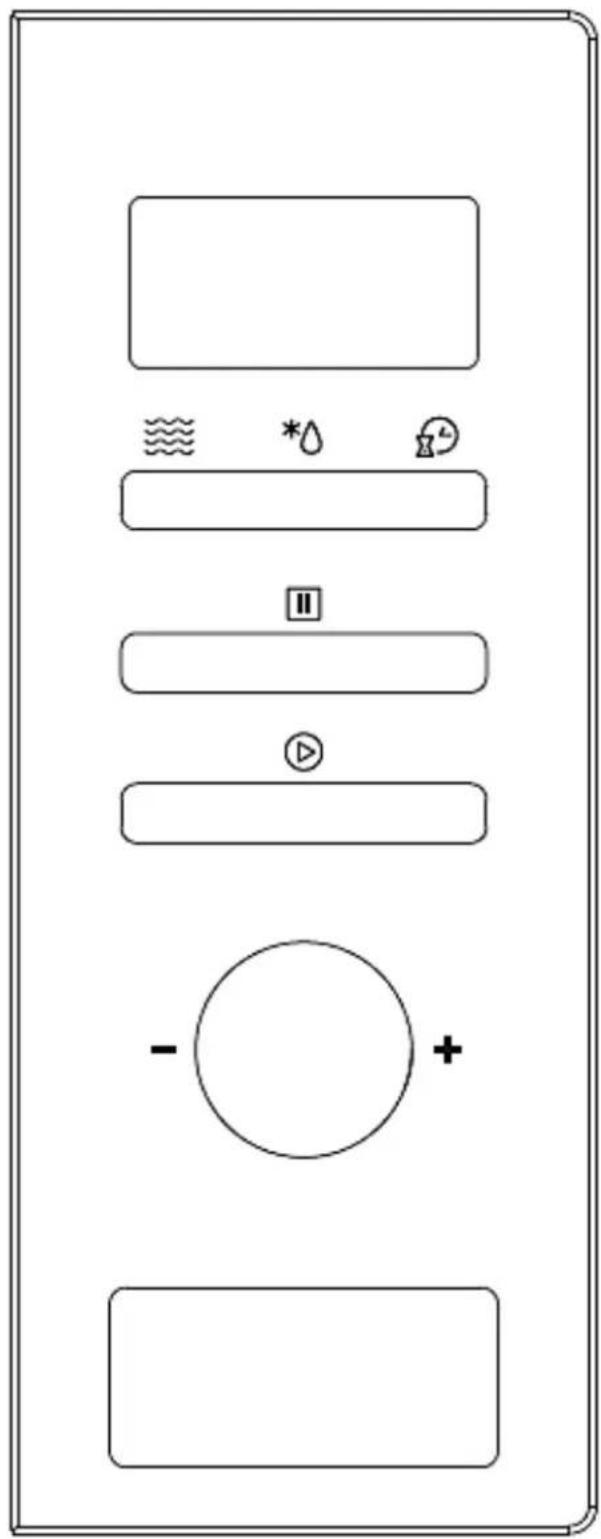



Microwave
Weight / Time Defrost
Kitchen Timer / Clock
Stop / Clear
Start / +30Sec. / Confirm
3.2 Setting of the clock
After connection to the mains: The display indicates 0:00 and an acoustic signal sounds once.
| 1. Press the button KITCHEN TIMER / CLOCK twice. The hour figures flash. |  KITCHEN TIMER / CLOCK KITCHEN TIMER / CLOCK |
| 2. Set the hours using the rotary knob (0-23). |  |
| 3. Press the button KITCHEN TIMER / CLOCK. The minute figures flash. |  KITCHEN TIMER / CLOCK KITCHEN TIMER / CLOCK |
| 4. Set the minutes using the rotary knob (0-59). |  |
| 5. Finally press the button KITCHEN TIMER / CLOCK. The colon : flashes and the time of the day is illuminated. |  KITCHEN TIMER / CLOCK KITCHEN TIMER / CLOCK |
If you press the button STOP / CLEAR during the setting of the clock, the appliance will return to its previous setting.
NOTICE! The Clock must be set in order that the appliance works properly.
3.3 How to cook food
- Press the button MICROWAVE. The display indicates P 100.
- Set the desired power (P 100 / P 80 / P 50 / P 30 / P 10) using the rotary knob or by pressing the button MICROWAVE repeatedly.

MICROWAVE P 100

MICROWAVE
(P 100 / P 80 / P 50 / P 30 / P 10)

| 3. Press the button START / +30SEC. / CONFIRM to confirm the setting. | [GWAD] START / +30SEC. / CONFIRM START / +30SEC. / CONFIRM |
| 4. Set the desired cooking time using the rotary knob (0:05 seconds - 95:00 minutes). |  (0:05 sec. - 95:00 min.) (0:05 sec. - 95:00 min.) |
| 5. Press the button START / +30SEC. / CONFIRM to start operation. | [TACK] START / +30SEC. / CONFIRM START / +30SEC. / CONFIRM |

Example: 20 minutes cooking time; 80 % power.
| a) Press the button MICROWAVE. The display indicates P 100. |  MICROWAVE P 100 MICROWAVE P 100 |
| b) Set the power to 80 % using the rotary knob or by pressing the button MICROWAVE repeatedly. |  MICROWAVE MICROWAVE  |
| c) Press the button START / +30SEC. / CONFIRM to confirm the setting. The display indicates P 80. |   START / +30SEC. / CONFIRM P 80 START / +30SEC. / CONFIRM P 80 |
| d) Set the cooking time (20 minutes) using the rotary knob. |  20:00 20:00 |
| e) Press the button START / +30SEC. / CONFIRM to start operation. Press the button STOP / CLEAR to cancel the setting. |   START / +30SEC. / CONFIRM or START / +30SEC. / CONFIRM or  STOP / CLEAR STOP / CLEAR |
Available settings:
| Cooking time | Timer stages |
| 0 - 1 minute | 5 seconds |
| 1 - 5 minutes | 10 seconds |
| 5 - 10 minutes | 30 seconds |
| 10 - 30 minutes | 1 minute |
| 30 - 95 minutes | 5 minutes |
3.3.1 Microwave - Order configuration
| Order | Display | Microwave power |
| 1 | P 100 | 100 % |
| 2 | P 80 | 80 % |
| 3 | P 50 | 50 % |
| 4 | P 30 | 30 % |
| 5 | P 10 | 10 % |
3.4 Start / Quick Start
- When the appliance is in waiting status, press the button START / +30SEC. / CONFIRM to start operation at full microwave power (100 %) for 30 seconds.
- Each pressing of the button START / +30SEC. / CONFIRM increases the cooking time by 30 seconds.
- The maximum cooking time is 95 minutes.
During cooking / defrosting (by time):
➢ Each pressing of the button START / +30SEC. / CONFIRM increases the cooking time by 30 seconds.
During waiting status:
➢ Turn the rotary knob in anti-clockwise direction to set the cooking time with 100 % power.
➢ Press the button START / +30SEC. / CONFIRM to start operation.
3.5 Defrost by weight
| 1. Press the button WEIGHT / TIME DEFROST once. |  WEIGHT / TIME DEFROST WEIGHT / TIME DEFROST |
| 2. The display indicates dEF1. | dEF1 |
| 3. Set the weight of the food using the rotary knob (100 g - 2000 g). |  |
| 4. Press the button START / +30SEC. / CONFIRM to start defrosting. |  +30Sec.START / +30SEC. / CONFIRM +30Sec.START / +30SEC. / CONFIRM |
3.6 Defrost by time
| 1. Press the button WEIGHT / TIME DEFROST twice. |  WEIGHT / TIME DEFROST WEIGHT / TIME DEFROST |
| 2. The display indicates dEF2. | dEF2 |
| 3. Set the desired time using the rotary knob. The maximum time setting is 95 Minutes. |  |
| 4. Press the button START / +30SEC. / CONFIRM to start defrosting. |  +30Sec.START / +30SEC. / CONFIRM +30Sec.START / +30SEC. / CONFIRM |
| 5. The preset defrosting power is 30 % and cannot be changed. | P 30 |
3.7 Query function
- During operation: Press the button MICROWAVE. The current power is indicated for 3 seconds.
- During operation: Press the button KITCHEN TIMER / CLOCK. The time is indicated for 3 seconds.
3.8 Multi-step operation
You can set max. 2 programme steps. If DEFROST is part of the programming, it must always be the first step.

Example: Step 1: 5 minutes defrosting time. Step 2: 7 minutes cooking time; 80% power.
| 1. Press the button WEIGHT / TIME DEFROST twice. The display indicates dEF2. |  WEIGHT / TIME DEFROST dEF2 WEIGHT / TIME DEFROST dEF2 |
| 2. Set the defrosting time using the rotary knob. The display indicates 05:00. |  05:00 05:00 |
| 3. Press the button MICROWAVE once. The display indicates P 100. |  MICROWAVE P 100 MICROWAVE P 100 |
| 4. Set the power to 80 % using the rotary knob or by pressing the button MICROWAVE once again. |  MICROWAVE or MICROWAVE or  |
| 5. Press the button START / +30SEC. / CONFIRM to confirm the setting. The display indicates P 80. |  +30Sec.START / +30SEC. / CONFIRM P 80 +30Sec.START / +30SEC. / CONFIRM P 80 |
| 6. Set the desired cooking time of 7 minutes using the rotary knob. The display indicates 07:00. |  07:00 07:00 |
| 7. Press the button START / +30SEC. / CONFIRM to start operation. |  +30Sec.START / +30SEC. / CONFIRM +30Sec.START / +30SEC. / CONFIRM |
| 8. Press the button STOP / CLEAR to cancel the setting. |  STOP / CLEAR STOP / CLEAR |
| ➢ For the first cooking step (defrosting) an acoustic signal sounds once. The set defrosting time expires.➢ When the second cooking step (cooking) begins, an acoustic signal sounds one more time.➢ If the set program has been finished, the acoustic signal sounds five times. | |
3.9 Auto-Menu
✿ Turn the rotary knob in clockwise direction to select the desired menu (A 1 - A 8).

Example: You wish to cook 350 g of fish by using the Auto-Menu.
- Set the menu for cooking fish (A 6) using the rotary knob (s. table below AUTO-MENU SETTINGS).
- Press the button START / +30SEC. / CONFIRM to confirm the setting.
- Set the weight of the fish (350 g) using the rotary knob. The display indicates 350.
- Press the button START / +30SEC. / CONFIRM to start operation..

A6

+30Sec.
START / +30SEC. / CONFIRM

350

+30Sec.
START / +30SEC. / CONFIRM
Auto-Menu settings:
| Menu | Quantity | Display |
| A-1 | 200 g | 200 |
| Pizza | 400 g | 400 |
| 250 g | 250 | |
| A-2 | 350 g | 350 |
| Meat | 450 g | 450 |
| 200 g | 200 | |
| A-3 | 300 g | 300 |
| Vegetables | 400 g | 400 |
| A-4 | 50 g (with 450 ml cold water) | 50 |
| Pasta | 100 g (with 800 ml cold water) | 100 |
| 200 g | 200 | |
| A-5 | 400 g | 400 |
| Potatoes | 600 g | 600 |
| 250 g | 250 | |
| A-6 | 350 g | 350 |
| Fish | 450 g | 450 |
| A-7 | 120 ml (one cup) | 1 |
| Soup / Beverages | 240 ml (two cups) | 2 |
| 360 ml (three cups) | 3 | |
| A-8 | 50 g | 50 |
| Popcorn | 100 g | 100 |
3.10 Timer
| 1. Press the button KITCHEN TIMER / CLOCK once. | KITCHEN TIMER / CLOCK |
| 2. The display indicates 00:00. | 00:00 |
| 3. Set the desired time using the rotary knob (00:05 seconds - 95:00 minutes). | |
| 4. Press the button START / +30SEC. / CONFIRM to confirm the setting | +30Sec.START / +30SEC. / CONFIRM |
| ➢ When the setting time is reached, an acoustic signal sounds five times and the time display is cancelled.➢ If the clock has been set (s. chapter 3.2 SETTING OF THE CLOCK), the current time will be indicated. | |
3.11 Child lock
In waiting status, press the button STOP / CLEAR for 3 seconds. A long acoustic signal sounds. The display indicates the current time and the indicator for the child lock goes on. If the time is not set, the display indicates [---]
➢ Unlock: Press the button STOP / CLEAR for 3 seconds. A long acoustic signal sounds. The child lock is cancelled.
3.12 Specifications
If the door would be opened during cooking, the button START / +30SEC. / CONFIRM must be pressed to continue cooking.
If a cooking program is set and the button START / +30SEC. / CONFIRM will not be pressed within one minute, the setting will be cancelled automatically and the current time will be displayed.
◆ Each operative input will be confirmed by an acoustic signal.
4.1 Basics of microwave cooking
- Arrange your food carefully. Place thick pieces at the outer areas of your arrangement.
- Consider the cooking times. Choose the shortest time available. If needed, add some more cooking time later. Any food, which is cooked too long in a microwave, can begin to fume or catch fire.
- Cover food while it is cooking. Covering avoids splashes and enhances an even cooking procedure.
- Turn over your food once while cooking it. Food like chicken or hamburgers will then cook faster. Larger pieces like roasts must be turned over at least once.
- Rearrange food like meat-balls in the middle of the cooking time from the outer areas to the inner ones (and inversely) and also turn them over.
- If you use microwave-safe plastic wrap, it must not contact the food as the wrap may melt.
- Some microwave-safe plastic cookware might not be suitable for cooking food with a high content of fat and sugar. Moreover, the preheating time specified in the dish instruction manual must not be exceeded.
4.2 Suitable materials for microwave cooking
- Use microwave-safe cookware made of heat-resistant ceramic, glass or plastic only.
- Do not use metal-made cookware or other metal-made items or plates with metal-made ornaments. Microwave radiation cannot penetrate metal.
- ⚠ WARNING! Metal can generate sparks. RISK OF FIRE.
| Material | Remarks |
| Aluminium foil | Only suitable to protect small parts of the food. You can cover the thin parts of meat or poultry using small parts of aluminium foil as an overcooking-protection. When the parts of the aluminium foil are too close to the walls of the appliance, sparking can occur. The aluminium foil must be at least 2.5 cr away from the walls of the appliance. |
| Browning dishes | Observe the information given by the relevant manufacturer. The bottom of the browning dish must be at least 5 mm above the turntable. Improper use can break the turntable. |
| Tableware | Use microwave-safe tableware only. Observe theinformation given by the relevant manufacturer. Do not use cracked or chipped tableware. |
| Glass jars | Always remove the lid. Heat-up the food until it is just warm. Most glass jars are not heat-resistant and can break. |
| Glass tableware | Use heat-resistant glass tableware only. The glass tableware must not contain any metal components. Do not use cracked or chipped glass tableware. |
| Oven cooking bags | Observe the information given by the relevant manufacturer. Do not close using metal tics. make small openings to allow steam to escape. |
| Paper plates / cups | Only suitable for short-time cooking or reheating! Do not leave the appliance unattended while it is operating. |
| Paper towel | Only suitable for short-time cooking or reheating! Do not leave the appliance unattended while it is operating. |
| Parchment paper | Use as a cover to prevent splattering or as a cove for steaming. |
| Plastic | Only use microwave-safe plastic. Observe the information given by the relevant manufacturer. The plastic must be labelled "Microwave-safe". Some plastic containers can melt when the food they contain becomes hot. Boiling bags and tightly closed plastic bags must be equipped with small openings, pierced or vented as described on their packaging. |
| Plastic wrap | Only use microwave-safe plastic wrap. You can use plastic wrap to cover the food so moisture is retained. The plastic wrap must not touch the food! |
| Thermometer | Only use microwave-safe thermometers. |
| Wax paper | You can use wax paper as a cover to protect the appliance from splatters or to retain moisture. |
4.3 Unsuitable materials for microwave cooking
| Material | Remarks |
| Aluminium trays | Aluminium trays can cause sparking. Transfer the food into a microwave-safe container. |
| Food carton with metal handle etc. | Food cartons with metal handle etc. can cause sparking. Transfer the food into a microwave-safe container. |
| Metal-made or metal-trimmed items | Metal shields the food from the microwave energy. Metal components can cause sparking! |
| Paper bags | Paper bags can catch fire in the appliance. RISK OF FIRE! |
| Plastic foam | Plastic foam can melt when exposed to high temperatures and/or contaminate the food. |
| Wood | Wood used in a microwave appliance can dry and/or can get cracks. Wood can catch fire in the appliance. RISK OF FIRE! |
5. Cleaning and maintenance
⚠ WARNING! Disconnect the appliance from the mains before you clean or maintain it. RISK OF ELECTRIC SHOCK!
- Keep the inside of your appliance clean. When food splatters or spilled liquids are on the walls of your appliance, clean it with a damp cloth. Mild detergents may be used if the appliance has become very dirty. Avoid the use of sprays and other harsh cleaners as they may stain, streak or dull the door-surface.
- Clean the outside with a damp cloth. Water should not run into the ventilation-openings to prevent damage to the operating parts inside the appliance.
- Wipe both sides of the door and the window, the door seals and adjacent parts frequently using a damp cloth to remove any spills or spatters. Do not use abrasive cleaners.
- The control panel should not become wet. Clean it with a soft and damp cloth. When cleaning the control panel, leave the door open so the appliance cannot be switched on accidentally.
- If steam accumulates inside or around the outside of the door, wipe it with a soft cloth. This may occur when the appliance runs under high-humidity-conditions. It is a normal occurrence.
- It is sometimes necessary to remove the turntable and/or rotating ring for cleaning. Wash the turntable/ring in warm soapy water, then rinse and dry thoroughly. When having removed the rotating ring from the appliance, you must reinstall it in its proper position.
- ⚠ WARNING! If it is necessary to remove the internal light ^2 of the appliance, please contact the shop you purchased the appliance at.
Normal operating conditions
| Interference to radio or television reception | Radio and TV reception can be interfered while the appliance is operating, similar to interferences of other electric appliances such as mixers, vacuum cleaners, electric fans etc. |
| Dim oven light | The oven light may become dim while the appliance is operating in lower power cooking. |
| Steam accumulation on door/hot air escapes from the air vents | During cooking, steam escapes from the food.Most of the steam is discharged via the ventilation openings. Nethertheless, some steam can accumulate at the cooler parts of the appliance, e.g. the door. |
| The appliance was accidentally-started without load (food). | WARNING! Never operate the appliance when it is empty. |
Malfunction
Possible cause(s)
Possible measure(s)
The appliance cannot be started.
| 1. The power cord is not plugged in properly. | 1. Unplug. Plug in again after 10 seconds. |
| 2. Blown fuse in household fuse box. | 2. Check household fuse box. |
| 3. Socket malfunction. | 3. Check the socket using another electric appliance. |
The appliance does not heat.
| The door of the appliance is not closed properly. | Close the door of the appliance properly. |
The turntable generates unusual noise.
| The rotating ring or the bottom of the appliance inside is contaminated. | Clean the relevant parts (look also chapter CLEANING AND MAINTENANCE). |
7. Technical data
| Type | Built-in microwave oven |
| Volume cooking chamber | 20 l |
| Voltage / frequency | 230 V AC / 50 Hz |
| Max. power / microwave | 800 W |
| Power levels microwave | 5 |
| Auto-programmes | 8 |
| Defrost setting | √ |
| Door Opening | Push button |
| LED display | √ |
| Acoustic end signal | √ |
| Child lock | √ |
| Timer | digital / max. 95 minutes |
| Turntable | √ / 245 mm |
| Length of power cord in cm | 100 |
| Dimensions without frame H*W*D | 28.90*46.10*34.35 cm |
| Dimensions with frame H*W*D | 38.20*59.50*34.35 cm |
| Dimensions installation recess H*W*D | 36.20*56.00*34.00 cm |
| Weight net / gross in kg | 14.50 / 16.00 |
8. Waste management
- While unpacking, the packaging materials (polythene bags, polystyrene pieces, etc.) should be kept away from children and pets. CHOKING HAZARD!
- Old and unused appliances must be send for disposal to the responsible recycling centre. Never expose to open flames.
- Before you dispose of an old appliance, render it inoperative. Unplug the appliance and cut off the entire power cord. Dispose of the power cord and the plug immediately.
- Dispose of any paper and cardboard into the corresponding containers.
- Dispose of any plastics into the corresponding containers.
- If suitable containers are not available at your residential area, dispose of these materials at a suitable municipal collection point for waste-recycling.
- Receive more detailed information from your retailer or your municipal facilities.


Materials marked with this symbol are Please contact your local authorities to recyclable. receive further information.
This appliance includes a 24-month guarantee for the consumer given by the manufacturer, dated from the day of purchase, referring to its flawless material-components and its faultless fabrication. The consumer is accredited with both the dues of the guarantee given by the manufacturer and the vendor's guarantees. These are not restricted to the manufacturer's guarantee. Any guarantee claim has to be made immediately after the detection and within 24 months after the delivery to the first ultimate vendee. The guarantee claim has to be verified by the vendee by submitting a proof of purchase including the date of purchase and/or the date of delivery. The guarantee does not establish any entitlement to withdraw from the purchase contract or for a price reduction. Replaced components or exchanged appliances demise to us as our property.
The guarantee claim does not cover:
- fragile components as plastic, glass or bulbs;
- minor modifications of the PKM-products concerning their authorized condition if they do not influence the utility value of the product;
- damage caused by handling errors or false operation;
- damage caused by aggressive environmental conditions, chemicals, detergents;
- damage caused by non-professional installation and haulage;
- damage caused by non common household use;
- damages which have been caused outside the appliance by a PKM-product unless a liability is forced by legal regulations.
The validity of the guarantee will be terminated if:
- the prescriptions of the installation and operation of the appliance are not observed.
- the appliance is repaired by a non-professional.
- the appliance is damaged by the vendor, the installer or a third party.
- the installation or the start-up is performed inappropriately.
- the maintenance is inadequately or incorrectly performed.
- the appliance is not used for its intended purpose.
- the appliance is damaged by force majeur or natural disasters, including, but with not being limited to fires or explosions.
The guarantee claims neither extend the guarantee period nor initiate a new guarantee period. The geographical scope of the guarantee is limited with respect to appliances, which are purchased and used in Germany, Austria, Belgium, Luxembourg and the Netherlands.

August 2016
Aftersales service information on the leaflet inside this instruction manual.
Subject to alterations
Updated
06/04/2017


- Index
- EU - Declaration of Conformity
- Safety information
- READ THE SAFETY INFORMATION AND THE SAFETY INSTRUCTIONS CAREFULLY BEFORE YOU OPERATE THE APPLIANCE FOR THE FIRST TIME.
- Precautions to avoid possible exposure to excessive microwave energy:
- Signal words
- DANGER!
- To reduce the risk of electrocution:
- WARNING!
- To reduce the risk of burns, electrocution, fire or injury to persons:
- CAUTION!
- stopped operating.
- NOTICE
- Installation
- Installation dimensions
- Installation
- Device description
- Installation of the turntable
- Setting of the clock
- How to cook food
- Start / Quick Start
- During waiting status:
- Defrost by weight
- Defrost by time
- Query function
- Multi-step operation
- Auto-Menu
- Timer
- Child lock
- Specifications
- Basics of microwave cooking
- Suitable materials for microwave cooking
- Unsuitable materials for microwave cooking
- Cleaning and maintenance
- ⚠ WARNING! Disconnect the appliance from the mains before you clean or maintain it. RISK OF ELECTRIC SHOCK!
- Technical data
- Waste management
- The guarantee claim does not cover:
- The validity of the guarantee will be terminated if:
Brand : PKM
Model : MW820-20EB
Category : Microwave