
920-538 - Turntable Marquant - Free user manual and instructions
Find the device manual for free 920-538 Marquant in PDF.


| Product Type | Turntable (vinyl record player) |
| Brand | Marquant |
| Model | 920-538 |
| Power Supply | AC 230 V ~ 50 Hz |
| Weight | 2.2 kg |
| Power Cord Length | 1.7 m |
| Built-in Speakers | 2 x 1 W RMS |
| Playback Speeds | 33⅓ and 45 RPM |
| Speed Selector | Yes, on top panel |
| Auto-Stop Function | Yes, can be disabled |
| Adapter for 45 RPM Records | Included |
| Pickup Arm | With support and locking catch |
| Dust Cover | Yes, hinged |
| Outputs | Line out (L/R RCA), 3.5 mm earphone jack, USB port |
| USB Port | For connection to computer (recording) |
| Recording Compatibility | Works with Audacity and other USB audio recording software |
| Speaker Power Switch | Yes, on back panel to enable/disable built-in speakers |
| Volume Control | Rotary knob (also power on/off) |
| Indicators | Voltage status lamp |
| Safety Features | Fuse for overload protection; keep away from water and heat |
| Intended Use | Playing vinyl records; can be connected to external audio system or computer |
| Maintenance | Clean with dry cloth; do not use liquids; replace fuse only by qualified technician |
Frequently Asked Questions - 920-538 Marquant
User questions about 920-538 Marquant
0 question about this device. Answer the ones you know or ask your own.
Ask a new question about this device
Download the instructions for your Turntable in PDF format for free! Find your manual 920-538 - Marquant and take your electronic device back in hand. On this page are published all the documents necessary for the use of your device. 920-538 by Marquant.
USER MANUAL 920-538 Marquant
Skivspelare
SE
Bruksanvisning i original
Operating instructions (Translation of the original instructions Important! Read the user instructions carefully before use. Save them for future reference.
Jula reserves the right to make changes. In the event of problems, please contact our service department. www.jula.com
Tillverkare/ Produsent / Produenci/ Manufacturer
Jula AB, Box 363, 532 24 SKARA
Date of production: 2017-01-03 © Jula AB

Värna om miljön!
Care for the environment!
Must not be discarded with household waste! This product contains electrical or electronic components that should be recycled. Leave the product for recycling at the designated station e.g. the local authority's recycling station.
3:1
3:2
3:3

SÄKERHETSANVISNINGAR1
WARNING!
SAFETY INSTRUCTIONS1
WARNING:
- Failure to follow all the instructions and safety instructions can result in the risk of electric shock, fire and/or serious personal injury.
- Do not use the appliance near water and do not expose it to rain or moisture.
• Make sure that no objects or liquid can penetrate the openings in the casing. - Handle the appliance with care, and do not expose it to knocks or blows.
- Do not block the ventilation openings on the appliance.
- Do not place the appliance near or above sources of heat, or expose it to direct sunlight.
- Connect the appliance by following these instructions.
-
The appliance has a fuse to protect it from overloading. If the fuse has tripped it must be replaced by a qualified technician.
-
Clean the appliance in accordance with these instructions.
- Unplug the power cord if the appliance is not going to be used for some time.
-
Have the appliance checked and if necessary repaired by a qualified technician if any of the following should occur.
-
The power cord or plug is damaged.
– The appliance has been exposed to liquid, or been banged.
– The appliance has been exposed to rain or moisture.
— The appliance is not working properly. - If the subwoofer is defective.
- Do not attempt to carry out any maintenance or repairs that are not described in these instructions. This will invalidate the warranty.
- The appliance must only be adjusted or repaired by qualified personnel.
- Do not expose the appliance to splashing/dripping water, or any other liquid. Do not, for example, place a vase of flowers on the appliance.
- The use of controllers, settings or procedures that are not described in these instructions could result in exposure to harmful radiation. The appliance is in standby mode when the power switch is switched off. Unplug the power cord to disconnect the power supply to the appliance.
- Connect the power cord on the appliance to an easily accessible mains outlet.
1:1 SYMBOLS
 | Warning: |
 | High voltage. |
TECHNICAL DATA2
Voltage AC 230 V\~ 50 Hz
Weight 2.2 kg
Cord length 1.7 m
Built-in speakers 2 x 1W RMS
DESCRIPTION3
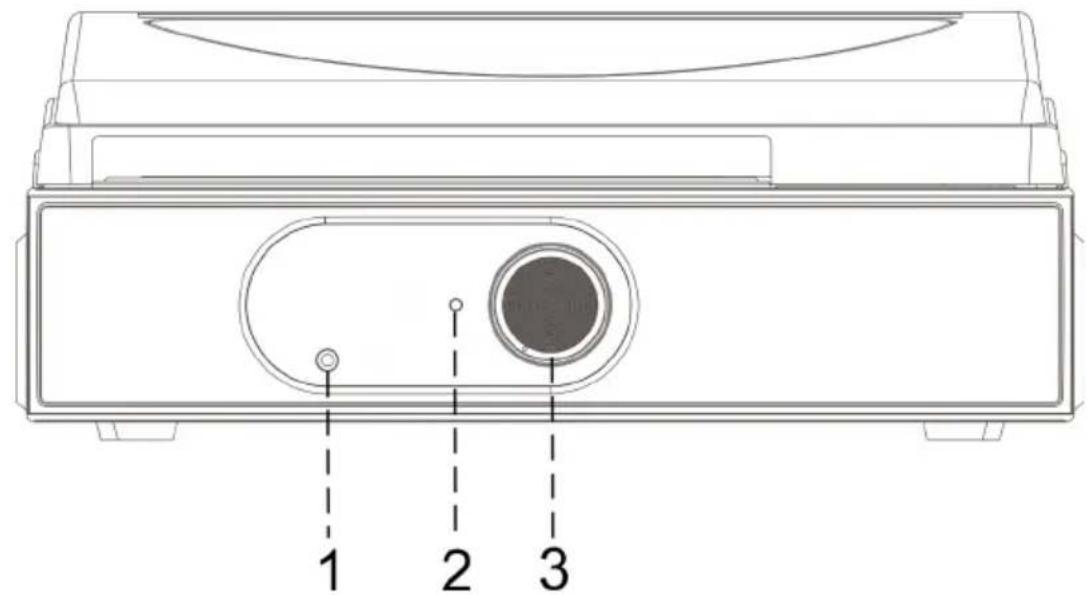
3:1 Front
- 3.5 mm earphone jack
- Voltage status lamp
- Power switch/volume control
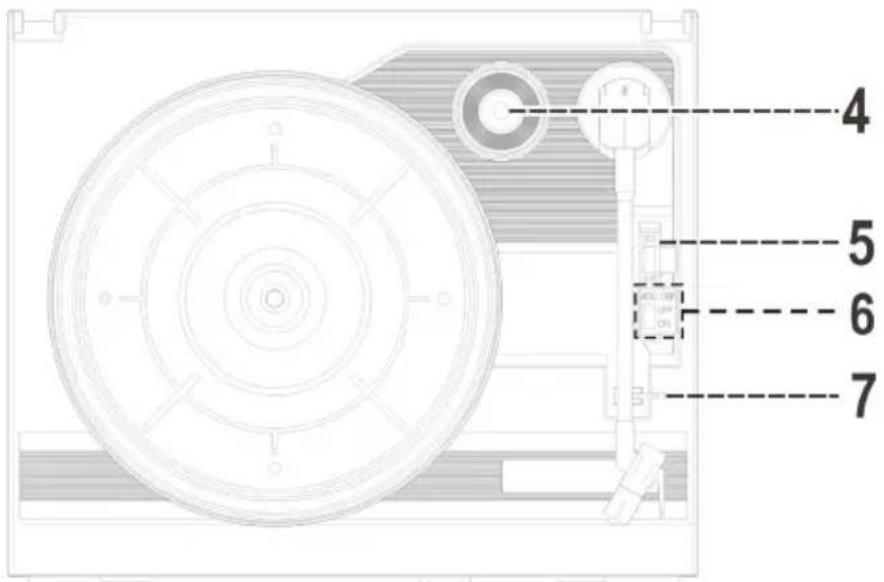
3:2 Top
- Adapter for record 45 rpm
- Speed selector
- Selector for automatic stop
- Pickup arm support
3:3 Back
- Line output (L/R)
- Power switch for built-in speakers
- USB port for connection to computer
- Power cord
4 USE
NOTE:
- Unpack the appliance and check that all the parts are included and undamaged before use.
- Check that the mains voltage corresponds to the rated voltage on the type plate.
- Do not block the ventilation openings on the appliance – risk of overheating. Leave a few centimetres of free space around the appliance for ventilation.
- Remove the protective cover from the pickup needle before use.
4:1 PLAYBACK
- Plug the record player's plug into a power point.
- Open the dust cover and place a record on the turntable. Use the adapter for 45 rpm records.
- Set the speed selector to the correct position for the actual record.
- To listen via the record player's built-in speakers, set the power switch for the built-in speakers to ON.
- Set the power switch for the built-in speakers to OFF if you want to:
- Listen with a headset connected to the 3.5 mm earphone jack
— Want to listen via external speakers connected via the line output -
Want to connect the record player to a computer
-
Start the record player by turning the power switch control so that the voltage status lamp goes on.
- Release the pickup catch and slowly lift the pickup from its support over the record. The turntable starts to rotate.
- Lower the pickup onto the record where you want to start playing.
- Turn the volume control to the required volume.
- At the end of the record the turntable stops automatically. Lift the pickup off the record and put it back on the support. Lock the pickup with the catch when the record player is not in use.
- To stop playing manually, lift the pickup off the record and put it back on the support.
- Some records with autostops outside the set limit can cause the turntable to stop before playing the last track to the end. If so, set the selector for automatic stop in the OFF position. In this mode the pickup arm needs to be manually lifted and returned to the support. The record player must be switched off to stop the turntable.
4:1:1 Playback via line out
The record player can be connected to an audio system or computer.
-
Use an RCA cable (sold separately) to connect the record player's line out to the AUX input on the system you want to connect to the record player to.
-
Switch off the internal speaker by setting the power switch for the built-in speaker to the OFF position. The volume control on the record player does not affect the volume on the line out.
4:2 RECORDING VIA COMPUTER
4:2:1 Before recording
- Recording software is needed to record music from the record player. The record player is compatible with all recording software that supports USB audio units.
- Follow the instructions on the enclosed CD to install Audacity. Additional instructions can be found at http://audacity.sourceforge.net/help/tutorials.
4:2:2 Recording
NOTE:
The instructions refer to Microsoft Windows XP with the Audacity program installed.
- Switch on the computer and wait until it is running.
- Start the record player and connect the USB port to the computer with a USB cable (sold separately). The computer detects the connected record player as a USB device.
- Open the Audacity program.
- Go to the EDIT tab and select PREFERENCES.
- Go to the DEVICE tab and select USB Audio Controller under Recording and Playback.
- Set Channels to 2 (STEREO) and click OK to close the window.
- Start playing the music on the record player.
- Click the red recording button in the program window. The sound waves are shown in real time on the screen and the sound from the record is heard in the computer's speakers.
- Click the yellow stop button after recording in the program window.
- Click FILE and save the recorded file.
- Click the green playback button to play the recording.
4:2:3 After recording
• Audacity saves the recorded music as WAV files.
• To save the recorded file as an MP3 file you need the program Lame MP3 Encoder. Lame MP3 Encoder can be found on the supplied CD in the Plug-ins folder.
- Files in MP3 format can be played on all MP3 compatible mobile digital units.
- Copy the Lame MP3 Encoder program to a folder on the computer.
- The search path to Lame MP3 Encoder is requested on the first export to MP3 files in Audacity.
- Go to the folder on your computer where Lame MP3 Encoder has been copied and select the plug-in file. Audacity will remember the search path to the file.
- TILLVERKARE/ PRODUSENT / PRODUENCI/ MANUFACTURER
- VÄRNA OM MILJÖN
- CARE FOR THE ENVIRONMENT
- SÄKERHETSANVISNINGAR1
- WARNING
- SAFETY INSTRUCTIONS1
- 1:1 SYMBOLS
- TECHNICAL DATA2
- DESCRIPTION3
- 3:1 FRONT
- 3:2 TOP
- 3:3 BACK
- 4 USE
- NOTE
- 4:1 PLAYBACK
- 4:1:1 PLAYBACK VIA LINE OUT
- 4:2 RECORDING VIA COMPUTER
- 4:2:1 BEFORE RECORDING
- 4:2:2 RECORDING
- 4:2:3 AFTER RECORDING
Brand : Marquant
Model : 920-538
Category : Turntable