AquaPix W520 Surf - Camera EASYPIX - Free user manual and instructions
Find the device manual for free AquaPix W520 Surf EASYPIX in PDF.


User questions about AquaPix W520 Surf EASYPIX
0 question about this device. Answer the ones you know or ask your own.
Ask a new question about this device
Download the instructions for your Camera in PDF format for free! Find your manual AquaPix W520 Surf - EASYPIX and take your electronic device back in hand. On this page are published all the documents necessary for the use of your device. AquaPix W520 Surf by EASYPIX.
USER MANUAL AquaPix W520 Surf EASYPIX
text_image
aquapix® w520 SurfINTRODUCTION
Congratulations on the purchase of your Camera! This manual contains important safety and operating information. Please read all the information carefully before you use the device to avoid accidents and keep it for future reference. Follow these important safety and operation instructions.
IMPORTANT NOTICE
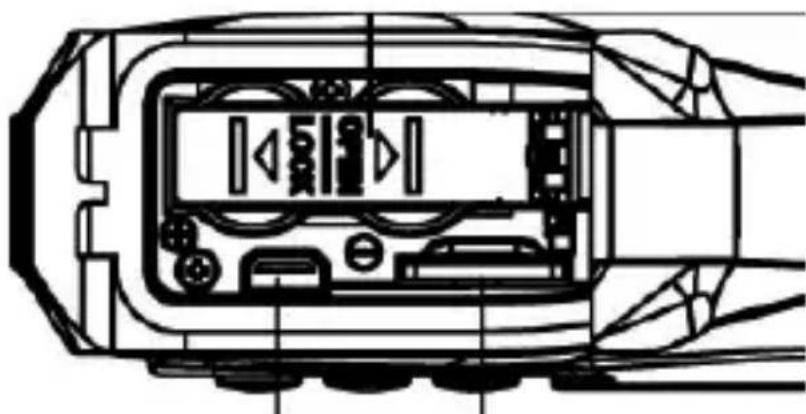
To ensure the batteries are locked into place and the camera will function properly, make sure the inner battery door is locked into position. (Shown below)
To lock the inner door into position you will need to insert the batteries. Once Inserted ensure the inner door is in its original position, then press hard on the inner door and slide the inner door towards the LOCK side marked below, it will click once in place.
natural_image
Technical line drawing of a vehicle front view showing internal components and no visible text or symbolsAdditional Troubleshooting:
If camera freezes please open battery compartment and inner battery door to reset. Then follow above to close the door.
SAFETY INSTRUCTIONS
- Keep the camera clean. Never store it next to a heat source or in dirty, humid places.
- Press the buttons gently. Pressing them or the screen too hard can damage the product.
- Do not use the camera in an extremely dry environment.
- Do not put the camera in high temperature places (over 40°C), especially not in a car with the windows closed in summer.
- Do not subject the camera to harsh impacts. Do not drop the unit to avoid damage.
- Do not attempt to dismantle or repair this camera yourself. Qualified personnel should perform repairs.
-
Disconnect the camera from the power source before cleaning.
• Use a dry soft cloth to clean this camera. -
This product is not intended for commercial use. Household Use Only.
- Do not disassemble this unit. To prevent the risk of electric shock, do not remove the cover. No user-serviceable parts inside. Refer servicing to qualified personnel.
- The USB cord for the device should be unplugged from the computer when the unit is left unused for a long period of time.
IMPORTANT SAFETY PRECAUTIONS
In order to prevent program failure, never disconnect the product suddenly from a PC while file transferring is in progress.
Disconnect the appliance from PC when cleaning. Use a dry soft cloth to clean this appliance. Do not dismantle the
product or use alcohol, thinners or benzene to clean the surface of the product.
The supplier or retailer accepts no liability for lost, corrupted or damaged data. It remains the responsibility of the user to ensure that they perform consistent data backups during the use of this product. Please ensure that you retain the original files you have downloaded to your device.
This product is not intended for commercial use. It is for household use only.
Attention:
We have done our best to produce a complete and accurate manual. However, we cannot ensure that there are no errors or omissions during the printing process.
Please note: This device uses batteries. Please observe the local regulations regarding the disposal of old equipment and battery.
PRODUCT SPECIFICATION
• Still Image Resolution: [12M] 4000x3000/
[8M] 32642x2448/ [5M] 2592x1944/[2M] 1600x1200
• Video Clip Resolution: [HD] 1280 x 720 /
[640] 640 × 480
- File Formats: JPEG/AVI
• Supports micro SD Memory Slot up to 32GB
- 4 x Digital Zoom
- USB 2.0 User Interface
- Waterproof up to 3m
• Power Source: 2 x AAA Batteries
• Works with Microsoft Windows XP, Vista, Windows 7
- Works with Mac OSX10.3 and above
• Storage/Operation Temperature: 5°C to 40°C
GETTING TO KNOW YOUR CAMERA
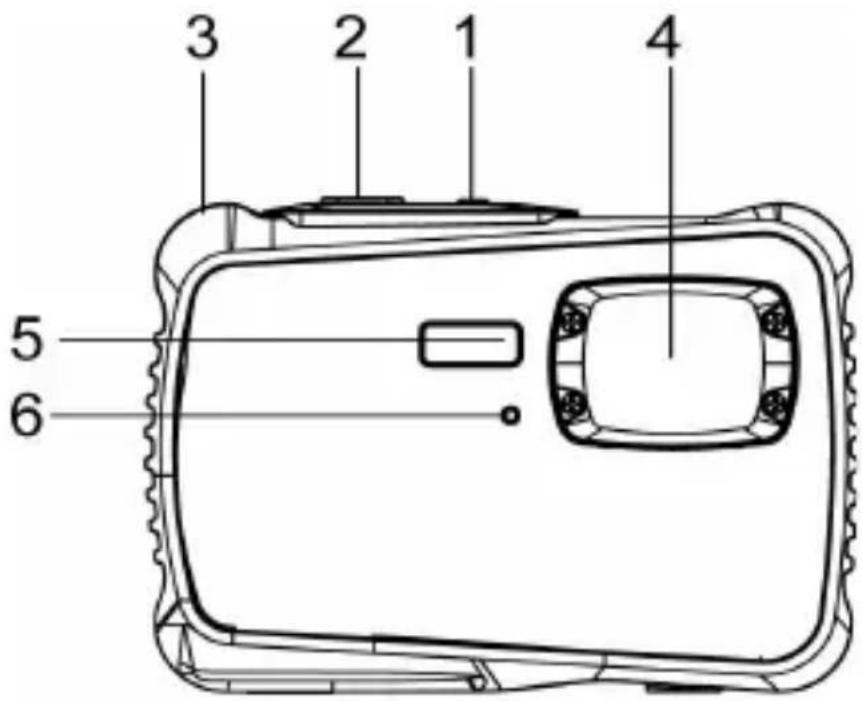
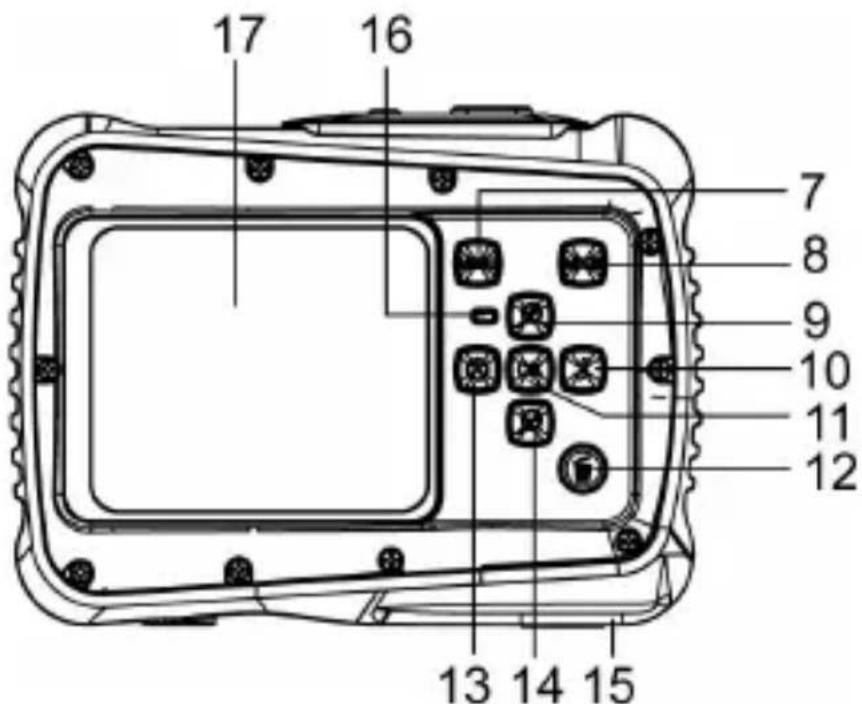
DEVICE OVERVIEW
| 1 | ON/OFF button | 5 | Flash Light |
| 2 | Shutter Button | 6 | Self-timer LED |
| 3 | Hand Strap Hole | 7 | MENU Button |
| 4 | Lens | 8 | MODE Button |
text_image
1 2 3 4 5 6| 9 | UP/Zoom In Button | 16 | Busy indicator |
| 10 | Right/Flash Button | 17 | Display Screen |
| 11 | OK Button | 18 | Battery inner door/Battery compartment |
| 12 | Delete Button | 19 | USB Slot |
| 13 | Left/self-timer button | 20 | Micro SD Card Slot |
| 14 | Down/Zoom out button | 21 | Tripod Connector |
| 15 | Battery door | ||
text_image
17 16 7 8 9 10 11 12 13 14 15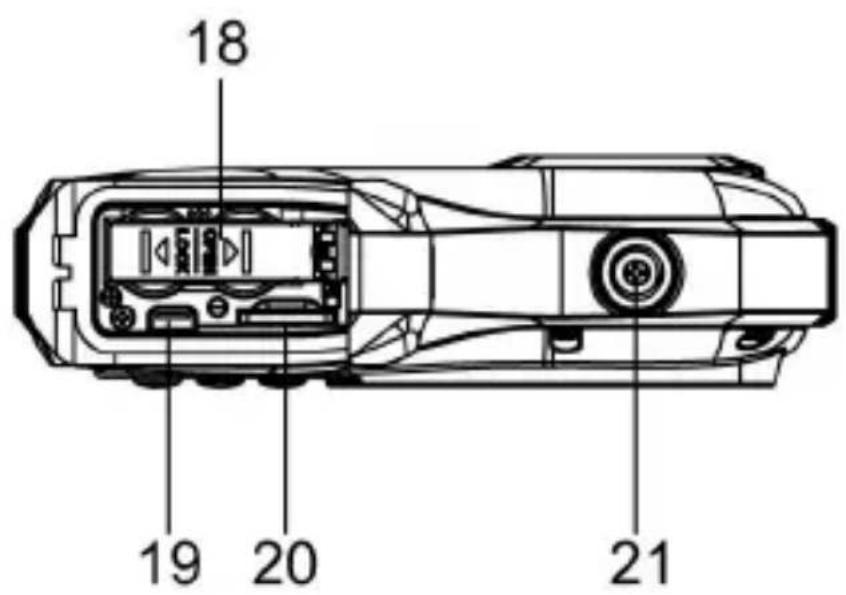
text_image
18 19 20 21INSTALLING THE BATTERY
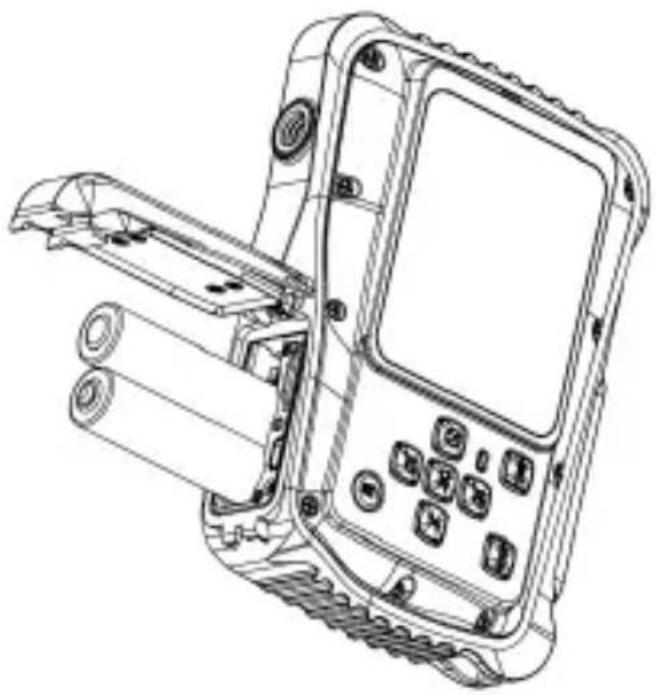
- Open the camera battery door by pushing the switch and release the cover at the same time.
- Insert 2 x AAA batteries as shown, ensuring the +/- symbols on the batteries are matching +/- symbols on the camera.
- Close the battery cover. Make sure the battery door is closed properly to avoid any contact with water.
natural_image
Line drawing of a mobile phone with attached case and keypad (no text or symbols)INSTALLING THE MICRO SD CARD
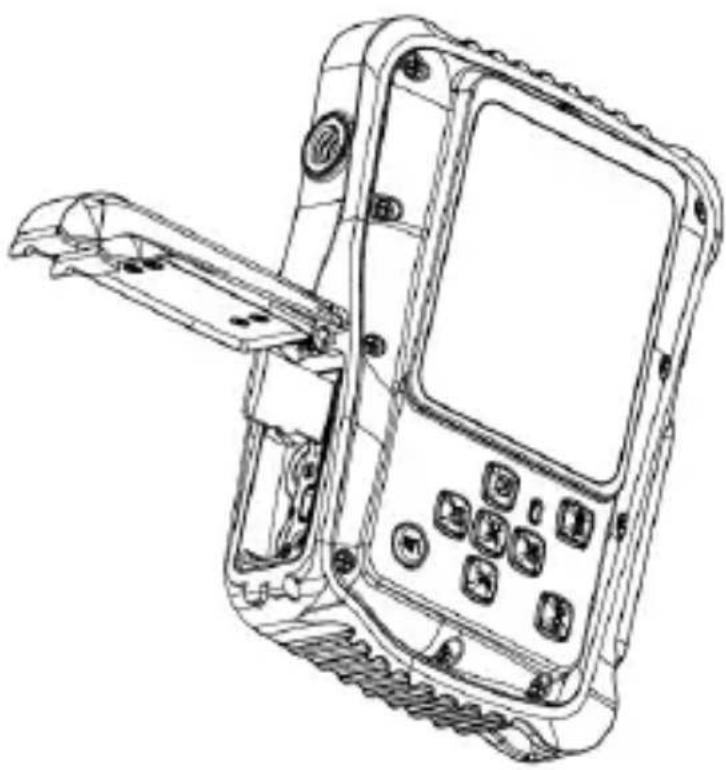
The camera has no internal memory, to be able to take images and video clips you will need to insert a memory card. The camera accepts micro SD memory cards up to 32GB. Turn off the camera before inserting or removing the card. Be sure to insert the card the correct way. Never try to force the card into the slot.
To insert the memory card:
-
Turn off the camera.
-
Find the micro SD card slot on the bottom of the camera.
-
Make sure the memory card is inserted as illustrated.
natural_image
Line drawing of a mobile phone with attached device and keypad (no text or symbols)TURNING ON YOUR CAMERA
To turn the camera on:
- To turn on the camera, press the Power button, press the power button again to turn the unit off.
NOTE: The camera will automatically turn itself off after a period of inactivity to save power.
CAMERA MODES
The camera has 3 different types of modes Capture mode, Video mode and Playback mode. Press the Mode button to select between all the modes.
| Display | Title | Description | |
 | Capture mode | For taking still photos | |
 | Video mode | For recording movie clips | |
 | Playback mode | For viewing saved files | |
CAPTURE MODE
TAKING A PHOTO
The Digital Video Camera allows you to take digital still photos. To take digital still photos:
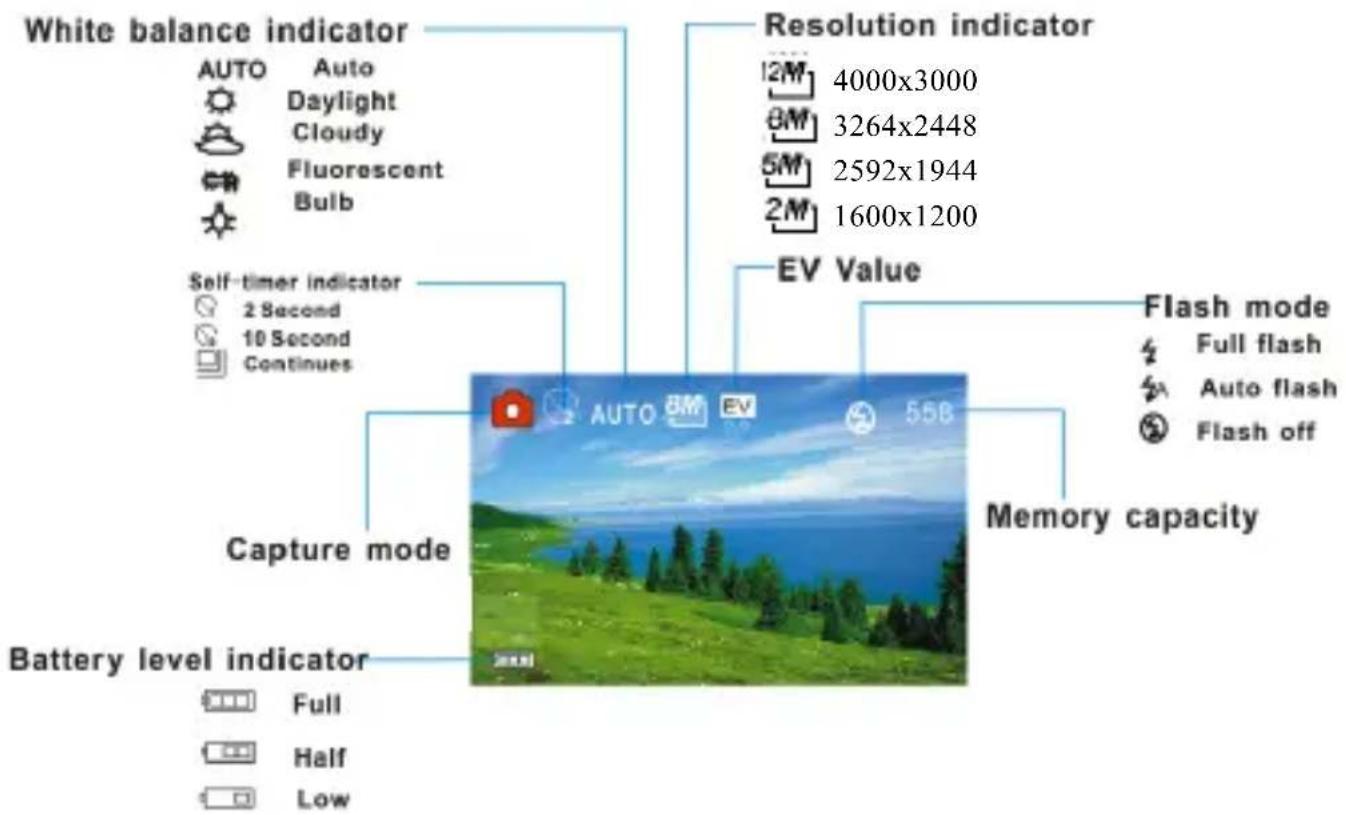
- Press the Mode button to set the camera to capture mode, the icon 📷 appears on the LCD screen. The screen will look like below:
flowchart
graph TD
    A["White balance indicator"] --> B["AUTO"]
    A --> C["Auto"]
    A --> D["Daylight"]
    A --> E["Cloudy"]
    A --> F["Fluorescent Bulb"]
    G["Resolution indicator"] --> H["12M 4000x3000"]
    G --> I["8M 3264x2448"]
    G --> J["5M 2592x1944"]
    G --> K["2M 1600x1200"]
    L["EV Value"] --> M["Capture mode"]
    L --> N["Memory capacity"]
    O["Flash mode"] --> P["Full flash"]
    O --> Q["Auto flash"]
    O --> R["Flash off"]
    S["Battery level indicator"] --> T["Full"]
    S --> U["Half"]
    S --> V["Low"]
- Use the LCD screen to view your subject.
- Use the “Zoom and Zoom Out” buttons to zoom in and out on your subject. The value of magnification level appears on the screen.
- Press the Shutter button to take a picture. After the picture has been taken the LCD will display image for a brief second. The Memory capacity in the top right of screen will decrease as one image is taken.
USING SELF TIMER/BURST FUNCTION
You can use the self-timer function when you wish to take a photograph of yourself or when you wish to photograph an object where the camera must be as still as possible. The burst function will allow you take continuous photos.
- Turn the power on, and set the camcorder to the Capture mode.
- Press the “Left” button to change the self-timer Mode: each time the button is pushed left, the icon on screen is changed.

2 seconds - The photo will be taken 2 seconds after the shutter is pressed.

10 Seconds - The photo will be taken 10 seconds after the shutter is pressed.

Burst snapshot: Hold the Shutter button to take pictures continuously. It will automatically take three pictures continuously in the interval of 1 second.
- Press the Shutter button to take picture.
USING THE FLASH
The flash is not only for taking pictures when there is insufficient light, but also for when the subject is in shade or with backlight conditions. Pressing the RIGHT/FLASH button cycles your camera through the various flash modes.
The flash will not activate during continuous shooting or movie recording.
- Turn the power on and set the camera to the Capture mode.
- Press the RIGHT/FLASH button to change the flash mode.
- Each time the RIGHT/FLASH button is pressed the flash mode will change.
| Icon | Title | Description |
 | Auto flash | Flash fires automatically when shooting conditions require extra lighting. |
 | Full Flash | Flash fires every time you take a photo, regardless of lighting conditions. |
 | Flash OFF | The flash never fires even in dark conditions. |
- Press SHUTTER button to take a picture.
The flash will not work when the battery is low. The screen is blank when the flash is charging. The next image can be shot only when charging is completed. Shooting with a flash in a bright environment may cause incorrect exposure.
PHOTO SETTINGS MENU
There are various photo settings that can be changed on the camera.
- Turn on the camera and set it to capture mode.
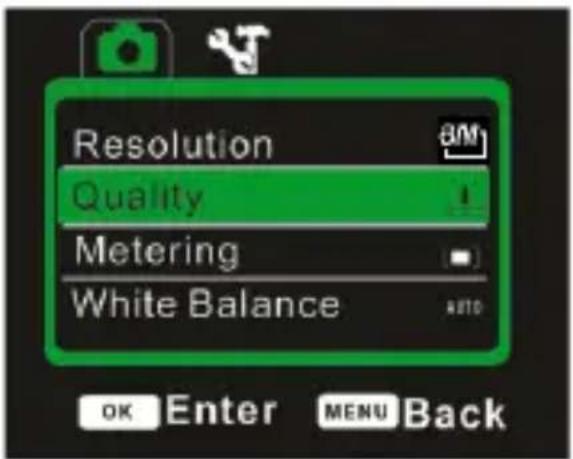
- Press the MENU button to display the menu.
- Press the "Up or Down" buttons to select an item.
- Push the "OK" button to enter the submenu.
- Press the "Up or Down" buttons to select the desired item.
-
Press the OK button to confirm the setting.
-
MENU button to return to the last menu.
text_image
Resolution Quality Metering White Balance OK Enter MENU BackPhoto Settings are as follows:
| Menu | Function |
| Resolution | Allows you to change the image resolution for taking still photos. There are four options for choice: [12M] 4000x3000/[8M] 32642x2448 / [5M] 2592x1944 /[2M] 1600x1200 |
| Quality | Selecting lower image quality decreases the image size and allows you to capture more images. There are three options for choice Super Fine, Fine, Normal. |
| Metering | Allows you to change the brightness of the picture. There are 3 Settings to choose fromCenter: The exposure will be calculated based on light in the center area and this is suitable for general use.Multi: The exposure will be calculated based on the average light.Spot: Only the spot in the center of the LCD screen will be metered for light. |
| White Balance | Allows you to adjust the white balance to suit different light sources. There are five options to choose from: Auto/Daylight/Cloudy/Fluorescent /Bulb. |
| Exposure | Allows you to set the exposure valuemanually to compensate for unusual lighting conditions such as indirect indoor lighting, dark backgrounds, and strong backlighting. The exposure value range is -2.0 to 2.0. |
| Capture Mode | Use this item to set the camera to different camera taking modes: Off / Self-timer 2s / Self-timer 10s / Continues |
| Effect | This function allows you to change the image's color tone for your next image you will take. There are several options: Normal/B&W/Sepia/Negative/Red/Green/Blue. |
| Date Stamp | This function can be used to add a date to your pictures as you take them. Options include: Off: Doesn't include any information.Date: Shows date to the image.Date and Time: Shows date and time to the image. |
VIDEO MODE
TAKING A VIDEO CLIP
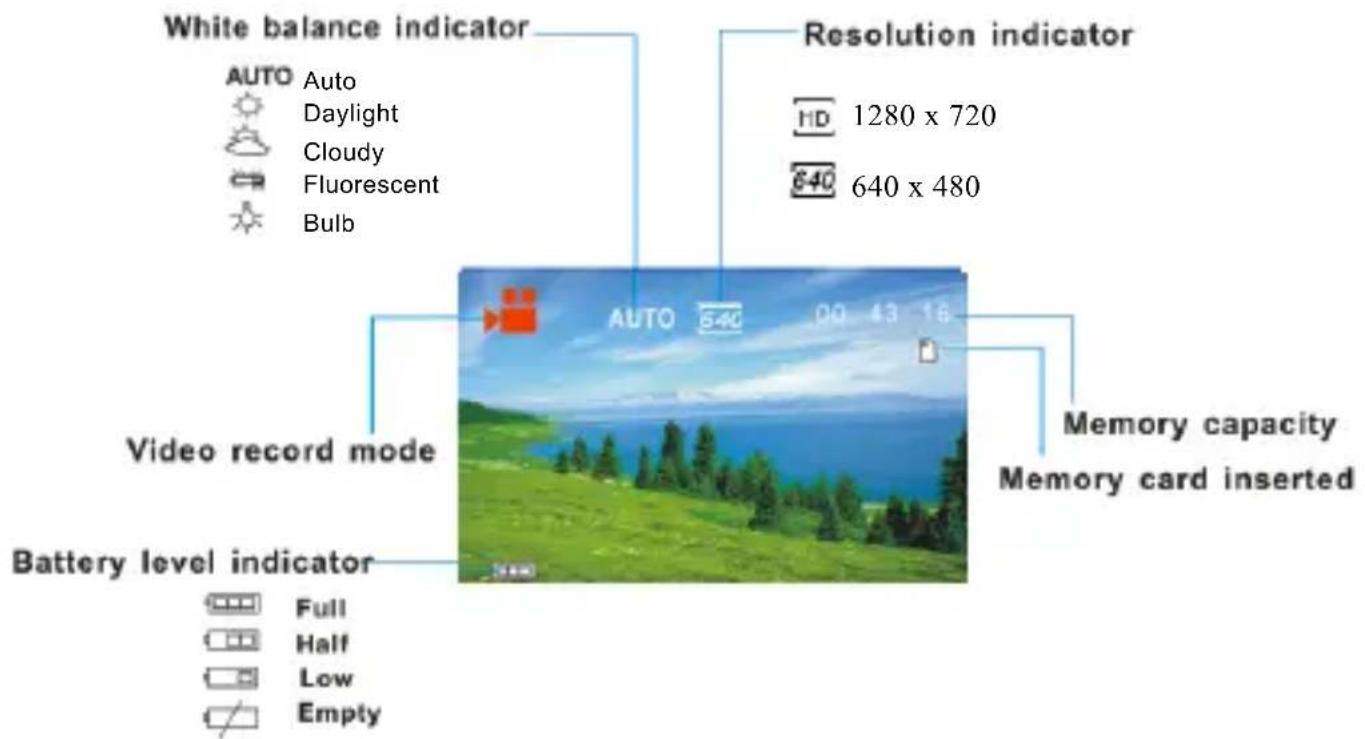
The Digital Camera allows you to take video clips without sounds. To take video clips:
- Press the Mode button to set the camera to video
mode, the icon appears on the LCD screen. The screen will look like below:
text_image
White balance indicator Resolution indicator AUTO Auto Daylight Cloudy Fluorescent Bulb HD 1280 x 720 640 x 480 Video record mode Battery level indicator Full Half Low Empty Memory capacity Memory card inserted- Use the LCD screen to view your subject.
- Use the “Zoom In and Zoom Out” buttons to zoom in and out on your subject. The value of magnification level appears on the screen.
- Press the Shutter button to start recording. While recording the top right of the screen will display how long it has been recording for. You can pause the recording by pressing the Right button and press it
again to resume recording.
- Press the Shutter button again to stop recording or recording stops when the current micro SD card is full.
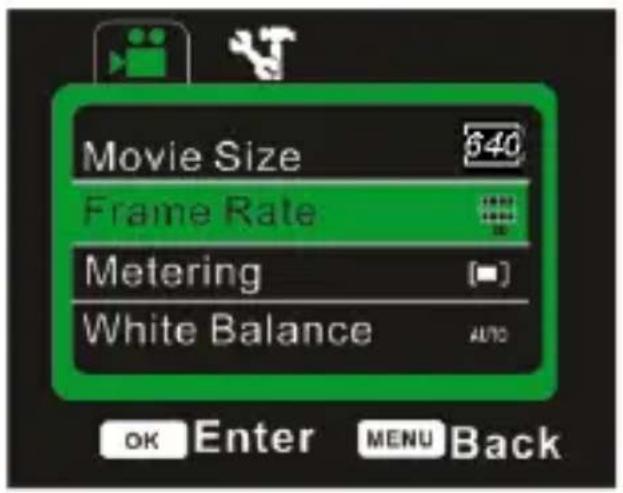
VIDEO SETTINGS MENU
There are various video settings that can be changed on the camera.
- Turn on the camera and set it to video mode.
- Press the MENU button to display the menu.
- Press the "Up or Down" buttons to select an item.
- Push the "OK" button to enter the submenu.
- Press the "Up or Down" buttons to select the desired item.
- Press the OK button to confirm the setting.
- Press the MENU button to return.
text_image
Movie Size 640 Frame Rate Metering White Balance AUTO OK Enter MENU BackVideo Settings are as follows:
| Menu | Function |
| Movie Size | Allows you to change the video resolution for the recording. You can choose from [HD] 1280 x 720 / [640] 640 x 480 |
| Frame Rate | Frame rate allows you to set how many frames per second are recorded. There are 2 choices High and Low. High records at 30fps, low records at 15fps. The higher frame rate gives better quality recording but also takes up extramemory. |
| Metering | Allows you to change the brightness of the picture. There are 3 Settings to choose fromCenter: The exposure will be calculated based on light in the center area and this is suitable for general use.Multi: The exposure will be calculated based on the average light.Spot: Only the spot in the center of the LCD screen will be metered for light. |
| White Balance | Allows you to adjust the white balance to suit different light sources. There are five options to choose from:Auto/Daylight/Cloudy/Fluorescent /Bulb. |
PLAYBACK MODE
VIEWING SAVED FILES
Playback mode allows you to view all your saved files. To access the playback menu:
- Press the MODE button to set the camera to playback mode, the 📄ion appears on the LCD screen. The screen will look like below:

text_image
Playback mode Protecting indicator 10 12 The sequence of current file/ The total number of recorded file Memory card inserted Date and time stampThe Screen will now display the files that have been saved.
- when the bottom left of the screen displaying the icon 🎩, it means the file is a video, while there is nothing, it is a image.
- Use the Left and Right buttons to browse through the files.
- Press the Down button to enter the thumbnail mode.
- Press the Up button to zoom in the current image.
VIDEO CLIPS
To be able to view the video files you need to:
- Press the Left or Right to select the movie clips you want to play.
- Press the OK button to start playing the file. press the right/left button to fast forward/backward. Press the up button to have a pause, press it again to recovery.
- To stop playing the file, press the Menu button.
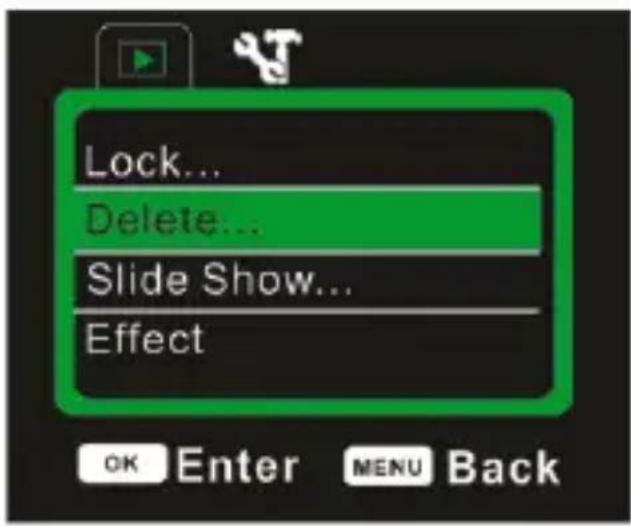
PLAYBACK SETTINGS MENU
There are various playback settings that can be changed on the camera.
- Turn on the camera and set it to playback mode.
- Press the MENU button to display the menu.
- Press the "Up or Down" buttons to select an item.
-
Push the "OK" button to enter the submenu.
-
Press the "Up or Down" buttons to select the desired item.
- Press the OK button to confirm the setting.
- Press the MENU button to return。
text_image
Lock... Delete... Slide Show... Effect OK Enter MENU BackPlayback Settings are as follows:
| Menu | Function |
| Lock | Allows you to Lock and Unlock images or videos from being deleted. There are 3 optionsLock/Unlock One, Lock All, Unlock All. Theicon will appear on each file that is locked whenviewing them in the playback mode |
| Delete | Allows you to delete one or all files. |
| Slide Show | This option allows you to play a slide show of the digital still photos, Choose the Interval time from 1-10secs by pressing Right /Left button, Press the OK button on Start and the slide show will start to play. If you want to repeat the function, change the Repeat setting to Yes. |
| Effect | This function allows you to change the image's color tone for your image. There are eleven options: B&W/Sepia/Negative/Red/ Green/ Blue/ Binarize/ Sunset/ Warm/ Cold/ Contrast. |
| Rotate | Allows you to rotate the image 90 degrees in the clockwise direction. The image will appear in the background on the screen. Once you are happy with the image, Press the Ok button on Save and the image will be saved likethis. |
| Resize | Allows you to resize the image to the following [32642x2448]/[2592x1944]/ [1600x1200]Note The image can only be resized to a smaller size than the original. |
NOTE: When playback video files, only Lock and Delete function is available
CAMERA SETTINGS
CAMERA SETTINGS MENU
The camera settings can be changed from any of the Capture, Video and Playback mode.
- Set Camera to any of the following modes Capture, Video or Playback.
-
Press the Menu button to bring up the Settings menu.
-
Press the "Right" button to access the camera settings

-
Press the Up and Down buttons to select the different settings.
-
Press the OK buttons to select the setting then use the UP/Down/OK buttons to select and confirm the setting options.
-
Press the MENU button to return.

text_image
Auto Review Power frequency Power Save OK Enter MENU BackCamera Settings are as follows:
| Menu | Function |
| Auto Review | Adjusts how long the picture will stay onscreen after taking a photo. There are three options Off, 1 second and 3 seconds. |
| Power Frequency | Light Frequency should be set depending on your region: [50HZ]/ [60HZ] |
| Power Save | To save power, the camera will automatically turn off after a period of time. 1min, 3min and 5min. |
| Date& Time | Allows you to set the date and time for the camera. |
| Language | Adjusts the language settings. |
| USB | Allows you to this camera as a PC camera or removable disk.MSDC: Use as a removable disk.PCCAM: Use as a PC camera.PictBridge: Can print directly when connect a Printer. |
| Format | Will format your micro SD Card.IMPORTANT: Formatting the micro SD card erases all pictures and video clips, including protected files. Removing the micro SD card during formatting may damage the card. |
| Reset all | Restores the camera to default settings. |
PC CAMERA MODE
IMPORTANT: Install driver before connecting to PC
PC Camera mode allows you to use the digital camera as a webcam. After you have completed installing the drivers plug your device in via the USB cable and switch it on. You need to set the camera to PCCAM mode.
DRIVER / SOFTWARE INSTALLATION
DRIVER INSTALLATION
IMPORTANT:
DO NOT CONNECT THE CAMERA TO COMPUTER
BEFORE CAMERA DRIVER IS INSTALLED
DO NOT CONNECT THE CAMERA TO THE COMPUTER
DURING THE DRIVER INSTALLATION PROCESS
To install driver click on "Install Driver" button and follow the
onscreen instructions to complete the installation.
After you complete the installation, restart your computer.
SOFTWARE INSTALLATION
To install software click on "Install MAGIX Video easy SE"
and "Install MAGIX Photo Manager 10" buttons and follow
the on-screen instructions to complete the installation.
TROUBLESHOOTING
| Problem | Solution |
| I cannot upload images to the PC | Check all cable connections are secured. |
| Set the camera to MSDC mode. | |
| I cannot switch on my Camera after inserting a micro SD card. | Make sure the micro SD card is inserted all the way in and close the slot door properly. |
| I press the shutter button but no response. | Wait for data process to complete and then take your next image. Or Delete some images in micro SD card, if the memory is full. |
| My images are blurred | Hold your camera steadily until you hear a “beep” whichindicates the image has been taken. |
| The battery indicator on the LCD screen flashes. | You need to change the battery, Or Charge the Battery |
| The LCD on my camera has frozen when micro SD card inserted. | Ensure you only use a new or formatted micro SD card for your camera. |
NOTE
Before using your camera in the water please verify that all lids and locks are tightly closed and sealed.
After using the camera in water please let it dry.
The camera should not be exposed to high temperatures and humidity differences to avoid condensation behind the lens.
Open the battery compartment only when the camera is dry.
HOW TO OPEN THE BATTERY COMPARTMENT OF THE
CAMERA:
Push the release lever toward the rear of the camera.
At the same time slide the compartment to the outside.
DECLARATION OF CONFORMITY
easypix hereby declares that the product W520 is in conformity to all
the essential requirements of Directive 1999/5/EC. The declaration of conformity
can be downloaded here: http://www.easypix.info/download/pdf/doc_w520.pdf
For technical help please visit our support area on www.easypix.eu.

Only EU

text_image
easypix®LIFESTYLE ELECTRONICS