V66 - Camera EASYPIX - Free user manual and instructions
Find the device manual for free V66 EASYPIX in PDF.


| Product Type | Digital Camera |
| Brand | Easypix |
| Model | V66 |
| Dimensions | Approx. 95 x 60 x 30 mm |
| Weight | Approx. 130 g (without batteries) |
| Power Source | 2 x AA batteries |
| Image Sensor | CMOS sensor, resolution not specified |
| Lens | Fixed focus lens |
| Zoom | Digital zoom |
| Display | LCD screen, size not specified |
| Storage Media | SD/SDHC memory card (not included) |
| Photo Modes | Auto, portrait, landscape, night, sport |
| Video Recording | Yes, AVI format |
| Self-timer | Yes, selectable delay |
| White Balance | Auto, daylight, cloudy, fluorescent, incandescent |
| ISO Sensitivity | Auto, 100, 200, 400 |
| Flash | Built-in, modes: auto, red-eye, forced, off |
| Connection Port | USB 2.0 |
| Maintenance | Clean lens with soft, dry cloth |
| Safety | Avoid exposure to water and extreme temperatures |
| Spare Parts & Repairability | Common parts (battery, charger) available; contact Easypix support for repairs |
| General | Compact and easy-to-use camera for beginners |
Frequently Asked Questions - V66 EASYPIX
User questions about V66 EASYPIX
0 question about this device. Answer the ones you know or ask your own.
Ask a new question about this device
Download the instructions for your Camera in PDF format for free! Find your manual V66 - EASYPIX and take your electronic device back in hand. On this page are published all the documents necessary for the use of your device. V66 by EASYPIX.
USER MANUAL V66 EASYPIX
megapix® ν66
User manual
020904
About this Manual
This manual makes using the Digital Camera as easy as possible. Information in this document has been carefully checked for accuracy; however, no guarantee is given to the correctness of the contents. The information in this document is subject to change without notice.
Copyright
(c) Copyright 2003
This document contains proprietary information protected by copyright. All rights are reserved.
Trademarks
All trademarks and registered trademarks are the property of their respective owners.
Table of Contents
Chapter 1 – Getting Started....1
Safety Information....2
Included Components....3
Camera Overview 4
Front View....4
Back View....6
Right View......8
Installing the Memory Card....9
Installing the Batteries....11
Choosing a Language 13
Chapter 2 – Taking Pictures....15
Preparing the Camera....15
Selecting the Camera Mode....16
Framing the Shot 16
Zooming and Shooting....16
Automatic Image Processing 17
Taking a picture....17
Protecting the Camera....17
Chapter 3 – Reviewing Your Pictures....18
Switching to Playback Mode....18
Full-Screen Review 18
Thumbnail Review 19
Chapter 4 – Connecting to a Computer....20
Installing Software 21
Making the Connection....23
Copying Photos to a PC 24
Using PC Camera Mode....25
Chapter 5 – Mode / Operation Guide....27
Capture Mode....27
FLASH Menu....28
PRESET Menu 29
RESOLUTION....30
SELF-TIMER 31
CONTINUOUS 32
Movie Mode....33
Digital zoom 33
Focus 34
Landscape 34
Portrait 34
Playback Mode 35
DPOF 36
Delete....37
Setup Menu 38
Language 39
Auto Off 40
Buzzer....41
TV Out....42
Preview....43
Opening......44
DPOF 45
Format 46
Memory Type 47
USB 48
Chapter 6 – Using the LCD Screen....49
Appendix 1 – Button Function Guide ....53
Appendix 2 – Specification ....54
Appendix 3 – Troubleshooting Guide......55
Chapter 1 – Getting Started
This chapter describes the features of the camera along with the components, a camera overview, and instructions on getting started.
Features
- Digital zoom (4X)
- Up to 2048 x 1536 resolution
- Interpolated resolution up to 6.6 Megapixels (2976 x 2232)
• Video capture resolution 320x240, 15 fps, AVI format
• 1.5" TFT color screen - USB 1.1 interface
• Built-in 8 MB flash memory
• Auto-exposure, fixed focus - Flash modes:
- Auto /On / Off
- White balance modes:
• Auto / Sun / Shade / Fluorescent
- Self-Timer mode
• Full-Screen or Thumbnail Review modes
- PC camera function
- Mass storage hard disk function
Safety Information
-
Do not disassemble the camera. Touching the product's internal parts could result in injury. In the event of a malfunction or if the camera is accidentally broken open, take the product to an authorized service center for inspection.
-
Avoid contact with liquid crystal. Should the LCD Screen break, care should be taken to avoid injury due to broken glass and to prevent the liquid crystal from touching the skin or entering the eyes or mouth.
-
Do not use in the presence of flammable gas. Using electronic equipment near flammable gas could result in explosion or fire.
-
Observe proper precautions when handling batteries. The camera uses only AA Alkaline, NiMH, or Lithium batteries. Batteries may leak or explode if handled improperly. Remove the batteries (and the memory card) from the camera if you are going to store the camera for extended periods. Ensure the camera is turned off before inserting or removing batteries. Insert batteries correctly. Do not expose batteries to flame or excessive heat. Do not immerse batteries in or expose to water. Discontinue use immediately if you notice any changes in the battery such as discoloration, deformation, or leakage.
-
Observe caution when operating the flash. Do not use the flash close to anyone's eyes. This can cause temporary damage to eyesight. Particular care should be observed when photographing infants - keep the flash at a distance of at least 1 meter from infants' eyes.
Included Components
Your digital camera comes equipped with the following components. Please check to make sure all items are included.

- User manual 6. Quick Reference Guide
- Digital Camera 7. Camera Protector
- Two (2) AA Alkaline Batteries 8. Video Cable
- Installation CD-ROM 9. Neck Strap Loop
- USB Cable
Camera Overview
The front, rear, bottom, and top views of the digital camera are shown on the following pages. Take a moment to review these illustrations to familiarize yourself with the terms used in this manual.
Front View

-
Shutter Button: Press this button to take pictures, or to select menu options.
-
Mode Switch: Slide to select the camera mode: Capture, Movie, or Playback.
-
Power Button: Press this button to turn on the digital camera. Press it again to turn it off.
-
Built-in Flash: The flash allows the camera to take pictures in low light conditions and can be used in bright conditions to remove unwanted shadows.
-
Video Out Port: Connect your video out cable here and the other end to your television set in order to use the television to preview your pictures.
-
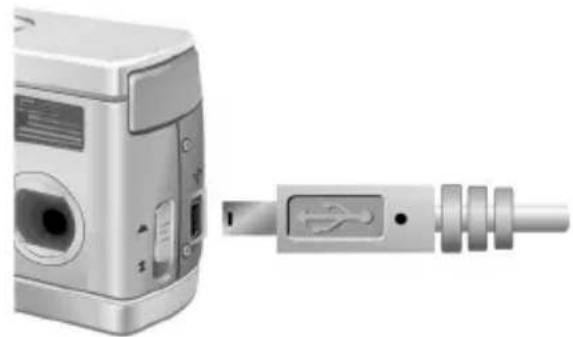
USB Port: The USB (Universal Serial Bus) port is used to connect the camera to a PC as well as for transferring photos. The USB port also enables you to use the camera as a PC camera.
-
Len Focus Switch: Optimize the focus for portrait or landscape style photos.
-
Lens: The lens focuses the light onto the digital image capturing circuitry. For the best picture quality, care should be taken to ensure it remains free of dust, fingerprints, and scratches.
Back View

-
LCD Screen: Use the LCD Screen to preview photos. While in the Setup menu, use the LCD Screen to view configuration details.
-
Left Button: Use the Left Button to cycle to the right during picture playback. In capture mode and movie mode, use the Left Button to reduce the EV level.
-
Zoom-in/up Button: Use the Zoom-in Button to zoom-in on your subject while in Capture mode. In Playback mode, use this button to zoom-in on a photo. The Zoom-in button is also used to move up through menus.
-
Right Button: Use Right Button to cycle to the left during picture Playback. In capture mode and movie mode, use the Right Button to increase the EV level.
-
Zoom-out/down Button: Use the Zoom-out Button to zoom-out on your subject while in Capture mode. In Playback mode, use this button to Zoom-out and switch between Thumbnail Review and Full-Screen modes. The Zoom-out button is also used to move down through menus.
-
Neck Strap Loop: Use the Neck Strap Loop to fix the neck strap to the camera for easy carrying.
-
MENU Button: Use the MENU Button to enter the menu system.
-
DISP Button: Use the DISP Button to cycle through the various display options: LCD, backlight, and status information all turned on; LCD and backlight on but no status information; LCD off.
-
Tripod Connector: Use the Tripod Connector to fix the camera to a tripod. This optional accessory is used to hold the camera still. It is especially useful for taking low light night pictures.
-
Power LED: Indicates the power status. In Playback and Movie mode, the power LED is always on. When using the flash in Capture mode, the LED blinks once every second until the flash is fully charged.
Right View

-
Battery / Memory Card Cover: Opens to allow access to the battery chambers as well as the memory card slot.
-
Battery Chamber: Takes two AA Alkaline, NiMH, or Lithium batteries.
-
Memory Card Slot: Accepts an MMC or SD Card to store images. For more information, see Memory Type on page 47.
Installing the Memory Card
To install the memory card:
- Turn off the camera.

- Open the battery / memory card compartment by pressing the cover and sliding it in the direction of the arrow as shown.
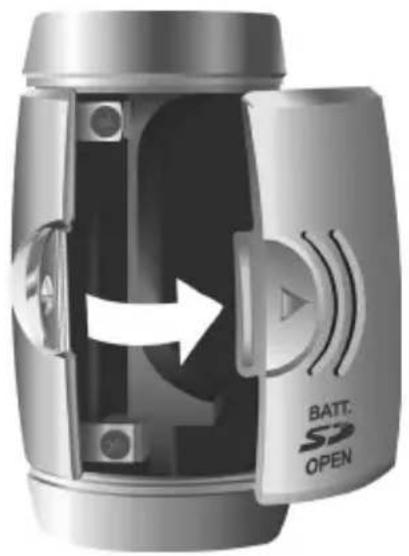
- Insert the memory card with the notched corner facing the outside edge of the camera (gold circuitry facing toward the back of the camera).

- Close the battery / memory card cover.

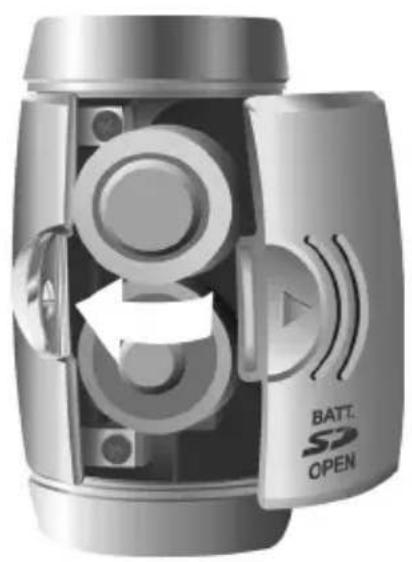
Installing the Batteries
To install or replace the batteries:
- Turn off the camera.

- Open the battery compartment on the bottom of the camera by pressing the cover and sliding it in the direction of the arrow as shown.

- Insert the batteries into the chamber making sure that the positive ⚠ and negative ⚡ ends are properly oriented, as indicated by the battery icons in the compartment.

- Close the battery cover.
Choosing a Language
The digital camera can display text in English, Spanish, German, French, Italian, Dutch, Chinese, and Japanese.
To select a different language:
- Turn the camera on.

- Press the MENU Button to display the menu.
- Use the down button (W) to select SETUP then press the right button (+) to enter the SETUP menu.
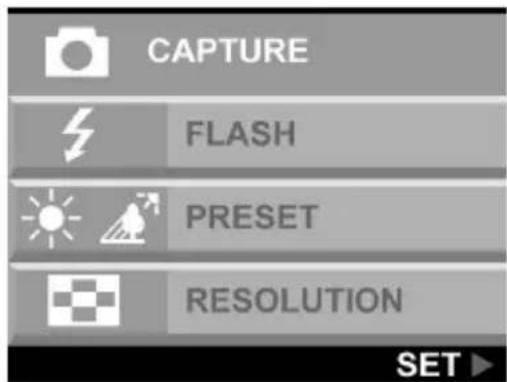
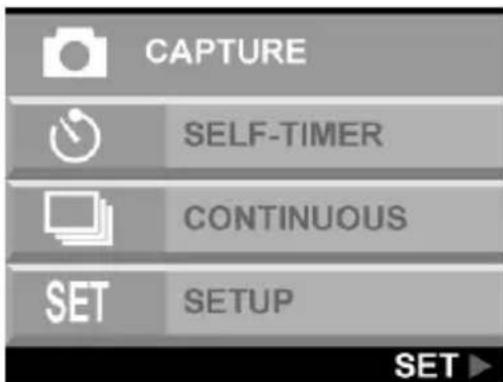
- Use the down button (W) to select LANGUAGE and then press the right button (+).

- Use the up and down button to select the language you want to use and then press the right button to set the language.

- Press the MENU button to exit.
Chapter 2 – Taking Pictures
This chapter shows you how to take pictures with your digital camera.
Preparing the Camera
To prepare the camera for taking pictures:
You can either slide the camera into a protector or simply take the picture while the camera is in the protector.

Press the power button to turn the camera on. A startup image appears on the LCD Screen.
NOTES:
• Make sure you have installed two AA batteries.
- If you want to store your photos on a flash card, make sure the card is installed before you turn on the camera. If you want to store images directly to the camera's internal memory, either remove the memory card or select INTERNAL from the Memory Type menu.
Selecting the Camera Mode
Slide the Mode Switch to the mode you wish to use.

For basic "point and click" picture taking, use the Capture mode indicated by the camera icon 📄.
Adjust the white balance setting by pressing the MENU button, selecting PRESET, then selecting: AWB (Auto White Balance), SUN, FLORESCENT, or SHADE.
To use the self-timer, press the MENU button, select SELF-TIMER, and then select ON.
Framing the Shot
Hold the camera steady to avoid taking blurry pictures. Use the LCD Screen to frame the picture.
Zooming and Shooting
You can use the Zoom-in (T) or Zoom-out (W) buttons to narrow or widen the camera's field of view. Use the LCD Screen to preview the effects of the zoom function.
Automatic Image Processing
The camera adjusts the shot to compensate for ambient lighting, and, in auto-flash mode, detects whether or not the flash is required.
Taking a picture
When you are satisfied with the preview, slowly press the Shutter button. Take care not to press the Shutter button too rapidly or forcefully; otherwise, you might shake the camera and get a blurry picture as a result.
Protecting the Camera
When you are finished taking pictures, press the power button to turn it off. Reverse the camera protector and slide the camera into the protector. The hard case will protect the camera against accidental damage of the lens, TFT LCD screen, or wear and tear on internal electronic parts.

Chapter 3 – Reviewing Your Pictures
One benefit of digital cameras is that you can immediately preview the shot you just took.
Switching to Playback Mode
To view the pictures that you have stored in internal memory or on the SD Card, slide the Mode Switch to Playback Mode ▶ and turn the camera on.

If the LCD Screen is not turned on, press the DISP Button.
Full-Screen Review
The default Playback method is to show each individual picture one at a time at full screen size. Press the left and right button s to cycle through the pictures you've taken.
You can also use the Zoom buttons (T)/(W) to a picture in more detail. The default zoom setting is 1.0X. Press the Zoom-in button (T) to increase the zoom ratio from 1.0X to 4.0X in 0.5X increments. Press the Zoom-out button (W) to decrease the zoom ratio.
Note: The digital zoom function doesn't work in 6.6 M (2976 X 2232) Economy mode.
Thumbnail Review
If you press the Zoom-Out button (W) when the zoom ratio is at 0.5X (default), the camera switches to Thumbnail Review mode.
In Thumbnail Review mode, up to nine pictures are shown on the LCD simultaneously. Use the up, down, left and right buttons to cycle through the thumbnail pages.
To return to Full-Screen Review, select the photo you want to view and press either the Shutter button or the Zoom-Out button. The selected picture will then expand to fill the entire LCD Screen.
Chapter 4 – Connecting to a Computer
The digital camera stores pictures as digital data rather than on film. Instead of making a trip to a developer and printing from negatives, you can copy your pictures to a computer for long-term storage. Once transferred, your pictures can be viewed, edited, printed, sent to friends and family via e-mail, or saved to any removable media device (such as floppy disk or CD-ROM) for delivery to a photofinisher. After transferring pictures to your computer, any copies stored on the memory card or on the camera's internal memory can be deleted to provide room for new pictures.
This chapter explains how to connect your digital camera to a computer to download pictures to a PC or to use as a PC camera.
CAUTION: Do not connect the camera to your computer before installing the software. This may cause installation problems. Please make sure you install the software from the CD-ROM prior to connecting the camera to your computer.
Installing Software
Follow these instructions to install the digital camera drivers and software on your system.
CAUTION: Have your Windows Installation CD-ROM ready beforehand, as you may be prompted to insert it during the installation process.
Step 1: Driver / Utility Installation
-
Insert the installation software CD into your CD-ROM drive. Don't connect the camera to the PC.
-
The installation program should start automatically. If not, double-click the My Computer icon on your desktop, open the CD-ROM drive, and double-click the 'setup.exe' found on the installation CD-ROM.
-
Follow the on-screen instructions. All the necessary software is installed automatically. The drivers and utility program that allow the camera to 'talk' to the computer via the USB cable are also installed.
Step 2: Card Reader / PC Camera Driver Installation
-
To install the necessary drivers for Card Reader mode and PC Camera mode, first set the correct operational mode for that function. For example, set the Mode Switch to Movie mode to install those drivers, and to any other mode to install Card Reader drivers.
-
Connect the small connector of the USB cable to the camera, as shown.
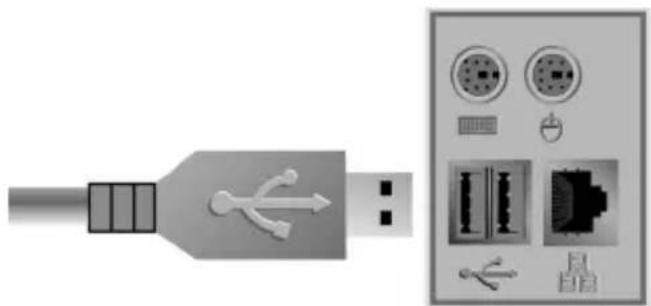
- Connect the large end of the USB cable to an empty USB slot on your computer. To locate USB slots on your computer, look for the USB icon 📋.
-
The Windows Add Hardware Wizard will automatically detect the camera and lead you through the installation procedures.
-
You will need to do this once for each mode (PC Camera and Card Reader).
NOTE: Reboot your computer before using the camera and software for the first time. Remember to connect your camera to the PC with the USB cable before downloading pictures.
Making the Connection
The camera can be used in two different modes when connected to your computer:
-
Card Reader
-
PC Camera
Card Reader mode allows you to use the camera just like a standard storage device where you can copy, delete, and move files to and from the camera just as you would a normal disk drive.
PC Camera mode allows you to use the camera as a standard PC video camera like the kind used for video teleconferencing, security, videophones, and so on.
Both Card Reader and PC Camera mode may only be used once you have connected the camera to your PC with the supplied USB cable.
Copying Photos to a PC
When connected to your computer in Card Reader mode, the digital camera behaves exactly like any other disk drive attached to your computer. This makes copying the images to your hard drive as easy as copying files from a floppy disk, zip drive or CD-ROM.
To copy photos to your computer:
-
Connect the digital camera to the computer with the USB cable.
-
Turn on the camera.
-
Open Windows Explorer. The contents of your computer will be displayed, including all your disk drives, and, if the camera is connected properly, an extra disk drive representing the camera's memory called "Removable Disk."
-
Select the digital camera drive. The camera's photos are listed. Select the photos and drag and drop them into any directory on your computer's hard disk.
Using PC Camera Mode
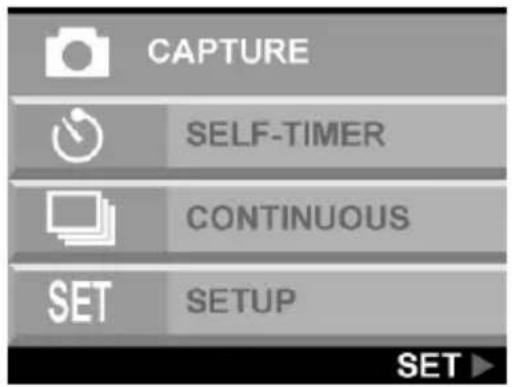
To use the camera as a PC Camera, you must set the USB in PC Camera mode in the setup menu and then connect it to the computer via the USB port.
- Turn the camera on
- Press the MENU button to enter the menu system.
- Use the down button to select SETUP. Then press the right button to enter the SETUP menu.

-
Use the down button to select USB. Then press the right button to enter the USB menu.
-
Use the up and down button to select CARD READER or PC CAMERA.

When connected, the camera may be used in conjunction with any commercially available video capture software to create your own home movies. You can edit and distribute your movie files across the Internet or save them on CD-ROM for later viewing on your PC or with a VCD/DVD player.
PC Camera mode can also be used with real-time video conferencing software such as Microsoft NetMeeting™.
CAUTION: Do not disconnect the USB cable when the digital camera is functioning as a PC Camera (i.e. when the application's window shows the camera video output or when the application is recording video). Unexpected problems could result.
Chapter 5 – Mode / Operation Guide
The digital camera has three modes of operation. Slide the Mode Switch to select the mode. This chapter describes these modes and their function.

Capture Mode

Capture mode is used for taking still pictures. The following buttons are used.
- Left button (-): Increases the camera exposure value, which allows in more light.
- Right button (+): Decreases the camera exposure value, which gradually blocks light.
- Zoom-out/down button (W): Widens the field framed by the camera's digital zoom from 4.0X to 1.0X in 0.2X steps.
- Zoom-in /up button (T): Narrows the field framed by the camera's digital zoom from 1.0X to 4.0X in 0.2X steps.
- DISP Button: Cycles through the following LCD Screen settings: LCD backlight and status information all turned on; LCD and backlight on but no status information.
FLASH Menu
The Flash menu determines how the flash is used.
- Press the MENU button to show the menu system.
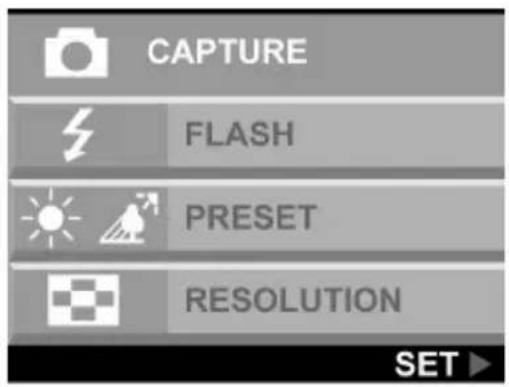
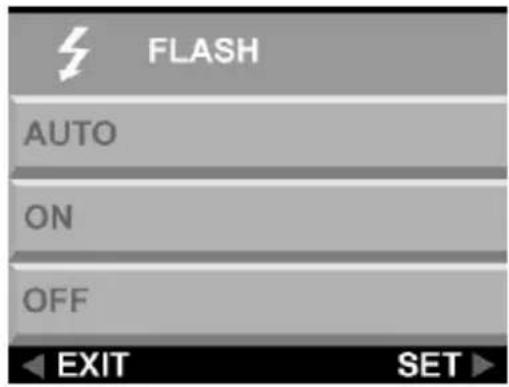
- Use the up and down button to select AUTO, ON, or OFF. Press the right button to enter the selected option.
Note: The image may be overexposed when you shoot bright scenes by using forced flash.
PRESET Menu
This mode is selected in the CAPTURE mode menu.
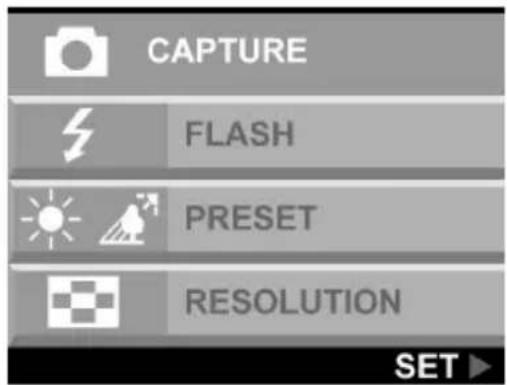

Change the preset white balance setting to suit the lighting conditions in which the picture is taken.
- AWB: Use the AWB setting to obtain the optimum image brightness (exposure) when the subject is much brighter or darker than the background. The available white balance values are between -2.0 to +2.0 EV in steps of 0.5 EV. Use the left or right button (-/+) to select the EV value. The EV value appears on the LCD Screen.
• SUN: For shooting outdoors or in brightly lit conditions. - FLUORESCENT: For shooting under fluorescent lamps.
• SHADE: For shooting in shade.
RESOLUTION
Adjust the image quality and resolution by selecting RESOLUTION from the menu display.
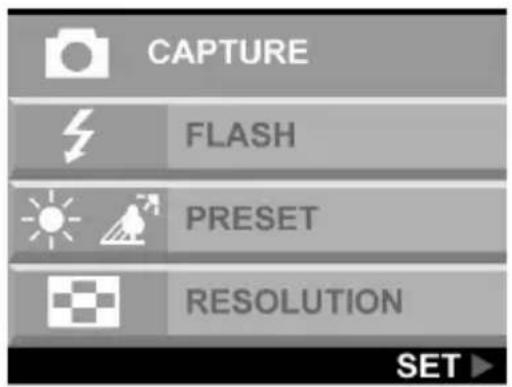

There are five different picture resolutions available:
| 6.6M | 2976 | x | 2232 |
| 3.0M | 2048 | x | 1536 |
| 0.7M | 1024 | x | 768 |
| Small 512 x 384 Fine | |||
| Photo | 2016 | x | 1344 |
Ecor Norn Fine
Photo
The higher the quality, the clearer your picture will be, but at the same time the image file size will be larger, and therefore you will be able to store fewer pictures in memory. A software interpolation method is employed to achieve the maximum effective resolution of 6.6 megapixels (2976 x 2232).
SELF-TIMER
This option gives you the ability to take hands-free photos, such as self-portraits or group photos.
To Take a Group Photo
- Position the camera on a stable surface (such as a tripod) and frame the shot.
- Press the Menu button to show the menu system.

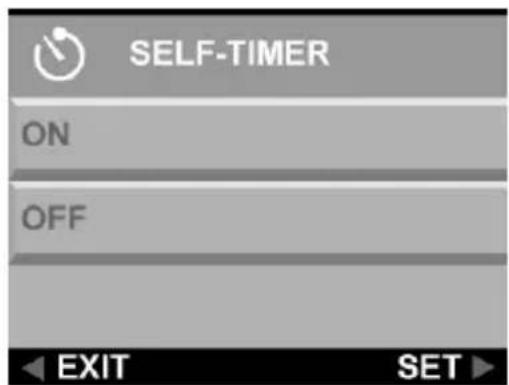
- Use the up and down button to select SELF-TIMER. Press the right button to enter the selected option.
- Use the up and down button to select ON. Press the right button
- Press the Menu button to exit the menu display.
- Press the Shutter button. The 10-second delay begins immediately. When the delay ends, the camera takes the picture.
CONTINUOUS
Use the continuous setting to take three consecutive images.
To setup a continuous shot
- Press the MENU button to show the menus.


- Use the up and down button to select CONTINUOUS. Press the right button to select the option.
- Use the up and down button to select ENABLE. Press the right button to select the option.
- Press MENU button to exit the menu display.
Movie Mode

Movie mode allows you record movie clips to your camera's on-board memory or flash card.
To record a movie clip
- Turn the Mode switch to the Movie Clip mode setting.
- Frame your shot, after the camera's LCD screen turns on.
- Press the Shutter button to begin recording. The camera keeps recording until the memory is full, or the Shutter button is pressed again.
Digital zoom
Digital zoom can be adjusted from 1.0X to 4.0X in 0.2X steps before recording a movie clip.
While recording a movie, press the left or right button to brighten or darken the movie.
Focus
A lens focus switch is located on the left side of the camera. Select the focus mode by sliding the focus switch.
Landscape

This focus is optimized for taking landscape pictures, with the lens focus universally distributed to encompass everything within the frame.
Portrait

This preset is optimized for taking "head shots" of people, focusing more on the center of the frame than on the peripheral areas.
This focusing optimizes the camera for taking close up shots of objects at a distance of 24 inches (60 cm) to 52 inches (130 cm) from the camera. Close up photos taken in Portrait mode have betters results than close up photos taken under Landscape mode.
Playback Mode

Playback mode is used to view photos stored in the digital camera's on-board memory or on a flash memory card. To view the photos, slide the Mode switch to Playback mode. (Press the DISP button to turn on the LCD screen.)
Playback mode button functions:
- Left Button (-): Move to the previous photo.
- Right Button (+): Move to the next photo.
- DISP Button: Cycles through the following LCD Screen settings: LCD, backlight and status information all turned on; LCD and backlight on but no status information.
- Zoom-in/up button (T): In Playback mode the Zoom-In buttons magnifies the image shown on the LCD Screen from 1.0X to 4.0X in 0.5X steps.
- Zoom-out/down button (W): In Playback mode, the Zoom-out button switches the display to Thumbnail mode.
Note: The digital zoom function doesn't work in 6.6 M (2976 X 2232) Economy mode.
DPOF
DPOF stands for "Digital Print Order Format", and refers to a format that is used for recording the print specifications of images taken using a digital camera on media such as a flash Card.
-
Press the left or right button to display the image for which you want to specify a DPOF setting.
-
Press the MENU button and use the down button to select the DPOF menu. Select ENABLE and press the right button to select the setting.


- Press the MENU button to exit the menu. A DPOF icon appears on the LCD screen.
Delete
-
Press the left or right button to display the image you want to delete.
-
Press the MENU button to enter the menu system.
-
Use the up or down button to select DELETE. Press the right button to enter the menu.

-
Use the up or down button to select YES or NO. Press the right button to confirm the selection.
-
Press the MENU button to exit the menus.
-
Repeat steps 1 to 5 to delete other images.
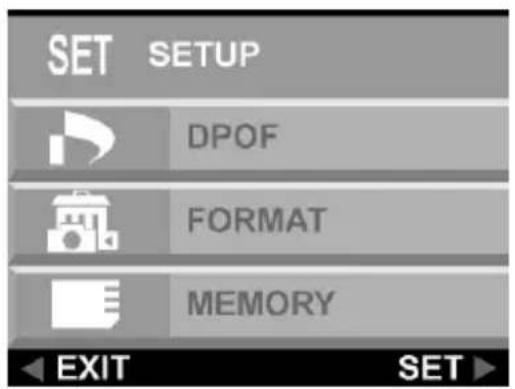
Setup Menu
The Setup menu configures the camera. Follow these instructions to use the Setup menu.
- Press the MENU button.
- Use the down button to select SETUP, and then press the right button to enter the Setup menu. The Setup menu appears.

Language

The digital camera can display menu items in the following languages: English, French, Spanish, German, Italian, Dutch, Chinese, and Japanese.

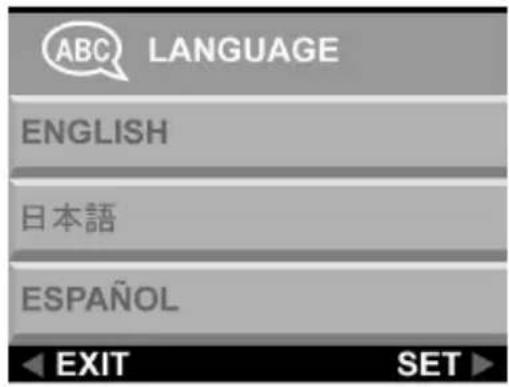
For more details on setting the default language, refer to page 13.
Auto Off

You can determine whether the digital camera turns itself off automatically after a period of inactivity.


DISABLE: The camera stays on until it is turned off manually.
60 SEC: The camera turns off if it is not used for 60 seconds.
120 SEC: The camera turns off if it is not used for 120 seconds.
Buzzer

When this feature is turned on, the camera makes a beep when you push a button.
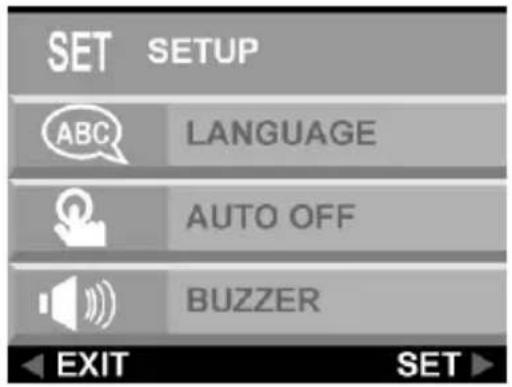

To activate the beeps, select the BUZZER option from the Setup menu. Select ON and press the right button to confirm the selection.
TV Out

When you connect the camera to a television set with the included video cable, you have the option to choose a transmission format compatible with that of your TV. This allows you to record video images sent to the TV with a VCR.


Select the TV OUT option from the SETUP menu, and choose NTSC or PAL according to your hardware and region. Press the right button to confirm your choice.
Preview
After taking a photo, you can decide to preview the image before saving it.


OFF: Saves the image without confirmation.
1 SEC: The image appears on the LCD screen for one second before being saved.
CONFIRM: A confirmation message appears on the LCD screen before the image is saved.
Opening
You can choose to display a startup screen when the camera is turned on.
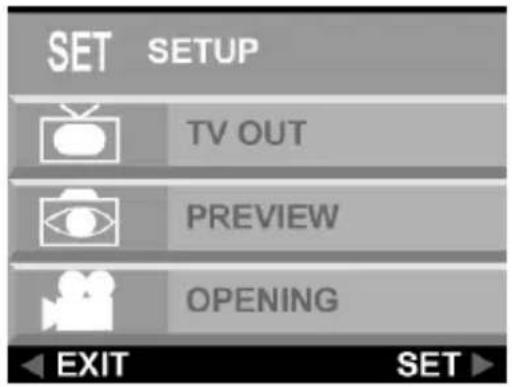

To turn the startup screen on or off, scroll down to the OPENING option, press the right button, select YES or NO, and press the right button to confirm. Press the MENU button to exit the menu.
DPOF

DPOF (Digital Print Order Format) is a system that allows digital cameras to define which captured images are to be printed on compatible print devices. At its simplest level the system saves a set of text files in a special directory on a digital camera's storage card. These files define the images that are to be printed, how many copies of each image, and if any information is to be overlaid on the image. This is usually implemented through a menu option on the digital camera.


There are two DPOF options.
STANDARD: Standard output to the printing device.
INDEX: All of the images are printed in a thumbnail style list to allow the user to select the photos he or she likes.
Format

This option completely erases and reformats the storage device. It is similar in function to formatting a PC hard drive. Although format takes longer than delete, be sure to format your storage device occasionally to ensure the card continues to function optimally.


Memory Type

You can choose whether you want to store photos in the on-board (internal) memory or on a flash card. Follow these instructions to set the default storage media.
- Turn the camera on.
- Press the MENU button to display the menu system.

-
Use the down button to select SETUP and press the right button to enter the setup menu.
-
Use the down button to select MEMORY and press the right button.


-
Use the up and down button to select INTERNAL or CARD. Press the right button to set your selection.
-
Press the Menu button to exit.
USB
The digital camera can be used with any commercially available video software as a video camera. Simply connect it to your PC with the supplied USB cable, select the PC Camera in the setup menu.
Chapter 6 – Using the LCD Screen
Icons on the LCD Screen show the status of camera settings and functions such as quality, zoom ratio, and number of pictures. These icons are displayed in every camera mode except Setup mode. This chapter describes the LCD Screen icons and their meanings.
Capture Mode

Movie Mode
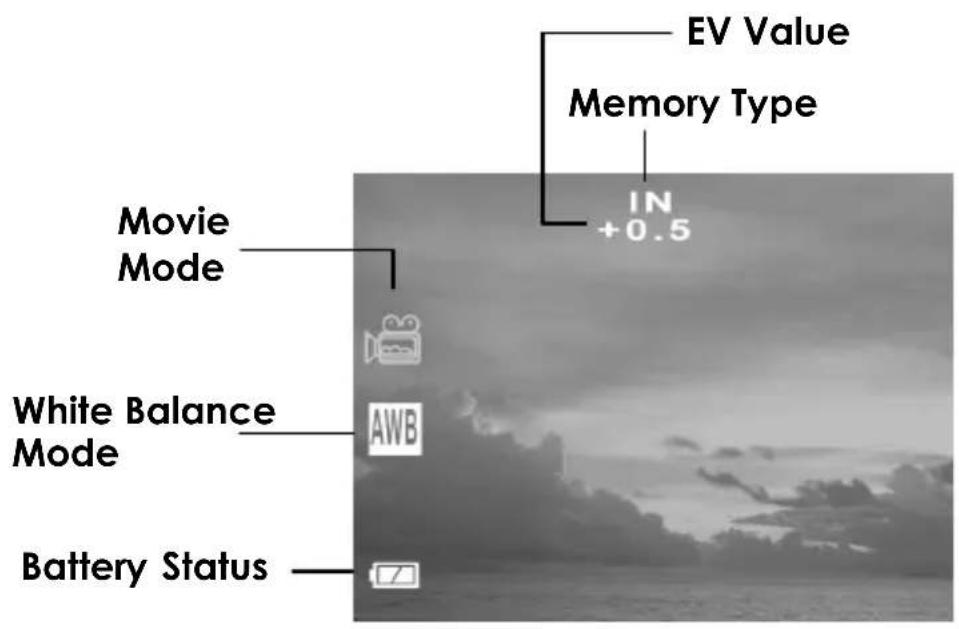
Playback Mode

LCD Icon Description
| Icon | Name | Description |
 | Auto Flash | The camera senses whether the flash is needed by detecting the amount of ambient light. |
 | Flash Off | Flash is turned off, regardless of the amount of light available. |
| [2X4X] | Flash On | Flash is always on, regardless of light available. |
 | Portrait | This preset is optimized for taking "head shots" of people, focusing more on the center of the frame than on the peripheral areas. |
 | Landscape | This focus is optimized for taking landscape pictures, with the lens focus universally distributed to encompass everything within the frame. |
 | Playback Mode | Indicates the camera is in Playback mode. This mode is used to view pictures stored on the camera's internal memory or on the memory card. |
 | Movie Mode | Indicates the camera is in Movie mode. Movie mode allows you take record movie to your camera's on-board memory or the SD Card. |
| [xzY8] | Self-Timer | Indicates the camera is using the Self-Timer preset. Pressing the Shutter button will initiate the 10-second countdown timer before taking a picture. |
 | Image Type | Indicates the playback image type, either still image (JPG) or video file (AVI). |
 | Zoom | Indicates the level of digital zoom currently applied.Movie Mode zoom options: 1.0X, 1.2X, 1.4X, 1.6X, 1.8X, 2.0X, 2.2X, 2.4X, 2.6X, 2.8X, 3.0X, 3.2X, 3.4X, 3.6X, 3.8X, and 4.0X Capture Mode zoom options: X1.0, 1.2X, 1.4X, 1.6X, 1.8X, 2.0X, 2.2X, 2.4X, 2.6X, 2.8X, 3.0X, 3.2X, 3.4X, 3.6X, 3.8X, and 4.0X.Playback Mode zoom options: 1.0X, 1.5X, 2.0X, 2.5X, 3.0X, 3.5X, and 4.0X. |
 | Battery Indicator | Indicates the level of battery power remaining. |
 | Continuous | Use the continuous setting to obtain the three continuous images when you want to take serious pictures in one touch |
 | Auto White Balance | The camera automatically determines the White Balance setting. |
 | Sun | Use this setting when taking pictures in bright daylight, to reduce the effect of "whitewashed" pictures. |
 | Shade | Use this setting when taking pictures in shade, or any time your pictures come out too dark. |
 | Fluorescent | Use this setting for taking pictures under fluorescent light. |
 | DPOF | The Digital Printer Order Format (DPOF) is used to directly print your photo to a printer that supports this function. |
 | Fine | Indicates that camera's resolution is set to Fine (1024 x 768) or small size (512 x384) |
 | Normal | Indicates that camera's resolution is set to Normal (2048 x 1536) |
 | Economic | Indicates that camera's resolution is set to Economic (2976 x 2232) |
 | Photo | Indicates that camera's resolution is set to Photo (2016 X 1344) |
Appendix 1 – Button Function Guide
| Mode | Shutter | Disp | Menu ↑ (T) | ↓ (W) | ← (-) | (+) → | |
 Capture Capture | Single Capture | LCD W Text ←→ LCD W/O Text | Menu Off ←→ Menu On | Zoom-in (T) | Zoom-out (W) | Decrease EV | Increase EV |
 Playback Playback | Select Photo Play/Stop AVI file | LCD W Text ←→ LCD W/O Text | Menu Off ←→ Menu On | Playback Zoom-in (T) / Panning up | Playback Zoom-out (W) / Panning down | Previous / Panning left | Next / Panning right |
 Movie Movie | Start / Stop Recording | LCD W Text ←→ LCD W/O Text | Menu Off ←→ Menu On | Zoom-in (T) | Zoom-out (W) | Decrease EV | Increase EV |
| Menu N/A | N/A | Exit | Up | Down | Exit | Enter/ Select | |
Appendix 2 – Specification
| Image Sensor Type: CMOS | Resolution: 3M pixels |
| Digital Zoom 4x for Still Image capture, 0.2 steps4x for Still Image playback, 0.5 steps | |
| Still image capture 2976 x 2232 (interpolated)2048 x 15361024 x 768512 x 3842016 x 1344 (photo) | |
| Video Clip Movie mode 320x240: 15 fps, AVI format | |
| PC camera mode 320x240: 15 fps | |
| Color TFT LCD Size: 1.5" | Resolution: 280 x 220 |
| Auto-exposure Automatic with menu compensation +/- 2.00.5 steps | |
| Preset mode Auto White BalanceSunFluorescentShade | |
| Flash mode Auto/On/Off | |
| File format JPEG compressionDCF file system.EXIF 2.2 file format | |
| PC Interface USB 1.1 | |
| Video Output NTSC & PAL | |
| Software Driver Card Reader, WDM for Microsoft Windows 98/98SE/ME/2000/XP compatibleWIA for Microsoft Windows ME/XP compatibleCard Reader for MAC OS 9.0 and above | |
| Power source 2 x AA (Alkaline, NiMH, Lithium | |
| Storage interface Internal 8 MB Flash memorySD card socket support | |
| Dimension Body: 110 (W) X 50 (H) X 27.8 (D) mmCover: 110 (W) X 56 (H) X 33.5 (D) mm | |
| Weight Body: 95g | Cover: 27.3g |
| Regulation and Certification | FCC Class B, CE |
Appendix 3 – Troubleshooting Guide
| Problem Possible cause Solution | ||
| The camera has no power. | The camera is turned off. | Press the power button to turn the camera ON. |
| The batteries are discharged. | Replace the batteries with fresh ones. Refer to Inserting Batteries. | |
| The batteries are inserted incorrectly. | Check the battery orientation. Refer to Inserting the Batteries. | |
| The camera won't take a picture. | Internal memory / Memory card full? | Backup your images and delete unwanted images or format the internal memory / memory card. |
| Is the camera connected to a computer? | The camera's buttons are not functional when connected to a PC. Disconnect the camera to take more pictures. | |
| The flash doesn't work. | Is the flash on? Ensure the flash is set to auto or always on. Refer to Setting the Flash. | |
| The batteries may be weak. | If the batteries are too weak, the flash will be unable to recharge. Turn the camera off and wait a few seconds before turning it back on. If this doesn't work, replace the batteries. | |
| The images are blurry. | The camera or subject was moving when the shot was taken. | Hold the camera steady or put it on a tripod to take pictures. |
| Lens focus adjustment | Check the lens focus is correct or not (refer to page 34). | |
| The computer does not recognize the camera | The camera was connected to a personal computer by USB before installing software. | Connect the camera to the computer with the USB cable. Select [My computer] > [Control panel] > [System] > [Device manager]. From [other devices] delete [Composite USB device] or [unknown device]. Disconnect the camera from the computer, install the software, and then reconnect the camera. |
| Windows ME and Windows 2000: when the USB cable is unplugged from the PC, an "Unsafe Removal Device Detected" error message appears. | When removing USB devices, it is recommended that users follow the "Safe Removal of USB Device" procedure. | Procedure:a. Right-click the Unplug or Eject hardware icon at the bottom-right of your computer screen.b. Left-click the Unplug or Eject hardware text box to open the 'Unplug or Eject Hardware' screen.c. From the 'Unplug or Eject Hardware' screen, select the device to be disconnected and then click the Stop button to bring up the 'Stop a Hardware device' confirmation screen.d. From the 'Stop a Hardware device' confirmation screen, select the device to be stopped and click OK to bring up the 'Safe To Remove Hardware' confirmation.e. Disconnect the Digital Camera from your PC. |
| Images lose formatting data during image capture in "PC Camera" mode. | If your hard disk's DMA setting is turned off images may lose formatting data during image capture. (Windows 98 and Windows ME only.) | Please check to make sure your hard drive's DMA setting is enabled, as follows:1. From the Windows Start menu, select Settings, then Control Panel.2. In the Control Panel double-click System, and then click the Device Manager tab.3. Select your hard drive from the list, and then click Properties.4. Click the Settings tab.5. Make sure the box marked DMA is checked. If not, check the box to ensure that your hard drive will protect image attributes during capture. |

- ABOUT THIS MANUAL
- COPYRIGHT
- TRADEMARKS
- TABLE OF CONTENTS
- CHAPTER 1 – GETTING STARTED....1
- CHAPTER 2 – TAKING PICTURES....15
- CHAPTER 3 – REVIEWING YOUR PICTURES....18
- CHAPTER 4 – CONNECTING TO A COMPUTER....20
- CHAPTER 5 – MODE / OPERATION GUIDE....27
- CAPTURE MODE....27
- MOVIE MODE....33
- FOCUS 34
- PLAYBACK MODE 35
- SETUP MENU 38
- CHAPTER 6 – USING THE LCD SCREEN....49
- APPENDIX 1 – BUTTON FUNCTION GUIDE ....53
- APPENDIX 2 – SPECIFICATION ....54
- APPENDIX 3 – TROUBLESHOOTING GUIDE......55
- CHAPTER 1 – GETTING STARTED
- FEATURES
- SAFETY INFORMATION
- INCLUDED COMPONENTS
- CAMERA OVERVIEW
- FRONT VIEW
- BACK VIEW
- RIGHT VIEW
- INSTALLING THE MEMORY CARD
- TO INSTALL THE MEMORY CARD
- INSTALLING THE BATTERIES
- TO INSTALL OR REPLACE THE BATTERIES
- CHOOSING A LANGUAGE
- TO SELECT A DIFFERENT LANGUAGE
- CHAPTER 2 – TAKING PICTURES
- PREPARING THE CAMERA
- NOTES
- SELECTING THE CAMERA MODE
- FRAMING THE SHOT
- ZOOMING AND SHOOTING
- AUTOMATIC IMAGE PROCESSING
- TAKING A PICTURE
- PROTECTING THE CAMERA
- CHAPTER 3 – REVIEWING YOUR PICTURES
- SWITCHING TO PLAYBACK MODE
- FULL-SCREEN REVIEW
- THUMBNAIL REVIEW
- CHAPTER 4 – CONNECTING TO A COMPUTER
- INSTALLING SOFTWARE
- STEP 1: DRIVER / UTILITY INSTALLATION
- STEP 2: CARD READER / PC CAMERA DRIVER INSTALLATION
- MAKING THE CONNECTION
- COPYING PHOTOS TO A PC
- TO COPY PHOTOS TO YOUR COMPUTER
- USING PC CAMERA MODE
- CHAPTER 5 – MODE / OPERATION GUIDE
- CAPTURE MODE
- FLASH MENU
- PRESET MENU
- RESOLUTION
- SELF-TIMER
- TO TAKE A GROUP PHOTO
- CONTINUOUS
- TO SETUP A CONTINUOUS SHOT
- MOVIE MODE
- TO RECORD A MOVIE CLIP
- DIGITAL ZOOM
- FOCUS
- LANDSCAPE
- PORTRAIT
- PLAYBACK MODE
- PLAYBACK MODE BUTTON FUNCTIONS
- DPOF
- DELETE
- SETUP MENU
- LANGUAGE
- AUTO OFF
- BUZZER
- TV OUT
- PREVIEW
- OPENING
- FORMAT
- MEMORY TYPE
- USB
- CHAPTER 6 – USING THE LCD SCREEN
- APPENDIX 1 – BUTTON FUNCTION GUIDE
- APPENDIX 3 – TROUBLESHOOTING GUIDE
Brand : EASYPIX
Model : V66
Category : Camera