
Kiddypix Galaxy - Camera EASYPIX - Free user manual and instructions
Find the device manual for free Kiddypix Galaxy EASYPIX in PDF.


| Product Type | Digital Camera |
| Brand | Easypix |
| Model | Kiddypix Galaxy |
| Image Sensor | 1.3 MP CMOS |
| Display | 2" (5 cm) LCD |
| Photo Resolution | Up to 5 MP (2592x1944) via interpolation |
| Video Resolution | Full HD 1920x1080 @25fps (interpolation), HD 1280x720 @30fps |
| Storage Medium | Micro SD card (up to 32 GB, not included) |
| USB Port | USB 2.0 |
| Power Supply | 4 x AA batteries (not included) |
| Power Saving | Auto-off options: 1/3/5 min or off |
| Operating System Compatibility | Windows XP/Vista/7/8, Mac 10.8 |
| Recording Mode | Video recording, photo, playback |
| Effects | 7 color effects (normal, B&W, retro, negative, red, green, blue) |
| Selfie Function | Yes, switch to rear lens |
| Zoom | Digital zoom (enable in settings) |
| Fill Light | Yes, for low light |
| Timer | 5-second delay |
| Built-in Memory | None (requires Micro SD card) |
| Safety Warning | Not for children under 3 years (choking hazard) |
| Package Contents | Camera, USB cable (batteries and memory card not included) |
| Care Instructions | Store cool, dry, dust-free; avoid high temperatures/sunlight |
Frequently Asked Questions - Kiddypix Galaxy EASYPIX
User questions about Kiddypix Galaxy EASYPIX
0 question about this device. Answer the ones you know or ask your own.
Ask a new question about this device
Download the instructions for your Camera in PDF format for free! Find your manual Kiddypix Galaxy - EASYPIX and take your electronic device back in hand. On this page are published all the documents necessary for the use of your device. Kiddypix Galaxy by EASYPIX.
USER MANUAL Kiddypix Galaxy EASYPIX

EN
USER MANUAL

IMPORTANT INFORMATION
To ensure the optimal functioning of your camera, please note the following important information:
MicroSD card:
- Please ensure your memory card is formatted in the camera before first using the card for the first time (Settings > Format).
- The maximum capacity memory card supported is 32GB.
Use of memory cards exceeding the maximum recommended capacity may result in file errors.
- The recording time depends on the selected resolution.
- After reaching a max. video recording time of approx. 20 minutes, the camera will stop recording automatically. A new recording must be restarted manually.
Batteries:
- If you are not going to use the camera for a long time, please remove the batteries.
EN
Safety instructions:
WARNING: The camera is not suitable for children under 36 months because of choking hazard.
WARNING: Always protect your camera from falls, blows and bumps.
- Keep a sufficient distance from objects that generate strong magnetic fields or radio waves, such as electrical appliances to prevent them from damaging the product or affecting the sound and image quality.
- Store the device cool (at room temperature) in a dry and dust-free location and never expose the product to high temperatures or permanently direct sunlight.
- In the unlikely event of overheating, smokes or unpleasant odors coming out of the unit, disconnect it immediately from the charging cable and remove the battery to avoid a fire.
EN
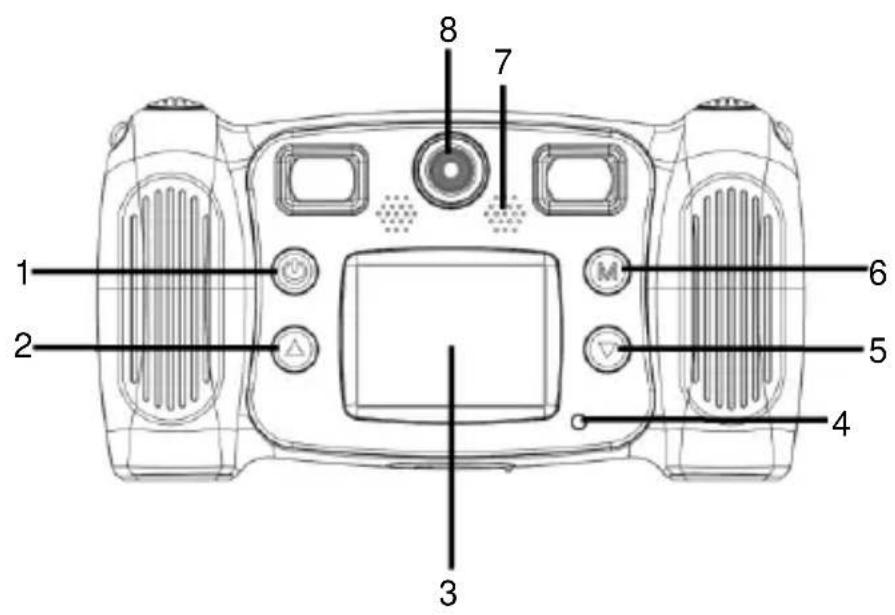
- Power button
- Page Up button
- Display
- Busy indicator light
- Page Down button
- Mode button
- Speaker
- Rear lens
EN

- Photo shutter button
- Fill light
- Recording button
- Front lens
EN

- Micro USB
- Micro SD card
- Battery door switch
- Battery door switch
- Microphone
EN
1. Battery installation
Slide the battery door lock as shown in the figure below to unlock and access the battery compartment. Insert 4 x AA batteries ensuring batteries are installed as indicated.

natural_image
Technical line drawing of a mechanical component with two circular ends and a central hub (no text or symbols)2. Memory card installation
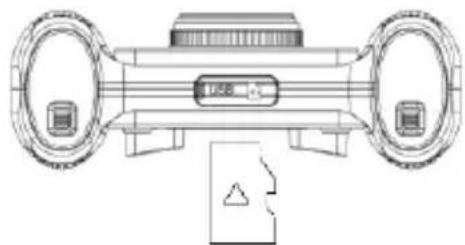
Insert the memory card into the card holder as indicated (not included).
To remove the memory card, press the end of the card gently, the card will be ejected.
natural_image
Technical line drawing of a mechanical component with two circular ends and a central display (no text or symbols)Note: The camera is not equipped with built-in memory. Please insert a memory card before using. Before using the memory card for the first time it is necessary to format the card in the camera.
3. Power on/off
Power on: Long-press the power button

The screen will turn on and the camera will enter standby.
Power off: Hold on power button for 3 seconds until the camera turns off.
Auto screen off: In order to maximize battery life, the camera display will automatically power off after an extended period of inactivity.
Low battery indication: A 'Low Battery' icon will be displayed on the LCD screen, indicating that your current photo or video should be completed as quickly as possible. When the icon flickers the camera will be turned off automatically.
4. Video recording mode
When turned on, the camera automatically enters the 'Video Recording' mode. Short-press the
Video recording button

to start recording a video. Short-press it again to stop recording.
Short-press the page up button

or page down button

to choose a color effect.
There are seven effect options to choose from including normal, black and white, retro, negative, red, green and blue.
EN
5. Photo mode
To take a photo, you can short-press photo button to enter photo mode.
Short-press the photo button again to capture your photo.
Short-press page up button or page down button to join different frame effects.
Long press the mode button to set the camera timer to automatically take a photo after 5 seconds.
Selfie function:
To take a selfie, long-press the photo button to switch to the rear camera lens.
Zoom function:
Please note that the Zoom Switcher must be switched on inside the settings.
To zoom in, long-press the page up button. To zoom out, long press the page down button.
Fill light:
You can turn on the fill light by long-pressing the recording button in low light conditions.
EN
6. Menu and playback mode
While in video recording mode or photo mode, short-press the mode button

Short-press the page up button

and page down button

to change modes.
Short-press the mode button

to confirm your choice.
To exit the menu screen, short-press power button


Video recording mode

hoto mode

Playback mode

System settings

Game
EN
You can view your videos and photos in one of the following ways:
- In the user menu select Playback mode, then press the page down or page up buttons to select the video or photo you would like to view.
To playback a video, press the mode button to start. Press the mode button again to pause playback or press the power button to stop playback. During playback, press the page up button or page down button to scroll through the photos and videos. Press the mode button to confirm your selection. - Connect your camera to a computer using the supplied USB cable to view your captured videos and photos.
- Short -press the recording button to enter to delete menu. Short-press the mode button to confirm your selection to delete one or all files. Press the power button to exit menu.
7. System settings
To adjust your camera settings, enter the 'System settings' menu.
Short-press the page up button

or page down button

to select the setting.
Short-press the mode button

confirm your selection.
Short-press the power button

to exit the menu.
EN
8. Connecting to PC
Your camera has a 'plug-and-play' function. Once connected to your computer and turned on, your camera will appear as a removable hard disk. The removable disk icon will appear in the "My Computer" window.

Note: During file download and transfer, do not disconnect your camera or remove the memory card as doing so may result in full data loss.
Technical parameters
| Image sensor | 1.3MP CMOS sensor |
| Function mode | Video recording, photo, playback |
| Display | 2” (5 cm) display |
| Picture resolution | 5MP* (2592x1944), 3MP* (2048x1536), 1.3MP (1280x720) *by interpolation |
| Video resolution | Full HD 1920x1080 @25fps by interpolation, HD 1280x720 @30fps |
EN
| Storage medium | Micro SD Card support up to 32GB (not included) |
| USB port | USB 2.0 |
| Power supply | 4 x AA battery (not included) |
| Power save | 1 min. / 3 min. / 5 min. / OFF |
| Operating system requirements | Windows XP/Vista/7/8, Mac 10.8 |
All product specifications are correct at time of print and are subject to change without prior notice.
Easypix GmbH reserves the right for errors or omissions.
For technical help please visit our support area on www.easypix.eu.
EN
CONFORMITY
We hereby declare that the CE marking has been affixed to this product in accordance with the essential requirements and relevant provisions of the European directives.
The EC Declaration of Conformity can be downloaded here:
http://www.easypix.info/download/pdf/doc_kiddypix_mystery_galaxy.pdf
DISPOSAL

Dispose of packaging
For disposal, separate packaging into different types. Cardboard and board must be disposed of as paper and foil must be recycled.

Disposal of Waste Electrical and Electronic Equipment and/or Battery by users in private households in the European Union. This symbol on the product or on the packaging indicates that this cannot be disposed of as a household waste. You must dispose of your waste equipment and/or battery by handling it over to the applicable take-back scheme for the recycling of electrical and electronic equipment and/or battery. For more information about recycling of this equipment and/or battery, please contact your city office, the shop where you purchased the equipment or your household waste disposal service. The recycling of materials will help to conserve natural resources and ensure that it is recycled in a manner that protects human health and environment.

Battery warning
- Never dismantle, crush, or pierce the battery, or allow the battery to short-circuit. Do not expose battery being placed in high temperature environment, if battery leaks or bulges, stop continue to use.
- Risk of explosion if battery is replaced by an incorrect type.
- Keep the battery out of reach of children.
- Batteries may explode if exposed to naked fire. Never dispose of batteries in a fire.
EN
- Disposed of used batteries observing local regulations.
- Before disposing the device, please remove the battery.

The camera is not suitable for children under 3 years because of choking hazard.


Made in China / Only for EU

LIFESTYLE ELECTRONICS

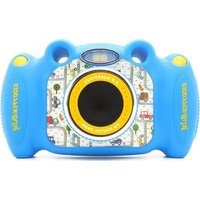
Brand : EASYPIX
Model : Kiddypix Galaxy
Category : Camera