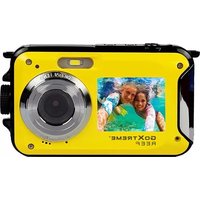
V130 - Camera EASYPIX - Free user manual and instructions
Find the device manual for free V130 EASYPIX in PDF.


| Product Type | Digital Camera |
| Brand | Easypix |
| Model | V130 |
| Resolution | 13 Megapixels (effective) |
| Sensor Type | CMOS |
| Optical Zoom | 3x |
| LCD Screen Size | 2.7 inches |
| Storage Medium | SD/SDHC memory card (up to 32GB) |
| Power Source | 2 x AA alkaline or NiMH rechargeable batteries |
| Dimensions (W x H x D) | 95 x 60 x 25 mm |
| Weight (without batteries) | 120 g |
| Video Recording | 720p HD video at 30 fps |
| Interface | USB 2.0 |
| Flash | Built-in auto flash with red-eye reduction |
| Self-Timer | 10 sec delay |
| Main Functions | Auto mode, scene modes, face detection, panorama |
| Care and Cleaning | Clean lens with a soft, dry cloth. Avoid solvents. |
| Safety Precautions | Do not immerse in water. Keep away from heat sources. |
| Spare Parts / Repairability | Battery compartment cover, USB cable, battery charger (optional) |
| General Information | User manual available in PDF format. Supports Windows and Mac. |
Frequently Asked Questions - V130 EASYPIX
User questions about V130 EASYPIX
0 question about this device. Answer the ones you know or ask your own.
Ask a new question about this device
Download the instructions for your Camera in PDF format for free! Find your manual V130 - EASYPIX and take your electronic device back in hand. On this page are published all the documents necessary for the use of your device. V130 by EASYPIX.
USER MANUAL V130 EASYPIX
1. Get to know your camera
1.1 Features
1.3 Mega pixels resolution sensor
Video clips
Web camera
1.3" CSTN display
Internal 16MB memory Driver free for Windows
Driver free for Windows XP/Vista and MAC 9.x and X.x
1.2 Specifications
| Sensor 1.3 Mega pixel CMOS sensor | |
| Image resolution | 5 Mega pixels: (2560 x 1920) (Hardware Interpolation) |
| 3 Mega pixels: (2048x1536) (Hardware Interpolation) | |
| 1.3 Mega pixels: (1280x960) | |
| VGA Mega pixels: (640x480) | |
| Lens | F/2.8 f=8.5mm |
| Focus range 0.5m. ~ | Infinity |
| Digital zoom 4x | |
| LCD display 1.3" color CSTN | |
| Video mode UP to 30 fps@QVGA & 20fps@VGA | |
| Built-in memory 16MB flash memory | |
| Picture Capacity in 16M memory (The quantity of pictures varies and depends on the complexity of the scene) | 5 M: (2560 x 1920)----15-35 Pictures |
| 3 M: (2048x1536)----20-50 Pictures | |
| 1.3 M: (1280x960)----40-100 Pictures | |
| VGA: (640x480)----120-260 Pictures | |
| File format Picture: JPEG, Video: AVI | |
| Self timer 10 seconds | |
| PC interface USB 1.1 | |
| Power source 2xAAA alkaline batteries | |
1.3 System requirement:
| Operating System | Windows XP/Vista or above | ||
| Mac 9.x or X. x | |||
| CPU Pentium II or above | |||
| RAM | At least 64MB | ||
| Interface | USB port | ||
| CD | 4x speed CD ROM or above | ||
2. Functional parts
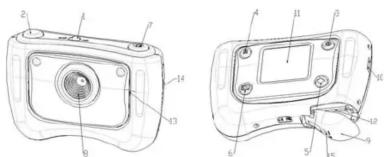
| 1 | Power on/off | Turn on when slide to ON position, Turn off when, slide to OFF position. |
| 2 | Shutter / OK button | Press this button to take photographs or to start/stop recording a short video clip. This button can be also used to confirm changes. |
| 3 | Zoom button | Digital zoom in |
| 4 | Mode/Set button | Select DSC / Video recording mode by press this button. Press and hold 2s this button to enter setup mode. Press this button to wake up when device turns to sleep status. |
| 5 | Next button | Next and down selection. |
| 6 | Playback button | Press this button to change mode between playback and preview mode. |
| 7 | Smile button | Press this button to send out "smile" sound. |
| 8 | Lens | Records the image to be taken.Note:Keep the lens clean. Dirt and fingerprints affect the outcome of the picture. |
| 9 | Battery door | 2xAAA alkaline batteries. |
| 10 | Strap hook | Hook for attaching the wrist strap to the camera. |
| 11 | LCD screen | View photographs and video clips, view camera setting and menu. |
| 12 | SD card slot | SD card slot |
| 13 | Speaker | For sound output. |
| 14 | USB interface | Via this connection, you can save photographs and video clips to a computer, or use the camera as a PC cam to chat on the Internet. |
| 15 | Battery cover Lock | Slid this button to lock or release battery cover. |
3. See following details to setting your digital camera
| SET | Photo | Resolution | 5M, 3M, 1.3M,VGA | Set the picture resolution. |
| Self-timer shot | 10s | Set the self timer to/10S. | ||
| Default setting | Load | Restore default setting. | ||
| Light-Frequency | 50Hz | Main European electricity Frequency. | ||
| 60Hz | Main American electricity Frequency. | |||
| USB connection | Mass-storage mode | Work as are movable disk. | ||
| PC-Camera mode | Work as are web camera. | |||
| Video | Resolution | VGA, QVGA | Level of pixel resolution. |
| Delete | Delete One (Default) | Delete the picture or video you selected. | |
| Format storage | Format storage | Format the memory card. |
Note: The camera will remain the last setting when it is turned off.
4. Explanation of the status icons on the LCD screen

| Item | Function | Description | |
| 1 | Battery indicator | The batteries are full.The batteries are empty. | |
| 2 | Recording mode | Setting for taking photographsSetting for recording videos | |
| 3 | Camera resolution | Displays the resolution.5M=2560x1920;3M = 2048x1536;1.3 M=1280x960 VGA=640x480;QVGA=320 x 240 | |
| 4 | Photo / Video counter | Photo mode: Photo No. have, been taken.Video mode: Video recording time in second;Playback mode: current number. of pictures or video clips | |
| 5 | Memory or SD card indicator | Indicates memory or SD card.M-Pictures stored in built-in memory.SD-Pictures stored in SD card. | |
5. Using the camera
5.1 Installing the batteries
- Open the battery door.
- Insert 2 AAA alkaline batteries into the camera according to the correct polarity marked in
the battery compartment. - Turn on the camera
Slide the power to activate. Slide it again to turn this Digital Camera off.
5.2 Inserting a memory card (not included)
This camera has built-in internal memory. This memory can be extended with a SD memory card (not included).
Follow the instructions given below to insert the optional SD memory card into the camera.
- Open the camera's battery doc
-
Insert the SD card into the slot.
-
Press the SD card completely into the camera and then close the door. Open the door and press on the memory card if you wish to remove it.
Note: There is only one right direction to insert the SD memory card into the slot. Do not force the card into the slot, or else it may damage both the camera and the SD memory card.
Note: The SD memory card must be formatted before taking photographs. See the following sections for more information.
sections for more information.
5.3 Setting your camera
In the mode you can set all the option of you camera;
- Press MODE to select the mode (picture or video) you want to set;
-
Press MODE and hold it to enter system setting menu;
-
Press MODE and hold it to enter system setting menu,
-
Select what you want to set by NEXT, and press OK to
-
Set the option you selected by NEXT, and press OK again to confirm;
-
Press MODE to exit.
5.4 Taking photographs
-
Slide the power ON/OFF to activate your Digital Camera.
-
Set the camera to photo mode (
-
Use the LCD screen to aim the object you wish to photograph.
-
Press Shutter button and hold the camera steadily for 2 to 3 sec, until the LCD display turn on again
-
You can press and hold MODE to set proper resolution, Self-time shot and so on, and press shutter to confirm, and press and hold MODE again to return.
Note: If you take photographs with the default camera settings, it is possible that the quality of the photographs will not always be optimal. Different surroundings produce different results. Adjust the camera settings as required.
5.5 Zoom in and out
The camera can zoom in up to 4 times in preview mode by pressing ZOOM (1x-4x-1x), and you can also use it to zoom in/out photographs in playback mode.
5.6 Taking photographs using self-timer function
You can use the self-timer function when you wish to take a photograph of yourself or when you wish to photograph an object where the camera must be as still as possible, for example on the stand.
-
Set the camera to photo mode (
-
Press and hold the MODE button. The quick menu will appear.
-
Press NEXT to select self-timer mode, and press OK to confirm
-
Setting the time with NEXT button(10S), and press OK to confirm
-
Press MODE to complete your setting. The self-timer function is now ready for use, and the ICON will be shown on the top of the LCD.
-
Aim the object you wish to photograph.
-
Press the shutter button to take a photograph.
-
The photograph will be taken after the time delay you set, and the camera will beep once.
5.7 Recording video clips
-
Press the MODE button to select video mode ( ),
-
Press the shutter button to start recording video, press the shutter button again for a pause.
The video clip will now be saved as an AVI file in the camera memory.
- You can press and hold MODE to set proper resolution, and press shutter to confirm.
5.8 Playback photographs or video clips
-
Press Playback button, it will show video clips or photos picture on the LCD
-
Press NEXT to review next the photo or video clip
-
Press MODE again to exit the Playback mode.
Note: The video clip will auto run if you select it until you select others.
5.9 Delete photographs and video clips
You can choose to delete a single photograph / video clip, or Format the memory.
Follow the instructions given below to delete photograph/video clips.
- Press playback button, enter playback mode.
- Select the photo or video clip you want to delete with NEXT key;
- Press and hold MODE button to enter the n
- Select Delete one Format memory Next key. Press OK to confirm.
- Select √ and press OK to confirm again, you will exit the menu.
- You can also press and hold MODE to exit.

the files in camera will be deleted all.
6. Press the smile button to send out "smile" sound before taking photo
7. Installing the camera driver
The driver in the CD has to be installed for windows ME, Windows 2000, Windows XP Windows Vista to use as a PC cam only. (Download picture /video is driver free).
7.1 Uninstalling old drivers and devices
There is a chance for a conflict between the new driver and an existing driver in the computer. In that case, it is better to remove these drivers before installing the new driver.
that case, it is better to remove those drivers before installing the new driver.
1. Enter Windows 'Safe Mode' (press F8 when starting Windows and then select 'Safe Mode')
from the menu which will be displayed).
2. Click on 'Start – Settings – Control Panel' and double-click on 'Add/Remove Programs'
icon.
3. Find all the programs for similar, old devices and remove these by clicking on the 'Add/Remove' button. When in 'Safe Mode', it is possible for some programs to appear twice. In that case, remove all the programs which appear twice.
4. Restart the computer.
7.2 Installing the driver for Windows XP/ Windows Vista
Note: Make sure all other programs are closed during the installation process.
Note: During installation for Windows XP, you may receive a message saying that the driver has not been signed. This does not cause a problem for the functionality of the program. Please click "Yes" to continue.
Note: For example, 'D:\' is used to indicate the CD-ROM drive. This may be different for your computer.
- Insert the CD-ROM into your computer's CD-ROM drive. The installation program will start automatically. If it does not start automatically, please do the following:
a) Select 'Run' from Windows Start menu.
b) Type [D:\SETUP.EXE] and click on 'OK' to start the Software Installer. - The Software Installer will appear.
- Select the language you wish to use for the installation.
- Click on 'Install driver to start the installation of the camera driver.
- Follow the on-screen instructions.
7.3 Connecting the camera
The camera can be connected to the computer in two different modes: mass storage device and PC camera.
7.3.1 Connecting as a mass storage device
This option makes it possible to download photographs and video clips onto your computer.
- Slide the power ON/OFF switch to activate your Digital Camera.
- Press and hold MODE button to enter system setting menu.
- Press NEXT button to select USB connection, and press OK to confirm.
- Press NEXT button to choose the mass storage mode.
- Press OK to confirm
- Connect the camera to the computer.
- Windows will automatically detect the camera. You can use this camera as a removable
disk.
7.3.2 Connecting as a PC camera
When you connect the camera as a PC camera, you can use the camera as a web cam for video conferencing on the Internet by using Windows NetMeeting or Windows Messenger. (You must install the driver before connecting the Digital Camera to your computer).
- Slide the power ON/OFF switch to activate your Digital Camera.
- Press and hold MODE button to enter system setting menu.
- Press NEXT button to select USB connection, and press OK to confirm.
- Press NEXT button to choose the PC Camera mode.
- Press OK to confirm
- Connect the camera to the computer
-
Windows will automatically detect the camera. You can use this camera as a web camera.
-
Trouble shooting
| Problem | Cause | Solution |
| Cannot turn on the camera by pressing the "power" button. | Low battery power, battery is missing or incorrectly inserted the battery. | Install or replace the battery correctly. |
| Photos are not saved or are missing when taking pictures. | The built-in memory hasn't been formatted properly in the camera. | Format the memory in system set mode of the camera. Please refer to section 5.4. |
| Cannot find removable disk after connecting the camera to the computer via USB. | 1. Connection failure.2. The mode of the camera is not set to removable disk properly | 1. Make sure all cable connections are secured and restart the computer.2. Set the camera to removable; refer to section 7.3.1 (system setting, USB connection). |
| The photos are blurry | 1. The camera is not held steadily2. The lens of camera is dirty | 1. Hold the camera steadily until it beeps when takes photo.2. Clean the lens with soft dry cloth. |
| Get a warning message: "Capture device was not detected" when trying to open PC cam. | 1. Conflict with another camera or capture device.2. The mode of the camera is not set to PC cam mode properly. | 1. Remove any other camera driver completely from your system. Sometimes you have to re-install your system.2. Set the camera to PC cam mode; refer to section 7.3.2 (system setting, USB connection). |


- GET TO KNOW YOUR CAMERA
- 1.1 FEATURES
- FUNCTIONAL PARTS
- SEE FOLLOWING DETAILS TO SETTING YOUR DIGITAL CAMERA
- EXPLANATION OF THE STATUS ICONS ON THE LCD SCREEN
- USING THE CAMERA
- 5.1 INSTALLING THE BATTERIES
- 5.2 INSERTING A MEMORY CARD (NOT INCLUDED)
- 5.3 SETTING YOUR CAMERA
- 5.4 TAKING PHOTOGRAPHS
- 5.5 ZOOM IN AND OUT
- 5.6 TAKING PHOTOGRAPHS USING SELF-TIMER FUNCTION
- 5.7 RECORDING VIDEO CLIPS
- 5.8 PLAYBACK PHOTOGRAPHS OR VIDEO CLIPS
- 5.9 DELETE PHOTOGRAPHS AND VIDEO CLIPS
- PRESS THE SMILE BUTTON TO SEND OUT "SMILE" SOUND BEFORE TAKING PHOTO
- INSTALLING THE CAMERA DRIVER
- 7.1 UNINSTALLING OLD DRIVERS AND DEVICES
- 7.2 INSTALLING THE DRIVER FOR WINDOWS XP/ WINDOWS VISTA
- 7.3 CONNECTING THE CAMERA
- 7.3.1 CONNECTING AS A MASS STORAGE DEVICE
- 7.3.2 CONNECTING AS A PC CAMERA
Brand : EASYPIX
Model : V130
Category : Camera