
UniFi Video Dome UVC-G3-DOME - Security Camera Ubiquiti Networks - Free user manual and instructions
Find the device manual for free UniFi Video Dome UVC-G3-DOME Ubiquiti Networks in PDF.


| Product Type | Security Camera (Dome) |
| Brand | Ubiquiti Networks |
| Model | UniFi Video Dome UVC-G3-DOME |
| Dimensions | ∅ 132 x 60 mm (∅ 5.20 x 2.36 in) |
| Weight | 260 g (9.17 oz) |
| Sensor | 1/3" 4-Megapixel HDR Sensor |
| Lens | E.F.L 2.8 mm / F2.0 |
| Viewing Angle (Before Correction) | 100.4° (H), 59.1° (V), 117.3° (D) |
| Viewing Angle (After Correction) | 87.8° (H), 55.4° (V), 96.4° (D) |
| Night Vision | IR LEDs with Mechanical ICR Filter |
| Video Resolution | 1080p FHD (1920 x 1080) |
| Maximum Frame Rate | 30 FPS |
| Video Compression | H.264 |
| Microphone | Built-in |
| Processor | Ambarella S2L63 (816 MHz ARM Cortex-A9) |
| Memory | 512 MB DDR3L |
| Network Interface | 1x 10/100 Ethernet Port |
| Power Method | 802.3af PoE / 24V Passive PoE |
| Max. Power Consumption | 4W |
| Power Supply | 802.3af PoE Switch or 24V, 0.5A PoE Adapter |
| Mounting | Wall or Ceiling Mount |
| Operating Temperature | -30 to 70°C (-22 to 158°F) |
| Operating Humidity | 20 to 90% Noncondensing |
| Management Software | UniFi Video v3.2 or later |
| LED Indicator | Steady blue during boot, flashes until adopted, steady blue for 10 min after adoption, then off |
| Reset | Press and hold Reset button for >10 seconds while powered |
Frequently Asked Questions - UniFi Video Dome UVC-G3-DOME Ubiquiti Networks
User questions about UniFi Video Dome UVC-G3-DOME Ubiquiti Networks
0 question about this device. Answer the ones you know or ask your own.
Ask a new question about this device
Download the instructions for your Security Camera in PDF format for free! Find your manual UniFi Video Dome UVC-G3-DOME - Ubiquiti Networks and take your electronic device back in hand. On this page are published all the documents necessary for the use of your device. UniFi Video Dome UVC-G3-DOME by Ubiquiti Networks.
USER MANUAL UniFi Video Dome UVC-G3-DOME Ubiquiti Networks
Introduction
Thank you for purchasing the Ubiquiti Networks® UniFi® Video Camera G3 Dome. This Quick Start Guide is designed to guide you through installation and includes warranty terms.
Package Contents


G3 Dome Camera Mounting Bracket Ceiling Backing Plate
Flat Head Screws (M3x50, Qty. 4)

Keps Nuts (M3, Qty. 4)

Screws
(M2.9x20, Qty. 4)

Screw Anchors (M3x20, Qty. 4)
PoE Adapter* (24V, 0.5A) with Mount Bracket
Power Cord* Quick Start Guide

* Only the single-pack of the UVC-G3-DOME includes a PoE adapter and a power cord.
TERMS OF USE: All Ethernet cabling runs must use CAT5 (or above). Shielded Ethernet cable and earth grounding must be used for outdoor installations as conditions of product warranty. TOUGHCable™ is designed for outdoor installations. It is the customer's responsibility to follow local country regulations, including operation within legal frequency channels, output power, and Dynamic Frequency Selection (DFS) requirements.
Installation Requirements
• Phillips screwdriver
- Drill and drill bit (6 mm for wall-mounting or 3 mm for ceiling-mounting)
- Optional: Drywall saw or 18 mm keyhole saw
- Cat5/6 cable for indoor installations
Outdoor Installation Requirements

Important: The UVC-G3-DOME may be installed outdoors under an eave or other protected location. Do not install the UVC-G3-DOME in an open environment.
- Mounting location should be at least 60 cm (2 ft) from the edge of the eave or ceiling.
- Cable feed must be pointed downwards when wall-mounted.
- Shielded Category 5 (or above) cabling should be used for all outdoor wired Ethernet connections and should be grounded through the AC ground of the PoE.
We recommend that you protect your networks from harmful outdoor environments and destructive ESD events with industrial-grade, shielded Ethernet cable from Ubiquiti Networks. For more details, visit www.ubnt.com/toughcable
Hardware Overview
Bottom View

Cable Gland For outdoor installations, ensure the rubber Cable Gland is installed for added protection.

Security Slot If you need to remove the UniFi Video Camera from the Mounting Bracket, insert a paper clip in the Security Slot to release the Lock Tab and turn the UniFi Video Camera counterclockwise.
Ports
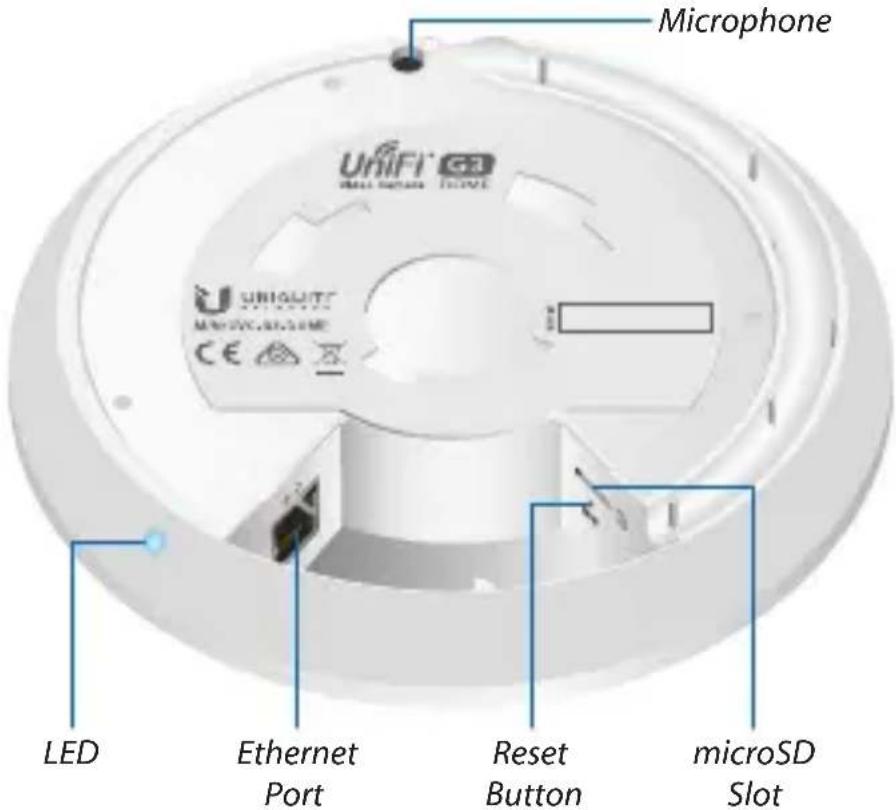
LED The LED will light steady blue during bootup. After bootup, the LED will flash until the camera is adopted by the NVR. Upon adoption the LED will light steady blue for 10 minutes and then turn off.
Ethernet The Ethernet port is a 10/100 Ethernet port used to connect the power and should be connected to the LAN and DHCP server.
Reset To reset to factory defaults, press and hold the Reset button for more than 10 seconds while the camera is already powered on.
microSD Reserved for future use.
Hardware Installation
The UniFi Video Camera can be mounted on the wall or ceiling. The Ethernet cable can be fed through a hole in the wall/ceiling or can be run along the wall/ceiling.
Wall Mount
- Position the Mounting Bracket at the desired location on the wall with the Arrow pointing up.
- Mark the four mounting holes, and use a 6 mm drill bit to drill the holes.
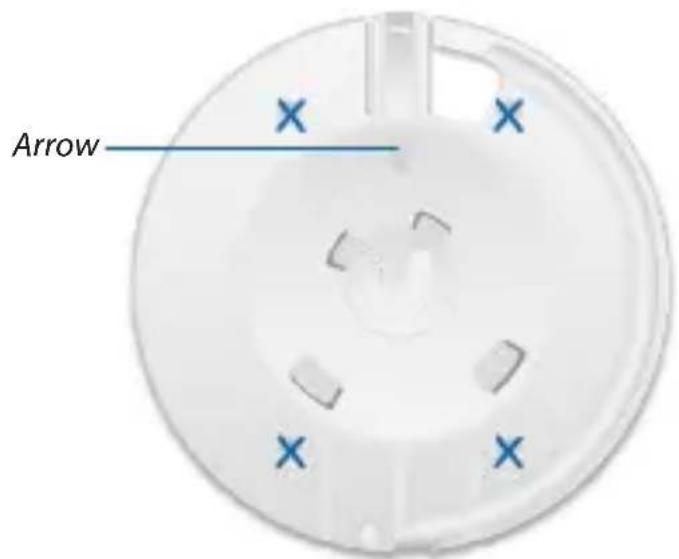
- If your Ethernet cable feeds through the wall, cut or drill a circle approximately 18 mm in diameter (as shown below). Then feed the CAT5/6 cable through the hole.
Optional 18 mm Hole for Ethernet Cable Feed through the Wall

- Insert the Screw Anchors into the 6 mm holes. Secure the Mounting Bracket to the wall by inserting the Screws into the anchors.

- Remove the Cable Gland from the UniFi Video Camera.


Note: For indoor installations, use of the Cable Gland is optional.
- Feed the Ethernet cable through the cable opening on the Cable Gland.


Note: The feed hole will stretch to accommodate the RJ45 connector, and then seal around the cable.
- Connect the Ethernet cable to the Ethernet port.


640-00211-04
- Replace the Cable Gland.
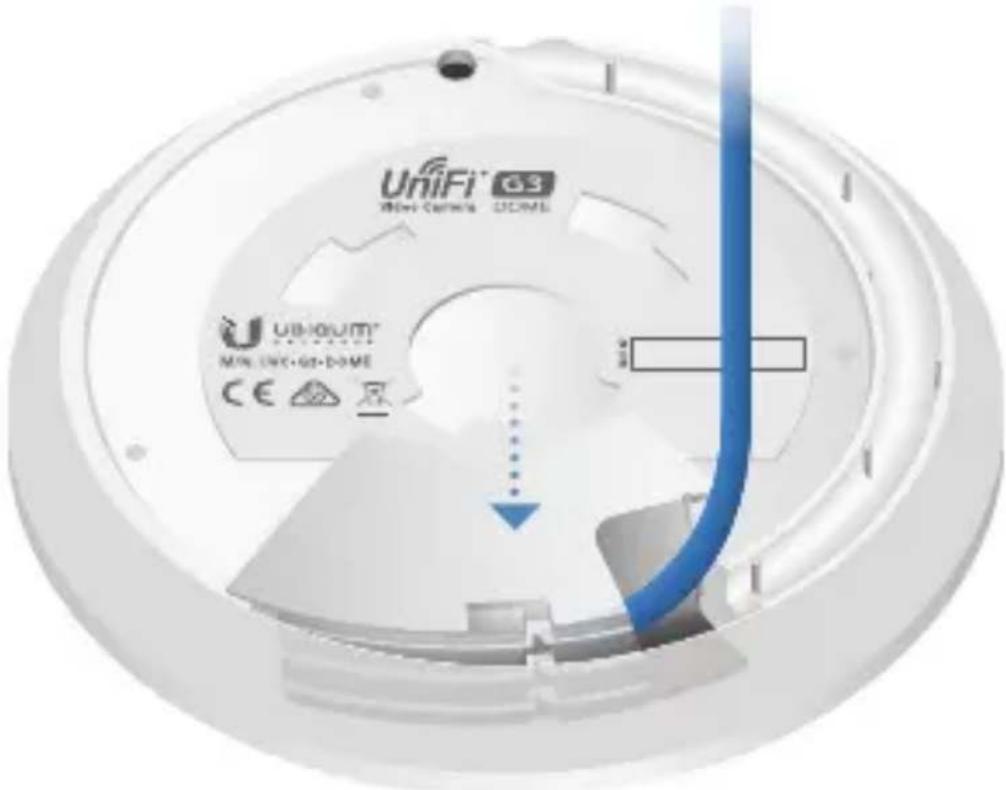
- If the Ethernet cable is fed through the wall, skip to step 10. If the Ethernet cable runs along the mounting surface, route the cable inside the cable channel.

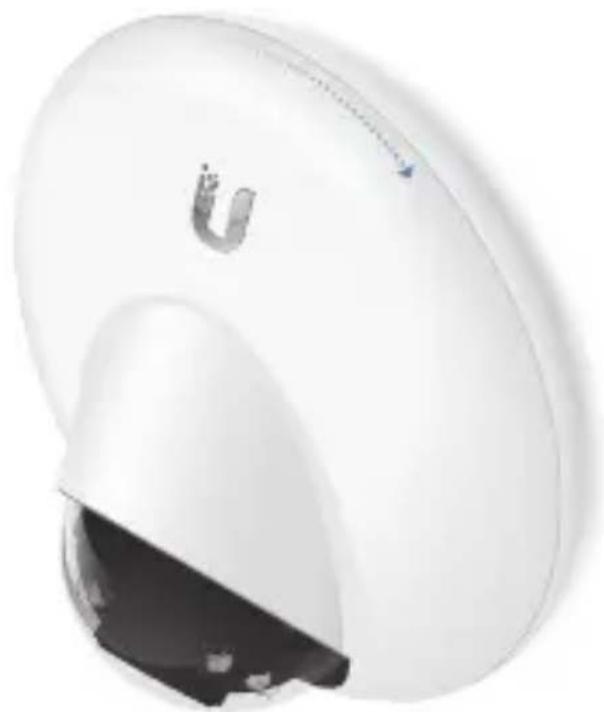
- Align the four tabs on the Mounting Bracket with the four slots on the bottom of the camera.
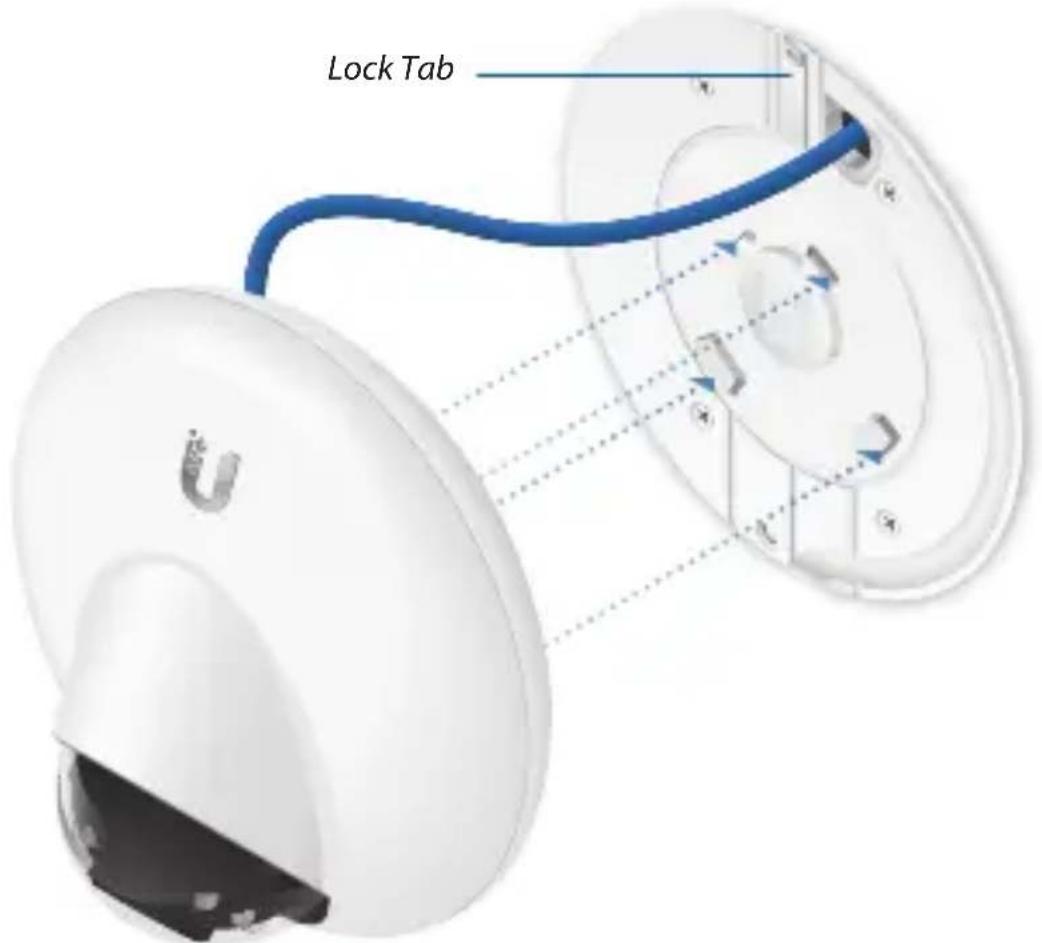
- Rotate the camera clockwise until the tabs lock into place and the Lock Tab engages.
Ceiling Mount
-
Remove the ceiling tile.
-
Center the Mounting Bracket on the front side of the ceiling tile and rotate the bracket to the desired direction of the camera view. Mark the four mounting screw holes and an 18 mm hole for the Ethernet cable feed.
18 mm Hole for Ethernet Cable Feed
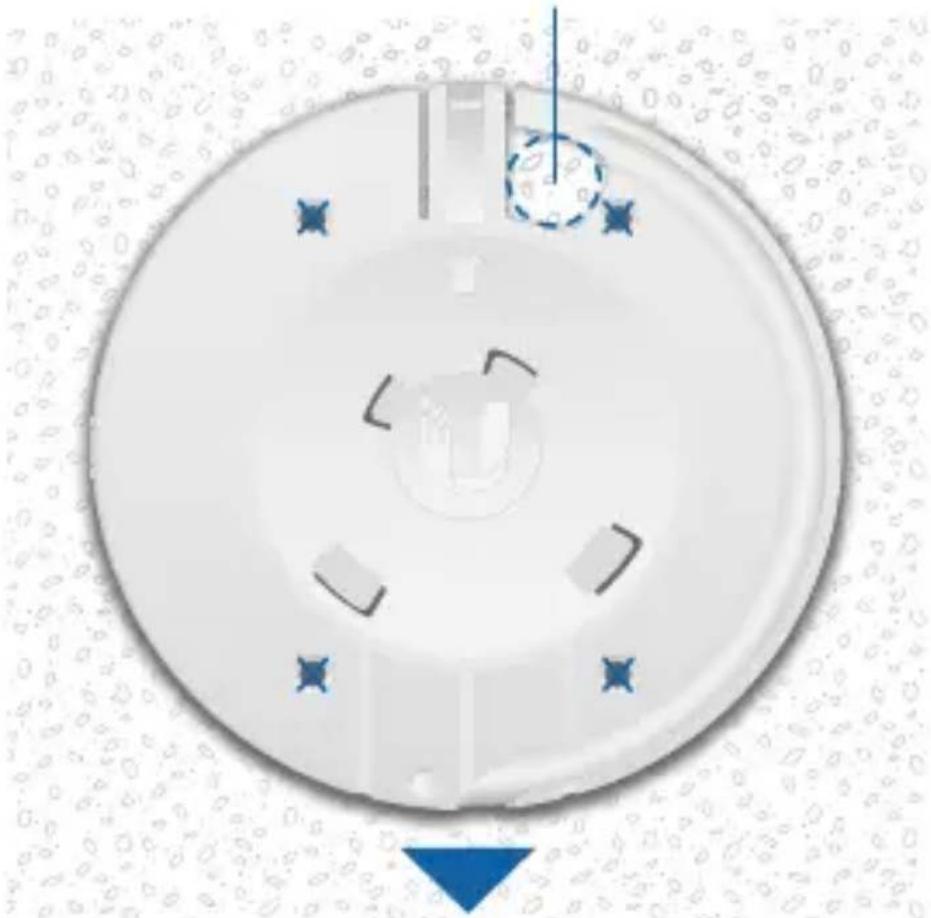
Direction of Camera View
-
Use a 3 mm drill bit to drill the screw holes, and cut or drill the hole for the Ethernet cable feed.
-
Insert the Flat Head Screws through the Mounting Bracket, ceiling tile, and Ceiling Backing Plate. Fasten the screws using the Keps Nuts. Then feed the Ethernet cable through the tile and bracket.

- Remove the Cable Gland from the UniFi Video Camera.
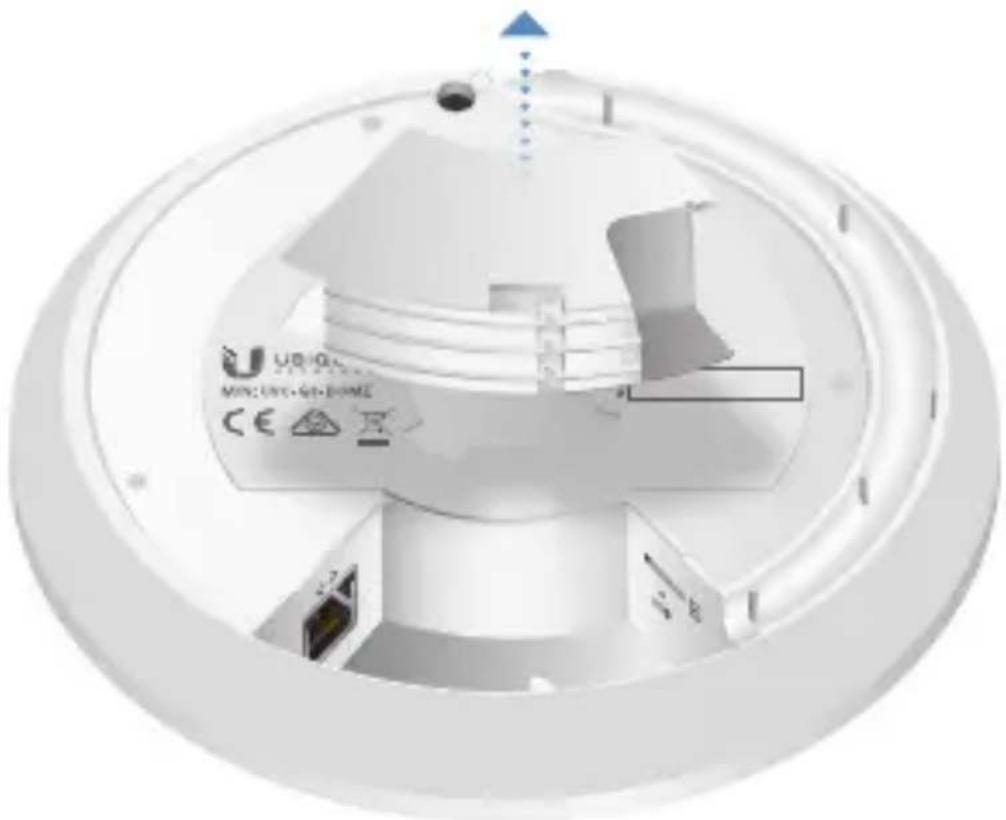

Note: For indoor installations, use of the Cable Gland is optional.
- Feed the Ethernet cable through the cable opening on the Cable Gland.


Note: The feed hole will stretch to accommodate the RJ45 connector, and then seal around the cable.
- Connect the Ethernet cable to the Ethernet port.

- Replace the Cable Gland.

- Align the four tabs on the Mounting Bracket with the four slots on the bottom of the camera.

- Rotate the camera clockwise until the tabs lock into place and the Lock Tab engages.

- Set the ceiling tile back into place.
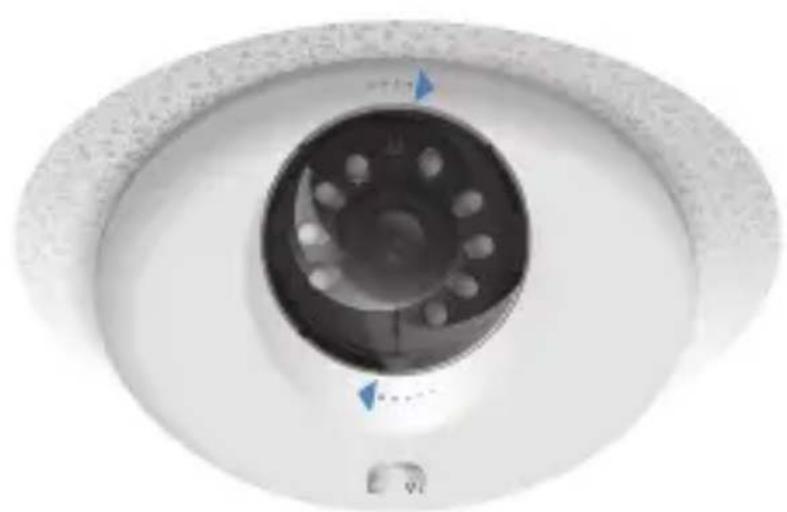
Adjusting the Camera Angle
- Press down on the Lens Cover and rotate it 10° counterclockwise to disengage it.


Note: The O-ring creates a tight seal between the Lens Cover and the camera body. Rotate the Lens Cover with your hand to break the seal. Do not use any tools.
- Pivot the Lens Cover away from the camera body and remove it.


Note: Remove the Protective Film from the Lens Cover after camera adjustments are completed to prevent damage during installation.
- Rotate the camera body toward the desired view.

- Tilt and rotate the camera lens assembly to set the desired view angle.

- Replace the Lens Cover by aligning the two small rib tabs on the cover with the two slots on the camera body.
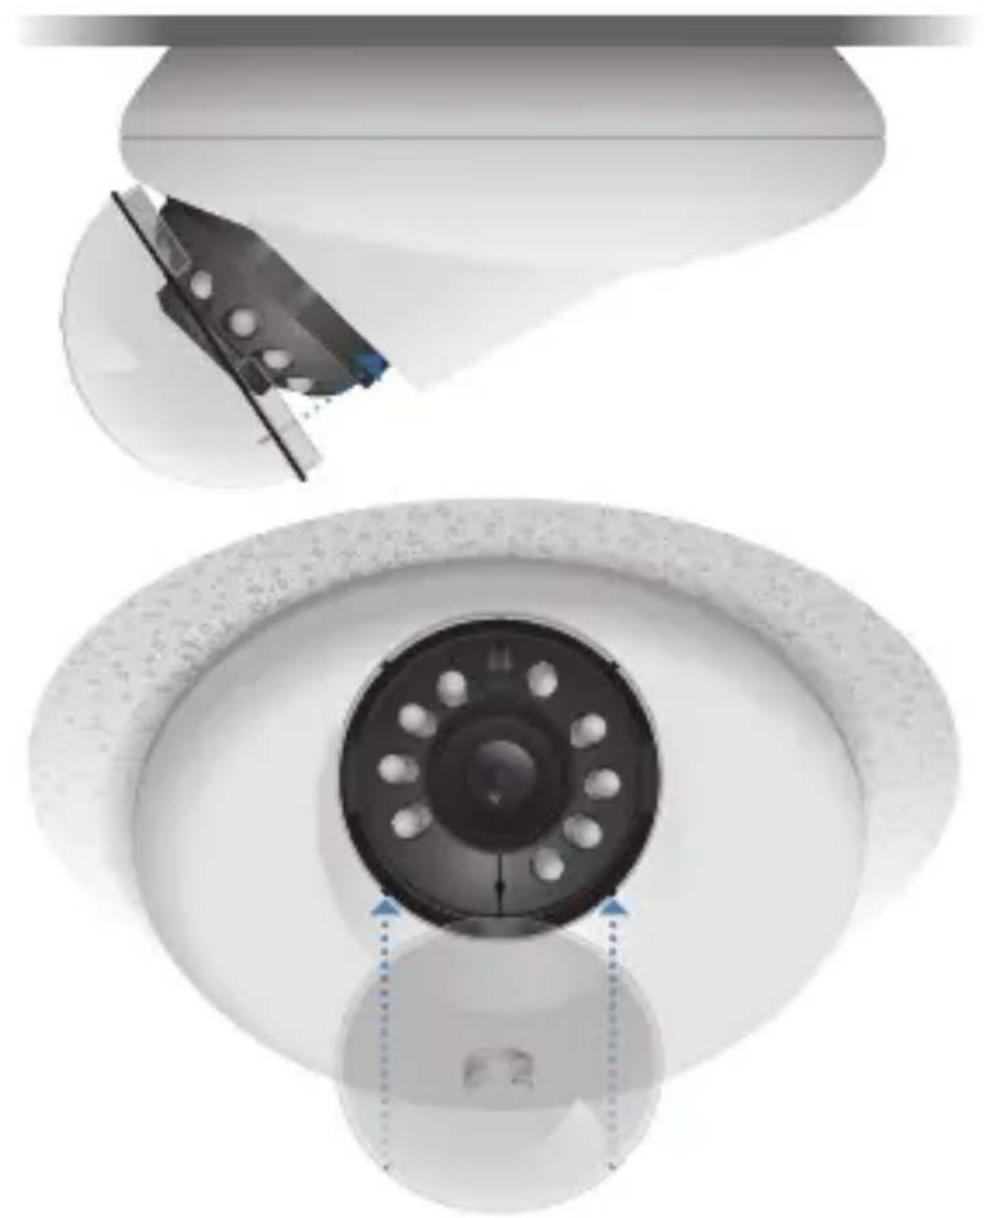
- Ensure the Lens Cover is evenly seated, and then push down and rotate the cover 10° clockwise to lock it in place.
Powering the UniFi Video Camera
The UVC-G3-DOME features auto-sensing 802.3af PoE and can be powered by any of the following:
• Ubiquiti Networks UniFi Switch
• 802.3af PoE compliant switch
• Ubiquiti Networks PoE Adapter (24V, 0.5A)
The single-pack of the UVC-G3-DOME includes one PoE adapter. For multi-pack units, PoE adapters or a UniFi Switch may be purchased separately.
Connecting to a PoE Switch
Connect the Ethernet cable from the UniFi Video Camera directly to a PoE port on the switch.

Connecting to a PoE Adapter
- Connect the Ethernet cable from the UniFi Video Camera to the POE port of the PoE Adapter.
- Connect an Ethernet cable from your LAN to the LAN port of the PoE Adapter.
- Connect the Power Cord to the adapter, and then plug the Power Cord into a power outlet.

Mounting the PoE Adapter (Optional)
- Remove the PoE Mounting Bracket from the adapter, place the bracket at the desired location, and mark the two holes.
- Pre-drill the holes if necessary, and secure the bracket using two fasteners (not included).
- Align the slots on the adapter with the tabs of the PoE Mounting Bracket, and then slide the adapter down.

UniFi Video
Ensure that you are running UniFi Video software version 3.2 or newer. The latest version of the UniFi Video software is available at downloads.ubnt.com/unifivideo
The UniFi Video auto-management feature should automatically detect your new camera(s). To manage the camera, perform the following steps:
- Click the Unmanaged tab.

- Click the camera row.

- The Camera Details window will appear on the right side of the screen. Enter ubnt in the Username and Password fields and click Manage.

The camera will appear in the Managed cameras list.
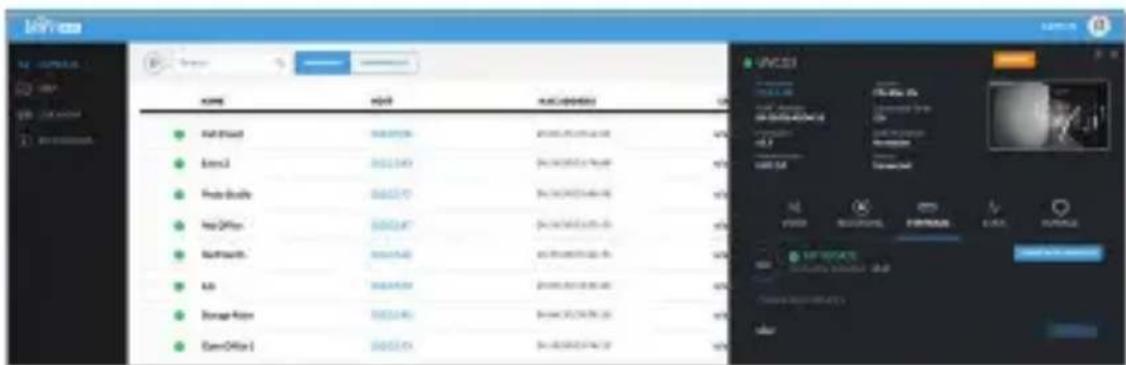

Note: You may need to update the firmware from the Firmware tab to complete the camera installation.
UniFi Video App

The UniFi Video mobile app is available for free in the App Store for iOS devices and Google Play for Android-based devices.

Specifications
| UVC-G3-DOME | |
| Dimensions | ∅ 132 x 60 mm(∅ 5.20 x 2.36") |
| Weight | 260 g (9.17 oz) |
| Sensor 1/3" 4-Megapixel HDR Sensor | |
| Lens E.F.L 2.8mm / F2.0 | |
| Viewing AngleBefore Lens CorrectionAfter Lens Correction | 100.4° (H), 59.1° (V), 117.3° (D)87.8° (H), 55.4° (V), 96.4° (D) |
| Night Mode IR LEDs with Mechanical ICR Filter | |
| Video Compression H.264 | |
| Resolution 1080p FHD (1920 x 1080) | |
| Maximum Frame Rate 30 FPS | |
| Image Settings Brightness, Contrast, Sharpness, Saturation,Noise Reduction, 50/60 Hz | |
| Microphone | Yes |
| Processor Ambarella S2L63 (816 MHz ARM Cortex-A9) | |
| Memory Information 512 MB DDR3L | |
| Management Interface UniFi Video v3.2 | |
| Networking Interface (1) 10/100 Ethernet Port | |
| Max. Power Consumption 4W | |
| Power Method 802.3af PoE / 24V Passive PoE | |
| Power Supply 802.3af PoE Switch / 24V, 0.5A PoE Adapter | |
| Supported Voltage 24V to 48V | |
| Mounting Wall/Ceiling Mount | |
| Operating Temperature | -30 to 70°C(-22 to 158°F) |
| Operating Humidity | 20 to 90% Noncondensing |
Safety Notices
- Read, follow, and keep these instructions.
- Heed all warnings.
- Only use attachments/accessories specified by the manufacturer.

WARNING: Hot Surface. Do not touch.

WARNING: Do not use this product in location that can be submerged by water.

WARNING: Avoid using this product during an electrical storm. There may be a remote risk of electric shock from lightning.
Electrical Safety Information
- Compliance is required with respect to voltage, frequency, and current requirements indicated on the manufacturer's label. Connection to a different power source than those specified may result in improper operation, damage to the equipment or pose a fire hazard if the limitations are not followed.
- There are no operator serviceable parts inside this equipment. Service should be provided only by a qualified service technician.
- This equipment is provided with a detachable power cord which has an integral safety ground wire intended for connection to a grounded safety outlet.
a. Do not substitute the power cord with one that is not the provided approved type. Never use an adapter plug to connect to a 2-wire outlet as this will defeat the continuity of the grounding wire.
b. The equipment requires the use of the ground wire as a part of the safety certification, modification or misuse can provide a shock hazard that can result in serious injury or death.
c. Contact a qualified electrician or the manufacturer if there are questions about the installation prior to connecting the equipment.
d. Protective earthing is provided by Listed AC adapter. Building installation shall provide appropriate short-circuit backup protection.
e. Protective bonding must be installed in accordance with local national wiring rules and regulations.
Limited Warranty
UBIQUITI NETWORKS, Inc ("UBIQUITI NETWORKS") warrants that the product(s) furnished hereunder (the "Product(s)") shall be free from defects in material and workmanship for a period of one (1) year from the date of shipment by UBIQUITI NETWORKS under normal use and operation. UBIQUITI NETWORKS' sole and exclusive obligation and liability under the foregoing warranty shall be for UBIQUITI NETWORKS, at its discretion, to repair or replace any Product that fails to conform to the above warranty during the above warranty period. The expense of removal and reinstallation of any Product is not included in this warranty. The warranty period of any repaired or replaced Product shall not extend beyond its original term.
Warranty Conditions
The above warranty does not apply if the Product:
(I) has been modified and/or altered, or an addition made thereto, except by Ubiquiti Networks, or Ubiquiti Networks' authorized representatives, or as approved by Ubiquiti Networks in writing;
(II) has been painted, rebranded or physically modified in any way;
(III) has been damaged due to errors or defects in cabling;
(IV) has been subjected to misuse, abuse, negligence, abnormal physical, electromagnetic or electrical stress, including lightning strikes, or accident;
(V) has been damaged or impaired as a result of using third party firmware;
(VI) has no original Ubiquiti MAC label, or is missing any other original Ubiquiti label(s); or
(VII) has not been received by Ubiquiti within 30 days of issuance of the RMA.
In addition, the above warranty shall apply only if: the product has been properly installed and used at all times in accordance, and in all material respects, with the applicable Product documentation; all Ethernet cabling runs use CAT5 (or above), and for outdoor installations, shielded Ethernet cabling is used, and for indoor installations, indoor cabling requirements are followed.
Returns
No Products will be accepted for replacement or repair without obtaining a Return Materials Authorization (RMA) number from UBIQUITI NETWORKS during the warranty period, and the Products being received at UBIQUITI NETWORKS' facility freight prepaid in accordance with the RMA process of UBIQUITI NETWORKS. Products returned without an RMA number will not be processed and will be returned freight collect or subject to disposal. Information on the RMA process and obtaining an RMA number can be found at: www.ubnt.com/support/warranty.
Disclaimer
EXCEPT FOR ANY EXPRESS WARRANTIES PROVIDED HEREIN, UBIQUITI NETWORKS, ITS AFFILIATES, AND ITS AND THEIR THIRD PARTY DATA, SERVICE, SOFTWARE AND HARDWARE PROVIDERS HEREBY DISCLAIM AND MAKE NO OTHER REPRESENTATION OR WARRANTY OF ANY KIND, EXPRESS, IMPLIED OR STATUTORY, INCLUDING, BUT NOT LIMITED TO, REPRESENTATIONS, GUARANTEES, OR WARRANTIES OF MERCHANTABILITY, ACCURACY, QUALITY OF SERVICE OR RESULTS, AVAILABILITY, SATISFACTORY QUALITY, LACK OF VIRUSES, QUIET ENJOYMENT, FITNESS FOR A PARTICULAR PURPOSE AND NON-INFRINGEMENT AND ANY WARRANTIES ARISING FROM ANY COURSE OF DEALING, USAGE OR TRADE PRACTICE IN CONNECTION WITH SUCH PRODUCTS AND SERVICES. BUYER ACKNOWLEDGES THAT NEITHER UBIQUITI NETWORKS NOR ITS THIRD PARTY PROVIDERS CONTROL BUYER'S EQUIPMENT OR THE TRANSFER OF DATA OVER COMMUNICATIONS FACILITIES, INCLUDING THE INTERNET, AND THAT THE PRODUCTS AND SERVICES MAY BE SUBJECT TO LIMITATIONS, INTERRUPTIONS, DELAYS, CANCELLATIONS AND OTHER PROBLEMS INHERENT IN THE USE OF COMMUNICATIONS FACILITIES. UBIQUITI NETWORKS, ITS AFFILIATES AND ITS AND THEIR THIRD PARTY PROVIDERS ARE NOT RESPONSIBLE FOR ANY INTERRUPTIONS, DELAYS, CANCELLATIONS, DELIVERY FAILURES, DATA LOSS, CONTENT CORRUPTION, PACKET LOSS, OR OTHER DAMAGE RESULTING FROM ANY OF THE FOREGOING. In addition, UBIQUITI NETWORKS does not warrant that the operation of the Products will be error-free or that operation will be uninterrupted. In no event shall UBIQUITI NETWORKS be responsible for damages or claims of any nature or description relating to system performance, including coverage, buyer's selection of products (including the Products) for buyer's application and/or failure of products (including the Products) to meet government or regulatory requirements.
Limitation of Liability
EXCEPT TO THE EXTENT PROHIBITED BY LOCAL LAW, IN NO EVENT WILL UBIQUITI OR ITS SUBSIDIARIES, AFFILIATES OR SUPPLIERS BE LIABLE FOR DIRECT, SPECIAL, INCIDENTAL, CONSEQUENTIAL OR OTHER DAMAGES (INCLUDING LOST PROFIT, LOST DATA, OR DOWNTIME COSTS), ARISING OUT OF THE USE, INABILITY TO USE, OR THE RESULTS OF USE OF THE PRODUCT, WHETHER BASED IN WARRANTY, CONTRACT, TORT OR OTHER LEGAL THEORY, AND WHETHER OR NOT ADVISED OF THE POSSIBILITY OF SUCH DAMAGES.
Note
Some countries, states and provinces do not allow exclusions of implied warranties or conditions, so the above exclusion may not apply to you. You may have other rights that vary from country to country, state to state, or province to province. Some countries, states and provinces do not allow the exclusion or limitation of liability for incidental or consequential damages, so the above limitation may not apply to you. EXCEPT TO THE EXTENT ALLOWED BY LOCAL LAW, THESE WARRANTY TERMS DO NOT EXCLUDE, RESTRICT OR MODIFY, AND ARE IN ADDITION TO, THE MANDATORY STATUTORY RIGHTS APPLICABLE TO THE LICENSE OF ANY SOFTWARE (EMBEDDED IN THE PRODUCT) TO YOU. The United Nations Convention on Contracts for the International Sale of Goods shall not apply to any transactions regarding the sale of the Products.
Compliance
FCC
Changes or modifications not expressly approved by the party responsible for compliance could void the user's authority to operate the equipment. This device complies with Part 15 of the FCC Rules. Operation is subject to the following two conditions:
- This device may not cause harmful interference, and
- This device must accept any interference received, including interference that may cause undesired operation.
NOTE: This equipment has been tested and found to comply with the limits for a Class A digital device, pursuant to part 15 of the FCC Rules. These limits are designed to provide reasonable protection against harmful interference when the equipment is operated in a commercial environment. This equipment generates, uses, and can radiate radio frequency energy and, if not installed and used in accordance with the instruction manual, may cause harmful interference to radio communications. Operations of this equipment in a residential area is likely to cause harmful interference in which case the user will be required to correct the interference at his own expense.
Industry Canada
CAN ICES-3(A)/NMB-3(A)
This Class A digital apparatus complies with Canadian ICES-003.
CAN ICES-3(A)/NMB-3(A)
CE marking on this product represents the product is in compliance with all directives that are applicable to it.

RoHS/WEEE Compliance Statement

English
European Directive 2002/96/EC requires that the equipment bearing this symbol on the product and/or its packaging must not be disposed of with unsorted municipal waste. The symbol indicates that this product should be disposed of separately from regular household waste streams. It is your responsibility to dispose of this and other electric and electronic equipment via designated collection facilities appointed by the government or local authorities. Correct disposal and recycling will help prevent potential negative consequences to the environment and human health. For more detailed information about the disposal of your old equipment, please contact your local authorities, waste disposal service, or the shop where you purchased the product.
Deutsch
Declaration of Conformity
| Česky [Czech] | UBIQUITI NETWORKS tímto prohlašuje, že toto UBIQUITI NETWORKS zařízení, je ve shod se základními požadavky a dalšími příslušnými ustanoveními směrnice 1999/5/ES. |
| Dansk [Danish] | Hermed, UBIQUITI NETWORKS, erklærer at denne UBIQUITI NETWORKS enhed, er i overensstemmelse med de væsentlige krav og øvrige relevante krav i direktiv 1999/5/EF. |
| Nederlands [Dutch] | Hierbij verklaart UBIQUITI NETWORKS, dat deze UBIQUITI NETWORKS apparaat, in overeenstemming is met de essentiële eisen en de andere relevante bepalingen van richtlijn 1999/5/EC. |
| English | Hereby, UBIQUITI NETWORKS, declares that this UBIQUITI NETWORKS device, is in compliance with the essential requirements and other relevant provisions of Directive 1999/5/EC. |
| Eesti [Estonian] | Käesolevaga UBIQUITI NETWORKS kinnitab, et antud UBIQUITI NETWORKS seade, on vastavus olulistele nõuetele ja teistele asjakohastele sätetele direktiivi 1999/5/EÜ. |
| Suomi [Finnish] | Täten UBIQUITI NETWORKS vakuuttaa, että tämä UBIQUITI NETWORKS laite, on yhdenmukainen olennaisten vaatimusten ja muiden sitä koskevien direktiivin 1999/5/EY. |
| Français [French] | Par la présente UBIQUITI NETWORKS déclare que l’appareil UBIQUITI NETWORKS, est conforme aux exigences essentielles et aux autres dispositions pertinentes de la directive 1999/5/CE. |
| Deutsch [German] | Hiermit erklärt UBIQUITI NETWORKS, dass sich dieses UBIQUITI NETWORKS Gerät, in Übereinstimmung mit den grundlegenden Anforderungen und den anderen relevanten Vorschriften der Richtlinie 1999/5/EG befindet. |
| Ελληνική [Greek] | Δια του παρόντος, UBIQUITI NETWORKS, δηλώνει ότι αυτή η συσκευή UBIQUITI NETWORKS, είναι σε συμμόρφωση με τις βασικές απαιτήσεις και τις λοιπές σχετικές διατάξεις της οδηγίας 1995/5/EK. |
| Magyar [Hungarian] | Ezennel UBIQUITI NETWORKS kijelenti, hogy ez a UBIQUITI NETWORKS készülék megfelel az alapvető követelményeknek és más vonatkozó 1999/5/EK irányely rendelkezéseit. |
| Íslenska [Icelandic] | Hér, UBIQUITI NETWORKS, því yfir að þetta UBIQUITI NETWORKS tæki er í samræmi við grunnkröfur og önnur viðeigandi ákvæði tilskipun 1999/5/EC. |
| Italiano [Italian] | Con la presente, UBIQUITI NETWORKS, dichiara che questo dispositivo UBIQUITI NETWORKS, è conforme ai requisiti essenziali ed alle altre disposizioni pertinenti della direttiva 1999/5/CE. |
| Latviski [Latvian] | Ar šo, UBIQUITI NETWORKS, deklarē, ka UBIQUITI NETWORKS ierīce, ir saskaņā ar būtiskajām prasībām un citiem attiecīgiem noteikumiem Direktīvā 1999/5/EK. |
| Lietuviškai[Lithuanian] | UBIQUITI NETWORKS deklaruoja, kad šis UBIQUITI NETWORKS jrenginys atitinka esminius reikalavimus ir kitas 1999/5/EB Direktyvos nuostatas. |
| Malti[Maltese] | Hawnhekk, UBIQUITI NETWORKS, tiddikjara li dan il-mezz UBIQUITI NETWORKS huwa konformi mar-rekwiziti essenzjali u dispožizzjonijiet rilevanti oħrajn ta ‘Direttiva 1999/5/EC. |
| Norsk[Norwegian] | Herved UBIQUITI NETWORKS, erklærer at denne UBIQUITI NETWORKS enheten, er i samsvar med de grunnleggende kravene og andre relevante bestemmelser i direktiv 1999/5/EF. |
| Slovensky[Slovak] | TýmtoUBIQUITI NETWORKS, prehlasuje, že toto UBIQUITI NETWORKS zariadenie, je v súlade so základnými požiadavkami a d’alšími relevantnými ustanoveniami smernice 1999/5/ES. |
| Svenska[Swedish] | Härmed UBIQUITI NETWORKS, intygar att denna UBIQUITI NETWORKS enhet är i överensstämmelse med de väsentliga egenskapskrav och övriga relevanta bestämmelser som framgår av direktiv 1999/5/EG. |
| Español[Spanish] | Por medio de la presente UBIQUITI NETWORKS declara que este dispositivo UBIQUITI NETWORKS, cumple con los requisitos esenciales y cualesquiera otras disposiciones aplicables o exigibles de la Directiva 1999/5/CE. |
| Polski[Polish] | Niniejszym, Ubiquiti Networks, oświadcza, že urządzenie UBIQUITI NETWORKS, jest zgodny z zasadniczymi wymaganiami oraz pozostałymi stosownymi postanowieniami Dyrektywy 1999/5/EC. |
| Português[Portuguese] | UBIQUITI NETWORKS declara que este dispositivo UBIQUITI NETWORKS, está conforme com os requisitos essenciais e outras disposições da Directiva 1999/5/CE. |
| Română[Romanian] | Prin prezenta, UBIQUITI NETWORKS declară că acest dispozitiv UBIQUITI NETWORKS este în conformitate cu cerințele esențiale și alte prevederi relevante ale Directivei 1999/5/CE. |
Online Resources
Support support.ubnt.com
Community community.ubnt.com
Downloads downloads.ubnt.com

www.ubnt.com


- INTRODUCTION
- PACKAGE CONTENTS
- INSTALLATION REQUIREMENTS
- OUTDOOR INSTALLATION REQUIREMENTS
- HARDWARE OVERVIEW
- BOTTOM VIEW
- PORTS
- HARDWARE INSTALLATION
- WALL MOUNT
- CEILING MOUNT
- ADJUSTING THE CAMERA ANGLE
- POWERING THE UNIFI VIDEO CAMERA
- CONNECTING TO A POE SWITCH
- CONNECTING TO A POE ADAPTER
- MOUNTING THE POE ADAPTER (OPTIONAL)
- UNIFI VIDEO
- UNIFI VIDEO APP
- SAFETY NOTICES
- ELECTRICAL SAFETY INFORMATION
- LIMITED WARRANTY
- WARRANTY CONDITIONS
- RETURNS
- DISCLAIMER
- LIMITATION OF LIABILITY
- NOTE
- COMPLIANCE
- FCC
- INDUSTRY CANADA
- CAN ICES-3(A)/NMB-3(A)
- ROHS/WEEE COMPLIANCE STATEMENT
- ENGLISH
- DEUTSCH
- ONLINE RESOURCES
Brand : Ubiquiti Networks
Model : UniFi Video Dome UVC-G3-DOME
Category : Security Camera