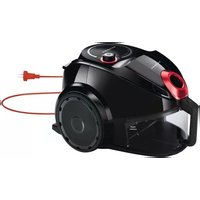
USER MANUAL VC9PT2200 Profilo
GB Operating Instructions
natural_image
Exterior view of a black handheld vacuum cleaner (no visible text or symbols)
7
VC9PT22..
Your vacuum cleaner....30
Replacement parts 31
Initial use 32
Vacuuming 35
When the work is done....38
Filter care 42
Cleaning instructions....47
Disposal 48
Conditions of guarantee 48
de
natural_image
3D rendered object resembling a conical tool or mechanical part, labeled with number 18 in the top-left corner (no other text or symbols)

natural_image
3D rendered image of a T-shaped mechanical component (no text or symbols visible)

natural_image
3D model of a mechanical component with multiple grooves and a base (no text or symbols visible)

natural_image
3D rendered image of a Y-shaped pipe fitting (no text or symbols)
natural_image
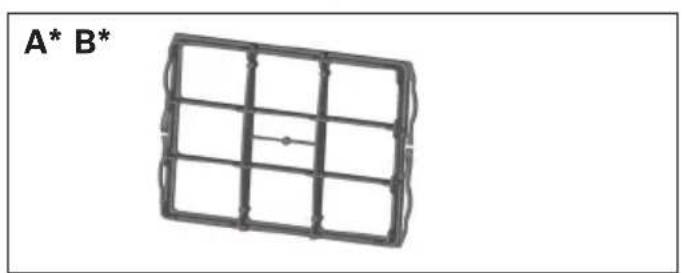
Diagram of a rectangular grid structure with labeled points A* and B* (no text or symbols on the diagram itself)

natural_image
3D rendering of a rectangular electronic device with grid pattern and mounting bracket (no text or symbols)
natural_image
Two metallic cylindrical objects with a downward arrow indicating a process or transformation (no text or symbols)
Resim 2
natural_image
3D rendering of a vacuum cleaner with a handle and lever, showing a black arrow indicating the component (no text or symbols present)
Resim 3
natural_image
3D rendering of a vacuum cleaner's side panel with a black arrow pointing to the exhaust grille (no text or symbols visible)
Resim 5
natural_image
Close-up of a gray vacuum cleaner's handle with a black arrow indicating rotation, accompanied by icons for grid and circuit symbols (no text or labels)
!Dikkat
natural_image
3D rendering of a vacuum cleaner with a pipe attachment, showing mechanical components and a black arrow indicating motion (no text or symbols)
Resim 10
natural_image
Two grayscale images showing a vacuum cleaner with attached hose and handle, plus a close-up of its internal structure (no text or symbols visible)
Resim 11
natural_image
3D rendering of a vacuum cleaner with a rotating arrow indicating motion (no text or symbols)
Resim 14
natural_image
3D rendering of a black vacuum cleaner with attached hose and handle (no text or symbols visible)
natural_image
Close-up of a car's air purifier with a circular inset showing internal components (no text or symbols visible)


natural_image
3D rendered mechanical component with a curved top and flanged base, showing internal structure and an upward arrow (no text or symbols)

natural_image
3D rendered mechanical component with a downward arrow indicating a feature, labeled 'c' in the top-left corner (no other text or symbols)
natural_image
Close-up of a metallic cylindrical pipe with an arrow indicating a specific section (no text or symbols present)
Resim 18
natural_image
Symbol of a trash bin with crossed lines indicating no waste or restriction, accompanied by a solid black rectangle below (no text or symbols)
Please keep this instruction manual. When passing the vacuum cleaner on to a third party, please also pass on this instruction manual.
Intended use
This vacuum cleaner is intended for domestic use and not for commercial use. Only use this vacuum cleaner in accordance with the instructions in this instruction manual. The manufacturer will not accept any responsibility for damage caused by improper use or incorrect operation.
Therefore, please note the following points.
The vacuum cleaner must only be operated with:
■ Original replacement parts, accessories or special accessories
In order to prevent injuries and damage, the vacuum cleaner must not be used for:
■ Vacuum-cleaning persons or animals
■ Vacuuming up:
- insects or spiders.
- hazardous, sharp-edged, hot or glowing substances.
- damp or liquid substances.
- highly flammable or explosive substances and gases.
- ash, soot from tiled stoves and central heating systems.
- toner dust from printers and copiers.
This vacuum cleaner complies with the recognised rules of technology and the relevant safety regulations.
■ The appliance may be used by children over the age of 8 years and by persons with reduced physical, sensory or mental capacity or by persons with a lack of experience or knowledge if they are supervised or have been instructed on the safe use of the appliance and the have understood the potential dangers of using the appliance.
■ Children must never play with the appliance.
■ Cleaning and user maintenance must never be carried out by children without supervision.
■ Plastic bags and films must be kept out of the reach of children before disposal. => Risk of suffocation.
Proper use
■ Only connect and use the vacuum cleaner in accordance with the specifications on the rating plate.
- Never vacuum without the dust bag or dust container, motor protection or exhaust filter. => This may damage the vacuum cleaner.
- Do not vacuum close to the head when using a nozzle and tube. => This could cause injury!
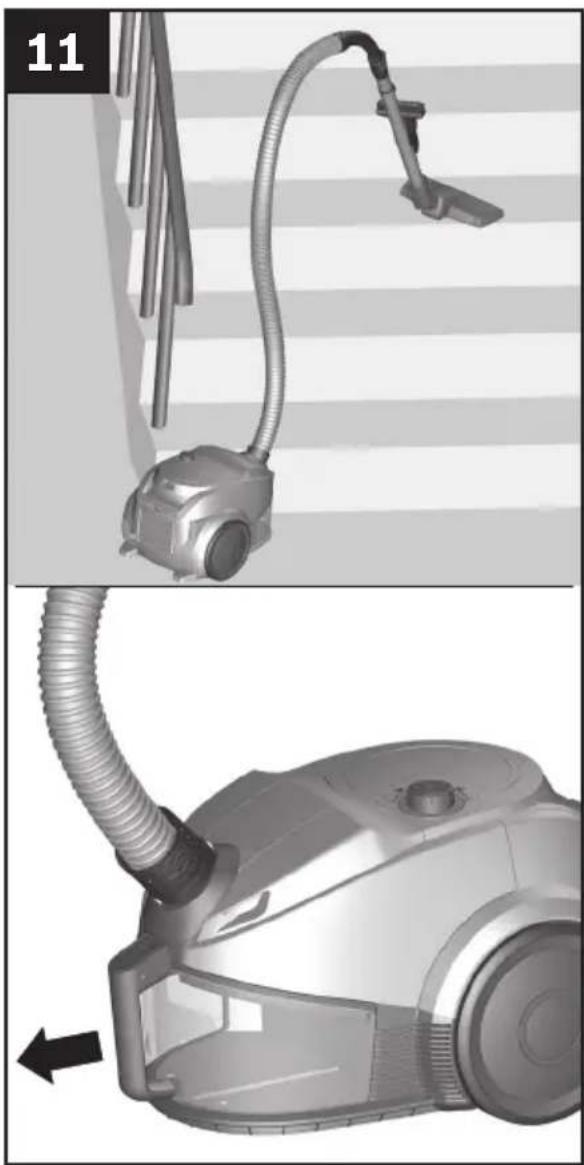
■ When vacuuming stairs, the appliance must always be positioned below the user.
- Do not use the power cord or the hose to carry or transport the vacuum cleaner.
■ For safety reasons, if this appliance's mains power cable becomes damaged, it must be replaced by the manufacturer, their after-sales service department or a similarlyqualified person.
■ Fully extend the power cord when using the vacuum cleaner continuously for several hours.
■ When disconnecting the appliance from the mains, pull on the plug itself to remove it; do not pull on the power cord.
- Do not pull the power cord over sharp edges or allow it to become trapped.
■ Pull out the mains plug before carrying out any work on the vacuum cleaner.
■ Do not operate the vacuum cleaner if it is damaged.
■ Unplug the appliance from the mains if a fault is detected.
■ For safety reasons, only authorised after-sales service personnel are permitted to carry out repairs and fit replacement parts to the vacuum cleaner.
- Protect the vacuum cleaner from the weather, moisture and sources of heat.
- Do not pour flammable substances or substances containing alcohol onto the filters (dust bag, motor protection filter, exhaust filter, etc.).
■ The vacuum cleaner is not suitable for use on construction sites. => Vacuuming up building rubble could damage the appliance.
■ Switch off the appliance when it is not in use.
■ At the end of its life, the appliance should immediately be rendered unusable, then disposed of in an appropriate manner.
! Please note
The mains socket must be protected by at least a 16 amp circuit breaker.
If a circuit breaker is tripped when you switch on the vacuum cleaner, this may be because other electrical appliances which have a high current draw are connected to the same power circuit.
To prevent the circuit breaker from tripping, select the lowest power setting before switching the appliance on, and increase the power only once it is running.
- Packaging
The packaging is designed to protect the vacuum cleaner from being damaged during transportation.
It is made of environmentally friendly materials and can therefore be recycled. Dispose of packaging that is no longer required at an appropriate recycling point.
- Old appliance
Old appliances still contain many valuable materials.
Therefore, please take appliances that have reached the end of their service life to your retailer or recycling centre so that they can be recycled. For current disposal methods, please enquire at a retailer or your local council.
■ Disposal of filters and dust bags
Filters and dust bags are manufactured from environmentally friendly materials. Provided they do not contain substances that are not permitted in household waste, you can dispose of them with your normal household waste.
Your vacuum cleaner en
natural_image
3D rendered object resembling a tapered tool or mechanical part, labeled with number 18 in the top-left corner (no other text or symbols)

natural_image
3D rendered image of a T-shaped mechanical component with flanges and a central shaft (no text or symbols)

natural_image
3D rendered mechanical component with ribbed structure and mounting bracket (no text or symbols)

natural_image
3D rendered mechanical component with two Y-shaped sections (no text or symbols)

natural_image
3D wireframe model of a rectangular grid structure with no text or symbols

natural_image
3D rendering of a rectangular electronic component with grid pattern and mounting bracket (no text or symbols)
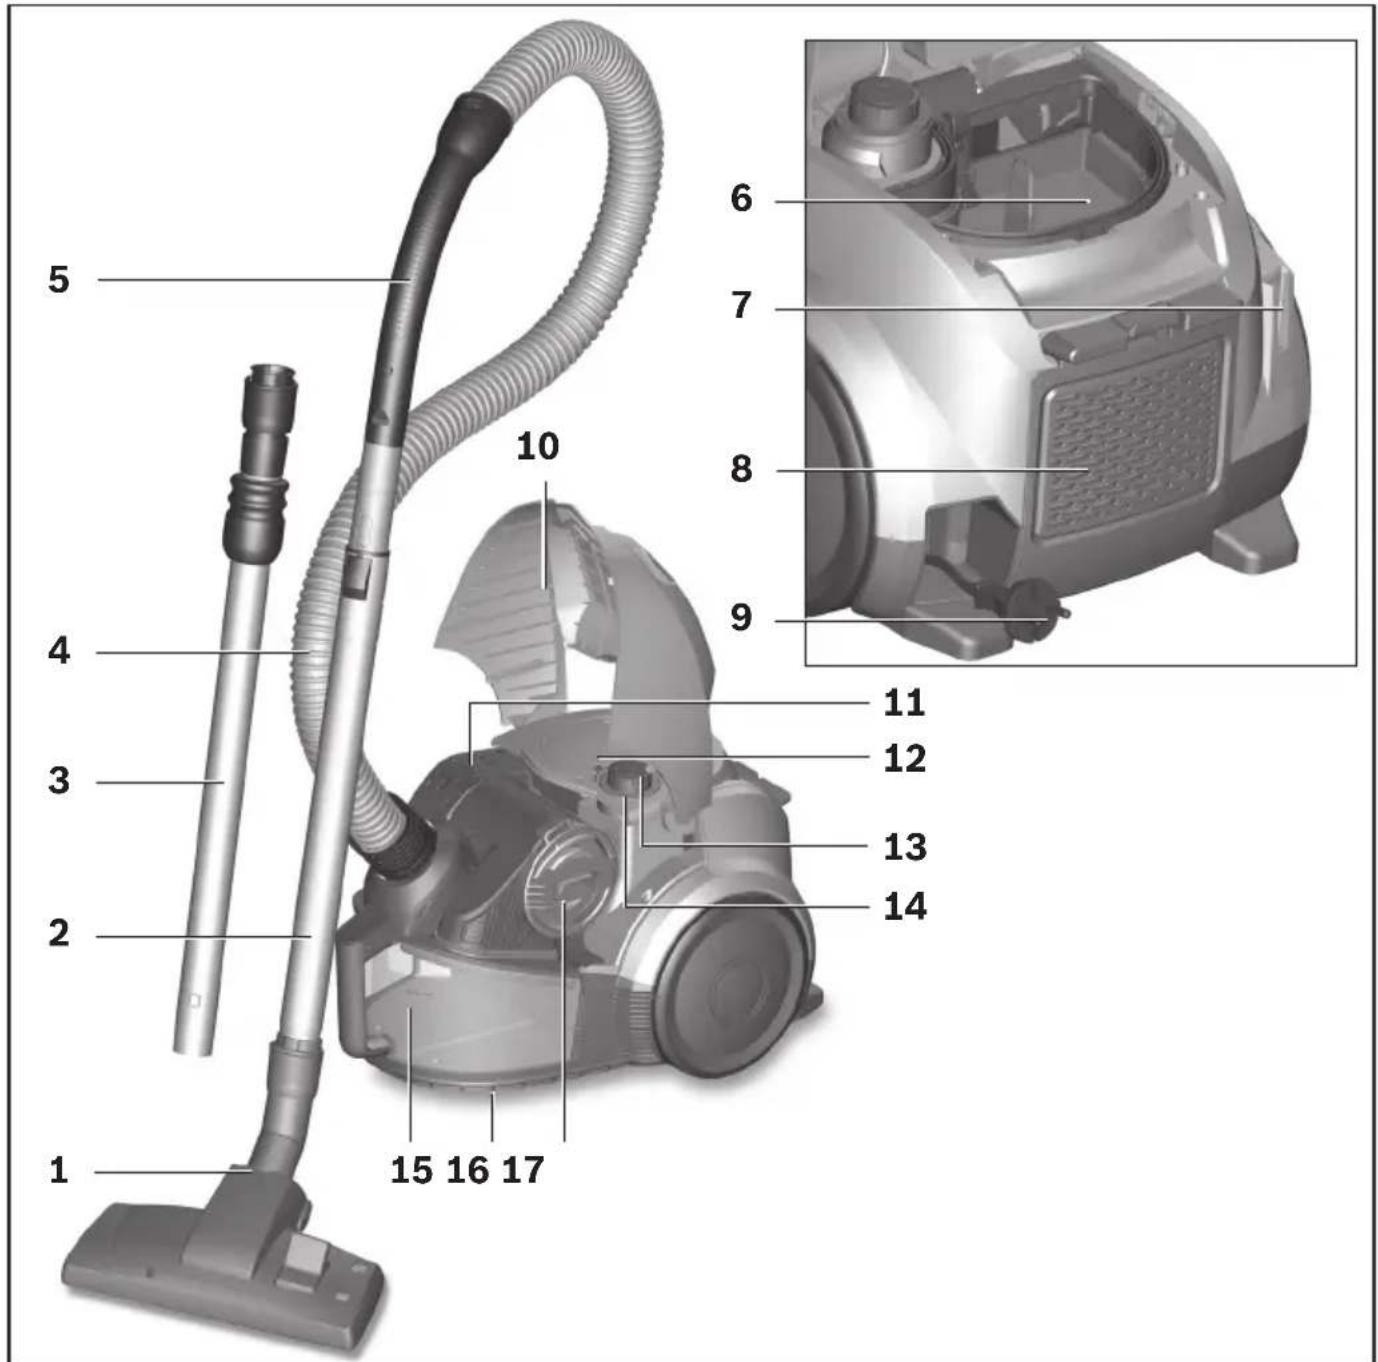
Your vacuum cleaner
en
1 Adjustable floor tool* (For the same functions, the appearance of the nozzle may differ from the picture)
2 Telescopic tube with sliding switch but without accessory connection*
3 Telescopic tube with adjusting sleeve and accessory connection*
4 Flexible hose
5 Handle
6 Motor protection filter
7 Parking aid on the back of the appliance
8 Exhaust filter lid
9 Power cord
10 Appliance lid
11 Tangential filter
12 Motor protection filter lid
13 On/off button with electronic suction regulator
14 Filter control display (sensor control)*
15 Dust container with carrying handle
16 Storage aid on the underside of the appliance
17 Fluff filter cover
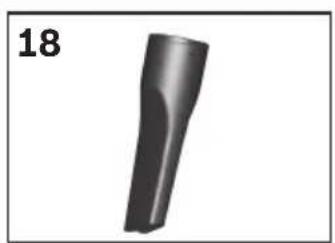
18Crevice nozzle
19 Upholstery nozzle
20 Brush ring (for fitting on the upholstery nozzle)*
21 Hard floor tool*
Replacement parts
A Motor protection filter\* 618 907
Protects the motor in your appliance and thus increases its service life.
B Hepa filter\* 575 386
Additional filter for cleaner exhaust air. Recommended for allergy sufferers.
Replace once a year.
Initial use en
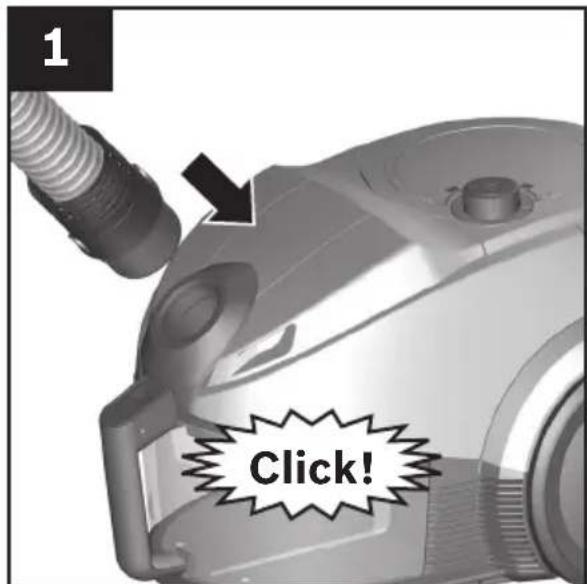
■ Push the flexible hose adapter into the air intake opening on the appliance and lock it in place. You will hear an audible 'click'.
natural_image
Two metallic cylindrical objects with a downward arrow indicating a process or transformation (no text or symbols)
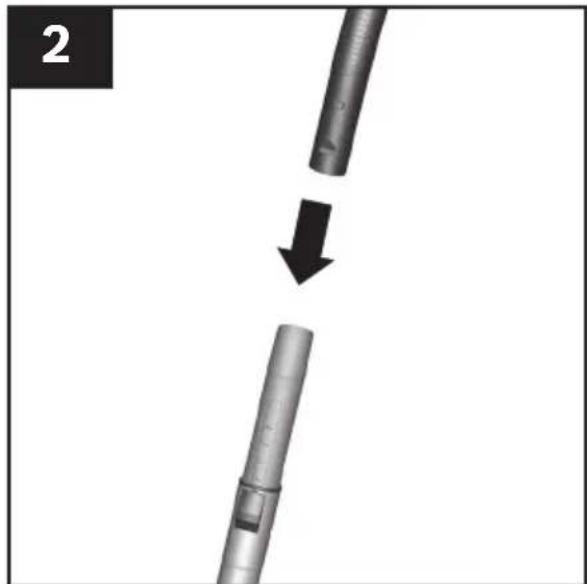
Telescopic tube without accessory connection:
■ Slide the handle into the telescopic tube.

natural_image
3D rendering of a vacuum cleaner with a handle and lever, showing a black arrow indicating the process (no text or symbols present)
Nozzle without accessory connection:
■ Insert the telescopic tube into the adapter on the floor tool.
Initial use en
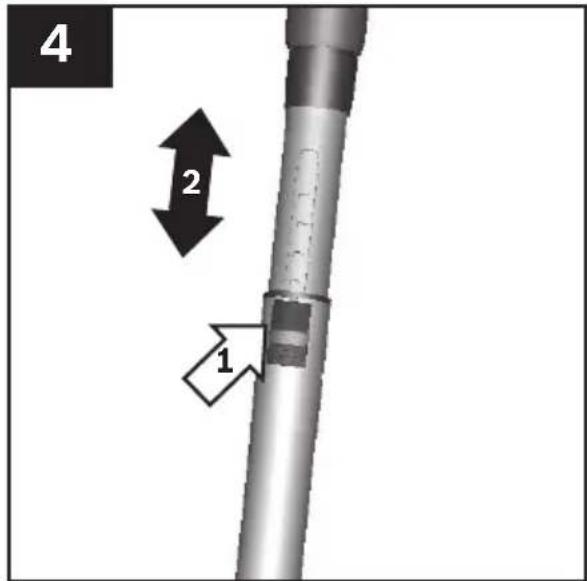
■ Unlock the telescopic tube to adjust its length by moving the sliding switch or adjusting sleeve in the direction of the arrow. The slide resistance on carpets is at its lowest when the telescopic tube has been completely pulled out.

natural_image
3D rendering of a vacuum cleaner with a black arrow pointing to the exhaust grille (no text or symbols visible)
■ Holding the power cord by the plug, pull out to the required length and insert the plug into the mains socket.

■ To switch the vacuum cleaner on or off, press the On/Off button.
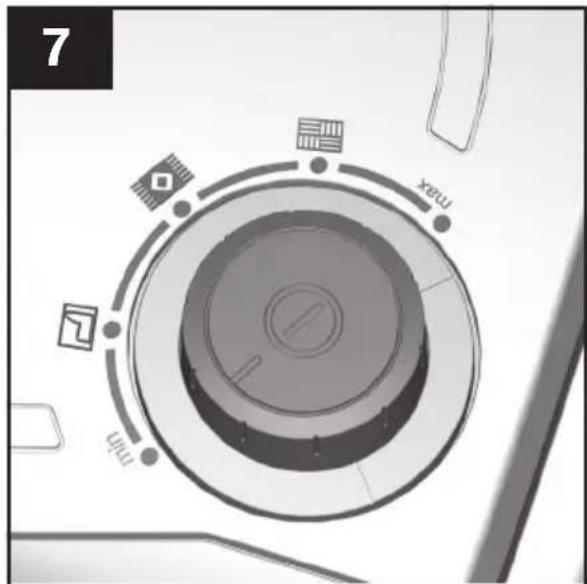
Controlling the suction level
The required suction power can be set to the desired level by turning the infinitely adjustable control knob.
■ Low power range =>

For vacuuming delicate materials, such as delicate upholstery, curtains, etc.
■ Medium power range =>

For daily vacuuming involving low levels of dirt.
■ High power range =>

For vacuuming durable floor coverings, hard floors and surfaces with heavy deposits of dirt.
Vacuuming en

natural_image
Close-up of a gray vacuum cleaner's handle with a curved arrow indicating rotation, accompanied by icons for grid and circuit symbols (no text or labels)
!N.B.
Floor tools are subject to a certain amount of wear, depending on the type of hard floors you have (e.g. rough, rustic tiles). Therefore, you must check the underside of the floor tool at regular intervals. Worn undersides of floor tools may have sharp edges that can damage sensitive hard floors, such as parquet or linoleum. The manufacturer does not accept any responsibility for damage caused by worn floor tools.
Setting the adjustable floor tool:
■ Rugs and carpets =>
■ Hard floors/parquet =>

If you are vacuuming up larger particles, make sure that you vacuum them up successively and carefully to ensure that the vacuum channels of the floor tool do not become blocked.
If necessary, you should raise the nozzle in order to better vacuum up the dirt particles.
Vacuuming en

Vacuuming with accessories
Attach the nozzles to the suction pipe or handle as required:
a) Crevice nozzle for vacuuming crevices and corners, etc.
b) Upholstery nozzle for vacuuming upholstered furniture, curtains, etc.
c) Upholstery nozzle with fixed brush ring for vacuuming window frames, cupboards, profiles, etc.
After use, insert the crevice nozzle and upholstery nozzle back into the accessories holder.
Vacuuming en

natural_image
3D rendering of a vacuum cleaner with a pipe fitting, showing mechanical components and a black arrow indicating assembly (no text or symbols)
You can use the parking aid on the back of the vacuum cleaner if you wish to stop vacuuming for a short time.
■ After switching off the appliance, slide the hook on the floor tool into the parking aid.
natural_image
Two grayscale images showing a vacuum cleaner with coiled tubing and a close-up of its internal structure (no text or symbols visible)
When vacuuming stairs, the appliance must be positioned at the bottom of the stairs. If it does not reach far enough, the appliance can also be carried using the carrying handle or the handle on the dust container.
When the work is done en

■ Switch off the appliance.
■ Pull out the mains plug.
■ Briefly pull on the power cord and then let go. (The power cord retracts automatically).

■ Unlock the telescopic tube by moving the sliding switch in the direction of the arrow and slide one tube into the other.

natural_image
Two-step illustration of a vacuum cleaner with internal components and airflow direction arrows (no text or symbols)
To store the appliance, use the storage aid on the underside.
a) Stand the appliance up by the hose or the dust container handle.
b) Slide the hook on the floor tool into the storage aid.
* Dependent on model
When the work is done en

natural_image
Close-up of a car's engine compartment with a circular inset showing internal components (no text or symbols visible)

natural_image
3D rendered mechanical component with a black arrow indicating upward motion (no text or symbols)

natural_image
3D rendered image of a mechanical device with a black arrow pointing to a component (no text or symbols visible)
Emptying the dust container
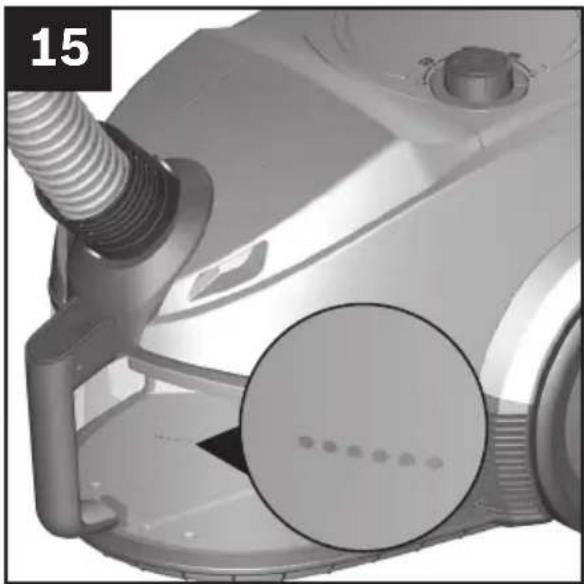
In order to achieve the best possible vacuuming results, the dust container should be emptied after every use or, at the latest, when dust at one point in the container has reached the height of the marking.
!N.B.
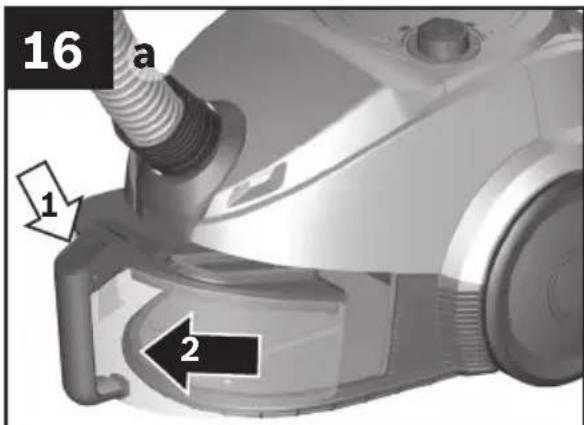
The dust container can only be removed when the appliance is in a horizontal position. Therefore, place the appliance on the floor to unlock the release button.
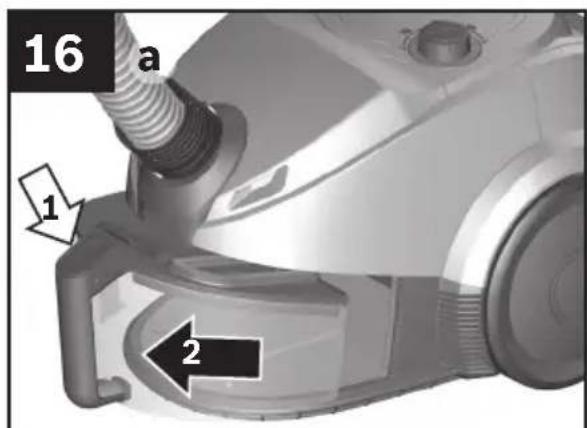
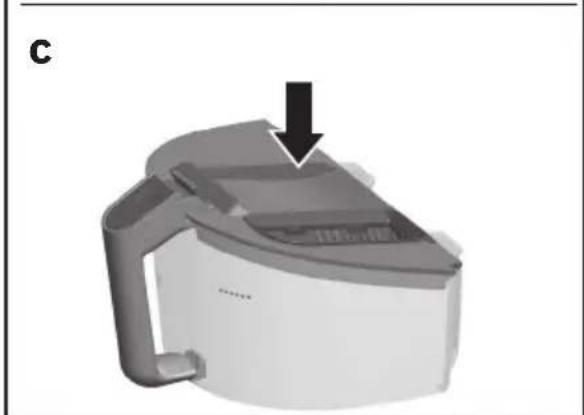
a) Press the release button and pull the dust container out of the appliance using the handle.
b) Remove the lid from the dust container and empty the dust container.
c) Put the lid back on the dust container.
When the work is done en
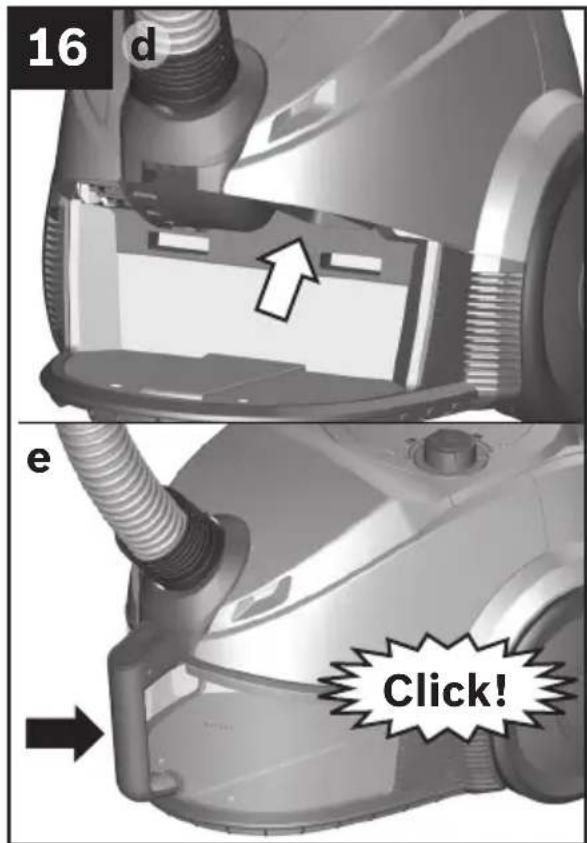
d) Remove any dirt which may have been lodged underneath the container ejector opening.
e) Insert the dust container in the appliance, so that it 'clicks' audibly into place.

Removal
■ To remove the flexible hose, press the two catches together and pull the hose out of the air intake opening of the appliance.

natural_image
Close-up of a metallic cylindrical pipe with an arrow indicating a process or movement, labeled '18' in the corner (no other text or symbols)
Telescopic tube without accessory connection:
■ To release the connection, turn the handle slightly and pull it out of the telescopic tube.
When the work is done en

natural_image
3D rendering of a vacuum cleaner with an arrow indicating motion (no text or symbols)
Nozzle without accessory connection:
■ To release the connection, turn the telescopic tube slightly and pull it out of the floor tool.
Filter care\*
If your appliance is equipped with a filter control, it constantly monitors whether your vacuum cleaner is reaching its optimum power level.
Otherwise, when the suction power noticeably reduces, you should carry out the following cleaning steps, if required.
Filter control display\*

The display (blue ring) flashes red when the motor protection filter needs to be cleaned. The appliance is automatically adjusted to the lowest power setting.

Cleaning the motor protection filter
Please switch off the appliance before cleaning the motor protection filter.
a) Open the lid of the motor protection filter by pulling on the locking lever.
b) Remove the motor protection filter with the aid of the filter handle.
c) Clean the motor protection filter by tapping out the dirt.
d) If it is very dirty, the motor protection filter should be rinsed. To do this, remove the foam filter out of the filter frame. Then allow the filter to dry completely.
e) After cleaning the motor protection filter, reinsert it into the appliance and close the lid of the motor protection filter.
! N.B.
The lid can only be closed when a filter has been inserted.
If, after cleaning the motor protection filter, the control display is still flashing red, please check whether the nozzle, suction pipe or flexible hose are blocked. This can also trigger the filter control display.
Cleaning the fluff filter
If the control display continues to flash red, despite the nozzle, pipe and hose being clear, the fluff filter needs to be cleaned.
Please switch off the appliance before cleaning the fluff filter.
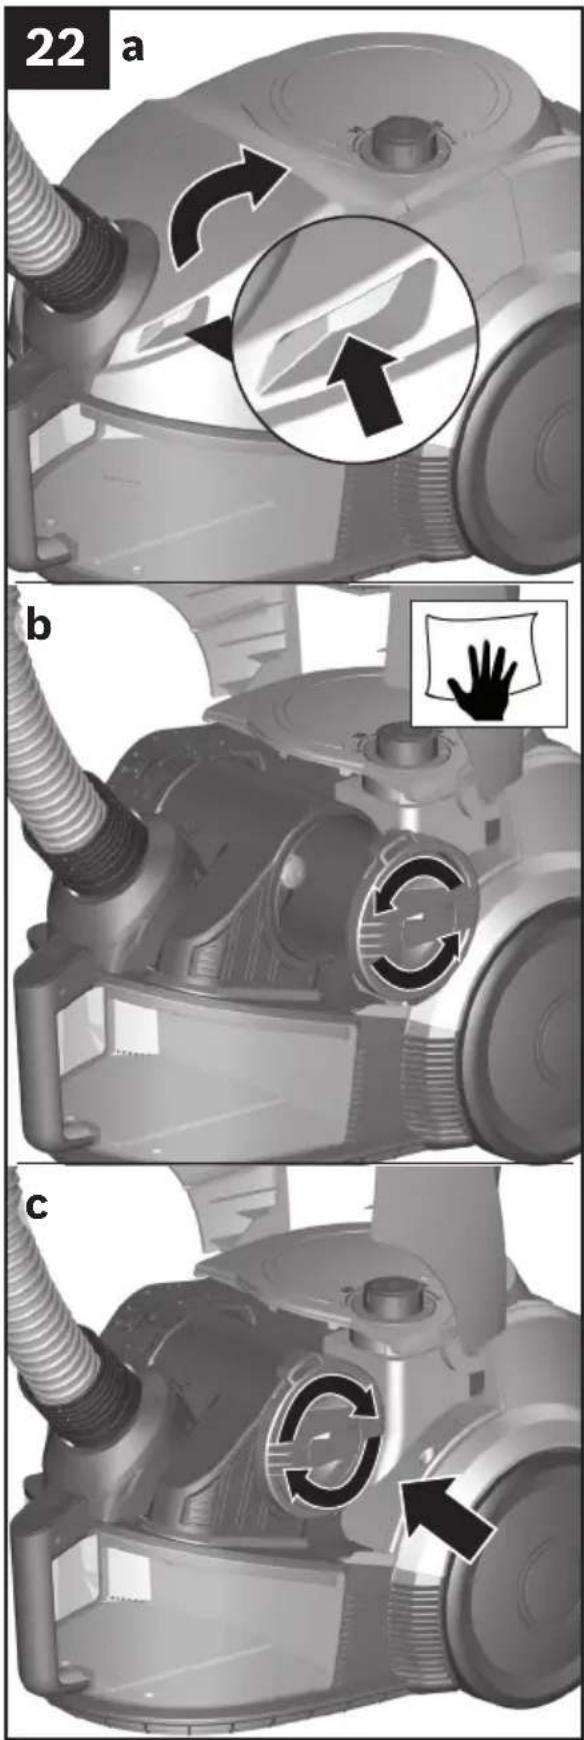
a) Hold the appliance lid by the recessed handle and open it.
b) Unlock the cover by turning it anti-clockwise and remove it from the appliance.
■ Clean the fluff filter by wiping it.
! N.B.: If dirt is protruding from the dust container or large dirt particles are in front of the fluff filter, please remove them.
c) Put the cover back on and lock it in place by turning it clockwise.
■ Close the appliance lid.
Exhaust filter (HEPA filter)\*
You can determine with which exhaust filter your appliance is equipped by looking at the imprint on the filter frame next to the reference number:
"washable" - washable
The filter can be cleaned.
Without this additional printing the filter must be replaced.
Filter care en

Cleaning washable HEPA filters\*
The HEPA filter is designed so that it does not need to be replaced if the appliance is used as intended for household cleaning.
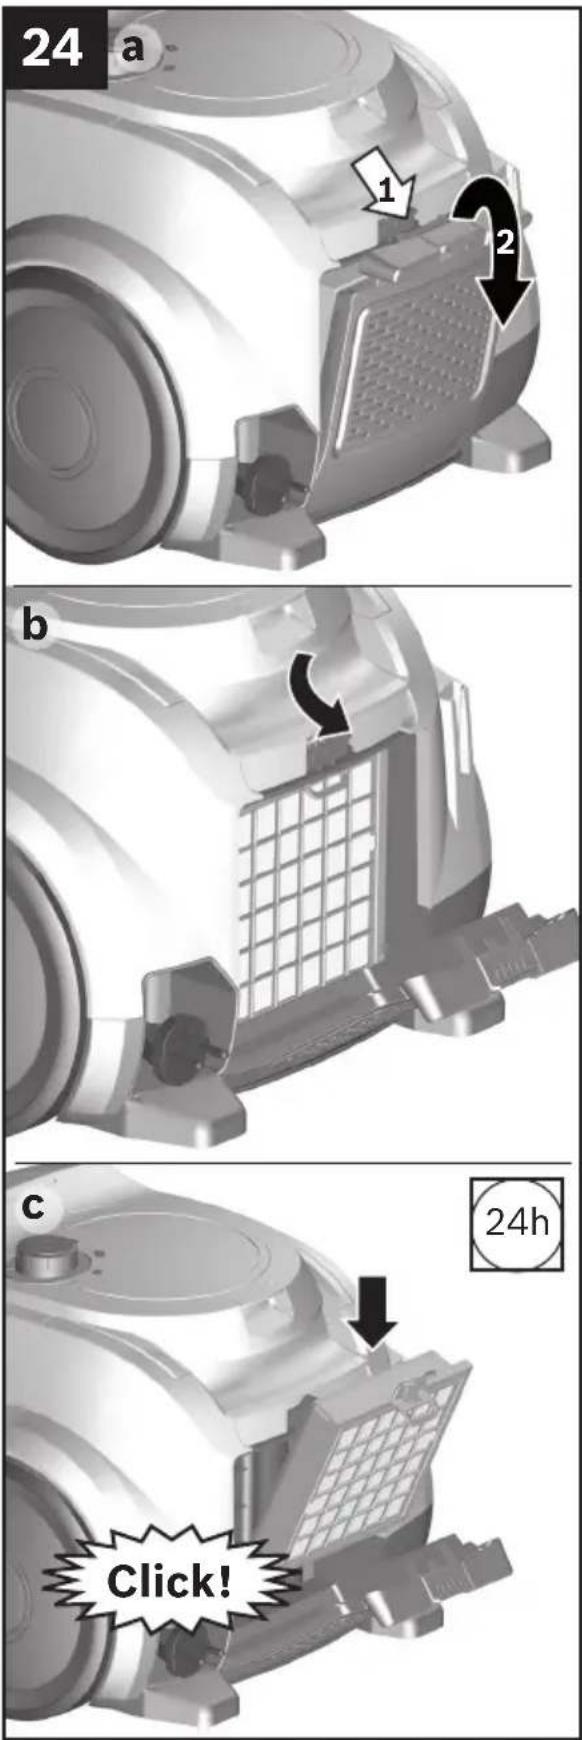
To ensure that the vacuum cleaner is working at its optimum power level, the exhaust filter should be rinsed after a year. The filtering action of the filter remains intact, even if the filter surface becomes discoloured.
a) Open the lid of the exhaust filter by pressing and pulling on the locking tab.
b) Unlock the HEPA filter and remove it from the appliance.
c) Tap out the filter unit and rinse it under running water.
d) Once the HEPA filter has dried completely (min. 24 hrs), insert it into the appliance and lock it in place.
■ Close the exhaust filter lid. Push the lock bolt upwards until you hear it click in place.
Filter care en
Replacing the HEPA filter
To ensure that the vacuum cleaner can work at its optimum power level, the HEPA filter should be replaced after one year.
a) Hold the appliance lid by the recessed handle and open it.
b) Unlock the HEPA filter and remove it from the appliance.
c) Insert the new HEPA filter into the appliance and lock it in place.
■ Close the exhaust filter lid. Push the lock bolt upwards until you hear it click in place.
Filter care en
Cleaning the tangential filter
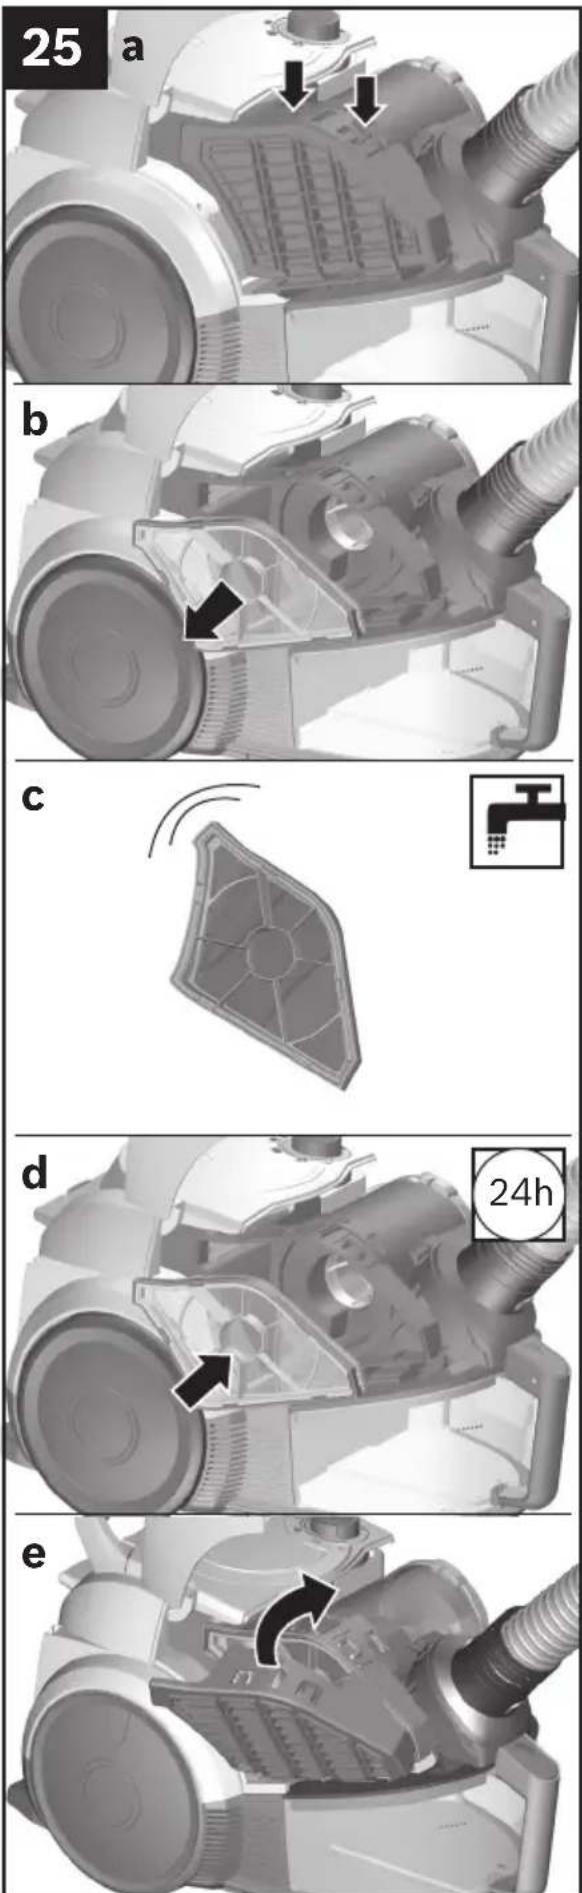
The tangential filter is designed so that it does not need to be cleaned, provided the appliance is used as intended in the household.
Hold the appliance lid by the recessed handle and open it.
a) Release the filter lid mounting brackets, using a screw driver for example, and remove the filter lid.
b) Remove the tangential filter from the appliance.
c) Tap out the filter and rinse it under running water.
d) Once the filter has dried completely (min. 24 hrs), insert it into the appliance.
e) Put the filter lid in place and lock it in position with the tabs.
■ Close the appliance lid.
Cleaning instructions en
Cleaning instructions
Always switch off the vacuum cleaner and disconnect the power cord from the mains before cleaning the vacuum cleaner. The vacuum cleaner and plastic accessories can be cleaned with a commercial plastic cleaner.
! N.B. Do not use a scourer, glass-cleaning agent or multi-purpose cleaning product. Never immerse the vacuum cleaner in water.
Subject to technical modifications.

natural_image
Symbol of a trash bin crossed with two diagonal lines, no text or numbers present
This appliance is labelled in accordance with European Directive 2012/19/EU concerning used electrical and electronic appliances (waste electrical and electronic equipment - WEEE). The guideline determines the framework for the return and recycling of used appliances as applicable throughout the EU.
Conditions of guarantee
For this appliance the guarantee conditions as set out by our representatives in the country of sale apply. Details regarding same may be obtained from the dealer from whom the appliance was purchased. For claims under guarantee the sales receipt must be produced.
natural_image
3D rendered image of a conical object with a pointed tip, labeled '18' in the top-left corner (no other text or symbols)

natural_image
3D rendered image of a T-shaped mechanical component with no visible text or symbols

natural_image
3D rendered mechanical component with ribbed structure and mounting bracket (no text or symbols)

natural_image
3D rendered Y-shaped pipe fitting with textured surface (no text or symbols)

natural_image
Diagram of a rectangular grid structure with labeled points A* and B* (no text or symbols on the diagram itself)

natural_image
3D rendering of a rectangular grid device with mounting bracket (no text or symbols)
natural_image
Close-up of a mechanical component being cut with a black arrow indicating direction (no text or symbols)
Bild 2
natural_image
3D rendering of a vacuum cleaner with a handle and lever, showing a black arrow indicating the component (no text or symbols present)
Bild 3
natural_image
3D rendering of a vacuum cleaner's side panel with a black arrow pointing to the exhaust grille (no text or symbols visible)
Bild 5
natural_image
Close-up of a gray vacuum cleaner's handle with a black arrow indicating rotation, accompanied by icons for grid and circuit symbols (no text or labels)
!Achtung
natural_image
3D rendering of a vacuum cleaner with a pipe attachment, showing mechanical components and a black arrow indicating motion (no text or symbols)
Bild 10
natural_image
Two grayscale images showing a vacuum cleaner with attached tubing, one being opened and the other closed (no text or symbols visible)
Bild 11
natural_image
3D rendering of a mechanical device with a circular component and threaded shaft, showing rotational motion indicated by an arrow (no text or symbols)
Bild 14
natural_image
3D rendering of a black vacuum cleaner with attached hose and lever (no text or symbols visible)
Nach der Arbeit de
natural_image
Close-up of a car's air purifier with attached hose and control panel (no visible text or symbols)

natural_image
3D rendered mechanical component with a highlighted top section and an arrow indicating upward motion (no text or symbols)
natural_image
3D rendered mechanical component with a downward arrow indicating a feature, labeled 'c' in the top-left corner (no text or symbols on the object itself)
natural_image
Close-up of a metallic cylindrical pipe with an arrow indicating a movement or force, labeled '18' in the corner (no other text or symbols)
Bild 18
natural_image
3D rendering of a vacuum cleaner with an arrow indicating motion (no text or symbols)
Bild 19
natural_image
Symbol of a trash bin crossed with two diagonal lines, no text or numbers present
natural_image
Simple black silhouette of a human figure inside a rounded square frame (no text or symbols)
Uzman Personel
natural_image
Icon of a hand washing a faucet with a stopper (no text or symbols)
Temiz Hizmet
natural_image
Simple line icon of a computer mouse inside a square frame (no text or symbols)
On-Line İzleme
natural_image
Simple line drawing of a hand giving a thumbs-up gesture (no text or symbols)
natural_image
Silhouette of a delivery truck inside a square frame (no text or symbols)
natural_image
Simple black-and-white icon of a warning light with radiating lines, enclosed in a rounded square frame (no text or symbols)
natural_image
Simple analog clock face with hour and minute hands (no numbers or text)