
Goldtouch Travel Go!2 - Keyboard R-Go Tools - Free user manual and instructions
Find the device manual for free Goldtouch Travel Go!2 R-Go Tools in PDF.


| Product Type | Adjustable ergonomic wireless keyboard |
| Brand | R-Go Tools (Goldtouch) |
| Model | Goldtouch Travel Go!2 (also known as Goldtouch Go! or SWK-4210BT) |
| Connectivity | Bluetooth (compatible with Bluetooth 2.0+ devices) |
| Compatible Operating Systems | Windows XP SP2+, Vista, 7, 8, 10; Mac OS X 10.4+; iOS 4.2.1+; Android 2.3+ (some restrictions) |
| Adjustability | 30° horizontal and 30° vertical split adjustment |
| Power Source | Rechargeable Li-ion battery (internal, not user-replaceable) |
| Charging Time | 2-3 hours to fully charge from empty |
| Battery Life | Over 10 years under normal operating conditions |
| Operating Distance | Up to 10 meters (may vary with adapter or environment) |
| Key Layout | Full-size with integrated numeric keypad (121 keys including F1-F100, but actual count not specified) |
| Special Features | Split design for ergonomic typing, Bluetooth pairing for PC/Mac/Android/iOS, power saving sleep mode |
| Indicators | Red LED: charging; Green LED: full charge/blinking during pairing; Red blinking: low battery |
| Maintenance & Cleaning | Wipe with a soft, dry cloth; avoid liquids; do not use abrasive cleaners |
| Safety Precautions | Keep away from moisture and heat; do not disassemble; use only supplied USB cable for charging |
| Part Numbers | GTP-0055W (keyboard only), GTP-0055W-D (with Bluetooth dongle) |
Frequently Asked Questions - Goldtouch Travel Go!2 R-Go Tools
User questions about Goldtouch Travel Go!2 R-Go Tools
0 question about this device. Answer the ones you know or ask your own.
Ask a new question about this device
Download the instructions for your Keyboard in PDF format for free! Find your manual Goldtouch Travel Go!2 - R-Go Tools and take your electronic device back in hand. On this page are published all the documents necessary for the use of your device. Goldtouch Travel Go!2 by R-Go Tools.
USER MANUAL Goldtouch Travel Go!2 R-Go Tools
How to change between Apple and PC modes
Your Bluetooth Go! Keyboard will automatically switch between Apple and PC modes during the pairing process. The key combination outlines on page 2 switches the keyboard mode, and places the keyboard into pairing mode.
Device Support
As mobile devices continue to expand in the marketplace, the Bluetooth Go! will endeavor to support all possible devices through compliance with hardware and wireless standards.
Various devices also provide different pairing processes that should be followed using the steps provided by the device manufacturer.
To obtain support, download guides, and to learn about additional ergonomic and mobile ergonomic products from goldtouch, please visit our website at:
www.goldtouch.com.

Windows XP SP2+ Windows Vista, 7 Windows Mobile Windows Phone
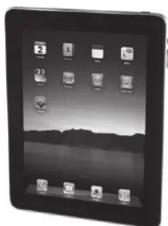
Mac OS X 10.4+ iPad w/ iOS 4.2.1+ iPhone iOS 4.2.1+

Google Android 2.3+ * Due to the open source nature of this OS, Goldtouch cannot warrant support for all Android devices.
Goldtouch
www.goldtouch.com
CEFC


Bluetooth
GOLDTOUCH Go!

natural_image
Illustration of a vintage computer keyboard and its open case, no text or symbols visible on the main components.User Manual
This manual will provide you with instructions on how to properly pair your wireless keyboard with Bluetooth devices, charge your Goldtouch Go!, and how to properly adjust your Bluetooth Mobile Keyboard.
Thank you for joining the (r)evolution in ergonomic mobile computing.
The Goldtouch Bluetooth Go! Mobile Keyboard provides you the convenience of a rechargeable, wireless keyboard, and the comfort of individualized fit, anywhere you go, no matter what mobile device you use. There are no batteries required, as the Bluetooth Go! provides a fully rechargeable battery with over 10 years of potential battery life under normal operating conditions.
The Goldtouch Go! retains its signature 30^0 horizontal and vertical adjustability, enhanced by new Bluetooth wireless technology.
Let's face it, the mobile user relies more and more on portable devices with touchscreen keyboard or tiny keys, but these are simply not practical for performing lengthy and complex typing tasks.
© 2012 Keyovation, LLC. All rights reserved. Goldtouch, the Goldtouch logo and Productivity through Prevention® are registered trademarks of Key Ovation, LLC


How to pair your Bluetooth Go! with your device
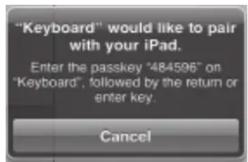
During the pairing process, you will be prompted to type a key sequence to secure the connection between your Go! Keyboard and your device or PC. Follow the instructions on the screen to complete the pairing process.
Bluetooth Pairing with PC
- Turn on the power using the power switch on the keyboard.
- Press Ctrl, left Alt, left Shift and Up arrow ▲ keys simultaneously.
- Release the Up arrow key first, and then release the other keys.
- Green LED light will be blinking.
- Engage your PC's "Add Bluetooth Device" wizard.
- Follow the Bluetooth device wizard process for your PC.
- Type the code presented on the screen into your Go! Keyboard and press Enter.
- LED will be turned off after successful pairing or time out failure.
- Wait for the "Installing Device Drivers" to complete before proceeding.
Bluetooth Pairing with MAC
- Turn on the power using the power switch on the keyboard.
- Press Ctrl, left Alt, left Shift and Down arrow ▼ keys simultaneously.
- Release the Down arrow Key first, and then release the other keys.
- Green LED light will be blinking.
- Follow the Bluetooth device addition process for MAC operating system.
- Type the code presented on the screen into your Go! Keyboard and press Enter.
- LED will be turned off after successful pairing or time out failure.

Darker shaded keys represent pairing in PC mode. Lighter shaded keys represent pairing in Mac mode.
Pressing these key combinations simultaneously changes the keyboard to Mac or PC mode and puts the keyboard into pairing mode.
Note: for Android users only - Follow the instructions provided above for pairing with a Mac device, then use these supplemental instructions. The PIN must be typed on BOTH the Go! Keyboard AND the Android device. First type in "0000" or "1234" on your device and press Enter, then type "0000" or "1234" on the keyboard and press Enter.
Microsoft AppleWebKit


Windows 7 - Putting the keyboard into pairing mode does not pair the keyboard with my PC.
Putting the keyboard in pairing mode alone does not cause your PC to detect a new Bluetooth device, you must first configure your PC to detect the new Bluetooth Device.
- Check to see if your radio receiver status is on and functioning correctly. Do not use the Optional Bluetooth Dongle adaptor if your computer or laptop already has a Bluetooth Receiver.
Note: If your computer has integrated Bluetooth and it is turned on when you go to your Task Bar you see the Bluetooth Devices icon
-
If you don't see this icon on the task bar, then your radio receiver is likely turned off or your computer does not have Bluetooth integrated in your computer. If you previously had Bluetooth devices connected to you device then you probably DO have native Bluetooth Support. In this case, using the Optional USB Bluetooth adapter will interfere with your system's native support. If your system has integrated Bluetooth, and it is turned on, you should see the BT icon on your Taskbar along the bottom of your screen. There is usually a slider switch on the front or side of the laptop.
-
If your computer does have integrated Bluetooth support, make sure you have installed the latest Bluetooth drivers from your manufacturer's website.
Follow these steps to complete the pairing process
- Double-click the Bluetooth icon on your Task Bar, or go to Control Panel\Devices and Printer\Bluetooth Devices.
- Turn the Keyboard On.
- Press the PC pairing keystroke sequence.
- Click Add Device and wait for the keyboard to connect to your system.
- When prompted, provide the Pairing Code by entering the code on the Go! Keyboard.
- You will be presented with a message that "The Device "SWK-4210BT" Has Been Successfully Installed".
Android - nothing happens when during pairing when I'm prompted to type "1234" or "0000" on the keyboard.
On many Android devices, it is first required to type the code "0000" or "1234" on the Android device itself before typing the code on the keyboard.
- Turn the Keyboard On.
- Press the PC pairing keystroke sequence.
- During the pairing process at the point where you are prompted to type in "0000" or "1234" first tap the entry field on the Android device and type "1234" and press Enter.
- Immediately type "1234" on the Go! Keyboard and press Enter.
- Your device will be detected and successfully added as "SWK-4210BT".
Installing The Optional Bluetooth Adapter - Continued
Windows 7
Installing the USB Bluetooth Adapter
- Ensure that you have an active internet connection.
- Insert the USB Bluetooth Adapter into an available USB Port.
- The Add New Hardware wizard will automatically detect the device and install the appropriate "Bluetooth Radio" drivers.
Mac OS X
Most newer Mac's have a built-in Bluetooth adapter.
DO NOT use this USB Bluetooth adapter unless your Mac does not have a built-in Bluetooth adapter.
Installing theUSB Bluetooth Adapter
- Ensure that you have an active internet connection.
- Insert the USB Bluetooth Adapter into an available USB Port.
- Your Mac will automatically install the necessary drivers
Troubleshooting Tips
This section covers several common issues encountered when pairing the Bluetooth Go! Mobile Keyboard with Windows ^® , Android ^® and Mac ^® OS X.
Mac OS X - Putting the keyboard into pairing mode does not pair the keyboard with my Mac.
Putting the keyboard in pairing mode alone does not cause your Mac to detect a new Bluetooth device, you must first configure your Mac to detect the new Bluetooth Device.
- To Pair - Go to System Preferences > Internet & Wireless, then click the Bluetooth Icon.
- Turn the keyboard on
- Press the Mac paring keystroke sequence, then immediately Click "Set-up New Device" on your Mac
- When the keyboard, device ID "SWK-4210BT" is detected, click Continue.
- When prompted, provide the Pairing Code by entering the code on the Go! Keyboard.
- Message will pop up that the keyboard has been added.
- Click Quit to exit.
Power Switch, USB Charging Port and Indicator Lights
The power switch for your Bluetooth Go! keyboard is located on the top right-hand side. The USB charging port is located on the side of the keyboard directly below the power switch.
Note: Always turn on the power before charging your Bluetooth Go!.
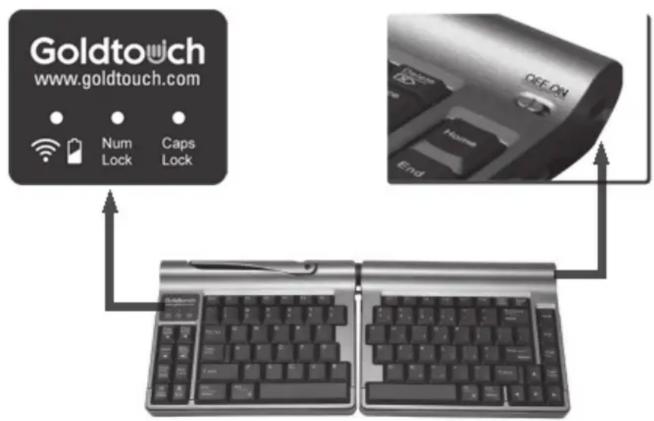
The LED lights located on the top left-hand side of your Goldtouch Go! Mobile Keyboard functions as a battery indicator and a status indicator.
• Red color On: Battery undergoing charging
• Green color On: Battery charging complete
• Red color blinking on keystroke: Battery level low and needs charging
• Green color blink: Undergoing Bluetooth pairing process
As a general rule, you may leave the power button on all the time, as the keyboard has a power saving/sleep mode. Turn the power button to the off position only if you are not using the keyboard for long periods of time or for transporting the device.
Operating Distance
Under normal operating conditions, your Bluetooth Go! will maintain connectivity to your mobile device or PC up to a distance of ten meters.
Note: The operating distance may be affected by the type of Bluetooth adapter in use.
How to adjust the Goldtouch Go!

natural_image
Black foldable keyboard with handle and control buttons, no visible text or symbols on the main body- Release the locking mechanism by pulling the handle away from the keyboard. This will allow for full 0^-30^ adjustment on both the horizontal and vertical planes for each segment of the keyboard.
- Once you have found your desired adjustment position, ensure that your keyboard is sitting firmly and evenly on the working surface and that all four feet are making contact.
• Finally, close the handle to lock the keyboard segments in place.
Note: always ensure that your fingers or any other foreign object are not in between the keyboard and the locking handle when closing. See our website www.goldtouch.com for video demonstrations on how to properly adjust your Goldtouch Keyboard.
How to charge your Bluetooth Go!

Note: Prior to charging, always switch the power off to your keyboard.
Your Bluetooth Go! may be charged using the provided USB adapter which may be connected to any PC or Mac system for charging.
The Bluetooth Go! Keyboard will require 2-3 hours to fully charge from a completely uncharged state.
Note: You may also use the USB power adapter provided Apple iPhone/iPad to charge your Go! via any standard wall jack.
Goldtouch Wireless Go! Travel Keyboard Part Numbers:
GTP-0055W Goldtouch Go! Wireless Keyboard
GTP-0055W-D Goldtouch Go! Wireless Keyboard with Dongle Bluetooth Adapter
USB Bluetooth Adapter - Optional
Depending on the model number ordered, you may have an optional USB Bluetooth adapter supplied with your Go! Keyboard.
If your computer has a built-in Bluetooth adapter, and you did not purchase the optional Bluetooth Dongle Adapter, you may skip the adapter installation steps in this guide and begin by pairing your device.

natural_image
Close-up of a black USB flash drive with four slots (no visible text or symbols)WARNING!!!
It is strongly recommended that you DO NOT use the optional Bluetooth adapter if your computer already has a built-in Bluetooth adapter.
The Goldtouch Go! Mobile Bluetooth Keyboard is designed to utilize Microsoft and Apple's built-in support for Bluetooth devices. There are no third-party drivers required to use the Bluetooth adapter supplied. This Install Guide will walk you through the basic installation of the Bluetooth adapter by following these simple instructions.
To put the keyboard in pairing mode, refer to the Bluetooth Go! Mobile Keyboard User Manual for instructions.
Installing The Optional Bluetooth Adapter
Please follow the instructions for your specific operating system to install the optional USB Bluetooth adapter. USB ports are only available on PC or Mac based computers, there are no USB ports on portable devices.
Windows XP SP3
Installing the USB Bluetooth Adapter
- Ensure that you have an active internet connection.
- Insert the USB Bluetooth Adapter into an available USB Port.
- The Add New Hardware wizard will automatically detect the device and install the appropriate "Bluetooth Radio" drivers.
Windows Vista
Installing the USB Bluetooth Adapter
- Ensure that you have an active internet connection.
- Insert the USB Bluetooth Adapter into an available USB Port.
- The Add New Hardware wizard will automatically detect the device and install the appropriate "Bluetooth Radio" drivers.
- How to change between Apple and PC modes
- Device Support
- Goldtouch
- GOLDTOUCH Go!
- User Manual
- How to pair your Bluetooth Go! with your device
- Bluetooth Pairing with PC
- Bluetooth Pairing with MAC
- Windows 7 - Putting the keyboard into pairing mode does not pair the keyboard with my PC.
- Android - nothing happens when during pairing when I'm prompted to type "1234" or "0000" on the keyboard.
- Installing The Optional Bluetooth Adapter - Continued
- Windows 7
- Mac OS X
- Troubleshooting Tips
- Mac OS X - Putting the keyboard into pairing mode does not pair the keyboard with my Mac.
- Power Switch, USB Charging Port and Indicator Lights
- Operating Distance
- How to adjust the Goldtouch Go!
- How to charge your Bluetooth Go!
- Goldtouch Wireless Go! Travel Keyboard Part Numbers:
- USB Bluetooth Adapter - Optional
- WARNING!!!
- Installing The Optional Bluetooth Adapter
- Windows XP SP3
- Windows Vista
Brand : R-Go Tools
Model : Goldtouch Travel Go!2
Category : Keyboard