
Design Handmixer Pro 40983 - Hand blender Gastroback - Free user manual and instructions
Find the device manual for free Design Handmixer Pro 40983 Gastroback in PDF.


| Product Type | Hand Blender |
| Brand | Gastroback |
| Model | Design Handmixer Pro 40983 |
| Power Rating | 700 W |
| Voltage | 220-240 V, 50/60 Hz |
| Dimensions (H x W x D) | Approx. 40 x 8 x 8 cm |
| Weight | Approx. 1.5 kg |
| Blending Shaft Material | Stainless steel |
| Number of Speeds | Variable speed control with turbo boost |
| Main Functions | Blending, chopping, whisking, pureeing |
| Accessories Included | 1L beaker, whisk attachment, chopper bowl with lid |
| Dishwasher Safe Parts | Blending shaft, beaker, whisk, chopper bowl |
| Overheat Protection | Yes, automatic shut-off |
| Soft Start Feature | Yes, to prevent splashing |
| Ergonomic Handle | Soft-grip handle for comfortable use |
| Hanging Loop | Yes, for easy storage |
| Spare Parts Available | Yes, replacement shafts and accessories |
| Repairability Index | 8/10 (easily disassembled for maintenance) |
| Warranty | 2 years |
Frequently Asked Questions - Design Handmixer Pro 40983 Gastroback
User questions about Design Handmixer Pro 40983 Gastroback
0 question about this device. Answer the ones you know or ask your own.
Ask a new question about this device
Download the instructions for your Hand blender in PDF format for free! Find your manual Design Handmixer Pro 40983 - Gastroback and take your electronic device back in hand. On this page are published all the documents necessary for the use of your device. Design Handmixer Pro 40983 by Gastroback.
USER MANUAL Design Handmixer Pro 40983 Gastroback
natural_image
Exterior view of a modern electric hand mixer with a coiled stand (no visible text or symbols)Art.- Nr. 40983 » Design Handmixer Pro «
natural_image
Simple line drawing of an open book with no text or symbols visiblenatural_image
Exterior and interior views of a Gastroback electric shaver device (no text or symbols visible)ZUBEHÖRE
DRAHTWERKZEUGE - 1 Paar Knethaken, 1 Paar Quirle, 1 Schneebesen PÜRIERSTAB
PÜRIERBECHER MIT DECKEL
natural_image
Exterior view of a modern electric hand mixer with a coiled stand (no visible text or symbols)Read all provided instructions before first usage!
Model and attachments are subject to change
For household use only!

We attach a certain importance to your safety. Thus, we ask you to read all provided instructions and information in this booklet carefully and completely, before you start running the appliance. This will help you to know all functions and properties of your new appliance. We especially ask you to adhere strictly to the safety information mentioned in these instructions.
TABLE OF CONTENTS
Important Safeguards 47
General Safety Instructions....47
Important Safeguards for Electrical Appliances 49
Moving Parts - Risk of Injuries 50
Technical Specifications....52
Knowing Your New Hand Mixer 53
Properties of Your New Hand Mixer 54
Selecting the Speed 54
Maximum Operating Time.... 55
Overload Protection 55
Tips for Best Results....55
Selecting the Required Accessory....56
Whisking 56
Puréeing, Blending, Mixing.... 56
Chopping and Mincing 57
Before First Use....58
Operation....58
Processing via the Wire Tools 60
Installing the Wire Tools 60
Operating the Wire Tools....60
Removing the Wire Tools....62
Using the Bar Blender....62
Installing the Bar Blender 63
Processing via the Bar Blender....63
Removing the Bar Blender....65
Using the Chopper System 65
Assembling the Chopper System 66
Processing Your Food....67
Removing the Motor Unit from the Chopper Container 67
Disassembling the Chopper System 68
Solving Problems....69
Care and Cleaning 73
Cleaning Immediately after Use....73
Removing Stubborn Residues from the Wire Tools 74
Thorough Cleaning of the Bar Blender 74
Cleaning the Blender Container 75
Cleaning the Chopper System....75
Cleaning the Motor Unit 76
Storage 77
Notes for Disposal....78
Information and Service....78
Warranty....79
Household Use....79
DEAR CUSTOMER!
The DESIGN HAND MIXER PRO is intended for blending and mixing, puréeing fruit and vegetables, chopping meat and herbs, as grinding nuts and almonds and for whipping and whisking egg whites, cream or light desserts. The DESIGN HAND MIXER PRO is perfectly suited for processing raw ingredients for salads, for sauces, dips, baby food, shakes or smoothies and time-saving preparation of the ingredients for your meals. By operating the DESIGN HAND MIXER PRO with 5 speed settings and 1 turbo function, it is effortless to adjust the results to your liking.
Please read all the advice and instructions in this booklet with care. Only use the appliance to process fresh, edible food in domestic use.
We hope that you will enjoy your new GASTROBACK DESIGN HAND MIXER PRO.
natural_image
Simple line drawing of an open book with no text or symbols visibleREAD AND OBSERVE INSTRUCTIONS FOR USE! FOLLOW INSTRUCTIONS!

IMPORTANT SAFEGUARDS
Carefully read all instructions, before operating this appliance and save the instructions for further reference. Do not attempt to use this appliance in any other way and for any other purpose, than described in these instructions (intended use). Any other use, especially misuse, can cause severe injuries or damage by electric shock, moving parts, overheating, or fire. Do not use any parts of the appliance with any other device or for any purpose not described in this booklet. Do not leave the appliance unattended, while connected to the power supply.
These instructions are an essential part of the appliance. Do not pass the appliance without this booklet to third parties. Any operation, repair and technical maintenance of the appliance or any part of it other than described in these instructions may only be performed at an authorised service centre (see: 'Warranty').

GENERAL SAFETY INSTRUCTIONS
- This appliance is for household use only and NOT intended for use in moving vehicles. Do not operate or store the appliance in humid or wet areas or outdoors. Any use of accessories, attachments or spare parts (e.g. wire tools, bar blender, chopper system) that are not recommended by the manufacturer or damaged in any way may result in injuries to persons and/or damage.
-
Check the entire appliance regularly for proper operation (e.g. check for distortion, discolouration, cracks, broken parts). Do not operate the appliance, when liquids have run into the motor unit. Do not operate the appliance, when the appliance or any part of it is likely to be damaged, to avoid risk of fire, electric shock or any other injuries to persons and/or damage. The appliance or its parts are likely to be damaged, if the appliance has been subject to inadmissible strain (e.g. overheating, mechanical or electric shock, moisture in the motor unit), or if there are any cracks or leaks, excessively frayed or melted parts, or distortions, or if the appliance does not work properly. If one of these cases occurs during operation, immediately unplug the appliance, and get in contact with an authorized service centre for examination and/or repair.
-
Only lay the appliance on a well accessible, stable, clean, dry, and suitable large table or counter, where it cannot fall.
- The blender container and chopper container are only suited for temperatures up to 60°C. Do not attempt to process very hard ingredients via the appliance (e.g. nuts, hard chocolate, seeds, kernels).
- Risk of Explosion! The appliance is not suited for processing inflammable food and beverages (e.g. high-proof alcoholic drinks).
- Do not wrap any clothes or tissue or other foreign objects around the appliance during operation, to avoid risk of fire, electric shock, and overheating. Do not block the ventilation slits at the front and/or side walls of the motor unit.
- This appliance may be used or handled by persons (including children from 8 years and above) with reduced physical, sensory or mental capabilities, or lack of experience and knowledge, if they have been given supervision and/or instruction concerning the use of the appliance by a person responsible for their safety, and if they understand and consider the involved hazards. Even cleaning may not be performed by children without supervision. Children must always be supervised to ensure that they do not play with the appliance or any part of the appliance or the packaging. Always keep the appliance where it is dry, frost-free, and clean, and where young children cannot reach it. Do not leave the appliance or any part of it unattended, when in reach of young children.
- Do not place the appliance on wet or inclined surfaces (e.g. sink or drain board). Do not place the appliance or any part of it on or near hot surfaces (e.g. burner, heater, range, or oven).
-
Do not leave the appliance unattended when connected to the power supply. Always switch OFF (speed selector to "O") and unplug the appliance, before cleaning the appliance and when the appliance is not in use. To avoid overheating, do not operate the appliance without any food. Immediately turn the appliance OFF (speed selector to "O"), when the motor stalls. Always observe the maximum operating times (see: 'Technical Specifications').
-
Do not place any hard and/or heavy foreign objects on or in the appliance or any part or accessory of it. Do not use any hard or sharp-edged objects for operation or cleaning (e.g. forks, knives, scrapers made of metal). Only use rubber, wooden, or plastic cooking utensils. Do not use violence. Do not place the motor unit or power cord in an automatic dishwasher!
- Do not leave any food dry on the surfaces of the appliance (see: 'Care and Cleaning'). Do not use any abrasive cleaners, cleaning pads (e.g. metal scouring pads), or any corrosive chemicals (e.g. bleach) for cleaning.
IMPORTANT SAFEGUARDS FOR ELECTRICAL APPLIANCES
The appliance is driven electrically. Operate the appliance near a suitable wall power outlet to connect the appliance directly to a protected mains power supply with protective conductor (earth/ground) connected properly. Ensure that the ratings of your mains power supply correspond to the requirements of the appliance (220 V- 240 V AC, 50 Hz - 60 Hz, rated for 10 A). The installation of a residual current operated circuit breaker (r.c.c.b.) with a maximum rated residual operating current of 30 mA in the supplying electrical circuit is strongly recommended. If in doubt, contact your electrician for further information.
- In various foreign countries, the specifications for power supplies are subject to incompatible norms. Therefore, it is possible that power supplies in foreign countries do not meet the requirements for safe operation of the appliance. Thus, before operating the appliance abroad, ensure that safe operation is possible.
- Do not use any desk top multi socket outlet, external timer, remote control systems or extension cord. The power outlet must always be easily accessible so that it would be possible to unplug the appliance immediately in case of any malfunction or danger.
- Power cords may never be knotted, twisted, pulled, strained or squeezed. The power cord may never touch hot surfaces, sharp-edged or moving parts (e.g. the accessories of the appliance). Do not let the plug or power cord hang over the edge of the table or counter.
Ensure that no one will pull the appliance by the power cord. Take care not to entangle in the power cord. Always grasp the plug to disconnect the power cord.
- Do not touch the motor unit or power plug with wet hands, while the appliance is connected to the power supply. Do not place the motor unit on wet or metal surfaces to avoid risk of fire and electric shock. Do not immerse the motor unit or power cord in water or any other liquid. DO NOT spill or drip any liquids on the motor unit or the power cord. Carefully avoid vigorous splashing of food and liquids during processing. If required, use another accessory or speed. The appliance is not suited for processing hot food and liquids (above 60°C). Evaporating steam could be sucked into the motor unit, damaging the motor and causing risk of electric shock and/or fire.
- Always immediately wipe off liquids that are spilled or splashed onto the motor unit. There are ventilation slits at the front and both sides of the motor unit. Do not operate the appliance, when liquid splashed or ran into the housing of the motor unit, thus getting into the interior of the motor unit. In this case, immediately unplug the appliance. Thereafter clean and dry the appliance thoroughly and leave the appliance dry naturally for approx. 1 day.

MOVING PARTS - RISK OF INJURIES
- Some tools of the Design Hand Mixer Pro are equipped with very sharp blades. During operation, the blades are moved on high speed. Thus, the appliance could cause severe injuries when handled improperly.
- Use caution, when handling the chopper knife or bar blender to avoid injuries. Always hold the bar blender and chopper knife by the upper part of the shaft for handling.
- The bar blender and chopper knife may not be disassembled. Do not attempt to assemble the chopper knife to the motor unit without the chopper container. Do not poke in the drive wheel compartment or the tool couplings via any type of foreign objects.
• DO NOT ATTEMPT TO USE THE BAR BLENDER OR WIRE TOOLS
WITHIN THE CHOPPER CONTAINER! The locking pin in the centre of the chopper container would damage the bar blender or wire tools and/or could get torn out or bent.
- Always ensure to switch to "0" (OFF), wait until the motor comes to a standstill, and unplug the motor unit, before installing or removing any accessories. Please note, that the motor may still be turning for a moment, after switching OFF. Always ensure that the motor unit is switched to "0" (OFF), before plugging in the appliance. Otherwise, the motor may start immediately!
- Always remove the accessories from the appliance and leave the appliance cool down, before cleaning.
- Do not touch any moving parts (accessories or drive wheels of the Motor) with your body or any foreign objects (e.g. clothes, cooking utensils), while the appliance is connected to the power supply. A rubber scraper may be used for pushing down food, while the motor unit is unplugged.
- Always ensure that the accessories are installed completely and correctly, before plugging in the motor. unit.
- Do not grasp into the containers or put any foreign objects (e.g. cooking utensils, brushes, or clothes) into the used containers or mixing bowls during operation. Always switch off and remove the appliance from the used container, before adding further ingredients or pushing the ingredients down on the inner walls of the container.
- Always switch off the appliance and then unplug from the power supply after use, before putting on or taking off accessories and before cleaning. Do not leave the appliance switched on uselessly. Do not use different wire tools (beater and dough hooks) at the same time. Only use a matched pair of wire tools simultaneously. Do not attempt to install any wire tools and the bar blender or chopping system simultaneously at the motor unit.
- When processing solid or heavy ingredients (e.g. heavy dough, fruits or vegetables) or overfilling the containers or the selected speed setting is too low, the motor could stall. In this case, always switch OFF
the appliance immediately (speed selector to "O") to avoid overload and overheating. Please adhere to the instructions, given in chapter 'Solving Problems'.
- When processing very runny food via the bar blender, your food may splash vigorously, when moving the bar blender up within the mixing container. In this case, always keep the bar blender at the bottom of the mixing container or use a wire tool for processing.
- Always hold the containers used for processing (mixing bowl, blender container, chopper container) with one hand during operation, because they could vigorously move around or fall due to the agitating accessory.
- Glutinous dough may creep up on the shafts of the wire tools during operation. Ensure that the dough will not reach the motor unit. Otherwise, the drive wheels in the motor unit may get polluted and food could get into the motor unit. Push down the dough in time, using a rubber scraper.
TECHNICAL SPECIFICATIONS
| Model: | Art.- No.: 40983 Design Hand Mixer Pro |
| Power supply: | 220 V-240 V AC, 50 Hz-60 Hz |
| Power consumption: | max. 500 W |
| Protection class: | II |
| Length of power cord | approx. 145 cm |
| Weight, motor unit: | approx. 1,2 kg |
| Dimensions: | approx. 18,5 cm x 16,0 cm x 23,5 cm(width x depth x height) |
| Capacity: | 800 ml (blender container)750 ml (chopper container) |
| Maximum operating time(continuous operation): | 10 minutes (beaters, dough hooks, whisk)1 minute (bar blender)15 seconds (chopper system) |
| Certification: |
These specifications may change without notice.
KNOWING YOUR NEW HAND MIXER
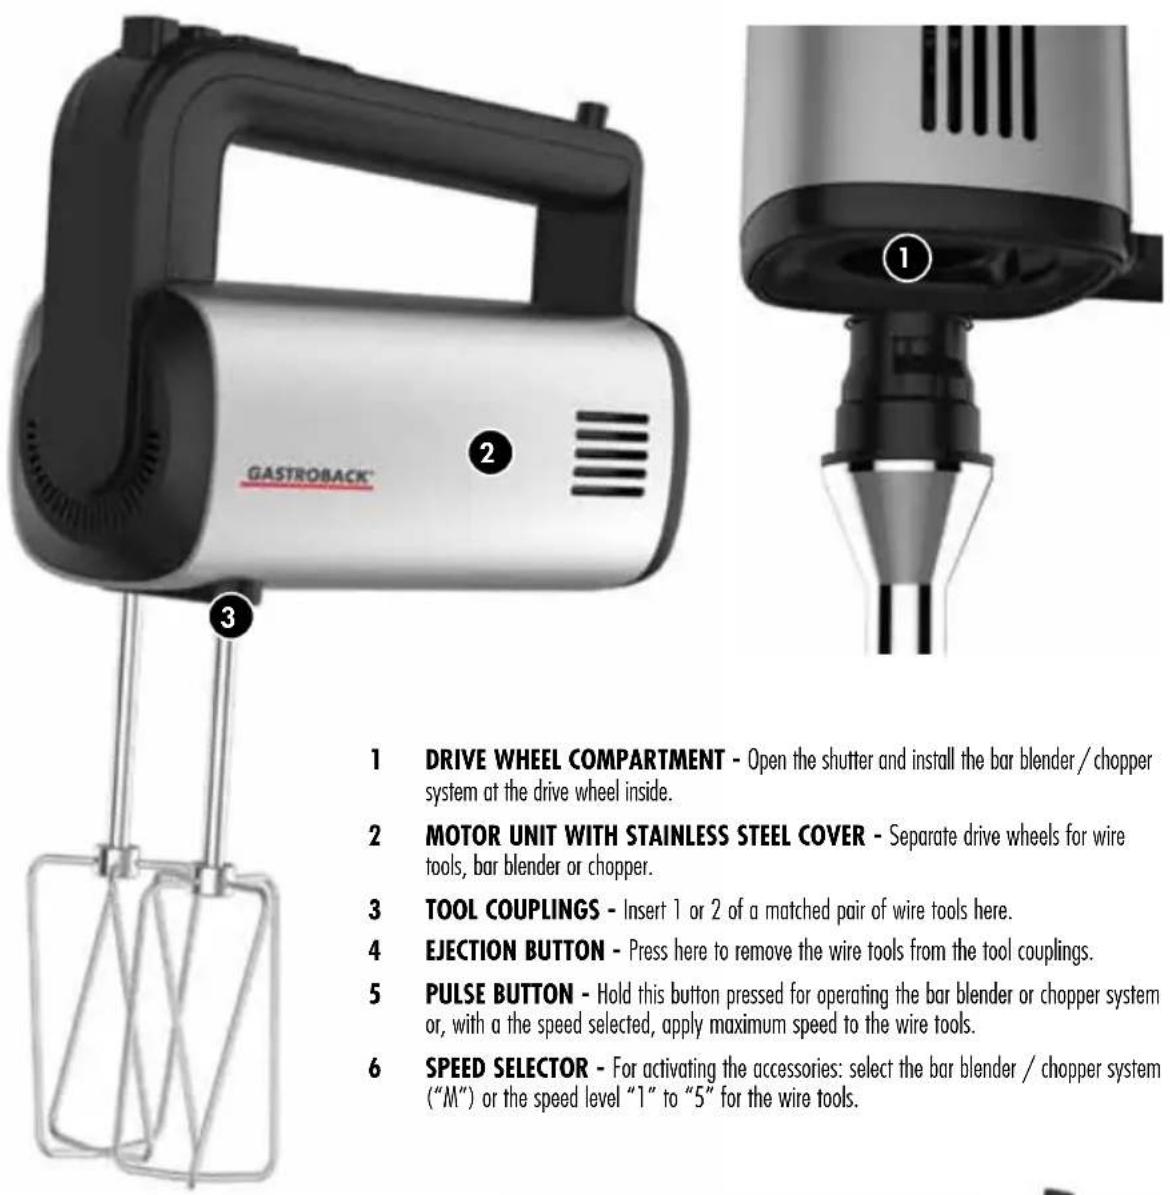
1 DRIVE WHEEL COMPARTMENT - Open the shutter and install the bar blender / chopper system at the drive wheel inside.
2 MOTOR UNIT WITH STAINLESS STEEL COVER - Separate drive wheels for wire tools, bar blender or chopper.
3 TOOL COUPLINGS - Insert 1 or 2 of a matched pair of wire tools here.
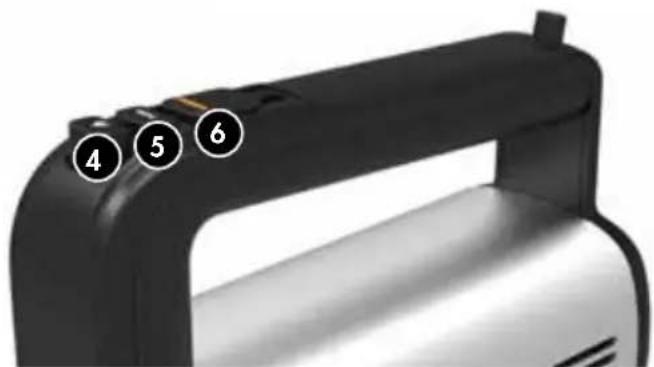
4 EJECTION BUTTON - Press here to remove the wire tools from the tool couplings.
5 PULSE BUTTON - Hold this button pressed for operating the bar blender or chopper system or, with a the speed selected, apply maximum speed to the wire tools.
6 SPEED SELECTOR - For activating the accessories: select the bar blender / chopper system ("M") or the speed level "1" to "5" for the wire tools.
natural_image
Close-up of a black handheld device with numbered callouts (4, 5, 6) pointing to its surface (no text or symbols on the device itself)ACCESSORIES
WIRE TOOLS - A pair of Dough hooks, A pair of Beaters, Whisk BAR BLENDER
BLENDER CONTAINER WITH CONTAINER LID
CHOPPER SYSTEM - Chopper container, chopper lid and chopper knife
PROPERTIES OF YOUR NEW HAND MIXER
Your new Design Hand Mixer Pro is intended for mixing beverages, sauces, and soups, whisking cream and egg white, stirring runny batters (e.g. for pancake or waffles), kneading light doughs (e.g. cake mixtures), as well as puréeing, chopping, and mincing solid food (e.g. meat, onions, potatoes, carrots, apples). However, please keep in mind that the Design Hand Mixer Pro cannot substitute all other kitchen utensils. The appliance is NOT suited for kneading very heavy dough (e.g. heavy yeast dough, bread dough), extracting juices of fruit and vegetables, or grinding very hard ingredients (e.g. nuts, kernels, hard chocolate).
SELECTING THE SPEED
Note
Speed selection is only possible with the wire tools (beaters, whisk, dough hooks). When using the bar blender or chopping system, you cannot select a speed. Additionally, these accessories are agitated via the "Pulse" button with the speed selector switched to the position "M" only. To avoid extra high risk of injuries, when using the bar blender, the motor will only operate, while the "Pulse" button is pressed. When using the wire tools (beater, whisk, dough hook), simply slide the speed selector to the desired speed setting "1" to "5". The suitable speed setting is determined by the textures of the ingredients and the desired consistency (see the following table). To use the pulse function you need to select a speed setting and, with the motor running, press the "Pulse" button to make the motor turn with maximum speed, according to speed selector setting "5" as long as you hold the button pressed. Please find some guidelines for selecting the suitable speed setting in the following table.
The position "M" is intended for using the bar blender and chopper system only. For achieving the optimal results when using these accessories, high speed of the blades is crucial. Therefore, speed selection is not possible and the appliance will operate at maximum power all the times.
| Speed Action | Description | |
| 1 | Combine/blend | Lowest speed for blending larger quantities and combining dry foodstuffs (e.g. flour and baking powder or sugar and cinnamon). For combining ingredients (e.g. stirring, beaten egg white into a mixture). |
| 2 | Slow whisk | Perfect speed for adding liquids or mixing salad dressings. |
| 3 | Combine / whisk | Preparing pastry or cake mixtures. |
| 4 | Mix / fast whisk | Whipping cream. For mixing butter and sugar, whisking cold puddings, custard, etc. |
| 5 | Whip | Whisking eggs, meringue, potato purée, whipping cream, mayonnaise, etc. |
| M | Bar blender | Puréeing fruits and vegetables for heavy juices. Puréeing potatoes and the ingredients for cream soups. |
| M | Chopper | Food processing, meat or vegetables. |
The appliance may not be operated continuously for an elongated time to avoid overheating. Make breaks, depending on the load and accessory you use. Please observe the following maximum operating times: Wire tools: max. 10 minutes of continuous operation. Bar Blender: max. 1 minute of continuous operation. Chopper System: max. 15 seconds of continuous operation.
Allow the appliance to cool down to room temperature in time, before using the appliance again.
OVERLOAD PROTECTION
The Design Hand Mixer Pro is fitted with a self-resetting overload protection device, which safeguards against overheating the motor. Overheating may be caused by ...too long time of continuous operation without breaks (see: 'Maximum Operating Time').too much food in the mixing container.
- hard ingredients block the accessories.
• too sticky and too heavy load (e.g. heavy yeast dough).
If overheating occurs, the appliance will automatically switch off the motor. In this case, switch OFF the appliance (speed selector to "0") and unplug. Remove any obstacle and leave the appliance cool down for at least 30 minutes. Thereafter, you may try to reactivate the appliance.
TIPS FOR BEST RESULTS
- First fill liquid ingredients into the mixing container (e.g. mixing bowl or blender container), if your recipe does not require any other method.
- Process your food only for some seconds. Then check for the required consistency. Avoid over-processing, because this may produce watery and too mushy results. With the wire tools, you may use several speed settings ("1" to "5") and the pulse function. This way, you can process a variety of different ingredients. Adapt the speed to the consistency of your food and the desired results. With the bar blender and chopper system, high speed processing is crucial for getting good
results. If you notice that the motor slows down during processing, you should reduce the amount (chopper system).
• In most cases, processing in small amounts will give better results.
SELECTING THE REQUIRED ACCESSORY
- The whisk is suited for runny food only. Do not use the whisk for heavy and thick ingredients to avoid damage. Instead of the whisk, the beaters or, with thick and heavy food (e.g. dough), the dough hooks must be used.
- For seasoning, you may process purée via the whisk or beaters. However, for puréeing solid vegetables or fruit, it may be better to use the bar blender. For puréeing soft ingredients (e.g. cooked potatoes) you may use the beaters. Use the bar blender for processing ingredients containing a lot of fibres (e.g. apples, peaches, mangoes). With the chopper system you will get a mixture of small pieces of food. Use this system for mincing meat also. The blender container and chopper container are no measuring devices. If your recipe requires exact amounts, please use a separate measuring cup.
- Use the chopper container only for the chopping system. DO NOT use the chopper container with any of the other accessories to avoid damage! Do not process liquids within the chopping system to avoid overflow. For processing runny food, you should use the beaters. Use caution when using the bar blender for runny food. To avoid splashing, with runny food keep the bar blender at the bottom of the mixing container.
WHISKING
- Do not over-process egg white and cream. Fat, proteins, and water of egg whites and cream will separate, when over-processed. Stop processing as soon as the product is frothy and stiff, building heaps. Insert a teaspoon for testing,: it should stand upright within the froth.
- Whip mixtures of fat (butter, marge) with sugar and spices until the sugar is dissolved. The colour of the mixture will get somewhat lighter during whipping.
PURÉEING, BLENDING, MIXING
- There is no need for using the blender container always for processing via the bar blender. Other sufficiently large, high-walled mixing containers may do as well. With the bar blender, the used mixing container should be flat at the bottom.
- When processing very runny food via the bar blender, your food may splash
vigorously, when moving the bar blender up within the mixing container. In this case, always keep the bar blender near the bottom of the mixing container or use a wire tool for processing. Only use high-walled mixing containers. Cut large pieces before processing. Fill the mixing container up to half height at the maximum only.
- You should fill in liquid ingredients at first. Cut solid ingredients in 2 cm pieces. Do not overfill the containers. Otherwise, liquids and runny purée could run out, or pieces of the ingredients block the used tools. Additionally, with the containers overfilled, you may get an uneven and poor processing result.
- When mixing in an appropriate large mixing bowl via the wire tools, move the wire tools in a slight circular motion during operation.
- During processing solid food, slowly move the bar blender a little up and down within your food, but do not press too hard on the bar blender to avoid that the motor slows down or stalls. Ensure that your food will not be hurled out of the mixing container.
CHOPPING AND MINCING
- Cut solid food (vegetables, fruit, cheese, meat, fish and seafood) in approx. 2 cm pieces, before processing.
- The chopper system is not suited for grinding hard ingredients (e.g. hard chocolate, nuts, seeds).
- The chopping system will process your food more efficiently when processing small amounts. Avoid filling the chopping container up to the MAX filling line. If required, process your food in portions.
- Do not overload the motor with too large ingredients (e.g. whole carrots). Additionally, with too much and too large pieces, you will get poor processing results.
- If the motor runs noticeably slow or stalls, then switch off the motor and remove pieces that are too large. Cut your food to smaller pieces and process in smaller portions. The chopper system is not suitable for processing liquids. If you wish to process solid ingredients mixed with a lot of liquids, pour off the liquid, before filling the solid components into the chopper container. After processing, combine solids and liquids again (e.g. via the beaters). During filling, you may protect the coupling of the chopper knife via a small glass or small beaker, but do not forget to remove the object, before assembling the chopper lid.
BEFORE FIRST USE
⚠ WARNING: DO NOT let young children play with the appliance or any part of it or the packaging! The blades of the bar blender and chopping knife are very sharp. Always handle the bar blender and chopping knife with care to avoid injuries and damage. Always switch OFF (speed selector to "O") and unplug the appliance before assembling or disassembling any accessories or cleaning the appliance, and when the appliance is not in use. Do not place the motor unit or power cord in an automatic dishwasher. Do not place or immerse the motor unit or power cord in water or other liquids or spill any liquids on the motor unit or power cord. Do not use any abrasive or corrosive cleaners for cleaning to avoid damage to the surfaces.
- Unpack the appliance and all parts and accessories carefully. Check that no parts are damaged or missing (see: 'Knowing Your New Hand Mixer'). Carefully remove all packaging, shipping materials, stickers, and promotional materials. However, DO NOT remove the model label.
- Before first use and after a longer period of storage, clean all parts of the appliance (see: 'Care and Cleaning').
Note
When using your hand mixer for the first time, you may notice an unusual odour from the motor. This is normal and will dissipate with repeated usage.
OPERATION
⚠ WARNING: Always ensure that the appliance and all its parts and accessories are out of reach of young children. Always unplug the appliance, before assembling or disassembling accessories and when the appliance is not in use. Do not leave the motor unit unattended, when it is connected to the power supply. The blades of the bar blender and chopping knife are very sharp. To avoid severe injuries, do not touch the blades with your hands.
Do not hold your hands or any foreign objects (e.g. cooking utensils) into the used mixing container or at the used accessory, while the motor is running. For pushing down or taking out food, adding or removing food, or checking the consistency, switch OFF (speed selector to "0"), wait until the motor comes to a complete standstill. Then remove the used accessory from the mixing container.
Only use cooking utensils made of wood, rubber, or plastic with the appliance. Do not use violence, especially when removing obstacles blocking the accessories to avoid damage. Do not attempt to spin the accessories mounted at the appliance
manually to avoid damage to the drive. Ensure to place the motor unit on a level, flat, stable, and dry surface. Do not place the motor unit near the edge of the working space or on inclined surfaces. Always hold the mixing container with one hand during operation, because it could vigorously move around due to the agitating accessory.
Always keep your workspace clean and dry during operation. Immediately wipe off spilled liquids or splashes using a dry cloth. Do not place the motor unit on wet or moist surfaces or on any clothes. Do not let any liquids run under or on the motor unit. If any liquids ran into the motor unit, immediately unplug the motor unit. Then clean and dry the motor unit (see: 'Care and Cleaning'). If in doubt, contact an authorised service centre for examination. To avoid overflow: Do not overfill the mixing container. Observe the MAX grading lines on the blender container and chopper container. However, in many cases, you should not fill in the maximum amount to avoid splashing. Do not use the chopping system for processing liquids, because liquids may run out from under the chopper lid.
The appliance is not suited for processing hot or inflammable food (e.g. high-proof alcoholic beverages). Steam escaping from your food may damage the motor unit during operation by condensation on the inner parts. Always leave your food cool down to max. 60°C (feels hot to the touch but will not burn immediately when touched). Always remove the motor unit from the chopper lid, before removing the chopper lid. To avoid high risk of severe injuries due to the chopper knife: do not attempt to use the chopper knife without the dedicated chopper container and chopper lid. Ensure that the chopper system is assembled completely and correctly.
CAUTION: Do not remove the used accessory from the motor unit with the motor still turning, to avoid damage. Always switch OFF (speed selector to "O") and wait for the accessories to stop complete, before removing the accessory out of the food. Unplug the motor unit, before removing the accessories from the motor unit. To avoid injuries, damage, and overheating, do not operate the appliance without any food. Always insert the assembled accessory into your food, before switching on the motor. During operation, do not touch the assembled accessory with your hands, and do not hold any foreign objects on the accessory.
Tip: You may store food within the blender container. For this, close the container with the provided lid. However, do not leave any food in the blender container go off or dry on the surfaces (see: 'Care and Cleaning').
PROCESSING VIA THE WIRE TOOLS
⚠️ CAUTION: Always ensure that the speed selector is set to the "O" (Off) position and the appliance is unplugged, before attaching or removing any accessories. Do not connect the appliance to the power supply, before the wire tools (beaters, dough hooks, whisk) have been installed securely and will not fall out. When using a pair of wire tools (beaters or dough hooks), it is crucial to install a matched pair. Do not mix up the wire tools.
Installing the Wire Tools
- Ensure that the motor unit is unplugged from the power supply. Ensure that the speed selector is set to the "0" (Off) position. Ensure that the upper shaft ends of the wire tools are dry and clean.
Note
The drives of the tool couplings rotate in opposite directions. Because of this, the wire tools dedicated for usage in pairs are designed mirror-image. For avoiding wrong installation, at the shaft of one of the wire tools a disc-shaped collar ensures that this tool will fit only in the tool coupling with the wide opening. Only one of a pair of beaters or dough hooks has a collar on the shaft; the other one is without that collar. The whisk must be used separately and will fit in both tool couplings.
- When inserting a pair of beaters or dough hooks, the beater or dough hook with the disc-shaped collar must be placed in the tool coupling with the wide opening. Push the shaft end into the appropriate tool coupling and slightly turn the shaft, while pushing the wire tool into the opening, until the wire tool clicks into place.
- Check, if the wire tools are engaged securely and correctly and will not fall out.
Operating the Wire Tools
⚠️ CAUTION: To prevent the motor unit from overheating, do not operate the motor continuously for more than 10 minutes. Allow the appliance to cool down to room temperature before using it again. Do not use the chopper container with any of the wire tools, to avoid damage to the appliance and its accessories!
Always insert the wire tools into the used mixing container with your food, before operation. Always switch OFF and remove the accessory from the mixing container before adding ingredients and before taking out your food. Otherwise, splashes and small particles could be hurled about.
- Place the ingredients into a mixing bowl suitable for your desired purposes. You may use the provided blender container. The mixing container should be filled up to half height at the maximum to avoid overflow and splashing.
- Provide a sufficiently large bowl or container, filled with some warm dishwater. The dishwater should be able to cover the wire tools to the lower end of the shaft.
- Ensure that the wire tools (beaters, dough hooks, or whisk) are inserted correctly into the tool couplings and clicked into place securely. Ensure that the speed selector is set to "O".
- Plug in the motor unit into a suitable wall power outlet.
- Immerse the assembled wire tools into the food. Then slide the speed selector to speed "1".
Note
To avoid splashing, start mixing on a low speed setting "1". Slowly increase the speed to the desired setting for the mixing task by sliding the speed selector towards the rear of the motor unit. The speed can be adjusted at any time during use.
- If required, slide the speed selector to another speed setting or press the "Pulse" button at any time you like. While the pulse button is pressed, the appliance's power is increased to reach the speed maximum.
Note
The "Pulse" button is the equivalent of speed setting "5", so when you are on speed setting "5", pressing the "Pulse" button will not add any extra power.
⚠️ CAUTION: To avoid damage to the appliance and the mixing container, always avoid to touch the inner walls of the mixing container via the wire tools. Otherwise, the wire tools could get deformed and/or the surfaces of the mixing container could get damaged.
Important: Do not attempt to remove the wire tools with the motor unit operating or still plugged in. Take the accessories out of the mixing container after all parts have come to a complete stop.
-
When mixing in an appropriate large mixing bowl, move the mixer in a slight circular motion during operation to enable efficient mixing results.
-
If required, stop operation (speed selector to "O") in time, for scraping your food down from wire tools and at the sides of the mixing container. For this, you may use a plastic or rubber spatula. Thereafter continue mixing. Do not scrape off food sticking to the inner walls of the mixing container via the spinning wire tools to avoid damage.
- After mixing, slide the speed selector to "0" (off) and wait until the wire tools come to a complete standstill.
- Take the wire tools out of your food. If required, scrape down food, still sticking to the wire tools. Then immerse the wire tool in the provided dishwater.
- Leave the motor operate for some seconds to remove any residues of food.
- Slide the speed selector to "0" (off) and wait until the wire tools come to a complete standstill. Unplug the motor unit.
Removing the Wire Tools
⚠️ CAUTION: Do not attempt to remove the wire tools by pulling them out of the tool couplings with violence! Always set the speed selector to "O"(off) and unplug the appliance before removing the wire tools. When pressing the Ejection button, the wire tools will fall out. Ensure that the wire tools will not fall down.
- Ensure that the appliance is switched OFF (speed selector to "0") and unplugged.
- Hold the wire tools with one hand or hold them at a short distance over a container or sink. Press the Ejection button for releasing the tool lock and for making the wire tools fall out of the tool couplings.
- Clean the appliance after each use to avoid that residues of food dry on the surfaces.
USING THE BAR BLENDER
⚠ WARNING: The blades of the bar blender are very sharp. DO NOT grasp into the bell-shaped end holding the blades to avoid severe injuries. Always ensure to keep your hands and any foreign objects (e.g. clothes, towels, cooking utensils) away from the blades of the bar blender, when the bar blender is installed at the motor unit to avoid severe injuries and damage. Before switching on the motor, always insert the blades of the bar blender into your food. The bell-shaped end should be covered with food.
⚠️ CAUTION: Always ensure that the dark drive coupling at the upper end of the bar blender is completely clean and dry, before installing the bar blender at the motor unit to avoid damage to the motor unit. Do not remove the bar blender during operation to avoid damage to the drive wheel and coupling.
Important: It is crucial to hold the bar blender straight upright during operation. The blades of the bar blender are spinning very fast and could hurl out your food, when tilting the bar blender during operation.
Installing the Bar Blender
Note
The drive compartment is protected by an automatically closing shutter. Before attaching the bar blender to the motor unit, you must push the shutter open.
- Ensure that the drive coupling of the bar blender (dark shaft end) is completely clean and dry.
- Use the dark shaft end of the bar blender to push open the shutter. Then push the bar blender shaft into the drive compartment onto the drive wheel of the motor unit.
- Turn the bar blender clockwise to the stop. With the bar blender engaged tangibly into position, the bar blender is ready for operation.
Processing via the Bar Blender
⚠ WARNING: Do not hold your hands or any type of foreign objects (e.g. cooking utensils) onto the blender blades with the bar blender installed at the motor unit.
⚠️ CAUTION: If the motor slows down noticeably during operation or stalls, immediately switch OFF the appliance (release the "Pulse" button, slide the speed selector to "O"). Remove any obstacles. Please, adhere to the instructions in chapter 'Solving Problems'.
Note
With the speed selector in position "M", the motor operates only with the bar blender or chopper lid mounted. Always insert the bar blender into your food, before starting the motor. Always switch off the motor (speed selector position "O"), before removing the bar blender from your food or inserting any foreign objects into the mixing container. This will prevent food and liquids from being hurled about. With solid pieces of food, you may move the bar blender carefully up and down a little within your food. When doing so, ensure that the food will not be hurled about, run out, or splashes.
Avoid over-processing your food. The bar blender will process your food within seconds. Using the blender container is not mandatory for processing via the bar blender. You may use other mixing containers (see: 'Tips for Best Results').
⚠️ CAUTION: To prevent the motor from overheating, do not operate the appliance for more than 1 minute at a time. Allow the motor unit to cool down to room temperature before using it again.
Note
Speed selection is not possible with the bar blender, because high speed rotation is crucial for the functioning of the bar blender. The speed selector must be set to "M" always.
- Ensure that the bar blender is inserted firmly at the motor unit (see above). Fill your food into the blender container.
- Provide a sufficiently large bowl or container, filled with some warm dishwater. The dishwater should be able to cover the bell-shaped end of the bar blender.
- Ensure that the speed selector is set to "0". Connect the motor unit to a suitable wall power outlet.
- Holding the motor unit by the handle, place the bell-shaped end of the bar blender into your food. With runny food, the bar blender should touch the bottom of the blender container.
- To avoid that the blender container is hurled about when switching on the appliance, grasp the blender container with one hand. Then slide the speed selector to "M".
Important: Ensure to hold the bar blender straight upright and avoid tilting the bar blender during operation. Otherwise, solid parts and liquids of your food could be hurled out of your mixing container. When moving the bar blender during operation, carefully ensure that the end of the bar blender will not come up too far to avoid splashing.
- Press the "Pulse" button to start the motor. The motor will agitate only with the "Pulse" button pressed and stop as soon as the "Pulse" button is released.
- Without tilting the bar blender, you may slowly and carefully move the bar blender up and down a little within the blender container.
- As soon as your food reached the desired consistency, release the "Pulse" button and wait until the motor stops completely.
- Immerse the bar blender into the provided warm dishwater. Ensure to make the bar blender touch the bottom of the container. Then hold the "Pulse" button pressed for some seconds to remove residues of food from the blades of the bar blender. Release the "Pulse" button, slide the speed selector to position "O", and unplug the appliance.
- Remove the bar blender immediately after use (see below).
Removing the Bar Blender
⚠ WARNING: Always set the speed selector to "0" (off) and unplug the motor unit, before removing the bar blender. Do not attempt to release the bar blender during operation. Do not grasp into the bell-shaped end of the bar blender when handling the bar blender to avoid injuries. Always grasp the bar blender by the shaft.
- Ensure that the speed selector is switched to position "O" (off), and the motor unit is unplugged.
- Grasp the bar blender by the shaft and turn the bar blender counter-clockwise to the stop. Then pull the bar blender out of the drive compartment. The shutter will close automatically.
- Clean all used accessories immediately after use (see: 'Care and Cleaning').
⚠ WARNING: The blades of the chopper knife are very sharp. Do not touch the blades to avoid injuries. Only touch the chopper knife at the upper part of the shaft. For your safety, the chopper knife cannot be driven by the motor unit directly, but only via the chopper lid. Additionally, the chopper knife will fall off the chopper lid, if the chopper lid is lifted from the chopper container. Thus, it is almost impossible to operate the chopper system with any of the accompanying parts missing. Do not attempt to corrupt this safety feature via using any type of foreign containers. Do not attempt to operate the chopper system with any of its parts damaged in any way. Before switching on the motor unit, always ensure that the chopper system is installed completely and correctly.
⚠️ CAUTION: Do not remove the motor unit from the chopper lid during operation to avoid damage to the drive wheel and coupling. If the motor slows down noticeably during operation or stalls, immediately switch OFF the appliance (release the "Pulse" button, slide the speed selector to "O"). See: 'Solving Problems'.
Ensure that the drive coupling of the chopper lid is completely clean and dry, before assembling the motor unit at the chopper system to avoid pollution and damage to the drive wheel of the motor unit. Additionally, you should keep the drive coupling of the chopper knife and chopper lid clean and dry, when assembling the chopper system to allow proper functioning.
Assembling the Chopper System
Important: Do not overfill the chopper container to avoid overflow. The chopper system is not suited for processing liquids (see: 'Tips for Best Results').
Note
The top of the chopper lid is shaped to fit into the drive wheel at the rear end of the motor unit. The drive wheel is protected by an automatically closing shutter. Before attaching the chopper system to the motor unit, you must open the shutter.
- Hold the chopper knife by the upper end of the shaft and insert the chopper knife into the chopper container.
Tip: While filling the chopper container, you may protect the upper shaft end of the chopper knife via a small beaker or small glass to avoid that food and liquids will get on the drive coupling of the shaft. Do not forget to remove this item, after filling.
- Fill the prepared food into the chopper container. Observe the maximum filling level (MAX) to avoid overflow and ensure a suitable processing result. Ensure that the coupling at the upper part of the chopper knife is clean.
- Cover the chopper container with the chopper lid. Turn the chopper lid clockwise to the stop for locking the chopper lid on the chopper container.
- Grasp the chopper system by the handle. It is best to open the shutter of the drive compartment via the chopper lid. For this, place the motor unit in an upright position onto the chopper lid and gently slide the motor unit over the top of the chopper lid to open the shutter. With the shutter open, the motor unit will settle down on the chopper lid coupling to a stable position.
- Turn the motor unit by 90^ to the lock the motor unit tangibly. The appliance is ready for operation, if the motor unit is locked securely in place.
Processing Your Food
⚠ WARNING: Do not remove the chopper lid and/or grasp into the chopper container or holding any type of objects into the chopper container with the motor unit placed on the chopper lid. Do not remove the motor unit, while the motor is agitating. First switch OFF the appliance (slide the speed selector to "0"), wait until the motor stops completely, and unplug the motor unit. Before opening the chopper system, always remove the motor unit from the chopper system.
⚠️ CAUTION: The chopper system will process your food in a few seconds. To prevent the appliance from overheating, do not operate the motor continuously for more than 15 seconds. Allow the appliance to cool down to room temperature before using it again.
- Ensure that the chopper system is assembled completely and correctly, with food in the chopper container. Ensure that the motor unit is assembled and locked securely to the chopper system (see above).
- Ensure that the speed selector is switched to position "0". Then connect the motor unit to a suitable wall power outlet.
- Slide the speed selector to "M". Grasp the chopper container AND motor unit by the handles.
- Hold the "Pulse" button pressed for operating the motor. The motor will stop moving, when the "Pulse" button is released.
Tip: You may achieve better results, when operating the appliance in short pulses. For most purposes, some short pulses will do. Avoid over-processing your food.
Removing the Motor Unit from the Chopper Container
CAUTION: Do not attempt to remove the motor unit from the chopper lid during operation. Always slide the speed selector to "O" (off) and unplug, before removing the motor unit from the chopper system. Always remove the motor unit from the chopper lid, before removing the chopper lid from the chopper container. Do not place the motor unit on wet or inclined surfaces.
- Release the "Pulse" button to stop operation. Slide the speed selector to "O" position (off) and unplug the motor unit.
- With one hand on the chopper lid, turn the motor unit counterclockwise to the stop. Then pull the motor unit upwards and out of the drive coupling of the chopper lid.
Disassembling the Chopper System
⚠ WARNING: The chopper knife is very sharp. Handle with care to avoid injuries.
- Remove the motor unit from the chopper system (see above).
- Turn the chopper lid counterclockwise to unlock the chopper lid, and remove the chopper lid from the chopper container.
- Grasp the chopper knife by the upper part of the shaft and take the chopper knife out.
- Take your food out of the chopper container via a plastic or wooden spoon or rubber scraper.
- After each use, clean the chopper system (see: 'Care and Cleaning').
Note
The chopper container is not intended for storing food.
SOLVING PROBLEMS
If a problem occurs, in most cases you will be able quite easily to solve it. The following error table will assist you.
| Problem Reason The | Solution | |
| The appliance is not working. | The motor unit is not live. Connect the motor unit to a wall power outlet. Check, if the used socket is live by connecting a lamp. | |
| Wire tools: you did not select a speed. | Even the “Pulse” button will not work without a speed selected. Slide the speed selector to a speed setting: “1” to “5”. | |
| Bar blender or chopper system: the speed selector is not in position “M”, and/or you did not press the “Pulse” button. | Speed selection is not possible. These accessories are driven always with maximum power. Slide the speed selector to position “M” and hold the “Pulse” button pressed for switching on the motor. | |
| The food in the mixing container is too hard or too heavy. | Immediately release the “Pulse” button and slide the speed selector to “0” (OFF). Try out the following solutions:- Add some liquid to make your food more runny.- Use another accessory (see: ‘Tips for Best Results’).- Take some food out of the mixing container. Process your food in smaller portions. | |
| Hard pieces of food block the used accessory. | Immediately slide the speed selector to “0” (OFF) and unplug the appliance. The appliance is not suited for processing extremely hard ingredients. Remove any parts of food, blocking the accessories. Try again.When using the bar blender, do not push too hard onto the bar blender, when moving it up and down for processing. | |
| You have subjected the motor to excessive load. The overload protection has been triggered. | Immediately switch OFF (“0”) and unplug the appliance. Please adhere to the instructions given in section ‘Overload Protection’. Leave the appliance cool down for at least 30 minutes. Make breaks (see: ‘Maximum Operating Time’). | |
| The used accessory is damaged. | If the motor can turn the bar blender or chopper system only with noticeable high resistance and audibly low speed, even when processing very runny food, the accessory may not be used furthermore. Distorted wire tools could block the motor as well. Please, contact your vendor for replacement. | |
| There is a slight strange smell, when starting the motor. | The appliance is still new. With the appliance still new, this is normal and no reason for concern. The smell will dissipate during repeated usage. | |
| The motor unit is damaged. Do not use the appliance, when food or liquids have gone into the motor unit. Contact an authorized service centre for examination and repair. | ||
| The motor does not respond to the “Pulse” button. | Wire tools: You did not select a speed. | The “Pulse” button will not work without a speed selected. Slide the speed selector to a speed setting. |
| Wire tools: You have selected the maximum speed setting “5” already. | When using the wire tools, the “Pulse” button will accelerate the motor to maximum speed. With speed “5” selected, the motor is on maximum speed already and nothing will happen. | |
| Bar blender or chopper system: The speed selector is not set to “M”. | Before operating the motor unit, you need to slide the speed selector to position “M”. Thereafter, press the “Pulse” button to start the motor. | |
| The accessories cannot be removed. | Wire tools: you did not press the Ejection button. | Always press the Ejection button for removing the wire tools from the motor unit.Do not attempt to pull out the wire tools with violence to avoid damage. |
| Bar blender: you did not unlock the bar blender. | For operation, the bar blender is locked to the drive wheel of the motor unit. Turn the shaft of the bar blender counter-clockwise to unlock the bar blender, then pull it out.Do not attempt to pull out the bar blender with violence to avoid damage. | |
| Chopper system: you did not unlock the chopper system. | For operation, the motor unit is locked to the chopper lid. For unlocking, turn the motor unit counter-clockwise. Then pull the motor unit out.Do not attempt to pull out the motor unit with violence to avoid damage. | |
| The wire tools fall out of the motor unit. | The wire tools are not engaged in the tool couplings correctly. | Make sure you push the wire tools into the tool couplings until you hear and feel them click into place. |
| The tool couplings are damaged. | When pulling out the wire tools violently, the tool couplings of the appliance may get damaged. Get in contact with an authorized service centre for examination and repair. | |
| The wire tool does not fit into the tool coupling of the motor unitAND/ORyou cannot engage the wire tool correctly in the tool coupling. | To avoid wrong installation, the shaft end of one of a matched pair of wire tools is shaped to fit only in one of the tool couplings in the motor unit. | Simply try the other tool coupling. |
| You attempted to mix up the wire tools. | Only use one matched pair of wire tools at a time. Do not attempt to operate the appliance with wire tools installed that does not fit to each other. | |
| The bar blender or chopper system is installed already at the motor unit. | For your safety, it is not possible to mix up the accessories. First remove the bar blender or remove the motor unit from the chopper lid. Then try again. | |
| You cannot install the bar blender or chopper system. | Wire tools are installed already at the motor unit. | For your safety, it is not possible to mix up the accessories. First remove the wire tools. Then try again. |
| Chopper system: You cannot lock the chopper lid at the chopper container. | The chopper lid is not in correct orientation. | Turn the chopper lid until it settles down. Then turn the chopper lid clockwise to lock it to the chopper container. |
| The chopper knife is not inserted correctly in the chopper container. | The chopper knife must stand upright in the chopper container, with the coupling facing upwards. Always place the chopper knife into the chopper container, before filling in your food. | |
| Foreign objects or food-stuffs are caught on the upper rim of the chopper container and/or the drive coupling of the chopper knife. | Always remove any food from the top of the chopper knife and the rim of the chopper container, before assembling the chopper lid. During filling, you may protect the drive coupling of the chopper knife via a small glass or beaker, but do not forget to remove the object, before assembling the chopper lid (see: 'Tips for Best Results'). | |
| The motor is operating noticeably slowORthe motor stops unexpectedly during operation.May be, you cannot start the motor again. | The mixture is too heavy.Hard ingredients block the accessories used. | - Wire tools: increase the speed. Try another accessory (e.g. the dough hooks).- Add some liquid to make your food more runny.- Reduce the amount of food in the mixing bowl and process your food in portions.- Please consider that the appliance is not suited for processing very heavy mixtures like bread dough (see: 'Properties of Your New Hand Mixer').Switch off („0”) and unplug the motor unit. Remove the obstacle using rubber,wooden or plastic cooking utensils. However, do not use violence to avoid damage to the accessories. Granulate very hard ingredients (e.g. nuts, hard chocolate) before processing them with the appliance. |
| Bar blender: you pushed on the bar blender with too much pressure. | Do not apply too much pressure, when moving the bar blender up and down within your food. This will improve the processing results as well. | |
| You have subjected the motor to excessive load. The overload protection has been triggered. | Immediately switch OFF (“0”) and unplug the appliance. Please adhere to the instructions given in section ‘Overload Protection’. Leave the appliance cool down for at least 30 minutes. Make breaks (see: ‘Maximum Operating Time’). | |
| Liquid is running out of the mixing container. | Chopper system: This accessory is not suitable for processing liquids. | Use another accessory for processing liquids; e.g. the bar blender. If you wish to process solid ingredients mixed with a lot of liquids, pour off the liquid, before filling the chopper container (see: ‘Tips for Best Results’). |
| Chopper system: the chopper container is over-filled. Juices of your food run out. | Depending on the type of food, you should not fill up the chopper container to the MAX filling line. It may be better to process your food in smaller portions (see: ‘Tips for Best Results’). | |
| Bar blender: you moved the bar blender out of the food during operation. | Use special care, when moving the bar blender up and down a little for cutting solid parts of your food during operation. Otherwise, particles of food may be hurled out or liquids may splash out of the mixing container. If in doubt, use another accessory (e.g. the beaters). | |
| The mixing container is spinning around vigorously during operation. | This may happen due to the force, the accessories apply to solid components of your food. | During operation, always hold the mixing container with one hand. |
CARE AND CLEANING
⚠ WARNING: Always ensure that all parts of the appliance are out of reach of young children. Always switch OFF (slide the speed selector to "O") and unplug the motor unit, before cleaning the appliance and when the appliance is not in use.
The blades of the bar blender and chopper knife are very sharp. Always take special care when handling the chopper system and/or bar blender to avoid injuries. Do not spill or pour any liquids on or in the motor unit or power cord. Do not place or immerse the motor unit or power cord in any liquids to avoid electric shock, risk of fire, and damage.
Do not expose the containers of the appliance to temperatures above 60^ C.
Do not use abrasive cleaning agents or aggressive liquids (e.g. bleach, solving agents) for cleaning the appliance or any part of it, to avoid damage to the surfaces. Do not use any hard or sharp-edged objects for cleaning (e.g. metal scoring pads, knives, metal scrapers). Do not use violence.
DO NOT place the motor unit or power cord in an automatic dishwasher! Cleaning the accessories in an automatic dishwasher is not recommended.
CLEANING IMMEDIATELY AFTER USE
Important: The following procedure may be used for any of the wire tools (beater, dough hook, and whisk) and for the bar blender only. Do not use this procedure for cleaning the chopper system, because the chopper system is not suited for processing liquids! The chopper system must be cleaned according to the instructions in section 'Cleaning the Chopper System'.
⚠ WARNING: The appliance is not suited for processing hot liquids! The temperature of the dishwater use for cleaning may not exceed 60°C to avoid damage and risk of electric shock.
- Use a sufficiently large, high walled mixing container (e.g. the blender container) and fill the container with warm dishwater (max. 60°C).
- If required, use a rubber spatula to scrape off any larger amounts of food (e.g. residues of fibres or heavy dough) from the wire tools.
- Install the used tool (wire tool or bar blender) at the motor unit. Ensure that the speed selector is set to "0" and plug in the motor unit (see: 'Operation').
-
Immerse the accessory into the dishwater, leaving at least 5 cm (2 inches) of free space to the motor unit. The bar blender must touch the bottom of the mixing container. Let the motor operate for a few seconds (see: 'Cleaning Immediately after Use').
-
Switch OFF (speed selector to "O") and unplug the motor unit. Remove the accessory from the motor unit (see: 'Processing via the Wire Tools' or 'Using the Bar Blender').
- Wipe the shaft of the accessories for cleaning. Then rinse thoroughly with clear water.
- Check, if there are any residues of food sticking to the accessory. If required, clean the accessory via the following sections.
- Dry the accessories thoroughly and leave them dry naturally for approx. 1/2 hours, where they are out of reach of young children.
REMOVING STUBBORN RESIDUES FROM THE WIRE TOOLS
⚠️ CAUTION: Do not attempt to perform the following procedures with the wire tools still assembled to the motor unit.
- Remove the wire tools from the motor unit (see: 'Processing via the Wire Tools').
- Soak the wire tools in warm dishwater for approx. 5 -10 minutes. Thereafter, wash the wire tools with a soft cloth. Rinse with clear water and dry thoroughly.
- Leave the wire tools dry naturally for approx. 1/2 hour where they are out of reach of young children.
THOROUGH CLEANING OF THE BAR BLENDER
⚠ WARNING: The blades of the bar blender are very sharp. Use extreme caution when working in the area of the blades to avoid injuries and damage.
Note
When cleaning the bar blender immediately after processing runny food, the procedure described above may do (see: 'Cleaning Immediately after Use'). With stubborn residues of glutinous food and fibres still sticking to the surfaces of the bar blender, proceed as follows.
- Ensure that the motor unit is switched OFF (speed selector at position "O"), and unplugged. Remove the bar blender from the motor unit (see: 'Using the Bar Blender').
- Then soak the bar blender in warm dishwater for 5 -10 minutes.
- Brush the bar blender using a soft nylon brush to remove any residues of food.
Doing so, please do not touch the blades with your hands to avoid injuries.
- Thereafter rinse the bar blender with clear water.
- Thoroughly wipe dry and leave the bar blender dry naturally for approx. 1/2 hour, where it is out of reach of young children.
CLEANING THE BLENDER CONTAINER
Note
The blender container may be used for short-time storing food. For this, the blender container can be closed via the appropriate lid. However, do not leave any food go off within the blender container.
- Wash the blender container and lid with warm dishwater and a soft cloth.
- Rinse thoroughly with clear water and dry thoroughly. Leave dry naturally for approx. 1/2 hour.
CLEANING THE CHOPPER SYSTEM
⚠ WARNING: The blades of the chopper knife are very sharp. Use extreme caution when cleaning the chopper knife to avoid injuries and damage the blades.
- Ensure that the motor unit is switched OFF (speed selector at position "O"), and unplugged. Remove the motor unit from the chopper system. Then disassemble the chopper system (see: 'Using the Chopper System').
- Wash all parts in warm dishwater, using a soft nylon brush. Special care is required, when cleaning the chopper knife to avoid injuries and damage.
- Stubborn residues can be removed after soaking the parts for approx. 5 -10 minutes in warm dishwater.
- Rinse all parts with clear water.
- Dry all parts thoroughly and leave dry naturally for approx. 1/2 hour, where they are out of reach of young children.
- After cleaning, you should re-assemble the chopper system to avoid that anyone may touch the blades unintentionally. For this, place the chopper knife into the chopper container. Then lock the chopper lid onto the chopper container (see: 'Using the Chopper System').
CLEANING THE MOTOR UNIT
⚠ WARNING: Before cleaning the motor unit always switch off (slide the speed selector to "O") and unplug the motor unit. Always remove the accessories. Do not pour or spill water or other liquids on the motor unit or leave any liquids run on or in the motor unit. Do not immerse the motor unit in liquids or place it on wet or damp surfaces. Always wipe off spilled liquids immediately. There are ventilation slits in the front plate and at the sides of the motor unit. Always ensure that no water can run or drip into the ventilation slits. Do not place the appliance or any part of it in an automatic dishwasher! We recommend to avoid cleaning the accessories in the automatic dishwasher.
⚠️ CAUTION: Do not poke in the tool couplings and drive compartment with any foreign objects to avoid damage to the motor unit. On normal operation, there is no need to clean the tool couplings and drive compartment.
- Switch off (speed selector to "O") and unplug the motor unit. Remove any accessories (see: 'Operation').
- Wipe the motor unit with a soft, damp, not dripping cloth. Remove any splashes, especially from the bottom of the housing.
- If required, wipe off any splashes of food from the power cord.
- Wipe dry the complete motor unit and power cord. Leave the motor unit dry naturally for approx. 1/2 hour where it is out of reach of young children.
STORAGE
⚠ WARNING: Young children must be supervised that they do not play with the appliance or any part of it. When the appliance is not in use, always slide the speed selector to "O" and unplug the appliance. Do not hold the appliance by the power cord or any attached accessory for moving the appliance to avoid damage.
For storage, you should not assemble any accessories at the motor unit. Always remove the motor unit from the chopper container for moving the appliance to prevent the chopper container or motor unit from falling down. Do not store any foreign objects within the containers of the appliance. Do not place any hard and/or heavy objects on the appliance or the accessories. Do not use any parts or accessories of the appliance for any other appliance or any other purpose than described in this booklet.
- Always clean the appliance and the accessories before storing (see: 'Care and Cleaning'). Always assemble the chopper system for storage (see: 'Using the Chopper System'). This way, the parts are protected against loss and unintentional touch.
Note
When storing the appliance for an elongated period of time, we recommend to leave the lids of the containers open to avoid the build-up of unpleasant odours. The power cord may never be knotted, twisted, pulled, strained or squeezed. Do not let the plug or power cord hang down.
-
Please store the motor unit on a stable, clean, dry, and level surface, where it is protected against inadmissible strain (e.g. mechanical or electric shock, frost, heat, direct sunlight) and out of reach of young children. Store the accessories with the appliance to avoid loss. You might loosely envelope the wire tools and bar blender in a soft clean cloth.
-
Lay the power cord besides the motor unit.
NOTES FOR DISPOSAL
Dispose of the appliance and packaging must be effected in accordance with the corresponding local regulations and requirements for electrical appliances and packaging. Please contact your local disposal company.
Do not dispose of electrical appliances as unsorted municipal waste, use separate collection facilities. Contact your local government for information regarding the collection systems available. If electrical appliances are disposed of in landfills, dumps, or refuse incineration, hazardous substances can leak into the groundwater or can be emitted into air, thus getting into the food chain, and damaging your health and well-being as well as poisoning flora and fauna. When replacing old appliances with new once, the vendor is legally obligated to take back your old appliance for disposal at least for free of charge.
INFORMATION AND SERVICE
Please check www.gastroback.de for further information.
For technical support, please contact GASTROBACK Customer Care Center by phone:
+49 (0)4165/22 25-0 or e-mail info@gastroback.de.
Please refer to our home page for a copy of these operating instructions in pdf format.
WARRANTY
We guarantee that all our products are free of defects at the time of purchase. Any demonstrable manufacturing or material defects will be to the exclusion of any further claim and within 2 years after purchasing the appliance free of charge repaired or substituted. There is no Warranty claim of the purchaser if the damage or defect of the appliance is caused by inappropriate treatment, over loading or installation mistakes. The Warranty claim expires if there is any technical interference of a third party without a written agreement. The purchaser has to present the sales slip in assertion-of-claim and has to bear all charges of costs and risk of the transport.
Note
Customers from Germany and Austria: For repair and service, please send GASTROBACK products to the following address:
Customers from other countries: Please contact your dealer.
Please agree that we cannot bear the charge of receipt. Submission of appliances: Please ensure packing the appliance ready for shipment without accessories. Add the sales slip and a short fault description. The processing time after receipt of the defective appliance will be approx. 2 weeks; we will inform you automatically. After the warranty period, please send defective appliances to the given address. You will get a free quotation and, thereafter, can decide, whether we shall repair the appliance to the costs possibly accrued, send back the defective appliance for free of charge, or dispose of the appliance for free of charge.
HOUSEHOLD USE
The appliance is intended for household use only and NOT suited for commercial, industrial or trade usage. Do not attempt to use this appliance in any other way or for any other purpose than the intended use, described in these instructions. Any other use is regarded as unintended use or misuse, and can cause severe injuries or damage. There is no warranty claim of the purchaser if any injuries or damages are caused by unintended use.
GASTROBACK GmbH
Gewerbestraße 20 • 21279 Hollenstedt / Germany Telefon +49(0)4165/2225-0 • Telefax +49(0)4165/2225-29 info@gastroback.de • www.gastroback.de

- ZUBEHÖRE
- TABLE OF CONTENTS
- DEAR CUSTOMER!
- IMPORTANT SAFEGUARDS
- GENERAL SAFETY INSTRUCTIONS
- IMPORTANT SAFEGUARDS FOR ELECTRICAL APPLIANCES
- MOVING PARTS - RISK OF INJURIES
- TECHNICAL SPECIFICATIONS
- KNOWING YOUR NEW HAND MIXER
- ACCESSORIES
- BLENDER CONTAINER WITH CONTAINER LID
- PROPERTIES OF YOUR NEW HAND MIXER
- SELECTING THE SPEED
- Note
- OVERLOAD PROTECTION
- TIPS FOR BEST RESULTS
- SELECTING THE REQUIRED ACCESSORY
- WHISKING
- PURÉEING, BLENDING, MIXING
- CHOPPING AND MINCING
- BEFORE FIRST USE
- OPERATION
- PROCESSING VIA THE WIRE TOOLS
- Installing the Wire Tools
- Operating the Wire Tools
- Removing the Wire Tools
- USING THE BAR BLENDER
- Installing the Bar Blender
- Processing via the Bar Blender
- Removing the Bar Blender
- Assembling the Chopper System
- Processing Your Food
- Removing the Motor Unit from the Chopper Container
- Disassembling the Chopper System
- SOLVING PROBLEMS
- CARE AND CLEANING
- CLEANING IMMEDIATELY AFTER USE
- REMOVING STUBBORN RESIDUES FROM THE WIRE TOOLS
- THOROUGH CLEANING OF THE BAR BLENDER
- CLEANING THE BLENDER CONTAINER
- CLEANING THE CHOPPER SYSTEM
- CLEANING THE MOTOR UNIT
- STORAGE
- NOTES FOR DISPOSAL
- INFORMATION AND SERVICE
- WARRANTY
- HOUSEHOLD USE
- GASTROBACK GmbH
Brand : Gastroback
Model : Design Handmixer Pro 40983
Category : Hand blender