
40969 - Hand blender Gastroback - Free user manual and instructions
Find the device manual for free 40969 Gastroback in PDF.


| Product Type | Hand Blender (Immersion Blender) |
| Brand | Gastroback |
| Model | 40969 |
| Power Rating | 700 W |
| Voltage | 220-240 V, 50/60 Hz |
| Dimensions (L x W x H) | Approx. 40 x 7 x 7 cm |
| Weight | Approx. 0.8 kg |
| Cable Length | 120 cm |
| Material | Stainless steel blending shaft, plastic handle |
| Functions | Blending, pureeing, emulsifying |
| Speed Settings | Variable speed with turbo boost |
| Blending Attachments | Removable stainless steel blade |
| Additional Accessories | Beaker (0.6 L) included |
| Cleaning | Detachable shaft for easy cleaning; hand wash recommended |
| Safety Features | Overheat protection, non-slip handle |
| Spare Parts Availability | Replacement blending shaft and blades available |
| Repairability | Moderate; professional service suggested for motor issues |
| Certifications | CE, GS |
| Warranty | 2 years |
Frequently Asked Questions - 40969 Gastroback
User questions about 40969 Gastroback
0 question about this device. Answer the ones you know or ask your own.
Ask a new question about this device
Download the instructions for your Hand blender in PDF format for free! Find your manual 40969 - Gastroback and take your electronic device back in hand. On this page are published all the documents necessary for the use of your device. 40969 by Gastroback.
USER MANUAL 40969 Gastroback
Instructions for use
DESIGN STAND MIXER ADVANCED

natural_image
Modern kitchen stand mixer with whisk, accompanied by food ingredients including egg, bowl, and cooking utensils (no visible text or symbols)Read all provided instructions before first use! Model and attachments are subject to change! For household use only!

Carefully read all provided instructions before you start running the appliance and pay attention to the warnings mentioned in these instructions.
Table of Contents
Knowing the Design Stand Mixer Advanced....30
Important Safeguards....31
Important Instructions....31
Safeguards for Daily Operation....31
Important Safeguards for all Electrical Appliances....33
Moving Parts - Risk of Injuries 33
Technical specifications....34
Features of your Design Stand Mixer Advanced 34
Speed Control 34
Tips for Use....35
Operating....36
Before First Use....36
Using your Design Stand Mixer Advanced....36
Attaching the bowl....36
Assembling the Processing Tools ....37
Operating the Appliance....37
Disassembling the Processing Tools ....38
Care and Cleaning 38
Storage....39
Notes for disposal....39
Information and service....39
Warranty 39
Recipes....40
Dear Customer!
The Gastroback Design Stand Mixer Advanced has a heavy metal housing with a timeless design. The high performance 800 watt motor makes processing food an ease and the planetary mixer evenly mixes all ingredients.
The appliance is perfectly suited for mixing, beating and blending foods (i.e. instant pudding, cocktail sauces, cream, crepe batter) and kneading pastry (i.e. shortcrust pastry or bread dough) or folding in ingredients (i.e. egg white). The Design Stand Mixer Advanced is straightforward in use and cleaning is quite easy.

natural_image
Close-up of a layered dessert with pink cream and white toppings, served on a glass plate with white flowers in the background (no text or symbols visible)KNOWING YOUR DESIGN STAND MIXER ADVANCED


natural_image
Abstract wireframe structure resembling a dome or cage-like form, no text or symbols present
natural_image
Metal hook-shaped object mounted on a black base (no text or symbols visible)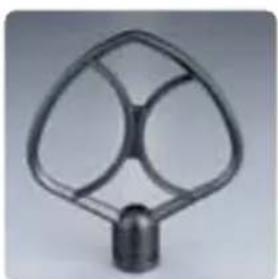
natural_image
Metallic mechanical component with three curved arms and a central hub (no text or symbols visible)A: whisker
B: dough hook
C: beater

natural_image
Close-up of a plated pizza with lettuce, cherry tomatoes, and green herbs (no text or symbols visible)
natural_image
Still life arrangement of dairy products including milk pitcher, butter, eggs, and nuts (no text or symbols visible)
natural_image
Close-up of a hand holding a glass with layered dessert and mint garnish (no text or symbols visible)
natural_image
Close-up of sliced food items on a plate (no visible text or symbols)
natural_image
Close-up of a layered dessert with chocolate topping and fruit toppings (no visible text or symbols)
natural_image
Close-up of a baked bread roll with golden-brown crust and visible grain (no text or symbols)IMPORTANT SAFEGUARDS
Carefully read all instructions before operating and save the instructions for further reference. Do not attempt to use this appliance for any other than the intended use, described in these instructions. Any other use, especially misuse, can cause severe injuries or damage by electric shock, fire or moving mechanical parts. When passing on the appliance to a third person, ensure to include these instructions. Never leave the appliance unattended when in operational mode.
Any operation, repair and technical maintenance of the appliance or any part of it other than described in these instructions may only be performed at an authorised service centre. Please contact your vendor.
Important Instructions
- The appliance is designed for normal household quantities. Do not operate or store the appliance outdoors or in damp or wet areas.
- Before use, always make sure that the appliance is properly and completely assembled. Always immediately unplug the appliance after each operation and before assembling or disassembling the beater, whisk or dough hook. Always ensure, that the processing tools are engaged firmly before connecting the appliance to the mains power supply (see >Operation<). Always handle the entire appliance and the tools with care and without violence.
- Do not touch the assembled processing tool (whisk, beater or dough hook) with your hands or any other objects when the appliance is connected to the poweroutlet.
- CAUTION: Do not use any other vessels or bowls then the provided bowl.
- CAUTION: Do not block the ventilation slits on the back of the appliance and do not use the appliance in continuous operation for more than 10 minutes to avoid overheating. If processing large quantities of food, regularly interrupt operation and unplug the appliance for a few minutes, to let the motor cool down.
- ATTENTION: Never switch on the appliance when the motor head is raised and never raise the motor head when the appliance is in operational mode. Risk of injury! Always ensure the appliance is switched >Off before raising or lowering the motor head.
- ATTENTION: Avoid contact the moving parts. Keep hands, hair, clothing, as well as spatula and other utensils, away from beater, whisk or dough hook during operation to prevent injury and/or damage to the mixer.
- ATTENTION: Keep hands and other utensils out of bowl while blending food to reduce the risk of severe injury to persons or damage to the unit. A scraper may be used but must be used only when the unit is not running.
- ATTENTION: DO NOT place the appliance, accessories or power cord in an automatic dishwasher.
- DO NOT immerse the motor housing or power cord in any liquids or spill any liquids on it.
Safeguards for Daily Operation
- The appliance is designed for normal household quantities. Do not operate or appliance outdoors or in damp or wet areas. Do not operate the appliance in continuous operation for more than 10 minutes to avoid overheating. If processing large quantities of food, interrupt operation after 10 minutes and unplug the appliance for a few minutes, to let the motor cool down.
- Do not attempt to operate the appliance using any parts or accessories not recommended by the manufacturer (i.e. processing tools). Especially the whisk, beater and dough hook are sensitive to careless handling. Do not operate the appliance, when the appliance or any part of it is likely to be damaged, to avoid risk of overheating, fire, electric shock or any other damage or injuries to persons. Do not attempt to open the motor housing or to repair the power cord. Check the entire appliance regularly for proper operation. The appliance is likely to be damaged if the appliance was subject to inadmissible strain (i.e. overheating, mechanical or electric shock) or if there are any cracks, excessively frayed parts, distortions or the gear stalls or stucks. The processing tools can get damaged or bend in case of inadmissible strain. In this case, immediately unplug the appliance and return the entire appliance (including all parts and accessories) to an authorised service centre for examination and repair. During operation do not block the ventilation slits at the back of the appliance.
- Always immediately unplug the appliance after each operation and before assembling or disassembling the processing tool. Always ensure, that the processing tool is engaged firmly before connecting the appliance to the mains power supply (see >Operation<). Never use force when assembling or disassembling the processing tools. To disassemble the processing tool push it upwards and turn it clockwise (regard the instructions >Assembling the processing tool)<) Always handle the entire appliance and the processing tools with care and without violence.
- Do not lift, pull or carry the appliance by the processing tool or power cord. To move the appliance, always hold on to the mixer stand.
- Before use, always make sure that the appliance is properly and completely assembled (see >Operation<).
- Close supervision is necessary when the appliance is used near young children. Do not let young children play with any parts of the appliance or the packing. The appliance is not intended for use by children or infirm persons without supervision. Take care that no one will pull the appliance by the power cord, especially when young children are near. Place the appliance on a clean, dry and stable surface where it is protected from inadmissible strain (i.e. mechanical or electric shock, overheating, frost, moisture, direct sunlight) and where young children cannot reach it.
- Operate the appliance on a well accessible, stable, level, dry, and suitable large table or counter. Do not place the appliance or any part of it on or near hot surfaces (heater, gas burner, grill or oven). Do not process hot food. Wait for the food to cool down. The rising steam and condensation on the appliance can damage the appliance. Do not place the appliance near the edge of the table or counter or on inclined or wet surfaces or where it can fall. Always unplug the appliance when not in use. Place the appliance on a stable and level surface.
- Do not immerse the appliance or power cord in water or any other liquid. Do not pour or drip any liquids on the motor head or power cord. When liquids are spilled on the motor head, immediately unplug the appliance and dry the motor head to avoid risk of electric shock or fire. Do not attempt to operate the appliance, when liquids are on or in the motor head. With the appliance connected to the power supply, do not touch the appliance with wet hands or when the appliance is damp or wet or is touching wet surfaces. In this case immediately unplug the power cord from the power supply and dry the appliance (see >Care and Cleaning<).
- Do not place the appliance, accessories or power cord in an automatic dishwasher!
- To avoid damage, do not use any abrasive cleaners, corrosive chemicals (i.e. disinfectants, bleach) or cleaning pads for cleaning. Do not use any hard or sharp utensils for operation
or cleaning. Keep the appliance away from sharp edges. Do not leave any food dry on the surfaces of the appliance.
- The appliance is intended for blending and mixing food only. Do not use the appliance for any other purpose, especially, do not process any liquids containing inflammable or corrosive solvents (i.e. paint or lacquer). Fumes of volatile solvents coming in contact with the motor, could catch fire and explode!
Important Safeguards for all Electrical Appliances
- Ensure that the voltage rating of your mains power supply corresponds requirements of the appliance (220/240 V, 50 Hz, AC). Always connect the appliance directly to a mains power supply wall socket with protective conductor (earth/ground) connected properly. The installation of a residual current safety switch with a maximum rated residual operating current of 30 mA in the supplying electrical circuit is recommended. If in doubt, contact your local electrician for further information. Do not use any multiple desk socket.
- Do not leave the appliance unattended while connected to the power supply. Always switch >Off< the appliance and immediately unplug the appliance after operation and if it is not in use, cleaning and/or assembling or disassembling the processing tools. Always grasp the plug to disconnect the appliance from the power outlet.
- Always handle the power cord with care. Do not pull or strain the power cord. The power cord may never be knotted or squeezed. Do not let the power cord hang over the edge of the table or counter. Take care not to entangle in the power cord.
- Do not touch the appliance with wet hands to avoid risk of electric shock. Do not touch the appliance, when it is damp or wet and connected to the mains power supply. In this case, immediately unplug the appliance to avoid risk of electric shock and damage.
Moving Parts - Risks of Injuries
- Do not touch the assembled processing tool (whisk, beater or dough) hands or any other objects (hair, clothes, brushes, cooking utensils), when the appliance is connected to the power supply. Always switch >Off< the appliance, unplug the appliance and wait for the motor to stop, before assembling/disassembling or cleaning the appliance and when not in use.
- ATTENTION: Keep hands and other utensils out of bowl while blending food to reduce the risk of severe injury to persons or damage to the unit.
• Always handle the whole appliance with care and without violence to avoid injuries to persons and damage. - Always lower the motor head with the assembled processing tool first, then attach the splash guard and then turn on the appliance. This way you avoid splashing.
- ATTENTION: Never use any other bowls then the provided. Ensure the bowl is firmly attached before you start operating the appliance.
TECHNICAL SPECIFICATIONS
| Model: | Art.-Nr. 40969 Design Stand Mixer Advanced |
| Power supply: | 230 V AC, 50 Hz |
| Maximum power consumption: | 800 W |
| Length of power cord: | approx. 154 cm |
| Weight: | approx. 9.9 kg |
| Dimensions: | approx. 418 x 243 x 380 mm(width x depth x height) |
| Certification: | CE |
FEATURES OF YOUR DESIGN STAND MIXER ADVANCED
Processing Tools
The appliance is delivered with three processing tools:
- Whisk: for liquid food (i.e. drinks, sauces, frothy desserts, pancake batter, whipped cream, egg whites and more)
• Dough hook: for pastry, potatoes or butter. - Beater: for stirring flour or fruit into cake mixes or making short crust pastry.
When assembled correctly, the processing tool accurate engage to the drive of the motor head and will not fall or wobble. To release the processing tool push the processing tool upwards (direction motor head) and turn it clockwise (chapter >Assembling the processing tool).
WARNING: Always switch >Off< the appliance (speed control in position >Off<) and wait until the motor stops completely before assembling or disassembling the processing tool.
ATTENTION: Always turn off the appliance before rising the motor head. Risk of injury.
Speed Control
The Design Stand Mixer Advanced features a speed control with 10 speed settings and >Off switch:

natural_image
Close-up of a glossy black circular object with white markings, possibly a device knob or dial (no readable text or symbols)| Speed Setting Use for ... | |
| Off assembling and disassembling | the processing tools. |
| Stir | starting a mixing process, mixing dry ingredients or to fold liquids into dry dough - slowest speed. |
| 2-3 | slow mixing, making yeast dough or other heavy dough, processing potatoes and other vegetables, to fold butter into dough and for mixing liquid dough. |
| 4-5 | making medium pastry, cookie dough, cake mixes, or to fold sugar into egg white or sponge mixture - medium speed. |
| 6-7 whisking and beating dough | - fast speed. |
| 8-10 | for making fluffy, light dough, to froth up eggs, making whipped cream, egg white, sponge or other airy dough. |
ATTENTION: Do not use a high speed mixing heavy dough. Overloading will damage the motor and the processing tools.
WARNING: Always lower the motor head with the assembled processing tool before you turn the appliance >On<. Ensure no foreign utensils such as a spatula, spoon, etc. are inside the bowl when turning the appliance >On<.
You change and choose a speed by turning the speed control. Always start the operation on the lowest speed level. Slowly arise the speed control until reaching the desired speed. This way you avoid splatter.
ATTENTION: Never process heavy dough with the whisk. The whisk can bend and will damage.
To turn the appliance >Off< you have to turn the speed control anticlockwise into the >Off<-position.
Tips for Use
- ATTENTION: Never switch the appliance >On< when the motor head is raised and never raise the motor head when the appliance is in operational mode. Risk of injury! Always ensure the appliance is switched >Off< before raising or lowering the motor head.
- Attend to add dry and liquid ingredients by turns.
- Choose a slow speed when mixing liquid food to avoid splashes. Wait for the dough to set before arising the speed.
- Choose the slowest speed when you start mixing and arise speed slowly up to the desired speed setting.
- When adding ingredients do not pour them directly onto the processing tool. Add them on the side of the bowl. The provided splash guard eases the sideways adding.
- Add liquid ingredients slowly otherwise the liquid will gather in the middle of the bowl and even mixing is getting more difficult.
- Process cake mixtures with the medium speed levels (4 - 5) and arise to the faster levels (7 - 8). Refer to the instructions of the recipe for best mixing results.
- Use the beater for adding heavy ingredients such as nuts, raisins, chocolatepieces or dried fruit and choose a slow speed level. The added ingredients wont get squashed this way but get carefully folded into the dough. For adding heavy ingredients the dough should be heavy
otherwise the ingredients will settle on the base of the cake pan. Flour sticky fruit before adding them to the dough.
- For yeast dough and other heavy dough use dough hook only and a slow speed (max speed lever 2). Overheating and overloading will damage the appliance.
- For best results warm up the bowl before making yeast dough. Therefore rinse the bowl with hot water. For the case that the dough sticks to the dough hook keep on processing the dough until smooth and even.
- WARNING: Do not process hot food. Wait for the food to cool down. The rising steam and condensation on the appliance can damage the appliance.
- Use the whisk for beating the white of eggs and ensure the bowl is dry or clean. Slowly arise the speed up to level 8 - 10 and check the consistency of the eggs. The white of egg is ready when it is stiff and shiny and when it sticks to the whisk taking the whisk out of the bowl. Do not beat the white of eggs too long otherwise the froth will irreversible separate from liquid.
- Chill the bowl when making whipped cream and only use chilled whipped cream. Slowly arise the speed up to level 8 - 10 and check the consistency of the whipped cream. The whipped cream is stiff when it sticks to the whisk taking the whisk out of the bowl. Do not overprocess the whipped cream.

lock
OPERATING
Before First Use
Remove all promotional materials and packing as well as any foreign objects, but do not remove the model label. Before first use and after a long period of storage, clean the processing tools in warm soapy water (see >Care and Cleaning<).

natural_image
Close-up of a kitchen mixer blending liquid into a bowl, no visible text or symbolstighten
Using the Design Stand Mixer Advanced
WARNING: Always switch >Off< the appliance, wait until the motor stops completely and unplug the appliance before rising the motor head or assembling/disassembling the processing tool. To turn the appliance >Off< you have to turn the speed control anticlockwise into the >Off<-position.
Push the head release lever with your right hand upwards (picture A). Grab hold to the motor head in front of the processing tool with your left hand and rise the motor head until locked into position.
NOTE: Release the head release lever as soon as it is possible to rise the motor head. The head release lever will lock in the lower position as soon as the motor head is risen all the way up.
Attaching the bowl
Take the bowl and place it on the bowl fitting. There are guiding pins on the base of the bowl and matching cannelure on the bowl fitting. With your right hand grab hold to the handle of the bowl and turn the bowl clockwise until it fits tight to the bowl fitting and is locked in position (picture B).
NOTE: Use the provided bowl only.

natural_image
Close-up of a mechanical component with a cylindrical shaft and arrow indicator (no text or symbols)Guiding pin of the motor head drive
Assembling the processing tools
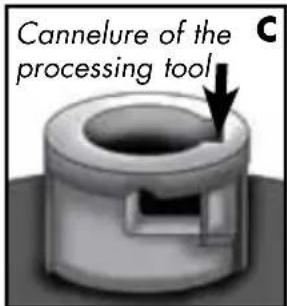
Take the processing tool you want to use into your right hand. On the top of the attachment of the processing tool is a cannelure (picture C).
The motor head drive has a matching guiding pin (picture D).
Slide the attachment of the processing tool over the drive of the motor head (picture E). Ensure the guiding pin slides through the cannelure of the attachment of the processing tool.
Push the processing tool upwards until the metal spiral compresses and you are able to turn the processing tool anticlockwise (picture F).
The processing tool is properly assembled when the guiding pin is locked in position (picture G).
Operating the appliance
Place the food into the bowl.
Grab hold of the motor head in front of the processing tool with your left hand and rise the motor head slightly upwards.
NOTE: When the motor head is locked in position the head release lever is locked as well. To release the head release lever slightly rise the motor head.
Push the head release lever (picture H) with your right hand upwards. The motor head is now released and you can lower it carefully.
NOTE: Do not drop the motor head. The motor head is very heavy and the pivoted joint would get damaged if the motor head falls down with active force.
Attach the splash guard to the top of the bowl, connect the power cord to the outlet and turn the appliance >On<. Select a slow speed to start with and slowly arise the speed level until reaching the desired speed.
Add ingredients sideways. For adding ingredients you do not need to remove splash guard. For more information regard to >Tips for usage>.
CAUTION: Do not block the ventilation slits on the back of the appliance and do not use the appliance in continuous operation for more than 10 minutes to avoid overheating. If processing large quantities of food, regularly interrupt operation and unplug the appliance for a few minutes, to let the motor cool down.
As soon as the food has the right consistency turn the appliance >Off< by turning the speed control anticlockwise into the >Off<-position (picture I). Pull the plug.
ATTENTION: Never switch >On< the appliance when the motor head is raised and never raise the motor head when the appliance is in operational
mode. Risk of injury! Always ensure the appliance is switched >Off before raising or lowering the motor head.
ATTENTION: Avoid contact the moving parts. Keep hands, hair, clothing, as well as spatula and other utensils, away from beater, whisk or dough hook during operation to prevent injury and/or damage to the mixer.

natural_image
Close-up of a mechanical component with a cylindrical shaft and flanged base (no visible text or symbols)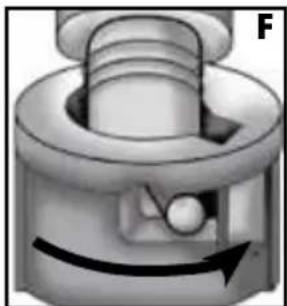
natural_image
Cross-sectional diagram of a mechanical component with internal structure and rotation arrow (no text or symbols)


natural_image
Close-up of a black spherical object with a white curved arrow pointing to its surface (no text or symbols visible)ATTENTION: Keep hands and other utensils out of bowl while blending food to reduce the risk of severe injury to persons or damage to the unit. A scraper may be used but must be used only when the unit is not running.
Take the splash guard off the bowl.
Push the head release lever with your right hand upwards (picture J). Grab hold of the motor head in front of the processing tool with your left hand and rise the motor head. Rise the motor head until locked into position.
NOTE: Release the head release lever as soon as you are possible to rise the motor head. The head release lever will lock in the lower position as soon as the motor head is risen.
Disassembling the processing tools
Push the attachment of the processing tool upward until it is released of the indent (picture K). Turn the processing tool clockwise until the guiding pin of the motor head fits through the cannelure of the processing tool (picture L/M).
You can release the processing tool now by pulling it downward.
Clean the appliance after use in accordance to the instructions in chapter Care and Cleaning. Do not leave any food dry on the surfaces of the appliance.
CARE AND CLEANING
WARNING: To avoid injuries to persons and damage, always switch 'Off' the appliance, wait for the motor to stop completely and unplug the appliance immediately after operation and before disassembling or cleaning the appliance. With the appliance connected to the power supply, do not touch the assembled tools with your hands or any objects.
DO NOT place the appliance, accessories or power cord in an automatic dishwasher. Do not immerse the motor housing or power cord in any liquids or spill any liquids on it. Always wipe off spilled liquids immediately.
CAUTION: Do not use abrasive cleaners, cleaning pads, corrosive chemicals (disinfectants, bleach) or any sharp or hard objects (i.e. metal scouring pads) for cleaning, for this could damage the surfaces. Carefully clean the appliance with a damped sponge or cloth and warm soapy water.
- Switch >Off< (speed control into >Off<-position), wait for the motor to stop completely and unplug the appliance from the power outlet.
- Disassemble the processing tool regarding the instructions >Disassembling the processing tools.
- Clean the processing tool with a soft nylon washing brush and warm dish-water. Rinse the processing tool thoroughly under running water.
ATTENTION: Do not clean the processing tool in an automatic dish-washer.


natural_image
Mechanical component diagram showing a rotating shaft and housing with an arrow indicating rotation direction (no text or symbols)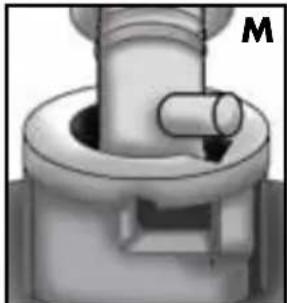
natural_image
Close-up of a mechanical component with a cylindrical shaft and flange, labeled 'M' in the corner (no other text or symbols)
natural_image
Close-up of a kitchen mixer with whisk inside a metal bowl, no visible text or symbolsSoak stubborn residues on the processing tool in warm dish-water for approximately 10 minutes and then remove the residues with a soft sponge.
WARNING: Do not place the motor housing, accessories or power cord in an automatic dishwasher. Do not use any hard or sharp utensils for cleaning. Do not immerse the appliance or power cord in water or any other liquid. Do not pour or drip any liquids on the appliance or power cord. Do not place the appliance on wet or damp surfaces. When liquids are spilled on the appliance, immediately unplug the appliance and dry it to avoid risk of electric shock or fire. Always handle with care and without violence.
-
Wipe the appliance and power cord with a damp soft cloth. Take care not to spill or drip water or any other liquids on the appliance.
-
Thoroughly dry the appliance and all parts of the appliance after each cleaning. Leave all parts dry naturally where they are out of reach of young children.
STORAGE
Always clean the appliance before storing (see >Care and Cleaning).
Ensure to store the appliance where it is clean, dry and safe from frost, direct sunlight and inadmissible strain (mechanical or electric shock, heat, moisture) and where it is out of reach of young children. Place the appliance on a clean and stable surface, where it can not fall. Do not place any hard or heavy objects on the appliance.
NOTES FOR DISPOSAL
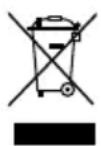
Dispose of the appliance and packaging must be effected in accordance with the corresponding local regulations and requirements for electrical appliances and packaging. Please contact your local disposal company.
Do not dispose of electrical appliances as unsorted municipal waste, use separate collection facilities. Contact your local government for information regarding the collection systems available. If electrical appliances are disposed of in landfills or dumps, hazardous substances can leak into the groundwater and get into the food chain, damaging your health and well-being. When replacing old appliances with new once, the retailer is legally obligated to take back your old appliance for disposal at least for free of charge.
INFORMATION AND SERVICE
Please check www.gastroback.de for further information. For technical support, please contact Gastroback Customer Care Center by phone: +49 (0)4165/22 25-0 or e-mail: info@gastroback.de.
WARRANTY
We guarantee that all our products are free of defects at the time of purchase. Any demonstrable manufacturing or material defects will be to the exclusion of any further claim and within warranty limits of the law free of charge repaired or substituted. There is no warranty claim of the purchaser if the damage or defect of the appliance is caused by inappropriate treatment, over loading or installation mistakes. The warranty claim expires if there is any technical interference of a third party without an written agreement.
The purchaser has to present the sales slip in assertion-of-claim and has to bear all charges of costs and risk of the transport.
RECIPE IDEAS
Speedy Processor Pizza Dough
2 cups (approx. 240 g) all-purpose flour
1 package (7 g) active dry yeast
1 tablespoon sugar
3/4 teaspoon salt
1 tablespoon vegetable oil
3/4 cup (180 ml) hot tap water
Operate according to the instructions >Operating>. Assemble the dough hook. Add flour, yeast, sugar and salt to bowl, lower the motorhead according to the instructions 'To operate the appliance', attach the splash guard to the bowl and process shortly on low speed to blend.
Add vegetable oil to hot water. With motor running on low speed, slowly add water/oil mixture sideways (should take about 30 seconds). Continue processing to knead dough for 12 to 1 minute. Stop the appliance, and test dough for stickiness. If dough is still sticky, process to knead for another 15 to 30 seconds. Let dough rest 10 minutes.
Remove splash guard, rise the motorhead and take the dough out of the bowl. On floured board, fold dough over 3 or 4 times to knead slightly. For 1 large pizza baked in a 38 x 25 x 2 cm backing pan, roll dough out to about that size, and transfer to greased pan. Gently push dough out to cover pan and form crust edge up sides of pan. For 2 thin crust pizzas (about 30 cm diameter), divide dough in half. Roll dough out to form a circle, and transfer to greased pizza pans. Shape crust partially up sides of pan to form crust edge. (Dough will be thin, and be sure to push dough together if any holes or rips occur.) Cover crust with pizza sauce, vegetables and cheeses as desired.
Bake at 220°C for 18 to 20 minutes for large, single pizza, or about 12 to 15 minutes for thinner, round pizzas. (Makes: 1 large, or 2 smaller pizza crusts.)
Basic White Bread
3,5 cups (approx. 420 g) all-purpose flour
3 tablespoons soft butter, divided in 4 pieces
2 tablespoons sugar
1 teaspoon salt
1 package (7g) active dry yeast
14 cup (approx. 60 ml) warm water
2/3 cup (approx. 160 ml) warm water
Operate according to the instructions >Operating<. Assemble the dough hook. Add flour, butter, sugar and salt to bowl, lower the motorhead according to the instructions >Operating the appliance<, attach the splash guard to the bowl and process shortly on low speed to blend. In measuring cup, add yeast to 14 cup water. Stir to mix, and allow to dissolve, about 10 minutes. With motor running on low speed, slowly add yeast mixture and water sideways (should take about 30 seconds). Continue processing to knead dough for 45 seconds. Stop the appliance, remove splash guard, rise the motorhead and scrape dough from sides of the bowl.
Lower the motorhead, replace the splash guard and process to knead for another minute. Turn off the appliance, remove the splash guard, rise the motorhead, take the dough out, shape into ball and place in a greased mixing bowl. Cover; let rise in warm place until doubled in size, about 1 to 1-1/2 hours. Turn the dough once and let rest for another 15 minutes.
Shape to fit 23 x 23 x 8 cm greased bread pan. Cover and let rise again in warm place until dough has risen about 1-inch over sides of pan, about 1 hour. Bake in preheated 200°C oven about 35 to 40 minutes, or until golden brown. Take out of pan immediately. (Makes: 1 loaf.)
One Crust Standard Pie Crust
1 cup (approx. 120 g) all-purpose flour
12 teaspoon salt
14 cup (approx. 55g) Palmin Soft
1 tablespoon butter or margarine, well chilled
3 tablespoons cold water
Operate according to the instructions >Operating>. Assemble the dough hook. Add flour, salt, Palmin Soft, and butter to bowl, lower the motorhead according to the instructions >Operating the appliance<, attach the splash guard to the bowl and process shortly on low speed until particles resemble coarse crumbs, about 15 seconds. Add water all at once sideways with motor running. Process until dough forms a ball, or no more than 20 seconds. If dough does not form a ball, stop the appliance. Remove splash guard, rise the motorhead and take out the dough. Gently shape dough into a ball with hands. Roll out for pie, or as directed in recipe. If crust is to be baked before filling, prick generously with fork.
Bake in preheated oven at 230irc C until golden brown, about 9 - 10 minutes. Makes: 1 (23 cm) pie crust.
Banana Cake with Cream Cheese Frosting
2¼ cups self raising flour
12 teaspoon salt
1 teaspoon cinnamon
12 teaspoon nutmeg
2 eggs
180g butter, room temperature, chopped
12 cup buttermilk
1 ½ cups raw sugar
1 teaspoon white vinegar
1 teaspoon vanilla essence
1 12 cups very ripe mashed banana
Preheat oven to 180 °C. Grease and line a 20cm baba pan. Sift flour, salt, cinnamon and nutmeg into a large bowl. Operate according to the instructions >Operating<. Assemble the whisk. Add butter, sugar and vanilla essence to bowl, lower the motorhead according to the instructions >Operating the
appliance<, attach the splash guard to the bowl and process until creamy. Slowly rise speed until reaching medium speed level. Add the eggs sideways and sir until dough is fluffy and creamy. Add vinegar, banana and buttermilk by turns and stir until ingredients are combined (mixture will separate at this stage but will come back together when mixed with dry ingredients).
Turn the appliance off, remove the splash guard, rise the motorhead, disassemble the whisk and assemble the dough hook. Lower the motorhead, attach the splash guard and add flour, salt, cinnamon and nutmeg by turns sideways. Mix on slow speed until combined.
Turn off the appliance, remove splash guard, rise the motorhead and pour mixture into prepared tin and bake for about 40 minutes or until cooked when tested with a skewer. Allow cake to cool in pan for 5 minutes before transferring to a wire rack to cool.
Cream Cheese Frosting
250 g softened cream cheese
60g butter
1 teaspoon vanilla
3 cups icing sugar mixture
14 cup passionfruit pulp
Combine cream cheese, butter and vanilla in the bowl. Operate according to the instructions >Operating<. Assemble the whisk, lower the motorhead according to the instructions >Operating the appliance<, attach the splash guard to the bowl and beat until smooth. Add the icing sugar mixture and beat until smooth. Reduce speed and add passionfruit. Spread over cooled cake.
Baked Lemon Cheesecake
250 g plain biscuit crumbs
2 teaspoons nutmeg
125 g butter, melted
250 ml thickened cream
3 eggs
12 cup caster sugar
2 teaspoon grated lemon rind
2 tablespoons lemon juice
500 g cream cheese, room temperature, cubed
Operate according to the instructions >Operating>. Assemble the dough hook. Add biscuit crumbs, nutmeg and melted butter and process on slow speed until combined. Scrape sides if necessary. Turn the appliance off, remove the splash guard, rise the motorhead and take out the dough. Press crumb mixture into the base and sides of a greased 20cm spring form pan. Place on a baking tray and refrigerate for 30 minutes.
Disassemble the dough hook and assemble the whisk. Lower the motorhead, attach the splash guard, add eggs and sugar to bowl and beat until creamy. Slowly rise speed until reaching medium speed level. Add thickened cream, lemon juice, lemon rind, and cream cheese by turns sideways and mix until creamy.
Turn off the appliance, remove splash guard, rise the motorhead and pour mixture into crust and bake in oven at 160irc for approximately 50 minutes or until firm. Cool in oven with door ajar. Refrigerate for several hours before serving.
Chocolate Cake
| 1 12 cups | self-raising flour |
| 12 cup | cocoa |
| 1 12 cups | caster sugar |
| pinch of | salt |
| 150 g | butter or margarine, at room temperature |
| 2 | eggs |
| 1 cup | milk |
Preheat oven to 180 °C, grease and line a 23cm cake tin. Operate according to the instructions >Operating<. Assemble the whisk. Add eggs, butter and sugar to bowl, lower the motorhead according to the instructions >Operating the appliance<, attach the splash guard to the bowl and process until creamy. Slowly rise speed until reaching medium speed level.
Add flour, cocoa and salt by turns sideways. Mix until combined. With motor running on low speed, slowly add milk and mix for 5 - 10 seconds. Turn the appliance off, remove the splash guard, rise the motorhead and scrape sides of the bowl. Lower the motorhead, attach the splash guard and beat until smooth. Turn off the appliance, remove splash guard, rise the motorhead and pour mixture into prepared cake tin. Bake in oven for approximately 34 - 40 minutes or until firm. Allow the cake to cool for 5 minutes then remove from baking pan. In the meantime prepare the chocolate icing (see over). Once the cake is completely cooled, ice with the chocolate icing.
Chocolate Icing
40 g butter
2 tablespoons cocoa
14 cup milk
2 cups icing sugar
Add all ingredients to bowl. Operate according to the instructions >Operating>. Assemble the whisk, lower the motorhead according to the instructions >Operating the appliance<, attach the splash guard to the bowl and beat until well combined. Spread over cooled cake.
Basic Buttercake
| 185 g | butter or margarine, at room temperature |
| 1 cup | caster sugar |
| 12 teaspoon | vanilla |
| 3 | eggs |
| 2 cups | self-raising flour |
| 14 cup | milk |
Preheat oven to 180°C, grease and line a 23 cm cake tin. Operate according to the instructions 'Operating'. Assemble the whisk. Add butter, sugar and vanilla to bowl. Lower the motorhead according to the instructions 'To operate the appliance', attach the splash guard to the bowl and beat until creamy. Slowly rise speed until reaching medium speed level. Add eggs sideways and beat on high speed until creamy.
Turn off the appliance, remove splash guard, rise the motorhead. Disassemble the whisk and assemble the beater. Lower the motorhead, attach the splash guard to the bowl and add flour and milk by turns sideways. Beat on slow speed until just combined. Do not over process. Turn off the appliance, remove splash guard, rise the motorhead and pour mixture into prepared cake tin. Place cake tin into the oven and bake for
40-50 minutes or until cooked, when tested with a wooden skewer. Allow the cake to cool slightly and remove from baking pan.
Ganache
300 g rich, dark chocolate
200 ml cream
Place chocolate into a clean, dry, heat-proof glass bowl. Heat the cream in a small saucepan and bring to the boil.
Pour the cream into the glass bowl over the chocolate and stir until the mixture is smooth and glossy. Allow mixture to almost set in refrigerator. Then spread over cake with a spatula and place in fridge to finish setting.
Lemon Lime Tart
Sweet Shortcrust pastry
| 114 cups | plain flour |
| 1/3 cup | icing sugar mixture |
| 1/4 cup | almond meal |
| 125g | butter |
| 1 | egg yolk |
| 1 - 2 teaspoons cold water | |
Lemon lime Filling
| 1 tablespoon grated lemon rind | |
| 1/3 cup | (80 ml) fresh lemon juice |
| 1/4 cup | (60 ml) fresh lime juice |
| 5 eggs | |
| 1 cup | (220 g) caster sugar |
| 200 ml | thickened cream |
Operate according to the instructions >Operating>. Assemble the dough hook. Add flour, icing sugar, almonds and butter to bowl, lower the motorhead according to the instructions >Operating the appliance<, attach the splash guard to the bowl and mix on slow speed until well combined. Add eggs and water by turns sideways and process until mixture forms a ball. Turn off the appliance, remove splash guard, rise the motorhead and knead pastry until smooth then shape into a disk. Wrap pastry in plastic wrap and refrigerate for 30 minutes. Grease a 24 cm round loose-based flan tin. Roll pastry, between two sheets of baking paper, large enough to line tin. Lift pastry into tin and press into sides; trim edges. Cover and refrigerate for 40 minutes.
Preheat oven to 200irc c. Place tin on oven tray; line tin with baking paper then fill with dried beans. Bake for 10 minutes then remove beans and paper and cook in oven for a further 10 minutes or until pastry is lightly browned; remove from oven and reduce heat to 160irc c.
For the lime filling clean bowl. Disassemble dough hook and assemble whisk. Add all ingredients for the filling to bowl, lower the motorhead, attach the splash guard to the bowl and mix until well combined. Turn off the appliance, remove splash guard, rise the motorhead and carefully pour into pastry case and bake for about 35 minutes or until set. Cool in tin before serving.
Chocolate Mousse
| 200 g | plain cooking chocolate |
| 30 g | butter, cubed, at room temperature |
| 4 | eggs |
| 40 g | sugar |
| 1 tablespoon | fresh cream |
Break chocolate into pieces and place in a bowl. Melt the chocolate by placing the bowl over a saucepan of simmering water. Add 2 tablespoons of water and the cubed butter to the chocolate and stir to obtain a smooth texture.
Operate according to the instructions >Operating<. Assemble the whisk. Add 2 egg yolks and half the quantity of sugar, lower the motorhead according to the instructions >Operating the appliance<, attach the splash guard to the bowl and beat for 30 seconds until creamy. Slowly rise speed until reaching medium speed level. Lower speed and add turn by turn sideways cream and continue to mix for a further 15 seconds slowly rising the speed. Lower speed and slowly add chocolate mixture. Slowly rise speed and mix for 20 seconds. Turn off the appliance, remove splash guard, rise the motorhead and carefully pour the mixture into a glass bowl.
Clean the bowl and whisk. Assemble the whisk. Add the egg whites to bowl, lower the motorhead, attach the splash guard to the bowl and mix until soft and peaks form. Add a pinch of salt and the remaining quantity of sugar sideways and continue to mix for a further 10 seconds.
Turn off the appliance, remove splash guard, rise the motorhead disassemble whisk and assemble beater. Add chocolate mixture to egg whites, lower the motorhead, attach splash guard and slowly fold mixture (as little as possible). Turn off the appliance, remove splash guard, rise the motorhead and pour mixture into serving bowls and place in the fridge to chill for at least 2 hours before serving.
Pikelets (Scottish Pancakes)
Makes approx. 24
2 large eggs
12 cup sugar
1½ cups milk
2 cups self raising flour
pinch salt
Operate according to the instructions >Operating<. Assemble the whisk. Add eggs and sugar to bowl, lower motorhead, attach splash guard and mix until creamy. Slowly rise speed until reaching high speed. Lower speed and add sideways the remaining ingredients. Mix until well combined slowly rising the speed.
Turn off the appliance, remove splash guard, rise the motorhead and pour mixture into a jug and refrigerate for 30 minutes. Place tablespoon amounts of mixture into a lightly greased frying pan until golden on each side. Serve with butter.
Crepes
Serves 4 - 6
3 eggs
60 g butter, melted
1¼ cups milk
250 g plain flour
2 tablespoons castor sugar
pinch salt
Operate according to the instructions >Operating<. Assemble the whisk. Add eggs and sugar to bowl, lower motorhead, attach splash guard and mix until creamy. Slowly rise speed until reaching high speed. Lower speed and add sideways the remaining ingredients. Mix until well combined slowly rising the speed.
Turn off the appliance, remove splash guard, rise the motorhead and pour mixture into a jug and stand for 15 minutes. Heat an electric skillet or crepe pan. Pour about 3 tablespoons of batter into the pan. Tilt the pan to spread the mixture evenly. Cook over a low heat on both sides until golden. Repeat with remaining mixture. Serve crepes with lemon juice and sugar.
Chocolate Chip Cookies
125g butter or margarine, at room temperature
½ cup brown sugar, lightly packed
12 cup caster sugar
12 teaspoon vanilla
1 egg
1 3/4 cups self-raising flour
14 teaspoon salt
1 cup chocolate chips
Preheat oven to 180irc C and grease oven trays.
Operate according to the instructions >Operating>. Assemble the whisk. Add butter, eggs, sugar and vanilla to bowl, lower motorhead, attach splash guard and mix until creamy. Slowly rise speed until reaching high speed. Turn off the appliance, remove splash guard, rise the motorhead disassemble whisk and assemble dough hook. Lower the motorhead, attach splash guard and turn by turn add sideways flour and salt. Mix on slow speed until combined. Add the chocolate chips and continue to mix until the mixture is just combined.
Turn off the appliance, remove splash guard, rise the motorhead and with a tablespoon, spoon mixture into small balls and place onto the oven tray, allowing room for spreading. Place trays into the oven and bake for 15 minutes or until cooked. Allow to cool on trays.
Basic Waffle recipe
Makes 1-2 waffles:
1 egg
4 tablespoons unsalted butter, melted and cooled
| 1 | heaped tablespoon sugar |
| 1 | small pinch salt |
| 100 ml | milk (round about) |
| 6 | heaped tablespoon flour |
Operate according to the instructions >Operating<. Assemble the whisk. Add melted butter and egg, sugar and salt to bowl, lower motorhead, attach splash guard and mix until creamy. Slowly rise speed until reaching high speed. Lower speed and add flour sideways. Mix until combined. Add as much milk as it needs to make the batter easy to pour. Turn off the appliance, remove splash guard, rise the motorhead and prepare your waffles according to the instructions of your wafflemaker.
Tip: Flavour and spice the batter ad libitum using i.e. gingerbread spices, vanilla flavour, chocolate flavour or cinnamon.
Classic belgian waffles
Classic Belgian waffles have a crispy outside and are soft and moist on the inside. They are often served as part of a celebration – even to celebrate something as simple as a beautiful day. Try these waffles with your favourite syrup or a topping such as sliced fresh strawberries and freshly whipped cream.
Makes 10 waffles:
355 ml water
2¼ teaspoons active dry yeast
packet)
3 cups (approx. 360 g) sifted
flour
14 teaspoon salt
3 large eggs, separated + 1
egg white
1/3 cup (approx. 75 g) sugar
236 ml milk
8 tablespoons unsalted butter, melted and cooled
2 teaspoons vegetable oil
2 teaspoons vanilla extract
Heat 12 of the water to lukewarm.
NOTE: Do not use water that is too hot because the yeast wont rise. In a separate bowl dissolve the yeast in the water with a pinch of the sugar from the recipe; let stand 5 to 10 minutes, until the mixture begins to foam.
Operate according to the instructions >Operating>. Rinse the bowl with warm water before usage. Assemble the whisk. Add egg yolks, egg white and sugar to bowl, lower motorhead, attach splash guard and mix on slow speed until just combined. Add remaining water, milk, oil and vanilla by turns sideways and mix until the mixture is smooth. Turn off the appliance, remove splash guard, rise the motorhead disassemble whisk and assemble beater. Lower the motorhead, attach the splash guard and add flour sideways. Beat until smooth. In separate bowl beat the egg whites until stiff peaks form. Turn off the appliance, remove splash guard, rise the motorhead, add egg whites to mixture. Lower the motorhead, attach the splash guard and slowly fold the egg whites into the batter. Let the batter stand for 1 hour, stirring every 15 minutes.
Turn off the appliance, remove splash guard, rise the motorhead and prepare your waffles according to the instructions of your wafflemaker. Serve with whipped cream, fruit, jam, powdered sugar, or a warm fruit syrup.
Gingerbread belgian waffles
These waffles have the flavour of just-baked gingerbread and are delicious served with fresh fruit or caramelised apples and pears.
Makes 6 waffles:
| 118 ml warm water(ane | |
| 1 teaspoon granulated sugar | |
| 2 14 teaspoons active dry yeast (1 packet) | |
| 1 12 cups (approx. 180 g) all-purpose flour | |
| 1 cup (approx. 250 g) short-bread biscuit crumbs | |
| 14 cup (approx. 55 g) granulated sugar | |
| 3 cups (approx. 360 g) sifted flour | |
| 14 teaspoon salt | |
| 1 teaspoon ground ginger | |
| 14 teaspoon lemon zest, finely chopped | |
| 472 ml warm milk | |
| 3 large eggs, separated | |
| 12 cup unsalted butter, melted and cooled | |
| 1 teaspoon vanilla extract |
Measure water into the bowl.
NOTE: Do not use water that is too hot because the yeast wont rise. Add 1 teaspoon granulated sugar and yeast; stir to dissolve. Let stand 10 minutes.
In a separate bowl, combine the flour, short-bread biscuit crumbs, 14 cup sugar, salt, ginger, and lemon zest; stir to combine.
Operate according to the instructions >Operating<. Assemble the whisk. Add milk, egg yolks, melted cooled butter, and vanilla to yeast mixture, lower motorhead, attach splash guard and mix on slow speed until smooth. Turn off the appliance, remove splash guard, rise the motorhead disassemble whisk and assemble beater. Lower motorhead, attach splash guard and turn the appliance on using slow speed. Slowly add dry ingredients sideways and mix until smooth. Turn off the appliance, remove splash guard, rise the motorhead and cover the bowl with waxed paper and let stand to rise in a warm, draft-free place for 30 minutes.
In separate bowl beat the egg whites until stiff, but not dry. Add egg whites to mixture. Lower the motorhead, attach the splash guard and slowly fold the egg whites into the batter.
Turn off the appliance, remove splash guard, rise the motorhead and prepare your waffles according to the instructions of your wafflemaker. Serve with lemon curd, fruit, jam, powdered sugar, a warm fruit syrup, or whipped cream.
Good night waffles
Most of the mixing for these waffles is done the night before. In the morning, just mix in the eggs, vanilla and a pinch of baking soda while the waffle maker is heating. Leftover batter may be covered and kept in the refrigerator for up to three days. Heat your wafflemaker in the morning, stir the batter and have a freshly baked waffle for breakfast.
Makes 6 waffles:
118 ml lukewarm water
1 tablespoon granulated sugar
2¼ teaspoons active dry yeast (1 yeast packet)
472 ml whole milk, warmed
12 cup (approx. 115 g) unsalted butter, melted and cooled
1 teaspoon salt
2 cups (approx. 240g) all-purpose flour
2 large eggs, lightly beaten
2 teaspoons vanilla extract
14 teaspoon baking soda
The night before, or at least 8 hours before baking, combine the warm water, granulated sugar and yeast. Let stand 10 minutes, until foamy.
Operate according to the instructions >Operating>. Assemble the whisk. Add warm milk, melted butter and salt to yeast mixture, lower motorhead, attach splash guard and mix on slow speed until just combined. Turn off the appliance, remove splash guard, rise the motorhead disassemble whisk and assemble beater. Lower motorhead, attach splash guard and turn the appliance on with slow speed. Add flour sideways until smooth.
Turn off the appliance, remove splash guard, rise the motorhead, wrap bowl tightly with plastic wrap and let stand overnight (or for 8 hours) on the countertop – do not refrigerate. When ready to bake, preheat your wafflemaker according to the instructions of your wafflemaker. While the waffle maker is heating, stir the eggs, vanilla and baking soda into the batter. Bake upon the instructions. Serve with sliced fresh fruit, jam, powdered sugar, a warm fruit syrup, or whipped cream.
ACCESSORIES FOR THE DESIGN STAND MIXER ADVANCED
You will get the accessories from your specialty retailer.

natural_image
Close-up of a white kitchen grater with handle and screw (no visible text or symbols)
natural_image
Five circular electronic components with dot patterns and internal markings, arranged on a plain background (no text or symbols)Pasta Maker Attachment
Art.-Nr.: 98100

natural_image
Close-up of a stainless steel kitchen grater with a meshing tool (no visible text or symbols)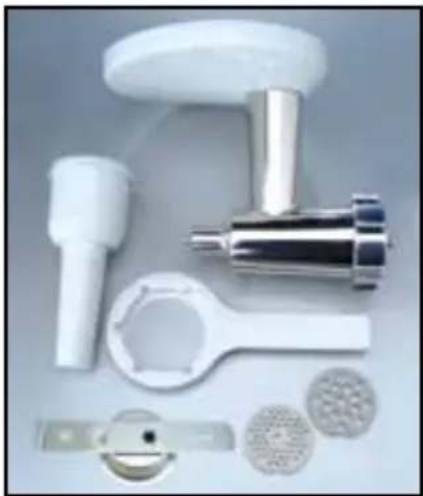
natural_image
Product photo of a kitchen tool with various kitchen components and circular base elements (no text or symbols visible)Meat Grinder and Cookie
Attachment
Art.-Nr.: 98101

natural_image
Close-up of a white manual pump or filter component with a circular vent, mounted on a metal base (no visible text or symbols)
natural_image
Three metallic plastic teapots with perforated bases, arranged on a reflective surface (no text or symbols visible)Food Slicer/
Shredder Attachment
Art.-Nr.: 98102

natural_image
Close-up of a stainless steel mixing bowl with whisk, mounted on a stand (no visible text or symbols)Additional stainless steel bowl
Art.-Nr.: 98103
GASTROBACK GmbH


- Instructions for use
- DESIGN STAND MIXER ADVANCED
- Table of Contents
- Dear Customer!
- KNOWING YOUR DESIGN STAND MIXER ADVANCED
- IMPORTANT SAFEGUARDS
- Important Instructions
- Safeguards for Daily Operation
- Important Safeguards for all Electrical Appliances
- Moving Parts - Risks of Injuries
- TECHNICAL SPECIFICATIONS
- FEATURES OF YOUR DESIGN STAND MIXER ADVANCED
- Processing Tools
- Speed Control
- Tips for Use
- OPERATING
- Before First Use
- Using the Design Stand Mixer Advanced
- Attaching the bowl
- Assembling the processing tools
- Operating the appliance
- Disassembling the processing tools
- CARE AND CLEANING
- STORAGE
- NOTES FOR DISPOSAL
- INFORMATION AND SERVICE
- WARRANTY
- RECIPE IDEAS
- Speedy Processor Pizza Dough
- Basic White Bread
- One Crust Standard Pie Crust
- Banana Cake with Cream Cheese Frosting
- Cream Cheese Frosting
- Baked Lemon Cheesecake
- Chocolate Icing
- Ganache
- Lemon Lime Tart
- Chocolate Mousse
- Pikelets (Scottish Pancakes)
- Crepes
- Chocolate Chip Cookies
- Basic Waffle recipe
- Classic belgian waffles
- Gingerbread belgian waffles
- Good night waffles
- ACCESSORIES FOR THE DESIGN STAND MIXER ADVANCED
- GASTROBACK GmbH
Brand : Gastroback
Model : 40969
Category : Hand blender