
41020 - Hand blender Gastroback - Free user manual and instructions
Find the device manual for free 41020 Gastroback in PDF.


| Brand | Gastroback |
| Model | 41020 |
| Product Type | Hand Blender |
| Power Consumption | 700 W |
| Speed Settings | 2 speeds + turbo |
| Blade Material | Stainless steel |
| Shaft Material | Stainless steel |
| Housing Material | Plastic |
| Ergonomic Grip | Yes, soft-touch |
| Immersion Depth | Up to 20 cm |
| Cord Length | 1.2 m |
| Weight | Approx. 1.2 kg |
| Dishwasher Safe Parts | Shaft and blade only (not motor unit) |
| Safety Features | Overheat protection, safety switch |
| Warranty | 2 years |
| Country of Origin | Germany |
| Package Contents | Hand blender, operating instructions |
| Recommended Use | Soup, sauces, smoothies, baby food |
| Cleaning | Wipe motor unit with damp cloth; shaft and blade under running water |
Frequently Asked Questions - 41020 Gastroback
User questions about 41020 Gastroback
0 question about this device. Answer the ones you know or ask your own.
Ask a new question about this device
Download the instructions for your Hand blender in PDF format for free! Find your manual 41020 - Gastroback and take your electronic device back in hand. On this page are published all the documents necessary for the use of your device. 41020 by Gastroback.
USER MANUAL 41020 Gastroback
natural_image
Gastrostatic blender with black handle and white base, no visible text or symbols on the device itselfnatural_image
Line drawing of a kitchen blender with a downward arrow indicating compression or disassembly (no text or symbols present)Abb. 1
natural_image
Technical line drawing of a mechanical device with a curved arrow indicating rotation (no text or symbols present)Abb. 2
natural_image
Line drawing of a blender with a rotating button and directional arrow (no text or symbols)Abb.3
natural_image
Close-up of a car wheel and its top view showing a metallic disc (no text or symbols visible)natural_image
Three-step diagram of a portable device with internal components and directional arrows indicating rotation (no text or symbols)natural_image
Line drawing of a portable water heater with a downward arrow indicating compression or cooling (no text or symbols)Abb. 7 Abb. 8
natural_image
Line drawing of a cylindrical water heater with lid and handle (no text or symbols)BEDIENUNG
Bedienfeld
EIN-/AUS-Taste
natural_image
Close-up of a kitchen blender with black plastic lid, black plastic cup, and plastic pitcher (no text or symbols visible)natural_image
Bowl of yellow soup garnished with green leafy leaves (no text or symbols visible)Zubereitung:
natural_image
Close-up of a pumpkin dish with a sliced orange vegetable and garnish, presented on a red surface (no text or symbols visible)Zubereitung:
natural_image
White ceramic bowl filled with creamy soup garnished with chopped green herbs, placed on a pink surface (no text or symbols visible)Zubereitung:
natural_image
Close-up of a bowl with green herbs and a knife, no visible text or symbolsZubereitung:
natural_image
Close-up of a smooth orange surface with a green leaf, no text or symbols visibleZubereitung:
natural_image
Close-up of a bowl of orange sauce with a green herb garnish, held by hands (no text or symbols visible)Zubereitung:
natural_image
Close-up of a yellow, granular substance in a white bowl (no text or symbols visible)Zubereitung:
natural_image
Close-up of avocado and open book with soft yellow liquid (no visible text or symbols)Zubereitung:
natural_image
Close-up of a bowl of soup with broth and herbs, served with a white spoon (no text or symbols visible)Zubereitung:
natural_image
White ceramic bowl filled with green tea leaves, held by a hand holding fresh herbs (no text or symbols visible)natural_image
Close-up of a white bowl containing a smooth, glossy orange substance (no text or symbols visible)Zubereitung:
natural_image
Close-up of a bowl of creamy soup with a spoon, no visible text or symbolsZubereitung:
natural_image
Close-up of a red cocktail with green garnish and water droplets, no text or symbols visibleZubereitung:
natural_image
Glass of kiwi smoothie with green garnish, blurred background of orange juice bottles and a tomato (no text or symbols visible)natural_image
Close-up of a smooth orange beverage with a glass of orange fruit and a slice of peaches (no text or symbols visible)Zubereitung:
Operating Instructions
COOK & MIX PLUS
natural_image
Gastrostatic blender with black handle and digital display, no visible text or symbols on the device itself.Art.-No. 41020 COOK & MIX PLUS
Read all provided instructions before first usage!
Model and attachments are subject to change!
For domestic use only!

Carefully read all provided instructions before you start running the appliance and pay attention to the warnings mentioned in these instructions.
Table of Contents
Knowing Your New COOK & MIX PLUS 29
Important Safeguards....30
Hot Surfaces – Risk of Burns 32
Technical Specifications 33
Before First Use....33
Powerful Functions of Your New COOK & MIX PLUS 34
Assembling the appliance 34
Disassembling the glass jar 34
Assembling the glass jar 35
Assembling the glass jar to the motor housing 35
Removing the glass jar to the motor housing 35
Lid & Measuring Cup....36
Operation 37
Control Panels 37
ON/OFF Power Button 37
Timer Control 37
Temperature Control 37
Stir Button 37
Blending Function 38
Working with the Cook & Mix Plus....38
Making Soup 38
Blending Cold Ingredients 39
Hints & Tips 39
Care and Cleaning 40
Cleaning the blades 41
Thorough Cleaning of the Glass Jar....41
Storage 42
Notes for disposal....42
Information and service....42
Warranty 42
Recipes 43
Dear Customer!
Congratulations! You have purchased an exceptional appliance coming with a multitude of surprising features. Heating function, blender and mixer combined in a powerful unit. Prepare your favourite soups or hot and cold drinks effortless and quickly, try out new recipes and enjoy the easiness and simplification coming with your new COOK & MIX PLUS.
These instructions for use will inform you about the various functions and features which makes it easy to take pleasure in your new COOK & MIX PLUS.
We hope that you will enjoy your new COOK & MIX PLUS.
Your Gastroback GmbH
KNOWING YOUR NEW COOK & MIX PLUS
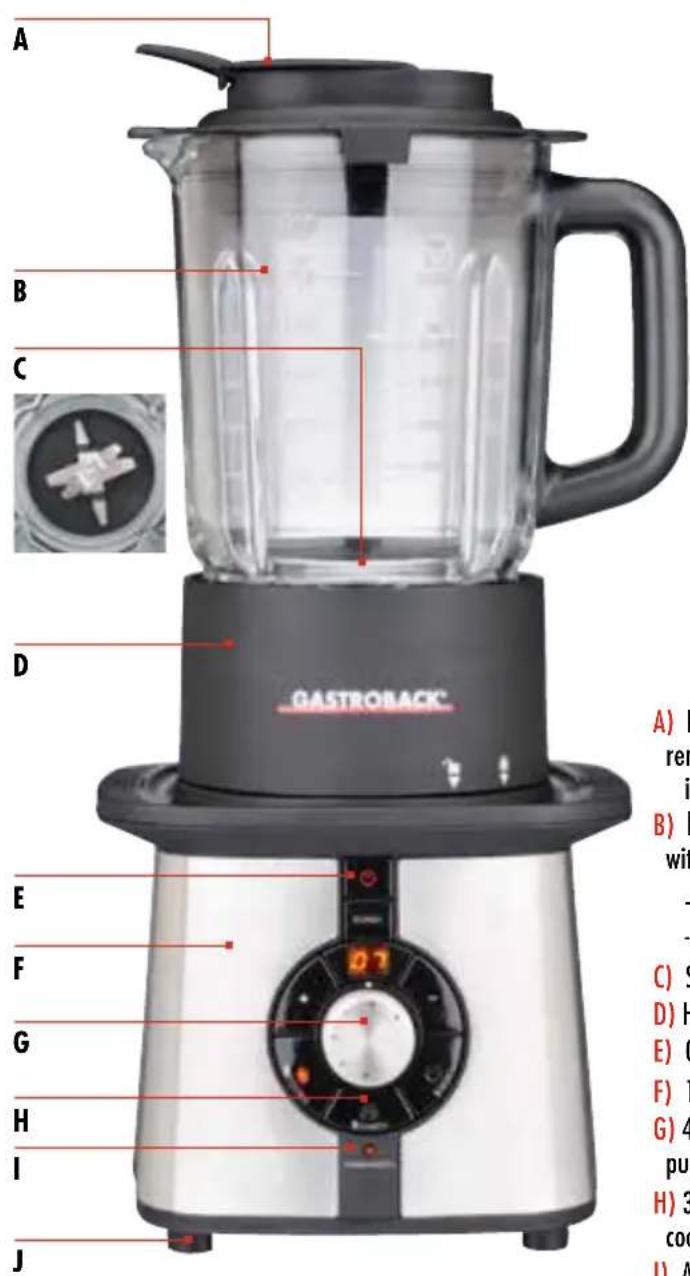
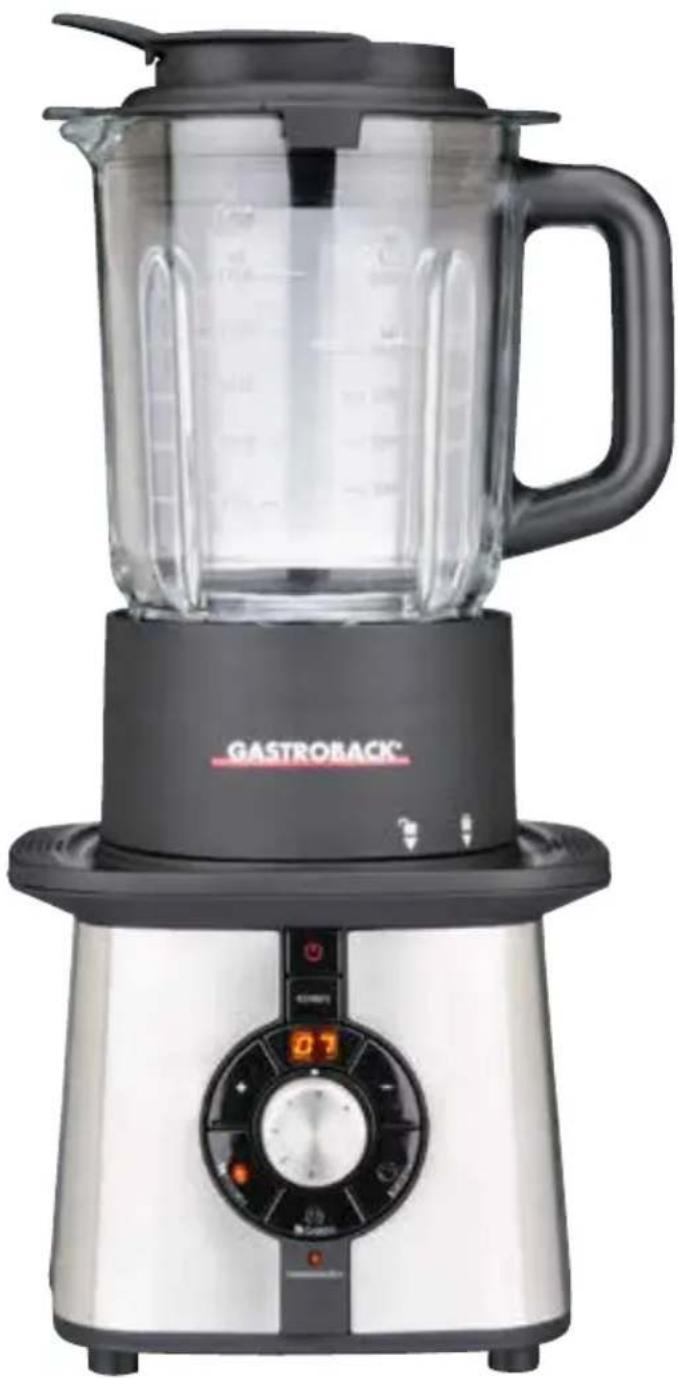
A) Lid with rubber seal and integrated, removable measuring cup with level indicator
B) borosilicate glass jar with scaling, heat-resistant
- 1,400 ml (for hot dishes >Soup<)
- 1,750 ml (for cold dishes >Cold<)
C) Sixfold stainless steel blades
D) Heating plate with non-stick coating
G) 4 speed selection and additional pulse function
H) 3 temperature settings to select the cooking temperature
1) Automatic keep-warm function
J) Non-slip rubber feet
K) Stir button — for mixing the basic ingredients over low heat
L) LED Timer (countdown and time display)
M) Timer control (+ and —) for precise presetting of the cooking time
N) >KOCHEN< — High (to bring your food to the boil quickly)
0) >GAREN< - Low (for cooking potatoes, carrots and similar)
P) >SIEDEN< — Simmer (for cooking delicate vegetable and keeping your dishes hot)
IMPORTANT SAFEGUARDS
Carefully read all instructions before operating this appliance and save for further reference. Do not attempt to use this appliance for any other than the intended use, described in these instructions. Any other use, especially misuse, can cause severe injuries or damage by electric shock, heat or fire.
Any operation, repair and technical maintenance of the appliance or any part of it other than described in these instructions may only be performed at an authorised service centre. Please contact your vendor.
- This appliance is for household use only and NOT intended for use in moving vehicles. Do not operate or store the appliance in humid or wet areas or outdoors. Any use of accessories, attachments or spare parts not recommended by the manufacturer may result in fire, electric shock and injuries to persons.
- Check the entire appliance regularly for proper operation — especially the power cord and glass jar. The pins of the power plug must be clean, smooth, and without discolouration. Do not use the appliance if the glass jar is damaged in any way (e.g. scratched, cracked, or chipped). Otherwise, the glass jar could burst or leak during operation and/or splinters could get into your foods and cause severe injuries. Do not operate the appliance, when liquids are on the motor base or accumulate at the rear/bottom of the appliance. Do not operate and immediately unplug the appliance, when the appliance or any part of it is likely to be damaged, to avoid risk of fire, electric shock or any other damage and/or injuries to persons. The appliance is likely to be damaged if the appliance was subject to inadmissible strain (e.g. overheating, mechanical or electric shock), or if there are any cracks, excessively frayed or melted parts, or distortions, or if the appliance is not working properly. In this case, immediately unplug the appliance and return the entire appliance (including all parts and accessories) to an authorised service centre for examination and repair.
- During operation keep the appliance in an appropriate distance of at least 30 cm on each side and 1 m above to furniture, walls, boards, curtains and other objects. Do not process inflammable liquids (e.g. high-proof alcohol). Do not operate the appliance beneath any heat-sensitive or moisture-sensitive materials or beneath boards or drop-lights to avoid damage caused by steam, condensate or splashes. Operate the appliance on a well accessible, stable, level, dry, heat-resistant, water-resistant and suitable large table or counter. Do not place the appliance over a power cord, or near the edge of the table or counter, or on wet or inclined surfaces or where it can fall. Always keep the appliance and the table or counter clean and dry, and wipe off spilled liquids immediately.
- Do not place any clothes or tissue or other objects beneath or on the appliance during operation, to avoid risk of fire, electric shock and overheating. Before operation, always ensure that there are no foreign objects in the glass jar, and the glass jar is assembled properly and not leaking with the lid firmly in place. Ensure that the glass jar will not tilt or wobble on the motor base. Solely use the appliance for processing edible food.
- This appliance is not intended for use by persons (including children) with reduced physical, sensory or mental capabilities, or lack of experience and knowledge, unless they have been given supervision or instruction concerning use of the appliance by a person responsible for their safety. Children should be supervised to ensure that they do not play with the appliance.
- Always keep the entire appliance dry and clean and where young children cannot reach it. Do not place any hard and/or heavy objects on the appliance or any part of it. Take care that no one will pull the appliance by the power cord.
- Always handle the stainless steel blades with care, especially while removing the blades, cleaning or emptying the jar.
- Before turning the appliance on, always make sure, there are no foreign objekts in the glas jar, it is assembled properly, is leakproof and is securely attached to the motor base. Do not place any clothes, napkins or other objects under or on the appliance during operation, to avoid damages through fire and electric shock.
- Do not leave any cooking utensils in the glass jar. Do not use any hard, sharp or edged objects (e.g. knives, forks) with the appliance. Only use wooden or heat-resistant plastic cooking utensils to stir and serve the food. Do not handle the appliance or any part of it with violence. Do not hold your hands or any foreign objects (e.g. cooking utensils, clothes) in the glass jar, while the glass jar is mounted on the motor base!
- The appliance or power cord may never touch hot surfaces. Do not place the appliance or any part of it on or near hot surfaces (i.e. burner, heater or oven). Do not use any part of the appliance (e.g. glass jar, measuring cup) with any other device (e.g. range, mixer). After using the heater function the glass jar and the bottom of the jar collar will be still hot for some minutes. Do not touch the glass jar and the bottom of the jar collar, or place the glass jar on any heat-sensitive surface.
- Do not leave the appliance unattended, when connected to the power supply. Do not move or tilt the appliance with the glass jar mounted on the motor base to avoid that the glass jar will fall or hot liquid will be spilled. Always switch Off, unplug and let the appliance cool down sufficiently when the appliance is not in use and before moving, cleaning, or for storage. Before moving or cleaning the appliance, always allow the appliance to cool down. Always grasp the motor base with both hands by the upper handles and the glass jar by its handle for moving or lifting. During operation and immediately after switching off only touch the appliance and its accessories by the handles and operating elements. Handle the processing blades with care, as they are very sharp.
- Even with the lid properly closed, steam will escape around the measuring cup, when preparing hot dishes. Do not hold your face, hands and arms over the lid during operation and some minutes after heating to avoid scalds. Do not overfill the glass jar, especially when heating foodstuffs that could violently froth or splash. Otherwise food could splash and overflow or drip on the motor housing and cause severe scalds and damage. Always pay attention to the maximum level indicator >Soup< for hot dishes; >Cold< for cold meals and drinks)!
- Before activating the heating function, always ensure that there is a sufficient amount of liquid or fat (at least 30 ml) in the glass jar and the glass jar is mounted correctly. DO NOT activate the heater function when the glass jar is empty! Before operating the Blender function, additionally ensure that the lid is closed properly with the measuring cup correctly in place. (See: >Operation<) Do not blend for longer than 3 minutes to avoid overheating.
- Do not use abrasive cleaners or cleaning pads (e.g. metal scouring pads) for cleaning. Do not immerse the motor base or power cord in water or any other liquid. Do not spill or drip
any liquids on the motor base or power cord to avoid risk of fire and electric shock. When liquids are spilled in the motor base, immediately switch off, unplug and wait for the appliance to cool down. Thereafter, clean the appliance thoroughly. (See: >Care and Cleaning<)
- DO NOT place the motor base in an automatic dishwasher.
- Always turn off the appliance before replacing accessories, disassembling and cleaningl.
- This appliance is intended to be used in household and similar applications such as:
– staff kitchen areas in shops, offices and other working environments;
- farm houses;
– by clients in hotels, motels and other residential type environments; - bed and breakfast type environments.
Important Safeguards for Electrical Appliances
The appliance is heated electrically. Place the appliance near a suitable wall power socket to connect the appliance directly to a protected mains power supply with protective conductor (earth/ground) connected properly. Ensure that the voltage rating of your mains power supply corresponds to the voltage requirements of the appliance (220/240 V, 50 Hz, AC, rated for 15 A). The installation of a residual current operated circuit breaker (r.c.c.b.) with a maximum rated residual operating current of 30 mA in the supplying electrical circuit is strongly recommended. If in doubt, contact your electrician for further information.
In various foreign countries, the specifications for power supplies are subject to incompatible norms. Therefore it is possible that power supplies in foreign countries do not meat the requirements for safe operation of the appliance. Thus, before operating the appliance abroad, ensure that safe operation is possible.
- It is recommended not to use any extension cords. Nevertheless, if you wish to use an extension cord, it must be connected properly with live, neutral and protective ground conductor and a permanent loading range of at least 15 A (core diameter: at least 1 mm2). Do not use a multi socket outlet.
- Always handle the power cord with care. Always completely unwind the power cord before use. Do not place the appliance on a power cord. Power cords may never be knotted, twisted, pulled, strained or squeezed. Do not let the plug or power cord hang over the edge of the table or counter. The power cord may not touch hot surfaces. Ensure that no one will pull the appliance by the power cord. Take care not to entangle in the power cord. Always grasp the plug to disconnect the power cord from the power outlet. Do not touch the power plug with wet hands while the appliance is connected to the power supply.
Hot Surfaces - Risk of Burns

The COOK & MIX PLUS is designed for cooking and heating a variety of foods and therefore the appliance will get hot during operation.
• Always switch Off the mixer/blender before removing the measuring cup or lid, and beware of splashing hot liquid when removing
the measuring cup during operation. Beware of steam and hot condensate during operation and even some minutes after switching off, especially when removing the measuring cup and/or lid. Protect your hands and arms. Even with the lid properly closed and the measuring cup inserted, steam will escape around the measuring cup, while preparing hot dishes.
Do not hold your hands, arms, face and clothes over the lid when the glass jar is still hot.
- Glass jar, jar base, lid and measuring cup may become very hot during operation. Only touch these parts by the handles. The heating elements are mounted at the bottom of the glass jar in the jar base. Do not touch the bottom of the jar base, shortly after using the heater function.
TECHNICAL SPECIFICATIONS
| Model: Art.-No. 41020 COOK | & MIX PLUS |
| Power supply: 220 - 240 V AC, | 50 Hz |
| Total power consumption: 1200 | W heater function with stir blender function;1000 W heater function;600 blender function; 200 W stir blender function |
| Length of power cord: appr. 90 | cm |
| Weight: appr. 5,5 kg | |
| Dimensions: appr. 23,0 cm x 18 | 8,4 cm x 45.3 cm(width x depth x height) |
| Capacity, glass jar: | max. 1750 ml (>Cold<),max. 1400 ml (hot; >Soup<) |
| Certification: |   |
BEFORE FIRST USE
WARNING: DO NOT let young children play with the appliance, or any part of it, or the packaging!
- Unpack the appliance and all accessories carefully and check whether any parts are damaged or missing.
- Carefully remove all shipping materials and tags, but do not remove the rating label on the bottom of the appliance. Especially ensure that there are no foreign objects (e.g. packaging) in the glass jar.
WARNING! Always turn the speed selector to position >0<, unplug and let the appliance cool down to room temperature, before assembling/disassembling or cleaning. Do not immerse the motor base or power cord in water or other liquids or spill any liquids on the motor base or power cord. Do not place the motor base, measuring cup, lid or power cord in an automatic dishwasher.
- Before first use and after a considerable period of storage, clean the glass jar. For this, using the self-cleaning feature is sufficient. (See: >Care and Cleaning<)
Powerful Functions of Your New COOK & MIX PLUS
The COOK & MIX PLUS is designed for mixing, cooking and heating foods and is heated by an integrated electric heating element.
WARNING: Do not heat the glass jar of the appliance using any other source of heat (e.g. range, microwave oven)! Glass jar, lid, measuring cup and jar base will get very hot when using the heater function. To avoid scalds, only touch the appliance at the handles and operating elements during operation. Beware of hot condensate, steam and hot food, when removing the lid or measuring cup, or when serving hot dishes. Do not use any other type of jar but the supplied glass jar with the appliance.
WARNING: Before connecting the appliance to the power supply and switching on, always ensure that the glass jar is mounted firmly on the motor base and will not tilt or wobble.
NOTE: A smart safety interlock system ensures that you can only switch on the appliance while the glass jar is mounted properly on the motor base. As soon as you remove the glass jar, the appliance is switched off automatically and the power indicator light goes out completely.
Your COOK & MIX PLUS comes with a variety of useful features that are accessed by the operating elements on the front panel (buttons, control dial and display). When pressing a button, a beep sounds. Due to the tightly closing lid foods will not overflow or splash during mixing or blending, or when the contents are boiling. The large opening in the lid can be used to add further ingredients during processing. There is no need to lift the lid. Simply grasp the measuring cup in the lid by its handle and lift it upwards. Add your ingredients and replace the measuring cup. For this, align the handle of the measuring cup over the handle of the lid.
WARNING: Always close the opening in the lid firmly with the measuring cup, before switching on the appliance, to avoid that foods overflow or splash; especially when processing solid food (e.g. sautéing onions or garlic), or when the glass jar is filled up to a high filling level. Close supervision is necessary, when cooking any lathery food with your COOK & MIX PLUS (e.g. milk), because foam could come out of the opening in the middle of the lid at the brim of the measuring cup. DO NOT leave the appliance unattended, during operation.
ASSEMBLING THE APPLIANCE
Before first use, clean the glass jar thoroughly (see: >Care and Cleaning<).
Disassembling the glass jar
- Place the glass jar on stable table.
- Remove the plastic base of the jar by twisting counter-clockwise 70 degrees.
- Lift up the glass jar.
- Get the seal ring out.
- Lift the blade base up from the plastic base.
- Carefully remove the blade base from the plastic blade. Be careful and don't touch the blades.
Assembling the glass jar
- Clean all parts of the glass jar. Handle the blades with care to avoid injuries.
- Put the square side of the blade base into the cup base first, then press the blade base into the jar base.
- Fix the seal ring into the blade base. NOTE: Damp the seal ring first and then assemble the glass jar. The glass jar will be more tight to the jar base after doing this.
- Assemble the glass jar into the jar base.
- Turn the glass jar clockwise about 70 degrees, lock the glass jar to the jar base tightly.
- Put the glass jar set onto the motor housing, close the lid.
Assembling the glass jar to the motor housing

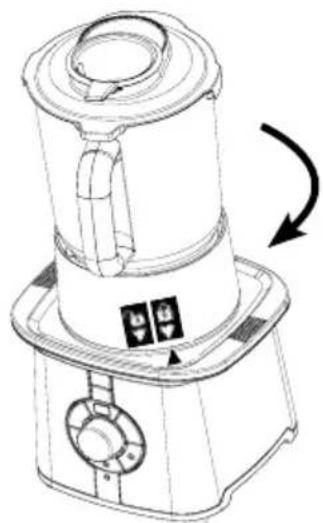
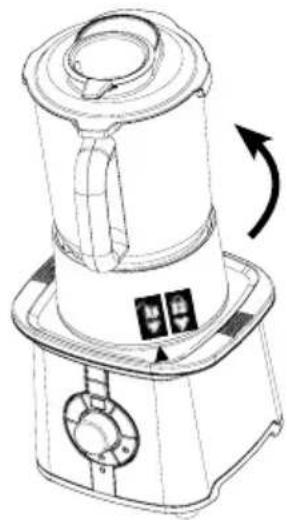
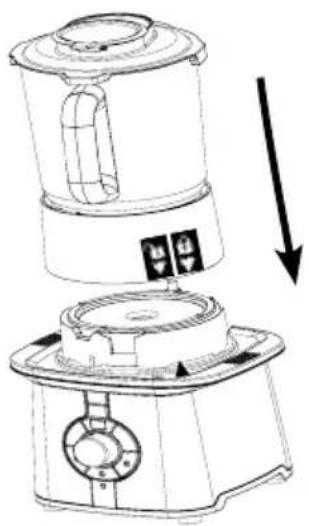
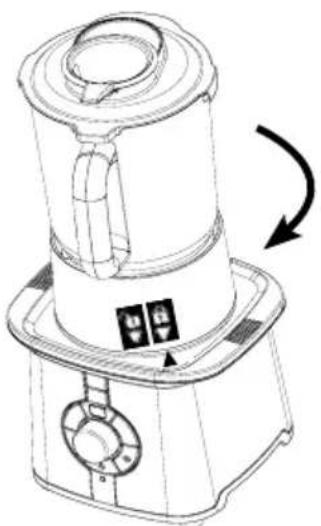
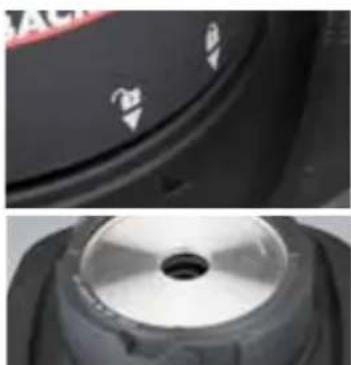
- Position jar unit on the motor housing (fig. 1) and rotate it clockwise until the lock arrow on the jar collar is level with the arrow on the housing unit (fig. 2).
- NOTE: Take care when placing the jar unit on the housing base as incorrect positions may damage the interlock switches (fig. 2).
natural_image
Technical line drawing of a kitchen appliance with a downward arrow indicating a change (no text or symbols present)Aibb.11
fig.2
fig.3
natural_image
Line drawing of a kitchen blender with a curved arrow indicating rotation (no text or symbols)Abb. 2
natural_image
Line drawing of a kitchen blender with a rotating button and directional arrow (no text or symbols)Abb.3
Removing the glass jar to the motor housing

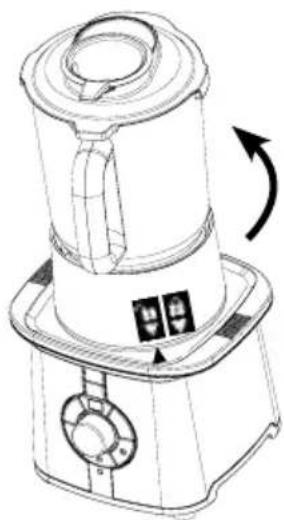
- Switch the appliance off and unplug from the outlet. Grip the jar, rotate it counter-clockwise, and then away from the housing base, until the arrow on the cup base reaches the arrow on the base.
- NOTE: Take care while removing the jar from the base, since overwinding can cause the interlock switch between the jar and the jar base to disconnect. This might lead to leaking during operation.
- CAUTION: The heating element is hot when the appliance is in heat mode, do not touch the underside of the jar base and the surface of the heating elements.
natural_image
Close-up of a black circular device with white markings and a metallic rim, showing internal components (no readable text or symbols)Lid & Measuring Cup
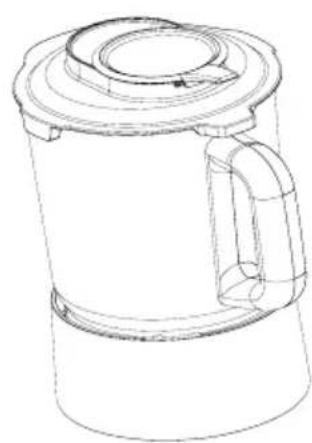
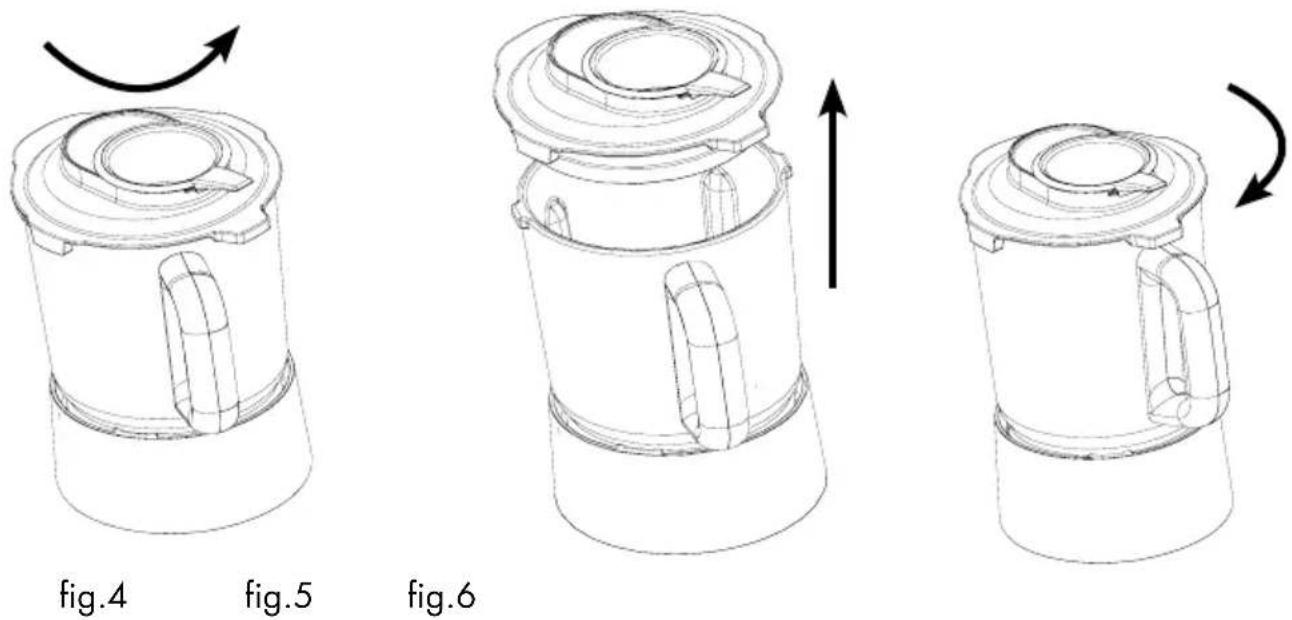
To remove the lid from the glass jar, grip the jar handle while use the thumb to press the edge of the lid and push it counter-clockwise firmly (fig. 4) and lift upwards (fig. 5). After adding the required food to the blender jar, replace lid on jar before heating and blending. To replace the lid, simply position it over the jar with the edge of the lid at the right side of the handle, press down firmly, and push it clockwise until the pouring spout on the jar is covered by the protrusion on the lid (fig. 6).
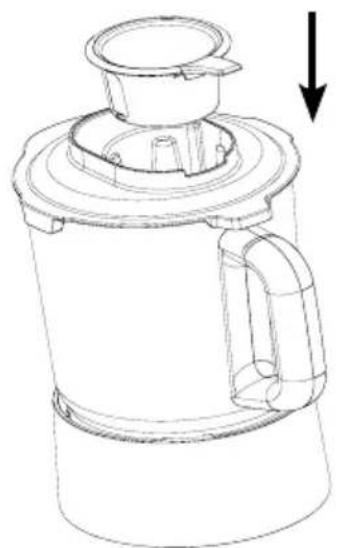
- To remove the measuring cup from the lid, lift up and away. To replace it, position the cup over the lid, aligning with the corresponding grooves in the lid.
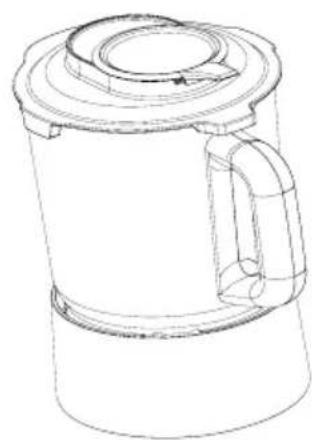
- NOTE: Press gently, when you hear a click sound, the measuring cup is locked in place (fig. 7 - 8).
WARNING: Steam will escape around the measuring cup when the appliance is in heat mode, this is normal, but handle with care – steam can cause burns. Always ensure the lid and cup are replaced before blending.
natural_image
Line drawing of a portable kitchen fan with lid and handle, showing internal structure and a downward arrow indicating motion (no text or symbols)figb7. 7 Abb. 8
fig.8
natural_image
Line drawing of a cylindrical container with lid and handle (no text or symbols)OPERATION
Control Panels
ON/OFF Power Button
- Plug the appliance into the outlet, the ON/OFF power button will flash. Press once and the light will become static; the appliance is now in >stand-by< mode.
- If the on/off button is pressed whilst in »stand-by« mode, the appliance will return back to idle mode with the on/off button flashing. Any settings entered will be cancelled.
- The only way to turn the flashing on/off button off is to unplug the appliance from the outlet.
Timer Control
- When the appliance is in >stand-by< mode the cooking time can be set by either pressing the > + < or > - < buttons. If the > - < button is pressed at this stage, 30 minutes will be displayed on the digital display, this is the maximum cooking time. If the > - < button is pressed at any other time, the cooking time will be reduced in one minute steps.
- The > + < button increases the cooking time in 1 minute steps.
- NOTE: Pressing any of the buttons will be accompanied by an audible sound.
- NOTE: The cooking time can be increased or decreased by pressing the > + < and > - < buttons at any time during the heating or cooking cycle.
Temperature Control
- The appliance will start its heating or cooking cycle when the temperature is selected to either high (>KOCHEN<), low (>GAREN<) or simmer (>SIEDEN<). When cooking time has elapsed, the appliance will beep 6 times, and then shift to >KEEP WARM< mode, the power indicator will become static white. After 40 min.(the longest keep warm time), the appliance will switch into stand-by mode and stop heating.
- NOTE: The temperature can be changed at any time during the heating or cooking cycle, by pressing the according button.
- By pressing the same cooking buttons ( >KOCHEN< , >GAREN< , >SIEDEN< ) ONCE again during the cooking or heating cycle, switches the appliance into the >keep warm< mode and the power indicator illuminates white. Pressing the same cooking button TWICE again will and the heating or cooking cycle.
Stir Button
- The stir function can be operated at any time during the heating or cooking cycle, it can also be operated in >stand-by< mode when ingredients are being added to the glass jar.
- It is recommended that you use the stir function while frying or sautéing onions, garlic or other base ingredients at the start of your recipe.
- It is not ideal to use the stir button to blend the soup but it can be used if you require chunky soup.
- NOTE: For safety, do not use stir button longer than ten seconds on heat mode. Use stir function intermittently.
Blending Function
- Your COOK & MIX PLUS features 4 different speed levels and a PULSE-function, which can be accessed with the rotary speed selector.
- For safety reasons, the blending function only works when the cooking or heating process has completed.
- The heating plate can also manually be turned off by pressing the heat button currently in use (lights will be illuminated) or alternatively pressing the ON/OFF power button.
- If the on/off power button is used to turn off the heater, the appliance will switch off completely and will have to be re-started for blending.
- For safety reasons, when hot ingredients' temperature is over 70^ , the max blending speed can only reach level 2 even if you are on level 3 or level 4.
- NOTE: Do not blend for longer than three minutes. This is the maximum running time for the motor.
- NOTE: Always turn the speed selector to position >0< after working the appliance or before the next use. Internal safeguard will prevent the appliance from mixing. This safeguard is installed to prevent any unintentional use and any damages while plugging the appliance into the power outlet again.
WORKING WITH THE COOK & MIX PLUS
Making Soup
- Place the motor housing onto a flat, sturdy surface.
- Assemble the appliance and plug into a suitable outlet.
- Press the ON/OFF button to set the appliance to >stand-by< mode.
- Select the required time, this can be adjusted throughout the cooking process, but a time must be selected to start the heater initially.
- NOTE: To fry ingredients such as onions or garlic, add butter or oil first before switching on the heat mode. Make sure you place the butter on the heating plate rather than the blades. Select low heat ( >SIEDEN< ) setting to melt butter. If frying onions and garlic, add and cook until softened, replacing the lid.
- NOTE: The appliance may smoke a little and release a slight odour during first use, this is normal.
-
To mix the onions or garlic, use the stir button ( >RÜHREN< ) on the control panel.
-
Add the remaining ingredients (vegetables, stock and seasoning etc) and set on a high heat and bring to the boil.
-
NOTE: When making soup, only fill the contents of the glass jar to 1400 ml mark.
- Once boiled reduce heat to simmer, set timer (+ and - buttons) and leave to cook.
- After boiling on High (>KOCHEN<) for several minutes, switch to Simmer (>SIEDEN<) and leave to cook.
- When cooking program has finished the appliance will beep 6 times.
- NOTE: When cooking time has finished, the machine will shift to >KEEP WARM< mode.
- NOTE: The heating element is regulated through a thermostat, therefore heat will increase or decrease accordingly and bubbles will become bigger or smaller during cooking.
- To blend soup, use the blend function; this can only be used once the heat mode and timer has been exited. When ready, simply blend soups on level 1 until desired consistency is achieved and serve.
WARNING: When cooking or blending with hot liquid it is essential the lid and measuring cup are securely attached to the blender to prevent injuries.
Blending Cold Ingredients
- The blender can also be used as a standard blender to blend cold ingredients and crush ice.
- Place the motor housing onto a flat, sturdy surface.
- Assemble the appliance; place on the base and plug into a suitable outlet.
- Add all necessary ingredients into the glass jar and replace the lid. You may add more ingredients during blending by lifting the measuring cup in the lid and dropping ingredients through the opening in the lid.
- NOTE: The maximum fill for cold ingredients is 1750 ml.
- Turn the blender speed selector to your desired speed or use the pulse function. Turn the blender speed selector to >0< when the desired consistency is reached.
- Unplug the appliance immediately after use.
- NOTE: Do not store food or liquid in the glass jar. Empty and clean thoroughly after use.
WARNING: Do not overload the appliance. If the motor stalls, turn the appliance off immediately, unplug the appliance and carefully remove a portion of the food, then continue.
Hints & Tips
- Use the mix function while frying or sautéing onions, garlic, or other base ingredients at the start of your recipe.
- It is best to use the blender function to get a smooth soup, but if you require a chunky soup, the mix function can be used.
-
Always add fat (e.g. butter or oil) directly on the heating plate and select a low heating temperature to allow melting, before frying vegetables.
-
To bring the ingredients to the boil as quickly as possible, it is recommended to use the Heater button High (>KOCHEN<) first. During heating up use the mix function in intervals. As soon as your foods are boiling, switch to a lower temperature setting Low (>GAREN<), or Simmer (>SIEDEN<) button.
- If soup recipes calls for cheese or cream to be added, do this after the cooking time has passed. Do not allow boiling again. Most soups will actually be hot enough to melt the cheese using just the mix function rather than further heating.
- To make low fat soups, use low fat fromage frais instead of crème fraîche or sour cream.
- If your soup is too thick, thin with a little water, broth or semi-skimmed milk for blending, but ensure not to exceed a total amount of 1.4 litre.
- If you are making tomato soup and your tomatoes are too pale and under ripe, add 1 tbsp of tomato purée to add colour and flavour.
- Cut large pieces of food into cubes of ca. 1.5 to 2.5 cm length (0.5 to 1 in) to achieve a more uniform result. Especially, cut cheese into pieces not larger than 1.5 cm.
- Use the measuring cup in the lid to measure liquid ingredients such as broth or milk. Always replace the measuring cup after the ingredients have been added.
- When chopping fresh herbs, garlic, onion, zest, breadcrumbs, nuts and spices via the blender function ensure that the glass jar and cutting blades are completely dry. Otherwise, these ingredients will stick to the walls of the glass jar.
- If food tends to stick to the sides of the glass jar when blending, use the PULSE-function in short bursts.
- Pulses should be short bursts. Between pulses wait until the blades come to rest.
- Don't over process foods. This appliance will achieve best results in seconds not minutes.
- For frozen drinks, chill all ingredients before blending.
- If foods do not seem to be blending smoothly, use the pulse function to chop then blend continuously.
CARE AND CLEANING
WARNING! The blades are very sharp. Handle the blades with care.
If the heater function has been used shortly before, the glass jar and especially the bottom of the jar collar are very hot. Always switch off the blender function, unplug from the power outlet and allow cooling before disassembling the glass jar, or cleaning the appliance. Do not immerse the motor base or power cord in water or any other liquids.
Do not use any abrasive cleaners, cleaning pads, other hard or sharp-edged objects, chemicals, or corrosive liquids for cleaning as this could affect or damage the surfaces. Do not spill any liquids on the motor base or the power cord. Do not place the motor base in an automatic dishwasher.
Always clean the appliance after each use. Do not leave any food dry up on the appliance or any parts of it to prevent a build up of baked-on foods.
Cleaning the blades
- Simply add ca. 0.5 Litre of dish-water to the glass jar.
- Set the timer for 2 minutes and press the Simmer (>SIEDEN<) button.
- When the dish-water is hot, turn the heater off (press Simmer button again), and switch the speed selector to speed selection 1 for ca. 1 minute.
- Pour out the dish-water and repeat this procedure with pure tap water. This will release food that maybe on the underside of the blades. For a thorough cleaning of the glass jar follow the instructions in the section below.
Thorough Cleaning of the Glass Jar
- Switch off, unplug and let the appliance cool down sufficiently.
- The glass part of the glass jar is mounted on the jar collar by a right-hand thread. For a better access to the heating plate and blades you may unscrew the glass part. Grasp the jar collar with one hand and the handle of the glass jar with the other and twist these parts against each other.
-
Clean glass part, lid, measuring cup, and rubber seal in warm dish water, using a soft cloth or nylon brush. These parts can be cleaned in an automatic dishwasher.
-
Remove lid and measuring cup from the glass jar. Remove the rubber seal from the lid.

natural_image
Close-up of kitchen cleaning tools including a black plastic cup, black ring, and plastic pitcher (no text or symbols visible)WARNING: The blades are very sharp. Handle with care to avoid injuries. Do not immerse or place the motor base or power cord in any liquids or pour any liquids on these parts.
- Use a nylon brush or sponge and warm dish-water for cleaning the heating plate. Doing so, be careful with the blades and do not damage the seal on the jar base. Soak stubborn residues with a drop or two of cooking oil for some minutes, before cleaning.
Tip: Stubborn residues on the other surfaces can be removed better by moistening with some warm dish-water before cleaning.
-
Wipe the power cord and the exterior of the motor base carefully with a soft damp cloth. Always ensure not to spill any liquids into the motor base.
-
Thoroughly wipe the appliance and all its parts dry.
-
Allow drying naturally for 12 hour. Always ensure that the appliance and all its parts and accessories are out of reach of young children.
-
Re-assemble the glass jar.
-
Ensure that the sealing surfaces on the brim of the jar collar and glass part are clean and without any damage (e.g. cracks, scratches, or signs of wear). Screw the glass part tightly on the jar collar. Eventually check the glass jar for leaks using some water.
STORAGE
WARNING: Always unplug the appliance, let the appliance cool down sufficiently, and clean the appliance and all its parts before storing. (See: >Care and Cleaning). Do not leave the appliance unattended while connected to the power supply.
Ensure to store the appliance where it is clean, dry and safe from frost, direct sunlight and inadmissible strain (mechanical or electric shock, heat, moisture) and where it is out of reach of young children. Place the appliance on a clean and stable surface, where it can not fall. Do not place any hard or heavy objects on the appliance.
Handle the power cord with care. Power cords may never be knotted, twisted, pulled, strained or squeezed. Do not place any hard or heavy objects on the power cord. Do not wrap the power cord around the motor base.
Do not move the appliance, when the glass jar is mounted on the motor base.
- To move the appliance, remove the glass jar from the motor base.
- Grasp the motor base with both hands at the handles on top of the housing, and ensure that the power cord will not hang down. Place the motor base on a suitable surface where it can not fall, and is out of reach of young children.
- Carry the glass jar by the handle, and place the glass jar besides the motor base.
NOTES FOR DISPOSAL
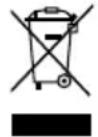
Dispose of the appliance and packaging must be effected in accordance with the corresponding local regulations and requirements for electrical appliances and packaging. Please contact your local disposal company.
Do not dispose of electrical appliances as unsorted municipal waste, use separate collection facilities. Contact your local government for information regarding the collection systems available. If electrical appliances are disposed of in landfills or dumps, hazardous substances can leak into the groundwater and get into the food chain, damaging your health and well-being. When replacing old appliances with new once, the retailer is legally obligated to take back your old appliance for disposal at least for free of charge.
INFORMATION AND SERVICE
Please check www.gastroback.de for further information. For technical support, please contact Gastroback Customer Care Center by phone: +49 (0)4165/22 25-0 or e-mail: info@gastroback.de.
WARRANTY
We guarantee that all our products are free of defects at the time of purchase. Any demonstrable manufacturing or material defects will be to the exclusion of any further claim and within warranty limits of the law free of charge repaired or substituted. There is no warranty claim of the purchaser if the damage or defect of the appliance is caused by inappropriate treatment, over loading or installation mistakes. The warranty claim expires if there is any technical interference of a third party without an written agreement.
The purchaser has to present the sales slip in assertion-of-claim and has to bear all charges of costs and risk of the transport.
RECIPES
Potato Cream Soup (For 2 to 3 persons)
Ingredients:
- 400 g potatoes
- 1 / 8 celeriac
- 200 g carrots
- 1 leek
- 12 litre vegetable stock
• 2 tablespoons sour cream - salt and pepper
- fresh marjoram

natural_image
Bowl of yellow soup garnished with green leafy leaves (no text or symbols visible)Procedure:
- Potatoes, celeriac and carrots skin and dice. Wash the leek and cut it in rough rings.
- Put the vegetables into the glass jar and mix round (>PULSE<).
- Afterwards douse it with vegetable stock. Switch to medium heat ( >GAREN< ) and bring to boil. Then wait until done (appr. 20 min.).
- Tasting the soup with salt, pepper and majoram and mix all again (speed selector 1 - 4). Refine it with sour cream. Garnish and serve the soup with majoram leaflets and pepper. Enjoy yor meal!
Pumpkin Cream Soup (For 2 to 3 persons)
Ingredients:
- 250 g pumpkin
- 2 small potatoes
- 12 leek
- 15 g butter
- 12 litre water
• 1 vegetable bouillon cube - salt and pepper

natural_image
Close-up of a pumpkin dish with orange sauce and garnish, served on a red surface (no text or symbols visible)Procedure:
- Skin and dice the pumpkin and the potatoes.
- Wash the leek and cut it into strips. Put everything into the glass jar and mix round ( >PULSE< ). Switch to maximum heat ( >KOCHEN< ) and bring to the boil (appr. 20 min.).
- Add butter and mix it (speed selector 1 - 4).
- Disolve the vegetable bouillon cube in water. Add 12 litre water with the vegetable bouillon cube. Spice it as you like with salt and pepper.
- Switch to middle heat ( >GAREN< ) and cook (appr. 15 min.) and stir occasionally ( >RÜH-REN< ). Enjoy yor meal!
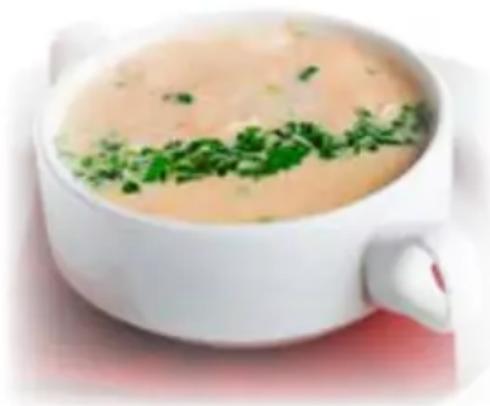
Mushroom Cream Soup (For 2 to 3 persons)
Ingredients:
- 250 g mushrooms
• 1.5 tablespoons butter - 1 teaspoon flour
- 1 / 2 lemon
• 400 ml stock (bouillon or chicken bouillon) - 50 ml cream
- 1 egg
- salt and pepper
- parsley
natural_image
Bowl of creamy soup garnished with chopped green herbs, served in a white ceramic bowl (no text or symbols visible)Procedure:
- The cleaned mushrooms drip with lemon juice. Put these into the glass jar and mix ( >PULSE< ). Add butter and switch to minimum ( >SIEDEN< ) and braise it lightly appr. 10 min. Flour the mushrooms and let it to lightly sautée.
- Add stock and switch to medium heat ( >GAREN< ) and bring to boil. Then wait until done (appr. 10 min.).
- Add cream and egg. Then mix these (speed selector 1 - 4), and let the soup steep simmer (>SIEDEN<) for appr. 10 min. and mix occasionally.
- Refine with twitched parsley. Add salt and pepper to taste. Mix everything (speed selector 1 - 4). Enjoy yor meal!
Cauliflower Cream Soup (For 2 to 3 persons)
Ingredients:
- 12 cauliflower
- 1 onion
- 1 teaspoon butter
• 1.5 teaspoon curry - 750 ml vegetable stock
- 50 ml cream
- 50 g cheese spread, creamy
- salt and pepper
- nutmeg
natural_image
Close-up of a bowl with chopped green herbs being cut with a knife (no text or symbols visible)Procedure:
- Wash the cauliflower and split it into small flowerets. Skin the onion, put it into the glas jar and mix round ( >PULSE< ).
- Switch to medium heat (>GAREN<) and let it boil for 15 minutes. Add butter and curry and let all simmer on minimum heat (>SIEDEN<).
- Add vegetable stock and Cream. Switch to medium heat ( >GAREN< ) and boil appr. 20 min. and mix it occasionally. Then add cheese spread. Add pepper, nutmeg and maybe a bit salt to taste. Enjoy yor meal!
Carrot Cream Soup (For 3 to 4 persons)
Ingredients:
• 30 to 40g olive oil or butter
- 10 g minced garlic
- 100 g minced onion
• 150 g potatoes (chopped into cubes)
• 300 g chopped carrots
- 120 ml milk or cream
- 600 ml water or broth
Flavourings: salt, pepper, spices, herbs to taste (e.g. nutmeg, basil, or others)

natural_image
Close-up of a smooth orange surface with a green leaf, no text or symbols visibleProcedure:
- Put olive oil or butter, then garlic and onion into the glass jar and mix thoroughly (ca. 1 min.).
- Add water or broth then add carrots, potatoes, and spices. Switch to maximum heat ( >KOCHEN< ) and bring to boil, mix occasionally.
- Switch to medium heat ( >GAREN< ) when boiling and cook until done (ca. 12 min.).
- Add flavouring as you like then mix thoroughly (ca. 1 min).
- Add milk or cream and mix again for some seconds. Enjoy yor meal!
Tomato Cream Soup (For 3 to 4 persons)
Ingredients:
- 1 kg tomatoes
- 12 tube tomato paste (appr. 100 ml)
- 100g cream
- 100g crème fraîche
- 1 garlic clove
Flavourings: salt, pepper (white and black), oregano, paprika powder, parsley, chives

natural_image
Close-up of a bowl of orange sauce with a green garnish, possibly a dish or soup item (no text or symbols visible)Procedure:
- Put the tomatoes with water into the glass jar. The tomatoes have to be completely covered with water. Switch to minimum heat (>SIEDEN). As soon as the skin of the tomatoes bursts, remove, skin and quarter these.
- Put the quartered tomatoes back in appr. 18 of the boiled water and boil these appr. 10 min. at maximum heat (>KOCHEN<). Spice with salt, oregano, white and blackpepper. Let it boil and mix occasionally (>RÜHREN<). Continue cooking additional 10 min. at maximum heat (>KOCHEN<).
- Add the tomato paste and mix (speed selector 1 - 4) it until the paste is dissolved and the soup creamy. Add the rest of the flavourings, the fine cutted parsley and chives as you like. Boil again for 10 min. and mix occasionally.
- Now add cream and crème fraîche and boil at medium heat (GAREN) once again until the crème fraîche is dissolved. Enjoy yor meal!
Pesto dip
Ingredients:
• 1 cup fresh basil leaves
• 1 clove garlic, peeled and chopped
- 40 ml lemon juice
- 60 g pine nuts
- 12 cup olive oil
- 12 cup cottage cheese
- 60 g fresh Parmesan cheese, grated
natural_image
Close-up of a yellow, granular substance in a white bowl (no text or symbols visible)Procedure:
Place all ingredients into the blender jar and using the mix function blend until smooth. Transfer mixture to a serving bowl. Chill until ready to use. Serve with toasted turkish bread.
Guacamole
Ingredients:
• 1 large avocado, peeled, stone removed and chopped
- 40 ml lemon juice
- 12 cup sour cream
• 1 teaspoon minced garlic
- 1 teaspoon chilli
natural_image
Close-up of a halved avocado and open book with blurred background (no visible text or symbols)Procedure:
Place all ingredients into blender jar and using the mix function blend until smooth. Serve with crustini, crudités, nacho chips or vegetable sticks.
Herb dressing
Ingredients:
- 34 cup mixed fresh herbs (parsley, coriander, mint, chives, rosemary, and basil)
• 1 clove peeled garlic, optional
• 2 tablespoons olive oil
• 3 tablespoons balsamic vinegar
natural_image
Bowl of soup with herbs and sauce, served with a white spoon (no text or symbols visible)Procedure:
Place all ingredients into the blender jar. Using the mix function blend until combined. Serve with lamb, chicken, fish.
Avocado dressing
Ingredients:
• 1 tablespoon lemon juice
- 12 cup sour cream
• 3 tablespoons cream
- 2 drops tabasco sauce
- 1 teaspoon honey
• 1 avocado, peeled, stoned and chopped
• 1 clove peeled garlic, chopped
natural_image
Close-up of a white ceramic bowl containing green broth with herbs, placed on a spoon (no text or symbols visible)Procedure:
Place all ingredients into the blender jar. Using the mix function, blend until smooth. Use as a dressing with potato salad.
Spicy peach sauce
Ingredients:
• 410 g canned sliced peaches
- 125 ml white wine
• 2 cloves peeled garlic, chopped
• 2 teaspoons grated fresh ginger
• 1 small red chilli, chopped
• 1 tablespoon lemon juice
• 2 tablespoons sweet sherry
- 2 tablespoons honey
• 2 teaspoons light soy sauce
Ingredients:
Place all ingredients into the blender jar. Using the mix function blend until smooth.
Serve with poultry or pork.
Thai green curry paste
Ingredients:
- 4 large green chillies, stems removed and roughly chopped
• 1 teaspoon black peppercorns
• 1 onion, roughly chopped
• 2 cloves peeled garlic - 1 bunch coriander, including root, washed and chopped
- 1 stem lemongrass, trimmed and thinly sliced
- 1 teaspoon salt
• 2 teaspoons ground coriander
• 1 teaspoon ground cumin
• 2 teaspoons dried shrimp paste
• 1 teaspoon ground turmeric - 250 ml oil

natural_image
Close-up of a white bowl containing a smooth, glossy orangeish-orange substance (no text or symbols visible)
natural_image
Close-up of a bowl of creamy soup with visible ingredients and a spoon (no text or symbols)Procedure:
Place all ingredients into the blender jar. Using the mix function blend to a smooth paste.
TIP: Scrape sides of blender jar with a spatula and add a little extra oil or tablespoon of water if necessary.
TIP: Store curry paste in an airtight blender jar in the refrigerator.
TIP: Substitute 2 teaspoons chopped lemon rind for lemongrass.
TIP: This curry paste is best suited to poultry. Allow 2 tablespoons paste per 500g poultry.
Margarita
Ingredients:
- 60 ml tequila
- 60 ml cointreau
- 80 ml lime juice
- 12 ice cubes
Procedure:
Place tequila, contreau, lime juice and ice cubes into the blender jar. Use the pulse function, blend until well combined and ice is crushed. Serve in salt rimmed glasses.
Frozen sangria
Ingredients:
• 250 ml fruity red wine, chilled
• 125 ml cranberry or red grape juice
• 125 ml lemon sorbet
- 80 ml orange concentrate
- 12 cup fresh seedless grapes, frozen
• 1 cup tinned plums, drained
Procedure:
Place all the ingredients in the blender jar. Using the pulse function blend until smooth.
Pina colada
Ingredients:
• 2 tablespoons white rum
• 2 tablespoons coconut cream
- 2 teaspoons sugar
- 3 / 4 cup unsweetened pineapple juice
- 10 ice cubes
Procedure:
Place all ingredients into blender jar. Use the pulse function, blend until well combined and ice is crushed. Serve immediately.
Wild thing
Ingredients:
• 1 cup orange juice, chilled
• 1 punnet strawberries, hulled
- 12 teaspoon grated orange rind
• 1 tablespoon oatmeal
- 2 large scoops wildberry vitari or another frozen fruit based yogurt
Procedure:
Place all ingredients into the blender jar. Use the pulse function, blend until smooth and thick. Pour into two glasses and serve immediately.
natural_image
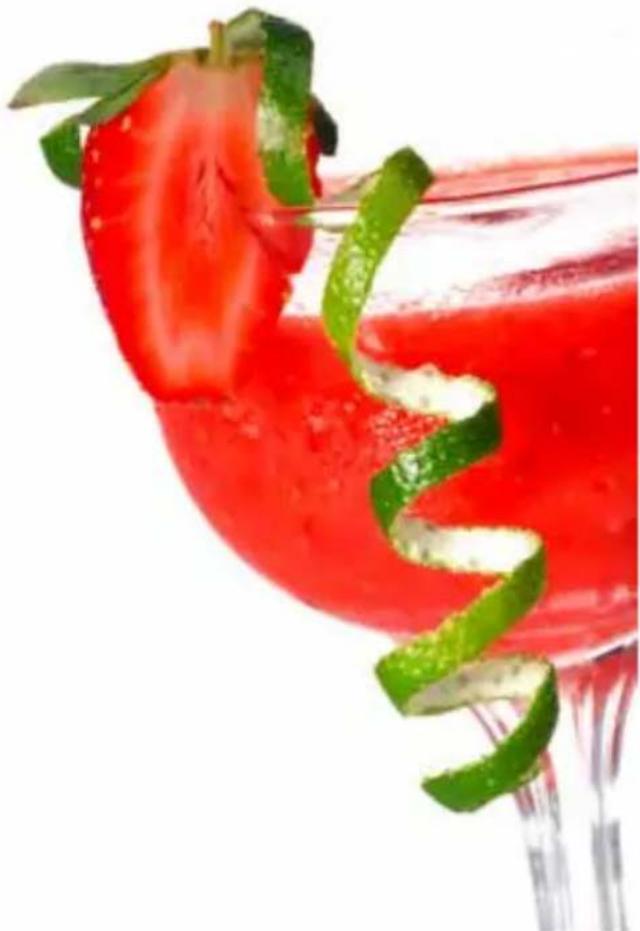
Close-up of a red cocktail with green garnish, no text or symbols visibleFruit cocktail
Ingredients:
• 250 ml pineapple juice
• 1 banana, peeled and chopped
• 1 orange, skin and pith removed then quartered
- 250 ml soda water
• 2 tablespoons passionfruit pulp
Procedure:
Place all ingredients in the blender jar except soda and passionfruit. Blend until well combined. Stir in passionfruit pulp and soda water and serve immediately in cocktail glasses.
Rockmelon and pineapple frappé
Ingredients:
• 1 cup chopped rockmelon
• 1 cup canned pineapple pieces
- 1 cup ice
- mint leaves, to serve
Procedure:
Place rockmelon, pineapple and ice into the blender jar. Blend until all ingredients are crushed and mixture is smooth and thick. Serve with chopped mint leaves.
Strawberry and passionfruit milkshake
Ingredients:
• 1 punnet strawberries, hulled
- Pulp of 4 passionfruit
- 500 ml milk, chilled
• 4 scoops passionfruit ice cream
• 2 tablespoons strawberry topping
Procedure:
Place strawberries in blender jar. Use the pulse function, puree until smooth. Add half passionfruit pulp, milk, and two ice cream scoops. Blend until smooth and thick. Pour into two glasses then top with remaining ice cream and passionfruit pulp and strawberry topping. Serve immediately.

natural_image
Glass of kiwi smoothie garnished with a green leaf and strawberry, with blurred colorful glasses in the background (no text or symbols visible)Chocolate malted smoothie with caramel sauce
Ingredients:
- 500 ml milk, chilled
• 3 tablespoons malted milk powder
• 4 scoops vanilla ice cream
• 4 scoops chocolate ice cream
• 4 tablespoons caramel sauce
• Chocolate curls for garnish (optional)
Procedure:
Place milk, malted milk powder and vanilla ice cream in the blender jar. Blend until well combined. Divide between 2 glasses and add chocolate ice cream. Top with caramel sauce and garnish with chocolate curls.
TIP: Create chocolate curls to garnish your drinks by using a potato peeler.
TIP: Substitute the dairy products to suit you: i.e. replace milk or ice cream with soy or low fat variations.
TIP: Milkshakes and smoothies are a great way to get your kids to eat fruit.
Baby muesli
Ingredients:
• 1 tablespoon rolled oats
• 2 tablespoons baby rice cereal
- 1 teaspoon sultanas
- 12 small apple, peeled, sliced
• 4 tablespoons prepared formula milk
Procedure:
Place rolled oats, rice cereal, sultanas and apples in blender jar. Use speed selector 1 - 4 to mix until roughly chopped. Warm and comebine with the prepared formula milk before serving.
Apple and banana custard
Ingredients:
- 12 small apple, cored
• 1 small banana, peeled and diced - 12 cup prepared baby custard
Procedure:
Cook apple until just soft. Cool. Place cooled apple and banana into blender jar and use the mix function until smooth. Fold fruit into custard.
TIP: Serve immediately to avoid fruit discolouring.

natural_image
Glass of orange smoothie with fruit toppings, no visible text or symbolsNOTES:
GASTROBACK GmbH

- BEDIENUNG
- Bedienfeld
- EIN-/AUS-Taste
- Zubereitung:
- COOK & MIX PLUS
- Table of Contents
- Dear Customer!
- KNOWING YOUR NEW COOK & MIX PLUS
- IMPORTANT SAFEGUARDS
- Important Safeguards for Electrical Appliances
- Hot Surfaces - Risk of Burns
- TECHNICAL SPECIFICATIONS
- BEFORE FIRST USE
- Powerful Functions of Your New COOK & MIX PLUS
- ASSEMBLING THE APPLIANCE
- Disassembling the glass jar
- Assembling the glass jar
- Assembling the glass jar to the motor housing
- Removing the glass jar to the motor housing
- Lid & Measuring Cup
- OPERATION
- Control Panels
- ON/OFF Power Button
- Timer Control
- Temperature Control
- Stir Button
- Blending Function
- WORKING WITH THE COOK & MIX PLUS
- Making Soup
- Blending Cold Ingredients
- Hints & Tips
- CARE AND CLEANING
- Cleaning the blades
- Thorough Cleaning of the Glass Jar
- WARNING: The blades are very sharp. Handle with care to avoid injuries. Do not immerse or place the motor base or power cord in any liquids or pour any liquids on these parts.
- STORAGE
- NOTES FOR DISPOSAL
- INFORMATION AND SERVICE
- WARRANTY
- RECIPES
- Potato Cream Soup (For 2 to 3 persons)
- Ingredients:
- Procedure:
- Pumpkin Cream Soup (For 2 to 3 persons)
- Mushroom Cream Soup (For 2 to 3 persons)
- Cauliflower Cream Soup (For 2 to 3 persons)
- Carrot Cream Soup (For 3 to 4 persons)
- Tomato Cream Soup (For 3 to 4 persons)
- Pesto dip
- Guacamole
- Herb dressing
- Avocado dressing
- Spicy peach sauce
- Thai green curry paste
- Margarita
- Frozen sangria
- Pina colada
- Wild thing
- Fruit cocktail
- Rockmelon and pineapple frappé
- Strawberry and passionfruit milkshake
- Chocolate malted smoothie with caramel sauce
- Baby muesli
- Apple and banana custard
- NOTES:
- GASTROBACK GmbH
Brand : Gastroback
Model : 41020
Category : Hand blender