USER MANUAL PA-VR10E SHARP
Never use the earphones or operate the digital voice recorder while driving a car or riding a motorcycle or bicycle. Doing so could result in a traffic accident.
While walking, never turn up the volume so high that you cannot hear what is going on around you. (Be particularly careful when crossing railroad tracks or crossing the street.) Failure to exercise appropriate caution could result in a traffic accident.
Do not disassemble or modify the product. Doing so could result in fire, damage or malfunction.
Do not use the product in the bath, in locations where it is exposed to rain, or in excessively humid places. Doing so could result in fire, damage or malfunction.
Cautions
Using the Product
Do not place the product in excessively cold locations or near an open flame. Doing so could result in fire or damage.
Do not place the product where it will be exposed to direct sunlight for extended periods of time (in particular, closed locations such as inside an automobile) or near heating equipment. Doing so could result in deformation or discoloration of the product, or in fire or damage.
Do not place the product in an unstable location. Doing so could result in the product falling and could cause injury or damage.
Do not place the product in a location where it will be exposed to oily fumes or steam. Doing so could result in fire or damage.
Do not leave the product in places where there is a likelihood of grit or foreign matter getting inside it, for example dusty or sandy locations such as a beach. Doing so could result in fire or damage.
Do not expose the product to excessive pressure or force, for example by putting it in your back trouser pocket or carrying it in a crowded train. Doing so could result in deformation of or damage to the product.
Do not turn up the volume excessively. Listening through earphones at a very high volume for extended periods of time can damage your hearing. Be sure to exercise appropriate caution.
Do not place magnetic cards, etc., near the speaker. The speaker contains magnets. Do not place magnetic media such as credit cards with magnetic strips, magnetically encoded prepaid cards, videocassettes, etc., near the speaker. Doing so could corrupt the digital data encoded in the magnetic media.
Do not place the product where it will be exposed to strong magnetic fields or near equipment that emits such fields. Making recordings in places with strong magnetic fields, such as near high-tension wires, or near equipment that emits electromagnetic waves, such as mobile phones, can cause noise in the recorded audio.
Cautions
Using Batteries
- Improper use of the batteries can cause them to rupture or catch fire. Improper use can also cause fluid leakage that could corrode the product or soil the user's hands or clothing.
Be sure to observe the following precautions regarding battery usage.
-
Make sure the positive (+) and negative (-) contacts are oriented correctly when inserting batteries.
-
Do not use batteries of different types together. Do not mix new and old batteries.
-
Do not leave exhausted batteries in the product.
-
Should fluid that has leaked from the batteries get in your eyes, flush your eyes thoroughly with clean water and seek medical attention immediately. Failure to do so could result in permanent eye damage.
-
Should fluid that has leaked from the batteries get on your skin or clothing, rinse immediately and thoroughly with water.
-
Never place batteries in water, expose them to an open flame, disassemble them or deliberately short the contacts.
-
Do not use rechargeable batteries with the product.
-
If the product will not be used for an extended period of time, remove the batteries to prevent damage from fluid leakage.
Information stored by the user in the product's memory can be altered or erased due to improper use of the product, exposure to static electricity or electromagnetic noise, malfunction and repair, or if the batteries are replaced incorrectly. Be sure to make a permanent note on paper, etc., of important information stored in the product's memory.
NOTICE
- SHARP assumes no responsibility for any loss or damage arising from improper use of the product and its accessories by the customer or any third party, malfunction during use, or any other problems caused by the use of the product and its accessories, except in cases where legal liability exists.
- The information provided in this manual is subject to change without notice.
- Use only a SHARP approved service facility.
Contents
Page
Part names. E-4
Using the PA-VR10E PC for the first time E-6
Settings E-12
Recording E-14
Playing recordings E-16
Deleting E-20
Other Functions E-21
Using the recorder connected to a PC. E-25
Important Information E-31
Troubleshooting E-34
Specifications E-35
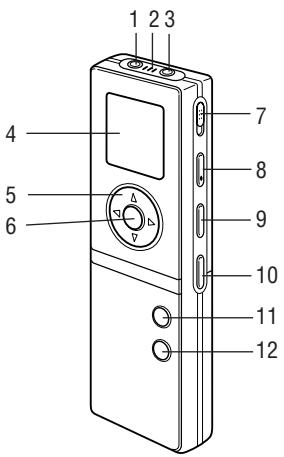
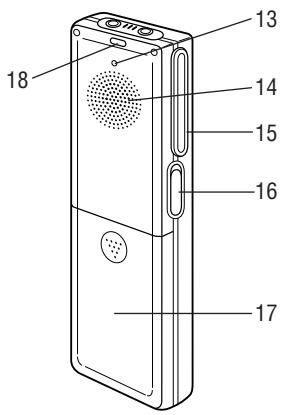
- Microphone jack
- Built-in microphone (page E-13)
- Earphone jack (page E-19)
- Display (page E-5)
- Cursor buttons
(VOL+) (VOL-), for skip/search) and
(for skip/search)
6. OK button
7. HOLD switch (page E-25)
8. RECORD/PAUSE button (page E-14)
9. FOLDER/REPEAT button (page E-14)
10. ERASE button (page E-20)
11. PLAY/PAUSE button (page E-16)
12. STOP/MENU button (page E-8)
13. Reset button (page E-6)
14. Speaker (page E-19)
15. Clip
16. USB jack (page E-26)
17. Battery cover (page E-6)
18. Record/play lamp (page E-14, E-16)
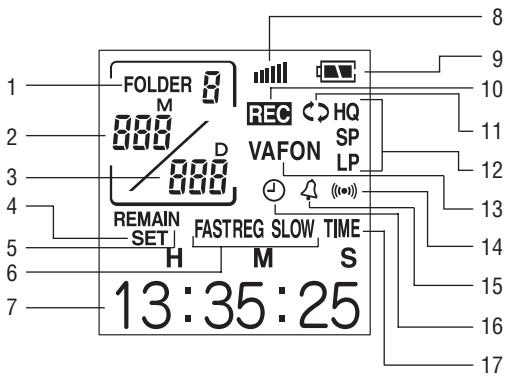
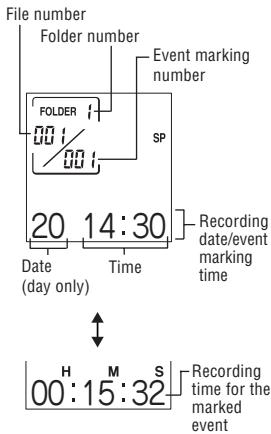
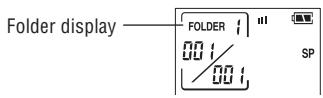
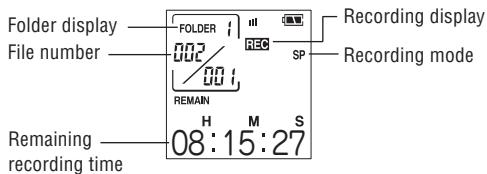
- Folder no.: Indicates the number of the folder in which recorded audio files are stored (page E-14).
- Date/File no.: Indicates the month/file no. of each recorded audio file (page E-14).
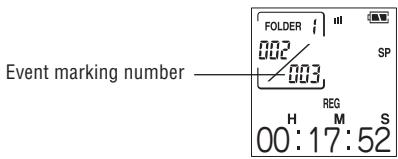
- Date/Event marking no.: Indicates the day/event marking number (page E-16).
- Settings mode: Displayed when making settings (page E-8).
- Remaining time: Indicates the remaining time available for recording (page E-14) or that of the timer.
- Playback speed: Indicates the playback speed (page E-16).
- Settings/Playback time, etc.: Indicates the setting item, playback time, etc. (page E-8).
- Volume: Indicates the volume level (page E-16).
- Battery level: Indicates the amount of battery charge remaining (page E-31).
- Recording: Displayed while recording is in progress (page E-14).
- Repeat playback: Displayed while repeat playback is in progress (page E-17).
- Recording mode: Indicates the recording quality (page E-12).
- Silence skip recording: Displayed while silence skip recording is in progress (page E-13).
- Message alarm function: Indicates that an alarm has been set (page E-23).
- Timer function: Indicates that the timer has been set (page E-24).
- Automatic recording function: Displayed when the automatic recording function has been activated (page E-21).
- Clock mode: Displayed when the clock mode has been activated (page E-7).
Screen displays and examples
- The screens actually displayed on the recorder may differ from the example screens shown in this manual.
Using the PA-VR10E pc for the first time
Before you attempt to use the recorder, insert the batteries and reset (initialise) the recorder to initialise its status.
Inserting the batteries and resetting (initialising) the recorder
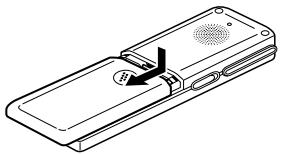
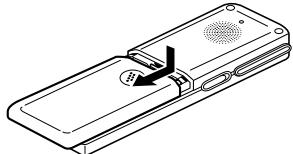
1 Remove the battery cover as shown in the diagram below.
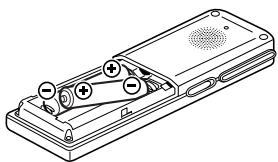
2 Insert the batteries provided with the recorder.
Ensure that the batteries are inserted with the correct polarity.
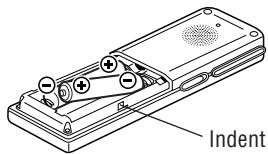
3 Fit the battery cover back in its original position, by aligning with the indent on the side of the recorder.
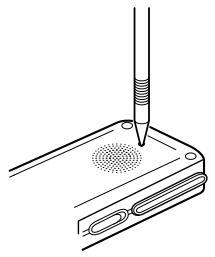
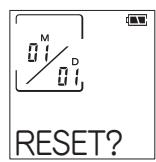
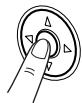
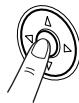
4 Using a ballpoint pen or similar tool, press the reset button on the back of the recorder.
A reset confirmation message ("RESET?") appears on the display.
- Do not use objects with extremely sharp or flexible points to press the Reset button.
When "OK?" appears on the display, press the OK button again.
The "RESET..." message appears on the display briefly and changes to "RESET!", then the screen for setting the date and time appears.
To set the date and time, follow from step 5 of the procedure on page E-10.
- If the display does not appear, try pressing the reset button again. If the display still does not appear, reinsert the batteries once again by repeating steps 1 to 5.
Clock and standby mode screens
Clock mode screen
The recorder switches to the clock mode if it is not used for approximately 30 seconds. To restore recorder operation, press the OK or PLAY/PAUSE button or any of the cursor buttons ( , , ,) . The standby mode screen shown below then appears.
- If you press the RECORD/PAUSE button, the recorder starts recording. There may be a gap of a few seconds before recording actually begins. The indication “WAIT...” appears on the display during this time.
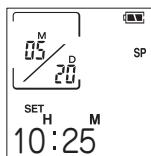
Standby mode screen
This screen shows the folder number, file number and the recording date/ event marking time. (Time stamp function)
Pressing the OK button switches to a screen showing the recording time for marked events.
Subsequent presses of the OK button toggle between the two screen displays.
The settings menu enables you to make recording settings or select alarm functions. To make recording, select from among the setting items shown on the menu screen. (Refer to the menu listing on the following page.)
1 Press the STOP/MENU button once or twice to display the menu screen (the screen with the "SET" indication).
2 Use the (+) or (-) cursor button to select a function and then press the OK button to display the settings screen for the selected function.
- The "SET" menu contains 4 settings. Use the cursor buttons to select an option and then press the OK button.
3 To change the setting, use the (+) or (-) cursor button to select the desired value and then press the OK button to confirm the setting.
※Refer to the respective settings page for details.
4 When you have completed the settings, press the STOP/MENU button to return to the original screen.


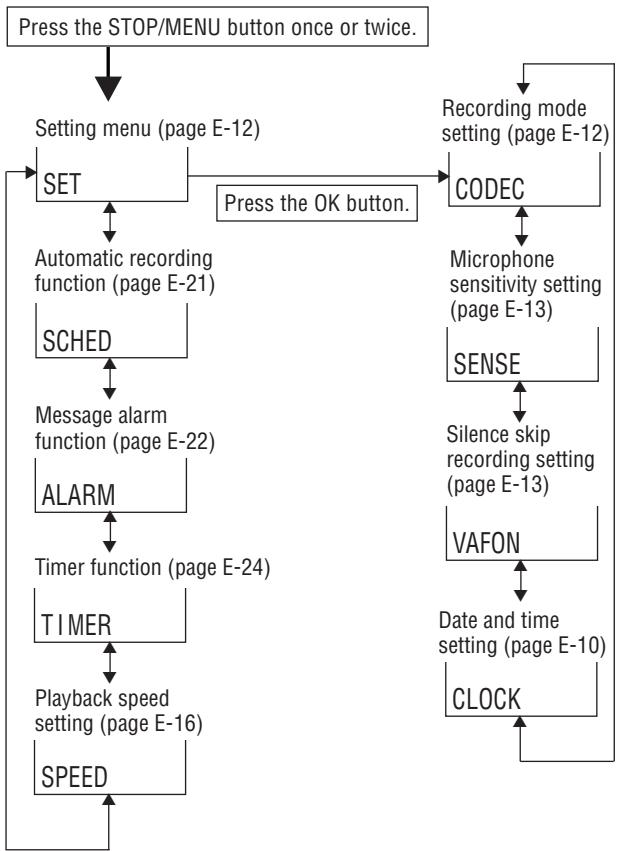
- Menus

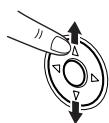
Press the (+) or (-) cursor button.
Setting the date and time (Clock setting)
You must set the date and time before using the recorder for the first time and after installing new batteries.
1 Press the STOP/MENU button once or twice to display the menu screen.


2 Press the OK button.
The settings mode screen appears.

3 Press the (+) or (-) cursor button until the "CLOCK" (time settings) screen appears.

Press the OK button.
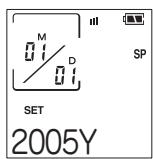
The "year" display flashes.
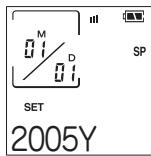
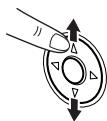
5 Press the (+) or (-) cursor button to select the year.
The year can be set between 2000 and 2099.
6 Press the OK button to confirm the selected year setting.
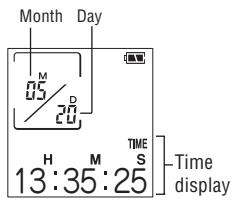
Next, the "month" display flashes.

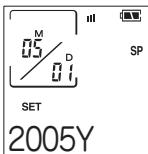
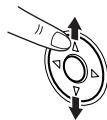
7 Press the (+) or (-) cursor button to select the month.

Press the OK button to confirm the selected month setting.
Next, the "day" display flashes.

Press the (+) or (-) cursor button to select the day.
10 Press the OK button to confirm the selected day setting.
Then use the same procedure to set the "hour" and "minute" settings.
After you have confirmed the "minute" setting by referring to an accurate clock, press the OK button.
This completes the date and time setting procedure and returns you to the menu screen.

12 Press the STOP/MENU button.

Tip
- Press the (I) cursor button to go to the preceding item.
- The screen will return to the clock mode if you do not press any buttons for 30 seconds or more. In order to set the seconds accurately against a radio time signal, press the (+) and (-) cursor buttons alternately until just before the time signal you are waiting for to ensure that 30 seconds does not elapse with no button presses.
Settings
In this section it is explained how to select the settings required to use the recorder's various functions.
Screen display
Recording mode setting CODEC
Microphone sensitivity setting SENSE
Silence skip recording setting VAFON
Date and time setting. CCK
Setting the recording mode
You can select HQ (high-quality recording), SP (standard-quality recording) or LP (long-play recording) as the recording mode.
1 Press the STOP/MENU button once or twice to display the menu screen.
2 Press the OK button.
The settings mode screen appears.
3 Press the (+) or (-) cursor button until the "CODEC" (recording mode settings) screen appears, then press the OK button.
The recording mode setting screen appears.
The displayed setting changes in the sequence shown below each time you press the (+) or (-) cursor button.
Recording modes and recording times
| HQ mode: | Approx. 4 hours |
| SP mode: | Approx. 8.5 hours |
| LP mode: | Approx. 28 hours |
HQ mode: Records at the recorder's highest quality.
SP mode: Records at the recorder's standard quality.
LP mode: Records for a long time but at reduced quality.
Select a recording mode and press the OK button.
Setting the microphone sensitivity
You can select the sensitivity of the recorder's internal microphone from two levels.
1 Press the STOP/MENU button once or twice to display the menu screen.
Press the OK button.
The settings mode screen appears.
3 Press the (+) or (-) cursor button until the "SENSE" (microphone sensitivity settings) screen appears, then press the OK button.
The microphone sensitivity settings screen appears.
The setting switches between HIGH and LOW each time you press the (+) or (-) cursor button.
SET HIGH
HIGH: A high-sensitivity mode that enables you to record peripheral sound also.
LOW: The normal sensitivity mode. Ideal for dictation.
4 Select the microphone setting and press the OK button.
Setting silence skip recording
Silence skip recording (VAFON) is a function that automatically pauses recording when the sound being recorded becomes inaudible.
1 Press the STOP/MENU button once or twice to display the menu screen.
Press the OK button.
The settings mode screen appears.
3 Press the (+) or (-) cursor button until the "VAFON" (silence skip recording settings) screen appears, then press the OK button.
The silence skip recording settings screen appears.
Press the (+) or (-) cursor button to select ON or OFF.
ON: Enables silence skip recording.
OFF: Returns to normal voice recording.
VAFON SET ON
Setting the date and time
See "Setting the date and time" on page E-10 for information on setting the date and time.
Recording
The PA-VR10E PC has four folders for storing voice recordings, which allows you to group recordings by category or occasion. The total recording time (page E-12) is shared between all the folders, and there is no limit on the part of the total time that may be stored in any one folder. Each folder may contain up to 127 recordings (files).
The displayed folder changes in the sequence shown below each time you press the FOLDER/REPEAT button. Folder 1 Folder 2 Folder 3 Folder 4 Folder 1...
Notes on recording voice
- You can record up to 127 files in each folder.
- When no available recording time remains, "FULL" appears on the display and you cannot make any more recordings. Erase some unwanted files and then try again.
- When you press the RECORD/PAUSE button, "FULL" may appear on the display even though some available recording time remains. Erase some unwanted files and try again.
The record/play time indication is only approximate.
- Do not remove the batteries while recording.
- You may connect a commercially available microphone and use it for recording, but the quality of the audio cannot be guaranteed.
※ Do only connect cable of microphone less than 1.0m to the digital voice recorder.
- Audio files recorded on this product cannot be saved onto devices such as tape recorders.
- When the clock mode screen is displayed, pressing the FOLDER/ REPEAT button will not display folders. Press OK, PLAY/PAUSE or any of the cursor buttons to return to standby mode.
Tip
- When the clock mode screen is displayed, you can begin recording by pressing the RECORD/PAUSE button. Voice is then recorded using the current folder and recording settings. There may be a gap of a few seconds before recording actually begins.
To pause recording
Press the RECORD/PAUSE button while the recorder is running. "PAUSE" appears on the display and recording is paused. To resume recording, press the RECORD/PAUSE button again.
Silence skip recording function
When silence skip recording is set to ON (see page E-13), recording pauses when the sound being recorded becomes inaudible. Under certain conditions the beginning of a recording may not be recorded. In such cases, turn this function OFF.
Inserting event marking numbers
You can insert event marking numbers into a file so that you can quickly locate a section you want to listen to again later. When a file contains event marking numbers, you can skip backwards or
forwards to the part you want to hear by pressing the (H) or (▶) cursor button during playback.
- Up to 50 event marking numbers can be inserted into each file.
A new event marking number appears on the display. Recording or playback continues after the marking number has been inserted. You can insert additional marking numbers in the same way.
Playing recordings
1 Select the standby mode screen and then press the FOLDER/ REPEAT button to select the desired folder and then press the OK button.
2 Use the (I) or (▶) cursor button to select the desired file number.
Press the PLAY/PAUSE button to start playback.
The lamp on the back of the recorder lights green.
Use the (VOL + ) and (VOL-) cursor buttons to adjust the
T playback volume.
5 To stop playback, press the STOP/MENU button.
Playback stops automatically when the end of the file is reached.
To pause playback
Press the PLAY/PAUSE button during playback. "PAUSE" flashes on the display and playback is paused.
To resume playback, press the PLAY/PAUSE button again.
To change the playback speed
1 Press the STOP/MENU button once or twice to display the menu screen.
2 Press the (+) or (-) cursor button until the "SPEED" (playback speed settings) screen appears, then press the OK button.

The settings screen appears.
3 Press the (+) or (-) cursor button to select "FAST," "REG" or "SLOW."
FAST: Fast playback
REG:Playback.
SLOW: Slow playback
4 Press the OK button.
Icon display
SET FAST
FAST
Repeat playback
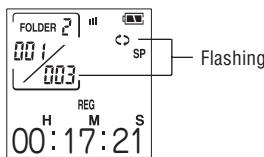
Event marking repeat
This function repeatedly plays back a section between 2 event marking numbers in the recording currently playing.
Press the FOLDER/REPEAT button during playback to repeatedly play back the section between event marking numbers. See "Inserting event marking numbers" on page E-15 for more information on event marking numbers.
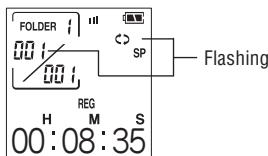
File repeat
This function repeatedly plays back the file currently playing.
To repeatedly play back the entire file, hold down the FOLDER/ REPEAT button for 1 second or longer during playback.
Cancel repeat
To return to normal playback, press the FOLDER/REPEAT button during repeat playback.
File skip
You can skip to the previous or next file by briefly pressing the (SKIP/SEARCH I<) or (SKIP/SEARCH ) cursor button.
If the current file contains event marking numbers, this procedure skips to the previous or next event marking number.
| Mode status | SKIP/SEARCH button pressed | Result |
| Stopped | or | Displays the previous or next file number. If the current recording contains event marking numbers, the previous or next event marking number is displayed. |
| Playback | (File advance) | Displays the next file number and begins playback from the beginning of that file. If the current recording contains event marking numbers, the next event marking number is displayed and playback begins from that number. |
| (File rewind) | Displays the previous file number and starts playback from the beginning of that file. If the current recording contains event marking numbers, the recorder displays the previous event marking number and starts playback from the beginning of that event. |
File search
This function searches within files in the Fast forward/Fast rewind mode while the left (↓←) or right (▶→) SKIP/SEARCH button is held down. If the current file contains event marking numbers, the recorder searches by marked events.
| Mode status | SKIP/SEARCH button (Press and hold) | Result |
| Playback | ▶(Fast forward) | Scans forward through the current file. When you release the right (▶) skip/search button, normal playback resumes. If the current recording contains event marking numbers, the recorder scans forward to the end of the current event and then skips forward one event marking number at a time. When the last event marking number in the file is reached, the recorder starts skipping forward one file at a time. When you release the right (▶) skip/search button, playback starts from the beginning of the file (or marked event) that has been reached. |
| (I-Back)(Fast rewind) | Scans backward through the current file. When you release the left (I-Back) skip/search button, normal playback resumes. If the current recording contains event marking numbers, the recorder scans backward to the beginning of the current event and then skips backward one event marking number at a time. When the first event marking number in the file is reached, the recorder starts skipping backward one file at a time. When you release the left (I-Back) skip/search button, playback starts from the beginning of the file (or marked event) that has been reached. |
Using the earphone
You can listen to your recordings through the earphone provided simply by plugging it into the recorder's earphone jack. When the earphone is connected, no sound is played through the speaker.
Notes: Do not turn the volume up too high when using the earphone as this could damage your hearing.
- Do not connect an earphone to the recorder other than the one provided.
- You cannot hear sound through the earphone or speaker during recording.
Deleting event marking numbers
1 Press the FOLDER/REPEAT button, select a folder and then press the OK button.
2 Press the (I) or (▶) cursor button and select the desired file number.
Press the (I or ( ) cursor button and select the event marking number to be deleted. Flashing
4 Press the ERASE button. "DEL.?" appears and the selected event marking number flashes.
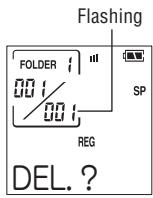
Press the OK button.
"DELETE!" appears and the event marking number is deleted.
- The remaining event marking numbers are adjusted after the number is deleted.
Note: Only the event marking number is deleted. The audio data referenced by the event marking number is not deleted.
Deleting during playback
- Follow steps 4 and 5 above while the event marking number appears on the display.
Deleting files
1 Press the FOLDER/REPEAT button, select a folder and then press the OK button.
2 Hold down the (1) or (▶) cursor button and select the file number to be deleted.
3 Hold down the ERASE button for 1 second or longer.
"DEL.?" appears and the selected file flashes.
4 Press the OK button. "DELETE!" appears and the file is deleted.
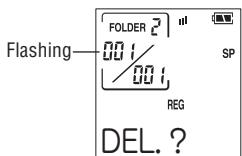
- The remaining file numbers are adjusted after the file is deleted.
Deleting during playback
- Follow steps 3 and 4 above while the file number appears on the display.
Deleting all the files in a folder
1 Press the FOLDER/REPEAT button, select a folder and then press the OK button.
2 Hold down the ERASE button for approximately 5 seconds or longer.
"DEL.?" appears and the selected folder number flashes.
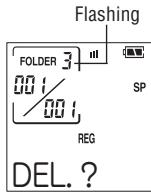
Press the OK button.
"DELETE!" appears and all the files in the folder are deleted.
Deleting during playback
- Follow steps 2 and 3 above.
Other Functions
Automatic recording function
This function enables you to automatically make a recording at a set time by specifying the start and end times.
1 Press the STOP/MENU button once or twice to display the menu screen.
2 Press the (+) or (-) cursor button until the "SCHED" (automatic recording function) screen appears, then press the OK button.
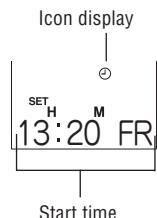
The automatic recording settings screen appears with the "hour" setting for the start time flashing.
3 Press the (+) or (-) cursor button to select the hour.
Press the OK button to confirm the displayed hour.
The "minutes" setting then starts flashing.
Press the (+) or (-) cursor button to select the minutes.
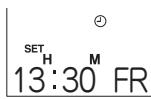
Press the OK button to confirm the displayed minutes.
The "hour" setting for the end time then starts flashing. Use the same procedure to select the hour and minute settings for the end time.

7 After you have confirmed the "minutes" setting, press the OK button.
This completes the time setting procedure and returns you to the menu screen.
Tip
Press the cursor button to go to the preceding setting. Press the cursor button to go to the next setting.
- Recording begins slightly before the scheduled recording time.
- Settings such as the recording mode and microphone sensitivity used for scheduled recording are those that were set before recording begins.
- If the scheduled time is reached while you are playing a recording, playback stops and the recorder starts recording.
- If the scheduled time is reached while the digital voice recorder is connected to a personal computer, a flashing indication appears on the display and recording does not take place.
To cancel the settings
1 Display the automatic recording settings screen. (See steps 1 and 2 on page E-21.)
Press the ERASE button.
"DEL.?" appears on the display.
Press the OK button.
"DELETE!" appears and the settings are deleted.
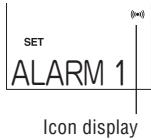
Message alarm function
This function enables the recorder to play a pre-recorded message or sound an alarm tone at a set time. You can set up to 3 alarms at one time.
1 Press the STOP/MENU button once or twice to display the menu screen.
2 Press the (+) or (-) cursor button until the "ALARM" (message alarm function) screen appears on the display, then press the OK button.
The ALARM 1 screen appears.
To select ALARM 2 or ALARM 3, press the (+) or (-) cursor button.
3 Press the OK button to display the ALARM settings screen.

4 Press the (+) or (-) cursor button until the "MSG" (message) screen appears on the display. Then press the OK button.
The RECORD screen appears.

Press the OK button to start recording.
(1) A “REC 3, 2, 1” countdown appears on the display, followed by “START” to indicate that you should begin recording the message. The recorded message can be up to 15 seconds long. A countdown on the display shows the remaining time.
- To stop recording mid-way, press the OK button.
(2) When you have finished recording the message, the "MSG" display flashes and the recorder plays back the recorded message.
(3) Then a confirmation message "OK?" appears on the display.
- If you are happy with the recording, press the OK button.
- To redo the recording, press the (+) cursor button to return to the RECORD screen selected in step 4.
6 Press the OK button to display the alarm time settings screen.
Next, the "minutes" setting flashes. Use the same procedure to select the minutes setting and then press the OK button.
(The "ONCE" setting plays the alarm message one time only. The "DAILY" setting plays the alarm message every day.)

Tip
- To use a message recorded earlier, use the (+) or (-) cursor button after step 4 to select "RECALL" and then press the OK button. Then set the alarm time.
- Messages are recorded with the microphone sensitivity set to "LOW" and "HQ" selected as the recording mode. These settings cannot be changed.
- If the set time is reached while you are playing a recording, playback stops and the recorder plays the message alarm.
- If the set time is reached while you are making a recording, the message alarm icon flashes on the display but recording is not interrupted.
- If the set time is reached while the digital voice recorder is connected to a personal computer, the message alarm icon flashes on the display. The recorder plays the message alarm as soon as it is disconnected from the personal computer.
Using an alarm tone
To have the recorder sound an alarm tone, select "CHIME" in step 4 and then set the alarm time.
Timer function
The recorder's timer function sounds an alarm once a set time has elapsed. You can set the timer delay to be from 1 to 99 minutes.
1 Press the STOP/MENU button once or twice to display the menu screen.
2 Press the (+) or (-) cursor button until the "TIMER" (timer function) screen appears on the display, then press the OK button.
The timer delay settings screen appears.
The timer starts running.
- To stop the timer while it is running, press the STOP/MENU button.
Hold function
Setting the HOLD switch to the locked position locks the recorder in its current status and disables the other buttons. Use this feature to prevent the recorder's buttons from being pressed by mistake. To unlock the recorder status, set the HOLD switch to the unlocked position.
Using the recorder connected to a PC
- You can store material captured using the digital voice recorder on a personal computer in the form of data files. It is also possible to transfer such data files from the personal computer back to the digital voice recorder at a later date.
-
You can play back recorded audio file on your PC by using the data conversion tool to convert the audio files to PC-compatible WAV-format files.
-
To play back audio files recorded on the digital voice recorder on a PC, you need to use the data conversion tool. Install the software from the bundled CD-ROM.
Your personal computer must meet the system requirements listed below in order to connect the digital voice recorder and use recorded material.
PC used for data storage only
| Supported models: IBM PC or 100% compatible |
| Supported Operating Systems:
Microsoft® Windows® XP Home Edition
Microsoft® Windows® XP Professional
Microsoft® Windows® 2000 Professional
Microsoft® Windows® Millennium Edition
Microsoft® Windows® 98/98 Second Edition |
| USB port: 1 port is required to connect the recorder (ver. 1.1/ 2.0) |
PC used for data playback
The requirements listed below in addition to those above
| CPU: | Intel Pentium II 300 MHz or higher |
| Hard disk drive: | Minimum 5 MB of space available
Additional disk space is required to store unconverted audio files and to create the converted (WAV-format) files. |
| RAM: | Minimum 128 MB |
| Other: | Audio playback devices (sound card, speakers, etc.), CD-ROM drive, Mouse, Microsoft® Windows Media® Player or other WAV playing software. |
Note:
If your PC is running Windows 98 or 98 Second Edition, you will need to install a dedicated USB driver. Install the dedicated USB driver from the bundled CD-ROM.
- Microsoft, Windows and Windows Media are either registered trademarks or trademarks of Microsoft Corporation in the U.S. and/or other countries.
Intel and Pentium are registered trademarks of Intel Corporation in the U.S.
Other company names and product names appearing in this operation manual are either registered trademarks or trademarks of those companies.
Connecting the digital voice recorder to a personal computer
To connect to a PC, use the bundled PC-Link cable (USB (A) male-USB (mini-B) male).
- Do only connect USB cable less than 1.2m to the digital voice recorder.
1 Plug the smaller connector of the PC-Link cable into the USB jack of the digital voice recorder.
Be sure the mark on the connector is facing downward.
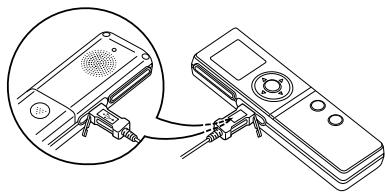
2 Plug the larger connector into a USB port on your personal computer.
Notes:
- Do not force the USB connectors when inserting them. If the connector cannot be plugged in easily, make sure it is not upside down.
- Connect the digital voice recorder directly to a USB port on your PC using a PC-Link cable.
- Make sure the digital voice recorder is powered on before connecting it to your PC.
- Make sure the recorder is not connected to the PC during recording or playback.
Playing recordings on a PC
Installing the software
Use the procedure below to install the data conversion tool from the bundled CD-ROM onto your PC.
1 Turn on the PC and launch Windows.
2 Load the bundled CD-ROM into the PC's CD-ROM drive.
3 When the Setup window appears, select "Installation of WAV conversion tool".
If the program does not start automatically, access the CD-ROM using Explorer and double-click the "installer.exe" file.
4 Proceed as directed by the on-screen instructions.
5 When the installation is complete, click "Finish".
Playing back audio files
1 Connect the recorder to your PC.
2 Double-click the "Data Conversion Tool" icon on the PC desktop. The window shown below appears.
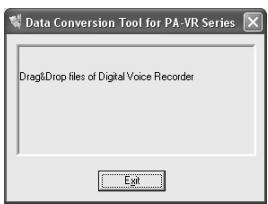
3 Next, double-click the removable disk icon for the recorder.
4 Open the "SACM" folder and copy the audio files you want to play by dragging them from folders 1 to 4 onto the desktop or into a folder on your hard disk.
5 Drag and drop the icons for the copied files into the Data Conversion Tool window.
The converted WAV files are created in the same folder as the source files.
6 Double-click the icon for a converted audio file to launch the audio playback software (e.g., Microsoft Windows Media Player) and play back the file.
Notes:
- If you drag and drop audio files directly into the Data Conversion Tool window without first copying them to the local disk (hard disk) on a PC, the files will not be converted. Also, you cannot convert audio files located on a removable disk, a network, or a CD-ROM. In all cases, copy the files to the local disk (hard disk) before converting them.
- Event marking numbers inserted by the digital voice recorder are not included in files converted to WAV format.
- You cannot play files converted to WAV format on the digital voice recorder. The digital voice recorder can only play audio files without conversion that are in the recorder's proprietary file format.
Storing your recordings on a PC
Folder structure when connected to a PC
When the recorder is connected to a PC, it appears as a removable drive in Microsoft Windows. The recordings are stored on this removable drive in the folder structure shown below.
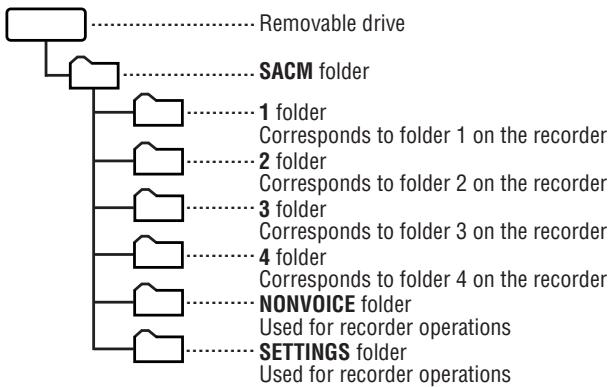
Backing up recorded audio data
The audio recordings are stored as data files in folders 1 to 4. To store these files on your PC, copy folders 1 to 4 to a folder of your choice. Refer to the Microsoft Windows User's Manual for instructions on copying files and folders.
Transferring audio data back to the digital voice recorder
To transfer audio files stored on your PC to the recorder so that you can listen to them, copy folders 1 to 4 from your PC to the SACM folder on the removable drive. Copying stored folders from your PC to the recorder will overwrite the folders and files previously stored in the recorder, and their contents will be lost forever. Appropriate care is therefore necessary when performing this step.
- Converted WAV-format files cannot be played back on the voice recorder.
Notes:
Be sure to keep the following points in mind when connecting the recorder to a PC.
- Do not use your personal computer to format the removable drive representing the digital voice recorder. Doing so could cause the recorder to malfunction, possibly making it impossible to record or play back audio correctly, reducing the recording time or causing data corruption.
-
Do not create new folders inside the SACM folder or delete or rename the folders it contains. Doing so could cause the recorder to malfunction, possibly resulting in data loss or the deletion of recorder settings.
-
Do not copy files other than audio files recorded using the recorder to the folders inside the SACM folder. Doing so could cause the recorder to malfunction.
- If you try to play a file in an incompatible format to the recorder, "? ? ?" appears on the display and the file does not play.
- Always copy audio recordings from the recorder to your PC, or from your PC to the recorder, an entire folder at a time. Attempting to copy individual files could result in the accidental deletion of important files from the recorder or cause it to malfunction.
- Do not change the names, attributes or extensions of audio files. Doing so could cause the recorder to malfunction.
- Do not unplug the PC-Link cable while data transfer is in progress. Doing so could result in data corruption or cause the recorder to malfunction.
- Do not connect the digital voice recorder to your PC during recording or playback.
- Do not copy so many audio files to the recorder that its storage capacity is used up. Doing so may result in a very short available recording time or recording may not be possible at all.
- Audio files are recorded in proprietary format. To play the audio files on your PC using applications such as Windows Media Player, convert the files to WAV format using the data conversion tool.
- Do not connect the recorder to your PC when the batteries are dead or if there are no batteries in the recorder. Doing so could cause the recorder to malfunction or could result in the recorder not being recognized as an external drive by the PC.
Disconnecting the digital voice recorder
- After confirming that data transfer is complete and performing the procedure for removing hardware from the personal computer, unplug the PC-Link cable from the digital voice recorder.
- The recorder remains in "LINK..." status until it is disconnected from the PC.
Replacing the batteries
Once the batteries are becoming exhausted, you will no longer be able to record or play back voice recordings. Before replacing the batteries, be sure to read the following information carefully and observe the instructions closely.
Batteries used
| Type | Model | Quantity |
| AAA-size alkaline batteries | LR03 | 2 |
※ Use only the designated battery type. Other batteries may have different capacities or voltages and could cause malfunctions or faults.
Notes:
- Remove the batteries if the recorder will not be used for a long period.
- Never remove batteries while the recorder is operating. Removing the batteries during recording, while recording is paused, during playback, or while erasing is in progress could result in recorded data not being saved or in loss of all recorded data.
- Leaving depleted batteries in the recorder may result in battery fluid leakage and damage to the recorder.
- The batteries supplied with the recorder were included at shipment and may become exhausted before their suggested operating time.
When to replace the batteries
The icon in the top-right corner of the display indicates when the batteries are becoming exhausted and should be replaced soon.
Battery level icons
:Full
:Low
Battery operating times
- Continuous recording time (in LP mode): Approx. 8 hours
- Continuous playback time (in LP mode): Approx. 6 hours
1 Slide the battery cover in the direction of the arrow to remove it.
2 Remove the used batteries.
3 Insert the new batteries.
Ensure that both replacement batteries are new and that they are inserted with the correct polarity.
Fit the battery cover back in place.
The screen for setting the date and time appears on the display.
To set the date and time, follow from step 5 of the procedure on page E-10.
Dealing with problems
In very unusual circumstances, such as exposure to strong external electrical interferences or a strong impact, all the buttons on the recorder may cease to function. If this happens, reset the recorder as described below.
Reset procedure
Using a ballpoint pen or similar tool, press the reset button on the back of the recorder.
The "RESET?" message appears on the display.
Press the STOP/MENU button.
The screen for setting the date and time appears on the display.
To set the date and time, follow from step 5 of the procedure on page E-10.
Initialisation procedure
If resetting the recorder does not remedy the problem, try initialising the recorder.
Never initialise the recorder unless absolutely necessary as this will erase all the data on the recorder.
※ This procedure will erase all the recordings stored on the recorder and will reset all the recorder settings (date/time, etc.) to their initial values.
Using a ballpoint pen or similar tool, press the reset button on the back of the recorder.
The "RESET?" message appears on the display.
Press the OK button.
When "OK?" appears on the display, press the OK button again.
The "RESET!" message appears on the display briefly and then the screen for setting the date and time appears.
To set the date and time, follow from step 5 of the procedure on page E-10.
Cleaning the recorder
Use a soft dry cloth to clean the recorder.
Do not use volatile fluids such as thinners or benzene or a dampened cloth as this could result in deformation or discoloration of the recorder.
Troubleshooting
If the problems described below occur, it does not necessarily mean that the recorder is faulty. Check the suggested items before requesting repairs.
| Problem | Check this |
| Nothing appears on the display. | ·Are the batteries exhausted?
·Are the batteries inserted with the correct polarity?
※If neither of the above apply, try the reset procedure. |
| Nothing happens when any button is pressed. | ·Is the HOLD switch set to the locked position? |
| The recorder will not record. | ·Are the batteries exhausted?
·If the “FULL” indication is displayed, try deleting some unwanted files. |
| The recorded voice is not audible. | ·Is the earphone connected?
·Is the volume set too low? |
| The recorded voice is too low. | ·Is the microphone sensitivity set to LOW during recording? Set the microphone sensitivity to HIGH. (See page E-13.) |
| The duration of the recorded audio is shorter than the actual recording time
The beginning of the recording is cut off. | ·Is silence skip recording turned on?
(See page E-13.) |
| The recording is hard to hear. | ·Is the recording mode set to LP?
(See page E-12.) |
Specifications
| Model | PA-VR10E PC |
| Name | Digital voice recorder |
| Internal memory | 64 MB |
| Recording times |
| HQ mode: Approx. 4 hours |
| SP mode: Approx. 8.5 hours |
| LP mode: Approx. 28 hours |
| Input/output terminals | Earphone: 3.5 mm dia.; |
| impedance: 32 Ω |
| Microphone: 3.5 mm dia.; |
| impedance: 2.4 kΩ |
| USB jack (Mini-B) |
| Speaker | 23 mm dia. |
| Clock accuracy | Average ±1 min./month (at 25°C) |
| Operating temperature | 0°C to 40°C |
| Maximum power | 70 mW |
| Power supply | 3V---(DC): AAA-size alkaline batteries (LR03) (2) |
| Continuous battery operation time | Approx. 8 hours (continuous recording in LP mode) |
| Approx. 6 hours (continuous playing in LP mode) |
| Volume at factory setting (initial level) |
| ※ Varies depending on the operating conditions and type of usage. The above figure is only an approximate guide and is in no way guaranteed. |
| Weight | Approx. 66 g (including batteries) |
| Dimensions | 31 (W) × 111 (D) × 16.8 (H) mm |
| Accessories | AAA-size alkaline batteries (2), PC-Link Cable, CD-ROM Software, earphone, operation manual |
Avertissements
Attention: Your product is marked with this symbol. It means that used electrical and electronic products should not be mixed with general household waste. There is a separate collection system for these
1. In the European Union
Attention: If you want to dispose of this equipment, please do not use the ordinary dust bin!
Used electrical and electronic equipment must be treated separately and in accordance with legislation that requires proper treatment, recovery and recycling of used electrical and electronic equipment.
Following the implementation by member states, private households within the EU states may return their used electrical and electronic equipment to designated collection facilities free of charge. In some countries your local retailer may also take back your old product free of charge if you purchase a similar new one. *) Please contact your local authority for further details.
If your used electrical or electronic equipment has batteries or accumulators, please dispose of these separately beforehand according to local requirements.
By disposing of this product correctly you will help ensure that the waste undergoes the necessary treatment, recovery and recycling and thus prevent potential negative effects on the environment and human health which could otherwise arise due to inappropriate waste handling.
2. In other Countries outside the EU
If you wish to discard this product, please contact your local authorities and ask for the correct method of disposal.
For Switzerland: Used electrical or electronic equipment can be returned free of charge to the dealer, even if you don't purchase a new product. Further collection facilities are listed on the homepage of www.swico.ch or www.sens.ch.
1. In the European Union
If the product is used for business purposes and you want to discard it:
Please contact your SHARP dealer who will inform you about the take-back of the product. You might be charged for the costs arising from take-back and recycling. Small products (and small amounts) might be taken back by your local collection facilities.
For Spain: Please contact the established collection system or your local authority for take-back of your used products.
2. In other Countries outside the EU
If you wish to discard of this product, please contact your local authorities and ask for the correct method of disposal.

m = 311 ;
This equipment complies with the requirements of Directive 89/336/EEC as amended by 93/68/EEC.