
MTS 1610 - Keyboard SILVERCREST - Free user manual and instructions
Find the device manual for free MTS 1610 SILVERCREST in PDF.


| Product Type | Cordless multimedia keyboard and mouse set |
| Model | MTS 1610 |
| Brand | SilverCrest |
| Connectivity | USB or PS/2 via receiver |
| Mouse Type | Optical |
| Mouse Resolution | 800 dpi |
| Mouse Buttons | 5 buttons with scrollwheel |
| Keyboard Layout | Standard with 105 keys |
| Hotkeys | 16 (10 freely programmable) |
| Power Supply (Keyboard) | 2 x AAA batteries (1.5V) |
| Power Supply (Mouse) | 2 x AAA batteries (1.5V) |
| Operating Temperature | 5°C to 40°C |
| Operating Humidity | Max. 90% relative humidity |
| Radio Frequency | 27 MHz |
| Keyboard Range | Approx. 1.8 m |
| Mouse Range | Approx. 1.2 m |
| System Requirements | Intel Pentium III, AMD Athlon or higher; 128 MB RAM; free USB or PS/2 port; Windows XP/2000; CD-ROM drive |
| Warranty | 36 months from date of purchase |
| Maintenance | Clean with a dry cloth only; do not use aggressive liquids |
| Safety | Keep out of reach of children; avoid liquid contact; do not open housing |
| Included Accessories | Keyboard, mouse, receiver, USB-PS/2 adapter, 4 AAA batteries, CD-ROM with drivers, operating instructions |
Frequently Asked Questions - MTS 1610 SILVERCREST
User questions about MTS 1610 SILVERCREST
0 question about this device. Answer the ones you know or ask your own.
Ask a new question about this device
Download the instructions for your Keyboard in PDF format for free! Find your manual MTS 1610 - SILVERCREST and take your electronic device back in hand. On this page are published all the documents necessary for the use of your device. MTS 1610 by SILVERCREST.
USER MANUAL MTS 1610 SILVERCREST
Cordless multimedia keyboard and mouse set
MTS 1610
1

natural_image
Black and white image of a standard computer keyboard with no visible text or symbols on the keys or background.2

natural_image
Close-up of a silver computer mouse with black bezel, no visible text or symbols on the device itself.3

natural_image
Black computer mouse with a cable, shown in studio setting (no text or symbols visible)4

Package contents
1 Cordless keyboard
2 Cordless optical mouse
3 Receiver
4 USB-PS/2 adapter
5 Batteries type AAA, 1.5V (4 batteries, not illustrated)
6 CD ROM with drivers (not illustrated)
7 Operating instructions (not illustrated)
Contents
PACKAGE CONTENTS 1
IMPORTANT SAFETY INSTRUCTIONS 3
Operating environment 3
Cables 3
Maintenance and care 4
Children 4
Intended normal use 4
Batteries 4
Radio interface 5
Conformity 6
Disposal of old devices 6
INSTALLING THE HARDWARE 7
Insert the batteries 7 Connect the radio receiver to the computer 8 Synchronizing the devices 10
INSTALLING THE SOFTWARE 11
The symbols in the taskbar 13
Technical Specifications 18
System requirements 18
DETAILS OF GUARANTEE 19
2 - English
Important safety instructions
Before using the device for the first time, please carefully read through the following instructions and note all warnings, even if you are familiar with handling electronic equipment. Store this manual in a safe place for future reference. If you sell or give away the device, please ensure you handover these instructions too.
Operating environment
Place the device on a firm, level surface and do not place any objects on the device. The device is not designed for use in rooms with a high temperature or air humidity (e.g. bathrooms) or excessive dust. Operating temperature and operating humidity: 5°C to 40°C, max. 90% relative humidity
Please ensure that:
- no direct heat sources (e.g. heaters) act on the device
- the device is not exposed to direct sunlight or strong artificial light
- you avoid contact with splashing and dripping water and aggressive liquids and that the device is not used near water, in particular, the device must never be immersed (do not place any objects filled with liquids on or near the device, e.g. vases or drinks);
- the device is not in the immediate vicinity of magnetic fields (e.g. loudspeakers);
- there are no naked flames or fire sources (e.g. burning candles) on or next to the device;
- no foreign bodies penetrate;
- the device is not exposed to large temperature fluctuations;
- the device is not exposed to excessive impacts and vibrations
Cables
Always hold all cables at the plug and do not pull on the cable itself. Never touch a cable with wet hands as this can cause a short-circuit or electric shock. Do not place the device, pieces of furniture or other heavy objects on the cable and ensure the cables are not kinked or bent, especially at the plug and at the connection sockets. Never make a know in a cable and never bind it together with other cables. All cables should be laid so that nobody treads on them or is hindered by them. Do not use adapter plugs or extension cables unless they conform to the applicable safety standards.
Maintenance and care
Maintenance work is necessary if the device has been damaged, if liquid or objects have got inside the housing, if the device has been exposed to rain or moisture or if it is not working properly or has been dropped. Switch the device off immediately if you see a build up of smoke, hear unusual sounds or smell unusual odours. In these cases you must not continue to use the device until it has been checked over by a qualified person. All repairs must be carried out by trained, qualified personnel only. Never open the housing of the device or the accessories. Clean the device with a clean, dry cloth only, never use aggressive liquids.
Children
Electrical devices must be kept out of reach of children. Never allow children to use electrical devices without supervision. Children are not always able to correctly recognise possible dangers. Batteries and small parts can be extremely dangerous if swallowed. Store batteries out of reach of small children. If a battery has been swallowed, you must seek medical assistance immediately. Keep packaging films, foils and sheeting out of reach of children too. Risk of suffocation.
Intended normal use
This keyboard and mouse set, consisting of a wireless keyboard, wireless mouse and radio receiver, is a information technology device. It may only be used for private purposes, not for industrial or other commercial purposes. In addition, the device must not be used outside closed rooms or in tropical climate regions. Only use connection cables and external devices which conform to the safety regulations and which correspond to this device with respect to electromagnetic compatibility and screening quality. This device fulfils all relevant standards related to its CE conformity. If the device is modified without the manufacturer's prior approval, compliance with these standards is no longer guaranteed. Use the accessories specified by the manufacturer only.
If you are not using the device within the Federal Republic of Germany you must comply with the national regulations and laws of the country in which it is used.
Batteries
Always insert the batteries correctly, i.e. ensuring the polarities are correctly positioned, do not attempt to recharge non-rechargeable batteries and never throw batteries onto a fire. Do not simultaneously use different
batteries (old (used) and new, alkali and carbon, etc.). Remove the batteries if you are not going to be using the device for a lengthy period. Risk of explosion and leakage in the event of improper use.
Actively think about protecting the environment. Used batteries do not belong in domestic waste. They must be submitted to a collection service for waste batteries.
Radio interface
Switch off the device if you are on an aeroplane, in a hospital, in an operating theatre or near a medical electronic system. The radio waves transmitted can disrupt the function of sensitive equipment.
Keep the device at least 20cm away from a pacemaker as otherwise proper function of the pacemaker can be disrupted by radio waves.
The transmitted radio waves can cause interference noises in hearing aids.
If the radio components are switched on, keep the device away from flammable gases and potentially explosive atmospheres (e.g. paint shop), as the transmitted radio waves can trigger an explosion or fire.
The range of radio waves depends on environmental and ambient conditions.
Data traffic via a wireless connection can also be received or intercepted by unauthorised third parties. TARGA GmbH is not responsible for radio or television interference caused by unpermitted changes to this device. Furthermore, TARGA does not accept any responsibility for the replacement or exchange of connection cables and devices not specified by TARGA GmbH. The user is solely responsible for the correction of faults caused by such unpermitted changes and for replacement or exchange of the devices.
Conformity

The wireless mouse & keyboard set has been tested and approved with respect to compliance with the basic requirements and other relevant regulations of the EMC Directive 89/336/EEC, the Directive for low voltage electrical equipment 73/23/EEC and the R&TTE Directive 99/5/EC.
Disposal of old devices

Devices marked with this symbol are subject to the European Directive 2002/96/EC. All waste electrical and electronic equipment must be disposed of separately from normal domestic waste in officially provided collection points. By properly disposing of old equipment you avoid environmental damage and a risk to your own personal health. Further information on proper disposal of the old device according to the regulations is available from your local authority, the waste disposal services authority or the shop where you purchased the product.
Installing the hardware
Insert the batteries
First, insert the batteries in the mouse and keyboard, as shown in the illustrations below. Ensure the batteries are inserted in the devices with the correct polarisation (note the + and - positions).
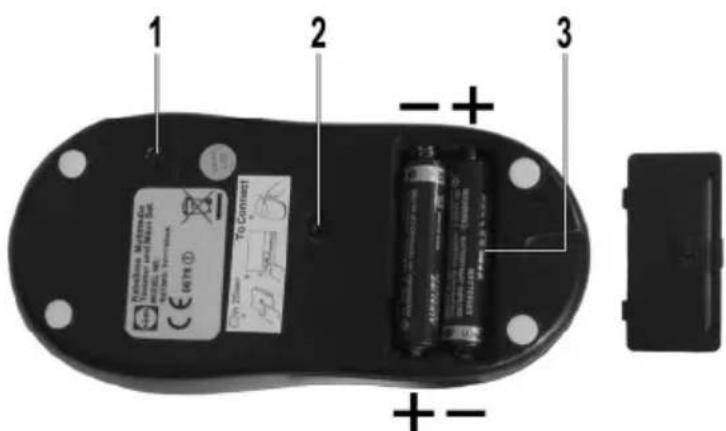
Underside of the mouse (with open battery compartment)

Detailed view of the underside of the keyboard (with open battery compartment)
1 Mouse synchronizer button
2 Optical sensor
3 Mouse battery compartment
4 Keyboard synchronizer
5 Keyboard battery compartment
Connect the radio receiver to the computer
Connect with the USB port:
Plug the USB connector of the radio receiver into a free USB socket of your switched on computer. The PS/2 connector (green) must not be connected via USB. The operating system recognises the new USB device and automatically installs the suitable drivers. During this one-off procedure the Windows® 2000/XP operating system reports: "New hardware found" and shortly afterwards: "The new hardware has been installed and can now be used."

i The keyboard and mouse still do not work as they have not yet been synchronised with the receiver. Please synchronise as described on page 10.
Connect with the PS/2 port:
Ensure your computer is switched off. Plug the USB-PS/2 adapter (violet) into the USB connector of the radio receiver, then connect the PS/2 connector of the radio receiver with the PS/2 mouse port of your computer and the attached adapter with the PS/2 keyboard port of your computer. The PS/2 ports are marked with colours on many computers (green = mouse connection, violet = keyboard connection). If your computer is not clearly marked, please refer to the relevant documentation you received with your computer. Then switch on the computer as usual.
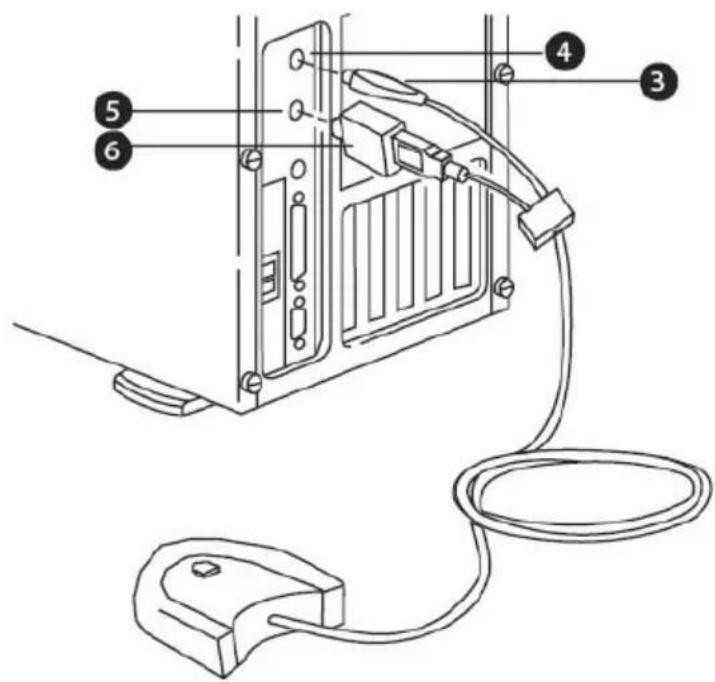
3 PS/2 port for the mouse (green)
4 PS/2 port for the mouse on the computer (green)
5 PS/2 port for the keyboard on the computer (violet)
6 USB-PS/2 adapter for the keyboard (violet)
i The keyboard and mouse still do not work as they have not yet been synchronised with the receiver. Please synchronise as described on the following pages.
Synchronizing the devices
The keyboard and mouse set is connected to the receiver by means of radio transmission. The radio channel must be synchronized the first time you startup the mouse and keyboard and after each battery change. To do this, position the mouse and keyboard in the immediate vicinity of the radio receiver.
- Press the synchronizer button on the radio receiver.
- Press the synchronizer button (figure page 7) on the underside of the keyboard. Take care not to put down the keyboard so it is resting on its top (keyboard side down) to avoid pressing keys.
- Press the synchronizer button (figure page 7) on the underside of the mouse.
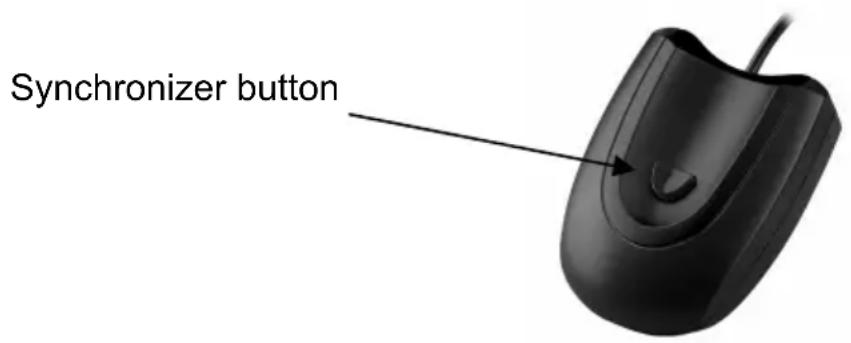
i Ensure you carry out the synchronizing procedure in the correct order within 25 seconds.
If the mouse or keyboard are now used the indicator light of the radio receiver flashes as a sign that it is receiving radio signals. If the devices do not work properly after the initial synchronization please repeat steps 1 to 3.
If you replace the batteries in the keyboard or mouse you must repeat the radio synchronization.
Installing the software
In order to use the full range of functions of your mouse and keyboard set you must install the supplied software. Please insert the enclosed CD ROM in the CD ROM drive of your computers. The installation process (see figure below) should start automatically.
If this window does not appear automatically, double-click the "autorun.exe" file on the CD ROM to start it manually.
You will be asked to choose the language for the installation. Select your language and click "Next" to start the installation.

Ensure you have selected the correct device and click "Next" to continue.

The installation is prepared. Please wait.

Click "Next" to start the installation.

Here you can select the target folder for the installation using the "Browse ..." button or use the suggested folder. Please click "Next" to continue.

The installation is finished. Set the selection to "Yes, restart computer now" and click "Finish".
Your computer then reboots.

As soon as your computer has restarted you can use the software to configure the optical mouse and keyboard. Do this by clicking one of the new symbols in the task bar (bottom right-hand side of your screen, next to the system clock).
The symbols in the taskbar

Double-click this symbol to open the configuration menu for the optical mouse (see description below).

Double-click this symbol to open the configuration menu for the keyboard (see description on page 14).

This symbol shows you that the "Num Lock" function on your keyboard has been activated. Press the "Num Lock" key again to deactivate this function.

This symbol shows you that the "Caps Lock" function on your keyboard has been activated. Press the "Caps Lock" key again to deactivate this function.

This symbol shows you that the "Scroll Lock" function on your keyboard has been activated. Press the "Scroll Lock" key again to deactivate this function.
The configuration
Configuring the optical mouse
Double-click this symbol ⚙ in the task bar to open the configuration menu for the mouse.
Here you can define a function for each of the mouse's five buttons. Do this by clicking the selection button behind the corresponding mouse button and select a function from the menu with a left-click.
Use the "Restore to default" button to reinstate the delivered factory condition.
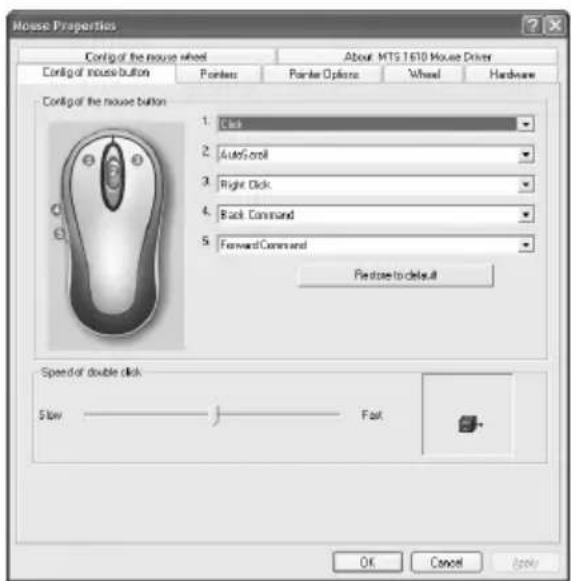
You can activate changes by clicking the "Apply" button (the window remains open) or the "OK" button (the window closes).
Use the slide switch to adjust the double-click speed. If you move the slider to the left and activate the function with the "Apply" button the mouse responds with a low double-click speed. If you move the slider to the right you must execute the double-click faster.
Double-click the graphic next to the slide switch to test the double-click speed setting.
Click the "Config of the mouse wheel" tab in the configuration menu to adjust the mouse's scrollwheel as follows:
Wheel Scroll Speed
The "Speed of wheel scroll" option determines the speed with which the scrollwheel moves characters on the screen up or down. You can choose between the settings: 1 line, 3 lines or 6 lines.
Use the "For Pages" option to scroll page-wise.
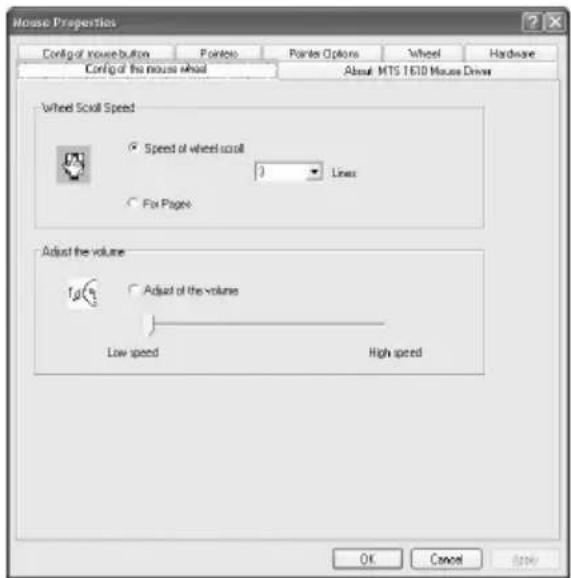
Adjust the volume
If this function is activated you can use the mouse's scrollwheel to adjust the system volume. The function described above (Wheel Scroll Speed) is automatically deactivated at the same time. Use the slide controller to determine the volume change per movement.
Use the menu's other tabs to adjust the known mouse settings of the operating system.
Configuring the keyboard
The cordless keyboard of the keyboard and mouse set has 16 fast-access keys (hotkeys) and a volume controller. After you have installed the software the hotkeys are assigned these standard settings:
Left-hand side (Internet hotkeys)

1 Homepage of your standard browser (e.g. Internet Explorer)
2 Favourites
3 Search
4 Stop page setup in the browser
5 Update the internet site page
6 Starts the standard eMail program
7 My computer
8 Calculator
Centre (system hotkeys) Right-hand side (multimedia hotkeys)

9 Standby
10 Shut down
11 Multimedia playback
12 Previous clip
13 Next clip
14 Stop
15 Play / pause
16 Mute
17 Volume control
Several hotkeys can be individually programmed. Double-click this symbol in the task bar to open the configuration menu for the keyboard.
In this menu you can define the function of the hotkeys. Some keys have unchangeable system functions, therefore not all the special keyboard keys are displayed here. Left-click the symbol corresponding to the special key to be changed.
Left-click one of the symbols to open this menu:
You can use the upper function "choose a function" to select one of the permanently set programs. If you activate this function with the "OK" button, the menu closes and you can conveniently start the selected program using the corresponding hotkey.

![Setup function of the key Choose a function Default Microsoft Word Microsoft Excel Microsoft PowerPoint Note Pad Copy[Ctrl+C] Paste[Ctrl+V] Cut[Ctrl+X] OK Cancel](/content/2026/05/790622/images/b10da157c3b628fe824a3fe626ef9c8d622bcb901a6786335f9c14eade8555cd.jpg)
Use the second function "Select a program to run" and then left-click the "Browse..." button to open this menu (see illustration on the right). Here you can select any executable file on your computer's hard drive, which you want to execute with the corresponding hotkey.

Appendix
Problem solving
Please check the following if the keyboard and mouse are not recognised after installation or do not respond to inputs:
☑ Check whether the batteries or rechargeable batteries have been correctly inserted with the right arrangement (correct polarisation).
√ Check whether the receiver is properly connected to the computer (see page 8 onwards – Connecting the radio receiver to the computer).
☑ Try another USB port.
√ Check the charge of the batteries and rechargeable batteries.
√ Change the position of the receiver to improve the reception conditions. The distance between the receiver and the keyboard/mouse should not be more than one metre when aligned.
☑ Check whether you have resynchronized after changing the batteries/rechargeable batteries.
☑ Please ensure that the radio receiver is not positioned on a metal surface.
√ You should use an underlay (e.g. mouse pad) if you use the mouse on a glass or glossy surface.
Technical Specifications
- 27 MHz radio frequency
- Operating temperature: 5°C - 40°C
- Humidity: max. 90% relative humidity
Optical mouse
- 5 buttons with scrollwheel
- 1 connection button
- Optical sensor
- 800 dpi optical resolution
- Radio range: approx 1.2 m
Keyboard
- Standard keyboard layout with 105 keys
- 1 radio channel (27MHz) with 256 IDs
- 16 hotkeys (of which 1 0 are freely programmable)
- Volume control ( +/-)
- 1 connection button
- Radio range: approx 1.8 m
Receiver
- 1 connection button
- USB port or PS/2 port
- Indicator light
System requirements
- Intel ^® Pentium ^® III, AMD Athlon ^TM or higher
- At least 128 MB RAM
- A free USB port or PS/2 ports for mouse and keyboard
- Windows ^® XP/2000
- CD ROM drive
Details of Guarantee
36 month warranty from date of purchase

United Kingdom
3
Important warranty information

Dear Customer,
Thank you for purchasing a SILVERCREST product.
Please carefully read through the enclosed documentation or online help before putting your SILVERCREST product into service. If you have a problem, which can't be solved in this way, please contact our hotline.
If the problem cannot be solved over the phone, you will be given a reference number (RMA), which you should enclose together with a copy of the proof of purchase. After you have packaged the unit safe for transport and in plain packaging, please send it for warranty processing, with the RMA noted on the outside of the package, to the address given to you by our hotline employee. After receiving the unit we will correct the manufacturing and material defect free of charge.
Up-to-date information and answers to the most frequently asked questions are available on the internet from:
www.silvercrest.cc
This guarantee is valid in the UK.
Your statutory guarantees from the seller are in addition to this warranty and are not limited by it.

MONTH WARRANTY
Hotline number: 0207-3650744
(Please have your serial number to hand!)
Manufacturer: TARGA GmbH, Postfach 2244.
D-59482 Soest
www.silvercrest.cc
36 month warranty from date of purchase

Important warranty information
SilverCrest
Dear Customer,
Thank you for purchasing a SILVERCREST product.
Please carefully read through the enclosed documentation or online help before putting your SILVERCREST product into service. If you have a problem, which can't be solved in this way, please contact our hotline.
If the problem cannot be solved over the phone, you will be given a reference number (RMA), which you should enclose together with a copy of the proof of purchase. After you have packaged the unit safe for transport and in plain packaging, please send it for warranty processing, with the RMA noted on the outside of the package, to the address given to you by our hotline employee. After receiving the unit we will correct the manufacturing and material defect free of charge.
Up-to-date information and answers to the most frequently asked questions are available on the internet from:
www.silvercrest.cc
This guarantee is valid in the Ireland.
Your statutory guarantees from the seller are in addition to this warranty and are not limited by it.
36
MONTH WARRANTY
Hotline number: 01-2421583
(Please have your serial number to hand!)
Manufacturer: TARGA GmbH, Postfach 2244,
D-59482 Soest
www.silvercrest.cc


- Cordless multimedia keyboard and mouse set
- MTS 1610
- Package contents
- Contents
- PACKAGE CONTENTS 1
- IMPORTANT SAFETY INSTRUCTIONS 3
- INSTALLING THE HARDWARE 7
- INSTALLING THE SOFTWARE 11
- DETAILS OF GUARANTEE 19
- - English
- Important safety instructions
- Operating environment
- Please ensure that:
- Cables
- Maintenance and care
- Children
- Intended normal use
- Batteries
- Radio interface
- Conformity
- Disposal of old devices
- Installing the hardware
- Insert the batteries
- Connect the radio receiver to the computer
- Synchronizing the devices
- Installing the software
- The symbols in the taskbar
- The configuration
- Configuring the optical mouse
- Wheel Scroll Speed
- Adjust the volume
- Configuring the keyboard
- Appendix
- Problem solving
- Technical Specifications
- Optical mouse
- Keyboard
- Receiver
- System requirements
- Details of Guarantee
- Important warranty information
- month warranty from date of purchase
- SilverCrest
Brand : SILVERCREST
Model : MTS 1610
Category : Keyboard