IN-9008 - Security Camera Instar - Free user manual and instructions
Find the device manual for free IN-9008 Instar in PDF.


User questions about IN-9008 Instar
0 question about this device. Answer the ones you know or ask your own.
Ask a new question about this device
Download the instructions for your Security Camera in PDF format for free! Find your manual IN-9008 - Instar and take your electronic device back in hand. On this page are published all the documents necessary for the use of your device. IN-9008 by Instar.
USER MANUAL IN-9008 Instar
natural_image
White INSTAR security camera with multiple lenses and a circular lens (no visible text or symbols on body)text_image
Technical diagram illustrating a mechanical assembly process with angular changes labeled 360° and 72°.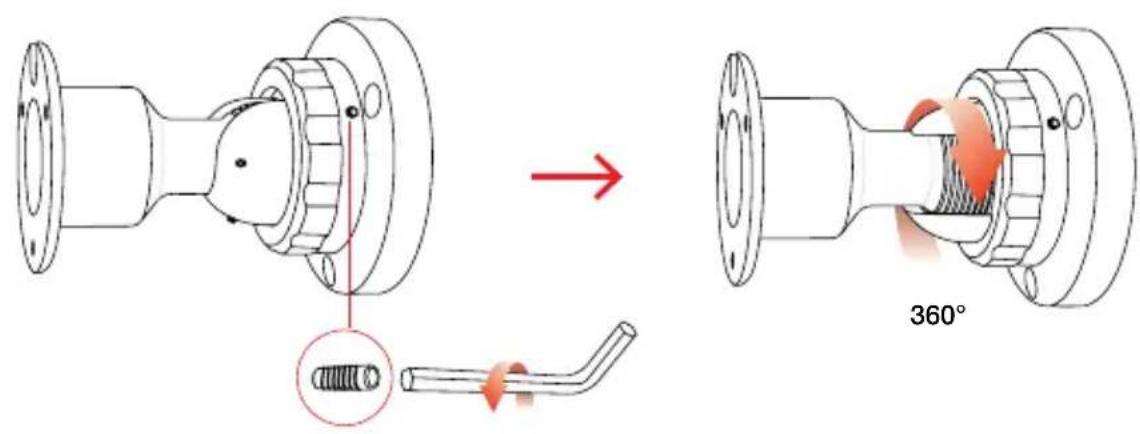
text_image
Technical diagram illustrating a mechanical assembly process with labeled components and a 360° angle indicator.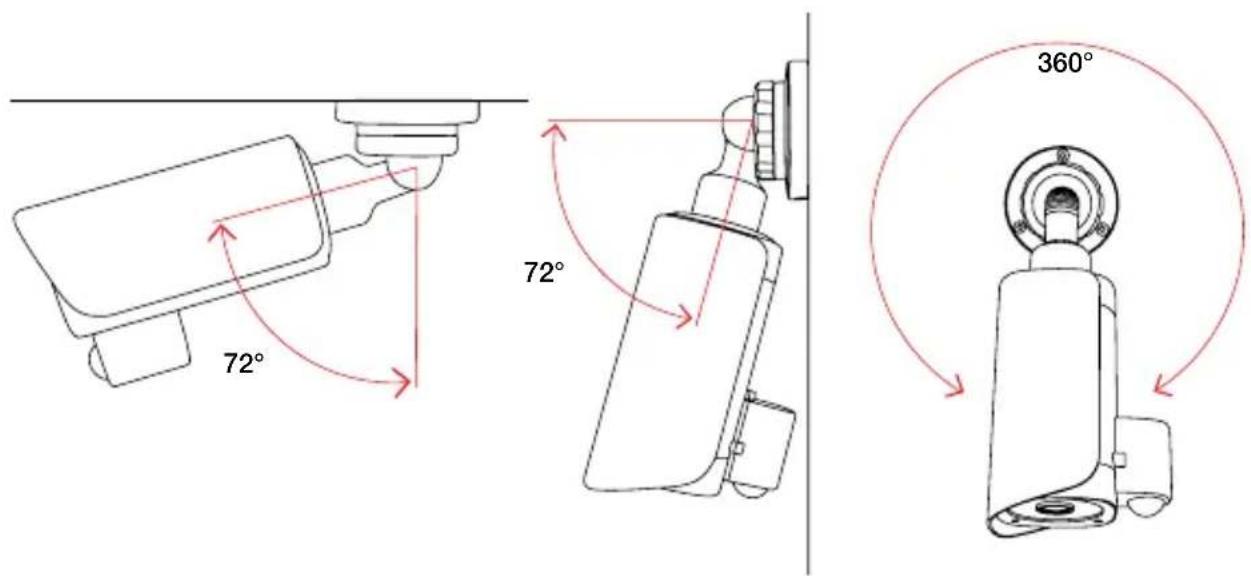
text_image
72° 72° 360°5. Installation
natural_image
Technical line drawing of a mechanical pump or motor assembly with mounting flanges and a handle (no text or symbols)natural_image
Technical line drawing of a mechanical component with internal parts and directional arrows (no text or symbols)natural_image
Line drawing of a hand inserting a component into a motor housing (no text or symbols)natural_image
Line drawing of a hand inserting a component into a motor housing (no text or symbols)natural_image
Technical line drawing of a mechanical device with a handle and mounting holes (no text or symbols)https://www.youtube.com/INSTARTV
10.4. Wiki, Kundenforum & Social Media
natural_image
Two security camera modules, one white and one black, with visible sensor lights and no text or symbols on the devices themselves.natural_image
White INSTAR security camera with multiple lenses and a circular lens (no visible text or symbols)- Panasonic Wide Dynamic Range (WDR) full HD image sensor
- User-friendly and modern HTML5 web user interface (WebUI)
- Supports all modern web browsers (IE 11, Edge, Firefox, Chrome, Safari, etc.)
- Supports MicroSD cards (max. 128GB) for alarm, manual or continuous recording
- Alarm notifications by email, push or to an alarm server
- Supports FTP(S) upload of alarm images, videos and photo series
- Supports TLS / SSL encryption for secure HTTPS and FTPS communication
- Supports secure video upload to the INSTAR Cloud (optional)
Table of Content
- Camera Introduction 2-EN
- Safety Warnings 3-EN
- Product Features 4-EN
- Camera Structure 5-EN
- Installation 9-EN
- Smartphone Apps 10-EN
- Remote Access 11-EN
- Camera Reset 12-EN
- Lens Adjustment 13-EN
14-EN10. Online
- INSTAR Cloud 15-EN
- Technical Data 16-EN
- Warranty & Disposal 17-EN
- Legal Information 18-EN
1. Camera Introduction
The IN-9008 is the newest indoor Full HD PIR Outdoor IP Camera from INSTAR. With a built-in state-of-the-art Panasonic passive infrared (PIR) motion sensor and four separately configurable alarm areas that can be linked together, the camera prevents false alarms and notifies you only when a real alarm has been triggered.
Equipped with one of the latest Panasonic Full HD CMOS image sensor, which features low noise, high speed and new Wide Dynamic Range (WDR) functionality, the IN-9008 is able to achieve the best image quality in daylight as well as clear image in night vision mode with the help of its high-power LEDs. Hence, the IN-9008 is able to deliver accurate motion detection and alarm notification.
The design of this outdoor camera was completely new developed in order to fulfill the wishes of our customers. Therefore it is now possible to insert only the necessary cable as there is no more connection cable with a lot of connectors which might not even be used. Thanks to the new concept design, you are now able, for example, to put only the power cord from the power supply through a small hole on the wall into the camera in case you want to connect the camera via WiFi.
This camera is running an embedded Linux operating system and a Webserver which supports TLS/SSL encryption for security and privacy. It provides a built-in, modern HTML5 based Web User Interface (WebUI) with focus on usability and simplicity, supporting all recent devices (desktop, tablet, smartphone) and operating systems (Windows, MacOS, Linux,...). Thanks to the built-in Camera Setup Wizard and the (built-in) help function, INSTAR users can enjoy a very easy initial set-up of the IP camera.
For your camera installation, please go to:
http://install.instar.com
Please note that this user manual describes both, the WiFi and PoE version of the IN-9008. Therefore some sections in this user manual might only apply to the WiFi and some only to the PoE model. Therefore, the WPS function for example only applies to the WiFi version.
2. Safety Warnings
Read the safety warnings carefully and keep them in a safe place.
- Make sure the power cord is not near any hot or heating up surfaces.
- Place the power and network cable properly to prevent injuries.
- This device shall not be used by people (including children) with limited physical, sensory and mental capabilities. Only a trained person who knows how to use the device carefully should use it.
- Children should be supervised in order to ensure they do not play with the device.
- If the power cord of this device gets damaged, it can only be replaced by the manufacturer, a customer service person or a similar qualified person to avoid any injury to you and damage to the device.
- Never try to repair the device by yourself. By opening the device the warranty will automatically expire. If any repair is needed, please contact your INSTAR Service Center.
- When cleaning, please never put the device in water or other liquids.
• Make sure you only install the device in a 110V - 240V power socket. - Only use this device to secure your home, office and similar places. If you are planning to install the device in a public area, please make sure you have all certificates to do so.
- This device is suitable for indoor and outdoor use.
- Don't use the camera for any other purpose than it is made for.
- Never install the device near explosive or flammable substances.
- INSTAR does not give any warranty, if you use any third party firmware.
3. Product Features
Hardware
WDR Sensor Full HD WDR Panasonic CMOS sensor / resolution 1920 x 1080px
Wide-Angle Lens Exchangeable 4.3mm lens with a 90^ diagonal field of view
MicroSD Card Max. 128GB (16GB incl.) for alarm, manual and continuous recording
PIR Sensor Integrated Panasonic passive infrared motion detector
Mic / Audio Out Integrated microphone and audio output (3.5mm Jack)
Cable entry Individually usable cable entry for power, network and audio
Software
Privacy Areas Mask areas for privacy concerns
Alarm Areas Define four areas for software motion detection and link with PIR
Alarm Triggers Supports motion, heat and noise detection
Pre-Recording Alarm videos start three seconds before the trigger event
Notifications Alarm emails and push (text) notifications in case of an alarm trigger
Alarm Server Send alarm triggers to third party devices such as home automations
Video Recording 15s alarm video / scheduled / manual continuous recording on SD
Video Stream Supports stream protocols like RTSP, RTP, RTMP, ONVIF, MJPEG...
Photo Series Interval snapshots for website integration or time lapse videos
Intercom Two-way audio with our InstarVision app
Connectivity
P2P Free point-2-point connectivity with InstarVision, works with IPv6
DDNS Free DDNS address to connect to your camera via the internet
Cloud Optional upload & management of alarm videos in the INSTAR Cloud
FTP Upload Upload alarm images / videos to an FTP server (FTP or secure FTPS)
WPS Use WiFi Protected Setup (WPS) to easily establish a WiFi connection
WiFi 2.4Ghz WiFi with IEEE 802.11b/g/n and WPA/WPA2 encryption
HTTPS Access the WebUI via HTTPS with secure TLS/SSL encryption
4. Camera Structure
4.1. Delivery Content

text_image
Camera Bracket 16GB MicroSD Sealing & Tropels Power Adaptor LAN Cable Antenna Allen KeyDelivery contents in the camera package
4.2. Camera Structure
text_image
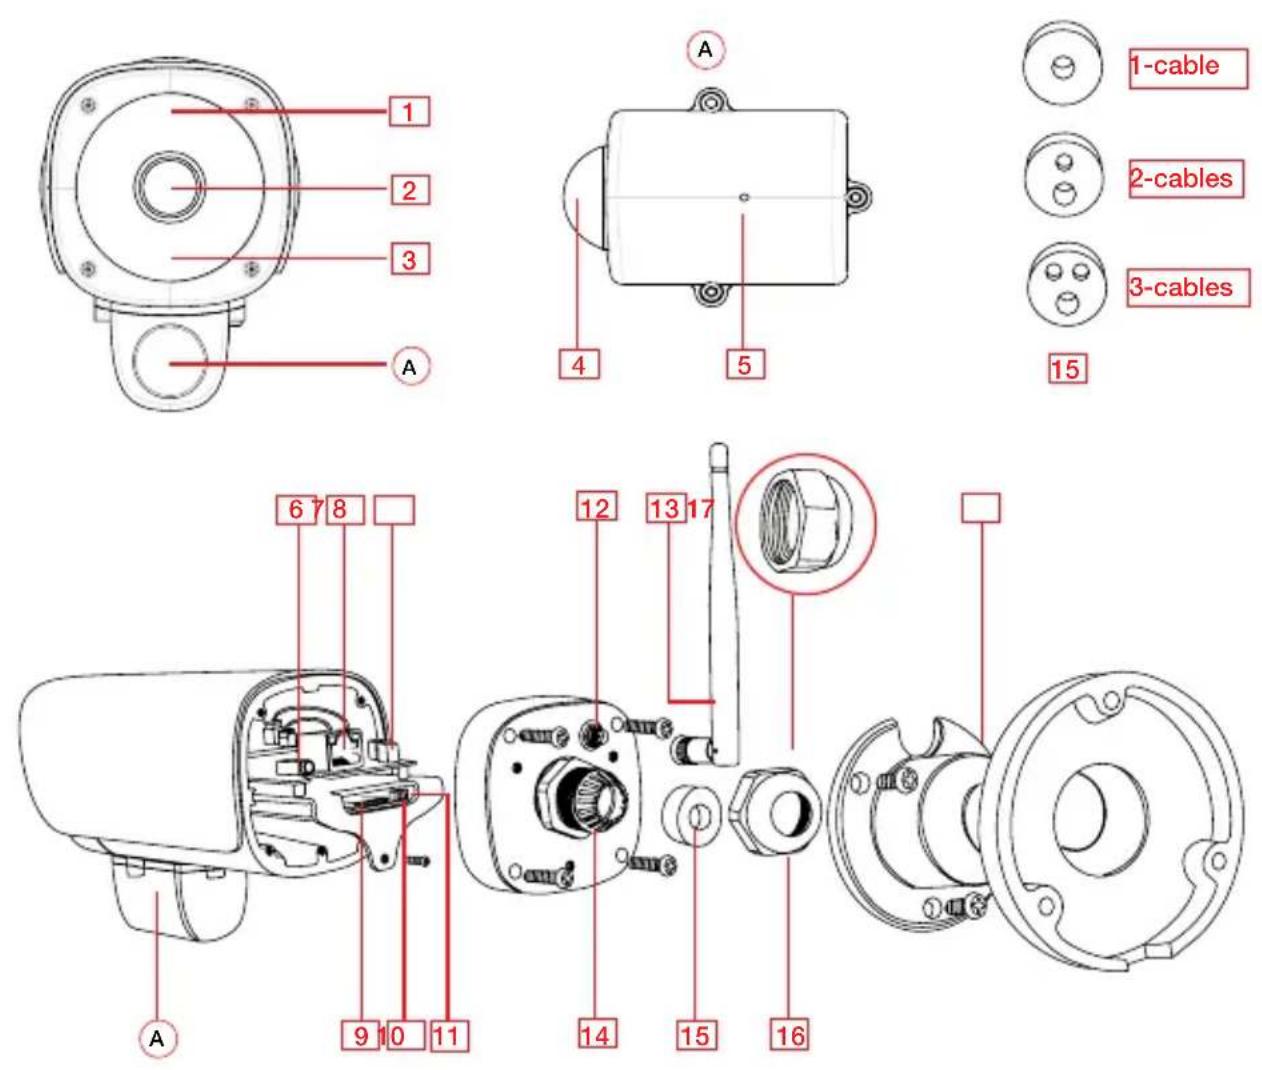
1 2 3 A 4 5 1-cable 2-cables 3-cables 15 6 7 8 12 13 17 14 15 16 A 9 10 111 - Infrared LEDs 5 high-powered IR LEDs (nightvision @ 850nm)
2 - Lens Wide-angle (focal length: 4.3mm / field of view: \~ 90° dia.)
3 - Photosensor Twilight switch for IR LEDs
4 - PIR Detector Integrated Panasonic passive infrared (PIR) motion detector
5 - Microphone For noise detection / audio rec. / two-way audio intercom
6 - Audio Output 3.5mm jack for earphone / active speaker
7 - Network Port RJ45 LAN port / connector for Cat5e LAN cable or higher
8 - Power Connector For included 12V / 2A power supply
9 - MicroSD Card Slot Slot for MicroSD/SDXC cards (max. 128GB - 16GB included)
10 - WPS / Reset Three seconds for quick WiFi setup / 15-20 seconds for reset
11 - Status LED Red: power; blue: network status (Please refer to Section 4.3)
12 - Antenna Connector RP-SMA WiFi antenna connector (not for PoE version)
13 - Antenna 3 dB Antenna (option: add INSTAR extension antenna cable)
14 - Weatherproof Connector For sealing cables with IP65 protection. Different scenarios available for 1-cable, 2-cables, 3-cables
15 - Rubber-Joint 1-cable, 2-cable, 3-cable rubber-joint for different connection purposes. (Please refer to Section 4.4 for more details)
16 - Weatherproof Nut To close the IP65 connector and to seal the rubber ring
17 - Bracket For wall mounting and overhead installation
4.3. Status LEDs
| Status LED Blue LED | Red LED | |
| Constantly on | Connected to WiFi N/A | |
| Slow Flashing | Connecting via WPS Camera at work | |
| Fast Flashing | N/A Upgrading firmware | |
| Off | LED is turned off, or camera is not plugged into power | LED is turned off, or camera is not plugged into power |
4.4. Weatherproof Screw Set
- Screw Head 2. Rubber-joint 3. Nut Rubber-joint inside Screw head Head Tighten the nut to the screw head

natural_image
Diagram showing a mechanical assembly process with four stages of the component (no text or labels)| Rubber-joint LAN/WIFI Camera PoE Camera | ||
 | For WiFi Connection(Only power adaptor necessary) | For PoE Connection(Only Ethernet Cable needed) |
 | For LAN and Power(Ethernet Cable & Power Adaptor) | For LAN and Power(Ethernet Cable & Power Adaptor) |
| For WiFi Connection & Audio Output(Power adaptor & audio cable) | ||
 | For LAN connection including power supply and audio-output(Ethernet cable, power adaptor & audio cable) | |
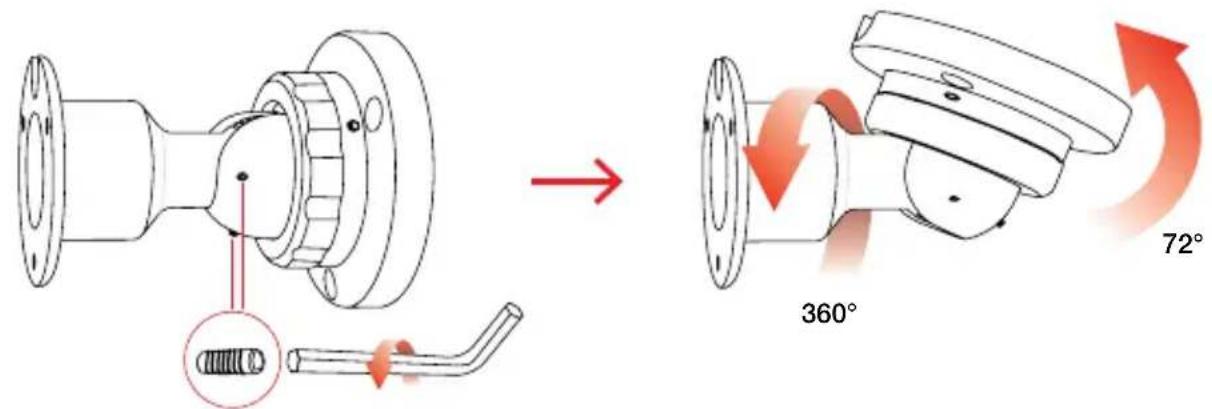
4.5. Bracket
Loosen the screws counter-clock wise in order to align the bracket to the desired position. Once the camera is positioned, please tighten the screws again.
text_image
Technical diagram illustrating the process of a mechanical component with angular changes, including a 360° and 72° rotation indicators.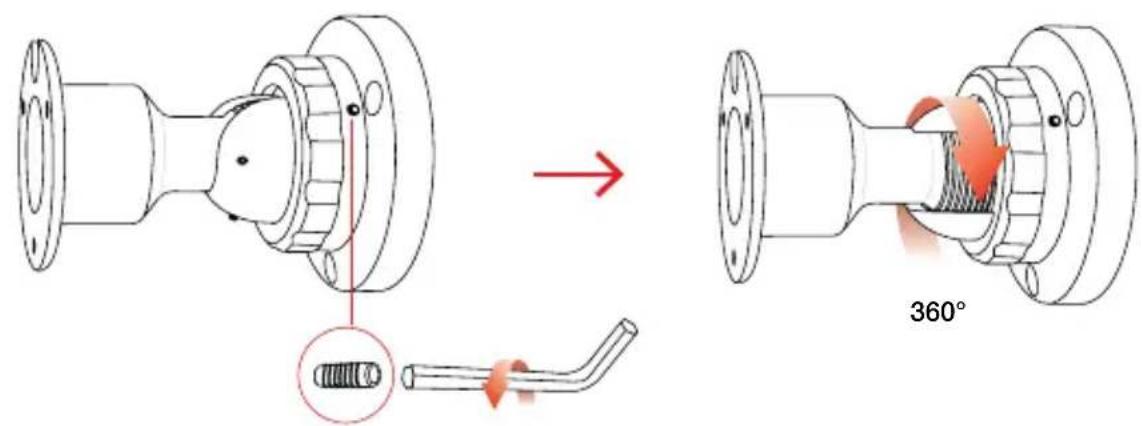
text_image
Technical diagram illustrating a mechanical assembly process with a 360-degree angle indicator and a magnified view of the component being rotated.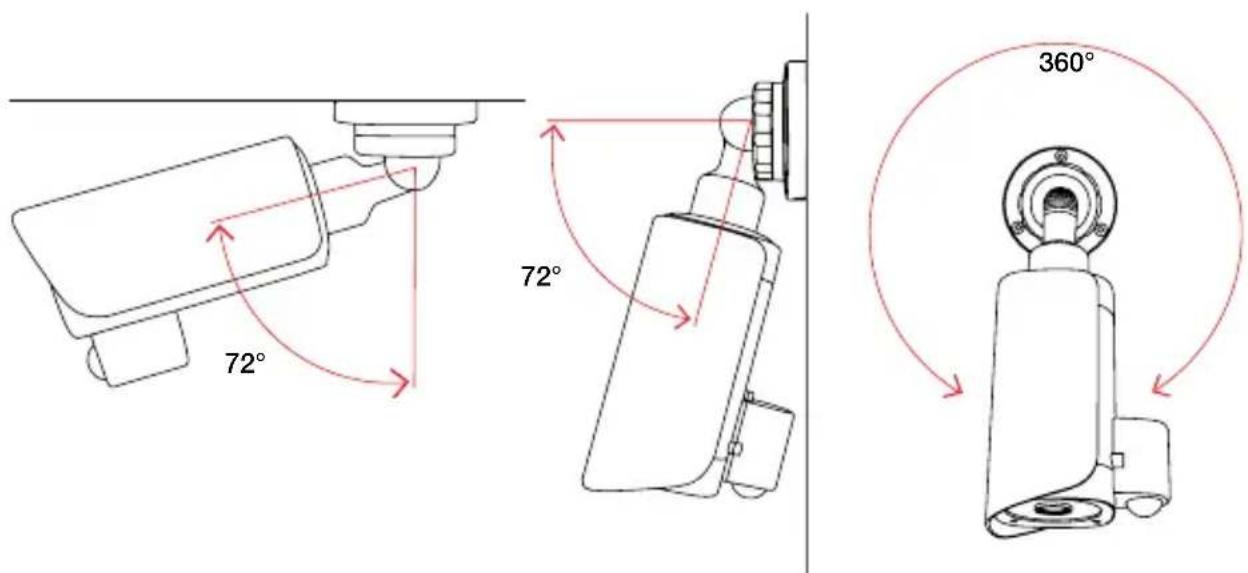
text_image
72° 72° 360°5. Installation
For installation, please simply follow the steps below:
Step 1 Please open the web browser and go to:
http://install.instar.com
to open the Camera Installation Guide.
Step 2 Choose your language and camera model IN-9008.
Step 3 Select the type of network connection:
a) Connection via LAN cable (recommended)
b) Connection directly with WiFi via WPS (not for PoE version)
Step 4 Follow each step of the installation process according to your choice.
Step 5 On the login page of your camera, please type in the default login credentials shown as below:
Username: admin
Password: instar
Step 6 You will be greeted with the Camera Setup Wizard. Please follow those steps to finalize the setup process. You can start configurating your camera by using the Web User Interface (WebUI).
6. Smartphone Apps
INSTAR offers free apps for Android, iOS (iPhone / iPad), Blackberry, Amazon-Kindle, Windows Phone and Windows 8.1 / 10 (Metro). To install the app, please search for "InstarVision" on your app store.
text_image
InstarVision Your APP STORE Android BlackBerry. amazonkindle iOS Metro UI Windows PhoneThe Difference between the App and the Web User Interface (WebUI)
App:
The InstarVision app offers you an easy way to access your camera and view the livestream at any time in any place. Also, it allows you to use the most important settings for every day usage such as alarm activation, alarm recordings playback, switching on/off the night vision, controlling the camera as well as the two-way audio intercom.
The app is not designed for the initial setup of your camera. For the initial setup of INSTAR cameras, please use the Web User Interface (WebUI).
Web User Interface (WebUI):
You can open the WebUI using a modern HTML5 based web browser on your computer. You only need to use the INSTAR Camera Tool to search for your camera's IP address and then open it inside your default web browser.
The WebUI allows you to set up your camera according to your needs. In the WebUI you can, for example, set the alarm areas for software motion detection, and you can also choose to link the motion detection and PIR to prevent false alarms. Once you set this in the WebUI, you can then activate or deactivate the alarm detection in the InstarVision app.
7. Remote Access
The camera supports two ways to remotely access the live video from all over the world using internet connection.
7.1. P2P Protocol
The P2P protocol provides you with a simple and fast way to connect and communicate with your camera, using our InstarVision app, available for all major platforms and devices. It works with any type of internet connection (local and public IPv4/6, mobile data like LTE, 3G, etc.) as no port forwarding is necessary.
a) Install our newest InstarVision app using the app store on your device
b) Open the app, click the “+” symbol and choose New P2P Camera
c) Open your camera's WebUI, navigate to the menu Network -> Remote access and scan the QR code to add your camera
7.2. DDNS Service - HTTP(S) Protocol
The DDNS service provides you with the possibility to directly access your camera remotely via your internet router. Therefore you can use any modern web browser, our InstarVision software/app and/or third party software for communication via the http(s) protocol.
a) Open the WebUI and go to Network -> IP configuration. Provide each camera with a unique HTTP (e.g. 8081, 8082,...), HTTPS (e.g. 443, 444,...) and RTMP Port (e.g. 1935, 1936,...)
b) Access your router and set up port forwarding rules for each port
c) Open the app, click the “+” symbol and choose New IP camera
d) Open your camera's WebUI, navigate to the menu Network -> Remote access and scan the QR Code to add your camera. Please be aware that the DDNS service might not work from your local network - always test with your LTE / data connection.
Please consider that port forwarding only works if your router has a public IPv4 address. For detailed description to port forwarding on your router model and DDNS service in general, please refer to:
http://remote.instar.com
8. Camera Reset
In order to reset your camera, please follow the instructions below:
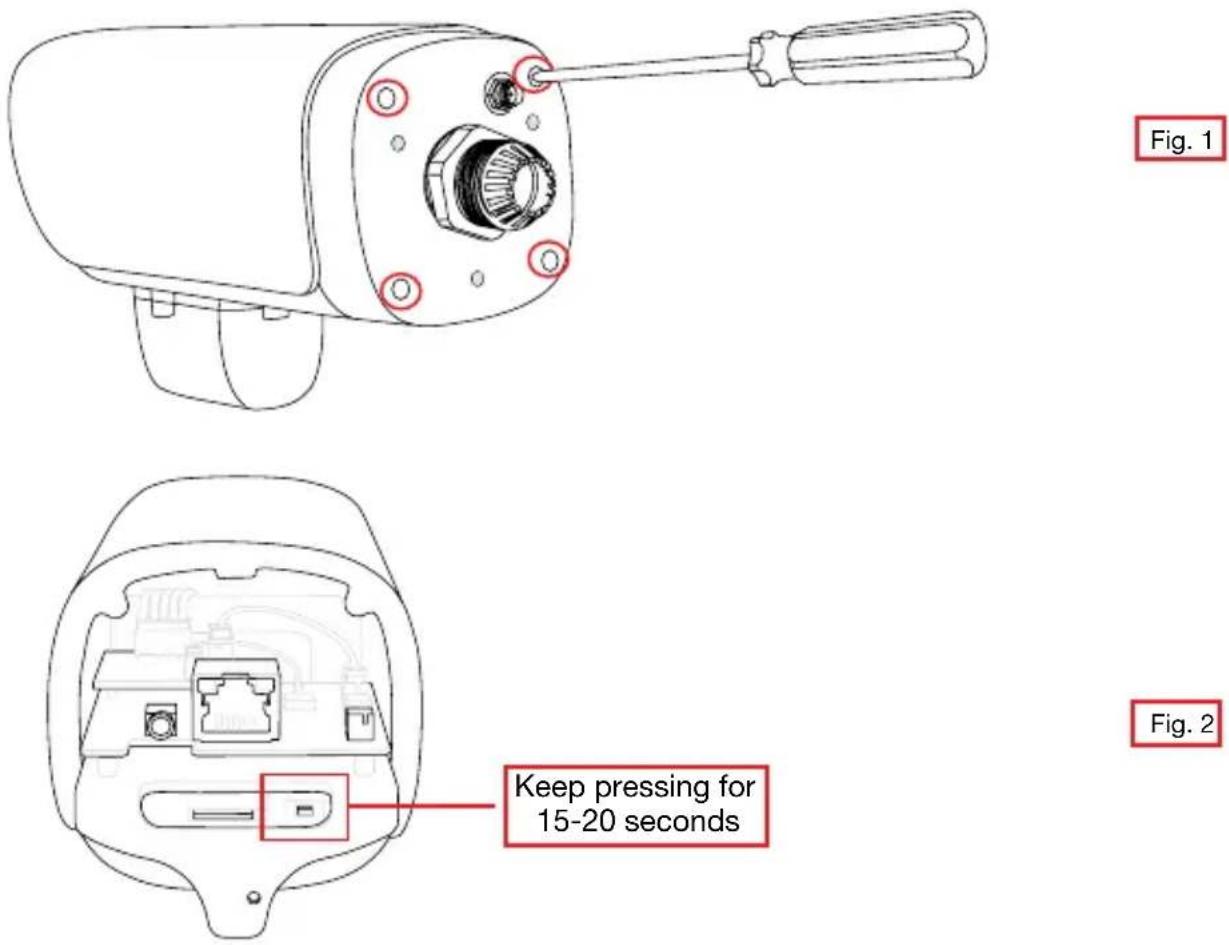
- Loosen the four screws on the backplate of your camera and put it aside. (See. Fig.1)
- You will find a small black reset button next to the MicroSD slot inside the camera. Keep pressing this reset button for 15-20 seconds. Once you release the button, the camera will start the reset process. (See Fig. 2)
- After the reset, the camera will restart, which can take up to 60 seconds. All data in the camera will be reset to factory defaults. Therefore, please use a network cable or WPS to reconnect the camera to your network. For more information on how to install your camera again, please visit: http://install.instar.com. Once you connect the camera to the network, use the INSTAR Camera Tool to find out the camera's IP address and open the camera's WebUI to start configuring your camera again.
text_image
Fig. 1 Keep pressing for 15-20 seconds Fig. 29. Lens Adjustment
The IN-9008 Full HD standard lens has a depth of field (also focus range) that is adjusted to a distance of approx. 10 - 15m. In case your area of interest is out of focus, you will have to adjust the lens accordingly.
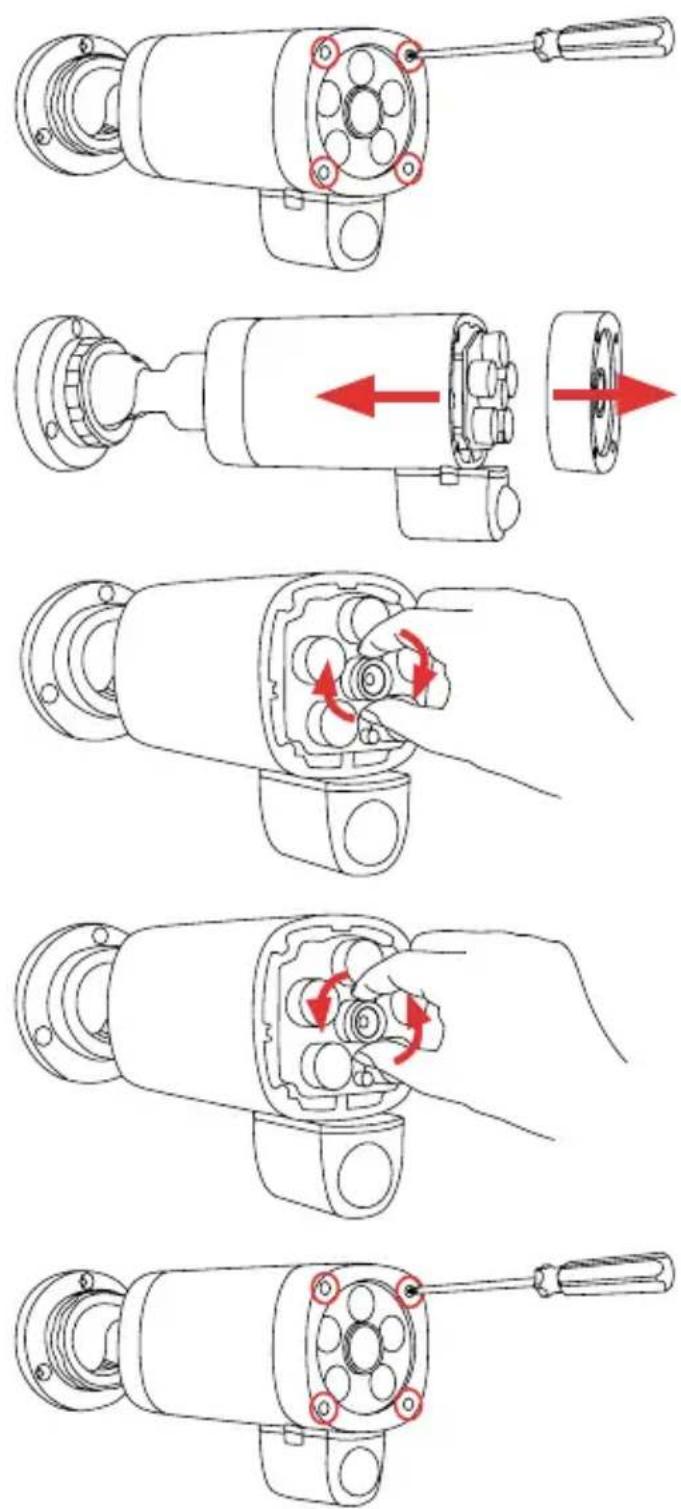
Slide the top cover towards the front to take it off and loosen the four screws at the front cover of the camera.
Carefully remove the front cover from the main casing and put it aside.
Open the WebUI and check the live video. Turn the lens, until your area of interest is in focus. If you turn the lens clock-wise, the plane of focus moves away from the camera image sensor.
If you turn the lens counter-clockwise, the plane of focus moves towards the camera's image sensor.
After you adjust the focal point, carefully reinstall the front cover to the casing and tighten the screws again. Also slide back the top cover on to the camera.
10. Online Material
10.1. Online Manual
This user manual is a printed version. Therefore it represents the specifications and software features from the date printed (August 2017). As we are constantly improving our cameras, please always refer to the up-to-date online manual:
http://manual.instar.com
The online manual offers you many important topics for using your camera. Below are some of the topics covered by the online manual:
- How to use the DDNS address
- How to set a port forwarding rule
- How to set up motion detection
- How to download videos from the built-in SD card etc...
10.2. Firmware Update
INSTAR cameras will be provided with free firmware updates. Open the WebUI and navigate to System -> Firmware Update to check if there is a new update available for your camera model. You can then download and install the latest firmware directly through the WebUI. The latest firmware can also be found here:
http://firmware.instar.com
10.3. Youtube Installation/Setup Video
For installation you may also check out our installation videos explaining topics like port forwarding, FTP(S) upload, motion detection and many more ... Just go to YouTube and search for INSTARTV or go directly to

https://www.youtube.com/INSTARTV
10.4. Wiki, Forum & Social Media
INSTAR offers IP Camera Wiki, customer forum and Facebook account.

https://wiki.instar.com
https://forum.instar.com
https://www.facebook.com/instar.deutschland
https://cloud.instar.de
text_image
INSAR Kamera Kameraware Administerion Bure Kameras Alle Ersignisse (100% Ersignisse) Kameraware All ErsignisseWhat's INSTAR Cloud?
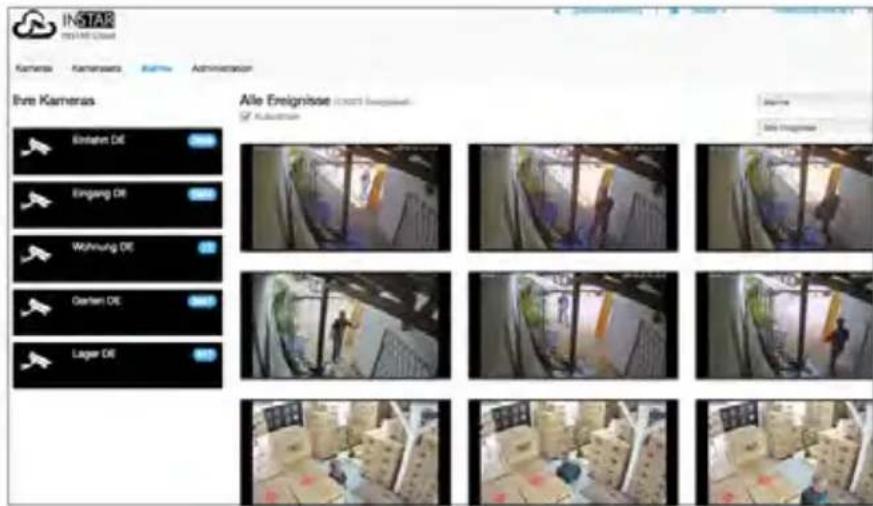
The INSTAR Cloud is a purely optional and paid service to backup your recordings. Try the INSTAR Cloud free of charge for 14 days at https://cloud.instar.de. The INSTAR Cloud costs only about 1/3 of what other cloud platforms demand. If you are planning with a storage unit of 10GB for a camera (you can store about 2,500 alarm events on 10GB), you can even save up to \~70% in comparison. INSTAR Cloud also helps you sort out the false alarms from true alarm events.
INSTAR Cloud Feature: Smart, Secured and Scalable
Smart:
- False alarm detection through an advanced motion analysis
- Lock and download important alarm events
- Automatic alarm-events deletion after a custom time-threshold
- 3-level user management and flexible access right settings
- Supports modern HTML5 web browsers, no plugins needed for video view
- Fast preview for quick surveillance & full view for detailed surveillance
Secured:
- Servers located in Germany (ISO 27001 certificated)
- Safety of your data thanks to two different physical locations of servers
- Secured and encrypted data transfer
Scalable:
- Extendable storage space per year without any subscription
- Alarm events can be removed automatically after custom selected period
- No limitation for the quantity of cameras
12. Technical Data
Image Sensor
| Sensor 1/3” Full HD Panasonic WDR CMOS MN34229 |
| Lens f = 4.3mm; F/2.1 (IR Lense) / M12 - S-Mount |
| Angle of View ~90° diagonal |
Video Properties
| Video Encoding h.264/MPEG-4 | AVC (Level3) / MJPEG |
| Video Framerate Up to 25fps | |
| Supported Resolutions 1920 x 1080, 640 x 352 and 320 x 176 Pixels | |
| Flip / Mirror Image Horizontal / Vertical | |
| Video Settings Brightness / Contrast / Saturation / Exposure... | |
Communication
| Network Interface 10Base-T/100Base-TX Ethernet Port | |
| Wireless (not for PoE version) | 2.4GHz, IEEE 802.11b/g/n up to 150Mbps |
| WiFi Frequency Range 2.4Ghz - 2.4835Ghz | |
| WiFi Transmission Power < 18dBm @ 11b, < 16dBm @ 11g, < 15dBm @ 11n | |
| WPA / WPA2 Encryption TKIP / AES (CCMP) | |
| PoE (only for PoE version) | IEEE 802.3af (+ Pin 4 and 5 / - Pin 7 and 8) |
Hardware
| PIR Detector Panasonic Passive Infrared Motion Detector | |
| Infrared LEDs 5 High-Power LEDs / 15-20m effective range | |
| MicroSD Card Reader For MicroSD / SDXC cards up to 128 GB | |
| Power Supply | Output: 12V DC 2A / Input: 110-240V |
| Power Consumption | Max. 8.5W (in normal operation 3W) |
| Operating Temperature | - 5°C to 55°C (-25°C with optional heater) |
Requirements
| Web Browser | Web browser supporting HTML5 |
| CPU / Graphic Card | Dual Core (min. 2Ghz) / 256MB+ Graphic Card |
| Bandwidth | Min. 512kbs per camera |
13. Warranty & Disposal
13.1. Warranty
INSTAR offers a 2-year warranty on its products. During this period you can send in your camera for free repair (the shipping cost to our service center will have to be paid by the customer). This excludes cameras installed with custom-made or third party firmware and WebUIs which have not been approved by INSTAR. The warranty is limited to hardware parts of the camera.
If you are calling our service team, please keep your model and serial number ready. In case your camera is defective and you want to send it for repair, please contact support@instar.com to request a RMA number. With this RMA number you can then send your camera for repairment.
You can find your INSTAR SERVICE CENTER at the following address:
Company:
Germany Email: support@instar.com
13.2. Disposal of old electrical appliances
The European Directive 2012/19/EU on Waste Electrical and Electronic Equipment (WEEE) requires that old household electrical appliances must not be disposed of in the normal unsorted municipal waste stream. Old appliances must be collected separately in order to optimize the recovery and recycling of the materials they contain, and reduce the impact on human health and the environment. The crossed out “wheeled bin” symbols on the product reminds you of your obligation that, when you dispose of the appliance, it must be separately collected. Consumers should contact their local authority or retailer for information concerning the correct disposal of their old appliance.
14. Legal Information
CE-Declaration of Conformity

Hereby, the INSTAR Deutschland GmbH, declares that this device is in compliance with the essential requirements and other relevant provisions of the Directive 2014/53/EU. The complete copy of the EU Declaration and Conformity
can be found on this website: http://www.instar.com/legal/eu-declarations
FCC

This device complies with Part 15 of the FCC rules. Operation is subject to the following two conditions: (1) this device may not cause harmful interference, and (2) this device must accept any interference received, including interference that may cause undesired operation.
The complete FCC Compliance Statement can be found on the following website: http://www.instar.com/legal/fcc
© INSTAR is a registered trademark of the INSTAR Deutschland GmbH.
natural_image
Two security camera modules with 3G sensor lights, one white and one black, shown against a plain background (no text or symbols visible)Your Specialist for Network and Security Equipments