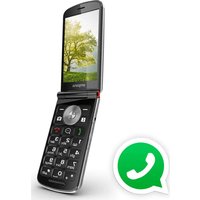
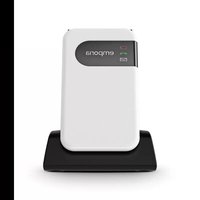
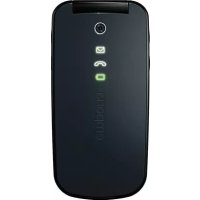
RL1 - Mobile Phone EMPORIA - Free user manual and instructions
Find the device manual for free RL1 EMPORIA in PDF.


| Product Type | Mobile Phone |
| Brand | Emporia |
| Model | RL1 |
| Dimensions (H x W x D) | 122 x 56 x 13 mm |
| Weight | 95 g |
| Display | 2.4-inch QVGA TFT, 240×320 pixels |
| Battery | Lithium-Ion 1000 mAh, removable |
| Standby Time | Up to 200 hours |
| Talk Time | Up to 6 hours |
| Network | 2G GSM 900/1800 MHz |
| SIM Card | Mini SIM (1 slot) |
| Memory | Internal: 64 MB, microSD up to 32 GB |
| Key Features | Large tactile buttons, SOS button, FM radio, flashlight, hands-free speaker |
| Operating System | Proprietary (not Android) |
| Connectors | Micro USB (charging/data), 3.5 mm headphone jack |
| SAR Value | 0.58 W/kg (head), 1.12 W/kg (body) |
| Care Instructions | Wipe with a soft, dry cloth; avoid liquids |
| Spare Parts & Repairability | Battery user-replaceable; other parts serviceable by authorized center |
| General Information | Manufacturer: Emporia Telecom; Made in China; IMEI printed under battery |
Frequently Asked Questions - RL1 EMPORIA
User questions about RL1 EMPORIA
0 question about this device. Answer the ones you know or ask your own.
Ask a new question about this device
Download the instructions for your Mobile Phone in PDF format for free! Find your manual RL1 - EMPORIA and take your electronic device back in hand. On this page are published all the documents necessary for the use of your device. RL1 by EMPORIA.
USER MANUAL RL1 EMPORIA

Brought to you by Vodafone

natural_image
Red circular ring shape with gradient shading (no text or symbols)emporiaRL1
DEAR MOBILE PHONE USER!
Congratulations on your emporia RL1 mobile phone!
To get you acquainted with your new mobile phone as quickly as possible, we have put together all the essential information on a few pages. The following pages of the user guide let you choose how much time you want to spend acquainting yourself with the most important functions of your mobile phone.
We hope you will have fun with your phone, and wish you all the best.
EMPORIA Telecom

Eveline Pupeter
Management

Albert Fellner
PACKAGE CONTENT:
Mobile phone Charging cable with Desktopcharger (RL - V170EU) (TL-RL1)
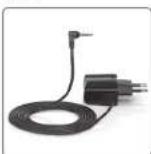
Charging cable

Battery pack (AK - RL1)
User guide
1 START
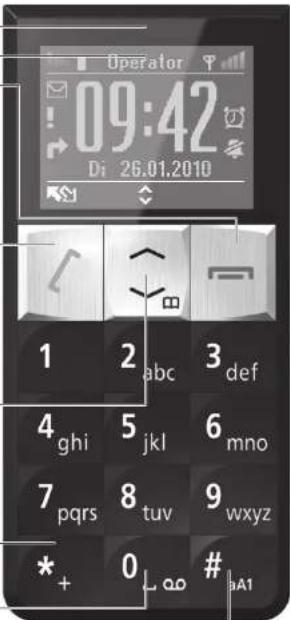
1.1 WHAT ARE ALL THE KEYS FOR?
Loudspeaker
Display (=Screen)
End Call/Back/Delete key
- During a call: End call
- In menu: one step back
- In standby mode access my menu
- When entering numbers or letters: delete
Make or receive a call/OK-key
- Dialling: Insert number and press
- Incoming call: answer
- In menu: select
- In standby mode: Access to call list (dialled, received, missed)
Arrow keys
- In standby mode access menu with
- In standby mode access phone book with √
Star key *
- Press twice: + (for country codes, i.e. +44 for UK)
- Press 3 times: insert a dial pause
- When writing: special symbols (?!,@-+\$€ etc.)
0 Key / Voicemail key
- Press and hold: listen to your voicemail
- When writing (SMS, phone book): insert a space
Pound key#
- Press and hold: List of missed calls
- When writing: Switch from upper to lower case or numbers
text_image
Operator 09:42 Di 26.01.2010 1 2 abc 3 def 4 ghi 5 jkl 6 mno 7 pqrs 8 tuv 9 wxyz * + 0 # A1Volume adjustment
- Change the receiver volume during a call
- If telephone rings:
press ⊖ to turn off the ringer
(it will ring again for the next call)
On/off key
To switch on or off: press and hold for 2 seconds

text_image
+ VOL - +
natural_image
Close-up of a dark, rectangular object with no visible text or symbolsDISPLAY SYMBOLS

Battery indicator Missed call Silence/Sleep

Clock Call forwarding Meeting/Theatre

Alarm on New SMS Maximum/Bus


text_image
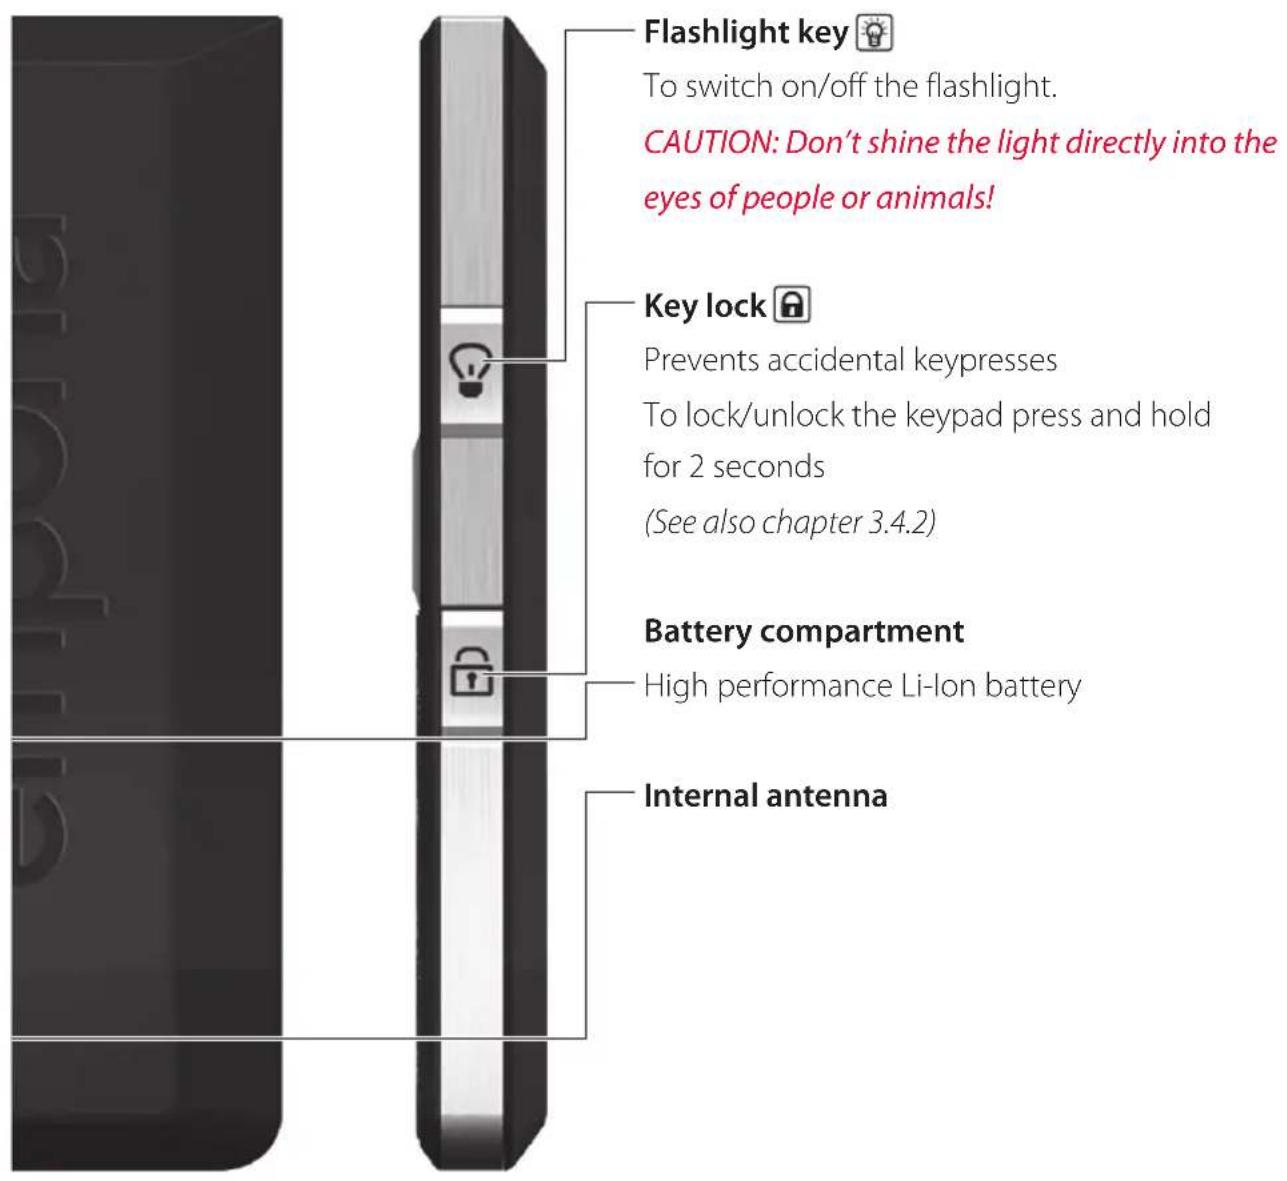
Flashlight key To switch on/off the flashlight. CAUTION: Don't shine the light directly into the eyes of people or animals! Key lock Prevents accidental keypresses To lock/unlock the keypad press and hold for 2 seconds (See also chapter 3.4.2) Battery compartment High performance Li-lon battery Internal antenna

Signal strength
Roaming If you are abroad, this symbol will replace the signal strength symbol to let you know that it is now more expensive to make a call.

Top 5
The most important numbers at the beginning of your contact list, independent of their alphabetical order. (see section 4.3.4)
TABLE OF CONTENT
1 Start
1.1 What are all the keys for?....03
1.2 Inserting the SIM card....10
1.3 Inserting the battery 10
1.4 Charging the battery 11
1.4.1 Charging with the desktop charger 11
1.4.2 Charging with the charger cable 11
1.5 You are ready: Turning the mobile phone on 12
1.6 De-activating the PIN code prompt .....13
1.7 Setting the date and time....13
2 10 minutes to get to know your mobile phone
2.1 Don't worry if you get lost in the menu 14
2.2 Receiving and ending calls....14
2.3 Dialling with the keypad 15
2.4 Redial / Call list 15
2.5 Handsfree....15
2.5.1 Handsfree with the desktop charger 15
2.6 Dialling from the phone book....16
2.7 Battery indicator and signal strength .....16
2.8 Accessing your phone book with SMS....17
2.9 Backlight time....17
3 20 minutes for easy handling
3.1 Useful functions of the keypad .....18
3.1.1 ☑ Key: Numbers Dialled.... 18
3.1.2 # Key: Missed Calls 18
3.1.3 ☐ Key: Listen to Voicemail 18
3.1.4 ① to ⑤: Speed Dialling ..... 18
3.1.5 Key: Call List 18
3.2 My Menu 19
3.2.1 Activating My Menu 19
3.2.2 Getting into My Menu Listing.... 19
3.2.3 Setting up My Menu Favourites.... 19
3.3 Alarm....20
3.3.1 Turning the Alarm On or Off....20
3.3.2 Setting and changing alarm time 20
3.3.3 Shutting Off the ringing alarm 20
3.3.4 Snooze function 21
3.3.5 Changing the alarm tone....21
3.4 Key lock....22
3.4.1 Manual keypad lock....22
3.4.2 Automatic keypad lock....22
3.5 ON/OFF - button 23
3.6 Menu-button....23
4 30 minutes for pros
4.1 Entering text with the keypad .....24
4.2 SMS-text messages 26
4.2.1 Writing SMS 26
4.2.2 Sending SMS 27
4.2.3 Receiving SMS....28
4.2.4 Answering SMS 28
4.2.5 Deleting SMS 29
4.2.6 Sending Phone Book Entries via SMS 29
4.2.7 Creating and Inserting Templates 30
4.2.8 SMS Blacklist....31
4.2.9 SMS confirmation 31
4.2.10 SMS Service Centre Number 31
4.3 Phone book....32
4.3.1 New phone book entry: Saving names and numbers . . . . . . . . . . 32
4.3.2 Editing phone book entries....33
4.3.3 Name Search 34
4.3.4 Top 5: The five most important numbers . . . . . . . . . . . . . . . . . . . . . . . . . . . . . . . . . . . . . . . . . . . . . . 35
4.3.5 Saving telephone numbers from Call lists or SMS to the Phone book.... 36
4.3.6 Fixed dialling numbers 36
4.3.7 Phone book settings 38
4.3.8 Accessing the Phone book via SMS 38
4.4 Settings....39
4.4.1 Silent/Sleep, Meeting/Theatre, or Maximum/Bus 39
4.4.2 De-activate PIN Prompt 40
4.4.3 SMS to Phonebook 41
4.4.4 Birthday reminders 42
4.4.5 Phone Book settings 43
4.4.6 Top 5: The most important numbers ..... 43
4.4.7 Voicemail number 43
4.4.8 SMS Service centre number 43
5 Menu overview 44
6 Product and safety information 46
6.1 RF Exposure .....47
6.2 Distraction....48
EC-Declaration of Conformity 49
6.3 Product Handling 50
6.4 Electrical Safety .....53
6.5 Battery Handling & Safety 53
6.6 Interference....54
6.7 Explosive environments ....55
6.8 Warranty....56
6.9 Disposal....56
6.10 Technical product description....57
7 Frequently asked questions 58
1.2 INSERTING THE SIM CARD
You need a SIM card to use your phone. The SIM card is the small card with the clipped corner, which you got from your network provider. It serves as identification in the mobile phone network.
Insert the SIM card as follows:
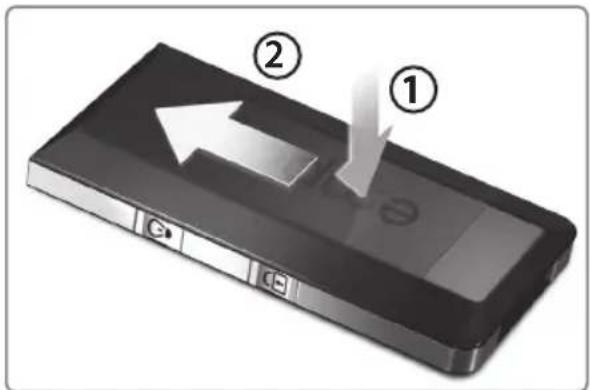
- Press the battery cover down.
- Slide the cover a few millimetres up and take it off. Remove the battery pack (if present) by lifting it from the bottom and taking/pulling it out.
- Insert the SIM card into the SIM card slot with the gold chip down and the clipped corner on the top left.
1.3 INSERTING THE BATTERY
- The battery contacts have to face the gold coloured contacts of the mobile phone.
- Replace the battery cover to the phone with the two hooks pointing forward. Slide the cover under light pressure until it snaps into place.
text_image
Diagram of a device with labeled parts and directional arrows indicating movement or process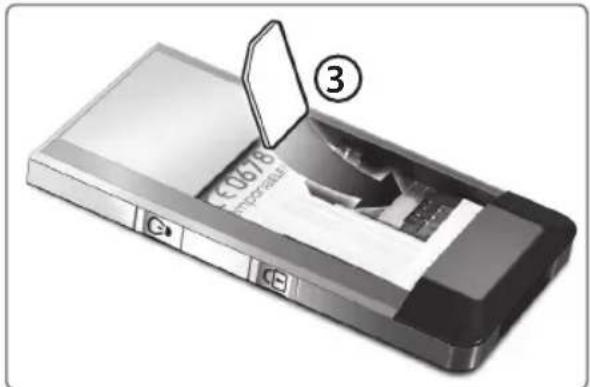
text_image
③ 10678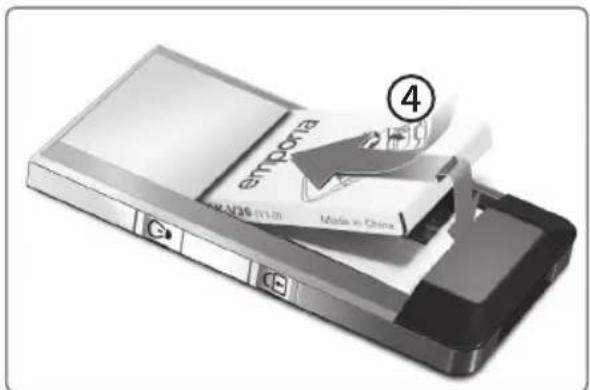
text_image
entpora Made in China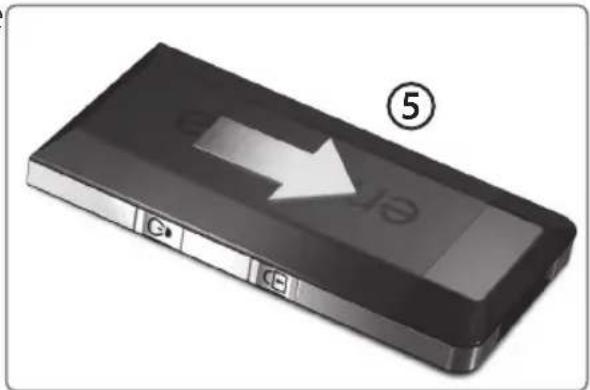
natural_image
Black rectangular device with a white arrow pointing to its side panel, labeled with number 5 (no text or symbols on the device itself)1.4 CHARGING THE BATTERY
Please note: The battery pack included with your mobile phone should be charged for at least 4 hours before your first call.
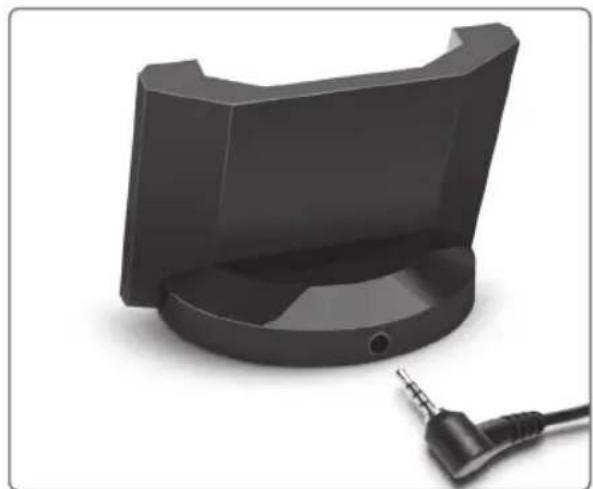
1.4.1 Charging with the desktop charger
-
Insert the power plug into the power socket.
-
Insert the plug of the charger cable into the socket on the rear side of the desktop charger.
Finally insert the mobile phone into the desktop charger.
natural_image
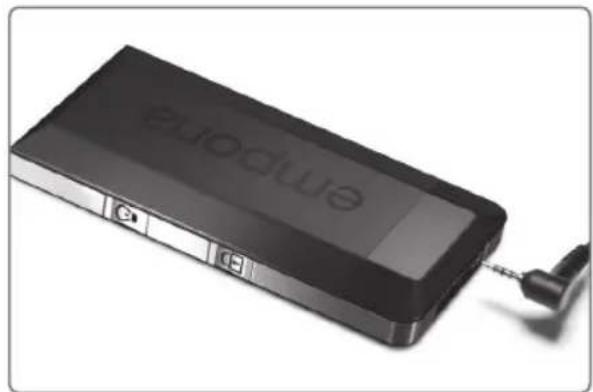
Black plastic electronic device with a small 3-pin connector attached (no text or symbols visible)1.4.2 Charging with the charger cable
-
Insert the power plug into the power socket.
-
Insert the plug of the charger cable into the socket on the bottom of the mobile phone.
-
At the start of the charging process a large battery symbol is shown, which begins to fill up.
natural_image
Black electronic device with 'euopwe' branding and a small connector, no visible text or symbols on the device body.After a few seconds the large battery symbol disappears and the battery icon, in the bottom left corner of the screen, continues to fill up.
-
Once the battery is fully charged, all four bars of the battery icon stop moving.
-
Disconnect the charger cable from mobile phone and power socket.
1.5 YOU ARE READY: TURNING THE MOBILE PHONE ON
Press the ⏻ key on the left of the mobile phone for two seconds.
This will turn the mobile phone on.
When you turn on your phone for the first time, you will be prompted to select a display language: Using ▲ move to the desired language and select it with ↗. You may change your selection at any time later by using Settings/Language in the menu.
Now set the time and date as follows:
-
Using the keypad or ▲ set the hour by using two digits (i.e.: "09" for 9 am) and continue with ▲ and set the minutes in the same way. If you made a mistake somewhere, go Back with
-
Save these settings with ↗.
-
Use the same procedure for setting the date.
You may change date and time anytime later by using Settings/Time & date in the menu. (see section 1.7)
When first using a new SIM card, the 4 digit PIN code must be entered.
The PIN code is designed to prevent unauthorised activation of your mobile phone.
However, it does not prevent someone else from using your phone once it is turned on.
Please refer to the documentation of your network provider for your PIN code (you received an information package with your SIM card).
- Enter the PIN code with the keypad and select it with ↗.
- Any mistakes while entering may be deleted with
We recommend de-activating the PIN code. (see section 1.6)
1.6 DE-ACTIVATING THE PIN CODE PROMPT
To prevent problems caused by forgetting the PIN code, we recommend you de-activate the PIN prompt. However, this is not possible with all network providers.
- Press ▲ key. The menu will be displayed.
- Use ☑ to navigate to Settings and select it with ↗
- Use ☑ to navigate to PIN request and select it with ↗
- Select Off using ↗. (If the Off option background is not already highlighted, navigate there by pressing ↗ to select it)
- The PIN prompt appears. Enter the PIN code on the keypad and confirm with ↗
- Go back to standby mode using ☐.
The PIN prompt is now deactivated.
1.7 SETTING THE DATE AND TIME
- Press ▲ key. The menu will be displayed.
- Use ☑ to navigate to Settings and select it with ↗
- Use ☑ to navigate to Time & date and select it with ↗
- Use ↗ to select Set time.
- Use the keypad or ⏰ set the hour by using two digits (i.e.: "09" for 9 am) and save it using ↗.
- Use the keypad or ⏻ set the minutes by using two digits and save it using ↗. The display will show Time set.
- Use ☑ to navigate to Set date, and select it with ⏻ Proceed as with Set time.
2 10 MINUTES TO GET TO KNOW YOUR MOBILE PHONE
2.1 DON'T WORRY IF YOU GET LOST IN THE MENU
If you get "lost" in the menu, you can go back quickly by pressing several times. This will always return you to the familiar look of the screen in standby mode.
- When the mobile phone has not been used for 10 seconds, the screen will turn off. The mobile phone is then in energy saving mode, but remains ready to receive calls.
Important information such as a missed call, the warning of an almost empty battery or the charging progress are still visible. - Just press any key once to re-activate the screen.
- Don't worry: If you were in a menu point earlier and the screen is now dark, when you then press a key the light is restored and you are returned to your previous position.
2.2 RECEIVING AND ENDING CALLS
If a call is received, the phone will ring and vibrate. The key and the flashlight blink, and the number and name of the caller will be displayed. (if saved in phone book)
- Receive a call by pressing ↗.
- To end a call press. If the caller hangs up first, this is not necessary.
- To reject a call when it rings, press
- If you don't want to reject the call, but also don't want the ringing to continue (you are in a public place like a theatre or restaurant), press the VOL ^⊖ key. The ringer is muted for the present call (but will ring again for the next one).
2.3 DIALLING WITH THE KEYPAD
ALWAYS enter the telephone number together with the area code.
(Example: enter "049789789" for number 789789 with area code 049.)
- Press ↗ to connect.
- End the call by pressing ☐. If the other caller hangs up first, you don't need to press ☐
2.4 REDIAL / CALL LIST
- Press the key to show previously dialled, missed or received calls.
- Use ▲ ▼ to navigate through the list.
- Press ↗ to call selected numbers. (see also section 3.1.5)
2.5 HANDSFREE
- While making a call, press ↗ to open the call menu.
- Use ☑ to navigate to Handsfree and select it by pressing ↗
- To change back, select Handsfree from the call menu.
2.5.1 Handsfree with the desktop charger
If the mobile phone is in the desktop charger you are able to:
- Answer incoming call by pressing the handsfree key on the desktop charger.
- Make a call, press☑ to select a phonebook entry and dial by pressing☐. The phone is automatically in handsfree mode.
- Pick up the phone or place it into the desktop charger during a call. Handsfree mode is switched on or off automatically.
- End a call by pressing the handsfree key on the desktop charger.
2.6 DIALLING FROM THE PHONE BOOK
Saved names and numbers are listed alphabetically in the phone book.
- Press ☑ in standby mode: Phonebook will be displayed.
- Use ▲ ▼ to navigate to the desired entry.
- Press ↗ to call.
Please note: To save yourself entering new telephone numbers into the phone book, you can have them sent to you via SMS. See section 2.8.
Please note: alphabetical search, see section 4.3.3.
Please note: you may store your 5 most important numbers at the beginning of your phone book list, independent of the alphabetical ordering, see section 4.3.4.
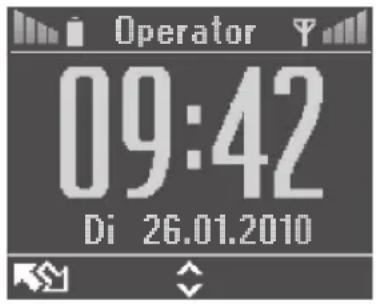
2.7 BATTERY INDICATOR AND SIGNAL STRENGTH
In standby mode the battery status is displayed on the upper left of the screen. When the battery charge drops below 25 % (4 bars indicate 100 %), and the warning flashes, charge the battery with the charger cable. (see section 1.4)
text_image
Operator 09:42 Di 26.01.2010In standby mode you will see the signal strength displayed on the upper right of the screen. If it drops below 25 % (4 bars indicate 100 %), reception and sound quality will be impaired. Try to find a location with better signal strength.
2.8 ACCESSING YOUR PHONE BOOK WITH SMS
You can receive Phonebook entries (from relations, friends, ...) by SMS message.
The messages have to be written in the following format:
Name#Number# → Example: #Tobias#01509876543
- The telephone number has to be entered including the area code.
- We recommend to save all numbers in international format with the international country code.
Example of an English international number: #Toby#+441509876543#
When you receive the SMS the number is automatically saved to the Phonebook.
Note: If your text message memory is full no Phonebook entries can be received by text message. Delete existing text messages in order to free up memory space. See chapter 4.2.5.
If you do not wish to use this function, go to Settings in the Menu or the SMS Menu, select SMS in PhoneBk and switch it OFF. (Also see chapter 4.4.3)
2.9 BACKLIGHT TIME
In the menu, Settings/Backlight time, you can set the backlight to shut off after 2, 5, 10, 20, or 30 seconds. Shorter backlight settings use less energy. If the backlight is off (screen is dark), press any key to turn it on again.
Even if you just opened a particular menu item and the screen went dark – don't worry! Pressing a key will only restore the backlight without changing what you were doing before.
3 20 MINUTES FOR EASY HANDLING
3.1 USEFUL FUNCTIONS OF THE KEYPAD
3.1.1\* Key: Numbers Dialled
- Press ✪ 3 seconds: The list of most recently dialled numbers will be displayed with date and time signature
- Use ▲ ▼ to navigate through the list.
- Press ☐ to call a selected number.
3.1.2# Key: Missed Calls
- Press #3 seconds: The list of missed calls will be displayed with date and time signature
- Use ▲ to navigate through the list.
- Press ↗ to call a selected number.
3.1.3 ☐ Key: Listen to Voicemail
Press and hold the ☐ key to connect to your voicemail. (See chapter 4.4.7)
3.1.4 1 to 5 Speed Dialling
By holding the respective key ① to ⑤ you can quickly call your most important telephone numbers. These top 5 are entered into the Phonebook before the rest of the contacts in alphabetical order. (See chapter 4.3.4)
3.1.5 Key: Call List
This list shows your most recent calls (dialled, missed, received) with date and time.
- Press ↗ to see the call list.
- Use ▲ ▼ to navigate through the list.
- Press ↗ to call a selected number.
3.2 MY MENU
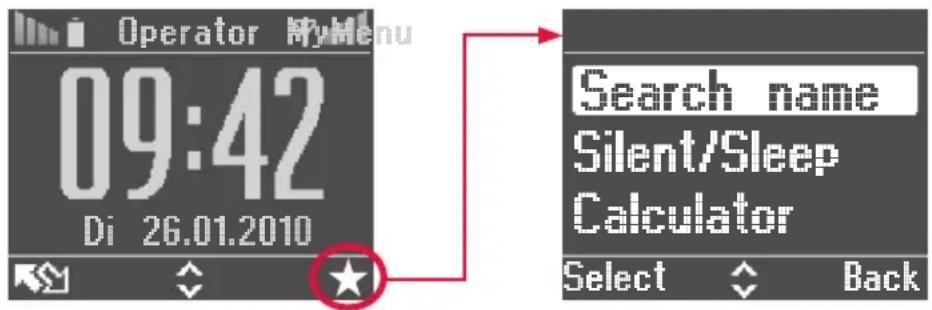
You can set up your favourite menu functions in MyMenu (without spending time scrolling in the main menu, e.g. Silent/Sleep, calculator, search names and so on). Once MyMenu is activated you access by pressing—in standby mode.
3.2.1 Activating My Menu
- Press ▲ key. The menu will be displayed.
- Use ☑ to navigate to Settings and select it with ↗
- Use ☑ to navigate to MyMenu and select it with ↗
- Use ☑ to navigate to Ⓞ and confirm it with ⏰
3.2.2 Getting into My Menu Listing
Press ☐ in standby mode to bring up My Menu.
text_image
Operator MyMenu 09:42 Di 26.01.2010 Search name Silent/Sleep Calculator Select Back3.2.3 Setting up My Menu Favourites
- Press ☐ key. The MyMenu will displayed.
- Press 3 x to navigate to Select options and select it with ↕
- Use ☑ to navigate to the desired item and tick with ⏻(switch on).
- Use ☑ to select the position number for the sequence and confirm it with ↗.
- Repeat the previous two steps to enter more favourites.
- Save selection with ☐ and confirm question Save changes in MyMenu? with ⏻.
3.3 ALARM
Your mobile phone is equipped with an alarm. The alarm will come with your selected alarm tone and a speaking clock.
To access the alarm menu proceed as follows:
- Press ▲ key. The menu will be displayed.
- Use ☑ to navigate to Settings and select it with ↗
- Use ☑ to navigate to Alarm and select it with ↗
3.3.1 Turning the alarm On or Off
- To turn on the alarm select New Time with ↗.
Set alarm time (see below) and confirm with ↗. - To turn off the alarm, use ☑ to navigate to Off and select it with ↗
3.3.2 Setting and changing alarm time
- Using the keypad or the ↗ keys, enter the hours using two digits (i.e."07" for 7 am) and press ↗ to continue.
- Using the keypad or the ⏠ keys, enter the minutes using two digits and save them by pressing ↗. After the confirmation message, the mobile phone will return to standby mode. The alarm symbol is displayed on screen.
3.3.3 Shutting Off the ringing alarm
- If the alarm is ringing, you may turn it off by pressing.
The alarm will come on again at the same time the next day. - If no keys are pressed, the alarm will ring every 3 minutes for a total of 90 minutes.
3.3.4 Snooze function
To be reminded again after 5 minutes, select Snooze with the ↗ key while the alarm is ringing. You may repeat this up to 17 times (90 minutes). Otherwise shut off the alarm by pressing☐.
3.3.5 Changing the alarm tone
Settings/Sound & alert/Alarm melody lets you select the alarm tone or radio alarm clock. However you wish to be woken up by.
Please note: If you choose an alarm tone clearly different from your ring tone there is less chance of confusing the two.
3.4 KEY LOCK
To avoid accidental keypresses (if the phone is in your pocket or a handbag for example) you can lock the keypad.
3.4.1 Manual keypad lock
- To activate the key lock press the 🔒 - button on the right side of the mobile phone and hold it for 2 seconds. A lock symbol indicates that the key lock has been activated.
- To switch off the key lock before using the phone hold the -button again for 2 seconds.
3.4.2 Automatic keypad lock
If you travel a lot with your mobile phone, we recommend using the automatic key lock. With this function the key lock is activated automatically, e.g. after the mobile phone is not used for 10 seconds.
To activate the automatic key lock:
- Press ☑ key. The menu will be displayed.
- Use ☑ to navigate to Settings and select it with ↗
- Use ☑ to navigate to Keypad auto look and select it with ↗
- Press ↗ to select On to activate this function.
- Use ⬆ √ to select the time before the automatic key lock is activated (2, 5, 10, 20 or 30 seconds) and confirm with ↗
A lock symbol indicates that the key lock is activated; this can be lifted at any time by holding the 🔒 - button for 2 seconds.
Note: incoming calls can be received as usual. If you want to reject the call, you first have to unlock the keypad (hold the 🔒 - button for 2 seconds, then reject the call with ☐).
3.5 ON/OFF - BUTTON
To switch the mobile phone on or off hold the ⏻ button on the left hand side of the mobile phone for 2 seconds.
3.6 MENU - BUTTON
With the ⏰ button you can access the menu points:
SMS Message, Phone book, Call info, Settings
4 30 MINUTES FOR PROS
4.1 ENTERING TEXT WITH THE KEYPAD
You may enter numbers and letters with the keypad.
Every key represents several signs, depending on how often you press the key. You may delete or change signs in the entered text later on.
- The vertical line „|” shows your current position.
- You can change your position by using the ▲ keys.
- By pressing and holding ▲ □ you jump one line up and down at a time.
Available signs and functions.
* → .,?!'"; () @ - + \$ ∈ £ ¥ # % * & \~ = α and Greek letters
→ Change between upper and lower case and keypad
Use the # key, to Choose from 4 Writing Styles:
Abo: Upper and lower case – Upper case only at beginning of sentence
abc: Only lower case – all letters are written in lower case
ABC: Only upper case – all letters are written in upper case
123: Numbers
I Made a Mistake. What Now?
- To delete single signs on the left of the vertical line „”, press the ☐ key briefly.
- If you press and hold the ☐ key for 3 seconds, all signs to the left of the vertical line „” are deleted.
(for instance to remove complete passages of text)
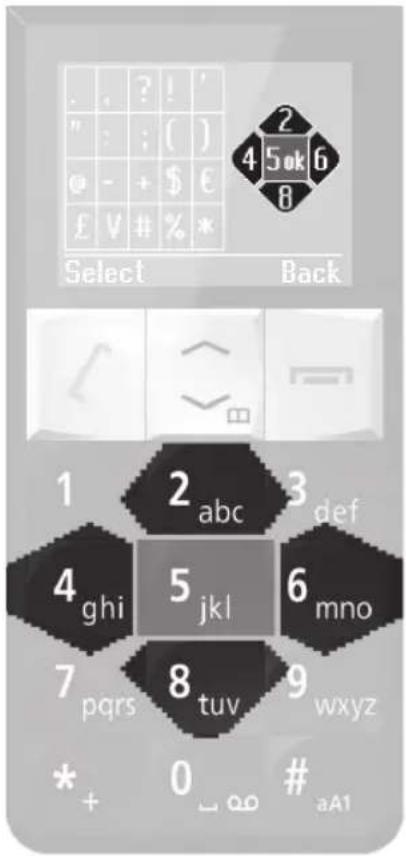
Inserting Special Symbols
text_image
. , ? ! ' ": ; ( ) @ - + $ € £ V # % * Select Back 1 2 abc 3 def 4 ghi 5 jkl 6 mno 7 pqrs 8 tuv 9 wxyz * + 0 _ aA1 #Press the ✕ key.
To move, as shown,
up with the 2 key,
down with the 8 key,
left with the ④ key, and
right with the 6 key.
Once you have found the desired sign,
press ↗
or 5
to insert it into the text.
4.2 SMS - TEXT MESSAGES
SMS are short written messages which may be sent to other mobile phone users. You only pay for sending them. Note: Some landline telephones can also receive SMS.
4.2.1 Writing SMS
- Press ☑ key. The menu will be displayed.
- Use ☑ to navigate to SMS Message and select it with ↗
- Select Write new SMS with ↗.
- Compose your SMS with the keypad.
- Delete any unwanted letters/signs by pressing
Suggestions and tricks for composing a text message
- A name and phone number can be inserted into the SMS text from Phone book:
Select Next with ↗.
Use ☑ to navigate to Insert name & number and select it with ↗.
Now you will see the phone book screen.
Use ▲ ▼ to navigate to the desired entry and select it with .
- You can send up to a maximum 480 signs. If your message is longer than 160 or 320 signs, it will automatically be divided into 2 or 3 messages. In the upper right corner of your screen you can see an indicator telling you how many signs are still available to add to your SMS.
Example: 1/135 means that you have another 135 signs available for your message.
If more than 160 signs have been written, the text will be sent in two messages, and the indicator in the upper right corner changes to 2/...
4.2.2 Sending SMS
- To send the completed text, press ↗.
- Select Send with ↗
- Telephone number saved/not saved to your mobile phone:
A Telephone number already saved in the phone book:
4. Select Search by pressing ↗.
5. Open Phone book by pressing ↗ again.
6. Navigate to the name with ☑ or enter the first letters of the name.
7. As soon as the desired number is displayed, confirm it with
8. The text message is sent to the selected number.
B Telephone number used recently, but not saved in Phone book:
4. Select Search by pressing ↗.
5. Using ▼ to navigate to Unsaved numbers.
6. Select using ↗.
7. Using ☑, navigate to the desired number in the displayed list of numbers (dialled, received, missed, SMS), confirm it with √
8. The text message is sent to the selected number.
C New telephone number
4. Enter the telephone number on the keypad.
5. Press ↗ to send SMS.
4.2.3 Receiving SMS
A short signal and vibration indicates a received SMS.
The display shows: New SMS
Press ☐ to select the SMS. Now you can read the message.
For longer texts, scroll down with the √ key.
4.2.4 Answering SMS
- When you have finished reading the SMS, use☑ to scroll down until the items Delete SMS, Call number, Read next SMS, Reply, Forward, Save to PhoneBk are displayed.
- Select Reply using ↗.
- Use ☑ to navigate to Templates (pre-designed short answers, Yes/No, Everything OK) or to Original Text to include it in your answer or to Empty Page and select it using ↗.
- Then press twice to send your answer to the sender.
4.2.5 Deleting SMS
Because a full SMS memory prevents the reception of further SMS, it must be deleted from time to time.
- Press ☑ key. The menu will be displayed.
- Use ☑ to navigate to SMS Message and select it with ↕
- Use ☑ to navigate to Delete SMS and select it with ↗
- Now you either delete the entire SMS memory by selecting All SMS, or you use ☑ to target only Received SMS and select them with ↗.
- Confirm the following prompt: Delete all received SMS ? by pressing ↗.
You can also delete individual SMS messages: scroll down in a message, until you see Delete SMS, then press twice.
4.2.6 Sending Phone Book Entries via SMS
If the recipient of your SMS is also using a suitable mobile phone, the entry will automatically be saved in his or her phone book.
- Press ▲ key. The menu will be displayed.
- Use ☑ to navigate to SMS Message and select it with ↗
- Use ☑ to navigate to Send contact by SMS and select it with ↗.
- Use ☑ to navigate to the entry you want to send and select it with ↗.
- Enter the telephone number or look up the name of the recipient and confirm it by pressing ↗
4.2.7 Creating and Inserting Templates
Templates are frequently used messages like Please call, or Running late, or I love you. Once made or selected from the template list they help save time when writing SMS messages. Existing templates can be changed before sending them. (See below)
Creating a new template
- Press ⬆ key. The menu will be displayed.
- Use ☑ to navigate to SMS Message and select it with ↗
- Use ☑ to navigate to Templates and select it with ↗
- Select New Template with ↗.
- Write the desired text using the keypad.
- Press ↗ to save it as a new template.
Changing existing templates:
- Press ▲ key. The menu will be displayed.
- Use ☑ to navigate to SMS Message and select it with ↗
- Use ☑ to navigate to Templates and select it with ↗
- Use ☑ to navigate to the template you want to change and select it with √.
- Use ☑ to navigate to Edit/Send Template and select it with ↗
- Edit text with keypad and delete key ☐ if needed.
- Press ↗ to go to the submenu.
- Either send the changed template as SMS by pressing or use to navigate to Save as template.
If you want to use the new text as a template in the future, save it with ↗.
4.2.8 SMS Blacklist
If you do not wish to receive SMS from certain people or advertisers, you can block whole numbers, or area codes (for instance 0900).
- Press ⬆ key. The menu will be displayed.
- Use ☑ to navigate to SMS Message and select it with ↕
- Use ☑ to navigate to SMS Blacklist and select it with ↕
- Select Add Blocked No. number with ↗.
- Enter the desired number or area code and confirm with
- Enter a name for this setting.
- Save the setting with ↗.
4.2.9 SMS confirmation
As soon as your SMS has been received, you will get a confirmation SMS. To de-activate or activate this service, proceed as follows:
- Press ☑ key. The menu will be displayed.
- Use ☑ to navigate to SMS Message and select it with ↗
- Use ☑ to navigate to SMS confirmation and select it with ↕
- Use △ √ to select On or Off and confirm with ↗.
Please note: Most network providers charge for this service.
4.2.10 SMS Service Centre Number
Your network provider's central number for processing all short messages. Normally, this number is already saved on your SIM card, and you need not enter or change anything.
4.3 PHONE BOOK
The phone book allows you to save, change or search up to 500 numbers. The entries may be saved to the phone, or the SIM card. (See capter 4.3.7)
Please note: We recommend saving your phone book regularly to a SIM back-up (available in stores, for instance as key pendants). If you should lose your telephone, or your SIM card, you still haven't lost all your phone book entries.
4.3.1 New phone book entry: Saving names and numbers
- Press ▲ key. The menu will be displayed.
- Use ☑ to navigate to Phone book and select it with ↗
- Use ☑ to navigate to Add contact and select it with ↗
- Enter the number including area code using the keypad. Example: "01509876543".
Suggestion: Always store the number including the international country code. Example “+441509876543”
Please note: Enter + by pressing ✪ twice.
- Press ↗ to continue.
- Enter the name on the keypad.
- Save it by pressing ↗.
Please note: You will be prompted to save the number of every incoming or outgoing call which has not previously been saved to your phone book. You can de-activate this function in the menu under Phone book / PhoneBk settings / Auto store in PhoneBk.
4.3.2 Editing phone book entries
- Press ▲ key. The menu will be displayed.
- Use ☑ to navigate to Phone book and select it with ↗
- Use ☑ to navigate to Edit contact and select it with ↗
- Use △ √ or the keypad to navigate to the entry to be edited, and select it with ↗.
- If necessary, correct the name using the keypad, or press ☐ to delete a sign.
- Continue with ↗.
- Using the keypad, or to delete, correct the telephone number.
To move through the individual numbers of a particular entry use√. - Use ↗ to save the edited entry.
4.3.3 Name Search
You may select a number from the phone book list and call it.
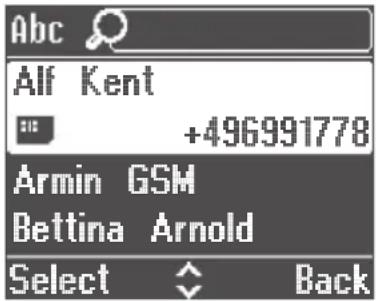
Press ☑ to access Phone book in standby mode or via the menu Phone book/Search name.
- Search for a phone book entry by entering one or more letters of the name on the keypad.
- The phone will find the entry, even if you have saved it as given name and surname (separated by a space), and are searching for the first name or the surname.
Phone book Enter one first letter Enter several letters
text_image
Abc Alf Kent +496991778 Armin GSM Bettina Arnold Select Back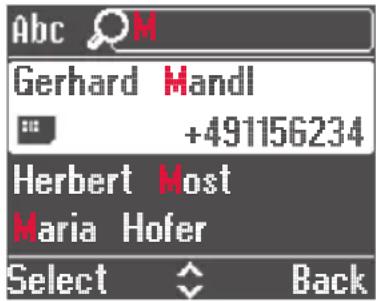
text_image
Abc M Gerhard Mandl +491156234 Herbert Most Maria Hofer Select Back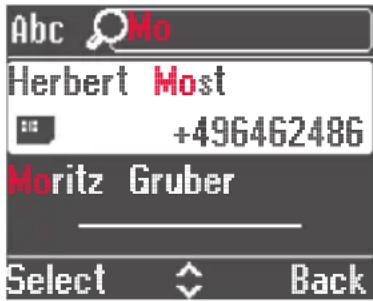
text_image
Abc Mo Herbert Most +496462486 Moritz Gruber Select BackPress ↗ to call the selected number.
4.3.4 Top 5: The five most important numbers
Your five most important numbers can be placed at the beginning of the phone book list, regardless of their alphabetical order.
Press and hold 1 for your Top1 entry, the number is dialled;
Press and hold 2 for Top2, and so on ...
or press ☑ to open Phone book and call Top1 with ↗.
To determine the Top5, proceed as follows:
- Press ⬆ key. The menu will be displayed.
- Press ☑ to navigate to Phone book and select it with ↗
-
Press ☑ to navigate to Top5 and select it with ↗.
-
Press ☑ to navigate to Add Top 5 and select it with ↗.
-
Press ↗ to select Top 1.
-
Use ☑ or the keypad to navigate to the desired phone book entry, and select it with ⏻. A list of previously saved Top5 numbers will be displayed briefly.
-
For other important numbers, repeat the previous steps as needed.
Please note: Only an existing phone book entry may be selected for Top5.
4.3.5 Saving telephone numbers from Call lists or SMS to the Phone book
Call lists:
You have opened a call list, and want to save a number in your phone book.
- Use ☑ to navigate to Save to PhoneBk at the end of the call list and select it with ↗.
- Use ☑ to navigate to the desired number and select it with ↗.
- Enter a name and save it with ↗.
- If necessary, correct the number with ☐ and save it with ☑
SMS:
- Use ☑ to navigate to Save to PhoneBk at the end of the SMS and select it with ↗.
- Use ☑ to navigate to the desired number and select it with √,
- If necessary, correct the number with ☐ and save it with ↗
- Enter a name and save it with ↗.
4.3.6 Fixed dialling numbers
You can restrict the numbers that can be called to prevent unwanted usage of your mobile phone. Although numbers which are not Fixed dialling numbers are visible in your phone book, they cannot be dialled.
Note: To add or delete numbers from the secure number list the PIN2 code is required. The PIN2 code can be found in the documents of your network operator, which you received with your SIM card.
Activating secure numbers:
- Press ▲ key. The menu will be displayed.
- Use ☑ to navigate to Phone book and select it with ↗
- Use ☑ to navigate to Fixed dialling numbers and select it with ↗
- Press ☐ to select On/Off.
- Enter the PIN2 code using the keypad and confirm it with
- Use √ to select On and confirm with ↗
Adding secure numbers:
- Press ▲ key. The menu will be displayed.
- Use ☑ to navigate to Phone book and select it with ↗
- Use ☑ to navigate to Fixed dialling numbers and select it with ↗
- Use ☑ to navigate to Add fixed number and select it with ↗
- Enter the PIN2 code using the keypad and confirm it with
- Enter the telephone number using the keypad or search in the phone book or amongst unsaved numbers. (Chapter 4.3.3, or 4.2.2)
Deleting secure numbers:
- Press ▲ key. The menu will be displayed.
- Use ☑ to navigate to Phone book and select it with ↗
- Use ☑ to navigate to Fixed dialling numbers and select it with ↗
- Use ☑ to navigate to Delete fixed number and select it with ↗
- Enter the PIN2 code using the keypad and confirm it with
- The list of saved secure numbers is now displayed.
- Use ☑ to navigate to the entry you wish to delete, and select it with √.
Note: If Fixed dialling numbers has been activated, you can still view the entries in the telephone memory or the list of secure numbers. Contacts which are saved on the SIM card cannot be viewed.
4.3.7 Phone Book Settings
Save entry on
- SIM Card: You may transfer your phone book list to another mobile phone, or
- Phone: Your phone book list stays in your phone when changing SIM cards.
Memory in use determines if you are opening a phone book entry from SIM memory, phone memory, or from both locations.
Memory Status shows you how much memory has been used on your SIM card or in your phone.
Auto store in PhoneBK allows you to automatically store unsaved numbers in your phone book. You will be prompted to save the previously unsaved number of any incoming or outgoing call.
4.3.8 Accessing the Phone book via SMS
To save you from entering new telephone numbers into the phone book, you can delegate this job to family, friends and acquaintances. (See chapter 2.8.)
4.4 SETTINGS
If you want to change settings (for instance the alarm, ringer volume, display contrast ...) this is the section to read.
- Press ▲ key. The menu will be displayed.
- Use ☑ to navigate to Settings and select it with ↗
Please note: The current setting is indicated by a checked box (√). A new setting is indicated by a bar. Save the new setting with √ or leave the old one by pressing ☐.
4.4.1 Silent/Sleep, Meeting/Theatre, or Maximum/Bus
In situations where a ringing phone may be frowned upon (in a restaurant, theatre or cinema for example), your phone has the functions Silent/Sleep and Meeting/Theatre.
If you turn on the Silent/Sleep function, all signal tones of your mobile phone will be de-activated (ringer, vibrator, key tones, SMS tone and confirmation signals). Only your alarm will still ring. This allows you to sleep restfully without being disturbed by any calls.
To ensure you don't forget to deactivate Silent/Sleep mode again (e.g. after a concert) and thereby make yourself unavailable, you can easily set after what time (1-24 hours) the ring tone of the telephone should be automatically turned back on (= switch off silent mode). This setting is also possible for the Meeting/Theatre function.
Choose the Meeting/Theatre function (in Sound & alert), when you want to be alerted to a call or a message (by the vibration alarm), but don't want others to notice – if you are sitting in a meeting, or in the theatre. Instead of ringing, your phone will beep twice and vibrate for 10 seconds. SMS and alarm will only cause the phone to vibrate.
If you select the Maximum/Bus function (in Sound & alert), the ring tone will be set to maximum volume and sound together with the vibration alarm. Receiver volume, key tones, SMS tone and confirmation signal are also set to maximum volume. Use this setting if you are in noisy surroundings, for instance on a bus.
4.4.2 De-activate PIN Prompt
See chapter 1.6
4.4.3 SMS in Phonebook
Here you can determine who may send you phone book entries by SMS. (See chapter 2.8)
On: Anyone may send you phone book entries by SMS. They will be stored automatically in your phone book.
Off: No one can send you phone book entries. However, entries will be displayed as SMS.
Only from PhoneBk: Only entries of addresses stored in the phone book will be accepted. Messages received from unsaved addresses will be displayed as SMS.
4.4.4 Birthday reminders
You can save birthday reminders.
Save birthday reminders.
- Press ⬆ key. The menu will be displayed.
- Use ☑ to navigate to Settings and select it with ↗
- Use ☑ to navigate to Birthday reminder and select it with ↗
- Use ☑ to navigate to New birthday and select it with ↗
- You can either save a birthday for contacts already in your Phone book (From Phone Bk) or new contact (Enter name).
Use ▲ to select and confirm with . ↗
From the Phone book:
- The phone book now appears on the screen.
- Use ▲ to navigate to the desired contact and select it with ↗
Enter the name:
- Enter the name of the person using the keypad.
-
Save with ↗.
-
Enter the birthday in the format dd.mm.yyyy and confirm with
-
Enter the time for the reminder in the format hh:mm and save with. The birthday is now saved. You will receive a reminder at the stated time.
Reminder function when a birthday is approaching:
- A reminder appears for the birthday at the predetermined time.
- If a telephone number has been stored with the birthday, this can be called immediately by confirming Yes with ↗.
- If you confirm No with ☐, the birthday reminder is cancelled.
4.4.5 Phone Book settings
See chapter 4.3.7
4.4.6 Top 5: The most important numbers
See chapter 4.3.4
4.4.7 Voicemail number
If you press and hold the ☐ key for 3 seconds, you will be connected automatically with your voicemail.
In case this number is not stored in your phone or on your SIM card, you will be prompted to enter the number. If you do not know the number, call the network provider hotline free of charge.
Don't worry, it is very simple, and makes using your voicemail much more convenient afterwards.
4.4.8 SMS Service centre number
See chapter 4.2.10
5 MENU OVERVIEW
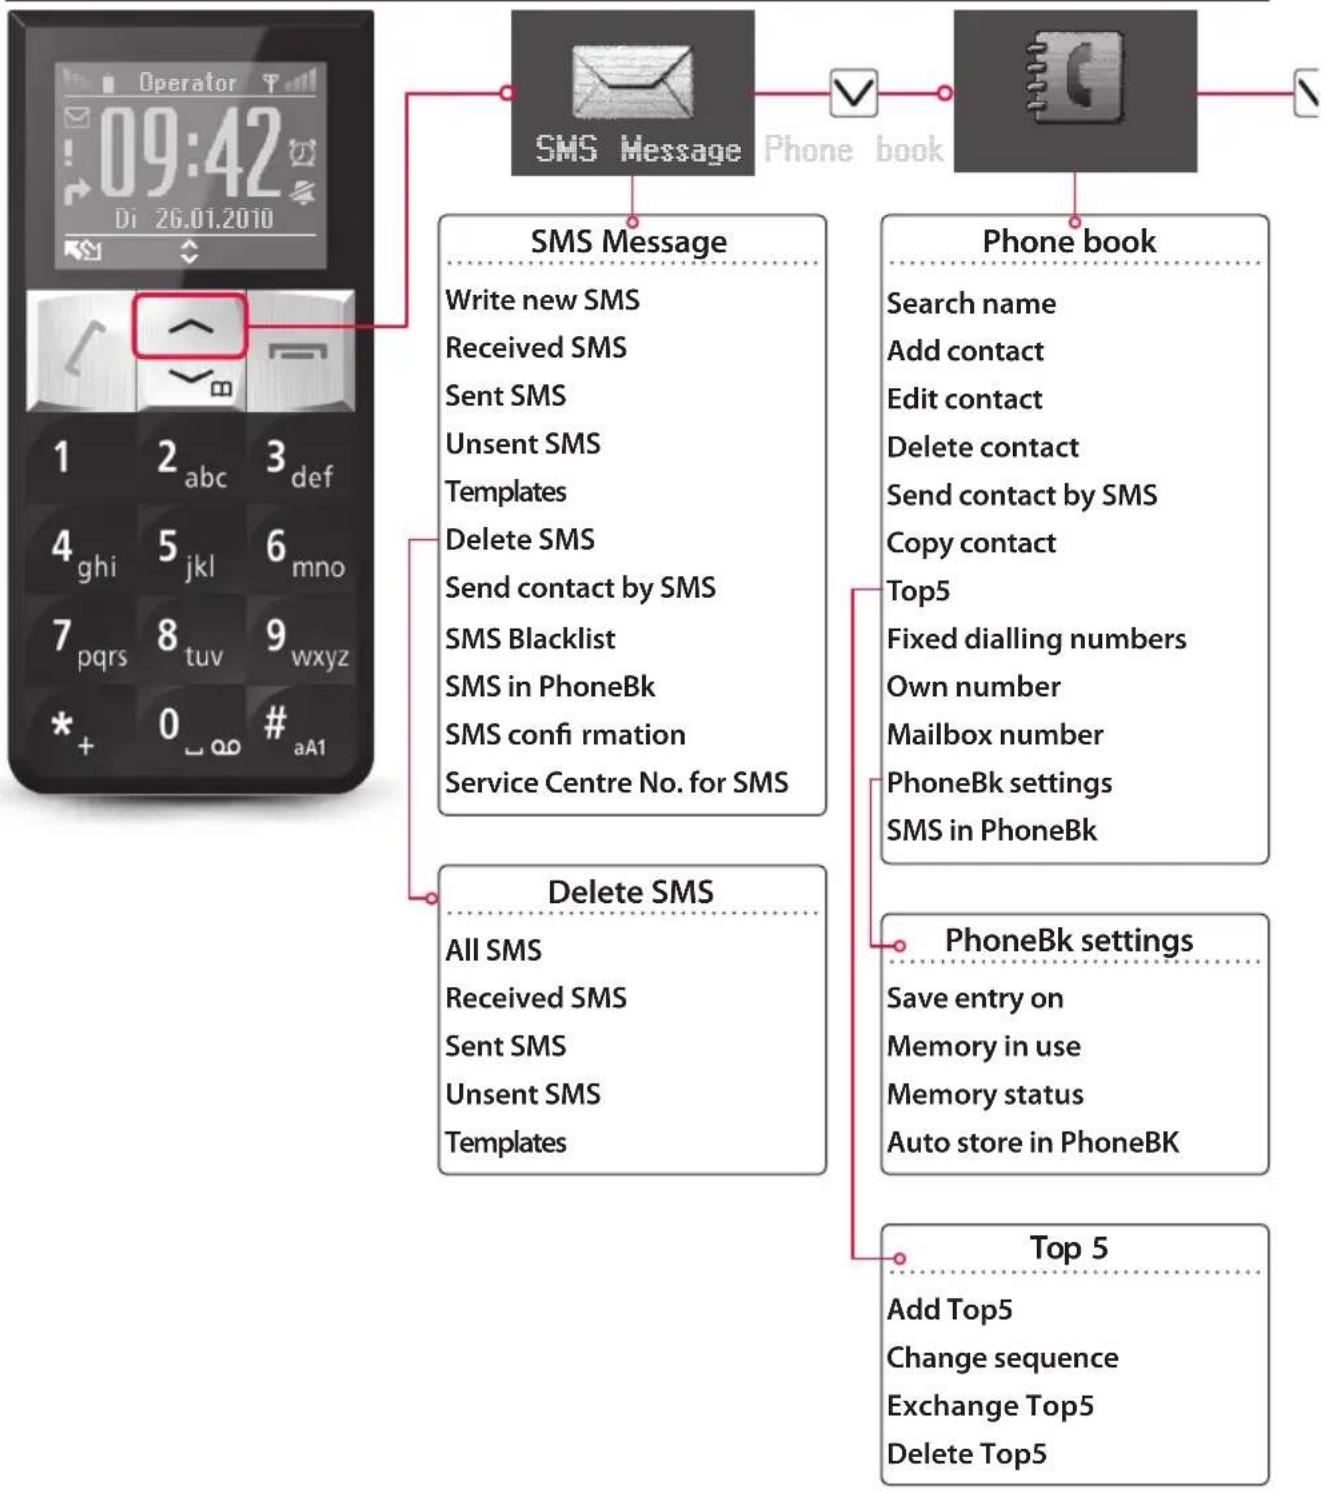
flowchart
graph TD
    A["Operator"] --> B["09:42"]
    B --> C["Di 26.01.2010"]
    C --> D["SMS Message"]
    D --> E["Phone book"]
    E --> F["Top 5"]
    F --> G["Add Top5"]
    F --> H["Change sequence"]
    F --> I["Exchange Top5"]
    F --> J["Delete Top5"]
    D --> K["Write new SMS"]
    D --> L["Received SMS"]
    D --> M["Sent SMS"]
    D --> N["Unsent SMS"]
    D --> O["Templates"]
    D --> P["Delete SMS"]
    D --> Q["Send contact by SMS"]
    D --> R["SMS Blacklist"]
    D --> S["SMS in PhoneBk"]
    D --> T["SMS confirmation"]
    D --> U["Service Centre No. for SMS"]
    E --> V["Search name"]
    E --> W["Add contact"]
    E --> X["Edit contact"]
    E --> Y["Delete contact"]
    E --> Z["Send contact by SMS"]
    E --> AA["Copy contact"]
    E --> AB["Top5"]
    E --> AC["Fixed dialling numbers"]
    E --> AD["Own number"]
    E --> AE["Mailbox number"]
    E --> AF["PhoneBk settings"]
    E --> AG["SMS in PhoneBk"]
    F --> AH["All SMS"]
    F --> AI["Received SMS"]
    F --> AJ["Sent SMS"]
    F --> AK["Unsent SMS"]
    F --> AL["Templates"]
    F --> AM["PhoneBk settings"]
    AM --> AN["Save entry on"]
    AM --> AO["Memory in use"]
    AM --> AP["Memory status"]
    AM --> AQ["Auto store in PhoneBK"]
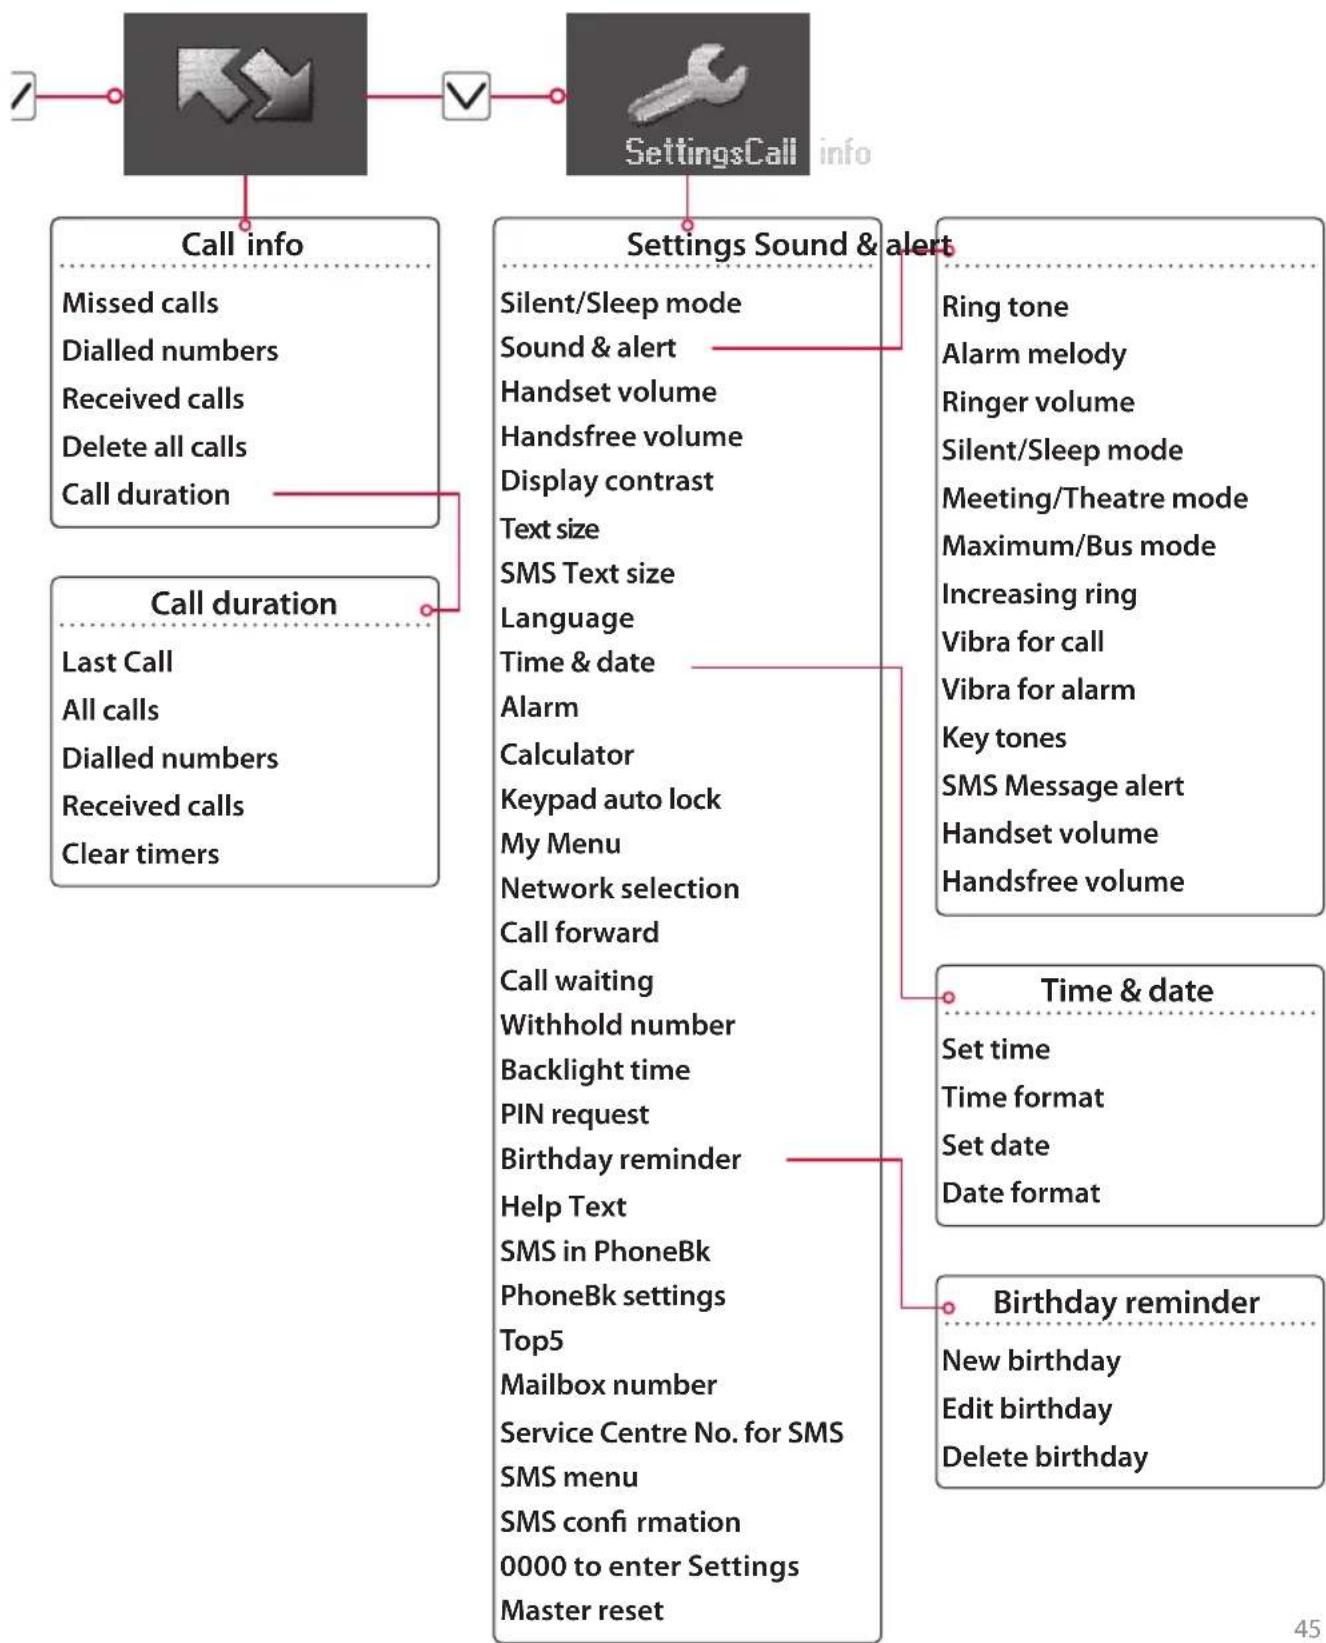
flowchart
graph TD
    A["Call info"] --> B["Settings Call"]
    C["Call duration"] --> D["Settings Sound & Alert"]
    D --> E["Time & date"]
    E --> F["Birthday reminder"]
    A --> G["Call info"]
    C --> H["Call duration"]
    D --> I["Settings Sound & Alert"]
    E --> J["Time & date"]
    F --> K["Birthday reminder"]
6 PRODUCT AND SAFETY INFORMATION

Read the Safety Information section of this user guide on page XX

Do not use hand-held while driving
For body-worn operation maintain a separation of 1.5 cm

Small parts may cause a choking hazard
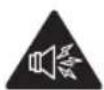
This device may produce a loud sound

Keep away from pacemakers and other personal medical devices

Switch off when instructed in hospitals and medical facilities

Switch off when instructed in aircrafts and airports

Switch off in explosive environments

Do not use while re-fuelling

This device may produce a bright or flashing light

Do not dispose of in a fire

Avoid contact with magnetic media
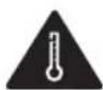
Avoid Extreme Temperatures

Avoid contact with liquid, keep dry
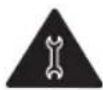
Do not try and disassemble
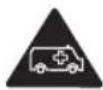
Do not rely on this device for emergency communications

Only use approved accessories
6.1 RF EXPOSURE
Your phone contains a transmitter and a receiver. When it is ON, it receives and transmits RF energy. When you communicate with your phone, the system handling your call controls the power level at which your phone transmits.
Specific Absorption Rate (SAR)
Your mobile device is a radio transmitter and receiver. It is designed not to exceed the limits for exposure to radio waves recommended by international guidelines. These guidelines were developed by the independent scientific organisation ICNIRP and include safety margins designed to assure the protection of all persons, regardless of age and health.
The guidelines use a unit of measurement known as the Specific Absorption Rate, or SAR. The SAR limit for mobile devices is 2 W/kg and the highest SAR value for this device when tested at the ear was 0,677 W/kg*. As mobile devices offer a range of functions, they can be used in other positions, such as on the body as described in this user guide.
As SAR is measured utilising the device's highest transmitting power, the actual SAR of this device while operating is typically below that indicated above. This is due to automatic changes to the power level of the device to ensure it only uses the minimum power required to communicate with the network.
*The tests are carried out in accordance with EN 50360:2001.
** Please see next chapter about body worn operation.
Body worn operation
Important safety information regarding radiofrequency radiation (RF) exposure:
To ensure compliance with RF exposure guidelines the phone must be used with a minimum of 1.5 cm separation from the body.
Failure to observe these instructions could result in your RF exposure exceeding the relevant guideline limits.
Limiting exposure to radio frequency (RF) fields
For individuals concerned about limiting their exposure to RF fields, the World Health Organisation (WHO) provides the following advice:
Precautionary measures: Present scientific information does not indicate the need for any special precautions for the use of mobile phones. If individuals are concerned, they might choose to limit their own or their children's RF exposure by limiting the length of calls, or using 'hands-free' devices to keep mobile phones away from the head and body.
Further information on this subject can be obtained from the WHO home page http://www.who.int/peh-emf WHO Fact sheet 193: June 2000.
Regulatory information
The following approvals and notices apply in specific regions as noted. See next page.
6.2 DISTRACTION
Driving
Full attention must be given to driving at all times in order to reduce the risk of an accident. Using a phone while driving (even with a hands free kit) causes distraction and can lead to an accident. You must comply with local laws and regulations restricting the use of wireless devices while driving.
Operating machinery
Full attention must be given to operating the machinery in order to reduce the risk of an accident.
EC-DECLARATION OF CONFORMITY
We, Emporia Telecom Produktions- und Vertriebs- GmbH & Co. KG. declare under our sole responsibility that the following product is in conformity with the following relevant harmonised standards.
Kind of Product: Dual Band Mobile Phone Article number: VF1
R & TTE Directive 1999/5/EC
Council Directive R&TTE 1999/5/EC on radio equipment and telecommunications terminal equipment and the mutual recognition of their conformity.
CE 2200
text_image
belie PiydeDate of Issue: 20.10.2010
Place of Issue: Linz/Austria
6.3 PRODUCT HANDLING
This mobile phone is robust and designed for mobile operation. However, it must be protected from moisture (rain, bath...) and impact. Do not expose it to direct sunlight.
Any utilization other than described above will cause damage to the device, and may be hazardous (electric shock, fire, etc.). The entire product must not be altered or rebuilt, and the housing must not be opened.
You alone are responsible for how you use your phone and any consequences of its use.
You must always switch off your phone wherever the use of a phone is prohibited. Use of your phone is subject to safety measures designed to protect users and their environment.
- Always treat your phone and its accessories with care and keep it in a clean and dust-free place.
- Do not expose your phone or its accessories to open flames or lit tobacco products.
- Do not expose your phone or its accessories to liquid, moisture or high humidity.
- Do not use harsh chemicals, cleaning solvents, or aerosols to clean the device or its accessories.
- Do not paint your phone or its accessories.
- Do not attempt to disassemble your phone or its accessories, only authorised personnel must do so.
- Do not expose your phone or its accessories to extreme temperatures, minimum 0° and maximum +40° Celsius.
- Please check local regulations for disposal of electronic products.
Do not carry your phone in your back pocket as it could break when you sit down.
Small Children
Do not leave your phone and its accessories within the reach of small children or allow them to play with it. They could hurt themselves or others, or could accidentally damage the phone.
Your phone contains small parts with sharp edges that may cause an injury or which could become detached and create a choking hazard.
Demagnetisation
To avoid the risk of demagnetisation, do not allow electronic devices or magnetic media close to your phone for a long time.
Electrostatic discharge (ESD)
Do not touch the SIM card's metal connectors.
Power supply
Do not connect your device to the power supply or switch it on until instructed to do so in the installation instructions. The power plug is suitable only for use with residential-type outlets of the public mains with 230 Volt / 50 Hz (10/16A) alternating current.
Antenna
Do not touch the antenna unnecessarily. Antenna location see page 5.
Indoor usage
This product is only suitable for indoor usage.
Normal use position
When placing or receiving a phone call, hold your phone to your ear, with the bottom towards your mouth or as you would do with a fixed line phone.
Air Bags
Do not place a phone in the area over an air bag or in the air bag deployment area. Store the phone safely before driving your vehicle.
Seizures/Blackouts
This phone is capable of producing bright flashing lights.
Repetitive Motion Injuries
To minimise the risk of RSI, when Texting or playing games with your phone:
- Do not grip the phone too tightly
- Press the buttons lightly
- Make use use of special features in the handset which minimise the number of buttons which have to be pressed, such as message templates and predictive text
- Take lots of breaks to stretch and relax
Emergency Calls
This phone, like any wireless phone, operates using radio signals, which cannot guarantee connection in all conditions. Therefore, you must never rely solely on any wireless phone for emergency communications.
Loud Noise
This phone is capable of producing loud noises which may damage your hearing.
Bright Light
This phone is capable of producing flash of light or use as a torch, do not use it too close to the eyes.
Phone Heating
Your phone may become warm during charging and during normal use.
6.4 ELECTRICAL SAFETY
Accessories
Use only approved accessories.
Do not connect with incompatible products or accessories.
Take care not to touch or allow metal objects, such as coins or key rings,
to contact or short-circuit the battery terminals.
Connection to a Car
Seek professional advice when connecting a phone interface to the vehicle electrical system.
Faulty and Damaged Products
Do not attempt to disassemble the phone or its accessory.
Only qualified personnel must service or repair the phone or its accessory.
If your phone or its accessory has been submerged in water, punctured, or subjected to a severe fall, do not use it until you have taken it to be checked at an authorised service centre.
6.5 BATTERY HANDLING & SAFETY
Always switch the device off and disconnect the charger before removing the battery.
Only use the battery and charger supplied, or manufacturer approved replacements intended for use with your phone. Using other batteries and chargers could be dangerous.
Do not disassemble or short-circuit the battery. Accidental short-circuiting can occur if a metallic object such as a key, paper clip, or pen touches the terminals of the battery.
Improper battery use may result in a fire, explosion, or other hazard. If you believe the battery has been damaged, do not use it, take it to a service centre for testing.
6.6 INTERFERENCE
Mobile phones may cause interference in TV sets or radios, particularly when the handset is used close to such a device.
Care must be taken when using the phone in close proximity to personal medical devices, such as pacemakers and hearing aids.
Pacemakers
Pacemaker manufacturers recommend that a minimum separation of 15 cm be maintained between a mobile phone and a pacemaker to avoid potential interference with the pacemaker. To achieve this use the phone on the opposite ear to your pacemaker and do not carry it in a breast pocket.
Hearing Aids
People with hearing aids or other cochlear implants may experience interfering noises when using wireless devices or when one is nearby.
The level of interference will depend on the type of hearing device and the distance from the interference source, increasing the separation between them may reduce the interference.
You may also consult your hearing aid manufacturer to discuss alternatives.
Medical devices
Please consult your doctor and the device manufacturer to determine if operation of your phone may interfere with the operation of your medical device.
Hospitals
Switch off your wireless device when requested to do so in hospitals, clinics or health care facilities. These requests are designed to prevent possible interference with sensitive medical equipment.
Aircraft
Switch off your wireless device whenever you are instructed to do so by airport or airline staff. Consult the airline staff about the use of wireless devices on board the aircraft, if your device offers a ‘flight mode’ this must be enabled prior to boarding an aircraft.
Interference in cars
Please note that because of possible interference to electronic equipment, some vehicle manufacturers forbid the use of mobile phones in their vehicles unless a handsfree kit with an external antenna is included in the installation.
6.7 EXPLOSIVE ENVIRONMENTS
Petrol stations and explosive atmospheres
In locations with potentially explosive atmospheres, obey all posted signs to turn off wireless devices such as your phone or other radio equipment.
Areas with potentially explosive atmospheres include fuelling areas, below decks on boats, fuel or chemical transfer or storage facilities, areas where the air contains chemicals or particles, such as grain, dust, or metal powders.
Blasting Caps and Areas
Turn off your mobile phone or wireless device when in a blasting area or in areas posted turn off "two-way radios" or "electronic devices" to avoid interfering with blasting operations.
6.8 WARRANTY
The 24 month warranty period begins with the delivery of the device.
Verify the delivery date with the original receipt (invoice, cash receipt) with IMEI number.
Store these documents carefully. The extent of our warranty is based on the warranty conditions in effect at the time of delivery.
To the greatest possible extent under current law emporia will not be liable under any circumstances for the following situations:
- Any loss of data or income
- Any particular or incidental damages, as well as any consequential or collateral damages, in whatever way these might have been caused.
6.9 DISPOSAL
- Disposal of packaging: Packaging and packaging materials are recyclable and should always be returned.
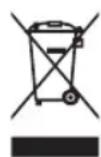
- Disposal of batteries: Batteries must not be disposed of with domestic rubbish! As a consumer you are required by law to recycle used batteries. You may return the battery local collection point or to the dealer.
- Disposal of the device: Do not throw your mobile phone into the garbage, once it has outlived its usefulness. For the benefit of the environment, take it to a recycling location for used phones so it can be processed in an environmentally responsible way.

6.10 TECHNICAL PRODUCT DESCRIPTION
- Hearing aid compatible loudspeaker
- Dual band GSM 900/1800
- Dimensions: 109 x 50 x 14 mm, 92 g
- Display: 1.7" OLED 160 x 128 Pixels
- Operating temperature: 0 - 40°C
- Battery AK - RL1: Li-Ion 3,7 V / 700 mAh
- Stand-by-time: up to 200 h
- Talk time: up to 150 Min.
- Internal antenna, SAR 0.677 W/kg
- Charger RL - V170EU (In: 110-240V\~ Out: 5,0V—...500mA)
- Desktop charger: TL-RL1 (In: 5,0V...500mA Out: 5,0V...500mA)
- Flashlight – Protection class 3
7 FREQUENTLY ASKED QUESTIONS
What do I have to pay for?
You will begin to be charged for a phone call you initiated once someone (or your voicemail) has answered on the other end. When you use the SMS function, you will only be charged for sending the SMS, not writing or receiving it.
Any other functions (alarm, calculator) are free of charge.
Calling Abroad
If you are outside the coverage of your own network provider, your mobile phone will automatically find another network. Many phone cards will need to be enabled by your network provider for usage abroad. Please contact your provider.
Can I make an emergency call without reception or credit balance?
- Without signal you cannot make a call (no service).
- If 'Limited Service' is displayed, you either have no connection to your network provider, or no credit balance. In this case you can place an Emergency 999 call, but no other calls.
How often should I charge my battery pack?
Don't recharge your batteries after every call. Even with "intelligent" electronic chargers this will result in reduced battery capacity.
To keep your batteries "fit", let them deplete completely at least once a month. If you are not using the mobile phone for more than one month, remove the battery pack.
How long will my phone work until I have to charge it again?
The operating time depends among other things on the distance from the transmitter (if you are far away from it, the mobile phone needs a lot more energy to maintain contact), on the number of calls, and the volume setting. Under optimal conditions the batteries will last for 2.5 hours of calling. In standby mode you may count on an maximum operating time of 200 hours. If you have been on the phone for 1 hour, the standby time is reduced to 120 hours.
If the signal strength (reception) of your network varies strongly or fails altogether at a particular location, your mobile phone is continuously forced to search for an available network. This increases power consumption, and consequently depletes your batteries faster.
How do I clean the mobile phone?
Clean the device with a damp cloth. Avoid sprays and too much moisture. It might get into the interior of the device and cause damage. Never use cleansers containing abrasive materials, alcohol, or solvents (turpentine). They might damage the housing and/or printed surfaces.
What is the standby mode?
You can receive calls and see the time display. If key lock is engaged you will see a large key symbol instead of the time (see section 3.4). If the phone is in energy saving mode, the display shuts off, but the phone remains ready to receive calls.
Did I select this function, or not?
Your current setting is indicated by the checked box (√).
The new setting is indicated by a bar.
Save the new setting with ↗ or keep the old setting with ↖
My call didn't go through:
- Make sure you have the correct number and area code.
- Did you remember to include the area code even for a local call?
SIM card inserted! Only emergency call 999 works!
- Check to make sure your SIM card is correctly inserted!
- Gold contacts on the bottom? Clipped corner back left?
- Remove SIM card and insert it again.
The screen of the mobile phone is empty (display turned off):
Your phone is in energy saving mode and has turned off the display (you can receive calls), press- the display will come on again.
The phone may be switched off (press and hold the ⏻ key on the left-hand side of the mobile phone for 2 seconds to switch it back on).
The screen of the mobile phone is black
The device is switched on, you hear key tones, but can't see anything on the screen.
The screen may be broken – have device serviced.
The mobile phone doesn't turn on
Remove the battery pack, insert it again, and switch the device on.
The phone doesn't charge
Leave the mobile phone connected for at least 10 minutes. If it does not begin to charge (battery symbol displayed) contact your service centre, as the battery or the charger may be defective.
Is it possible to hide my number?
If you don't want your telephone number to be seen by the other party, go to the menu and select Settings/Withhold number/Yes.
There is fluid leaking from the battery pack
Please make sure the fluid doesn't come in contact with skin or eyes. If this should happen, immediately rinse the area with water. To be completely safe, contact your doctor.
The battery pack is damaged
This may happen, for instance, if the mobile phone or the battery pack fall on a hard surface. Stop using the battery pack, and let a service professional determine if the batteries may be used again.
fax +43.732.77 77 17-8
www.emporia.at
Emporia Telecom Hotline:
Subject to print errors, mistakes and technical changes.
PartNo.: 54376-ENG; ENGLISH; VF1-IM_ENG-V2_G2-201102