
HRS 8755 CI+ - Receiver XORO - Free user manual and instructions
Find the device manual for free HRS 8755 CI+ XORO in PDF.


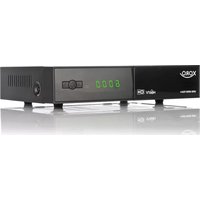
| Product Type | Satellite Receiver |
| Model | HRS 8755 CI+ |
| Brand | XORO |
| Tuner | Sensitive Tuner with Loop-Through |
| Channel Storage | 3000 transponders, 5000 channels |
| Favorite Groups | 32 |
| Video System | PAL/NTSC Conversion |
| OSD | True full color (16-bit) |
| Common Interface | CI/CI+ slot for Pay-TV |
| USB Ports | 2x USB 2.0 (DC 5V, 500mA max) |
| Video Outputs | HDMI, TV-SCART, RCA (AUDIO/VIDEO) |
| Audio Outputs | Analog Stereo (L/R), S/PDIF Coaxial |
| EPG | 7-day Electronic Program Guide |
| Teletext | Supported |
| PVR Recording | Via USB (timeshift and recording) |
| Media Player | Image, Video, Music, Record files |
| Power Supply | 100-240V AC, 50/60Hz |
| Dimensions (approx.) | 25 x 15 x 5 cm |
| Weight (approx.) | 0.8 kg |
| Accessories Included | Remote Control, Batteries, User Manual |
| Safety Standards | International safety standards |
| Maintenance | Clean with soft cloth; no solvents |
Frequently Asked Questions - HRS 8755 CI+ XORO
User questions about HRS 8755 CI+ XORO
0 question about this device. Answer the ones you know or ask your own.
Ask a new question about this device
Download the instructions for your Receiver in PDF format for free! Find your manual HRS 8755 CI+ - XORO and take your electronic device back in hand. On this page are published all the documents necessary for the use of your device. HRS 8755 CI+ by XORO.
USER MANUAL HRS 8755 CI+ XORO
FREE TO CHOOSE INNOVATIONS
XORO®
HR5 8755 CI+
Bedienungsanleitung
User's Manual
Hinweise:

USB Anschlüsse
Wartung
Firmware aktualisieren (USB)
Audio Stereo (analog L/R), S/PDIF (Koaxial)
FREE TO CHOOSE INNOVATIONS
XORO®
HR5 8755 CI+

User's Manual
Content
Safety Precaution....4
1. Reference ....4
1.1 General Features....4
1.2 Accessories....4
2. Product Overview....5
2.1 Front Panel 5
2.2 Rear Panel....6
2.3 Remote Control Unit (RCU)....7
3. Installation....8
3.1 Powering On 8
4. Edit Channel ......9
4.1 TV Channel List 9
4.2 Delete All....9
5. System Setup....9
5.1 Language....9
5.2 TV System 9
5.3 Display Setting....9
5.4 Local Time Setting ....10
5.5 Timer Setting....10
5.6 Parental Lock....11
5.7 OSD Setting....11
5.8 Favourite....11
5.9 Other....11
6. Tools....11
6.1 Information....11
6.2 Factory Setting....11
6.3 Common Interface ....12
6.4 USB Upgrade & Save 12
6.5 Media Player....12

6.6 Remove USB device safely 16
-
Games ....16
-
REC Setting ...... 16
8.1 PVR Storage Setting....16
8.2 PVR Setting 16
- Basic Operation ....16
9.1 Audio....16
9.2 Zoom In....17
9.3 EPG 17
9.4 Subtitle....17
9.5 Teletext ....17
- Channel List....17
10.1 OK List....17
10.2 Favorite List ....17
- USB Control .... 18
11.1 Recording and Timeshift 18
11.2 Recording List....19
-
CAM Module ....19
-
Additional Information ....20
13.1 Trouble Shooting....20
Safety Precaution
This STB has been designed and manufactured to satisfy the international safety standards. Please read the following safety precautions carefully before operating this receiver.
Main Supply:
Before operating, please check the units operating voltage is 100-240V AC 50/60Hz.
Overload:
Do not overload a wall outlet, extension cord or adapter, neither use damaged power cord or touch it with wet hand as this may result in electric shock.
Liquid:
The receiver shall not be exposed to dripping or splashing water, and that no objects filled with liquids, such as vase, shall be placed on the apparatus.
Ventilation:
Keep the slots on top of the receiver uncover to allow sufficient airflow to the unit. Do not put the receiver on soft furnishings or carpets. Do not expose the receiver to direct light or do not place it near a heater or in humid conditions. Do not stack other electronic equipments on top of the receiver.
Cleaning:
Plug out the receiver from the wall outlet before cleaning. Clean the receiver by a soft cloth or mild solution of washing-up liquid (no solvents).
Connection:
Disconnect the receiver from the mains when you connect it to satellite LNB or disconnect it from LNB. Failure would possibly cause damage to the LNB.
Location:
Put the receiver indoor in order to avoid lightening, raining or sunlight.
Uncover:
Do not remove the cover, to reduce the risk of electric shock. Contact qualified and licensed service personnel to repair the receiver, or contact your dealer.
1. Reference
1.1 General Features
Sensitive Tuner with Loop-Through
Auto Search supported
PAL/NTSC Conversion
True full Color (16 bits) on screen display (OSD)
Storing memory: 3000 transponders and 5000 channels
32 favorite group and parental lock supported
CI/Cl+ supported
Multi-language menu supported
Multi-language audio supported
Multi-language DVB Subtitle output
7 days Electronic Program Guide (EPG)
Teletext
2x USB 2.0 Interface
1.2 Accessories
- Users manual
- Remote Control Unit
• Batteries for Remote Control Unit

Figure 1. Accessories
2. Product Overview
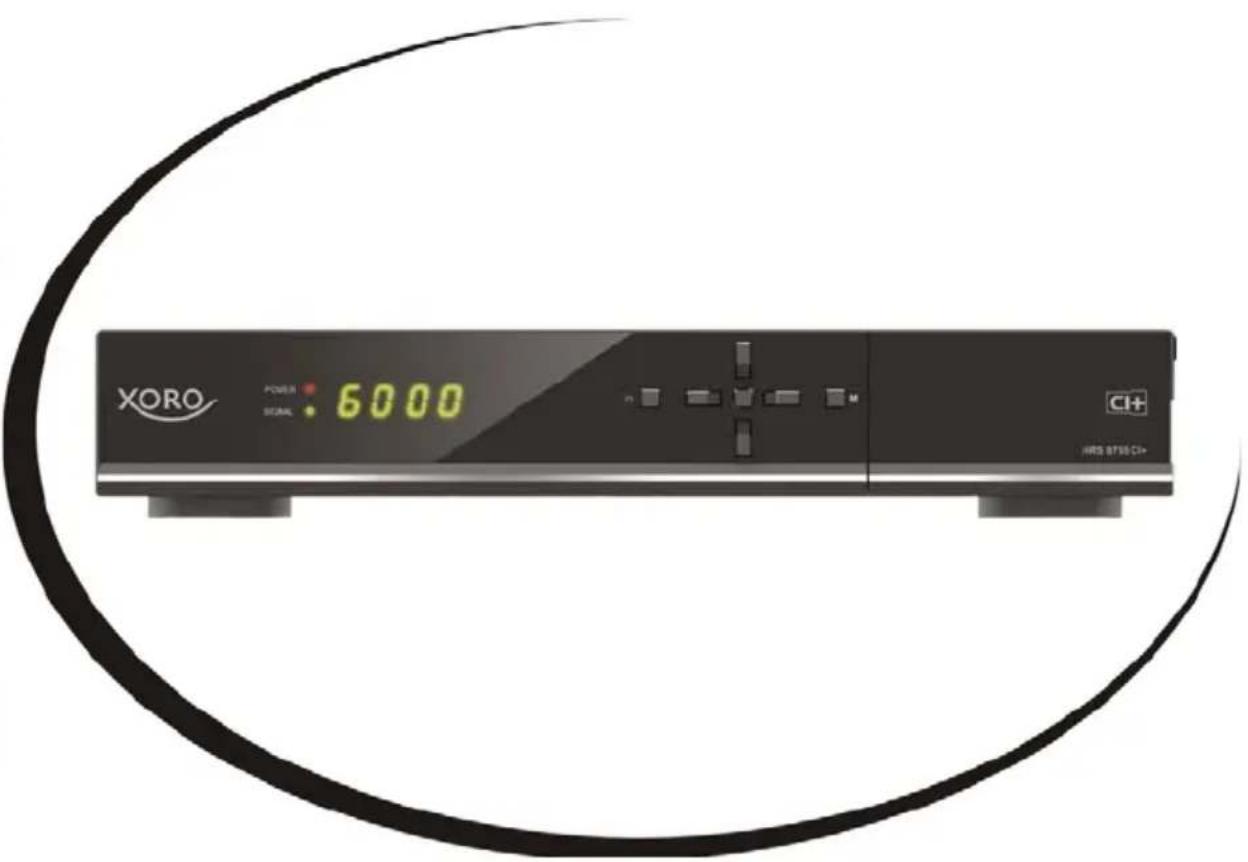
2.1 Front Panel

Figure 1. Front Panel
1. Power button and Power LED
Switch between operation and standby modes and it is a power indicator.
2. MENU Button
Activate the main menu in viewing mode.
3. OK Button
Activate the highlighted sub menu in menu mode and activate the channel list in viewing mode
4. ◀/▶
Decrease / increase the volume in viewing mode and change settings in menu mode.
5. ▲/▼
Change channel in viewing mode and move the cursor up/down in menu mode.
6. Signal LED
Signal indicator.
7. Display
It displays channel and status information. If enabled, Time will be displayed in Standby.
2.2 Rear Panel

Figure 2. Rear Panel
1. LNB IN
Connect the satellite antenna cable (13/18V 300mA max.)
2. LOOP OUT
Connect another receiver.
3. ON/OFF
Power on/off.
4. USB2.0
Two USB 2.0 Host Ports. (DC 5V, 500mA max.)
5.HDMI
Connect to the TV using an HDMI cable.
6.TV-SCART
Connect to the SCART cable.
7. AUDIO/VIDEO
Connect to the TV using a RCA cable.
8. S/PDIF (COAX)
Digital Audio output (Coaxial).
2.3 Remote Control Unit (RCU)
You can control this receiver by this remote controller with full function.
-
POWER: Switch between operation and standby modes.
-
SLEEP: Set the sleep timer.
-
MUTE : Mute audio.
-
NUMERIC KEY (0\~9): Enter a TV/radio channel number or menu option number.
-
AUDIO: Display the audio list.
-
SUB: Display the subtitle language list.
-
TV/R: Switch between TV and RADIO.
8.TXT: Display the Teletext.
-
EPG (Electronic Program Guide): Display the program guide.
-
INFO: Display the program information.
-
FIND: Search Channels by Name in Channel list.
-
GREEN: Accessorial function.
-
MARK: Accessorial function.
-
JUMP.M: Accessorial function.
-
MENU: Activate main menu.
-
EXIT: Exit current menu step by step.
-
▲/▼: Changes program.
-
OK: Confirm the selected operation or display the Channel list while watching a TV.
-
VOL◀/VOL▶: Change volume in viewing mode.
-
P▲/P▼: Page up/down on menu.
-
FAV: Display favorite channel list.
-
VOL+/VOL-: Change volume in viewing mode.
-
USB: Open USB Media Player
-
SWAP: Switch USB Port in Media Player mode.
-
DVR: Display PVR Menu (set Marks, display DVR-List).
-
🙏 : Switch to the previous viewed channel
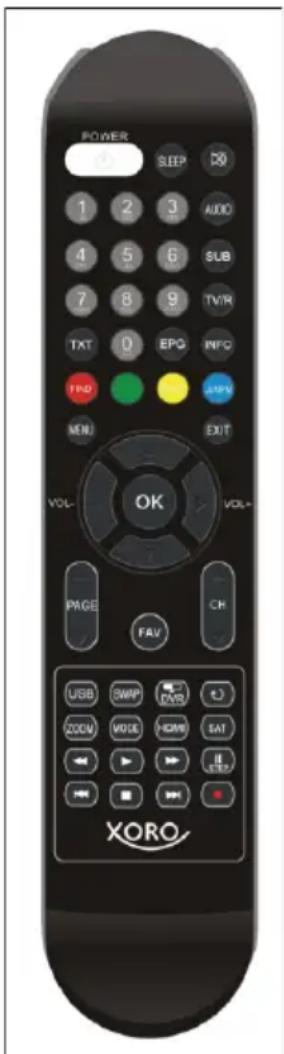
Figure 4. Remote Control

- ZOOM: Picture zooming function.
- MODE: Set the display format/aspect ratio.
- HDMI: Set the HDMI mode/resolution.
- SAT: Show the scanned satellite list.
- ◀◀/▶▶: Fast Rewind/Fast Forward.
- ▶/I I: Play/ Pause.
- I ◀ ◀/▶ ▶ I: Previous/Next.
- ■: Stop recording and playing.
- ●: Record.
3. Installation
You should install the receiver when powering on your product for the first time after purchase.
Tip: The default password is 0000. If you have forgotten your password, please contact the XORO-Service.
3.1 Powering On
- Connect the power cord of the product to a wall outlet.
- Ensure the ON/OFF switch at the rear of the product is switched to ON.
- Power on by pressing the STANDBY button on the remote control or the
STANDBY button at the front of the product.
3.2 Antenna Settings
Antenna Setting allows you to configure the antenna setting parameters.

3.3 USALS Setup
If you set the Motor Mode to USALS, you need set the longitude and the latitude in USALS Setup.
4. Edit Channel
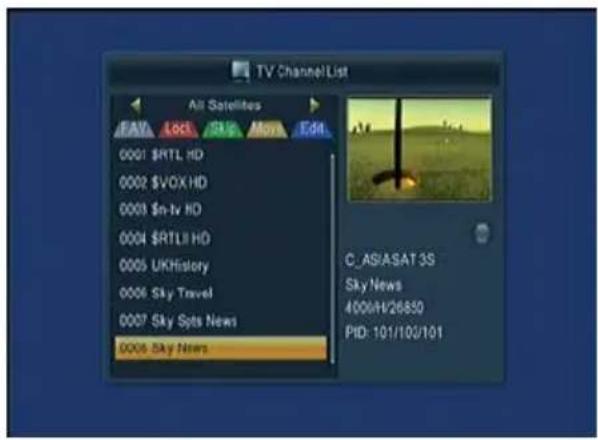
4.1 TV Channel List
Edit Channels enables you to move, delete, sort, rename, lock/unlock, skip the channels in the channel list conveniently, and set favorite.
Tip: Radio Channels operation similar to the TV Channels.
4.2 Delete All
If you select this option, all the channels will be deleted.
5. System Setup
5.1 Language
Enter Language menu, you can set the OSD Language, First Audio Language, Second Audio Language, Subtitle Language and Teletext Language.
5.2 TV System
Enter TV System menu, you can set the Video Resolution, Aspect Mode and Digital Audio Out.

5.3 Display Setting
The display settings can set Brightness, Contrast, Saturation, Hue and Sharpness. You can press the VOL+/VOL- button to adjust the value.
5.4 Local Time Setting
The Local Time Setting contains option for GMT Offset, Summer Time, Date and Time.
5.5 Timer Setting
Menu->System Setup->Timer Setting
You can setup a View or Record Timer here. Select a timer and press OK button.
Timer Mode
- Once: only one time.
● Daily: Repeat every day. - Off: Close this timer.
● Weekly: Repeat the channel weekly.
● Mo-Fr: Repeat the channel from Monday to Friday.
● Sa-Su: Repeat the channel from Saturday to Sunday.

Timer Service
- Channel: Will switch to the channel when the timer is started.
- Record: Only if there is a USB device, it will be recorded automatically when the timer is started. And the recorded PVR will be saved in USB device.
Wakeup Channel
Select the Channel from Channel List.
Event Name
If you add a event timer from EPG, it shows the event name.
Wakeup Date
Input start date of the timer.
On Time
Set Start time of the timer.
Stop Time
Set End time of the timer.
After Recording
Set the status after the timer.
● Auto: Back to the status that before the timer.

- Standby mode: Go to standby mode after the timer.
● Power on: Still power on after the timer.
5.6 Parental Lock
Parent Lock allows you to set limits for each program or change your previous password.
5.7 OSD Setting
OSD Setting allows you to set Subtitle Display, OSD Timeout, OSD Transparency and OSD Animation.
5.8 Favourite
You can rename the favorite group's name in this menu.
5.9 Other
1.LNB Power
You can set the Low Power Standby on or off.
2. Auto Standby
It can standby automatic as the time that you set.
3. LED Brightness
You can press the VOL+/VOL- button to change the LED Brightness.
4. Standby Time
You can set the time display on front panel when standby.
6. Tools
6.1 Information
Display version information such as software or hardware.
6.2 Factory Setting
You have the opportunity to make undo all the settings and changes by load the default settings.

Note: All settings are reset and all channels lists are delete. You have to do the channel scan again.
6.3 Common Interface
This option allows you to view, change the settings and information of a Common Access Module.
6.4 USB Upgrade & Save
Let you install a new software version on the device. This of course must be connected to a USB HDD or memory stick with the update file in the root directory.
1. Upgrade & Save
Software Updates can be found at www.xoro.de/downloads/
6.5 Media Player
Menu->Tools->USB
The Media Player can play many kinds of media files, you also can record channels and playback them and you can do various operations when using USB HDD or USB disk. You can press VOL+/VOL- button to change media type in Image/Video/Record/Music.
1. Image
When in the files browser:
OK: Start the slide show of all images in this folder
▲/▼: Move to the previous or next image or folder
RED: Display the Play List of pictures
GREEN: Add the highlighted image to the Play List
YELLOW: Add all the images in current directory to the Play List
BLUE: Edit (Rename/Delete/Copy/Create Folder/Unedit)
SWAP: Switch to the other USB device
DVR : Sort the files by Name/Time/Size/Favourite
INFO: Set menu with the options for the slide show time and slide show repeat
TXT: Display all images as small thumbnails
EXIT: Return to previous directory
[]
3/4 When in Playback:
Start playing the slide show by pressing the OK button. The following operations are available:
Ÿ/ź: Display the next/previous picture
VOL+/VOL-: Rotates the image 90 degrees clockwise/counter clockwise
PAUSE: Pause playing the slide show
ZOOM: Zoom in pictures. The zooms change as follows: x1 ->x2->x4 ->x8 ->x16 ->x1.
EXIT: Stop playing and return to the File Browser
- Music
[]
3/4 When in the files browser:
OK/Ż: Play the selected music file
Ÿ/ź: Move to the previous or next music or folder
RED: Display the Play List of the music files
GREEN: Add the highlighted music to the Play List
YELLOW: Add all the music files in current directory to the Play List
BLUE: Edit (Rename/Delete/Copy/Create Folder/Unedit)
SWAP: Switch to the other USB device
DVR: Sort the files by Name/Time/Size/Favourite
INFO: Set the Repeat mode (Single, Folder, Folder Random)
EXIT: Return to previous directory
3/4 When in Playback:
Start playback by pressing the OK or the Ž button. The following operations are available:
Iżż/ŻŹI: Change to the previous/next song
ŻŻ/ŻŻ: Fast Rewind/Forward
II: Pauses the music play

■: Stop playing
INFO: Repeating modes (Single track, directory, random directory)
EXIT: Return to previous directory but not stop playing
3. Video
When in the files browser:
OK/▶: Play the selected video file
▲/▼: Move to the previous or next video or folder
BLUE: Edit (Rename/Delete/Copy/Create Folder/Unedit)
SWAP: Switch to the other USB device
DVR: Sort the files by Name/Time/Size/Favourite
EXIT: Return to previous directory
When in Playback:
If you press OK the movie starts playing directly in full screen.
▲/▼: Play the previous or next video
VOL+/VOL-: Jump to backward/forward for a period of time
II: Pause and pressing || again enter step mode
▶: Cancel pause, continues playing
■: Stop and returns to the browser
◀◀/▶▶: Fast forward/backward (x1 -> x2 -> x4 -> x8 -> x16)
I ◀ ◀/▶ ▶ I: Jump to previous/next chapter
AUDIO: Switch audio track
SUB: Switch (off) Subtitles
DVR: Show information like play time (current and over all) file name etc
RED: Switch video program
GREEN: Jump to a certain (self defined) time
YELLOW: Switch chapter
4. Record
When in the files browser:

▲/▼: Move to the previous or next recording or folder
OK: Starts playback of the file or open the folder
RED: Rename the selected file
GREEN: Lock the selected file
YELLOW: Delete the selected file
BLUE: Rename the EPG name of the selected file.
EXIT: Return to previous directory

When in Playback:
If you press OK the movie starts playing directly in full screen.
VOL+/VOL-: Jump to backward/forward for a period of time
II: Pause and pressing || again enter step mode
▶: Cancel pause, continues playing
■: Stop and returns to the browser
◀◀/▶▶: Fast forward/backward (x1 -> x2 -> x4 -> x8 -> x16)
I ◀ ◀/▶ ▶ I: Jump to backward/forward as jump option in the PVR Setting menu
GREEN: Jump to a certain (self defined) time
MARK: Mark on current time
JUMP.M : Jump to mark
AUDIO: Switch audio track
SUB: Switch (off) Subtitles
INFO: Display the information of current live channel
DVR: Show information like play time (current and over all) file name etc
TXT: Show the teletext
EXIT: Exit to PVR list


5. Play List
You can press GREEN or YELLOW button add some favorite pictures or music to the play list. And then you can press RED button display the play list, and pressing OK button to play them. The play list will save to the USB memory. You can play the favorite files in the play list next time. In the play list, you can Move/Delete/Delete all the files.
6.6 Remove USB device safely
You can use this item to remove USB device safely.
7. Games
You can play 2 games here, Othello and Sudoku.
8. REC Setting
8.1 PVR Storage Setting
You can press VOL+/VOL- button to see the selected partition information of USB HDD or memory stick. If you are connecting 2 USB devices, then press ▲/▼ to change USB device.
Press BLUE button to set the DVR type. There are three options of DVR Type, REC & TMS, REC and TMS.
Press YELLOW button to format selected partition.
8.2 PVR Setting
The PVR settings contain relevant options for the inclusion or time-shift function. These are Timeshift, Jump, Timeshift to Record, display REC icon and Play Start Pos.
9. Basic Operation
9.1 Audio
You can select the language you prefer in Audio if the current program is available in multiple audio languages.
9.2 Zoom In
You can zoom in the current video picture.
9.3 EPG
You can view the EPG information of all channels in time and date order.
Here you can press the ▲/▼ button to change channel. Press the VOL+/VOL-button to change EPG event of the highlighted channel. Press the OK button to display the detail information of the highlighted EPG event. Press the GREEN button to enter Timer Setup menu. After setup, press the OK button can add the highlighted EPG event to the Timer. Press the I◀◀/▶▶I button to browse EPG of day back or day forward.
9.4 Subtitle
You can select the language for the subtitle if the program provides subtitle information.
9.5 Teletext
You can view the Teletext information of this program.
10. Channel List
This chapter will help you manipulate the channel list.
Tip: You can press the VOL+/VOL- button to choose different satellite when you are operating on a channel list, then all the channels of this sat will be display in list.
10.1 OK List
1) Press the OK button to enter the channel list while watching a program.
2) Press the VOL+/VOL- button to switch the FAV group.
3) Press the ▲/▼ button to move the highlighting, and press OK button to watch the highlighting channel.
10.2 Favorite List
1) If you have set several favorite lists, press the FAV button can enter the favorite list.
2) Press the ▲/▼ button to change different favorite list and press the OK button can select a favorite group.
3) Press ▲/▼ button to select the channel in the current favorite list.
Note: If you selected a favorite list, press the ▲/▼ button can only change the channels in this favorite list and press the OK button can only display the channels in this favorite list.
11. USB Control
11.1 Recording and Timeshift
11.1.1 Recording
You can record two channels at the same time. But you can only record a HD+ channel. You can also do many operations while recording.
1. Start Recording
1) You can press the ● button to start recording while watching program.
2) If you have set the timer, and set the Time Record on, it will start recording automatically according to the start time of the timer.
2. Stop Recording
1) You can press the ■ button to stop recording. If you don't press the ■ button, it will stop recording according to the record duration.
2) If you have set the timer, it will stop recording automatically according to the stop time of the timer.
3) If the free space on the USB HDD or USB disk is insufficient, recording will stop.
3. Watch the Other Program while Recording
At the same time, if you record two channels from different TP, then you can only watch the program from the same TP that recorded. If you record one or two channels from the same TP, then you can watch all the programs on this TP.
4. Other Operations while Recording
While the recording channel is current channel, press the INFO button can display the channel information. And press the DVR button can display the recording time And press the DVR button twice can display all the previous recording files. Press the • button can set the record duration. Press the || button to pause the program and press the ▶ button to play the program. Press the ◀◀/▶▶ button can fast rewind or fast forward in playback mode.
11.1.2 Timeshift
Timeshift allows you to pause a live broadcast and return to it later and continue

where you left off.
In order to use the Time Shift function, you must navigate to Menu -> REC Setting -> PVR Setting-> Timeshift with the option "ON". And the Timeshift will start automatically while play the program. While it is in Timeshift mode, press the DVR button can display the Timeshift information, press the || button can pause the program and press the ▶ button to play the program, press the ◀◀/▶▶ button can fast rewind or fast forward. Press YELLOW button to mark on current time when info bar display. And press the BLUE button to jump to mark.
11.2 Recording List
You can press the DVR INFO button to enter the recording list directly. Press the ▲/▼ to highlight the PVR file you want to play, press the OK button to play. And you can watch the PVR file while recording.
12. CAM Module
To watch Pay-TV you need a CAM module with the appropriate subscription card.
All the CAM modules which correspond with CI and CI+ standard are supported.
CI+ module authenticate
If you insert the CI+ module, it will appear the prompt box such as the right picture. Waiting few minutes, it will appear the other prompt box.

The information is “Your Module is operational”. Then the prompt box will disappear automatically.
And you can watch the Pay-TV.
Note: If you inset the module first time or switch to another module, the module will authenticate for a long time. Please wait patiently.
13. Additional Information
13.1 Trouble Shooting
Before contacting your local service centre, please read the tips below carefully. If the problem persists after completing the following procedure, please contact your local product distributor or service centre for further instructions.
1. No message displayed on the front display. (The product will not switch on.)
- Check the main power cable and make sure it is plugged into a suitable power outlet.
- Check that the mains supply is switched on.
- Connect the power cable to a different power outlet.
- Check that the power switch is on at the rear of the product. (where applicable)
2. No picture
- Make sure that the product is powered on and in operation mode. (Press the STANDBY button)
- Make sure that the AV/HDMI/SCART cable is firmly connected to the TV.
- Make sure that the antenna cable is properly connected to the product.
- Be sure to activate channel search.
- Check the brightness level of the TV.
- Check if the channel is currently on air. Contact the broadcaster to ensure that the channel is running.
3. Poor picture/sound quality
- Make sure there is no mobile phone or microwave oven near the product.
- Adjust the antenna direction to get a better picture.
- Set the antenna power in menu to on.
4. No or poor sound
- Check that your AV/HDMI cable is connected correctly.
- Check the volume levels of your TV set and the product.
- Check if the product or TV is on mute.
- Check audio type or soundtrack option (Where applicable).
5. Remote control does not operate.
- To control the product, the top end of the remote control should point directly towards the receiving part of the product.
- Remove and reinsert the batteries in the remote control.
- Replace the batteries in the remote control for a new set.
Limited Warranty
In case the products delivered are not free from defects in material or workmanship, MAS Elektronik AG has the right to either repair or replace the defective product at its choice. MAS Elektronik AG manufactures and repairs goods using components which are new or equivalent to new in accordance with industry standards and practice. The warranty for wearing parts (e.g. rechargeable batteries) is limited to 6 months.

In case the device is equipped with internal data storage (e.g. hard disc drive, Flash drive), the customer is responsible to backup his data before sending the device. MAS Elektronik AG is not liable for any data loss on returned devices. MAS Elektronik AG reserves the right to reset returned devices to factory defaults. Please note your personal settings for this reason.
MAS Elektronik AG is not liable for any accessories not belonging to original package content such as DVDs, hard disc drives, Flash storage devices, batteries, etc.
This limited warranty covers the warranty requirements set by authorities in your country.
This limited warranty only is valid in the country the product was purchased. This limited warranty does not cover finishes, accessories or batteries, nor does it cover damage resulting from accident, misuse, abuse, dirt, water, battery leakage, tampering, servicing performed or attempted by unauthorized service agencies. This limited warranty does not cover damages resulting from firmware upgrades. Only in case of firmware upgrades needed to add functions promised at time of purchase, such damages are covered by this limited warranty. For a correct and frictionless completion of warranty or repairs you need a RMA No. You may obtain a RMA on the internet at www.mas.de/FAQ or by telephone.
Please send the device in its original packing material, all standard accessories and a copy of the invoice, a description of defect and the RMA No. to following address. Please note the RMA number clear and in large numbers on the outer package.
MAS Elektronik AG
Weidegrund 3
21614 Buxtehude
Germany
Support
e-mail: support@ersservice.de
Hotline: +49 (0) 4161 800 24 24
FREE TO CHOOSE INNOVATIONS

XORO by MAS Elektronik AG
Weidegrund 3
21614 Buxtehude
Deutschland
Telefon: 04161 800 24 24
HRS 8755 CI+
DE: V1
ENG: V1 OEM
FS: 12564



- XORO®
- USB ANSCHLÜSSE
- WARTUNG
- FIRMWARE AKTUALISIEREN (USB)
- CONTENT
- SAFETY PRECAUTION....4
- REFERENCE ....4
- PRODUCT OVERVIEW....5
- INSTALLATION....8
- EDIT CHANNEL ......9
- SYSTEM SETUP....9
- TOOLS....11
- SAFETY PRECAUTION
- MAIN SUPPLY
- OVERLOAD
- LIQUID
- VENTILATION
- CLEANING
- CONNECTION
- LOCATION
- UNCOVER
- REFERENCE
- 1.1 GENERAL FEATURES
- 1.2 ACCESSORIES
- PRODUCT OVERVIEW
- 2.1 FRONT PANEL
- POWER BUTTON AND POWER LED
- MENU BUTTON
- OK BUTTON
- ◀
- ▲/▼
- SIGNAL LED
- DISPLAY
- 2.2 REAR PANEL
- LNB IN
- LOOP OUT
- ON/OFF
- USB2.0
- 5.HDMI
- 6.TV-SCART
- AUDIO/VIDEO
- S/PDIF (COAX)
- 2.3 REMOTE CONTROL UNIT (RCU)
- INSTALLATION
- 3.1 POWERING ON
- 3.2 ANTENNA SETTINGS
- 3.3 USALS SETUP
- EDIT CHANNEL
- 4.1 TV CHANNEL LIST
- 4.2 DELETE ALL
- SYSTEM SETUP
- 5.1 LANGUAGE
- 5.2 TV SYSTEM
- 5.3 DISPLAY SETTING
- 5.4 LOCAL TIME SETTING
- 5.5 TIMER SETTING
- TIMER MODE
- TIMER SERVICE
- WAKEUP CHANNEL
- EVENT NAME
- WAKEUP DATE
- ON TIME
- STOP TIME
- AFTER RECORDING
- 5.6 PARENTAL LOCK
- 5.7 OSD SETTING
- 5.8 FAVOURITE
- 5.9 OTHER
- 1.LNB POWER
- AUTO STANDBY
- LED BRIGHTNESS
- STANDBY TIME
- TOOLS
- 6.1 INFORMATION
- 6.2 FACTORY SETTING
- 6.3 COMMON INTERFACE
- 6.4 USB UPGRADE & SAVE
- UPGRADE & SAVE
- 6.5 MEDIA PLAYER
- MENU->TOOLS->USB
- IMAGE
- WHEN IN THE FILES BROWSER
- VIDEO
- RECORD
- WHEN IN PLAYBACK
- PLAY LIST
- 6.6 REMOVE USB DEVICE SAFELY
- GAMES
- REC SETTING
- 8.1 PVR STORAGE SETTING
- 8.2 PVR SETTING
- BASIC OPERATION
- 9.1 AUDIO
- 9.2 ZOOM IN
- 9.3 EPG
- 9.4 SUBTITLE
- 9.5 TELETEXT
- CHANNEL LIST
- 10.1 OK LIST
- 10.2 FAVORITE LIST
- USB CONTROL
- 11.1 RECORDING AND TIMESHIFT
- 11.1.1 RECORDING
- START RECORDING
- STOP RECORDING
- WATCH THE OTHER PROGRAM WHILE RECORDING
- OTHER OPERATIONS WHILE RECORDING
- 11.1.2 TIMESHIFT
- 11.2 RECORDING LIST
- CAM MODULE
- CI+ MODULE AUTHENTICATE
- ADDITIONAL INFORMATION
- 13.1 TROUBLE SHOOTING
- NO MESSAGE DISPLAYED ON THE FRONT DISPLAY. (THE PRODUCT WILL NOT SWITCH ON.)
- NO PICTURE
- POOR PICTURE/SOUND QUALITY
- NO OR POOR SOUND
- REMOTE CONTROL DOES NOT OPERATE
- LIMITED WARRANTY
- XORO BY MAS ELEKTRONIK AG
Brand : XORO
Model : HRS 8755 CI+
Category : Receiver