COMfortel 1100 - Phone Auerswald - Free user manual and instructions
Find the device manual for free COMfortel 1100 Auerswald in PDF.


User questions about COMfortel 1100 Auerswald
0 question about this device. Answer the ones you know or ask your own.
Ask a new question about this device
Download the instructions for your Phone in PDF format for free! Find your manual COMfortel 1100 - Auerswald and take your electronic device back in hand. On this page are published all the documents necessary for the use of your device. COMfortel 1100 by Auerswald.
USER MANUAL COMfortel 1100 Auerswald
Operation and Configuration Instructions
System Telephone
COMfortel®1100
natural_image
Line drawing of a classic office telephone with keypad and cord (no text or symbols)Table of Contents
Important Information....11
Safety Information 12
Proper Use 13
Technical Data....14
Copyright 16
Environmental Notice 17
Getting to Know Your Telephone....18
Functions of Keys and LEDs 19
Menu Options 21
Menu Option Examples 21
Using the Configuration Software COMfortel Set 26
Configuration Software COMfortel Set....27
Minimum Requirements for PC for Using Configuration Software COMfortel Set...... 27
Installing COMfortel Set....27
Starting COMfortel Set 28
Exiting COMfortel Set 28
Configuring the Language of the Configuration Software.... 29
Configuring Interface Used....29
Configuring V.24 options....30
Opening Configuration....31
Creating a New Configuration.... 32
Saving Configuration 32
Close the Configuration 34
Using Print Functions 34
Operating Instructions for COMfortel Set.... 35
Help....38
Opening the Help Topic-Relevantly.... 38
Navigating in the Help Window 38
Searching in the Help 41
Printing from within the Help....42
Icons in the Help Window 42
Telephoning 43
Incoming Calls 44
Options During an Incoming Call 44
Accepting Incoming Calls 45
Rejecting Incoming Calls 45
Hold incoming calls....46
Forwarding Incoming Calls 46
Call Waiting Calls 48
Options During a Call Waiting Call 48
Rejecting Call Waiting Calls....49
Accepting Call Waiting 49
Forwarding Call Waiting 50
Switching off Call Waiting Tone 51
Outgoing Calls 52
Options for Outgoing Calls....52
Picking up Receiver and Dialling Telephone Number 53
Dialling Telephone Number with Dial Preparation 53
Dialling Telephone Number on Direct Exchange Line Access.... 54
Options for Unsuccessful Calls....54
Initiating Callback on Busy 55
Initiating Callback on No Response.... 56
Initiating Priority Call for Do-not-disturb 57
Ending a Query Call 58
Calls 59
Options during a Call 59
Retrieving Information about a Call 60
Sending DTMF Signals....60
Muting a Call....61
Ending a Call 61
Query Calls 62
Initiating a Query Call 62
Options during a Query Call 63
Splitting 63
Ending One of the Two Calls 64
Connecting Both Communication Partners....64
Transfer 65
Options for Transferring a Call 65
Transfer with Announcement 66
Transfer without Announcement 66
Placing External Communication Partner in Waiting Loop 67
Calling a Third Subscriber and Transferring to an Active Communication Partner...... 68
Conference Calls 69
Initiating Conference Calls 69
Options during a Conference Call....69
Initiating Splitting during a Conference Call.... 70
Ending a Call with a Conference Call Partner 70
Connecting both Conference Call Partners 71
Ending Conference Call Completely 71
Hands-free Calling....72
Initiating Call in Hands-free Calling Mode 72
Ending up Call in Hands-free Calling Mode 72
Switching on Hands-free Calling During a Call.... 73
Switching off Hands-free Calling and Returning to Normal Calling 73
Loudspeaker Listening 74
Switching on Loudspeaker Listening during a Call.... 74
Switching off Loudspeaker Listening and Returning to Normal Calling.... 74
Ending a Call in Loudspeaker Listening Mode 75
Headset Calls....76
Initiating Headset Calls....76
Ending a Call in Headset Operation 76
Telephone Book and Telephone Number Lists 77
Telephone Book....78
Opening the Telephone Book 78
Dialling from Telephone Book....79
Excepting Telephone Numbers into Other Menus 79
Configuring Displayed Telephone Number Range for Telephone Book.... 80
Redial List....81
Opening the Redial List 81
Dialling from Redial List....82
Deleting Entries in Redial List....82
Configuring Calls to be Recorded for Redial List.... 83
Calls List....84
Opening the Calls List 84
Dialling from Calls List 85
Deleting Entries in Calls List....85
Configuring and Operating Function Key for Calls List.... 86
Configuring Calls to be Recorded for Calls List.... 87
Caller List 88
Opening the Caller List 88
Dialling from Caller List....89
Deleting Entries in Caller List 90
Configuring and Operating Function Key for Caller Lists.... 90
Configuring Calls to be Recorded for Caller List.... 92
Configuring the LED Message Key....93
Configuring and Managing the Telephone....94
Identification 95
Configuring MSN 95
Protection from Unauthorised Access....97
Configuring a User PIN....97
Configuring a Function Lock....98
Configuring Settings Lock....99
Display....100
Configuring the Language on Telephone.... 100
Adjusting Contrast 101
Configuring Time Format.... 101
Configuring Date Format 102
Call Signalling....103
Switching Ring Signal On/Off 103
Configuring and Operating Function Key for Ring Signal 104
Ringer Melodies 106
Determining Different Types of Calls 106
Configuring Ringer Melodies 107
Changing Volume Automatically.... 109
Call Charges.... 110
Configuring Currency....110
Configuring Cost per Call Unit.... 111
Headset....112
Configuring and Operating Function Key for Headset Operation 112
Switching Headset Ringing On/Off 113
Function Keys.... 115
Configuring Accessibility of Second Key Level.... 115
Configuring and Operating Function Key for Shift 116
Exchanging or Moving Function Keys.... 117
Configuring and Operating Functions 118
Automatic Call Acceptance 119
Configuring and Operating Function Key for Automatic Call Acceptance.... 119
Attention Tone for Switching Automatic Call Acceptance On/Off.... 120
Configuring Call Acceptance Time for Automatic Call Acceptance 121
Call Deblocker (Incoming) – VIP Numbers 122
Configuring and Operating Function Key for Call Deblocker (Incoming) 122
Call Forwarding 124
Call Forwarding Variations.... 124
Kinds of Call Forwarding.... 125
Configuring and Operating Function Key for Call Forwarding for Subscribers 126
Configuring and Operating Function Key for Call Forwarding for External Numbers..... 132
Call Restrictor (Incoming) – Robinson Numbers.... 139
Configuring and Operating Function Key for Call Restrictor (Incoming).... 139
Call Waiting 141
Configuring and Operating Function Key for Call Waiting.... 141
Switching Call Waiting Signalling On/Off via LED/Tone 142
Configuration Switchover 144
Configuring and Operating Function Key for Configuration Switchover.... 144
Do-not-disturb.... 146
Configuring and Operating Function Key for Do-not-disturb.... 146
Configuring Type of Do-not-disturb.... 147
Door Functions....149
Configuring and Operating Function Key for Door Functions 149
Exchange Line Transfer....151
Exchange Line Transfer Sequence 151
Configuring and Operating Function Key for Exchange Line Transfer.... 152
Group Functions....154
Detailed Information about Group Functions.... 154
Configuring and Operating Function Key for Group Function.... 155
Configuring and Operating Function Key for Logging Out of All Groups 157
Configuring and Operating the Display of the Group Status.... 159
Hotel Function 161
Function Areas of the Hotel Function 161
Configuring the Hotel Function....162
Configuring Wake-up Time on Hotel Room Telephone 164
Querying Call Charges on Hotel Room Telephone.... 164
Configuring and Operating Function Key for Hotel Room on Hotel Room Telephone ..... 165
InterCom Announcement/Handsfree.... 167
InterCom Announcement Procedure.... 167
Executing InterCom Announcement.... 168
Configuring and Operating Function Key for InterCom Announcement.... 168
InterCom Handsfree Procedure.... 171
Executing InterCom Handsfree.... 171
Configuring and Operating Function Key for InterCom Handsfree 172
Configuring and Operating Function Key for InterCom Permission 173
Loudspeaker Audio Out....175
Executing Loudspeaker Audio Out 175
Configuring and Operating Function Key for Loudspeaker Audio Out.... 176
Macro 178
Macro Execution Procedure 178
Configuring and Operating Function Key for Macro.... 179
Configuring Display Presentation during Macro Execution.... 181
Memo 182
Creating a Memo 182
Retrieving a Memo....182
Phone Lock 183
Enabling the Phone Lock....183
Disabling the Phone Lock....183
Configuring and Operating Function Key for Phone Lock.... 184
Pickup....186
Executing Pickup 186
Executing Pickup during Call 186
Configuring and Operating Function Key for Pickup.... 187
Power Save Mode 189
Switching Automatic Activation of Power Save Mode On/Off 189
Switching Power Save Mode Activation On/Off Depending on Configuration 190
Configuring and Operating Function Key for Manually Activating Power Save Mode..... 191
Switching the Power Save Mode Link to Phone Lock On/Off 192
Project Assignment 193
Configuring and Operating Function Key for Project Assignment.... 193
Relays 195
Configuring and Operating Function Key for Switching Relays On/Off.... 195
Room Monitoring....197
Initiating Room Monitoring 197
Ending Room Monitoring 197
Configuring and Operating Function Key for Room Monitoring 198
Speed Dialling 200
Application Options for Speed Dialling Keys.... 200
Configuring and Operating Function Key for Speed Dialling 201
Switching Automatic Speed Dialling Pick-up On/Off 204
Switching the Display of the Registration Status On/Off.... 204
Targeted Exchange Line Access....206
Targeted Exchange Line Access Variants 206
Initiating Targeted Exchange Line Access 207
Configuring and Operating Function Key for Targeted Exchange Line Access (A) ...... 207
Configuring and Operating Function Key for Targeted Exchange Line Access (B) ...... 209
Configuring and Operating Function Key for Targeted Exchange Line Access (C) ...... 211
Targeted VoIP Access Point 213
Initiating a Targeted VoIP Access Point 213
Configuring and Operating Function Key for Targeted VoIP Access Point 214
Text before Answering 216
Variants for Text before Answering 216
Switching Text before Answering for Group On/Off 217
Configuring and Operating Function Key for Text before Answering for Group 217
Switching Text before Answering for External Telephone Number On/Off.... 219
Configuring and Operating Function Key for Text before Answering for External Telephone Number 219
Voicemail Center 461/461.2 221
Configuring and Operating Function Key for Remotely Accessing the Voicemail Center....221
Switching Rapid Remote Access of Voicemail Centers 461.2 On/Off 223
Configuring and Managing Voice Mailboxes 225
Voice Mailbox 226
Readiness 227
Configuring and Operating the Function Key for Readiness.... 227
Configuration-Dependent Control....229
Configuring and Operating the Function Key for Configuration-Dependent Control..... 229
Remote Access 231
Execute Remote Access....231
Configuring and Operating the Function Key for Remote Access 232
Message Forwarding....234
Configuring and Operating the Function Key for Message Forwarding 234
Substitute Function....236
Configuring and Operating the Function Key for the Substitute Function.... 236
Service and Maintenance 238
Firmware Update....239
Firmware Update Variants 239
Initiating Manual Firmware Update.... 239
Configuring Update Server Number 241
Initiating Instant Firmware Update via Update Server.... 241
Distributing Firmware....242
Saving Firmware as File on PC 243
Data Backup on PC 244
Backing up Current Data in a File on the PC.... 244
Saving Data Backups on PC to Telephone 245
Selecting a PBX 247
Initiating PBX Synchronisation 248
Deleting Data....249
Restoring Factory Setting 249
Deleting Charges....250
Glossary 251
Terminology and Functions 252
A 252
C 252
D 254
E 255
F 255
G....256
H 256
1....257
L....257
M....258
P 259
Q....260
R....261
S 261
T 262
V 263
W 263
Abbreviations....264
Index 265
Important Information
This section includes necessary information for operating your equipment safely. Before you put the telephone into operation, it is absolutely necessary for you to read the safety information described here and to make yourself familiar with the intended use of the device as well as the technical information.
Topics
– Safety Information (page 12)
– Proper Use (page 13)
- Technical Data (page 14)
– Copyright (page 16)
– Environmental Notice (page 17)
Safety Information
Please observe the basic safety information given in the following.

Warning: Touching defective connection lines can result in a life-threatening electric shock. In addition, any damage to the casing or to the device itself can be life-threatening.
- Only connect the device connection cable with sockets that are designed for that purpose.
- Replace damaged connection lines immediately.
- Always have a professional carry out repairs immediately. Please contact your dealer or the manufacturer directly.
- Use only original accessories.
- Do not touch the contact points with pointed, metallic or moist objects.
- Do not carry the device by the connection cables.
- Use the cable channels at the bottom of the telephone to carry the load.
Warning: Any liquid that penetrates the casing can result in a life-threatening electric shock or can damage or destroy or the device.
- Carefully select the location for installing the device and take care when cleaning the casing to ensure that no liquid can penetrate the casing.
- Never make calls in humid rooms (for example, in the bathroom).
Proper Use
The COMfortel 1100 is a system telephone.
A system telephone is intended exclusively for connecting an internal S0 or UP0 port to the following PBX units from Auerswald: COMpact 2204 USB, COMpact 3000, COMpact 2206 USB, COMpact 4406 DSL, COMpact 4410 USB, COMpact 5010 VoIP, COMpact 5020 VoIP, COMmander Basic (19"), COMmander Basic.2 (19") and COMmander Business (19").
Note: Connecting to a PBX from another manufacturer or to the external S0 connection of a network provider is not intended.
The system telephone is not cordless and is intended for use in closed, dry rooms.
Important: Auerswald products are not designed, manufactured, or intended for use or resale in environments requiring fail-safe performance, such as in the operation of life-support systems and/or nuclear facilities. Use or sale of our products for these purposes is only allowed with prior written permission by Auerswald for each individual incident.
The system telephone is different from “normal telephones” connected to Auerswald PBXs in that it is especially easy to use, among other things. Most of the functions available on the PBXs such as internal and external calls, call protection and call forwarding can be operated over the display or by simply pressing previously programmed buttons. Furthermore, the system telephone offers various telephone number lists (for example, a caller list and a calls list).
The system telephone can be configured using the PC software included in the package. The required PC is connected to a PC interface on the PBX.
The system telephone allows you to make calls by using both the connected receiver and the integrated loud speakers (hands-free calling). Another option is to connect a wired headset (not included in the package). It is connected in place of a receiver in the receiver jack.
Note: Accessories and service parts can be bought at specialised stores or in the Internet shop distriCOM at http://www.districom.de. (Delivery is provided only in Germany and to Austria.)
Technical Data
Technical Data for the Telephone
Power supply Power via the internal S
0 or U_P0 port from the PBX
0 port or UP0 port from one of the following
PBXs: COMmander Business (19"), COMmander
Basic.2 (19"), COMmander Basic (19"), COMpact 5020
VoIP, COMpact 5010 VoIP, COMpact 4410 USB,
COMpact 4406 DSL, COMpact 2206 USB, COMpact
3000 or COMpact 2204 USB
PC/data interface None
Display 18 LEDs, partially polychromatic
1-line LCD
User elements Keypad, 17 permanent function keys, 15 programmable
function keys
Receiver Electret microphone, dynamic receiver, hearing aid-
compatible
Loud speakers 8 Ohm, ∅ 66 mm
Hook switch Magnetic switch contact
Cabinet Plastic material
Colours Black
Dimensions 261 mm x 216 mm x 89 mm
(W x D x H)
Weight Approx. 980 g
Ambient temperature 0 to 40 °C
Humidity 10 to 90 %
Safety CE
Data for Connecting a Headset
Microphone power Max. 0,5 mA
consumption
Microphone sensitivity 45 dB
Loud speaker 150 Ohm
impedance
Loud speaker sensitivity 19,5 W3 dBPa/V
at 1 kHz
Sound pressure limit 24 dBPa
Important Information
Technical Data
Receiver jack assignment
1 Microphone +
2 Loud speaker +
3 Loud speaker -
4 Microphone -
Copyright
Disseminating and reproducing these instructions, as well as using and disclosing the contents, even in part, is permitted only with our express permission. Offenders will be subject to claims for damages. All rights reserved. f Auerswald GmbH & Co. KG, 38162 Cremlingen, 2010
Environmental Notice
If your Auerswald device is taken out of use, please make sure that it is properly disposed of (must not be disposed of with normal household waste).

For the sake of environmental protection, please make sure that packaging materials are also properly disposed of.

Please consult your municipal administration authorities for options of proper and environmentally safe disposal of the device. If you want us to take over the disposal, please send the device to us. Shipment which is not prepaid cannot be accepted.

Batteries and accumulators have to be discharged completely before disposal (empty/voltage-free). Batteries have to be handed in at the collection point for old batteries.
Getting to Know Your Telephone
This section provides a general overview how to operate the telephone. Here, you will find a description of the icons and text shown on the unit display as well as the keys on the device In addition, you get an overview of the contents of the individual menus.
Topics
– Functions of Keys and LEDs (page 19)
- Menu Options (page 21)
Functions of Keys and LEDs
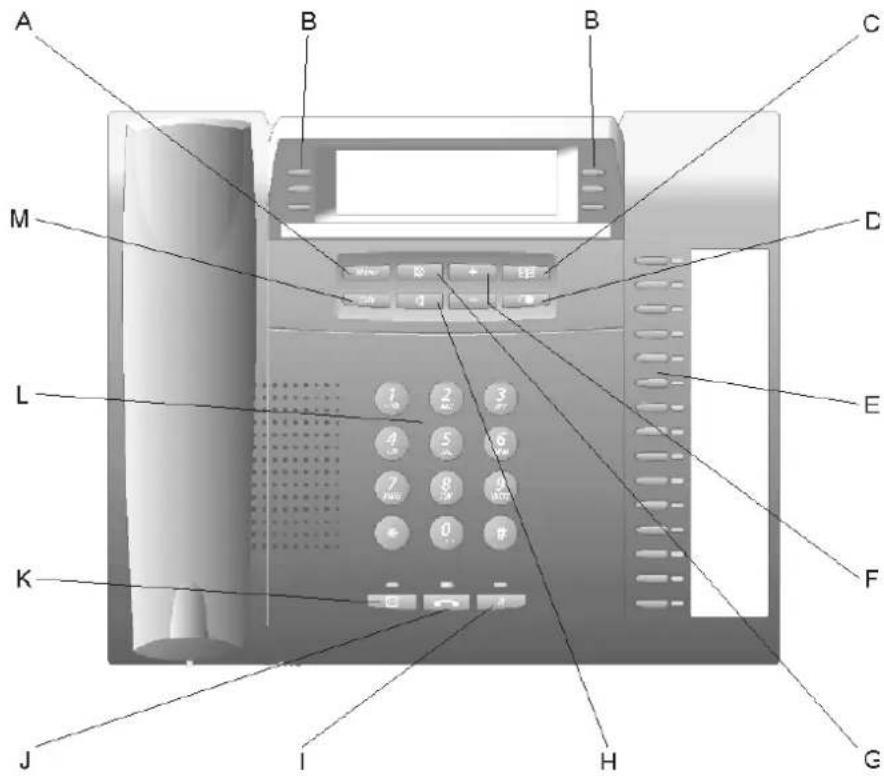
The keys and the functions that are executed by them are listed at the end:
text_image
A B B C M D L E K F J I H GA Menu key
Opens the main menu.
B Soft keys
Initiates the entry of a telephone number note (memo) during a call.
☒ Deletes the last character during entry.
Holding the key (2 seconds) deletes the entire entry.
i Opens additional information.
^ Scrolls to the previous function or information.
√ Scrolls to the next function or information.
√ Opens the menu displayed, initiates the function displayed or accepts the entry.
C Telephone book key
Opens the telephone book
D Redial key
Opens the redial list.
When the receiver is off the hook, dials the previously dialled telephone number.
E Function keys with LED
They are freely programmable.
The LED indicates the status depending on the key definition.
F Plus/minus key
Increases/decreases the volume of the ringer, the receiver or loudspeaker depending on the operating mode.
G Microphone key
Switches the microphone off (mute) and on again.
H Loudspeaker key
Switches loudspeaker listening on during a call.
Holding the key (for 2 seconds) switches hands-free calling on.
I Query key with LED
Initiates a query call.
J Hook key with LED
Initiates/Ends headset calls or calls in hands-free calling mode.
The LED signals incoming calls
K Message key with LED
Opens the caller list
The LED signals existing (new) entries.
L Keypad
Enables number dialling as well as entering digits and letters.
M E x i t k e y
Closes the opened menu. Incorrectly exited settings are not saved.
Menu Options
The telephone has a single line display with 16 characters.
To both sides, there is room for three icons that show the functions of the softkeys next to them.
The appearance of the display depends on the state of the telephone.
Only those functions are offered that are usable in the respective state. If not all of the information can be displayed due to lack of space, only the most important functions are displayed.
Menu Option Examples
The menu options are dependent on the state of the telephone. In conclusion, here are several examples of menu options.
Menu Options in the Idle State
The following information is shown on the display while the telephone is in the idle state: Date and time
When the time is invalid: The internal telephone number or name of the subscriber in the PBX
In addition, various pieces of status information are displayed: For example, enabled functions such as do-not-disturb, call forwarding and headset operation.
Press the softkey in the idle state to access the information listed.
- version of telephone
- version of PBX
- PBX type
- configuration
- interface
- call charges
- call allowance account
- serial number
In addition, various pieces of status information are displayed here: For example, enabled functions such as do-not-disturb, call forwarding and headset operation.
Press the √ and ∧ softkeys to scroll through this information. Press the exit key to go back to the previous view.
Menu Options in Main Menu (after Pressing Menu Key)
Press the menu key to access the various menus.
- speed Dialling Key
- local MSN
– synchronisation with PBX - firmware update
- distributing Firmware
- language
- select PBX
- PIN (only for operation on a COMmander Basic or COMpact 2206/4410 USB)
- contrast
Press the √ and ∧ softkeys to scroll through the selection list.
Press the softkey to open the menu currently displayed.
Press the exit key to go back to the idle state. In addition, the telephone automatically switches back into the idle state if no keys are pressed within a period of 30 seconds.
Important: The settings and functions available in the menu can be restricted from unauthorised use by the administrator. The release and display of these disabled functions in to the selection list requires entering the corresponding PIN after selecting additional. The release remains intact during the settings that now follow. The release is revoked if no keys are pressed within a time period of 60 seconds. You can actively disable the release by selecting log out.
Menu Options in Telephone Number and Text Entry Menus
Using the pushbutton dial, you can enter digits, characters and letters. In the text entry menu, press the digit keys want a more times until the desired character appears. The assignment is listed in the table at the end.
Press the ☒ softkey to delete the last character before the cursor.
Press the softkey to accept the entry.
Key Assignment
1 1 - / @ +
2 A B C 2 Ä Æ Ä Ç
3 D E F 3 É
Key Assignment
| 4 | G | H | I | 4 | ||
| 5 | J | K | L | 5 | ||
| 6 | M | N | O | 6 | Ö | ∅ |
| 7 | P | Q | R | S | 7 | β |
| 8 | T | U | V | 8 | Ü | |
| 9 | W | X | Y | Z | 9 | |
| 0 | S | a | c | e | 0 . , : ; ’ “ ? ¿ ! i _ | |
| * | * ( ) [ ] <= > « » ^ ‘ ~ { } | |||||
| # | # % & § £ $ Euro symbol | |||||
Menu Options during Incoming Calls
The following information is displayed during an incoming call: Caller, call waiting or call type (for special calls, for example, alarm calls, wake-up calls, callback)
Note:
If the telephone number is entered in the central telephone book (short-code numbers) on the PBX, as soon as the telephone detects the telephone number, it will show the associated name in the display instead of the telephone number. The prerequisite for displaying the telephone number is that the exchange line subscriber has not suppressed the display of his telephone number or that he has approved transmission of the telephone number.
If the telephone number is not available, "Unknown" is displayed.
If the name of the caller is not in the telephone book, a search for the name can be performed using the online name search function on a server in the Internet (see the PBX manual). If the telephone number is transmitted for an incoming call, the PBX automatically looks for the corresponding entry.
When an entry is found, it is shown on the display of the system telephone.
Press the √ and ∧ softkeys to scroll through the various options during an incoming call. Press the √ softkey to initiate the function currently displayed.
Menu Options during Outgoing Calls
The following information is displayed during an outgoing call: The call target or perhaps a status note (for example, busy).
Note: If the telephone number dialled has been assigned a name in the central telephone book (short-code numbers) of the system telephone, this will be displayed as soon as the telephone detects the telephone number. The telephone number is simply overwritten by the name.
Press the √ and ∧ softkeys to scroll through the various options during an outgoing call. Press the √ softkey to initiate the function currently displayed.
Menu Options during Calls
The following information is displayed during a call: Telephone number or name of the communication partner
Press the √ and ∧ softkeys to scroll through the various options. Press the √ softkey to initiate the function currently displayed.
Press the i softkey to access additional information about the call.
– Duration in minutes:seconds (as of 59:59, in hours:minutes)
– Costs (for outgoing external calls)
- Project number and name
– Telephone number of the communication partner
– Provider number and name
Press the √ and ∧ softkeys to scroll through this information. Press the √ softkey to go back to the previous view.
Menu Options during Query Calls
The following information is displayed during a query call: Active communication partner
Press the √ and ∧ Softkeys to scroll through the various options. Press the √ softkey to initiate the function currently displayed.
Press the i softkey to access additional information about the call.
– Duration in minutes: seconds (as of 59:59, in hours:minutes)
– Costs (for outgoing external calls)
- Project number and name
– Telephone number of the communication partner
Getting to Know Your Telephone
Menu Options
Menu Option Examples
– Provider number and name
Press the √ and ∧ softkeys to scroll through this information. Press the √ softkey to go back to the previous view.
Using the Configuration Software COMfortel Set
This section provides a general overview of the configuration software COMfortel Set. It describes how to install and generally operate the configuration software.
Moreover, you can find tips on how to use the help in a targeted and efficient manner.
Topics
- Configuration Software COMfortel Set (page 27)
- Help (page 38)
Configuration Software COMfortel Set
The configuration software COMfortel Set lets you easily set up the system telephone on your computer. The configuration software is contained on the Auerswald Mega Disk contained in the package.
Minimum Requirements for PC for Using Configuration Software COMfortel Set
The computer must meet the following requirements:
• PC with Intel Pentium 800 MHz or compatible processor
- Windows 2000 (as of Service Pack 4), Windows XP (as of Service Pack 3), Windows Vista 32/64-bit (as of Service Pack 2), Windows 7 32/64-bit, Mac OS X (as of 10.5), Linux (as of Kernel 2.6)
- Memory (RAM: 256 MB, recommended 512 MB; for Windows Vista/Windows 7: 512 MB, recommended 1 GB)
• 37 MB free hard disk space for COMfortel Set
- 85 MB free hard disk space for Java Runtime
- USB interface (if will be used): USB specification 1.1 or 2.0
- CD-ROM drive
- Mouse or compatible pointing device
- SVGA graphics card with a resolution of 800 x 600, recommended 1024 x 768, and 65536 colours (16 bit)
Installing COMfortel Set
Requirements:
– The Auerswald Mega Disk contained in the package
- Insert the CD (Auerswald Mega Disk) into the CD-ROM drive.
Note: The following steps describe how to configure the settings on the operating systems, Windows XP, Vista and Windows 7. If using another operating system, refer to the documentation of your operating system.
- If the CD does not start automatically, click Start and then Execute.
- Click Browse and open the corresponding CD-ROM drive. Double-click the application autostart.exe in the main directory. Click OK.
- Follow the instructions on the screen by repeatedly clicking Next and selecting the telephone in question.
- Continue following the instructions on the screen and select the configuration software COMfortel Set.
- Follow the instructions displayed on the screen.
Starting COMfortel Set
In order to start COMfortel Set, double-click the program shortcut on your computer desktop. Or, proceed as described in the following.
- Click Start > All programs > Auerswald > COMfortel > COMfortel Set.
You are asked whether you would like to open a configuration file or a telephone configuration.
- If you would like to instead create a new configuration, click Cancel.
Exiting COMfortel Set
- Open the menu File > Quit.
If you have opened a configuration, you are asked whether you would like to save the configuration beforehand.
- If you have already saved the configuration, click No.
Configuring the Language of the Configuration Software
- Open the menu Options > Language....
- Select the desired language from the list field.
- Click OK.
- Quit COMfortel Set and restart it.
Configuring Interface Used
Requirements:
– Existing PC connection to a PC interface on the PBX or a connected system telephone
- Open the menu Options > Interface....
- In the Interface list field, select one of the following options:
COM1, COM2, COM3, COM4: Enable the existing connection via the serial V.24 interface on the PBX for carrying out the transmission. (No other action is required.)
ISDN card (CAPI 2.0): Enable the existing connection via the CAPI interface on the PBX or a connected system telephone for carrying out the transmission. (No other action is required.)
IP network: Enable the existing connection via the Ethernet interface on the PBX for carrying out the transmission.
USB: Enable the existing connection via the USB interface on the PBX or a connected system telephone for carrying out the transmission. (No other action is required.)
Note:
For an indirect PC connection to the system telephone to be configured (for example, a PC connection to the USB port of a COMpact 2206 USB), the selection ISDN card (CAPI 2.0) (transmission via the B channel) is significantly faster than via the selection USB (transmission via the D channel).
Select IP network for a PC connection via the USB interface on the PBX COMmander Business or COMmander Basic.2.
- In the IP address entry field, enter the IP address of the PBX. The following entries are possible:
IP address with areas from 0 to 255 (example: 192.168.0.240)
- in the IP port (default: 7002) entry field, enter the configuration port for system telephones on the PBX. The following entries are possible:
1 to 65535
- Click OK.
Configuring V.24 options
If there are transmission problems with the V.24 connection, the transmission rate can be restricted to 9600 Baud. This increases transmission reliability and improves the quality of the connection, for example, on long lines or in a disrupted environment.
- Open the menu Options > V.24 options....
- Select one of the following options:
Safe transmission: Limits the transmission rate to 9600 Baud.
Fast transmission: Allows the maximum possible transmission rate.
- Click OK.
Opening Configuration
You can open the configuration of the telephone or a configuration file saved on the hard disk.
Opening the Telephone Configuration
Requirements:
- An existing PC connection configured correctly in COMfortel Set to a PC interface on the PBX or another connected system telephone
-
MSN configured for the system telephone
– Knowledge of the required PIN -
Open the menu File > Open.
- Click Telephone.
The Connection routes dialogue with the devices connected via the interface configured above opens.
- Select the telephone whose configuration you would like to open and click OK.
The PIN entry dialogue opens.
Note: For operation on the PBXs COMpact 3000, COMpact 5010 VoIP, COMpact 5020 VoIP, COMmander Basic.2 and COMmander Business, access to the telephone is only possible via the 6-digit PIN assigned in the PBX. In this case, you need to first select which PIN you would like to enter based on the authority level: the Admin PIN, one of the subadmin PINs or the user PIN that belongs to the telephone.
- Enter the associated PIN and click OK.
The configuration is loaded from the telephone. This may take a while.
Opening a Configuration File
Requirements:
- Configuration file (*.cf2) saved on the hard disk
In order to open one of the files previously saved with this program, open the menu File > Related files and select the file.
Or, proceed as described in the following.
- Open the menu File > Open.
- Click File.
A dialogue for selecting the file with the configuration data opens.
- Switch to the directory where the file is located and select the file.
- Click Open (this text is dependent on the operating system used).
Creating a New Configuration
If you would like, for example, to create a configuration for a telephone before the required connection to the PBX or to the PC has been established, you can open an empty configuration as described in the following.
- Open the menu File > New.
- Select the type of telephone COMfortel 1100 in the upper list field.
- Select the type of PBX on which you would like to operate the telephone.
- Click OK.
Saving Configuration
The configuration can be saved on the telephone or as a file on the PC.
Saving Configuration on Telephone
Requirements:
- An existing PC connection configured correctly in COMfortel Set to a PC interface on the PBX or another connected system telephone
- MSN configured for the system telephone
-
An open configuration and the required PIN, if necessary
-
Open the menu File > Save.
- Click Telephone.
The Connection routes dialogue with the devices connected via the interface configured above opens.
- Select the telephone on which you would like to save the configuration and click OK.
The PIN entry dialogue opens.
Note: For operation on the PBXs COMpact 3000, COMpact 5010 VoIP, COMpact 5020 VoIP, COMmander Basic.2 and COMmander Business, access to the telephone is only possible via the 6-digit PIN assigned in the PBX. In this case, you need to first select which PIN you would like to enter based on the authority level: the Admin PIN, one of the subadmin PINs or the user PIN that belongs to the telephone.
- Enter the associated PIN and click OK.
The configuration is saved on the telephone. This may take a while.
Saving Configuration File on PC
Requirements:
- Open configuration
- Open the menu File > Save.
- Click File.
A file location dialogue opens.
- Select the directory in which you would like to save the file.
- Enter a filename with the ending .cf2 and click Save (this text is dependent on the operating system used).
Close the Configuration
- Open the menu File > Close.
You will be asked whether you would like to save the configuration beforehand.
- If you have already saved the configuration, click No.
Using Print Functions
Requirements: - Open configuration
- Open the menu File > Printing.
- Select or clear the Assign function keys check box.
Lettering labels with the current function key assignment are printed.
☐ The lettering labels are not printed.
- Select or clear the Project list check box.
☑ The project list in the configuration is printed.
☐ The project list is not printed.
- Click OK.
If you have selected the Assign function keys check box, a print preview dialogue for viewing the lettering labels opens.
Note: If you have cleared the Assign function keys check box, proceed to the penultimate step.
- If you would like to configure the colour settings for the lettering labels, click Colour selection.
a) Click Change next to one of the following options:
Colour of the text for level 1: Enables changes to the colour of the text at level 1.
Colour of the text for level 2: Enables changes to the colour of the text at level 2.
Background colour: Enables changes to the background colour.
b) Change the colour as you like, and click OK.
c) Select or clear the Use these colours for all labels check box.
☑ The colour settings are used for the print out all of the lettering labels.
☐ The colour settings are only used for the print out of the lettering label shown.
d) Click OK.
- In the list field under the Colour selection button, select one of the following options:
centre justified text: Enables centre justified text.
left-aligned: Enables left-aligned text.
Note: In the factory settings, the text is centre justified.
- Click OK.
The print dialogue for the operating system opens.
- Click OK (this text is dependent on the operating system used).
Operating Instructions for COMfortel Set
The operating instructions for COMfortel Set contain the following topics:
- Navigation
- Entry and Selection Fields
- Creating and Deleting Table Entries
Navigation in COMfortel Set
After opening a configuration, the current areas are displayed in a directory tree. To show the organisation of the topics clearly, most topics have been consolidated under a main topic.
Double-click the desired main topic or the plus sign next to the main topic to open the underlying list of topics. Then click the topic you want.
The topic you have chosen opens on the page to the right.
You can select sub-topics directly on some pages by clicking tabs.
Entry and Selection Fields
Note: The menu bar is not required for processing the page. All entries and changes are made using the mouse or keyboard directly in the pages.

An empty field normally indicates that a name or number is to be entered. Click within the field in question and use the keyboard to enter a number or desired text.
In order to change an existing entry, double-click the entry to be overwritten. The field then becomes blue and can either be overwritten directly or the existing text can be deleted using the delete/backspace key.

For functions that offer more than just being switched on and off but only have a few options to choose from, the field already contains a default setting. To change this, click the opened list field to make a selection.
- If this is a single field with an arrow pointing downward, open the list field by clicking the field.
- If there are multiple fields in a table column (without an arrow pointing downward), open the list field by double-clicking the field.

For some functions, a small circular button (radio button) is located next to the setting options listed. The selected setting is indicated by a black dot inside the circle. The setting is changed by clicking an empty circle. Selecting this setting option simultaneously deactivates any other previous selection.


A square check box indicates a switching function. An empty check box means "off" and "no"; a check mark on the other hand, means "on" and "yes". The switchover is done by simply clicking the box.

Creating and Deleting List Entries
To create new list entries, fill the empty entry fields in the lower table row. Additional rows are then added to the list.
To delete an entry, an entire line can be deleted. To do this, double-click in an field in the line to be deleted. The field is then selected as indicated by the colour change. Right-clicking opens a menu. Click Delete. You can delete multiple fields by dragging your mouse with the left mouse button pressed to select multiple fields.
Help
Via the help you can access the entire operation and configuration instruction for the system telephone.
Opening the Help Topic-Relevantly
Below the directory tree, there is a window containing links to several help topics. The offered help topics refer to the currently open configuration page.
- Click the link to go to the desired help topic.
The corresponding help page opens. You can navigate back and forward within the selected topic by clicking the ▶ and ▶ icons.
- Press the key F1.
The help opens and displays the description of the configuration software.
Note: You can always access the entire operating and configuration instructions for the system telephone via the navigation.
Navigating in the Help Window
There are several ways to navigate through the help.
Navigating via the Table of Contents
Click the Table of Contents (this text is dependent on the operating system used) tab to go to the table of contents (the tab is highlighted in yellow)
The table of contents will be displayed on the left-hand side of the help window as a directory tree.
By clicking one of the topics in the table of contents, you can open the belonging help page on the right-hand side of the help window.
The icon indicates that further topics are available under a specific topic. Click this icon to expand the subordinate topics. You can close the subordinate topics again by clicking the icon.
Note:
The table of contents area and the selected page are separated by a vertical line or a scroll bar. To enlarge the area (this automatically makes the other areas smaller), click and hold the cursor above the separator line and slide the line to the location you want. This setting only applies to the help window currently open.
The currently opened topic is highlighted in the table of contents (for example, with a grey background). Scrolling through the table of contents may cause this highlighting to disappear. By clicking the icon in the help window, you can display the currently open help page in the table of contents again.
Navigating via Expanding Texts
Some help texts contain expanding texts that flip down. Expanding text is indicated by a blue font and is underlined. In addition, the ▶ icon is shown behind the expanding text.
You can expand the text by clicking the icon or the line. You can close the text again by clicking the icon or the line.
Navigating via the Index
Click the Index (this text is dependent on the operating system used) tab to go to the index (the tab is highlighted in yellow)
The index will be displayed on the left-hand side of the help window.
By clicking a letter of the alphabet, you can go directly to the keywords under this letter.
By clicking the desired keyword, you can open the belonging help page on the right-hand side of the help window.
Note:
The index area and the selected page are separated by a vertical line or a scroll bar. To enlarge the area (this automatically makes the other areas smaller), click and hold the cursor above the separator line and slide the line to the location you want. This setting only applies to the help window currently open.
By clicking the icon in the help window, you can display the currently open help page in the table of contents.
Navigating by Browsing
By clicking the icon, you can go to the next page of the instruction. By clicking the icon, you can go to the previous page of the instruction.
Navigating via the Back Button
Clicking the icon takes you back to the previously opened help page.
Note: You may have to scroll back to the beginning of the currently displayed help page in order to access the icon.
Navigating via Links
Some help texts contain links to subordinate topics or to more detailed information. A link is indicated by a blue font and is underlined.
By clicking a link, you can go to the belonging help page.
Navigating via Breadcrumbs
The path you took to get to the currently open page is displayed above the help text. The path consists of the titles of the topics superordinate to the current topic. The superordinate topics are shown in a blue font and the current topic is shown in a grey font.
By clicking a superordinate topic, you can go to the belonging help page.
Searching in the Help
You can search the entire help for one or several terms.
- Click the Search tab (this text is dependent on the operating system used).
The tab is activated (it is highlighted in yellow). The left area of the help window contains a input field for the keywords and a button for starting the search.
- Enter the desired term in the entry fields.
Note:
The character * can be used as a placeholder (wildcard) in a search. A search using teleph* results, e.g., in hits for telephone, telephoning and telephone book.
If you enter several terms, the Help texts which contain all these keywords will be displayed irrespective of the sequence and context.
- Click Search (this text is dependent on the operating system used).
Help is searched; this may take some time. Afterwards, the topics that contain the search term are listed. The sequence within this list is determined by the number of hits and the importance of the search term found. The higher the value displayed under in %, the more important the help text is to the search.
- Click the desired Title within the list.
The corresponding help page will be opened on the right-hand side of the help window.
Note:
Some browsers, e. g. Internet Explorer 7, also highlight the identified search terms within the help text.
The search area and the selected page are separated by a vertical line or a scroll bar. To enlarge the area (this automatically makes the other areas smaller), click and hold the cursor above the separator line and slide the line to the location you want. This setting only applies to the help window currently open.
By clicking the icon in the help window, you can display the currently open help page in the table of contents.
Printing from within the Help
You can print the currently displayed help page using the print function of the help.
Note:
If the displayed help page includes expanding texts, expand all texts you want to print.
If you want to print only part of the displayed help page, mark the corresponding text by clicking and drawing with the left mouse key. Afterwards, select Selection as print area in the print dialog box.
- In the help window, click the icon.
The print dialog box opens.
- Select the desired printer.
- Click Print.
Icons in the Help Window


Clicking the icon takes you back to the previously opened help page.
Clicking the icon takes you to the next page of the instruction.
Clicking the icon takes you back to the previous page of the instruction.
Clicking the icon displays the opened help page in the table of contents.
Display: The expanding text is currently closed.
You can open the text by clicking the icon or the line.
Display: The expanding text is currently shown.
You can hide the text by clicking the icon or the line.
Clicking the icon opens the print dialog box.
Display: Subordinate topics are closed.
Clicking the icon opens the subordinate topics.
Display: Subordinate topics are shown.
Clicking the icon closes the subordinate topics.
Display: The topic does not have any subordinate topics.
Clicking the icon opens the corresponding help page.
Telephoning
This section describes the various types of telephoning that your telephone provides.
Topics
- Incoming Calls (page 44)
- Call Waiting Calls (page 48)
- Outgoing Calls (page 52)
- Calls (page 59)
– Query Calls (page 62) - Transfer (page 65)
– Conference Calls (page 69) - Hands-free Calling (page 72)
– Loudspeaker Listening (page 74) - Headset Calls (page 76)
Incoming Calls
The following types of calls apply to incoming calls:
- Alarm calls
- External calls
- Internal calls
- Group calling (a call directed to a group)
- InterCom calls
- External callback calls
- Internal callback calls
- Door calls
- Call deblocker calls (calls enabled despite do-not-disturb)
- Wake-up calls
- Other calls
Options During an Incoming Call
During an incoming call, the following actions are possible:
Accept an Incoming Call
If you receive a call and would like to talk with the caller, you can accept the incoming call as you would normally by picking up the receiver.
Reject an Incoming Call
If you receive a call but you do not want to talk to the caller, you can reject the incoming call. The caller receives a busy signal – in as far as no other telephones are called (for example, in a group call).
Forward an Incoming Call
If you receive a call but you do not want to talk to the caller yourself, you can the forward the incoming call to any internal or external destination number.
Put an Incoming Call on Hold
If you receive a call but would like to postpone accepting the call for a while, you can put the incoming call on hold. The caller hears the hold music.
Accepting Incoming Calls
Requirements:
– Knowledge of the telephone and its menu options
When you receive a call, proceed as described in the following.
- Pick up the receiver or press the hook key.
You are connected with the caller.
Note:
If you are not present once in a while or cannot accept the call for any other reason, the telephone number of the caller is saved in the caller list (in as far as the telephone number is available and the call type is to be entered in the caller list).
Calls made from the telephone or from the PBX (wake-up calls, alarm calls, door calls) are displayed in plain text and, if necessary, can be confirmed by pressing the √ softkey (alarm calls are confirmed after first picking up the receiver).
Rejecting Incoming Calls
Requirements:
- Knowledge of the telephone and its menu options
When you receive a call, proceed as described in the following.
- Select reject.
- Press the softkey.
The caller receives a busy signal – in as far as no other telephones are called (for example, in a group call).
Hold incoming calls
Requirements:
– Knowledge of the telephone and its menu options
When you receive a call, proceed as described in the following.
- Select hold incoming.
- Press the softkey.
You will hear the internal dial tone. The caller on hold hears the hold music.
- Select back.
- Press the softkey.
You are connected with the caller.
Forwarding Incoming Calls
Important: Only available for operation on the PBXs COMpact 3000, COMpact 5010 VoIP, COMpact 5020 VoIP, COMmander Basic.2 and COMmander Business.
Requirements:
– Knowledge of the telephone and its menu options
When you receive a call, proceed as described in the following.
- Select call deflection.
- Press the softkey.
- Enter the destination number or press the telephone book key to select the telephone number you want in the telephone book.
Important: Enter telephone numbers exactly as when dialling, for example, external telephone numbers always with a leading exchange line access number. (exception: direct exchange access). The default exchange line access number on the PBX is "0" in the factory settings; however, this can be changed for several PBXs (see the PBX manual).
4. Press the softkey.
The subscriber is called.
Note: If the destination number is saved on the programmable function key (speed dialling key), you can forward the call by simply pressing this key and then confirming with the √ softkey. The previous function selection via the display is no longer applicable.
Call Waiting Calls
During a call, you are made aware of another call (external or internal subscriber, alarm or someone at the door) by a call waiting signal (tone and/or blinking hook LED).
Options During a Call Waiting Call
During a call waiting call, the following actions are possible:
Reject a Call Waiting Call
If you receive another call while you are already on a call and you do not want to speak with the second caller, or you do not want to interrupt the first call, you can reject the call waiting call. The caller receives a busy signal – in as far as no other telephones are being called (for example, in a group call).
Accept the Call Waiting Call
If you receive another call while you are already on a call and you would like to speak to the second caller, or you would like to end the current call, you can accept the call waiting call. After accepting, you are connected with the other caller. Your previous communication partner hears the hold music.
Forward Call Waiting
If you receive another call while you are already on a call and personally do not want to talk with the second caller, or you do not want to interrupt the current call, you can forward the call waiting call to any internal or external destination number.
Switch off the Call Waiting Tone
If you receive another call while you are already on a call but you would like to postpone accepting the second call for a while, you can switch off the call waiting tone. The second call will continue to try to get through and you can accept it at any time.
Rejecting Call Waiting Calls
Requirements:
– Knowledge of the telephone and its menu options
- Call waiting enabled
When call waiting signals that there is an incoming call, proceed as described in the following.
- Select reject.
- Press the softkey.
The caller receives a busy signal – in as far as no other telephones are being called (for example, in a group call).
Accepting Call Waiting
Requirements:
– Knowledge of the telephone and its menu options
- Call waiting enabled
When call waiting signals that there is an incoming call, proceed as described in the following.
- Select accept.
- Press the softkey.
You are connected with the caller. Your previous communication partner hears the hold music.
Note: If you first hang up the receiver to end the current call, your telephone then rings and you can accept the incoming call as you would normally.
Forwarding Call Waiting
Important: Only available for operation on the PBXs COMpact 3000, COMpact 5010 VoIP, COMpact 5020 VoIP, COMmander Basic.2 and COMmander Business.
Requirements:
– Knowledge of the telephone and its menu options
- Call waiting enabled
When call waiting signals that there is an incoming call, proceed as described in the following.
- Select call deflection.
- Press the softkey.
- Enter the destination number or press the telephone book key to select the telephone number you want in the telephone book.
Important: Enter telephone numbers exactly as when dialling, for example, always enter external telephone numbers with a leading exchange line access number. (exception: direct exchange access). The default exchange line access number on the PBX is "0" in the factory settings; however, this can be changed for several PBXs (see the PBX manual).
- Press the softkey.
The subscriber is called.
Note: If the destination number is saved on the programmable function key (speed dialling key), you can forward the call by simply pressing this key and then confirming with the √ softkey. The previous function selection via the display is no longer applicable.
Switching off Call Waiting Tone
Requirements:
– Knowledge of the telephone and its menu options
- Call waiting enabled
When call waiting signals that there is an incoming call, proceed as described in the following.
- Select call wait.off.
- Press the softkey.
The second call will continue to try to get through and you can accept it at any time.
Outgoing Calls
Outgoing calls are calls that you have initiated yourself.
Options for Outgoing Calls
An outgoing call can be initiated in two ways:
Dialling the Telephone Number
If you have already picked up the receiver before dialling, the telephone number that you have entered is dialled immediately.
Dialling the Telephone Number with Dial Preparation
Dial preparation – first dialling and then picking up the receiver – makes it possible to check the telephone number entered and, if necessary, to correct it before the connection is established.
Dialling the Telephone Number on Direct Exchange Line Access
If your system telephone has been configured as a direct exchange access point in the PBX, you will hear an external dial a tone directly after picking up the receiver. The manner in which an outgoing call is initiated is different than the manner in which a normal call is initiated, as described previously.
Additional Options
– Initiating Targeted Exchange Line Access (page 207)
- Initiating a Targeted VoIP Access Point (page 213)
– Dialling from Telephone Book (page 79)
– Dialling from Caller List (page 89)
– Dialling from Calls List (page 85)
– Dialling from Redial List (page 82)
Picking up Receiver and Dialling Telephone Number
Requirements:
– Knowledge of the telephone and its menu options
- Pick up the receiver or press the hook key.
- Dial a telephone number.
Important: Do not forget to dial the exchange line access number for external telephone numbers or to select public exchange and press the √ softkey. (Exceptions: direct exchange access
Note: If you want to cancel dialling and start again as soon as you have dialled the first digit, select dial again and press the √ softkey.
Once you have finished dialling the telephone number, the subscriber is called.
Dialling Telephone Number with Dial Preparation
Requirements:
– Knowledge of the telephone and its menu options
1. Dial a telephone number.
Important: Enter telephone numbers exactly as when dialling, for example, external telephone numbers always with a leading exchange line access number. (exception: direct exchange access).
Note: You can make corrections, if necessary, while entering the telephone number.
2. Pick up the receiver or press the hook key.
Note: If you would like to exit the menu without dialling the telephone number entered, press the exit key.
Dialling Telephone Number on Direct Exchange Line Access
Requirements:
– Knowledge of the telephone and its menu options
- Telephone is configured as a direct exchange access point via the PBX
In order to dial an external telephone number on a direct exchange line access point, pick up the receiver and enter the external telephone number without the exchange line access number.
In order to carry out other types of calls (for example, internal or short-code), proceed as described in the following.
- Pick up the receiver or press the hook key.
You will hear the external dial tone.
- Select internal.
You will hear the internal dial tone.
- Dial an internal telephone number.
Once you have finished dialling the telephone number, the subscriber is called.
Note: If you would like to use dial preparation or, for example, configure a speed dialling key, you must press the star key twice beforehand for internal and short-code calls.
Options for Unsuccessful Calls
The following options are available for unsuccessful call:
Initiating Callback on Busy
If you cannot get through to a busy subscriber despite repeated attempts, you can initiate a callback on busy. The PBX supports the service attribute "Automatic callback on busy (CCBS)". This service attribute is required for an external call.
If you have initiated a callback, as soon as the other subscriber has hung up the receiver to end the call, the PBX (for an internal call) or central office (for an external call) calls you. If you then pick up the receiver, the other subscriber is called. If the other subscriber picks up the receiver, the connection for the call is established. This deletes the callback procedure in the PBX/central office.
Initiating Callback on No Response
If the person being called does not pick up the receiver, you can configure callback on no response in order to reach this person without having to call him repeatedly. The function can be used for both internal and external calls. The service attribute "Callback on no response (CCNR)" is supported by the PBX. This service attribute is required for external calls.
If you have initiated a callback, as soon as the other subscriber has hung up the receiver to end the call, the PBX or central office calls you. If you then pick up the receiver, the other subscriber is called. If the other subscriber picks up the receiver, the connection for the call is established. This deletes the callback procedure in the PBX/central office.
Initiating Priority Call for Do-not-disturb
If, for example, a person must absolutely be reached in an emergency despite the do-not-disturb function, the do-not-disturb function can be circumvented by a priority call from an internal telephone.
Initiating Callback on Busy
Requirements:
– Knowledge of the telephone and its menu options
- For external calls: The given technical requirements for a callback on busy (for instance, not all network providers provide callback on a Point-to-Point connection)
If the connection you are calling is busy, proceed as described in the following.
- Select recall.
- Press the softkey.
- Hang up the receiver.
Note: When operated on the PBXs COMpact 3000, COMpact 5010 VoIP, COMpact 5020 VoIP, COMmander Basic.2 and COMmander Business: If you want to delete the callback, press the ☑ Softkey in the redial list in front of the corresponding entry.
As soon as the connection is no longer busy, you are called by the central office/PBX for a period of 20 seconds.
- Pick up the receiver to the carry out the callback.
Note: If you do not pick up the receiver within the 20 seconds during which the central office/PBX calls you, the callback instruction is deleted.
If you pick up the receiver, the subscriber is called.
Note:
You also have the option of letting the central office call you as soon as one of the B-channels on the previously called ISDN connection is available. If the person for which you have set up callback is telephoning on the other B-channel, callback will remain unsuccessful.
A callback is tried up to 45 minutes by the central office/PBX. If the called person did not finish his call until then, the callback will be deleted automatically.
Initiating Callback on No Response
Requirements:
– Knowledge of the telephone and its menu options
- For external calls: The given technical requirements for a callback on no response (for instance, not all network providers provide callback on a Point-to-Point connection)
- For external calls: the service attribute CCNR (Callback on no response) enabled with the network provider
If no one answers on the connection you are calling, proceed as described in the following.
1. Select recall.
- Press the softkey.
- Hang up the receiver.
Note: When operated on the PBXs COMpact 3000, COMpact 5010 VoIP, COMpact 5020 VoIP, COMmander Basic.2 and COMmander Business: If you want to delete the callback, press the ☑ Softkey in the redial list in front of the corresponding entry.
As soon as the connection is used, the central office/PBX calls you for period of 30 seconds (or only 15 seconds for external callback).
- Pick up the receiver to the carry out the callback.
Note:
If you do not pick up the receiver within the 30 seconds (or 15 seconds) during which the central office/PBX calls you, the callback instruction is deleted.
A callback on an external subscriber is tried up to 45 minutes by the central office. If the called person did not finish his call until then, the callback will be deleted automatically.
If you pick up the receiver, the subscriber is called.
Initiating Priority Call for Do-not-disturb
Requirements:
– Knowledge of the telephone and its menu options
- Kind of do-not-disturb configured to All (PBX) on the telephone of the person being called
If the internal telephone you are trying to call is busy because it is set to do-not-disturb, proceed as described in the following.
- For operation on the PBXs COMpact 2204 USB, COMpact 2206 USB, COMpact 4406 DSL, COMpact 4410 USB and COMmander Basic: Select priority call and press the √ softkey.
- For operation on the PBXs COMpact 3000, COMpact 5010 VoIP, COMpact 5020 VoIP, COMmander Basic.2 and COMmander Business: Wait ten seconds.
The subscriber is now called.
Ending a Query Call
Requirements:
– Knowledge of the telephone and its menu options
If you make a query call and the number is busy but there is no response, proceed as described in the following.
Important: Do not hang up the receiver as this will disconnect any calls waiting or will initiate an unannounced transfer of the call to another internal telephone.
1. Select back.
Note: If you would like to try this with another telephone number, select dial again. You can then dial a new telephone number, without having to explain to the person waiting on the other line that you are trying again.
2. Press the softkey.
You are now reconnected with the person waiting on the other line.
Calls
The system telephone allows you to make internal and external calls on the PBX. Internal calls are toll-free.
Options during a Call
During a call, the following actions are possible:
Retrieving Information about a Call
During a call, you see information about the call and your communication partner on the display.
Sending DTMF Signals
During an existing connection, you can use the keypad to send DTMF signals (tones used in DTMF dialling) to operate an answering machine remotely, for example. The digits dialled are shown on the display.
Mute
If you would like to discuss something with another person in the room without your communication partner on the telephone being able to hear, you can temporarily mute the call.
Additional Options
- Initiating a Query Call (page 62)
- Transfer (page 65)
- Creating a Memo (page 182)
– Executing Pickup during Call (page 186)
Retrieving Information about a Call
Requirements:
– Knowledge of the telephone and its menu options
During a call, proceed as described in the following.
- Press the softkey.
All the available information about a call is displayed.
- Press the softkey to end the display.
Sending DTMF Signals
Requirements:
– Knowledge of the telephone and its menu options
During a call, proceed as described in the following.
- Enter the digits and characters. The following entries are possible:
Digits and the characters * and #
The digits and characters dialled are shown on the display and you hear the corresponding tones.
Muting a Call
Requirements:
– Knowledge of the telephone and its menu options
During a call, proceed as described in the following.
1. Press the microphone key.
The microphone on the receiver, device or headset is switched off. The symbol is shown in the display.
- If you would like to switch the microphone on again, press the microphone key again.
Ending a Call
After your communication partner ends the call, your telephone goes into the idle state. If you wait to hang up the receiver for a few seconds, you will hear the busy signal on the receiver and then also on the loudspeaker of the base system, in case the receiver was accidentally hung up incorrectly.
Requirements:
– Knowledge of the telephone and its menu options
During a call, proceed as described in the following.
- Hang up the receiver.
Note: If you would like to end a current call and then immediately make a new call, press the hook key instead and start dialling the next number within 30 seconds.
Query Calls
During a query call, you are talking with one subscriber while your previous communication partner is on hold on the PBX in the background listening to hold music.
A query call is initiated either by calling a query call subscriber, using pick-up during a call, or by accepting a call signalled by call waiting.
Initiating a Query Call
Requirements:
– Knowledge of the telephone and its menu options
During a call, proceed as described in the following.
- Select query/transfer.
- Press the softkey.
You will hear the internal dial tone. Your current communication partner is kept on hold on the PBX and is listening to hold music.
- Enter a telephone number.
Important: Enter telephone numbers exactly as when dialling, for example, always enter external telephone numbers with a leading exchange line access number.
The subscriber is called.
Note:
If the telephone number of the query call subscriber is located in the telephone book of the telephone, you can initiate a query call by dialling directly out of the telephone book (also without previously selecting query/transfer).
If the telephone number of the query call subscriber is saved on one of the freely programmable function keys (speed dialling key), you can initiate the query call by simply pressing this key (without previously selecting query/transfer).
Options during a Query Call
The following actions are possible during a query call:
Splitting
You can use at the splitting function to switch between your two communication partners.
Ending One of the Two Calls
When you end a query call and would like to continue talking with one of the communication partners, you can specifically end the call with the other communication partner separately. Of course, one of your communication partners can simply hang up so that you can continue talking with the other communication partner alone.
Connecting Both Communication Partners
If you would like to let your communication partners speak with each other, you can connect them together.
Splitting
Requirements:
– Knowledge of the telephone and its menu options
- Initiated query call
During a query call, proceed as described in the following.
- Select switch curr. num.
- Press the softkey.
You continue to conduct a query call. The other communication partner is now active.
Ending One of the Two Calls
Requirements:
– Knowledge of the telephone and its menu options
- Initiated query call
If one of your two communication partners hangs up the receiver, you remain connected with the other one.
Or, during a query call, proceed as described in the following.
- Switch to the communication partner with whom you would like to end the call.
- Select curr.call canc..
- Press the softkey.
You then conduct an individual call with the communication partner who had previously been on hold.
Connecting Both Communication Partners
Requirements:
– Knowledge of the telephone and its menu options
- Initiated query call
- To connect two external communication partners, the following is required: Authorization in the PBX for Transfer of external calls to external
To connect both communication partners, hang up the receiver during a query call.
Or, proceed as described in the following.
- Select conn. both calls.
- Press the softkey.
Both communication partners are connected with each other.
Transfer
A communication partner can be transferred or connected to an internal or external subscriber.
Options for Transferring a Call
During an existing call, the following options are available for transferring a call:
Transfer with Announcement
In order to transfer a call, first initiate a query call, announce the call and then connect both communication partners.
Transfer without Announcement
If you would like to transfer an external communication partner to another internal subscriber, you do not have to wait until the subscriber being called via the query call accepts the call; you can hang up the receiver while this call is being made. The internal subscriber will continue to be called.
Placing the External Communication Partner in the Waiting Loop
If the internal subscriber to which you would like to transfer an external communication partner is busy, you can place the external communication partner in the waiting loop of this subscriber.
Note: If, for example, you have accepted a call signalled by call waiting and have therefore established a query call, you can place this call in the waiting loop in the same manner. The communication partner to be transferred must be the active communication partner.
Calling a Third Internal Subscriber and Transferring to an Active Communication Partner
Assuming that you have gained an additional communication partner from a call, for example, from accepting a call signalled by call waiting, and this second communication partner would like to now be transferred to somebody else. You can now initiate a third call that connects the second and third communication partners with each other and then continue telephoning with your first communication partner.
Transfer with Announcement
Requirements:
– Knowledge of the telephone and its menu options
- Initiated query call
- To connect two external communication partners, the following is required: Authorization in the PBX for Transfer of external calls to external
During a query call, proceed as described in the following.
- Select conn. both calls.
- Press the softkey.
Both communication partners are connected with each other.
Transfer without Announcement
Requirements:
– Knowledge of the telephone and its menu options
– Internal transfer destination
During a call, proceed as described in the following.
- Select query/transfer.
- Press the softkey.
You will hear the internal dial tone. Your current communication partner is kept on hold on the PBX and is listening to hold music.
- Dial an internal telephone number.
The subscriber is called.
- Hang up the receiver.
The internal subscriber will continue to be called. If the subscriber accepts the call, the connection is established.
If the subscriber being called does not accept the call, the call is transferred back to your telephone 60 seconds later (your telephone rings).
Note: In order to carry out an open query call, dial the internal basis telephone number + park position and hang up, instead of dialling the internal telephone number (see also the PBX manual). To make this operation more convenient, you can save the internal basis telephone number + park position on one or more freely programmable function keys (speed dialling key). The LEDs for the speed dialling keys then indicate whether a park position is available or busy.
Placing External Communication Partner in Waiting Loop
Requirements:
– Knowledge of the telephone and its menu options
- Internal transfer destination
If the internal telephone to which you are trying to transfer a call is busy, proceed as described in the following.
- Select waiting loop.
- Press the softkey.
- Hang up the receiver.
The external communication partner continues to listen to hold music.
As soon as the internal subscriber hangs up the receiver, this external communication partner is called. Once he accepts the call, he is connected with the subscriber in the waiting loop.
Note:
If the internal subscriber does not answer the call within 60 seconds, or the line remains busy during the three minute waiting time, the call will be transferred back to you.
If you pick up the receiver, you will be reconnected with the external communication partner. You can then place him in the waiting loop again. If you do not pick up the call within 60 seconds, the exchange line connection is disconnected completely (for example, if your line was busy even for a short time).
Calling a Third Subscriber and Transferring to an Active Communication Partner
Requirements:
– Knowledge of the telephone and its menu options
- Initiated query call
During a query call, proceed as described in the following.
- Switch to the communication partner you would like to transfer.
- Select transf. act. call
- Press the softkey.
- Dial the telephone number of the subscriber to be called.
As soon as to the person being called picks up the receiver, conduct a third call.
Important: Enter telephone numbers exactly as when dialling, for example, always enter external telephone numbers with a leading exchange line access number.
5. Select transfer.
Both previously active communication partners are connected.
Then return to conducting an individual call with your first communication partner.
Conference Calls
During a conference call, you are talking with two subscribers simultaneously.
Initiating Conference Calls
Requirements:
– Knowledge of the telephone and its menu options
– A query call you initiated yourself
During a query call, proceed as described in the following.
- Select conference.
- Press the softkey.
You are making a conference call.
Options during a Conference Call
The following actions are possible during a conference call:
Initiating Splitting
When you end a conference call and would like to talk to each of the conference call partners separately one after the other, you can specifically put one of the conference call partners on hold in the background.
Ending a Call with a Conference Call Partner
When you end a conference call and would like to continue talking with one of the conference call partners, you can specifically end the call with the other conference call partner separately. Of course, one of your conference call partners can simply hang up so that you can continue talking with the other conference call partner alone.
Connecting both Conference Call Partners
If you would like to leave a conference call that you initiated yourself and your conference call partners would like to continue talking with each other, you can connect both parties.
Ending a Conference Call Completely
If you initiated the conference call yourself, you can end the conference call completely.
Initiating Splitting during a Conference Call
Requirements:
– Knowledge of the telephone and its menu options
– A conference call that you initiated yourself
During a conference call, proceed as described in the following.
- If necessary, select switch curr. num and press the √ softkey to activate the conference call partner with whom you would like to talk.
- Select splitting.
- Press the softkey.
You are making a query call.
Ending a Call with a Conference Call Partner
Requirements:
– Knowledge of the telephone and its menu options
– A conference call that you initiated yourself
During a conference call, proceed as described in the following.
-
If necessary, select switch curr. num and press the √ softkey to activate the conference call partner with whom you would like to end the call.
-
Select terminate.
- Press the softkey.
You are conducting an one-on-one call with the other conference call partner.
Connecting both Conference Call Partners
Requirements:
– Knowledge of the telephone and its menu options
– A conference call that you initiated yourself
- To connect two external communication partners, the following is required: Authorization in the PBX for Transfer of external calls to external
During a conference call, proceed as described in the following.
- Select conn. both calls.
- Press the softkey.
Both conference call partners are connected with each other.
Ending Conference Call Completely
Requirements:
– Knowledge of the telephone and its menu options
– A conference call that you initiated yourself
During a conference call, proceed as described in the following.
- Hang up the receiver.
The conference call is disconnected completely.
Hands-free Calling
During hands-free calling, the loudspeaker and microphone on the device are switched on. This option allows you to talk on the telephone even if you have no hands free. In addition, other people in the room can participate in the call.
Initiating Call in Hands-free Calling Mode
Requirements:
– Knowledge of the telephone and its menu options
- When your phone rings, press the hook key or the loudspeaker key to initiate the call.
You are conducting a call in hands-free calling mode. The following symbol is shown in the display: - If you would like to call someone, dial the telephone number and press the hook key or the loudspeaker key to initiate the call.
You are conducting a call in hands-free calling mode. The following symbol is shown in the display:
Note: During headset operation, you can only use the loudspeaker key since the hook key is being used to initiate and end the headset call.
Ending up Call in Hands-free Calling Mode
Requirements:
– Knowledge of the telephone and its menu options
During hands-free calling mode, proceed as described in the following.
- Press the hook key.
Switching on Hands-free Calling During a Call
Requirements:
– Knowledge of the telephone and its menu options
During a normal call or a call in loudspeaker listening mode using the receiver, proceed as described in the following.
- Press and hold the loudspeaker key for approx. 2 seconds. You can then hang up the receiver.
You are conducting a call in hands-free calling mode. The following symbol is shown in the display:
Switching off Hands-free Calling and Returning to Normal Calling
Requirements:
– Knowledge of the telephone and its menu options
During hands-free calling mode, proceed as described in the following.
- Pick up the receiver.
You are conducting a normal call.
- If you have already picked up the receiver or a headset is connected, press the loudspeaker key.
You are conducting a normal call or a headset call.
Loudspeaker Listening
During loudspeaker listening, the receiver loudspeaker as well as the loudspeaker in the device are switched on. This allows other people in the room to listen in on the call. The call is continued using the receiver microphone (no hands-free calling).
Switching on Loudspeaker Listening during a Call
Requirements:
– Knowledge of the telephone and its menu options
During a normal call using the receiver, proceed as described in the following.
- Press the loudspeaker key.
You are conducting a call in loudspeaker listening mode. The following symbol is shown in the display:
Switching off Loudspeaker Listening and Returning to Normal Calling
Requirements:
– Knowledge of the telephone and its menu options
During loudspeaker listening mode, proceed as described in the following.
- Press the loudspeaker key.
You are conducting a normal call.
Ending a Call in Loudspeaker Listening Mode
Requirements:
– Knowledge of the telephone and its menu options
During loudspeaker listening mode, proceed as described in the following.
- Hang up the receiver.
Headset Calls
A headset enables you to participate in calls when you have no hands free. This is a very useful feature, especially in certain professional areas (for example, in a call center).
Initiating Headset Calls
Requirements:
– Knowledge of the telephone and its menu options
- Headset operation enabled
- When your telephone rings, press the hook key to initiate the call.
You are making a headset call.
- If you would like to call someone, dial the telephone number and press the hook key to initiate the call.
You are making a headset call.
Ending a Call in Headset Operation
Requirements:
– Knowledge of the telephone and its menu options
- Headset operation enabled
During a headset call or other call in headset operation, proceed as described in the following.
- Press the hook key.
Telephone Book and Telephone Number Lists
This section describes the telephone book and the current caller and calls lists in the telephone.
Topics
– Telephone Book (page 78)
- Redial List (page 81)
- Calls List (page 84)
- Caller List (page 88)
Telephone Book
Internal telephone numbers (subscriber, groups, door, emergency call) as well as the telephone book/short-code numbers on the PBX are displayed in the telephone book. If one of these entries does not have a name, the system telephone generates a name for the telephone book (for example, int. TN45, KW-A 05306...). The entries cannot be changed in the system telephone; they can only be changed using the corresponding PC software on the PBX (internal telephone numbers with COMset; short-code numbers with COMtools). All of the contacts are displayed in alphabetical order.
If a telephone number that is in the telephone book is transmitted during a call, the assigned name is displayed instead of the telephone number.
Opening the Telephone Book
Opening can be carried out as follows:
• Via the telephone menu
Requirements:
– Knowledge of the telephone and its menu options
- Press the telephone book key.
- Scroll to the desired contact.
Note:
In order to find the desired contact more quickly, you can enter the first letter into the keypad.
If there is no contact for the letter entered (display "no hits") or the contact in question is not present, you can delete the letters entered by pressing the softkey and enter another letter.
If there are multiple contacts for the beginning letter entered, you can enter additional letters to narrow the selection further.
- If you would like to leave the menu, press the exit key.
Dialling from Telephone Book
Dialling can be carried out as follows:
• Via the telephone menu
Dialling from Telephone Book via Telephone Menu
Requirements:
– Knowledge of the telephone and its menu options
- Press the telephone book key.
- Scroll to the desired contact or enter the first letter of the desired contact into the keypad.
- Pick up the receiver or press the hook key.
Excepting Telephone Numbers into Other Menus
Before entering a telephone number in a menu (when configuring a speed dialling key), you can select the desired telephone numbers in the telephone book. If you have already entered any codes, the telephone number from this telephone book entry is added at the end.
The configuration can be made as follows:
• Via the telephone menu
Requirements:
– Knowledge of the telephone and its menu options
After opening a menu for entering telephone numbers, proceed as described in the following.
- Press the telephone book key.
-
Scroll to the desired contact or enter the first letter of the desired contact into the keypad.
-
Press the √ softkey to accept the telephone number in the menu for the telephone number entry.
- Press the softkey to save the entry.
Note: The name is also accepted.
Configuring Displayed Telephone Number Range for Telephone Book
If you would like to prevent too many entries from being displayed in the telephone book, you can restrict the display of the various telephone number ranges. The following areas can be selected:
- Emergency numbers (emergency numbers configured in the PBX)
- Internal telephone numbers (internal telephone numbers configured in the PBX)
- PBX telephone book (telephone book entries/short-code numbers configured in the PBX)
The configuration can be made as follows:
- Via COMfortel Set
Configuring Displayed Telephone Number Range for Telephone Book via COMfortel Set
Requirements:
- An open configuration and the required PIN, if necessary
- Open the page Settings/functions > Lists.
- Under Telephone book, select or clear the check box for the number ranges listed on the tab.
☑ The telephone number range in question is displayed in the telephone book.
☐ The telephone number range in question is not displayed in the telephone book.
Further steps:
- Save your configuration before closing.
Redial List
The last 10 telephone numbers dialled are saved in the redial list. For more than 10 telephone numbers dialled, the oldest entry is overwritten. The telephone numbers are saved along with date and time of dialling (for multiple dialling operations, the date/time of the last attempt).
Opening the Redial List
Opening can be carried out as follows:
• Via the telephone menu
Requirements:
– Knowledge of the telephone and its menu options
- At least one entry in the list
1. Press the redial key.
The redial list is now opened. The entry with the telephone number dialled previously is displayed.
2. Select the desired option:
☒ Deletes the entry shown.
Deletes the callback shown (function only available for operation on the PBXs COMpact 3000, COMpact 5010 VoIP, COMpact 5020 VoIP, COMmander Basic.2 and COMmander Business).
i Indicates additional information.
▲ Scrolls to the next entry.
√ Scrolls to the previous entry.
√ Accepts the entry into dial preparation.
Dialling from Redial List
Dialling can be carried out as follows:
• Via the telephone menu
Requirements:
– Knowledge of the telephone and its menu options
- Open the redial list.
The last telephone number dialled is displayed.
Note: If you have already picked up the receiver when you press the redial key, the telephone number dialled last is immediately dialled.
-
Scroll to the desired entry or press the redial key several times.
-
Pick up the receiver or press the hook key.
The subscriber is called.
Note: If you would like to exit the menu without dialling the telephone number displayed, press the exit key.
Deleting Entries in Redial List
Deleting can be carried out as follows:
• Via the telephone menu
Requirements:
– Knowledge of the telephone and its menu options
-
Open the redial list.
The last telephone number dialled is displayed. -
Press the softkey to the delete the entry shown.
Configuring Calls to be Recorded for Redial List
If you would like to prevent too many entries from being entered in the redial list, you can configure the list in relation to the calls to be recorded. The following calls can be selected:
- External calls
- Internal calls
- Door terminal calls
- Other calls
The configuration can be made as follows:
- Via COMfortel Set
Configuring Calls to be Recorded for Redial List via COMfortel Set
Requirements:
- An open configuration and the required PIN, if necessary
- Open the page Settings/functions > Lists.
- Under Redial list, select or clear the check box for the types of call listed on the tab.
The call type in question is entered on the redial list.
☐ The call type in question is not entered on the redial list.
Further steps:
- Save your configuration before closing.
Calls List
The calls made (incoming and outgoing) are saved in the calls list of the telephone along with the telephone number of the communication partner as well as date and time of the call. A maximum of 10 calls can be saved. For more than 10 calls, the oldest entry is overwritten. A previous communication partner can called directly from the calls list.
Opening the Calls List
Opening can be carried out as follows:
• Via the telephone menu
Requirements:
– Knowledge of the telephone and its menu options and the required PIN, if necessary
- At least one entry in the list
- Press a function key configured for calls list. The call conducted last is displayed.
- Select the desired option:
☒ Deletes the entry shown.
i Indicates additional information.
▲ Scrolls to the next entry.
√ Scrolls to the previous entry.
√ Accepts the entry into dial preparation.
Dialling from Calls List
Dialling can be carried out as follows:
• Via the telephone menu
Requirements:
– Knowledge of the telephone and its menu options and the required PIN, if necessary
- Open the calls list.
The call conducted last is displayed. - Scroll to the desired entry.
- Pick up the receiver or press the hook key.
The subscriber is called.
Note: If you would like to exit the menu without dialling the telephone number entered, press the exit key.
Deleting Entries in Calls List
Deleting can be carried out as follows:
• Via the telephone menu
Requirements:
– Knowledge of the telephone and its menu options and the required PIN, if necessary
- Open the calls list.
The call conducted last is displayed. - Press the softkey to the delete the entry shown.
Configuring and Operating Function Key for Calls List
Press the key while the telephone is in the idle state to open the calls list.
LED signalling next to the key:
None
The configuration can be carried out as follows:
• Via COMfortel Set
Configuring Function Key for Calls List via COMfortel Set
Requirements:
- An open configuration and the required PIN, if necessary
- Open the page Function keys > Assign function keys.
- Click one of the following tabs:
Level 1: Keys are defined on the first key level.
Level 2: Keys are defined on the second key level.
- Right-click the function key you want to assign.
A function selection dialogue opens.
- Select the Calls list function.
The current settings for defining the key are displayed.
- In the Key name entry field, enter a name for the key. The following entries are possible:
Up to 16 digits
Digits and characters
Clicking automatically enters the default name in the entry field.
Note: The key name is used for printing the label.
Further steps:
- Save your configuration before closing.
Configuring Calls to be Recorded for Calls List
If you would like to prevent too many entries from being entered in the calls list, you can configure the calls list in relation to the calls to be recorded. The following calls can be selected:
- External calls without telephone numbers
• External calls with telephone numbers - Internal calls
- Alarm calls
- Door terminal calls
- Other calls
The configuration can be made as follows:
- Via COMfortel Set
Configuring Calls to be Recorded for Calls List via COMfortel Set
Requirements:
- An open configuration and the required PIN, if necessary
- Open the page Settings/functions > Lists.
- Under Calls list, select or clear the check box for the types of calls listed on the tab.
☑ The call type in question is entered in the calls list.
☐ The call type in question is not entered in the calls list.
Further steps:
- Save your configuration before closing.
Caller List
Telephone numbers of calls not accepted are saved in the caller list of the telephone, along with the date and time of the call (for multiple call attempts, date/time of the last call attempt). A maximum of 10 telephone numbers can be saved. If more than 10 calls from various telephone numbers come in, the oldest entry is overwritten.
A caller be called back directly from the caller list.
The LED above the message key indicates whether entries are present on the caller list.
Opening the Caller List
Opening can be carried out as follows:
• Via the telephone menu
Requirements:
– Knowledge of the telephone and its menu options and the required PIN, if necessary
- At least one entry in the list
You can open the caller list by pressing a function key configured for this purpose.
Or, proceed as described in the following.
1. Press the message key.
The last received call is displayed.
2. Select the desired option:
☒ Deletes the entry shown.
i Indicates additional information.
^ Scrolls to the next entry.
√ Scrolls to the previous entry.
√ Accepts the entry into dial preparation.
Dialling from Caller List
Dialling can be carried out as follows:
• Via the telephone menu
Requirements:
– Knowledge of the telephone and its menu options and the required PIN, if necessary
- Open the caller list.
The last incoming call is displayed.
-
Scroll to the desired entry or press the message key several times.
-
Pick up the receiver or press the hook key.
The subscriber is called.
Note:
If you would like to exit the menu without dialling the telephone number displayed, press the exit key.
As soon as a connection (incoming or outgoing) has been established with the caller, the telephone number in question is deleted from the caller list. Only when operated on the PBXs COMpact 5010 VoIP, COMpact 5020 VoIP, COMmander Basic.2 and COMmander Business: If this is a group called, the telephone number is also deleted from the caller lists of the other members of the group. (Can be configured using the configuration manager on the PBX. Group-wide deletion does not occur if the person calling back has already deleted his caller list or has been called again by the same caller on his subscriber telephone number.)
Deleting Entries in Caller List
Deleting can be carried out as follows:
• Via the telephone menu
Requirements:
– Knowledge of the telephone and its menu options and the required PIN, if necessary
- Open the caller list.
The last incoming call is displayed. - Press the softkey to the delete the entry shown.
Configuring and Operating Function Key for Caller Lists
Press the key while the telephone is in the idle state to open the caller list.
In addition, when functions are defined on the first key level, the status of the caller list is indicated by the corresponding LED.
LED signalling next to the key:
Green There are no new entries. All of the entries in the list have been viewed, but have not yet been deleted.
Green The list contains new entries that have not yet been viewed.
(blinking)
off The list is empty.
The configuration can be carried out as follows:
- Via COMfortel Set
Configuring Function Key for Caller List via COMfortel Set
Requirements:
- An open configuration and the required PIN, if necessary
- Open the page Function keys > Assign function keys.
- Click one of the following tabs:
Level 1: Keys are defined on the first key level.
Level 2: Keys are defined on the second key level.
- Right-click the function key you want to assign.
A function selection dialogue opens.
- Select the Caller list function.
The current settings for defining the key are displayed.
- In the Key name entry field, enter a name for the key. The following entries are possible:
Up to 16 digits
Digits and characters
Clicking automatically enters the default name in the entry field.
Note: The key name is used for printing the label.
Further steps:
- Save your configuration before closing.
Configuring Calls to be Recorded for Caller List
If you would like to prevent too many entries from being entered in the caller list, you can configure the list in relation to the calls to be recorded. The following calls can be selected:
- External calls without telephone numbers
• External calls with telephone numbers - Internal calls
- Alarm calls
- Door terminal calls
- Calls accepted by another subscriber
- Other calls
The configuration can be made as follows:
• Via COMfortel Set
Configuring Calls to be Recorded for Caller List via COMfortel Set
Requirements:
- An open configuration and the required PIN, if necessary
- Open the page Settings/functions > Lists.
- Under Caller list, select or clear the check box for the types of call listed on the tab.
☑ The call type in question is entered on the caller list.
☐ The call type in question is not entered on the caller list.
Further steps:
- Save your configuration before closing.
Configuring the LED Message Key
While in the idle state, the LED above the message key indicates the state of the list/s available over the message key.
- LED is flashing: The list contains new entries that have not yet been viewed.
- LED lights up: There are no new entries. All of the entries in the list have been viewed, but have not yet been deleted.
If the LED signalling is disruptive or bothersome, it can be switched off.
The configuration can be carried out as follows:
- Via COMfortel Set
Configuring LED Message Key via COMfortel Set
Requirements:
- An open configuration and the required PIN, if necessary
- Open the page Settings/functions > Signalling/ringer.
- In the Message LED list field, select one of the following options:
Flashing/always on: Switches on LED signalling.
Flashing/off: Switches on LED signalling only for new entries that have not yet been viewed.
Always off: Switches off LED signalling.
Further steps:
- Save your configuration before closing.
Configuring and Managing the Telephone
This section describes how to configure and manage your telephone.
Topics
– Identification (page 95)
– Protection from Unauthorised Access (page 97)
- Display (page 100)
- Call Signalling (page 103)
– Ringer Melodies (page 106)
- Call Charges (page 110)
- Headset (page 112)
- Function Keys (page 115)
Identification
The telephone must be uniquely identified on the PBX.
Configuring MSN
In order for the PBX to identify the telephone, the internal telephone number (MSN) for the telephone must be entered.
The configuration can be made as follows:
• Via the configuration manager
• Via the telephone menu
Configuring MSN via COMfortel Set
Requirements:
- An open configuration and the required PIN, if necessary
- Open the page Settings/functions > Basic settings.
- In the Internal number, enter the internal telephone number (MSN).
Important: Use each of the internal subscriber telephone numbers for only one of the devices.
Further steps:
- Save your configuration before closing.
Configuring MSN via Telephone Menu
Requirements:
– Knowledge of the telephone, its menu options and the required PIN, if necessary
- The internal telephone number for the telephone configured on the PBX
- Press the menu key and open the menu local MSN.
- Enter the internal telephone number (MSN).
Important: Use each of the internal subscriber telephone numbers for only one of the devices.
- Press the softkey to save the entry.
Protection from Unauthorised Access
In order to prevent important settings from being changed accidentally or by unauthorised people, the telephone can be protected from unauthorised access.
When operating the PBXs COMpact 3000, COMpact 5010 VoIP, COMpact 5020 VoIP, COMmander Basic.2 and COMmander Business, access to the telephone is subdivided into four authorisation levels:
- Administrator (access via admin PIN on the PBX)
- Sub-administrator (access via one of the four sub-admin PINs on the PBX)
- User (access via user PIN assigned to subscriber)
• Guests (unprotected access)
The PINs are transmitted from the PBX and cannot be changed in the telephone itself.
When operating on the PBXs COMpact 2204 USB, COMpact 2206 USB, COMpact 4406 DSL, COMpact 4410 USB and COMmander Basic, access to the telephone is subdivided into two authorisation levels:
- User (access via user PIN)
• Guests (unprotected access)
The user PIN is configured in the telephone.
Configuring a User PIN
Important: This is only available for operation on the PBXs COMpact 2204 USB, COMpact 2206 USB, COMpact 4406 DSL, COMpact 4410 USB and COMmander Basic.
The configuration can be carried out as follows:
• Via the telephone menu
Requirements:
- Knowledge of the telephone, its menu options and the required PIN, if necessary
- Press the menu key and open the change PIN menu.
a) If a user PIN has already been configured on your telephone, (old) will be shown on the display. Enter the old user PIN and press the √ softkey.
- On the display, you will see (new, 1). Enter the user PIN and press the √ softkey.
- On the display, you will see (new, 2). Renter the user PIN and press the √ softkey.
Note: You can delete the user PIN by not entering a PIN in either menu, and simply pressing the softkey.
Configuring a Function Lock
The speed dialling function available in the menu can be blocked from unauthorised use. The display of this restricted function in the selection list requires entering the corresponding PIN after selecting additional at the end of the selection list.
The configuration can be carried out as follows:
- Via COMfortel Set
Configuring Function Lock via COMfortel Set
Requirements:
- An open configuration and the required PIN, if necessary
- Open the page Settings/functions > Restrictions.
- Click the Telephone menu functions tab.
- Select one of the following options in the Speed dialling list field.
No restrictions: The speed dialling function is not blocked.
Guests: Blocks the speed dialling function from guests.
Guests + users: Blocks the speed dialling function from guests and users.
Guests + users + SubAdmin: Blocks the speed dialling function from guests, users and sub-administrators.
Further steps:
- Save your configuration before closing.
Configuring Settings Lock
The settings that can be selected in the menu can be restricted from unauthorised use. The display of these restricted settings in the selection list requires entering the corresponding PIN after selecting additional at the end of the selection list.
The configuration can be carried out as follows:
- Via COMfortel Set
Configuring Settings Lock via COMfortel Set
Requirements:
- An open configuration and the required PIN, if necessary
- Open the page Settings/functions > Restrictions.
- Click the Telephone menu settings tab.
- Select one of the following options for the setting to be blocked.
No restrictions: The setting is not blocked.
Guests: Blocks the setting in question from guests.
Guests + users: Blocks the setting in question from guests and users.
Guests + users + SubAdmin: Blocks the setting in question from guests, users and sub-administrators.
If you would like to restrict all of the settings, select one of the following options under All - restricted for.
No restrictions: No settings are blocked.
Guests: Blocks all settings for guests.
Guests + users: Blocks all settings for guests and users.
Guests + users + SubAdmin: Blocks all settings for guests, users and sub-administrators.
Further steps:
- Save your configuration before closing.
Display
Configuring the Language on Telephone
This setting specifies the language used on the telephone display.
The configuration can be made as follows:
- Via COMfortel Set
• Via the telephone menu
Configuring the Language on Telephone via COMfortel Set
Requirements:
- An open configuration and the required PIN, if necessary
- Open the page Settings/functions > Basic settings.
- Select the desired language in the Display language list field.
Further steps:
- Save your configuration before closing.
Configuring the Language on Telephone via Telephone Menu
Requirements:
- Knowledge of the telephone, its menu options and the required PIN, if necessary
- Press the menu key and open the menu language.
Note: To open the language menu, you can also press the menu key, # and 0 in that order.
- Select the desired display language.
Adjusting Contrast
The configuration can be made as follows:
• Via the telephone menu
Requirements:
– Knowledge of the telephone, its menu options and the required PIN, if necessary
- Press the menu key and open the menu contrast.
- Press the - and + softkeys to configure the desired contrast.
- Press the softkey to accept the setting.
Configuring Time Format
This setting specifies the format in which time is depicted on the display.
The configuration can be made as follows:
- Via COMfortel Set
Configuring Time Format via COMfortel Set
Requirements:
- An open configuration and the required PIN, if necessary
- Open the page Settings/functions > Display.
- In the Time format list field, select one of the following options:
HH.MM: Selects the time format in the order of hour, minute separated by a point.
HH:MM: Selects the time format in the order of hour, minute separated by a colon.
Further steps:
- Save your configuration before closing.
Configuring Date Format
The date format selected here is displayed in the idle state as well as in the caller and calls lists.
The configuration can be made as follows:
- Via COMfortel Set
Configuring Date Format via COMfortel Set
Requirements:
- An open configuration and the required PIN, if necessary
- Open the page Settings/functions > Display.
- In the Date format list field, select one of the following options:
DD.MM.YY: Selects the date format in the order of day, month, year separated by points.
DD/MM/YY: Selects the date format in the order of day, month, year separated by slashes.
DD-MM-YY: Selects the date format in the order of day, month, year separated by hyphens.
YY-MM-DD: Selects the date format in the order of year, month, day separated by hyphens.
Further steps:
- Save your configuration before closing.
Call Signalling
The system telephone can signal incoming calls as follows:
- Ring signal (the telephone rings with a configured ringer melody)
- Display message (text)
- Flashing LED above the hook key
Switching Ring Signal On/Off
If the ring signal is enabled, calls are acoustically signalled by a ring signal. If you don't want your environment to be disturbed by the ringer on the telephone, you can switch off the ring signal.
This function is different than the do-not-disturb function on the PBX in that calls are still possible. However, they are no longer signalled acoustically but rather visually.
Switching this on/off can be done as follows:
- Via COMfortel Set
Switching Ring Signal On/Off via COMfortel Set
Requirements:
- An open configuration and the required PIN, if necessary
- Open the page Settings/functions > Signalling/ringer.
- Select or clear the Ring signal check box.
Enables the ring signal.
□ Disables the ring signal.
Further steps:
- Save your configuration before closing.
Configuring and Operating Function Key for Ring Signal
Press the key to switch the ring signal on or off or to switch it over.
Press the key during an incoming call to switch the ring signal on or off for this call or to switch it over.
In addition, when functions are defined on the first key level, the status of the function is indicated by the corresponding LED.
LED signalling next to the key:
Off The ring signal is enabled.
Red The ring signal is disabled.
The configuration can be carried out as follows:
- Via COMfortel Set
Configuring Function Key for Ring Signal via COMfortel Set
Requirements:
- An open configuration and the required PIN, if necessary
- Open the page Function keys > Assign function keys.
- Click one of the following tabs:
Level 1: Keys are defined on the first key level.
Level 2: Keys are defined on the second key level.
- Right-click the function key you want to assign.
A function selection dialogue opens.
- Select the Ring signal function.
The current settings for defining the key are displayed.
- In the Kind of switching list field, select one of the following options:
switch off: Press the key to disable the ring signal.
switch on: Press the key to enable the ring signal.
switch over: Press the key to switch the ring signal on and off.
Configuring and Managing the Telephone
Call Signalling
Configuring and Operating Function Key for Ring Signal
- In the Key name entry field, enter a name for the key. The following entries are possible:
Up to 16 digits
Digits and characters
Clicking automatically enters the default name in the entry field.
Note: The key name is used for printing the label.
Further steps:
- Save your configuration before closing.
Ringer Melodies
Determining Different Types of Calls
There are 8 different ringer melodies available to differentiate between types of calls.
The ringer melodies can be assigned to different kinds of calls or call targets. You can make the assignments depending on what information you think is the most important. Configure the settings as follows:
- If you would like to differentiate between the different kinds of calls by using different ringer melodies, configure the corresponding settings via the telephone menu or via COMfortel Set. The following kinds of calls are available for this:
- Alarm calls
- External calls
- Internal calls
- Group calling (a call directed to a group)
- InterCom calls
- External callback calls
- Internal callback calls
- Door calls
- Call deblocker calls (calls enabled despite do-not-disturb)
- Wake-up calls
- Other calls
- If you would like to be notified, using different ringer melodies, which of your external telephone numbers the caller dialled, configure the corresponding settings via COMfortel Set.
Important: Only available for operation on the PBXs COMpact 3000, COMpact 5010 VoIP, COMpact 5020 VoIP, COMmander Basic.2 and COMmander Business.
- If you would like to be notified, using different ringer melodies, which of your groups is being called by the caller, configure the corresponding settings via COMfortel Set.
As external and internal calls can be affected by more than one of these three settings, these types of calls are signaled based on a predetermined sequence (priority list). When this is done, the external telephone number or group telephone number dialled by the caller is checked. If no specific ringer melody has been configured for this either, the ringer melody of the kind of call is used.
Priority List for External Calls
- For the ringer melody configured for the call type call deblocker, in as much as the caller can be identified even when he has do-not-disturb enabled as a part of a call deblocker
- For a ringer melody configured for a certain external telephone number, in as much as the telephone number was dialled by the caller
- For the ringer melody configured for a certain group telephone number, in as much as the group is called
- For the ringer melody configured for a certain call type group calling, in as much as a non-specified group is called
- For the ringer melody for the call type external calls
Priority List for Internal Calls
- For the ringer melody configured for a certain group telephone number, in as much as the group is called
- For the ringer melody configured for a certain call type group calling, in as much as a non-specified group is called
- For the ringer melody for the call type internal calls
Configuring Ringer Melodies
You have the option of assigning the several call types each a specific ringer melody. .
In addition to making call type-dependent assignments, COMfortel Set can also be used to configure which ringer melody to assign to each of 10 separate external telephone numbers or groups depending on the number.
The configuration can be made as follows:
- Via COMfortel Set
Configuring Call Type-dependent Ringer Melodies via COMfortel Set
Requirements:
- An open configuration and the required PIN, if necessary
- Open the page Settings/functions > Signalling/ringer.
- Click the Ringer melodies (call type-dependent) tab.
- Select the desired ringer melody from the list field of call types in question.
Further steps:
- Save your configuration before closing.
Configuring Number-dependent Ringer Melodies via COMfortel Set
Requirements:
- An open configuration and the required PIN, if necessary
- Open the page Settings/functions > Signalling/ringer.
- Click the Ringer melodies (number-dependent) tab.
- In the Group number 1 to Group number 10 entry field, enter the telephone numbers of the group and select the desired ringer melody from the list field.
- In the External telephone numbers 1 to External telephone numbers 10 entry field, enter each of your external telephone numbers and select the desired ringer melody in the list field.
Important: Only available for operation on the PBXs COMpact 3000, COMpact 5010 VoIP, COMpact 5020 VoIP, COMmander Basic.2 and COMmander Business.
Further steps:
- Save your configuration before closing.
Changing Volume Automatically
You can increase and decrease the volume on the telephone automatically. The telephone starts to ring at the volume you configured and increases/decreases this every 5 seconds by one level until it reaches the maximum/minimal volume.
The change can be made as follows:
- Via COMfortel Set
Changing Ringer Volume Automatically via COMfortel Set
Requirements:
- An open configuration and the required PIN, if necessary
- Open the page Settings/functions > Signalling/ringer.
- Under Automatic change of the ringer volume, select one of the following options:
Constant ringer volume: Selects a steady volume during the entire calling phase.
Increase the ringer volume automatically: Selects an automatic increase in the volume during the calling phase.
Reduce the ringer volume automatically: Selects an automatic decrease in the volume during the calling phase.
Single tone: Selects a single quiet tone instead of the ringer melodies configured.
Further steps:
- Save your configuration before closing.
Call Charges
To calculate call charges, the currency of the country as well as the cost per call unit must be configured in COMfortel Set.
Configuring Currency
The configuration can be made as follows:
- Via COMfortel Set
Requirements:
- An open configuration and the required PIN, if necessary
- Open the page Settings/functions > Basic settings.
- In the Currency (max. 3 characters) entry field, enter the currency for the charge function on the telephone that should be used. The following entries are possible:
Up to 3 digits
Further steps:
- Save your configuration before closing.
Configuring Cost per Call Unit
The configuration can be made as follows:
- Via COMfortel Set
Requirements:
- An open configuration and the required PIN, if necessary
- Open the page Settings/functions > Basic settings.
- In the Cost per call unit (0-9999 currency subunits) entry field, enter the cost per call unit. The following entries are possible:
Up to 4 digits
Digits, for example, 6 for 6 cent
Note: If you configure your telephone as room telephone, the value for cost per call unit should match the value configured in the PBX. Otherwise misunderstandings might occur regarding final invoice because the value configured in the PBX is used for calculating the cost of calls.
Further steps:
- Save your configuration before closing.
Headset
Configuring and Operating Function Key for Headset Operation
Press the key to switch headset operation on or off or to switch it over.
In addition, when functions are defined on the first key level, the status of the function is indicated by the corresponding LED.
LED signalling next to the key:
Green Headset operation is enabled.
Off Headset operation is disabled.
The configuration can be carried out as follows:
- Via COMfortel Set
Configuring Function Key for Headset Operation via COMfortel Set
Requirements:
- An open configuration and the required PIN, if necessary
- Open the page Function keys > Assign function keys.
- Click one of the following tabs:
Level 1: Keys are defined on the first key level.
Level 2: Keys are defined on the second key level.
- Right-click the function key you want to assign.
A function selection dialogue opens.
- Select the Headset function.
The current settings for defining the key are displayed.
- In the Kind of switching list field, select one of the following options:
switch off: Enables headset operation.
switch on: Enables headset operation.
switch over: Pressing the key switches headset operation on and off.
- In the Key name entry field, enter a name for the key. The following entries are possible:
Up to 16 digits
Digits and characters
Clicking automatically enters the default name in the entry field.
Note: The key name is used for printing the label.
Further steps:
- Save your configuration before closing.
Switching Headset Ringing On/Off
During headset operation (headset switched on), three types of call signalling are possible:
- Ringing through the loud speaker (as for receiver operation)
- Ringing through the loud speaker + a short attention tone on the headset
- Short attention tone on the headset
For the second and third operating mode, headset ringing must be switched on as described here. For the third operating mode, the ringer must also be switched off.
Switching this on/off can be done as follows:
- Via COMfortel Set
Configuring Headset Ringing via COMfortel Set
Requirements:
- An open configuration and the required PIN, if necessary
- Open the page Settings/functions > Headset.
- Select or clear the Headset ringing check box.
☑ Enables the headset ringer.
☐ Disables the headset ringer.
Further steps:
- Save your configuration before closing.
Function Keys
Configuring Accessibility of Second Key Level
The freely programmable function keys can each be defined twice (on two levels). Here, you configure how the second level of the function keys should be operated. The variant Second level via shift key is always enabled. If you would like to use this, you must define one of your function keys with the shift function. The variant Second level via double-click (300 ms) can be disabled if it is not needed.
The configuration can be made as follows:
• Via COMfortel Set
Configuring Accessibility of Second Key Level via COMfortel Set
Requirements:
- An open configuration and the required PIN, if necessary
- Open the page Settings/functions > User settings.
- Select or clear the Second-level function via double keypress check box.
☑ Enables pressing the key twice to access the second level.
☐ Disables pressing the key twice to access the second level.
Further steps:
- Save your configuration before closing.
Configuring and Operating Function Key for Shift
Press the key to access the second key level for a few seconds.
In addition the status of the function is indicated by the corresponding LED.
LED signalling next to the key:
Red The second key level is accessible.
Off The first key level is accessible.
The configuration can be carried out as follows:
- Via COMfortel Set
Configuring Function Key for Shift via COMfortel Set
Requirements:
- An open configuration and the required PIN, if necessary
- Open the page Function keys > Assign function keys.
- Click Level 1.
Important: Configuring this function is only possible on the first level. The second level is then blocked. If a function has been assigned to the second level, it is deleted.
- Right-click the function key you want to assign.
A function selection dialogue opens.
- Select the Shift function.
The current settings for defining the key are displayed.
- In the Key name entry field, enter a name for the key. The following entries are possible:
Up to 16 digits
Digits and characters
Clicking automatically enters the default name in the entry field.
Note: The key name is used for printing the label.
Further steps:
- Save your configuration before closing.
Exchanging or Moving Function Keys
The exchanging/moving procedure can be carried out as follows:
- Via COMfortel Set
Requirements:
- An open configuration and the required PIN, if necessary
- Open the page Function keys > Exchange/move.
- Click the function key field that you would like to move or exchange.
The field is selected. - Click one of the following options:
Exchange: Exchanges the selected function key after clicking the target field.
Move: Moves the selected function key after clicking the target field. - Click the target field to which the selected function key should be moved or with which the function key should be exchanged.
Further steps:
- Back up your configuration before you leave the PC programme.
Configuring and Operating Functions
This section describes how to set up and operate the functions on your telephone. Descriptions are given on what the functions do, how to operate them and – if possible – how to define these functions on programmable function keys.
Topics
– Automatic Call Acceptance (page 119)
- Call Deblocker (Incoming) – VIP Numbers (page 122)
- Call Forwarding (page 124)
- Call Restrictor (Incoming) – Robinson Numbers (page 139)
- Call Waiting (page 141)
- Configuration Switchover (page 144)
- Do-not-disturb (page 146)
- Door Functions (page 149)
– Exchange Line Transfer (page 151)
– Group Functions (page 154)
- Hotel Function (page 161)
- InterCom Announcement/Handsfree (page 167)
– Loudspeaker Audio Out (page 175)
- Macro (page 178)
- Memo (page 182)
- Phone Lock (page 183)
- Pickup (page 186)
- Power Save Mode (page 189)
– Project Assignment (page 193)
- Relays (page 195)
– Room Monitoring (page 197)
– Speed Dialling (page 200)
– Targeted Exchange Line Access (page 206)
– Targeted VoIP Access Point (page 213)
– Text before Answering (page 216)
- Voicemail Center 461/461.2 (page 221)
Automatic Call Acceptance
Automatic call acceptance facilitates headset operation at call centers or on hotlines. An incoming call is automatically accepted after a configured amount of time. Call acceptance is signalled by an attention tone.
Configuring and Operating Function Key for Automatic Call Acceptance
Press the key to switch the automatic call acceptance function on or off or to switch it over.
In addition, when functions are defined on the first key level, the status of the function is indicated by the corresponding LED.
LED signalling next to the key:
Green Automatic call acceptance is enabled.
Off Automatic call acceptance is disabled.
The configuration can be carried out as follows:
- Via COMfortel Set
Configuring Function Key for Automatic Call Acceptance via COMfortel Set
Requirements:
- An open configuration and the required PIN, if necessary
- Open the page Function keys > Assign function keys.
- Click one of the following tabs:
Level 1: Keys are defined on the first key level.
Level 2: Keys are defined on the second key level.
- Right-click the function key you want to assign.
A function selection dialogue opens.
- Select the Automatic call acceptance function.
The current settings for defining the key are displayed.
- In the Kind of switching list field, select one of the following options:
switch off: Press the key to disable automatic call acceptance.
switch on: Press the key to enable automatic call acceptance. At the same time, the readiness of answering machine in a telephone is disabled.
switch over: Press the key to switch automatic call acceptance over.
- In the Key name entry field, enter a name for the key. The following entries are possible:
Up to 16 digits
Digits and characters
Clicking automatically enters the default name in the entry field.
Note: The key name is used for printing the label.
Further steps:
- Save your configuration before closing.
Requirements for operating the function:
- Headset operation enabled
Attention Tone for Switching Automatic Call Acceptance On/Off
If the attention tone for automatic call acceptance is switched on, the automatic call acceptance of a currently incoming call is signalled by an attention tone. If the attention tone bothers you, you can switch it off. The volume of the attention tone is dependent on the configured ringer volume.
Switching this on/off can be done as follows:
- Via COMfortel Set
Switching Attention Tone for Automatic Call Acceptance On/Off via COMfortel Set
Requirements:
- An open configuration and the required PIN, if necessary
- Open the page Settings/functions > Headset.
- Select or clear the Attention tone for automatic call acceptance check box.
☑ Enables the attention tone for automatic call acceptance.
☐ Disables the attention tone for automatic call acceptance.
Further steps:
- Save your configuration before closing.
Configuring Call Acceptance Time for Automatic Call Acceptance
The call acceptance time for automatic call acceptance indicates after how many seconds an incoming call is automatically accepted.
The configuration can be made as follows:
- Via COMfortel Set
Configuring Call Acceptance Time for Automatic Call Acceptance via COMfortel Set
Requirements:
- An open configuration and the required PIN, if necessary
- Open the page Settings/functions > Headset.
- Enter a value in the Call acceptance time (0-30 secs) for automatic call acceptance entry field. The following entries are possible:
0 to 30: After 0 to 30 minutes, an incoming call is automatically accepted, depending on the entry.
Further steps:
- Save your configuration before closing.
Call Deblocker (Incoming) – VIP Numbers
If you would still like to allow specific people to call you despite enabling the do-not-disturb function, the external telephone numbers (VIP numbers) of these people can be assigned a call deblocker for incoming calls in the PBX. The call deblocker which applies to all subscribers can be enabled on your own telephone as needed. If the call deblocker is enabled, the do-not-disturb function does not apply to callers who use one of the VIP numbers.
Configuring and Operating Function Key for Call Deblocker (Incoming)
Press the key to switch the subscriber's call deblocker on or off or to switch it over.
In addition, when functions are defined on the first key level, the status of the function is indicated by the corresponding LED.
LED signalling next to the key:
Green The call deblocker is enabled.
Off The call deblocker is disabled.
The configuration can be carried out as follows:
- Via COMfortel Set
Configuring Function Key for the Call Deblocker (Incoming) via COMfortel Set
Requirements:
- An open configuration and the required PIN, if necessary
- Open the page Function keys > Assign function keys.
- Click one of the following tabs:
Level 1: Keys are defined on the first key level.
Level 2: Keys are defined on the second key level. -
Right-click the function key you want to assign.
A function selection dialogue opens. -
Select the Call deblocker - incoming (VIP no.) function.
The current settings for defining the key are displayed.
- In the Kind of switching list field, select one of the following options:
switch off: Pressing the key disables call deblocker.
switch on: Pressing the key enables call deblocker.
switch over: Pressing the key switches call deblocker on and off.
- In the Key name entry field, enter a name for the key. The following entries are possible:
Up to 16 digits
Digits and characters
Clicking automatically enters the default name in the entry field.
Note: The key name is used for printing the label.
Further steps:
- Save your configuration before closing.
Requirements for operating the function:
– Unrestricted numbers configured on the PBX and assigned to the subscriber
- Authorisation in the PBX for Controlling of the PBX via telephone
- Kind of do-not-disturb configured to All (PBX)
Call Forwarding
Call forwarding allows calls to be forwarded. When this is done, a difference is made between calls to a specific telephone (call forwarding for subscribers), to groups (call forwarding for groups) and to connections (call forwarding for external telephone numbers).
Call Forwarding Variations
Auerswald PBXs support three different kinds of call forwarding:
Call Forwarding for Subscribers
Important: Not available for operation on the PBX COMpact 3000.
When call forwarding (CF) for subscribers is used, internal and external calls to a single telephone can be rerouted to other internal telephones or external connections. In this way, the subscriber in question or his replacement can take these calls on another telephone.
Call forwarding for subscribers makes sure that the subscriber in question or his replacement is always available at his own phone number, even if the subscriber cannot take a call on his own telephone.
Important: Call forwarding for subscribers does not function for incoming group calls on your telephone. If you would like to prevent your telephone from ringing unanswered when calls to the group in which you belong come through, you need to log yourself out of the group or configure call forwarding for groups.
Note: If you would like to configure call forwarding for subscribers on the destination telephone, use the follow me function.
Call Forwarding for Groups
Important: Not available for operation on the PBX COMpact 3000.
When call forwarding for groups is used, internal and external calls to a group can be rerouted to other internal telephones or external connections. In this way, a person that is not a member of this group and therefore cannot log in, can receive these calls.
Call forwarding for groups makes sure that someone is always available on the group telephone number, even if the calls cannot be taken by a member of the group.
To configure call forwarding for groups, refer to the user manual for the PBX.
Call Forwarding for External Numbers
When call forwarding for external numbers is used, calls made to an external phone number (dialled by an external caller) are rerouted to other external connections. In this way, these calls can be taken on another telephone, for example, on a mobile phone if no one can take the call internally.
Call forwarding for external numbers can be configured for the current configuration or for the permanent configuration.
Note: If you would like to also forward internal calls, use call forwarding for subscribers or for groups instead of call forwarding for external numbers. This also allows forwarding to internal telephones.
Kinds of Call Forwarding
As there can be many different reasons for not accepting a call, for example, the subscriber in question is not present or is on another line, three kinds of call forwarding are provided:
CF unconditional
The telephone being called does not ring. The call is forwarded immediately.
CF on busy
The call is forwarded immediately but only if the telephone being called is busy.
CF on no reply
The telephone being called rings for a certain amount of time. If the call is not accepted, it is forwarded.
Note:
A different destination can be configured for each of the three kinds of call forwarding.
If "CF on busy" and "CF on no reply" are enabled at the same time, both kinds apply. Depending on which case occurs – the telephone is busy or nobody answers it – the call is forwarded to their respective telephone numbers.
If "CF unconditional" is enabled in addition to the "CF on busy" and/or "CF on no reply," all of the calls are forwarded immediately. In this case, the other kinds of call forwarding are overridden, but remain enabled. As soon as "CF unconditional" is disabled, the other kinds that are still enabled are again applicable.
Configuring and Operating Function Key for Call Forwarding for Subscribers
Press the key to enable, disable and switch call forwarding for subscribers over.
Exception: A key that is defined to disable call forwarding for subscribers only disables the currently enabled call forwarding for subscribers.
In addition, when functions are defined on the first key level, the status of the function is indicated by the corresponding LED.
LED signalling next to the key (not applicable if defined with "deactivate all"):
Red Call forwarding for subscribers is enabled for the configured destination.
Yellow Call forwarding for subscribers is enabled for another destination.
Off Call forwarding for subscribers is disabled.
The configuration can be carried out as follows:
- Via COMfortel Set
Configuring Function Key for Call Forwarding Unconditional for Subscribers via COMfortel Set
Requirements:
- An open configuration and the required PIN, if necessary
- Open the page Function keys > Assign function keys.
- Click one of the following tabs:
Level 1: Keys are defined on the first key level.
Level 2: Keys are defined on the second key level.
- Right-click the function key you want to assign.
A function selection dialogue opens.
- Select the Subscriber CF unconditional function.
The current settings for defining the key are displayed.
- In the Kind of switching list field, select one of the following options:
switch off: Pressing the key disables call forwarding unconditional for subscribers.
switch on: Pressing the key enables call forwarding unconditional for subscribers.
switch over: Pressing the key switches call forwarding unconditional for subscribers over.
- In the Telephone no entry field, enter the destination number. The following entries are possible:
Up to 24 digits
Digits and the characters * and #
- In the Type of telephone number list field, select one of the following options:
Internal no.: Defines the destination number entered as an internal telephone number.
External no.: Defines the destination number entered as an external telephone number.
- In the Key name entry field, enter a name for the key. The following entries are possible:
Up to 16 digits
Digits and characters
Clicking automatically enters the default name in the entry field.
Note: The key name is used for printing the label.
Further steps:
- Save your configuration before closing.
Requirements for operating the function:
– Authorisation in the PBX for Controlling of the PBX via telephone
- For external destination numbers: Authorization assigned in the PBX for Configuring CF (sub) to ext. number
Configuring Function Key for Call Forwarding on Busy for Subscribers via COMfortel Set
Requirements:
- An open configuration and the required PIN, if necessary
- Open the page Function keys > Assign function keys.
- Click one of the following tabs:
Level 1: Keys are defined on the first key level.
Level 2: Keys are defined on the second key level.
- Right-click the function key you want to assign.
A function selection dialogue opens.
- Select the Subscriber CF on busy function.
The current settings for defining the key are displayed.
- In the Kind of switching list field, select one of the following options:
switch off: Pressing the key disables call forwarding on busy for subscribers.
switch on: Pressing the key enables call forwarding on busy for subscribers.
switch over: Pressing the key switches call forwarding on busy for subscribers off.
- In the Telephone no entry field, enter the destination number. The following entries are possible:
Up to 24 digits
Digits and the characters * and #
- In the Type of telephone number list field, select one of the following options:
Internal no.: Defines the destination number entered as an internal telephone number.
External no.: Defines the destination number entered as an external telephone number.
- In the Key name entry field, enter a name for the key. The following entries are possible:
Up to 16 digits
Digits and characters
Clicking automatically enters the default name in the entry field.
Note: The key name is used for printing the label.
Further steps:
- Save your configuration before closing.
Requirements for operating the function:
– Authorisation in the PBX for Controlling of the PBX via telephone
- For external destination numbers: Authorization assigned in the PBX for Configuring CF (sub) to ext. number
Configuring Function Key for Call Forwarding on No Reply for Subscribers via COMfortel Set
Requirements:
- An open configuration and the required PIN, if necessary
- Open the page Function keys > Assign function keys.
- Click one of the following tabs:
Level 1: Keys are defined on the first key level.
Level 2: Keys are defined on the second key level.
- Right-click the function key you want to assign.
A function selection dialogue opens.
- Select the Subscriber CF on no reply function.
The current settings for defining the key are displayed.
- In the Kind of switching list field, select one of the following options:
switch off: Pressing the key disables call forwarding on no reply for subscribers.
switch on: Pressing the key enables call forwarding on no reply for subscribers.
switch over: Pressing the key switches call forwarding on no reply for subscribers.
- In the Telephone no entry field, enter the destination number. The following entries are possible:
Up to 24 digits
Digits and the characters * and #
- In the Type of telephone number list field, select one of the following options:
Internal no.: Defines the destination number entered as an internal telephone number.
External no.: Defines the destination number entered as an external telephone number.
- In the Key name entry field, enter a name for the key. The following entries are possible:
Up to 16 digits
Digits and characters
Clicking automatically enters the default name in the entry field.
Note: The key name is used for printing the label.
Further steps:
- Save your configuration before closing.
Requirements for operating the function:
– Authorisation in the PBX for Controlling of the PBX via telephone
- For external destination numbers: Authorization assigned in the PBX for Configuring CF (sub) to ext. number
Configuring Function Key for Switching Call Forwarding for Subscribers Off via COMfortel Set
Requirements:
- An open configuration and the required PIN, if necessary
- Open the page Function keys > Assign function keys.
- Click one of the following tabs:
Level 1: Keys are defined on the first key level.
Level 2: Keys are defined on the second key level.
- Right-click the function key you want to assign.
A function selection dialogue opens.
- Select the Switch off all subscriber CF function.
The current settings for defining the key are displayed.
- In the Key name entry field, enter a name for the key. The following entries are possible:
Up to 16 digits
Digits and characters
Clicking automatically enters the default name in the entry field.
Note: The key name is used for printing the label.
Further steps:
- Save your configuration before closing.
Requirements for operating the function:
– Authorisation in the PBX for Controlling of the PBX via telephone
- For external destination numbers: Authorization assigned in the PBX for Configuring CF (sub) to ext. number
Configuring and Operating Function Key for Call Forwarding for External Numbers
Important: Only available for operation on the PBXs COMpact 3000, COMpact 5010 VoIP, COMpact 5020 VoIP, COMmander Basic.2 and COMmander Business. On the other PBX systems this function can be set via programming sequence (see manual of the PBX).
Pressing the key enables, disables and switches call forwarding for external numbers over.
Exception: A key defined to disable all instances of call forwarding for external numbers only disables call forwarding for external numbers for which a key has been configured.
In addition, when functions are defined on the first key level, the status of the function is indicated by the corresponding LED.
LED signalling next to the key (not applicable if defined with "deactivate all"):
Red Call forwarding for external numbers is enabled in the central office/PBX for the configured destination and selected configuration.
Yellow Call forwarding on busy or on no reply for external numbers has been configured, but it is overridden by an additional call forwarding unconditional for external numbers.
Yellow Call forwarding for external numbers is enabled in the central office/PBX for another destination or configuration.
Off Call forwarding for external numbers is disabled in the central office/PBX.
Important: When operating the function via the key, the success/failure of the operation is indicated by a change in colour on the LED. During the configuration in the central office (this takes perhaps from a few seconds up to a minute), the LED blinks yellow.
The configuration can be carried out as follows:
- Via COMfortel Set
Configuring Function Key for Call Forwarding Unconditional for External Numbers via COMfortel Set
Requirements:
- An open configuration and the required PIN, if necessary
- Open the page Function keys > Assign function keys.
- Click one of the following tabs:
Level 1: Keys are defined on the first key level.
Level 2: Keys are defined on the second key level.
- Right-click the function key you want to assign.
A function selection dialogue opens.
- Select the CF unconditional (MSN/DDI) function.
The current settings for defining the key are displayed.
- In the Kind of switching list field, select one of the following options:
switch off: Pressing the key disables call forwarding unconditional for external numbers.
switch on: Pressing the key enables call forwarding unconditional for external numbers.
switch over: Pressing the key switches call forwarding unconditional for external numbers over.
- In the Configuration list field, select one of the following options:
permanent configuration: Call forwarding unconditional for external numbers is enabled, disabled or switched over in the permanent configuration.
current configuration: Call forwarding unconditional for external numbers is enabled, disabled or switched over only in the current configuration.
Note: Call forwarding for the current configuration can only be enabled if call forwarding for the permanent configuration is disabled.
- In the Telephone no entry field under Your own exchange line, enter the external phone number to be forwarded on the PBX (with a prefix). The following entries are possible:
Up to 24 digits
Digits and the characters * and #
- In the Telephone no entry field under Destination of Call Forwarding, enter the destination number (with exchange line access number). The following entries are possible:
Up to 24 digits
Digits and the characters * and #
- In the Key name entry field, enter a name for the key. The following entries are possible:
Up to 16 digits
Digits and characters
Clicking automatically enters the default name in the entry field.
Note: The key name is used for printing the label.
Further steps:
- Save your configuration before closing.
Requirements for operating the function:
- Authorization assigned in the PBX for Configuring CF (sub) to ext. number
Configuring Function Key for Call Forwarding on Busy for External Numbers via COMfortel Set
Requirements:
- An open configuration and the required PIN, if necessary
- Open the page Function keys > Assign function keys.
- Click one of the following tabs:
Level 1: Keys are defined on the first key level.
Level 2: Keys are defined on the second key level.
- Right-click the function key you want to assign.
A function selection dialogue opens.
- Select the CF on busy (MSN/DDI) function.
The current settings for defining the key are displayed.
- In the Kind of switching list field, select one of the following options:
switch off: Pressing the key disables call forwarding on busy for external numbers.
switch on: Pressing the key enables call forwarding on busy for external numbers.
switch over: Pressing the key switches call forwarding on busy for external numbers over.
- In the Configuration list field, select one of the following options:
permanent configuration: Call forwarding on busy for external numbers is enabled, disabled or switched over in the permanent configuration.
current configuration: Call forwarding on busy for external numbers is enabled, disabled or switched over only in the current configuration.
Note: Call forwarding for the current configuration can only be enabled if call forwarding for the permanent configuration is disabled.
- In the Telephone no entry field under Your own exchange line, enter the external phone number to be forwarded on the PBX (with a prefix). The following entries are possible:
Up to 24 digits
Digits and the characters * and #
- In the Telephone no entry field under Destination of Call Forwarding, enter the destination number (with exchange line access number). The following entries are possible:
Up to 24 digits
Digits and the characters * and #
- In the Key name entry field, enter a name for the key. The following entries are possible:
Up to 16 digits
Digits and characters
Clicking automatically enters the default name in the entry field.
Note: The key name is used for printing the label.
Further steps:
- Save your configuration before closing.
Requirements for operating the function:
- Authorization assigned in the PBX for Configuring CF (sub) to ext. number
Configuring Function Key for Call Forwarding on No Reply for External Numbers via COMfortel Set
Requirements:
- An open configuration and the required PIN, if necessary
- Open the page Function keys > Assign function keys.
- Click one of the following tabs:
Level 1: Keys are defined on the first key level.
Level 2: Keys are defined on the second key level.
- Right-click the function key you want to assign.
A function selection dialogue opens.
- Select the CF on no reply (MSN/DDI) function.
The current settings for defining the key are displayed.
- In the Kind of switching list field, select one of the following options:
switch off: Pressing the key disables call forwarding on no reply for external numbers.
switch on: Pressing the key enables call forwarding on no reply for external numbers.
switch over: Pressing the key switches call forwarding on no reply for external numbers over.
- In the Configuration list field, select one of the following options:
permanent configuration: Call forwarding on no reply for external numbers is enabled, disabled or switched over in the permanent configuration.
current configuration: Call forwarding on no reply for external numbers is enabled, disabled or switched over only in the current configuration.
Note: Call forwarding for the current configuration can only be enabled if call forwarding for the permanent configuration is disabled.
- In the Telephone no entry field under Your own exchange line, enter the external phone number to be forwarded on the PBX (with a prefix). The following entries are possible:
Up to 24 digits
Digits and the characters * and #
- In the Telephone no entry field under Destination of Call Forwarding, enter the destination number (with exchange line access number). The following entries are possible:
Up to 24 digits
Digits and the characters * and #
- In the Key name entry field, enter a name for the key. The following entries are possible:
Up to 16 digits
Digits and characters
Clicking automatically enters the default name in the entry field.
Note: The key name is used for printing the label.
Further steps:
- Save your configuration before closing.
Requirements for operating the function:
- Authorization assigned in the PBX for Configuring CF (sub) to ext. number
Configuring Function Key for Switching Call Forwarding for External Numbers Off via COMfortel Set
Requirements:
- An open configuration and the required PIN, if necessary
- Open the page Function keys > Assign function keys.
- Click one of the following tabs:
Level 1: Keys are defined on the first key level.
Level 2: Keys are defined on the second key level.
-
Right-click the function key you want to assign.
A function selection dialogue opens. -
Select the Switch off all CF (MSN/DDI) function.
The current settings for defining the key are displayed.
- In the Key name entry field, enter a name for the key. The following entries are possible:
Up to 16 digits
Digits and characters
Clicking automatically enters the default name in the entry field.
Note: The key name is used for printing the label.
Further steps:
- Save your configuration before closing.
Requirements for operating the function:
- Authorization assigned in the PBX for Configuring CF (sub) to ext. number
Call Restrictor (Incoming) – Robinson Numbers
If there are certain persons who you absolutely do not want to call you, their external phone numbers (Robinson numbers) can be assigned to a call restrictor for incoming calls in the PBX. The call restrictor which applies to all subscribers can be enabled on your own telephone as needed. If the call restrictor is enabled, a caller, who transmitted one of the Robinson numbers, is rejected.
Configuring and Operating Function Key for Call Restrictor (Incoming)
Press the key to switch the subscriber's call restrictor on or off or to switch it over.
In addition, when functions are defined on the first key level, the status of the function is indicated by the corresponding LED.
LED signalling next to the key:
Red The call restrictor is enabled.
Off The call restrictor is disabled.
The configuration can be carried out as follows:
- Via COMfortel Set
Configuring Function Key for Call Restrictor (Incoming) via COMfortel Set
Requirements:
- An open configuration and the required PIN, if necessary
- Open the page Function keys > Assign function keys.
- Click one of the following tabs:
Level 1: Keys are defined on the first key level.
Level 2: Keys are defined on the second key level. -
Right-click the function key you want to assign.
A function selection dialogue opens. -
Select the Call restrictor - incoming (Robinson no.) function.
The current settings for defining the key are displayed.
- In the Kind of switching list field, select one of the following options:
switch off: Pressing the key enables the call restrictor.
switch on: Pressing the key enables the call restrictor.
switch over: Pressing the key switches the call restrictor on and off.
- In the Key name entry field, enter a name for the key. The following entries are possible:
Up to 16 digits
Digits and characters
Clicking automatically enters the default name in the entry field.
Note: The key name is used for printing the label.
Further steps:
- Save your configuration before closing.
Requirements for operating the function:
- A call restrictor configured on the PBX and assigned to the subscriber
- Authorisation in the PBX for Controlling of the PBX via telephone
Call Waiting
If you are already in a call, the call waiting function notifies you using the call waiting tone when another communication partner is calling.
Configuring and Operating Function Key for Call Waiting
Press the key to switch call waiting on or off or to switch it over.
In addition, when functions are defined on the first key level, the status of the function is indicated by the corresponding LED.
LED signalling next to the key:
Green Call waiting is enabled.
Off Call waiting is disabled.
The configuration can be carried out as follows:
- Via COMfortel Set
Configuring Function Key for Call Waiting via COMfortel Set
Requirements:
- An open configuration and the required PIN, if necessary
- Open the page Function keys > Assign function keys.
- Click one of the following tabs:
Level 1: Keys are defined on the first key level.
Level 2: Keys are defined on the second key level. - Right-click the function key you want to assign.
A function selection dialogue opens. -
Select the Call waiting function.
The current settings for defining the key are displayed. -
In the Kind of switching list field, select one of the following options:
switch off: Pressing the key disables call waiting.
switch on: Pressing the key enables call waiting.
switch over: Pressing the key switches call waiting on and off.
- In the Key name entry field, enter a name for the key. The following entries are possible:
Up to 16 digits
Digits and characters
Clicking automatically enters the default name in the entry field.
Note: The key name is used for printing the label.
Further steps:
- Save your configuration before closing.
Requirements for operating the function:
- Authorisation in the PBX for Controlling of the PBX via telephone
Switching Call Waiting Signalling On/Off via LED/Tone
Incoming calls during a call are indicated by a change in the display.
If call waiting signalling via LED has been enabled, incoming calls during a call are also indicated via a blinking LED above the hook key.
If call waiting signalling via tone is enabled, incoming calls during a call are also indicated by a tone on the receiver.
Switching this on/off can be done as follows:
- Via COMfortel Set
Switching Call Waiting Signal via LED/Tone On/Off via COMfortel Set
Requirements:
- An open configuration and the required PIN, if necessary
- Open the page Settings/functions > Signalling/ringer.
- Select or clear the Call waiting (LED) check box.
☑ Enables call waiting signalling via LED using the hook key.
☐ Disables call waiting signalling via LED using the hook key.
- Select or clear the Call waiting (tone) check box.
☑ Enables call waiting signalling via tone.
□ Disables call waiting signalling via tone.
Further steps:
- Save your configuration before closing.
Configuration Switchover
If multiple configurations have been saved in the PBX, for example, for day, night, etc., switching over from one configuration to another can be carried out manually and/or in a time controlled manner.
Configuring and Operating Function Key for Configuration Switchover
Press the key for configurations to enable the configuration that has been set up.
In addition, when functions are defined on the first key level, the status of the function is indicated by the corresponding LED.
LED signalling next to the key:
Green The configuration saved in the key is enabled.
Off The configuration saved in the key is disabled.
The configuration can be carried out as follows:
- Via COMfortel Set
Configuring Function Key for Defined Configuration Switchover via COMfortel Set
Requirements:
- An open configuration and the required PIN, if necessary
-
At least two configurations set up in the PBX
-
Open the page Function keys > Assign function keys.
- Click one of the following tabs:
Level 1: Keys are defined on the first key level.
Level 2: Keys are defined on the second key level.
- Right-click the function key you want to assign.
A function selection dialogue opens.
- Select the Defined config. on function.
The current settings for defining the key are displayed.
-
Configure the settings dependent on the type of PBX.
-
Select a configuration in the configuration to be activated list field.
-
Enter the identification number of the configuration in the identification number field.
-
In the Key name entry field, enter a name for the key. The following entries are possible:
Up to 16 digits
Digits and characters
Clicking automatically enters the default name in the entry field.
Note: The key name is used for printing the label and for display.
Further steps:
- Save your configuration before closing.
Requirements for operating the function:
- Authorization in the PBX for Configuration switching
Do-not-disturb
The do-not-disturb function offers the option of blocking internal and external calls as well as blocking group calls on a specific telephone. A caller hears only a busy signal. An internal subscriber can reach a telephone with call protection in an emergency using a priority call.
The do-not-disturb function has no influence on outbound calls, callbacks, alarm calls, scheduled calls, wake-up calls or InterCom calls.
Configuring and Operating Function Key for Do-not-disturb
Press the key to switch the do-not-disturb function on or off or to switch it over.
In addition, when functions are defined on the first key level, the status of the function is indicated by the corresponding LED.
LED signalling next to the key:
Yellow The do-not-disturb function is enabled.
Off The do-not-disturb function is disabled.
The configuration can be carried out as follows:
- Via COMfortel Set
Configuring Function Key for Do-not-disturb via COMfortel Set
Requirements:
- An open configuration and the required PIN, if necessary
- Open the page Function keys > Assign function keys.
- Click one of the following tabs:
Level 1: Keys are defined on the first key level.
Level 2: Keys are defined on the second key level.
- Right-click the function key you want to assign.
A function selection dialogue opens.
- Select the Do-not-disturb function.
The current settings for defining the key are displayed.
- In the Kind of switching list field, select one of the following options:
switch off: Disables the do-not-disturb function.
switch on: Enables the do-not-disturb function.
switch over: Pressing the key switches the do-not-disturb function on and off.
- In the Key name entry field, enter a name for the key. The following entries are possible:
Up to 16 digits
Digits and characters
Clicking automatically enters the default name in the entry field.
Note: The key name is used for printing the label.
Further steps:
- Save your configuration before closing.
Requirements for operating the function:
- Authorisation in the PBX for Controlling of the PBX via telephone
Configuring Type of Do-not-disturb
Defining the type of Do-not-disturb function determines how do-not-disturb works when it is enabled.
The configuration can be made as follows:
- Via COMfortel Set
Configuring Type of Do-not-disturb via COMfortel Set
Requirements:
- An open configuration and the required PIN, if necessary
- Open the page Settings/functions > Do-not-disturb.
- Under Kind of do-not-disturb, select one of the following options:
All (PBX): The do-not-disturb function is carried out via the PBX. All incoming calls are rejected and not entered in the caller list on the telephone.
Reject anonymous: All anonymous calls are rejected.
Only contacts: All calls are rejected except for calls from contacts listed in the telephone book.
All (telephone): The do-not-disturb function is carried out via the phone. All incoming calls are rejected and entered in the caller list on the telephone.
Note:
Parallel to the kind of do-not-disturb, All (PBX), the call deblocker (incoming) can be enabled so that the VIP numbers registered in the call deblocker on the PBX are not rejected.
Internal telephone calls are only rejected if the kind of do-not-disturb function All (PBX) and All (telephone) are used. An internal subscriber can reach a protected telephone in an emergency with a priority call if the kind of do-not-disturb function All (PBX) is used. Calls are only registered in the caller list on the telephone if the kind of do-not-disturb function All (telephone) is used.
Further steps:
- Save your configuration before closing.
Door Functions
A door terminal system connected with the interface FTZ 123 D12-0 (PBX requires extension module) enables the following functions. Calls to the door can be made from any telephone (intercom). During a call to the door, the door can be opened (open door) and a stairwell light controlled by switching a relay (switch on light).
These functions can be executed on the system telephone without initiating a door call.
Configuring and Operating Function Key for Door Functions
Important: Not available for operation on the PBXs COMpact 2204 USB and COMpact 3000.
Press the key to initiate a call connection with the door (after picking up the receiver) or to switch on the door opener and/or light.
In addition, when functions are defined on the first key level, the status of the function is indicated by the corresponding LED.
LED signalling next to the key:
Green The door opener function is enabled.
Red A call connection has been established with the door.
Yellow The light is switched on.
Off None of the functions configured on the key are enabled.
The configuration can be carried out as follows:
- Via COMfortel Set
Configuring Function Key for Defined Door Terminal Functions via COMfortel Set
Requirements:
- An open configuration and the required PIN, if necessary
– The authority level assigned in the PBX for the door terminal -
The relays configured in the PBX for the intercom, opening the door and the stairwell light
-
Open the page Function keys > Assign function keys.
- Click one of the following tabs:
Level 1: Keys are defined on the first key level.
Level 2: Keys are defined on the second key level.
- Right-click the function key you want to assign.
A function selection dialogue opens.
- Select the Defined door function function.
The current settings for defining the key are displayed.
- In the Telephone no entry field, enter the telephone number of the door.
- In the Door terminal function list field, select one of the following options:
Open the door & switch on the light: Press the key to switch the door opener and the light on.
Open the door: Press the key to switch the door opener on.
Light on: Press the key to switch the light on.
Talking: Press the key to initiate a call connection to the door.
Note: The door terminal function Light on switches on the third relay of the door station in question separately at the time configured in the PBX.
- In the Key name entry field, enter a name for the key. The following entries are possible:
Up to 16 digits
Digits and characters
Clicking automatically enters the default name in the entry field.
Note: The key name is used for printing the label and for display.
Further steps:
- Save your configuration before closing.
Requirements for operating the function:
– Authorization in the PBX for Open door
Exchange Line Transfer
A suitably authorised telephone, for example, the telephone exchange, can transfer the exchange line access required for an outgoing call to another internal telephone for a short period of time. This is meaningful, for example, when this telephone is located in a publicly accessible room and is only occasionally used for external calls by an employee.
Exchange Line Transfer Sequence
The exchange line transfer proceeds as follows:
- The requesting telephone must initiate an internal call with the telephone authorised to make the exchange in order to request exchange line access.
Important:
For an exchange line transfer, the telephone making the transfer needs the authority level itself to transfer external calls externally.
The requesting telephone needs at least the official exchange line authority level for incoming external calls.
- After the function key assigned to exchange line transfer has been pressed on the telephone authorised for making exchanges, a confirmation tone is issued to both internal subscribers and the internal call must be ended.
- The requesting telephone now has access to the exchange line settings configured for this purpose on the PBX. These exchange line settings remain until the first successful, outgoing external call or until the time limitation has elapsed for initiating the external call.
Note: Configuring the exchange line transfer function is done in the PBX.
Configuring and Operating Function Key for Exchange Line Transfer
Important: Only available for operation on the PBXs COMpact 3000, COMpact 5010 VoIP, COMpact 5020 VoIP, COMmander Basic.2 and COMmander Business.
Press the key during an internal call to transfer the exchange line access to your communication partner for a single external call. Afterwards, a confirmation tone is issued on both internal telephones and the internal call must be ended.
LED signalling next to the key:
None
The configuration can be carried out as follows:
- Via COMfortel Set
Configuring Function Key for Exchange Line Transfer via COMfortel Set
Requirements:
- An open configuration and the required PIN, if necessary
- Open the page Function keys > Assign function keys.
- Click one of the following tabs:
Level 1: Keys are defined on the first key level.
Level 2: Keys are defined on the second key level.
- Right-click the function key you want to assign.
A function selection dialogue opens.
- Select the Exchange line call transfer function.
The current settings for defining the key are displayed.
- In the Key name entry field, enter a name for the key. The following entries are possible:
Up to 16 digits
Digits and characters
Clicking automatically enters the default name in the entry field.
Note: The key name is used for printing the label.
Further steps:
- Save your configuration before closing.
Requirements for operating the function:
– Authorization in the PBX for Transfer of external calls to external
Group Functions
In addition to internal subscribers, the PBX can also manage groups. The internal subscribers can become members of any and all groups. These groups can be used, for example, to collect the internal subscribers in certain departments or teams (Support, Marketing, Sales) together.
Membership in a group does not necessarily mean that a subscriber receives calls sent to the group. A subscriber that is logged out takes on no group functions. This can be especially important for employees of a support department, who should not be available to customers around the clock, but rather rotate in and out of the hotline.
Detailed Information about Group Functions
Important: Not available for operation on the PBX COMpact 3000.
Note:
If a group (subgroup) has been configured in the PBX as member of a group (main group) and a subscriber is at the same time member of these two groups, he will only be considered as a member of the main group when a call comes in.
Subgroups (i.e. groups that have been configured as members of other groups) are "permanently logged in as incoming" and "permanently logged out as outgoing" in the corresponding main group.
There are three different ways to logon:
Only incoming
When logging into a group as "incoming", the subscriber then finds himself in the call distribution of the group in question for internal, exchange line and door calls.
Only outgoing
When logging into a group as "outgoing", the subscriber acquires a number of characteristics/access rights from the group. These replace his own characteristics/access rights as an individual subscriber for outgoing work-related calls. A subscriber can only be logged on in a single group as "outgoing" even if he is a member of more than one group.
Note: If a subscriber logs into different groups as "outgoing" one after the other, he will only remain logged in as "outgoing" in the group that he logged into last.
Incoming and outgoing
When logging into a group as "incoming and outgoing", the subscriber then finds himself in the call distribution of the group in question for internal, exchange line and door calls and also acquires a number of additional characteristics/access rights from the group. These replace his own characteristics/permissions as an individual subscriber for outgoing work-related calls.
Note: If a subscriber logs into more than one group as "incoming and outgoing", he will only remain logged in as "incoming and outgoing" in the group that he logged into last. And in all other groups, he is then only "logged in as incoming".
Configuring and Operating Function Key for Group Function
Press the key to execute the action configured in the key for the specified group.
In addition, when functions are defined on the first key level, the status of the function is indicated by the corresponding LED.
LED signalling next to the key:
Green The telephone is logged into the group for incoming and outgoing calls.
Yellow The telephone is only logged into the group for either incoming or outgoing calls.
Off The telephone is logged out of the group.
LED signalling next to the key (when defined with a specific group function only incoming):
Green The telephone is logged into the group for incoming and outgoing calls.
Yellow The telephone is only logged into the group for incoming calls.
Off The telephone is logged out of the group for incoming calls.
LED signalling next to the key (when defined with a specific group function only outgoing):
Green The telephone is logged into the group for outgoing and incoming calls.
Yellow The telephone is only logged into the group for outgoing calls.
Off The telephone is logged out of the group for outgoing calls.
The configuration can be carried out as follows:
• Via COMfortel Set
Configuring Function Key for Defined Group Functions via COMfortel Set
Requirements:
- An open configuration and the required PIN, if necessary
-
The telephone is a member of a group configured in the PBX
-
Open the page Function keys > Assign function keys.
- Click one of the following tabs:
Level 1: Keys are defined on the first key level.
Level 2: Keys are defined on the second key level.
- Right-click the function key you want to assign.
A function selection dialogue opens.
- Select the Defined group function.
The current settings for defining the key are displayed.
- In the Telephone no entry field, enter the telephone number of the group.
- In the action list field, select one of the following options:
Log out: Press the key to log the telephone out of the group.
Log in: Press the key to log the telephone into the group.
Change logging: Press the key to change the log in status.
- In the direction list field, select one of the following options:
incoming: Select the type of call for incoming.
outgoing: Select the type of call for outgoing.
inbound + outbound: Select the type of call for inbound + outbound.
- In the Key name entry field, enter a name for the key. The following entries are possible:
Up to 16 digits
Digits and characters
Clicking automatically enters the default name in the entry field.
Note: The key name is used for printing the label and for display.
Further steps:
- Save your configuration before closing.
Requirements for operating the function:
– Authorisation in the PBX for Controlling of the PBX via telephone
Configuring and Operating Function Key for Logging Out of All Groups
Press the key while the telephone is in the idle state to log the telephone out of all groups.
LED signalling next to the key:
None
The configuration can be carried out as follows:
- Via COMfortel Set
Configuring Function Key for Logging Out of All Groups via COMfortel Set
Requirements:
- An open configuration and the required PIN, if necessary
-
The telephone is a member of a group configured in the PBX
-
Open the page Function keys > Assign function keys.
- Click one of the following tabs:
Level 1: Keys are defined on the first key level.
Level 2: Keys are defined on the second key level.
- Right-click the function key you want to assign.
A function selection dialogue opens.
- Select the Group functions off function.
The current settings for defining the key are displayed.
- In the Key name entry field, enter a name for the key. The following entries are possible:
Up to 16 digits
Digits and characters
Clicking automatically enters the default name in the entry field.
Note: The key name is used for printing the label.
Further steps:
- Save your configuration before closing.
Requirements for operating the function:
- Authorisation in the PBX for Controlling of the PBX via telephone
Configuring and Operating the Display of the Group Status
Press the key in the idle mode of the telephone to display the current group status of the subscribers (logged out, logged in as incoming and/or outgoing) on the LEDs of configured speed dialling keys for approx. ten seconds. For this purpose, the speed dialling keys must be assigned to the corresponding subscriber telephone numbers. Press the key again during the ten seconds to cancel the display.
LED signalling next to the key:
Blinking
The group status is being queried.
yellow
LED signalling next to the speed dialling keys assigned to subscriber telephone numbers (group members):
Red The telephone is logged out of the group.
Green The telephone is logged into the group for incoming and outgoing calls.
Yellow The telephone is logged into the group for incoming calls.
Blinking
The telephone is logged into the group for outgoing calls.
yellow
The configuration can be carried out as follows:
- Via COMfortel Set
Configuring Function Key for Displaying the Group Status via COMfortel Set
Requirements:
- An open configuration and the required PIN, if necessary
- Open the page Function keys > Assign function keys.
- Click one of the following tabs:
Level 1: Keys are defined on the first key level.
Level 2: Keys are defined on the second key level. -
Right-click the function key you want to assign.
A function selection dialogue opens. -
Select the Group status function.
The current settings for defining the key are displayed.
-
In the Telephone no entry field, enter the phone number of the group.
-
In the Key name entry field, enter a name for the key. The following entries are possible:
Up to 16 digits
Digits and characters
Clicking automatically enters the default name in the entry field.
Note: The key name is used for printing the label and for display.
Further steps:
- Save your configuration before closing.
Requirements for operating the function:
- Speed dialling keys assigned to the corresponding subscriber telephone numbers
Hotel Function
The hotel function allows you to conveniently manage room and call data when the PBX is used in a hotel.
Function Areas of the Hotel Function
The range of features in the hotel function can be divided into the following three areas:
Hotel reception telephones
Via the display and the LEDs on the function keys, the hotel reception telephone supports various control and query functions thereby making the need of a PC at the reception unnecessary. A function key is configured on the reception telephone for each room. In addition to check-in and check-out, other functions are available.
Before check-in, the status of the room can be checked (cleaned, unclean, blocked) and changed.
As soon as check-in is complete, the following configuration and query functions can be used.
- Call charge queries including check-in date
- Interim call charge calculation printout
- Wake-up time configuration
- External access block
- Check-out
Room telephones
The PBX provides a variety of functions that may not be suitable or may even be harmful in relation to room telephone usage. Therefore, telephones configured as room telephones are blocked from not only programming functions (for example, do-not-disturb, call forwarding) but also from switching functions and special types of call initiation. This means that guests can only make and except calls. Furthermore, cleaning personnel have the option of indicating the status of the room by entering a series of numbers (cleaned, unclean, blocked).
The advantages of a system telephone compared to using standard telephones include centrally controlled delete functions when a guest checks out (data protection) as well as various convenience functions, and specially configured function keys when necessary. The functions that are still permitted on room telephones are operated in the exact same way as is
described for normal telephones. With one exception: A function key assigned to the hotel room function enables the guest to set a wake-up time as well as query his call charges and his check-in time.
The following functions are still possible:
- Making and excepting internal and external calls
- Deleting data and call charges using the Functions menu command (this does not affect the call charge counter on the PBX)
- The use of the caller/call/redial list as well as of the telephone book (parts of the telephone book can be blocked in the telephone)
- Scheduled call/reminders and power dialling
- Call charge query and wake-up time configuration using a function key
Print function
This print function enables a printout of the guest's call charges up to that point as an invoice (or interim invoice) including an itemised list of the individual calls. This function is controlled by the hotel reception telephone.
Note: The recommended printers are listed in the manual for the PBX in question.
Configuring the Hotel Function
Important: Only available for operation on the PBXs COMpact 4406 DSL, COMpact 4410 USB, COMmander Basic, COMpact 5020 VoIP, COMmander Basic.2 and COMmander Business.
The hotel function is configured as described in the following.
- For operation on the PBXs COMpact 5020 VoIP, COMmander Basic.2 and COMmander Business: Use the configuration manager on the PBX to activate the hotel function.
Important: Activating is done with an activation code that you can acquire from the Auerswald Upgrade Centre. For operation on the PBXs, COMmander Business and COMmander Basic.2, the number of available hotel telephones (reception and room telephones) must be activated. For operation on the PBX, COMpact 5020 VoIP, the hotel function only needs to be activated once.
- Use the configuration manager or configuration software on the PBX to select the telephones that are to be used as reception or room telephones.
Note:
It is not possible to use the COMfortel 1100 system telephone as a reception telephone.
It is not possible to use the system telephone as a waiting field reception and as a reception telephone at the same time.
For operation on the PBXs COMpact 4406 DSL and COMpact 4410 USB, a max. of 1 hotel reception telephone is possible. For operation on the PBX COMmander Basic, a max. of 4 hotel reception telephones is possible.
- Use the configuration manager or the configuration software on the PBX to configure the print function.
- On each hotel reception telephone, assign a hotel room key each for each hotel room telephone to be managed.
Note:
If a check-in or check-out operation is in progress, the hotel reception telephone is not accessible for incoming calls during this period of time. It is recommended to configure call forwarding on busy for cases like this.
Note that the option of entering internal calls into the caller list must be activated if the hotel reception telephone should inform hotel guests of why their calls could not go through.
- Assign a hotel room key on each room telephone for call charge queries and for setting up wake-up times.
Note: In order to avoid misunderstandings when querying call charges, the value configured in COMfortel Set for the cost per call unit must correspond with the value configured in the PBX.
Configuring Wake-up Time on Hotel Room Telephone
The configuration can be carried out as follows:
• Via the telephone menu
Requirements:
– A function key configured for hotel rooms
– Successful check-in
- Press a function key configured for hotel rooms.
- Select wake-up time.
- Select the desired option:
switched off: Disables wake-up. (No other action is required.)
wake-up once: Switches the wake-up time on for a single wake-up.
wake-up daily: Switches the wake-up time on for daily wake-up. - Enter the time.
- Press the softkey to save the entry.
Querying Call Charges on Hotel Room Telephone
The query can be carried out as follows:
• Via the telephone menu
Requirements:
– A function key configured for hotel rooms
- Successful check-in
- Press a function key configured for hotel rooms.
- Select call charges.
The call charges including check-in date are displayed.
Configuring and Operating Function Key for Hotel Room on Hotel Room Telephone
Important: Configuring a function key on the room telephone must be done via COMfortel Set, since configuration via the telephone menu is blocked.
Press the key to open the menu for querying call charges and setting up a wake-up time.
LED signalling next to the key:
None
The configuration can be carried out as follows:
- Via COMfortel Set
Configuring Function Key for Hotel Room on Room Telephone via COMfortel Set
Requirements:
- An open configuration and the required PIN, if necessary
-
The hotel subscriber activated in the PBX (for a fee) and the room telephone function assigned to the telephone
-
Open the page Function keys > Assign function keys.
- Click the Level 1 tab.
Important: Configuring this function is only possible on the first level. The second level is then blocked. If a function has been assigned to the second level, it is deleted.
- Right-click the function key you want to assign.
A function selection dialogue opens.
- Select the Hotel room function.
The current settings for defining the key are displayed.
-
In the Telephone no entry field, enter the internal telephone number for the room telephone.
-
In the Key name entry field, enter a name for the key. The following entries are possible:
Up to 16 digits
Digits and characters
Clicking automatically enters the default name in the entry field.
Note: The key name is used for printing the label.
Further steps:
- Save your configuration before closing.
InterCom Announcement/Handsfree
The InterCom function enables an announcement to one system telephone or to all system telephones of a group from any internal telephone without someone having to actively receive a call (for example, in a doctor's office).
If the InterCom destination is one system telephone, this can be programmed to switch on the microphone in addition to the loudspeaker (handsfree) so that a person nearby can speak with the caller using this intercom system.
InterCom Announcement Procedure
InterCom announcement is carried out as follows:
- Depending on the InterCom destination, one system telephone or all system of a group are called using the InterCom function.
Note: Only the system telephones of the group which are ready for calls (e.g., not busy) are called. The individual group members need not to be logged into the group. They are also called when they are logged out of the group.
- After a few rings, either one system telephone or all system telephones of the group automatically pick up the call, depending on the InterCom destination.
- Announcement is executed.
Note: Announcement is limited to 120 seconds due to security reasons in order to prevent possible misuse of this function (for example, eavesdropping from remote rooms).
- After 120 seconds has elapsed, the connection is automatically interrupted. The connection can be maintained if the InterCom destination is one system telephone and the receiver is picked up before 120 seconds has elapsed.
Executing InterCom Announcement
Requirements:
– Existing InterCom authorisation at the InterCom destination/s
- Configured function key for InterCom announcement
Note: InterCom announcement can also be executed from any internal telephone (see the PBX manual).
Depending on the kind of action configured on the key, proceed as described.
- Press the function key for InterCom announcement or press and hold the function key.
The LED next to the function key lights up in yellow or green to indicate the existing call connection. - To end announcement function, press the function key again or release the function key.
Configuring and Operating Function Key for InterCom Announcement
Press the key while the telephone is in the idle state to dial the subscriber or group telephone number assigned to the key and initiate the InterCom announcement. Depending on the kind of action configured, you need to hold the key during the announcement (as soon as you release the key again, the connection is terminated) or switch the key over by briefly pressing the key (the key is pressed once at the start and once at the end).
In addition, when InterCom destination is defined on the first key level, the status of the InterCom destination connection is indicated by the corresponding LED.
LED signalling next to the key (when defined with an internal subscriber telephone number):
Green There is currently an active connection to the InterCom destination.
Off There is currently no active connection to the InterCom destination.
LED signalling next to the key (when defined with an internal group telephone number):
Green There is currently an active connection to all InterCom destinations.
Yellow There is currently an active connection to at least one InterCom destination.
Yellow The InterCom call is sent to the PBX.
(blinking)
Red No InterCom destination can be reached.
The configuration can be carried out as follows:
- Via COMfortel Set
Configuring Function Key for InterCom Announcement via COMfortel Set
Requirements:
- An open configuration and the required PIN, if necessary
-
For a group as InterCom destination: at least one group configured in the PBX
-
Open the page Function keys > Assign function keys.
- Click one of the following tabs:
Level 1: Keys are defined on the first key level.
Level 2: Keys are defined on the second key level.
- Right-click the function key you want to assign.
A function selection dialogue opens.
- Select the InterCom announcement function.
The current settings for defining the key are displayed.
- In the Telephone no entry field, enter the destination number. The following entries are possible:
Internal telephone number of the subscriber Internal telephone number of the group
- In the Type list field, select one of the following options:
Subscriber: Defines the telephone number entered as a subscriber telephone number.
Group: Defines the telephone number entered as a group telephone number.
- In the Kind of action list field, select one of the following options:
hold: The key must be held down during the announcement.
switch over: A short press of the key starts the announcement. Another short press of the key ends the announcement.
- In the Key name entry field, enter a name for the key. The following entries are possible:
Up to 16 digits
Digits and characters
Clicking automatically enters the default name in the entry field.
Note: The key name is used for printing the label and for display.
Further steps:
- Save your configuration before closing.
Requirements for operating the function:
– Existing InterCom authorisation at the InterCom destination
InterCom Handsfree Procedure
InterCom handsfree is carried out as follows:
- A system telephone is called using InterCom handsfree.
- After a few rings, the system telephone automatically picks up the call.
- Hands-free calling is executed.
Note: Hands-free calling is limited to 120 seconds due to security reasons in order to prevent possible misuse of this function (for example, eavesdropping from remote rooms).
- After 120 seconds has elapsed, the connection is automatically interrupted unless the system telephone receiver is picked up during this time.
Executing InterCom Handsfree
Requirements:
– Existing InterCom authorisation at the InterCom destination
- Configured function key for InterCom handsfree
Note: InterCom handsfree can also be executed from any internal telephone (see the PBX manual).
Depending on the kind of action configured on the key, proceed as described.
- Press the function key for InterCom handsfree or press and hold the function key. The LED next to the function key lights up in green to indicate the existing call connection.
- To end handsfree function, press the function key again or release the function key.
Configuring and Operating Function Key for InterCom Handsfree
Press the key while the telephone is in the idle state to dial the phone number assigned to the key and initiate InterCom handsfree. Depending on the kind of action configured, you need to hold the key during handsfree operation (as soon as you release the key again, the connection is terminated) or switch the key over by briefly pressing the key (the key is pressed once at the start and once at the end).
In addition, when InterCom destination is defined on the first key level, the status of the InterCom destination connection is indicated by the corresponding LED.
LED signalling next to the key:
Green There is currently an active connection to the InterCom destination.
Off There is currently no active connection to the InterCom destination.
The configuration can be carried out as follows:
- Via COMfortel Set
Configuring Function Key for InterCom Handsfree via COMfortel Set
Requirements:
- An open configuration and the required PIN, if necessary
- Open the page Function keys > Assign function keys.
- Click one of the following tabs:
Level 1: Keys are defined on the first key level.
Level 2: Keys are defined on the second key level.
- Right-click the function key you want to assign.
A function selection dialogue opens.
- Select the InterCom handsfree function.
The current settings for defining the key are displayed.
-
In the Telephone no entry field, enter the destination number.
-
In the Kind of action list field, select one of the following options:
hold: The key must be held down during the announcement.
switch over: A short press of the key starts the announcement. Another short press of the key ends the announcement.
- In the Key name entry field, enter a name for the key. The following entries are possible:
Up to 16 digits
Digits and characters
Clicking automatically enters the default name in the entry field.
Note: The key name is used for printing the label and for display.
Further steps:
- Save your configuration before closing.
Requirements for operating the function:
– Existing InterCom authorisation at the InterCom destination
Configuring and Operating Function Key for InterCom Permission
Press the key to switch the InterCom permission function on or off or to switch it over.
In addition, when functions are defined on the first key level, the status of the function is indicated by the corresponding LED.
LED signalling next to the key:
Green InterCom permission is enabled.
Off InterCom permission is disabled.
The configuration can be carried out as follows:
- Via COMfortel Set
Configuring Function Key for InterCom Permission via COMfortel Set
Requirements:
- An open configuration and the required PIN, if necessary
- Open the page Function keys > Assign function keys.
- Click one of the following tabs:
Level 1: Keys are defined on the first key level.
Level 2: Keys are defined on the second key level.
- Right-click the function key you want to assign.
A function selection dialogue opens.
- Select the InterCom permission function.
The current settings for defining the key are displayed.
- In the Kind of switching list field, select one of the following options:
switch off: Pressing the key disables InterCom permission.
switch on: Pressing the key enables InterCom permission.
switch over: Pressing the key switches InterCom permission over.
- In the Key name entry field, enter a name for the key. The following entries are possible:
Up to 16 digits
Digits and characters
Clicking automatically enters the default name in the entry field.
Note: The key name is used for printing the label.
Further steps:
- Save your configuration before closing.
Requirements for operating the function:
– Authorisation in the PBX for Controlling of the PBX via telephone
Loudspeaker Audio Out
This function enables loudspeaker audio out over an audio output on the loudspeaker connected to the PBX unit or an active loudspeaker (for example, a loudspeaker system in a department store/supermarket). In addition, a previously specified telephone number is called by an internal telephone. The call connection is immediately established after dialling the telephone number.
Executing Loudspeaker Audio Out
Important: Not available for operation on the PBX COMpact 3000.
The execution can be made as follows:
• Via the telephone menu
Requirements:
– Authorization in the PBX for Speaker announcement
– A function key configured for loudspeaker audio out
Note: Loudspeaker audio out can also be executed from any internal telephone (see PBX manual).
Depending on the kind of action configured on the key, proceed as described.
- Press the function key for InterCom announcement/handsfree or press and hold the function key.
The LED next to the function key lights up in green to indicate the existing call connection.
- To end announcement or handsfree function, press the function key again or release the function key.
Configuring and Operating Function Key for Loudspeaker Audio Out
Important: Not available for operation on the PBX COMpact 3000.
Press the key while the telephone is in the idle state to establish a connection to the audio output on the PBX. Depending on the kind of action configured, you need to hold the key during the audio out (as soon as you release the key again, the connection is terminated) or switch the key over by briefly pressing the key (the key is pressed once at the start and once at the end).
In addition, when the audio output is defined on the first key level, the status of the audio output connection is indicated by the corresponding LED.
LED signalling next to the key:
Green There is currently an active connection to the audio output.
Off There is currently no active connection to the audio output.
The configuration can be carried out as follows:
• Via COMfortel Set
Configuring Function Key for Loudspeaker Audio Out via COMfortel Set
Requirements:
-
An open configuration and the required PIN, if necessary
– An audio output configured in the PBX -
Open the page Function keys > Assign function keys.
- Click one of the following tabs:
Level 1: Keys are defined on the first key level.
Level 2: Keys are defined on the second key level.
- Right-click the function key you want to assign.
A function selection dialogue opens.
- Select the InterCom audio out function.
The current settings for defining the key are displayed.
- In the Telephone no entry field, enter the internal telephone number for the audio output.
- In the Kind of action list field, select one of the following options:
hold: The key must be held down during the announcement.
switch over: A short press of the key starts the announcement. Another short press of the key ends the announcement.
- In the Key name entry field, enter a name for the key. The following entries are possible:
Up to 16 digits
Digits and characters
Clicking automatically enters the default name in the entry field.
Note: The key name is used for printing the label and for display.
Further steps:
- Save your configuration before closing.
Requirements for operating the function:
– Authorization in the PBX for Speaker announcement
Macro
The macro function enables a function key to be defined with digits and various consecutive commands, for example, for accessing an answering machine remotely or programming a function on the PBX.
Macro Execution Procedure
The following describes the procedure based on an example key using the following command sequence HZ300CW2Z#22#Lg:
- Command H: After pressing the macro key, the telephone switches to hands-free calling.
Note: If the H command (hang-up/pick-up with the hook key) is located at the beginning of the macro, the start of macro execution must be confirmed.
- Command Z300: The telephone dials the phone number 300 (for example, the answering machine).
- Command C: The telephone waits for the connection.
- Command W2: After the connection has been established, the telephone waits another 2 seconds.
- Command Z#22#: The telephone dials the DTMF code #22#.
- Command Lg: The LED next to the function key switches on (green).
Important: The state of the LED remains the same after a macro is executed – until the next time the command Lo, Lg, Lr or Ly is executed with the same key. If the LED is not to be used for status indication, it is recommended that you add the command Lo (disable LED) to the end of a macro.
If you would like to end macro execution, press the Exit key.
Macro execution is ended immediately when an incoming call is made to a destination that is busy or when a connection returns that it is busy. This occurs, for instance, when the other calling party ends the call or the macro contains a programming code that is not authorised.
Configuring and Operating Function Key for Macro
Press the key while the telephone is in the idle state to execute a macro. If the H command (hang-up/pick-up with the hook key) is located at the beginning of a macro, the macro saved in the system is executed immediately. If this is not the case, you need to first confirm the start of macro execution.
In addition and depending on the settings, when a macro is defined on the first key level, the status of the macro in question is indicated by the corresponding LED.
LED signalling next to the key:
Depending on the purpose of the commands Lo, Lg, Lr and Ly.
Note: If there is a macro on both levels of a function key, LED control is also performed by the macro on the second level. This makes it possible, for instance, to use the macro to switch the LED on the one key level and to use the macro to switch LED off on the other key level. This allows the switching status of a simultaneously switched function to be read on the LED.
The configuration can be carried out as follows:
• Via COMfortel Set
Configuring Function Key for Macro via COMfortel Set
Requirements:
- An open configuration and the required PIN, if necessary
- Open the page Function keys > Assign function keys.
-
Click one of the following tabs:
Level 1: Keys are defined on the first key level.
Level 2: Keys are defined on the second key level. -
Right-click the function key you want to assign.
A function selection dialogue opens.
- Select the Macro function.
The current settings for defining the key are displayed.
- In the Macro sign entry field, enter the macro. The following entries are possible:
Up to 100 characters for a max. of 10 keys, up to 40 characters for additional keys
The commands listed at the end:
Z [digit sequence]: Digit sequence selection including * and #
W [digits 1-5]: Waiting time/pause time of 1-5 seconds
K: Switchover to keypad
M: Switchover to DTMF
H: Hang-up/pick-up with the hook key
C: Wait for a connection
Lo: The LED next to the function key switches off
Lr: The LED next to the function key switches on (red)
Ly: The LED next to the function key switches on (yellow)
Lg: The LED next to the function key switches on (green)
Note:
If you would like to configure a programming function on the PBX as a macro, enter a pause between the password and programming code sequence.
Pauses cannot be entered at the beginning of a macro.
The maximum pause time is 5 seconds. This restriction does not apply for the C command (waiting for a connection).
LED control commands are only possible on the first level. Exception: If there is a macro on both levels of a function key, LED control is also performed by the macro on the second level. This makes it possible, for instance, to use the macro to switch the LED on on the one key level and to use the macro to switch LED off on the other key level. This allows the switching status of a simultaneously switched function to be read on the LED.
- In the Key name entry field, enter a name for the key. The following entries are possible:
Up to 16 digits
Digits and characters
Clicking automatically enters the default name in the entry field.
Note: The key name is used for printing the label and for display.
Further steps:
- Save your configuration before closing.
Configuring Display Presentation during Macro Execution
This setting specifies if the digits that have just been dialled or the name of the key are shown in the telephone display during macro execution.
The configuration can be made as follows:
- Via COMfortel Set
Configuring Display Presentation during Macro Execution via COMfortel Set
Requirements:
- An open configuration and the required PIN, if necessary
- Open the page Settings/functions > User settings.
- Under Display presentation during macro execution, select one of the following options:
Single steps: During macro execution, the digits that have just been dialled are shown.
Name of the key/name of the contact: During macro execution, the name of the key is shown on the display.
Further steps:
- Save your configuration before closing.
Memo
The memo function allows you to enter a telephone number note on the telephone during a call. After the call has been ended, the telephone number can be retrieved and, for instance, accepted into dial preparation.
Creating a Memo
The creation can be carried out as follows:
• Via the telephone menu
Requirements:
- Knowledge of the telephone and its menu options
During a call, proceed as described in the following.
- Press the softkey.
- Enter the phone number that you would like to make a note of.
- Press the softkey to save the entry.
Retrieving a Memo
The retrieval can be carried out as follows:
• Via the telephone menu
Requirements:
– Knowledge of the telephone and its menu options
- A saved memo
- Press the softkey.
The saved telephone number is displayed in dial preparation.
Note: If you would like to delete the telephone number, press the ☒ softkey.
Phone Lock
The phone lock can be used to block the telephone from unauthorised use. Even after enabling the phone lock, it is possible to receive incoming calls and to make emergency calls (manual dialling of emergency numbers entered in the PBX only).
Enabling the Phone Lock
Requirements:
– Knowledge of the telephone, its menu options and the required PIN, if necessary
- Configured user or subadmin PIN
- Press the function key configured for the phone lock.
Disabling the Phone Lock
The disabling procedure can be carried out as follows:
• Via the telephone menu
Requirements:
-
Knowledge of the telephone, its menu options and the required PIN, if necessary
– Knowledge of the user, subadmin or admin PIN -
Press the function key configured for the phone lock.
- Enter the user, subadmin or admin PIN.
- Press the softkey.
Configuring and Operating Function Key for Phone Lock
Press the key on the telephone in the idle state to enable the phone lock.
Press the key again and then enter the user PIN, admin PIN or subadmin PIN to disable the phone lock again.
In addition, when functions are defined on the first key level, the status of the function is indicated by the corresponding LED.
LED signalling next to the key:
Red The phone lock is enabled.
Off The phone lock is disabled.
The configuration can be carried out as follows:
- Via COMfortel Set
Configuring Function Key for Phone Lock via COMfortel Set
Requirements:
- An open configuration and the required PIN, if necessary
- Open the page Function keys > Assign function keys.
- Click one of the following tabs:
Level 1: Keys are defined on the first key level.
Level 2: Keys are defined on the second key level.
- Right-click the function key you want to assign.
A function selection dialogue opens.
- Select the Phone lock function.
The current settings for defining the key are displayed.
- In the Key name entry field, enter a name for the key. The following entries are possible:
Up to 16 digits
Digits and characters
Clicking automatically enters the default name in the entry field.
Note: The key name is used for printing the label.
Further steps:
- Save your configuration before closing.
Requirements for operating the function:
- Configured user, subadmin or admin PIN
– Knowledge of the user, subadmin or admin PIN
Pickup
Using Pickup, you can take a call on your own phone that was originally sent to another internal telephone.
If the call has already been taken, the call can be taken using same procedure if the call takeover has been allowed by the subscriber being called. This function is useful, for example, in the case of answering machines.
Executing Pickup
Requirements:
- Knowledge of the telephone, its menu options and the required PIN, if necessary
– Authorization in the PBX for Pickup
If an internal telephone rings in your proximity, proceed as described in the following.
- Press a function key configured for pickup.
- Enter the internal phone number of the telephone that is ringing. (In case of direct exchange access you do not have to dial ** first.)
Note: If you would like to take call that is directed to a group, select the pickup for the group telephone number. - Pick up the receiver or press the Hook key.
Executing Pickup during Call
Requirements:
- Knowledge of the telephone, its menu options and the required PIN, if necessary
– Authorization in the PBX for Pickup
If you are already taking a call and an internal telephone rings in your proximity, proceed as described in the following.
- Select pickup.
- Press the softkey.
You will hear the internal dial tone. The person you had been talking to hears the hold music.
- Enter the internal phone number of the telephone that is ringing. (In case of direct exchange access you do not have to dial ** first.)
Note: If you would like to take call that is directed to a group, select the pickup for the group telephone number.
Once you have finished dialling the phone number, you are connected to the caller.
Configuring and Operating Function Key for Pickup
Pressing the key opens the pickup menu. This allows you to enter the internal phone number of the telephone that is ringing.
In addition, you can press the key to initiate a call take-over on telephones or answering machines for which permission has been given (see the PBX manual).
LED signalling next to the key:
None
Note: If you often take pickups for specific telephones, you can configure a speed dialling key for the associated internal subscriber/group telephone as an alternative to this key. You then see a red blinking LED indicating that the phone number is being called. You can press the speed dialling key and after the confirmation, take the call on your telephone.
The configuration can be carried out as follows:
- Via COMfortel Set
Configuring Function Key for Pick-up via COMfortel Set
Requirements:
- An open configuration and the required PIN, if necessary
- Open the page Function keys > Assign function keys.
- Click one of the following tabs:
Level 1: Keys are defined on the first key level.
Level 2: Keys are defined on the second key level.
- Right-click the function key you want to assign.
A function selection dialogue opens.
- Select the Pick-up function.
The current settings for defining the key are displayed.
- In the Key name entry field, enter a name for the key. The following entries are possible:
Up to 16 digits
Digits and characters
Clicking automatically enters the default name in the entry field.
Note: The key name is used for printing the label.
Further steps:
- Save your configuration before closing.
Requirements for operating the function:
– Authorization in the PBX for Pickup
Power Save Mode
In power save mode, the LEDs are inactive (exception: the message LED blinks for missed calls).
After a configurable waiting time and depending on the configuration, power save mode can be activated automatically during the switchover into a PBX configuration and/or manually by pressing a key. Power save mode is deactivated again as soon as an incoming call is signalled or any key is pressed.
Switching Automatic Activation of Power Save Mode On/Off
If automatic activation of power save mode is enabled, the telephone automatically switches into power save mode when the telephone is not in use.
The holding time indicates how much time after the key was last pressed before power save mode is activated.
Switching this on/off can be done as follows:
- Via COMfortel Set
Switching Automated Activation of Power Save Mode On/Off via COMfortel Set
Requirements:
- An open configuration and the required PIN, if necessary
- Open the page Settings/functions > Power save mode.
- Select or clear the Automated activation check box.
☑ Enables the automated activation of power save mode.
☐ Disables the automated activation of power save mode.
- Enter a value in the corresponding Waiting time (1 to 999 minutes) entry field. The following entries are possible:
1 to 999: After 1 to 999 minutes, power save mode is automatically activated, depending on the entry.
Further steps:
- Save your configuration before closing.
Switching Power Save Mode Activation On/Off Depending on Configuration
If configuration-dependent power save mode activation is enabled, the telephone goes into power save mode during a switchover into a specific PBX configuration (for example, a night configuration).
Switching this on/off can be done as follows:
- Via COMfortel Set
Switching Configuration-dependent Activation of Power Save Mode On/Off via COMfortel Set
Requirements:
- An open configuration and the required PIN, if necessary
- Open the page Settings/functions > Power save mode.
- Make the necessary changes depending on the type of PBX.
- In the Configuration entry field, select a configuration in order to enable the configuration-dependent activation of power save mode.
- In the Configuration (10 to 9999) entry field, enter the identification number of a configuration in order to enable the configuration-dependent activation of power save mode.
Note: To disable the configuration-dependent activation of power save mode, you need to select --- in the list field or delete the identification number of the configuration from the entry field.
Further steps:
- Save your configuration before closing.
Configuring and Operating Function Key for Manually Activating Power Save Mode
Pressing the key while in the telephone's idle state switches it immediately into power save mode.
LED signalling next to the key:
None
The configuration can be carried out as follows:
- Via COMfortel Set
Configuring Function Key for Manually Activating Power Save Mode via COMfortel Set
Requirements:
- An open configuration and the required PIN, if necessary
- Open the page Function keys > Assign function keys.
-
Click one of the following tabs:
Level 1: Keys are defined on the first key level.
Level 2: Keys are defined on the second key level. -
Right-click the function key you want to assign.
A function selection dialogue opens. -
Select the Power save mode function.
The current settings for defining the key are displayed.
- In the Key name entry field, enter a name for the key. The following entries are possible:
Up to 16 digits
Digits and characters
Clicking automatically enters the default name in the entry field.
Note: The key name is used for printing the label.
Further steps:
- Save your configuration before closing.
Switching the Power Save Mode Link to Phone Lock On/Off
If the power save mode link to the phone lock is enabled, the phone lock is enabled as soon as the telephone changes to power save mode.
Switching this on/off can be done as follows:
- Via COMfortel Set
Switching Power Save Mode Link to Phone Lock On/Off via COMfortel Set
Requirements:
- An open configuration and the required PIN, if necessary
- Open the page Settings/functions > Power save mode.
- Select or clear the Link to telephone lock check box.
☑ Enables the power save mode link to the phone lock.
☐ Disables the power save mode link to the phone lock.
Further steps:
- Save your configuration before closing.
Project Assignment
The exchange line access with project assignment enables an external call to be assigned to a specific project/customer/client (for example, in a lawyer's office). Based on the evaluation of call data, both the charges as well as the time required can be assigned to a specific project.
Configuring and Operating Function Key for Project Assignment
Important: Not available for operation on the PBXs COMpact 2204 USB and COMpact 3000.
Press the key for project assignment when in the idle state of the telephone to set which project number the next outgoing external call will be assigned to. After this, you can initiate the call by dialling an external phone number (with the exchange line access number).
Press the key for project assignment during a call to set which project number the current external call will be assigned to.
In addition, when functions are defined on the first key level, the status of the function is indicated by the corresponding LED.
LED signalling next to the key:
Green The project number on the key is assigned to the next outgoing external call (for a key configured for general functions, it applies for any project number).
Off The next outgoing call will not be assigned to a project.
The configuration can be carried out as follows:
- Via COMfortel Set
Configuring Function Key for Project Assignment via COMfortel Set
Requirements:
- An open configuration and the required PIN, if necessary
1. Open the page Function keys > Assign function keys.
- Click one of the following tabs:
Level 1: Keys are defined on the first key level.
Level 2: Keys are defined on the second key level.
- Right-click the function key you want to assign.
A function selection dialogue opens.
- Select the Defined project function.
The current settings for defining the key are displayed.
- In the Project number entry field, enter the project number of the project. The following entries are possible:
2 to 6 digits
- In the Key name entry field, enter a name for the key. The following entries are possible:
Up to 16 digits
Digits and characters
Clicking automatically enters the default name in the entry field.
Note: The key name is used for printing the label and for display.
Further steps:
- Save your configuration before closing.
Requirements for operating the function:
- Project numbers enabled in the PBX (for a fee)
Relays
If the PBX is equipped with one or more relays, they can be switched on and off independently of the operating mode configured for each telephone.
Configuring and Operating Function Key for Switching Relays On/Off
Important: Not available for operation on the PBXs COMpact 2204 USB and COMpact 3000.
Press the key to switch to the configured relay on or off or to switch it over.
In addition, when functions are defined on the first key level, the status of the relay is indicated by the corresponding LED.
LED signalling next to the key:
Green The relay configured on the key is enabled.
Off The relay configured on the key is disabled.
The configuration can be carried out as follows:
- Via COMfortel Set
Configuring Function Key for Switching Relays via COMfortel Set
Requirements:
- An open configuration and the required PIN, if necessary
- A switchable relay configured in the PBX
-
For the subscriber disabled relay mode PC relay subscriber in the PBX
-
Open the page Function keys > Assign function keys.
-
Click one of the following tabs:
Level 1: Keys are defined on the first key level.
Level 2: Keys are defined on the second key level.
- Right-click the function key you want to assign.
A function selection dialogue opens.
- Select the Relay function.
The current settings for defining the key are displayed.
-
Configure the settings dependent on the type of PBX.
-
Select a relay in the Relays to be switched list field.
-
Enter the identification number of the relay in question in the identification number field.
-
In the Kind of switching list field, select one of the following options:
switch off: Press the key to disable the relay.
switch on: Press the key to enable the relay.
switch over: Press the key to switch the relay on and off.
- In the Key name entry field, enter a name for the key. The following entries are possible:
Up to 16 digits
Digits and characters
Clicking automatically enters the default name in the entry field.
Note: The key name is used for printing the label and for display.
Further steps:
- Save your configuration before closing.
Requirements for operating the function:
– Authorization in the PBX for Switching of relay
Room Monitoring
The room monitoring function can be used for monitoring a room acoustically, for instance, for monitoring a small child while she sleeps. The internal telephone in this room must be suitably configured for this purpose.
The configured telephone can then be called by another internal telephone or by a password-protected external telephone. The connection is established immediately and it is possible to listen into the room.
Initiating Room Monitoring
Requirements:
– Knowledge of the telephone, its menu options and the required PIN, if necessary
– Authorisation in the PBX for Controlling of the PBX via telephone
- Press a function Key configured for room monitoring.
The microphone of the hands-free component switches on automatically. If the telephone is then called from an internal telephone, the connection is immediately established and it is possible to listen into the room.
Note: How to listen into a room from an external telephone is described in the user manual for the PBX.
Ending Room Monitoring
- Press the softkey √ or the Hook key or pick up the receiver and then hang it up again.
Configuring and Operating Function Key for Room Monitoring
Press the key while the telephone is in the idle state to switch on room monitoring.
In addition, when functions are defined on the first key level, the status of the function is indicated by the corresponding LED.
LED signalling next to the key:
Red The room monitoring function is enabled.
Off The room monitoring function is disabled.
The configuration can be carried out as follows:
- Via COMfortel Set
Configuring Function Key for Room Monitoring via COMfortel Set
Requirements:
- An open configuration and the required PIN, if necessary
- Open the page Function keys > Assign function keys.
- Click one of the following tabs:
Level 1: Keys are defined on the first key level.
Level 2: Keys are defined on the second key level.
- Right-click the function key you want to assign.
A function selection dialogue opens.
- Select the Room monitoring function.
The current settings for defining the key are displayed.
- In the Key name entry field, enter a name for the key. The following entries are possible:
Up to 16 digits
Digits and characters
Clicking automatically enters the default name in the entry field.
Note: The key name is used for printing the label.
Further steps:
- Save your configuration before closing.
Requirements for operating the function:
– Authorisation in the PBX for Controlling of the PBX via telephone
Speed Dialling
The speed dialling function enables a function key to be defined with not only internal and external phone numbers but also with programming codes on the PBX. The saved codes can be easily dialled by pressing a key, if necessary.
Application Options for Speed Dialling Keys
Speed dialling keys can be used in the following ways:
Dialling a phone number
Pressing a speed dialling key immediately dials a saved phone number. If the receiver is on hook, the saved phone number is first transmitted into dial preparation.
If a speed dialling key is pressed during a call, a query call is placed and the saved phone number is dialed immediately.
Dialling part of a phone number
The telephone speed dialling keys to be defined with parts of phone numbers (for example, telephone provider prefixes). The phone number parts can then be assembled by pressing multiple speed dialling keys in an order. The names assigned to the phone numbers are shown one after the other on the display.
Assignment overview
Speed dialling keys defined with to internal subscriber and group phone numbers enable an overview of the current activity status of the subscriber or group via the corresponding LEDs.
Pickup and call take-over
Speed dialling keys defined with internal subscriber and group phone numbers enable the pickup function for these subscribers and groups. If the LED next to the key is blinking in red because the saved phone number is being called, you can take the call on your telephone by pressing the speed dialling key and then confirming.
If a subscriber allows call take-over (for example, on an answering machine), you can still take the call on your telephone in the same manner even after it has already been accepted.
Configuring and Operating Function Key for Speed Dialling
Press the key while the telephone is in the idle state to transfer a telephone number saved in a key to dial preparation – also additional information.
Exception: If the telephone number saved is an internal phone number and is currently being called, you can carry out the Pickup function on this call.
After picking up the receiver, press the key to dial the telephone number saved in the key.
Press the key during a call to put the active communication partner on hold and to dial the phone number saved in the key.
In addition, when a subscriber or a group telephone number is defined at the first key level, the status of the subscriber or group can be read from the corresponding LED.
LED signalling next to the key (when defined with an internal subscriber telephone number):
Red (blinking) The internal telephone is now being called. Press the key to initiate a pickup.
Red A call is in progress on the internal telephone. Press the key to initiate a call take-over.
Green (blinking) A call is being made from the internal telephone and the call was not accepted.
Yellow The internal telephone is not reachable (do-not-disturb or call forwarding for subscribers has been configured).
Yellow (blinking) Only for internal VoIP subscriber and enabled display of the registration status: The telephone is not registered on the PBX.
Off The internal telephone is available. Press the key to place a call.
LED signalling next to the key (when defined with an internal group phone number):
Red (blinking) A logged-in telephone is now being called. Press the key to initiate a pickup.
Red Calls are in progress on all logged-in telephones or no telephone in the group is logged in.
Yellow The logged-in telephones are not reachable (do-not-disturb or call forwarding for subscribers has been configured).
Off The logged-in telephones are available. Press the key to place a call.
LED signalling next to the key (when defined with an external telephone number):
Green (blinking) A call is being made from the telephone of the external subscriber and the call was not accepted (in as far as the external telephone number is transmitted).
The configuration can be carried out as follows:
• Via COMfortel Set
• Via the telephone menu
Configuring Function Key for Speed Dialling via COMfortel Set
Requirements:
- An open configuration and the required PIN, if necessary
- Open the page Function keys > Assign function keys.
- Click one of the following tabs:
Level 1: Keys are defined on the first key level.
Level 2: Keys are defined on the second key level.
- Right-click the function key you want to assign.
A function selection dialogue opens.
- Select the Speed dialling function.
The current settings for defining the key are displayed.
- In the Telephone no entry field, enter the destination number. The following entries are possible:
Up to 24 digits
Digits and the characters * and #
- In the Type of telephone number list field, select one of the following options:
Internal no.: Defines the destination number entered as an internal telephone number.
External no.: Defines the destination number entered as an external telephone number.
- In the Key name entry field, enter a name for the key. The following entries are possible:
Up to 16 digits
Digits and characters
Clicking automatically enters the default name in the entry field.
Note: The key name is used for printing the label and for display.
Further steps:
- Save your configuration before closing.
Configuring Function Key for Speed Dialling via Telephone Menu
Requirements:
– Knowledge of the telephone, its menu options and the required PIN, if necessary
- Press the menu key and open the speed dial. key menu.
- Press the function key that you would like to define.
- Select the desired option:
First level: Keys are defined on the first key level.
Second level: Keys are defined on the second key level.
- Enter the destination number. The following entries are possible:
Up to 24 digits
Digits and the characters * and #
Important: Enter telephone numbers exactly as when dialling, for example, external telephone numbers always with a leading exchange line access number. (exception: direct exchange access). The default exchange line access number on the PBX is "0" in the factory settings; however, this can be changed for several PBXs (see the PBX manual).
- Press the softkey
- Enter a name. The following entries are possible:
Up to 16 digits
Digits and characters
- Press the softkey to accept the setting.
Switching Automatic Speed Dialling Pick-up On/Off
If automatic speed dialling pick-up is enabled, pressing a speed dialling key while the telephone is in the idle state automatically picks up a call (when using a headset) or switches the telephone to hands-free calling.
Switching this on/off can be done as follows:
- Via COMfortel Set
Switching Automatic Speed Dialling Pick-up On/Off via COMfortel Set
Requirements:
- An open configuration and the required PIN, if necessary
- Open the page Settings/functions > User settings.
- Select or clear the Automatic off-hook for speed dialling check box.
☑ Enables automatic speed dialling pick-up.
□ Disables automatic speed dialling pick-up.
Further steps:
- Save your configuration before closing.
Switching the Display of the Registration Status On/Off
If the display of the registration status is switched on, the individual registration status of the subscribers will be signalled via the LEDs of the speed dialling keys assigned to internal VoIP subscribers. If the corresponding VoIP subscriber is not registered at the PBX, its LED will blink yellow.
Switching this on/off can be done as follows:
- Via COMfortel Set
Switching the Display of the Registration Status On/Off via COMfortel Set
Requirements:
- An open configuration and the required PIN, if necessary
- Open the page Settings/functions > signalling/ringer.
- Select or clear the Registration status subscriber check box.
☑ Switches the display of the registration status on.
☐ Switches the display of the registration status off.
Further steps:
- Save your configuration before closing.
Targeted Exchange Line Access
Using targeted exchange line access, you can define which MSN (your own external phone number) is transmitted for an external call and which exchange line should be used while doing so.
Targeted Exchange Line Access Variants
Auerswald PBXs support three different kinds of targeted exchange line access:
Variant A
Important: Only available for operation on the PBXs COMpact 3000, COMpact 5010 VoIP, COMpact 5020 VoIP, COMmander Basic.2 and COMmander Business.
Targeted exchange line access is carried out and includes the transmission of a specific MSN.
When this function is defined on a key, the status of the S port is indicated by the corresponding LED thereby giving you an overview of key definition.
Variant B
Important: Only available for operation on the PBXs COMpact 2204 USB, COMpact 2206 USB, COMpact 4406 DSL, COMpact 4410 USB and COMmander Basic.
Targeted exchange line access is carried out along with the transmission of the standard telephone number.
When this function is defined on a key, the status of the S port is indicated by the corresponding LED thereby giving you an overview of key definition.
Variant C
Important: Only available for operation on the PBXs COMpact 2204 USB, COMpact 2206 USB, COMpact 4406 DSL, COMpact 4410 USB and COMmander Basic.
Targeted exchange line access is carried out and includes the transmission of a specific MSN.
Initiating Targeted Exchange Line Access
Initiation can be carried out as follows:
• Via the telephone menu
Requirements:
– Knowledge of the telephone, its menu options and the required PIN, if necessary
– A function key configured for targeted exchange line access
- For targeted exchange line access with the transmission of a specific MSN: Telephone number transmission activated
- Press a function key configured for targeted exchange line access.
- Dial a telephone number without an exchange line access number.
Important: For targeted exchange line access with the transmission of a specific MSN, select an external telephone number with an exchange line access number.
- Pick up the receiver or press the hook key.
The subscriber is called.
Note: If another call comes through before you have finished placing the call, the telephone will reject the targeted exchange line access for your next call.
Configuring and Operating Function Key for Targeted Exchange Line Access (A)
Important: Only available for operation on the PBXs COMpact 3000, COMpact 5010 VoIP, COMpact 5020 VoIP, COMmander Basic.2 and COMmander Business.
Press the key to initiate targeted exchange line access. This allows you to immediately dial the external phone number (with an exchange line access number).
Exception: In case of direct exchange access you do not have to dial an exchange line access number.
In addition, when the function is defined on the first key level, the status of the S_0 port/bundle is indicated by the corresponding LED.
LED signalling next to the key:
Red All of the B-channels on the S 0 port/bundle are in use.
Yellow At least one B-channel on the S 0 port/bundle is available. Press the key to allocate the line still available.
Off S 0 port/bundle is available. Press the key to allocate one of the available lines.
The configuration can be carried out as follows:
- Via COMfortel Set
Configuring Function Key for Targeted Exchange Line Access (A) via COMfortel Set
Requirements:
- An open configuration and the required PIN, if necessary
- Open the page Function keys > Assign function keys.
- Click one of the following tabs:
Level 1: Keys are defined on the first key level.
Level 2: Keys are defined on the second key level.
- Right-click the function key you want to assign.
A function selection dialogue opens.
- Select the Exchange line function.
The current settings for defining the key are displayed.
- In the Telephone no entry field, enter the external telephone number for the PBX that you want to transfer during targeted exchange line access.
Up to 24 digits
Digits and the characters * and #
- In the Key name entry field, enter a name for the key. The following entries are possible:
Up to 16 digits
Digits and characters
Clicking automatically enters the default name in the entry field.
Note: The key name is used for printing the label and for display.
Further steps:
- Save your configuration before closing.
Configuring and Operating Function Key for Targeted Exchange Line Access (B)
Important: Only available for operation on the PBXs COMpact 2204 USB, COMpact 2206 USB, COMpact 4406 DSL, COMpact 4410 USB and COMmander Basic.
Press the key to initiate targeted exchange line access. This allows you to immediately dial the external telephone number (without an exchange line access number).
In addition, when the function is defined on the first key level, the status of the S_0 port is indicated by the corresponding LED.
LED signalling next to the key:
Red Both B-channels on the S 0 port are in use.
Yellow One B-channel on the S line still available. 0 port is still available. Press the key to allocate the
Off S 0 port is available. Press the key to allocate one of the available lines.
The configuration can be carried out as follows:
- Via COMfortel Set
Configuring Function Key for Targeted Exchange Line (B) Access via COMfortel Set
Requirements:
- An open configuration and the required PIN, if necessary
- Open the page Function keys > Assign function keys.
- Click one of the following tabs:
Level 1: Keys are defined on the first key level.
Level 2: Keys are defined on the second key level.
- Right-click the function key you want to assign.
A function selection dialogue opens.
- Select the Exchange line function.
The current settings for defining the key are displayed.
- In the B channel list field, select the exchange line that you would like to use during targeted exchange line access.
- In the Key name entry field, enter a name for the key. The following entries are possible:
Up to 16 digits
Digits and characters
Clicking automatically enters the default name in the entry field.
Note: The key name is used for printing the label and for display.
Further steps:
- Save your configuration before closing.
Configuring and Operating Function Key for Targeted Exchange Line Access (C)
Important: Only available for operation on the PBXs COMpact 2204 USB, COMpact 2206 USB, COMpact 4406 DSL, COMpact 4410 USB and COMmander Basic.
Press the key to initiate targeted exchange line access. This allows you to immediately dial the external telephone number (with an exchange line access number).
In addition, when functions are defined on the first key level, the status of the function is indicated by the corresponding LED.
LED signalling next to the key:
Green The MSN on the key is transmitted during the next outgoing external call.
Off The standard telephone number transmitted during the next outgoing call.
The configuration can be carried out as follows:
- Via COMfortel Set
Configuring Function Key for Targeted Exchange Line Access (C) via COMfortel Set
Requirements:
- An open configuration and the required PIN, if necessary
- Open the page Function keys > Assign function keys.
- Click one of the following tabs:
Level 1: Keys are defined on the first key level.
Level 2: Keys are defined on the second key level. - Right-click the function key you want to assign.
A function selection dialogue opens. -
Select the Exchange line MSN function.
The current settings for defining the key are displayed. -
In the Telephone no entry field, enter the external telephone number for the PBX that you want to transfer during targeted exchange line access.
Up to 24 digits
Digits and the characters * and #
- In the Key name entry field, enter a name for the key. The following entries are possible:
Up to 16 digits
Digits and characters
Clicking automatically enters the default name in the entry field.
Note: The key name is used for printing the label and for display.
Further steps:
- Save your configuration before closing.
Targeted VoIP Access Point
Using a targeted VoIP access point, an external call can be initiated via a specific VoIP account.
Initiating a Targeted VoIP Access Point
Important: Only available for operation on the PBXs COMpact 3000, COMpact 5010 VoIP, COMpact 5020 VoIP, COMmander Basic.2 and COMmander Business.
Initiation can be carried out as follows:
• Via the telephone menu
Requirements:
– Knowledge of the telephone, its menu options and the required PIN, if necessary
- Configured function key for a targeted VoIP access point
- Press a function key configured for a targeted VoIP access point.
The VoIP account is activated for the next call. The account number is displayed in dial preparation.
- Dial a phone number (an external phone number with an exchange line access number).
Note:
In any case, the external phone number must be dialled with the corresponding city code, even if it is the local prefix. The special numbers provided by the VoIP provider for checking one's account status or dialling usually do not include a local prefix.
In case of direct exchange access you do not have to dial an exchange line access number.
- Pick up the receiver or press the Hook key.
The subscriber is called.
Configuring and Operating Function Key for Targeted VoIP Access Point
Important: Only available for operation on the PBXs COMpact 3000, COMpact 5010 VoIP, COMpact 5020 VoIP, COMmander Basic.2 and COMmander Business.
Press the key to initiate a targeted VoIP access point. This allows you to immediately dial the external phone number (with an exchange line access number).
Exception: In case of direct exchange access you do not have to dial an exchange line access number.
In addition, when a targeted VoIP access point is defined on the first key level, the status of the channels for the targeted VoIP access point is indicated by the corresponding LED.
LED signalling next to the key:
Red All of the channels for the VoIP access point are in use (no call possible).
Yellow Some of the channels for the VoIP access point are partially in use (at least one channel for the VoIP access line is still available). Press the key to allocate the channel still available.
Off All channels for the VoIP access point are available. Press the key to allocate an available channel.
The configuration can be carried out as follows:
- Via COMfortel Set
Configuring Function Key for Targeted VoIP Access Point via COMfortel Set
Requirements:
- An open configuration and the required PIN, if necessary
- Open the page Function keys > Assign function keys.
- Click one of the following tabs:
Level 1: Keys are defined on the first key level.
Level 2: Keys are defined on the second key level.
- Right-click the function key you want to assign.
A function selection dialogue opens.
- Select the VoIP account function.
The current settings for defining the key are displayed.
- In the Telephone no entry field, enter the account number for the VoIP account.
Exception: For a direct exchange line access device, enter the account number starting with two leading asterisks ( ^** account number).
- In the Key name entry field, enter a name for the key. The following entries are possible:
Up to 16 digits
Digits and characters
Clicking automatically enters the default name in the entry field.
Note: The key name is used for printing the label and for display.
Further steps:
- Save your configuration before closing.
Text before Answering
The text before answering function enables the caller to be greeted with an automatic announcement before accepting the call (charges apply for the external caller).
Variants for Text before Answering
Text before answering for group
Important: Only available for operation on the PBXs COMpact 5010 VoIP, COMpact 5020 VoIP, COMmander Basic.2 and COMmander Business.
Switching the text before answering function on is done separately for each group.
There are two types possible:
• Text before answering on busy
The caller hears the announcement for text before answering only if all of the group members are busy. After this, the caller is automatically connected to the corresponding queue.
• Text before answering always
The caller hears the announcement independent of whether the group members are being called or are busy. If all of the group members are busy, the caller is automatically connected to the corresponding queue.
Text before answering for external telephone number
Important: Only available for operation on the PBXs COMpact 4406 DSL, COMpact 4410 USB and COMmander Basic.
Switching the text before answering function on is done separately for each external telephone number.
Switching Text before Answering for Group On/Off
Important: Only available for operation on the PBXs COMpact 5010 VoIP, COMpact 5020 VoIP, COMmander Basic.2 and COMmander Business.
Requirements:
- Function key configured for the text before answering function
- The text before answering announcement on the PBX assigned to the group
- Press the function key configured for the text before answering function.
Configuring and Operating Function Key for Text before Answering for Group
Important: Only available for operation on the PBXs COMpact 5010 VoIP, COMpact 5020 VoIP, COMmander Basic.2 and COMmander Business.
Press the key while the telephone is the idle state to switch text before answering for the configured group on or off or to switch it over.
In addition, when functions are defined on the first key level, the status of the function is indicated by the corresponding LED.
LED signalling next to the key:
Green The text before answering function for the configured group is enabled.
Off The text before answering function for the configured group is disabled.
The configuration can be carried out as follows:
• Via COMfortel Set
Configuring Function Key for Text before Answering via COMfortel Set
Requirements:
- An open configuration and the required PIN, if necessary
-
The telephone is a member of a group configured in the PBX
-
Open the page Function keys > Assign function keys.
- Click one of the following tabs:
Level 1: Keys are defined on the first key level.
Level 2: Keys are defined on the second key level.
- Right-click the function key you want to assign.
A function selection dialogue opens.
- Select the Text before answering function.
The current settings for defining the key are displayed.
- In the Telephone no entry field, enter the phone number of the group.
- In the Kind of switching list field, select one of the following options:
switch off: Press the key to disable text before answering.
switch on (on busy): Press the key to enable text before answering on busy.
switch on (always): Press the key to enable text before answering.
switch over (on busy): Press the key to switch text before answering on busy on and off.
switch over (always): Press the key to switch text before answering on and off.
- In the Key name entry field, enter a name for the key. The following entries are possible:
Up to 16 digits
Digits and characters
Clicking automatically enters the default name in the entry field.
Note: The key name is used for printing the label and for display.
Further steps:
- Save your configuration before closing.
Requirements for operating the function:
– The text before answering announcement on the PBX and assigned to the group
Switching Text before Answering for External Telephone Number On/Off
Important: This function is only available for operation on the PBXs COMpact 4406 DSL, COMpact 4410 USB and COMmander Basic.
Requirements:
- Function key configured for the text before answering function
– Text before answering announcement saved on the PBX
- Press the function key configured for the text before answering function.
Configuring and Operating Function Key for Text before Answering for External Telephone Number
Important: This function is only available for operation on the PBXs COMpact 4406 DSL, COMpact 4410 USB and COMmander Basic.
Press the key while the telephone is the idle state to switch text before answering for the configured telephone number on or off or to switch it over.
In addition, when functions are defined on the first key level, the status of the function is indicated by the corresponding LED.
LED signalling next to the key:
Green The text before answering function for the configured telephone number is enabled.
Off The text before answering function for the configured telephone number is disabled.
The configuration can be carried out as follows:
- Via COMfortel Set
Configuring Function Key for Text before Answering via COMfortel Set
Requirements:
- An open configuration and the required PIN, if necessary
- Open the page Function keys > Assign function keys.
- Click one of the following tabs:
Level 1: Keys are defined on the first key level.
Level 2: Keys are defined on the second key level.
- Right-click the function key you want to assign.
A function selection dialogue opens.
- Select the Text before answering function.
The current settings for defining the key are displayed.
- In the Telephone no (your own exchange line) entry field, enter the external telephone number on the PBX.
Up to 24 digits
Digits and the characters * and #
- In the Kind of switching list field, select one of the following options:
switch off: Press the key to disable text before answering.
switch on: Press the key to enable text before answering.
switch over: Press the key to switch text before answering on and off.
- In the Key name entry field, enter a name for the key. The following entries are possible:
Up to 16 digits
Digits and characters
Clicking automatically enters the default name in the entry field.
Note: The key name is used for printing the label and for display.
Further steps:
- Save your configuration before closing.
Requirements for operating the function:
– Text before answering announcement saved on the PBX
Voicemail Center 461/461.2
If a Voicemail Center 461/461.2 (optional accessory from Auerswald) is connected to an Auerswald PBX, its mailboxes can be accessed/managed over the system telephone.
Configuring and Operating Function Key for Remotely Accessing the Voicemail Center
While the telephone is in the idle state, press the key and then pick up the receiver to establish a connection to mailbox set in the configured Voicemail Center 461/461.2. If new recordings are present, they are played back immediately.
Note: The telephone is now under manual control. In this state, you can use the remote control functions described in the Voicemail Center 461.2 user manual on the Auerswald Mega Disk. After this, entering the remote access code is no longer necessary, and you can start directly by entering the corresponding function code.
It is possible to press the key while a connection exists with the Voicemail Center 461/461.2 to pick up the call.
In addition, when functions are defined on the first key level, the status of the function is indicated by the corresponding LED.
LED signalling next to the key:
Red (blinking) The Voicemail Center 461/461.2 is called.
Red The Voicemail Center 461/461.2 has accepted the call. Press the key to initiate a pick-up to accept the call.
Green (blinking) New recordings are present in the configured mailbox.
Green Old recordings are present in the configured mailbox.
The configuration can be carried out as follows:
- Via COMfortel Set
Configuring Function Key for Defined Remote Access of Voicemail Center via COMfortel Set
Requirements:
- An open configuration and the required PIN, if necessary
-
At least one Voicemail Center 461/461.2 connected to the PBX
-
Open the page Function keys > Assign function keys.
- Click one of the following tabs:
Level 1: Keys are defined on the first key level.
Level 2: Keys are defined on the second key level.
-
Right-click the function key you want to assign.
A function selection dialogue opens. -
Select the Defined Voicemail Center function.
The current settings for defining the key are displayed. -
In the Telephone no entry field, enter the telephone number of the Voicemail Center.
-
In the list field, select one of the following options:
Global mailbox: Defines that the global mailbox will be accessed.
Single mailbox: Defines that a single mailbox will be accessed.
- Only when the option Single mailbox is selected: In the Individual mailbox for subscriber telephone number entry field, enter the subscriber telephone number that is assigned to the single mailbox.
Important: If you let call a group on the PBX and redirect this group to the Voicemail Center, you have to enter the group telephone number in the Individual mailbox for subscriber telephone number entry field.
- In the Remote control code entry field, enter the remote access code for the mailbox.
Note:
When selecting Single mailbox, you need to use the remote access code entered at the following location: in the Voicemail Center 461.2 under create mailboxes > ...mailbox > remote access or in the Voicemail Center 461 under mailboxes > remote control code.
When selecting Global mailbox, you need to use the remote access code entered at the following location: In the Voicemail Center 461.2 under settings > remote access > remote access code or in the Voicemail Center 461 under settings > remote access code.
- In the Key name entry field, enter a name for the key. The following entries are possible:
Up to 16 digits
Digits and characters
Clicking automatically enters the default name in the entry field.
Note: The key name is used for printing the label and for display.
Further steps:
- Save your configuration before closing.
Switching Rapid Remote Access of Voicemail Centers 461.2 On/Off
Compared to the Voicemail Center 461, the Voicemail Center 461.2 with firmware version 2.02 and higher supports more rapid remote access over the telephone. If you would like to take advantage of this, update the firmware for the existing Voicemail Center 461.2 and enable rapid remote access on the telephone.
Note: If you would also like to use the telephone to operate the Voicemail Center 461, disable rapid remote access to prevent making mistakes when accessing the device.
Switching this on/off can be done as follows:
- Via COMfortel Set
Switching Rapid Remote Access on Voicemail Center 461.2 On/Off via COMfortel Set
Requirements:
- An open configuration and the required PIN, if necessary
- Open the page Settings/functions > Basic settings.
- Select or clear the Voicemail Center 461.2 with firmware >= 2.02 check box.
☑ Enables rapid remote access.
□ Disables rapid remote access.
Further steps:
- Save your configuration before closing.
Configuring and Managing Voice Mailboxes
This section describes how to configure and operate voice mailboxes. Moreover, it shows you how to record announcements, execute remote access, and forward messages, e.g. to a substitute.
Topics
A voice mailbox which is assigned to the telephone or to a group can be operated like a local answering machine.
It saves the voice messages for an individual subscriber or a group and can be queried any time by the subscriber or the members of the group.
Voice messages and announcements are not stored in the telephone but in the PBX (in contrast to a local answering machine). The size of a voice mailbox is determined by the PBX, as well as the authorization to use it. A voice mailbox can be assigned to an individual subscriber or to a group. Moreover, a subscriber may be granted authorization for several voice mailboxes.
Note: The voice mailbox will only function if an optionally available COMmander VMF module is inserted into the COMmander Business or COMmander Basic.2 PBX. For the COMpact 5010 VoIP PBX, an optionally available COMpact 2VoIP module has to be inserted, for COMpact 5020 VoIP an optionally available COMpact 2VoIP or 6VoIP module.
Readiness
To enable the voice mailbox to accept calls and record messages, readiness must be enabled.
Configuring and Operating the Function Key for Readiness
Press the defined and assigned key to switch a previously defined voice mailbox on or off or switch it over.
In addition, when functions are assigned on the first key level, the status of the function is indicated by the corresponding LED.
LED signalling next to the key:
Green Readiness is enabled.
Off Readiness is disabled.
The configuration can be carried out as follows:
- Via COMfortel Set
Configuring the Function Key for Readiness (defined) via COMfortel Set
Requirements:
- COMmander Business or COMmander Basic.2 with inserted COMmander VMF module, COMpact 5010 VoIP with inserted COMpact 2VoIP module, or COMpact 5020 VoIP with inserted COMpact 2VoIP or 6VoIP module
– Voice mailbox which is configured in the PBX and assigned to it -
An open configuration and knowledge of the required PIN, if necessary
-
Open the page function keys > assign function keys.
- Click one of the following tabs:
Level 1: Keys are assigned on the first key level.
Level 2: Keys are assigned on the second key level.
- Right-click the function key you want to assign.
A function selection dialog opens.
- Select the voice mailbox - readiness defined function.
The current settings for assigning the key are displayed.
-
In the Number entry field, enter the number of the voice mailbox which is to be switched via the function key.
-
In the kind of switching list field, select one of the following options:
switch on: Press the key to enable the readiness mode.
switch off: Press the key to disable the readiness mode.
switch over: Press the key to switch the readiness mode on and off.
- In the key name entry field, enter a name for the key. The following entries are possible:
Up to 16 digits
Digits and characters
Clicking automatically enters the default name in the entry field.
Note: The key name is used for printing the label.
Further steps:
- Save your configuration before closing.
Configuration-Dependent Control
The readiness of the voice mailbox be switched on permanently. In addition, however, there are alternative options. With the help of configuration-dependent control, the voice mailbox can be switched via the PBX configurations, e. g. day-night switching.
Configuring and Operating the Function Key for Configuration-Dependent Control
Press the defined and assigned key to enable configuration-dependent control for a previously defined voice mailbox.
In addition, when functions are assigned on the first key level, the status of the function is indicated by the corresponding LED.
LED signalling next to the key:
Green Configuration-dependent control is enabled. The permanent configuration is inactive.
Off Configuration-dependent control is disabled. The permanent configuration is active.
The configuration can be carried out as follows:
- Via COMfortel Set
Configuring the Function Key for Configuration-Dependent Control (defined) via COMfortel Set
Requirements:
- COMmander Business or COMmander Basic.2 with inserted COMmander VMF module, COMpact 5010 VoIP with inserted COMpact 2VoIP module, or COMpact 5020 VoIP with inserted COMpact 2VoIP or 6VoIP module
– Voice mailbox which is configured in the PBX and assigned to it - Configurations made in the PBX
-
An open configuration and knowledge of the required PIN, if necessary
-
Open the page function keys > assign function keys.
- Click one of the following tabs:
Level 1: Keys are assigned on the first key level.
Level 2: Keys are assigned on the second key level.
- Right-click the function key you want to assign.
A function selection dialog opens.
- Select the voice mailbox - config. control defined function.
The current settings for assigning the key are displayed.
-
In the Number entry field, enter the number of the voice mailbox which is to be switched via the function key.
-
In the key name entry field, enter a name for the key. The following entries are possible:
Up to 16 digits
Digits and characters
Clicking automatically enters the default name in the entry field.
Note: The key name is used for printing the label.
Further steps:
- Save your configuration before closing.
Remote Access
Remote access is used to access and operate the voice mailbox from an internal telephone or from an external telephone.
Execute Remote Access
Performing this procedure can be carried out as follows:
- Using a character string on an external telephone
- Using a character string on the internal telephone
Requirements:
-
COMmander Business or COMmander Basic.2 with inserted COMmander VMF module, COMpact 5010 VoIP with inserted COMpact 2VoIP module, or COMpact 5020 VoIP with inserted COMpact 2VoIP or 6VoIP module
– Knowledge of the telephone, its menu options and the required PIN, if necessary
– Voice mailbox which is configured in the PBX -
Call the voice mailbox.
The voice mailbox accepts the call. You hear the configured announcement.
- Dial *.
Note: If the querying internal telephone is the owner/user of the voice mailbox, step 3 will be omitted.
- Enter the user PIN or the PIN for remote access and dial #.
Remote access is started. You are led through the remote access menu with the help of various announcements.
- Execute remote access by entering the following digits.
0: Opens the Help menu.
1: Opens the main menu.
2: Replays new messages.
3: Replays all of the messages.
4: Jumps back to the previous message.
5: Repeats the message currently being replayed.
6: Jumps to the next message.
7: Deletes the message currently being replayed.
8: Ends replay.
* 10: Disables the voice mailbox.
* 11: Enables the voice mailbox.
* 20: Permits recording and exchanging announcements.
* 30: Disables message forwarding.
* 31: Enables message forwarding.
* 70: Deletes all messages and voice memos.
* 99: Records a voice memo.
Hang-up: Ends remote access.
Note: By dialing 9 while a message is being replayed, the telephone number of the caller will be displayed—provided it has been transferred. By pressing the# key, you can initiate a callback to the telephone number of the caller.
Configuring and Operating the Function Key for Remote Access
Press the defined and assigned key to switch the remote access for a defined voice mailbox on or off or switch it over.
In addition, when functions are assigned on the first key level, the status of the function is indicated by the corresponding LED.
LED signalling next to the key:
Green Remote access is enabled.
Off Remote access is disabled.
The configuration can be carried out as follows:
- Via COMfortel Set
Configuring the Function Key for Defined Remote Access via COMfortel Set
Requirements:
- COMmander Business or COMmander Basic.2 with inserted COMmander VMF module, COMpact 5010 VoIP with inserted COMpact 2VoIP module, or COMpact 5020 VoIP with inserted COMpact 2VoIP or 6VoIP module
– Voice mailbox which is configured in the PBX -
An open configuration and knowledge of the required PIN, if necessary
-
Open the page function keys > assign function keys.
- Click one of the following tabs:
Level 1: Keys are assigned on the first key level.
Level 2: Keys are assigned on the second key level.
- Right-click the function key you want to assign.
A function selection dialog opens.
- Select the voice mailbox - remote access defined function.
The current settings for assigning the key are displayed.
- In the Number entry field, enter the number of the voice mailbox which is to be switched via the function key.
- In the kind of switching list field, select one of the following options:
switch off: Press the key to disable the remote access.
switch on: Press the key to enable the remote access.
switch over: Press the key to switch the remote access on and off.
- In the key name entry field, enter a name for the key. The following entries are possible:
Up to 16 digits
Digits and characters
Clicking automatically enters the default name in the entry field.
Note: The key name is used for printing the label.
Further steps:
- Save your configuration before closing.
Message Forwarding
Message forwarding enables the voice mailbox to notify you of new messages even if you are out and about.
Configuring and Operating the Function Key for Message Forwarding
Press the defined and assigned key to switch message forwarding for a defined voice mailbox on or off or switch it over.
In addition, when functions are assigned on the first key level, the status of the function is indicated by the corresponding LED.
LED signalling next to the key:
Green Message forwarding of the voice mailbox is enabled.
Off Message forwarding of the voice mailbox is disabled.
The configuration can be carried out as follows:
- Via COMfortel Set
Configuring the Function Key for Defined Message Forwarding via COMfortel Set
Requirements:
- COMmander Business or COMmander Basic.2 with inserted COMmander VMF module, COMpact 5010 VoIP with inserted COMpact 2VoIP module, or COMpact 5020 VoIP with inserted COMpact 2VoIP or 6VoIP module
- An open configuration and knowledge of the required PIN, if necessary
– Voice mailbox which is configured in the PBX and assigned to it -
The destination for message forwarding of the voice mailbox configured in the PBX
-
Open the page function keys > assign function keys.
- Click one of the following tabs:
Level 1: Keys are assigned on the first key level.
Level 2: Keys are assigned on the second key level.
- Right-click the function key you want to assign.
A function selection dialog opens.
- Select the voice mailbox - message forwarding defined function.
The current settings for assigning the key are displayed.
-
In the Number entry field, enter the number of the voice mailbox which is to be switched via the function key.
-
In the kind of switching list field, select one of the following options:
switch off: Press the key to disable message forwarding.
switch on: Press the key to enable message forwarding.
switch over: Press the key to switch message forwarding on and off.
- In the key name entry field, enter a name for the key. The following entries are possible:
Up to 16 digits
Digits and characters
Clicking automatically enters the default name in the entry field.
Note: The key name is used for printing the label.
Further steps:
- Save your configuration before closing.
Substitute Function
If the substitute function is switched on, the caller can be connected with the substitute instead of leaving a message on the voice mailbox. For this purpose, the caller dials "1" during the announcement or recording phase.
You have to include this information ("You can reach my substitute by dialling the digit 1...") into the announcement yourself by recording it via an own announcement.
Configuring and Operating the Function Key for the Substitute Function
Press the defined and assigned key to switch the substitute function for a previously defined voice mailbox on or off or switch it over.
In addition, when functions are assigned on the first key level, the status of the function is indicated by the corresponding LED.
LED signalling next to the key:
Green The substitute function is enabled.
Off The substitute function is disabled.
The configuration can be carried out as follows:
- Via COMfortel Set
Configuring the Function Key for the Defined Substitute Function via COMfortel Set
Requirements:
- COMmander Business or COMmander Basic.2 with inserted COMmander VMF module, COMpact 5010 VoIP with inserted COMpact 2VoIP module, or COMpact 5020 VoIP with inserted COMpact 2VoIP or 6VoIP module
– Voice mailbox which is configured in the PBX and assigned to it - The substitute function configured in the PBX for the voice mailbox
-
An open configuration and knowledge of the required PIN, if necessary
– Recorded announcement for the voice mailbox (see the manual for the PBX) -
Open the page function keys > assign function keys.
- Click one of the following tabs:
Level 1: Keys are assigned on the first key level.
Level 2: Keys are assigned on the second key level.
- Right-click the function key you want to assign.
A function selection dialog opens.
- Select the voice mailbox - substitute defined function.
The current settings for assigning the key are displayed.
-
In the Number entry field, enter the number of the voice mailbox for which you want to configure this function.
-
In the kind of switching list field, select one of the following options:
switch off: Press the key to disable the substitute function.
switch on: Press the key to enable the substitute function.
switch over: Press the key to switch the substitute function on and off.
- In the number of substitute entry field, enter the number of the substitute. The following entries are possible:
Up to 24 digits
Digits and the characters * and #
- In the key name entry field, enter a name for the key. The following entries are possible:
Up to 16 digits
Digits and characters
Clicking automatically enters the default name in the entry field.
Note: The key name is used for printing the label.
Further steps:
- Save your configuration before closing.
Service and Maintenance
This section describes useful service functions, among other things. This includes deleting, saving and restoring data in the case of a malfunction and the need to exchange the telephone or PBX.
Topics
– Firmware Update (page 239)
– Data Backup on PC (page 244)
– Selecting a PBX (page 247)
- Initiating PBX Synchronisation (page 248)
– Deleting Data (page 249)
Firmware Update
When firmware is updated, errors are corrected and new features are installed. To do this, the device establishes a connection to a server in order to download the most current firmware (the device settings remain intact). Except for the charges for the required server connection, the update is free of charge.
Firmware Update Variants
There are various options for carrying out a firmware update. The variants are differentiated as follows:
Manual Firmware Update
When a manual firmware update is carried out, a file (*.rom) is uploaded into the telephone via COMfortel Set thereby saving the new firmware in the telephone.
Instant Firmware Update via the Update Server
When an instant firmware update is activated via the update server, the firmware update is initiated automatically. After a connection to the update server has been established, the server sends the latest firmware to telephone.
Initiating Manual Firmware Update
Initiation can be carried out as follows:
- Via COMfortel Set
Requirements:
- An existing PC connection configured correctly in COMfortel Set to a PC interface on the PBX or another connected system telephone
– Knowledge of the required PIN - The firmware file saved on the hard drive (*.rom)
Note: You can download the firmware file from the support pages at the Auerswald web site (Internet address: www.auerswald.de).
- Open the menu Service > Write firmware into the telephone....
A file selection dialogue opens.
- Select the file you want (*.rom) and click Open (this text is dependent on the operating system used).
The Connection routes dialogue with the devices connected via the interface configured above opens.
- Select the telephone on which you would like to save the firmware and click OK.
The PIN entry dialogue opens.
Note: For operation on the PBXs COMpact 3000, COMpact 5010 VoIP, COMpact 5020 VoIP, COMmander Basic.2 and COMmander Business, access to the telephone is only possible via the 6-digit PIN assigned in the PBX. In this case, you need to first select which PIN you would like to enter based on the authority level: the Admin PIN, one of the subadmin PINs or the user PIN that belongs to the telephone.
- Enter the associated PIN and click OK.
The firmware is saved on the telephone. This may take a while.
Further steps:
- In order to use new features after a firmware update, you normally need a new version of the operating manual. This is available per download from the support pages at the Auerswald website (Internet address: www.auerswald.de).
- In order to use the new features after a firmware update of the telephone, an update of the PBX firmware is often necessary. See the PBX manual.
Configuring Update Server Number
The telephone number for the update server must be configured for instant firmware updates via the update server.
The configuration can be carried out as follows:
- Via COMfortel Set
Requirements:
- An open configuration and the required PIN, if necessary
- Open the page Settings/functions > Basic settings.
- In the Update server telephone number entry field enter the telephone number of the update server.
Further steps:
- Save your configuration before closing.
Initiating Instant Firmware Update via Update Server
Initiation can be carried out as follows:
• Via the telephone menu
Requirements:
- Knowledge of the telephone, its menu options and the required PIN, if necessary
– The PBX connected to ISDN connection
1. Press the menu key and open the menu firmware update.
When you have entered the telephone number of the update server via COMfortel Set, the telephone number is shown in the display. If necessary, change the telephone number of the update server.
When you have not entered the telephone number of the update server via COMfortel Set, number is shown in the display. Enter the telephone number of the update server.
2. Press the softkey.
The firmware update is performed. After this, a message appears in the display indicating whether the update was successful.
3. Press the softkey.
Further steps:
- Once you have carried out the firmware update, you can distribute the new firmware version from this telephone to all the other COMfortel 1100 and COMfortel 1500 system telephones connected to the PBX.
- In order to use new features after a firmware update, you normally need a new version of the operating manual. This is available per download from the support pages at the Auerswald website (Internet address: www.auerswald.de).
- In order to use the new features after a firmware update of the telephone, an update of the PBX firmware is often necessary. See the PBX manual.
Distributing Firmware
A new version of firmware can be distributed from a system telephone to all of the other COMfortel 1100 and COMfortel 1500 system telephones connected to the PBX.
The distribution can be carried out as follows:
• Via the telephone menu
Requirements:
– Knowledge of the telephone, its menu options and the required PIN, if necessary
– Existing new firmware on the distributing system telephone
1. Press the menu key and open the menu distr. firmware.
The firmware is distributed. During the distribution process, Server Mode is displayed on the display panel of the distributing system telephone. It is not possible to use the system telephone during this process.
Saving Firmware as File on PC
The saving procedure can be carried out as follows:
- Via COMfortel Set
Requirements:
-
An existing PC connection configured correctly in COMfortel Set to a PC interface on the PBX or another connected system telephone
– Knowledge of the required PIN -
Open the menu Service > Read firmware from the telephone....
A file location dialogue opens.
- Select the directory in which you would like to save the file.
- Enter a filename with the ending .rom and click Save (this text is dependent on the operating system used).
The Connection routes dialogue with the devices connected via the interface configured above opens.
- Select the telephone whose firmware you would like to read and click OK.
The PIN entry dialogue opens.
Note: For operation on the PBXs COMpact 3000, COMpact 5010 VoIP, COMpact 5020 VoIP, COMmander Basic.2 and COMmander Business, access to the telephone is only possible via the 6-digit PIN assigned in the PBX. In this case, you need to first select which PIN you would like to enter based on the authority level: the Admin PIN, one of the subadmin PINs or the user PIN that belongs to the telephone.
- Enter the associated PIN and click OK.
The firmware is read out the telephone and saved on the PC. This may take a while.
Data Backup on PC
During data backup on a PC, a backup file containing telephone data is created and saved on the PC via COMfortel Set. If necessary, this backup file can be uploaded back into the same system telephone or to another of the same model. The required areas (for example, configuration or telephone book) can be selected. The following areas can be selected:
• MSN (own internal number)
- Configuration
- Settings (settings configured in the settings menu (except blocking))
- Functions (settings configured in the functions menu)
- Function keys (function key definitions)
– Specific information (for example, charges for last call, charge totals)
- Ringer rhythms/melodies (customised ringer rhythms)
- Call list (entries in the call list)
- Caller list (entries in the caller list)
- Redial list (entries in the redial list)
Backing up Current Data in a File on the PC
The backup can be carried out as follows:
- Via COMfortel Set
Requirements:
-
An existing PC connection configured correctly in COMfortel Set to a PC interface on the PBX or another connected system telephone
– Knowledge of the required PIN -
Open the menu Service > Create backup file....
The Connection routes dialogue with the devices connected via the interface configured above opens.
- Select the telephone whose firmware you would like to read out and click OK.
The PIN entry dialogue opens.
Note: For operation on the PBXs COMpact 3000, COMpact 5010 VoIP, COMpact 5020 VoIP, COMmander Basic.2 and COMmander Business, creating a backup file for the telephone is only possible using a 6-digit admin PIN assigned in the PBX.
- Enter the associated PIN and click OK.
The data is read out from the telephone. This may take a while.
A file location dialogue opens.
- Select the directory in which you would like to save the file.
- Enter a filename with the ending .cfi and click Save (this text is dependent on the operating system used).
Saving Data Backups on PC to Telephone
The saving procedure can be carried out as follows:
- Via COMfortel Set
Requirements:
- An existing PC connection configured correctly in COMfortel Set to a PC interface on the PBX or another connected system telephone
– Knowledge of the required PIN -
Backup file (*.cfi) on the hard disk
-
Open the menu Service > Accept backup data....
A file selection dialogue opens.
- Select the file (*.cfi) you want and click Open (this text is dependent on the operating system used).
The Connection routes dialogue with the devices connected via the interface configured above opens.
- Select the telephone on which you would like to save the backup file and click OK.
The PIN entry dialogue opens.
Note: For operation on the PBXs COMpact 3000, COMpact 5010 VoIP, COMpact 5020 VoIP, COMmander Basic.2 and COMmander Business, saving a backup file is only possible using the 6-digit admin PIN assigned in the PBX.
- Enter the associated PIN and click OK.
A dialogue for selecting the data to be transferred opens.
- Select or clear the check box for the files to be transferred.
☑ The corresponding data of the backup file is saved on the telephone.
☐ The corresponding data of the backup file is not saved on the telephone.
a) When the MSN (own internal number): check box has been selected, you may enter another MSN in the MSN (own internal number) entry field. This MSN is then saved on the telephone, instead of the MSN in the backup file.
b) If one or more of the check boxes Calls list, Caller list and/or Redial list are selected: Enter the corresponding PIN in the PIN of the backup file entry field.
Note: For operation on the PBXs COMpact 3000, COMpact 5010 VoIP, COMpact 5020 VoIP, COMmander Basic.2 and COMmander Business, it is only possible to save the lists using the 6-digit user PIN assigned in the PBX.
- Select or clear the Delete not selected areas? check box.
☑ Data that is not to be saved on the telephone and which are marked with an asterisk (*) are deleted from the destination telephone.
☐ Data that is not to be saved on the telephone remains in the destination telephone.
- Click OK.
The backup data is saved on the telephone. This may take a while.
Selecting a PBX
The configuration of the telephone is dependent on the PBX that it is run on. In order to preconfigure a telephone for operation in another PBX (for example, for service calls), configure the system to be valid ahead of time. Ignore the error message and configure the desired presettings using the COMfortel Set. If you select another PBX instead of COMpact 3000, COMpact 5010 VoIP, COMpact 5020 VoIP, COMmander Basic.2 or COMmander Business (or vice versa), the existing configuration is irrevocably deleted.
The selection can be carried out as follows:
• Via the telephone menu
Requirements:
- Knowledge of the telephone, its menu options and the required PIN, if necessary
- Press the menu key and open the menu select PBX.
- Select the desired PBX.
The telephone restarts.
Note: If the wrong PBX is selected, this is detected and an error message is displayed. If the setting for a wrong PBX is made on purpose for service reasons, the error message must be ignored.
Initiating PBX Synchronisation
If necessary, you can initiate a complete data synchronisation with the PBX.
Initiation can be carried out as follows:
• Via the telephone menu
Requirements:
– Knowledge of the telephone, its menu options and the required PIN, if necessary
- Press the menu key and open the menu sync. with PBX. Data synchronisation is performed with the PBX.
Deleting Data
You have the option of deleting individual pieces of data saved in the telephone. This includes resetting the telephone back to factory settings as well as deleting charges.
Restoring Factory Setting
The restoration can be carried out as follows:
• Via the telephone menu
Requirements:
- Knowledge of the telephone, its menu options and the required PIN, if necessary
- Press the menu key and enter #201 via the keypad.
- Press the softkey to confirm the action.
Note: When operated on one of the PBXs COMpact 3000, COMpact 5010 VoIP, COMpact 5020 VoIP, COMmander Basic.2 or COMmander Business, the PINs remain because the PINs of the PBX are used. When operated on one of the other PBXs the user PIN will be deleted.
Further steps:
- Put the telephone back into operation. If necessary, refer to the commissioning instructions.
- Create a new configuration or reinstall the previously saved configuration in the telephone.
Deleting Charges
The total of the charges accumulated since they were last deleted is stored on the telephone. In order to view the charge expenses accumulated during specified time intervals, you can delete the total charges accumulated from time to time.
Deleting can be carried out as follows:
• Via the telephone menu
Requirements:
- Knowledge of the telephone, its menu options and the required PIN, if necessary
- Press the softkey.
- Scroll to the call char.: information and press the ☒softkey.
The call charge total list is deleted.
Note: Neither the total charges recorded in the PBX nor the call data sets are affected by the delete operation.
Glossary
The glossary contains an alphabetical list of the functions and terminology used accompanied by short explanations.
There is also an index of abbreviations.
Topics
- Terminology and Functions (page 252)
- Abbreviations (page 264)
Terminology and Functions
A C D E F G H I L M P Q R S T V W
A
Automatic Call Acceptance
Automatic call acceptance facilitates headset operation at call centers or on hotlines. An incoming call is automatically accepted after a configured amount of time. Call acceptance is signalled by an attention tone.
C
Call Deblocker (Incoming) – VIP Numbers
If you would still like to allow specific people to call you despite enabling the do-not-disturb function, the external telephone numbers (VIP numbers) of these people can be assigned a call deblocker for incoming calls in the PBX. The call deblocker which applies to all subscribers can be enabled on your own telephone as needed. If the call deblocker is enabled, the do-not-disturb function does not apply to callers who use one of the VIP numbers.
Call Forwarding
Call forwarding allows calls to be forwarded. When this is done, a difference is made between calls to a specific telephone (call forwarding for subscribers), to groups (call forwarding for groups) and to connections (call forwarding for external telephone numbers).
Call Restrictor (Incoming) – Robinson Numbers
If there are certain persons who you absolutely do not want to call you, their external phone numbers (Robinson numbers) can be assigned to a call restrictor for incoming calls in the PBX. The call restrictor which applies to all subscribers can be enabled on your own telephone as needed. If the call restrictor is enabled, a caller, who transmitted one of the Robinson numbers, is rejected.
Call Waiting
If you are already in a call, the call waiting function notifies you using the call waiting tone when another communication partner is calling.
Callback on Busy
After initiating a callback on busy (CCBS), a subscriber is automatically called back by the PBX or by the central office when a busy subscriber becomes available again.
Callback on No Reply
After initiating a callback on no reply (CCNR), a subscriber is automatically called back by the PBX or by the central office when a subscriber is reachable again.
Caller List
Telephone numbers of calls not accepted are saved in the caller list of the telephone, along with the date and time of the call (for multiple call attempts, date/time of the last call attempt). A maximum of 10 telephone numbers can be saved. If more than 10 calls from various telephone numbers come in, the oldest entry is overwritten.
A caller be called back directly from the caller list.
The LED above the message key indicates whether entries are present on the caller list.
Calls
The system telephone allows you to make internal and external calls on the PBX. Internal calls are toll-free.
Calls List
The calls made (incoming and outgoing) are saved in the calls list of the telephone along with the telephone number of the communication partner as well as date and time of the call. A maximum of 10 calls can be saved. For more than 10 calls, the oldest entry is overwritten. A previous communication partner can called directly from the calls list.
Conference Calls
During a conference call, you are talking with two subscribers simultaneously.
Configuration Switchover
If multiple configurations have been saved in the PBX, for example, for day, night, etc., switching over from one configuration to another can be carried out manually and/or in a time controlled manner.
D
DDI
The DDI (Direct Dialing In) is the extension number for dialing directly to a specific subscriber on a telephone system. Example: In the number 0 53 06 / 92 00 - 700, 700 is the extension (DDI) for the Auerswald info-line.
Direct Exchange Line Access
If the telephone has been configured as a direct exchange access point on the PBX, you will hear an external dial tone directly after picking up the receiver. You can directly dial the telephone number without the leading 0.
Do-not-disturb
The do-not-disturb function offers the option of blocking internal and external calls as well as blocking group calls on a specific telephone. A caller hears only a busy signal. An internal subscriber can reach a telephone with call protection in an emergency using a priority call.
The do-not-disturb function has no influence on outbound calls, callbacks, alarm calls, scheduled calls, wake-up calls or InterCom calls.
Door Functions
A door terminal system connected with the interface FTZ 123 D12-0 (PBX requires extension module) enables the following functions. Calls to the door can be made from any telephone (intercom). During a call to the door, the door can be opened (open door) and a stairwell light controlled by switching a relay (switch on light).
These functions can be executed on the system telephone without initiating a door call.
E
Exchange Line Transfer
A suitably authorised telephone, for example, the telephone exchange, can transfer the exchange line access required for an outgoing call to another internal telephone for a short period of time. This is meaningful, for example, when this telephone is located in a publicly accessible room and is only occasionally used for external calls by an employee.
F
Firmware
Firmware is the operating software on the telephone or PBX that is stored in the device itself. The device cannot function without firmware.
Firmware Update
When firmware is updated, errors are corrected and new features are installed. To do this, the device establishes a connection to a server in order to download the most current firmware (the device settings remain intact). Except for the charges for the required server connection, the update is free of charge.
G
Group Functions
In addition to internal subscribers, the PBX can also manage groups. The internal subscribers can become members of any and all groups. These groups can be used, for example, to collect the internal subscribers in certain departments or teams (Support, Marketing, Sales) together.
Membership in a group does not necessarily mean that a subscriber receives calls sent to the group. A subscriber that is logged out takes on no group functions. This can be especially important for employees of a support department, who should not be available to customers around the clock, but rather rotate in and out of the hotline.
H
Hands-free Calling
During hands-free calling, the loudspeaker and microphone on the device are switched on. This option allows you to talk on the telephone even if you have no hands free. In addition, other people in the room can participate in the call.
Headset Calls
A headset enables you to participate in calls when you have no hands free. This is a very useful feature, especially in certain professional areas (for example, in a call center).
Hotel Function
The hotel function allows you to conveniently manage room and call data when the PBX is used in a hotel.
|
InterCom Announcement/Handsfree
The InterCom function enables an announcement to one system telephone or to all system telephones of a group from any internal telephone without someone having to actively receive a call (for example, in a doctor's office).
If the InterCom destination is one system telephone, this can be programmed to switch on the microphone in addition to the loudspeaker (handsfree) so that a person nearby can speak with the caller using this intercom system.
L
LED
An LED is a light emitting diode. This is an electronic device that is similar to a lamp and is used for displays (also multi-coloured).
Loudspeaker Audio Out
This function enables loudspeaker audio out over an audio output on the loudspeaker connected to the PBX unit or an active loudspeaker (for example, a loudspeaker system in a department store/supermarket). In addition, a previously specified telephone number is called by an internal telephone. The call connection is immediately established after dialling the telephone number.
Loudspeaker Listening
During loudspeaker listening, the receiver loudspeaker as well as the loudspeaker in the device are switched on. This allows other people in the room to listen in on the call. The call is continued using the receiver microphone (no hands-free calling).
M
Macro
The macro function enables a function key to be defined with digits and various consecutive commands, for example, for accessing an answering machine remotely or programming a function on the PBX.
Memo
The memo function allows you to enter a telephone number note on the telephone during a call. After the call has been ended, the telephone number can be retrieved and, for instance, accepted into dial preparation.
MSN
An ISDN point-to-multipoint connection is reachable under multiple telephone numbers, the MSN (Multiple Subscriber Number) or multiple subscriber numbers. The MSN is the part of the telephone number without a local prefix.
Mute
If you would like to discuss something with another person in the room without your communication partner on the telephone being able to hear, you can temporarily mute the call.
P
Permanent Configuration
For situations where your settings are supposed to apply even after configuration switchovers, you can use the so-called permanent configuration. If permanent configuration is enabled, the configuration-dependent settings will be overridden by the permanent configuration settings.
Permanent configuration is available for the following settings:
- Call forwarding for external number
Phone Lock
The phone lock can be used to block the telephone from unauthorised use. Even after enabling the phone lock, it is possible to receive incoming calls and to make emergency calls (manual dialling of emergency numbers entered in the PBX only).
Pickup
Using Pickup, you can take a call on your own phone that was originally sent to another internal telephone.
If the call has already been taken, the call can be taken using same procedure if the call takeover has been allowed by the subscriber being called. This function is useful, for example, in the case of answering machines.
PIN
A PIN (Personal Identification Number) is a multi-digit secret code that has to be entered to get access to services or authorisations.
Power Save Mode
In power save mode, the LEDs are inactive (exception: the message LED blinks for missed calls).
Glossary
Terminology and Functions
Q
After a configurable waiting time and depending on the configuration, power save mode can be activated automatically during the switchover into a PBX configuration and/or manually by pressing a key. Power save mode is deactivated again as soon as an incoming call is signalled or any key is pressed.
Priority Call
When the do-not-disturb function is enabled, a subscriber is no longer reachable by normal callers. A priority call creates an exception and allows the incoming internal call to circumvent the do-not-disturb function.
Project Assignment
The exchange line access with project assignment enables an external call to be assigned to a specific project/customer/client (for example, in a lawyer's office). Based on the evaluation of call data, both the charges as well as the time required can be assigned to a specific project.
Q
Query Calls
During a query call, you are talking with one subscriber while your previous communication partner is on hold on the PBX in the background listening to hold music.
A query call is initiated either by calling a query call subscriber, using pick-up during a call, or by accepting a call signalled by call waiting.
R
Redial List
The last 10 telephone numbers dialled are saved in the redial list. For more than 10 telephone numbers dialled, the oldest entry is overwritten. The telephone numbers are saved along with date and time of dialling (for multiple dialling operations, the date/time of the last attempt).
Relays
If the PBX is equipped with one or more relays, they can be switched on and off independently of the operating mode configured for each telephone.
Room Monitoring
The room monitoring function can be used for monitoring a room acoustically, for instance, for monitoring a small child while she sleeps. The internal telephone in this room must be suitably configured for this purpose.
The configured telephone can then be called by another internal telephone or by a password-protected external telephone. The connection is established immediately and it is possible to listen into the room.
S
Server
A server is a computer or a software. Depending on the type of server it fulfils different tasks as part of the network. It provides, for example, other users (clients) in this network with certain information, data and services.
Splitting
Splitting is the switching between two calls. As opposed to a conference call, you can only speak to each communication partner by going back and forth between the two. When you speak with one communication partner, the other call is kept on "hold".
T
Targeted Exchange Line Access
Using targeted exchange line access, you can define which MSN (your own external phone number) is transmitted for an external call and which exchange line should be used while doing so.
Targeted VoIP Access Point
Using a targeted VoIP access point, an external call can be initiated via a specific VoIP account.
Telephone Book
Internal telephone numbers (subscriber, groups, door, emergency call) as well as the telephone book/short-code numbers on the PBX are displayed in the telephone book. If one of these entries does not have a name, the system telephone generates a name for the telephone book (for example, int. TN45, KW-A 05306...). The entries cannot be changed in the system telephone; they can only be changed using the corresponding PC software on the PBX (internal telephone numbers with COMset; short-code numbers with COMtools). All of the contacts are displayed in alphabetical order.
If a telephone number that is in the telephone book is transmitted during a call, the assigned name is displayed instead of the telephone number.
Text before Answering
The text before answering function enables the caller to be greeted with an automatic announcement before accepting the call (charges apply for the external caller).
Transfer
A communication partner can be transferred or connected to an internal or external subscriber.
Transferring Without Announcement
This describes a type of transfer where external calls are transferred to internal subscribers. The caller is put through to the desired subscriber without an announcement.
V
Voicemail Center 461/461.2
If a Voicemail Center 461/461.2 (optional accessory from Auerswald) is connected to an Auerswald PBX, its mailboxes can be accessed/managed over the system telephone.
VoIP Account
To get the access data needed for VoIP calls, accounts have to be set up from one or several VoIP providers. To do this, a registration with name and address data has to be done on the website of a provider. Afterwards, one or several telephone numbers which are available on the fixed network and the Internet as well as an account with user name and password are assigned. In the majority of cases the registered account is available within a few minutes and can be used very soon.
W
Waiting Loop
If the internal subscriber to which you would like to transfer an external communication partner is busy, you can place the external communication partner in the waiting loop of this subscriber.
Abbreviations
| CCBS Completion of Calls to Busy Subscriber | |
| CCNR Completion of Calls on No Reply | |
| CF Call Forwarding | |
| CFB Call Forwarding on Busy | |
| CFNR Call Forwarding on No Reply | |
| CFU Call Forwarding Unconditional | |
| CLIP Calling Line Identification Presentation | |
| CLIR Calling Line Identification Restriction | |
| CW Call Waiting | |
| DDI Direct Dialling In | |
| DTMF Dual Tone Multi Frequency | |
| ISDN Integrated Services Digital Network | |
| LED Light Emitting Diode | |
| MSN Multiple Subscriber Number | |
| PBX Private Branch Exchange | |
| PIN Personal Identification Number | |
| USB Universal Serial Bus |
Index
A
abbreviations ......264
active communication partner,
changing (splitting) 63
announcement (InterCom) .....167, 257
function key 168
attention tone
automatic call acceptance .....120
automatic call acceptance .....119, 252
attention tone 120
call acceptance time ....121
function key 119
B
backup
on PC 244
busy signal
callback, initiate ....55
end call for query call ....58
priority call (do-not-disturb) .....57
C
call 59,253
accept 45
call waiting, accept ....49
call waiting, forward .....50
call waiting, ignore ....51
call waiting, reject .....49
display navigation ......24
DTMF signals, send 60
end 61
forward 46
hands-free calling 72, 256
hands-free calling, switch off .....73
hands-free calling, switch on .....73
headset 76,256
incoming call, on hold 46
interrupt for pickup 186
loudspeaker listening 74, 258
loudspeaker listening, switch off .. 74
loudspeaker listening, switch on .. 74
mute 61
reject 45
subscriber, changing 63
third communication partner, transfer 68
transfer 65,263
transfer from query call 68
transfer without announcement .... 66
call charges 110
call charges, configure
cost per call unit 111
currency 110
call deblocker function key .... 122
call deblocker (incoming) ...... 122, 252
call deflection (forward call) 46
call forwarding 124, 252
kinds 125
variants 206
variations 124
call forwarding (ext. no.) function key 132
call forwarding (subscribers) function key .... 126
call restrictor function key .... 139
call restrictor (incoming) 139, 253
call signalling, configure 103
call waiting 141, 253
call waiting calls 48
call waiting tone, switch off 51
call waiting, accept 49
call waiting, forward ....50
call waiting, reject ....49
call, ignore ....51
function key 141
signalling 142
call, end
during conference call ....71
during query call ......64
call, incoming ....44
call, initiate ....52
from caller list 89
from calls list 85
from redial list 82
from telephone book 79
from the calls list 85
in hands-free calling mode .....72
on direct exchange line access ....53, 54
via targeted exchange line access ....207
via targeted VoIP access point ....213
with dial preparation ....53
callback
initiate on busy 55
initiate on no response .....56
on busy 253
on no reply 253
caller list 88, 253
call types, select 92
display navigation 88
entries, delete .....90
function key 90
open 88
signalling LED, select 93
telephone number, dialling .....89
calls list 84, 254
call types, select 87
display navigation 84
entries, delete 85
function key 86
open 84
telephone number, dialling .....85
calls, outgoing 52
CCBS (callback on busy) 55
CCNR (callback on no response) ..... 56
CE symbol ..... see insert "Conditions of Guarantee, Information Service"
CE symbol ......see insert "Warranty Conditions, Information Service"
charges, delete 250
COMfortel Set
entry fields 36
exit 28
installation 27
interface, configure 29
language, configure 29
list entries, create 37
list entries, delete 37
navigation 36
operating instructions 35
print functions 34
selection fields 36
start 28
V.24 options, configure 30
conditions of guarantee ..... see insert "Conditions of Guarantee, Information Service"
conference
both conference call partners, connect 71 options 69
conference call 69,254
conference call partner, end call .. 70 end completely .... 71 initiate .... 69
conference call, initiate 69
configuration
close 34
open 31
permanent configuration 259
save on PC 33
save on telephone 32
configuration file, open ......31
configuration software 27
entry fields 36
exit 28
installation 27
interface, configure 29
language, configure .....29
list entries, create ....37
list entries, delete 37
minimum requirements, PC ......27
navigation 36
output fields ......36
print functions 34
start 28
V.24 options, configure ....30
configuration switchover .....144, 254
function key 144
configuration-dependent control
function key 229
voice mailbox 229
contrast 101
cost per call unit 111
currency 110
D
data backup
on PC 244
data, delete 249
date format 102
DDI 254
declaration of conformity ......see insert
"Conditions of Guarantee, Information Service"
declaration of conformity ......see insert
"Warranty Conditions, Information
Service"
delete
charges 250
dial
from caller list 89
from calls list 85
from redial 82
on direct exchange line access .... 54
dial preparation 53
dialling
DTMF codes in call 60
from telephone book 79
out of a call (query call) 62
telephone number 53
display
call, during 24
caller list 88
calls list 84
idle state 21
incoming call 23
main menu 22
outgoing call 24
query call, during 24
redial 81
telephone number entry 22
text entry 22
display settings
contrast 101
date format 102
language 100
time format 101
do-not-disturb 146, 255
function key 146
ignore (priority call) 57
type 147
environment ... see insert "Conditions of
Guarantee, Information Service"
environment ......see insert "Warranty
Conditions, Information Service"
exchange line access, targeted
initiating 207
exchange line transfer .....151, 255
function key 152
sequence ....151
F
factory settings ......249
factory settings, reset 249
firmware 255
distribute 242
save on PC 243
firmware update ....239, 256
manual 239
update server ......241
update, carry out instant .....241
variants 239
firmware update, instant .....241
function key
automatic call acceptance .....119
call deblocker ....122
call forwarding (ext. no.) .....132
call forwarding (subscribers) .....126
call restrictor ....139
call waiting 141
caller list 90
calls list 86
configuration switchover .....144
configuration-dependent control .229
do-not-disturb 146
door functions ......149
exchange line transfer .....152
group functions ......155
group status ....159
headset 112
hotel room telephone 165
InterCom announcement ......168
InterCom handsfree 172
InterCom permission .....173
log out of all groups 157
loudspeaker audio out 176
macro 179
message forwarding 234
MSN/DDI call forwarding 132
phone lock 184
pickup 187
power save mode 191
project assignment 193
readiness voice mailbox 227
relays 195
remote access 232
ring signal 104
room monitoring 198
shift 116
speed dialling 201
subscriber call forwarding ..... 126
substitute function 236
targeted exchange line access .. 207,
209, 211
targeted VoIP access point ..... 214
text before answering ..... 217, 219
Voicemail Center 221
function keys
exchange/move 117
print assignment 34
second level, enable 115
function lock, configure 98
G
glossary 251
group functions 154, 256
detailed information 154
function key 155
group status
function key 159
H
handsfree (InterCom) 167, 257
function key 172
hands-free calling 72, 256
headset
call, make 76, 256
function key 112
ringing 113
help 38
icons 42
navigation ....38
opening 38
printing 42
search 41
hotel function 161, 257
configure 162
function areas ......161
hotel room telephone
configure wake-up time .....164
function key 165
query call charges ....164
|
identification of telephone .....95
idle state
menu options ......21
important information ....11
incoming call
display navigation ......23
incoming call, on hold 46
installation
COMfortel Set ......27
InterCom announcement .....167, 257
execute 168
function key 168
procedure 167
InterCom handsfree .....167, 257
execute 171
function key 172
procedure 171
InterCom permission
function key 173
interface
COMfortel Set 29
K
keys 19
L
language, configure 100
LED 257
LED message key 93
LEDs 19
list entries
create (COMfortel Set) 37
delete (COMfortel Set) 37
log out of all groups
function key 157
loudspeaker audio out 175, 257
execute 175
function key 176
loudspeaker listening 74, 258
M
macro 178,258
display presentation 181
execution procedure 178
function key 179
main menu
menu options 22
maintenance 238
manual firmware update 239
memo 182, 258
create 182
retrieve 182
menu options ......21
call, during 24
in idle state ....21
incoming call 23
main menu 22
outgoing call 24
query call, during 24
telephone number entry .....22
text entry 22
menu overview 22
message forwarding ....234
function key 234
microphone
switch off 61
minimum requirements, PC ......27
MSN 258
configure 95
MSN/DDI call forwarding
function key ......132
mute 61,258
N
navigation
COMfortel Set ....36
no response
callback, initiate ....56
0
operating instructions
COMfortel Set ....35
outgoing call
display navigation ......24
output fields
COMfortel Set ....36
P
PBX
select 247
synchronisation 248
PC
data backup 244
minimum requirements 27
permanent configuration 259
phone lock 183,259
disable 183
enable 183
function key 184
pickup 186,259
during call 186
execute 186
function key 187
PIN 259
configure 97
power save mode 189, 259
activation depending on
configuration 190
automatic activation 189
function key 191
link to phone lock 192
print functions 34
priority call 260
initiate 57
project assignment 193, 260
function key 193
list, print 34
proper use 13
Q
query call 62, 260
both communication partners,
connect 64
call, ending 64
initiate 62
number calls is busy/no response 58
query call, end 58
R
readiness voice mailbox ....227
function key 227
redial list 81, 261
call types, select 83
display navigation ....81
entries, delete 82
open 81
select 82
registration status ......204
reject
call waiting 49
caller 45
relays 195, 261
function key ......195
remote access
voice mailbox ....231
reset factory settings .....249
restrictions 97
function lock 98
settings lock 99
ring signal
function key 104
ringer
determine type of call .....106
melodies, configure ....107
switch on/off 103
volume, increase automatically ...109
Robinson numbers ......139, 253
room monitoring .....197, 261
end 197
function key 198
initiate ....197
s
safety information ....12
server 261
service 238
service ...... see insert "Conditions of
Guarantee, Information Service"
service ......see insert "Warranty
Conditions, Information Service"
settings lock, configure 99
shift 116
speed dialling 200
automatic pick-up 204
function key 201
registration status 204
speed dialling keys
application options 200
splitting 63,262
active call, ending 64
active communication partner, transfer 68
both communication partners, connect 64
from query call 63
initiating from conference call ...... 70
to third subscriber, transfer ..... 68
subscriber call forwarding
function key 126
subscribers, changing (splitting) ...... 63
targeted exchange line
access 206, 262
function key 207, 209, 211
targeted VoIP access point ..... 213, 262
function key 214
initiate 213
technical data 14
telephone
identification 95
telephone book 77, 78, 262
open 78
print 34
telephone number range,
configure displayed ....80
telephone number, dial .....79
telephone number lists ....77
telephone ringer, switch on/off .....103
telephoning
call waiting calls ....48
call, accept ....45
call, incoming 44
caller, reject ....45
calls, outgoing .....52
conference call, initiate ......69
during conference call ......69
during query call ......63
text before answering
function key ......217, 219
variants 216
text before answering for group .216, 262
switch on/off 217, 219
time format ....101
transfer 65,263
from query call ......68
in waiting loop, place 67
options 65
to third communication partner .....68
with announcement 66
without announcement 66
transferring without announcement ..263
type of do-not-disturb .....147
U
update server ......241
user PIN, configure .....97
V
V.24 options
COMfortel Set 30
VIP numbers 122, 252
voice mailbox 226
configuration-dependent
control 229
execute remote access 231
function key remote access ..... 232
message forwarding 234
Readiness 227
remote access 231
substitute function 236
Voicemail Center 221, 263
function key 221
rapid remote access 223
VoIP account 263
volume, change
automatically 109
W
waiting loop 67, 263
warranty ...... see insert "Conditions of Guarantee, Information Service"
warranty ......see insert "Warranty Conditions, Information Service"