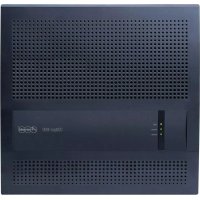
COMfortel 2500 AB - Phone Auerswald - Free user manual and instructions
Find the device manual for free COMfortel 2500 AB Auerswald in PDF.


User questions about COMfortel 2500 AB Auerswald
0 question about this device. Answer the ones you know or ask your own.
Ask a new question about this device
Download the instructions for your Phone in PDF format for free! Find your manual COMfortel 2500 AB - Auerswald and take your electronic device back in hand. On this page are published all the documents necessary for the use of your device. COMfortel 2500 AB by Auerswald.
USER MANUAL COMfortel 2500 AB Auerswald
System Telephone and Answering Machine
COMfortel ^® VoIP 2500 AB
text_image
N 100mm-500mm R R R R R R R R R R R R R R R R R R R R R R R R R R R R R R R R R R R R R R R R R R R R R R R R R R M 100mm-500mm-500mm-500mm-500mm-500mm-500mm-500mm-500mm-500mm-500mm-500mm-500mm-500mm-500mm-500mm-500mm-500mm-500mm-500mm-500mm-Table of Contents
Important Information....17
Safety Information 18
Proper Use 19
Technical Data 21
Copyright 23
Environmental Notice 24
Getting to Know Your Telephone 25
Functions of Keys and LEDs 26
Menu Options 28
Menu Option Examples 28
Menu Overview....36
Icons 42
Using the Configuration Manager....49
Configuration Manager....50
Minimum Requirements for PC for Using Configuration Manager.... 50
Opening the Configuration Manager.... 50
Operating Instructions for the Configuration Manager.... 52
Switching the Language 56
Configuring Time Lapse for Forced Logout 57
Help....58
Opening the Help....58
Navigating in the Help Window....58
Searching in the Help 61
Printing from within the Help....62
Icons in the Help Window 62
Telephoning 63
Incoming Calls....64
Options During an Incoming Call....64
Accepting Incoming Calls 65
Rejecting Incoming Calls 65
Hold incoming calls....66
Forwarding Incoming Calls 66
Call Waiting Calls 68
Options During a Call Waiting Call 68
Rejecting Call Waiting Calls....69
Accepting Call Waiting 69
Forwarding Call Waiting....70
Switching off Call Waiting Tone 70
Outgoing Calls 72
Options for Outgoing Calls....72
Picking up Receiver and Dialling Telephone Number.... 73
Dialling Telephone Number with Dial Preparation 73
Initiating External Calls with Number Presentation Suppression.... 74
Dialling Telephone Number on Direct Exchange Line Access.... 74
Options for Unsuccessful Calls....75
Initiating Callback on Busy....76
Initiating Callback on No Response.... 77
Initiating Priority Call for Do-Not-Disturb....78
Ending a Query Call 78
Calls 80
Options during a Call 80
Retrieving Information about a Call 81
Sending DTMF Signals....81
Muting a Call 81
Ending a Call 82
Query Calls 83
Initiating a Query Call 83
Options during a Query Call 84
Splitting 84
Ending One of the Two Calls 85
Connecting Both Communication Partners....85
Transfer 86
Options for Transferring a Call 86
Transfer with Announcement 87
Transfer without Announcement 87
Placing External Communication Partner in Waiting Loop 88
Calling a Third Subscriber and Transferring to an Active Communication Partner...... 89
Conference Calls....90
Initiating Conference Calls....90
Options during a Conference Call....90
Initiating Splitting during a Conference Call.... 91
Ending a Call with a Conference Call Partner 91
Connecting both Conference Call Partners 92
Ending Conference Call Completely 92
Hands-free Calling....93
Initiating Call in Hands-free Calling Mode 93
Ending up Call in Hands-free Calling Mode 93
Switching on Hands-free Calling During a Call.... 94
Switching off Hands-free Calling and Returning to Normal Calling 94
Loudspeaker Listening 95
Switching on Loudspeaker Listening during a Call.... 95
Switching off Loudspeaker Listening and Returning to Normal Calling.... 95
Ending a Call in Loudspeaker Listening Mode 96
Headset Calls....97
Initiating Headset Calls 97
Ending a Call in Headset Operation 97
Initiating Listen in Function on Receiver.... 98
Ending Listen in Function on Receiver 98
Telephone Book and Telephone Number Lists 99
Telephone Book....100
Opening the Telephone Book 100
Dialling from Telephone Book....102
Configuring a Contact....103
Editing a Contact 107
Deleting a Contact....110
Entering Comments for a Contact 112
Configuring a Call Macro 113
Switching Specific Call Acceptance/Announcement for Telephone Book Contacts On/Off 115
Accepting Telephone Numbers from Dial Preparation.... 116
Accepting Telephone Numbers into Other Menus 117
Configuring Displayed Telephone Number Range for Telephone Book.... 118
Exporting the Telephone Book 119
Importing the Telephone Book....120
Redial List....121
Opening the Redial List 121
Dialling from Redial List....122
Deleting Entries in Redial List.... 123
Configuring Calls to be Recorded for Redial List.... 123
Calls List.... 125
Opening the Calls List 125
Dialling from Calls List 126
Deleting Entries in Calls List.... 127
Configuring and Operating Function Key for Calls List 128
Configuring Calls to be Recorded for Calls List.... 129
Caller List 131
Opening the Caller List 131
Dialling from Caller List.... 132
Deleting Entries in Caller List 133
Configuring and Operating Function Key for Caller Lists.... 134
Configuring Calls to be Recorded for Caller List.... 136
Configuring the LED Message Key.... 137
Configuring and Operating Functions 139
Automatic Call Acceptance 141
Switching Automatic Call Acceptance On/Off.... 141
Configuring and Operating Function Key for Automatic Call Acceptance.... 142
Attention Tone for Switching Automatic Call Acceptance On/Off.... 144
Configuring Call Acceptance Time for Automatic Call Acceptance 145
Boss/Secretary Function 146
Procedure when Calling the Boss Telephone.... 146
Switching Boss/Secretary Function on Boss Telephone On/Off.... 147
Configuring and Operating Secretary Key on Boss Telephone 147
Configuring and Operating Boss Key on Secretary Telephone 150
Call Deblocker (Incoming) – VIP Numbers 153
Switching Call Deblocker (Incoming) On/Off 153
Configuring and Operating Function Key for Call Deblocker (Incoming) 154
Call Forwarding 157
Call Forwarding Variations....157
Kinds of Call Forwarding.... 158
Switching Call Forwarding for Subscribers On/Off.... 159
Configuring and Operating Function Key for Call Forwarding for Subscribers 160
Switching Call Forwarding for External Numbers On/Off.... 167
Configuring and Operating Function Key for Call Forwarding for External Numbers..... 169
Call Restrictor (Incoming) – Robinson Numbers.... 178
Switching the Call Restrictor (Incoming) On/Off 178
Configuring and Operating Function Key for Call Restrictor (Incoming).... 179
Call Waiting 181
Switching Call Waiting On/Off....181
Configuring and Operating Function Key for Call Waiting.... 182
Switching Call Waiting Signalling On/Off via LED/Tone 184
Configuration Switchover 186
Configuration Switchover Executed Manually.... 186
Configuring and Operating Function Key for Configuration Switchover.... 186
Do-not-disturb....190
Switching the Do-not-disturb Function On/Off 190
Configuring and Operating Function Key for Do-not-disturb.... 191
Configuring Type of Do-not-disturb.... 193
Door Functions....195
Executing Door Functions.... 195
Configuring and Operating Function Key for Door Functions 197
Exchange Line Transfer....202
Exchange Line Transfer Sequence 202
Configuring and Operating Function Key for Exchange Line Transfer.... 203
Follow me 205
Switching Follow me On/Off 205
Configuring and Operating Function Key for Follow me 206
Free Seating....208
Free Seating Procedure....208
Configuring Free Seating....209
Performing Free Seating....209
Ending Free Seating on the Foreign Telephone 210
Ending Free Seating on Your Own Telephone with Data Transfer 211
Ending Free Seating on Your Own Telephone without Data Transfer 211
Creating a USB Memory Stick for an Emergency.... 212
Group Functions....214
Detailed Information about Group Functions.... 214
Logging the Telephone In/Out 215
Logging Telephone Out of All Groups.... 216
Configuring and Operating Function Key for Group Function.... 216
Configuring and Operating Function Key for Logging Out of All Groups 221
Configuring and Operating the Display of the Group Status.... 223
Hotel Function 226
Function Areas of the Hotel Function 226
Configuring the Hotel Function 227
Check/Change Room Status on Hotel Reception Telephone 228
Performing Check-in on Hotel Reception Telephone.... 229
Configuring Wake-up Time for Room on Hotel Reception Telephone 230
Querying Call Charges for Room on Hotel Reception Telephone 231
Printing Interim Invoice for Room from Hotel Reception Telephone 231
Blocking External Telephoning for Room on Hotel Reception Telephone.... 232
Performing Check-out on Hotel Reception Telephone.... 233
Configuring Wake-up Time on Hotel Room Telephone 235
Querying Call Charges on Hotel Room Telephone 236
Configuring and Operating Function Key for Hotel Room on Hotel Reception Telephone 236
Configuring and Operating Function Key for Hotel Room on Hotel Room Telephone 239
InterCom Announcement/Handsfree.... 241
InterCom Announcement Procedure.... 241
Executing InterCom Announcement.... 242
Configuring and Operating Function Key for InterCom Announcement.... 242
InterCom Handsfree Procedure.... 245
Executing InterCom Handsfree.... 246
Configuring and Operating Function Key for InterCom Handsfree 246
Switching InterCom Permission On/Off 249
Configuring and Operating Function Key for InterCom Permission 250
Loudspeaker Audio Out....252
Executing Loudspeaker Audio Out 252
Configuring and Operating Function Key for Loudspeaker Audio Out.... 253
Macro 256
Macro Execution Procedure 256
Configuring and Operating Function Key for Macro.... 257
Configuring Display Presentation during Macro Execution.... 260
Memo 262
Creating a Memo 262
Retrieving a Memo....262
Phone Lock 264
Enabling the Phone Lock....264
Disabling the Phone Lock....264
Configuring and Operating Function Key for Phone Lock.... 265
Pickup....267
Executing Pickup 267
Executing Pickup during Call 267
Configuring and Operating Function Key for Pickup.... 268
Power Dialling....271
Power Dialling Procedure 271
Executing Power Dialling 271
Cancelling Power Dialling 272
Switching Attention Tone for Power Dialling On/Off.... 272
Power Save Mode 274
Switching Automatic Activation of Power Save Mode On/Off 274
Switching Power Save Mode Activation On/Off Depending on Configuration 275
Configuring and Operating Function Key for Manually Activating Power Save Mode..... 277
Switching the Power Save Mode Link to Phone Lock On/Off 278
Project Assignment 280
Detailed Information about Project Assignment.... 280
Initiating a Project Assignment 280
Executing Project Assignment during a Call.... 281
Configuring and Operating Function Key for Project Assignment.... 282
Configuring a List for Project Assignment 285
Deleting a Project List 286
Exporting a Project List....287
Importing a Project List....287
Relays 289
Switching Relays On/Off 289
Configuring and Operating Function Key for Switching Relays On/Off.... 290
Room Monitoring 293
Initiating Room Monitoring 293
Ending Room Monitoring 293
Configuring and Operating Function Key for Room Monitoring 294
Scheduled Call 296
Opening Scheduled Call List 296
Configuring Scheduled Call as Schedule Reminder.... 297
Configuring Scheduled Call as Call Reminder 298
Accepting Scheduled Call as Schedule Reminder 299
Accepting Scheduled Call as Call Reminder 300
Editing Existing Scheduled Calls in Scheduled Call List 300
Deleting Existing Scheduled Calls from Scheduled Call List.... 301
Configuring and Operating Function Key for Scheduled Calls.... 302
Speed Dialling 304
Application Options for Speed Dialling Keys.... 304
Configuring and Operating Function Key for Speed Dialling 305
Switching Automatic Speed Dialling Pick-up On/Off.... 308
Switching the Display of the Registration Status On/Off.... 309
Targeted Exchange Line Access 310
Initiating Targeted Exchange Line Access 310
Configuring and Operating Function Key for Targeted Exchange Line Access .... 311
Targeted VoIP Access Point 314
Initiating a Targeted VoIP Access Point 314
Configuring and Operating Function Key for Targeted VoIP Access Point 315
Text before Answering 318
More Information about Text before Answering for Group 318
Switching Text before Answering for Group On/Off 319
Configuring and Operating Function Key for Text before Answering 319
Voicemail Center 461/461.2 322
Initiating Remote Access to Voicemail Center 322
Configuring and Operating Function Key for Remotely Accessing the
Voicemail Center 322
Switching Rapid Remote Access of Voicemail Centers 461.2 On/Off 327
Waiting Field Function.... 329
Configuring a Waiting Field 329
Sequence for Call Acceptance in Waiting Field.... 330
Switching Waiting Field Reception On/Off.... 331
Configuring and Operating Function Key and External Waiting Field.... 333
Configuring and Operating Function Key for Internal Waiting Field.... 335
Configuring and Operating Function Key for Switching Waiting Field Reception
On/Off 338
Switching Attention Tone for Waiting Field On/Off.... 341
Configuring and Operating the Answering Machine 342
Forwarding Incoming Calls to Answering Machine.... 343
Answering Machine Accepts Call – Call Acceptance 344
Readiness 345
Switching Readiness On/Off....345
Configuring and Operating Function Key for Readiness.... 346
Answering Machine List 349
Opening the Answering Machine List 349
Listening to recordings (messages and call recordings) 351
Dialling from the Answering Machine List 352
Configuring the LED Message Key 352
Configuring and Operating Function Key for Answering Machine List.... 353
List of Voice Memos 355
Recording Memos 355
Configuring and Operating Function Key Recording Voice Memos.... 356
Opening the List of Voice Memos.... 357
Listening to Recordings (Memos).... 359
Configuring the LED Message Key.... 359
Announcements 360
Creating a New Announcement.... 360
Editing Existing Announcement in List 361
Deleting an Existing Announcement from List.... 362
Configuring and Operating Function Key for Editing Announcements.... 363
Call Acceptance and Announcement Assignment 366
Configuration Variants for Call Acceptance and Announcement Assignment .... 366
Call Types 367
Configuring Simple Automatic 368
Configuring Automatic for Experts 370
Creating Entries for Automatic....371
Deleting Entries in Automatic....379
Configuring and Operating Function Key for Manually Activating Entries in Automatic... 380
Switching Time Control On/Off 383
Configuring and Operating Function Key for Time Control.... 384
Basic Settings....387
Configuring Call Acceptance Time 387
Configuring Maximum Recording Time 388
Configuring Maximum Recording Time for Door Terminal Calls 389
Switching Listen in Function On/Off 391
Switching Automatic Playback On/Off 392
Call Recording....394
Executing Call Recording 394
Configuring and Operating Function Key for Call Recording Initiation On/Off.... 395
Switching Automatic Call Recording On/Off 396
Configuring and Operating Function Key for Automatic Call Recording 398
Switching Info Tone for Call Recording On/Off 400
Remote Access 402
Remote Access Variants 402
Configuring Remote Access 403
Switching Remote Access On/Off 404
Switching Remote Access Toll Saver (and Quick Access) On/Off.... 405
Entering Quick Access Telephone Numbers 406
Executing Remote Access....408
Message Forwarding....410
Message Forwarding Sequence.... 410
Switching Message Forwarding On/Off 410
Configuring and Operating Function Key for Message Forwarding 412
Configuring Announcement for Message Forwarding.... 414
Configuring a Message Forwarding Target.... 415
Configuring Waiting Period for Message Forwarding.... 417
Configuring Message Forwarding Repetition.... 418
Data Exchange....420
Transmitting Data from PC to USB Memory Stick 420
Transmitting Data from USB Memory Stick to PC 421
Deleting Data Saved on the USB Memory Stick.... 422
Configuring and Managing Voice Mailboxes 423
Voice Mailbox 424
Opening a Voice Mailbox 424
Listening to Recordings 426
Selecting from the Message List of the Voice Mailbox 427
Configuring and Operating the Function Key to Open the Voice Mailbox.... 428
Readiness 432
Switching Readiness On/Off....432
Configuring and Operating the Function Key for Readiness.... 433
Configuration-Dependent Control....437
Switching the Configuration-Dependent Control On/Off 437
Configuring and Operating the Function Key for Configuration-Dependent Control..... 438
Voice Memos 442
Configuring and Operating the Function Key for Recording Voice Memos.... 442
Distribution of Messages 445
Configuring and Operating the Function Key for Distributing Messages 445
Announcements 449
Create a New Announcement.... 449
Edit an Existing Announcement.... 450
Delete an Existing Announcement 451
Switching the Call Information On/Off for New Messages.... 452
Switching the Separator Tone On/Off for New Messages.... 452
Remote Access 454
Execute Remote Access.... 454
Switching Remote Access On/Off 455
Configuring and Operating the Function Key for Remote Access 456
Message Forwarding....460
Switching Message Forwarding On/Off 460
Configuring and Operating the Function Key for Message Forwarding 461
Substitute Function......465
Switching the Substitute Function On/Off 465
Configuring and Operating the Function Key for the Substitute Function.... 466
Configuring and Managing the Telephone.... 470
Identification 471
Configuring MSN 471
Switching DHCP Client On/Off 472
Configuring Telephone IP Address 473
Configuring Subnet Mask 474
Configuring Gateway 475
Protection from Unauthorised Access 477
Configuring a Function Lock....477
Configuring Settings Lock.... 479
Display and Backlight 482
Configuring the Language on Telephone.... 482
Configuring Display Backlight 483
Configuring Brightness 484
Adjusting Contrast 485
Switching the Inverse Display View On/Off 485
Configuring Time Format....486
Configuring Date Format 487
Call Signalling....489
Switching Ring Signal On/Off 489
Configuring and Operating Function Key for Ring Signal 490
Switching Flashing Display Backlight for Call Signalling On/Off 492
Configuring and Operating Function Key for Call Signalling by Flashing
Display Backlight 493
Ringer Melodies 496
Determining Different Types of Calls 496
Configuring Ringer Melodies 498
Changing Volume Automatically 499
Call Charges....501
Configuring Currency....501
Configuring Cost per Call Unit 501
Receiver and Headset....503
Adjusting Receiver Volume 503
Switching Headset Operation On/Off.... 503
Configuring and Operating Function Key for Headset Operation 504
Configuring Headset Type 506
Switching Headset Ringing On/Off 507
Adjusting Headset Volume....508
Switching Echo Reduction On/Off 509
Menu and Function Keys....510
Restricting Menu Selection....510
Configuring Accessibility of Second Key Level.... 510
Configuring and Operating Function Key for Shift 511
Exchanging or Moving Function Keys.... 513
Printing Lettering Labels 514
VoIP Provider 516
Configuring Registrar....516
Configuring Registration Time 517
Configuring STUN Server for Operation as External Private Branch Exchange .... 518
Configuring Interval for NAT Keep Alive.... 520
Configuring Outbound Proxy 522
Configuring Jitter Buffer Size 523
Configuring Codecs 525
Configuring the SIP Transport Protocol 526
Configuring SIP Port 527
Configuring DTMF 528
Storing Root Certificate of the PBX in the Telephone.... 530
Configuring Fingerprint of Certificate....531
VoIP Accounts 532
Configuring VoIP Accounts 532
Internet Access 534
Configuring DNS Server 534
Configuring HTTP Proxy 535
Switching DiffServ On/Off 538
Switching Increased Protection against Cross-Site Scripting (XSS) On/Off.... 539
VLAN 540
VLAN Variants 540
Configuring a Telephone VLAN 541
Enabling/Disabling the Forwarding of the Telephone VLAN to External Port 543
Configuring an External VLAN....544
Service and Maintenance 547
Firmware Update....548
Firmware Update Variants 548
Initiating Manual Firmware Update.... 548
Configuring Update Server Address.... 550
Initiating Instant Firmware Update via Update Server 550
Configuring Regular Firmware Updates via Update Server 552
Restoring Previous Firmware 553
Data Backup 555
Data Backup to USB Memory Stick.... 555
Configuring Areas for Data Backup to USB Memory Stick 556
Backing up Current Data on USB Memory Stick 556
Saving USB Memory Stick Data Backups on Telephone.... 557
Switching Regular Automatic Data Backup On/Off.... 557
Backing up Configuration Data....559
Saving Configuration Data on PC to Telephone 559
Saving Configuration Data on PC.... 560
Resetting Configuration 560
Selecting a PBX 561
Finding PBX 562
Initiating PBX Synchronisation 563
Shutting Down Telephone 564
Shutting Down Telephone via Configuration Manager 564
Shutting Down Telephone via Telephone Menu.... 564
Restarting the Telephone 565
Removing USB Memory Stick 566
Deleting Data....567
Restoring Factory Settings 567
Deleting Charges 568
Deleting Personal Data 569
Logging the Network Data Stream 571
Port Overview....572
Glossary 573
Terminology and Functions 574
A 574
B 574
C 575
D 577
E 579
F 580
G....580
H....581
1....582
J....582
L....583
M....583
N 585
O....585
P 586
Q 588
R 588
S 590
T 591
V 592
W 594
Abbreviations....595
Index 597
Important Information
This section includes necessary information for operating your equipment safely. Before you put the telephone into operation, it is absolutely necessary for you to read the safety information described here and to make yourself familiar with the intended use of the device as well as the technical information.
Topics
– Safety Information (page 18)
– Proper Use (page 19)
- Technical Data (page 21)
– Copyright (page 23)
– Environmental Notice (page 24)
Safety Information
Please observe the basic safety information given in the following.

Warning: Inappropriate use or incorrect replacement of the power plug can result in a life-threatening electric shock or can damage or destroy or the device:
- Therefore, use only a power plug of type no. HW 824 or FW7577/EU/40.
- Make sure it is inserted firmly and securely into the power socket. Wobbly connectors or cable sockets pose a fire risk.
- Do not remove the power plug by pulling on the cable. If you would like to disconnect the power supply, pull the power plug itself.
- If the power plug is damaged, first unscrew the fuse for the power supply before pulling out the power plug.
- When handling 230 V system voltage and devices attached to mains, be sure to adhere to the applicable regulations.
Warning: Touching defective connection lines can result in a life-threatening electric shock. In addition, any damage to the casing or to the device itself can be life-threatening.
- Only connect the device connection cable with sockets that are designed for that purpose.
- Replace damaged connection lines immediately.
- Always have a professional carry out repairs immediately. Please contact your dealer or the manufacturer directly.
- Use only original accessories.
- Do not touch the contact points with pointed, metallic or moist objects.
- Do not carry the device by the connection cables.
- Use the cable channels at the bottom of the telephone to carry the load.
Warning: Any liquid that penetrates the casing can result in a life-threatening electric shock or can damage or destroy or the device.
- Carefully select the location for installing the device and take care when cleaning the casing to ensure that no liquid can penetrate the casing.
- Never make calls in humid rooms (for example, in the bathroom).
Proper Use
Important: Auerswald products are not designed, manufactured, or intended for use or resale in environments requiring fail-safe performance, such as in the operation of life-support systems and/or nuclear facilities. Use or sale of our products for these purposes is only allowed with prior written permission by Auerswald for each individual incident.
Important:
Improper use may cause, for example, functional restrictions or interference, the destruction of the device or, in a worst case scenario, personal injury.
If you are still not sure of the intended use of the product after reading the following section, please contact your vendor.
The COMfortel VoIP 2500 AB is a VoIP system telephone. The device is designed to be integrated in a local network (LAN) as a VoIP end device on one of the following Auerswald PBXs:
• COMmander Basic.2 (19")
• COMmander Business (19")
- COMpact 3000
• COMpact 5010 VoIP
• COMpact 5020 VoIP
Important:
To support internal IP telephony, the PBXs COMpact 5010 VoIP, COMpact 5020 VoIP, COMmander Basic.2 or COMmander Business need firmware version 3.0 or higher. The PBX COMpact 3000 needs firmware version 3.6A or higher. When using a COMpact 3000 analog or COMpact 3000 ISDN, VoIP channels must be obtained at the Upgrade Center and enabled by it.
This device is not designed to be connected to a PBX from another manufacturer.
The system telephone is not cordless and is intended for use in closed, dry rooms.
The system telephone is different from “normal telephones” connected to PBXs in that it is especially easy to use, among other things. Most of the functions available on the PBXs such as internal and external calls, call protection and call forwarding can be operated over the
display or by simply pressing previously programmed buttons. In addition, the PBX system telephone supports offered functions for telephone switch boards (for example, the Waiting Field) and various telephone number lists (for example, the telephone book or call list).
The system telephone can be configured either using the menu on the telephone display or via the configuration manager that is accessible via the web server integrated in the telephone. The required PC is connected either directly to an Ethernet port on the telephone (see) or must be in the same network.
The system telephone allows you to make calls by using both the connected receiver and the integrated loud speakers (hands-free calling). Another option is to connect a headset (not included in the package).
The system telephone supports the operation of cable-connected headsets as well as wireless headsets (headsets with a DHSG interface, for example, from GN and Plantronics).
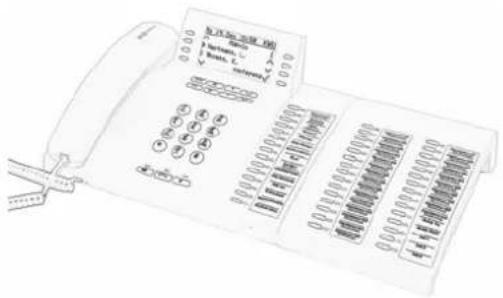
Up to three COMfortel Xtension30 key extension modules (not included in the delivery) can be attached to the system telephone in order to add freely programmable function keys. The modules can be attached on either the left or the right side of the telephone. A completely extended system provides 105 freely programmable function keys.
Note:
Accessories and service parts can be bought at specialised stores or in the Internet shop distriCOM at http://www.districom.de. (Delivery is provided only in Germany and to Austria.)
Technical Data
Technical Data of the telephone
Power supply Power supply provided via power plug at 230 V M;
W10%; 50 Hz or via the Ethernet port using PoE in
compliance with IEEE 802.3AF
Power plug Type no. HW 824 or FW7577/EU/40
Power network Min. 2.2 W, max. 2.7 W (without COMfortel Xtension30
key extension modules)
Power PoE Min. 2 W, max. 2.5 W (without COMfortel Xtension30
key extension modules)
System connection 10/100Base Tx Ethernet
PC/data interface 10/100Base Tx Ethernet
Display 18 LEDs, 15 of these polychromatic LCD, 128 x 64
pixels, illuminated in white COMfortel Xtension30: 30
LEDs, polychromatic
User elements Keypad, 11 permanent function keys, 8 softkeys, 15
programmable function keys COMfortel Xtension30: 30
programmable function keys
Receiver Electret microphone, dynamic receiver, hearing aid-
compatible
Loud speaker 8 Ohm, ∅ 66 mm
Hook switch Magnetic switch contact
Cabinet Plastic material
Colours White (light grey), navy, black
Dimensions 261 mm x 109 mm x 216 mm COMfortel Xtension30:
(W x H x D) 146 mm x 55 mm x 216 mm
Weight Approx. 1010 g COMfortel Xtension30: approx. 410 g
Ambient temperature 0 to 40 °C
Safety CE
VoIP codecs G.711, G.722, iLBC
Data for Connecting a Headset
| Microphone power consumption | Max. 0,5 mA |
| Microphone sensitivity 45 dB | |
| Loud speaker impedances | 150 Ohm |
| Loud speaker sensitivity at 1 kHz | 19,5 W3 dBPa/V |
| Sound pressure limit 24 dBPa |
Headset jack pin-out
| 1 DHSG BUS_IN |
| 2 DHSG GND |
| 3 Microphone - |
| 4 Loud speaker - |
| 5 Loud speaker + |
| 6 Microphone + |
| 7 DHSG + 3.3 V |
| 8 DHSG BUS_OUT |
Copyright
Disseminating and reproducing these instructions, as well as using and disclosing the contents, even in part, is permitted only with our express permission. Offenders will be subject to claims for damages. All rights reserved. f Auerswald GmbH & Co. KG, 38162 Cremlingen, 2010
Environmental Notice
If your Auerswald device is taken out of use, please make sure that it is properly disposed of (must not be disposed of with normal household waste).
For the sake of environmental protection, please make sure that packaging materials are also properly disposed of.

Please consult your municipal administration authorities for options of proper and environmentally safe disposal of the device. If you want us to take over the disposal, please send the device to us. Shipment which is not prepaid cannot be accepted.

Batteries and accumulators have to be discharged completely before disposal (empty/voltage-free). Batteries have to be handed in at the collection point for old batteries.
Getting to Know Your Telephone
This section provides a general overview how to operate the telephone. Here, you will find a description of the icons and text shown on the unit display as well as the keys on the device In addition, you get an overview of the contents of the individual menus.
Topics
– Functions of Keys and LEDs (page 26)
- Menu Options (page 28)
Functions of Keys and LEDs
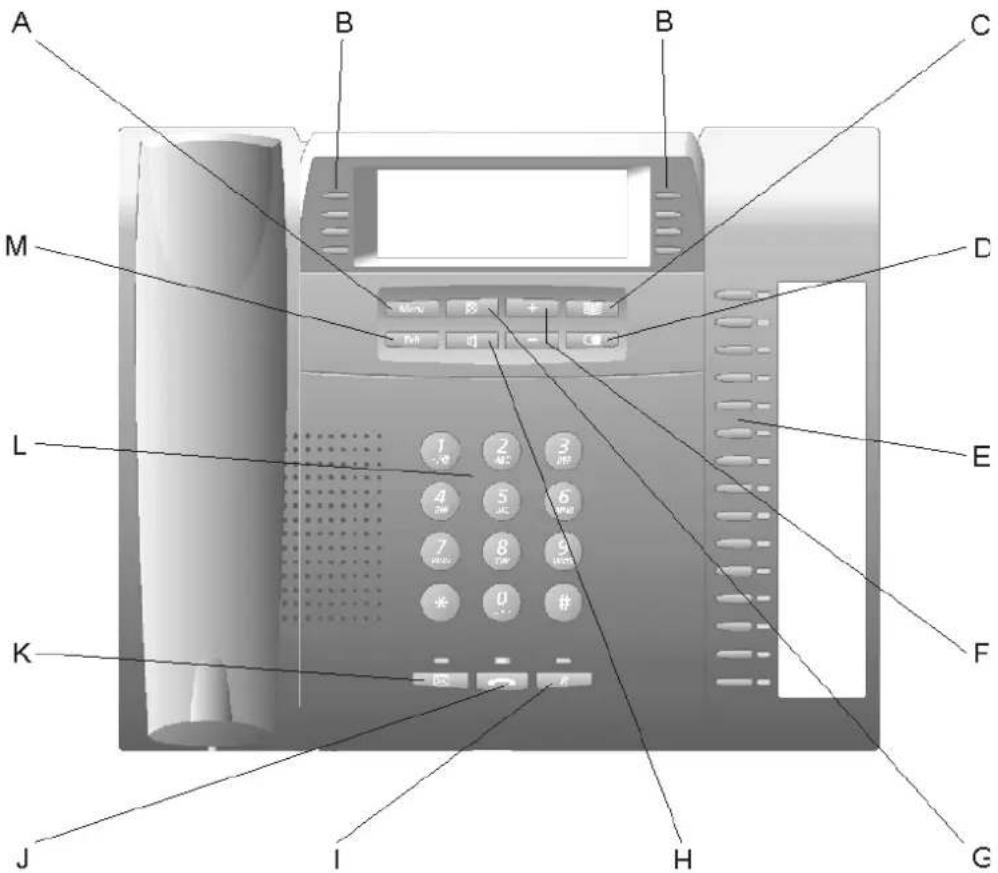
The keys and the functions that are executed by them are listed at the end:
text_image
A B B C M D L E K F J I H GA Menu key
Opens the main menu.
B S o f t k e y s
Switch their function depending on the situation.
C Telephone book key
Opens the telephone book
D Redial key
Opens the redial list.
Scrolls through the redial list.
When the receiver is off the hook, dials the previously dialled telephone number.
E Function keys with LED
They are freely programmable.
The LED indicates the status depending on the key definition.
F Plus/minus key
Increases/decreases the volume of the ringer, the receiver or loudspeaker depending on the operating mode.
G Microphone key
Switches the microphone off (mute) and on again.
H Loudspeaker key
Switches loudspeaker listening on during a call.
Holding the key (for 2 seconds) switches hands-free calling on.
I Query key with LED
Initiates a query call.
J Hook key with LED
Initiates/Ends headset calls or calls in hands-free calling mode.
The LED signals incoming calls
K Message key with LED
Opens the caller list, the answering machine list and the list of voice memos.
The LED signals existing (new) entries.
L Keypad
Enables number dialling as well as entering digits and letters.
M E x i t k e y
Closes the opened menu. Incorrectly exited settings are not saved.
Menu Options
The telephone has a 5-line graphic display, each line with 16 characters (when entering telephone numbers, the font size is changed to display more characters).
To both sides, there is room for up to four icons that show the functions of the softkeys next to them. These special keys next to the display change their function depending on the situation and facilitate operation.
Note: In the second menu/function level (after pressing the 2 softkey), icons are not used. The function is named in clear text next to the corresponding key. Some softkeys are not used in the information menu in order to display more information.
The appearance of the display depends on the state of the telephone.
Only those functions are offered that are usable in the respective state. If not all of the information can be displayed due to lack of space, only the most important functions are displayed.
Menu Option Examples
The menu options are dependent on the state of the telephone. In conclusion, here are several examples of menu options.
Menu Options in the Idle State
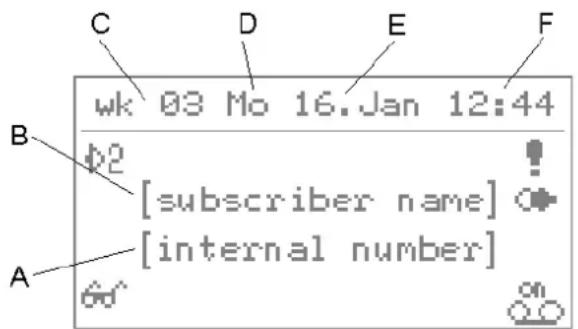
The following information is shown on the display while the telephone is in the idle state:
text_image
C D E F wk 03 Mo 16.Jan 12:44 B φ2 [subscriber name] A [internal number]A The internal telephone number of the subscriber in the PBX
B Name of the subscriber in the PBX
C Calendar week
D Weekday
E Date
F Time
In addition, various pieces of status information are displayed:
- Current settings that affect telephoning, for example, call allowance account empty, baby/senior calls
- Current settings that limit reachability, for example, do-not-disturb, call forwarding immediately, follow-me, ringer off
- No connection to the PBX
- Missed scheduled call
– Power dialling enabled
Press the 2 softkey to switch to the menu/function level 2.
| second level | |
| calls list | pickup |
| project | |
| Voicemail | schedule |
| shut down | |
Press the softkey to perform various functions. The current function of the softkey is displayed in the second level by the text to the side.
Menu Options in Main Menu (after Pressing Menu Key)
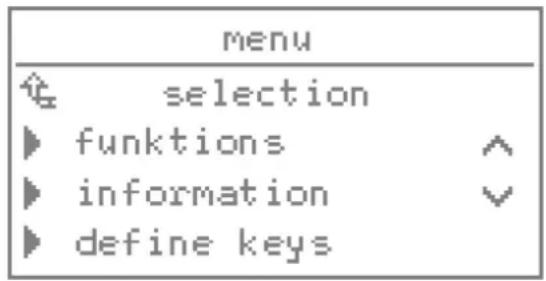
Press the menu key to open the main menu with various menus.
text_image
menu selection ► funktions ► information ► define keysPress the and softkeys to scroll through the selection list.
Press the ▶ softkey to go to the next menu labelled in the text.
- In the Functions menu, you can activate/deactivate or execute functions in the PBX and the telephone (for example, call forwarding and the telephone lock).
- The Information menu is only used to display information (for example, versions, accumulated charges and the status of certain important functions/settings). No changes can be made here.
- In the define keys menu, you can assign functions on the PBX and the telephone to programmable function keys (for example, call forwarding and speed dialling).
- Configure the telephone in the settings menu.
- You can configure and operate the answering machine in the answer.machine menu.
In the submenus, you can scroll through the selection lists using the √ and ∧ softkeys just as you can in the main menu. Press the ▶ softkey to again go to the next menu labelled in the text.
To go back to the preceding menu level, press the softkey. To go back into the idle state, press the exit key. In addition, the telephone automatically switches back into the idle state if no keys are pressed within a period of 30 seconds.
Important:
Some functions are not offered until the function is available on the PBX and has been configured, and if necessary, an authority level has been granted for the use of this function.
The functions and settings available in the menus functions, define keys, settings and answer.machine can be restricted by the administrator to prevent unauthorised use. The release and display of these disabled functions in to the selection list requires entering the corresponding PIN after selecting additional. The release remains intact during the settings that now follow. The release is revoked if no keys are pressed within a time period of 60 seconds. You can actively disable the release by selecting log out in the menu settings > blocking > additional.
Menu Options during Key Definition
Press the menu key and then press the ▶ softkey in front of define keys to open the associated menu.
After this, you must first press the function key to be defined and then the ▶ softkey in front of the level to be defined.
If the function key has not yet been defined with a function, you can select the desired function after selecting the level to be defined.
On the other hand, if the function key has already been defined with a function, the selection of the level is then followed by a selection menu for further procedures. Select new to select a new function for the key in question. Select delete to empty the key of any definitions. Keys that have been defined with functions are redefined by selecting change (for example, a new telephone number for call forwarding). If you have made a mistake and would like keep the original state, press the softkey.
Menu Options in Telephone Number and Text Entry Menus
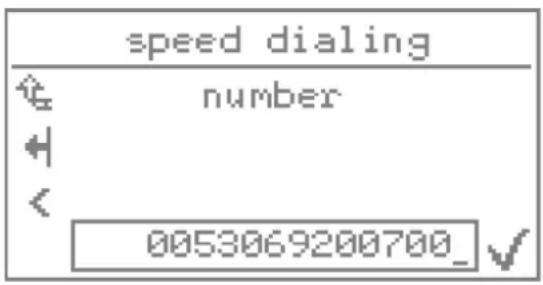
To enter a telephone number or text, the telephone opens one of the following menus.
text_image
speed dialing number 0053069200700_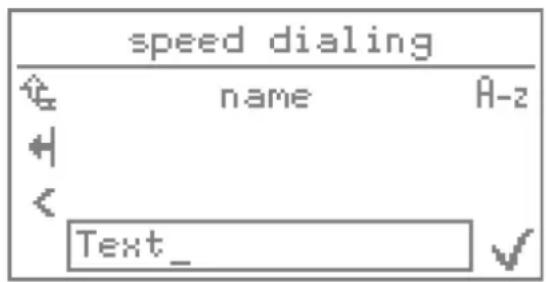
text_image
speed dialing name A-z Text_Using the pushbutton dial, you can enter the digits, characters and letters you need. In the text entry menu, press the digit keys want a more times until the desired character appears. The assignment is listed in the table at the end.
Press the softkeys -z , -z and -z to switch between uppercase and lowercase letters. The icon indicates the current settings.
If you would like to make changes to your entry, move the cursor to the left and right by pressing the < and > softkeys. Press the ← softkey to delete the last character before the cursor.
Press the softkey to accept the entry.
Key Assignment for uppercase letters Assignment for lowercase letters
| 1 | 1 - / @ + | 1 - / @ + | |||||||||
| 2 | A B C 2 Ä AE Å Ç | a b c 2 ä æ å á à â ç | |||||||||
| 3 | D E F 3 É | d e f 3 é è ê ë | |||||||||
| 4 | G | H | I | 4 | g | h | i | 4 | i | ||
| 5 | J | K | L | 5 | j | k | l | 5 | |||
| 6 | M N O 6 Ö ∅ | m n o 6 ö ø ñ ó ó ô | |||||||||
| 7 | P Q R S 7 β | p q r s 7 β | |||||||||
| 8 | T U V 8 Ü | t u v 8 ü ú ù û ï | |||||||||
| 9 | W X Y Z 9 | w x y z 9 | |||||||||
| 0 | Space 0 . , : ' ? ¿ ! i _ | Space 0 . , : ' ? ¿ ! i _ | |||||||||
Key Assignment for uppercase letters Assignment for lowercase letters
$$ \begin{array}{l} * \quad * (\quad) = \ll \gg^ {\prime} \sim \quad * (\quad) = \ll \gg^ {\prime} \sim \end{array} $$
# # & § £ \Euro symbol # & § £ \ Euro symbol
Menu Options During Incoming Calls
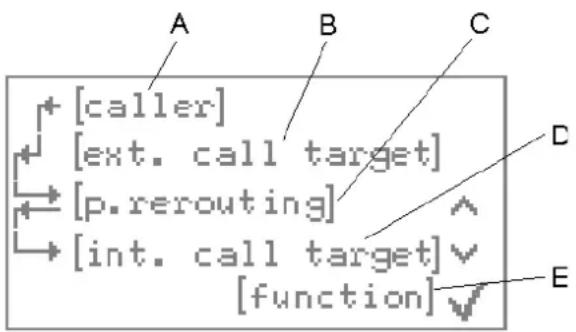
The following information is displayed during an incoming call:
text_image
[caller] [ext. call target] [p.rerouting] [int. call target] (function)A Caller, call waiting or call type (for special calls, for example, alarm calls, wake-up calls)
Note:
If the telephone number is entered in the telephone book of your system telephone or in the central telephone book (short-code numbers) on the PBX, as soon as the telephone detects the telephone number, it will show the associated name in the display instead of the telephone number. The prerequisite for displaying the telephone number is that the exchange line subscriber has not suppressed the display of his telephone number or that he has approved transmission of the telephone number.
If the telephone number is not available, "Unknown" is displayed.
If the name of the caller is not in the telephone book, a search for the name can be performed using the online name search function on a server in the Internet (see the PBX manual). If the telephone number is transmitted for an incoming call, the PBX automatically looks for the corresponding entry.
When an entry is found, it is shown on the display of the system telephone.
B External call target/exchange line number called (for external calls), doorbells (for door calls) or InterCom type (for InterCom calls)
C The person rerouting the call (for rerouted calls)
D Internal call target (subscriber or group)
E Possible Functions for Incoming Calls
Your system telephone shows possible functions during an incoming call in the lower line of the display. Press the √ and ∧ softkeys to scroll through the various options. Press the √ softkey to initiate the function currently displayed.
Menu Options during Outgoing Calls
The following information is displayed during an outgoing call:
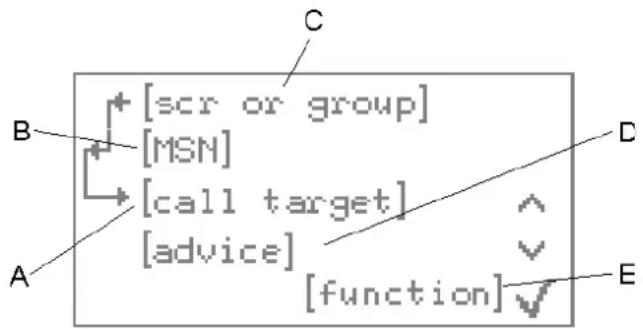
text_image
[scr or group] [MSN] [call target] [advice] (function) A B C D EA Call target
Note:
If the telephone number dialled has been assigned a name in the telephone book of the system telephone, this will be displayed as soon as the telephone detects the telephone number. The telephone number is simply overwritten by the name.
If less than nine digits have been entered, they are displayed in a larger font to facilitate legibility (during dialling/during the call). If the telephone number dialled has been assigned a name in the telephone book of the system telephone, and this name comprises fewer than nine characters, this name is also displayed in a larger font.
B Outbound MSN used for the call
C Subscriber or group (if "logged in as outgoing" in a group)
D Note (for example, busy, do-not-disturb, no exchange line authorisation)
E Possible Functions for Outgoing Calls
Your system telephone shows possible functions during an outgoing call in the lower line of the display. Press the √ and ∧ softkeys to scroll through the various options. Press the √ softkey to initiate the function currently displayed.
Menu Options during Calls
The following information is displayed during a call:
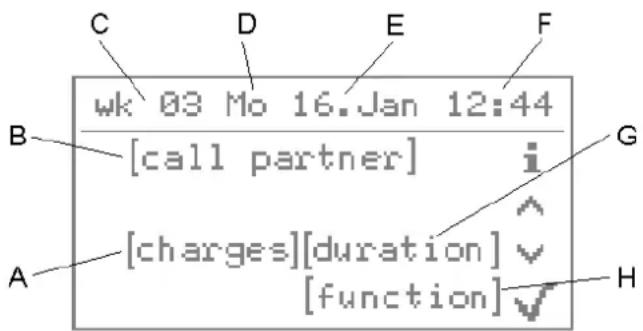
text_image
C D E F wk 03 Mo 16.Jan 12:44 [call partner] i [charges][duration] ✓ [function] ✓ A B G HA Costs (for outgoing external calls)
B Communication partner
C Calendar week
D Weekday
E Date
F Time
G Duration in minutes:seconds (as of 59:59, in hours:minutes)
H Possible Functions during a Call
Your system telephone shows possible functions during a call in the lower line on the display. Press the √ and ∧ softkeys to scroll through the various options. Press the √ softkey to initiate the function currently displayed.
Press the i softkey to access additional information about the call.
– Telephone number of the communication partner
- MSN dialled
– Exchange line used (for targeted exchange line access)
– Provider number and name
- Project number and name
Press the √ and ∧ softkeys to scroll through this information. Press the √ softkey to go back to the previous view.
Menu Options during Query Calls
The following information is displayed during a query call:
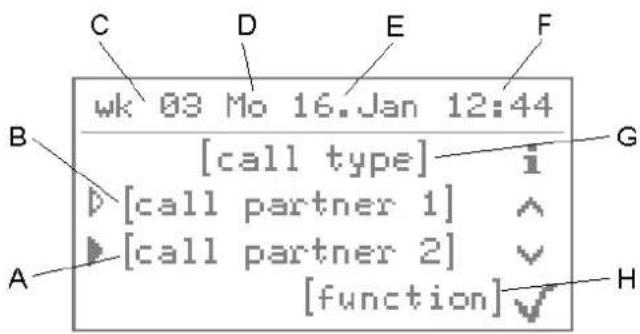
text_image
C D E F wk 03 Mo 16.Jan 12:44 [call type] i D [call partner 1] ^ ▶ [call partner 2] ✓ [function] ✓ A B G HA Communication partner 2
B Communication partner 1
C Calendar week
D Weekday
E Date
F Time
G Type of call (splitting or conference call)
H Possible Functions during Query Call
Press the ▷ softkey to select the active communication partner. During splitting, the other communication partner who had been active up until now is put on hold in the backgrounds listening to hold music. During a conference call, the status of the call does not change at first. Pressing the ▷ softkey during a conference call only activates the communication partner in relation to carrying out the next function.
Your system telephone shows possible functions during a query call in the lower line on the display. Press the √ and ∧ softkeys to scroll through the various options. Press the √ softkey to initiate the function currently displayed.
Press the i softkey to access additional information about the call.
– Telephone number of the communication partner
- MSN dialled
– Exchange line used (for targeted exchange line access)
– Provider number and name
– Duration in minutes:seconds (as of 59:59, in hours:minutes)
– Costs (for outgoing external calls)
- Project number and name
Press the √ and ∧ softkeys to scroll through this information. Press the √ softkey to go back to the previous view.
Menu Overview
The main menu (after pressing the menu key) provides access to the menus listed at the end.
Selection List in information Menu
- version of telephone
- version of PBX
- MSN/name
- configuration
– subscriber CF unconditional
– subscriber CF on busy
– subscriber CF on no reply - call deblocker
- call restrictor
- ringer tone
- ringer volume
- call waiting
-do-not-disturb - InterCom permission
- interface
- headset
- hardware
- call charge
- call allowance account
- serial number
- TAM message fwd.
- TAM quick access numbers
- USB storage stick
- IP address
- network mask
- gateway
- MAC address
- DNS server
- registration state
Selection List in functions Menu
- automatic call acceptance
- call deblocker (incoming)
– call forwarding: subscriber
– call restrictor (incoming) - call signal/light
- call waiting
- caller list
- calls list
- delete charges
- delete data
-do-not-disturb - door functions
- follow-me
- group
- group functions off
- headset
- InterCom permission
- phone lock
- pickup
- project
- relays
- ringer tone
- room monitoring
- scheduled call
- switch configuration
- waiting field reception
Selection List in define keys Menu
- automatic call acceptance
- boss key
- call deblocker (incoming)
– call forwarding: subscriber
– call restrictor (incoming) - call signal/light
-
call waiting
-
caller list
- calls list
-do-not-disturb - door functions
- exchange line
- exchange line transfer
- follow-me
- group
- group status
- headset
- hotel room
- InterCom
- InterCom permission
- log out all groups
- macro
-MSN/DDI CF - phone lock
- pickup
- power save mode
- project
- ringer tone
- room monitoring
- relays
- scheduled call
- secretary key
- shift
- speed dialling
- switch configuration
– TAM automatic call recording - TAM automatic ID
- TAM call recording
- TAM edit announcement
- TAM list
- TAM message fwd.
- TAM readiness
- TAM time control
-
TAM voice memo
-
text before answering
- Voicemail Center
- VoIP account
- waiting field
- waiting field reception
Selection List in the settings Menu
- backup
- automatic
- configuration
- CF2500 -> USB
- USB -> CF2500
- w/o MSN -> CF
- blocking
- function lock
- settings lock
- default settings
- echo reduction
- language
- MSN
- receiver volume
- VMC461.2FW>=2.02
- display
- brightness max.
- brightness min.
- contrast
- date format
- display backlight
-
inverse view
– time format -
do-not-disturb
- kind of do-not-disturb
- headset
- automatic call acceptance
- headset type
- headset volume
- headset ringer
- lists
- caller list
- calls list
- phone book
- redial list
- network
- DHCP
- IP address
- network mask
- gateway
- DNS server 1
- DNS server 2
- Quality of Service
- HTTP proxy
- proxy address
- proxy port
– proxy authorisation - proxy user name
- proxy password
- VLAN internal
- VLAN external
- VLAN ID (external)
- VLAN priority (external)
- VLAN options
- power save mode
- automatic activation
- configuration
- idle time
- phone lock
- signalling
- attention tone
- call waiting tone
-
message LED
-
registration status subscriber
- ringer melody
- ringer volume
- synchronisation
- find PBX
- firmware update
- register as new
- select PBX
– synchronisation with PBX - update interval
- update period
- user settings
- keys 2nd level
- macro display
- menu definition
- speed dialling key
• VoIP
- account
- provider
Selection List in answer. machine Menu
- functions
- TAM announcement
– TAM automatic call recording - TAM list
- TAM message forwarding
- TAM readiness
- TAM time control
- TAM voice memo
- settings
- automatic playback
- call acceptance time
- call recording tone
- edit announcement
– forwarding announcement
– forwarding repetitions
– forwarding repetition time
- forwarding target
- forwarding time
- listen in
- phone book announcements
- quick access
- recording time
- recording time door
- remote access
- remote access toll saver
Icons
The icons and the functions they execute are listed at the end according to the states and menus in which they can occur.
Icons in the Idle State
Function of the softkey next to the icon
2 Switches from the idle state to menu/function level 2.
- Display only: Internal calls are encrypted.
Display only: Internal calls are not encrypted.
Switches unsuccessful power dialling off early.
Enables number presentation suppression (CLIR) for the next call(s).
Active setting: Number is presented.
Disables number presentation suppression (CLIR) for the next call(s).
Active setting: Number is suppressed.
Retrieves a memo (telephone number note).
Switches an enabled telephone lock (PIN entry is required).
Switches the answering machine on.
on Switches the answering machine off.
Icons in Dial Preparation Menu
Function of the softkey next to the icon
< Moves the cursor to the left.
Moves the cursor to the right.
- Deletes the last character before the cursor. Holding the key (2 seconds) deletes the entire entry.
√ Accepts the entry and dials.
Switches back into the idle state.
Creates a telephone book entry with the telephone number shown.
Creates a scheduled call with the telephone number shown.
Menu Icons for Callers and Calls
Function of the softkey next to the icon
Selects the communication partner for splitting or other functions. The communication partner is currently inactive/waiting.
▶ Display only: The communication partner is currently active.
Selects the communication partner for additional functions during a conference call. The communication partner is currently inactive.
▶ Display only: The communication partner is currently active.
√ Selects the function shown in the lower line of the display.
√ Scrolls to the next function in the lower line of the display.
▲ Scrolls to the previous function in the lower line of the display.
i Opens information about the current call.
☐ Display only: Loudspeaker listening is enabled.
■ Display only: Hands-free calling is enabled.
☒ Display only: The microphone is switched off (mute).
Menu Navigation Icons
Function of the softkey next to the icon
Switches back in the previous menu or the previous level.
√ Scrolls down to the next entry or to the next function.
Holding the key allows quicker scrolling.
Simultaneously pressing the key lets you jump to the beginning of the list.
^ Scrolls up to the previous entry or the previous function.
Holding the key allows quicker scrolling.
▶ Selects an entry or a function for further editing.
目 Opens a short overview in the telephone book and in the telephone number lists.
Selectable Icons
Function of the softkey next to the icon
○ Selects and accepts the function indicated in clear text behind the icon. The function is currently not enabled.
- Selects and accepts the function indicated in plain text behind the icon. The function is currently enabled.
☐ Selects the currently empty check box.
☑ Clears the currently selected check box.
√ Accepts the changes.
Icons in Telephone Number and Text Entry Menus
Function of the softkey next to the icon
< Moves the cursor to the left.
Moves the cursor to the right.
◀ Deletes the last character before the cursor.
Holding the key (2 seconds) deletes the entire entry.
√ Accepts the entry.
A-z Switches the setting for upper and lower case spelling during letter entry.
Active setting: If the next letter is upper case, then the letters are automatically displayed in lower case.
Function of the softkey next to the icon
A-2 Switches the setting for upper and lower case spelling during letter entry. Active setting: All letters are upper case.
a-2 Switches the setting for upper and lower case spelling during letter entry. Active setting: All letters are lower case.
Icons in define keys Menu
Function of the softkey next to the icon
☒ Initiates entry/change of the telephone number.
目 Initiates entry/change of the name.
Switches between various options.
← Initiates entry/change of the telephone number to be forwarded.
√ Accepts the changes.
Confirmation Icons
Function of the softkey next to the icon
√ Confirms the displayed question with "Yes". Or: Confirms the display of a change and switches into the idle state.
✗ Confirms the displayed question with "No".
Icons in Telephone Book Menu
Function of the softkey next to the icon
☐ Opens an expanded display of the contact shown.
Initiates the creation of a new contact.
Opens a current contact for editing/deleting.
目 Initiates entry/change of the name.
Initiates entry/change of the business telephone number.
Initiates entry/change of the private telephone number.
Initiates entry/change of the mobile telephone number.
Initiates entry/change of the comment.
▶ Initiates entry/change of the call macro.
Function of the softkey next to the icon
Accepts the telephone number for subsequent dialling in dial preparation.
Adds a special character (only when entering a call macro).
☒ Deletes the contact.
Initiates selection of a ringer rhythm for the contact.
Menu Icons in Telephone Number Lists
Function of the softkey next to the icon
☒ Deletes individual entries from the caller, call and redial lists.
☒» Deletes all entries from the caller, call and redial lists.
Accepts the telephone number for subsequent dialling in dial preparation.
i Indicates additional information.
Icons in Scheduled Call Menu
Function of the softkey next to the icon
Opens a current entry for editing/deleting.
Initiates the creation of a new entry.
Icons in Restriction Menu
Function of the softkey next to the icon
○○○ Initiates a change to the restriction for the next function. There is currently no restriction.
••• Initiates a change to the restriction for the next function. The function is currently restricted for guests.
••• Initiates a change to the restriction for the next function. The function is currently restricted for guests and users.
••• Initiates a change to the restriction for the next function. The function is currently restricted for guests, users and subadministrators.
Icons for Answering Machine
Function of the softkey next to the icon
▶▶ Scrolls to next (older) recording.
During playback: Skips the recording currently being played back.
Scrolls to the previous (more recent) recording.
During playback: Repeats the previous recording or the one currently being played back.
Starts the playback of the recording.
II Interrupts the playback of the recording.
☒ Deletes the recording.
Switches the answering machine on.
Switches the answering machine off.
Switches the answering machine off.
Display: There are new messages in the answering machine list.
display only: The recording is a new message or voice memo.
old Display only: The recording is an old message or voice memo or one that has already been played back.
✗ Display only: The recording is recording of an actual call.
USB init Display only: The USB memory stick is initialised.
Icons for Voice Mailbox
Function of the softkey next to the icon
▶ Scrolls to next (older) recording.
During playback: Skips the recording currently being played back.
Scrolls to the previous (more recent) recording.
During playback: Repeats the previous recording or the one currently being played back.
Starts the playback of the recording.
11 Interrupts the playback of the recording. If you press this key for a longer period of time, the system will go back to the start of the recording.
☒ Deletes the recording. If you press this key for a longer period of time, all messages from the message list will be deleted.
The recording is a new message or voice memo.
The recording is an old message or voice memo or one that has already been played back.
Function of the softkey next to the icon
Accepts the telephone number for subsequent dialling in dial preparation.
Initiates entry/change of the telephone number of the substitute.
Message is saved in the archiv.
Opens a current announcement for editing.
Voicemail Center Icons
Function of the softkey next to the icon
√ Skips the recording currently being played back.
^ Repeats the previous recording or the one currently being played back.
■Starts playback of the new recording that has not yet been listened to. Hold the key until "all messages" is displayed: Starts playback of all recordings.
■ Ends playback of the recordings or the recording of the announcement.
☒ Deletes the recording currently being played back.
CLR Deletes all of the recordings.
Starts the recording of the announcement.
Hold the key until "announcement.only" is displayed: Starts the recording of an announcement without the option of recording a message in response.
Initiates a change to the announcement.
Initiates manual control.
1 Switches to menu/function level 1.
Using the Configuration Manager
This section provides a general overview of the integrated configuration manager. It describes how to open and generally operate the configuration manager.
Moreover, you can find tips on how to use the help in a targeted and efficient manner.
Topics
- Configuration Manager (page 50)
- Help (page 58)
Configuration Manager
The configuration manager lets you easily set up the system telephone on your computer. The configuration manager is accessible via the integrated web server in the telephone. The required PC is connected either directly to an Ethernet port on the telephone or must be in the same network.
Minimum Requirements for PC for Using Configuration Manager
The computer must meet the following requirements:
• PC with Intel Pentium 1 GHz or compatible processor
- Windows XP (as of Service Pack 3), Windows Vista 32/64-bit, Windows 7 32/64-bit (as of Service Pack 2), Mac OS X (as of 10.4), Linux (as of Kernel 2.6)
- Memory (RAM: 256 MB, recommended 512 MB; for Windows Vista/7: 1024 MB, for 64-bit 2048 MB)
- Browser for the configuration: Recommended Microsoft Internet Explorer as of version 7.0, Mozilla Firefox as of version 3.0
- Network card (the computer must be equipped with a network card and the required driver installed)
- Internet protocol TCP/IP (Transmission Control Protocol/Internet Protocol)
- Mouse or compatible pointing device
- SVGA graphics card with a resolution of 1024 x 768, and 65536 colours (16 bit)
Opening the Configuration Manager
To open the configuration manager, you need to log into the system telephone. You can log in at different authorisation levels.
Note: As parts of the system telephone can be blocked by the administrator, it is possible that you will not be able to save all the changes you make on a telephone if you are logged in as a user or a subadministrator.
Opening Configuration Manager as User
Requirements:
- Knowledge of the telephone IP address (can be found in the telephone menu under Information > IP address)
-
Knowledge of the user PIN for the telephone – if available
– Existing Ethernet connection between the PC and the system telephone -
Start a browser (for example, Mozilla Firefox or Microsoft Internet Explorer).
-
Enter the IP address of the telephone in the address field of the browser (for example, http://192.168.178.4).
-
Under User name, enter the internal telephone number of the telephone.
-
Under PIN, enter the associated user PIN.
Note: If no user PIN has been entered in the PBX, leave this field empty.
5. Click Login.
The configuration manager opens.
Opening Configuration Manager as Subadministrator
Requirements:
-
Knowledge of the telephone IP address (can be found in the telephone menu under Information > IP address)
– Knowledge of a subadmin PIN on the PBX
– Existing Ethernet connection between the PC and the system telephone -
Start a browser (for example, Mozilla Firefox or Microsoft Internet Explorer).
- Enter the IP address of the telephone in the address field of the browser (for example, http://192.168.178.4).
- Under User name, enter the user name sub-admin.
- Under PIN, enter a subadmin PIN of the PBX.
- Click Login.
The configuration manager opens.
Opening Configuration Manager as Administrator
Requirements:
-
Knowledge of the telephone IP address (can be found in the telephone menu under Information > IP address)
– Knowledge of the admin PIN on the PBX
– Existing Ethernet connection between the PC and the system telephone -
Under User name, enter the admin user name of the PBX.
- Under PIN, enter the admin PIN of the PBX.
-
Click Login.
The configuration manager opens. -
Start a browser (for example, Mozilla Firefox or Microsoft Internet Explorer).
-
Enter the IP address of the telephone in the address field of the browser (for example, http://192.168.178.4).
Operating Instructions for the Configuration Manager
The operating instructions for the configuration manager contain the following topics:
- Navigation
- Logging off
- Entry and Selection Fields
- Creating and Deleting Table Entries
- Symbols
- Display/Legibility
Configuration Manager Navigation
After opening the configuration manager, the current areas are displayed in a directory tree. To show the organisation of the topics clearly, most topics have been consolidated under a main topic.
Click the desired main topic or the plus sign next to the main topic to open the underlying list of topics. Then click the topic you want.
The topic you have chosen opens on the page to the right.
The directory tree area and the selected page are separated by a vertical line. To enlarge the area (this automatically makes the other areas smaller), click and hold the cursor above the separator line and slide the line to the location you want. This setting applies only to the current login.
You can select sub-topics directly on some pages by clicking tabs. The active tab is displayed with a yellow background.
On some pages, it is possible to click Configure and go to other pages that are not displayed in the tree.
Logging off
Click in the upper left corner of the configuration manager to be logged off from the configuration manager. You return directly to the login page.
Entry and Selection Fields
Important: All of the settings configured on the pages with the following fields must be confirmed by clicking Execute. This initiates the transmission of the data displayed into the telephone. The transmission of the data is indicated by a blinking save icon on the upper right of the page.

An empty field normally indicates that a name or number is to be entered. Click within the field in question and use the keyboard to enter a number or desired text.
The following characters may not be used:
- " quotation marks
- \$ dollar sign
• % percent sign - < pointy bracket - smaller than
• > pointy bracket - higher than - \backslash
- ^ caret
• [ ] square brackets - {} curly brackets
If increased security against Cross-Site Scripting (XSS) has been enabled under Administration > Server configuration, the following characters may also not be used:
- 'apostrophe
-
pound sign
- & and sign
• + plus sign
• / slash
In order to change an existing entry, double-click the entry to be overwritten. The field then becomes blue and can either be overwritten directly or the existing text can be deleted using the delete/backspace key.

For functions that offer more than just being switched on and off but only have a few options to choose from, the field already contains a default setting. To change this, click the opened list field to make a selection. Left-click the field to open the list field.

For some functions, a small circular button (radio button) is located next to the setting options listed. The selected setting is indicated by a dot inside the circle. The setting is changed by clicking an empty circle. Selecting this setting option simultaneously deactivates any other previous selection.


A square check box indicates a switching function. An empty check box means "off" and "no"; a check mark on the other hand, means "on" and "yes". The switchover is done by simply left-clicking the box.

Creating and Deleting List Entries
To create new list entries, fill the empty entry fields in the lower table row and confirm your entries by clicking Execute. Additional rows are then added to the list.
To delete an entry, first click Delete in the list field Action below on the page. Then use your mouse to select one or more entries in the first table column.
If you would like to select all of the entries, click the check box at the very bottom left on the page.
Delete then the selected entries by clicking Execute.
Symbols


Clicking the symbol opens the entire help.
Clicking the symbol logs off the administrator, sub-administrator or user from the configuration manager.
Clicking the symbol closes all of the folders in the directory tree. Only the main topics are displayed.
Clicking the symbol opens all of the folders in the directory tree. The main topics and all of the sub-topics are displayed.
Display only: Currently, no data is being transmitted.
When data is being transmitted, the symbol starts blinking for a few seconds.
Clicking the check box activates all of the entries in the list above.
Clicking the symbol takes you to the first contact in the telephone book.
Clicking the symbol takes you to the previous contact in the telephone book.
Clicking the symbol takes you to the next contact in the telephone book.
Clicking the symbol takes you to the last contact in the telephone book.
Display/Legibility
The display/legibility of the configuration manager may be affected by browser settings, e. g.:
- Scaling/zooming of browsers (e. g. by pressing the CTRL key and scrolling with the mouse wheel)
- Ignoring the display settings of the configuration manager (e. g. in Internet Explorer 7 under Tools > Internet Options > General + Accessibility)
Note: If the configuration manager is not legible because of scaling/zooming of the browser, you can restore the original view (e.g. as of Internet Explorer 7 under Page>Zoom >100% or Mozilla Firefox, as of Version 3.0.12 under View >Zoom >Reset.
Switching the Language
Switching can be done as follows:
• Via the configuration manager
Requirements:
- Configuration manager, open with a sufficient authority level
- Open the page Administration > Server configuration.
-
In the Language list field under Webserver configuration, select the desired language.
German: Opens the configuration manager in German.
English: Opens the configuration manager in English. -
Click Execute.
Configuring Time Lapse for Forced Logout
The time lapse for a forced logout defines after how many minutes a user is automatically logged out of the configuration manager if no action has been taken in the configuration manager within a configured time period.
The configuration can be made as follows:
• Via the configuration manager
Requirements:
- Configuration manager, open with a sufficient authority level
- Open the page Administration > Server configuration.
- Enter a value in the Forced logout if no action happens after entry field under Webserver configuration. The following entries are possible:
5 to 60: If no action takes place in the configuration manager during the entered time period, you are automatically logged out. - Click Execute.
Help
Via the help you can access the entire operation and configuration instruction for the system telephone.
Opening the Help
Below the directory tree Navigation, there is the Help topics window containing links to several help topics. The offered help topics refer to the currently open configuration page.
- Click the link to go to the desired help topic.
The corresponding help page opens. You can navigate back and forward within the selected topic by clicking the ▶ and ▶ icons.
- Click ?
The entire help opens.
Note: You can always access the entire operation and configuration instructions for the system telephone via the navigation.
Navigating in the Help Window
There are several ways to navigate through the help.
Navigating via the Table of Contents
Click the Table of Contents (this text is dependent on the operating system used) tab to go to the table of contents (the tab is highlighted in yellow)
The table of contents will be displayed on the left-hand side of the help window as a directory tree.
By clicking one of the topics in the table of contents, you can open the belonging help page on the right-hand side of the help window.
The icon indicates that further topics are available under a specific topic. Click this icon to expand the subordinate topics. You can close the subordinate topics again by clicking the icon.
Note:
The table of contents area and the selected page are separated by a vertical line or a scroll bar. To enlarge the area (this automatically makes the other areas smaller), click and hold the cursor above the separator line and slide the line to the location you want. This setting only applies to the help window currently open.
The currently opened topic is highlighted in the table of contents (for example, with a grey background). Scrolling through the table of contents may cause this highlighting to disappear. By clicking the icon in the help window, you can display the currently open help page in the table of contents again.
Navigating via Expanding Texts
Some help texts contain expanding texts that flip down. Expanding text is indicated by a blue font and is underlined. In addition, the ▶ icon is shown behind the expanding text.
You can expand the text by clicking the icon or the line. You can close the text again by clicking the icon or the line.
Navigating via the Index
Click the Index (this text is dependent on the operating system used) tab to go to the index (the tab is highlighted in yellow)
The index will be displayed on the left-hand side of the help window.
By clicking a letter of the alphabet, you can go directly to the keywords under this letter.
By clicking the desired keyword, you can open the belonging help page on the right-hand side of the help window.
Note:
The index area and the selected page are separated by a vertical line or a scroll bar. To enlarge the area (this automatically makes the other areas smaller), click and hold the cursor above the separator line and slide the line to the location you want. This setting only applies to the help window currently open.
By clicking the icon in the help window, you can display the currently open help page in the table of contents.
Navigating by Browsing
By clicking the icon, you can go to the next page of the instruction. By clicking the icon, you can go to the previous page of the instruction.
Navigating via the Back Button
Clicking the icon takes you back to the previously opened help page.
Note: You may have to scroll back to the beginning of the currently displayed help page in order to access the icon.
Navigating via Links
Some help texts contain links to subordinate topics or to more detailed information. A link is indicated by a blue font and is underlined.
By clicking a link, you can go to the belonging help page.
Navigating via Breadcrumbs
The path you took to get to the currently open page is displayed above the help text. The path consists of the titles of the topics superordinate to the current topic. The superordinate topics are shown in a blue font and the current topic is shown in a grey font.
By clicking a superordinate topic, you can go to the belonging help page.
Searching in the Help
You can search the entire help for one or several terms.
- Click the Search tab (this text is dependent on the operating system used).
The tab is activated (it is highlighted in yellow). The left area of the help window contains a input field for the keywords and a button for starting the search.
- Enter the desired term in the entry fields.
Note:
The character * can be used as a placeholder (wildcard) in a search. A search using teleph* results, e.g., in hits for telephone, telephoning and telephone book.
If you enter several terms, the Help texts which contain all these keywords will be displayed irrespective of the sequence and context.
- Click Search (this text is dependent on the operating system used).
Help is searched; this may take some time. Afterwards, the topics that contain the search term are listed. The sequence within this list is determined by the number of hits and the importance of the search term found. The higher the value displayed under in %, the more important the help text is to the search.
- Click the desired Title within the list.
The corresponding help page will be opened on the right-hand side of the help window.
Note:
Some browsers, e. g. Internet Explorer 7, also highlight the identified search terms within the help text.
The search area and the selected page are separated by a vertical line or a scroll bar. To enlarge the area (this automatically makes the other areas smaller), click and hold the cursor above the separator line and slide the line to the location you want. This setting only applies to the help window currently open.
By clicking the icon in the help window, you can display the currently open help page in the table of contents.
Printing from within the Help
You can print the currently displayed help page using the print function of the help.
Note:
If the displayed help page includes expanding texts, expand all texts you want to print.
If you want to print only part of the displayed help page, mark the corresponding text by clicking and drawing with the left mouse key. Afterwards, select Selection as print area in the print dialog box.
- In the help window, click the icon.
The print dialog box opens.
- Select the desired printer.
- Click Print.
Icons in the Help Window


Clicking the icon takes you back to the previously opened help page.
Clicking the icon takes you to the next page of the instruction.
Clicking the icon takes you back to the previous page of the instruction.
Clicking the icon displays the opened help page in the table of contents.
Display: The expanding text is currently closed.
You can open the text by clicking the icon or the line.
Display: The expanding text is currently shown.
You can hide the text by clicking the icon or the line.
Clicking the icon opens the print dialog box.
Display: Subordinate topics are closed.
Clicking the icon opens the subordinate topics.
Display: Subordinate topics are shown.
Clicking the icon closes the subordinate topics.
Display: The topic does not have any subordinate topics.
Clicking the icon opens the corresponding help page.
Telephoning
This section describes the various types of telephoning that your telephone provides.
Topics
- Incoming Calls (page 64)
- Call Waiting Calls (page 68)
- Outgoing Calls (page 72)
- Calls (page 80)
– Query Calls (page 83) - Transfer (page 86)
– Conference Calls (page 90) - Hands-free Calling (page 93)
– Loudspeaker Listening (page 95) - Headset Calls (page 97)
Incoming Calls
The following types of calls apply to incoming calls:
- Alarm calls
- External calls
- Internal calls
- Group calling (a call directed to a group)
- InterCom calls
- External callback calls
- Internal callback calls
- Scheduled calls
- Door calls
- Call deblocker calls (calls enabled despite do-not-disturb)
- Wake-up calls
- Other calls
Options During an Incoming Call
During an incoming call, the following actions are possible:
Accept an Incoming Call
If you receive a call and would like to talk with the caller, you can accept the incoming call as you would normally by picking up the receiver.
Reject an Incoming Call
If you receive a call but you do not want to talk to the caller, you can reject the incoming call. The caller receives a busy signal – in as far as no other telephones are called (for example, in a group call).
Forward an Incoming Call
If you receive a call but you do not want to talk to the caller yourself, you can the forward the incoming call to any internal or external destination number.
Put an Incoming Call on Hold
If you receive a call but would like to postpone accepting the call for a while, you can put the incoming call on hold. The caller hears the hold music.
Additional Options
– Forwarding Incoming Calls to Answering Machine (page 343)
Accepting Incoming Calls
Requirements:
– Knowledge of the telephone and its menu options
When you receive a call, proceed as described in the following.
- Pick up the receiver or press the hook key.
You are connected with the caller.
Note:
If you are not present once in a while or cannot accept the call for any other reason, the telephone number of the caller is saved in the caller list (in as far as the telephone number is available and the call type is to be entered in the caller list).
Calls made from the telephone or from the PBX (wake-up calls, alarm calls, door calls, scheduled calls) are displayed in plain text and, if necessary, can be confirmed by pressing the √ softkey (alarm calls are confirmed after first picking up the receiver).
Rejecting Incoming Calls
Requirements:
– Knowledge of the telephone and its menu options
When you receive a call, proceed as described in the following.
- Select reject.
- Press the softkey.
The caller receives a busy signal – in as far as no other telephones are called (for example, in a group call).
Hold incoming calls
Requirements:
– Knowledge of the telephone and its menu options
When you receive a call, proceed as described in the following.
- Select hold incoming.
- Press the softkey.
You will hear the internal dial tone. The caller on hold hears the hold music.
- Select back.
- Press the softkey.
You are connected with the caller.
Forwarding Incoming Calls
Requirements:
– Knowledge of the telephone and its menu options
When you receive a call, proceed as described in the following.
-
Select call deflection.
-
Press the softkey.
- Enter the destination number or press the telephone book key to select the telephone number you want in the telephone book.
Important: Enter telephone numbers exactly as when dialling, for example, external telephone numbers always with a leading exchange line access number. (exception: direct exchange access). The default exchange line access number on the PBX is "0" in the factory settings; however, this can be changed for several PBXs (see the PBX manual).
- Press the softkey.
The subscriber is called.
Note: If the destination number is saved on the programmable function key (speed dialling key), you can forward the call by simply pressing this key and then confirming with the √ softkey. The previous function selection via the display is no longer applicable.
Call Waiting Calls
During a call, you are made aware of another call (external or internal subscriber, alarm or someone at the door) by a call waiting signal (tone and/or blinking hook LED).
Options During a Call Waiting Call
During a call waiting call, the following actions are possible:
Reject a Call Waiting Call
If you receive another call while you are already on a call and you do not want to speak with the second caller, or you do not want to interrupt the first call, you can reject the call waiting call. The caller receives a busy signal – in as far as no other telephones are being called (for example, in a group call).
Accept the Call Waiting Call
If you receive another call while you are already on a call and you would like to speak to the second caller, or you would like to end the current call, you can accept the call waiting call. After accepting, you are connected with the other caller. Your previous communication partner hears the hold music.
Forward Call Waiting
If you receive another call while you are already on a call and personally do not want to talk with the second caller, or you do not want to interrupt the current call, you can forward the call waiting call to any internal or external destination number.
Switch off the Call Waiting Tone
If you receive another call while you are already on a call but you would like to postpone accepting the second call for a while, you can switch off the call waiting tone. The second call will continue to try to get through and you can accept it at any time.
Rejecting Call Waiting Calls
Requirements:
– Knowledge of the telephone and its menu options
- Call waiting enabled
When call waiting signals that there is an incoming call, proceed as described in the following.
- Select reject.
- Press the softkey.
The caller receives a busy signal – in as far as no other telephones are being called (for example, in a group call).
Accepting Call Waiting
Requirements:
– Knowledge of the telephone and its menu options
- Call waiting enabled
When call waiting signals that there is an incoming call, proceed as described in the following.
- Select accept.
- Press the softkey.
You are connected with the caller. Your previous communication partner hears the hold music.
Note: If you first hang up the receiver to end the current call, your telephone then rings and you can accept the incoming call as you would normally.
Forwarding Call Waiting
Requirements:
– Knowledge of the telephone and its menu options
- Call waiting enabled
When call waiting signals that there is an incoming call, proceed as described in the following.
- Select call deflection.
- Press the softkey.
- Enter the destination number or press the telephone book key to select the telephone number you want in the telephone book.
Important: Enter telephone numbers exactly as when dialling, for example, always enter external telephone numbers with a leading exchange line access number. (exception: direct exchange access). The default exchange line access number on the PBX is "0" in the factory settings; however, this can be changed for several PBXs (see the PBX manual).
- Press the softkey.
The subscriber is called.
Note: If the destination number is saved on the programmable function key (speed dialling key), you can forward the call by simply pressing this key and then confirming with the √ softkey. The previous function selection via the display is no longer applicable.
Switching off Call Waiting Tone
Requirements:
– Knowledge of the telephone and its menu options
- Call waiting enabled
When call waiting signals that there is an incoming call, proceed as described in the following.
- Select call wait.off.
- Press the softkey.
The second call will continue to try to get through and you can accept it at any time.
Outgoing Calls
Outgoing calls are calls that you have initiated yourself.
Options for Outgoing Calls
An outgoing call can be initiated in two ways:
Dialling the Telephone Number
If you have already picked up the receiver before dialling, the telephone number that you have entered is dialled immediately.
Dialling the Telephone Number with Dial Preparation
Dial preparation – first dialling and then picking up the receiver – makes it possible to check the telephone number entered and, if necessary, to correct it before the connection is established.
Dialling the Telephone Number on Direct Exchange Line Access
If your system telephone has been configured as a direct exchange access point using the configuration manager on the PBX, you will hear an external dial a tone directly after picking up the receiver. The manner in which an outgoing call is initiated is different than the manner in which a normal call is initiated, as described previously.
Initiating External Calls with Number Presentation Suppression
If you prefer that the person you are calling does not see your telephone number, you can use number presentation suppression.
Additional Options
– Initiating Targeted Exchange Line Access (page 310)
- Initiating a Targeted VoIP Access Point (page 314)
– Dialling from Telephone Book (page 102)
– Dialling from Caller List (page 132)
– Dialling from Calls List (page 126)
– Dialling from Redial List (page 122)
Picking up Receiver and Dialling Telephone Number
Requirements:
– Knowledge of the telephone and its menu options
- Pick up the receiver or press the hook key.
- Dial a telephone number.
Important: Do not forget to dial the exchange line access number for external telephone numbers or press the √ softkey after public exchange. (Exceptions: direct exchange access)
Note: As soon as you have dialled the first digit, you can cancel dialling by pressing the softkey and starting again.
Once you have finished dialling the telephone number, the subscriber is called.
Dialling Telephone Number with Dial Preparation
Requirements:
– Knowledge of the telephone and its menu options
1. Dial a telephone number.
Important: Enter telephone numbers exactly as when dialling, for example, external telephone numbers always with a leading exchange line access number. (exception: direct exchange access).
Note: You can make corrections, if necessary, while entering the telephone number.
2. Pick up the receiver or press the hook key.
Note: If you would like to exit the menu without dialling the telephone number entered, press the exit key.
Initiating External Calls with Number Presentation Suppression
Requirements:
– Knowledge of the telephone and its menu options
- The service attribute CLIR (selective number presentation suppression) enabled by the network provider
– Telephone number display enabled on the PBX
- Press the softkey to activate suppression for the next call.
The display will show darkened eyeglasses as an indication that number presentation suppression has been enabled.
- Dial a phone number (an external phone number with an exchange line access number).
- Pick up the receiver or press the hook key.
The subscriber is called.
Number presentation suppression remains enabled until the 🔊 softkey is pressed again.
Dialling Telephone Number on Direct Exchange Line Access
Requirements:
– Knowledge of the telephone and its menu options
- Telephone is configured as a direct exchange access point via the PBX
In order to dial an external telephone number on a direct exchange line access point, pick up the receiver and enter the external telephone number without the exchange line access number.
In order to carry out other types of calls (for example, internal or short-code), proceed as described in the following.
- Pick up the receiver or press the hook key.
You will hear the external dial tone.
- Select internal.
You will hear the internal dial tone.
3. Dial an internal telephone number.
Once you have finished dialling the telephone number, the subscriber is called.
Note: If you would like to use dial preparation or, for example, make an entry in the telephone book or configure a speed dialling key, you must press the star key twice beforehand for internal and short-code calls.
Options for Unsuccessful Calls
The following options are available for unsuccessful call:
Initiating Callback on Busy
If you cannot get through to a busy subscriber despite repeated attempts, you can initiate a callback on busy. The PBX supports the service attribute "Automatic callback on busy (CCBS)". This service attribute is required for an external call.
If you have initiated a callback, as soon as the other subscriber has hung up the receiver to end the call, the PBX (for an internal call) or central office (for an external call) calls you. If you then pick up the receiver, the other subscriber is called. If the other subscriber picks up the receiver, the connection for the call is established. This deletes the callback procedure in the PBX/central office.
Initiating Callback on No Response
If the person being called does not pick up the receiver, you can configure callback on no response in order to reach this person without having to call him repeatedly. The function can be used for both internal and external calls. The service attribute "Callback on no response (CCNR)" is supported by the PBX. This service attribute is required for external calls.
If you have initiated a callback, as soon as the other subscriber has hung up the receiver to end the call, the PBX or central office calls you. If you then pick up the receiver, the other subscriber is called. If the other subscriber picks up the receiver, the connection for the call is established. This deletes the callback procedure in the PBX/central office.
Initiating Priority Call for Do-not-disturb
If, for example, a person must absolutely be reached in an emergency despite the do-not-disturb function, the do-not-disturb function can be circumvented by a priority call from an internal telephone.
Additional Options
- Executing Power Dialling (page 271)
- Configuring Scheduled Call as Call Reminder (page 298)
Initiating Callback on Busy
Requirements:
– Knowledge of the telephone and its menu options
- For external calls: The given technical requirements for a callback on busy (for instance, not all network providers provide callback on a Point-to-Point connection)
If the connection you are calling is busy, proceed as described in the following.
- Select recall.
- Press the softkey.
If callback is configured, you receive the message recall activated.
- Hang up the receiver.
Note: If you would like to delete the callback, press the ☑ softkey in the redial list.
As soon as the connection is no longer busy, you are called by the central office/PBX for a period of 20 seconds.
- Pick up the receiver to the carry out the callback.
Note:
If you do not pick up the receiver within the 20 seconds during which the central office/PBX calls you, the callback instruction is deleted.
If you would like to cancel the callback, select reject.
If you pick up the receiver, the subscriber is called.
Note:
You also have the option of letting the central office call you as soon as one of the B-channels on the previously called ISDN connection is available. If the person for which you have set up callback is telephoning on the other B-channel, callback will remain unsuccessful.
A callback is tried up to 45 minutes by the central office/PBX. If the called person did not finish his call until then, the callback will be deleted automatically.
Initiating Callback on No Response
Requirements:
– Knowledge of the telephone and its menu options
- For external calls: The given technical requirements for a callback on no response (for instance, not all network providers provide callback on a Point-to-Point connection)
- For external calls: the service attribute CCNR (Callback on no response) enabled with the network provider
If no one answers on the connection you are calling, proceed as described in the following.
- Select recall.
- Press the softkey.
If callback is configured, you receive the message recall activated.
- Hang up the receiver.
Note: If you would like to delete the callback, press the 📄 softkey in the redial list.
As soon as the connection is used, the central office/PBX calls you for period of 30 seconds (or only 15 seconds for external callback).
- Pick up the receiver to the carry out the callback.
Note:
If you do not pick up the receiver within the 30 seconds (or 15 seconds) during which the central office/PBX calls you, the callback instruction is deleted.
If you would like to cancel the callback, select reject.
A callback on an external subscriber is tried up to 45 minutes by the central office. If the called person did not finish his call until then, the callback will be deleted automatically.
If you pick up the receiver, the subscriber is called.
Initiating Priority Call for Do-Not-Disturb
Requirements:
– Knowledge of the telephone and its menu options
- The subscriber who is called has configured all (PBX) as kind of do-not-disturb
If the internal telephone you are trying to call is busy because it is set to do-not-disturb, proceed as described in the following.
- Wait ten seconds.
The subscriber is now called.
Ending a Query Call
Requirements:
– Knowledge of the telephone and its menu options
If you make a query call and the number is busy but there is no response, proceed as described in the following.
Important: Do not hang up the receiver as this will disconnect any calls waiting or will initiate an unannounced transfer of the call to another internal telephone.
1. Select back.
Note: If you would like to try this with another telephone number, select dial again. You can then dial a new telephone number, without having to explain to the person waiting on the other line that you are trying again.
2. Press the softkey.
You are now reconnected with the person waiting on the other line.
Calls
The system telephone allows you to make internal and external calls on the PBX. Internal calls are toll-free.
Options during a Call
During a call, the following actions are possible:
Retrieving Information about a Call
During a call, you see information about the call and your communication partner on the display as well as general time information (date, time, calendar week, weekday).
Sending DTMF Signals
During an existing connection, you can use the keypad to send DTMF signals (tones used in DTMF dialling) to operate an answering machine remotely, for example. The digits dialled are shown on the display.
Mute
If you would like to discuss something with another person in the room without your communication partner on the telephone being able to hear, you can temporarily mute the call.
Additional Options
- Initiating a Query Call (page 83)
- Transfer (page 86)
- Creating a Memo (page 262)
– Executing Pickup during Call (page 267)
– Executing Project Assignment during a Call (page 281) - Configuring Scheduled Call as Call Reminder (page 298)
– Executing Call Recording (page 394)
Retrieving Information about a Call
Requirements:
– Knowledge of the telephone and its menu options
During a call, proceed as described in the following.
- Press the softkey.
All the available information about a call is displayed.
- Press the softkey to end the display.
Sending DTMF Signals
Requirements:
– Knowledge of the telephone and its menu options
- When you selected the option DTMF-Outband or DTMF-Outband (Quit.) in the menu settings > VoIP > provider > DTMF: a VoIP module inserted into the PBX
During a call, proceed as described in the following.
- Enter the digits and characters. The following entries are possible:
Digits and the characters * and #
The digits and characters dialled are shown on the display and you hear the corresponding tones.
Muting a Call
Requirements:
– Knowledge of the telephone and its menu options
During a call, proceed as described in the following.
- Press the microphone key.
The microphone on the receiver, device or headset is switched off. The ☑ symbol is shown in the display.
- If you would like to switch the microphone on again, press the microphone key again.
Ending a Call
After your communication partner ends the call, your telephone goes into the idle state. If you wait to hang up the receiver for a few seconds, you will hear the busy signal on the receiver and then also on the loudspeaker of the base system, in case the receiver was accidentally hung up incorrectly.
Requirements:
– Knowledge of the telephone and its menu options
During a call, proceed as described in the following.
- Hang up the receiver.
Note: If you would like to end a current call and then immediately make a new call, press the hook key instead and start dialling the next number within 30 seconds.
Query Calls
During a query call, you are talking with one subscriber while your previous communication partner is on hold on the PBX in the background listening to hold music.
A query call is initiated either by calling a query call subscriber, using pick-up during a call, or by accepting a call signalled by call waiting.
Initiating a Query Call
Requirements:
- Knowledge of the telephone and its menu options
During a call, proceed as described in the following.
- Select query/transfer.
- Press the softkey.
You will hear the internal dial tone. Your current communication partner is kept on hold on the PBX and is listening to hold music.
- Enter a telephone number.
Important: Enter telephone numbers exactly as when dialling, for example, always enter external telephone numbers with a leading exchange line access number.
The subscriber is called.
Note:
If the telephone number of the query call subscriber is located in the telephone book of the telephone, you can initiate a query call by dialling directly out of the telephone book (also without previously selecting query/transfer).
If the telephone number of the query call subscriber is saved on one of the freely programmable function keys (speed dialling key), you can initiate the query call by simply pressing this key (without previously selecting query/transfer).
Options during a Query Call
The following actions are possible during a query call:
Splitting
You can use at the splitting function to switch between your two communication partners.
Ending One of the Two Calls
When you end a query call and would like to continue talking with one of the communication partners, you can specifically end the call with the other communication partner separately. Of course, one of your communication partners can simply hang up so that you can continue talking with the other communication partner alone.
Connecting Both Communication Partners
If you would like to let your communication partners speak with each other, you can connect them together.
Splitting
Requirements:
– Knowledge of the telephone and its menu options
- Initiated query call
During a query call, proceed as described in the following.
- If necessary, press the ▷ softkey in front of the name or telephone number of the communication partner to whom you would like to change.
The active communication partner is indicated by ▶ and the waiting communication partner by ▶
You continue to conduct a query call. The other communication partner is now active.
Ending One of the Two Calls
Requirements:
– Knowledge of the telephone and its menu options
- Initiated query call
If one of your two communication partners hangs up the receiver, you remain connected with the other one.
Or, during a query call, proceed as described in the following.
- If necessary, press the ▷ softkey in front of the name or telephone number of the communication partner with whom you would like to end the call.
The active communication partner is indicated by ▶ and the waiting communication partner by ▶ - Select curr.call canc..
- Press the softkey.
You then conduct an individual call with the communication partner who had previously been on hold.
Connecting Both Communication Partners
Requirements:
– Knowledge of the telephone and its menu options
- Initiated query call
- To connect two external communication partners, the following is required: Authorization in the PBX for Transfer of external calls to external
To connect both communication partners, hang up the receiver during a query call.
Or, proceed as described in the following.
- Select conn. both calls.
- Press the softkey.
Both communication partners are connected with each other.
Transfer
A communication partner can be transferred or connected to an internal or external subscriber.
Options for Transferring a Call
During an existing call, the following options are available for transferring a call:
Transfer with Announcement
In order to transfer a call, first initiate a query call, announce the call and then connect both communication partners.
Transfer without Announcement
If you would like to transfer an external communication partner to another internal subscriber, you do not have to wait until the subscriber being called via the query call accepts the call; you can hang up the receiver while this call is being made. The internal subscriber will continue to be called.
Placing the External Communication Partner in the Waiting Loop
If the internal subscriber to which you would like to transfer an external communication partner is busy, you can place the external communication partner in the waiting loop of this subscriber.
Note: If, for example, you have accepted a call signalled by call waiting and have therefore established a query call, you can place this call in the waiting loop in the same manner. The communication partner to be transferred must be the active communication partner (indicated by ▶).
Calling a Third Internal Subscriber and Transferring to an Active Communication Partner
Assuming that you have gained an additional communication partner from a call, for example, from accepting a call signalled by call waiting, and this second communication partner would like to now be transferred to somebody else. You can now initiate a third call that connects the second and third communication partners with each other and then continue telephoning with your first communication partner.
Transfer with Announcement
Requirements:
– Knowledge of the telephone and its menu options
- Initiated query call
- To connect two external communication partners, the following is required: Authorization in the PBX for Transfer of external calls to external
During a query call, proceed as described in the following.
- Select conn. both calls.
- Press the softkey.
Both communication partners are connected with each other.
Transfer without Announcement
Requirements:
– Knowledge of the telephone and its menu options
– Internal transfer destination
During a call, proceed as described in the following.
- Select query/transfer.
- Press the softkey.
You will hear the internal dial tone. Your current communication partner is kept on hold on the PBX and is listening to hold music.
- Dial an internal telephone number.
The subscriber is called.
- Hang up the receiver.
The internal subscriber will continue to be called. If the subscriber accepts the call, the connection is established.
If the subscriber being called does not accept the call, the call is transferred back to your telephone 60 seconds later (your telephone rings).
Note: In order to carry out an open query call, dial the internal basis telephone number + park position and hang up, instead of dialling the internal telephone number (see also the PBX manual). To make this operation more convenient, you can save the internal basis telephone number + park position on one or more freely programmable function keys (speed dialling key). The LEDs for the speed dialling keys then indicate whether a park position is available or busy.
Placing External Communication Partner in Waiting Loop
Requirements:
– Knowledge of the telephone and its menu options
- Internal transfer destination
If the internal telephone to which you are trying to transfer a call is busy, proceed as described in the following.
- Select waiting loop.
- Press the softkey.
- Hang up the receiver.
The external communication partner continues to listen to hold music.
As soon as the internal subscriber hangs up the receiver, this external communication partner is called. Once he accepts the call, he is connected with the subscriber in the waiting loop.
Note:
If the internal subscriber does not answer the call within 60 seconds, or the line remains busy during the three minute waiting time, the call will be transferred back to you.
If you pick up the receiver, you will be reconnected with the external communication partner. You can then place him in the waiting loop again. If you do not pick up the call within 60 seconds, the exchange line connection is disconnected completely (for example, if your line was busy even for a short time).
Calling a Third Subscriber and Transferring to an Active Communication Partner
Requirements:
– Knowledge of the telephone and its menu options
- Initiated query call
During a query call, proceed as described in the following.
- If necessary, press the ▷ softkey in front of the name or telephone number of the communication partner you would like to transfer.
The active communication partner is indicated by ▶ and the waiting communication partner by ▶ - Select transf. act. call
- Press the softkey.
- Dial the telephone number of the subscriber to be called.
As soon as to the person being called picks up the receiver, conduct a third call.
Important: Enter telephone numbers exactly as when dialling, for example, always enter external telephone numbers with a leading exchange line access number.
- Select transfer.
Both previously active communication partners are connected.
Then return to conducting an individual call with your first communication partner.
Conference Calls
During a conference call, you are talking with two subscribers simultaneously.
Initiating Conference Calls
Requirements:
– Knowledge of the telephone and its menu options
– A query call you initiated yourself
During a query call, proceed as described in the following.
- Select conference.
- Press the softkey.
You are making a conference call.
Options during a Conference Call
The following actions are possible during a conference call:
Initiating Splitting
When you end a conference call and would like to talk to each of the conference call partners separately one after the other, you can specifically put one of the conference call partners on hold in the background.
Ending a Call with a Conference Call Partner
When you end a conference call and would like to continue talking with one of the conference call partners, you can specifically end the call with the other conference call partner separately. Of course, one of your conference call partners can simply hang up so that you can continue talking with the other conference call partner alone.
Connecting both Conference Call Partners
If you would like to leave a conference call that you initiated yourself and your conference call partners would like to continue talking with each other, you can connect both parties.
Ending a Conference Call Completely
If you initiated the conference call yourself, you can end the conference call completely.
Initiating Splitting during a Conference Call
Requirements:
– Knowledge of the telephone and its menu options
– A conference call that you initiated yourself
During a conference call, proceed as described in the following.
- If necessary, press the || softkey in front of the name or telephone number of the conference call partner with whom you would like to talk.
- Select splitting.
- Press the softkey.
You are making a query call.
Ending a Call with a Conference Call Partner
Requirements:
– Knowledge of the telephone and its menu options
– A conference call that you initiated yourself
During a conference call, proceed as described in the following.
-
If necessary, press the softkey in front of the name or telephone number of the conference call partner with whom you would like to end the call.
-
Select terminate.
- Press the softkey.
You are conducting an one-on-one call with the other conference call partner.
Connecting both Conference Call Partners
Requirements:
– Knowledge of the telephone and its menu options
– A conference call that you initiated yourself
- To connect two external communication partners, the following is required: Authorization in the PBX for Transfer of external calls to external
During a conference call, proceed as described in the following.
- Select conn. both calls.
- Press the softkey.
Both conference call partners are connected with each other.
Ending Conference Call Completely
Requirements:
– Knowledge of the telephone and its menu options
– A conference call that you initiated yourself
During a conference call, proceed as described in the following.
- Hang up the receiver.
The conference call is disconnected completely.
Hands-free Calling
During hands-free calling, the loudspeaker and microphone on the device are switched on. This option allows you to talk on the telephone even if you have no hands free. In addition, other people in the room can participate in the call.
Initiating Call in Hands-free Calling Mode
Requirements:
– Knowledge of the telephone and its menu options
- When your phone rings, press the hook key or the loudspeaker key to initiate the call.
You are conducting a call in hands-free calling mode. The following symbol is shown in the display: - If you would like to call someone, dial the telephone number and press the hook key or the loudspeaker key to initiate the call.
You are conducting a call in hands-free calling mode. The following symbol is shown in the display:
Note: During headset operation, you can only use the loudspeaker key since the hook key is being used to initiate and end the headset call.
Ending up Call in Hands-free Calling Mode
Requirements:
– Knowledge of the telephone and its menu options
During hands-free calling mode, proceed as described in the following.
- Press the hook key.
Switching on Hands-free Calling During a Call
Requirements:
– Knowledge of the telephone and its menu options
During a normal call or a call in loudspeaker listening mode using the receiver, proceed as described in the following.
- Press and hold the loudspeaker key for approx. 2 seconds. You can then hang up the receiver.
You are conducting a call in hands-free calling mode. The following symbol is shown in the display:
Switching off Hands-free Calling and Returning to Normal Calling
Requirements:
– Knowledge of the telephone and its menu options
During hands-free calling mode, proceed as described in the following.
- Pick up the receiver.
You are conducting a normal call.
- If you have already picked up the receiver or a headset is connected, press the loudspeaker key.
You are conducting a normal call or a headset call.
Loudspeaker Listening
During loudspeaker listening, the receiver loudspeaker as well as the loudspeaker in the device are switched on. This allows other people in the room to listen in on the call. The call is continued using the receiver microphone (no hands-free calling).
Switching on Loudspeaker Listening during a Call
Requirements:
– Knowledge of the telephone and its menu options
During a normal call using the receiver, proceed as described in the following.
- Press the loudspeaker key.
You are conducting a call in loudspeaker listening mode. The following symbol is shown in the display: 📄
Switching off Loudspeaker Listening and Returning to Normal Calling
Requirements:
– Knowledge of the telephone and its menu options
During loudspeaker listening mode, proceed as described in the following.
- Press the loudspeaker key.
You are conducting a normal call.
Ending a Call in Loudspeaker Listening Mode
Requirements:
– Knowledge of the telephone and its menu options
During loudspeaker listening mode, proceed as described in the following.
- Hang up the receiver.
Headset Calls
A headset enables you to participate in calls when you have no hands free. This is a very useful feature, especially in certain professional areas (for example, in a call center).
Initiating Headset Calls
Requirements:
– Knowledge of the telephone and its menu options
- Headset operation enabled
- When your telephone rings, press the hook key to initiate the call.
You are making a headset call.
- If you would like to call someone, dial the telephone number and press the hook key to initiate the call.
You are making a headset call.
Note: If a receiver is connected and picked up while the telephone is in the idle state, press the hook key or the loudspeaker key to initiate a headset call that also includes reception on the receiver.
Ending a Call in Headset Operation
Requirements:
– Knowledge of the telephone and its menu options
- Headset operation enabled
During a headset call or other call in headset operation, proceed as described in the following.
- Press the hook key.
Initiating Listen in Function on Receiver
Requirements:
– Knowledge of the telephone and its menu options
- Headset operation enabled
- Connected receiver
During a headset call or other call in headset operation, proceed as described in the following.
- Pick up the receiver.
You are making a headset call with an enabled receiver. - If you have already picked up the receiver and hands-free calling is enabled, press the loudspeaker key.
You are making a headset call with an enabled receiver.
Ending Listen in Function on Receiver
Requirements:
– Knowledge of the telephone and its menu options
- Headset operation enabled
- Connected receiver
During a headset call with an enabled receiver, proceed as described in the following.
- Hang up the receiver.
You are making a headset call.
- If you would like to participate with the others on the call, press the loudspeaker key.
You are conducting a call in hands-free calling mode.
Note: If, during a headset call with an enabled receiver, you switch off headset operation, you can make a normal call using the receiver. You can only switch off headset operation during a call using a function key configured for this purpose.
Telephone Book and Telephone Number Lists
This section describes the telephone book and the current caller and calls lists in the telephone.
Topics
– Telephone Book (page 100)
- Redial List (page 121)
- Calls List (page 125)
- Caller List (page 131)
Telephone Book
The telephone book is used for storing useful or frequently dialled telephone numbers along with the associated names. If a telephone number that is entered in the telephone book is transmitted during a call, the assigned name is displayed instead of the telephone number is displayed.
In the telephone book, entries (telephone numbers, macros and comments) can be stored. Up to four entries can be assigned to a name (contact).
In addition, internal telephone numbers (subscriber, groups, door, emergency call) as well as the telephone book/short-code numbers on the PBX are displayed. If one of these entries does not have a name, the system telephone generates a name for the telephone book (for example, int. TN45, KW-A 05306...). The entries cannot be changed in the telephone book of the system telephone; they can only be changed using the corresponding PC software on the PBX (internal telephone numbers with COMset; short-code numbers with COMtools). Each name (contact) is assigned only one telephone number entry. All of the contacts are displayed in alphabetical order.
Opening the Telephone Book
Opening can be carried out as follows:
• Via the telephone menu
Requirements:
– Knowledge of the telephone and its menu options
- Press the telephone book key.
- Scroll to the desired contact.
Note:
In order to find the desired contact more quickly, you can enter the first letter into the keypad.
If there is no contact for the letter entered (display "no hits") or the contact in question is not present, you can delete the letters entered by pressing the
← softkey and enter another letter.
If there are multiple contacts for the beginning letter entered, you can enter additional letters to narrow the selection further.
The following information about the contact is shown on the display:
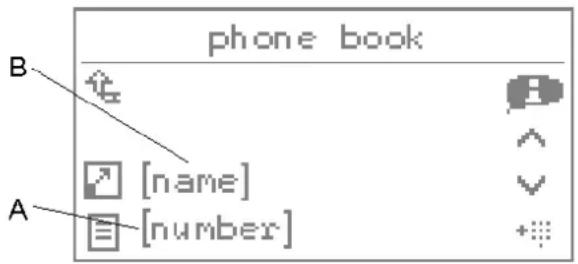
text_image
phone book B A [name] [number]A Telephone number (for multiple entries for this contact, the telephone number last dialled or entered)
B Name (contact)
- Select the desired option:
Switches back into the idle state.
Opens the expanded display.
目 This opens the short overview.
Indicates the available comments.
Accepts the entry into dial preparation or into the telephone book, if applicable.
Note: If this is an internal telephone number or a short-code number on the PBX for the content displayed, the extended display is not available since these contacts can only contain a single telephone number.
If you have opened the extended display, the following information about the contact in the display is shown:
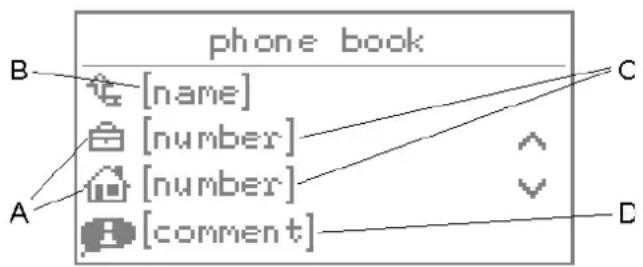
text_image
phone book B [name] C A [number] A [number] A [comment]A Type of entry: business telephone number ( ) private telephone number ( ), mobile telephone number ( ) call macro ( )
B Name (contact)
C Existing entry
D Existing comments
4. Select the desired option:
Switches back into the list view.
Excepts the available business telephone number into the dial preparation.
Excepts the available private telephone number into the dial preparation.
Excepts the available mobile telephone number into the dial preparation.
▶Ⅱ Excepts the available call macro into the dial preparation.
Indicates the available comments.
Opens a contact for editing.
5. If you would like to leave the menu, press the exit key.
Dialling from Telephone Book
Dialling can be carried out as follows:
• Via the configuration manager
• Via the telephone menu
Dialling from Telephone Book via Configuration Manager
Requirements:
- An open configuration manager
- Open the page Telephone book > Overview.
- Click the receiver symbol in front of the desired telephone number.
The subscriber is called.
Note: If you click a contact's telephone number directly, you automatically go to the page Telephone book > Edit. You can then edit the content in question.
Dialling from Telephone Book via Telephone Menu
Requirements:
– Knowledge of the telephone and its menu options
- Press the telephone book key.
- Scroll to the desired contact or enter the first letter of the desired contact into the keypad.
The default telephone number is displayed. If there are multiple entries for a contact, this will be the telephone number last dialled or entered. - If you would like to dial a different number than the default telephone number associated with the contact, press the ↗ softkey to open the expanded display. Then press the softkey in front of the desired telephone number.
- Pick up the receiver or press the hook key.
Note: The telephone number now dialled becomes the default telephone number at the end of the call.
Configuring a Contact
The telephone book provides space for 1600 entries (telephone numbers, macros and comments). Up to four entries can be assigned to a name (contact).
The configuration can be carried out as follows:
• Via the configuration manager
• Via the telephone menu
Configuring a Contact via Configuration Manager
Requirements:
- An open configuration manager
-
Open the page Telephone book > New.
-
Enter the name of the contact in the Name entry field. The following entries are possible:
Up to 16 digits
Digits and characters
- In the Kind list field, select one of the following options:
business: Defines the telephone number to be entered as a business telephone number.
mobile (business): Defines the telephone number to be entered as a business mobile telephone number.
private: Defines the telephone number to be entered as a private telephone number.
mobile (private): Defines the telephone number to be entered as a private mobile telephone number.
- In the Type list field, select one of the following options:
internal: Defines the telephone number to be entered as an internal telephone number.
external: Defines the telephone number to be entered as an external telephone number.
- Enter the telephone number in the Telephone number/text entry field. The following entries are possible:
Up to 40 digits
Digits and the characters * and #
- If you would like to be signaled by a specific ringer melody when a contact calls, select the ringer melody in question in the Ringer rhythm list field.
Note: You can add your own ringer melodies to the list using a USB memory stick inserted into the USB port on the telephone. Open the page Answering machine > Data exchange and load any WAV files available in the ring tone directory on the USB memory stick.
- If you would like the answering machine to assign a certain kind of call acceptance to the contact, select one of the following options in the Answering machine call acceptance list field.
Standard: When the contact calls, the call acceptance and announcement of the corresponding call type are used. The settings for this are configured under Answering machine > Automatic.
Only announcement: The announcement selected for the contact is played back; however, the caller can leave no message.
No call acceptance: A call from the contact is not accepted by the answering machine.
Announcement and recording: The announcement selected for the contact is played back. After this, the caller can leave a message.
Important: A changed in call acceptance/an announcement made here is only taken into account if special call acceptance/an announcement for telephone book contacts has been enabled.
-
In the Answering machine call acceptance list field, if you have selected either the option Only announcement or Announcement and recording, select the announcement in the Announcement list field that will be used when accepting a call from the corresponding contact.
-
Click Execute.
Note: On the page Telephone book > Edit, you can configure additional settings for this contact at the end.
Configuring a Contact via Telephone Menu
Requirements:
– Knowledge of the telephone and its menu options
- Press the telephone book key.
In the bottom line of the display, the number of existing entries and the maximum number of entries are displayed.
-
Press the ☐ softkey in front of new contact.
-
Enter the name of the contact. The following entries are possible:
Up to 16 digits
Digits and characters
-
Press the softkey to save the entry.
-
Select the desired option:
Allows a business telephone number to be entered.
Allows a private telephone number to be entered.
Allows a mobile telephone number to be entered.
- Enter the telephone number. The following entries are possible:
Up to 40 digits
Digits and the characters * and #
Important: Enter telephone numbers exactly as when dialling, for example, always enter external telephone numbers with a leading exchange line access number. (exception: direct exchange access). The default exchange line access number on the PBX is "0" in the factory settings; however, this can be changed for several PBXs (see the PBX manual).
Note: While entering the telephone number, you can press the Ⓧ softkey to change the kind of the telephone number (business, private, mobile).
- Press the softkey to save the entry.
The edit contact menu is opened. You can also enter additional telephone numbers and call macros as well as a comment (up to four entries). In addition, you can configure a specific ringer melody for calls from one of the corresponding telephone numbers.
- If you would like to leave the menu, press the exit key.
If you would like to configure another contact without leaving the menu, press the √ softkey.
Note: When entering multiple telephone numbers or call macros, the last entry configured or changed is used as the default telephone number.
Editing a Contact
A contact that has already been configured, can be edited later.
Editing can be carried out as follows:
• Via the configuration manager
• Via the telephone menu
Editing a Contact via Configuration Manager
Requirements:
- An open configuration manager
- Open the page Telephone book > Edit.
- Use the following symbols to navigate to the contact that you would like to edit.

Jumps to the first contact in the telephone book.

Jumps to the previous contact in the telephone book.

Jumps to the next contact in the telephone book.

Jumps to the last contact in the telephone book.
Note:
Or you can click a telephone number directly in the contact to be edited on the page Telephone book > Overview. After this, the menu for editing the contacting question opens automatically.
Only contacts configured on the telephone can be edited or deleted. The internal telephone numbers as well as the telephone book/short-code numbers on the PBX can only be changed using the corresponding PC software or the web interface on the PBX (internal telephone numbers with COMset, short-code numbers with COMtools).
- In the Kind list field, select one of the following options:
business: Defines the telephone number to be entered as a business telephone number.
mobile (business): Defines the telephone number to be entered as a business mobile telephone number.
private: Defines the telephone number to be entered as a private telephone number.
mobile (private): Defines the telephone number to be entered as a private mobile telephone number.
Macro: Allows a macro to be entered.
comment: Allows a comment to be entered.
- In the Type list field, select one of the following options:
internal: Defines the telephone number to be entered as an internal telephone number.
external: Defines the telephone number to be entered as an external telephone number.
- Enter the telephone number or the text in the Telephone number/text entry field. The following entries are possible:
Up to 40 digits
Numbers and letters.
- If you would like to be signaled by a specific ringer melody when a contact calls, select the ringer melody in question in the Ringer rhythm list field.
Note: You can add your own ringer melodies to the list using a USB memory stick inserted into the USB port on the telephone. Open the page Answering machine > Data exchange and load any WAV files available in the ring tone directory on the USB memory stick.
- If you would like the answering machine to assign a certain kind of call acceptance to the contact, select one of the following options in the Answering machine call acceptance list field.
Standard: When the contact calls, the call acceptance and announcement of the corresponding call type are used. The settings for this are configured under
Answering machine > Automatic.
Only announcement: The announcement selected for the contact is played back; however, the caller can leave no message.
No call acceptance: A call from the contact is not accepted by the answering machine.
Announcement and recording: The announcement selected for the contact is played back. After this, the caller can leave a message.
Important: A changed in call acceptance/an announcement made here is only taken into account if special call acceptance/an announcement for telephone book contacts has been enabled.
- In the Answering machine call acceptance list field, if you have selected either the option Only announcement or Announcement and recording, select the announcement in the Announcement list field that will be used when accepting a call from the corresponding contact.
- Click Execute.
Editing Contact via Telephone Menu
Requirements:
– Knowledge of the telephone and its menu options
- Press the telephone book key.
- Scroll to the desired contact or enter the first letter of the desired contact into the keypad.
- Press the ↗ softkey to open the expanded display.
Note: Only contacts configured on the telephone can be edited or deleted; this means that the expanded display is only available for such contacts. The internal telephone numbers as well as the telephone book/short-code numbers on the PBX can only be changed using the corresponding PC software or the web interface on the PBX (internal telephone numbers with COMset, short-code numbers with COMtools).
- Press the softkey to the open the contact for editing.
The following information about the contact is shown on the display:
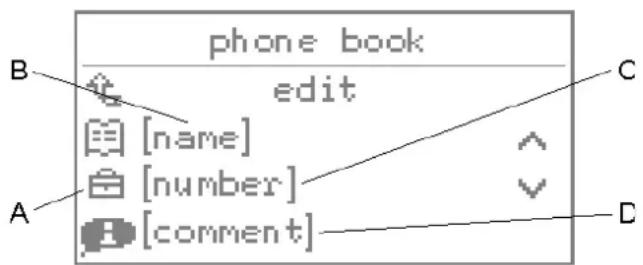
text_image
phone book edit [name] [number] [comment]A Type of entry: business telephone number ( ) private telephone number ( ), mobile telephone number ( ) call macro ( )
B Name (contact)
C Existing entry
D Existing comments
5. Select the desired option:
目 Allows the name to be changed.
Allows the existing business telephone number to be changed.
Allows the existing private telephone number to be changed.
Allows the existing mobile telephone number to be changed.
▶■ Enables the existing call macro to be changed.
Enables a comment to be entered and changed.
Enables the ringer rhythm that signals a call from this contact to be selected or changed.
Enables call acceptance on the answering machine to be changed and the announcement to be selected that is used when accepting a call from the corresponding contact.
Enables an additional telephone number or call macro to be entered.
Enables deleting the contact.
Important:
Enter telephone numbers exactly as when dialling, for example, always enter external telephone numbers with a leading exchange line access number. (exception: direct exchange access). The default exchange line access number on the PBX is "0" in the factory settings; however, this can be changed for several PBXs (see the PBX manual).
A changed in call acceptance/an announcement made here is only taken into account if special call acceptance/an announcement for telephone book contacts has been enabled.
Note: When entering multiple telephone numbers or call macros, the last entry configured or changed is used as the default telephone number.
- If you would like to leave the menu, press the exit key.
Deleting a Contact
Deleting can be carried out as follows:
• Via the configuration manager
• Via the telephone menu
Deleting a Contact via Configuration Manager
Requirements:
- An open configuration manager
- Open the page Telephone book > Overview.
- Select the check box in front of the contact to be deleted.
☑ The contact in question is deleted.
☐ The contact in question is not deleted.
To select the check boxes of all the contacts at one time, select the check box in the last row.
Note: Only contacts configured on the telephone can be edited or deleted. The internal telephone numbers as well as the telephone book/short-code numbers on the PBX can only be changed using the corresponding PC software or the web interface on the PBX (internal telephone numbers with COMset, short-code numbers with COMtools).
3. Click Execute.
Deleting a Contact via Telephone Menu
Requirements:
– Knowledge of the telephone and its menu options
- Press the telephone book key.
- Scroll to the desired contact or enter the first letter of the desired contact into the keypad.
-
Press the softkey to open the expanded display.
-
Press the softkey.
- Press the softkey.
- Press the softkey to confirm the action.
- If you would like to leave the menu, press the exit key.
Entering Comments for a Contact
The comment function is used for entering more detailed information about a contact, for example, the reachability or the name of the contact partner for a company.
The entry can be made as follows:
• Via the configuration manager
• Via the telephone menu
Entering Comments for a Contact via Configuration Manager
Requirements:
– An open configuration manager
- Open a contact for editing or create a new contact.
- In the Kind list field, select the Comment option.
- Enter the comment in the Telephone number/text entry field. The following entries are possible:
Up to 40 digits
Digits and characters - Click Execute.
Entering Comments for a Contact via Telephone Menu
Requirements:
– Knowledge of the telephone and its menu options
- Open a contact for editing.
- Press the Softkey.
- Enter the comment. The following entries are possible:
Up to 40 digits
Digits and characters - Press the softkey to save the entry.
Note: When scrolling though the telephone book, you can see whether a contact contains a comment or not. Press the Ⓐ softkey to display this.
Configuring a Call Macro
A call macro can contain numbers as well as certain control characters. This enables you, for example, to query an answering machine.
The configuration can be carried out as follows:
• Via the configuration manager
• Via the telephone menu
Configuring a Call Macro via Configuration Manager
Requirements:
– An open configuration manager
- Open a contact for editing or create a new contact.
-
In the Kind list field, select the macro option.
-
Enter the call macro in the Telephone number/text entry field. The following entries are possible:
Up to 40 digits
Digits and the characters * and #
The commands listed at the end.
-: Waiting time/pause time of 1 second
=: Waiting time/pause time of 2 seconds
<: Waiting time/pause time of 4 seconds
W: Wait for a connection
H: Replace/pick up receiver
- Click Execute.
Configuring a Call Macro via Telephone Menu
Requirements:
– Knowledge of the telephone and its menu options
- Open a contact for editing or create a new contact.
- Press the ☐ softkey (not applicable when configuring a new contact).
- Press the softkey.
- Enter a call macro. The following entries are possible:
Up to 40 digits
Digits and the characters * and #
Commands
a) Press the softkey to add a command.
b) Select the desired option:
pause: 1 second: Inserts a pause of one second.
pause: 2 seconds: Inserts a pause of two seconds.
pause: 4 seconds: Inserts a pause of four seconds.
wait for connect: Inserts a pause that lasts until the connection is established. (If no connection is possible, the macro ends.)
repl/lift hands: Ends the connection or initiates, it depending on the status.
5. Press the softkey to save the entry.
Important: Enter telephone numbers exactly as when dialling, for example, always enter external telephone numbers with a leading exchange line access number. (exception: direct exchange access). The default exchange line access number on the PBX is "0" in the factory settings; however, this can be changed for several PBXs (see the PBX manual).
Switching Specific Call Acceptance/Announcement for Telephone Book Contacts On/Off
If the specific call acceptance/announcement for telephone book contact is switched on, the settings configured for call acceptance and announcement for the telephone book contacts are taken into account.
The call acceptance/announcement for the contact applies to each of the contact's four possible telephone numbers.
Switching this on/off can be done as follows:
• Via the configuration manager
• Via the telephone menu
Switching Specific Call Acceptance/Announcement for Telephone Book Contacts On/Off via Configuration Manager
Requirements:
- Configuration manager, open with a sufficient authority level
- Open the page Answering machine > Global.
- Select or clear the Specific announcements for telephone book entries check box.
☑ Enables the specific call acceptance/announcement for telephone book contacts.
□ Disables the specific call acceptance/announcement for telephone book contacts.
- Click Execute.
Switching Specific Call Acceptance/Announcement for Telephone Book Contacts On/Off via Telephone Menu
Requirements:
– Knowledge of the telephone and its menu options and the required PIN, if necessary
- Press the menu key and open the menu answer.machine > settings > ph.book announced..
- Select or clear the ph.book announc. check box.
☑ Enables the specific call acceptance/announcement for telephone book contacts.
□ Disables the specific call acceptance/announcement for telephone book contacts.
- Press the softkey to accept the setting.
Accepting Telephone Numbers from Dial Preparation
If you would like to enter telephone numbers from different lists (caller, calls, redial list) into the telephone book, you can accept them directly from dial preparation.
Accepting can be carried out as follows:
• Via the telephone menu
Requirements:
– Knowledge of the telephone and its menu options
After accepting or entering a telephone number in dial preparation, proceed as described in the following.
- Press the ☐ softkey in order to accept the telephone number into the telephone book.
- Enter the name of the contact. The following entries are possible:
Up to 16 digits
Digits and characters
- Press the softkey to save the entry.
- Select the desired option:
Enters the telephone number as a business telephone number.
Enters the telephone number as a private telephone number.
Enters the telephone number as a mobile telephone number.
▶ Enters the telephone number as a call macro.
- Change the telephone number, if necessary.
- Press the softkey to save the entry.
Accepting Telephone Numbers into Other Menus
Before entering a telephone number in a menu (for example, when configuring a speed dialling key, a scheduled call with dial preparation or call forwarding for subscribers), you can select the desired telephone numbers in the telephone book. If you have already entered any codes, the telephone number from this telephone book entry is added at the end.
Accepting can be carried out as follows:
• Via the telephone menu
Requirements:
– Knowledge of the telephone and its menu options
After opening a menu for entering telephone numbers, proceed as described in the following.
- Press the telephone book key.
- Scroll to the desired contact or enter the first letter of the desired contact into the keypad.
The default telephone number is displayed. If there are multiple entries for a contact, this will be the telephone number last dialled or entered.
- Press the +: softkey to accept the telephone number in the menu for the telephone number entry.
- Press the softkey to save the entry.
Note: The name is also accepted – if it is needed in the menu for the function in question.
Configuring Displayed Telephone Number Range for Telephone Book
If you would like to prevent too many entries from being displayed in the telephone book, you can restrict the display of the various telephone number ranges. The following areas can be selected:
- Emergency numbers (emergency numbers configured in the PBX)
- Internal telephone numbers (internal telephone numbers configured in the PBX)
- PBX telephone book (telephone book entries/short-code numbers configured in the PBX)
- Local telephone book (telephone book entries you have configured in the telephone yourself)
The configuration can be made as follows:
• Via the configuration manager
• Via the telephone menu
Configuring Displayed Telephone Number Range for Telephone Book via Configuration Manager
Requirements:
- Configuration manager, open with a sufficient authority level
- Open the page Settings/functions > Lists/data.
- Click the Telephone book tab.
- Select or clear the check box for the number ranges listed on the tab.
☑ The telephone number range in question is displayed in the telephone book.
☐ The telephone number range in question is not displayed in the telephone book.
- Click Execute.
Configuring Displayed Telephone Number Range for Telephone Book via Telephone Menu
Requirements:
– Knowledge of the telephone, its menu options and the required PIN, if necessary
- Press the menu key and open the menu settings > lists.
- Select phone book.
Note: To open this menu, you can also press the telephone book key for approx. 3 seconds in the idle state of the telephone.
- Select or clear the check box for the telephone number ranges on the list.
☑ The telephone number range in question is displayed in the telephone book.
☐ The telephone number range in question is not displayed in the telephone book.
- Press the softkey to accept the setting.
Exporting the Telephone Book
The export can be carried out as follows:
• Via the configuration manager
Requirements:
-
An open configuration manager
– Existing entries in the telephone book -
Open the page Telephone book > Import/export.
- Click Export.
All the data is transferred to a new page. There, it is arranged in rows and separated by semicolons. All of the settings made for the contact are exported.
-
Select the data (for example, with your mouse or using Ctrl+A).
-
Copy the data to the clip board (for example, using Ctrl+C).
The text data can then be transferred from the clip board to the desired external program for further processing.
Note: You can leave the new page with the transferred data by clicking a topic area in the directory tree.
Importing the Telephone Book
This function enables you to import a telephone book that had previously been exported out of another system telephone into the telephone book on an identical model. All of the settings made for the contact are imported.
The import can be carried out as follows:
• Via the configuration manager
Requirements:
– An open configuration manager
- A telephone book saved on the hard drive as a text file (e.g., *.txt, *.csv), data arranged in rows and separated by semicolons
- Open the page Telephone book > Import/export.
- Click Browse (this text is dependent on the operating system used).
A file selection dialogue opens.
- Select the file to be imported and click Open (this text is dependent on the operating system used).
- Click Import.
The telephone book is saved in the telephone.
Redial List
The last 30 telephone numbers dialled are saved in the redial list. For more than 30 telephone numbers dialled, the oldest entry is overwritten. The telephone numbers are saved along with number of dialling operations, date and time of dialling (for multiple dialling operations, the date/time of the last attempt).
Opening the Redial List
Opening can be carried out as follows:
• Via the telephone menu
Requirements:
– Knowledge of the telephone and its menu options
- At least one entry in the list
1. Press the redial key.
The redial list is now opened. The entry with the telephone number dialled previously is displayed.
The following information about the entry is shown on the display:
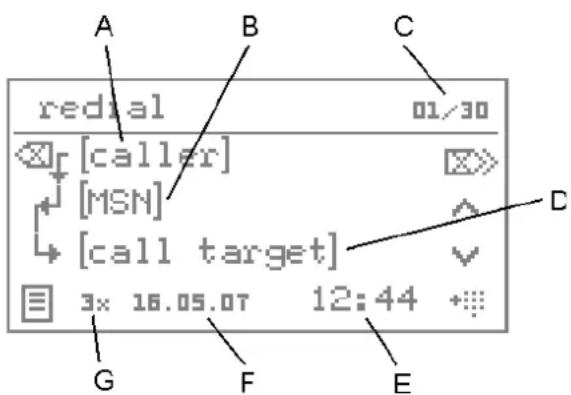
text_image
redial 01/30 [caller] [MSN] [call target] 3x 16.05.07 12:44 G F EA C a l l e r
B Outbound MSN used for the call
C Consecutive number of entries/number of existing entries
Note: The latest entry is displayed with consecutive number 1.
D Call target
E Time of last attempt
F Date of last attempt
G Number of attempts
2. Select the desired option:
☒ Deletes the entry shown.
☒ Deletes the callback shown.
☒» Deletes the entire redial list.
This opens the short overview.
^ Scrolls to the next entry.
√ Scrolls to the previous entry.
Accepts the entry into dial preparation or into the telephone book, if applicable.
Dialling from Redial List
Dialling can be carried out as follows:
• Via the telephone menu
Requirements:
– Knowledge of the telephone and its menu options
- Open the redial list.
The last telephone number dialled is displayed.
Note: If you have already picked up the receiver when you press the redial key, the telephone number dialled last is immediately dialled.
-
Scroll to the desired entry or press the redial key several times.
-
Pick up the receiver or press the hook key.
The subscriber is called.
Note: If you would like to exit the menu without dialling the telephone number displayed, press the exit key.
Deleting Entries in Redial List
Deleting can be carried out as follows:
• Via the telephone menu
Requirements:
– Knowledge of the telephone and its menu options
-
Open the redial list.
The last telephone number dialled is displayed. -
Press the softkey to the delete the entry shown.
Note: In order to delete the entire redial list, press the ➕ softkey and confirm the action. Or you can delete the entire redial list via the function menu using functions > delete data > redial list.
Configuring Calls to be Recorded for Redial List
If you would like to prevent too many entries from being entered in the redial list, you can configure the list in relation to the calls to be recorded. The following calls can be selected:
- External calls
-
Internal calls
-
Door terminal calls
- Other calls
The configuration can be made as follows:
• Via the configuration manager
• Via the telephone menu
Configuring Calls to be Recorded for Redial List via Configuration Manger
Requirements:
- Configuration manager, open with a sufficient authority level
- Open the page Settings/functions > Lists/data.
- Click the Redial list tab.
-
Select or clear the check box for the call types listed on the tab.
☑ The call type in question is entered on the redial list.
☐ The call type in question is not entered on the redial list. -
Click Execute.
Configuring Calls to be Recorded for Redial List via Telephone Menu
Requirements:
– Knowledge of the telephone and its menu options and the required PIN, if necessary
- Press the menu key and open the menu settings > lists
- Select redial list.
- Select or clear the check box for the types of call entered on the list.
☑ The call type in question is entered on the redial list.
☐ The call type in question is not entered on the redial list.
- Press the softkey to accept the setting.
Calls List
The calls made (incoming and outgoing) are saved in the calls list of the telephone along with the telephone number of the communication partner as well as date, time and duration of the call. A maximum of 30 calls can be saved. For more than 30 calls, the oldest entry is overwritten. A previous communication partner can called directly from the calls list.
Opening the Calls List
Opening can be carried out as follows:
• Via the telephone menu
Requirements:
– Knowledge of the telephone and its menu options and the required PIN, if necessary
- At least one entry in the list
You can open the calls list by pressing a function key configured for this purpose.
In addition, you can also open the calls list via the telephone menu Functions > calls list.
Or, proceed as described in the following.
- Press the 2 softkey to change from the idle state into the second level.
- Select calls list.
The call conducted last is displayed.
The following information about the entry is shown on the display:
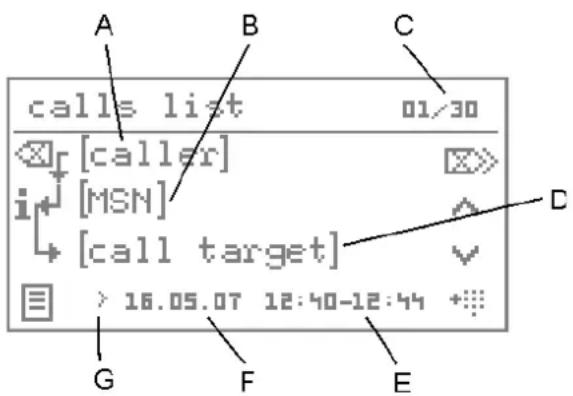
text_image
calls list 01/30 [caller] [MSN] [call target] > 16.05.07 12:40-12:44 G F E C DA Caller (communication partner)
B Outbound MSN used for an external call, external call target/exchange line number called (for an external inbound call) or project number
C Consecutive number of entries/number of existing entries
Note: The latest entry is displayed with consecutive number 1.
D Call target (communication partner)
E Time of the call
F Date of the call
G Type of call: external outgoing ( ), external incoming ( ), internal outgoing ( ) and internal incoming ( )
3. Select the desired option:
☒ Deletes the entry shown.
☒ Deletes the entire calls list.
i ^d Indicates additional information, if available.
目 This opens the short overview.
^ Scrolls to the next entry.
√ Scrolls to the previous entry.
Accepts the entry into dial preparation or into the telephone book, if applicable.
Dialling from Calls List
Dialling can be carried out as follows:
• Via the telephone menu
Requirements:
– Knowledge of the telephone and its menu options and the required PIN, if necessary
1. Open the calls list.
The call conducted last is displayed.
- Scroll to the desired entry.
- Pick up the receiver or press the hook key.
The subscriber is called.
Note: If you would like to exit the menu without dialling the telephone number entered, press the exit key.
Deleting Entries in Calls List
Deleting can be carried out as follows:
• Via the telephone menu
Requirements:
- Knowledge of the telephone and its menu options and the required PIN, if necessary
- Open the calls list.
The call conducted last is displayed. - Press the softkey to the delete the entry shown.
Note: In order to delete the entire calls list, press the ➕ softkey and confirm the action. Or you can delete the entire calls list via the function menu using Functions > delete data > calls list.
Configuring and Operating Function Key for Calls List
Press the key while the telephone is in the idle state to open the calls list.
LED signalling next to the key:
None
The configuration can be carried out as follows:
• Via the configuration manager
• Via the telephone menu
Configuring Function Key for Calls List via Configuration Manager
Requirements:
- Configuration manager, open with a sufficient authority level
- Open the page Function keys > Assign function keys.
- Only available in installed extension modules: In the telephone displayed at the top left, click the key group in which you would like to define keys.
- Click one of the following tabs:
Level 1: Keys are defined on the first key level.
Level 2: Keys are defined on the second key level.
- In the list field next to the function key that you would like to define, select the function Calls list.
The current settings for defining the key are displayed.
- In the Key name entry field, enter a name for the key. The following entries are possible:
Up to 16 digits
Digits and characters
Note: The key name is used for printing the label.
- Click Execute.
Configuring Function Key for Calls List via Telephone Menu
Requirements:
- Knowledge of the telephone and its menu options and the required PIN, if necessary
- Press the menu key and open the define keys menu.
- Press the function key that you would like to define.
- Select the desired option:
first level: Keys are defined on the first key level.
second level: Keys are defined on the second key level.
The list of available functions is displayed.
- Select the calls list function.
- Press the softkey to accept the setting.
Configuring Calls to be Recorded for Calls List
If you would like to prevent too many entries from being entered in the calls list, you can configure the calls list in relation to the calls to be recorded. The following calls can be selected:
- External calls without telephone numbers
• External calls with telephone numbers - Internal calls
- Alarm calls
- Door terminal calls
- Other calls
The configuration can be made as follows:
• Via the configuration manager
• Via the telephone menu
Configuring Calls to be Recorded for Calls List via Configuration Manager
Requirements:
- Configuration manager, open with a sufficient authority level
- Open the page Settings/functions > Lists/data.
- Click the Calls list tab.
- Select or clear the check box for the call type listed on the page.
☑ The call type in question is entered in the calls list.
☐ The call type in question is not entered in the calls list.
- Click Execute.
Configuring Calls to be Recorded for Calls List via Telephone Menu
Requirements:
- Knowledge of the telephone and its menu options and the required PIN, if necessary
- Press the menu key and open the menu settings > lists.
- Select calls list.
-
Select or clear the check box for the types of calls entered on the list.
☑ The call type in question is entered in the calls list.
☐ The call type in question is not entered in the calls list. -
Press the softkey to accept the setting.
Caller List
Telephone numbers of calls not accepted are saved in the caller list of the telephone, along with the number of call attempts as well as the date and time of the call (for multiple call attempts, date/time of the last call attempt). A maximum of 30 telephone numbers can be saved. If more than 30 calls from various telephone numbers come in, the oldest entry is overwritten.
A caller be called back directly from the caller list.
The LED above the message key indicates whether entries are present on the caller list.
Opening the Caller List
Opening can be carried out as follows:
• Via the telephone menu
Requirements:
– Knowledge of the telephone and its menu options and the required PIN, if necessary
- At least one entry in the list
You can open the caller list by pressing a function key configured for this purpose.
In addition, you can also open the caller list via the telephone menu functions > caller list.
Or, proceed as described in the following.
1. Press the message key.
The available lists are displayed. To the right next to the selection of lists, the respective numbers of existing recordings and calls are displayed.
2. Select caller list to open the caller list (this is skipped if the other lists are empty).
The last received call is displayed.
The following information about the entry is shown on the display:
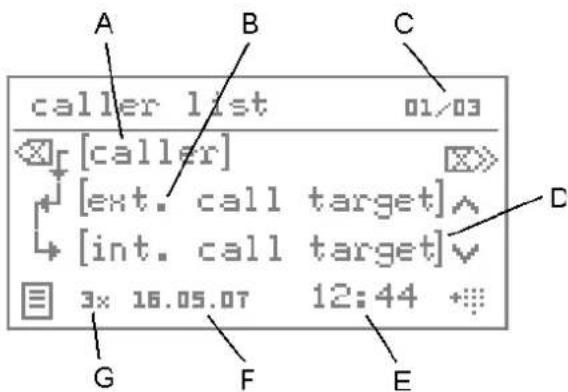
text_image
A b c caller list 01/03 [caller] [ext. call target] [int. call target] 3: 16.05.07 12:44 G F EA C a l l e r
B External call target/exchange line number called (for an external call)
C Consecutive number of entries/number of existing entries
Note: The latest entry is displayed with consecutive number 1.
D Internal call target
E Time of last attempt
F Date of last attempt
G Number of attempts
- Select the desired option:
☒ Deletes the entry shown.
☒ Deletes the entire caller list.
This opens the short overview.
▲ Scrolls to the next entry.
√ Scrolls to the previous entry.
Accepts the entry into dial preparation or into the telephone book, if applicable.
Dialling from Caller List
Dialling can be carried out as follows:
• Via the telephone menu
Requirements:
– Knowledge of the telephone and its menu options and the required PIN, if necessary
- Open the caller list.
The last incoming call is displayed.
-
Scroll to the desired entry or press the message key several times.
-
Pick up the receiver or press the hook key.
The subscriber is called.
Note:
If you would like to exit the menu without dialling the telephone number displayed, press the exit key.
As soon as a connection (incoming or outgoing) has been established with the caller, the telephone number in question is deleted from the caller list. If this is a group called, the telephone number is also deleted from the caller lists of the other members of the group. (can be configured using the configuration manager on the PBX. Group-wide deletion does not occur if the person calling back has already deleted his caller list or has been called again by the same caller on his subscriber telephone number.
Deleting Entries in Caller List
Deleting can be carried out as follows:
• Via the telephone menu
Requirements:
– Knowledge of the telephone and its menu options and the required PIN, if necessary
- Open the caller list.
The last incoming call is displayed.
- Press the softkey to the delete the entry shown.
Note: In order to delete the entire caller list, press the ➕ softkey and confirm the action. Or you can delete the entire caller list via the function menu using Functions > delete data > caller list.
Configuring and Operating Function Key for Caller Lists
Press the key while the telephone is in the idle state to open the caller list.
In addition, when functions are defined on the first key level, the status of the caller list is indicated by the corresponding LED.
LED signalling next to the key:
Green There are no new entries. All of the entries in the list have been viewed, but have not yet been deleted.
Green (blinking) The list contains new entries that have not yet been viewed.
off The list is empty.
The configuration can be carried out as follows:
• Via the configuration manager
• Via the telephone menu
Configuring Function Key for Caller List via Configuration Manager
Requirements:
- Configuration manager, open with a sufficient authority level
- Open the page Function keys > Assign function keys.
-
Only available in installed extension modules: In the telephone displayed at the top left, click the key group in which you would like to define keys.
-
Click one of the following tabs:
Level 1: Keys are defined on the first key level.
Level 2: Keys are defined on the second key level.
- In the list field next to the function key that you would like to define, select the function Caller list.
The current settings for defining the key are displayed.
- In the Key name entry field, enter a name for the key. The following entries are possible:
Up to 16 digits
Digits and characters
Note: The key name is used for printing the label.
- Click Execute.
Configuring Function Key for Caller List via Telephone Menu
Requirements:
– Knowledge of the telephone and its menu options and the required PIN, if necessary
- Press the menu key and open the define keys menu.
- Press the function key that you would like to define.
- Select the desired option:
first level: Keys are defined on the first key level.
second level: Keys are defined on the second key level.
The list of available functions is displayed.
- Select the caller list function.
- Press the softkey to accept the setting.
Configuring Calls to be Recorded for Caller List
If you would like to prevent too many entries from being entered in the caller list, you can configure the list in relation to the calls to be recorded. The following calls can be selected:
- External calls without telephone numbers
• External calls with telephone numbers - Internal calls
- Alarm calls
- Door terminal calls
- Calls accepted by another subscriber
- Other calls
The configuration can be made as follows:
• Via the configuration manager
• Via the telephone menu
Configuring Calls to be Recorded for Caller List via Configuration Manager
Requirements:
- Configuration manager, open with a sufficient authority level
- Open the page Settings/functions > Lists/data.
- Click the Caller list tab.
-
Select or clear the check box for the call type listed on the page.
☑ The call type in question is entered on the caller list.
☐ The call type in question is not entered on the caller list. -
Click Execute.
Configuring Calls to be Recorded for Caller List via Telephone Menu
Requirements:
– Knowledge of the telephone and its menu options and the required PIN, if necessary
- Press the menu key and open the menu settings > lists.
- Select caller list.
- Select or clear the check box for the types of call entered on the list.
☑ The call type in question is entered on the caller list.
☐ The call type in question is not entered on the caller list.
- Press the softkey to accept the setting.
Configuring the LED Message Key
While in the idle state, the LED above the message key indicates the state of the list/s available over the message key.
- LED is flashing: The list contains new entries that have not yet been viewed.
- LED lights up: There are no new entries. All of the entries in the list have been viewed, but have not yet been deleted.
If the LED signalling is disruptive or bothersome, it can be switched off.
The configuration can be carried out as follows:
• Via the configuration manager
• Via the telephone menu
Configuring LED Message Key via Configuration Manager
Requirements:
- Configuration manager, open with a sufficient authority level
- Open the page Settings/functions > Signalling/ringer.
- Under Message LED, select one of the following options:
flashing/always on: Switches on LED signalling.
flashing/off: Switches on LED signalling only for new entries that have not yet been viewed.
always off: Switches off LED signalling.
- Click Execute.
Configuring LED Message Key via Telephone Menu
Requirements:
– Knowledge of the telephone, its menu options and the required PIN, if necessary
- Press the menu key and open the menu settings > signalling > message LED.
The icon indicates the current setting.
- Select the desired option:
flashing + on: Switches on LED signalling.
flashing only: Switches on LED signalling only for new entries that have not yet been viewed.
LED always off: Switches off LED signalling.
Configuring and Operating Functions
This section describes how to set up and operate the functions on your telephone. Descriptions are given on what the functions do, how to operate them and – if possible – how to define these functions on programmable function keys.
In most cases, configuration can be carried out in two different ways:
- Configuration via the telephone menu
- Configuration via the configuration manager
Topics
– Automatic Call Acceptance (page 141)
– Boss/Secretary Function (page 146)
- Call Deblocker (Incoming) – VIP Numbers (page 153)
- Call Forwarding (page 157)
- Call Restrictor (Incoming) – Robinson Numbers (page 178)
- Call Waiting (page 181)
- Configuration Switchover (page 186)
- Do-not-disturb (page 190)
- Door Functions (page 195)
– Exchange Line Transfer (page 202)
- Follow me (page 205)
– Free Seating (page 208)
- Group Functions (page 214)
- Hotel Function (page 226)
- InterCom Announcement/Handsfree (page 241)
– Loudspeaker Audio Out (page 252)
- Macro (page 256)
- Memo (page 262)
- Phone Lock (page 264)
- Pickup (page 267)
– Power Dialling (page 271)
- Power Save Mode (page 274)
– Project Assignment (page 280)
- Relays (page 289)
– Room Monitoring (page 293)
– Scheduled Call (page 296)
- Speed Dialling (page 304)
– Targeted Exchange Line Access (page 310)
- Targeted VoIP Access Point (page 314)
– Text before Answering (page 318)
– Voicemail Center 461/461.2 (page 322)
- Waiting Field Function (page 329)
Automatic Call Acceptance
Automatic call acceptance facilitates headset operation at call centers or on hotlines. An incoming call is automatically accepted after a configured amount of time. Call acceptance is signalled by an attention tone.
Switching Automatic Call Acceptance On/Off
Switching this on/off can be done as follows:
• Via the telephone menu
Requirements:
– Knowledge of the telephone, its menu options and the required PIN, if necessary
- Headset operation enabled
Press the function Key configured for automatic call acceptance to switch automatic call acceptance on or off.
Or, proceed as described in the following.
- Press the menu key and open the menu functions > auto call accept.
The ♦con indicates the current setting.
- Select the desired option:
switch on: Enables automatic call acceptance.
switch off: Disables automatic call acceptance.
Note: Switching on automatic call acceptance automatically switches off the readiness of answering machine in a telephone. On the other hand, switching on the readiness of answering machine automatically switches off automatic call acceptance.
Configuring and Operating Function Key for Automatic Call Acceptance
Press the key to switch the automatic call acceptance function on or off or to switch it over.
In addition, when functions are defined on the first key level, the status of the function is indicated by the corresponding LED.
LED signalling next to the key:
Green Automatic call acceptance is enabled.
Off Automatic call acceptance is disabled.
The configuration can be carried out as follows:
• Via the configuration manager
• Via the telephone menu
Configuring Function Key for Automatic Call Acceptance via Configuration Manager
Requirements:
- Configuration manager, open with a sufficient authority level
- Open the page Function keys > Assign function keys.
- Only available in installed extension modules: In the telephone displayed at the top left, click the key group in which you would like to define keys.
-
Click one of the following tabs:
Level 1: Keys are defined on the first key level.
Level 2: Keys are defined on the second key level. -
In the list field next to the function key that you would like to define, select the function Automatic call acceptance.
The current settings for defining the key are displayed.
- In the Kind of switching list field, select one of the following options:
switch off: Press the key to disable automatic call acceptance.
switch on: Press the key to enable automatic call acceptance. At the same time, the readiness of answering machine in a telephone is disabled.
switch over: Press the key to switch automatic call acceptance over.
- In the Key name entry field, enter a name for the key. The following entries are possible:
Up to 16 digits
Digits and characters
Note: The key name is used for printing the label.
- Click Execute.
Requirements for operating the function:
- Headset operation enabled
Configuring Function Key for Automatic Call Acceptance via Telephone Menu
Requirements:
- Knowledge of the telephone, its menu options and the required PIN, if necessary
- Press the menu key and open the define keys menu.
- Press the function key that you would like to define.
- Select the desired option:
first level: Keys are defined on the first key level.
second level: Keys are defined on the second key level.
The list of available functions is displayed.
- Select the auto call accept function.
The current settings for defining the key are shown on the display.
- Select the kind of switching. Press the ⬆ softkey to switch over between the different kinds of switching.
switch off: Press the key to disable automatic call acceptance.
switch on: Press the key to enable automatic call acceptance. At the same time, the readiness of answering machine in a telephone is disabled.
switch over: Press the key to switch automatic call acceptance over.
- Press the softkey to accept the setting.
Requirements for operating the function:
- Headset operation enabled
Attention Tone for Switching Automatic Call Acceptance On/Off
If the attention tone for automatic call acceptance is switched on, the automatic call acceptance of a currently incoming call is signalled by an attention tone. If the attention tone bothers you, you can switch it off. The volume of the attention tone is dependent on the configured ringer volume.
Switching this on/off can be done as follows:
• Via the configuration manager
• Via the telephone menu
Switching Attention Tone for Automatic Call Acceptance On/Off via Configuration Manager
Requirements:
- Configuration manager, open with a sufficient authority level
- Open the page Settings/functions > Headset.
- Select or clear the Attention tone check box under Automatic call acceptance.
☑ Enables the attention tone for automatic call acceptance.
□ Disables the attention tone for automatic call acceptance.
- Click Execute.
Switching Attention Tone for Automatic Call Acceptance On/Off via Telephone Menu
Requirements:
- Knowledge of the telephone, its menu options and the required PIN, if necessary
- Press the menu key and open the menu settings > headset > auto call accept > indicator tone.
- Select or clear the indicator tone check box.
☑ Enables the attention tone for automatic call acceptance.
□ Disables the attention tone for automatic call acceptance.
- Press the softkey to accept the setting.
Configuring Call Acceptance Time for Automatic Call Acceptance
The call acceptance time for automatic call acceptance indicates after how many seconds an incoming call is automatically accepted.
The configuration can be made as follows:
• Via the configuration manager
• Via the telephone menu
Configuring Call Acceptance Time for Automatic Call Acceptance via Configuration Manager
Requirements:
- Configuration manager, open with a sufficient authority level
- Open the page Settings/functions > Headset.
- Enter a value in the Call acceptance time (in seconds) entry field under Automatic call acceptance. The following entries are possible:
0 to 30: After 0 to 30 minutes, an incoming call is automatically accepted, depending on the entry. - Click Execute.
Configuring Call Acceptance Time for Automatic Call Acceptance via Telephone Menu
Requirements:
- Knowledge of the telephone, its menu options and the required PIN, if necessary
- Press the menu key and open the menu settings > headset > auto call accept > call accept time.
- Enter a value. The following entries are possible:
0 to 30: After 0 to 30 minutes, an incoming call is automatically accepted, depending on the entry. - Press the softkey to save the entry.
Boss/Secretary Function
The boss/secretary function protects the boss telephone from direct calls by rerouting them to the secretary. The most important difference from call forwarding is that the boss telephone can still be called from the secretary telephone and the secretary can still transfer important calls to the boss telephone.
Procedure when Calling the Boss Telephone
If the boss/secretary function has been switched on, calls to the boss telephone are made as follows:
- All internal and external calls (also call through) as well as door calls and callbacks initiated by the caller are rerouted to the secretary's telephone in question. The following types of calls are not rerouted to the secretary's telephone even when the boss/secretary function has been switched on:
- Alarm calls
- Scheduled calls
- InterCom calls (if permitted)
- Wake-up calls
– Callbacks initiated from the boss telephone - Callbacks after a system software update
– Repeated calls from the boss telephone after an exchange transfer
Important: When the boss/secretary function is switched on, incoming calls are also rerouted to the secretary when the functions do-not-disturb, call restrictor incoming or call forwarding for subscribers are enabled on the boss telephone. On the other hand, a call from the secretary to the boss telephone is rerouted if call forwarding is enabled or signals busy if do-not-disturb is enabled.
- The rerouted calls are shown on the display of the boss telephone and can be accepted by pressing the secretary key (pick-up).
- If a rerouted call is picked up on the secretary's telephone, the call can be treated normally. If multiple boss keys have been programmed, the red blinking LED lights up next to the boss key indicating the boss telephone it is assigned to.
Note: On the secretary's telephone, in addition to the boss key, it is also a good idea to configure a speed dialling key for the phone number of the boss telephone in order to keep track of whether it is busy or not.
- It is possible to initiate a query call to the boss telephone or to forward a call to the boss telephone by pressing a boss key on the secretary's telephone.
Note: In order to recognise a call coming from the secretary's telephone, the secretary's telephone number can be entered into the telephone book on the boss telephone and assigned a specific ringer rhythm.
Switching Boss/Secretary Function on Boss Telephone On/Off
Switching this on/off can be done as follows:
• Via the telephone menu
Requirements:
- Knowledge of the telephone, its menu options and the required PIN, if necessary
– A secretary key configured on the boss telephone - A suitably configured boss key on the secretary telephone
- Press the function key configured as the secretary key.
Configuring and Operating Secretary Key on Boss Telephone
Note:
It is not possible to configure boss keys and secretary keys to exist simultaneously on the same telephone; this means that a telephone cannot be both a boss telephone and a secretary telephone at the same time.
A maximum of one secretary key can be configured on a boss telephone. Multiple secretary telephones must be linked in a group.
Press the key while in the telephone's idle state to switch the boss/secretary function on or off.
During an incoming call, rerouted calls are shown on the display of the boss telephone. Press the secretary key to pick up this call.
In addition, the corresponding LED indicates the status of the function.
LED signalling next to the secretary key:
Green The boss/secretary function is enabled. The secretary telephone is currently not being used for a call. Press the key to switch the boss/secretary function on and off.
Red (blinking) The boss/secretary function is enabled. A call has just been forwarded to the associated secretary. Press the key to initiate a pick-up.
Red The boss/secretary function is enabled. The associated secretary is not available. In this case, a caller hears a busy signal unless call waiting is enabled on the secretary telephone. If the boss/secretary function is still enabled for additional telephones, the call is rerouted to one of them.
Off The boss/secretary function is disabled. Press the key to enable the boss/secretary function.
The configuration can be carried out as follows:
• Via the configuration manager
• Via the telephone menu
Configuring Secretary Key on Boss Telephone via Configuration Manager
Requirements:
- Configuration manager, open with a sufficient authority level
- Open the page Function keys > Assign function keys.
- Only available in installed extension modules: In the telephone displayed at the top left, click the key group in which you would like to define keys.
- Click the Level 1 tab.
Important: Configuring this function is only possible on the first level.
- In the list field next to the function key that you would like to define, select the Secretary key function.
The current settings for defining the key are displayed.
- In the Telephone number entry field, enter the internal telephone number for the secretary telephone.
- In the Key name entry field, enter a name for the key. The following entries are possible:
Up to 16 digits
Digits and characters
Note: The key name is used for printing the label and for display.
- Click Execute.
Requirements for operating the function:
– A suitably configured boss key on the secretary telephone
Configuring Secretary Key for Boss Telephone via Telephone Menu
Requirements:
- Knowledge of the telephone, its menu options and the required PIN, if necessary
- Press the menu key and open the define keys menu.
- Press the function key that you would like to define.
- Select first level.
Important: Configuring this function is only possible on the first level.
The list of available functions is displayed.
- Select the secretary key function.
The current settings for defining the key are shown on the display.
- Press the softkey.
-
Select an internal phone number on the PBX to be the secretary telephone.
-
Press the softkey.
- Enter a name for the phone number. The following entries are possible:
Up to 16 digits
Digits and characters
- Press the softkey to accept the setting.
Requirements for operating the function:
– A suitably configured boss key on the secretary telephone
Configuring and Operating Boss Key on Secretary Telephone
Note:
It is not possible to configure boss keys and secretary keys to exist simultaneously on the same telephone; this means that a telephone cannot be both a boss telephone and a secretary telephone at the same time.
A maximum of five boss keys can be configured on one telephone.
Press the key to initiate a call or a callback to the corresponding boss telephone.
In addition, the corresponding LED indicates the status of the function.
LED signalling next to the boss key:
Green The boss/secretary function is enabled.
Red (blinking) The boss/secretary function is enabled. The call received has been forwarded to the corresponding boss telephone. Press the key to initiate a call back on the boss telephone.
Off The boss/secretary function is disabled.
The configuration can be carried out as follows:
• Via the configuration manager
• Via the telephone menu
Configuring Boss Key on Secretary Telephone via Configuration Manager
Requirements:
- Configuration manager, open with a sufficient authority level
- Open the page Function keys > Assign function keys.
- Only available in installed extension modules: In the telephone displayed at the top left, click the key group in which you would like to define keys.
- Click the Level 1 tab.
Important: Configuring this function is only possible on the first level.
- In the list field next to the function key that you would like to define, select the Boss key function.
The current settings for defining the key are displayed.
-
In the Telephone number entry field, enter the internal telephone number for the boss telephone.
-
In the Key name entry field, enter a name for the key. The following entries are possible:
Up to 16 digits
Digits and characters
Note: The key name is used for printing the label and for display.
7. Click Execute.
Requirements for operating the function:
– A suitably configured secretary key on the boss telephone
Configuring Boss Key on Secretary Telephone via Telephone Menu
Requirements:
- Knowledge of the telephone, its menu options and the required PIN, if necessary
- Press the menu key and open the define keys menu.
- Press the function key that you would like to define.
- Select first level.
Important: Configuring this function is only possible on the first level.
The list of available functions is displayed.
- Select the boss key function.
The current settings for defining the key are shown on the display.
- Press the softkey.
- Select an internal phone number on the PBX to be the boss telephone.
- Press the softkey.
- Enter a name for the phone number. The following entries are possible:
Up to 16 digits
Digits and characters
- Press the softkey to accept the setting.
Requirements for operating the function:
– A suitably configured secretary key on the boss telephone
Call Deblocker (Incoming) – VIP Numbers
If you would still like to allow specific people to call you despite enabling the do-not-disturb function, the external telephone numbers (VIP numbers) of these people can be assigned a call deblocker for incoming calls in the PBX. The call deblocker which applies to all subscribers can be enabled on your own telephone as needed. If the call deblocker is enabled, the do-not-disturb function does not apply to callers who use one of the VIP numbers.
Switching Call Deblocker (Incoming) On/Off
Switching this on/off can be done as follows:
• Via the telephone menu
Requirements:
– Knowledge of the telephone, its menu options and the required PIN, if necessary
- A call deblocker configured on the PBX and assigned to the subscriber
– Authorisation in the PBX for Controlling of the PBX via telephone
- Kind of do-not-disturb configured to all (PBX)
In order to activate or deactivate the call deblocker, press the function key configured for the call deblocker (incoming).
Or, proceed as described in the following.
- Press the menu key and open the menu functions > Call Deblocker.
The icon indicates the current setting.
- Select the desired option:
switch on: Enables the call deblocker.
switch off: Disables the call deblocker.
Configuring and Operating Function Key for Call Deblocker (Incoming)
Press the key to switch the subscriber's call deblocker on or off or to switch it over.
In addition, when functions are defined on the first key level, the status of the function is indicated by the corresponding LED.
LED signalling next to the key:
Green The call deblocker is enabled.
Off The call deblocker is disabled.
The configuration can be carried out as follows:
• Via the configuration manager
• Via the telephone menu
Configuring Function Key for the Call Deblocker (Incoming) via Configuration Manager
Requirements:
- Configuration manager, open with a sufficient authority level
- Open the page Function keys > Assign function keys.
- Only available in installed extension modules: In the telephone displayed at the top left, click the key group in which you would like to define keys.
-
Click one of the following tabs:
Level 1: Keys are defined on the first key level.
Level 2: Keys are defined on the second key level. -
In the list field next to the function key that you would like to define, select the Call Deblocker (incoming) - VIP no. function.
The current settings for defining the key are displayed.
- In the Kind of switching list field, select one of the following options:
switch off: Pressing the key disables the call deblocker.
switch on: Pressing the key enables the call deblocker.
switch over: Pressing the key switches the call deblocker on and off.
- In the Key name entry field, enter a name for the key. The following entries are possible:
Up to 16 digits
Digits and characters
Note: The key name is used for printing the label.
- Click Execute.
Requirements for operating the function:
- A call deblocker configured on the PBX and assigned to the subscriber
– Authorisation in the PBX for Controlling of the PBX via telephone - Kind of do-not-disturb configured to All (PBX)
Configuring Function Key for Call Deblocker (Incoming) via Telephone Menu
Requirements:
– Knowledge of the telephone, its menu options and the required PIN, if necessary
- Press the menu key and open the define keys menu.
- Press the function key that you would like to define.
- Select the desired option:
first level: Keys are defined on the first key level.
second level: Keys are defined on the second key level.
The list of available functions is displayed.
- Select the Call Deblocker function.
The current settings for defining the key are shown on the display.
- Select the kind of switching. Pressing the ⬆ softkey allows you to switch over between the different kinds of switching.
switch off: Pressing the key disables the call deblocker.
switch on: Pressing the key enables the call deblocker.
switch over: Pressing the key switches the call deblocker on and off.
- Press the softkey to accept the setting.
Configuring and Operating Functions
Call Deblocker (Incoming) – VIP Numbers
Configuring and Operating Function Key for Call Deblocker (Incoming)
Requirements for operating the function:
- A call deblocker configured on the PBX and assigned to the subscriber
– Authorisation in the PBX for Controlling of the PBX via telephone - Kind of do-not-disturb configured to all (PBX)
Call Forwarding
Call forwarding allows calls to be forwarded. When this is done, a difference is made between calls to a specific telephone (call forwarding for subscribers), to groups (call forwarding for groups) and to connections (call forwarding for external telephone numbers).
Call Forwarding Variations
Auerswald PBXs support three different kinds of call forwarding:
Call Forwarding for Subscribers
Important: Not available for operation on the PBX COMpact 3000.
When call forwarding (CF) for subscribers is used, internal and external calls to a single telephone can be rerouted to other internal telephones or external connections. In this way, the subscriber in question or his replacement can take these calls on another telephone.
Call forwarding for subscribers makes sure that the subscriber in question or his replacement is always available at his own phone number, even if the subscriber cannot take a call on his own telephone.
Important: Call forwarding for subscribers does not function for incoming group calls on your telephone. If you would like to prevent your telephone from ringing unanswered when calls to the group in which you belong come through, you need to log yourself out of the group or configure call forwarding for groups.
Note: If you would like to configure call forwarding for subscribers on the destination telephone, use the follow me function.
Call Forwarding for Groups
Important: Not available for operation on the PBX COMpact 3000.
When call forwarding for groups is used, internal and external calls to a group can be rerouted to other internal telephones or external connections. In this way, a person that is not a member of this group and therefore cannot log in, can receive these calls.
Call forwarding for groups makes sure that someone is always available on the group telephone number, even if the calls cannot be taken by a member of the group.
To configure call forwarding for groups, refer to the user manual for the PBX.
Call Forwarding for External Numbers
When call forwarding for external numbers is used, calls made to an external phone number (dialled by an external caller) are rerouted to other external connections. In this way, these calls can be taken on another telephone, for example, on a mobile phone if no one can take the call internally.
Call forwarding for external numbers can be configured for the current configuration or for the permanent configuration.
Note: If you would like to also forward internal calls, use call forwarding for subscribers or for groups instead of call forwarding for external numbers. This also allows forwarding to internal telephones.
Kinds of Call Forwarding
As there can be many different reasons for not accepting a call, for example, the subscriber in question is not present or is on another line, three kinds of call forwarding are provided:
CF unconditional
The telephone being called does not ring. The call is forwarded immediately.
CF on busy
The call is forwarded immediately but only if the telephone being called is busy.
CF on no reply
The telephone being called rings for a certain amount of time. If the call is not accepted, it is forwarded.
Note:
A different destination can be configured for each of the three kinds of call forwarding.
If "CF on busy" and "CF on no reply" are enabled at the same time, both kinds apply. Depending on which case occurs – the telephone is busy or nobody answers it – the call is forwarded to their respective telephone numbers.
If "CF unconditional" is enabled in addition to the "CF on busy" and/or "CF on no reply," all of the calls are forwarded immediately. In this case, the other kinds of call forwarding are overridden, but remain enabled. As soon as "CF unconditional" is disabled, the other kinds that are still enabled are again applicable.
Switching Call Forwarding for Subscribers On/Off
Switching this on/off can be done as follows:
• Via the telephone menu
Requirements:
- Knowledge of the telephone, its menu options and the required PIN, if necessary
– Authorisation in the PBX for Controlling of the PBX via telephone - For external destination numbers: Authorization assigned in the PBX for Configuring CF (sub) to ext. number
To enable or disable call forwarding for subscribers, press the function key configured for call forwarding (subscribers).
Or, proceed as described in the following.
- Press the menu key and open the menu functions > Call fwd.:scr.
- Select the desired option:
deactivate all: Disables all currently enabled call forwarding for subscribers.
(No other action is required.)
unconditional: Switches call forwarding unconditional for subscribers on or off.
on busy: Switches call forwarding on busy for subscribers on or off.
on no reply: Switches call forwarding on no reply for subscribers on or off.
The ♦con indicates the current setting.
3. Select the desired option:
switch on: Enables call forwarding for subscribers.
switch off: Disables call forwarding for subscribers. (No other action is required.)
Note: If you press the Telephone book key before entering the destination number, you can select the desired phone number from the telephone book.
4. Enter the destination number. The following entries are possible:
Up to 24 digits
Digits and the characters * and #
Important: Enter telephone numbers exactly as when dialling, for example, external telephone numbers always with a leading exchange line access number. (exception: direct exchange access). The default exchange line access number on the PBX is "0" in the factory settings; however, this can be changed for several PBXs (see the PBX manual).
5. Press the softkey to save the entry.
Configuring and Operating Function Key for Call Forwarding for Subscribers
Press the key to enable, disable and switch call forwarding for subscribers over.
Exception: A key that is defined to disable call forwarding for subscribers only disables the currently enabled call forwarding for subscribers.
In addition, when functions are defined on the first key level, the status of the function is indicated by the corresponding LED.
LED signalling next to the key (not applicable if defined with "deactivate all"):
Red Call forwarding for subscribers is enabled for the configured destination.
Yellow Call forwarding for subscribers is enabled for another destination.
Off Call forwarding for subscribers is disabled.
The configuration can be carried out as follows:
• Via the configuration manager
• Via the telephone menu
Configuring Function Key for Call Forwarding Unconditional for Subscribers via Configuration Manager
Requirements:
- Configuration manager, open with a sufficient authority level
- Open the page Function keys > Assign function keys.
-
Only available in installed extension modules: In the telephone displayed at the top left, click the key group in which you would like to define keys.
-
Click one of the following tabs:
Level 1: Keys are defined on the first key level.
Level 2: Keys are defined on the second key level.
- In the list field next to the function key that you would like to define, select the Subscriber CF immediately function.
The current settings for defining the key are displayed.
- In the Kind of switching list field, select one of the following options:
switch off: Pressing the key disables call forwarding unconditional for subscribers. (Entering the destination number is not required)
switch on: Pressing the key enables call forwarding unconditional for subscribers.
switch over: Pressing the key switches call forwarding unconditional for subscribers over.
- In the Telephone number entry field, enter the destination number. The following entries are possible:
Up to 24 digits
Digits and the characters * and #
- In the Telephone number list field, select one of the following options:
internal: Defines the destination number entered as an internal phone number.
external: Defines the destination number entered as an external phone number.
- In the Key name entry field, enter a name for the key. The following entries are possible:
Up to 16 digits
Digits and characters
Note: The key name is used for printing the label.
- Click Execute.
Requirements for operating the function:
– Authorisation in the PBX for Controlling of the PBX via telephone
- For external destination numbers: Authorization assigned in the PBX for Configuring CF (sub) to ext. number
Configuring Function Key for Call Forwarding on Busy for Subscribers via Configuration Manager
Requirements:
- Configuration manager, open with a sufficient authority level
- Open the page Function keys > Assign function keys.
- Only available in installed extension modules: In the telephone displayed at the top left, click the key group in which you would like to define keys.
- Click one of the following tabs:
Level 1: Keys are defined on the first key level.
Level 2: Keys are defined on the second key level.
- In the list field next to the function key that you would like to define, select the Subscriber CF on Busy function.
The current settings for defining the key are displayed.
- In the Kind of switching list field, select one of the following options:
switch off: Pressing the key disables call forwarding on busy for subscribers.
(Entering the destination number is not required)
switch on: Pressing the key enables call forwarding on busy for subscribers.
switch over: Pressing the key switches call forwarding on busy for subscribers off.
- In the Telephone number entry field, enter the destination number. The following entries are possible:
Up to 24 digits
Digits and the characters * and #
- In the Telephone number list field, select one of the following options:
internal: Defines the destination number entered as an internal phone number.
external: Defines the destination number entered as an external phone number.
- In the Key name entry field, enter a name for the key. The following entries are possible:
Up to 16 digits
Digits and characters
Note: The key name is used for printing the label.
- Click Execute.
Requirements for operating the function:
– Authorisation in the PBX for Controlling of the PBX via telephone
- For external destination numbers: Authorization assigned in the PBX for Configuring CF (sub) to ext. number
Configuring Function Key for Call Forwarding on No Reply for Subscribers via Configuration Manager
Requirements:
- Configuration manager, open with a sufficient authority level
-
Open the page Function keys > Assign function keys.
-
Only available in installed extension modules: In the telephone displayed at the top left, click the key group in which you would like to define keys.
- Click one of the following tabs:
Level 1: Keys are defined on the first key level.
Level 2: Keys are defined on the second key level.
- In the list field next to the function key that you would like to define, select the Subscriber CF on no Reply function.
The current settings for defining the key are displayed.
- In the Kind of switching list field, select one of the following options:
switch off: Pressing the key disables call forwarding on no reply for subscribers. (Entering the destination number is not required)
switch on: Pressing the key enables call forwarding on no reply for subscribers.
switch over: Pressing the key switches call forwarding on no reply for subscribers.
- In the Telephone number entry field, enter the destination number. The following entries are possible:
Up to 24 digits
Digits and the characters * and #
- In the Telephone number list field, select one of the following options:
internal: Defines the destination number entered as an internal phone number.
external: Defines the destination number entered as an external phone number.
- In the Key name entry field, enter a name for the key. The following entries are possible:
Up to 16 digits
Digits and characters
Note: The key name is used for printing the label.
- Click Execute.
Requirements for operating the function:
- Authorisation in the PBX for Controlling of the PBX via telephone
- For external destination numbers: Authorization assigned in the PBX for Configuring CF (sub) to ext. number
Configuring Function Key for Switching Call Forwarding for Subscribers Off via Configuration Manager
Requirements:
- Configuration manager, open with a sufficient authority level
- Open the page Function keys > Assign function keys.
- Only available in installed extension modules: In the telephone displayed at the top left, click the key group in which you would like to define keys.
- Click one of the following tabs:
Level 1: Keys are defined on the first key level.
Level 2: Keys are defined on the second key level.
- In the list field next to the function key that you would like to define, select the Switch off all Subscriber CF function.
The current settings for defining the key are displayed.
- In the Key name entry field, enter a name for the key. The following entries are possible:
Up to 16 digits
Digits and characters
Note: The key name is used for printing the label.
- Click Execute.
Requirements for operating the function:
- Authorisation in the PBX for Controlling of the PBX via telephone
- For external destination numbers: Authorization assigned in the PBX for Configuring CF (sub) to ext. number
Configuring Function Key for Call Forwarding for Subscribers via Telephone Menu
Requirements:
– Knowledge of the telephone, its menu options and the required PIN, if necessary
- Press the menu key and open the define keys menu.
- Press the function key that you would like to define.
- Select the desired option:
first level: Keys are defined on the first key level.
second level: Keys are defined on the second key level.
The list of available functions is displayed.
- Select the Call fwd.:scr function.
- Select the desired option:
deactivate all: Defines a key with the Switch off all function. (No other action is required.)
unconditional: Defines a key with the call forwarding unconditional for subscribers function.
on busy: Defines a key with the call forwarding on busy for subscribers function.
on no reply: Defines a key with the call forwarding on no reply for subscribers function.
The current settings for defining the key are shown on the display.
- Select the kind of switching. Pressing the ⬆ softkey allows you to switch over between the different kinds of switching.
switch off: Pressing the key disables call forwarding for subscribers. (No other action is required.)
switch on: Pressing the key enables call forwarding for subscribers.
switch over: Pressing the key switches call forwarding for subscribers over.
- Press the softkey.
Note: If you press the Telephone book key before entering the destination number, you can select the desired phone number from the telephone book.
- Enter the destination number. The following entries are possible:
Up to 24 digits
Digits and the characters * and #
Important: Enter telephone numbers exactly as when dialling, for example, external telephone numbers always with a leading exchange line access number. (exception: direct exchange access). The default exchange line access number on the PBX is "0" in the factory settings; however, this can be changed for several PBXs (see the PBX manual).
-
Press the softkey.
-
Enter a name. The following entries are possible:
Up to 16 digits
Digits and characters
- Press the softkey to accept the setting.
Requirements for operating the function:
– Authorisation in the PBX for Controlling of the PBX via telephone
- For external destination numbers: Authorization assigned in the PBX for Configuring CF (sub) to ext. number
Switching Call Forwarding for External Numbers On/Off
Switching this on/off can be done as follows:
• Via the telephone menu
Requirements:
– Knowledge of the telephone, its menu options and the required PIN, if necessary
- Authorization assigned in the PBX for Configuring CF (sub) to ext. number
To enable or disable call forwarding for external numbers, press the function key configured for call forwarding (external numbers).
Or, proceed as described in the following.
- Press the menu key and open the menu functions > CF ext.no..
- Select the desired option:
time control: Switches permanent configuration off and the current condition on.)
deactivate all: Disables all currently enabled call forwarding for subscribers.
(No other action is required.)
unconditional: Switches call forwarding unconditional for external numbers on or off.
on busy: Switches call forwarding on busy for external numbers on or off.
on no reply: Switches call forwarding on no reply for external numbers on or off.
- Enter the external phone number to be forwarded on the PBX (without an exchange line access number). The following entries are possible:
Up to 24 digits
Digits and the characters * and #
- Press the softkey.
The icon indicates the current setting.
- Select the desired option:
switch on: Enables call forwarding for external numbers.
For time control: Switches the current configuration on and the permanent configuration off. (No other action is required.)
switch off: Disables call forwarding for external numbers. (No other action is required.)
For time control: Switches the current configuration off and the permanent configuration on. (No other action is required.)
Note: If you press the telephone book key before entering the destination number, you can select the desired phone number from the telephone book.
- Enter the destination number (with exchange line access number). The following entries are possible:
Up to 24 digits
Digits and the characters * and #
- Press the softkey to save the entry.
Configuring and Operating Function Key for Call Forwarding for External Numbers
Pressing the key enables, disables and switches call forwarding for external numbers over.
Exception: A key defined to disable all instances of call forwarding for external numbers only disables call forwarding for external numbers for which a key has been configured.
In addition, when functions are defined on the first key level, the status of the function is indicated by the corresponding LED.
LED signalling next to the key (not applicable if defined with "deactivate all"):
Red Call forwarding for external numbers is enabled in the central office/PBX for the configured destination and selected configuration.
Yellow Call forwarding on busy or on no reply for external numbers has been configured, but it is overridden by an additional call forwarding unconditional for external numbers.
Yellow Call forwarding for external numbers is enabled in the central office/PBX for another destination or configuration.
Off Call forwarding for external numbers is disabled in the central office/PBX.
Important: When operating the function via the key, the success/failure of the operation is indicated by a change in colour on the LED. During the configuration in the central office (this takes perhaps from a few seconds up to a minute), the LED blinks yellow.
The configuration can be carried out as follows:
• Via the configuration manager
• Via the telephone menu
Configuring Function Key for Call Forwarding Unconditional for External Numbers via Configuration Manager
Requirements:
- Configuration manager, open with a sufficient authority level
-
Open the page Function keys > Assign function keys.
-
Only available in installed extension modules: In the telephone displayed at the top left, click the key group in which you would like to define keys.
- Click one of the following tabs:
Level 1: Keys are defined on the first key level.
Level 2: Keys are defined on the second key level.
- In the list field next to the function key that you would like to define, select the CF unconditional (ext. no.) function.
The current settings for defining the key are displayed.
- In the Kind of switching list field, select one of the following options:
switch off: Pressing the key disables call forwarding unconditional for external numbers. (Entering the destination number is not required)
switch on: Pressing the key enables call forwarding unconditional for external numbers.
switch over: Pressing the key switches call forwarding unconditional for external numbers over.
- In the Your own exchange line (telephone number) entry field, enter the external phone number to be forwarded on the PBX (with a prefix). The following entries are possible:
Up to 24 digits
Digits and the characters * and #
- In the Destination of Call Forwarding (telephone number with exchange line access number) entry field, enter the destination number (with exchange line access number). The following entries are possible:
Up to 24 digits
Digits and the characters * and #
- In the Configuration list field, select one of the following options:
permanent configuration: Call forwarding unconditional for external numbers is enabled, disabled or switched over in the permanent configuration.
current configuration: Call forwarding unconditional for external numbers is enabled, disabled or switched over only in the current configuration.
Note: Call forwarding for the current configuration can only be enabled if call forwarding for the permanent configuration is disabled.
- In the Key name entry field, enter a name for the key. The following entries are possible:
Up to 16 digits
Digits and characters
Note: The key name is used for printing the label.
- Click Execute.
Requirements for operating the function:
- Authorization assigned in the PBX for Configuring CF (sub) to ext. number
Configuring Function Key for Call Forwarding on Busy for External Numbers via Configuration Manager
Requirements:
- Configuration manager, open with a sufficient authority level
- Open the page Function keys > Assign function keys.
- Only available in installed extension modules: In the telephone displayed at the top left, click the key group in which you would like to define keys.
- Click one of the following tabs:
Level 1: Keys are defined on the first key level.
Level 2: Keys are defined on the second key level.
- In the list field next to the function key that you would like to define, select the CF on Busy (ext. no.) function.
The current settings for defining the key are displayed.
- In the Kind of switching list field, select one of the following options:
switch off: Pressing the key disables call forwarding on busy for external numbers. (Entering the destination number is not required)
switch on: Pressing the key enables call forwarding on busy for external numbers.
switch over: Pressing the key switches call forwarding on busy for external numbers over.
- In the Your own exchange line (telephone number) entry field, enter the external phone number to be forwarded on the PBX (with a prefix). The following entries are possible:
Up to 24 digits
Digits and the characters * and #
- In the Destination of Call Forwarding (telephone number with exchange line access number) entry field, enter the destination number (with exchange line access number). The following entries are possible:
Up to 24 digits
Digits and the characters * and #
- In the Configuration list field, select one of the following options:
permanent configuration: Call forwarding on busy for external numbers is enabled, disabled or switched over in the permanent configuration.
current configuration: Call forwarding on busy for external numbers is enabled, disabled or switched over only in the current configuration.
Note: Call forwarding for the current configuration can only be enabled if call forwarding for the permanent configuration is disabled.
- In the Key name entry field, enter a name for the key. The following entries are possible:
Up to 16 digits
Digits and characters
Note: The key name is used for printing the label.
- Click Execute.
Requirements for operating the function:
- Authorization assigned in the PBX for Configuring CF (sub) to ext. number
Configuring Function Key for Call Forwarding on No Reply for External Numbers via Configuration Manager
Requirements:
- Configuration manager, open with a sufficient authority level
- Open the page Function keys > Assign function keys.
- Only available in installed extension modules: In the telephone displayed at the top left, click the key group in which you would like to define keys.
- Click one of the following tabs:
Level 1: Keys are defined on the first key level.
Level 2: Keys are defined on the second key level.
- In the list field next to the function key that you would like to define, select the CF on no Reply (ext. no.) function.
The current settings for defining the key are displayed.
- In the Kind of switching list field, select one of the following options:
switch off: Pressing the key disables call forwarding on no reply for external numbers. (Entering the destination number is not required)
switch on: Pressing the key enables call forwarding on no reply for external numbers.
switch over: Pressing the key switches call forwarding on no reply for external numbers.
- In the Your own exchange line (telephone number) entry field, enter the external phone number to be forwarded on the PBX (with a prefix). The following entries are possible:
Up to 24 digits
Digits and the characters * and #
- In the Destination of Call Forwarding (telephone number with exchange line access number) entry field, enter the destination number (with exchange line access number). The following entries are possible:
Up to 24 digits
Digits and the characters * and #
- In the Configuration list field, select one of the following options:
permanent configuration: Call forwarding on no reply for external numbers is enabled, disabled or switched over in the permanent configuration.
current configuration: Call forwarding on no reply for external numbers is enabled, disabled or switched over only in the current configuration.
Note: Call forwarding for the current configuration can only be enabled if call forwarding for the permanent configuration is disabled.
- In the Key name entry field, enter a name for the key. The following entries are possible:
Up to 16 digits
Digits and characters
Note: The key name is used for printing the label.
- Click Execute.
Requirements for operating the function:
- Authorization assigned in the PBX for Configuring CF (sub) to ext. number
Configuring Function Key for Switching Call Forwarding for External Numbers Off via Configuration Manager
Requirements:
- Configuration manager, open with a sufficient authority level
- Open the page Function keys > Assign function keys.
- Only available in installed extension modules: In the telephone displayed at the top left, click the key group in which you would like to define keys.
- Click one of the following tabs:
Level 1: Keys are defined on the first key level.
Level 2: Keys are defined on the second key level.
- In the list field next to the function key that you would like to define, select the Switch off all CF (ext. no.) function.
The current settings for defining the key are displayed.
- In the Key name entry field, enter a name for the key. The following entries are possible:
Up to 16 digits
Digits and characters
Note: The key name is used for printing the label.
- Click Execute.
Requirements for operating the function:
- Authorization assigned in the PBX for Configuring CF (sub) to ext. number
Configuring Function Key for Call Forwarding for External Numbers via Telephone Menu
Requirements:
– Knowledge of the telephone, its menu options and the required PIN, if necessary
- Press the menu key and open the define keys menu.
- Press the function key that you would like to define.
- Select the desired option:
first level: Keys are defined on the first key level.
second level: Keys are defined on the second key level.
The list of available functions is displayed.
- Select the CF ext.no. function.
- Select the desired option:
deactivate all: Defines a key with the Switch off all function. (No other action is required.)
unconditional: Defines a key with the call forwarding unconditional for external numbers function.
on busy: Defines a key with the call forwarding on busy for external numbers function.
on no reply: Defines a key with the call forwarding on no reply for external numbers function.
The current settings for defining the key are shown on the display.
- Select the kind of switching. Pressing the ⬆ softkey allows you to switch over between the different kinds of switching.
switch off: Pressing the key disables call forwarding for external numbers.
switch on: Pressing the key enables call forwarding for external numbers.
switch over: Pressing the key switches call forwarding for external numbers over.
- Select the configuration. Pressing the ⬆ softkey allows you to switch over between the current and the permanent configuration.
current config.: Call forwarding for external numbers is enabled, disabled or switched over only in the current configuration.
permanent config: Call forwarding for external numbers is enabled, disabled or switched over in the permanent configuration.
Note: Call forwarding for the current configuration can only be enabled if call forwarding for the permanent configuration is disabled.
- Press the softkey.
Note: If you press the telephone book key before entering the destination number, you can select the desired phone number from the telephone book.
- Enter the destination number (with exchange line access number). The following entries are possible:
Up to 24 digits
Digits and the characters * and #
-
Press the Softkey.
-
Enter a name. The following entries are possible:
Up to 16 digits
Digits and characters
- Press the softkey.
Configuring and Operating Functions
Call Forwarding
Configuring and Operating Function Key for Call Forwarding for External Numbers
- Enter the external phone number to be forwarded on the PBX (without an exchange line access number and with a prefix). The following entries are possible:
Up to 24 digits
Digits and the characters * and #
- Press the softkey to accept the setting.
Requirements for operating the function:
- Authorization assigned in the PBX for Configuring CF (sub) to ext. number
Call Restrictor (Incoming) – Robinson Numbers
If there are certain persons who you absolutely do not want to call you, their external phone numbers (Robinson numbers) can be assigned to a call restrictor for incoming calls in the PBX. The call restrictor which applies to all subscribers can be enabled on your own telephone as needed. If the call restrictor is enabled, a caller, who transmitted one of the Robinson numbers, is rejected.
Switching the Call Restrictor (Incoming) On/Off
Switching this on/off can be done as follows:
• Via the telephone menu
Requirements:
– Knowledge of the telephone, its menu options and the required PIN, if necessary
- A call restrictor configured on the PBX and assigned to the subscriber
- Authorisation in the PBX for Controlling of the PBX via telephone
In order to activate or deactivate the call restrictor, press the function key configured for the call restrictor (incoming).
Or, proceed as described in the following.
- Press the menu key and open the menu functions > Call Restrictor.
The icon indicates the current setting.
- Select the desired option:
switch on: Enables the call restrictor.
switch off: Disables the call restrictor.
Configuring and Operating Function Key for Call Restrictor (Incoming)
Press the key to switch the subscriber's call restrictor on or off or to switch it over.
In addition, when functions are defined on the first key level, the status of the function is indicated by the corresponding LED.
LED signalling next to the key:
Red The call restrictor is enabled.
Off The call restrictor is disabled.
The configuration can be carried out as follows:
• Via the configuration manager
• Via the telephone menu
Configuring Function Key for Call Restrictor (Incoming) via Configuration Manager
Requirements:
- Configuration manager, open with a sufficient authority level
- Open the page Function keys > Assign function keys.
- Only available in installed extension modules: In the telephone displayed at the top left, click the key group in which you would like to define keys.
-
Click one of the following tabs:
Level 1: Keys are defined on the first key level.
Level 2: Keys are defined on the second key level. -
In the list field next to the function key that you would like to define, select the Call Restrictor (incoming) - Robinson no. function.
The current settings for defining the key are displayed.
- In the Kind of switching list field, select one of the following options:
switch off: Pressing the key enables the call restrictor.
switch on: Pressing the key enables the call restrictor.
switch over: Pressing the key switches the call restrictor on and off.
- In the Key name entry field, enter a name for the key. The following entries are possible:
Up to 16 digits
Digits and characters
Note: The key name is used for printing the label.
- Click Execute.
Requirements for operating the function:
- A call restrictor configured on the PBX and assigned to the subscriber
– Authorisation in the PBX for Controlling of the PBX via telephone
Configuring Function Key for Call Restrictor (Incoming) via Telephone Menu
Requirements:
- Knowledge of the telephone, its menu options and the required PIN, if necessary
- Press the menu key and open the define keys menu.
- Press the function key that you would like to define.
- Select the desired option:
first level: Keys are defined on the first key level.
second level: Keys are defined on the second key level.
The list of available functions is displayed.
- Select the Call Restrictor function.
The current settings for defining the key are shown on the display.
- Select the kind of switching. Pressing the ⬆ softkey allows you to switch over between the different kinds of switching.
switch off: Pressing the key enables the call restrictor.
switch on: Pressing the key enables the call restrictor.
switch over: Pressing the key switches the call restrictor on and off.
- Press the softkey to accept the setting.
Requirements for operating the function:
- A call restrictor configured on the PBX and assigned to the subscriber
– Authorisation in the PBX for Controlling of the PBX via telephone
Call Waiting
If you are already in a call, the call waiting function notifies you using the call waiting tone when another communication partner is calling.
Switching Call Waiting On/Off
Switching this on/off can be done as follows:
• Via the telephone menu
Requirements:
- Knowledge of the telephone, its menu options and the required PIN, if necessary
– Authorisation in the PBX for Controlling of the PBX via telephone
In order to enable or disable call waiting, press the function key configured for call waiting. Or, proceed as described in the following.
- Press the menu key and open the menu functions > call waiting.
The ♦con indicates the current setting.
- Select the desired option:
switch on: Enables call waiting.
switch off: Disables call waiting.
Configuring and Operating Function Key for Call Waiting
Press the key to switch call waiting on or off or to switch it over.
In addition, when functions are defined on the first key level, the status of the function is indicated by the corresponding LED.
LED signalling next to the key:
Green Call waiting is enabled.
Off Call waiting is disabled.
The configuration can be carried out as follows:
• Via the configuration manager
• Via the telephone menu
Configuring Function Key for Call Waiting via Configuration Manager
Requirements:
- Configuration manager, open with a sufficient authority level
- Open the page Function keys > Assign function keys.
- Only available in installed extension modules: In the telephone displayed at the top left, click the key group in which you would like to define keys.
-
Click one of the following tabs:
Level 1: Keys are defined on the first key level.
Level 2: Keys are defined on the second key level. -
In the list field next to the function key that you would like to define, select the Call Waiting function.
The current settings for defining the key are displayed.
- In the Kind of switching list field, select one of the following options:
switch off: Pressing the key disables call waiting.
switch on: Pressing the key enables call waiting.
switch over: Pressing the key switches call waiting on and off.
- In the Key name entry field, enter a name for the key. The following entries are possible:
Up to 16 digits
Digits and characters
Note: The key name is used for printing the label.
- Click Execute.
Requirements for operating the function:
– Authorisation in the PBX for Controlling of the PBX via telephone
Configuring Function Key for Call Waiting via Telephone Menu
Requirements:
- Knowledge of the telephone, its menu options and the required PIN, if necessary
- Press the menu key and open the define keys menu.
- Press the function key that you would like to define.
- Select the desired option:
first level: Keys are defined on the first key level.
second level: Keys are defined on the second key level.
The list of available functions is displayed.
- Select the Call Waiting function.
The current settings for defining the key are shown on the display.
- Select the kind of switching. Pressing the ⬆ softkey allows you to switch over between the different kinds of switching.
switch off: Pressing the key disables call waiting.
switch on: Pressing the key enables call waiting.
switch over: Pressing the key switches call waiting on and off.
- Press the softkey to accept the setting.
Requirements for operating the function:
- Authorisation in the PBX for Controlling of the PBX via telephone
Switching Call Waiting Signalling On/Off via LED/Tone
Incoming calls during a call are indicated by a change in the display.
If call waiting signalling via LED has been enabled, incoming calls during a call are also indicated via a blinking LED above the hook key.
If call waiting signalling via tone is enabled, incoming calls during a call are also indicated by a tone on the receiver.
Switching this on/off can be done as follows:
• Via the configuration manager
• Via the telephone menu
Switching Call Waiting Signalling via LED/Tone On/Off via Configuration Manager
Requirements:
- Configuration manager, open with a sufficient authority level
- Open the page Settings/functions > Signalling/ringer.
- Select or clear the Call waiting (LED) check box.
☑ Enables call waiting signalling via LED using the hook key.
☐ Disables call waiting signalling via LED using the hook key.
- Select or clear the Call waiting (tone) check box.
☑ Enables call waiting signalling via tone.
□ Disables call waiting signalling via tone.
- Click Execute.
Switching Call Waiting Signalling via LED/Tone On/Off via Telephone Menu
Requirements:
- Knowledge of the telephone, its menu options and the required PIN, if necessary
-
Press the menu key and open the menu settings > signalling > call wait. tone.
-
Select or clear the LED check box.
☑ Enables call waiting signalling via LED using the hook key.
☐ Disables call waiting signalling via LED using the hook key.
- Select or clear the tone check box.
☑ Enables call waiting signalling via tone.
☐ Disables call waiting signalling via tone.
- Press the softkey to accept the setting.
Configuration Switchover
If multiple configurations have been saved in the PBX, for example, for day, night, etc., switching over from one configuration to another can be carried out manually and/or in a time controlled manner.
Configuration Switchover Executed Manually
The execution can be made as follows:
• Via the telephone menu
Requirements:
– Knowledge of the telephone, its menu options and the required PIN, if necessary
- At least two configurations set up in the PBX
- Authorization in the PBX for Configuration switching
In order to switch over a configuration in the PBX, press the function key configured for configuration switchover.
Or, proceed as described in the following.
-
Press the menu key and open the menu functions > switch config..
The ♦con indicates the current setting. -
Select the desired configuration according to its name.
The configuration selected is switched on.
Configuring and Operating Function Key for Configuration Switchover
Press the key for general functions while the telephone is in the idle state to open the Configuration menu. After this, you can enable the configuration.
Press the key defined for configurations to enable the configuration that has been set up.
In addition, when functions are defined on the first key level, the status of the function is indicated by the corresponding LED.
LED signalling next to the key (only for defined key assignment):
Green The configuration saved in the key is enabled.
Off The configuration saved in the key is disabled.
The configuration can be carried out as follows:
• Via the configuration manager
• Via the telephone menu
Configuring Function Key for General Configuration Switchover via Configuration Manager
Requirements:
- Configuration manager, open with a sufficient authority level
-
At least two configurations set up in the PBX
-
Open the page Function keys > Assign function keys.
- Only available in installed extension modules: In the telephone displayed at the top left, click the key group in which you would like to define keys.
- Click one of the following tabs:
Level 1: Keys are defined on the first key level.
Level 2: Keys are defined on the second key level.
- In the list field next to the function key that you would like to define, select the Config. on function.
The current settings for defining the key are displayed.
- In the Key name entry field, enter a name for the key. The following entries are possible:
Up to 16 digits
Digits and characters
Note: The key name is used for printing the label.
6. Click Execute.
Requirements for operating the function:
- Authorization in the PBX for Configuration switching
Configuring Function Key for Defined Configuration Switchover via Configuration Manager
Requirements:
- Configuration manager, open with a sufficient authority level
-
At least two configurations set up in the PBX
-
Open the page Function keys > Assign function keys.
- Only available in installed extension modules: In the telephone displayed at the top left, click the key group in which you would like to define keys.
- Click one of the following tabs:
Level 1: Keys are defined on the first key level.
Level 2: Keys are defined on the second key level.
- In the list field next to the function key that you would like to define, select the function Defined config. on.
The current settings for defining the key are displayed.
- In the Identification number entry field, enter the identification number of the configuration.
- In the Key name entry field, enter a name for the key. The following entries are possible:
Up to 16 digits
Digits and characters
Note: The key name is used for printing the label and for display.
7. Click Execute.
Requirements for operating the function:
- Authorization in the PBX for Configuration switching
Configuring Function Key for Configuration Switchover via Telephone Menu
Requirements:
- Knowledge of the telephone, its menu options and the required PIN, if necessary
-
At least two configurations set up in the PBX
-
Press the menu key and open the define keys menu.
- Press the function key that you would like to define.
- Select the desired option:
first level: Keys are defined on the first key level.
second level: Keys are defined on the second key level.
The list of available functions is displayed.
- Select the switch config. function.
The current settings for defining the key are shown on the display.
- Select the kind of key. Press the Ⓧ softkey to switch over between the different kinds of keys.
general: Press the key to open the switch configuration menu. (No other action is required.)
defined: Press the key to enable the set configuration.
- Press the softkey.
- Select a configuration based on its name.
- Press the softkey to accept the setting.
Requirements for operating the function:
- Authorization in the PBX for Configuration switching
Do-not-disturb
The do-not-disturb function offers the option of blocking internal and external calls as well as blocking group calls on a specific telephone. A caller hears only a busy signal. An internal subscriber can reach a telephone with call protection in an emergency using a priority call.
The do-not-disturb function has no influence on outbound calls, callbacks, alarm calls, scheduled calls, wake-up calls or InterCom calls.
Switching the Do-not-disturb Function On/Off
Switching this on/off can be done as follows:
• Via the telephone menu
Requirements:
- Knowledge of the telephone, its menu options and the required PIN, if necessary
- Authorisation in the PBX for Controlling of the PBX via telephone
In order to activate or deactivate the do-not-disturb function, press the function key configured for do-not-disturb.
Or, proceed as described in the following.
- Press the menu key and open the menu functions > do-not-disturb.
The icon indicates the current setting.
- Select the desired option:
switch on: Enables the do-not-disturb function.
switch off: Disables the do-not-disturb function.
Configuring and Operating Function Key for Do-not-disturb
Press the key to switch the do-not-disturb function on or off or to switch it over.
In addition, when functions are defined on the first key level, the status of the function is indicated by the corresponding LED.
LED signalling next to the key:
Yellow The do-not-disturb function is enabled.
Off The do-not-disturb function is disabled.
The configuration can be carried out as follows:
• Via the configuration manager
• Via the telephone menu
Configuring Function Key for Do-not-disturb via Configuration Manager
Requirements:
- Configuration manager, open with a sufficient authority level
- Open the page Function keys > Assign function keys.
- Only available in installed extension modules: In the telephone displayed at the top left, click the key group in which you would like to define keys.
-
Click one of the following tabs:
Level 1: Keys are defined on the first key level.
Level 2: Keys are defined on the second key level. -
In the list field next to the function key that you would like to define, select the Do-not-disturb function.
The current settings for defining the key are displayed.
- In the Kind of switching list field, select one of the following options:
switch off: Disables the do-not-disturb function.
switch on: Enables the do-not-disturb function.
switch over: Pressing the key switches the do-not-disturb function on and off.
- In the Key name entry field, enter a name for the key. The following entries are possible:
Up to 16 digits
Digits and characters
Note: The key name is used for printing the label.
- Click Execute.
Requirements for operating the function:
- Authorisation in the PBX for Controlling of the PBX via telephone
Configuring Function Key for Do-not-disturb via Telephone Menu
Requirements:
– Knowledge of the telephone, its menu options and the required PIN, if necessary
- Press the menu key and open the define keys menu.
- Press the function key that you would like to define.
- Select the desired option:
first level: Keys are defined on the first key level.
second level: Keys are defined on the second key level.
The list of available functions is displayed.
- Select the do-not-disturb function.
The current settings for defining the key are shown on the display.
- Select the kind of switching. Pressing the ⬆ softkey allows you to switch over between the different kinds of switching.
switch off: Disables the do-not-disturb function.
switch on: Enables the do-not-disturb function.
switch over: Pressing the key switches the do-not-disturb function on and off.
- Press the softkey to accept the setting.
Requirements for operating the function:
- Authorisation in the PBX for Controlling of the PBX via telephone
Configuring Type of Do-not-disturb
Defining the type of Do-not-disturb function determines how do-not-disturb works when it is enabled.
The configuration can be made as follows:
• Via the configuration manager
• Via the telephone menu
Configuring Type of Do-not-disturb via Configuration Manager
Requirements:
- Configuration manager, open with a sufficient authority level
- Open the page Settings/functions > do-not-disturb.
- Under Kind of do-not-disturb, select one of the following options:
all (PBX): The do-not-disturb function is carried out via the PBX. All incoming calls are rejected and not entered in the caller list on the telephone.
reject anonymous: All anonymous calls are rejected.
only contacts: All calls are rejected except for calls from contacts listed in the telephone book.
all (telephone): The do-not-disturb function is carried out via the phone. All incoming calls are rejected and entered in the caller list on the telephone.
Note:
Parallel to the kind of do-not-disturb, all (PBX), the call deblocker (incoming) can be enabled so that the VIP numbers registered in the call deblocker on the PBX are not rejected.
Internal telephone calls are only rejected if the kind of do-not-disturb function all (PBX) and all (telephone) are used. An internal subscriber can reach a protected telephone in an emergency with a priority call if the kind of do-not-disturb function all (PBX) is used. Calls are only registered in the caller list on the telephone if the kind of do-not-disturb function all (telephone) is used.
3. Click Execute.
Configuring Type of Do-not-disturb via Telephone Menu
Requirements:
– Knowledge of the telephone, its menu options and the required PIN, if necessary
- Press the menu key and open the menu settings > do-not-disturb > kind do-not-dist.
The icon indicates the current setting.
- Select the desired option:
all (PBX): The do-not-disturb function is carried out via the PBX. All incoming calls are rejected and not entered in the caller list on the telephone.
reject anonymous: All anonymous calls are rejected.
only contacts: All calls are rejected except for calls from contacts listed in the telephone book.
all (telephone): The do-not-disturb function is carried out via the phone. All incoming calls are rejected and entered in the caller list on the telephone.
Note:
Parallel to the kind of do-not-disturb, all (PBX), the call deblocker (incoming) can be enabled so that the VIP numbers registered in the call deblocker on the PBX are not rejected.
Internal telephone calls are only rejected if the kind of do-not-disturb function all (PBX) and all (telephone) are used. An internal subscriber can reach a protected telephone in an emergency with a priority call if the kind of do-not-disturb function all (PBX) is used. Calls are only registered in the caller list on the telephone if the kind of do-not-disturb function all (telephone) is used.
Door Functions
A door terminal system connected with the interface FTZ 123 D12-0 (PBX requires extension module) enables the following functions. Calls to the door can be made from any telephone (intercom). During a call to the door, the door can be opened (open door) and a stairwell light controlled by switching a relay (switch on light).
These functions can be executed on the system telephone without initiating a door call.
Executing Door Functions
Important: Not available for operation on the PBX COMpact 3000.
The execution can be made as follows:
• Via the telephone menu
Requirements:
– Knowledge of the telephone, its menu options and the required PIN, if necessary
– The authority level assigned in the PBX for the door terminal
- The relays configured in the PBX for the intercom, opening the door and the stairwell light
– Authorization in the PBX for Open door
In order to operate the door functions, press the function key configured for door functions.
Or, proceed as described in the following.
- Press the menu key and open the menu functions > door function.
- Select the desired door based on its name/number.
- Select the desired option:
open door/light: Opens the door and switches the stairwell light on.
open door: Opens the door.
light on: Switches the stairwell light on.
talk: Establishes a call connection to the door.
Note: The door function light on switches on the third relay of the door terminal in question separately for the period configured in the PBX.
Own Telephone Rings (Door Call) – Accept Call and Open Door
The accepting/opening procedure can be carried out as follows:
• Via the telephone menu
Requirements:
– Knowledge of the telephone, its menu options and the required PIN, if necessary
- The authority level assigned in the PBX for the door terminal
- The relays configured in the PBX for the intercom, opening the door and the stairwell light
– Authorization in the PBX for Open door
Proceed as described further down if you receive a door call.
- Pick up the receiver or press the Hook key.
- Select open door/light.
The door is opened. If the third relay of the door terminal in question is used for switching the stairwell light, this is also switched on for the period configured in the PBX.
The door knocks – open the door without accepting the call
During a call, you can handle an incoming door call generally as you would an incoming external subscriber. This means that you can accept the call, reject it or ignore it. In addition, you can, if you do not want to interrupt your current call, still open the door for the visitor by pressing the door opener.
Opening can be carried out as follows:
• Via the telephone menu
Requirements:
– Knowledge of the telephone, its menu options and the required PIN, if necessary
– The authority level assigned in the PBX for the door terminal
- The relays configured in the PBX for the intercom, opening the door and the stairwell light
– Authorization in the PBX for Open door
Proceed as described when a door calls.
- Select open door/light.
The door is opened. If the third relay of the door terminal in question is used for switching the stairwell light, this is also switched on for the period configured in the PBX.
Configuring and Operating Function Key for Door Functions
Important: Not available for operation on the PBX COMpact 3000.
Press the key for general functions while the telephone is in the idle state to open the door function menu. After this, you can initiate a door function for the configured door.
Press the key defined to initiate a call connection with the door (after picking up the receiver) or to switch on the door opener and/or light.
In addition, when functions are defined on the first key level, the status of the function is indicated by the corresponding LED.
LED signalling next to the key:
Green The door opener function is enabled.
Red A call connection has been established with the door.
Yellow The light is switched on.
Off None of the functions configured on the key are enabled.
The configuration can be carried out as follows:
• Via the configuration manager
• Via the telephone menu
Configuring Function Key for Door Terminal Functions via Configuration Manager
Requirements:
- Configuration manager, open with a sufficient authority level
– The authority level assigned in the PBX for the door terminal -
The relays configured in the PBX for the intercom, opening the door and the stairwell light
-
Open the page Function keys > Assign function keys.
- Only available in installed extension modules: In the telephone displayed at the top left, click the key group in which you would like to define keys.
- Click one of the following tabs:
Level 1: Keys are defined on the first key level.
Level 2: Keys are defined on the second key level.
- In the list field next to the function key that you would like to define, select the door terminal function.
The current settings for defining the key are displayed.
- In the Telephone number entry field, enter the phone number of the door.
- In the Key name entry field, enter a name for the key. The following entries are possible:
Up to 16 digits
Digits and characters
Note: The key name is used for printing the label and for display.
7. Click Execute.
Requirements for operating the function:
– Authorization in the PBX for Open door
Configuring Function Key for Defined Door Terminal Functions via Configuration Manager
Requirements:
- Configuration manager, open with a sufficient authority level
– The authority level assigned in the PBX for the door terminal -
The relays configured in the PBX for the intercom, opening the door and the stairwell light
-
Open the page Function keys > Assign function keys.
-
Only available in installed extension modules: In the telephone displayed at the top left, click the key group in which you would like to define keys.
-
Click one of the following tabs:
Level 1: Keys are defined on the first key level.
Level 2: Keys are defined on the second key level.
- In the list field next to the function key that you would like to define, select the Defined door function function.
The current settings for defining the key are displayed.
-
In the Telephone number entry field, enter the phone number of the door.
-
In the Door terminal function list field, select one of the following options:
Open the door & switch on the light: Press the key to switch the door opener and the light on.
Open the door: Press the key to switch the door opener on.
Light on: Press the key to switch the light on.
Talking: Press the key to initiate a call connection to the door.
Note: The door terminal function Light on switches on the third relay of the door station in question separately at the time configured in the PBX.
- In the Key name entry field, enter a name for the key. The following entries are possible:
Up to 16 digits
Digits and characters
Note: The key name is used for printing the label and for display.
8. Click Execute.
Requirements for operating the function:
– Authorization in the PBX for Open door
Configuring Function Key for Door Function via Telephone Menu
Requirements:
- Knowledge of the telephone, its menu options and the required PIN, if necessary
- The authority level assigned in the PBX for the door terminal
-
The relays configured in the PBX for the intercom, opening the door and the stairwell light
-
Press the menu key and open the define keys menu.
- Press the function key that you would like to define.
- Select the desired option:
first level: Keys are defined on the first key level.
second level: Keys are defined on the second key level.
The list of available functions is displayed.
- Select the door function function.
The current settings for defining the key are shown on the display.
- Select the kind of key. Press the ⬆ softkey to switch over between the different kinds of keys.
general: Press the key to open the door function menu for the door configured.
defined: Press the key to execute the configured door function for the configured door.
- Only when the kind of key defined has been selected: Select the door function. Press the ⬇ softkey to switch over between the different kinds of door functions.
open door/light: Press the key to switch the door opener and the light on.
open door: Press the key to switch the door opener on.
light on: Press the key to switch the light on.
talk: Press the key to initiate a call connection to the door.
Note: The door terminal function Light on switches on the third relay of the door station in question separately at the time configured in the PBX.
- Press the softkey.
- Select a door based on its name/number.
- Press the softkey.
- Enter a new name for the door. The following entries are possible:
Up to 16 digits
Digits and characters
- Press the softkey to accept the setting.
Requirements for operating the function:
– Authorization in the PBX for Open door
Exchange Line Transfer
A suitably authorised telephone, for example, the telephone exchange, can transfer the exchange line access required for an outgoing call to another internal telephone for a short period of time. This is meaningful, for example, when this telephone is located in a publicly accessible room and is only occasionally used for external calls by an employee.
Exchange Line Transfer Sequence
The exchange line transfer proceeds as follows:
- The requesting telephone must initiate an internal call with the telephone authorised to make the exchange in order to request exchange line access.
Important:
For an exchange line transfer, the telephone making the transfer needs the authority level itself to transfer external calls externally.
The requesting telephone needs at least the official exchange line authority level for incoming external calls.
- After the function key assigned to exchange line transfer has been pressed on the telephone authorised for making exchanges, a confirmation tone is issued to both internal subscribers and the internal call must be ended.
- The requesting telephone now has access to the exchange line settings configured for this purpose on the PBX. These exchange line settings remain until the first successful, outgoing external call or until the time limitation has elapsed for initiating the external call.
Note: Configuring the exchange line transfer function is done in the PBX.
Configuring and Operating Function Key for Exchange Line Transfer
Press the key during an internal call to transfer the exchange line access to your communication partner for a single external call. Afterwards, a confirmation tone is issued on both internal telephones and the internal call must be ended.
LED signalling next to the key:
None
The configuration can be carried out as follows:
• Via the configuration manager
• Via the telephone menu
Configuring Function Key for Exchange Line Transfer via Configuration Manager
Requirements:
- Configuration manager, open with a sufficient authority level
- Open the page Function keys > Assign function keys.
- Only available in installed extension modules: In the telephone displayed at the top left, click the key group in which you would like to define keys.
- Click one of the following tabs:
Level 1: Keys are defined on the first key level.
Level 2: Keys are defined on the second key level.
- In the list field next to the function key that you would like to define, select the exchange line call transfer function.
The current settings for defining the key are displayed.
- In the Key name entry field, enter a name for the key. The following entries are possible:
Up to 16 digits
Digits and characters
Note: The key name is used for printing the label.
6. Click Execute.
Requirements for operating the function:
– Authorization in the PBX for Transfer of external calls to external
Configuring Function Key for Exchange Line Transfer via Telephone Menu
Requirements:
- Knowledge of the telephone, its menu options and the required PIN, if necessary
- Press the menu key and open the define keys menu.
- Press the function key that you would like to define.
- Select the desired option:
first level: Keys are defined on the first key level.
second level: Keys are defined on the second key level.
The list of available functions is displayed.
- Select the ext. line transfer function.
The current settings for defining the key are shown on the display.
- Press the softkey to accept the setting.
Requirements for operating the function:
– Authorization in the PBX for Transfer of external calls to external
Follow me
Follow me is a type of "internal call forwarding unconditional for subscribers" that is configured on the respective destination telephone (instead of on the forwarding telephone). This provides the option of going from room to room and taking the calls with you.
Switching Follow me On/Off
Important: Not available for operation on the PBX COMpact 3000.
Switching this on/off can be done as follows:
• Via the telephone menu
Requirements:
– Knowledge of the telephone, its menu options and the required PIN, if necessary
- Authorisation in the PBX for Controlling of the PBX via telephone
- Press the menu key and open the menu functions > follow me.
Or, press a function key configured for follow me.
- Select the desired option:
deactivate all: Disables all of the currently enabled follow me functions. (No other action is required.)
switch on: Enables follow me for a subscriber.
switch off: Disables follow me for a subscriber.
- Select the subscriber whose calls should be rerouted using his name/number.
Note: Follow me can also be disabled on the forwarded telephone by using "Disable follow me" on the subscriber's own phone number.
Configuring and Operating Function Key for Follow me
Important: Not available for operation on the PBX COMpact 3000.
Press the key while the telephone is in the idle state to open the follow me menu. This allows you to switch follow me on or off or to switch it over for an internal subscriber.
LED signalling next to the key:
None
The configuration can be carried out as follows:
• Via the configuration manager
• Via the telephone menu
Configuring Function Key for Follow me via Configuration Manager
Requirements:
- Configuration manager, open with a sufficient authority level
- Open the page Function keys > Assign function keys.
-
Only available in installed extension modules: In the telephone displayed at the top left, click the key group in which you would like to define keys.
-
Click one of the following tabs:
Level 1: Keys are defined on the first key level.
Level 2: Keys are defined on the second key level.
- In the list field next to the function key that you would like to define, select the Follow me function.
The current settings for defining the key are displayed.
- In the Key name entry field, enter a name for the key. The following entries are possible:
Up to 16 digits
Digits and characters
Note: The key name is used for printing the label.
6. Click Execute.
Requirements for operating the function:
- Authorisation in the PBX for Controlling of the PBX via telephone
Configuring Function Key for Follow me via Telephone Menu
Requirements:
– Knowledge of the telephone, its menu options and the required PIN, if necessary
- Press the menu key and open the define keys menu.
- Press the function key that you would like to define.
- Select the desired option:
first level: Keys are defined on the first key level.
second level: Keys are defined on the second key level.
The list of available functions is displayed.
- Select the follow me function.
The current settings for defining the key are shown on the display.
- Press the softkey to accept the setting.
Requirements for operating the function:
- Authorisation in the PBX for Controlling of the PBX via telephone
Free Seating
The free seating function allows you to register at a foreign COMfortel VoIP 2500 AB using the configuration of your own telephone in order to operate the foreign telephone like your own one. The prerequisite is that both telephones are registered at the same PBX.
Free Seating Procedure
Free seating is done as follows:
- The free seating function needs to be configured. For this purpose, store the configuration of your own telephone on the inserted USB memory stick.
- Remove the USB memory stick from your own telephone and insert it into the foreign COMfortel VoIP 2500 AB.
Note:
After removing the USB memory stick from your own telephone, the latter will be blocked. It can only be used for emergency calls. If you dial an emergency number, the telephone will register at the PBX for 30 minutes and the emergency call will be processed.
Do not remove the USB memory stick from the telephone while the telephone is still synchronizing data with the PBX. During the synchronization with the PBX the arrow on the top left of the telephone display is filled with black colour.
- After entering your own user PIN on the foreign telephone, you can operate it like your own one and you will be available for incoming phone calls like on your own telephone.
Note: The MSN of the foreign COMfortel VoIP 2500 AB is no longer available and callers will hear the busy tone.
Configuring Free Seating
When configuring free seating, the configuration of your own telephone is stored on the USB memory stick. If the USB memory stick already contains another free seating configuration, it will be overwritten.
The configuration can be carried out as follows:
• Via the telephone menu
Requirements:
- Knowledge of the telephone, its menu options and the required PIN, if necessary
- A USB memory stick inserted into the USB port
-
User PIN configured for your own telephone
-
Press the menu key and open the menu settings > free seating > configure. The configuration of the telephone will be stored on the USB memory stick. Free Seating is shown on the telephone display.
Performing Free Seating
Requirements:
– Knowledge of the telephone, its menu options and the required PIN, if necessary
- A USB memory stick inserted into the USB port
- User PIN configured for your own telephone
– Free seating configured
- Your own telephone and the foreign COMfortel VoIP 2500 AB need to be connected to the same PBX
- Press the menu key, enter #207 via the keypad and press the softkey √.
- Remove the USB memory stick from the USB port of your telephone.
The access to your telephone will be blocked and callers will hear the busy tone. You cannot make other phone calls than emergency calls. -
Insert the USB memory stick into the USB port of the foreign telephone you would like to operate with your own configuration.
-
Enter the user PIN configured for your own telephone.
- Press the softkey.
The foreign telephone will deregister. Subsequently, it will be blocked and callers will hear the busy tone.
Note: The user PIN of the last activated free seating configuration is stored in the telephone. If free seating has been performed before with the same free seating configuration, the user PIN entry is not necessary.
The free seating configuration of your own telephone is now active and you can operate the foreign phone just like your own one.
Ending Free Seating on the Foreign Telephone
Requirements:
– Knowledge of the telephone, its menu options and the required PIN, if necessary
- User PIN configured for your own telephone
– Free seating configured and performed
- Your own telephone and the foreign COMfortel VoIP 2500 AB need to be connected to the same PBX
- Press the menu key, enter #207 via the keypad and press the softkey √.
- Remove the USB memory stick from the USB port of the foreign telephone you have operated with your free seating configuration.
The telephone will deregister and then register with its own MSN at the PBX.
- Insert the USB memory stick into the USB port of your own telephone.
Your telephone registers at the PBX.
Ending Free Seating on Your Own Telephone with Data Transfer
If you have changed the free seating configuration of your USB memory stick while performing free seating on a foreign telephone, you can store this configuration subsequently on your own telephone. The free seating configuration will be deleted from the USB memory stick and free seating will be ended.
Ending can be carried out as follows:
• Via the telephone menu
Requirements:
- Knowledge of the telephone, its menu options and the required PIN, if necessary
- A USB memory stick inserted into the USB port
-
User PIN configured for your own telephone
– Free seating configured -
Press the menu key and open the menu settings > free seating > end with transf..
The free seating configuration will be stored on your telephone and deleted from the USB memory stick.
Free seating will be ended. Free Seating is no longer shown on the telephone display.
Further steps:
- If required, configure free seating again on your telephone.
Ending Free Seating on Your Own Telephone without Data Transfer
You can end free seating on your own telephone. The free seating configuration will be deleted from the USB memory stick and not stored on the telephone.
Ending can be carried out as follows:
• Via the telephone menu
Requirements:
– Knowledge of the telephone, its menu options and the required PIN, if necessary
- A USB memory stick inserted into the USB port
- User PIN configured for your own telephone
– Free seating configured
- Press the menu key and open the menu settings > free seating > end w/o transfer.
The free seating configuration will be deleted from the USB memory stick.
Free seating will be ended. Free Seating is no longer shown on the telephone display.
Further steps:
- If required, configure free seating again on your telephone.
Creating a USB Memory Stick for an Emergency
After configuring free seating on your own telephone and removing the USB memory stick from the telephone, the telephone is blocked and can only be registered again at the PBX after inserting the USB memory stick. If this USB memory stick has been lost, damaged, or is just not available, a replacement USB memory stick can be created for an emergency. For this purpose, the administrator needs to specially configure an internal telephone number and a user PIN at the PBX for a further COMfortel VoIP 2500 AB to be used as replacement telephone.
Requirements:
– Knowledge of the telephone, its menu options and the required PIN, if necessary
- Internal telephone number configured in the PBX and user PIN for a further COMfortel VoIP 2500 AB (replacement telephone)
- A USB memory stick inserted into the USB port
- At the PBX, register the replacement telephone for which an internal telephone number and a user PIN have been configured in the PBX.
-
Configure free seating on the replacement telephone.
-
Press the menu key, enter #207 via the keypad and press the softkey √.
- Remove the USB memory stick from the USB port of the replacement telephone.
The access to the replacement telephone will be blocked and callers will hear the busy tone. You cannot make other phone calls than emergency calls.
- Insert the USB memory stick into the USB port of your own telephone.
- Enter the user PIN of the replacement telephone where free seating has been configured.
- Press the softkey.
Your telephone registers at the PBX using the MSN of the replacement telephone. You are available via the MSN of the replacement telephone where free seating has been configured. You can operate your telephone using the free seating configuration of the inserted USB memory stick.
Group Functions
In addition to internal subscribers, the PBX can also manage groups. The internal subscribers can become members of any and all groups. These groups can be used, for example, to collect the internal subscribers in certain departments or teams (Support, Marketing, Sales) together.
Membership in a group does not necessarily mean that a subscriber receives calls sent to the group. A subscriber that is logged out takes on no group functions. This can be especially important for employees of a support department, who should not be available to customers around the clock, but rather rotate in and out of the hotline.
Detailed Information about Group Functions
Important: Not available for operation on the PBX COMpact 3000.
Note:
If a group (subgroup) has been configured in the PBX as member of a group (main group) and a subscriber is at the same time member of these two groups, he will only be considered as a member of the main group when a call comes in.
Subgroups (i.e. groups that have been configured as members of other groups) are "permanently logged in as incoming" and "permanently logged out as outgoing" in the corresponding main group.
There are three different ways to logon:
Only incoming
When logging into a group as "incoming", the subscriber then finds himself in the call distribution of the group in question for internal, exchange line and door calls.
Only outgoing
When logging into a group as "outgoing", the subscriber acquires a number of characteristics/access rights from the group. These replace his own characteristics/access rights as an individual subscriber for outgoing work-related calls. A subscriber can only be logged on in a single group as "outgoing" even if he is a member of more than one group.
Note: If a subscriber logs into different groups as "outgoing" one after the other, he will only remain logged in as "outgoing" in the group that he logged into last.
Incoming and outgoing
When logging into a group as "incoming and outgoing", the subscriber then finds himself in the call distribution of the group in question for internal, exchange line and door calls and also acquires a number of additional characteristics/access rights from the group. These replace his own characteristics/permissions as an individual subscriber for outgoing work-related calls.
Note: If a subscriber logs into more than one group as "incoming and outgoing", he will only remain logged in as "incoming and outgoing" in the group that he logged into last. And in all other groups, he is then only "logged in as incoming".
Logging the Telephone In/Out
The log in/out can be carried out as follows:
• Via the telephone menu
Requirements:
- Knowledge of the telephone, its menu options and the required PIN, if necessary
- The telephone is a member of a group configured in the PBX
- Authorisation in the PBX for Controlling of the PBX via telephone
In order to log a telephone into a group and or out of it, press the function key configured for group functions.
Or, proceed as described in the following.
- Press the menu key and open the menu functions > group.
-
Select the desired group based on its name/number.
-
Select the desired option:
logging in: Logs the telephone into the group.
log out: Logs the telephone out of the group.
- Select the desired option:
outgoing: Select the type of call for outgoing.
inbound: Select the type of call for incoming.
inbound & outbnd: Selects the type of call for inbound & outbound.
Logging Telephone Out of All Groups
The log out can be carried out as follows:
• Via the telephone menu
Requirements:
– Knowledge of the telephone, its menu options and the required PIN, if necessary
- The telephone is a member of a group configured in the PBX
– Authorisation in the PBX for Controlling of the PBX via telephone
In order to log out of all groups, press the function key configured for logging out of all groups.
Or, proceed as described in the following.
- Press the menu key and open the menu Functions > log out all grp..
Configuring and Operating Function Key for Group Function
Press the key for general functions while the telephone is the idle state to open the menu for logging in or out of a specified group. After making the selection, you still need to specify the type of call (incoming, outgoing or incoming & outgoing).
Press the defined key to execute the action configured in the key for the specified group.
In addition, when functions are defined on the first key level, the status of the function is indicated by the corresponding LED.
LED signalling next to the key:
Green The telephone is logged into the group for incoming and outgoing calls.
Yellow The telephone is only logged into the group for either incoming or outgoing calls.
Off The telephone is logged out of the group.
LED signalling next to the key (when defined with a specific group function only incoming):
Green The telephone is logged into the group for incoming and outgoing calls.
Yellow The telephone is only logged into the group for incoming calls.
Off The telephone is logged out of the group for incoming calls.
LED signalling next to the key (when defined with a specific group function only outgoing):
Green The telephone is logged into the group for outgoing and incoming calls.
Yellow The telephone is only logged into the group for outgoing calls.
Off The telephone is logged out of the group for outgoing calls.
The configuration can be carried out as follows:
• Via the configuration manager
• Via the telephone menu
Configuring Function Key for General Group Functions via Configuration Manager
Requirements:
- Configuration manager, open with a sufficient authority level
-
The telephone is a member of a group configured in the PBX
-
Open the page Function keys > Assign function keys.
-
Only available in installed extension modules: In the telephone displayed at the top left, click the key group in which you would like to define keys.
-
Click one of the following tabs:
Level 1: Keys are defined on the first key level.
Level 2: Keys are defined on the second key level.
- In the list field next to the function key that you would like to define, select the function Group.
The current settings for defining the key are displayed.
-
In the Telephone number entry field, enter the phone number of the group.
-
In the Key name entry field, enter a name for the key. The following entries are possible:
Up to 16 digits
Digits and characters
Note: The key name is used for printing the label and for display.
- Click Execute.
Requirements for operating the function:
- Authorisation in the PBX for Controlling of the PBX via telephone
Configuring Function Key for Defined Group Functions via Configuration Manager
Requirements:
- Configuration manager, open with a sufficient authority level
- The telephone is a member of a group configured in the PBX
-
Open the page Function keys > Assign function keys.
-
Only available in installed extension modules: In the telephone displayed at the top left, click the key group in which you would like to define keys.
-
Click one of the following tabs:
Level 1: Keys are defined on the first key level.
Level 2: Keys are defined on the second key level.
- In the list field next to the function key that you would like to define, select the Defined group function.
The current settings for defining the key are displayed.
- In the Telephone number entry field, enter the phone number of the group.
- In the action list field, select one of the following options:
Log out: Press the key to log the telephone out of the group.
Log in: Press the key to log the telephone into the group.
Change logging: Press the key to change the log in status.
- In the direction list field, select one of the following options:
incoming: Select the type of call for incoming.
outgoing: Select the type of call for outgoing.
incoming + outgoing: Select the type of call for inbound + outbound.
- In the Key name entry field, enter a name for the key. The following entries are possible:
Up to 16 digits
Digits and characters
Note: The key name is used for printing the label and for display.
- Click Execute.
Requirements for operating the function:
- Authorisation in the PBX for Controlling of the PBX via telephone
Configuring Function Key for Group Functions via Telephone Menu
Requirements:
– Knowledge of the telephone, its menu options and the required PIN, if necessary
- The telephone is a member of a group configured in the PBX
- Press the menu key and open the define keys menu.
-
Press the function key that you would like to define.
-
Select the desired option:
first level: Keys are defined on the first key level.
second level: Keys are defined on the second key level.
The list of available functions is displayed.
- Select the group function.
The current settings for defining the key are shown on the display.
- Select the kind of key. Press the ⬤ softkey to switch over between the different kinds of keys.
general: Press the key to select the action and direction of the group configured.
defined: Executes the action specified for the group configured.
-
Press the softkey.
-
Select a group based on its name/number.
-
Press the softkey.
-
Enter a name for the group. The following entries are possible:
Up to 16 digits
Digits and characters
- Only when the kind of key defined has been selected: Select the action. Press the
+ softkey to switch over between the different actions.
log out: Press the key to log the telephone out of the group.
logging in: Press the key to log the telephone into the group.
log over: Press the key to change the log in status.
- Only when the kind of key defined has been selected: Select the direction. Press the
softkey to switch over between the different directions.
inbound: Select the type of call for incoming.
outgoing: Select the type of call for outgoing.
inbound & outbnd: Selects the type of call for incoming and outgoing.
- Press the softkey to accept the setting.
Requirements for operating the function:
– Authorisation in the PBX for Controlling of the PBX via telephone
Configuring and Operating Function Key for Logging Out of All Groups
Press the key while the telephone is in the idle state to log the telephone out of all groups.
LED signalling next to the key:
None
The configuration can be carried out as follows:
• Via the configuration manager
• Via the telephone menu
Configuring Function Key for Logging Off of All Groups via Configuration Manager
Requirements:
- Configuration manager, open with a sufficient authority level
-
The telephone is a member of a group configured in the PBX
-
Open the page Function keys > Assign function keys.
- Only available in installed extension modules: In the telephone displayed at the top left, click the key group in which you would like to define keys.
- Click one of the following tabs:
Level 1: Keys are defined on the first key level.
Level 2: Keys are defined on the second key level.
- In the list field next to the function key that you would like to define, select the Group functions off function.
The current settings for defining the key are displayed.
- In the Key name entry field, enter a name for the key. The following entries are possible:
Up to 16 digits
Digits and characters
Note: The key name is used for printing the label.
- Click Execute.
Requirements for operating the function:
- Authorisation in the PBX for Controlling of the PBX via telephone
Configuring Function Key for Logging Out of All Groups via Telephone Menu
Requirements:
– Knowledge of the telephone, its menu options and the required PIN, if necessary
- The telephone is a member of a group configured in the PBX
- Press the menu key and open the define keys menu.
- Press the function key that you would like to define.
- Select the desired option:
first level: Keys are defined on the first key level.
second level: Keys are defined on the second key level.
The list of available functions is displayed.
- Select the log out all grp. function.
The current settings for defining the key are shown on the display.
- Press the softkey to accept the setting.
Requirements for operating the function:
– Authorisation in the PBX for Controlling of the PBX via telephone
Configuring and Operating the Display of the Group Status
Press the key in the idle mode of the telephone to display the current group status of the subscribers (logged out, logged in as incoming and/or outgoing) on the LEDs of configured speed dialling keys for approx. ten seconds. For this purpose, the speed dialling keys must be assigned to the corresponding subscriber telephone numbers. Press the key again during the ten seconds to cancel the display.
LED signalling next to the key:
Blinking
The group status is being queried.
yellow
LED signalling next to the speed dialling keys assigned to subscriber telephone numbers:
Red The telephone is logged out of the group.
Green The telephone is logged into the group for incoming and outgoing calls.
Yellow The telephone is logged into the group for incoming calls.
Blinking
The telephone is logged into the group for outgoing calls.
yellow
The configuration can be carried out as follows:
• Via the configuration manager
• Via the telephone menu
Configuring Function Key for Displaying the Group Status via Configuration Manager
Requirements:
- Configuration manager, opened with a sufficient authorization level
- Open the page Function keys > Assign function keys.
- Only available in installed extension modules: In the telephone displayed at the top left, click the key group in which you would like to define keys.
- Click one of the following tabs:
Level 1: Keys are defined on the first key level.
Level 2: Keys are defined on the second key level.
- In the list field next to the function key that you would like to define, select the function Group status.
The current settings for defining the key are displayed.
- In the Telephone no entry field, enter the phone number of the group.
- In the Key name entry field, enter a name for the key. The following entries are possible:
Up to 16 digits
Digits and characters
Note: The key name is used for printing the label.
- Click Execute.
Requirements for operating the function:
– Speed dialling keys assigned to the corresponding subscriber telephone numbers
Configuring Function Key for Displaying the Group Status via Telephone Menu
Requirements:
- Knowledge of the telephone, its menu options and the required PIN, if necessary
- Press the menu key and open the Define keys menu.
- Press the function key that you would like to define.
- Select the desired option:
First level: Keys are defined on the first key level.
Second level: Keys are defined on the second key level.
The list of available functions is displayed.
- Select the Group status function.
The current settings for defining the key are shown on the display.
- Press the softkey.
- Select a group based on its name/number.
Configuring and Operating Functions
Group Functions
Configuring and Operating the Display of the Group Status
-
Press the softkey.
-
Enter a name for the group. The following entries are possible:
Up to 16 digits
Digits and characters
- Press the softkey to accept the setting.
Requirements for operating the function:
– Speed dialling keys assigned to the corresponding subscriber telephone numbers
Hotel Function
The hotel function allows you to conveniently manage room and call data when the PBX is used in a hotel.
Function Areas of the Hotel Function
The range of features in the hotel function can be divided into the following three areas:
Hotel reception telephones
Via the display and the LEDs on the function keys, the hotel reception telephone supports various control and query functions thereby making the need of a PC at the reception unnecessary. A function key is configured on the reception telephone for each room. In addition to check-in and check-out, other functions are available.
Before check-in, the status of the room can be checked (cleaned, unclean, blocked) and changed.
As soon as check-in is complete, the following configuration and query functions can be used.
- Call charge queries including check-in date
- Interim call charge calculation printout
- Wake-up time configuration
- External access block
- Check-out
Room telephones
The PBX provides a variety of functions that may not be suitable or may even be harmful in relation to room telephone usage. Therefore, telephones configured as room telephones are blocked from not only programming functions (for example, do-not-disturb, call forwarding) but also from switching functions and special types of call initiation. This means that guests can only make and except calls. Furthermore, cleaning personnel have the option of indicating the status of the room by entering a series of numbers (cleaned, unclean, blocked).
The advantages of a system telephone compared to using standard telephones include centrally controlled delete functions when a guest checks out (data protection) as well as various convenience functions, and specially configured function keys when necessary. The functions that are still permitted on room telephones are operated in the exact same way as is
described for normal telephones. With one exception: A function key assigned to the hotel room function enables the guest to set a wake-up time as well as query his call charges and his check-in time.
The following functions are still possible:
- Making and excepting internal and external calls
- Deleting data and call charges using the Functions menu command (this does not affect the call charge counter on the PBX)
- The use of the caller/call/redial list as well as of the telephone book (parts of the telephone book can be blocked in the telephone)
- Scheduled call/reminders and power dialling
- Call charge query and wake-up time configuration using a function key
Print function
This print function enables a printout of the guest's call charges up to that point as an invoice (or interim invoice) including an itemised list of the individual calls. This function is controlled by the hotel reception telephone.
Note: The recommended printers are listed in the manual for the PBX in question.
Configuring the Hotel Function
Important: Only available for operation on the PBXs COMpact 5020 VoIP, COMmander Basic.2 and COMmander Business.
The hotel function is configured as described in the following.
- Use the configuration manager on the PBX to activate the hotel function.
Important: Activating is done with an activation code that you can acquire from the Auerswald Upgrade Centre. For operation on the PBXs, COMmander Business and COMmander Basic.2, the number of available
hotel telephones (reception and room telephones) must be activated. For operation on the PBX, COMpact 5020 VoIP, the hotel function only needs to be activated once.
- Use the configuration manager on the PBX to select the telephones that are to be used as reception or room telephones.
Note: It is not possible to use the system telephone as a waiting field reception and as a reception telephone at the same time.
- Use the configuration manager on the PBX to configure the print function.
- On each hotel reception telephone, assign a hotel room key each for each hotel room telephone to be managed.
Note:
If a check-in or check-out operation is in progress, the hotel reception telephone is not accessible for incoming calls during this period of time. It is recommended to configure call forwarding on busy for cases like this.
Note that the option of entering internal calls into the caller list must be activated if the hotel reception telephone should inform hotel guests of why their calls could not go through.
- Assign a hotel room key on each room telephone for call charge queries and for setting up wake-up times.
Note: In order to avoid misunderstandings when querying call charges, the value configured in the telephone webserver for the cost per call unit must correspond with the value configured in COMset.
Check/Change Room Status on Hotel Reception Telephone
When the guest arrives, you can check the room status and, if necessary, change it before check-in (cleaned, unclean, blocked). If the room is block, check-in is not possible. The other two states are for information only.
The checking/changing procedure can be carried out as follows:
• Via the telephone menu
Requirements:
– Knowledge of the telephone, its menu options and the required PIN, if necessary
– A function key configured for hotel rooms
- Press a function key configured for a hotel room twice.
Note: If the room data is being accessed by another hotel reception telephone or even by the hotel room telephone itself, you will be notified that the data is already in process.
- Select room status.
The ♦con indicates the current setting.
- Select the desired option:
clean: Indicates that the room is cleaned.
unclean: Indicates that the room is uncleaned.
blocked: Indicates that the room is out of service.
Note: After check-in, the room status is reset to unclean every day at midnight.
Performing Check-in on Hotel Reception Telephone
Performing this procedure can be carried out as follows:
• Via the telephone menu
Requirements:
-
Knowledge of the telephone, its menu options and the required PIN, if necessary
– A function key configured for hotel rooms
– Room status not blocked -
Press a function key configured for a hotel room twice.
Note: If the room data is being accessed by another hotel reception telephone or even by the hotel room telephone itself, you will be notified that the data is already in process.
- Select check in.
Configuring Wake-up Time for Room on Hotel Reception Telephone
The configuration can be carried out as follows:
• Via the telephone menu
Requirements:
– Knowledge of the telephone, its menu options and the required PIN, if necessary
– A function key configured for hotel rooms
– Successful check-in
- Press a function key configured for a hotel room twice.
Note: If the room data is being accessed by another hotel reception telephone or even by the hotel room telephone itself, you will be notified that the data is already in process.
- Select wake-up time.
The icon indicates the current setting.
- Select the desired option:
switched off: Disables wake-up. (No other action is required.)
wake-up once: Switches the wake-up time on for a single wake-up.
wake-up daily: Switches the wake-up time on for daily wake-up.
- Enter the time.
- Press the softkey to save the entry.
Querying Call Charges for Room on Hotel Reception Telephone
The query can be carried out as follows:
• Via the telephone menu
Requirements:
– Knowledge of the telephone, its menu options and the required PIN, if necessary
– A function key configured for hotel rooms
- Successful check-in
- Press a function key configured for a hotel room twice.
Note: If the room data is being accessed by another hotel reception telephone or even by the hotel room telephone itself, you will be notified that the data is already in process.
- Select call charges.
The call charges including check-in date are displayed.
Printing Interim Invoice for Room from Hotel Reception Telephone
If the guest would like to see a breakdown of his call charges so far during his stay, you can print out an interim invoice directly from the printer. The format of the interim invoice corresponds to the final invoice, except that the check-out time is replaced by the print date. The printed data is retained in its entirety and is printed again at check-out.
The printout can be made as follows:
• Via the telephone menu
Requirements:
– Knowledge of the telephone, its menu options and the required PIN, if necessary
– A function key configured for hotel rooms
- Successful check-in
- Printer connected
– Existing call charges
- Press a function key configured for a hotel room twice.
Note: If the room data is being accessed by another hotel reception telephone or even by the hotel room telephone itself, you will be notified that the data is already in process.
- Select interim invoice.
The call charges accumulated so far are printed.
- Press the softkey to accept a printout.
Note: The number of copies configured via the configuration manager on the PBX is not taken into account; this is only information for the guest. If a copy should be printed anyway, when the question appears whether the printout is ok, simply press the ✗ softkey and then select repeat print-out.
Blocking External Telephoning for Room on Hotel Reception Telephone
For example, if a guest, who has children staying in his room, wishes to restrict external calls, these calls can be blocked by the hotel reception telephone. This means that only internal calls can be made. External calls can still be accepted.
The blocking can be done as follows:
• Via the telephone menu
Requirements:
– Knowledge of the telephone, its menu options and the required PIN, if necessary
– A function key configured for hotel rooms
- Successful check-in
- Press a function key configured for a hotel room twice.
Note: If the room data is being accessed by another hotel reception telephone or even by the hotel room telephone itself, you will be notified that the data is already in process.
2. Select external access.
The ♦con indicates the current setting.
3. Select the desired option:
allowed: Allows both incoming and also fee-based outgoing external calls on the hotel room telephone.
inbound only: Allows only the acceptance of incoming external calls on the hotel room telephone.
Performing Check-out on Hotel Reception Telephone
When checkout is performed, it is also possible to print out a final invoice. The printout contains an itemised list of calls made between the times the guest checked in and when he checked out. The invoice total corresponds with the call charge counter displayed by selecting call charges.
Performing this procedure can be carried out as follows:
• Via the telephone menu
Requirements:
– Knowledge of the telephone, its menu options and the required PIN, if necessary
– A function key configured for hotel rooms
- Successful Check-in
- Press a function key configured for a hotel room twice.
Note: If the room data is being accessed by another hotel reception telephone or even by the hotel room telephone itself, you will be notified that the data is already in process.
- Select check out.
If no call charges have accumulated, check-out is completed.
If call charges have accumulated and the printer is connected, you are asked whether you would like a printout of the final invoice.
- Press the softkey to initiate a printout.
The call charges accumulated during the stay are printed.
Note: If you press the ✗ softkey instead, check-out is completed at the end.
- Press the √ softkey to accept the printout and to complete the check-out procedure.
Note: If the printout is not correct, press the ✗ softkey and then select repeat print-out.
After completing check-out, all of the room data including telephone book, caller, call and redial lists as well as the volume of the ringer is reset. Any scheduled calls configured, the call charge counter and also any call data is deleted.
Note:
The PBX has a call data memory in which call data sets are saved and protected from power outages. If the capacity of the memory has been exceeded and has been overwritten by, for instance, calls made by a long-term guest, a note is made on the invoice that the itemised call list is not complete. The total of the call charges indicated on the invoice is taken from the call charge counter which keeps track of the charge independent of the call data.
If the recording of data associated with a particular type of call is disabled in order to save called data recording space, these calls are missing from the itemised list of individual calls on the telephone invoice. The total of the call charges indicated on the invoice is taken from the call charge counter which keeps track of the charges independent of the call data.
Later, the invoice number is listed in the call data list under the project number. This number is automatically assigned during check-in.
Cancelling a Check-out or Print Job
The cancelling procedure can be carried out as follows:
• Via the telephone menu
Requirements:
– Knowledge of the telephone, its menu options and the required PIN, if necessary
If you have accidentally selected the check out procedure or problems with the printer are preventing a correct printout, there are several options for cancelling the operation.
- Press the Exit key. The operation is cancelled and the room remains in the check-in state.
- When the question print-out OK? appears, press the ✗ softkey and select cancel print-out. The operation is cancelled and the room remains in the check-in state.
- Do not press any key when the question print-out OK? appears. After three minutes, the operation is cancelled and the room remains in the check-in state.
Configuring Wake-up Time on Hotel Room Telephone
The configuration can be carried out as follows:
• Via the telephone menu
Requirements:
– A function key configured for hotel rooms
– Successful check-in
- Press a function key configured for hotel rooms.
- Select wake-up time.
The ♦con indicates the current setting.
- Select the desired option:
switched off: Disables wake-up. (No other action is required.)
wake-up once: Switches the wake-up time on for a single wake-up.
wake-up daily: Switches the wake-up time on for daily wake-up.
- Enter the time.
- Press the softkey to save the entry.
Querying Call Charges on Hotel Room Telephone
The query can be carried out as follows:
• Via the telephone menu
Requirements:
– A function key configured for hotel rooms
- Successful check-in
- Press a function key configured for hotel rooms.
- Select call charges.
The call charges including check-in date are displayed.
Configuring and Operating Function Key for Hotel Room on Hotel Reception Telephone
Press the key twice (or use the shift key for the second level) when the telephone is in the idle state to open the menu for check-in/check-out for the hotel room telephone assigned to the key. After this is done, any functions available are dependent on the state of the room whether checked in or checked out.
Press the key once while the telephone is in the idle state to transfer the telephone number saved in the key to dial preparation – also as an additional number.
Exception: If the phone number is currently being called, pick-up the call.
After picking up the receiver, press the key to dial the telephone number saved in the key.
Press the key during a call to put the active communication partner on hold and to dial the phone number saved in the key.
In addition, the corresponding LED indicates the status of the room telephone.
LED signalling next to the key:
Red (blinking) The room telephone is now being called. Press the key to initiate a pick-up.
Red A call is in progress on the room telephone.
Green (blinking) A call was made from the room telephone and the call was not accepted.
Off The room telephone is available. Press the key to place a call.
The configuration can be carried out as follows:
• Via the configuration manager
• Via the telephone menu
Configuring Function Key for Hotel Room on Hotel Reception Telephone via Configuration Manager
Requirements:
- Configuration manager, open with a sufficient authority level
-
The hotel subscriber activated in the PBX (for a fee) and the hotel reception telephone function assigned to the telephone
-
Open the page Function keys > Assign function keys.
-
Only available in installed extension modules: In the telephone displayed at the top left, click the key group in which you would like to define keys.
-
Click the Level 1 tab.
Important: Configuring this function is only possible on the first level. The second level is then blocked. If a function has been assigned to the second level, it is deleted.
- In the list field next to the function key that you would like to define, select the Hotel room function.
The current settings for defining the key are displayed.
-
In the Telephone number entry field, enter the internal telephone number for the room telephone.
-
In the Key name entry field, enter a name for the key. The following entries are possible:
Up to 16 digits
Digits and characters
Note: The key name is used for printing the label.
- Click Execute.
Configuring Function Key for Hotel Room on Hotel Reception Telephone via Telephone Menu
Requirements:
- Knowledge of the telephone, its menu options and the required PIN, if necessary
-
The hotel subscriber activated in the PBX (for a fee) and the hotel reception telephone function assigned to the telephone
-
Press the menu key and open the define keys menu.
- Press the function key that you would like to define.
- Select first level.
Important: Configuring this function is only possible on the first level. The second level is then blocked. If a function has been assigned to the second level, it is deleted.
The list of available functions is displayed.
- Select the hotel room function.
The current settings for defining the key are shown on the display.
- Press the softkey.
- Select the room telephone using its name/number.
-
Press the softkey.
-
Enter a new name for the room telephone. The following entries are possible:
Up to 16 digits
Digits and characters
- Press the softkey to accept the setting.
Configuring and Operating Function Key for Hotel Room on Hotel Room Telephone
Important: Configuring a function key on the room telephone must be done via the configuration manager, since configuration via the telephone menu is blocked.
Press the key to open the menu for querying call charges and setting up a wake-up time.
LED signalling next to the key:
None
The configuration can be carried out as follows:
• Via the configuration manager
• Via the telephone menu
Configuring Function Key for Hotel Room on Room Telephone via Configuration Manager
Requirements:
- Configuration manager, open with a sufficient authority level
-
The hotel subscriber activated in the PBX (for a fee) and the room telephone function assigned to the telephone
-
Open the page Function keys > Assign function keys.
- Only available in installed extension modules: In the telephone displayed at the top left, click the key group in which you would like to define keys.
3. Click the Level 1 tab.
Important: Configuring this function is only possible on the first level. The second level is then blocked. If a function has been assigned to the second level, it is deleted.
- In the list field next to the function key that you would like to define, select the Hotel room function.
The current settings for defining the key are displayed. - In the Telephone number entry field, enter the internal telephone number for the room telephone.
- In the Key name entry field, enter a name for the key. The following entries are possible:
Up to 16 digits
Digits and characters
Note: The key name is used for printing the label.
7. Click Execute.
InterCom Announcement/Handsfree
The InterCom function enables an announcement to one system telephone or to all system telephones of a group from any internal telephone without someone having to actively receive a call (for example, in a doctor's office).
If the InterCom destination is one system telephone, this can be programmed to switch on the microphone in addition to the loudspeaker (handsfree) so that a person nearby can speak with the caller using this intercom system.
InterCom Announcement Procedure
InterCom announcement is carried out as follows:
- Depending on the InterCom destination, one system telephone or all system of a group are called using the InterCom function.
Note: Only the system telephones of the group which are ready for calls (e.g., not busy) are called. The individual group members need not to be logged into the group. They are also called when they are logged out of the group.
- After a few rings, either one system telephone or all system telephones of the group automatically pick up the call, depending on the InterCom destination.
- Announcement is executed.
Note: Announcement is limited to 120 seconds due to security reasons in order to prevent possible misuse of this function (for example, eavesdropping from remote rooms).
- After 120 seconds has elapsed, the connection is automatically interrupted. The connection can be maintained if the InterCom destination is one system telephone and the receiver is picked up before 120 seconds has elapsed.
Executing InterCom Announcement
Requirements:
– Existing InterCom authorisation at the InterCom destination/s
- Configured function key for InterCom announcement
Note: InterCom announcement can also be executed from any internal telephone (see the PBX manual).
Depending on the kind of action configured on the key, proceed as described.
- Press the function key for InterCom announcement or press and hold the function key.
The LED next to the function key lights up in yellow or green to indicate the existing call connection. - To end announcement function, press the function key again or release the function key.
Configuring and Operating Function Key for InterCom Announcement
Press the key while the telephone is in the idle state to dial the subscriber or group telephone number assigned to the key and initiate the InterCom announcement. Depending on the kind of action configured, you need to hold the key during the announcement (as soon as you release the key again, the connection is terminated) or switch the key over by briefly pressing the key (the key is pressed once at the start and once at the end).
In addition, when InterCom destination is defined on the first key level, the status of the InterCom destination connection is indicated by the corresponding LED.
LED signalling next to the key (when defined with an internal subscriber telephone number):
Green There is currently an active connection to the InterCom destination.
Off There is currently no active connection to the InterCom destination.
LED signalling next to the key (when defined with an internal group telephone number):
Green There is currently an active connection to all InterCom destinations.
Yellow There is currently an active connection to at least one InterCom destination.
Yellow The InterCom call is sent to the PBX.
(blinking)
Red No InterCom destination can be reached.
The configuration can be carried out as follows:
• Via the configuration manager
• Via the telephone menu
Configuring Function Key for InterCom Announcement via Configuration Manager
Requirements:
- Configuration manager, open with a sufficient authority level
-
For a group as InterCom destination: at least one group configured in the PBX
-
Open the page Function keys > Assign function keys.
- Only available in installed extension modules: In the telephone displayed at the top left, click the key group in which you would like to define keys.
- Click one of the following tabs:
Level 1: Keys are defined on the first key level.
Level 2: Keys are defined on the second key level.
- In the list field next to the function key that you would like to define, select the InterCom announcement function.
The current settings for defining the key are displayed.
- In the Telephone number entry field, enter the destination number. The following entries are possible:
Internal telephone number of the subscriber Internal telephone number of the group
- In the Type list field, select one of the following options:
Subscriber: Defines the telephone number entered as a subscriber telephone number.
Group: Defines the telephone number entered as a group telephone number.
- In the Kind of action list field, select one of the following options:
hold: The key must be held down during the announcement.
switch over: A short press of the key starts the announcement. Another short press of the key ends the announcement.
- In the Key name entry field, enter a name for the key. The following entries are possible:
Up to 16 digits
Digits and characters
Note: The key name is used for printing the label and for display.
- Click Execute.
Requirements for operating the function:
– Existing InterCom authorisation at the InterCom destination
Configuring Function Key for InterCom Announcement via Telephone Menu
Requirements:
– Knowledge of the telephone, its menu options and the required PIN, if necessary
– Existing InterCom authorisation at the InterCom destination
- For a group as InterCom destination: at least one group configured in the PBX
- Press the menu key and open the define keys menu.
-
Press the function key that you would like to define.
-
Select the desired option:
first level: Keys are defined on the first key level.
second level: Keys are defined on the second key level.
The list of available functions is displayed.
- Select the InterCom function and then InterCom OneWay.
The current settings for defining the key are shown on the display.
- Scroll to the last ⚙ softkey to select the type of InterCom destination. Pressing the
softkey allows you to switch over between the different types of InterCom destinations available.
user: Selects an internal subscriber as InterCom destination.
group: Selects a group as InterCom destination.
-
Press the softkey.
-
Select InterCom destination from the list.
-
Press the softkey.
-
Enter a name. The following entries are possible:
Up to 16 digits
Digits and characters
- Select the kind of action. Pressing the penultimate softkey allows you to switch
over between the different kinds of action available.
hold key: The key must be held down during the announcement.
toggle key: A short press of the key starts the announcement. Another short
press of the key ends the announcement.
- Press the softkey to accept the setting.
InterCom Handsfree Procedure
InterCom handsfree is carried out as follows:
- A system telephone is called using InterCom handsfree.
• After a few rings, the system telephone automatically picks up the call. - Hands-free calling is executed.
Note: Hands-free calling is limited to 120 seconds due to security reasons in order to prevent possible misuse of this function (for example, eavesdropping from remote rooms).
- After 120 seconds has elapsed, the connection is automatically interrupted unless the system telephone receiver is picked up during this time.
Executing InterCom Handsfree
Requirements:
– Existing InterCom authorisation at the InterCom destination
- Configured function key for InterCom handsfree
Note: InterCom handsfree can also be executed from any internal telephone (see the PBX manual).
Depending on the kind of action configured on the key, proceed as described.
-
Press the function key for InterCom handsfree or press and hold the function key. The LED next to the function key lights up in green to indicate the existing call connection.
-
To end handsfree function, press the function key again or release the function key.
Configuring and Operating Function Key for InterCom Handsfree
Press the key while the telephone is in the idle state to dial the phone number assigned to the key and initiate InterCom handsfree. Depending on the kind of action configured, you need to hold the key during handsfree operation (as soon as you release the key again, the connection is terminated) or switch the key over by briefly pressing the key (the key is pressed once at the start and once at the end).
In addition, when InterCom destination is defined on the first key level, the status of the InterCom destination connection is indicated by the corresponding LED.
LED signalling next to the key:
Green There is currently an active connection to the InterCom destination.
Off There is currently no active connection to the InterCom destination.
The configuration can be carried out as follows:
• Via the configuration manager
• Via the telephone menu
Configuring Function Key for InterCom Handsfree via Configuration Manager
Requirements:
- Configuration manager, open with a sufficient authority level
- Open the page Function keys > Assign function keys.
-
Only available in installed extension modules: In the telephone displayed at the top left, click the key group in which you would like to define keys.
-
Click one of the following tabs:
Level 1: Keys are defined on the first key level.
Level 2: Keys are defined on the second key level.
- In the list field next to the function key that you would like to define, select the InterCom handsfree function.
The current settings for defining the key are displayed.
-
In the Telephone number entry field, enter the destination number.
-
In the Kind of action list field, select one of the following options:
hold: The key must be held down during handsfree operation.
switch over: A short press of the key starts handsfree operation. Another short press of the key ends handsfree operation.
- In the Key name entry field, enter a name for the key. The following entries are possible:
Up to 16 digits
Digits and characters
Note: The key name is used for printing the label and for display.
- Click Execute.
Requirements for operating the function:
– Existing InterCom authorisation at the InterCom destination
Configuring Function Key for InterCom Handsfree via Telephone Menu
Requirements:
– Knowledge of the telephone, its menu options and the required PIN, if necessary
– Existing InterCom authorisation at the InterCom destination
- Press the menu key and open the define keys menu.
- Press the function key that you would like to define.
- Select the desired option:
first level: Keys are defined on the first key level.
second level: Keys are defined on the second key level.
The list of available functions is displayed.
- Select the InterCom function and then IC speakerphone.
The current settings for defining the key are shown on the display. - Press the softkey.
- Select the InterCom destination from the list.
- Press the softkey.
- Enter a name. The following entries are possible:
Up to 16 digits
Digits and characters
- Select the kind of action. Pressing the ⬆ softkey allows you to switch over between the different kinds of action available.
hold key: The key must be held down during the announcement.
toggle key: A short press of the key starts the announcement. Another short press of the key ends the announcement.
- Press the softkey to accept the setting.
Switching InterCom Permission On/Off
Switching this on/off can be done as follows:
• Via the telephone menu
Requirements:
– Knowledge of the telephone, its menu options and the required PIN, if necessary
- Authorisation in the PBX for Controlling of the PBX via telephone
For InterCom calls, InterCom permission must be enabled for the system telephone being called.
Press the function key configured for InterCom permission to switch InterCom permission on or off.
Or, proceed as described in the following.
- Press the menu key and open the menu functions > InterCom (Auth).
The icon indicates the current setting.
- Select the desired option:
switch on: Enables InterCom permission.
switch off: Disables InterCom permission.
Configuring and Operating Function Key for InterCom Permission
Press the key to switch the InterCom permission function on or off or to switch it over.
In addition, when functions are defined on the first key level, the status of the function is indicated by the corresponding LED.
LED signalling next to the key:
Green InterCom permission is enabled.
Off InterCom permission is disabled.
The configuration can be carried out as follows:
• Via the configuration manager
• Via the telephone menu
Configuring Function Key for InterCom Permission via Configuration Manager
Requirements:
- Configuration manager, open with a sufficient authority level
- Open the page Function keys > Assign function keys.
- Only available in installed extension modules: In the telephone displayed at the top left, click the key group in which you would like to define keys.
-
Click one of the following tabs:
Level 1: Keys are defined on the first key level.
Level 2: Keys are defined on the second key level. -
In the list field next to the function key that you would like to define, select the InterCom permission function.
The current settings for defining the key are displayed.
- In the Kind of switching list field, select one of the following options:
switch off: Pressing the key disables InterCom permission.
switch on: Pressing the key enables InterCom permission.
switch over: Pressing the key switches InterCom permission over.
- In the Key name entry field, enter a name for the key. The following entries are possible:
Up to 16 digits
Digits and characters
Note: The key name is used for printing the label.
- Click Execute.
Requirements for operating the function:
- Authorisation in the PBX for Controlling of the PBX via telephone
Configuring Function Key for InterCom Permission via Telephone Menu
Requirements:
– Knowledge of the telephone, its menu options and the required PIN, if necessary
- Press the menu key and open the define keys menu.
- Press the function key that you would like to define.
- Select the desired option:
first level: Keys are defined on the first key level.
second level: Keys are defined on the second key level.
The list of available functions is displayed.
- Select the InterCom (Auth) function.
The current settings for defining the key are shown on the display.
- Select the kind of switching. Pressing the ⬆ softkey allows you to switch over between the different kinds of switching.
switch off: Pressing the key disables InterCom permission.
switch on: Pressing the key enables InterCom permission.
switch over: Pressing the key switches InterCom permission over.
- Press the softkey to accept the setting.
Requirements for operating the function:
- Authorisation in the PBX for Controlling of the PBX via telephone
Loudspeaker Audio Out
This function enables loudspeaker audio out over an audio output on the loudspeaker connected to the PBX unit or an active loudspeaker (for example, a loudspeaker system in a department store/supermarket). In addition, a previously specified telephone number is called by an internal telephone. The call connection is immediately established after dialling the telephone number.
Executing Loudspeaker Audio Out
Important: Not available for operation on the PBX COMpact 3000.
The execution can be made as follows:
• Via the telephone menu
Requirements:
– Authorization in the PBX for Speaker announcement
– A function key configured for loudspeaker audio out
Note: Loudspeaker audio out can also be executed from any internal telephone (see PBX manual).
Depending on the kind of action configured on the key, proceed as described.
- Press the function key for InterCom announcement/handsfree or press and hold the function key.
The LED next to the function key lights up in green to indicate the existing call connection.
- To end announcement or handsfree function, press the function key again or release the function key.
Configuring and Operating Function Key for Loudspeaker Audio Out
Important: Not available for operation on the PBX COMpact 3000.
Press the key while the telephone is in the idle state to establish a connection to the audio output on the PBX. Depending on the kind of action configured, you need to hold the key during the audio out (as soon as you release the key again, the connection is terminated) or switch the key over by briefly pressing the key (the key is pressed once at the start and once at the end).
In addition, when the audio output is defined on the first key level, the status of the audio output connection is indicated by the corresponding LED.
LED signalling next to the key:
Green There is currently an active connection to the audio output.
Off There is currently no active connection to the audio output.
The configuration can be carried out as follows:
• Via the configuration manager
• Via the telephone menu
Configuring Function Key for Loudspeaker Audio Out via Configuration Manager
Requirements:
-
Configuration manager, open with a sufficient authority level
– An audio output configured in the PBX -
Open the page Function keys > Assign function keys.
-
Only available in installed extension modules: In the telephone displayed at the top left, click the key group in which you would like to define keys.
-
Click one of the following tabs:
Level 1: Keys are defined on the first key level.
Level 2: Keys are defined on the second key level.
- In the list field next to the function key that you would like to define, select the InterCom Audio Out function.
The current settings for defining the key are displayed.
- In the Telephone number entry field, enter the internal telephone number for the audio output.
- In the Kind of action list field, select one of the following options:
hold: The key must be held down during audio out.
switch over: A short press of the key starts audio out. Another short press of the key ends audio out.
- In the Key name entry field, enter a name for the key. The following entries are possible:
Up to 16 digits
Digits and characters
Note: The key name is used for printing the label and for display.
- Click Execute.
Requirements for operating the function:
– Authorization in the PBX for Speaker announcement
Configuring Function Key for Loudspeaker Audio Out via Telephone Menu
Requirements:
– Knowledge of the telephone, its menu options and the required PIN, if necessary
– An audio output configured in the PBX
- Press the menu key and open the define keys menu.
- Press the function key that you would like to define.
- Select the desired option:
first level: Keys are defined on the first key level.
second level: Keys are defined on the second key level.
The list of available functions is displayed.
- Select the InterCom function and then Audio out.
The current settings for defining the key are shown on the display.
- Select the kind of switching. Pressing the ⬆ softkey allows you to switch over between the different kinds of switching.
hold key: The key must be held down during audio out.
toggle key: A short press of the key starts audio out. Another short press of the key ends audio out.
- Press the softkey to accept the setting.
Requirements for operating the function:
– Authorization in the PBX for Speaker announcement
Macro
The macro function enables a function key to be defined with digits and various consecutive commands, for example, for accessing an answering machine remotely or programming a function on the PBX.
Macro Execution Procedure
The following describes the procedure based on an example key using the following command sequence HZ300CW2Z#22#Lg:
- Command H: After pressing the macro key, the telephone switches to hands-free calling.
Note: If the H command (hang-up/pick-up with the hook key) is located at the beginning of the macro, the start of macro execution must be confirmed.
- Command Z300: The telephone dials the phone number 300 (for example, the answering machine).
- Command C: The telephone waits for the connection.
- Command W2: After the connection has been established, the telephone waits another 2 seconds.
- Command Z#22#: The telephone dials the DTMF code #22#.
- Command Lg: The LED next to the function key switches on (green).
Important: The state of the LED remains the same after a macro is executed – until the next time the command Lo, Lg, Lr or Ly is executed with the same key. If the LED is not to be used for status indication, it is recommended that you add the command Lo (disable LED) to the end of a macro.
If you would like to end macro execution, press the Exit key.
Macro execution is ended immediately when an incoming call is made to a destination that is busy or when a connection returns that it is busy. This occurs, for instance, when the other calling party ends the call or the macro contains a programming code that is not authorised.
Configuring and Operating Function Key for Macro
Press the key while the telephone is in the idle state to execute a macro. If the H command (hang-up/pick-up with the hook key) is located at the beginning of a macro, the macro saved in the system is executed immediately. If this is not the case, you need to first confirm the start of macro execution.
In addition and depending on the settings, when a macro is defined on the first key level, the status of the macro in question is indicated by the corresponding LED.
LED signalling next to the key:
Depending on the purpose of the commands Lo, Lg, Lr and Ly.
Note: If there is a macro on both levels of a function key, LED control is also performed by the macro on the second level. This makes it possible, for instance, to use the macro to switch the LED on the one key level and to use the macro to switch LED off on the other key level. This allows the switching status of a simultaneously switched function to be read on the LED.
The configuration can be carried out as follows:
• Via the configuration manager
• Via the telephone menu
Configuring Function Key for Macro via Configuration Manager
Requirements:
- Configuration manager, open with a sufficient authority level
- Open the page Function keys > Assign function keys.
- Only available in installed extension modules: In the telephone displayed at the top left, click the key group in which you would like to define keys.
- Click one of the following tabs:
Level 1: Keys are defined on the first key level.
Level 2: Keys are defined on the second key level.
- In the list field next to the function key that you would like to define, select the function Macro.
The current settings for defining the key are displayed.
- In the Macro sign entry field, enter the macro. The following entries are possible:
Up to 100 characters for a max. of 10 keys, up to 40 characters for additional keys
The commands listed at the end:
Z [digit sequence]: Digit sequence selection including * and #
W [digits 1-5]: Waiting time/pause time of 1-5 seconds
H: Hang-up/pick-up with the hook key
C: Wait for a connection
Lo: The LED next to the function key switches off
Lr: The LED next to the function key switches on (red)
Ly: The LED next to the function key switches on (yellow)
Lg: The LED next to the function key switches on (green)
Note:
If you would like to configure a programming function on the PBX as a macro, enter a pause between the password and programming code sequence.
Pauses cannot be entered at the beginning of a macro.
The maximum pause time is 5 seconds. This restriction does not apply for the C command (waiting for a connection).
- In the Key name entry field, enter a name for the key. The following entries are possible:
Up to 16 digits
Digits and characters
Note: The key name is used for printing the label and for display.
- Click Execute.
Configuring Function Key for a Macro via Telephone Menu
Requirements:
– Knowledge of the telephone, its menu options and the required PIN, if necessary
- Press the menu key and open the define keys menu.
- Press the function key that you would like to define.
- Select the desired option:
first level: Keys are defined on the first key level.
second level: Keys are defined on the second key level.
The list of available functions is displayed.
- Select the macro function.
The current settings for defining the key are shown on the display.
- Press the softkey.
- Enter a name. The following entries are possible:
Up to 16 digits
Digits and characters
- Press the softkey.
- Enter the macro. The following entries are possible:
Up to 100 characters for a max. of 10 keys, up to 40 characters for additional keys
The commands listed at the end:
Z [digit sequence]: Digit sequence selection including * and #
W [digits 1-5]: Waiting time/pause time of 1-5 seconds
H: Hang-up/pick-up with the hook key
C: Wait for a connection
Lo: The LED next to the function key switches off
Lr: The LED next to the function key switches on (red)
Ly: The LED next to the function key switches on (yellow)
Lg: The LED next to the function key switches on (green)
Note:
If you would like to configure a programming function on the PBX as a macro, enter a pause between the password and programming code sequence.
Pauses cannot be entered at the beginning of a macro.
The maximum pause time is 5 seconds. This restriction does not apply for the C command (waiting for a connection).
- Press the softkey to accept the setting.
Configuring Display Presentation during Macro Execution
This setting specifies if the digits that have just been dialled or the name of the key are shown in the telephone display during macro execution.
The configuration can be made as follows:
• Via the configuration manager
• Via the telephone menu
Configuring Display Presentation during Macro Execution via Configuration Manager
Requirements:
- Configuration manager, open with a sufficient authority level
- Open the page Settings/functions > User settings.
-
Under Display presentation during macro execution, select one of the following options:
single steps: During macro execution, the digits that have just been dialled are shown.
name of the key/name of the contact: During macro execution, the name of the key is shown on the display. -
Click Execute.
Configuring Display Presentation during Macro Execution via Telephone Menu
Requirements:
– Knowledge of the telephone, its menu options and the required PIN, if necessary
- Press the menu key and open the menu settings > user settings > macro display. The icon indicates the current setting.
- Select the desired option:
title/name: During macro execution, the name of the key is shown on the display.
macro steps: During macro execution, the digits that have just been dialled are shown.
Memo
The memo function allows you to enter a telephone number note on the telephone during a call. After the call has been ended, the telephone number can be retrieved and, for instance, accepted into dial preparation.
Creating a Memo
The creation can be carried out as follows:
- Via the telephone menu
Requirements:
– Knowledge of the telephone and its menu options
During a call, proceed as described in the following.
- Select memo.
- Press the softkey.
- Enter the phone number that you would like to make a note of.
- Press the softkey to save the entry.
Retrieving a Memo
The retrieval can be carried out as follows:
• Via the telephone menu
Requirements:
– Knowledge of the telephone and its menu options
- A saved memo
- Press the spftkey.
The saved phone number is displayed.
- Press the softkey in order to accept the phone number for further use in dial preparation.
Note: If you would like to delete the phone number, instead press the ☒ softkey.
Phone Lock
The phone lock can be used to block the telephone from unauthorised use. Even after enabling the phone lock, it is possible to receive incoming calls and to make emergency calls (manual dialling of emergency numbers entered in the PBX only).
Enabling the Phone Lock
Requirements:
– Knowledge of the telephone, its menu options and the required PIN, if necessary
- Configured user or subadmin PIN
- Press the menu key and open the menu functions > phone lock.
Or, press the function key configured for the phone lock.
Disabling the Phone Lock
The disabling procedure can be carried out as follows:
• Via the telephone menu
Requirements:
-
Knowledge of the telephone, its menu options and the required PIN, if necessary
– Knowledge of the user, subadmin or admin PIN -
Press the softkey.
Or, press the function key configured for the phone lock.
- Enter the user, subadmin or admin PIN.
- Press the softkey.
Configuring and Operating Function Key for Phone Lock
Press the key on the telephone in the idle state to enable the phone lock.
Press the key again and then enter the user PIN, admin PIN or subadmin PIN to disable the phone lock again.
In addition, when functions are defined on the first key level, the status of the function is indicated by the corresponding LED.
LED signalling next to the key:
Red The phone lock is enabled.
Off The phone lock is disabled.
The configuration can be carried out as follows:
• Via the configuration manager
• Via the telephone menu
Configuring Function Key for Phone Lock via Configuration Manager
Requirements:
- Configuration manager, open with a sufficient authority level
- Open the page Function keys > Assign function keys.
- Only available in installed extension modules: In the telephone displayed at the top left, click the key group in which you would like to define keys.
- Click one of the following tabs:
Level 1: Keys are defined on the first key level.
Level 2: Keys are defined on the second key level. -
In the list field next to the function key that you would like to define, select the Phone lock function.
The current settings for defining the key are displayed. -
In the Key name entry field, enter a name for the key. The following entries are possible:
Up to 16 digits
Digits and characters
Note: The key name is used for printing the label.
- Click Execute.
Requirements for operating the function:
- Configured user, subadmin or admin PIN
- For enabling the function: Knowledge of the user or subadmin PIN
- For disabling the function: Knowledge of the user, subadmin or admin PIN
Configuring Function Key for Phone Lock via Telephone Menu
Requirements:
- Knowledge of the telephone, its menu options and the required PIN, if necessary
- Press the menu key and open the define keys menu.
- Press the function key that you would like to define.
- Select the desired option:
first level: Keys are defined on the first key level.
second level: Keys are defined on the second key level.
The list of available functions is displayed.
- Select the phone lock function.
The current settings for defining the key are shown on the display.
- Press the softkey to accept the setting.
Requirements for operating the function:
- Configured user, subadmin or admin PIN
- For enabling the function: Knowledge of the user or subadmin PIN
- For disabling the function: Knowledge of the user, subadmin or admin PIN
Pickup
Using Pickup, you can take a call on your own phone that was originally sent to another internal telephone.
If the call has already been taken, the call can be taken using same procedure if the call takeover has been allowed by the subscriber being called. This function is useful, for example, in the case of answering machines.
Executing Pickup
Requirements:
- Knowledge of the telephone, its menu options and the required PIN, if necessary
– Authorization in the PBX for Pickup
If an internal telephone rings in your proximity, proceed as described in the following.
- Press the ♦2 softkey and select pickup.
Or, press a function key configured for pickup.
- Enter the internal phone number of the telephone that is ringing. (In case of direct exchange access you do not have to dial ** first.)
Note: If you would like to take call that is directed to a group, select the pickup for the group telephone number.
- Pick up the receiver or press the Hook key.
Executing Pickup during Call
Requirements:
– Knowledge of the telephone, its menu options and the required PIN, if necessary
– Authorization in the PBX for Pickup
If you are already taking a call and an internal telephone rings in your proximity, proceed as described in the following.
- Select pickup.
- Press the softkey.
You will hear the internal dial tone. The person you had been talking to hears the hold music.
- Enter the internal phone number of the telephone that is ringing. (In case of direct exchange access you do not have to dial ** first.)
Note: If you would like to take call that is directed to a group, select the pickup for the group telephone number.
Once you have finished dialling the phone number, you are connected to the caller.
Configuring and Operating Function Key for Pickup
Pressing the key opens the pickup menu. This allows you to enter the internal phone number of the telephone that is ringing.
In addition, you can press the key to initiate a call take-over on telephones or answering machines for which permission has been given (see the PBX manual).
LED signalling next to the key:
None
Note: If you often take pickups for specific telephones, you can configure a speed dialling key for the associated internal subscriber/group telephone as an alternative to this key. You then see a red blinking LED indicating that the phone number is being called. You can press the speed dialling key and after the confirmation, take the call on your telephone.
The configuration can be carried out as follows:
• Via the configuration manager
• Via the telephone menu
Configuring Function Key for Pickup via Configuration Manager
Requirements:
- Configuration manager, open with a sufficient authority level
- Open the page Function keys > Assign function keys.
- Only available in installed extension modules: In the telephone displayed at the top left, click the key group in which you would like to define keys.
- Click one of the following tabs:
Level 1: Keys are defined on the first key level.
Level 2: Keys are defined on the second key level.
- In the list field next to the function key that you would like to define, select the Pickup function.
The current settings for defining the key are displayed.
- In the Key name entry field, enter a name for the key. The following entries are possible:
Up to 16 digits
Digits and characters
Note: The key name is used for printing the label.
- Click Execute.
Requirements for operating the function:
– Authorization in the PBX for Pickup
Configuring Function Key for Pickup via Telephone Menu
Requirements:
– Knowledge of the telephone, its menu options and the required PIN, if necessary
- Press the menu key and open the define keys menu.
-
Press the function key that you would like to define.
-
Select the desired option:
first level: Keys are defined on the first key level.
second level: Keys are defined on the second key level.
The list of available functions is displayed.
- Select the pickup function.
The current settings for defining the key are shown on the display.
- Press the softkey to accept the setting.
Requirements for operating the function:
– Authorization in the PBX for Pickup
Power Dialling
If the telephone being called is busy, but automatic callback on busy is not possible, the power dialling function be activated instead. When this is done, the system telephone attempts to reach the subscriber being called in short time intervals.
Power Dialling Procedure
Power dialling is executed as follows:
- The system telephone attempts to reach the subscriber being called in short time intervals (every 10 seconds).
- As soon as the subscriber is no longer busy and the system telephone detects a dial tone, it switches the loudspeaker.
- The connection is then established when the person being called picks up the receiver. If he does not pick up the receiver, power dialling is ended.
- If power dialling is not successful, the system telephone automatically cancels the function after 10 minutes.
Note: If interruptions occur (for example, calls that are initiated intermittently), this time period is extended accordingly.
Executing Power Dialling
Requirements:
– Knowledge of the telephone, its menu options and the required PIN, if necessary
Note: The power dialling function may not be used when calling a VoIP number.
If the connection is busy and callback is not possible, proceed as described in the following.
- Select Power Dialling.
- Press the √ softkey in order to initiate power dialling.
Note: Avoid leaving the telephone once power dialling has been activated since whenever a connection is established, the loudspeaker on the system telephone is automatically switched on.
Cancelling Power Dialling
Requirements:
– Power dialling has been initiated
If you would like to cancel power dialling in progress, proceed as described in the following.
- The telephone is now in the idle state: Press the ◆ softkey.
- The telephone is not in the idle state. It is currently attempting to reach the subscriber in question: Press the Hook key.
Switching Attention Tone for Power Dialling On/Off
If the attention tone for power dialling has been enabled, the attention tone signals that the subscriber being called with power dialling is no longer busy and the loudspeaker has been switched on. The volume of the attention tone is dependent on the configured ringer volume.
Switching this on/off can be done as follows:
• Via the configuration manager
• Via the telephone menu
Switching Attention Tone for Power Dialling On/Off via Configuration Manager
Requirements:
- Configuration manager, open with a sufficient authority level
- Open the page Settings/functions > Signalling/ringer.
- Select or clear the Attention tone (power dialling) check box.
☑ Enables the attention tone for power dialling.
☐ Disables the attention tone for power dialling.
- Click Execute.
Switching Attention Tone for Power Dialling On/Off via Telephone Menu
Requirements:
– Knowledge of the telephone, its menu options and the required PIN, if necessary
- Press the menu key and open the menu settings > signalling > attention tone.
- Select or clear the power dialling check box.
☑ Enables the attention tone for power dialling.
□ Disables the attention tone for power dialling.
- Press the softkey to accept the setting.
Power Save Mode
In power save mode, the display lighting (if available) and the LEDs are inactive (exception: the message LED blinks for missed calls).
After a configurable waiting time and depending on the configuration, power save mode can be activated automatically during the switchover into a PBX configuration and/or manually by pressing a key. Power save mode is deactivated again as soon as an incoming call is signalled or any key is pressed.
Switching Automatic Activation of Power Save Mode On/Off
If automatic activation of power save mode is enabled, the telephone automatically switches into power save mode when the telephone is not in use.
The holding time indicates how much time after the key was last pressed before power save mode is activated.
Switching this on/off can be done as follows:
• Via the configuration manager
• Via the telephone menu
Switching Automatic Activation of Power Save Mode On/Off via Configuration Manager
Requirements:
- Configuration manager, open with a sufficient authority level
- Open the page Settings/functions > Power save mode.
- Select or clear the Automated activation check box.
☑ Enables the automated activation of power save mode.
☐ Disables the automated activation of power save mode.
- Enter a value in the corresponding Waiting time (in minutes) input field. The following entries are possible:
1 to 999: After 1 to 999 minutes, power save mode is automatically activated, depending on the entry.
- Click Execute.
Switching Automatic Activation of Power Save Mode On/Off via Telephone Menu
Requirements:
– Knowledge of the telephone, its menu options and the required PIN, if necessary
- Press the menu key and open the menu settings > power save mode > autom.activation.
- Select or clear the autom.activation check box.
☑ Enables the automated activation of power save mode.
☐ Disables the automated activation of power save mode.
- Open the menu settings > power save mode > idle time.
- Enter a value. The following entries are possible:
1 to 199: After 1 to 999 minutes, power save mode is automatically activated, depending on the entry.
- Press the softkey to accept the setting.
Switching Power Save Mode Activation On/Off Depending on Configuration
If configuration-dependent power save mode activation is enabled, the telephone goes into power save mode during a switchover into a specific PBX configuration (for example, a night configuration).
Switching this on/off can be done as follows:
• Via the configuration manager
• Via the telephone menu
Switching Configuration-dependent Activation of Power Save Mode On/Off via Configuration Manager
Requirements:
- Configuration manager, open with a sufficient authority level
- Open the page Settings/functions > Power save mode.
- In the Identification number of the configuration entry field, enter the identification number of a configuration in order to enable the configuration-dependent activation of power save mode.
Note: To disable the configuration-dependent activation of power save mode, you need to delete the identification number of the configuration from the entry field.
- Click Execute.
Switching Configuration-dependent Activation of Power Save Mode On/Off via Telephone Menu
Requirements:
- Knowledge of the telephone, its menu options and the required PIN, if necessary
- Press the menu key and open the menu settings > power save mode > configuration.
The ♦con indicates the current setting.
- Select the desired option:
switch off: Disables configuration-dependent activation. (No other action is required.)
switch on: Enables configuration-dependent activation.
- Select a configuration from the list.
Configuring and Operating Function Key for Manually Activating Power Save Mode
Pressing the key while in the telephone's idle state switches it immediately into power save mode.
LED signalling next to the key:
None
The configuration can be carried out as follows:
• Via the configuration manager
• Via the telephone menu
Configuring Function Key for Manually Activating Power Save Mode via Configuration Manager
Requirements:
- Configuration manager, open with a sufficient authority level
- Open the page Function keys > Assign function keys.
-
Only available in installed extension modules: In the telephone displayed at the top left, click the key group in which you would like to define keys.
-
Click one of the following tabs:
Level 1: Keys are defined on the first key level.
Level 2: Keys are defined on the second key level.
- In the list field next to the function key that you would like to define, select the function Power save mode.
The current settings for defining the key are displayed.
- In the Key name entry field, enter a name for the key. The following entries are possible:
Up to 16 digits Digits and characters
Note: The key name is used for printing the label.
- Click Execute.
Configuring Function Key for Manually Activating Power Save Mode via Telephone Menu
Requirements:
- Knowledge of the telephone, its menu options and the required PIN, if necessary
- Press the menu key and open the define keys menu.
- Press the function key that you would like to define.
- Select the desired option:
first level: Keys are defined on the first key level.
second level: Keys are defined on the second key level.
The list of available functions is displayed.
- Select the power save mode function.
The current settings for defining the key are shown on the display.
- Press the softkey to accept the setting.
Switching the Power Save Mode Link to Phone Lock On/Off
If the power save mode link to the phone lock is enabled, the phone lock is enabled as soon as the telephone changes to power save mode.
Switching this on/off can be done as follows:
• Via the configuration manager
• Via the telephone menu
Switching Power Save Mode Link to Phone Lock On/Off via Configuration Manager
Requirements:
- Configuration manager, open with a sufficient authority level
-
Configured user, subadmin or admin PIN
– Knowledge of the user, subadmin or admin PIN -
Open the page Settings/functions > Power save mode.
-
Select or clear the Link to phone lock check box.
☑ Enables the power save mode link to the phone lock.
☐ Disables the power save mode link to the phone lock.
- Click Execute.
Switching Power Save Mode Link to Phone Lock On/Off via Telephone Menu
Requirements:
– Knowledge of the telephone, its menu options and the required PIN, if necessary
- Configured user, subadmin or admin PIN
– Knowledge of the user, subadmin or admin PIN
- Press the menu key and open the menu settings > power save mode > phone lock.
- Select or clear the phone lock check box.
☑ Enables the power save mode link to the phone lock.
☐ Disables the power save mode link to the phone lock.
- Press the softkey to accept the setting.
Project Assignment
The exchange line access with project assignment enables an external call to be assigned to a specific project/customer/client (for example, in a lawyer's office). Based on the evaluation of call data, both the charges as well as the time required can be assigned to a specific project.
Detailed Information about Project Assignment
Important: Not available for operation on the PBX COMpact 3000.
Project numbers can be used and managed in different ways:
Direct entry
Before or during a call, you can enter any project number directly via the menu.
Function key
You can configure one defined function key for each project. Before or during a call, you select a project by pressing one of these function keys.
Project list
In the configuration manager you can create a project list with up to 100 project numbers. Before or during a call, you select a project by means of the corresponding name in the project list.
Initiating a Project Assignment
Initiation can be carried out as follows:
• Via the telephone menu
Requirements:
– Knowledge of the telephone, its menu options and the required PIN, if necessary
- Project numbers enabled in the PBX (for a fee)
In order to define a project number for the next outgoing call, press the function key configured for project assignment.
Or, proceed as described in the following.
- Press the 2 softkey and select project.
Or press the menu key and open the menu functions > project.
- Select the desired project using its name/number or enter the project number. The following entries are possible:
2 to 6 digits
- Press the softkey to save the entry.
The selected project is then assigned to the next outgoing call.
Note: If you have entered a project number for the next outgoing call and are called before starting your own call, the project number is discarded by the telephone.
Executing Project Assignment during a Call
The execution can be made as follows:
• Via the telephone menu
Requirements:
– Knowledge of the telephone, its menu options and the required PIN, if necessary
– Project numbers enabled in the PBX (for a fee)
In order to assign a call in progress to a project, press the function key configured for project assignment.
Or, proceed as described in the following.
- Select project.
- Press the softkey.
- Select the desired project using its name/number or enter the project number. The following entries are possible:
2 to 6 digits - Press the softkey to save the entry.
Configuring and Operating Function Key for Project Assignment
Press the key for general functions to open the menu for selecting or entering a project number.
Press the key defined for project assignment when in the idle state of the telephone to set which project number the next outgoing external call will be assigned to. After this, you can initiate the call by dialling an external phone number (with the exchange line access number).
Press the key defined for project assignment during a call to set which project number the current external call will be assigned to.
In addition, when functions are defined on the first key level, the status of the function is indicated by the corresponding LED.
LED signalling next to the key:
Green The project number on the key is assigned to the next outgoing external call (for a key configured for general functions, it applies for any project number).
Off The next outgoing call will not be assigned to a project.
The configuration can be carried out as follows:
• Via the configuration manager
• Via the telephone menu
Configuring Function Key for General Project Assignment via Configuration Manager
Requirements:
- Configuration manager, open with a sufficient authority level
- Open the page Function keys > Assign function keys.
- Only available in installed extension modules: In the telephone displayed at the top left, click the key group in which you would like to define keys.
- Click one of the following tabs:
Level 1: Keys are defined on the first key level.
Level 2: Keys are defined on the second key level.
- In the list field next to the function key that you would like to define, select the Project function.
The current settings for defining the key are displayed.
- In the Key name entry field, enter a name for the key. The following entries are possible:
Up to 16 digits
Digits and characters
Note: The key name is used for printing the label.
- Click Execute.
Requirements for operating the function:
– Project numbers enabled in the PBX (for a fee)
Configuring Function Key for Defined Project Assignment via Configuration Manager
Requirements:
- Configuration manager, open with a sufficient authority level
- Open the page Function keys > Assign function keys.
-
Only available in installed extension modules: In the telephone displayed at the top left, click the key group in which you would like to define keys.
-
Click one of the following tabs:
Level 1: Keys are defined on the first key level.
Level 2: Keys are defined on the second key level.
- In the list field next to the function key that you would like to define, select the Defined project function.
The current settings for defining the key are displayed.
- In the Project number entry field, enter the project number of the project. The following entries are possible:
2 to 6 digits
- In the Key name entry field, enter a name for the key. The following entries are possible:
Up to 16 digits
Digits and characters
Note: The key name is used for printing the label and for display.
- Click Execute.
Requirements for operating the function:
– Project numbers enabled in the PBX (for a fee)
Configuring Function Key for Project Assignment via Telephone Menu
Requirements:
– Knowledge of the telephone, its menu options and the required PIN, if necessary
- Press the menu key and open the define keys menu.
- Press the function key that you would like to define.
- Select the desired option:
first level: Keys are defined on the first key level.
second level: Keys are defined on the second key level.
The list of available functions is displayed.
- Select the project function.
The current settings for defining the key are shown on the display.
- Select the kind of key. Press the Ⓧ softkey to switch over between the different kinds of keys.
general: Press the key to open the menu for selecting a project. (No other action is required.)
defined: Press the key to define a saved project number for the next external call.
-
Press the softkey.
-
Enter a project number. The following entries are possible:
2 to 6 digits
-
Press the softkey.
-
Enter a name for the project number. The following entries are possible:
Up to 16 digits
Digits and characters
- Press the softkey to accept the setting.
Requirements for operating the function:
- Project numbers enabled in the PBX (for a fee)
Configuring a List for Project Assignment
If a project has been entered in the project list, it can be simply selected before or during a call. The project list can contain up to 100 project numbers with the corresponding names.
The configuration can be carried out as follows:
• Via the configuration manager
Requirements:
- An open configuration manager
-
Open the Project list page.
-
Enter the desired project numbers in the entry fields from / until under Project number. The following entries are possible:
2 to 6 digits
-
Click Execute.
-
In the Project name entry field, enter a name for the corresponding project. The following entries are possible:
Up to 16 digits
Digits and characters
- Click Execute.
Note: If you have not entered a project name for a project, a name is created automatically after leaving the Project list page.
Deleting a Project List
Deleting can be carried out as follows:
• Via the configuration manager
Requirements:
- An open configuration manager
-
Open the Project list page.
-
In the Action list field, select the Delete option.
-
Select the check box in front of the entry to be deleted.
☑ The entry in question is deleted.
☐ The entry in question is not deleted.
To select the check boxes of all the entries at one time, select the check box in the last row.
- Click Execute.
Exporting a Project List
The export can be carried out as follows:
• Via the configuration manager
Requirements:
-
An open configuration manager
– Existing entries in the project list -
Open the Project list page.
- In the Action list field, select the Export option.
- Click Execute.
All the data is transferred to a new page. There, it is arranged in rows and separated by semicolons.
- Select the data (for example, with your mouse or using Ctrl+A).
- Copy the data to the clip board (for example, using Ctrl+C).
The text data can then be transferred from the clip board to the desired external program for further processing.
Note: You can leave the new page with the transferred data by clicking a topic area in the directory tree.
Importing a Project List
The import can be carried out as follows:
• Via the configuration manager
Requirements:
- An open configuration manager
-
A project list saved on the hard drive as a text file (e.g., *.txt, *.csv), data arranged in rows and separated by semicolons
-
Open the Project list page.
- In the Action list field, select the Import option.
- Click Execute.
-
Click Browse (this text is dependent on the operating system used). A file selection dialogue opens.
-
Select the file to be imported and click Open (this text is dependent on the operating system used). The path and the file name are displayed in the Import file (data source) field.
-
Click Import file. The project list is saved in the telephone.
Requirements for operating the function: – Project numbers enabled in the PBX (for a fee)
Relays
If the PBX is equipped with one or more relays, they can be switched on and off independently of the operating mode configured for each telephone.
Switching Relays On/Off
Important: Not available for operation on the PBX COMpact 3000.
Switching this on/off can be done as follows:
• Via the telephone menu
Requirements:
- Knowledge of the telephone, its menu options and the required PIN, if necessary
– A switchable relay configured in the PBX
– Authorization in the PBX for Switching of relay - For the subscriber disabled relay mode PC relay subscriber in the PBX
In order to switch a relay on and off, press the function key configured for switching relays.
Or, proceed as described in the following.
- Press the menu key and open the menu functions > relay.
- Select the desired relay based on its name/number.
- Select the desired option:
switch on: Enables the relay.
switch off: Disables the relay.
Configuring and Operating Function Key for Switching Relays On/Off
Important: Not available for operation on the PBX COMpact 3000.
Press the key to switch to the configured relay on or off or to switch it over.
In addition, when functions are defined on the first key level, the status of the relay is indicated by the corresponding LED.
LED signalling next to the key:
Green The relay configured on the key is enabled.
Off The relay configured on the key is disabled.
The configuration can be carried out as follows:
• Via the configuration manager
• Via the telephone menu
Configuring Function Key for Switching Relays via Configuration Manager
Requirements:
- Configuration manager, open with a sufficient authority level
- A switchable relay configured in the PBX
-
For the subscriber disabled relay mode PC relay subscriber in the PBX
-
Open the page Function keys > Assign function keys.
- Only available in installed extension modules: In the telephone displayed at the top left, click the key group in which you would like to define keys.
- Click one of the following tabs:
Level 1: Keys are defined on the first key level.
Level 2: Keys are defined on the second key level.
- In the list field next to the function key that you would like to define, select the Relays function.
The current settings for defining the key are displayed.
- Enter the identification number of the relay in question in the Identification number field.
- In the Kind of switching list field, select one of the following options:
switch off: Press the key to disable the relay.
switch on: Press the key to enable the relay.
switch over: Press the key to switch the relay on and off.
- In the Key name entry field, enter a name for the key. The following entries are possible:
Up to 16 digits
Digits and characters
Note: The key name is used for printing the label and for display.
- Click Execute.
Requirements for operating the function:
– Authorization in the PBX for Switching of relay
Configuring Function Key for Switching Relays via Telephone Menu
Requirements:
– Knowledge of the telephone, its menu options and the required PIN, if necessary
- A switchable relay configured in the PBX
- For the subscriber disabled relay mode PC relay subscriber in the PBX
- Press the menu key and open the define keys menu.
- Press the function key that you would like to define.
- Select the desired option:
first level: Keys are defined on the first key level.
second level: Keys are defined on the second key level.
The list of available functions is displayed.
- Select the relay function.
The current settings for defining the key are shown on the display.
- Press the softkey.
- Select a relay based on its name.
- Select the kind of switching. Press the ⬆ softkey to switch over between the different kinds of switching.
switch off: Press the key to disable the relay.
switch on: Press the key to enable the relay.
switch over: Press the key to switch the relay on and off.
- Press the softkey to accept the setting.
Requirements for operating the function:
– Authorization in the PBX for Switching of relay
Room Monitoring
The room monitoring function can be used for monitoring a room acoustically, for instance, for monitoring a small child while she sleeps. The internal telephone in this room must be suitably configured for this purpose.
The configured telephone can then be called by another internal telephone or by a password-protected external telephone. The connection is established immediately and it is possible to listen into the room.
Initiating Room Monitoring
Requirements:
- Knowledge of the telephone, its menu options and the required PIN, if necessary
– Authorisation in the PBX for Controlling of the PBX via telephone
To enable room monitoring, press a function Key configured for room monitoring.
Or, proceed as described in the following.
- Press the menu key and open the menu functions > room monitoring.
- Select switch on.
The microphone of the hands-free component switches on automatically. If the telephone is then called from an internal telephone, the connection is immediately established and it is possible to listen into the room.
Note: How to listen into a room from an external telephone is described in the user manual for the PBX.
Ending Room Monitoring
- Press the softkey √ or the Hook key or pick up the receiver and then hang it up again.
Configuring and Operating Function Key for Room Monitoring
Press the key while the telephone is in the idle state to switch on room monitoring.
In addition, when functions are defined on the first key level, the status of the function is indicated by the corresponding LED.
LED signalling next to the key:
Red The room monitoring function is enabled.
Off The room monitoring function is disabled.
The configuration can be carried out as follows:
• Via the configuration manager
• Via the telephone menu
Configuring Function Key for Room Monitoring via Configuration Manager
Requirements:
- Configuration manager, open with a sufficient authority level
- Open the page Function keys > Assign function keys.
-
Only available in installed extension modules: In the telephone displayed at the top left, click the key group in which you would like to define keys.
-
Click one of the following tabs:
Level 1: Keys are defined on the first key level.
Level 2: Keys are defined on the second key level.
- In the list field next to the function key that you would like to define, select the Room monitoring function.
The current settings for defining the key are displayed.
- In the Key name entry field, enter a name for the key. The following entries are possible:
Up to 16 digits
Digits and characters
Note: The key name is used for printing the label.
6. Click Execute.
Requirements for operating the function:
– Authorisation in the PBX for Controlling of the PBX via telephone
Configuring Function Key for Room Monitoring via Telephone Menu
Requirements:
– Knowledge of the telephone, its menu options and the required PIN, if necessary
- Press the menu key and open the define keys menu.
- Press the function key that you would like to define.
- Select the desired option:
first level: Keys are defined on the first key level.
second level: Keys are defined on the second key level.
The list of available functions is displayed.
- Select the room monitoring function.
The current settings for defining the key are shown on the display.
- Press the softkey to accept the setting.
Requirements for operating the function:
- Authorisation in the PBX for Controlling of the PBX via telephone
Scheduled Call
The scheduled call provides the option of being reminded of a schedule or to place a specific call by the system telephone. The telephone can be configured with up to 16 schedules. The configured schedules are saved in a scheduled call list in the order they are to be processed.
Opening Scheduled Call List
Opening can be carried out as follows:
• Via the telephone menu
Requirements:
– Knowledge of the telephone, its menu options and the required PIN, if necessary
- Press the 2 softkey and select schedule.
Or, press the function key configured for a scheduled call or press the menu key to open the menu functions > scheduled call.
- Scroll to the desired schedule.
The following information about schedule is shown on the display:

text_image
scheduled call B [name] 16:00 31.07.08 A [number] C DA Time of the schedule
B Name of the person to be called or information about the schedule
C Date of the schedule
D Phone number of the person to be called
3. Select the desired option:
This switches you back to the second level.
This initiates either the deletion or editing of the schedule.
目 This opens the short overview.
This accepts entries into dial preparation.
Note: As soon as a phone number is accepted into dial preparation, this schedule is considered completed and is deleted from the scheduled call list.
Configuring Scheduled Call as Schedule Reminder
The configuration can be carried out as follows:
• Via the telephone menu
Requirements:
- Knowledge of the telephone, its menu options and the required PIN, if necessary
In order to configure a scheduled call that is meant to remind you of a schedule, select the reschedule call function during a call.
Or, proceed as described in the following.
- Open the scheduled call list.
- Press the □ softkey in front of new entry.
- Enter the time and date.
-
Press the softkey.
-
Select just a reminder.
-
Enter some information. The following entries are possible:
Up to 16 digits
Digits and characters
- Press the softkey to save the entry.
Configuring Scheduled Call as Call Reminder
The configuration can be carried out as follows:
• Via the telephone menu
Requirements:
– Knowledge of the telephone, its menu options and the required PIN, if necessary
In order to configure a scheduled call that is meant to remind you to make a specific call, select the reschedule call function during a call.
If the telephone number is on the caller list, for example, transfer the phone number into dial preparation, and then press the ☑softkey.
Or, proceed as described in the following.
- Open the scheduled call list.
- Press the ☐ softkey in front of new entry.
- Enter the time and date.
- Press the softkey.
- Select with dial prep..
Note:
If you carry out configuration during a call, the phone number of your communication partner is now display – if it is known.
If you press the Telephone book key before entering the phone number, you can select the desired phone number from the telephone book.
- Enter the telephone number that you would like to call later. The following entries are possible:
Up to 40 digits
Digits and the characters * and #
Important: Enter telephone numbers exactly as when dialling, for example, external telephone numbers always with a leading exchange line access number. (exception: direct exchange access). The default exchange line access number on the PBX is "0" in the factory settings; however, this can be changed for several PBXs (see the PBX manual).
- Enter the corresponding name or information. The following entries are possible:
Up to 16 digits
Digits and characters
- Press the softkey to save the entry.
Accepting Scheduled Call as Schedule Reminder
The accepting procedure can be carried out as follows:
• Via the telephone menu
Requirements:
– Knowledge of the telephone, its menu options and the required PIN, if necessary
If a schedule call causes your telephone to ring to remind you of a schedule, proceed as described in the following.
- Select the desired option:
confirm: Confirms the scheduled call.
reschedule: Reschedules the scheduled call for 10 minutes later.
reschedule call: Allows you to reschedule the scheduled call using the options of 30 minutes, 1 hour, 2 hours, 1 day, 1 week, 2 weeks, 4 weeks or a user-defined option.
- Press the softkey to accept the selection.
Note: If you are not present when the scheduled call occurs, it is automatically rescheduled. As soon as the telephone is operated again afterwards, the scheduled call occurs again 1 minute after returning to the idle state.
Accepting Scheduled Call as Call Reminder
The accepting procedure can be carried out as follows:
• Via the telephone menu
Requirements:
– Knowledge of the telephone, its menu options and the required PIN, if necessary
If your telephone rings due to a scheduled call for a call reminder, pick up the receiver to accept the call. The phone number saved is dialled immediately.
Or, proceed as described in the following.
- Select the desired option:
dial preparation: Enters the phone number saved into dial preparation.
delete: Deletes the scheduled call.
reschedule: Reschedules the scheduled call 10 minutes later.
reschedule call: Allows you to reschedule the scheduled call using the options of 30 minutes, 1 hour, 2 hours, 1 day, 1 week, 2 weeks, 4 weeks or a user-defined option.
- Press the softkey to accept the selection.
Note: If you are not present when the scheduled call occurs, it is automatically rescheduled. As soon as the telephone is operated again afterwards, the scheduled call occurs again 1 minute after returning to the idle state.
Editing Existing Scheduled Calls in Scheduled Call List
Editing can be carried out as follows:
• Via the telephone menu
Requirements:
– Knowledge of the telephone, its menu options and the required PIN, if necessary
- Open the scheduled call list.
- Scroll to the desired schedule.
- Press the softkey.
- Select change.
- Make the desired changes.
Deleting Existing Scheduled Calls from Scheduled Call List
Deleting can be carried out as follows:
• Via the telephone menu
Requirements:
- Knowledge of the telephone, its menu options and the required PIN, if necessary
- Open the scheduled call list.
- Scroll to the desired schedule.
- Press the softkey.
- Select delete.
- Press the softkey to confirm the action.
Configuring and Operating Function Key for Scheduled Calls
Press the key while the telephone is the idle state to open the scheduled call menu. This allows you to configure a new scheduled call or to open the scheduled call list.
In addition, when functions are defined on the first key level, the status of the function is indicated by the corresponding LED.
LED signalling next to the key:
Red (blinking) A scheduled call is signalled.
Red The scheduled call was not accepted/confirmed.
Green One or more scheduled calls are configured.
Off No scheduled call is configured.
The configuration can be carried out as follows:
• Via the configuration manager
• Via the telephone menu
Configuring Function Key for Scheduled Calls via Configuration Manager
Requirements:
- Configuration manager, open with a sufficient authority level
- Open the page Function keys > Assign function keys.
- Only available in installed extension modules: In the telephone displayed at the top left, click the key group in which you would like to define keys.
-
Click one of the following tabs:
Level 1: Keys are defined on the first key level.
Level 2: Keys are defined on the second key level. -
In the list field next to the function key that you would like to define, select the Scheduled call function.
The current settings for defining the key are displayed.
- In the Key name entry field, enter a name for the key. The following entries are possible:
Up to 16 digits
Digits and characters
Note: The key name is used for printing the label.
- Click Execute.
Configuring Function Key for Scheduled Calls via Telephone Menu
Requirements:
– Knowledge of the telephone, its menu options and the required PIN, if necessary
- Press the menu key and open the define keys menu.
- Press the function key that you would like to define.
- Select the desired option:
first level: Keys are defined on the first key level.
second level: Keys are defined on the second key level.
The list of available functions is displayed.
- Select the scheduled call function.
The current settings for defining the key are shown on the display.
- Press the softkey to accept the setting.
Speed Dialling
The speed dialling function enables a function key to be defined with not only internal and external phone numbers but also with programming codes on the PBX. The saved codes can be easily dialled by pressing a key, if necessary.
Application Options for Speed Dialling Keys
Speed dialling keys can be used in the following ways:
Dialling a phone number
Pressing a speed dialling key immediately dials a saved phone number. If the receiver is on hook, the saved phone number is first transmitted into dial preparation.
If a speed dialling key is pressed during a call, a query call is placed and the saved phone number is dialed immediately.
Dialling part of a phone number
The telephone speed dialling keys to be defined with parts of phone numbers (for example, telephone provider prefixes). The phone number parts can then be assembled by pressing multiple speed dialling keys in an order. The names assigned to the phone numbers are shown one after the other on the display.
Assignment overview
Speed dialling keys defined with to internal subscriber and group phone numbers enable an overview of the current activity status of the subscriber or group via the corresponding LEDs.
Pickup and call take-over
Speed dialling keys defined with internal subscriber and group phone numbers enable the pickup function for these subscribers and groups. If the LED next to the key is blinking in red because the saved phone number is being called, you can take the call on your telephone by pressing the speed dialling key and then confirming.
If a subscriber allows call take-over (for example, on an answering machine), you can still take the call on your telephone in the same manner even after it has already been accepted.
Configuring and Operating Function Key for Speed Dialling
Press the key while the telephone is in the idle state to transfer a telephone number saved in a key to dial preparation – also additional information.
Exception: If the telephone number saved is an internal phone number and is currently being called, you can carry out the Pickup function on this call.
After picking up the receiver, press the key to dial the telephone number saved in the key.
Press the key during a call to put the active communication partner on hold and to dial the phone number saved in the key.
In addition, when a subscriber or a group telephone number is defined at the first key level, the status of the subscriber or group can be read from the corresponding LED.
LED signalling next to the key (when defined with an internal subscriber telephone number):
Red (blinking) The internal telephone is now being called. Press the key to initiate a pickup.
Red A call is in progress on the internal telephone. Press the key to initiate a call take-over.
Green (blinking) A call is being made from the internal telephone and the call was not accepted.
Yellow The internal telephone is not reachable (do-not-disturb or call forwarding for subscribers has been configured).
Yellow (blinking) Only for internal VoIP subscriber and enabled display of the registration status: The telephone is not registered on the PBX.
Off The internal telephone is available. Press the key to place a call.
LED signalling next to the key (when defined with an internal group phone number):
Red (blinking) A logged-in telephone is now being called. Press the key to initiate a pickup.
Red Calls are in progress on all logged-in telephones or no telephone in the group is logged in.
Yellow The logged-in telephones are not reachable (do-not-disturb or call forwarding for subscribers has been configured).
Off The logged-in telephones are available. Press the key to place a call.
LED signalling next to the key (when defined with an external telephone number):
Green (blinking) A call is being made from the telephone of the external subscriber and the call was not accepted (in as far as the external telephone number is transmitted).
The configuration can be carried out as follows:
• Via the configuration manager
• Via the telephone menu
Configuring Function Key for Speed Dialling via Configuration Manager
Requirements:
- Configuration manager, open with a sufficient authority level
- Open the page Function keys > Assign function keys.
- Only available in installed extension modules: In the telephone displayed at the top left, click the key group in which you would like to define keys.
- Click one of the following tabs:
Level 1: Keys are defined on the first key level.
Level 2: Keys are defined on the second key level.
-
In the list field next to the function key that you would like to define, select the Speed dialling function.
The current settings for defining the key are displayed. -
In the Telephone number entry field, enter the destination number. The following entries are possible:
Up to 24 digits Digits and the characters * and #
- In the Telephone number list field, select one of the following options:
internal: Defines the destination number entered as an internal phone number. external: Defines the destination number entered as an external phone number.
- In the Key name entry field, enter a name for the key. The following entries are possible:
Up to 16 digits Digits and characters
Note: The key name is used for printing the label and for display.
- Click Execute.
Configuring Function Key for Speed Dialling via Telephone Menu
Requirements:
– Knowledge of the telephone, its menu options and the required PIN, if necessary
- Press the menu key and open the define keys menu.
- Press the function key that you would like to define.
- Select the desired option:
first level: Keys are defined on the first key level.
second level: Keys are defined on the second key level.
The list of available functions is displayed.
- Select the speed dialling function.
The current settings for defining the key are shown on the display.
- Press the softkey.
Note: If you press the telephone book key before entering the destination number, you can select the desired phone number from the telephone book.
- Enter the destination number. The following entries are possible:
Up to 24 digits
Digits and the characters * and #
Important: Enter telephone numbers exactly as when dialling, for example, external telephone numbers always with a leading exchange line access number. (exception: direct exchange access). The default exchange line access number on the PBX is "0" in the factory settings; however, this can be changed for several PBXs (see the PBX manual).
- Press the softkey.
- Enter a name. The following entries are possible:
Up to 16 digits
Digits and characters
- Press the softkey to accept the setting.
Switching Automatic Speed Dialling Pick-up On/Off
If automatic speed dialling pick-up is enabled, pressing a speed dialling key while the telephone is in the idle state automatically picks up a call (when using a headset) or switches the telephone to hands-free calling.
Switching this on/off can be done as follows:
• Via the configuration manager
• Via the telephone menu
Switching Automatic Speed Dialling Pick-up On/Off via Configuration Manager
Requirements:
- Configuration manager, open with a sufficient authority level
- Open the page Settings/functions > User settings.
-
Select or clear the Automatic off-hook for speed dialling check box.
☑ Enables automatic speed dialling pick-up.
□ Disables automatic speed dialling pick-up. -
Click Execute.
Switching Automatic Speed Dialling Pick-up On/Off via Telephone Menu
Requirements:
– Knowledge of the telephone, its menu options and the required PIN, if necessary
- Press the menu key and open the menu settings > user settings > speed dial.key.
- Select or clear the auto. off hook check box.
Enables automatic speed dialling pick-up.
□ Disables automatic speed dialling pick-up.
- Press the softkey to accept the setting.
Switching the Display of the Registration Status On/Off
If the display of the registration status is switched on, the individual registration status of the subscribers will be signalled via the LEDs of the speed dialling keys assigned to internal VoIP subscribers. If the corresponding VoIP subscriber is not registered at the PBX, its LED will blink yellow.
Switching this on/off can be done as follows:
• Via the configuration manager
• Via the telephone menu
Switching the Display of the Registration Status On/Off via Configuration Manager
Requirements:
- Configuration manager, opened with a sufficient authorization level
- Open the page Settings/functions > signalling/ringer.
-
Select or clear the Registration status subscriber check box.
☒ Switches the display of the registration status on.
☐ Switches the display of the registration status off. -
Click Execute.
Switching the Display of the Registration Status On/Off via Telephone Menu
Requirements:
- Knowledge of the telephone, its menu options and the required PIN, if necessary
-
Press the menu key and open the menu settings > signalling > reg.status scr.
-
Select or clear the reg.status scr. check box.
☑ Switches the display of the registration status on.
☐ Switches the display of the registration status off.
- Press the softkey to accept the setting.
Targeted Exchange Line Access
Using targeted exchange line access, you can define which MSN (your own external phone number) is transmitted for an external call and which exchange line should be used while doing so.
Initiating Targeted Exchange Line Access
Initiation can be carried out as follows:
• Via the telephone menu
Requirements:
– Knowledge of the telephone, its menu options and the required PIN, if necessary
– A function key configured for targeted exchange line access
- Press a function key configured for targeted exchange line access.
The required PBX programming codes for targeted exchange line access are accepted into dial preparation. - Dial a phone number (an external phone number with an exchange line access number).
- Pick up the receiver or press the Hook key.
The subscriber is called.
Note:
If another call comes through before you have finished placing the call, the telephone will reject the targeted exchange line access for your next call.
If you want to transmit the defined MSN (your own external phone number) for external calls, telephone number transmission has to be activated (display of the softkey).
Configuring and Operating Function Key for Targeted Exchange Line Access
Press the key to initiate targeted exchange line access. This allows you to immediately dial the external phone number (with an exchange line access number).
Exception: In case of direct exchange access you do not have to dial an exchange line access number.
In addition, when the function is defined on the first key level, the status of the S_0 port/bundle is indicated by the corresponding LED.
LED signalling next to the key:
Red All of the B-channels on the S 0 port/bundle are in use.
Yellow At least one B-channel on the S 0 port/bundle is available. Press the key to allocate the line still available.
Off S 0 port/bundle is available. Press the key to allocate one of the available lines.
The configuration can be carried out as follows:
• Via the configuration manager
• Via the telephone menu
Configuring Function Key for Targeted Exchange Line Access via Configuration Manager
Requirements:
- Configuration manager, open with a sufficient authority level
- Open the page Function keys > Assign function keys.
- Only available in installed extension modules: In the telephone displayed at the top left, click the key group in which you would like to define keys.
- Click one of the following tabs:
Level 1: Keys are defined on the first key level.
Level 2: Keys are defined on the second key level.
- In the list field next to the function key that you would like to define, select the Exchange line function.
The current settings for defining the key are displayed.
- In the Telephone number entry field, enter the external phone number for the PBX that you want to transfer during targeted exchange line access.
Up to 24 digits
Digits and the characters * and #
- In the Key name entry field, enter a name for the key. The following entries are possible:
Up to 16 digits
Digits and characters
Note: The key name is used for printing the label and for display.
- Click Execute.
Configuring Function Key for Targeted Exchange Line Access via Telephone Menu
Requirements:
- Knowledge of the telephone, its menu options and the required PIN, if necessary
- Press the menu key and open the define keys menu.
- Press the function key that you would like to define.
- Select the desired option:
first level: Keys are defined on the first key level.
second level: Keys are defined on the second key level.
The list of available functions is displayed.
- Select the exchange line function.
The current settings for defining the key are shown on the display.
- Press the softkey.
- Enter the external phone number for the PBX that you want to transfer during targeted exchange line access (without an exchange line access number and without a prefix). The following entries are possible:
Up to 24 digits
Digits and the characters * and #
Configuring and Operating Functions
Targeted Exchange Line Access
Configuring and Operating Function Key for Targeted Exchange Line Access
-
Press the softkey.
-
Enter a name. The following entries are possible:
Up to 16 digits
Digits and characters
- Press the softkey to accept the setting.
Targeted VoIP Access Point
Using a targeted VoIP access point, an external call can be initiated via a specific VoIP account.
Initiating a Targeted VoIP Access Point
Initiation can be carried out as follows:
• Via the telephone menu
Requirements:
- Knowledge of the telephone, its menu options and the required PIN, if necessary
-
Configured function key for a targeted VoIP access point
-
Press a function key configured for a targeted VoIP access point.
The VoIP account is activated for the next call. The account number is displayed in dial preparation.
- Dial a phone number (an external phone number with an exchange line access number).
Note:
In any case, the external phone number must be dialled with the corresponding city code, even if it is the local prefix. The special numbers provided by the VoIP provider for checking one's account status or dialling usually do not include a local prefix.
In case of direct exchange access you do not have to dial an exchange line access number.
- Pick up the receiver or press the Hook key.
The subscriber is called.
Configuring and Operating Function Key for Targeted VoIP Access Point
Press the key to initiate a targeted VoIP access point. This allows you to immediately dial the external phone number (with an exchange line access number).
Exception: In case of direct exchange access you do not have to dial an exchange line access number.
In addition, when a targeted VoIP access point is defined on the first key level, the status of the channels for the targeted VoIP access point is indicated by the corresponding LED.
LED signalling next to the key:
Red All of the channels for the VoIP access point are in use (no call possible).
Yellow Some of the channels for the VoIP access point are in use (at least one channel for the VoIP access line is still available). Press the key to allocate the channel still available.
Off All channels for the VoIP access point are available. Press the key to allocate an available channel.
The configuration can be carried out as follows:
• Via the configuration manager
• Via the telephone menu
Configuring Function Key for Targeted VoIP Access Point via Configuration Manager
Requirements:
-
Configuration manager, open with a sufficient authority level
– A configured VoIP account -
Open the page Function keys > Assign function keys.
- Only available in installed extension modules: In the telephone displayed at the top left, click the key group in which you would like to define keys.
- Click one of the following tabs:
Level 1: Keys are defined on the first key level.
Level 2: Keys are defined on the second key level.
- In the list field next to the function key that you would like to define, select the Voice over IP account function.
The current settings for defining the key are displayed.
- In the Telephone number entry field, enter the account number for the VoIP account.
Exception: In case of direct exchange access enter the account number with two leading asterisks ( ^** account number).
- In the Key name entry field, enter a name for the key. The following entries are possible:
Up to 16 digits
Digits and characters
Note: The key name is used for printing the label and for display.
- Click Execute.
Configuring Function Key for Targeted VoIP Access Point via Telephone Menu
Requirements:
-
Knowledge of the telephone, its menu options and the required PIN, if necessary
– A configured VoIP account -
Press the menu key and open the define keys menu.
- Press the function key that you would like to define.
- Select the desired option:
first level: Keys are defined on the first key level.
second level: Keys are defined on the second key level.
The list of available functions is displayed.
- Select the VoIP account function.
The current settings for defining the key are shown on the display.
- Press the softkey.
- Select a VoIP account from the list.
- Press the softkey.
Configuring and Operating Functions
Targeted VoIP Access Point
Configuring and Operating Function Key for Targeted VoIP Access Point
- Change the name, if necessary. The following entries are possible:
Up to 16 digits
Digits and characters
- Press the softkey to accept the setting.
Text before Answering
The text before answering function enables the caller to be greeted with an automatic announcement before accepting the call (charges apply for the external caller).
More Information about Text before Answering for Group
Important: Not available for operation on the PBX COMpact 3000.
Switching the text before answering function on is done separately for each group.
There are two types possible:
Text before answering on busy
The caller hears the announcement for text before answering only if all of the group members are busy. After this, the caller is automatically connected to the corresponding queue.
Text before answering always
The caller hears the announcement independent of whether the group members are being called or are busy. If all of the group members are busy, the caller is automatically connected to the corresponding queue.
Note: Using the configuration manager on the PBX, it is defined whether the telephones set to the variant "always" ring during an announcement or not until afterwards. Furthermore, it is defined whether the caller hears hold music or the call tone after hearing the announcement.
Switching Text before Answering for Group On/Off
Requirements:
- Function key configured for the text before answering function
– The text before answering announcement on the PBX assigned to the group
- Press the function key configured for the text before answering function.
Configuring and Operating Function Key for Text before Answering
Press the key while the telephone is the idle state to switch text before answering for the configured group on or off or to switch it over.
In addition, when functions are defined on the first key level, the status of the function is indicated by the corresponding LED.
LED signalling next to the key:
Green The text before answering function for the configured group is enabled.
Off The text before answering function for the configured group is disabled.
The configuration can be carried out as follows:
• Via the configuration manager
• Via the telephone menu
Configuring Function Key for Text before Answering via Configuration Manager
Requirements:
- Configuration manager, open with a sufficient authority level
-
The telephone is a member of a group configured in the PBX
-
Open the page Function keys > Assign function keys.
-
Only available in installed extension modules: In the telephone displayed at the top left, click the key group in which you would like to define keys.
-
Click one of the following tabs:
Level 1: Keys are defined on the first key level.
Level 2: Keys are defined on the second key level.
- In the list field next to the function key that you would like to define, select the function text before answering.
The current settings for defining the key are displayed.
-
In the Telephone number entry field, enter the phone number of the group.
-
In the Kind of switching list field, select one of the following options:
switch off: Press the key to disable text before answering.
switch on (on busy): Press the key to enable text before answering on busy.
switch on (always): Press the key to enable text before answering.
switch over (on busy): Press the key to switch text before answering on busy on and off.
switch over (always): Press the key to switch text before answering on and off.
- In the Key name entry field, enter a name for the key. The following entries are possible:
Up to 16 digits
Digits and characters
Note: The key name is used for printing the label and for display.
- Click Execute.
Requirements for operating the function:
– The text before answering announcement on the PBX and assigned to the group
Configuring Function Key for Text before Answering via Telephone Menu
Requirements:
– Knowledge of the telephone, its menu options and the required PIN, if necessary
- The telephone is a member of a group configured in the PBX
-
Press the menu key and open the define keys menu.
-
Press the function key that you would like to define.
- Select the desired option:
first level: Keys are defined on the first key level.
second level: Keys are defined on the second key level.
The list of available functions is displayed.
- Select the text before answering function.
The current settings for defining the key are shown on the display.
- Press the softkey.
- Select a group based on its name/number.
- Press the softkey.
- Enter a name for the group. The following entries are possible:
Up to 16 digits
Digits and characters
- Select the kind of switching. Press the ⬆ softkey to switch over between the different kinds of switching.
deactivate: Press the key to disable text before answering.
sw.on (on busy): Press the key to enable text before answering on busy.
sw.on (always) Press the key to enable text before answering.
sw.on (on busy): Press the key to switch text before answering on busy on and off.
sw.on (always) Press the key to switch text before answering on and off.
- Press the softkey to accept the setting.
Requirements for operating the function:
– The text before answering announcement on the PBX and assigned to the group
Voicemail Center 461/461.2
If a Voicemail Center 461/461.2 (optional accessory from Auerswald) is connected to an Auerswald PBX, its mailboxes can be accessed/managed over the system telephone.
Initiating Remote Access to Voicemail Center
Initiation can be carried out as follows:
• Via the telephone menu
Requirements:
– Knowledge of the telephone, its menu options and the required PIN, if necessary
- At least one Voicemail Center 461/461.2 connected to the PBX
To initiate remote access to the Voicemail Center, press the 2 softkey and select Voicemail.
Or, press a function key configured for remotely accessing the Voicemail Center.
Important: Refer to the following instructions for a complete description on how to configure and operate the function: "Instructions for operation on Auerswald PBXs" for the Voicemail Center 461.2 or the corresponding user manual for the Voicemail Center 461.
Configuring and Operating Function Key for Remotely Accessing the Voicemail Center
Press the key for general functions while the telephone is in the idle state to open the menu for selecting between global mailbox or single mailbox. After selecting the mailbox, entering the following associated remote access code and picking up the receiver, you are connected with the configured Voicemail Center 461/461.2. If new recordings are present, they are played back immediately. You can operate the Voicemail Center 461/461.2 using the softkeys.
While the telephone is in the idle state, press the key defined for accessing the function and then pick up the receiver to establish a connection to mailbox set in the configured Voicemail Center 461/461.2. If new recordings are present, they are played back immediately. You can operate the Voicemail Center 461/461.2 using the softkeys.
It is possible to press the key while a connection exists with the Voicemail Center 461/461.2 to pick up the call.
In addition, when functions are defined on the first key level, the status of the function is indicated by the corresponding LED.
LED signalling next to the key:
Red (blinking) The Voicemail Center 461/461.2 is called.
Red The Voicemail Center 461/461.2 has accepted the call. Press the key to initiate a pick-up to accept the call.
Green (blinking) New recordings are present (applies to a key defined only for the preconfigured mailbox; for a key configured for general functions, it applies for all of the mailboxes).
Green Old recordings are present (applies to a key defined only for the preconfigured mailbox; for a key configured for general functions, it applies for all of the mailboxes).
The configuration can be carried out as follows:
• Via the configuration manager
• Via the telephone menu
Configuring Function Key for General Remote Access of Voicemail Center via Configuration Manager
Requirements:
- Configuration manager, open with a sufficient authority level
- Open the page Function keys > Assign function keys.
-
Only available in installed extension modules: In the telephone displayed at the top left, click the key group in which you would like to define keys.
-
Click one of the following tabs:
Level 1: Keys are defined on the first key level.
Level 2: Keys are defined on the second key level.
- In the list field next to the function key that you would like to define, select the Voicemail Center function.
The current settings for defining the key are displayed.
-
In the Telephone number entry field, enter the phone number of the Voicemail Center.
-
In the Key name entry field, enter a name for the key. The following entries are possible:
Up to 16 digits
Digits and characters
Note: The key name is used for printing the label.
- Click Execute.
Requirements for operating the function:
- At least one Voicemail Center 461/461.2 connected to the PBX
Configuring Function Key for Defined Remote Access of Voicemail Center via Configuration Manager
Requirements:
- Configuration manager, open with a sufficient authority level
- At least one Voicemail Center 461/461.2 connected to the PBX
-
Open the page Function keys > Assign function keys.
-
Only available in installed extension modules: In the telephone displayed at the top left, click the key group in which you would like to define keys.
-
Click one of the following tabs:
Level 1: Keys are defined on the first key level.
Level 2: Keys are defined on the second key level.
- In the list field next to the function key that you would like to define, select the Defined Voicemail Center function.
The current settings for defining the key are displayed.
- In the Telephone number entry field, enter the phone number of the Voicemail Center.
- In the list field, select one of the following options:
Global mailbox: Defines that the global mailbox will be accessed.
Single mailbox: Defines that a single mailbox will be accessed.
- Only when the option Single mailbox is selected: In the Individual mailbox for subscriber telephone number entry field, enter the subscriber telephone number that is assigned to the single mailbox.
- In the Remote control code entry field, enter the remote access code for the mailbox.
Note:
When selecting Single mailbox, you need to use the remote access code entered at the following location: in the Voicemail Center 461.2 under create mailboxes > ...mailbox > remote access or in the Voicemail Center 461 under mailboxes > remote control code.
When selecting Global mailbox, you need to use the remote access code entered at the following location: In the Voicemail Center 461.2 under settings > remote access > remote access code or in the Voicemail Center 461 under settings > remote access code.
- In the Key name entry field, enter a name for the key. The following entries are possible:
Up to 16 digits
Digits and characters
Note: The key name is used for printing the label and for display.
- Click Execute.
Configuring Function Key for Remotely Accessing the Voicemail Center via Telephone Menu
Requirements:
– Knowledge of the telephone, its menu options and the required PIN, if necessary
- At least one Voicemail Center 461/461.2 connected to the PBX
-
Press the menu key and open the define keys menu.
-
Press the function key that you would like to define.
-
Select the desired option:
first level: Keys are defined on the first key level.
second level: Keys are defined on the second key level.
The list of available functions is displayed.
- Select the Voicemail Center function.
The current settings for defining the key are shown on the display.
- Select the kind of key. Press the ⬆ softkey to switch over between the different kinds of keys.
general: Press the key to open the menu for the selecting the type of mailbox. Then after entering the remote access code, a connection can be established to the configured Voicemail Center.
defined: Press the key and then pick up the receiver to establish a connection to a specific mailbox in the configured Voicemail Center.
-
Press the softkey.
-
Select a Voicemail Center 461/461.2 using its name/number.
-
Press the softkey.
-
Enter a name for the Voicemail Center 461/461.2. The following entries are possible:
Up to 16 digits
Digits and characters
- Only when the kind of key defined has been selected: Select the type of mailbox.
Press the ⬆ softkey to switch over between the different kinds of mailboxes.
global mailbox: Defines that the global mailbox will be accessed.
private mailbox: Defines that a single mailbox will be accessed.
a) Only when the type of mailbox private mailbox is selected: Press the ☒ softkey.
b) Select the subscriber whose calls should be rerouted using its name/number.
- Press the softkey.
- Enter the remote access code for the mailbox.
Note:
When selecting Single mailbox, you need to use the remote access code entered at the following location: in the Voicemail Center 461.2 under create mailboxes > ...mailbox > remote access or in the Voicemail Center 461 under mailboxes > remote control code.
When selecting Global mailbox, you need to use the remote access code entered at the following location: In the Voicemail Center 461.2 under settings > remote access > remote access code or in the Voicemail Center 461 under settings > remote access code.
- Press the softkey to accept the setting.
Switching Rapid Remote Access of Voicemail Centers 461.2 On/Off
Compared to the Voicemail Center 461, the Voicemail Center 461.2 with firmware version 2.02 and higher supports more rapid remote access over the telephone. If you would like to take advantage of this, update the firmware for the existing Voicemail Center 461.2 and enable rapid remote access on the telephone.
Note: If you would also like to use the telephone to operate the Voicemail Center 461, disable rapid remote access to prevent making mistakes when accessing the device.
Switching this on/off can be done as follows:
• Via the configuration manager
• Via the telephone menu
Switching Rapid Remote Access on Voicemail Center 461.2 On/Off via Configuration Manager
Requirements:
- Configuration manager, open with a sufficient authority level
- Open the page Settings/functions > Default settings.
- Select or clear the Voicemail Center 461.2 with firmware >= 2.02 check box.
☑ Enables rapid remote access.
□ Disables rapid remote access.
- Click Execute.
Switching Rapid Remote Access on Voicemail Center 461.2 On/Off via Telephone Menu
Requirements:
– Knowledge of the telephone, its menu options and the required PIN, if necessary
- Press the Menu key and open the menu settings > def. settings > VMC461.2FW>=2.02.
- Select or clear the VMC461.2FW>=2.02 check box.
☑ Enables rapid remote access.
□ Disables rapid remote access.
- Press the softkey to accept the setting.
Waiting Field Function
In a waiting field, callers can be parked either automatically or by pressing the key, and then individually retrieved and forwarded.
Configuring a Waiting Field
Important: Only available for operation on the PBXs COMpact 5020 VoIP, COMmander Basic.2 and COMmander Business.
The waiting field is configured as described in the following:
- Use the configuration manager in the PBX to configure automatic call acceptance for the waiting field.
- Using the configuration manager on the PBX, select a system telephone as the waiting field reception. To operate the waiting field with multiple waiting field receptions, a group must be configured and selected as the waiting field reception.
Note:
If multiple system telephones have been configured and enabled as waiting field receptions, multiple employees can operate the waiting field simultaneously. Incoming calls and waiting callers are then signalled in all the waiting field receptions. However, if someone is talking to a caller in one of the waiting field receptions, this caller is not signalled in the other waiting field receptions.
The maximum number of waiting field receptions is limited by the number of possible group members.
- On each waiting field reception telephone, assign one or more external waiting field keys, which can be used to monitor and process exchange line calls. During configuration, each waiting field key is assigned to a bundle. A bundle can be either an S_0 port, multiple bundled S_0 ports, an S_2M port or a VoIP account.
Note:
After selecting the bundle, the keys are assigned dynamically. This offers the option of configuring only one key for an S_0 port and only so many keys for an S_2M port that can be processed at a time. If calls come in over a bundle, they are displayed on the associated available keys. If more multiple calls come in over a bundle than there are keys available, they are not displayed until a key becomes available.
The number of possible waiting field keys depends on the number of existing external lines/B-channels and therefore the maximum possible number of simultaneous callers. Two keys per S_0 port, 30 keys per S_2M port and 1 key for the VoIP access point can be configured, that is, a max. of 38 keys on the COMmander Business and a max. of 34 keys on the COMmander Basic.2.
- Assign an internal waiting field key to each waiting field reception, with which internal calls (also alarm calls and door calls) are monitored and processed.
- After configuring a waiting field key on a system telephone, the waiting field reception function on the system telephone in question is automatically enabled and can be switched on and off, if necessary.
Sequence for Call Acceptance in Waiting Field
Call acceptance in the waiting field is carried out as follows:
- If all of the waiting field receptions have been switched off, the telephones ring according to normal call distribution.
- After switching on one or more waiting field receptions, the calls in the respective waiting field are signalled on the waiting field keys of the enabled waiting field receptions.
Important:
After switching on the waiting field reception, any call forwarding for subscribers configured for the telephone, parallel calls as well as the do-not-disturb function are switched off. Not until the waiting field reception is switched off (on the telephone) will these functions (for example, call forwarding on an answering machine) become available again. The function in question (except parallel calling) must be switched on again.
For existing calls, incoming exchange line calls are signalled by blinking LEDs and also by an attention tone, if enabled. For multiple active waiting field receptions, a caller placed in the waiting field is also signalled in the other waiting field receptions by the attention tone.
- The caller can be accepted normally by picking up the receiver or placed in the waiting field by pressing the associated waiting field key. If the automatic call acceptance is set to on busy or according to a time, callers are also automatically placed in the waiting field.
- A caller who has been placed in the waiting field, hears hold music. If a group is configured as waiting field reception and text before answering is enabled, the caller hears the text before answering announcement first.
- A caller is kept a max. of 16 minutes without interruption in the waiting field. If the waiting time is not interrupted by a call to the waiting caller or the call is forwarded, the connection is disconnected.
- You are reminded that the subscriber is still waiting by a short tone once per minute.
- Press the corresponding waiting field key to initiate a call with a caller in the waiting field.
- An external caller in the waiting field can be rerouted internally as normal. If the line of the person being called is busy, the external subscriber can be placed in that person's queue. If the person being called does not accept the call, the external caller is put back in the waiting field. This is signalled by an attention tone, if enabled.
- If there is no one in the waiting field, you can make calls as normal and use the keys on the telephone without limitations.
- As long as information about a call in the queue is showing on the display (LED lights up in yellow), several of the keys are without function and as soon as you picked up the receiver, you are connected to the call in the queue. You can prevent this by pressing the Exit key. After this, the LED lights up in red and the display is in the idle state. Now you can make a call as normal, for instance, by selecting a phone number from the telephone book.
Switching Waiting Field Reception On/Off
Switching this on/off can be done as follows:
• Via the telephone menu
Requirements:
- Knowledge of the telephone, its menu options and the required PIN, if necessary
– The telephone has been selected in the PBX as a waiting field reception
In order to switch the waiting field reception on or off, press the function key configured for the waiting field reception.
Or, proceed as described in the following.
-
Press the menu key and open the menu functions > w.fld.reception.
The icon indicates the current setting. -
Select the desired option:
switch on: Enables the waiting field reception.
switch off: Disables the waiting field reception.
Important:
It is only possible to switch a waiting field reception off if no callers are in the waiting field. For multiple waiting field receptions, this limitation only applies when only one waiting field reception is switched on.
When the waiting field reception is switched off, the subscriber is automatically logged out of the waiting field group incoming; the subscriber is automatically logged on again when the waiting field reception is switched on again.
Configuring and Operating Function Key and External Waiting Field
Press the key to place the caller signalled by the key in the waiting field or establish a connection with the caller from the waiting field. Whether you press the key depends on the current status as displayed by the LED next to the key. Refer to the description of LED signalling.
LED signalling next to the key:
| Green No connection with an external subscriber exists. Information about the communication partner is shown on the display: (If other waiting field receptions have been enabled, the communication partners for these are not signalled.) Press the key once to place the communication partner in the waiting field. | |
| Yellow An external subscriber is on hold in the waiting field. Information about the calls waiting are shown on the display: (If other waiting field receptions have been enabled, the LED lights up in red.) Press the key once to establish a connection to the call waiting. | |
| Red An external subscriber is on hold in the waiting field. Press the key once to display information about the call waiting – if no call is in progress. | |
| Yellow (blinking) | An external subscriber is calling. Information about the caller is shown on the display: Press the key once to place the caller in the waiting field. Press the key twice to establish a connection to the caller. |
| Red (blinking) | An external subscriber is calling. Press the key once to place the caller in the waiting field. |
Note: If a caller is placed in the waiting field by pressing the waiting field key, the LED then lights up in yellow next to the key. If a caller is placed in the waiting field either automatically or by another waiting field reception, the LED then lights up in red.
The configuration can be carried out as follows:
• Via the configuration manager
• Via the telephone menu
Configuring Function Key for External Waiting Field via Configuration Manager
Requirements:
- Configuration manager, open with a sufficient authority level
- Open the page Function keys > Assign function keys.
- Only available in installed extension modules: In the telephone displayed at the top left, click the key group in which you would like to define keys.
- Click the Level 1 tab.
Important: Configuring this function is only possible on the first level. The second level is then blocked. If a function has been assigned to the second level, it is deleted.
- In the list field next to the function key that you would like to define, select the function Waiting field (external).
The current settings for defining the key are displayed.
- In the Telephone number entry field, enter the phone number for the bundle whose incoming calls should be monitored. The following entries are possible:
Up to 24 digits
Note: A bundle can be either an S_0 port, multiple bundled S_0 ports, an S_2M port or a VoIP account.
- In the Key name entry field, enter a name for the key. The following entries are possible:
Up to 16 digits
Digits and characters
Note: The key name is used for printing the label.
- Click Execute.
Requirements for operating the function:
– The telephone has been selected in the PBX as a waiting field reception
Configuring Function Key for External Waiting Field via Telephone Menu
Requirements:
- Knowledge of the telephone, its menu options and the required PIN, if necessary
- Press the menu key and open the define keys menu.
- Press the function key that you would like to define.
- Select first level.
Important: Configuring this function is only possible on the first level. The second level is then blocked. If a function has been assigned to the second level, it is deleted.
The list of available functions is displayed.
- Select the waiting field function and then external.
The current settings for defining the key are shown on the display.
- Press the softkey.
- Select the bundle whose incoming calls should be monitored.
Note: A bundle can be either an S_0 port, multiple bundled S_0 ports, an S_2M port or a VoIP account.
- Press the softkey to accept the setting.
Requirements for operating the function:
- The telephone has been selected in the PBX as a waiting field reception
Configuring and Operating Function Key for Internal Waiting Field
Note: A maximum of one internal waiting field key is possible on a single telephone.
Press the key to place the internal caller in the waiting field or establish a connection with the caller from the waiting field. Whether you press the key depends on the current status as displayed by the LED next to the key. Refer to the description of LED signalling.
LED signalling next to the key:
Green There is currently a connection with an internal subscriber. Information about the communication partner is shown on the display:
(If other waiting field receptions have been enabled, the communication partners for these are not signalled.)
Press the key once to place the communication partner in the waiting field.
Yellow An internal subscriber is on hold in the waiting field. Information about the calls waiting are shown on the display:
(If other waiting field receptions have been enabled, the calls waiting in these are not signalled.)
Press the key once to establish a connection to the call waiting.
Red An internal subscriber is on hold in the waiting field.
(If other waiting field receptions have been enabled, the calls waiting in these are not signalled.)
Press the key once to display information about the call waiting – if no call is in progress.
Yellow (blinking) An internal subscriber is calling. Information about the caller is shown on the display:
Press the key once to place the caller in the waiting field.
Press the key twice to establish a connection to the caller.
Red (blinking) An internal subscriber is calling.
Press the key once to place the caller in the waiting field.
The configuration can be carried out as follows:
• Via the configuration manager
• Via the telephone menu
Configuring Function Key for Internal Waiting Field via Configuration Manager
Requirements:
- Configuration manager, open with a sufficient authority level
- Open the page Function keys > Assign function keys.
- Only available in installed extension modules: In the telephone displayed at the top left, click the key group in which you would like to define keys.
- Click the Level 1 tab.
Important: Configuring this function is only possible on the first level. The second level is then blocked. If a function has been assigned to the second level, it is deleted.
- In the list field next to the function key that you would like to define, select the function Waiting field (internal).
The current settings for defining the key are displayed.
- In the Key name entry field, enter a name for the key. The following entries are possible:
Up to 16 digits
Digits and characters
Note: The key name is used for printing the label.
- Click Execute.
Requirements for operating the function:
- The telephone has been selected in the PBX as a waiting field reception
Configuring Function Key for Internal Waiting Field via Telephone Menu
Requirements:
– Knowledge of the telephone, its menu options and the required PIN, if necessary
- Press the menu key and open the define keys menu.
- Press the function key that you would like to define.
- Select first level.
Important: Configuring this function is only possible on the first level. The second level is then blocked. If a function has been assigned to the second level, it is deleted.
The list of available functions is displayed.
- Select the waiting field function and then internal.
The current settings for defining the key are shown on the display.
- Press the softkey to accept the setting.
Requirements for operating the function:
– The telephone has been selected in the PBX as a waiting field reception
Configuring and Operating Function Key for Switching Waiting Field Reception On/Off
Press the key while in the telephone's idle state to switch the waiting field reception on or off or switch it over.
In addition, the status of the function is indicated by the corresponding LED.
LED signalling next to the key:
Green The waiting field reception is enabled.
Off The waiting field reception is disabled.
The configuration can be carried out as follows:
• Via the configuration manager
• Via the telephone menu
Configuring Function Key for Switching Waiting Field Reception On/Off via Configuration Manager
Requirements:
- Configuration manager, open with a sufficient authority level
- Open the page Function keys > Assign function keys.
- Only available in installed extension modules: In the telephone displayed at the top left, click the key group in which you would like to define keys.
- Click the Level 1 tab.
Important: Configuring this function is only possible on the first level.
- In the list field next to the function key that you would like to define, select the Waiting field reception function.
The current settings for defining the key are displayed.
- In the Kind of switching list field, select one of the following options:
switch off: Disables the waiting field reception.
switch on: Enables the waiting field reception.
switch over: Press the key to switch the waiting field reception function on and off.
- In the Key name entry field, enter a name for the key. The following entries are possible:
Up to 16 digits
Digits and characters
Note: The key name is used for printing the label.
7. Click Execute.
Requirements for operating the function:
– The telephone has been selected in the PBX as a waiting field reception
Configuring Function Key for Switching Waiting Field Reception On/Off via Telephone Menu
Requirements:
– Knowledge of the telephone, its menu options and the required PIN, if necessary
- Press the menu key and open the define keys menu.
- Press the function key that you would like to define.
- Select first level.
Important: Configuring this function is only possible on the first level.
The list of available functions is displayed.
- Select the w.fld.reception function.
The current settings for defining the key are shown on the display.
- Select the kind of switching. Press the ⬆ softkey to switch over between the different kinds of switching.
switch off: Disables the waiting field reception.
switch on: Enables the waiting field reception.
switch over: Press the key to switch the waiting field reception function on and off.
- Press the softkey to accept the setting.
Requirements for operating the function:
– The telephone has been selected in the PBX as a waiting field reception
Switching Attention Tone for Waiting Field On/Off
If the attention tone has been switched on for the waiting field, incoming calls in the waiting field are signalled by an attention tone. If the attention tone bothers you, you can switch it off. The volume of the attention tone is dependent on the configured ringer volume.
Switching this on/off can be done as follows:
• Via the configuration manager
• Via the telephone menu
Switching Attention Tone for Waiting Field On/Off via Configuration Manager
Requirements:
- Configuration manager, open with a sufficient authority level
- Open the page Settings/functions > Signalling/ringer.
- Select or clear the Attention tone (waiting field) check box.
☑ Enables the attention tone for the waiting field.
☐ Disables the attention tone for the waiting field.
- Click Execute.
Switching Attention Tone for Waiting Field On/Off via Telephone Menu
Requirements:
– Knowledge of the telephone, its menu options and the required PIN, if necessary
- Press the menu key and open the menu settings > signalling > attention tone.
- Select or clear the waiting field check box.
☑ Enables the attention tone for the waiting field.
□ Disables the attention tone for the waiting field.
- Press the softkey to accept the setting.
Configuring and Operating the Answering Machine
This section describes how to set up and operate the functions on your answering machine. Descriptions are given on what the functions do, how to operate them and – if possible – how to define these functions on programmable function keys.
In most cases, configuration can be carried out in two different ways:
- Configuration via the telephone menu
- Configuration via the configuration manager
Topics
– Forwarding Incoming Calls to Answering Machine (page 343)
- Answering Machine Accepts Call – Call Acceptance (page 344)
- Readiness (page 345)
– Answering Machine List (page 349)
- List of Voice Memos (page 355)
- Announcements (page 360)
– Call Acceptance and Announcement Assignment (page 366)
– Basic Settings (page 387)
- Call Recording (page 394)
- Remote Access (page 402)
- Message Forwarding (page 410)
– Data Exchange (page 420)
Forwarding Incoming Calls to Answering Machine
Requirements:
– Knowledge of the telephone and its menu options
– Disabled readiness of the answering machine
When you receive a call, proceed as described in the following.
- Select answer. machine.
- Press the softkey.
The answering machine accepts the call.
Answering Machine Accepts Call – Call Acceptance
Requirements:
– Knowledge of the telephone and its menu options
Note: If the listen in function has been enabled on the answering machine, the loudspeaker on the telephone is switched on for listening in when a call is accepted by the answering machine.
If the answering machine has already accepted the call, proceed as described.
- Pick up the receiver or press the Hook key. You are connected with the caller.
Readiness
In order for the answering machine to accept calls and record messages, readiness must be enabled.
Switching Readiness On/Off
Note:
Also when readiness is enabled, only calls of the types that have been activated for call acceptance will be accepted.
You can also switch readiness on and off remotely.
Switching this on/off can be done as follows:
• Via the configuration manager
• Via the telephone menu
Switching Readiness On/Off via Configuration Manager
Requirements:
- An answering machine, put into operation
-
Configuration manager, open with a sufficient authority level
-
Open the page Answering machine > Global.
- Select or clear the Answering machine readiness check box.
☑ Enables the readiness function.
□ Disables the readiness function.
- Click Execute.
Switching Readiness On/Off via Telephone Menu
Requirements:
- An answering machine, put into operation
- Knowledge of the telephone, its menu options and the required PIN, if necessary
In order to switch readiness on or off, press the function key configured for readiness.
In addition, you can enable readiness from the idle state by pressing the 🎩 softkey, and disable it by pressing the 🔗 softkey. The icon indicates the current state.
Or, proceed as described in the following.
- Press the menu key and open the menu answer.machine > functions > TAM readiness.
The icon indicates the current setting.
- Select the desired option:
switch on: Enables readiness.
switch off: Disables readiness.
Configuring and Operating Function Key for Readiness
Press the key to switch readiness on or off or to switch it over.
In addition, when functions are defined on the first key level, the status of the function is indicated by the corresponding LED.
LED signalling next to the key:
Green The readiness function is enabled.
Off The readiness function is disabled.
The configuration can be carried out as follows:
• Via the configuration manager
• Via the telephone menu
Configuring Function Key for Readiness via Configuration Manager
Requirements:
- An answering machine, put into operation
-
Configuration manager, open with a sufficient authority level
-
Open the page Function keys > Assign function keys.
- Only available in installed extension modules: In the telephone displayed at the top left, click the key group in which you would like to define keys.
- Click one of the following tabs:
Level 1: Keys are defined on the first key level.
Level 2: Keys are defined on the second key level.
- In the list field next to the function key that you would like to define, select the TAM - readiness function.
The current settings for defining the key are displayed.
- In the Kind of switching list field, select one of the following options:
switch off: Press the key to disable the readiness function.
switch on: Press the key to enable the readiness function.
switch over: Press the key to switch the readiness function on and off.
- In the Key name entry field, enter a name for the key. The following entries are possible:
Up to 16 digits
Digits and characters
Note: The key name is used for printing the label.
- Click Execute.
Configuring Function Key for Readiness via Telephone Menu
Requirements:
- An answering machine, put into operation
-
Knowledge of the telephone, its menu options and the required PIN, if necessary
-
Press the menu key and open the define keys menu.
- Press the function key that you would like to define.
- Select the desired option:
first level: Keys are defined on the first key level.
second level: Keys are defined on the second key level.
The list of available functions is displayed.
- Select the TAM readiness function.
The current settings for defining the key are shown on the display.
- Select the kind of switching. Press the ⬆ softkey to switch over between the different kinds of switching.
switch off: Press the key to disable the readiness function.
switch on: Press the key to enable the readiness function.
switch over: Press the key to switch the readiness function on and off.
- Press the softkey to accept the setting.
Answering Machine List
The telephone answering machine list can save up to 250 messages and call recordings made on the answering machine. The list also includes the date and time of the recording as well as the telephone number of the caller/communication partner. The recordings are numbered consecutively, with the last/latest recording assigned the number 1.
You can call someone who has called you directly from the answering machine list.
The LED above the message key indicates whether entries are present on the answering machine list.
Opening the Answering Machine List
Opening can be carried out as follows:
• Via the telephone menu
Requirements:
- An answering machine, put into operation
- Knowledge of the telephone, its menu options and the required PIN, if necessary
To open the answering machine list, press the function key configured for it or press the menu key to open the menu answer.machine > functions > TAM list.
Or, proceed as described in the following.
1. Press the message key.
The available lists are displayed. To the right next to the selection of lists, the respective number of existing recordings/calls is displayed.
2. Select TAM list to open the answering machine list (this is skipped if the other lists are empty).
The following information about the recording is shown on the display:
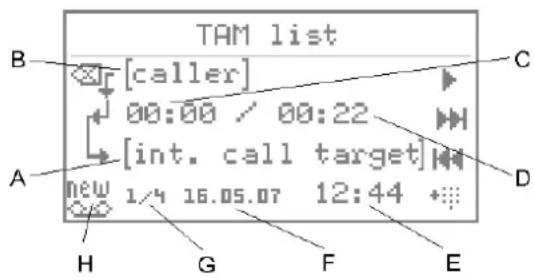
text_image
TAM list [caller] 00:00 / 00:22 [int. call target] new 1/4 16.05.07 12:44 H G F EA Internal call target
B C a l l e r
C Length of time the recording has been played back
D Entire length of the recording
E Time of recording
F Date of recording
G Consecutive number of recordings/number of existing recordings
Note: The latest recording is displayed with consecutive number 1.
H Recording type: new message ()older message already played back (),call recording (3)
Note: If you have activated automatic playback, the new recordings are automatically played back in sequence after the answering machine list is opened. The latest recording is played back first.
3. Select the desired option:
☒ Deletes the displayed recording.
Starts the playback of the recording.
Pages to the next (older) recording.
Pages to the previous (more recent) recording.
Accepts the entry into dial preparation or into the telephone book, if applicable.
- If you would like to leave the menu, press the Exit key.
Listening to recordings (messages and call recordings)
Listening can be carried out as follows:
• Via the telephone menu
Requirements:
-
An answering machine, put into operation
– Knowledge of the telephone, its menu options and the required PIN, if necessary -
Open the answering machine list.
- Use the ⬆ and ⬆ softkeys to scroll to the desired recording.
- Press the ▶ softkey to start playing back the recording.
Note: You can also pick up the receiver to prevent others present from listening.
The recording is played back.
4. Select the desired option:
☒ Deletes the recording currently being played back.
11 Interrupts playback.
▶▶ Skips the recording currently being played back.
Repeats the previous recording or the one currently being played back.
Accepts the entry into dial preparation or into the telephone book, if applicable.
5. If you would like to leave the menu, press the Exit key.
Note: You can also access and listen to the recordings remotely.
Dialling from the Answering Machine List
Requirements:
-
An answering machine, put into operation
– Knowledge of the telephone, its menu options and the required PIN, if necessary -
Open the answering machine list.
- Use the and softkeys to scroll to the desired recording.
- Press the +: softkey in order to accept the telephone number in dial preparation.
- Pick up the receiver or press the Hook key.
The subscriber is called.
Note: If you would like to exit the menu without dialling the number displayed, press the Exit key.
Configuring the LED Message Key
See:
- Configuring the LED Message Key (page 137)
Configuring and Operating Function Key for Answering Machine List
Press the key while the telephone is in the idle state to open the answering machine list.
In addition, when functions are defined on the first key level, the status of the answering machine list is indicated by the corresponding LED.
LED signalling next to the key:
Green There are no new entries. All of the entries in the list have been viewed, but have not yet been deleted.
Green The list contains new entries that have not yet been viewed.
(blinking)
Off The list is empty.
The configuration can be carried out as follows:
• Via the configuration manager
• Via the telephone menu
Configuring Function Key for Answering Machine List via Configuration Manager
Requirements:
- An answering machine, put into operation
-
Configuration manager, open with a sufficient authority level
-
Open the page Function keys > Assign function keys.
- Only available in installed extension modules: In the telephone displayed at the top left, click the key group in which you would like to define keys.
- Click one of the following tabs:
Level 1: Keys are defined on the first key level.
Level 2: Keys are defined on the second key level.
- In the list field next to the function key that you would like to define, select the TAM - list function.
The current settings for defining the key are displayed.
- In the Key name entry field, enter a name for the key. The following entries are possible:
Up to 16 digits
Digits and characters
Note: The key name is used for printing the label.
- Click Execute.
Configuring Function Key for Answering Machine List via Telephone Menu
Requirements:
- An answering machine, put into operation
-
Knowledge of the telephone, its menu options and the required PIN, if necessary
-
Press the menu key and open the define keys menu.
- Press the function key that you would like to define.
- Select the desired option:
first level: Keys are defined on the first key level.
second level: Keys are defined on the second key level.
The list of available functions is displayed.
- Select the TAM list function.
- Press the softkey to accept the setting.
List of Voice Memos
Up to 250 voice memos including date, time, and length of the recording can be saved in this list. The recordings are numbered consecutively, with the last/latest recording assigned the number 1.
The LED above the message key indicates entries in the voice memo list.
Recording Memos
The recording can be made as follows:
• Via the telephone menu
Requirements:
- An answering machine, put into operation
– Knowledge of the telephone, its menu options and the required PIN, if necessary
To record voice memos, press a function key configured for recording voice memos.
Or, proceed as described in the following.
- Press the menu key and open the menu answer.machine > functions > TAM voice memo.
- Press the √ softkey next to start of record. to start the recording. The recording proceeds.
- Record the memo.
- Press the √ softkey next to end of recording to end the recording.
- Press the softkey to save the recording.
Note: Recordings with a recording time shorter than 1 second are discarded by the telephone.
Configuring and Operating Function Key Recording Voice Memos
Press the key while the telephone is in the idle state to start recording a voice memo.
In addition, when functions are defined on the first key level, the associated LED indicates whether a voice memo is currently being recorded.
LED signalling next to the key:
Red (blinking) A voice memo is being recorded.
The configuration can be carried out as follows:
• Via the configuration manager
• Via the telephone menu
Configuring Function Key for Recording Voice Memos via Configuration Manager
Requirements:
- An answering machine, put into operation
-
Configuration manager, open with a sufficient authority level
-
Open the page Function keys > Assign function keys.
-
Only available in installed extension modules: In the telephone displayed at the top left, click the key group in which you would like to define keys.
-
Click one of the following tabs:
Level 1: Keys are defined on the first key level.
Level 2: Keys are defined on the second key level.
- In the list field next to the function key that you would like to define, select the TAM - voice memo function.
The current settings for defining the key are displayed.
- In the Key name entry field, enter a name for the key. The following entries are possible:
Up to 16 digits
Digits and characters
Note: The key name is used for printing the label.
- Click Execute.
Configuring Function Key for Recording Voice Memos via Telephone Menu
Requirements:
-
An answering machine, put into operation
– Knowledge of the telephone, its menu options and the required PIN, if necessary -
Press the menu key and open the define keys menu.
- Press the function key that you would like to define.
- Select the desired option:
first level: Keys are defined on the first key level.
second level: Keys are defined on the second key level.
The list of available functions is displayed.
- Select the TAM voice memo function.
- Press the softkey to accept the setting.
Opening the List of Voice Memos
Opening can be carried out as follows:
• Via the telephone menu
Requirements:
– An answering machine, put into operation
- Knowledge of the telephone, its menu options and the required PIN, if necessary
- Press the message key.
The available lists are displayed. To the right next to the selection of lists, the respective numbers of existing recordings and calls are displayed.
- Select TAM voice memos to open the list of voice memos (this is skipped if the other lists are empty).
The following information about the recording is shown on the display:
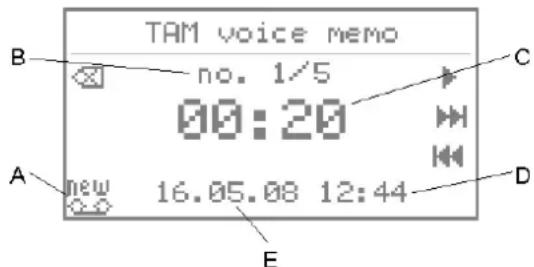
text_image
TAM voice memo no. 1/5 00:20 new 16.05.08 12:44 A B C D EA Recording type: new voice memo ( ) old voice memo already listens to ( ).
B Consecutive number of recording/number of existing recordings
Note: The latest recording is displayed with consecutive number 1.
C Length of the recording
D Time of recording
E Date of recording
Note: If you have activated automatic playback, the new recordings are automatically played back in sequence after the list of voice memos is opened. The latest recording is played back first.
- Select the desired option:
☒ Deletes the displayed recording.
Starts the playback of the recording.
Pages to next (older) recording.
Pages to the previous (more recent) recording.
- If you would like to leave the menu, press the Exit key.
Listening to Recordings (Memos)
Listening can be carried out as follows:
• Via the telephone menu
Requirements:
-
An answering machine, put into operation
– Knowledge of the telephone, its menu options and the required PIN, if necessary -
Open the voice memo list.
- Use the ⬆ and ⬆ softkeys to scroll to the desired recording.
- Press the ▶ softkey to start playing back the recording.
Note: You can also pick-up the receiver to prevent others present from listening.
The recording is played back.
- Select the desired option:
☒ Deletes the recording currently being played back.
11 Interrupts playback.
▶ Skips the recording currently being played back.
Repeats the previous recording or the one currently being played back.
- If you would like to leave the menu, press the Exit key.
Configuring the LED Message Key
See:
- Configuring the LED Message Key (page 137)
Announcements
In addition to standard announcements, the answering machine lets you manage customized announcements.
Existing announcements can transferred to a USB memory stick via the configuration manager or new announcements can be recorded over the phone.
The announcements can be assigned to different types of calls as well as to different callers.
Creating a New Announcement
The creation can be carried out as follows:
• Via the telephone menu
Requirements:
-
An answering machine, put into operation
– Knowledge of the telephone, its menu options and the required PIN, if necessary -
Press the menu key and open the menu answer.machine > settings > edit announcement..
- Press the ☐ softkey in front of new announcement to record a new announcement (this step is skipped if there are not yet any announcements).
- Enter the name. The following entries are possible:
Up to 8 digits
Numbers and characters using the 0...9 keys
- Press the softkey to save the entry.
- Press the √ softkey next to start of record. to start recording the announcement. The recording proceeds.
- Record the announcement.
- Press the √ softkey next to end of recording to end recording the announcement.
Note:
You have the option of recording the announcement again (by selecting new announcement option) or listening to the announcement that you recorded (by selecting the playback option).
Recordings with a recording time shorter than 1 second are discarded by the telephone.
- Select store to save the recorded announcement in the announcement list.
Editing Existing Announcement in List
Editing can be carried out as follows:
• Via the telephone menu
Requirements:
- An answering machine, put into operation
- Knowledge of the telephone, its menu options and the required PIN, if necessary
In order to edit an announcement, press the function key configured for editing announcements.
Or, proceed as described in the following.
- Press the menu key and open the menu answer.machine > settings > edit announcement..
- Scroll to the desired entry.
- Press the softkey.
- Select change.
- Overwrite the name, if necessary. The following entries are possible:
Up to 8 digits
Digits and characters
-
Press the softkey to save the entry.
-
Press the √ softkey to overwrite the existing announcement.
- Press the √ softkey next to start of record. to start recording the announcement. The recording proceeds.
- Record the announcement.
- Press the √ softkey next to end of recording to end recording the announcement.
Note:
You have the option of recording the announcement again (by selecting new announcement option) or listening to the announcement that you recorded (by selecting the playback option).
Recordings with a recording time shorter than 1 second are discarded by the telephone.
- Select store to save the recorded announcement in the announcement list.
Deleting an Existing Announcement from List
Deleting can be carried out as follows:
• Via the telephone menu
Requirements:
- An answering machine, put into operation
- Knowledge of the telephone, its menu options and the required PIN, if necessary
In order to delete an announcement, press the function key configured.
Or, proceed as described in the following.
- Press the menu key and open the menu answer.machine > settings > edit announcement..
- Scroll to the desired entry.
-
Press the softkey.
-
Select delete.
- Press the softkey to confirm the action.
Configuring and Operating Function Key for Editing Announcements
Press the key for general functions while the telephone is in the idle state to open the announcement selection menu. After selecting an announcement, you can edit it.
While the telephone is in the idle state, press the key defined for opening the menu for editing the configured announcement.
LED signalling next to the key:
None
The configuration can be carried out as follows:
• Via the configuration manager
• Via the telephone menu
Configuring Function Key for Editing Announcements via Configuration Manager
Requirements:
- An answering machine, put into operation
-
Configuration manager, open with a sufficient authority level
-
Open the page Function keys > Assign function keys.
-
Only available in installed extension modules: In the telephone displayed at the top left, click the key group in which you would like to define keys.
-
Click one of the following tabs:
Level 1: Keys are defined on the first key level.
Level 2: Keys are defined on the second key level.
- In the list field next to the function key that you would like to define, select the TAM - edit announcement function.
The current settings for defining the key are displayed.
- In the Key name entry field, enter a name for the key. The following entries are possible:
Up to 16 digits
Digits and characters
Note: The key name is used for printing the label.
- Click Execute.
Configuring Function Key for Editing a Defined Announcement via Configuration Manager
Requirements:
- An answering machine, put into operation
-
Configuration manager, open with a sufficient authority level
-
Open the page Function keys > Assign function keys.
- Only available in installed extension modules: In the telephone displayed at the top left, click the key group in which you would like to define keys.
- Click one of the following tabs:
Level 1: Keys are defined on the first key level.
Level 2: Keys are defined on the second key level.
- In the list field next to the function key that you would like to define, select the TAM - edit announcement defined function.
The current settings for defining the key are displayed.
- Select an announcement from the Announcement list.
- In the Key name entry field, enter a name for the key. The following entries are possible:
Up to 16 digits
Digits and characters
Note: The key name is used for printing the label.
7. Click Execute.
Configuring Function Key for Editing Announcements via Telephone Menu
Requirements:
-
An answering machine, put into operation
– Knowledge of the telephone, its menu options and the required PIN, if necessary -
Press the menu key and open the define keys menu.
- Press the function key that you would like to define.
- Select the desired option from the list.
first level: Keys are defined on the first key level.
second level: Keys are defined on the second key level.
The list of available functions is displayed.
- Select the TAM edit announce function.
The current settings for defining the key are shown on the display.
- Select the kind of key. Press the ⬆ softkey to switch over between the different kinds of keys.
general: Press the key to open the menu for selecting an assignment from the list. (No other action is required.)
defined: Press the key to open the menu for editing the configured announcement.
- Press the \$oftkey.
- Select an announcement from the list.
- Press the softkey to accept the setting.
Call Acceptance and Announcement Assignment
Call acceptance and announcement assignment can be configured to be both call-dependent and time-dependent.
Configuration Variants for Call Acceptance and Announcement Assignment
The following configuration variants are possible for call acceptance and announcement assignment:
Simple Automatic
For each of the six types of calls, anonymous calls, calls for groups, external calls, internal calls, door terminal calls and call deblocker calls, separate call acceptance and announcement assignment can be configured.
Automatic for Experts
In addition to the six types of calls for the simple automatic function, calls for specific group telephone numbers, calls for specific separate external telephone numbers as well as calls for specific door numbers can be differentiated.
For each of these types of calls, multiple entries for call acceptance and announcement assignment can be created. These entries can be activated manually by pressing a key and/or time-dependently.
Special Call Acceptance/Announcement for Telephone Book Contacts
For each contact entered in the telephone book, special settings for call acceptance and announcement can be configured. In order to ensure that these settings are used, the special call acceptance/announcement for all of the telephone book contacts must be activated.
Call Types
The type of call acceptance can be configured depending on the type of call. The two following call types are differentiated by whether they focus on the caller or on the call target.
A Calls from a telephone book contact (caller transmits a telephone number contained in the telephone book)
B Anonymous calls (caller transmits no telephone number)
C Call deblocker calls (when do-not-disturb is switched on, caller transmits a telephone number contained in the call deblocker)
D Calls for group telephone number X (call target is a specific group number)
E Calls for the subscriber's own external telephone number X (call target is a specific external telephone number for the subscriber)
F Calls for groups (call target is any group number)
G External calls (caller is an external subscriber)
H Internal calls (caller is an internal subscriber)
I Door terminal calls for door number X (caller is a specific door terminal)
J Door terminal calls (caller is any door terminal)
The sequence displayed here corresponds to the sequence that is taken into account in the settings. Applicable call types, for which no settings (default) have been configured, are not taken into account for an incoming call. Instead, the next applicable call type is sought out. If a setting has not been made for any of the applicable call types, the default setting
Announcement and recording with the default announcement STANDARD.WAV is used.
Example
The following example illustrates taking the settings into account:
Initial situation
- Different settings have been made regarding call acceptance and announcement for internal calls (call type H) and external calls (call type G) as well as for calls to your group telephone number 300 (call type D).
- The answering machine is switched on.
Call 1
Properties of call 1:
- The caller is an external subscriber who does not transmit a telephone number.
- The call target is the external telephone number assigned to the internal subscriber telephone number.
- The call type A does not apply due to the missing telephone number display.
- For the first applicable call type B, no setting are present.
- The call type C does not apply due to the missing telephone number display.
- The call types D, E and F do not apply due to the telephone number dialled.
- The existing setting for the next applicable call type G is used.
Sequence for call 1:
Call 2
Properties of call 2:
- The caller is a door terminal.
Sequence for call 2:
- The call types A to H are not taken into account for door terminal calls.
- Not setting is present for call types I and J.
- The default setting Announcement and recording with the default announcement STANDARD.WAV is used.
Configuring Simple Automatic
The configuration can be carried out as follows:
• Via the configuration manager
• Via the telephone menu
Configuring Simple Automatic via Configuration Manager
Requirements:
– An answering machine, put into operation
- Configuration manager, open with a sufficient authority level
-
Open the page Answering machine > Automatic.
-
Click the Standard tab.
-
If an entry should be activated together with other entries simultaneously at the press of a key, select the desired collective ID for the entry of the call type in question from the Collective ID entry field. The following entries are possible:
80 to 99
- In the Call acceptance list field, select one of the following options for the call type in question.
Standard: Type of call is not taken into account. The type of call acceptance depends on the call type next applicable to the call. If Standard has been selected for all the applicable call types, the caller hears the default announcement and can then leave a message on the answering machine.
Announcement and recording: The caller hears the announcement selected under Announcement and can then leave a message on the answering machine.
Only announcement: The caller hears the announcement selected under Announcement; however, he cannot leave a message on the answering machine.
No call acceptance: The call made by the corresponding caller is not accepted by the answering machine.
-
In the Announcement list field, select the desired announcement for the call type in question.
-
Click Execute.
Configuring Function Key for Simple Automatic via Telephone Menu
Requirements:
-
An answering machine, put into operation
– Knowledge of the telephone, its menu options and the required PIN, if necessary -
Press the menu key and open the menu answer.machine > functions > TAM announcement.
-
Select the type of call for which you would like to configure call acceptance.
The ♦con indicates the current setting.
- Select one of the following options for the call type in question.
standard: Type of call is not taken into account. The type of call acceptance depends on the call type which is applicable to the call next. If standard has been selected for all the applicable call types, the caller hears the default announcement and can then leave a message on the answering machine.
announc/record.: At the end, the caller hears the selected announcement and can then leave a message on the answering machine.
announcement.only: At the end, the caller hears the selected announcement; however, he cannot leave a message on the answering machine.
no call accept.: The call made by the corresponding caller is not accepted by the answering machine.
- Scroll through the announcement list to your selection.
The name of the announcement along with the creation date and time is displayed.
- Press the softkey to accept the setting.
Configuring Automatic for Experts
The configuration can be carried out as follows:
• Via the configuration manager
Requirements:
- An answering machine, put into operation
-
Configuration manager, open with a sufficient authority level
-
Open the page Answering machine > Automatic.
- Click the Settings tab.
- Select or clear the Expert view check box.
Enables the expert view.
- Select or clear the Time control check box.
Enables time control.
□ Disables time control.
Note: Time control can be enabled or disabled as needed via the telephone menu or a function key.
- Click Execute.
- Create entries for the various types of calls in the automatic as described in the following.
Note:
If no entry has been created for a type of call, the setting for the simple automatic applies to this type of call.
In order to ensure that time-dependent entries are taken into account, time control must also be enabled for the entry in question.
- In order to be able to manually activate an entry by pressing a key, configure a function key with the ID assigned to the entry as described in the following.
Note: If more than one entry should be activated simultaneously with a key, assign the entries in question to a collective ID and configure a function key with the collective ID saved on it.
Creating Entries for Automatic
The creation can be carried out as follows:
• Via the configuration manager
Creating Entry in Automatic for Anonymous Calls
Requirements:
- An answering machine, put into operation
-
Configuration manager, open with a sufficient authority level
– Expert view enabled -
Open the page Answering machine > Automatic.
- Click the Anonymous calls tab.
- Under Kind of time control, select one of the following options:
Individual switching times: An individual switching time can be configured for each entry according to the weekday and time. The entry is than taken into account starting at this switching point up to the next valid switching point.
Depending on configuration: A configuration can be defined for each entry in which the configuration for the entry is taken into account in the PBX.
- In the ID entry field, enter an ID for the entry. The following entries are possible:
10 to 79
Note: An ID may only be issued once.
- If this entry should be activated simultaneously with other entries at the press of a key, select the desired collective ID for the entry from the Collective ID list field.
- In the Call acceptance list field, select one of the following options:
Announcement and recording: The caller hears the announcement selected under Announcement and can then leave a message on the answering machine.
Only announcement: The caller hears the announcement selected under Announcement; however, he cannot leave a message on the answering machine.
No call acceptance: The call made by the corresponding caller is not accepted by the answering machine.
- Select the desired announcement in the Announcement list field.
- Select or clear the Time control active check box.
☑ Time control is enabled for the entry in question.
☐ Time control is disabled for the entry in question. (No other action is required.)
-
Configure the settings for time control dependent on the type of time control.
-
In the Identification number of the configuration entry field, enter the identification number of the PBX configuration.
-
In the Day list field, select the desired day or days on which the entry should automatically be activated. In the Time entry field, enter the associated time.
-
Click Execute.
Creating Entry in Automatic for Calls for Groups
Requirements:
- An answering machine, put into operation
-
Configuration manager, open with a sufficient authority level
– Expert view enabled -
Open the page Answering machine > Automatic.
- Click the Calls for groups tab.
- Under Kind of time control, select one of the following options:
Individual switching times: An individual switching time can be configured for each entry according to the weekday and time. The entry is than taken into account starting at this switching point up to the next valid switching point.
Depending on configuration: A configuration can be defined for each entry in which the configuration for the entry is taken into account in the PBX.
- In the ID entry field, enter an ID for the entry. The following entries are possible:
10 to 79
Note: An ID may only be issued once.
- If this entry should be activated together with other entries simultaneously at the press of a key, select the desired collective ID for the entry from the Collective ID list field.
- In the Group number entry field, enter the group telephone number that applies to the entry in question.
Note: If no group telephone number has been entered, the entry in question applies to all of the calls for groups.
- In the Call acceptance list field, select one of the following options:
Announcement and recording: The caller hears the announcement selected under Announcement and can then leave a message on the answering machine.
Only announcement: The caller hears the announcement selected under Announcement; however, he cannot leave a message on the answering machine.
No call acceptance: The call made by the corresponding caller is not accepted by the answering machine.
-
Select the desired announcement in the Announcement list field.
-
Select or clear the Time control active check box.
☒ Time control is enabled for the entry in question.
☐ Time control is disabled for the entry in question. (No other action is required.)
-
Configure the settings for time control dependent on the type of time control.
-
In the Identification number of the configuration entry field, enter the identification number of the PBX configuration.
-
In the Day list field, select the desired day or days on which the entry should automatically be activated. In the Time entry field, enter the associated time.
-
Click Execute.
Creating an Entry in Automatic for External Calls
Requirements:
- An answering machine, put into operation
-
Configuration manager, open with a sufficient authority level
– Expert view enabled -
Open the page Answering machine > Automatic.
- Click the External calls tab.
- Under Kind of time control, select one of the following options:
Individual switching times: An individual switching time can be configured for each entry according to the weekday and time. The entry is than taken into account starting at this switching point up to the next valid switching point.
Depending on configuration: A configuration can be defined for each entry in which the configuration for the entry is taken into account in the PBX.
- In the ID entry field, enter an ID for the entry. The following entries are possible:
10 to 79
Note: An ID may only be issued once.
-
If this entry should be activated together with other entries simultaneously at the press of a key, select the desired collective ID for the entry from the Collective ID list field.
-
In the External telephone number entry field, enter one of your own external telephone numbers to which the entry in question should apply.
Note: If no external telephone number is entered here, the entry in question applies to all external calls.
- In the Call acceptance list field, select one of the following options:
Announcement and recording: The caller hears the announcement selected under Announcement and can then leave a message on the answering machine.
Only announcement: The caller hears the announcement selected under Announcement; however, he cannot leave a message on the answering machine.
No call acceptance: The call made by the corresponding caller is not accepted by the answering machine.
-
Select the desired announcement in the Announcement list field.
-
Select or clear the Time control active check box.
☑ Time control is enabled for the entry in question.
☐ Time control is disabled for the entry in question. (No other action is required.)
-
Configure the settings for time control dependent on the type of time control.
-
In the Identification number of the configuration entry field, enter the identification number of the PBX configuration.
-
In the Day list field, select the desired day or days on which the entry should automatically be activated. In the Time entry field, enter the associated time.
-
Click Execute.
Creating an Entry in Automatic for Internal Calls
Requirements:
- An answering machine, put into operation
-
Configuration manager, open with a sufficient authority level
– Expert view enabled -
Open the page Answering machine > Automatic.
-
Click the Internal calls tab.
-
Under Kind of time control, select one of the following options:
Individual switching times: An individual switching time can be configured for each entry according to the weekday and time. The entry is than taken into account starting at this switching point up to the next valid switching point.
Depending on configuration: A configuration can be defined for each entry in which the configuration for the entry is taken into account in the PBX.
- In the ID entry field, enter an ID for the entry. The following entries are possible:
10 to 79
Note: An ID may only be issued once.
-
If this entry should be activated together with other entries simultaneously at the press of a key, select the desired collective ID for the entry from the Collective ID list field.
-
In the Call acceptance list field, select one of the following options:
Announcement and recording: The caller hears the announcement selected under Announcement and can then leave a message on the answering machine.
Only announcement: The caller hears the announcement selected under Announcement; however, he cannot leave a message on the answering machine.
No call acceptance: The call made by the corresponding caller is not accepted by the answering machine.
-
Select the desired announcement in the Announcement list field.
-
Select or clear the Time control active check box.
☑ Time control is enabled for the entry in question.
☐ Time control is disabled for the entry in question. (No other action is required.)
-
Configure the settings for time control dependent on the type of time control.
-
In the Identification number of the configuration entry field, enter the identification number of the PBX configuration.
-
In the Day list field, select the desired day or days on which the entry should automatically be activated. In the Time entry field, enter the associated time.
-
Click Execute.
Creating an Entry in Automatic for Door Terminal Calls
Requirements:
- An answering machine, put into operation
-
Configuration manager, open with a sufficient authority level
– Expert view enabled -
Open the page Answering machine > Automatic.
- Click the Door terminal calls tab.
- Under Kind of time control, select one of the following options:
Individual switching times: An individual switching time can be configured for each entry according to the weekday and time. The entry is than taken into account starting at this switching point up to the next valid switching point.
Depending on configuration: A configuration can be defined for each entry in which the configuration for the entry is taken into account in the PBX.
- In the ID entry field, enter an ID for the entry. The following entries are possible:
10 to 79
Note: An ID may only be issued once.
- If this entry should be activated together with other entries simultaneously at the press of a key, select the desired collective ID for the entry from the Collective ID list field.
- In the Door number entry field, enter the door number that applies to the entry in question.
Note: If no door number has been entered here, the entry in question applies to all door terminal calls.
- In the Call acceptance list field, select one of the following options:
Announcement and recording: The caller hears the announcement selected under Announcement and can then leave a message on the answering machine.
Only announcement: The caller hears the announcement selected under Announcement; however, he cannot leave a message on the answering machine.
No call acceptance: The call made by the corresponding caller is not accepted by the answering machine.
-
Select the desired announcement in the Announcement list field.
-
Select or clear the Time control active check box.
☒ Time control is enabled for the entry in question.
☐ Time control is disabled for the entry in question. (No other action is required.)
-
Configure the settings for time control dependent on the type of time control.
-
In the Identification number of the configuration entry field, enter the identification number of the PBX configuration.
-
In the Day list field, select the desired day or days on which the entry should automatically be activated. In the Time entry field, enter the associated time.
-
Click Execute.
Creating an Entry in Automatic for Call Deblocker Calls
Requirements:
- An answering machine, put into operation
-
Configuration manager, open with a sufficient authority level
– Expert view enabled -
Open the page Answering machine > Automatic.
- Click the Call Deblocker calls tab.
- Under Kind of time control, select one of the following options:
Individual switching times: An individual switching time can be configured for each entry according to the weekday and time. The entry is than taken into account starting at this switching point up to the next valid switching point.
Depending on configuration: A configuration can be defined for each entry in which the configuration for the entry is taken into account in the PBX.
- In the ID entry field, enter an ID for the entry. The following entries are possible:
10 to 79
Note: An ID may only be issued once.
-
If this entry should be activated together with other entries simultaneously at the press of a key, select the desired collective ID for the entry from the Collective ID list field.
-
In the Call acceptance list field, select one of the following options:
Announcement and recording: The caller hears the announcement selected under Announcement and can then leave a message on the answering machine.
Only announcement: The caller hears the announcement selected under Announcement; however, he cannot leave a message on the answering machine.
No call acceptance: The call made by the corresponding caller is not accepted by the answering machine.
-
Select the desired announcement in the Announcement list field.
-
Select or clear the Time control active check box.
☑ Time control is enabled for the entry in question.
☐ Time control is disabled for the entry in question. (No other action is required.)
-
Configure the settings for time control dependent on the type of time control.
-
In the Identification number of the configuration entry field, enter the identification number of the PBX configuration.
-
In the Day list field, select the desired day or days on which the entry should automatically be activated. In the Time entry field, enter the associated time.
-
Click Execute.
Deleting Entries in Automatic
Deleting can be carried out as follows:
• Via the configuration manager
Requirements:
- An answering machine, put into operation
-
Configuration manager, open with a sufficient authority level
-
Open the page Answering machine > Automatic.
-
Click the tab for the type of call desired.
-
In the Action list field, select the Delete option.
- Select the check box in front of the entry to be deleted.
☑ The entry in question is deleted.
☐ The entry in question is not deleted.
To select the check boxes of all the entries at one time, select the check box in the last row.
- Click Execute.
Configuring and Operating Function Key for Manually Activating Entries in Automatic
While the telephone is in the idle state, press the key defined for opening the menu for entering an automatic ID. After this, you can activate entry associated with the automatic ID.
While the telephone is in the idle state, press the key defined for activating the entry associated with the configured automatic ID.
In addition, when functions are defined on the first key level, the status of the function is indicated by the corresponding LED.
LED signalling next to the key (only for defined key assignment):
Green The entry associated with the automatic ID saved on the key is active.
Off The entry associated with the automatic ID saved on the key is not active.
The configuration can be carried out as follows:
• Via the configuration manager
• Via the telephone menu
Configuring Function Key for Manually Activating Entries in Automatic via Configuration Manager
Requirements:
- An answering machine, put into operation
-
Configuration manager, open with a sufficient authority level
-
Open the page Function keys > Assign function keys.
- Only available in installed extension modules: In the telephone displayed at the top left, click the key group in which you would like to define keys.
- Click one of the following tabs:
Level 1: Keys are defined on the first key level.
Level 2: Keys are defined on the second key level.
- In the list field next to the function key that you would like to define, select the TAM - automatic ID function.
The current settings for defining the key are displayed.
- In the Key name entry field, enter a name for the key. The following entries are possible:
Up to 16 digits
Digits and characters
Note: The key name is used for printing the label.
- Click Execute.
Configuring Function Key for Manually Activating a Defined Entry in Automatic via Configuration Manager
Requirements:
- An answering machine, put into operation
-
Configuration manager, open with a sufficient authority level
-
Open the page Function keys > Assign function keys.
- Only available in installed extension modules: In the telephone displayed at the top left, click the key group in which you would like to define keys.
- Click one of the following tabs:
Level 1: Keys are defined on the first key level.
Level 2: Keys are defined on the second key level.
- In the list field next to the function key that you would like to define, select the TAM - automatic ID defined function.
The current settings for defining the key are displayed.
- In the Automatic ID entry field, enter an ID from the automatic table.
- In the Key name entry field, enter a name for the key. The following entries are possible:
Up to 16 digits
Digits and characters
Note: The key name is used for printing the label and for display.
- Click Execute.
Configuring Function Key for Manually Activating Entries in Automatic via Telephone Menu
Requirements:
- An answering machine, put into operation
-
Knowledge of the telephone, its menu options and the required PIN, if necessary
-
Press the menu key and open the define keys menu.
- Press the function key that you would like to define.
- Select the desired option from the list.
first level: Keys are defined on the first key level.
second level: Keys are defined on the second key level.
The list of available functions is displayed.
- Select the TAM automatic ID function.
The current settings for defining the key are shown on the display.
- Select the kind of key. Press the ⚙ softkey to switch over between the different kinds of keys.
general: Press the key to open the menu for entering an ID. (No other action is required.)
defined: Press the key to open the menu for activating the configured ID.
- Press the softkey.
- Enter an ID from the automatic table.
- Press the softkey.
- Enter a name. The following entries are possible:
Up to 16 digits
Digits and characters
- Press the softkey to accept the setting.
Switching Time Control On/Off
If time control has been enabled, the time control configured for call acceptance and announcement assignment on the configuration manager is used.
Note: If you switch off time control, all entries active at this point in time remain. Manual changes are still possible.
Switching this on/off can be done as follows:
• Via the configuration manager
• Via the telephone menu
Switching Time Control On/Off via Configuration Manager
Requirements:
- An answering machine, put into operation
-
Configuration manager, open with a sufficient authority level
-
Open the page Answering machine > Automatic.
-
Click the Settings tab.
-
Select or clear the Time control check box.
Enables time control.
□ Disables time control.
- Click Execute.
Switching Time Control On/Off via Telephone Menu
Requirements:
- An answering machine, put into operation
– Knowledge of the telephone, its menu options and the required PIN, if necessary
In order to switch time control on or off, press the function key configured for time control.
Or, proceed as described in the following.
- Press the menu key and open the menu answer.machine > functions > TAM time control.
The ●con indicates the current setting.
- Select the desired option:
switch on: Enables time control.
switch off: Disables time control.
Configuring and Operating Function Key for Time Control
Press the key to switch the time control function on or off or to switch it over.
In addition, when functions are defined on the first key level, the status of the function is indicated by the corresponding LED.
LED signalling next to the key:
Green Time control is enabled.
Off Time control is disabled.
The configuration can be carried out as follows:
• Via the configuration manager
• Via the telephone menu
Configuring Function Key for Time Control via Configuration Manager
Requirements:
- An answering machine, put into operation
-
Configuration manager, open with a sufficient authority level
-
Open the page Function keys > Assign function keys.
-
Only available in installed extension modules: In the telephone displayed at the top left, click the key group in which you would like to define keys.
-
Click one of the following tabs:
Level 1: Keys are defined on the first key level.
Level 2: Keys are defined on the second key level.
- In the list field next to the function key that you would like to define, select the TAM - time control function.
The current settings for defining the key are displayed.
- In the Kind of switching list field, select one of the following options:
switch off: Press the key to disable time control.
switch on: Press the key to enable time control.
switch over: Press the key to switch time control on and off.
- In the Key name entry field, enter a name for the key. The following entries are possible:
Up to 16 digits Digits and characters
Note: The key name is used for printing the label.
- Click Execute.
Configuring Function Key for Time Control via Telephone Menu
Requirements:
- An answering machine, put into operation
-
Knowledge of the telephone, its menu options and the required PIN, if necessary
-
Press the menu key and open the define keys menu.
- Press the function key that you would like to define.
- Select the desired option:
first level: Keys are defined on the first key level.
second level: Keys are defined on the second key level.
The list of available functions is displayed.
- Select the TAM time control function.
The current settings for defining the key are shown on the display.
- Select the kind of switching. Pressing the ⬆ softkey allows you to switch over between the different kinds of switching.
switch off: Press the key to disable time control.
switch on: Press the key to enable time control.
switch over: Press the key to switch time control on and off.
- Press the softkey to accept the setting.
Basic Settings
Default settings have already been configured for the basic functions on the answering machine. These basic functions can be adapted to your own specific requirements as described in the following.
Configuring Call Acceptance Time
The call acceptance time indicates the number of seconds after which the answering machine accepts a call.
The configuration can be made as follows:
• Via the configuration manager
• Via the telephone menu
Configuring Call Acceptance Time via Configuration Manager
Requirements:
- An answering machine, put into operation
-
Configuration manager, open with a sufficient authority level
-
Open the page Answering machine > Global.
- Enter a value in the Call acceptance time (in seconds) entry field. The following entries are possible:
1 to 99: The answering machine accepts the call, depending on the entry, after 1 to 99 seconds. - Click Execute.
Configuring Call Acceptance Time via Telephone Menu
Requirements:
- An answering machine, put into operation
-
Knowledge of the telephone, its menu options and the required PIN, if necessary
-
Press the menu key and open the menu answer.machine > settings > call accept time.
- Enter a value. The following entries are possible:
1 to 99: The answering machine accepts the call, depending on the entry, after 1 to 99 seconds. - Press the softkey to save the entry.
Note: If you have enabled the remote access toll saver, the call accept time depends on whether new messages are present or not.
Configuring Maximum Recording Time
The maximum recording time indicates the number of minutes after which the answering machine ends a recording automatically (in as far as the caller has not already hung up).
The configuration can be made as follows:
• Via the configuration manager
• Via the telephone menu
Configuring Maximum Recording Time via Configuration Manager
Requirements:
- An answering machine, put into operation
-
Configuration manager, open with a sufficient authority level
-
Open the page Answering machine > Global.
- Enter a value in the entry field Recording time (in minutes, 99 = max. storage utilization). The following entries are possible:
0: No recording takes place. The caller hears only an announcement.
1 to 98: The maximum recording time is configured (1 to 98 minutes).
99: The recording time is unlimited (maximum storage utilization).
3. Click Execute.
Note: Recordings with a recording time shorter than 1 second are discarded by the telephone.
Configuring Maximum Recording Time via Telephone Menu
Requirements:
- An answering machine, put into operation
-
Knowledge of the telephone, its menu options and the required PIN, if necessary
-
Press the menu key and open the menu answer.machine > settings > recording time.
- Enter a value. The following entries are possible:
0: No recording takes place. The caller hears only an announcement.
1 to 98: The maximum recording time is configured (1 to 98 minutes).
99: The recording time is unlimited (maximum storage utilization).
- Press the softkey to save the entry.
Note: Recordings with a recording time shorter than 1 second are discarded by the telephone.
Configuring Maximum Recording Time for Door Terminal Calls
The maximum recording time for door terminal calls indicates the number of minutes after which the answering machine ends the recording of a door terminal call automatically.
Note that the recording cannot be actively ended from the door terminal. Therefore, a door terminal call recording lasts as long as you have defined it.
The configuration can be made as follows:
• Via the configuration manager
• Via the telephone menu
Configuring Maximum Recording Time for Door Terminal Calls via Configuration Manager
Requirements:
- An answering machine, put into operation
-
Configuration manager, open with a sufficient authority level
-
Open the page Answering machine > Global.
-
Enter a value in the Recording time door (in minutes) entry field. The following entries are possible:
0: No recording takes place. The caller hears only an announcement.
1 to 98: The maximum recording time is configured (1 to 98 minutes).
99: The recording time is unlimited (maximum storage utilization). -
Click Execute.
Configuring Maximum Recording Time for Door Terminal Calls via Telephone Menu
Requirements:
- An answering machine, put into operation
-
Knowledge of the telephone, its menu options and the required PIN, if necessary
-
Press the menu key and open the menu answer.machine > settings > record. time door.
-
Enter a value. The following entries are possible:
0: No recording takes place. The caller hears only an announcement.
1 to 98: The maximum recording time is configured (1 to 98 minutes).
99: The recording time is unlimited (maximum storage utilization).
- Press the softkey to save the entry.
Switching Listen in Function On/Off
If the listen in function is enabled, the loudspeaker on the telephone is switched on for listening in when a call is accepted by the answering machine. Depending on whether to listen to your own announcement every time or not, it can also be configured if the loudspeaker on the telephone is switched on or off during playback of the announcement.
Switching this on/off can be done as follows:
• Via the configuration manager
• Via the telephone menu
Switching Listen in Function On/Off via Configuration Manager
Requirements:
- An answering machine, put into operation
-
Configuration manager, open with a sufficient authority level
-
Open the page Answering machine > Global.
- Under Listen in, select one of the following options:
off: Disables the listen in function.
with announcement: Enables the listen in function. The loudspeaker on the telephone is switched on during playback of the announcement.
without announcement: Enables the listen in function. The loudspeaker on the telephone is switched off during playback of the announcement.
- Click Execute.
Switching Listen in Function On/Off via Telephone Menu
Requirements:
- An answering machine, put into operation
-
Knowledge of the telephone, its menu options and the required PIN, if necessary
-
Press the menu key and open the menu answer.machine > settings > listen in. The ♦con indicates the current setting.
2. Select the desired option:
off: Disables the listen in function.
with announcem.: Enables the listen in function. The loudspeaker on the telephone is switched on during playback of the announcement.
w/o announcement: Enables the listen in function. The loudspeaker on the telephone is switched off during playback of the announcement.
Switching Automatic Playback On/Off
If automatic playback is enabled, the new recordings are played back automatically after the answering machine list or the voice memo list is open.
Switching this on/off can be done as follows:
• Via the configuration manager
• Via the telephone menu
Switching Automatic Playback On/Off via Configuration Manager
Requirements:
- An answering machine, put into operation
-
Configuration manager, open with a sufficient authority level
-
Open the page Answering machine > Global.
- Select or clear the Automatic playback of all recordings check box.
☑ Enables automatic playback.
□ Disables automatic playback.
Note: Call recordings are excluded from automatic playback.
- Click Execute.
Switching Automatic Playback On/Off via Telephone Menu
Requirements:
-
An answering machine, put into operation
– Knowledge of the telephone, its menu options and the required PIN, if necessary -
Press the menu key and open the menu answer.machine > settings > autom. playback.
- Select or clear the autom. playback check box.
☑ Enables automatic playback.
□ Disables automatic playback.
- Press the softkey to accept the setting.
Call Recording
The call recording function enables telephone calls to be recorded, for example, for later evaluation. In addition to the automatic recording of all calls, it is also possible to record calls manually. This functions independent of the automatic call recording function. This allows calls to be recorded in pieces.
Executing Call Recording
If automatic call recording is enabled, every call you make it automatically recorded.
Note: Always ask your communication partner to give his approval for recording the call. You are liable to prosecution, if you record a call without your communication partner's knowledge (breach of confidentiality of the word). For reasons of data protection, an info tone informs your communication partner that the call is being recorded.
Requirements:
- An answering machine, put into operation
– Knowledge of the telephone, its menu options and the required PIN, if necessary
To start or end recording during a call, press the function key configured for initiating call recording.
Or, during a call, proceed as described in the following.
- Select the TAM call record. function.
- Press the softkey to start call recording.
The call is recorded. - Press the softkey to end call recording.
Note: Recordings with a recording time shorter than 1 second are discarded by the telephone.
Configuring and Operating Function Key for Call Recording Initiation On/Off
Press the key during a call to switch call recording on. Press the key again to turn it off.
In addition, when functions are defined on the first key level, the status of the function is indicated by the corresponding LED.
LED signalling next to the key:
Red (blinking) The current call is recorded.
The configuration can be carried out as follows:
• Via the configuration manager
• Via the telephone menu
Configuring Function Key for Call Recording Initiation via Configuration Manager
Requirements:
- An answering machine, put into operation
-
Configuration manager, open with a sufficient authority level
-
Open the page Function keys > Assign function keys.
-
Only available in installed extension modules: In the telephone displayed at the top left, click the key group in which you would like to define keys.
-
Click one of the following tabs:
Level 1: Keys are defined on the first key level.
Level 2: Keys are defined on the second key level.
- In the list field next to the function key that you would like to define, select the TAM - call recording function.
The current settings for defining the key are displayed.
- In the Key name entry field, enter a name for the key. The following entries are possible:
Up to 16 digits
Digits and characters
Note: The key name is used for printing the label.
- Click Execute.
Configuring Function Key for Call Recording Initiation via Telephone Menu
Requirements:
-
An answering machine, put into operation
– Knowledge of the telephone, its menu options and the required PIN, if necessary -
Press the menu key and open the define keys menu.
- Press the function key that you would like to define.
- Select the desired option:
first level: Keys are defined on the first key level.
second level: Keys are defined on the second key level.
The list of available functions is displayed.
- Select the TAM call record. function.
- Press the softkey to accept the setting.
Switching Automatic Call Recording On/Off
If automatic call recording has been enabled, every call (incoming and outgoing) is recorded completely.
Note:
Always ask your communication partner to give his approval for recording the call. You are liable to prosecution, if you record a call without your communication partner's knowledge (breach of confidentiality of the word).
For reasons of data protection, an info tone informs your communication partner that the call is being recorded.
Recordings with a recording time shorter than 1 second are discarded by the telephone.
Switching this on/off can be done as follows:
• Via the configuration manager
• Via the telephone menu
Switching Automatic Call Recording On/Off via Configuration Manager
Requirements:
- An answering machine, put into operation
-
Configuration manager, open with a sufficient authority level
-
Open the page Answering machine > Global.
- Select or clear the Automatic call recording check box.
☑ Enables automatic call recording.
□ Disables automatic call recording.
3. Click Execute.
Switching Automatic Call Recording On/Off via Telephone Menu
Requirements:
- An answering machine, put into operation
– Knowledge of the telephone, its menu options and the required PIN, if necessary
Press the function Key configured for automatic call recording to switch automatic call recording on or off.
Or, proceed as described in the following.
- Press the menu key and open the menu answer.machine > functions > TAM aut.call rec.
The ●con indicates the current setting.
- Select the desired option:
switch on: Enables automatic call recording.
switch off: Disables automatic call recording.
Configuring and Operating Function Key for Automatic Call Recording
Press the key to switch the automatic call recording function on or off or to switch it over.
In addition, when functions are defined on the first key level, the status of the function is indicated by the corresponding LED.
LED signalling next to the key:
Red Automatic call recording is enabled.
Red (blinking) The current call is recorded.
(Signalling only occurs here if automatic call recording enabled; not, however, if call recording is enabled during a call.)
Off Automatic call recording is disabled.
The configuration can be carried out as follows:
• Via the configuration manager
• Via the telephone menu
Configuring Function Key for Automatic Call Recording via Configuration Manager
Requirements:
- An answering machine, put into operation
-
Configuration manager, open with a sufficient authority level
-
Open the page Function keys > Assign function keys.
- Only available in installed extension modules: In the telephone displayed at the top left, click the key group in which you would like to define keys.
- Click one of the following tabs:
Level 1: Keys are defined on the first key level.
Level 2: Keys are defined on the second key level.
- In the list field next to the function key that you would like to define, select the TAM - automatic call recording function.
The current settings for defining the key are displayed.
- In the Kind of switching list field, select one of the following options:
switch off: Press the key to disable automatic call recording.
switch on: Press the key to enable automatic call recording.
switch over: Press the key to switch automatic call recording over.
- In the Key name entry field, enter a name for the key. The following entries are possible:
Up to 16 digits
Digits and characters
Note: The key name is used for printing the label.
- Click Execute.
Configuring Function Key for Automatic Call Recording via Telephone Menu
Requirements:
-
An answering machine, put into operation
– Knowledge of the telephone, its menu options and the required PIN, if necessary -
Press the menu key and open the define keys menu.
- Press the function key that you would like to define.
- Select the desired option:
first level: Keys are defined on the first key level.
second level: Keys are defined on the second key level.
The list of available functions is displayed.
- Select the TAM aut.call rec function.
The current settings for defining the key are shown on the display.
- Select the kind of switching. Press the ⬆ softkey to switch over between the different kinds of switching.
switch off: Press the key to disable automatic call recording.
switch on: Press the key to enable automatic call recording.
switch over: Press the key to switch automatic call recording over.
- Press the softkey to accept the setting.
Switching Info Tone for Call Recording On/Off
In order to notify your communication partner that the call is being recorded, you can switch on the call recording info tone.
Note: Always ask your communication partner to give his approval for recording the call. You are liable to prosecution, if you record a call without your communication partner's knowledge (breach of confidentiality of the word).
Switching this on/off can be done as follows:
• Via the configuration manager
• Via the telephone menu
Switching Info Tone for Call Recording On/Off via Configuration Manager
Requirements:
- An answering machine, put into operation
-
Configuration manager, open with a sufficient authority level
-
Open the page Answering machine > Global.
- Select or clear the Info tone call recording check box.
☑ Enables the call recording info tone.
□ Disables the call recording info tone.
3. Click Execute.
Switching Info Tone for Call Recording On/Off via Telephone Menu
Requirements:
- An answering machine, put into operation
-
Knowledge of the telephone, its menu options and the required PIN, if necessary
-
Press the menu key and open the menu answer.machine > settings > call rec.tone.
Configuring and Operating the Answering Machine
Call Recording
Switching Info Tone for Call Recording On/Off
- Select or clear the call rec.tone check box.
☑ Enables the call recording info tone.
□ Disables the call recording info tone.
- Press the softkey to accept the setting.
Remote Access
Remote access is used to access and operate the answering machine from another internal telephone or from an external telephone.
Remote Access Variants
The answering machine supports three different remote access variants:
Remote access toll saver off
The answering machine always accepts a call after the call accept time configured.
After the answering machine has accepted the call, you can initiate remote access during the announcement and the following 10 seconds (by pressing the * key + user PIN + # key).
Remote access toll saver on
The answering machine only accepts a call after the call accept time configured if there are new messages present. Otherwise, if no new messages are present, the time it takes to accept a call is 10 seconds (approx. 2 rings) longer than the configured call accept time.
This notifies you before the answering machine accepts the call whether access is necessary or you can hang up.
After the answering machine has accepted the call, you can initiate remote access during the announcement and the following 10 seconds (by pressing the * key + user PIN + # key).
Note:
Note that when remote access toll saver is enabled, the call accept time extended by 10 seconds applies to each caller (at least as long as there are no new messages present). Take this into consideration when configuring the call accept time.
If you have configured settings on your PBX or telephone that cause the telephone to delay making a call (for example, call forwarding on no reply for subscribers), using remote access toll saver is not meaningful.
Remote Access Toll Saver with Quick Access
The answering machine automatically accepts a call when the quick remote access number is transmitted and new messages are present. Otherwise, if no new messages are present, the time it takes to accept a call is 10 seconds (approx. 2 rings) longer than the configured call accept time.
As soon as the answering machine has accepted the call, you can start remote access. Entering the user PIN is not necessary.
Note:
When quick access is enabled, the call accept time varies only if the quick remote access number has been correctly transmitted. For all other callers, the answering machine accepts the call after the configured call accept time (independently of whether new messages are present or not).
If you have configured settings on your PBX or telephone that cause the telephone to delay making a call (for example, call forwarding on no reply for subscribers), using quick access is not meaningful.
Configuring Remote Access
Remote access is configured as described in the following.
- Switch remote access on.
- Assign a user PIN.
- If you would like to save money by not using remote access, you can switch the remote access toll saver on as long as no new messages are present.
- If you would like to simplify remote access by not entering a user PIN and instead using your telephone number, switch the remote access toll saver with quick access on. In addition, enter one or two quick access telephone numbers.
- If you would like the answering machine to notify you as soon as new message is present, configure message forwarding and switch it on when required.
Switching Remote Access On/Off
Switching this on/off can be done as follows:
• Via the configuration manager
• Via the telephone menu
Switching Remote Access On/Off via Configuration Manager
Requirements:
- An answering machine, put into operation
-
Configuration manager, open with a sufficient authority level
-
Open the page Answering machine > Remote access.
- Select or clear the Remote access check box.
☑ Enables remote access.
□ Disables remote access.
- Click Execute.
Switching Remote Access On/Off via Telephone Menu
Requirements:
-
An answering machine, put into operation
– Knowledge of the telephone, its menu options and the required PIN, if necessary -
Press the menu key and open the menu answer.machine > settings > remote access.
- Select or clear the remote access check box.
☑ Enables remote access.
□ Disables remote access.
- Press the softkey to accept the setting.
Switching Remote Access Toll Saver (and Quick Access) On/Off
Switching this on/off can be done as follows:
• Via the configuration manager
• Via the telephone menu
Switching Remote Access Toll Saver On/Off via Configuration Manager
Requirements:
- An answering machine, put into operation
-
Configuration manager, open with a sufficient authority level
-
Open the page Answering machine > Remote access.
-
In the Remote access toll saver list field, select one of the following options:
off: Disables remote access toll saver.
on: Enables remote access toll saver.
Quick remote access: Enables remote access toll saver with quick access.
Also requires entering a quick remote access number. -
Click Execute.
Switching Remote Access Toll Saver On/Off via Telephone Menu
Requirements:
-
An answering machine, put into operation
– Knowledge of the telephone, its menu options and the required PIN, if necessary -
Press the menu key and open the menu answer.machine > settings > r/a toll saver.
The ♦con indicates the current setting.
- Select the desired option:
off: Disables remote access toll saver.
on: Enables remote access toll saver.
quick access: Enables remote access toll saver with quick access. Also requires entering a quick remote access number.
Entering Quick Access Telephone Numbers
For remote access toll saver with quick access, up to two quick access telephone numbers can be entered. The caller who transmits this quick remote access number when making a call can, when quick access is configured, access all of the recordings saved on the answering machine without having to enter the user PIN.
The entry can be made as follows:
• Via the configuration manager
• Via the telephone menu
Configuring Quick Access Telephone Numbers via Configuration Manager
Requirements:
- An answering machine, put into operation
-
Configuration manager, open with a sufficient authority level
-
Open the page Answering machine > Remote access.
- In each of the entry fields Quick remote access number 1 and Quick remote access number 2, enter a quick remote access number. The following entries are possible:
Up to 24 digits
Digits and the characters * and #
- In each of the list fields Quick remote access number 1 and Quick remote access number 2, select one of the following options:
internal: Defines the quick remote access number entered as an internal telephone number.
external: Defines the quick remote access number entered as an external telephone number.
- Click Execute.
Entering Quick Access Telephone Numbers via Telephone Menu
Requirements:
-
An answering machine, put into operation
– Knowledge of the telephone, its menu options and the required PIN, if necessary -
Press the menu key and open the menu answer.machine > settings > quick access.
- Select the desired option:
---: Allows a quick remote access number to be entered.
[telephone number]: Allows existing quick remote access numbers to be changed.
Note: If you press the Telephone book key before entering the quick remote access number, you can select the desired telephone number from the telephone book.
- Enter the quick remote access number. The following entries are possible:
Up to 24 digits
Digits and the characters * and #
Important: Enter telephone numbers exactly as when dialling, for example, always enter external telephone numbers with a leading exchange line access number. (exception: direct exchange access). The default exchange line access number on the PBX is "0" in the factory settings; however, this can be changed for several PBXs (see the PBX manual).
- Press the softkey to save the entry.
Executing Remote Access
Requirements:
- Configured remote access
– DTMF dialling support on the internal or external telephone
– Knowledge of the user PIN on the system telephone
- When readiness on the answering has been switched off: Configured remote access toll saver with quick remote access and transmission of a quick remote access number entered in advance by the telephone making the call
1. Call the system telephone.
After the configured call accept time has elapsed, the answering telephone accepts the call. You hear the configured announcement.
Note: When remote access toll saver is enabled, the call accept time may change. When remote access toll saver with quick remote access has been enabled, you also immediately hear the announcement for remote access (REMOTE.WAV). You can begin remote access (without PIN entry).
2. Initiate remote access during the announcement and the following 10 seconds by entering the following DTMF code: \* user PIN #
Note:
If you make a mistake while entering the user PIN, you can reenter it after pressing the star key (*).
When the entry is correct, you will hear a positive confirmation tone (6 short tones). If the entry is incorrect, you will hear a negative confirmation tone (3 long tones).
You then hear the announcement for remote access REMOTE.WAV.
3. Execute remote access by entering the following codes.
2: Plays back new recordings (only messages).
3: Plays back all recordings (call recordings and messages).
4: Jumps back to the previous recording.
5: Repeats the recording currently being played back.
6: Jumps to the next recording.
7: Deletes the recording currently being played back.
8: Ends playback.
# automatic ID: Enables the entry of the automatic function.
* 10: Disables readiness.
* 11: Enables readiness.
* 20: Disables time control for the automatic function.
* 21: Enables time control for the automatic function.
* 30: Disables message forwarding.
* 31: Enables message forwarding.
* 32 telephone number #: Changes the destination for message forwarding.
* 70: Deletes all of the recordings.
* 99: Ends remote access and records a voice memo. After this, hang up the receiver.
Hang-up: Ends remote access.
Message Forwarding
Message forwarding enables the answering machine to notify you of new messages even if you are out and about.
Message Forwarding Sequence
Message forwarding proceeds as follows:
- When a caller leaves a new message, the telephone dials the destination number entered after the waiting time has elapsed.
- If the person receiving the call picks up the receiver, first the announcement and then the new message are played back.
- Remote access can be started within 30 seconds after the new messages have been played back.
Switching Message Forwarding On/Off
If message forwarding has been configured, it can be enabled, for example, for times when you leave the building.
Note: You can also switch message forwarding on and off or enter a new destination number by remote access.
Switching this on/off can be done as follows:
• Via the configuration manager
• Via the telephone menu
Switching Message Forwarding On/Off via Configuration Manager
Requirements:
- An answering machine, put into operation
-
Configuration manager, open with a sufficient authority level
-
Open the page Answering machine > Message forwarding.
-
Select or clear the Message forwarding check box.
☑ Enables message forwarding.
□ Disables message forwarding.
- Click Execute.
Switching Message Forwarding On/Off via Telephone Menu
Requirements:
- An answering machine, put into operation
– Knowledge of the telephone, its menu options and the required PIN, if necessary
In order to switch message forwarding on or off, press the function key configured for message forwarding.
Or, proceed as described in the following.
- Press the menu key and open the menu answer.machine > functions > TAM message fwd.
The icon indicates the current setting.
- Select the desired option:
switch on: Enables message forwarding.
switch off: Disables message forwarding.
Configuring and Operating Function Key for Message Forwarding
Press the key to switch message forwarding on or off or to switch it over.
In addition, when functions are defined on the first key level, the status of the function is indicated by the corresponding LED.
LED signalling next to the key:
Green Message forwarding is enabled.
Off Message forwarding is disabled.
The configuration can be carried out as follows:
• Via the configuration manager
• Via the telephone menu
Configuring Function Key Message Forwarding via Configuration Manager
Requirements:
– An answering machine, put into operation
- Configuration manager, open with a sufficient authority level
- Open the page Function keys > Assign function keys.
-
Only available in installed extension modules: In the telephone displayed at the top left, click the key group in which you would like to define keys.
-
Click one of the following tabs:
Level 1: Keys are defined on the first key level.
Level 2: Keys are defined on the second key level.
- In the list field next to the function key that you would like to define, select the TAM - message forwarding function.
The current settings for defining the key are displayed.
- In the Kind of switching list field, select one of the following options:
switch off: Press the key to disable message forwarding.
switch on: Press the key to enable message forwarding.
switch over: Press the key to switch message forwarding on and off.
- In the Key name entry field, enter a name for the key. The following entries are possible:
Up to 16 digits
Digits and characters
Note: The key name is used for printing the label.
- Click Execute.
Configuring Function Key for Message Forwarding via Telephone Menu
Requirements:
-
An answering machine, put into operation
– Knowledge of the telephone, its menu options and the required PIN, if necessary -
Press the menu key and open the define keys menu.
- Press the function key that you would like to define.
- Select the desired option:
first level: Keys are defined on the first key level.
second level: Keys are defined on the second key level.
The list of available functions is displayed.
- Select the TAM message fwd. function.
The current settings for defining the key are shown on the display.
- Select the kind of switching. Pressing the ⬆ softkey allows you to switch over between the different kinds of switching.
switch off: Press the key to disable message forwarding.
switch on: Press the key to enable message forwarding.
switch over: Press the key to switch message forwarding on and off.
- Press the softkey to accept the setting.
Configuring Announcement for Message Forwarding
Before the new messages are played back, the person being called hears the default announcement FORWARD.WAV.
Instead of the default announcement, you can configure your own announcement for message forwarding.
The configuration can be made as follows:
• Via the configuration manager
• Via the telephone menu
Configuring Announcement for Message Forwarding via Configuration Manager
Requirements:
- An answering machine, put into operation
-
Configuration manager, open with a sufficient authority level
-
Open the page Answering machine > Message forwarding.
- Select the desired announcement from the Announcement list field.
- Click Execute.
Configuring Announcement for Message Forwarding via Telephone Menu
Requirements:
- An answering machine, put into operation
-
Knowledge of the telephone, its menu options and the required PIN, if necessary
-
Press the menu key and open the menu answer.machine >settings >fwd announcement.
The ♦con indicates the current setting.
- Select the desired option:
own announcement: Switches on a customized announcement for message forwarding.
standard announce: Switches on the default announcement for message forwarding. (No other action is required.)
- Scroll through the announcement list to your selection.
The name of the announcement along with the creation date and time is displayed.
- Press the softkey to accept the announcement.
Configuring a Message Forwarding Target
A telephone number can be entered as a target for message forwarding. The new messages on the answering machine should be forwarded to the telephone number.
The configuration can be carried out as follows:
• Via the configuration manager
• Via the telephone menu
Configuring Function Key for Message Forwarding Target via Configuration Manager
Requirements:
- An answering machine, put into operation
-
Configuration manager, open with a sufficient authority level
-
Open the page Answering machine > Message forwarding.
- In the Destination number entry field, enter the destination number for message forwarding.
Up to 40 digits
Digits and characters
- In the Destination number list field, select one of the following options:
internal: Defines the destination number entered as an internal telephone number.
external: Defines the destination number entered as an external telephone number.
- Click Execute.
Configuring Function Key for Message Forwarding Target via Telephone Menu
Requirements:
-
An answering machine, put into operation
– Knowledge of the telephone, its menu options and the required PIN, if necessary -
Press the menu key and open the menu answer.machine > settings > forward. target.
Note: If you press the telephone book key before entering the destination number, you can select the desired phone number from the telephone book.
- Enter the destination number. The following entries are possible:
Up to 40 digits
Digits and the characters * and #
Important: Enter telephone numbers exactly as when dialling, for example, external telephone numbers always with a leading exchange line access number. (exception: direct exchange access). The default exchange line access number on the PBX is "0" in the factory settings; however, this can be changed for several PBXs (see the PBX manual).
- Press the softkey to save the entry.
Configuring Waiting Period for Message Forwarding
The waiting period for message forwarding indicates how many seconds after which a message that has just arrived is automatically forwarded.
The configuration can be made as follows:
• Via the configuration manager
• Via the telephone menu
Configuring Function Key for Message Forwarding Waiting Period via Configuration Manager
Requirements:
- An answering machine, put into operation
-
Configuration manager, open with a sufficient authority level
-
Open the page Answering machine > Message forwarding.
- Enter a value in the Waiting period (in seconds) entry field. The following entries are possible:
0: A message that has just arrived is forwarded immediately.
1 to 99: After 1 to 99 seconds, a call that has recently arrived is forwarded, depending on the entry. - Click Execute.
Configuring Function Key for Message Forwarding via Telephone Menu
Requirements:
- An answering machine, put into operation
-
Knowledge of the telephone, its menu options and the required PIN, if necessary
-
Press the menu key and open the menu answer.machine > settings > forwarding time.
-
Enter a value. The following entries are possible:
0: A message that has just arrived is forwarded immediately.
1 to 99: After 1 to 99 seconds, a call that has recently arrived is forwarded, depending on the entry.
- Press the softkey to save the entry.
Configuring Message Forwarding Repetition
Message forwarding repetition indicates how often message forwarding should be reattempted if it cannot be carried out successfully. This is the case, for example, if the subscriber could not be reached with the destination number entered or a new message could not be played back in its entirety.
The repetition waiting period indicates how many minutes should elapse between the individual attempts to repeat message forwarding.
The configuration can be made as follows:
• Via the configuration manager
• Via the telephone menu
Configuring Function Key for Message Forwarding Repetition via Configuration Manager
Requirements:
- An answering machine, put into operation
-
Configuration manager, open with a sufficient authority level
-
Open the page Answering machine > Message forwarding.
- In the Number of repetitions list field, select one of the following options:
None: No attempt is made to repeat message forwarding.
1...9: Depending on the selection, message forwarding may be repeated 1 to 9 times.
- In the Number of repetitions list field, select one of the following options:
0 minutes...9 minutes: 0 to 9 minutes lie between the separate attempts, depending on the selection.
- Click Execute.
Configuring Function Key for Message Forwarding Repetition via Telephone Menu
Requirements:
- An answering machine, put into operation
-
Knowledge of the telephone, its menu options and the required PIN, if necessary
-
Press the menu key and open the menu answer.machine > settings > fwd.repetitions
- Enter a value. The following entries are possible:
0: No attempt is made to repeat message forwarding.
1 to 9: Depending on the entry, message forwarding may be repeated 1 to 9 times.
- Press the softkey to save the entry.
- Press the menu key and open the menu answer.machine > settings > fwd repet.time.
- Enter a value. The following entry is possible:
0 to 9: 0 to 9 minutes lie between the separate attempts, depending on the entry.
- Press the softkey to save the entry.
Data Exchange
The configuration manager can be used to transfer data, for example, recorded announcements, from a USB memory stick to a PC or in the other direction from a PC to a USB memory stick.
If the USB memory stick is inserted into the USB port on the telephone, a directory structure is automatically created on the USB memory stick. This directory contains the following directories:
- announce (location where newly recorded announcements are saved)
- backup (location of the backups)
- memo (location of the memos)
- messages (location of the messages and call recordings)
- ringtone (location of the ringer melodies)
- system (location of the synthetically generated signal tones as well as the standard announcements in the various languages)
Transmitting Data from PC to USB Memory Stick
The transmission can be carried out as follows:
• Via the configuration manager
Requirements:
- Configuration manager, open with a sufficient authority level
- A USB memory stick inserted into the USB port
You would like to transmit a file saved on your computer to the USB memory stick of your telephone. Proceed as described in the following.
- Open the page Answering machine > Data exchange.
- Click Browse (this text is dependent on the operating system used).
A file selection dialogue opens. - Select the file you want and click Open (this text is dependent on the operating system used).
The path and the file name are displayed in front of Browse.
- Enter a name for the file in the entry field. The following entries are possible.
Up to 8 digits
Digits and characters
The name you entered is automatically appended with the file extension .WAV.
Note: Wave files with 16 kHz, 16-bit linear can be transmitted to the USB memory stick.
- In the directory tree of the USB memory stick, select the directory in which the file should be saved.
- Click Send.
- Click OK.
Transmitting Data from USB Memory Stick to PC
The transmission can be carried out as follows:
• Via the configuration manager
Requirements:
- Configuration manager, open with a sufficient authority level
- A USB memory stick inserted into the USB port
You would like to transfer a file saved on the USB memory stick of your telephone to your PC. Proceed as described in the following.
- Open the page Answering machine > Data exchange.
- In the directory tree of the USB memory stick, click the directory in which the file is saved. You may have to repeat this procedure and a subdirectory.
The files in the directory are displayed. You get more information on each file: filename (File), size (Filesize), date of recording (Date). In case of call recordings, the telephone number of your own exchange line (Line), via which you took the call, as well as the telephone number and the name of the caller (Telephone number/name) are displayed.
- Right-click the desired file.
- Select Save file as a... (this text is dependent on the operating system used). A file location dialogue opens.
- Select the desired location and click Save (this text is dependent on the operating system used).
Deleting Data Saved on the USB Memory Stick
Deleting can be carried out as follows:
• Via the configuration manager
Requirements:
- Configuration manager, open with a sufficient authority level
- A USB memory stick inserted into the USB port
You would like to delete a file saved on the USB memory stick. Proceed as described in the following.
- Open the page Answering machine > Data exchange.
-
In the directory tree of the USB memory stick, click the directory in which the file is saved. You may have to repeat this procedure and a subdirectory.
The files in the directory are displayed. You get more information on each file: filename (File), size (Filesize), date of recording (Date). In case of call recordings, the telephone number of your own exchange line (Line), via which you took the call, as well as the telephone number and the name of the caller (Telephone number/name) are displayed. -
ClickX.
-
Click OK.
Configuring and Managing Voice Mailboxes
This section describes how to configure and operate voice mailboxes. Moreover, it shows you how to record announcements, execute remote access, and forward messages, e.g. to a substitute.
Topics
A voice mailbox which is assigned to the telephone or to a group can be operated like a local answering machine.
It saves the voice messages for an individual subscriber or a group and can be queried any time by the subscriber or the members of the group.
Voice messages and announcements are not stored in the telephone but in the PBX (in contrast to a local answering machine). The size of a voice mailbox is determined by the PBX, as well as the authorization to use it. A voice mailbox can be assigned to an individual subscriber or to a group. Moreover, a subscriber may be granted authorization for several voice mailboxes.
Note:
The voice mailbox will only function if an optionally available COMmander VMF module is inserted into the COMmander Business or COMmander Basic.2 PBX. For the COMpact 5010 VoIP PBX, an optionally available COMpact 2VoIP module has to be inserted, for COMpact 5020 VoIP an optionally available COMpact 2VoIP or 6VoIP module.
The readiness of the local answering machine at the telephone will automatically be switched off if the assigned voice mailbox is used in the PBX. Querying voice messages, as well as replaying and deleting own announcements is still possible. The recording function can still be used.
Opening a Voice Mailbox
Open the voice mailbox to query, replay, or delete messages or move them into an archive. If a subscriber is authorized to query several voice mailboxes, a list of further boxes will be offered for selection in addition to voice mailbox used.
The LED above the message key indicates whether new messages have been received on the voice mailbox.
LED signalling over the message key:
Off No messages available.
LED signalling over the message key:
Red (blinking) There are new messages.
The fill level of at least one assigned voice mailbox has reached the state "almost full" or "full".
Lit in red There are no new messages. There are only messages which you have already listened to.
The fill level of at least one assigned voice mailbox has reached the state "almost full" or "full" and has already been confirmed.
Opening can be carried out as follows:
• Via the telephone menu
Requirements:
- COMmander Business or COMmander Basic.2 with inserted COMmander VMF module, COMpact 5010 VoIP with inserted COMpact 2VoIP module, or COMpact 5020 VoIP with inserted COMpact 2VoIP or 6VoIP module
– Voice mailbox which is configured in the PBX and assigned to it
– Knowledge of the telephone, its menu options and the required PIN, if necessary
To open the voice mailbox, press the function key configured for it or press the menu key to open the menu Voice mailbox > functions > VMB open.
Alternatively, proceed as described in the following.
1. Press the message key.
The available lists are displayed. To the left next to the selection of lists, the respective numbers of existing recordings and calls are displayed.
2. Select VMB used (this is skipped if the other lists are empty).
The following information about the recording is shown on the display:
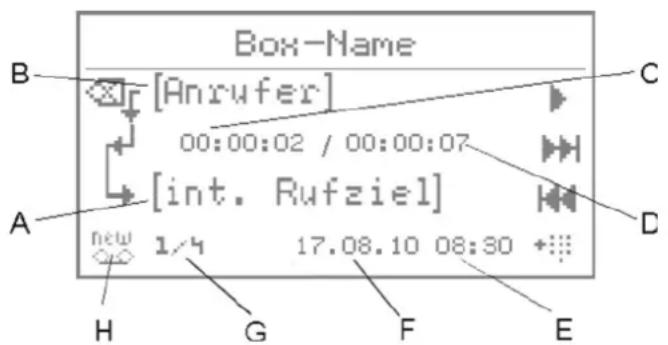
text_image
Box-Name [Anrufer] 00:00:02 / 00:00:07 [int. Rufziel] new 1/4 17.08.10 08:30 H G F E C DA Internal call destination
B C a l l e r
C Length of time the recording has been replayed
D Entire length of the recording
E Time of recording
F Date of recording
G Consecutive number of recording/number of existing recordings
Note: The latest recording is displayed with consecutive number 1.
H Recording type: new message ( ) old message already listened to ( ).
Note: If you have activated automatic replay in the PBX, the new recordings are automatically replayed in sequence after the voice mailbox is opened. The latest recording is replayed first.
3. Select the desired option:
☒ Deletes the displayed recording. If you press this key for a longer period of time, all messages from the message list will be deleted.
Starts the replay of the recording.
11 Interrupts the replay of the recording. If you press this key for a longer period of time, the system will go back to the start of the recording.
▶▶ Scrolls to next (older) recording.
Scrolls to the previous (more recent) recording.
Accepts the entry into dial preparation or into the telephone book, if applicable.
- If you would like to leave the menu, press the Exit key.
Listening to Recordings
Listening can be carried out as follows:
• Via the telephone menu
Requirements:
- COMmander Business or COMmander Basic.2 with inserted COMmander VMF module, COMpact 5010 VoIP with inserted COMpact 2VoIP module, or COMpact 5020 VoIP with inserted COMpact 2VoIP or 6VoIP module
– Voice mailbox which is configured in the PBX and assigned to it -
Knowledge of the telephone, its menu options and the required PIN, if necessary
-
Open the message list of the voice mailbox.
- Use the softkeys and to scroll to the desired recording.
- Press the ▶ softkey to start replaying the recording.
Note: You can also pick-up the receiver to prevent others present from listening.
The recording is replayed.
- Select the desired option:
☒ Deletes the displayed recording. If you press this key for a longer period of time, all messages from the message list will be deleted.
Starts the replay of the recording.
11 Interrupts the replay of the recording. If you press this key for a longer period of time, the system will go back to the start of the recording.
▶▶ Scrolls to next (older) recording.
Scrolls to the previous (more recent) recording.
Accepts the entry into dial preparation or into the telephone book, if applicable.
- If you would like to leave the menu, press the Exit key.
Note: You can also access and listen to the recordings remotely.
Selecting from the Message List of the Voice Mailbox
Requirements:
-
COMmander Business or COMmander Basic.2 with inserted COMmander VMF module, COMpact 5010 VoIP with inserted COMpact 2VoIP module, or COMpact 5020 VoIP with inserted COMpact 2VoIP or 6VoIP module
– Voice mailbox which is configured in the PBX and assigned to it
– Knowledge of the telephone, its menu options and the required PIN, if necessary -
Open the message list of the voice mailbox.
-
Use the softkeys and to scroll to the desired recording.
-
Press the +: softkey in order to accept the telephone number in dial preparation.
Note:
The number cannot be taken over into dial preparation as long as switching between messages is performed.
A callback can only be made if the number of the caller has been transferred.
- Pick up the receiver or press the hook key.
The subscriber is called.
Note: If you would like to exit the menu without dialling the number displayed, hang up the receiver or press the Exit key.
Configuring and Operating the Function Key to Open the Voice Mailbox
While the telephone is in the idle state, press the key generally assigned for accessing the function and then pick up the receiver to establish a connection to the voice mailbox. If you have been assigned several voice mailboxes, a list of voice mailboxes will be opened which contain messages.
Press the defined and assigned key in the idle state of the telephone to set up a connection to a defined voice mailbox.
If you press the defined and assigned key during recording, you can take over the call or open the assigned voice mailbox.
Note: Press the function key again to switch from the message entry to archive or vice versa. You can identify the archive by the before the name of the voice mailbox.
In addition, when functions are assigned on the first key level, the status of the voice mailbox is indicated by the corresponding LED.
LED signalling next to the key:
Green There are no new messages. There are only messages which you have already listened to in at least one voice mailbox.
Green There are new messages.
(blinking)
Red A new message is being recorded.
Off No messages available.
The configuration can be carried out as follows:
• Via the configuration manager
• Via the telephone menu
Configuring the Function Key for General Opening of a Voice Mailbox via the Configuration Manager
Requirements:
- COMmander Business or COMmander Basic.2 with inserted COMmander VMF module, COMpact 5010 VoIP with inserted COMpact 2VoIP module, or COMpact 5020 VoIP with inserted COMpact 2VoIP or 6VoIP module
– Voice mailbox which is configured in the PBX and assigned to it -
Configuration manager, opened with a sufficient authorization level
-
Open the page function keys > assign function keys.
- Only available in installed extension modules: In the telephone displayed at the top left, click the key group in which you would like to assign keys.
- Click one of the following tabs:
Level 1: Keys are assigned on the first key level.
Level 2: Keys are assigned on the second key level.
- In the list field next to the function key that you would like to assign, select the VMB - open function.
The current settings for assigning the key are displayed.
- In the key name entry field, enter a name for the key. The following entries are possible:
Up to 16 digits
Digits and characters
Note: The key name is used for printing the label.
- Click execute.
Configuring the Function Key for Defined Opening of a Voice Mailbox via the Configuration Manager
Requirements:
- COMmander Business or COMmander Basic.2 with inserted COMmander VMF module, COMpact 5010 VoIP with inserted COMpact 2VoIP module, or COMpact 5020 VoIP with inserted COMpact 2VoIP or 6VoIP module
– Voice mailbox which is configured in the PBX and assigned to it -
Configuration manager, opened with a sufficient authorization level
-
Open the page function keys > assign function keys.
- Only available in installed extension modules: In the telephone displayed at the top left, click the key group in which you would like to assign keys.
- Click one of the following tabs:
Level 1: Keys are assigned on the first key level.
Level 2: Keys are assigned on the second key level.
- In the list field next to the function key that you would like to assign, select the VMB - open defined function.
The current settings for assigning the key are displayed.
- In the Number entry field, enter the number of the voice mailbox which is to be opened via the function key.
- In the key name entry field, enter a name for the key. The following entries are possible:
Up to 16 digits
Digits and characters
Note: The key name is used for printing the label.
- Click execute.
Configuring the Function Key for Opening of a Voice Mailbox via the Telephone Menu
Requirements:
- COMmander Business or COMmander Basic.2 with inserted COMmander VMF module, COMpact 5010 VoIP with inserted COMpact 2VoIP module, or COMpact 5020 VoIP with inserted COMpact 2VoIP or 6VoIP module
– Voice mailbox which is configured in the PBX and assigned to it -
Knowledge of the telephone, its menu options and the required PIN, if necessary
-
Press the menu key and open the define keys menu.
- Press the function key that you would like to assign.
- Select the desired option:
First level: Keys are assigned on the first key level.
Second level: Keys are assigned on the second key level.
The list of available functions is displayed.
- Select the VMB open function.
The current settings for assigning the key are shown on the display.
- Select the kind of key. Press the ⬤ softkey to switch over between the different kinds of keys.
general: Press the key to open a voice mailbox. (No other action is required.)
defined: Press the key to open the selected voice mailbox.
- Press the softkey ☒ and select a voice mailbox from the list.
- Press the softkey and enter a name.
- Press the softkey to accept the setting.
Readiness
To enable the voice mailbox to accept calls and record messages, readiness must be enabled.
Switching Readiness On/Off
Note: You can also switch readiness on and off via remote access.
Switching on/off can be done as follows:
• Via the telephone menu
Requirements:
- COMmander Business or COMmander Basic.2 with inserted COMmander VMF module, COMpact 5010 VoIP with inserted COMpact 2VoIP module, or COMpact 5020 VoIP with inserted COMpact 2VoIP or 6VoIP module
– Voice mailbox which is configured in the PBX and assigned to it - Knowledge of the telephone, its menu options and the required PIN, if necessary
In order to switch readiness on or off, press the function key configured for readiness.
Alternatively, proceed as described in the following.
- Press the menu key and open the voice mailbox > functions > VMB readiness menu.
- Select a voice mailbox from the list.
- Select the desired option:
permanently on: Enables readiness.
permanently off: Disables readiness.
The ◦con indicates the current setting.
Configuring and Operating the Function Key for Readiness
Press the generally assigned key to permanently switch the readiness of a voice mailbox to be selected on or off.
Press the defined and assigned key to switch a previously defined voice mailbox on or off or switch it over.
In addition, when functions are assigned on the first key level, the status of the function is indicated by the corresponding LED.
LED signalling next to the key:
Green Readiness is enabled.
Yellow The readiness of at least one voice mailbox has been switched off (only in case of general assignment).
The readiness of the box is switched on, but the permanent configuration is inactive (only in case of defined assignment).
Off Readiness is disabled.
The configuration can be carried out as follows:
• Via the configuration manager
• Via the telephone menu
Configuring the Function Key for Readiness (general) via the Configuration Manager
Requirements:
- COMmander Business or COMmander Basic.2 with inserted COMmander VMF module, COMpact 5010 VoIP with inserted COMpact 2VoIP module, or COMpact 5020 VoIP with inserted COMpact 2VoIP or 6VoIP module
– Voice mailbox which is configured in the PBX and assigned to it -
Configuration manager, opened with a sufficient authorization level
-
Open the page function keys > assign function keys.
- Only available in installed extension modules: In the telephone displayed at the top left, click the key group in which you would like to assign keys.
-
Click one of the following tabs:
Level 1: Keys are assigned on the first key level.
Level 2: Keys are assigned on the second key level. -
In the list field next to the function key that you would like to assign, select the VMB - readiness function.
The current settings for assigning the key are displayed.
- In the key name entry field, enter a name for the key. The following entries are possible:
Up to 16 digits
Digits and characters
Note: The key name is used for printing the label.
- Click execute.
Configuring the Function Key for Readiness (defined) via the Configuration Manager
Requirements:
- COMmander Business or COMmander Basic.2 with inserted COMmander VMF module, COMpact 5010 VoIP with inserted COMpact 2VoIP module, or COMpact 5020 VoIP with inserted COMpact 2VoIP or 6VoIP module
– Voice mailbox which is configured in the PBX and assigned to it -
Configuration manager, opened with a sufficient authorization level
-
Open the page function keys > assign function keys.
- Only available in installed extension modules: In the telephone displayed at the top left, click the key group in which you would like to assign keys.
- Click one of the following tabs:
Level 1: Keys are assigned on the first key level.
Level 2: Keys are assigned on the second key level.
- In the list field next to the function key that you would like to assign, select the VMB - readiness defined function.
The current settings for assigning the key are displayed.
- In the Number entry field, enter the number of the voice mailbox which is to be switched via the function key.
- In the kind of switching list field, select one of the following options:
switch on: Press the key to enable the readiness mode.
switch off: Press the key to disable the readiness mode.
switch over: Press the key to switch the readiness mode on and off.
- In the key name entry field, enter a name for the key. The following entries are possible:
Up to 16 digits
Digits and characters
Note: The key name is used for printing the label.
- Click execute.
Configuring the Function Key for Readiness via the Telephone Menu
Requirements:
-
COMmander Business or COMmander Basic.2 with inserted COMmander VMF module, COMpact 5010 VoIP with inserted COMpact 2VoIP module, or COMpact 5020 VoIP with inserted COMpact 2VoIP or 6VoIP module
– Voice mailbox which is configured in the PBX and assigned to it
– Knowledge of the telephone, its menu options and the required PIN, if necessary -
Press the menu key and open the define keys menu.
- Press the function key that you would like to assign.
- Select the desired option:
First level: Keys are assigned on the first key level.
Second level: Keys are assigned on the second key level.
The list of available functions is displayed.
- Select the VMB readiness function.
- Select the kind of key. Press the ⬆ softkey to switch over between the different kinds of keys.
general: If you press the key, one voice mailbox will be switched into readiness mode. (No other action is required.)
defined: If you press the key, the selected voice mailbox will be switched into readiness mode.
- Press the softkey ☒ and select a voice mailbox from the list.
- Press the softkey and enter a name.
- Only when the kind of key defined has been selected: Select the kind of switching. Press the ⬆ softkey to switch over between the different kinds of switching.
switch off: Press the key to disable the readiness mode.
switch on: Press the key to enable the readiness mode.
switch over: Press the key to switch the readiness mode on and off.
- Press the softkey to accept the setting.
Configuration-Dependent Control
The readiness of the voice mailbox be switched on permanently. In addition, however, there are alternative options. With the help of configuration-dependent control, the voice mailbox can be switched via the PBX configurations, e.g. day-night switching.
Switching the Configuration-Dependent Control On/Off
Switching on/off can be done as follows:
• Via the telephone menu
Requirements:
- COMmander Business or COMmander Basic.2 with inserted COMmander VMF module, COMpact 5010 VoIP with inserted COMpact 2VoIP module, or COMpact 5020 VoIP with inserted COMpact 2VoIP or 6VoIP module
– Voice mailbox which is configured in the PBX and assigned to it - Configurations made in the PBX
- Knowledge of the telephone, its menu options and the required PIN, if necessary
To enable configuration-dependent control, press a function Key configured for configuration-dependent control. To disable onfiguration-dependent control, switch the readiness on.
Alternatively, proceed as described in the following.
- Press the menu key and open the voice mailbox > functions > VMB config. control menu.
- Select a voice mailbox from the list.
- Press the softkey to accept the setting.
Configuring and Operating the Function Key for Configuration-Dependent Control
Press the generally assigned key to enable configuration-dependent control for a voice mailbox, which remains to be selected.
Press the defined and assigned key to enable configuration-dependent control for a previously defined voice mailbox.
In addition, when functions are assigned on the first key level, the status of the function is indicated by the corresponding LED.
LED signalling next to the key:
Green Configuration-dependent control is enabled.
Off Configuration-dependent control is disabled.
The configuration can be carried out as follows:
• Via the configuration manager
• Via the telephone menu
Configuring the Function Key for Configuration-Dependent Control (general) via the Configuration Manager
Requirements:
- COMmander Business or COMmander Basic.2 with inserted COMmander VMF module, COMpact 5010 VoIP with inserted COMpact 2VoIP module, or COMpact 5020 VoIP with inserted COMpact 2VoIP or 6VoIP module
– Voice mailbox which is configured in the PBX and assigned to it - Configurations made in the PBX
-
Configuration manager, opened with a sufficient authorization level
-
Open the page function keys > assign function keys.
- Only available in installed extension modules: In the telephone displayed at the top left, click the key group in which you would like to assign keys.
- Click one of the following tabs:
Level 1: Keys are assigned on the first key level.
Level 2: Keys are assigned on the second key level.
- In the list field next to the function key that you would like to assign, select the VMB - config. control function.
The current settings for assigning the key are displayed.
- In the key name entry field, enter a name for the key. The following entries are possible:
Up to 16 digits
Digits and characters
Note: The key name is used for printing the label.
- Click execute.
Configuring the Function Key for Configuration-Dependent Control (defined) via COMfortel Set
Requirements:
- COMmander Business or COMmander Basic.2 with inserted COMmander VMF module, COMpact 5010 VoIP with inserted COMpact 2VoIP module, or COMpact 5020 VoIP with inserted COMpact 2VoIP or 6VoIP module
– Voice mailbox which is configured in the PBX and assigned to it - Configurations made in the PBX
-
An open configuration and knowledge of the required PIN, if necessary
-
Open the page function keys > assign function keys.
- Only available in installed extension modules: In the telephone displayed at the top left, click the key group in which you would like to assign keys.
- Click one of the following tabs:
Level 1: Keys are assigned on the first key level.
Level 2: Keys are assigned on the second key level.
- Right-click the function key you want to assign.
A function selection dialog opens.
- Select the voice mailbox - config. control defined function.
The current settings for assigning the key are displayed.
- In the Number entry field, enter the number of the voice mailbox which is to be switched via the function key.
- In the key name entry field, enter a name for the key. The following entries are possible:
Up to 16 digits
Digits and characters
Clicking automatically enters the default name in the entry field.
Note: The key name is used for printing the label.
Further steps:
- Save your configuration before closing.
Configuring the Function Key for Configuration-Dependent Control via the Telephone Menu
Requirements:
- COMmander Business or COMmander Basic.2 with inserted COMmander VMF module, COMpact 5010 VoIP with inserted COMpact 2VoIP module, or COMpact 5020 VoIP with inserted COMpact 2VoIP or 6VoIP module
– Voice mailbox which is configured in the PBX and assigned to it - Configurations made in the PBX
-
Knowledge of the telephone, its menu options and the required PIN, if necessary
-
Press the menu key and open the define keys menu.
- Press the function key that you would like to assign.
-
Select the desired option:
First level: Keys are assigned on the first key level.
Second level: Keys are assigned on the second key level.
The list of available functions is displayed. -
Select the VMB config. control function.
-
Select the kind of key. Press the ⬆ softkey to switch over between the different kinds of keys.
general: Press the key to switch configuration-dependent control on. (No other action is required.)
defined: Press the key to enable configuration-dependent control for the selected voice mailbox.
- Press the softkey ☒ and select a voice mailbox from the list.
- Press the softkey and enter a name.
- Press the softkey to accept the setting.
Voice Memos
You can use the voice mailbox to save your own voice memos. Up to 250 voice memos including date, time, and length of the recording can be saved in the voice mailbox. The recordings are numbered consecutively, with the last/latest recording assigned the number 1.
You can listen to, edit, and delete voice memos like any other messages.
Configuring and Operating the Function Key for Recording Voice Memos
Press the key while the telephone is in the idle state to start recording a voice memo.
In addition, when functions are assigned on the first key level, the associated LED indicates whether a voice memo is currently being recorded.
LED signalling next to the key:
Green Recording mode
Yellow Connection setup to the voice mailbox
(blinking)
Off The function is disabled.
The configuration can be carried out as follows:
• Via the configuration manager
• Via the telephone menu
Configuring the Function Key for Recording Voice Memos via the Configuration Manager
Requirements:
- COMmander Business or COMmander Basic.2 with inserted COMmander VMF module, COMpact 5010 VoIP with inserted COMpact 2VoIP module, or COMpact 5020 VoIP with inserted COMpact 2VoIP or 6VoIP module
– Voice mailbox which is configured in the PBX and assigned to it -
Configuration manager, opened with a sufficient authorization level
-
Open the page function keys > assign function keys.
-
Only available in installed extension modules: In the telephone displayed at the top left, click the key group in which you would like to assign keys.
- Click one of the following tabs:
Level 1: Keys are assigned on the first key level.
Level 2: Keys are assigned on the second key level.
- In the list field next to the function key that you would like to assign, select the VMB - voice memo function.
The current settings for assigning the key are displayed.
- In the Number list field, select the voice mailbox where you wish to record the voice memos.
- In the key name entry field, enter a name for the key. The following entries are possible:
Up to 16 digits
Digits and characters
Note: The key name is used for printing the label.
- Click execute.
Configuring the Function Key for Recording Voice Memos via the Telephone Menu
Requirements:
-
COMmander Business or COMmander Basic.2 with inserted COMmander VMF module, COMpact 5010 VoIP with inserted COMpact 2VoIP module, or COMpact 5020 VoIP with inserted COMpact 2VoIP or 6VoIP module
– Voice mailbox which is configured in the PBX and assigned to it
– Knowledge of the telephone, its menu options and the required PIN, if necessary -
Press the menu key and open the define keys menu.
- Press the function key that you would like to assign.
- Select the desired option:
First level: Keys are assigned on the first key level.
Second level: Keys are assigned on the second key level.
The list of available functions is displayed.
Configuring and Managing Voice Mailboxes
Voice Memos
Configuring and Operating the Function Key for Recording Voice Memos
- Select the VMB voice memo function.
The current settings for assigning the key are shown on the display. - Press the softkey ☒ and select a voice mailbox from the list.
- Press the softkey and enter a name.
- Press the softkey to accept the setting.
Distribution of Messages
The messages in a voice mailbox can be distributed to other voice mailboxes.
Configuring and Operating the Function Key for Distributing Messages
Press the generally assigned key after calling a voice mailbox to distribute messages to another voice mailbox, which remains to be selected.
Press the defined and assigned key after calling a voice mailbox to distribute messages to a previously defined voice mailbox. Moreover, you can select whether you want to move or copy your messages.
LED signalling next to the key:
None
The configuration can be carried out as follows:
• Via the configuration manager
• Via the telephone menu
Configuring the Function Key for the General Distribution of Messages via the Configuration Manager
Requirements:
- COMmander Business or COMmander Basic.2 with inserted COMmander VMF module, COMpact 5010 VoIP with inserted COMpact 2VoIP module, or COMpact 5020 VoIP with inserted COMpact 2VoIP or 6VoIP module
– Voice mailbox which is configured in the PBX and assigned to it -
Configuration manager, opened with a sufficient authorization level
-
Open the page function keys > assign function keys.
- Only available in installed extension modules: In the telephone displayed at the top left, click the key group in which you would like to assign keys.
- Click one of the following tabs:
Level 1: Keys are assigned on the first key level.
Level 2: Keys are assigned on the second key level.
- In the list field next to the function key that you would like to assign, select the VMB - distribute messages function.
The current settings for assigning the key are displayed.
- In the key name entry field, enter a name for the key. The following entries are possible:
Up to 16 digits
Digits and characters
Note: The key name is used for printing the label.
- Click execute.
Configuring the Function Key for the Defined Distribution of Messages via the Configuration Manager
Requirements:
- COMmander Business or COMmander Basic.2 with inserted COMmander VMF module, COMpact 5010 VoIP with inserted COMpact 2VoIP module, or COMpact 5020 VoIP with inserted COMpact 2VoIP or 6VoIP module
– Voice mailbox which is configured in the PBX and assigned to it -
Configuration manager, opened with a sufficient authorization level
-
Open the page function keys > assign function keys.
- Only available in installed extension modules: In the telephone displayed at the top left, click the key group in which you would like to assign keys.
- Click one of the following tabs:
Level 1: Keys are assigned on the first key level.
Level 2: Keys are assigned on the second key level.
- In the list field next to the function key that you would like to assign, select the VMB - distribute messages defined function.
The current settings for assigning the key are displayed.
- In the Number entry field, enter the number of the voice mailbox to where messages are to be distributed.
Note: If you have entered your own voice mailbox as number, the messages will be distributed to the archive.
- In the kind of switching list field, select one of the following options:
move: Press the key to move messages. The messages in the voice mailbox will be deleted.
copy: Press the key to copy messages. The messages in the voice mailbox remain unchanged.
- In the key name entry field, enter a name for the key. The following entries are possible:
Up to 16 digits
Digits and characters
Note: The key name is used for printing the label.
- Click execute.
Configuring the Function Key for Distributing Messages via the Telephone Menu
Requirements:
- COMmander Business or COMmander Basic.2 with inserted COMmander VMF module, COMpact 5010 VoIP with inserted COMpact 2VoIP module, or COMpact 5020 VoIP with inserted COMpact 2VoIP or 6VoIP module
– Voice mailbox which is configured in the PBX and assigned to it -
Knowledge of the telephone, its menu options and the required PIN, if necessary
-
Press the menu key and open the define keys menu.
- Press the function key that you would like to assign.
- Select the desired option:
First level: Keys are assigned on the first key level.
Second level: Keys are assigned on the second key level.
The list of available functions is displayed.
- Select the VMB - distribute messages function.
- Select the kind of key. Press the ⬆ softkey to switch over between the different kinds of keys.
general: Press the key to distribute messages to another voice mailbox. (No other action is required.)
defined: Press the key to distribute messages to the selected voice mailbox.
- Press the softkey ☒ and enter the number of the voice mailbox in the entry field, to where messages are to be distributed.
- Press the softkey and enter a name.
- Select whether you want to copy or move the message. Press the ⬆ softkey to switch over between the two modes.
move: Press the key to move messages. The messages in the voice mailbox will be deleted.
copy: Press the key to copy messages. The messages in the voice mailbox remain unchanged.
- Press the softkey to accept the setting.
Announcements
For each assigned voice mailbox you can record announcements via the telephone. You can replay, edit, and delete your own announcements. In addition to the standard announcement from the voice files, maximally 10 own announcements can be stored per voice mailbox.
Create a New Announcement
Announcements can be created, as follows:
• Via the telephone menu
Requirements:
-
COMmander Business or COMmander Basic.2 with inserted COMmander VMF module, COMpact 5010 VoIP with inserted COMpact 2VoIP module, or COMpact 5020 VoIP with inserted COMpact 2VoIP or 6VoIP module
– Voice mailbox which is configured in the PBX and assigned to it
– Knowledge of the telephone, its menu options and the required PIN, if necessary -
Press the Menu key and open the voice mailbox > settings > edit announc. menu.
- Select the voice mailbox from the list for which you want to record the announcement.
- Press the softkey to record an announcement.
- Enter the name. The following entries are possible:
Up to 16 digits
Numbers and characters using the 0...9 keys.
- Press the softkey to save your entry.
- Press the softkey √ next to start of recording to start recording the announcement.
The recording proceeds.
- Record the announcement.
- Press the √ softkey next to end of recording to end recording the announcement.
Note:
You have the option of recording the announcement again (by selecting the ➕ option) or listening to the announcement that you have recorded (by selecting the ➕ option).
Recordings with a recording time shorter than 3 second are discarded by the telephone.
- Select store to save the recorded announcement in the announcement list.
Edit an Existing Announcement
Editing can be carried out as follows:
• Via the telephone menu
Requirements:
- COMmander Business or COMmander Basic.2 with inserted COMmander VMF module, COMpact 5010 VoIP with inserted COMpact 2VoIP module, or COMpact 5020 VoIP with inserted COMpact 2VoIP or 6VoIP module
– Voice mailbox which is configured in the PBX and assigned to it - Knowledge of the telephone, its menu options and the required PIN, if necessary
Proceed as described in the following.
- Press the Menu key and open the voice mailbox > settings > edit announc. menu.
- Select the voice mailbox from the list for which you want to edit an announcement.
- Scroll to the desired entry.
- Press the softkey
- Overwrite the name, if necessary. The following entries are possible:
Up to 16 digits
Digits and characters
- Press the softkey √ to save your entry and start the recording.
- Press the softkey √ next to start of recording to start recording the announcement.
The recording proceeds.
- Record the announcement.
- Press the √ softkey next to end of recording to end recording the announcement.
Note:
You have the option of recording the announcement again (by selecting the ➕ option) or listening to the announcement that you have recorded (by selecting the ➕ option).
Recordings with a recording time shorter than 3 second are discarded by the telephone.
- Select store to save the recorded announcement in the announcement list.
Delete an Existing Announcement
Deleting can be carried out as follows:
• Via the telephone menu
Requirements:
- COMmander Business or COMmander Basic.2 with inserted COMmander VMF module, COMpact 5010 VoIP with inserted COMpact 2VoIP module, or COMpact 5020 VoIP with inserted COMpact 2VoIP or 6VoIP module
– Voice mailbox which is configured in the PBX and assigned to it
– Knowledge of the telephone, its menu options and the required PIN, if necessary
Proceed as described in the following.
- Press the Menu key and open the voice mailbox > settings > edit announc. menu.
- Select the voice mailbox from the list for which you want to delete an announcement.
- Scroll to the desired entry.
- Press the softkey
- Press the softkey to confirm the action.
Switching the Call Information On/Off for New Messages
If call information is switched on for a new message, the subscriber will be informed when the call was received before the message is replayed.
Switching on/off can be done as follows:
• Via the telephone menu
Requirements:
- COMmander Business or COMmander Basic.2 with inserted COMmander VMF module, COMpact 5010 VoIP with inserted COMpact 2VoIP module, or COMpact 5020 VoIP with inserted COMpact 2VoIP or 6VoIP module
– Voice mailbox which is configured in the PBX and assigned to it -
Knowledge of the telephone, its menu options and the required PIN, if necessary
-
Press the Menu key and open the voice mailbox > settings > call information menu.
- Select or clear the call information check box.
Switches call information on.
□ Switches call information off.
- Press the softkey to accept the setting.
Switching the Separator Tone On/Off for New Messages
If the separator tone is switched on for new messages, a tone will be replayed after each message when listening to several new messages. This makes it easier to distinguish the individual messages from each other.
Switching on/off can be done as follows:
• Via the telephone menu
Requirements:
- COMmander Business or COMmander Basic.2 with inserted COMmander VMF module, COMpact 5010 VoIP with inserted COMpact 2VoIP module, or COMpact 5020 VoIP with inserted COMpact 2VoIP or 6VoIP module
– Voice mailbox which is configured in the PBX and assigned to it -
Knowledge of the telephone, its menu options and the required PIN, if necessary
-
Press the Menu key and open the voice mailbox > settings > separator tone menu.
- Select or clear the separator tone check box.
Enables the separator tone.
□ Disables the separator tone.
- Press the softkey to accept the setting.
Remote Access
Remote access is used to access and operate the voice mailbox from an internal telephone or from an external telephone.
Execute Remote Access
Performing this procedure can be carried out as follows:
- Using a character string on an external telephone
- Using a character string on the internal telephone
Requirements:
- COMmander Business or COMmander Basic.2 with inserted COMmander VMF module, COMpact 5010 VoIP with inserted COMpact 2VoIP module, or COMpact 5020 VoIP with inserted COMpact 2VoIP or 6VoIP module
-
Knowledge of the telephone, its menu options and the required PIN, if necessary
– Voice mailbox which is configured in the PBX -
Call the voice mailbox.
The voice mailbox accepts the call. You hear the configured announcement.
- Dial *.
Note: If the querying internal telephone is the owner/user of the voice mailbox, step 3 will be omitted.
- Enter the user PIN or the PIN for remote access and dial #.
Remote access is started. You are led through the remote access menu with the help of various announcements.
- Execute remote access by entering the following digits.
0: Opens the Help menu.
1: Opens the main menu.
2: Replays new messages.
3: Replays all of the messages.
4: Jumps back to the previous message.
5: Repeats the message currently being replayed.
6: Jumps to the next message.
7: Deletes the message currently being replayed.
8: Ends replay.
* 10: Disables the voice mailbox.
* 11: Enables the voice mailbox.
* 20: Permits recording and exchanging announcements.
* 30: Disables message forwarding.
* 31: Enables message forwarding.
* 70: Deletes all messages and voice memos.
* 99: Records a voice memo.
Hang-up: Ends remote access.
Note: By dialing 9 while a message is being replayed, the telephone number of the caller will be displayed—provided it has been transferred. By pressing the# key, you can initiate a callback to the telephone number of the caller.
Switching Remote Access On/Off
Switching on/off can be done as follows:
• Via the telephone menu
Requirements:
- COMmander Business or COMmander Basic.2 with inserted COMmander VMF module, COMpact 5010 VoIP with inserted COMpact 2VoIP module, or COMpact 5020 VoIP with inserted COMpact 2VoIP or 6VoIP module
– Knowledge of the telephone, its menu options and the required PIN, if necessary
– Voice mailbox which is configured in the PBX and assigned to it
In order to switch remote access to the voice mailbox on or off, press the function key configured for remote access.
Alternatively, proceed as described in the following.
-
Press the menu key and open the voice mailbox > functions > VMB remote access menu.
-
Select a voice mailbox from the list.
- Select the desired option:
switch on: Enables the remote access function.
switch off: Disables the remote access function.
The icon indicates the current setting.
- Press the softkey to save your entry.
Configuring and Operating the Function Key for Remote Access
Press the generally assigned key to switch the remote access for a voice mailbox to be selected on or off or switch it over.
Press the defined and assigned key to switch the remote access for a defined voice mailbox on or off or switch it over.
In addition, when functions are assigned on the first key level, the status of the function is indicated by the corresponding LED.
LED signalling next to the key:
Green Remote access is enabled.
Yellow The remote access to at least one voice mailbox has been switched off (only in case of general assignment).
Off Remote access is disabled.
Switching on/off can be done as follows:
• Via the configuration manager
• Via the telephone menu
Configuring the Function Key for General Remote Access via the Configuration Manager
Requirements:
- COMmander Business or COMmander Basic.2 with inserted COMmander VMF module, COMpact 5010 VoIP with inserted COMpact 2VoIP module, or COMpact 5020 VoIP with inserted COMpact 2VoIP or 6VoIP module
– Voice mailbox which is configured in the PBX -
An open configuration and knowledge of the required PIN, if necessary
-
Open the page function keys > assign function keys.
- Only available in installed extension modules: In the telephone displayed at the top left, click the key group in which you would like to assign keys.
- Click one of the following tabs:
Level 1: Keys are assigned on the first key level.
Level 2: Keys are assigned on the second key level.
- In the list field next to the function key that you would like to assign, select the VMB - remote access function.
The current settings for assigning the key are displayed.
- In the key name entry field, enter a name for the key. The following entries are possible:
Up to 16 digits
Digits and characters
Note: The key name is used for printing the label.
- Click execute.
Configuring the Function Key for Defined Remote Access via the Configuration Manager
Requirements:
- COMmander Business or COMmander Basic.2 with inserted COMmander VMF module, COMpact 5010 VoIP with inserted COMpact 2VoIP module, or COMpact 5020 VoIP with inserted COMpact 2VoIP or 6VoIP module
- Voice mailbox which is configured in the PBX
-
An open configuration and knowledge of the required PIN, if necessary
-
Open the page function keys > assign function keys.
- Only available in installed extension modules: In the telephone displayed at the top left, click the key group in which you would like to assign keys.
- Click one of the following tabs:
Level 1: Keys are assigned on the first key level.
Level 2: Keys are assigned on the second key level.
- In the list field next to the function key that you would like to define, select the VMB - remote access defined function.
The current settings for assigning the key are displayed.
- In the Number entry field, enter the number of the voice mailbox which is to be switched via the function key.
- In the kind of switching list field, select one of the following options:
switch off: Press the key to disable the remote access.
switch on: Press the key to enable the remote access.
switch over: Press the key to switch the remote access on and off.
- In the key name entry field, enter a name for the key. The following entries are possible:
Up to 16 digits
Digits and characters
Note: The key name is used for printing the label.
- Click execute.
Configuring the Function Key for Remote Access via the Telephone Menu
Requirements:
-
COMmander Business or COMmander Basic.2 with inserted COMmander VMF module, COMpact 5010 VoIP with inserted COMpact 2VoIP module, or COMpact 5020 VoIP with inserted COMpact 2VoIP or 6VoIP module
– Voice mailbox which is configured in the PBX and assigned to it
– Knowledge of the telephone, its menu options and the required PIN, if necessary -
Press the menu key and open the define keys menu.
- Press the function key that you would like to assign.
- Select the desired option:
First level: Keys are assigned on the first key level.
Second level: Keys are assigned on the second key level.
The list of available functions is displayed.
- Select the VMB rem. access function.
- Select the kind of key. Press the ⬆ softkey to switch over between the different kinds of keys.
general: Press the key to enable the remote access. (No other action is required.)
defined: Press the key to configure remote access for a selected voice mailbox.
- Press the softkey ☒ and select a voice mailbox from the list.
- Press the softkey and enter a name.
- Only when the kind of key defined has been selected: Select the kind of switching. Press the ⬆ softkey to switch over between the different kinds of switching.
switch off: Press the key to disable the remote access.
switch on: Press the key to enable the remote access.
switch over: Press the key to switch the remote access on and off.
- Press the softkey to accept the setting.
Message Forwarding
Message forwarding enables the voice mailbox to notify you of new messages even if you are out and about.
Switching Message Forwarding On/Off
Switching on/off can be done as follows:
• Via the telephone menu
Requirements:
- COMmander Business or COMmander Basic.2 with inserted COMmander VMF module, COMpact 5010 VoIP with inserted COMpact 2VoIP module, or COMpact 5020 VoIP with inserted COMpact 2VoIP or 6VoIP module
- Knowledge of the telephone, its menu options and the required PIN, if necessary
– Voice mailbox which is configured in the PBX and assigned to it - The destination for message forwarding of the voice mailbox configured in the PBX
In order to switch message forwarding on or off, press the function key configured for message forwarding.
Alternatively, proceed as described in the following.
- Press the menu key and open the voice mailbox > functions > VMB forwarding menu.
- Select a voice mailbox from the list.
- Select the desired option:
switch on: Enables message forwarding.
switch off: Disables message forwarding.
The icon indicates the current setting.
- Press the softkey to save your entry.
Configuring and Operating the Function Key for Message Forwarding
Press the generally assigned key to switch the message forwarding for a voice mailbox to be selected on or off or switch it over.
Press the defined and assigned key to switch message forwarding for a defined voice mailbox on or off or switch it over.
In addition, when functions are assigned on the first key level, the status of the function is indicated by the corresponding LED.
LED signalling next to the key:
Green Message forwarding is enabled.
Yellow The message forwarding for at least one voice mailbox has been switched off (only in case of general assignment).
Off Message forwarding is disabled.
The configuration can be carried out as follows:
• Via the configuration manager
• Via the telephone menu
Configuring the Function Key for General Message Forwarding via the Configuration Manager
Requirements:
- COMmander Business or COMmander Basic.2 with inserted COMmander VMF module, COMpact 5010 VoIP with inserted COMpact 2VoIP module, or COMpact 5020 VoIP with inserted COMpact 2VoIP or 6VoIP module
- Configuration manager, opened with a sufficient authorization level
– Voice mailbox which is configured in the PBX and assigned to it -
The destination for message forwarding of the voice mailbox configured in the PBX
-
Open the page function keys > assign function keys.
- Only available in installed extension modules: In the telephone displayed at the top left, click the key group in which you would like to assign keys.
-
Click one of the following tabs:
Level 1: Keys are assigned on the first key level.
Level 2: Keys are assigned on the second key level. -
In the list field next to the function key that you would like to assign, select the VMB - message forwarding function.
The current settings for assigning the key are displayed.
- In the key name entry field, enter a name for the key. The following entries are possible:
Up to 16 digits
Digits and characters
Note: The key name is used for printing the label.
- Click execute.
Configuring the Function Key for Defined Message Forwarding via the Configuration Manager
Requirements:
- COMmander Business or COMmander Basic.2 with inserted COMmander VMF module, COMpact 5010 VoIP with inserted COMpact 2VoIP module, or COMpact 5020 VoIP with inserted COMpact 2VoIP or 6VoIP module
- Configuration manager, opened with a sufficient authorization level
– Voice mailbox which is configured in the PBX and assigned to it -
The destination for message forwarding of the voice mailbox configured in the PBX
-
Open the page function keys > assign function keys.
- Only available in installed extension modules: In the telephone displayed at the top left, click the key group in which you would like to assign keys.
- Click one of the following tabs:
Level 1: Keys are assigned on the first key level.
Level 2: Keys are assigned on the second key level.
- In the list field next to the function key that you would like to assign, select the VMB - message forwarding defined function.
The current settings for assigning the key are displayed.
- In the Number entry field, enter the number of the voice mailbox which is to be switched via the function key.
- In the kind of switching list field, select one of the following options:
switch off: Press the key to disable message forwarding.
switch on: Press the key to enable message forwarding.
switch over: Press the key to switch message forwarding on and off.
- In the key name entry field, enter a name for the key. The following entries are possible:
Up to 16 digits
Digits and characters
Note: The key name is used for printing the label.
- Click execute.
Configuring Function Key for Message Forwarding via the Telephone Menu
Requirements:
- COMmander Business or COMmander Basic.2 with inserted COMmander VMF module, COMpact 5010 VoIP with inserted COMpact 2VoIP module, or COMpact 5020 VoIP with inserted COMpact 2VoIP or 6VoIP module
- Knowledge of the telephone, its menu options and the required PIN, if necessary
– Voice mailbox which is configured in the PBX and assigned to it -
The destination for message forwarding of the voice mailbox configured in the PBX
-
Press the menu key and open the define keys menu.
- Press the function key that you would like to assign.
- Select the desired option:
First level: Keys are assigned on the first key level.
Second level: Keys are assigned on the second key level.
The list of available functions is displayed.
- Select the VMB forwarding function.
- Select the kind of key. Press the ⏻ softkey to switch over between the different kinds of keys.
general: Press the key to enable message forwarding. (No other action is required.)
defined: Press the key to configure message forwarding for a selected voice mailbox.
- Press the softkey ☒ and select a voice mailbox from the list.
- Press the softkey and enter a name.
- Only when the kind of key defined has been selected: Select the kind of switching. Press the softkey ↩ to switch over between the different kinds of switching.
switch off: Press the key to disable message forwarding.
switch on: Press the key to enable message forwarding.
switch over: Press the key to switch message forwarding on and off.
- Press the softkey to accept the setting.
Substitute Function
If the substitute function is switched on, the caller can be connected with the substitute instead of leaving a message on the voice mailbox. For this purpose, the caller dials "1" during the announcement or recording phase.
You have to include this information ("You can reach my substitute by dialling the digit 1...") into the announcement yourself by recording it via an own announcement.
Switching the Substitute Function On/Off
Switching on/off can be done as follows:
• Via the telephone menu
Requirements:
- COMmander Business or COMmander Basic.2 with inserted COMmander VMF module, COMpact 5010 VoIP with inserted COMpact 2VoIP module, or COMpact 5020 VoIP with inserted COMpact 2VoIP or 6VoIP module
- Knowledge of the telephone, its menu options and the required PIN, if necessary
– Voice mailbox which is configured in the PBX and assigned to it - The substitute function configured in the PBX for the voice mailbox
– Recorded announcement for the voice mailbox (see the manual for the PBX)
In order to switch the substitute function on or off, press the function key configured for the substitute function.
Alternatively, proceed as described in the following.
- Press the menu key and open the voice mailbox > functions > VMB substitute menu.
- Select a voice mailbox from the list.
- Select the desired option:
switch on: Enables the substitute function.
switch off: Disables the substitute function.
The icon indicates the current setting.
- Enter the destination number of the substitute. The following entries are possible:
Up to 32 digits
Digits and the characters * and #
Important: Enter telephone numbers exactly as when dialling, for example, always enter external telephone numbers with a leading exchange line access number "0". (exception: direct exchange access).
- Press the softkey to save your entry.
Configuring and Operating the Function Key for the Substitute Function
Press the generally assigned key to switch the substitute function for a voice mailbox to be selected on or off or switch it over.
Press the defined and assigned key to switch the substitute function for a previously defined voice mailbox on or off or switch it over.
In addition, when functions are assigned on the first key level, the status of the function is indicated by the corresponding LED.
LED signalling next to the key:
Green The substitute function is enabled.
Yellow The substitute function for at least one voice mailbox has been switched off (only in case of general assignment).
Off The substitute function is switched off.
The configuration can be carried out as follows:
• Via the configuration manager
• Via the telephone menu
Configuring the Function Key for the General Substitute Function via the Configuration Manager
Requirements:
- COMmander Business or COMmander Basic.2 with inserted COMmander VMF module, COMpact 5010 VoIP with inserted COMpact 2VoIP module, or COMpact 5020 VoIP with inserted COMpact 2VoIP or 6VoIP module
– Voice mailbox which is configured in the PBX and assigned to it
- The substitute function configured in the PBX for the voice mailbox
- Configuration manager, opened with a sufficient authorization level
– Recorded announcement for the voice mailbox (see the manual for the PBX)
- Open the page function keys > assign function keys.
- Only available in installed extension modules: In the telephone displayed at the top left, click the key group in which you would like to assign keys.
- Click one of the following tabs:
Level 1: Keys are assigned on the first key level.
Level 2: Keys are assigned on the second key level.
- In the list field next to the function key that you would like to assign, select the VMB - substitute function.
The current settings for assigning the key are displayed.
- In the key name entry field, enter a name for the key. The following entries are possible:
Up to 16 digits
Digits and characters
Note: The key name is used for printing the label.
- Click execute.
Configuring the Function Key for the Defined Substitute Function via the Configuration Manager
Requirements:
- COMmander Business or COMmander Basic.2 with inserted COMmander VMF module, COMpact 5010 VoIP with inserted COMpact 2VoIP module, or COMpact 5020 VoIP with inserted COMpact 2VoIP or 6VoIP module
– Voice mailbox which is configured in the PBX and assigned to it - The substitute function configured in the PBX for the voice mailbox
-
Configuration manager, opened with a sufficient authorization level
– Recorded announcement for the voice mailbox (see the manual for the PBX) -
Open the page function keys > assign function keys.
-
Only available in installed extension modules: In the telephone displayed at the top left, click the key group in which you would like to assign keys.
- Click one of the following tabs:
Level 1: Keys are assigned on the first key level.
Level 2: Keys are assigned on the second key level.
- In the list field next to the function key that you would like to assign, select the VMB - substitute defined function.
The current settings for assigning the key are displayed.
- In the Number entry field, enter the number of the voice mailbox for which you want to configure this function.
- In the kind of switching list field, select one of the following options:
switch off: Press the key to disable the substitute function.
switch on: Press the key to enable the substitute function.
switch over: Press the key to switch the substitute function on and off.
- In the key name entry field, enter a name for the key. The following entries are possible:
Up to 16 digits
Digits and characters
Note: The key name is used for printing the label.
- Click execute.
Configuring the Function Key for the Substitute Function via the Telephone Menu
Requirements:
- COMmander Business or COMmander Basic.2 with inserted COMmander VMF module, COMpact 5010 VoIP with inserted COMpact 2VoIP module, or COMpact 5020 VoIP with inserted COMpact 2VoIP or 6VoIP module
– Voice mailbox which is configured in the PBX and assigned to it
- The substitute function configured in the PBX for the voice mailbox
- Knowledge of the telephone, its menu options and the required PIN, if necessary
– Recorded announcement for the voice mailbox (see the manual for the PBX)
-
Press the menu key and open the define keys menu.
-
Press the function key that you would like to assign.
- Select the desired option:
First level: Keys are assigned on the first key level.
Second level: Keys are assigned on the second key level.
The list of available functions is displayed.
- Select the VMB substitute function.
- Select the kind of key. Press the ⬆ softkey to switch over between the different kinds of keys.
general: Press the key to enable the substitute function. (No other action is required.)
defined: Press the key to configure the substitute function for a selected voice mailbox.
- Press the softkey ☑ and select a voice mailbox from the list.
- Press the softkey and enter a name.
- Press the softkey 📁 next to VMB substitute.
- Enter the number of the substitute. The following entries are possible:
Up to 32 digits
Digits and the characters * and #
Important: Enter telephone numbers exactly as when dialling, for example, always enter external telephone numbers with a leading exchange line access number "0". (exception: direct exchange access).
- Only when the kind of key defined has been selected: Select the kind of switching.
Press the ✦ softkey to switch over between the different kinds of switching.
switch off: Press the key to disable the substitute function.
switch on: Press the key to enable the substitute function.
switch over: Press the key to switch the substitute function on and off.
- Press the softkey to accept the setting.
Configuring and Managing the Telephone
This section describes how to configure and managed your telephone.
Topics
– Identification (page 471)
- Display and Backlight (page 482)
– Call Signalling (page 489)
– Ringer Melodies (page 496)
- Call Charges (page 501)
– Receiver and Headset (page 503)
- Menu and Function Keys (page 510)
- VoIP Provider (page 516)
- VoIP Accounts (page 532)
- Internet Access (page 534)
- VLAN (page 540)
– Protection from Unauthorised Access (page 477)
Identification
The telephone must be uniquely identified on the PBX. If this is done, the PBX displays the VoIP provider on the telephone.
Besides, the telephone is integrated into an existing network. In order to make sure the telephone is identified in this network, several settings must be configured.
Configuring MSN
In order for the PBX to identify the telephone, the internal telephone number (MSN) for the telephone must be entered.
The configuration can be made as follows:
• Via the configuration manager
• Via the telephone menu
Configuring MSN via Configuration Manager
Requirements:
- Configuration manager, open with a sufficient authority level
-
The internal telephone number for the telephone configured on the PBX
-
Open the page Settings/functions > Basic settings.
- In the Internal number, enter the internal telephone number (MSN).
Important: Use each of the internal subscriber telephone numbers for only one of the devices.
- Click Execute.
Configuring MSN via Telephone Menu
Requirements:
– Knowledge of the telephone, its menu options and the required PIN, if necessary
- The internal telephone number for the telephone configured on the PBX
- Press the menu key and open the menu settings > def. settings > MSN.
- Enter the internal telephone number (MSN).
Important: Use each of the internal subscriber telephone numbers for only one of the devices.
- Press the softkey to save the entry.
Switching DHCP Client On/Off
If the DHCP client function has been enabled, the DHCP server automatically assigns the telephone an IP address.
Switching this on/off can be done as follows:
• Via the configuration manager
• Via the telephone menu
Switching DHCP Client On/Off via Configuration Manager
Requirements:
- Configuration manager, open with a sufficient authority level
- Open the page Administration > Server configuration.
-
Select or clear the Receive the IP address automatically (DHCP client) check box under Ethernet configuration.
Enables the DHCP client.
□ Disables the DHCP client. -
Click Execute.
Switching DHCP Client On/Off via Telephone Menu
Requirements:
– Knowledge of the telephone, its menu options and the required PIN, if necessary
- Press the menu key and open the menu settings > network > DHCP.
- Select or clear the DHCP check box.
Enables the DHCP client.
- Press the softkey to accept the setting.
Configuring Telephone IP Address
The IP address on the telephone is used to uniquely identify the telephone on the network.
The configuration can be made as follows:
• Via the configuration manager
• Via the telephone menu
Configuring Telephone IP Address via Configuration Manager
Requirements:
- Configuration manager, open with a sufficient authority level
-
Disabled DHCP client
-
Open the page Administration > Server configuration.
- In the IP address entry field under Ethernet configuration, enter the IP address of the gateway. The following entries are possible:
IP address with a range of 0 to 255 (example: 192.168.0.240)
- Click Execute.
Configuring Telephone IP Address via Telephone Menu
Requirements:
- Knowledge of the telephone, its menu options and the required PIN, if necessary
-
Disabled DHCP client
-
Press the menu key and open the menu settings > network > IP address.
- Enter the IP address of the telephone. The following entries are possible:
IP address with a range of 0 to 255 (example: 192.168.0.240)
- Press the softkey to save the entry.
Configuring Subnet Mask
The configuration can be made as follows:
• Via the configuration manager
• Via the telephone menu
Configuring Subnet Mask via Configuration Manager
Requirements:
- Configuration manager, open with a sufficient authority level
-
Disabled DHCP client
-
Open the page Administration > Server configuration.
- In the Sub-network mask entry field under Ethernet configuration, enter the subnet mask. The following entries are possible:
IP address with a range of 0 to 255 (example: 255.255.255.0)
- Click Execute.
Configuring Subnet Mask via Telephone Menu
Requirements:
– Knowledge of the telephone, its menu options and the required PIN, if necessary
- Disabled DHCP client
- Press the menu key and open the menu settings > network > network mask.
- Enter the subnet mask. The following entries are possible:
IP address with a range of 0 to 255 (example: 255.255.255.0)
- Press the softkey to save the entry.
Configuring Gateway
On gateway is a PC or router that is used as an intermediary between two (different) networks. The Internet service provider is the gateway for direct Internet dial-up connections. If you use a router, this is the gateway in a local network.
The configuration can be made as follows:
• Via the configuration manager
• Via the telephone menu
Configuring Gateway via Configuration Manager
Requirements:
- Configuration manager, open with a sufficient authority level
-
Disabled DHCP client
-
Open the page Administration > Server configuration.
- In the Gateway entry field under Ethernet configuration, enter the IP address of the gateway. The following entries are possible:
IP address with a range of 0 to 255 (example: 192.168.0.2)
- Click Execute.
Configuring Gateway via Telephone Menu
Requirements:
- Knowledge of the telephone, its menu options and the required PIN, if necessary
-
Disabled DHCP client
-
Press the menu key and open the menu settings > network > gateway.
- Enter the IP address of the gateway. The following entries are possible:
IP address with a range of 0 to 255 (example: 192.168.0.2)
- Press the softkey to save the entry.
Protection from Unauthorised Access
In order to prevent important settings from being changed accidentally or by unauthorised people, the telephone can be protected from unauthorised access.
The following authorisation levels are available:
- Administrator (access via admin PIN on the PBX)
- Sub-administrator (access via one of the four sub-admin PINs on the PBX)
- User (access via user PIN assigned to subscriber)
• Guests (unprotected access)
Note: Unprotected access as a guest is not possible via configuration manager, but only via telephone menu.
The PINs are transmitted from the PBX and cannot be changed in the telephone itself.
Configuring a Function Lock
The functions available in the function menu and key definition menu can be blocked from unauthorised use. The display of these restricted functions in the selection list requires entering the corresponding PIN after selecting additional at the end of the selection list.
Note: A function key defined with a restricted function cannot be used with out entering a PIN. This means that the administrator can, for example, enable the switching on/off of a specific call forwarding configuration via the function key even though the ability to configure any number of call forwarding configurations is restricted.
The configuration can be carried out as follows:
• Via the configuration manager
• Via the telephone menu
Configuring Function Lock via Configuration Manager
Requirements:
- Configuration manager, open with a sufficient authority level
- Open the page Settings/functions > Restrictions.
- Click the Telephone menu functions tab.
- Select one of the following options for the function to be blocked.
No restrictions: The function is not blocked.
Restrictions for guests: Blocks the function in question from guests.
Restrictions for guests and users: Blocks the function in question from guests and users.
Restrictions for guests, users and sub-administrators: Blocks the function in question from guests, users and sub-administrators.
If you would like to restrict all of the functions, select one of the following options under All - restricted for.
No restrictions: No function is blocked.
Restrictions for guests: Blocks all functions for guests.
Restrictions for guests and users: Blocks all functions for guests and users.
Restrictions for guests, users and sub-administrators: Blocks all functions for guests, users and sub-administrators.
4. Click Execute.
Configuring Function Lock via Telephone Menu
Requirements:
– Knowledge of the telephone, its menu options and the required PIN, if necessary
- Press the menu key and open the menu settings > blocking > function lock.
The o-ion indicates no blocking.
The •icon indicates that guests are blocked.
The •••on indicates that guests and users are blocked.
The •••on indicates that guests, users and sub-administrators are blocked.
- Select the function to be blocked.
The menu for restricting the selected function is opened.
- Enable one of the following options:
☑ Sub Admin: Blocks the function in question from guests, users and sub-administrators.
☑ user: Blocks the function in question from guests and users.
☑ guests: Blocks the function in question from guests.
☑ no blocking: The function is not blocked.
- Press the softkey to end the configuration for this function.
The modified settings are displayed, and you can select another function.
- Press the softkey to accept the setting.
Configuring Settings Lock
The settings that can be selected in the settings menu can be restricted from unauthorised use. The display of these restricted settings in the selection list requires entering the corresponding PIN after selecting additional at the end of the selection list.
The configuration can be carried out as follows:
• Via the configuration manager
• Via the telephone menu
Configuring Settings Lock via Configuration Manager
Requirements:
- Configuration manager, open with a sufficient authority level
- Open the page Settings/functions > Restrictions.
-
Click the Telephone menu settings tab.
-
Select one of the following options for the setting to be blocked.
No restrictions: The setting is not blocked.
Restrictions for guests: Blocks the setting in question from guests.
Restrictions for guests and users: Blocks the setting in question from guests and users.
Restrictions for guests, users and sub-administrators: Blocks the setting in question from guests, users and sub-administrators.
If you would like to restrict all of the settings, select one of the following options under All - restricted for.
No restrictions: No settings are blocked.
Restrictions for guests: Blocks all settings for guests.
Restrictions for guests and users: Blocks all settings for guests and users.
Restrictions for guests, users and sub-administrators: Blocks all settings for guests, users and sub-administrators.
- Click Execute.
Configuring Settings Lock via Telephone Menu
Requirements:
- Knowledge of the telephone, its menu options and the required PIN, if necessary
- Press the menu key and open the menu settings > blocking > settings lock.
The icon indicates no blocking.
The ••ion indicates that guests are blocked.
The •••on indicates that guests and users are blocked.
The •••on indicates that guests, users and sub-administrators are blocked.
- Select the setting to be blocked.
The menu for blocking the selected setting is opened.
- Enable one of the following options:
☑ Sub Admin: Blocks the setting in question from guests, users and sub-administrators.
☑ user: Blocks the setting in question from guests and users.
☑ guests: Blocks the setting in question from guests.
☑ no blocking: The setting is not blocked.
- Press the √ softkey to end the configuration for this setting.
The modified settings are displayed, and you can select another setting.
- Press the softkey to accept the setting.
Display and Backlight
Configuring the Language on Telephone
This setting specifies the language used on the telephone display.
The configuration can be made as follows:
• Via the configuration manager
• Via the telephone menu
Configuring the Language on Telephone via Configuration Manager
Requirements:
- Configuration manager, open with a sufficient authority level
- Open the page Settings/functions > Basic settings.
- Select the desired language in the Display language list field.
- Click Execute.
Configuring the Language on Telephone via Telephone Menu
Requirements:
– Knowledge of the telephone, its menu options and the required PIN, if necessary
- Press the Menu key and open the menu settings > def. settings > language.
Note: To open the language menu, you can also press the menu key, # and 0 in that order.
The con indicates the current setting.
- Select the desired display language.
Configuring Display Backlight
The display backlight on the telephone can be adapted according to individual work place requirements.
The configuration can be made as follows:
• Via the configuration manager
• Via the telephone menu
Configuring Display Backlight via Configuration Manager
Requirements:
- Configuration manager, open with a sufficient authority level
- Open the page Settings/functions > Display.
- Under Display backlight, select one of the following options:
automatically: As soon as a key is pressed, the receiver is picked up or the telephone is called, the backlight is switched on (brightness max.) and remains in this state afterwards for short transitional period. Otherwise, the backlight remains on a standby level (brightness min.).
permanently switched on during a call: In addition to the times available in the automatically selection, the backlight remains switched on for the entire duration of a call and afterwards for a short transitional period.
off: Switches off the backlight completely.
Note: The selection permanently switched on during a call and automatically selections require additional configuration of the brightness.
3. Click Execute.
Configuring Display Backlight via Telephone Menu
Requirements:
- Knowledge of the telephone, its menu options and the required PIN, if necessary
- Press the menu key and open the menu settings > display > display light.
The ♦con indicates the current setting.
- Select the desired option:
switch off: Switches off the backlight completely.
on during call: In addition to the times available in the automatically selection, the backlight remains switched on for the entire duration of a call and afterwards for a short transitional period.
automatically: As soon as a key is pressed, the receiver is picked up or the telephone is called, the backlight is switched on (brightness max.) and remains in this state afterwards for short transitional period. Otherwise, the backlight remains on a standby level (brightness min.).
Note: The selection on during call or automatically requires additional configuration of the brightness.
Configuring Brightness
The configuration can be made as follows:
• Via the telephone menu
Requirements:
– Knowledge of the telephone, its menu options and the required PIN, if necessary
– Generally enabled display backlight
-
Press the menu key and open the menu settings > display > brightness (min).
-
Press the - and + softkeys to configure the desired basic brightness on the display while the telephone is in the idle state.
-
Press the softkey to accept the setting.
-
Select brightness (max.).
-
Press the - and + softkeys to configure the desired brightness on the display for calls during operation.
-
Press the softkey to accept the setting.
Adjusting Contrast
The configuration can be made as follows:
• Via the telephone menu
Requirements:
– Knowledge of the telephone, its menu options and the required PIN, if necessary
- Press the menu key and open the menu settings > display > contrast.
- Press the - and + softkeys to configure the desired contrast.
- Press the softkey to accept the setting.
Switching the Inverse Display View On/Off
If the inverse display view is switched on, the text on the display is light-coloured and the background is dark.
Switching this on/off can be done as follows:
• Via the configuration manager
• Via the telephone menu
Switching Inverse Display View On/Off via Configuration Manager
Requirements:
- Configuration manager, open with a sufficient authority level
- Open the page Settings/functions > Display.
-
Select or clear the Inverse view check box.
☑ Enables the inverse display view function on the display.
☐ Disables the inverse display view function on the display. -
Click Execute.
Switching Inverse Display View On/Off via Telephone Menu
Requirements:
– Knowledge of the telephone, its menu options and the required PIN, if necessary
- Press the menu key and open the menu settings > display > inverse view.
- Select or clear the inverse view check box.
☑ Enables the inverse display view function on the display.
☐ Disables the inverse display view function on the display.
- Press the softkey to accept the setting.
Configuring Time Format
This setting specifies the format in which time is depicted on the display.
The configuration can be made as follows:
• Via the configuration manager
• Via the telephone menu
Configuring Time Format via Configuration Manager
Requirements:
- Configuration manager, open with a sufficient authority level
- Open the page Settings/functions > Display.
- Under Time format, select one of the following options:
HH.MM: Selects the time format in the order of hour, minute separated by a point.
HH:MM: Selects the time format in the order of hour, minute separated by a colon.
- Click Execute.
Configuring Time Format via Telephone Menu
Requirements:
– Knowledge of the telephone, its menu options and the required PIN, if necessary
- Press the menu key and open the menu settings > display > time format.
The icon indicates the current setting.
- Select one of the following options:
HH:MM: Selects the time format in the order of hour, minute separated by a colon.
HH.MM: Selects the time format in the order of hour, minute separated by a point.
Configuring Date Format
The date format selected here is displayed, for example, in the caller and calls lists. In the idle state, this format is modified as follows:
The month is depicted with three letters and the year is omitted (for example, 03. Jun).
The configuration can be made as follows:
• Via the configuration manager
• Via the telephone menu
Configuring Date format via Configuration Manager
Requirements:
- Configuration manager, open with a sufficient authority level
-
Open the page Settings/functions > Display.
-
Under Date format, select one of the following options:
DD.MM.YY: Selects the date format in the order of day, month, year separated by points.
DD/MM/YY: Selects the date format in the order of day, month, year separated by slashes.
DD-MM-YY: Selects the date format in the order of day, month, year separated by hyphens.
YY-MM-DD: Selects the date format in the order of year, month, day separated by hyphens.
- Click Execute.
Configuring Call Date Format via Telephone Menu
Requirements:
– Knowledge of the telephone, its menu options and the required PIN, if necessary
- Press the menu key and open the menu settings > display > date format.
The icon indicates the current setting.
- Select one of the following options:
DD.MM.YY: Selects the date format in the order of day, month, year separated by points.
DD/MM/YY: Selects the date format in the order of day, month, year separated by slashes.
DD-MM-YY: Selects the date format in the order of day, month, year separated by hyphens.
YY-MM-DD: Selects the date format in the order of year, month, day separated by hyphens.
Call Signalling
The system telephone can signal incoming calls as follows:
- Ring signal (the telephone rings with a configured ringer melody)
- Display message (text)
- Flashing LED above the hook key
- Display backlight
- Display backlight with flashing signal
Switching Ring Signal On/Off
If the ring signal is enabled, calls are acoustically signalled by a ring signal. If you don't want your environment to be disturbed by the ringer on the telephone, you can switch off the ring signal.
This function is different than the do-not-disturb function on the PBX in that calls are still possible. However, they are no longer signalled acoustically but rather visually.
Switching this on/off can be done as follows:
• Via the configuration manager
• Via the telephone menu
Switching Ring Signal On/Off via Configuration Manager
Requirements:
- Configuration manager, open with a sufficient authority level
-
Open the page Settings/functions > Signalling/ringer.
-
Select or clear the Ring signal check box.
Enables the ring signal.
□ Disables the ring signal.
- Click Execute.
Switching Ring Signal On/Off via Telephone Menu
Requirements:
- Knowledge of the telephone, its menu options and the required PIN, if necessary
- Press the menu key and open the menu functions > ringer tone.
The icon indicates the current setting.
- Select the desired option:
switch on: Enables the ring signal.
switch off: Disables the ring signal.
Configuring and Operating Function Key for Ring Signal
Press the key to switch the ring signal on or off or to switch it over.
Press the key during an incoming call to switch the ring signal on or off for this call or to switch it over.
In addition, when functions are defined on the first key level, the status of the function is indicated by the corresponding LED.
LED signalling next to the key:
Off The ring signal is enabled.
Red The ring signal is disabled.
The configuration can be carried out as follows:
• Via the configuration manager
• Via the telephone menu
Configuring Function Key for Ring Signal via Configuration Manager
Requirements:
- Configuration manager, open with a sufficient authority level
- Open the page Function keys > Assign function keys.
- Only available in installed extension modules: In the telephone displayed at the top left, click the key group in which you would like to define keys.
- Click one of the following tabs:
Level 1: Keys are defined on the first key level.
Level 2: Keys are defined on the second key level.
- In the list field next to the function key that you would like to define, select the function Ring signal.
The current settings for defining the key are displayed.
- In the Kind of switching list field, select one of the following options:
switch off: Press the key to disable the ring signal.
switch on: Press the key to enable the ring signal.
switch over: Press the key to switch the ring signal on and off.
- In the Key name entry field, enter a name for the key. The following entries are possible:
Up to 16 digits
Digits and characters
Note: The key name is used for printing the label.
- Click Execute.
Configuring Function Key for Ring Signal via Telephone Menu
Requirements:
– Knowledge of the telephone, its menu options and the required PIN, if necessary
- Press the menu key and open the define keys menu.
- Press the function key that you would like to define.
- Select the desired option:
first level: Keys are defined on the first key level.
second level: Keys are defined on the second key level.
The list of available functions is displayed.
- Select the ringer tone function.
The current settings for defining the key are shown on the display.
- Select the kind of switching. Press the ⬆ softkey to switch over between the different kinds of switching.
switch off: Press the key to disable the ring signal.
switch on: Press the key to enable the ring signal.
switch over: Press the key to switch the ring signal on and off.
- Press the softkey to accept the setting.
Switching Flashing Display Backlight for Call Signalling On/Off
If you don't want your environment to be disturbed by the ringer on the telephone, you can signal calls instead by having the display backlight flash (in addition to the other visual signals). Depending on the brightness in the room, this can be a highly noticeable visual signal.

Warning: Certain blinking frequencies can possibly trigger epileptic seizures. Those suffering from or in danger of epileptic seizures should therefore avoid using this function.
Switching this on/off can be done as follows:
• Via the configuration manager
• Via the telephone menu
Switching Call Signalling by Flashing Display Backlight On/Off via Configuration Manager
Requirements:
- Configuration manager, open with a sufficient authority level
-
Open the page Settings/functions > Signalling/ringer.
-
Select or clear the Call signal/light check box.
☑ Enables call signalling by a flashing display backlight.
☐ Disables call signalling by a flashing display backlight.
- Click Execute.
Switching Call Signalling by Flashing Display Backlight On/Off via Telephone Menu
Requirements:
– Knowledge of the telephone, its menu options and the required PIN, if necessary
-
Press the menu key and open the menu functions > call signal/light.
The con indicates the current setting. -
Select the desired option:
switch on: Enables call signalling by a flashing display backlight.
switch off: Disables call signalling by a flashing display backlight.
Configuring and Operating Function Key for Call Signalling by Flashing Display Backlight
Press the key while in the telephone's idle state to switch call signalling by the flashing display backlight on or off or to switch it over.
In addition, when functions are defined on the first key level, the status of the function is indicated by the corresponding LED.
LED signalling next to the key:
Off Call signalling by a flashing display backlight is disabled.
Red Call signalling by a flashing display backlight is enabled.
The configuration can be carried out as follows:
• Via the configuration manager
• Via the telephone menu
Configuring Function Key for Call Signalling by Flashing Display Backlight via Configuration Manager
Requirements:
- Configuration manager, open with a sufficient authority level
- Open the page Function keys > Assign function keys.
-
Only available in installed extension modules: In the telephone displayed at the top left, click the key group in which you would like to define keys.
-
Click one of the following tabs:
Level 1: Keys are defined on the first key level.
Level 2: Keys are defined on the second key level.
- In the list field next to the function key that you would like to define, select the call signal/light function.
The current settings for defining the key are displayed.
- In the Kind of switching list field, select one of the following options:
switch off: Press the key to switch call signalling by a flashing display backlight off.
switch on: Press the key to switch call signalling by a flashing display backlight on.
switch over: Press the key to switch call signalling by a flashing display backlight on and off.
- In the Key name entry field, enter a name for the key. The following entries are possible:
Up to 16 digits
Digits and characters
Note: The key name is used for printing the label.
- Click Execute.
Configuring Function Key for Call Signalling by Flashing Display Backlight via Telephone Menu
Requirements:
- Knowledge of the telephone, its menu options and the required PIN, if necessary
- Press the menu key and open the define keys menu.
- Press the function key that you would like to define.
- Select the desired option:
first level: Keys are defined on the first key level.
second level: Keys are defined on the second key level.
The list of available functions is displayed.
- Select the call signal/light function.
The current settings for defining the key are shown on the display.
- Select the kind of switching. Press the ⬆ softkey to switch over between the different kinds of switching.
switch off: Press the key to switch call signalling by a flashing display backlight off.
switch on: Press the key to switch call signalling by a flashing display backlight on.
switch over: Press the key to switch call signalling by a flashing display backlight on and off.
- Press the softkey to accept the setting.
Ringer Melodies
Determining Different Types of Calls
There are 16 different ringer melodies available to differentiate between types of calls. You can use the configuration manager to add additional WAV files to these ringer melodies.
The ringer melodies can be assigned to different kinds of calls, callers or call targets. You can make the assignments depending on what information you think is the most important.
Configure the settings as follows:
- If you would like to differentiate between the different kinds of calls by using different ringer melodies, configure the corresponding settings via the telephone menu or via the configuration manager. The following kinds of calls are available for this:
- Alarm calls
- External calls
- Internal calls
- Group calling (a call directed to a group)
- InterCom calls
- External callback calls
- Internal callback calls
- Scheduled calls
- Door calls
- Call deblocker calls (calls enabled despite do-not-disturb)
- Wake-up calls
-
Other calls
-
If you would like to differentiate between different callers using different ringer melodies, enter the telephone numbers of these people in a local telephone book and assign the contact in question a specific ringer melody (the prerequisite for this function is that the caller transmits his telephone number).
- If you would like to be notified, using different ringer melodies, which of your external telephone numbers the caller dialled, configure the corresponding settings via the configuration manager.
- If you would like to be notified, using different ringer melodies, which of your groups is being called by the caller, configure the corresponding settings via the configuration manager.
As external, internal and door terminal calls can be affected by more than one of these four settings, these types of calls are signaled based on a predetermined sequence (priority list). When this is done, the caller is always identified first. If no specific ringer melody has been configured for the caller, the external telephone number or group telephone number dialled by the caller is checked. If no specific ringer melody has been configured for this either, the ringer melody of the kind of call is used.
Priority List for External Calls
- The ringer melody defined in the telephone book, in as far as the caller can be identified as a telephone book entry
- For the ringer melody configured for the call type call deblocker, in as much as the caller can be identified even when he has do-not-disturb enabled as a part of a call deblocker
- For a ringer melody configured for a certain external telephone number, in as much as the telephone number was dialled by the caller
- For the ringer melody configured for a certain group telephone number, in as much as the group is called
- For the ringer melody configured for a certain call type group calling, in as much as a non-specified group is called
- For the ringer melody for the call type external calls
Priority List for Internal Calls
- The ringer melody defined in the telephone book, in as far as the caller can be identified as a telephone book entry
- For the ringer melody configured for a certain group telephone number, in as much as the group is called
- For the ringer melody configured for a certain call type group calling, in as much as a non-specified group is called
- For the ringer melody for the call type internal calls
Priority List for Door Terminal Calls
- The ringer melody defined in the telephone book, in as far as the door terminal can be identified as a telephone book entry
- For the ringer melody for the call type door call
Configuring Ringer Melodies
You have the option of assigning the several call types each a specific ringer melody via the telephone menu.
In addition to making call type-dependent assignments, the configuration manager can also be used to configure which ringer melody to assign to each of 10 separate external telephone numbers or groups depending on the number.
The configuration can be made as follows:
• Via the configuration manager
• Via the telephone menu
Configuring Call Type-dependent Ringer Melodies via Configuration Manager
Requirements:
- Configuration manager, open with a sufficient authority level
- Open the page Settings/functions > Signalling/ringer.
- Click the Ringer melodies (call type-dependent) tab.
- Select the desired ringer melody from the list field of call types in question.
Note: You can add your own ringer melodies to the list using a USB memory stick inserted into the USB port on the telephone. Open the page Answering machine > Data exchange and load any WAV files available in the ring tone directory on the USB memory stick.
- Click Execute.
Configuring Number-dependent Ringer Melodies via Configuration Manager
Requirements:
- Configuration manager, open with a sufficient authority level
- Open the page Settings/functions > Signalling/ringer.
-
Click the Ringer melodies (number-dependent) tab.
-
In the Group number 1 to Group number 10 entry field, enter the telephone numbers of the group and select the desired ringer melody from the list field.
Note: You can add your own ringer melodies to the list using a USB memory stick inserted into the USB port on the telephone. Open the page Answering machine > Data exchange and load any WAV files available in the ring tone directory on the USB memory stick.
-
In the External telephone numbers 1 to External telephone numbers 10 entry field, enter each of your external telephone numbers and select the desired ringer melody in the list field.
-
Click Execute.
Configuring Ringer Melodies via Telephone Menu
Requirements:
- Knowledge of the telephone, its menu options and the required PIN, if necessary
- Press the menu key and open the menu settings > signalling > ringer melody.
- Select the desired call type.
You hear the currently configured ringer melody. The associated name is shown in the display.
- Select the desired ringer melody.
You hear the displayed ringer melody to see if you like it.
- Press the softkey to accept the setting.
You now have option of configuring the ringer melody for another call type.
Changing Volume Automatically
You can increase and decrease the volume on the telephone automatically. The telephone starts to ring at the volume you configured and increases/decreases this every 5 seconds by one level until it reaches the maximum/minimal volume.
The change can be made as follows:
• Via the configuration manager
• Via the telephone menu
Changing Ringer Volume Automatically via Configuration Manager
Requirements:
- Configuration manager, open with a sufficient authority level
- Open the page Settings/functions > Signalling/ringer.
- Under Ringer volume, select one of the following options:
constant ringer volume: Selects a steady volume during the entire calling phase.
increase the ringer volume automatically: Selects an automatic increase in the volume during the calling phase.
reduce the ringer volume automatically: Selects an automatic decrease in the volume during the calling phase.
single tone: Selects a single quiet tone instead of the ringer melodies configured.
3. Click Execute.
Changing Ringer Volume Automatically via Telephone Menu
Requirements:
– Knowledge of the telephone, its menu options and the required PIN, if necessary
-
Press the menu key and open the menu settings > signalling > ringer volume.
The ●con indicates the current setting. -
Select the desired option:
steady: Selects a steady volume during the entire calling phase.
autom.increase: Selects an automatic increase in the volume during the calling phase.
auto-reduction: Selects an automatic decrease in the volume during the calling phase.
single ringtone: Selects a single quiet tone instead of the ringer melodies configured.
Call Charges
To calculate call charges, the currency of the country as well as the cost per call unit must be configured in the configuration manager.
Configuring Currency
The configuration can be made as follows:
• Via the configuration manager
Requirements:
– An open configuration manager
- Open the page Settings/functions > Basic settings.
- In the Currency (max. 3 characters) entry field, enter the currency for the charge function on the telephone that should be used. The following entries are possible:
Up to 3 digits - Click Execute.
Configuring Cost per Call Unit
The configuration can be made as follows:
• Via the configuration manager
Requirements:
- An open configuration manager
-
Open the page Settings/functions > Basic settings.
-
In the Cost per call unit (0-9999 currency subunits) entry field, enter the cost per call unit. The following entries are possible:
Up to 4 digits
Digits, for example, 6 for 6 cent
Note: If you configure your telephone as room telephone, the value for cost per call unit should match the value configured in the PBX. Otherwise misunderstandings might occur regarding final invoice because the value configured in the PBX is used for calculating the cost of calls.
- Click Execute.
Receiver and Headset
Adjusting Receiver Volume
Whenever necessary, the microphone volume of the receiver can be increased or decreased.
The adjustment can be done as follows:
• Via the telephone menu
Requirements:
– Knowledge of the telephone and its menu options
- Press the menu key and open the menu settings > def. settings > receiver volume.
- Press the - and + softkeys to configure the desired microphone volume.
- Press the softkey to accept the setting.
Switching Headset Operation On/Off
If you have connected a headset to your system telephone and selected it, you can switch between receiver and headset operation.
Switching this on/off can be done as follows:
• Via the telephone menu
Requirements:
– Knowledge of the telephone, its menu options and the required PIN, if necessary
In order to switch headset operation on and off, press the function key configured for a headset.
Or, proceed as described in the following.
- Press the menu key and open the menu functions > headset.
The ●con indicates the current setting.
- Select the desired option:
switch on: Enables headset operation.
switch off: Enables headset operation.
Further steps:
- If required, switch the automatic call acceptance on.
Configuring and Operating Function Key for Headset Operation
Press the key to switch headset operation on or off or to switch it over.
In addition, when functions are defined on the first key level, the status of the function is indicated by the corresponding LED.
LED signalling next to the key:
Green Headset operation is enabled.
Off Headset operation is disabled.
The configuration can be carried out as follows:
• Via the configuration manager
• Via the telephone menu
Configuring Function Key for Headset Operation via Configuration Manager
Requirements:
- Configuration manager, open with a sufficient authority level
- Open the page Function keys > Assign function keys.
-
Only available in installed extension modules: In the telephone displayed at the top left, click the key group in which you would like to define keys.
-
Click one of the following tabs:
Level 1: Keys are defined on the first key level.
Level 2: Keys are defined on the second key level.
- In the list field next to the function key that you would like to define, select the function Headset.
The current settings for defining the key are displayed.
- In the Kind of switching list field, select one of the following options:
switch off: Enables headset operation.
switch on: Enables headset operation.
switch over: Pressing the key switches headset operation on and off.
- In the Key name entry field, enter a name for the key. The following entries are possible:
Up to 16 digits
Digits and characters
Note: The key name is used for printing the label.
- Click Execute.
Configuring Function Key for Headset Operation via Telephone Menu
Requirements:
– Knowledge of the telephone, its menu options and the required PIN, if necessary
- Press the menu key and open the define keys menu.
- Press the function key that you would like to define.
- Select the desired option:
first level: Keys are defined on the first key level.
second level: Keys are defined on the second key level.
The list of available functions is displayed.
- Select the headset function.
The current settings for defining the key are shown on the display.
- Select the kind of switching. Press the ⬆ softkey to switch over between the different kinds of switching.
switch off: Enables headset operation.
switch on: Enables headset operation.
switch over: Pressing the key switches headset operation on and off.
- Press the softkey to accept the setting.
Configuring Headset Type
If a headset is connected, the headset type used must be configured.
The configuration can be made as follows:
• Via the configuration manager
• Via the telephone menu
Configuring Headset Type via Configuration Manager
Requirements:
- Configuration manager, open with a sufficient authority level
- Open the page Settings/functions > Headset.
- Under Type of headset, select one of the following options.
cable headset: Selects the cable-connected headset type.
DHSG headset: Selects the wireless headset type with a DHSG interface. - Click Execute.
Configuring Headset Type via Telephone Menu
Requirements:
– Knowledge of the telephone, its menu options and the required PIN, if necessary
-
Press the menu key and open the menu settings > headset > headset type.
The ●con indicates the current setting. -
Select the desired option:
wired headset: Selects the cable-connected headset type.
DHSG headset: Selects the wireless headset type with a DHSG interface.
Switching Headset Ringing On/Off
During headset operation (headset switched on), three types of call signalling are possible:
- Ringing through the loud speaker (as for receiver operation)
- Ringing through the loud speaker + a short attention tone on the headset
- Short attention tone on the headset
For the second and third operating mode, headset ringing must be switched on as described here. For the third operating mode, the ringer must also be switched off.
Switching this on/off can be done as follows:
• Via the configuration manager
• Via the telephone menu
Configuring Headset Ringing via Configuration Manager
Requirements:
- Configuration manager, open with a sufficient authority level
- Open the page Settings/functions > Headset.
-
Select or clear the Headset ringing check box under Headset.
☒ Enables the headset ringer.
□ Disables the headset ringer. -
Click Execute.
Switching Headset Ringing On/Off via Telephone Menu
Requirements:
- Knowledge of the telephone, its menu options and the required PIN, if necessary
- Press the menu key and open the menu settings > headset > headset ringer.
- Select or clear the headset ringer check box.
☑ Enables the headset ringer.
□ Disables the headset ringer.
- Press the softkey to accept the setting.
Adjusting Headset Volume
Whenever necessary, the headset volume can be used to adjust the microphone amplifier on the connected headset upwards (if your communication partner cannot understand you) or downwards (if speech is distorted).
The adjustment can be done as follows:
• Via the telephone menu
Requirements:
– Knowledge of the telephone and its menu options
- Press the menu key and open the menu settings > headset > headset volume.
- Press the - and + softkeys to configure the desired microphone volume.
- Press the softkey to accept the setting.
Switching Echo Reduction On/Off
If the echo reduction is switched on, echos and hall effects occurring during receiver and/or headset operation are reduced. If this is not the case after switching echo reduction on or if other disturbing effects occur you should switch off echo reduction.
Switching this on/off can be done as follows:
• Via the configuration manager
• Via the telephone menu
Switching Echo Reduction On/Off via Configuration Manager
Requirements:
- Configuration manager, open with a sufficient authority level
- Open the page Settings/functions > Basic settings.
- Select or clear the Echo reduction check box.
Enables echo reduction.
□ Disables echo reduction.
- Click Execute.
Switching Echo Reduction On/Off via Telephone Menu
Requirements:
– Knowledge of the telephone, its menu options and the required PIN, if necessary
- Press the menu key and open the menu settings > def. settings > echo reduction.
- Select or clear the echo reduction check box.
Enables echo reduction.
□ Disables echo reduction.
- Press the softkey to accept the setting.
Menu and Function Keys
Restricting Menu Selection
You can adapt the function menu to your own needs. If you would like to only use some of the functions available, you can hide the remaining functions in order to shorten the menu selection. Hiding applies only to the function menu. If the functions in question are also available over a different path, for example, via the key definition menu or an already defined key, this remains available.
The restriction can be carried out as follows:
• Via the telephone menu
Requirements:
– Knowledge of the telephone, its menu options and the required PIN, if necessary
- Press the menu key and open the menu functions > user settings > menu definition.
- Enable or disable the desired function.
☑ The function in question is shown on the display.
☐ The function in question is not shown on the display.
- Press the softkey to accept the setting.
Configuring Accessibility of Second Key Level
The freely programmable function keys can each be defined twice (on two levels). Here, you configure how the second level of the function keys should be operated. The variant Second level via shift key is always enabled. If you would like to use this, you must define one of your function keys with the shift function. The variant Second level via double-click (300 ms) can be disabled if it is not needed.
The configuration can be made as follows:
• Via the configuration manager
• Via the telephone menu
Configuring Accessibility of Second Key Level via Configuration Manager
Requirements:
- Configuration manager, open with a sufficient authority level
- Open the page Settings/functions > User settings.
-
Select or clear the Second-level function via double keypress check box.
☑ Enables pressing the key twice to access the second level.
☐ Disables pressing the key twice to access the second level. -
Click Execute.
Configuring Accessibility of Second Key Level via Telephone Menu
Requirements:
– Knowledge of the telephone, its menu options and the required PIN, if necessary
- Press the menu key and open the menu functions > user settings > keys 2nd level.
-
Select or clear the double click check box.
☑ Enables pressing the key twice to access the second level.
☐ Disables pressing the key twice to access the second level. -
Press the softkey to accept the setting.
In addition the status of the function is indicated by the corresponding LED.
LED signalling next to the key:
Red The second key level is accessible.
Off The first key level is accessible.
The configuration can be carried out as follows:
• Via the configuration manager
• Via the telephone menu
Configuring Function Key for Shift via Configuration Manager
Requirements:
- An open configuration manager
- Open the page Function keys > Assign function keys.
- Only available in installed extension modules: In the telephone displayed at the top left, click the key group in which you would like to define keys.
- Click Level 1.
Important: Configuring this function is only possible on the first level. The second level is then blocked. If a function has been assigned to the second level, it is deleted.
- In the list field next to the function key that you would like to define, select the Shift function.
The current settings for defining the key are displayed.
- In the Key name entry field, enter a name for the key. The following entries are possible:
Up to 16 digits
Digits and characters
Note: The key name is used for printing the label.
- Click Execute.
Configuring Function Key for Shift via Telephone Menu
Requirements:
– Knowledge of the telephone and its menu options
- Press the menu key and open the define keys menu.
- Press the function key that you would like to define.
- Select first level.
Important: Configuring this function is only possible on the first level. The second level is then blocked. If a function has been assigned to the second level, it is deleted.
The list of available functions is displayed.
- Select the shift function.
The current settings for defining the key are shown on the display.
- Press the softkey to accept the setting.
Exchanging or Moving Function Keys
The exchanging/moving procedure can be carried out as follows:
• Via the configuration manager
Requirements:
- An open configuration manager
- Open the page Function keys > Exchange/move.
- Click the function key field that you would like to move, copy or exchange.
The field is selected.
- Click one of the following options:
Move: Moves the selected function key after clicking the target field.
Copy: Copies the selected function key after clicking the target field.
Exchange: Exchanges the selected function key after clicking the target field.
Cancel: Cancels the operation.
- Click the target field to which the selected function key should be moved/copied or with which the function key should be exchanged.
Printing Lettering Labels
The printout can be made as follows:
• Via the configuration manager
Requirements:
- An open configuration manager
- Open the page Function keys > Key printout.
- Select the colour of your telephone under Colour recommendation.
- Under Individual colour selection, select the desired colours each for the text on level 1 and 2, the background of level 1 and 2 as well as for the frame.
To select a colour, click the coloured check box to the right next to each selection. A window with a colour palette open where you can choose the colour you would like.
- Select or clear the Centre justify text check box under Individual colour selection.
☑ Enables centre justified text.
□ Disables centre justified text.
Important: To be able to print out the background colours for the lettering labels, you need to enable the corresponding function in your browser. In Internet Explorer select the option Print background colors and images
under Tools > Internet options > Advanced (Scroll downwards to the end of the page to find the option). In Mozilla Firefox select the option Print Background (colors & images) under File > Page Setup).
- Click Execute.
- Click Printing.
You can print your lettering label.
Note: If you use Mozilla Firefox, under File > Page Setup, the Shrink To Fit Page Width check box must be cleared to the lettering labels from being reduced during printing.
VoIP Provider
The PBX displays the VoIP provider on the telephone. This VoIP provider cannot be modified.
Configuring Registrar
The registrar is the IP address or URL of the PBX that the telephone is registered with.
The configuration can be made as follows:
• Via the configuration manager
• Via the telephone menu
Configuring Registrar via Configuration Manager
Requirements:
- Configuration manager, open with a sufficient authority level
- Open the page Voice over IP > VoIP provider.
- click Configure.
- In the Registrar entry field, enter the registrar. The following entries are possible:
IP address with a range of 0 to 255 (example: 111.222.125.6)
URL (example: www.registrar.de) - Click Execute.
Configuring Registrar via Telephone Menu
Requirements:
– Knowledge of the telephone, its menu options and the required PIN, if necessary
-
Press the menu key and open the menu settings > VoIP > provider > Registrar.
-
Enter the registrar. The following entries are possible:
IP address with a range of 0 to 255 (example: 111.222.125.6)
URL (example: www.registrar.de)
- Press the softkey to save the entry.
Configuring Registration Time
The registration time indicates after how many minutes, the telephone reregisters itself with the VoIP provider.
If the telephone is being put into operation for the first time, it is recommended that a small value, for example, 5 minutes be configured for the registration time.
The configuration can be made as follows:
• Via the configuration manager
• Via the telephone menu
Configuring Registration Time via Configuration Manager
Requirements:
- Configuration manager, open with a sufficient authority level
- Open the page Voice over IP > VoIP provider.
- Click Configure.
- In the Time lapse for the registration entry field, enter a value. The following entries are possible:
1 to 60: The telephone registers itself with the VoIP provider after 1 to 60 minutes, depending on the entry. - Click Execute.
Configuring Registration Time via Telephone Menu
Requirements:
- Knowledge of the telephone, its menu options and the required PIN, if necessary
- Press the menu key and open the menu settings >VoIP > provider > registr. time.
- Enter a value. The following entries are possible:
1 to 60: The telephone registers itself every 1 to 60 minutes, depending on the entry. - Press the softkey to save the entry.
Configuring STUN Server for Operation as External Private Branch Exchange
In order to operate a COMfortel VoIP 2500 AB system telephone as an external private branch exchange, it must either be connected to the PBX network via a VPN/ VLAN tunnel or the telephone and the PBX must establish the connection via a publicly accessible STUN server on the Internet.
Important:
For security reasons, the connection of external private branch exchanges by means of a VPN tunnel should be preferred.
As a protection measure against the access by third parties, regularly check the call data recording of your PBX and the LOGs of your NAT router for inconsistencies.
The configuration can be made as follows:
• Via the configuration manager
• Via the telephone menu
Configuring STUN Server for Operation as External Private Branch Exchange via Configuration Manager
Requirements:
- Configuration manager, open with a sufficient authority level
- Open the page Voice over IP > VoIP provider.
- Click Configure.
- Select or clear the STUN server check box.
☑ Enables the STUN server.
☐ Disables the STUN server. (No other action is required.)
- In the IP address or URL entry field, enter the STUN server. The following entries are possible:
IP address with a range of 0 to 255 (example: 103.103.103.103)
URL (example: www.stunserver.de)
- In the Port entry field, enter the associated port number (port). The following entries are possible:
1 to 65535
- In the Interval for STUN server query entry field, enter a value. The following entries are possible:
1 to 60: A STUN server query takes place every 1 to 60 minutes, depending on the entry.
- Click Execute.
Configuring STUN Server for Operation as External Private Branch Exchange via Telephone Menu
Requirements:
– Knowledge of the telephone, its menu options and the required PIN, if necessary
-
Press the menu key and open the menu settings > VoIP > provider > STUN activation.
-
Select or clear the STUN activation check box.
Enables the STUN server.
☐ Disables the STUN server. (No other action is required.)
- Open the STUN address menu and enter the STUN server. The following entries are possible:
IP address with a range of 0 to 255 (example: 103.103.103.103)
URL (example: www.stunserver.de)
- Press the softkey to save the entry.
- Open the STUN port menu and enter the associated port number (port). The following entries are possible:
1 to 65535
- Press the softkey to save the entry.
- Open the STUN interval menu and enter the interval for STUN server queries. The following entries are possible:
1 to 60: A STUN server query takes place every 1 to 60 minutes, depending on the entry.
- Press the softkey to save the entry.
Configuring Interval for NAT Keep Alive
The interval for NAT keep alive indicates the number of seconds after which NAT keep alive packages are sent in order to maintain NAT mapping in the firewall.
The configuration can be made as follows:
• Via the configuration manager
• Via the telephone menu
Configuring Interval for NAT Keep Alive via Configuration Manager
Requirements:
- Configuration manager, open with a sufficient authority level
- Open the page Voice over IP > VoIP provider.
- Click Configure.
-
Select or clear the Interval for NAT Keep Alive check box.
Enables NAT keep alive.
□ Disables NAT keep alive. (No other action is required.) -
In the Interval for NAT Keep Alive entry field, enter a value. The following entries are possible:
1 to 255: NAT keep alive packages are sent every 1 to 255 seconds, depending on the entry.
- Click Execute.
Configuring Interval for NAT Keep Alive via Telephone Menu
Requirements:
– Knowledge of the telephone, its menu options and the required PIN, if necessary
-
Press the menu key and open the menu settings > VoIP > provider > use NATKA.
The ●con indicates the current setting. -
Select the desired option:
switch on: Enables NAT keep alive.
switch off: Disables NAT keep alive. (No other action is required.)
- Open the NAT keep alive menu and enter the interval for NAT keep alive. The following entries are possible:
1 to 255: NAT keep alive packages are sent every 1 to 255 seconds, depending on the entry.
- Press the softkey to save the entry.
Configuring Outbound Proxy
The outbound proxy is the destination of all requests (except registration).
The configuration can be made as follows:
• Via the configuration manager
• Via the telephone menu
Configuring Outbound Proxy via Configuration Manager
Requirements:
- Configuration manager, open with a sufficient authority level
- Open the page Voice over IP > VoIP provider.
- Click Configure.
-
Under Outbound proxy, select one of the following options:
deactivated: Disables the outbound proxy. (No other action is required.)
automatically: Accepts the outbound proxy configured in the PBX. (No other action is required.)
manually: Permits an outbound proxy to be entered. -
In the manually entry field under Outbound proxy, enter the outbound proxy. The following entries are possible:
IP address with a range of 0 to 255 (example: 123.123.123.123)
URL (example: www.outboundproxy.de)
- In the Port entry field under Outbound proxy, enter the associated port number (port). The following entries are possible:
1 to 65535
- Click Execute.
Configuring Outbound Proxy via Telephone Menu
Requirements:
– Knowledge of the telephone, its menu options and the required PIN, if necessary
- Press the menu key and open the menu settings > VoIP > provider > outbound proxy.
The icon indicates the current setting.
- Select the desired option:
switch off: Disables the outbound proxy. (No other action is required.)
automatic: Accepts the outbound proxy configured in the PBX. (No other action is required.)
manual: Permits an outbound proxy to be entered.
- Open the proxy address menu and enter the outbound proxy. The following entries are possible:
IP address with a range of 0 to 255 (example: 123.123.123.123)
URL (example: www.outboundproxy.de)
-
Press the softkey to save the entry.
-
Open the proxy port menu and enter the associated port number (port). The following entries are possible:
1 to 65535
- Press the softkey to save the entry.
Configuring Jitter Buffer Size
The jitter buffer size indicates how many RTP packages can be buffered to bypass or compensate interferences.
The configuration can be made as follows:
• Via the configuration manager
• Via the telephone menu
Configuring Jitter Buffer Size via Configuration Manager
Requirements:
- Configuration manager, open with a sufficient authority level
- Open the page Voice over IP > VoIP provider.
- Click Configure.
- In the Jitter buffer entry field, enter a value. The following entries are possible:
40 to 160: Jitter buffer size in milliseconds (duration of the audio signal).
Small values: A small number of RTP packages can be buffered to bypass or compensate interferences.
High values: A large number of RTP packages can be buffered to bypass or compensate interferences.
- Click Execute.
Configuring Jitter Buffer Size via Telephone Menu
Requirements:
- Knowledge of the telephone, its menu options and the required PIN, if necessary
- Press the menu key and open the menu settings > VoIP > provider > jitter buffer.
- Enter a value. The following entries are possible:
40 to 160: Jitter buffer size in milliseconds (duration of the audio signal).
Small values: A small number of RTP packages can be buffered to bypass or compensate interferences.
High values: A large number of RTP packages can be buffered to bypass or compensate interferences.
- Press the softkey, to save the entry.
Configuring Codecs
Codecs G.722, G.711 and iLBC can be used for data transmission. Codec selection affects the quality of a VoIP call. Depending on the connection bandwidth, codecs with the best possible VoIP call quality or codecs with high compression (low bandwidth) can be configured.
The codec actually used for a call is not specified until the codec is negotiated with the VoIP provider.
Note: Not every codec is supported by every provider.
The configuration can be made as follows:
• Via the configuration manager
• Via the telephone menu
Configuring Codecs via Configuration Manager
Requirements:
- Configuration manager, open with a sufficient authority level
- Open the page Voice over IP > VoIP provider.
- Click Configure.
- Under Codec, select one of the following options:
Best available quality: The G.722 codec has priority level 1, the G.711 codec has priority level 2 and the iLBC codec has priority level 3.
Best possible compression: The iLBC codec has priority level 1, the G.722 codec has priority level 2 and the G.711 codec has priority level 3. - Click Execute.
Configuring Codecs via Telephone Menu
Requirements:
- Knowledge of the telephone, its menu options and the required PIN, if necessary
- Press the menu key and open the menu settings > VoIP > provider > codec.
The ♦con indicates the current setting.
- Select one of the following options:
best avail. qual.: The G.722 codec has priority level 1, the G.711 codec has priority level 2 and the iLBC codec has priority level 3.
best poss. compr.: The iLBC codec has priority level 1, the G.722 codec has priority level 2 and the G.711 codec has priority level 3.
Configuring the SIP Transport Protocol
The SIP transport protocol indicates which protocol is used for the SIP transfer.
Configuration can be carried out as follows:
• Via the configuration manager
• Via the telephone menu
Configuring the SIP Transport Protocol via Configuration Manager
Requirements:
- Configuration manager, open with a sufficient authority level
- Open the page Voice over IP > VoIP provider.
- Click Configure.
- Under SIP transport protocol, select one of the following options:
UDP: Selects UDP as the SIP transport protocol.
TCP: Selects TCP as the SIP transport protocol. - Click Execute.
Configuring the SIP Transport Protocol via Telephone Menu
Requirements:
– Knowledge of the telephone, its menu options and the required PIN, if necessary
- Press the menu key and open the menu settings > VoIP > provider > ???. The icon indicates the current setting.
- Select the desired option: UDP: Selects UDP as the SIP transport protocol. TCP: Selects TCP as the SIP transport protocol.
Configuring SIP Port
The configuration can be made as follows:
• Via the configuration manager
• Via the telephone menu
Configuring SIP Port via Configuration Manager
Requirements:
- Configuration manager, open with a sufficient authority level
- Open the page Voice over IP > VoIP provider.
- Click Configure.
- In the SIP Port (1...65535) entry field, enter the SIP port. The following entries are possible:
1 to 65535 - Click Execute.
Configuring SIP Port via Telephone Menu
Requirements:
– Knowledge of the telephone, its menu options and the required PIN, if necessary
- Press the menu key and open the menu settings > VoIP > provider > SIP port.
- Enter the SIP port. The following entries are possible:
1 to 65535 - Press the softkey to save the entry.
Configuring DTMF
You can configure if DTMF signals are transmitted via the VoIP module of the PBX or with the speech data of the telephone.
The configuration can be carried out as follows:
• Via the configuration manager
• Via the telephone menu
Configuring DTMF via Configuration Manager
Requirements:
- Configuration manager, open with a sufficient authority level
- Open the page Voice over IP > VoIP provider.
- Click Configure.
- In the DTMF list field, select one of the following options:
DTMF outband without confirmation tone: The DTMF signals are transmitted via the VoIP module of the PBX. You can hear no confirmation tone.
DTMF outband with confirmation tone (approx. 425 Hz): The DTMF signals are transmitted via the VoIP module of the PBX. You can hear a confirmation tone.
DTMF inband: The DTMF signals are transmitted with the speech data of the telephone.
Note: When you select DTMF outband without confirmation tone or DTMF outband with confirmation tone a VoIP module has to be installed in the PBX.
4. Click Execute.
Configuring DTMF via Telephone Menu
Requirements:
- Knowledge of the telephone, its menu options and the required PIN, if necessary
- Press the menu key and open the menu settings > VoIP > provider > DTMF. The ●con indicates the current setting.
- Select the desired option:
DTMF-outband: The DTMF signals are transmitted via the VoIP module of the PBX. You can hear no confirmation tone.
DTMF-outb.(tone): The DTMF signals are transmitted via the VoIP module of the PBX. You can hear a confirmation tone.
DTMF-inband: The DTMF signals are transmitted with the speech data of the telephone.
Note: When you select DTMF-outband or DTMF-outb.(tone) a VoIP module has to be installed in the PBX.
Storing Root Certificate of the PBX in the Telephone
The root certificate can be transmitted automatically to the VoIP system telephones via UDP. This automated transmission of the certificate requires IP fragmenting. Some routers do not support fragmenting. For this reason, problems may occur during transmission to external private branch exchanges. In this case, the certificate should be stored manually in the corresponding external private branch exchanges.
The saving procedure can be carried out as follows:
• Via the configuration manager
Requirements:
- Configuration manager, open with a sufficient authority level
-
The firmware file saved on the hard drive (*.pem)
-
Open the page Voice over IP > VoIP provider.
- Click configure.
- Under Root certificate click Browse (this text is dependent on the operating system used).
A file selection dialogue opens.
- Select the file you want (*.pem) and click Open (this text is dependent on the operating system used).
The path and the file name are displayed in the File field.
- Click Store in the telephone.
Further steps:
– Enter the corresponding fingerprint.
Configuring Fingerprint of Certificate
When you have saved a root certificate in the PBX to encrypt internal calls, this root certificate is automatically transmitted to the telephone. To verify the certificate, you have to enter the fingerprint into the telephone.
The configuration can be made as follows:
• Via the configuration manager
• Via the telephone menu
Configuring Fingerprint of Certificate via Configuration Manager
Requirements:
- Configuration manager, open with a sufficient authority level
-
Root certificate saved in the PBX
-
Open the page Voice over IP > VoIP provider.
- Click Configure.
- In the Fingerprint of Certificate entry field, enter the fingerprint of the root certificate of the PBX.
- Click Execute.
Configuring Fingerprint of Certificate via Telephone Menu
Requirements:
- Knowledge of the telephone, its menu options and the required PIN, if necessary
-
Root certificate saved in the PBX
-
Press the menu key and open the menu settings > VoIP > provider > fingerprint.
- Enter the fingerprint of the certificate.
- Press the softkey to save the entry.
VoIP Accounts
To get the access data needed for VoIP calls, accounts have to be set up from one or several VoIP providers. To do this, a registration with name and address data has to be done on the website of a provider. Afterwards, one or several telephone numbers which are available on the fixed network and the Internet as well as an account with user name and password are assigned. In the majority of cases the registered account is available within a few minutes and can be used very soon.
A VoIP account can be configured on a telephone. The VoIP account is the prerequisite for communicating with the PBX and should therefore not be changed.
The following entries are necessary:
- User name (internal telephone number on the telephone)
Note: In addition, the internal telephone number (MSN) is configured via the configuration manager under Settings/functions > Basic settings or via the telephone menu under settings > def. settings > MSN.
- Password (the user PIN of the telephone entered in the PBX configuration)
Configuring VoIP Accounts
The configuration can be carried out as follows:
• Via the configuration manager
• Via the telephone menu
Configuring VoIP Accounts via Configuration Manager
Requirements:
- Configuration manager, open with a sufficient authority level
-
The internal telephone number for the telephone configured on the PBX
-
Open the page Voice over IP > VoIP accounts.
- In the User name (*), enter the internal telephone number (MSN).
Note: The internal number (MSN) entered is also saved under Settings/functions > Basic settings.
- In the Password (*) entry field, enter the user PIN.
If no user PIN for the telephone has been entered in the PBX configuration, leave the entry field empty.
- Click Execute.
Configuring VoIP Accounts via Telephone Menu
Requirements:
- Knowledge of the telephone, its menu options and the required PIN, if necessary
-
The internal telephone number for the telephone configured on the PBX
-
Press the menu key and open the menu settings > VoIP > account > user name.
- Enter the internal telephone number (MSN).
- Press the softkey to save the entry.
Note: The internal number (MSN) entered is also saved under settings > def. settings > MSN.
- Open the password menu and enter the user PIN saved in the telephone into the PBX configuration.
If no user PIN for the telephone has been entered in the PBX configuration, leave the entry field empty.
- Press the softkey to save the entry.
Internet Access
In order to carry out Voice over IP, the telephone must be prepared for Internet access by configuring a few settings.
Configuring DNS Server
The DNS server is required for Internet access (for example, for Voice over IP or Online name search). The data is specified by the Internet service provider or system administrator of the network.
The configuration can be made as follows:
• Via the configuration manager
• Via the telephone menu
Configuring DNS Server via Configuration Manager
Requirements:
- Configuration manager, open with a sufficient authority level
- Open the page Administration > Server configuration.
- In the First DNS server and Second DNS server entry fields under DNS configuration, enter the IP address for each of the DNS servers. The following entries are possible:
IP address with a range of 0 to 255 (example: 192.168.0.12) - Click Execute.
Configuring DNS Server via Telephone Menu
Requirements:
- Knowledge of the telephone, its menu options and the required PIN, if necessary
- Press the menu key and open the menu settings > network > DNS server 1.
- Enter the IP address of the DNS server. The following entries are possible: IP address with a range of 0 to 255 (example: 192.168.0.240)
- Press the softkey to save the entry.
- If you would like to configure a second DNS server, open the DNS server 2 menu.
- Enter the IP address of the DNS server. The following entries are possible: IP address with a range of 0 to 255 (example: 192.168.0.240)
- Press the softkey to save the entry.
Configuring HTTP Proxy
The HTTP proxy is a proxy for the HTTP protocol. Via this protocol Internet pages are retrieved and files downloaded.
In the system telephone the HTTP proxy is needed for firmware updates via the update server, for example.
The configuration can be made as follows:
• Via the configuration manager
• Via the telephone menu
Configuring HTTP Proxy via Configuration Manager
Requirements:
- Configuration manager, open with a sufficient authority level
-
Open the page Administration > Server configuration.
-
In the HTTP proxy list field under HTTP proxy configuration, select one of the following options:
off: Disables the HTTP proxy. (No other action is required.)
automatically: Accepts the HTTP proxy configured in the PBX. (No other action is required.)
manual: Permits an HTTP proxy to be entered.
- In the IP address or URL entry field under HTTP proxy configuration, enter the HTTP proxy. The following entries are possible
IP address with a range of 0 to 255 (example: 123.123.123.123)
URL (example: www.proxyserver.de)
- In the Port entry field under HTTP proxy configuration, enter the associated port number (port). The following entries are possible:
1 to 65535
- Select or clear the Proxy authorisation check box under HTTP proxy configuration.
☑ Enables the proxy authorisation.
☐ Disables the Proxy authorisation. (No other action is required.)
- In the User name entry field under HTTP proxy configuration, enter the user name for the authorisation into the HTTP proxy.
- In the Password entry field under HTTP proxy configuration, enter the password for the authorisation into the HTTP proxy.
- Click Execute.
Configuring HTTP Proxy via Telephone Menu
Requirements:
- Knowledge of the telephone, its menu options and the required PIN, if necessary
- Press the menu key and open the menu settings > network > HTTP proxy.
The ●con indicates the current setting.
- Select the desired option:
switch off: Disables the HTTP proxy. (No other action is required.)
automatic: Accepts the HTTP proxy configured in the PBX. (No other action is required.)
manual: Permits an HTTP proxy to be entered.
- Open the proxy address menu and enter the HTTP proxy. The following entries are possible:
IP address with a range of 0 to 255 (example: 123.123.123.123)
URL (example: www.proxyserver.de)
-
Press the softkey to save the entry.
-
Open the proxy port menu and enter the associated port number (port). The following entries are possible:
1 to 65535
-
Press the softkey to save the entry.
-
Open the proxy authorisation menu and select or clear the proxy authorisation check box.
☑ Enables the proxy authorisation.
□ Disables the Proxy authorisation. (No other action is required.)
-
Press the softkey to save the setting.
-
Open the proxy user name and enter the user name for the authorisation into the HTTP proxy.
-
Press the softkey to save the entry.
-
Open the proxy password and enter the password for the authorisation into the HTTP proxy.
-
Press the softkey to save the entry.
Switching DiffServ On/Off
If DiffServ (Differentiated Services Flag) is enabled, voice data is transmitted with priority so that VoIP calls can be easily made at any time.
Note: Normally VoIP providers do not support DiffServ. It is therefore possible that this setting is not considered in the Internet.
Switching this on/off can be done as follows:
• Via the configuration manager
• Via the telephone menu
Switching DiffServ On/Off via Configuration Manager
Requirements:
-
Configuration manager, open with a sufficient authority level
– Existing and enabled DiffServ support on all active network components -
Open the page Administration > Server configuration.
- Select or clear the DiffServ check box under Quality of Service (QoS).
☑ Enables DiffServ. The following DSCP values are set for VoIP calls (as recommended in RFC 4594): signalling (SIP): CS5, speech (RTP): EF
□ Disables DiffServ.
- Click Execute.
- Only when DiffServ has been enabled: Restart the telephone.
Switching DiffServ On/Off via Telephone Menu
Requirements:
-
Knowledge of the telephone, its menu options and the required PIN, if necessary
– Existing and enabled DiffServ support on all active network components -
Press the menu key and open the menu settings > network > Qual. of Service.
-
Select or clear the DiffServ check box.
☑ Enables DiffServ. The following DSCP values are set for VoIP calls (as recommended in RFC 4594): signalling (SIP): CS5, speech (RTP): EF
□ Disables DiffServ.
- Press the softkey to save the entry.
- Only when DiffServ has been enabled: Restart the telephone.
Switching Increased Protection against Cross-Site Scripting (XSS) On/Off
In order to protect against cross-site scripting, several special characters may not be entered in either the configuration manager or in the telephone menu. If increased protection against Cross-Site Scripting has been enabled, additional special characters are added to the list of restricted special characters.
Switching this on/off can be done as follows:
• Via the configuration manager
Requirements:
- Configuration manager, open with a sufficient authority level
- Open the page Administration > Server configuration.
- Select or clear the Increased protection (against XSS) check box under Webserver configuration.
Enables the increased protection against Cross-Site Scripting (XSS). The following characters are automatically removed if entered into the configuration manager or into the telephone: "\$ % < > \ [ ] ^ {} ' # & + /.
□ Disables the increased protection against Cross-Site Scripting (XSS). The following characters are automatically removed if entered into the configuration manager or into the telephone: " \$ % < > \ [ ] ^ {} .
- Click Execute.
VLAN
A VLAN (Virtual Local Area Network) is a logical network within a physical network. Using a VLAN, you can operate several logical networks within a physical network in order to map company departments logically in the network or to split up network loads, e.g. separating PC data from voice data and introducing prioritization.
The operation of VLANs requires VLAN-capable network components compatible with the IEEE 802.1Q and/or IEEE 802.1P Standard.
VLAN Variants
The following VLAN variants are available:
Telephone VLAN External VLAN
Variant A Disabled Disabled
Variant B Disabled Configured
Variant C Configured Disabled
Variant D Configured Configured
Variant A
Both the telephone VLAN and the external VLAN are disabled. The operation of the telephone continues to work without VLANs, but the VLANs are forwarded from port to port.
Variant B
Only the external VLAN is configured, e. g. for the data of a PC. The VLAN is untagged behind the external port in order to connect VLAN-incapable hardware. Incoming packets from the external port are marked with the tag specified under VID for the external LAN port and with the configured priority. If you want to use VLAN-capable hardware at the external LAN port, disable the external VLAN to make all VLANs available at the external port.
Variant C
Only the telephone VLAN is configured. The voice data is transferred securely in a separate VLAN. Using this variant, it is also possible to enable the forwarding of the telephone VLAN to the external port. This means that further VoIP telephones can be connected to the external port of the telephone (daisy chain).
Variant D
The telephone is completely operated via VLANs. Using this variant, it is also possible to enable the forwarding of the telephone VLAN to the external port. This means that further VoIP telephones can be connected to the external port of the telephone (daisy chain).
Configuring a Telephone VLAN
The telephone VLAN is used for the secure transmission of voice data in a separate VLAN.
Note: To make sure the VLAN functions smoothly within the network, please contact your responsible system administrator for the configuration.
The configuration can be carried out as follows:
• Via the configuration manager
• Via the telephone menu
Configuring a Telephone VLAN via Configuration Manager
Requirements:
-
Configuration manager, opened with a sufficient authorization level
– VLAN provided in the network -
Open the page Administration > VLAN configuration.
- Select or clear the Telephone VLAN check box under Configuration for telephone VLAN.
☑ Enables the telephone VLAN.
☐ Disables the telephone VLAN. (No other action is required.)
- In the entry field VID under Configuration for telephone VLAN, enter the VID for the telephone VLAN. The following entries are possible:
1 to 4094
- In the entry field Priority for the telephones under Configuration for telephone VLAN, enter the priority for the telephones. The following entries are possible:
0 (lowest priority) to 7 (highest priority)
- Click Execute.
Configuring a Telephone VLAN via Telephone Menu
Requirements:
-
Knowledge of the telephone, its menu options and the required PIN, if necessary
– VLAN provided in the network -
Press the menu key and open the menu settings > network> VLAN internal.
- Select or clear the VLAN internal check box.
Enables the telephone VLAN.
□ Disables the telephone VLAN. (No other action is required.)
- Press the softkey to save the entry.
- Open the menu VLAN ID (int.) and enter the VID for the telephone VLAN. The following entries are possible:
1 to 4094
- Press the softkey to save the entry.
- Open the menu VLAN prio (int.) and enter the priority for the telephones. The following entries are possible:
0 (lowest priority) to 7 (highest priority)
- Press the softkey to save the entry.
Enabling/Disabling the Forwarding of the Telephone VLAN to External Port
If the forwarding of the telephone VLAN to the external port is enabled, you can connect further VoIP telephones to the external port of the telephone. The telephone VLAN is then forwarded via the external port.
The figure below shows the external port on the rear side of the telephone.
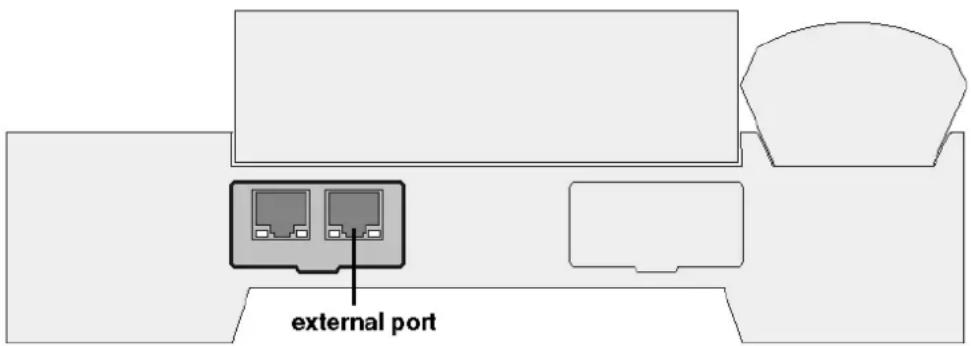
text_image
external portNote: It is usually possible to connect e. g. a VLAN-capable switch and/or further COMfortel VoIP 2500 AB to the external port of the telephone (Daisy Chain).
Switching this on/off can be done as follows:
• Via the configuration manager
• Via the telephone menu
Enabling/Disabling the Forwarding of the Telephone VLAN to an External Port via Configuration Manager
Requirements:
- Configuration manager, opened with a sufficient authorization level
- VLAN provided in the network
-
Configured Telephone VLAN
-
Open the page Administration > VLAN configuration.
-
Select or clear the Forward telephone VLAN to external port check box under Configuration for telephone VLAN.
☑ Enables the forwarding of the telephone VLAN to the external port.
☐ Disables the forwarding of the telephone VLAN to the external port.
- Click Execute.
Enabling/Disabling the Forwarding of the Telephone VLAN to an External Port via Telephone Menu
Requirements:
- Knowledge of the telephone, its menu options and the required PIN, if necessary
– VLAN provided in the network -
Configured Telephone VLAN
-
Press the menu key and open the menu settings > network> VLAN internal.
- Select or clear the VLAN tel.-> ext. check box.
☑ Enables the forwarding of the telephone VLAN to the external port.
□ Disables the forwarding of the telephone VLAN to the external port.
- Press the softkey to save the entry.
Configuring an External VLAN
Note: To make sure the VLAN functions smoothly within the network, please contact your responsible system administrator for the configuration.
The configuration can be carried out as follows:
• Via the configuration manager
• Via the telephone menu
Configuring an External VLAN via Configuration Manager
Requirements:
-
Configuration manager, opened with a sufficient authorization level
– VLAN provided in the network -
Open the page Administration > VLAN configuration.
- Select or clear the External VLAN check box under Configuration for external VLAN.
☑ Enables external VLAN.
☐ Disables external VLAN. (No other action is required.)
- In the entry field VID for the external LAN port under Configuration for external
VLAN, enter the VID for the external port. The following entries are possible:
1 to 4094
- In the entry field Priority for the external port under Configuration for external
VLAN, enter the priority for the external port. The following entries are possible:
0 (lowest priority) to 7 (highest priority)
- Click Execute.
Configuring an External VLAN via Telephone Menu
Requirements:
– Knowledge of the telephone, its menu options and the required PIN, if necessary
– VLAN provided in the network
- Press the menu key and open the menu settings > network> VLAN external.
- Select or clear the VLAN external check box.
Enables external VLAN.
☐ Disables external VLAN. (No other action is required.)
-
Press the softkey to save the entry.
-
Open the menu VLAN ID (ext.) and enter the VLAN ID. The following entries are possible:
1 to 4094
- Press the softkey to save the entry.
- Open the menu VLAN prio (ext.) and enter the priority for the external port. The following entries are possible:
0 (lowest priority) to 7 (highest priority) - Press the softkey to save the entry.
Service and Maintenance
This section describes useful service functions, among other things. This includes deleting, saving and restoring data in the case of a malfunction and the need to exchange the telephone or PBX.
Topics
– Firmware Update (page 548)
– Data Backup (page 555)
- Backing up Configuration Data (page 559)
– Selecting a PBX (page 561)
– Finding PBX (page 562)
- Initiating PBX Synchronisation (page 563)
– Shutting Down Telephone (page 564)
- Restarting the Telephone (page 565)
- Removing USB Memory Stick (page 566)
– Deleting Data (page 567)
- Logging the Network Data Stream (page 571)
- Port Overview (page 572)
Firmware Update
When firmware is updated, errors are corrected and new features are installed. To do this, the device establishes a connection to a server in order to download the most current firmware (the device settings remain intact). Except for the charges for the required server connection, the update is free of charge.
Firmware Update Variants
There are various options for carrying out a firmware update. The variants are differentiated as follows:
Manual Firmware Update
When a manual firmware update is carried out, a file (*.rom) it is uploaded into the configuration manager in the telephone thereby saving the new firmware in the telephone. After a firmware update, the telephone must be restarted.
Instant Firmware Updates via the Update Server
When an instant firmware update is activated via the update server, the firmware update is initiated automatically. After a connection to the update server has been established, the server sends the latest firmware to telephone.
Regular Firmware Updates via the Update Server
When a regular firmware update is initiated via the update server, a regular (for example, yearly) automatic firmware update can be configured. The interval and the time of the update are adjustable.
Initiating Manual Firmware Update
Initiation can be carried out as follows:
• Via the configuration manager
Requirements:
- Configuration manager, open with a sufficient authority level
- The firmware file saved on the hard drive (*.rom)
Note: You can download the firmware file from the support pages at the Auerswald website (Internet address: www.auerswald.de).
- Open the page Administration > Firmware update/restart.
- Click Browse under Store the firmware in the telephone (manual firmware update).
A file selection dialogue opens.
- Select the file you want (*.rom) and click Open (this text is dependent on the operating system used).
The path and the file name are displayed in the Firmware file field.
- Click Store in the telephone.
As soon as the firmware file has been saved in the telephone, you will receive a message.
Note: The new firmware is not yet enabled. If you do not restart, the old firmware is not updated.
- To enable the new firmware, click Restart under Restart of the telephone (reboot).
Further steps:
- In order to use new features after a firmware update, you normally need a new version of the operating manual and the operating manual. This is available per download from the support pages at the Auerswald website (Internet address: www.auerswald.de).
- In order to use the new features after a firmware update on the telephone, an update of the PBX firmware is often necessary. See the PBX manual.
Configuring Update Server Address
The address for the update server must be configured for instant and regular firmware updates via the update server. The factory settings are already configured with the address of the update server. However, if this is not the case or if you would like to change the address, proceed as described in the following.
The configuration can be carried out as follows:
• Via the configuration manager
Requirements:
- Configuration manager, open with a sufficient authority level
Note: If you change the address of the update server via the telephone menu under settings > synchronisation > firmware update, a firmware update is carried out immediately afterwards.
- Open the page Administration > Server configuration.
- In the Address of the update server entry field under Firmware update, enter the address of the update server. The following entries are possible:
Digits and characters - Click Execute.
Initiating Instant Firmware Update via Update Server
Initiation can be carried out as follows:
• Via the configuration manager
• Via the telephone menu
Initiating Instant Firmware Update via Update Server via Configuration Manager
Requirements:
- Configuration manager, open with a sufficient authority level
– The PBX connected to broadband Internet access - The address of the update server entered on the page Administration > Server configuration: www.auerswald-update.de
-
The address of the DNS server entered on the page Administration > Server configuration
-
Open the page Administration > Firmware update/restart.
- Click Update under Instant firmware update via update server.
The firmware update is performed.
Further steps:
– In order to use new features after a firmware update, you normally need a new version of the operating manual. This is available per download from the support pages at the Auerswald website (Internet address: www.auerswald.de).
– In order to use the new features after a firmware update of the telephone, an update of the PBX firmware is often necessary. See the PBX manual.
Initiating Instant Firmware Update via Update Server via Telephone Menu
Requirements:
– Knowledge of the telephone, its menu options and the required PIN, if necessary
– The PBX connected to broadband Internet access
- The DNS address entered in the menu settings > network > DNS server 1
- Press the menu key and open the menu settings > synchronisation.
The address of the update server is displayed. If necessary, change the address of the update server.
- Press the softkey.
The firmware update is performed. After this, a message appears in the display indicating whether the update was successful.
- Press the softkey.
Further steps:
– In order to use new features after a firmware update, you normally need a new version of the operating manual. This is available per download from the support pages at the Auerswald website (Internet address: www.auerswald.de).
- In order to use the new features after a firmware update of the telephone, an update of the PBX firmware is often necessary. See the PBX manual.
Configuring Regular Firmware Updates via Update Server
The configuration can be carried out as follows:
• Via the configuration manager
• Via the telephone menu
Configuring Regular Firmware Updates via Update Server via Configuration Manager
Requirements:
- Configuration manager, open with a sufficient authority level
– The PBX connected to broadband Internet access - The address of the update server entered on the page Administration > Server configuration: www.auerswald-update.de
-
The address of the DNS server entered on the page Administration > Server configuration
-
Open the page Administration > Firmware update/restart.
-
In the Interval list field under Regular firmware updates via update server, select one of the following options:
None: No regular firmware update will be carried out.
every 12 weeks: A firmware update will be automatically initiated every 12 weeks.
semi-yearly: A firmware update is automatically initiated every six months.
yearly: A firmware update is automatically initiated once a year. -
In the Period list field under Regular firmware updates via update serve, select the desired time frame during which the regular firmware update should be carried out.
-
Click Accept.
Configuring Regular Firmware Updates via Update Server via Telephone Menu
Requirements:
– Knowledge of the telephone, its menu options and the required PIN, if necessary
– The PBX connected to broadband Internet access
- The DNS address entered in the menu settings > network > DNS server 1
- The DNS address entered in the menu settings > synchronisation > firmware update
- Press the menu key and open the menu settings > synchronisation > update interval.
The icon indicates the current setting.
- Select one of the following options:
none: No regular firmware update will be carried out.
every 12 weeks: A firmware update will be automatically initiated every 12 weeks.
semi-yearly: A firmware update is automatically initiated every six months.
yearly: A firmware update is automatically initiated once a year.
- Press the menu key and open the menu settings > synchronisation > update period.
The ♦con indicates the current setting.
- Select the desired time frame during which the regular firmware update should be carried out.
Restoring Previous Firmware
If you have carried out a firmware update and the firmware proves to be erroneous, you can restore the previous firmware installation.
The telephone retains not only the current firmware used but also the firmware last used in Flash memory. When the firmware is restored, you can switch back and forth between either firmware version. During an update, the currently inactive firmware is overwritten.
The restoration can be carried out as follows:
• Via the configuration manager
- Via the telephone
Restoring Previous Firmware via Configuration Manager
Requirements:
– Firmware update, carried out
- Configuration manager, open with a sufficient authority level
Note: If the configuration manager cannot be opened again, you must restore the firmware via the telephone.
- Open the page Administration > Firmware update/restart.
- Click Restore firmware under Restore firmware (reboot).
The previous firmware is restored.
Restoring Previous Firmware via Telephone
Requirements:
- firmware update, carried out
If you would like to restore the previous firmware and the configuration manager will not open, proceed as described in the following.
- Disconnect the telephone from the power source.
- Simultaneously press the message key and the query key. Keep both keys pressed.
- While keeping both keys pressed, reconnect the telephone to the power source.
After about four seconds, the LED above the hook key starts blinking quickly. After about four seconds, the LED starts blinking more slowly. - As soon as the LED above the hook key starts blinking more slowly, you may release both the message key and the query key.
The previous firmware is restored.
Data Backup
During a data backup, a backup file is created either automatically or manually. This file contains the configuration and/or other data and settings for the telephone. The areas to be backed up can be configured separately.
Data Backup to USB Memory Stick
Every time a backup is made, a backup file is saved on the USB memory stick inserted in the telephone. The backup file can be transmitted back to the original telephone or into any of the other system telephones, if necessary. When transmitting personal data such as the caller list and the call list to another telephone, the user PIN on the telephone from which the data originated is required.
Instead of a total backup of the telephone, a partial area can be selected for backup. The following areas can be selected:
- Caller list (entries in the caller list)
- Settings (settings configured in the settings menu (except blocking))
- Functions (settings configured in the functions menu)
• Function keys (function key definitions) - Call list (entries in the call list)
- Ringer rhythms (customised ringer rhythms)
- Project number (existing project list)
- Blocking (blocking settings configured in the settings menu)
- Local telephone book (entries in the local telephone book)
- Scheduled call list (entries in the scheduled call list)
- Redial list (entries in the redial list)
Configuring Areas for Data Backup to USB Memory Stick
Instead of a total backup of the telephone, a partial area can be selected for backup. Configuration applies in the same way for both manual and automatic data backup.
The configuration can be made as follows:
• Via the telephone menu
Requirements:
– Knowledge of the telephone, its menu options and the required PIN, if necessary
- A USB memory stick inserted into the USB port
- Press the menu key and open the menu settings > Backup > configuration.
- Select or clear the check box for the areas in question.
The area in question becomes a part of the data backup.
☐ The area in question does not become a part of the data backup.
- Press the softkey to accept the setting.
Backing up Current Data on USB Memory Stick
The backup can be carried out as follows:
• Via the telephone menu
Requirements:
– Knowledge of the telephone, its menu options and the required PIN, if necessary
- A USB memory stick inserted into the USB port
- Press the menu key and open the menu settings > Backup > CF2500 -> USB.
- Enter a name. The following entries are possible:
Up to 8 digits
Digits and characters
3. Press the softkey.
The data is backed up in the backup directory on the USB memory stick.
Saving USB Memory Stick Data Backups on Telephone
The USB memory stick data also contain the MSN. They can be saved on the telephone with or without the MSN.
The saving procedure can be carried out as follows:
• Via the telephone menu
Requirements:
– Knowledge of the telephone, its menu options and the required PIN, if necessary
- A USB memory stick inserted into the USB port
1. Proceed as follows:
- If you also want to save the MSN on the telephone, press the menu key and open the menu settings > Backup > USB -> CF2500.
- If you want to save the data on the telephone without the MSN, press the menu key and open the menu settings > Backup > w/o MSN -> CF.
The date and time of the data backup are displayed.
2. Select the desired data backup and press the softkey.
The data is saved in the telephone.
Switching Regular Automatic Data Backup On/Off
If automatic data backup is switched on, data will be backed up every day at midnight (as soon as the telephone goes into the idle state).
Switching this on/off can be done as follows:
• Via the telephone menu
Requirements:
– Knowledge of the telephone, its menu options and the required PIN, if necessary
- A USB memory stick inserted into the USB port
- Press the menu key and open the menu settings > Backup > automatic.
- Select or clear the automatic check box.
☑ Enables automatic data backup.
□ Disables automatic data backup.
- Press the softkey to accept the setting.
Backing up Configuration Data
In addition to backing up all the data on the telephone, the configuration manager can also be used to back up the configuration data onto the PC. When this is done, a configuration file (*.cft) is created that can also be uploaded back into the telephone, if necessary.
The configuration data includes the following:
- Settings (settings configured in the settings menu (except blocking))
- Functions (settings configured in the functions menu)
• Function keys (function key definitions) - Project number (existing project list)
- Local telephone book (entries in the local telephone book)
Saving Configuration Data on PC to Telephone
The saving procedure can be carried out as follows:
• Via the configuration manager
Requirements:
- Configuration manager, open with a sufficient authority level
- Configuration file (*.cft) on the hard disk
- Open the page Administration > Data backup.
- Click Browse under Store configuration data in the telephone.
A file selection dialogue opens. -
Select the file (*.cft) you want and click Open (this text is dependent on the operating system used).
The path and the file name are displayed in the Configuration file field. -
Click Store in the telephone.
The configuration data is saved in the telephone.
Saving Configuration Data on PC
The saving procedure can be carried out as follows:
• Via the configuration manager
Requirements:
- Configuration manager, open with a sufficient authority level
- Open the page Administration > Data backup.
- Click Read from telephone under Read configuration data from the telephone. A dialogue for downloading the configuration file opens.
- Save the configuration file on the PC.
Resetting Configuration
When you reset the configuration in the telephone, all of the existing configuration data is deleted and you began with a new configuration.
The reset can be carried out as follows:
• Via the configuration manager
Requirements:
- Configuration manager, open with a sufficient authority level
- Open the page Administration > Data backup.
- Click Reset under Reset configuration.
Further steps:
- Create a new configuration or reinstall the previously saved configuration in the telephone.
Selecting a PBX
The configuration of the telephone is dependent on the PBX that it is run on. In order to preconfigure a telephone for operation in another PBX (for example, for service calls), configure the system to be valid ahead of time. Ignore the error message and configure the desired presettings using the configuration manager.
The selection can be carried out as follows:
• Via the telephone menu
Requirements:
– Knowledge of the telephone, its menu options and the required PIN, if necessary
- Press the menu key and open the menu settings > synchronisation > select PBX. The icon indicates the current setting.
- Select the desired PBX.
The telephone restarts.
Note: If the wrong PBX is selected, this is detected and an error message is displayed. If the setting for a wrong PBX is made on purpose for service reasons, the error message must be ignored.
Finding PBX
The search can be carried out as follows:
• Via the telephone menu
Requirements:
– Knowledge of the telephone, its menu options and the required PIN, if necessary
- Press the menu key and open the menu settings > synchronisation > find PBX.
- The telephone searches for a PBX on the network.
If a PBX is found, its IP address is shown on the display.
- Press the √ softkey to confirm the IP address displayed.
Note: If there are two or more PBXs on the network and the display is showing the IP address of the incorrect PBX, press the ✗ softkey. Enter the IP address for the correct PBX.
The telephone registers itself on the PBX.
Initiating PBX Synchronisation
If necessary, you can initiate a complete data synchronisation with the PBX.
Initiation can be carried out as follows:
• Via the telephone menu
Requirements:
– Knowledge of the telephone, its menu options and the required PIN, if necessary
- Press the menu key and open the menu settings > synchronisation > sync. with PBX.
Data synchronisation is performed with the PBX.
Shutting Down Telephone
It is possible to turn the telephone off totally. To do this, it can be shut down like a computer.
The shutting down can be carried out as follows:
• Via the configuration manager
• Via the telephone menu
Shutting Down Telephone via Configuration Manager
Requirements:
- Configuration manager, open with a sufficient authority level
- Open the page Administration > Firmware update/restart.
- Click Shut down of the telephone under Restore firmware (reboot).
The telephone shuts down. - In order to start the telephone back up, disconnect the telephone from the 230V power source and then connect it again.
The telephone starts up.
Shutting Down Telephone via Telephone Menu
Requirements:
- Knowledge of the telephone, its menu options and the required PIN, if necessary
- Press the 2 softkey to change from the idle state into the second level.
- Select shut down.
The telephone shuts down. - In order to start the telephone back up, disconnect the telephone from the 230V power source and then connect it again.
The telephone starts up.
Restarting the Telephone
The restart can be carried out as follows:
• Via the configuration manager
Requirements:
- Configuration manager, open with a sufficient authority level
- Open the page Administration > Firmware update/restart.
- Click Restart under Restart of the telephone (reboot).
The telephone is restarted.
Important: When the telephone is restarted, the connection to the configuration manager as well as all to calls and data services is terminated.
Unsaved data are lost.
Removing USB Memory Stick
Before a USB memory stick in a USB port on the telephone can be removed, it must be dismounted via the telephone menu.
The removal can be carried out as follows:
• Via the telephone menu
Requirements:
- Knowledge of the telephone, its menu options and the required PIN, if necessary
-
A USB memory stick inserted into the USB port
-
Press the menu key, enter #207 via the keypad and press the √ softkey to confirm the action.
- Remove the USB memory stick from the USB port on the telephone.
Deleting Data
You have the option of deleting individual pieces of data saved in the telephone. This includes resetting the telephone back to factory settings as well as deleting charges and personal data.
Restoring Factory Settings
The restoration can be carried out as follows:
• Via the telephone menu
Requirements:
– Knowledge of the telephone, its menu options and the required PIN, if necessary
In order to reset the telephone back to the factory settings, press the menu key, enter #201 via the keypad and press the softkey to confirm the action.
If this is no longer possible (the telephone no longer reacts), proceed as described in the following.
- Disconnect the telephone from the 230V power source.
- Simultaneously press the third and 13th function key (from below). Keep both function keys pressed.
-
While keeping both function keys pressed, reconnect the telephone to the 230V power source.
After about four seconds, the LED on the 13th function key starts blinking quickly. After about four seconds, the LED starts blinking more slowly. -
As soon as the LED on the 13th function key starts blinking more slowly, you can release both function keys.
The telephone is reset back to factory settings.
Note: The PINs are part of the system configuration and therefore remain intact.
Further steps:
- Put the telephone back into operation. If necessary, refer to the commissioning instructions.
- Create a new configuration or reinstall the previously saved configuration in the telephone.
Deleting Charges
The total charges accumulated since the last operation are displayed in the Information menu. In order to view the charge expenses accumulated during specified time intervals, you can delete the total charges accumulated from time to time. If you would like to prevent anyone from seeing the charges for your last call, you can also delete that entry.
Deleting can be carried out as follows:
• Via the telephone menu
Requirements:
– Knowledge of the telephone, its menu options and the required PIN, if necessary
- Press the menu key and open the menu functions > del.call charge.
- Select one of the following options:
most recent call: Deletes the charges of the last call.
call charge total: Deletes all of the charges accumulated so far.
- Press the softkey to confirm the action.
Note: Neither the total charges recorded in the PBX nor the call data sets are affected by the delete operation.
Deleting Personal Data
You can delete your personal data, for example, telephone numbers, messages and settings based on the function.
Deleting can be carried out as follows:
• Via the configuration manager
• Via the telephone menu
Deleting Personal Data via Configuration Manager
Requirements:
- Configuration manager, open with a sufficient authority level
- Open the page Settings/functions > Lists/data.
- Click the Delete data tab.
- Select or clear the check box for the respective data listed on the tab.
☑ The corresponding data is deleted.
☐ The corresponding data is not deleted.
- Click Execute.
Deleting Personal Data via Telephone Menu
Requirements:
– Knowledge of the telephone, its menu options and the required PIN, if necessary
- Press the menu key and open the menu functions > delete data.
- Select one of the following options:
caller list Deletes all of the entries in the caller list.
calls list: Deletes all of the entries in the calls list.
redial list: Deletes all of the entries in the redial list.
phone book: Deletes all of the entries in the telephone book on the telephone.
function keys: Deletes all of the function keys that are not blocked.
scheduled call list: Deletes all of the entries in the scheduled call list.
TAM list: Deletes all of the entries in the answering machine list.
TAM voice memo: Deletes all of the entries in the list of voice memos.
all: Deletes all of the data listed here.
- Press the softkey to confirm the action.
Logging the Network Data Stream
To log the Ethernet data stream transferred between the PBX and the telephone, a network protocol in PCAP format can be recorded. This protocol can be evaluated subsequently (e.g. with Wireshark/Ethereal), for instance to find out the cause of failures which have occurred.
The logging procedure can be carried out as follows:
• Via the configuration manager
Requirements:
- Configuration manager, open with a sufficient authority level
-
Pop-up blocker which is disabled in the browser or defined exception rule
-
Open the page Administration > Log network data stream.
- Click Start trace.
The recording of the network protocol is started.
- To stop the recording of the network protocol, click Stop trace.
A dialogue box for downloading the ethernettrace.pcap file is opened.
- Save the file.
Note: The ethernettrace.pcap file enables the technical departments (Service, Development) to perform troubleshooting.
Port Overview
The port overview shows the previously configured and the permanently-specified ports on the telephone.
Note: The overview can be viewed in the configuration manager by opening the page Administration > Port overview.
Glossary
The glossary contains an alphabetical list of the functions and terminology used accompanied by short explanations.
There is also an index of abbreviations.
Topics
- Terminology and Functions (page 574)
- Abbreviations (page 595)
Terminology and Functions
A B C D E F G H I J L M N O P Q R S T V W
A
Answering Machine List
The telephone answering machine list can save up to 250 messages and call recordings made on the answering machine. The list also includes the date and time of the recording as well as the telephone number of the caller/communication partner. The recordings are numbered consecutively, with the last/latest recording assigned the number 1.
You can call someone who has called you directly from the answering machine list.
The LED above the message key indicates whether entries are present on the answering machine list.
Automatic Call Acceptance
Automatic call acceptance facilitates headset operation at call centers or on hotlines. An incoming call is automatically accepted after a configured amount of time. Call acceptance is signalled by an attention tone.
B
Boss/Secretary Function
The boss/secretary function protects the boss telephone from direct calls by rerouting them to the secretary. The most important difference from call forwarding is that the boss telephone can still be called from the secretary telephone and the secretary can still transfer important calls to the boss telephone.
C
Call Deblocker (Incoming) – VIP Numbers
If you would still like to allow specific people to call you despite enabling the do-not-disturb function, the external telephone numbers (VIP numbers) of these people can be assigned a call deblocker for incoming calls in the PBX. The call deblocker which applies to all subscribers can be enabled on your own telephone as needed. If the call deblocker is enabled, the do-not-disturb function does not apply to callers who use one of the VIP numbers.
Call Forwarding
Call forwarding allows calls to be forwarded. When this is done, a difference is made between calls to a specific telephone (call forwarding for subscribers), to groups (call forwarding for groups) and to connections (call forwarding for external telephone numbers).
Call Recording
The call recording function enables telephone calls to be recorded, for example, for later evaluation. In addition to the automatic recording of all calls, it is also possible to record calls manually. This functions independent of the automatic call recording function. This allows calls to be recorded in pieces.
Call Restrictor (Incoming) – Robinson Numbers
If there are certain persons who you absolutely do not want to call you, their external phone numbers (Robinson numbers) can be assigned to a call restrictor for incoming calls in the PBX. The call restrictor which applies to all subscribers can be enabled on your own telephone as needed. If the call restrictor is enabled, a caller, who transmitted one of the Robinson numbers, is rejected.
Call Waiting
If you are already in a call, the call waiting function notifies you using the call waiting tone when another communication partner is calling.
Callback on Busy
After initiating a callback on busy (CCBS), a subscriber is automatically called back by the PBX or by the central office when a busy subscriber becomes available again.
Callback on No Reply
After initiating a callback on no reply (CCNR), a subscriber is automatically called back by the PBX or by the central office when a subscriber is reachable again.
Caller List
Telephone numbers of calls not accepted are saved in the caller list of the telephone, along with the number of call attempts as well as the date and time of the call (for multiple call attempts, date/time of the last call attempt). A maximum of 30 telephone numbers can be saved. If more than 30 calls from various telephone numbers come in, the oldest entry is overwritten.
A caller be called back directly from the caller list.
The LED above the message key indicates whether entries are present on the caller list.
Calls
The system telephone allows you to make internal and external calls on the PBX. Internal calls are toll-free.
Calls List
The calls made (incoming and outgoing) are saved in the calls list of the telephone along with the telephone number of the communication partner as well as date, time and duration of the call. A maximum of 30 calls can be saved. For more than 30 calls, the oldest entry is overwritten. A previous communication partner can called directly from the calls list.
Codec
A codec is a method that encodes (digitizes) analogue voice data for transmission and again decodes again, meaning converts into back into voice. There are various codecs that feature different voice data compression rates thereby require different band widths for data transmission. The equality of VoIP calls is dependent on the codec used.
Conference Calls
During a conference call, you are talking with two subscribers simultaneously.
Configuration Manager
The configuration manager lets you easily set up the system telephone on your computer. The configuration manager is accessible via the integrated web server in the telephone. The required PC is connected either directly to an Ethernet port on the telephone or must be in the same network.
Configuration Switchover
If multiple configurations have been saved in the PBX, for example, for day, night, etc., switching over from one configuration to another can be carried out manually and/or in a time controlled manner.
Cross-Site Scripting (XSS)
In the case of Cross-Site Scripting (XSS), a security hole in web applications can be used to access the data of another user.
D
Data Backup
During a data backup, a backup file is created either automatically or manually. This file contains the configuration and/or other data and settings for the telephone. The areas to be backed up can be configured separately.
DDI
The DDI (Direct Dialing In) is the extension number for dialing directly to a specific subscriber on a telephone system. Example: In the number 0 53 06 / 92 00 - 700, 700 is the extension (DDI) for the Auerswald info-line.
DHCP
DHCP (Dynamic Host Configuration Protocol) is a client/server protocol for dynamically allocating IP addresses and network parameters. The IP addresses are requested by the DHCP clients (PCs in the network) on the DHCP server (for example, a router or the Internet service provider). The DHCP server takes these IP addresses from a set address pool and sends them to the client. In addition, the client receives additional information (for example, the addresses for the standard gateway and DNS server).
The IP address is temporarily allocated for a certain amount of time. If the address is no longer required by the client, the server has access to it again and can allocate it to another client.
DiffServ
The Differentiated Services Flag (DiffServ) is evaluated by active network components such as routers or switches in networks in order to forward packets according to their priority. This is necessary, for example, to give voice packets (VoIP) priority and to achieve better voice quality.
Direct Exchange Line Access
If the telephone has been configured as a direct exchange access point on the PBX, you will hear an external dial tone directly after picking up the receiver. You can directly dial the telephone number without the leading 0.
DNS
DNS (Domain Name Service) is needed to translate Internet addresses from a form readable by the user (for example, www.auerswald.de) and to the corresponding IP addresses that the PC can use to request the page on the Internet. This service is provided by DNS servers at the various Internet service providers or by upper domain servers.
Do-not-disturb
The do-not-disturb function offers the option of blocking internal and external calls as well as blocking group calls on a specific telephone. A caller hears only a busy signal. An internal subscriber can reach a telephone with call protection in an emergency using a priority call.
The do-not-disturb function has no influence on outbound calls, callbacks, alarm calls, scheduled calls, wake-up calls or InterCom calls.
Door Functions
A door terminal system connected with the interface FTZ 123 D12-0 (PBX requires extension module) enables the following functions. Calls to the door can be made from any telephone (intercom). During a call to the door, the door can be opened (open door) and a stairwell light controlled by switching a relay (switch on light).
These functions can be executed on the system telephone without initiating a door call.
E
Ethernet
A network system with a speed of 10/100/1000 Mbit/s that was developed by the companies INTEL, DEC and Xerox.
Exchange Line Transfer
A suitably authorised telephone, for example, the telephone exchange, can transfer the exchange line access required for an outgoing call to another internal telephone for a short period of time. This is meaningful, for example, when this telephone is located in a publicly accessible room and is only occasionally used for external calls by an employee.
F
Firmware
Firmware is the operating software on the telephone or PBX that is stored in the device itself. The device cannot function without firmware.
Firmware Update
When firmware is updated, errors are corrected and new features are installed. To do this, the device establishes a connection to a server in order to download the most current firmware (the device settings remain intact). Except for the charges for the required server connection, the update is free of charge.
Follow me
Follow me is a type of "internal call forwarding unconditional for subscribers" that is configured on the respective destination telephone (instead of on the forwarding telephone). This provides the option of going from room to room and taking the calls with you.
Free Seating
The free seating function allows you to register at a foreign COMfortel VoIP 2500 AB using the configuration of your own telephone in order to operate the foreign telephone like your own one. The prerequisite is that both telephones are registered at the same PBX.
G
Gateway
On gateway is a PC or router that is used as an intermediary between two (different) networks. The Internet service provider is the gateway for direct Internet dial up connections. If you use a router, this is the gateway in a local network.
Group Functions
In addition to internal subscribers, the PBX can also manage groups. The internal subscribers can become members of any and all groups. These groups can be used, for example, to collect the internal subscribers in certain departments or teams (Support, Marketing, Sales) together.
Membership in a group does not necessarily mean that a subscriber receives calls sent to the group. A subscriber that is logged out takes on no group functions. This can be especially important for employees of a support department, who should not be available to customers around the clock, but rather rotate in and out of the hotline.
H
Hands-free Calling
During hands-free calling, the loudspeaker and microphone on the device are switched on. This option allows you to talk on the telephone even if you have no hands free. In addition, other people in the room can participate in the call.
Headset Calls
A headset enables you to participate in calls when you have no hands free. This is a very useful feature, especially in certain professional areas (for example, in a call center).
Hotel Function
The hotel function allows you to conveniently manage room and call data when the PBX is used in a hotel.
HTTP Proxy
An HTTP proxy is a proxy for the HTTP protocol, over which Internet sites are called or files downloaded.
|
InterCom Announcement/Handsfree
The InterCom function enables an announcement to one system telephone or to all system telephones of a group from any internal telephone without someone having to actively receive a call (for example, in a doctor's office).
If the InterCom destination is one system telephone, this can be programmed to switch on the microphone in addition to the loudspeaker (handsfree) so that a person nearby can speak with the caller using this intercom system.
IP Address
In order to ensure that the data packets reach the correct recipients, all of the devices in a TCP/IP network require a unique address, known as the IP address. IP addresses comprise four numbers between 0 and 255 that are separated by a point, for example, 192.168.0.14. The network addresses are divided up into different classes (Class A to C) depending on how many computers can be located in a network.
Certain ranges are reserved for the operation of local networks:
– Class A: 10.x.x.x (for networks with up to 16.5 million PCs)
- Class B: 172.16.x.x bis 172.31.x.x (for networks with up to 65534 PCs)
- Class C: 192.168.0.x bis 192.168.255.x (for networks with up to 254 PCs)
These addresses have no validity on the Internet; this means that data packets with this kind of sender or recipient address cannot be transported on the Internet. However, they can be used in local networks without restriction. The advantage of this is that if data from a local network configured in this way comes in contact with the Internet, none of the data on the computers in the local network can leak out or be accessed externally.
J
Jitter Buffer
The jitter buffer buffers RTP packages, to compensate irregular transfer rates of the Internet.
L
LED
An LED is a light emitting diode. This is an electronic device that is similar to a lamp and is used for displays (also multi-coloured).
Loudspeaker Audio Out
This function enables loudspeaker audio out over an audio output on the loudspeaker connected to the PBX unit or an active loudspeaker (for example, a loudspeaker system in a department store/supermarket). In addition, a previously specified telephone number is called by an internal telephone. The call connection is immediately established after dialling the telephone number.
Loudspeaker Listening
During loudspeaker listening, the receiver loudspeaker as well as the loudspeaker in the device are switched on. This allows other people in the room to listen in on the call. The call is continued using the receiver microphone (no hands-free calling).
M
MAC Address
A MAC address (Media Access Control) is a special unique hardware address specified for each individual single network card used in the whole world. This means that the network card unique and can be controlled without any problems and detected by the network The IP addresses on the TCP/IP network are always mapped to the respective MAC address.
Glossary
Terminology and Functions
M
Macro
The macro function enables a function key to be defined with digits and various consecutive commands, for example, for accessing an answering machine remotely or programming a function on the PBX.
Memo
The memo function allows you to enter a telephone number note on the telephone during a call. After the call has been ended, the telephone number can be retrieved and, for instance, accepted into dial preparation.
Message Forwarding
Message forwarding enables the answering machine to notify you of new messages even if you are out and about.
MSN
An ISDN point-to-multipoint connection is reachable under multiple telephone numbers, the MSN (Multiple Subscriber Number) or multiple subscriber numbers. The MSN is the part of the telephone number without a local prefix.
Mute
If you would like to discuss something with another person in the room without your communication partner on the telephone being able to hear, you can temporarily mute the call.
N
NAT
NAT (Network Address Translation) permits the mapping of a specific IP address used within a network to another IP address used by another network. This function is e.g. performed by a router which connects a local area network to the Internet.
Network
A network is a merger of more than one computer and other communication devices. This enables multiple users to access common resources such as files, printers, etc.
NTP
As the time on a computer or on other devices in the network is only rarely precisely adjustable, the NTP (Network Time Protocol) is used. This is a protocol that is used to synchronise the time on a computer or on other devices in the network with other computers or with an external clock via the Internet. An NTP server is selected to perform the time synchronisation. The time provided by the NTP server is synchronised as exactly as possible to Coordinated Universal Time (UTC).
If a local NTP server is available in a local network, it can be selected, or a public NTP server from a public list on the Internet can be used.
0
Outbound Proxy
The outbound proxy is an intermediate server that processes all requests and connections going to the provider (except registration).
P
Permanent Configuration
For situations where your settings are supposed to apply even after configuration switchovers, you can use the so-called permanent configuration. If permanent configuration is enabled, the configuration-dependent settings will be overridden by the permanent configuration settings.
Permanent configuration is available for the following settings:
- Call forwarding for external number
Phone Lock
The phone lock can be used to block the telephone from unauthorised use. Even after enabling the phone lock, it is possible to receive incoming calls and to make emergency calls (manual dialling of emergency numbers entered in the PBX only).
Pickup
Using Pickup, you can take a call on your own phone that was originally sent to another internal telephone.
If the call has already been taken, the call can be taken using same procedure if the call takeover has been allowed by the subscriber being called. This function is useful, for example, in the case of answering machines.
PIN
A PIN (Personal Identification Number) is a multi-digit secret code that has to be entered to get access to services or authorisations.
PoE
PoE (Power over Ethernet) is a method by which a small devices in a network, for example, VoIP telephones, receive power over an Ethernet cable. This benefit of this is that there are fewer power cables to deal with.
PoE is described in the IEEE 802.3af Standard.
Port
A single PC can simultaneously establish multiple connections and provide multiple services for other PCs. Ports are used to differentiate these connections from parallel connections. Due to a common agreement, PCs usually provide their services on ports 1 to 1023. Outgoing connections are usually established starting at Port 1024. Most services that use the standard port numbers (for example, web browsers use port 80).
Power Dialling
If the telephone being called is busy, but automatic callback on busy is not possible, the power dialling function be activated instead. When this is done, the system telephone attempts to reach the subscriber being called in short time intervals.
Power Save Mode
In power save mode, the display lighting (if available) and the LEDs are inactive (exception: the message LED blinks for missed calls).
After a configurable waiting time and depending on the configuration, power save mode can be activated automatically during the switchover into a PBX configuration and/or manually by pressing a key. Power save mode is deactivated again as soon as an incoming call is signalled or any key is pressed.
Priority Call
When the do-not-disturb function is enabled, a subscriber is no longer reachable by normal callers. A priority call creates an exception and allows the incoming internal call to circumvent the do-not-disturb function.
Project Assignment
The exchange line access with project assignment enables an external call to be assigned to a specific project/customer/client (for example, in a lawyer's office). Based on the evaluation of call data, both the charges as well as the time required can be assigned to a specific project.
Proxy
The proxy is a network component to which specific requests are sent instead of sending them directly to the destination. The proxy either forwards the request to the destination, rejects it, or replies directly if the data is already contained in its own cache.
Q
Query Calls
During a query call, you are talking with one subscriber while your previous communication partner is on hold on the PBX in the background listening to hold music.
A query call is initiated either by calling a query call subscriber, using pick-up during a call, or by accepting a call signalled by call waiting.
R
Readiness
In order for the answering machine to accept calls and record messages, readiness must be enabled.
Redial List
The last 30 telephone numbers dialled are saved in the redial list. For more than 30 telephone numbers dialled, the oldest entry is overwritten. The telephone numbers are saved along with number of dialling operations, date and time of dialling (for multiple dialling operations, the date/time of the last attempt).
Relays
If the PBX is equipped with one or more relays, they can be switched on and off independently of the operating mode configured for each telephone.
Remote Access
Remote access is used to access and operate the answering machine from another internal telephone or from an external telephone.
Room Monitoring
The room monitoring function can be used for monitoring a room acoustically, for instance, for monitoring a small child while she sleeps. The internal telephone in this room must be suitably configured for this purpose.
The configured telephone can then be called by another internal telephone or by a password-protected external telephone. The connection is established immediately and it is possible to listen into the room.
Router
Routers connect two separate networks. This means, for example, that you can connect the local network to another LAN or a WAN. When a PC wants to send a data packet, this packet must travel over a router. The router uses the IP address to detect the network it must send the data to. In addition to connecting to networks, routers can also execute certain control functions, such as maintaining a simple firewall. In a home network, routers are usually used to connect the local network to the Internet and to enable simultaneous Internet access for multiple users.
S
Scheduled Call
The scheduled call provides the option of being reminded of a schedule or to place a specific call by the system telephone. The telephone can be configured with up to 16 schedules. The configured schedules are saved in a scheduled call list in the order they are to be processed.
Server
A server is a computer or a software. Depending on the type of server it fulfils different tasks as part of the network. It provides, for example, other users (clients) in this network with certain information, data and services.
SIP
SIP (Session Initiation Protocol) is a network protocol which provides establishing a communication session between two ore more subscribers. Via SIP only communication conditions are arranged. For actual data transmission other protocols are responsible, as RTP, for example.
SIP Port
The SIP port is entered as the port of the local system which has to be used as the output port for the SIP transfer.
Splitting
Splitting is the switching between two calls. As opposed to a conference call, you can only speak to each communication partner by going back and forth between the two. When you speak with one communication partner, the other call is kept on "hold".
STUN
Using STUN (Simple Transversal of UDP over NATs), the public IP address of a DSL connection can be determined. To do this, a STUN request is sent to a STUN server, which then shares its own IP address allocated by the VoIP provider with the DSL connection.
Subnet mask
Configuring subnetworks makes it possible to connect many totally different networks located in totally different areas because each subnetwork receives its own address and can therefore be addressed by the router. A subnetwork is created when the IP address is linked with a subnet mask:
If a bit in the subnet mask is set, the corresponding bit in the IP address is considered a part of the network address. If a bit is not set in the subnet mask, the corresponding bit in the IP address is used as a part of the PC address.
The value of the subnet mask, as with IP addresses, is often given in decimal form with separating points (for example, 255.255.255.0).
T
Targeted Exchange Line Access
Using targeted exchange line access, you can define which MSN (your own external phone number) is transmitted for an external call and which exchange line should be used while doing so.
Targeted VoIP Access Point
Using a targeted VoIP access point, an external call can be initiated via a specific VoIP account.
Telephone Book
The telephone book is used for storing useful or frequently dialled telephone numbers along with the associated names. If a telephone number that is entered in the telephone book is transmitted during a call, the assigned name is displayed instead of the telephone number is displayed.
In the telephone book, entries (telephone numbers, macros and comments) can be stored. Up to four entries can be assigned to a name (contact).
In addition, internal telephone numbers (subscriber, groups, door, emergency call) as well as the telephone book/short-code numbers on the PBX are displayed. If one of these entries does not have a name, the system telephone generates a name for the telephone book (for example,
int. TN45, KW-A 05306...). The entries cannot be changed in the telephone book of the system telephone; they can only be changed using the corresponding PC software on the PBX (internal telephone numbers with COMset; short-code numbers with COMtools). Each name (contact) is assigned only one telephone number entry. All of the contacts are displayed in alphabetical order.
Text before Answering
The text before answering function enables the caller to be greeted with an automatic announcement before accepting the call (charges apply for the external caller).
Transfer
A communication partner can be transferred or connected to an internal or external subscriber.
Transferring Without Announcement
This describes a type of transfer where external calls are transferred to internal subscribers. The caller is put through to the desired subscriber without an announcement.
V
VLAN
A VLAN (Virtual Local Area Network) is a logical network within a physical network. Using a VLAN, you can operate several logical networks within a physical network in order to map company departments logically in the network or to split up network loads, e.g. separating PC data from voice data and introducing prioritization.
The operation of VLANs requires VLAN-capable network components compatible with the IEEE 802.1Q and/or IEEE 802.1P Standard.
Voicemail Center 461/461.2
If a Voicemail Center 461/461.2 (optional accessory from Auerswald) is connected to an Auerswald PBX, its mailboxes can be accessed/managed over the system telephone.
VoIP
In Internet telephony (VoIP, Voice over Internet Protocol), an Internet connection (for example, DSL) is used for telephoning instead of an analogue or ISDN line. In this case, digital voice data is sent as IP packets from one telephone to another. This functions the same way as the transmission of a webpage over the Internet.
There are already numerous providers which issue each customer their own telephone number, which can be called not only over the Internet but also via a public switched network. Depending on the provider used and the number called, these types of telephone connections are extremely reasonable if not free of charge.
Some providers give the impression that Internet telephony is totally free of charge. However, it is important to research the actual costs incurred by taking the tariff tables of the respective provider. As the connection to a public switched network is established over a gateway, the location of the gateway may affect any charges associated with the call. This applies especially to international calls that may be more expensive than simple calls on a public switched network if the gateway is located domestically.
The transmission quality and the reliability of Voice over IP depends to a great extent on the quality of the Internet connection used.
VoIP Account
To get the access data needed for VoIP calls, accounts have to be set up from one or several VoIP providers. To do this, a registration with name and address data has to be done on the website of a provider. Afterwards, one or several telephone numbers which are available on the fixed network and the Internet as well as an account with user name and password are assigned. In the majority of cases the registered account is available within a few minutes and can be used very soon.
A VoIP account can be configured on a telephone. The VoIP account is the prerequisite for communicating with the PBX and should therefore not be changed.
W
Waiting Field Function
In a waiting field, callers can be parked either automatically or by pressing the key, and then individually retrieved and forwarded.
Waiting Loop
If the internal subscriber to which you would like to transfer an external communication partner is busy, you can place the external communication partner in the waiting loop of this subscriber.
Wideband Sound Quality (G.722)
In the field of telephony, this describes a higher level of speech quality. This level of speech quality is achieved through the speech codec G.722, which uses a broader frequency spectrum from 100 to 7000 Hz but only requires 64 kbps of bandwidth. In conventional PSNT telephony, only a frequency spectrum of 300 to 3400 Hz is used; this also uses 64 kbps.
The best possible sound quality depends on the end device used.
Abbreviations
| CCBS Completion of Calls to Busy Subscriber | |
| CCNR Completion of Calls on No Reply | |
| CF Call Forwarding | |
| CFB Call Forwarding on Busy | |
| CFNR Call Forwarding on No Reply | |
| CFU Call Forwarding Unconditional | |
| CLIP Calling Line Identification Presentation | |
| CLIR Calling Line Identification Restriction | |
| CW Call Waiting | |
| DDI Direct Dialling In | |
| DHCP Dynamic Host Configuration Protocol | |
| DiffServ Differentiated Services Flag | |
| DNS Domain Name Service | |
| DTMF Dual Tone Multi Frequency | |
| IP | Internet Protocol |
| ISDN | Integrated Services Digital Network |
| LED | Light Emitting Diode |
| MAC | Media Access Control |
| MSN Multiple Subscriber Number | |
| NAT | Network Address Translation |
| NTP Network Time Protocol | |
| PBX Private Branch Exchange | |
| PIN Personal Identification Number | |
| PoE Power over Ethernet | |
| RTP Real-Time Transport Protocol | |
| SIP Session Initiation Protocol | |
| SIPS Session Initiation Protocol Secure | |
| SRTP Secure Real-Time Transport Protocol | |
| STUN Simple Transversal of UDP over NATs | |
| TCP Transmission Control Protocol | |
| UDP User Datagram Protocol | |
| USB Universal Serial Bus | |
| VLAN Virtual Local Area Network | |
| VoIP | Voice over Internet Protocol |
Index
A
abbreviations ....595
active communication partner,
changing (splitting) 84
announcement
change manually with key .....363
create 449
edit 450
specific for telephone book
contacts ....115
switch call information on/off .....452
switch separator tone on/off .....452
time control 383
announcement (InterCom) .....241, 582
function key 242
announcements ....449
recording (answering machine) ...360
answering machine
announcements, recording .....360
answering machine list .....349, 574
automatic for experts, configure ..370
basic settings ......387
call acceptance readiness ...345, 588
call acceptance time ....387
call acceptance/announcement
assignment 366
call recording ....394, 575
call recording, automatic .....396
call recording, info tone ....400
call recordings, listening to
(answering machine list) ....351
call types ....367
data exchange 420
forward call 343
icons 47
listen in function 391
memos, listen to ....359
memos, record ....355
message forwarding ...... 410, 584
message forwarding
announcement 414
message forwarding, repetition .. 418
message forwarding, target ..... 415
message forwarding,
waiting period 417
messages, listening to
(answering machine list) 351
playback, automatic 392
quick remote access number ..... 406
readiness 345, 588
recording time 388
recording time,
remote access 402, 589
remote access toll saver 405
remote access, configure ...... 403
remote access, execute 408
time control 383
answering machine list 349, 574
display navigation 349, 425
function key 353
open 349, 357
recordings, listening to 351
telephone number, dial 352
answering machine menu 41
attention tone
automatic call acceptance ..... 144
power dialling 272
waiting field 341
automatic (answering machine)
anonymous calls (create entry) .. 371
call deblocker calls
(create entry) 378
calls for groups (create entry) ..... 373
door terminal calls (create entry) 377
entries, delete 379
external calls (create entry) ..... 374
function key 380
internal calls (create entry) ......375
time control 383
automatic call acceptance .....141, 574
attention tone 144
call acceptance time ....145
function key 142
switch on/off 141
automatic data backup ....557
B
backlight 483
backup 555, 577
on USB memory stick ....555
boss key 150
boss telephone
secretary key 147
boss/secretary function .....146, 574
brightness 484
busy signal
callback, initiate ....76
end call for query call ....78
priority call (do-not-disturb) .....78
C
call 80,576
accept 65
call waiting, accept ....69
call waiting, forward .....70
call waiting, ignore ....70
call waiting, reject ....69
display navigation ....34
DTMF signals, send ....81
end 82
forward 66
hands-free calling .....93, 581
hands-free calling, switch off .....94
hands-free calling, switch on .....94
headset 97,581
icons 43
incoming call, on hold 66
interrupt for pickup 267
loudspeaker listening 95, 583
loudspeaker listening, switch off .. 95
loudspeaker listening, switch on .. 95
mute 81
project assignment 281
reject 65
subscriber, changing 84
third communication partner,
transfer 89
to boss telephone 146
transfer 86,592
transfer from query call 89
transfer without announcement .... 87
call acceptance
specific for telephone book
contacts 115
call acceptance readiness ..... 345, 588
call acceptance time 387
call charges 501
call charges, configure
cost per call unit 501
currency 501
call deblocker
function key 154
switch on/off 153, 178
call deblocker (incoming) ...... 153, 575
call deflection (forward call) 66
call forwarding 157, 575
for external numbers 167
kinds 158
subscribers 159
variations 157
call forwarding (ext. no.)
function key 169
switch on/off 167
call forwarding (subscribers)
function key 160
switch on/off 159
call macro, configure 113
call recording ....394, 575
automatic 396
automatic, function key ....398
function key 395
info tone 400
listening to
(answering machine list) ......351
call restrictor
function key ......179
call restrictor (incoming) .....178, 575
call signal, light
function key 493
call signalling, configure ....489
call waiting 181,575
call waiting calls 68
call waiting tone, switch off .....70
call waiting, accept ....69
call waiting, forward .....70
call waiting, reject ....69
call, ignore ....70
door knocks ....196
function key 182
signalling ....184
switch on/off ....181
call, end
during conference call .....92
during query call 85
call, incoming 64
call, initiate ....72
from answering machine list .....352
from caller list ....132
from calls list ....126
from redial list ......122
from telephone book ......102
from the calls list ....126
in hands-free calling mode .....93
on direct exchange line
access 73, 74
via targeted exchange line
access 310
via targeted VoIP access point ....314
with dial preparation 73
with number presentation
suppression 74
callback
initiate on busy 76
initiate on no response 77
on busy 576
on no reply 576
caller list 131,576
call types, select 136
display navigation 131
entries, delete 133
function key 134
open 131
signalling LED, select 137
telephone number, dialling ..... 132
calls list 125, 576
call types, select 129
display navigation 125
entries, delete 127
function key 128
open 125
telephone number, dialling ..... 126
calls, outgoing 72
CCBS (callback on busy) 76
CCNR (callback on no response) ..... 77
CE symbol ..... see insert "Conditions of
Guarantee, Information Service"
CE symbol ......see insert "Warranty
Conditions, Information Service"
certificate 530
fingerprint 531
codec 525, 576
comments 112
Conditions of Guarantee ..... see insert
"Conditions of Guarantee, Information
Service"
conference
both conference call partners,
connect 92
options 90
conference call 90, 577
conference call partner, end call ...91
end completely 92
initiate 90
conference call, initiate .....90
configuration
permanent configuration ....586
configuration data
on PC 560
on telephone, save 559
configuration data, backup ....559
configuration manager ....50, 577
display 56
entry fields ....54
forced logout 57
language 56
legibility 56
list entries, create ....55
list entries, delete .....55
log off ....53
minimum requirements, PC .....50
navigation 52
open 50
operating instructions ....52
selection fields 54
symbols 55
configuration switchover .....186, 577
function key 186
manual 186
configuration, reset ....560
configuration-dependent control
function key 438
voice mailbox 437
contrast 485
cost per call unit ....501
Cross-Site Scripting (XSS) .....539, 577
currency 501
D
data backup 555, 577
automatic 557
on USB memory stick 555
data exchange 420
data, delete 567
date format 487
DDI 578
Declaration of Conformity ..... see insert
"Conditions of Guarantee, Information
Service"
delete
charges 568
personal data 569
deleting charges 568
DHCP 578
DHCP client, switching on/off 472
dial
from answering machine list ..... 352
from caller list 132
from calls list 126
from redial 122
on direct exchange line access .... 74
dial preparation 73
icons 43
number into telephone book ..... 116
dialling
DTMF codes in call 81
from telephone book 102
out of a call (query call) 83
telephone number 73
DiffServ 538, 578
display
answering machine list .....349, 425
call, during 34
caller list 131
calls list 125
configuration manager ....56
idle state 28
incoming call 32
inverse display view 485
key definition 30
main menu 29
outgoing call 33
query call, during 34
redial 121
telephone book 101
telephone number entry ....31
text entry 31
display backlight 483
brightness, configure ....484
use as ring signal ....492
display settings
contrast 485
date format 487
language 482
time format ....486
display view, inverse .....485
DNS 578
DNS server 534
do-not-disturb 190, 579
function key .....191
ignore (priority call) .....78
switch on/off 190
type 193
door
accept door call ....196
door knocks 196
open door 196
door functions .....195, 579
function key 197
DTMF, configure ....528
E
echo reduction 509
Environment ... see insert "Conditions of
Guarantee, Information Service"
environment ......see insert "Warranty
Conditions, Information Service"
Ethernet 579
ethernet trace 571
exchange line transfer 202,579
function key 203
sequence 202
export (telephone book) 119
external VLAN 544
external waiting field
function key 333
F
factory settings 567
factory settings, reset 567
find PBX 562
fingerprint 531
firmware 580
firmware update 548, 580
manual 548
regular 552
update server 550
update, carry out instant .... 550
variants 548
firmware update, instant 550
firmware update, manual 548
firmware update, regular 552
firmware, restore 553
follow me 205, 580
function key 206
switch on/off 205
free seating 208, 580
configure 209
end 210
end with data transfer .....211
end without data transfer .....211
perform 209
procedure 208
replacement memory stick .....212
store configuration on the
telephone 211
function key
announcement, editing ....363
answering machine list ....353
automatic (answering machine) ..380
automatic call acceptance .....142
boss key 150
call deblocker ....154
call forwarding (ext. no.) .....169
call forwarding (subscribers) .....160
call recording 395
call recording, automatic .....398
call restrictor ....179
call signal, light 493
call waiting 182
caller list 134
calls list 128
configuration switchover .....186
configuration-dependent control .438
do-not-disturb 191
door functions ......197
exchange line transfer .....203
follow me 206
group functions ......216
group status ......223
headset ....504
hotel reception telephone .....236
hotel room telephone ......239
InterCom announcement ......242
InterCom handsfree 246
InterCom permission .....250
log out of all groups .....221
loudspeaker audio out 253
macro 257
message forwarding .....412, 461
MSN/DDI call forwarding 169
open voice mailbox 428
phone lock 265
pickup 268
power save mode 277
project assignment 282
readiness 346
readiness voice mailbox 433
relays 290
remote access 456
ring signal 490
room monitoring 294
scheduled call 302
secretary key 147
shift 511
speed dialling 305
subscriber call forwarding 160
substitute function 466
targeted exchange line access ... 311
targeted VoIP access point ...... 315
text before answering 319
time control 384
voice memos 356, 442
Voicemail Center 322
waiting field (external) 333
waiting field (internal) 335
waiting field reception 338
function keys
exchange/move 513
second level, enable 510
function lock, configure 477
function menu 37
G
gateway 580
configure 475
glossary 573
group functions 214, 581
detailed information 214
function key 216
log out of all groups 216
log telephone in/out 215
group status
function key 223
H
handsfree (InterCom) ......241, 582
function key 246
hands-free calling 93, 581
headset
call, make 97, 581
echo reduction 509
function key 504
operation, switch on/off ....503
ringing 507
type 506
volume 508
help 58
icons 62
navigation 58
opening 58
printing 62
search 61
hotel function 226, 581
configure 227
function areas 226
hotel reception telephone
block external telephoning .....232
check/change room status .....228
function key 236
perform check-in 229
perform check-out 233
print interim invoice 231
query call charges ......231
hotel room telephone
configure wake-up time .....235
function key 239
query call charges ......236
HTTP proxy ....535, 581
|
icons 42
answering machine 47
calls 43
confirmation 45
dial preparation 43
idle state 42
key definition 45
menu navigation 44
restriction 46
scheduled call 46
selection 44
telephone book 45
telephone number entry 44
telephone number lists 46
text entry 44
voice mailbox 47
voicemail center 48
identification of telephone 471
idle state
icons 42
menu options 28
import (telephone book) 120
important information 17
incoming call
display navigation 32
incoming call, on hold 66
information menu 36
initiate call
from the message list of the voice mailbox 427
InterCom announcement ...... 241, 582
execute 242
function key 242
procedure 241
InterCom handsfree 241, 582
execute 246
function key 246
procedure 245
InterCom permission ....249 function key ....250
internal waiting field function key ....335
Internet access (telephone) ....534 DiffServ ....538 DNS server ....534 HTTP proxy ....535 increased protection against XSS ....539
interval for NAT keep alive ....520 IP address ....582 IP address, configure ....473
J
jitter buffer 523, 582
K
key definition icons ....45
key definition menu ....37 keys ....26
L
language, configure ....482
LED 583
LED message key 137
LEDs 26
legibility configuration manager ....56
lettering labels, print 514
listen in function ......391
listening to recordings voice mailbox ....426
log into a group .....215
log off configuration manager .... 53
log out of a group 215
log out of all groups function key 221
logging network data stream 571
loudspeaker audio out ..... 252, 583 execute ..... 252 function key ..... 253
loudspeaker listening 95, 583
M
MAC address 583
macro 256, 584 display presentation 260 execution procedure 256 function key 257
main menu menu options 29
maintenance 547
memo 262, 584 create 262 retrieve 262
memos (list) recordings, listen to .... 359
menu navigation icons 44
menu options 28
call, during 34
icons 42
in idle state 28
incoming call 32
key definition 30
main menu 29
outgoing call 33
query call, during 34
telephone number entry 31
text entry 31
menu overview 36
answering machine menu .....41
function menu 37
information menu 36
key definition menu ....37
settings menu 39
menu selection, restrict ....510
message forwarding .....410, 460, 584
announcement 414
function key 412, 461
repetition 418
switching on/off 460
target 415
waiting period 417
messages, listening to
(answering machine list) ....351
microphone
switch off 81
minimum requirements, PC ....50
MSN 584
configure 471
MSN/DDI call forwarding
function key 169
switch on/off 167
mute 81,584
N
NAT 585
NAT keep alive ....520
navigation
configuration manager ....52
network 585
network data stream, log ....571
no response
callback, initiate ....77
NTP 585
0
operating instructions configuration manager .... 52
outbound proxy, configure 522
outgoing call display navigation .... 33
overview ports 572
P
PBX select .... 561 synchronisation .... 563
PC minimum requirements .... 50
permanent configuration 586
personal data delete 569
phone lock 264, 586
disable 264
enable 264
function key 265
pickup 267, 586
during call 267
execute 267
function key 268
PIN 586
playback, automatic 392
PoE (Power over Ethernet) 586
port 587
ports overview .... 572
Power over Ethernet (PoE) .....586
power save mode ....274, 587
activation depending on
configuration 275
automatic activation 274
function key 277
link to phone lock 278
priority call ....587
initiate 78
project assignment .....280, 587
configure list 285
delete list 286
during call 281
export list 287
function key 282
import list 287
initiate 280
proper use ....19
Q
query call 83,588
both communication partners, connect ....85
call, ending 85
initiate 83
number calls is busy/no response 78
query call, end 78
quick remote access number .....406
R
readiness ....345, 588
function key 346
readiness voice mailbox ....432
function key 433
switch on/off 432
receiver
echo reduction ....509
receiver volume ....503
reception telephone configure wake-up time .... 230
recording time 388
remote access 402, 589
configure 403
execute 408
variants 402
voice mailbox 454
remote access toll saver 405
reset factory settings 567
restart (telephone) 565
restriction
icons 46
restrictions 477
function lock 477
settings lock 479
ring signal
function key 490
ringer
by flashing display backlight ..... 492
melodies, configure 498
switch on/off 489
volume, configure ....498
volume, increase automatically ...499
Robinson numbers ......178, 575
room monitoring .....293, 589
end 293
function key 294
initiate 293
root certificate ....530
router 589
runction key
move messages ....445
s
safety information ....18
scheduled call ......296, 590
accept as call reminder ....300
accept as schedule reminder .....299
configure as call reminder .....298
configure as schedule reminder ..297
function key 302
icons 46
open list 296
scheduled call list
delete scheduled calls ....301
edit scheduled calls ......300
secretary function .....146, 574
secretary key 147
secretary telephone
boss key 150
selection
from the message list of the
voice mailbox 427
icons 44
server 590
service 547
Service ...... see insert "Conditions of
Guarantee, Information Service"
service ......see insert "Warranty
Conditions, Information Service"
settings lock, configure 479
settings menu 39
shift 511
shut down (telephone) 564
SIP 590
port 590
port, configure 527
transport protocol 526
speed dialling 304
automatic pick-up 308
function key 305
registration status 309
speed dialling keys
application options 304
splitting 84,590
active call, ending 85
active communication partner, transfer 89
both communication partners, connect 85
from query call 84
initiating from conference call ..... 91
to third subscriber, transfer 89
STUN 590
STUN server 518
subnet mask, configure 474
subnetwork 591
subscriber call forwarding
function key 160
switch on/off 159
subscribers, changing (splitting) ..... 84
substitute function
switching on/off 465
suppress
telephone number display 74
switching remote access on/off ..... 455
symbols
configuration manager ....55
synchronisation (PBX) ....563
T
targeted exchange line access ..310, 591
function key 311
initiate 310
targeted VoIP access point .....314, 591
function key 315
initiate ....314
technical data 21
telephone
identification 471
telephone book .....99, 100, 591
call macro, configure .....113
comments ....112
contact, delete 111
contact, edit ......107
export 119
icons 45
import 120
new contact, configure .....103
open 100
specific call acceptance/
announcement ....115
telephone number from dial
preparation ....116
telephone number range,
configure displayed ....118
telephone number, dial .....102
telephone number display
suppress ....74
telephone number entry
icons 44
telephone number lists .....99
icons 46
telephone ringer, switch on/off .....489
telephone VLAN ....541
forwarding to external port .....543
telephone, shut down 564
telephoning
call waiting calls 68
call, accept 65
call, incoming 64
caller, reject 65
calls, outgoing 72
conference call, initiate 90
during conference call 90
during query call 84
text before answering
function key 319
text before answering for group 318, 592
switch on/off 319
text entry
icons 44
time control
function key 384
time format 486
trace 571
transfer 86,592
from query call 89
in waiting loop, place 88
options 86
to third communication partner ..... 89
with announcement 87
without announcement 87
transfer without announcement 87
transferring without announcement .592
transmission
telephone number, suppress ..... 74
type of do-not-disturb 193
U
update server 550
USB memory stick
data backup 555
remove 566
V
VIP numbers ......153, 575
VLAN 540, 592
external VLAN 544
telephone VLAN ....541
variants 540
voice mailbox ....424
announcements 449
configuration-dependent control .437
create announcement 449
edit announcement ....450
execute remote access 454
function key open 428
function key remote access .....456
icons 47
listening to recordings 426
message forwarding 460
move messages 445
open 424
readiness 432
remote access ....454
substitute function 465
switch readiness on/off 432
switch remote access on/off .....455
switch substitute function on/off ..465
switching message forwarding
on/off 460
voice memos 442
voice memo, record 355
voice memos ....442
function key 356, 442
voice memos (list) ......355
open 357
Voicemail Center 322, 593
function key 322
initiate remote access ....322
rapid remote access ....327
Voicemail Center
icons 48
VoIP (Voice over IP)
VoIP account 532, 593
configuring 532
VoIP provider 516
codec 525
jitter buffer 523
registrar 516
registration time 517
SIP transport protocol 526
STUN server 518
volume
headset 508
receiver 503
volume, change
automatically 499
W
waiting field
attention tone 341
waiting field (external)
function key 333
waiting field (internal)
function key 335
waiting field function 329, 594
configure 329
sequence for call acceptance ..... 330
waiting field reception
function key 338
switch on/off 331
waiting loop 88,594
Warranty ..... see insert "Conditions of
Guarantee, Information Service"
warranty ......see insert "Warranty
Conditions, Information Service"
wideband sound quality 594
X
XSS (Cross-Site Scripting) ..... 539, 577