SCT016 - Memory reader Sveon - Free user manual and instructions
Find the device manual for free SCT016 Sveon in PDF.


| Product Type | Memory Card Reader with USB Hub |
| Brand | Sveon |
| Model | SCT016 |
| Interface | USB 2.0 (Compliant with USB 1.1) |
| USB Hub | 3-Port USB Hub |
| Card Slots | 4 slots: SD/MMC/MS/XD, Micro SD/M2, Smart Card (DNIe), SIM, Compact Flash I/II |
| Supported Card Formats | 44 formats including SD, SDHC, MMC, MS, XD, Micro SD, TF, M2, Compact Flash, and more |
| Smart Card Support | Yes (ISO 7816, PC/SC, CSP, PKCS#11, supports DNIe) |
| SIM Card Support | Yes with SIM Editor software for contact/SMS management |
| Operating Systems | Windows 2000, XP, Vista |
| Power Supply | USB bus powered; optional power adapter included |
| Dimensions (Approx.) | 100 mm x 100 mm (depth not specified) |
| Package Contents | Multi card reader, USB cable, power adapter, Memory Stick Pro Duo adapter, CD driver with manual, guarantee card, Quick Installation Guide |
| Special Features | Direct copy between cards, Plug and Play, Hot Swappable, LED indicators |
Frequently Asked Questions - SCT016 Sveon
User questions about SCT016 Sveon
0 question about this device. Answer the ones you know or ask your own.
Ask a new question about this device
Download the instructions for your Memory reader in PDF format for free! Find your manual SCT016 - Sveon and take your electronic device back in hand. On this page are published all the documents necessary for the use of your device. SCT016 by Sveon.
USER MANUAL SCT016 Sveon
natural_image
Black and white photo of a mobile phone with a card and a digital screen displaying a teal abstract image (no visible text or symbols on the device body)SCT016
Sconned series
44in1 Card Reader & DNle/SIM reader & Hub
CSP (Cryptographic Service Provider Microsoft)
API PKCS#11
XD, Micro SD, TF, M2 and Compact Flash I y II.
natural_image
Close-up of a black electronic device with three ports and a labeled arrow pointing to the number 6 (no text or symbols on the device itself)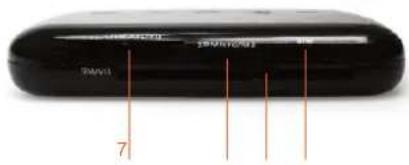


natural_image
Close-up of a black electronic device with two red arrows pointing to the internal components (no visible text or symbols)7. Instalación
3. Firefox
- Welcome
- Features
- Technical Specifications
- System Requirements
- Content
- Hardware
- Installation
8.DNIe software installation - SIM Editor
- Card Reader
- Card Reader Uninstallation
- FAQs
1. Welcome
Thanks for choosing SCT016, the most complete card reader from Sveon. This unit not only includes a multi card reader compliant with up to 44 different formats, but also includes a 3 ports USB Hub to connect up to three peripheral. It is also compliant with DNie and Smart cards and with SIM cards.
This multiformat card reader will allow you to read and write in a lot of memory cards, making easier to manage all your information comfortably. Includes four different slots, some of them are multiformat (supports more than one card) to assure a maximum compatibility in the minimum space.
The Smart Card reader is specially developed for DNle cards, which allows you to do a lot of procedures with Administration or to get a secure indentification on Internet.
Thanks to the complete software which includes the unit, specially for SIM cards (mobile phone cards), is possible to do a back up of the SIM information (contact list or SMS), add or delete contacts, etc in a very easy way.
2. Features
- USB 2.0 connection (compliant with USB 1.1)
- 3 ports USB Hub
- DNle and Smart Cards supported. Includes all the protocolos demanded by Administration.
- SIM Editor software included to manage the information of your SIM cards (mobile phone cards).
- Multi card reader included to read and write in up to 44 formats of memoy cards.
- Direct copy between cards inserted in different slots.
- USB powered only. It also includes a power adaptor for the situations in which it is needed.
- Indicators led to indicate the status of the device and the access to the memory cards.
- Plug and Play and Hot Swappable functions.
3. Technical Specifications
3 ports USB Hub
Interface: USB 2.0 fully compliant with USB 1.1
Three available USB ports
Smart Card Reader: 1 slot
Supports the following standard: ISO 7816 1/2/3/4
Supports asynchronous cards based on protocols T=0 y T=1
Standard supported:
API PC/SC (Personal Computer / Smart Card)
CSP (Cryptographic Service Provider Microsoft)
API PKCS#11
3V and 5V cards supported
Maximum power consumption: 45mA
SIM Card Reader: 1 slot
SIM Card
Card Reader: 3 slots. Supported cards
SD, SD ROM, Extreme SD, Extreme II SD, Ultra SD, Ultra II SD, SD Pro, SD Elite Pro, HS SD, Ultra Speed SD, Micro SD, SD Ultra X, SDHC. Mini SD and HS Mini SD need adapter.
MMC, MMCII, MMC4.0, MMC Plus, HS MMC. RS MMC, MMC Mobile, HS RS MMC and DV-RS MMC 4.0 need adapter.
MS, MS Pro, HS MS Pro, MS Magic Gate, HS MS Magic Gate Pro, Extreme MS Pro, Extreme III MS Pro, Ultra MS Pro, MS ROM, MS Select. MS Duo, MS Pro Duo, HS MS Pro Duo, MS Magic Gate Pro Duo, HS MS Magic Gate Pro Duo need adapter.
XD, Micro SD, TF, M2 and Compact Flash I and II.
4. System Requirements
Pentium III 300MHz (or higher) with an available USB port (2.0 or 1.1)
OS: Windows 2000, XP or Vista
CD ROM unit
5. Content
- Multi card reader
- USB Cable
- Power adaptor
- Memory Stick Pro Duo adapter
- CD Driver (user guide included)
- Guarantee card
- Quick Installation Guide
6. Hardware
- Power Led (power on / off)
- Status Led (access to memory cards)
3, 4 y 5 USB Hub indicator led
6.3 ports USB Hub - Slot for SD / MMC / MS and XD
- Slot for SD Micro / M2
- Slot for Smart cards (DNIe)
- Slot for SIM cards
- Slot for Compact Flash cards
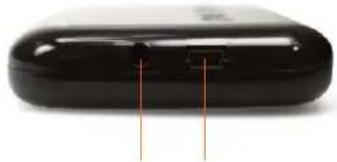
- Power connector
- USB Connector


natural_image
Close-up of a black electronic device with three ports and a labeled dimension '6' (no text or symbols beyond the number)

natural_image
Close-up of a black electronic device with two red arrows pointing to the ports (no visible text or symbols)7. Installation
- Insert the CD Driver provided with the unit in the DVD o CD ROM of your PC. The installation window should appear automatically. If it doesn't appear please go to "My Computer", select the CD or DVD ROM unit icon, click on "Windows" and run the following file: "SCT016 Driver and SIM Editor". Click on "Next" to continue.
- In the following window select if you want to create an icon in your taskbar or in your desktop. If you don't want to create them, don't select any option and click on "Next".
- Wait until the process is finished.
- Click on "Finish" once the installation has been finished. We suggest you restart the PC when everything is installed

- Welcome
- Features
- Technical Specifications
- System Requirements
- Content
- Hardware
- Installation
- DNle software installation
- SIM Editor
- Card Reader
- Card Reader uninstallation
-
FAQs
-
After restarting your computer, connect the card reader and wait until the computer shows a message to inform the device is ready to be used.

8. DNle software installation
If you want to use your DNle or smart card make sure there is not a SIM card inserted in the card reader.
How to install the cryptographic module for DNle
The CD Driver provided with the unit includes the software with the autorun file for cryptographic DNle module installation: /DniDigital/Windows/DNle_v4_0_0.exe. You can also find the last version of the software in the following link:http://www.dnielectronico.es/descargas/windows.html with this name: "DNle vx_j_y.exe".
Run this file to install CSP module for Windows and run the PKCS#11 module for Firefox Mozilla and Netscape. Restart your computer to finish the installation process. During the restart process the DGP root certificate will be installed (for the navigator softwares you have installed). The security systems for Firefox Mozilla and Netscape will be also setup. There are two files in the following directory: C:\DNie which you can use if you want to setup the device it in the future.
DGP root certificate
ACRAIZ CERTIFICATE AND CRL SIGNING SHA1.crt
PKSC#11 installation module
- Depending on the navigator setup, it is possible that when you restart your computer the following window will appear asking for the installation of DNle root certificate. Please click on accept/install. This step is necessary for the correct use of your DNle.

- Click on "Next" to continue.

- Click on "Next" to continue.

-
Welcome
-
Features
-
Technical Specifications
-
System Requirements
-
Content
-
Hardware
-
Installation
-
DNle software installation
-
SIM Editor
-
Card Reader
-
Card Reader uninstallation
-
FAQs
-
Select "Yes" to allow the installation of the DNIE Root Authorization (AC RAIZ DNIE) in your navigator. Thanks to this installation, the certification could be properly done.
-
Click on "Ok".
-
Install Java application you will find in the CD Driver. Run the file: jxpiinstall-6u12-fcs-bin-b04-windows-i586-17_jan_2009.exe and wait until the installation finishes.

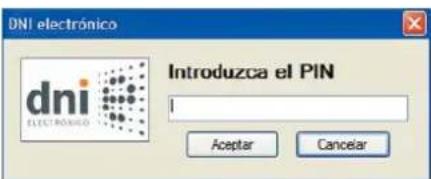
Step 1. Insert the DNle in its slot and then go to "Tools" menu / Internet Options / Content / Certificates.

Step 2. If the CSP module is correctly installed (Certification Service Provider), the DNIe PIN will be required.
Step 3. Once you write the correct PIN of your DNle, you will be able to see your certificates in "Personal" section, and "Certification entities":
- Certificate of Authentication
- Certificate of signature
Step 4. In the tab "Trusted Root Certification Authorities" you can view the root certificate of AC RAIZ DNle.
Step 5. If you have successfully completed the previous steps and you can view your certificates, it means that the CSP module and the Microsoft root certificate are properly installed.
Step 1. Go to Tools / Options / Advanced / Security devices

Step 2. If the PKCS#11 module is correctly installed, it will appear in the tab "Security devices and modules installed".

-
Welcome
-
Features
-
Technical Specifications
-
System Requirements
-
Content
-
Hardware
-
Installation
-
DNle software installation
-
SIM Editor
-
Card Reader
-
Card Reader uninstallation
-
FAQs
Step 3. When you have installed PKCS#11 module, you are able to check your certificates. Open Netscape navigator and then go to Tools menu / Options / Advanced / View Certificates to access to DNle certificates. The PIN of DNle will be required.
Enter the correct PIN of your DNie. A certificate manager assistant window will appear and show your certificates:
- Certificate of Authentication
- Certificate of signature
Step 4. In "Authorities" tab you can view the AC DNIE 00X certificate and the root certificate AC RAIZ DNIE.
Step 5. If you have completed all the previous steps and you can view the certificates in "Authorities" tab, the PKCS#11 module and the Netscape root certificate have been properly installed.

3. Firefox
Step 1. Go to Tools Menu / Options / Advanced / Security and "Security devices"
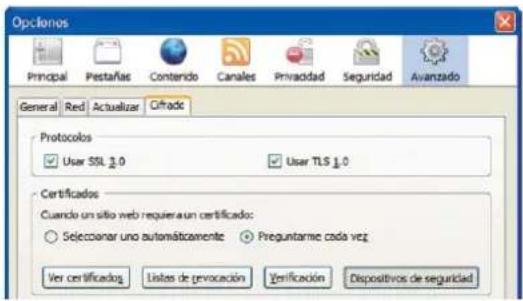
Step 2. If the PKCS#11 module is properly installed, the PKCS#11 DNle module will appear in the list of security modules and installed devices list.

Step 3. When the PKCS#11 DNie module is properly installed, you are able to view the DNie certificates. Open the Mozilla/Firefox navigator and go to Tools menu / Options / Advanced / View certificates. The DNie PIN will be required, please write it and go to "Options" section. Then press on "View Certificates" and in "Your Certificates" tab to find your certificates:
- Certificate of Authentication
- Certificate of signature
Step 4. In "Authorities" tab you will be able to view the AC DNIE 00X certificate and the AC RAIZ DNIE root certificate.

Step 5. If you have completed successfully all the previous steps and you can find the certificates, the PKCS#11 module and Firefox root certificate are properly installed.
- Welcome
- Features
- Technical Specifications
- System Requirements
- Content
- Hardware
- Installation
- DNle software installation
- SIM Editor
- Card Reader
- Card Reader uninstallation
- FAQs
9. SIM Editor
SIM Editor will allow you to manage all the information saved in the SIM card of your mobile phone. You will be able to edit, add, copy or delete contacts in your contact list, make a back up of your contact list, sort or delete SMS and even change the PIN code of your SIM card.
If you want to manage the information saved in your SIM card please make sure there is not any Smart Card or DNle inserted in the card reader.
SIM Editor icons:

- Load
- Save
- Import / Export
- SIM information
- Enable, disable or change the PIN code
- Unblock
- New
- Delete
- Select Language
- Close SIM Editor
1. How to obtain the information from your contact list or SMS
Insert the SIM card of your mobile in the correct slot of the card reader.

Run SIM Editor software by double clicking in the program icon installed in your taskbar or in your desktop. You can also access to the program from Start menu / Programs / USIM Editor.
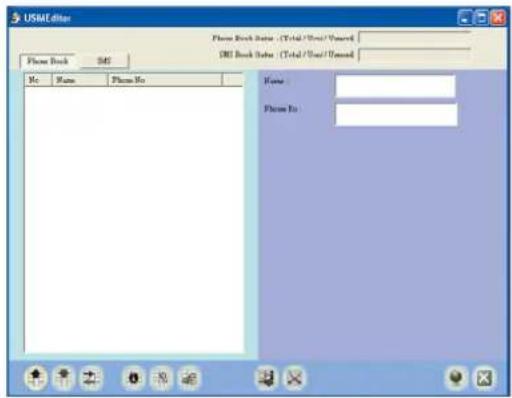
If you want to obtain the information from your contact list, make sure the tab "Directory" is marked and click on the icon located in the bottom left corner "Load".
All the contact list will be displayed in the program window. Select any contact to view further information; this information will appear in the right part of the program window.

- Welcome
- Features
- Technical Specifications
- System Requirements
- Content
- Hardware
- Installation
- DNle software installation
q. SIM Editor - Card Reader
- Card Reader uninstallation
- FAQs
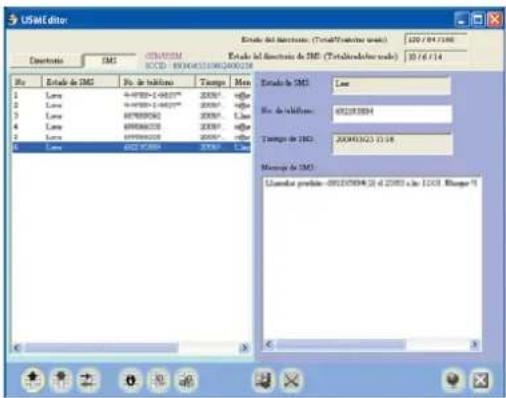
If you want to obtain the SMS (short messages) saved in your SIM card, make sure the option "SMS" is marked and click on the icon located in the bottom left corner of the program window "Load". The SMS list will be displayed. Select a message to display further information about the message in the right part of the program window: SMS status, telephone number used to send the message, date of send and content.
In the top of the program window SIM Editor software informs you about the maximum quantity of entries which can contain your contact list and SMS list. Besides the program offers information about the free and used entries.
2. Edit / Delete / Add entries
You can modify the name of a contact or its telephone number directly from the right part of the program window. To delete a contact, select it and click over "Delete" icon.

How to create a new contact: press over "New" icon and a new entry will be created in your contact list. Write the name for the new contact in "Name" field and then write the telephone number in "Telephone number" field in the right part of the program window.
You can also edit your SMS received messages directly from the right part of the program window. If you want to delete a SMS, select it and press over "Delete" icon.
SIM Editor allows you to create new SMS messages which will be sent when you turn your mobile phone on. Press over "New" icon, a new entry will appear. In "SMS Status" tab select "To be sent". Enter the telephone number you want to send the SMS and write the text.

Once you have made all the changes you want in your contact list and in your SMS list you have to press "Save" if you want to save all the changes. If you forgot to press "Save" all the changes will be lost.
3. Export
SIM Editor allows you to make a back up of the contact list of your mobile phone and of your SMS list. Click on "Import/Export", select "Export" function and select the folder in which you want to save the back up and the name you want to use for it (the name selected by default is phone.csv for contact list back up and sms.csv for SMS back up).
4. Import
Select "Import/Export" and "Import" function if you want to add new entries to your contact list. Choose the file .CSV you want to import. All the contacts saved in the CSV file will be added to your contact list automatically.
5. SIM Information
Select this option to display all the information about the SIM card of your mobile phone. This information will be shown only if it is available.
6. Enable, disable or change PIN code
You are able to enable, disable or change the PIN code of your SIM card. Click over this icon and choose between the different options: "Enable PIN code", "Disable PIN code" or "Change PIN code". If you select "Change PIN code" you must enter the new PIN code you want to assign.
7. Unblock
This option allows you to unblock the SIM card of your mobile phone.
8. Select language
You can change the OSD language of the SIM Editor program. Click on "Select language" and select the OSD language you want to use from the list. Press "OK" to confirm or "Cancel" to cancel.

-
Welcome
-
Features
-
Technical Specifications
-
System Requirements
-
Content
-
Hardware
-
Installation
-
DNle software installation
9. SIM Editor
-
Card Reader
-
Card Reader uninstallation
-
FAQs
10. Card Reader
Thanks to its multi-slot design you will be able to insert different memory cards simultaneously and share files between cards inserted in different slots.
The cards must be inserted in their slots smoothly. Please do not force the cards when you insert them in their slots because it could damage the device. When you insert a memory card in its slot, an indicator led will be turned on in red. When you insert a DNle, smart card or SIM card in their slots, the indicator led will be turned on in green and it will flicker in red when the card reader reads the content of the cards.
If you want to access to the files saved in the memory cards go to "My PC". The slots which have memory cards inside are marked in blue colour in My PC menu. Double click over the memory card where you want to access.
You will be able to copy files between memory cards inserted in different slots directly without needing to copy the file previously in your computer. First, you have to access to the memory card which contains the files you want to copy, select the file you want to copy by right clicking and then select "Copy". Then, you have to access to the memory card in where you want to copy the file, select it by right clicking and then select "Paste". The file will be copied directly.
11. Uninstallation
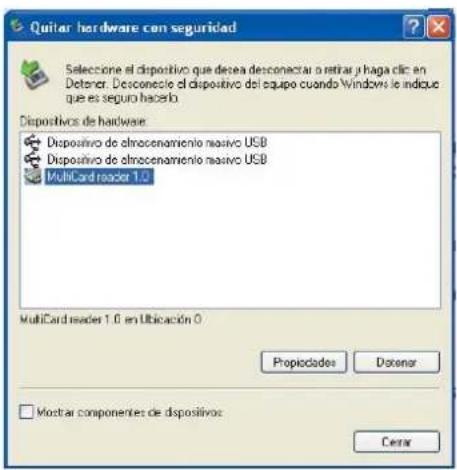
We suggest you to disconnect the device by clicking on "Remove hardware safety". Right clicking over the device icon in the window bar and then select "Remove hardware safely". Select the device and then click on "Stop". A confirmation message will appear when you could unplug the device.
The certificate doesn't work although the DNle is in its slot
Please make sure the card is properly inserted in the card reader. Besides, check if the device has a SIM card inserted (if yes, please take it out). If it is correctly inserted, try to remove it and insert it again. If the certificate still doesn't work please go to "I can't view the AC DNie root certificate" question, it could be a problem during installation process.
I can not view the AC RAIZ DNle root certificate
This problem could appear in Internet Explorer, Netscape and Firefox navigators.
The installation program copies the root certificate in the following directory: c:\DNl\con el nombre ACRAIZ_CERTIFICATE_AND_CRL_SIGNING_SHA1.crt.
To solve this problem open the navigator (Internet Explorer, Netscape or Firefox) and then select the certificate and, without loose the file, put it in the navigator window. Then you have to follow the indicated steps.
If you want to verify if the root certificate is correctly installed, consult the steps indicated in this user guide.
I can not view the PKCS#11 DNle module
This problem could appear in Firefox and Netscape navigators. The installation program copy the PKCS#11 cryptographic module in the following directory: c:\DNle\ con el nombre instalac.htm
Open a navigator window (Netscape or Firefox), select the file instalac.htm and, without loose the file, put it in the navigator window. Follow the indicated steps.
If you want to verify if the root certificate is correctoy installed consult the steps indicated in this user guide.
I want to use my DNle in a computer in which has been installed the cryptographic module under another user
The DNie cryptographic module is installed in the following way:
CSP module for Microsoft
PKCS#11 module for Netscape and Firefox
Root Certificate: for Microsoft, Netscape and Firefox
When a new user want to use the DNle in a computer with another cryptographic module installed, the navigator software has to be configured again:
Internet Explorer
Under Internet Explorer the new user only has to install the Root Certificate. Follow the indications shown in the question "I can not view the AC RAIC DNle root certificate".
-
Welcome
-
Features
-
Technical Specifications
-
System Requirements
-
Content
-
Hardware
-
Installation
-
DNle software installation
-
SIM Editor
-
Card Reader
-
Card Reader uninstallation
-
FAQs
Netscape and/or Firefox
These are the steps the user has to follow to complete the installation:
- Install the AC RAIZ DNIE root certificate. Follow the indiations shown in the question "I can not view the AC RAIZ DNIE root certificate".
- Setup the Security Device. Follow the steps indicated in the question "I can not view the PKCS#11 DNIE module"
When I click on "Load" icon in SIM Editor software window an error message appears.
Please make sure the SIM card is placed in the correct slot and also if it is correctly inserted. Besides, check if the device has a Smart card or a DNle card inserted (if yes, please take it out). If the device still doesn't recognize the SIM card, unplug the card reader and plug it again to your PC.
-
Welcome
-
Features
-
Technical Specifications
-
System Requirements
-
Content
-
Hardware
-
Installation
-
DNle software installation
-
SIM Editor
-
Card Reader
-
Card Reader uninstallation
-
FAQs
sveon
SCTo16 Manual do utilizador
Índice
CSP (Cryptographic Service Provider Microsoft)
API PKCS#11
natural_image
Close-up of a black electronic device with three ports and a labeled pin (6), no text or symbols beyond the number.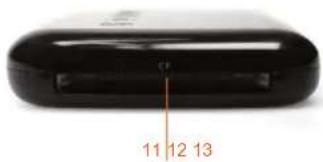


natural_image
Close-up of a black electronic device with two orange arrows pointing to the interior (no visible text or symbols)7. Instalação
3. Firefox
SCTo16 Manual do utilizador
Indice


- SCT016
- 44in1 Card Reader & DNle/SIM reader & Hub
- Instalación
- Firefox
- Welcome
- Features
- Technical Specifications
- System Requirements
- Content
- Hardware
- Installation
- DNle software installation
- How to install the cryptographic module for DNle
- DGP root certificate
- PKSC#11 installation module
- SIM Editor
- How to obtain the information from your contact list or SMS
- Edit / Delete / Add entries
- Export
- Import
- SIM Information
- Enable, disable or change PIN code
- Unblock
- Select language
- Card Reader
- Uninstallation
- The certificate doesn't work although the DNle is in its slot
- I can not view the AC RAIZ DNle root certificate
- I can not view the PKCS#11 DNle module
- I want to use my DNle in a computer in which has been installed the cryptographic module under another user
- When I click on "Load" icon in SIM Editor software window an error message appears.
- Índice
- Instalação
- Indice
Brand : Sveon
Model : SCT016
Category : Memory reader