
Monster X5 Pro - Smartphone Pentagram - Free user manual and instructions
Find the device manual for free Monster X5 Pro Pentagram in PDF.


| Product Type | Smartphone |
| Brand | Pentagram |
| Model | Monster X5 Pro (P 500-2) |
| Dimensions (slim battery) | 140 x 68.4 x 9.8 mm |
| Dimensions (monster battery) | 140 x 68.4 x 14.8 mm |
| Weight (slim battery) | 151 g |
| Weight (monster battery) | 203 g |
| Display | 5.0" IPS, 1280 x 720 pixels |
| Processor | Qualcomm MSM822B, 4x1.4 GHz |
| GPU | Adreno 305 |
| RAM | 1 GB |
| Internal Storage | 4 GB NAND flash |
| Expandable Storage | microSD up to 2 GB / microSDHC up to 32 GB |
| Operating System | Android 4.3 Jelly Bean with Google Play |
| Battery | 3000 mAh (slim) or 6000 mAh (monster) Li-Ion |
| Rear Camera | 18.0 MP (interpolated) / 13.0 MP optical with flash |
| Front Camera | 2.0 MP |
| Network | GSM, WCDMA, HSDPA+ up to 21 Mbps |
| Wi-Fi | 802.11 b/g/n |
| Bluetooth | Yes (version not specified) |
| GPS | Yes, with A-GPS |
| Sensors | Proximity sensor, accelerometer |
| Audio Jack | 3.5 mm stereo mini-jack |
| Charging/Data Port | MicroUSB |
| SIM | Dual SIM (GSM+WCDMA) |
| Box Contents | Device, Slim battery (3000 mAh), Monster battery (6000 mAh), Slim cover, Monster cover, USB cable, AC charger, Earphones, Warranty card, Quick guide |
| Safety Notes | Do not use in dusty or humid areas; avoid extreme temperatures; do not operate with wet hands; clean with dry cloth only; do not modify or repair yourself; backup data regularly. |
| Cleaning Instructions | Disconnect from power and clean with a soft, dry cloth. Do not use chemicals, benzine, or detergents. |
Frequently Asked Questions - Monster X5 Pro Pentagram
User questions about Monster X5 Pro Pentagram
0 question about this device. Answer the ones you know or ask your own.
Ask a new question about this device
Download the instructions for your Smartphone in PDF format for free! Find your manual Monster X5 Pro - Pentagram and take your electronic device back in hand. On this page are published all the documents necessary for the use of your device. Monster X5 Pro by Pentagram.
USER MANUAL Monster X5 Pro Pentagram
PENTAGRAM Monster X5 PRO [P 500-2]
WIADOMOŚCI SMS I MMS....10
KONFIGURACJA KART SIM....10
IKONY POWIADOMIEN....10
SPECYFIKACJA....11
Ważne informacje
Środki ostrożności
The latest versions of manual, drivers and applications are available on www.pentagram.eu
Spis treści
IMPORTANT INFORMATION....2
SAFETY PRECAUTIONS....2
INFORMATION CONCERNING WASTE ELECTRONIC EQUIPMENT......3
INTRODUCTION....3
BOX CONTENTS....3
MINIMUM SYSTEM REQUIREMENTS....3
PREPARATION FOR WORK....4
THE APPEARANCE OF THE DEVICE....4
ASSEMBLING SIM CARD, MICRO SD MEMORY CARD AND BATTERY...6
BATTERY CHARGING....6
CONNECTING TO THE COMPUTER....6
FIRMWARE UPGRADE....7
UNLOCKING AND LOCKING THE SCREEN....7
DEVICE OPERATION....7
TOUCH SCREEN....7
THE SCREEN DISPLAY....8
CONNECTION TO WIRELESS NETWORK....9
PHONE CALL....9
ANSWER OR DECLINE A CALL....10
SMS AND MMS....10
CONFIGURATION OF SIM CARDS....10
NOTIFICATION ICONS....10
SPECIFICATIONS....11
Important information
Safety precautions
- Do not use or store the device or it's accessories in dusty places, where the humidity is high or in extreme temperatures. This may lead to their damage not covered by warranty.
- Do not operate the device with wet hands to avoid the risk of device damage or electric shock.
- Do not clean the device with chemicals, such as benzine or detergents - always clean the device with a soft, dry cloth.
- Disconnect the device from the computer or another power source prior to cleaning.
- Do not modify or fix the device yourself in any way, it might void the guarantee.
- Do not drop or shake the device. Mechanical damage caused by means other than normal usage are not covered by warranty.
- Do not disconnect the device from the computer when transferring data. They might get irrecoverably lost.
- Files and data stored in the device memory and on the memory card are prone to damage like any other files. For this reason, if necessary, make the backup copies of those files and data.
- PENTAGRAM cannot be held responsible for any data loss.
Information concerning waste electronic equipment
The markings on the device and in the attached documentation indicate that it cannot be disposed of along with unsegregated general black bag waste when withdrawn from use. The device must be recycled or processed in another way to recover reusable materials and neutralize hazardous components.
The users should contact recycling/recovery authorities to determine how the device is to be disposed of in an environment-friendly manner.

NOTE: All information and technical data is subject to change without previous notice and/or indication in this manual.
Copyright ©2014 PENTAGRAM
All rights reserved; copying and reproduction is strictly forbidden.
Introduction
Thank you for purchasing smartphone PENTAGRAM Monster X5 PRO equipped with operating system Android ^™ 4.3. The device allows you to phone calls, send and receive SMS / MMS messages, download applications and use the Internet the same way as using a computer. It also features a video player, music player, photo viewer, ebook reader and many more.
Box Contents
- PENTAGRAM Monster X5 PRO [P 500-2] 6. USB cable
- SLIM battery 3000 mAh 7. AC charger
- MONSTER battery 6000 mAh 8. Earphones
- SLIM battery cover 9. Warranty card
- MONSTER battery cover 10. Quick guide
Minimum system requirements
These requirements are only important when connecting the device to a computer.
- A PC with an available USB port
- Operating system: Windows Me / 2000 / XP / Vista / 7 / 8
Preparation for work
The appearance of the device
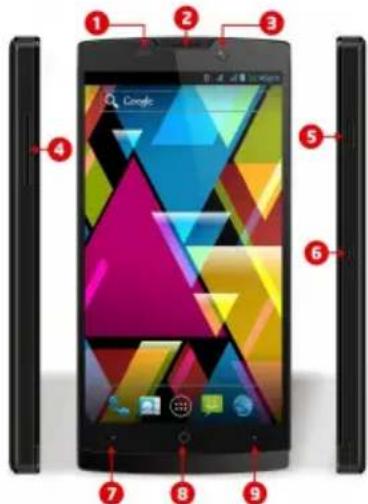
-
Proximity sensor - used to fade the screen during a call, to not disconnect or suspend a call.
-
Speaker - active during a call.
-
Front camera 2.0 Mpix.
-
Volume Control - to increase / decrease the volume.
-
Power button - to turn on or off the device, press and hold this button for approx. 4 seconds.
- Press the button to enter the device in sleep mode and lock the screen. In this mode, the machine is still working only screen of the device is turned off.
- Press the button and drag the "padlock" on the left to unlock the screen.
-
Functional button - ability to assign functions: screenshot or audio recording.
-
MENU button - displays the options available for the current screen.
-
HOME button - return directly to the main screen from anywhere in the interface.
-
BACK button - return to the previous screen at any time.
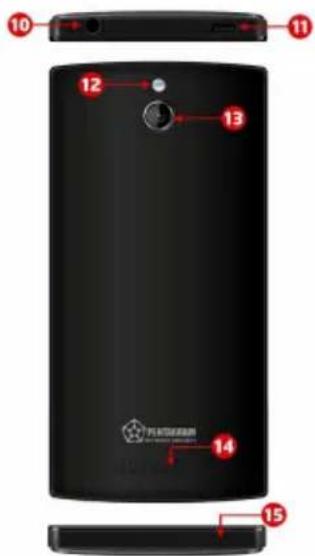
- Headphones socket.
- MicroUSB socket.
- Flash.
- Camera back 18.0 Mpix (boosted) / 13.0 Mpix (optical).
- Speaker - if no headphones are connected to the device, all the sounds will be played through the built-in speaker.
- Microphone.
Assembling SIM card, Micro SD memory card and battery
- If the device is on, press and hold the Power/Lock key and select Power off OK to turn it off. →
- Remove the back cover, use fingernail to gently lift the back cover.
- Insert the SIM card and Micro SD card with the contacts facing down.
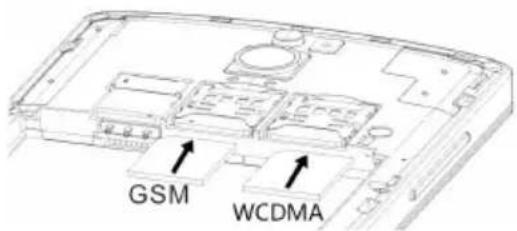
- Replace the battery.
- Replace the back cover.
Battery charging
It is recommended to charge and discharge the battery several times so that it reaches its full performance and service life.
In the top right corner of the main menu there is an icon representing the battery charge. When the icon is filled with bars, it means the battery is fully charged. If the icon is empty, the battery is very low and you have to charge it as quickly as possible. The battery will start charging automatically after connecting the device to the AC charger or when connected to a computer via the supplied USB cable.
Connecting to the computer
NOTES:
- To install applications and store your own files you can use either a memory card and flash memory.
- When the data are being transferred, do not disconnect the device from the computer to prevent the possible damage or loss of data.
The device works with the following operating systems: Windows Me / 2000 / XP / Vista / 7 / 8.
After connecting operating device to the computer via a USB cable on the device in the status bar, select USB connected and then Turn on USB storage. The device will be detected by the computer as a portable hard disk and will be visible in Windows Explorer.
Firmware upgrade
If necessary, you can upgrade the device firmware to a newer version. The latest firmware is available for download at www.pentagram.eu . The downloaded new firmware archive contains detailed information on preparing and performing the upgrade.
Unlocking and locking the screen
To unlock the screen, press the power button on the device, then touch and drag the lock icon on the open padlock icon.
To lock the device, press the power button on the device. The unit will go into sleep mode if not used for a long time (Settings-> Display-> Sleep).
Device operation
Smartphone Pentagram Monster X5 PRO has a touchscreen that needs to be operated using your finger.
Android ^™ interface has five screens. To go to the panels located on the left or right side of the main screen, slide your finger horizontally across the screen. For each of the five screens, you can place shortcuts, bookmarks and widgets.
Touch screen
Touch screen operation is intuitive, with your finger follow instructions, as well as using a computer mouse.
- Scrolling - Touch and slide your finger up and down, right and left; for example, to move between screens, scroll through a web page or go to the next page while reading the book.
- Single touch / select - tap once on an item to start it or choose; for example, application, game.
- Holding - tap and hold your finger on the selected icon to move the icon to another location on the screen or remove the icon from the screen (the symbol x in the upper part of the screen).
- Pinch gesture - tap the screen with two fingers, fingers closer to each view will be reduced, fingers away from each view will be enlarged.
Rotate the touch screen - a motion sensor built into the device can independently specify the location the tablet. The screen is rotated according to the arrangement of the device. Most applications allow for such a change. Not applicable main screens.
Rotate the touch screen can be turned off, whatever the position of the screen doesn't rotate (Settings -> Display-> Auto-rotate screen).
The screen display
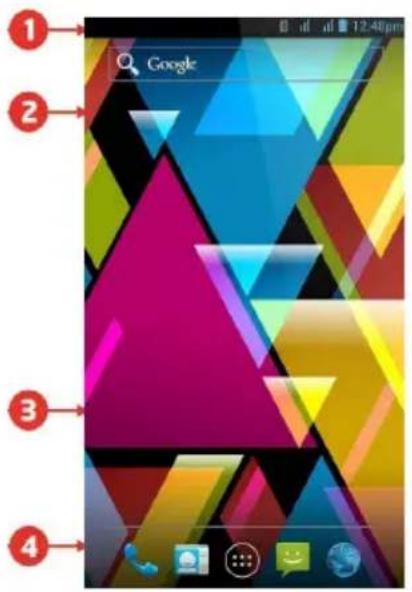
-
On each screen, the status bar is displayed. On the left side there are icons such as missed call notifications, new SMS / MMS messages, new e-mail, etc. On the right side displays icons indicating the status of the phone such as battery status, current time, Wifi connection, etc. The information on the status bar can be expanded: Tap the status bar and drag your finger down the screen. To close the information, tap the circle icon and drag your finger to the top.
-
The standard pre-installed widget to search the contents of the device and the Internet with Google search (access to the Internet must first be established via wireless or mobile network). Widget - a small application which is permanently running in the background.
-
Shortcuts of applications installed on the device. Press and hold your finger on the selected icon, allowing you to change its location or remove the shortcut (application will not be completely removed, uninstalled).
-
The navigation menu available on every screen.
- make a call by entering a phone number or find a person in the contact list. You can check the call history.
- contacts stored on the SIM card and the phone memory. Contacts can be segregated by groups and add to favorites. Using the icon in the lower right corner, you can add a new contact
- displays all installed applications and widgets on the device. You can run the application you want by clicking on it. Longer holding your finger on the icon allows you to create a shortcut on one of the screens.
- SMS and MMS. You can write a new message, and view the archive incoming messages
- browser
Connection to wireless network
Press the icon 📋 then go to Settings. In the first section, turn on the WiFi, then select WiFi. Find the wireless network that you can connect to. Tap on the chosen network and enter the password if the network is secured.
Please note: It is strongly recommended to turn the WiFi off if you are not using the network. This will prolong the battery working time.
Phone call
Select the icon ☐, enter a phone number or locate a person in your contact list, and then click the handset icon in the upper right corner to make the call.
Select the icon 🔔, on the contact list, tap and hold the name of the person, and then click handset icon to make a call.
In other applications, such as SMS, call history, there is also the option to make a call.
Answer or decline a call
Answer a call - drag the icon to the right earpiece, on the green phone icon. Reject a call - drag the icon to the left earpiece on the red phone icon. During a call, you can increase or decrease the volume by using volume bottom.
SMS and MMS
Select the icon to write or read the SMS and MMS.
To write a new text message, select the icon in the lower right corner. In the upper table, enter the phone number or select the person from contact list. In the lower table, enter the message text using the touch keyboard.
The maximum length of a message can contain 160 characters. If you exceed 480 characters (3 messages) message automatically becomes a multimedia message.
Configuration of SIM cards
In case of a problem with the automatic obtaining configuration data after inserting the SIM card, press the icon 📄, then go to Settings, section device, select Settings Dual SIM and enter the necessary data from the operator.
Notification icons
| GPRS in use | Connected to GPRS mobile network | Roaming | |
| GPRS in use | No signal | ||
| Connected to EDGE mobile network | No SIM card installed | ||
| EDGE in use | Vibrate mode | ||
| Connected to 3G mobile network | Ringer is silenced | ||
| 3G in use | Phone microphone is mute | ||
| Mobile network signal strength | Battery is very low | ||
| Connected to a Wi-Fi network | Battery is low | ||
| Bluetooth is on | Battery is partially drained | ||
| Connected to a Bluetooth device | Battery is full | ||
| Airplane Mode | Battery is charging | ||
| Alarms is set | GPS is on | ||
| Speakerphone is on | Receiving location data from GPS |
| New e-mail message | 3 more notifications not displayed | ||
| New text or multimedia message | Call in progress | ||
| Problem with text of multimedia message delivery | Call in progress using Bluetooth headset | ||
| New Google Talk message | Missed call | ||
| New voicemail | Call on hold | ||
| Upcoming event | Call forwarding is on | ||
| Data is syncing | Song is playing | ||
| Problem with sign-in or sync | Uploading data | ||
| SD card is full | Downloading data | ||
| An open Wi-Fi network is available | Download finished | ||
| Phone is connected via USB cable | Connected to VPN | ||
| Phone is sharing list data connection via USB (USB tethering) | Disconnected from VPN | ||
| Phone is sharing list data connection as a Wi-Fi hotspot (Wi-Fi tethering) | Application update available | ||
| Phone is tethered in multiple ways | System update available |
Specifications*
| System parameters | |
| RAM 1GB | |
| NAND flash 4 GB | |
| Card slot microSD up to 2 GB / microSDHC up to 32 GB | |
| Operating System Android version 4.3 with Google Play | |
| Parameters | |
| Display 5.0" | |
| Resolution 1280*720 | |
| Processor Qualcomm MSM822B 4x1.4 GHz | |
| GPU Andreno 305 | |
| Network Wireless 802.11 b/g/n, HSDPA+ up to 21 Mbps | |
| Battery type 3000 mAh and 6000 mAh | |
| Earphones 3,5mm stereo mini-jack | |
| Basic parameters | |
| Audio MP3, WMA, OGG, APE, FUAC, WAV | |
| Video 720P HD | |
| Image JPG, BMP, PNG | |
| General info | |
| Size 140*68.4*9.8mm / 140*6 | 8.4*14.8 mm |
| Weight | 151g / 203 g |
| Working temp. | od 0°C do +40°C |
| Storage temp. | od 10°C do +40°C |
* Specifications are subject to change without prior notice.
DÜLEŽITÉ INFORMACE....2
BEZPEČNOSTNÍ OPATŘENÍ 2
INFORMACE TÝKAJÍCÍ SE NAKLÁDÁNÍ S ELEKTROZAŘÍZENÍMI A
ELEKTROODPADY....3
ÚVOD....3
OBSAH BALENÍ 3
MINIMÁLNÍ POŽADAVKY NA SYSTÉM....3
PŘÍPRAVA NA PRÁCI....3
VZHLED PŘÍSTROJE 4
INSTALACE SIM KARTY, PAMÉTOVE KARTY MICRO SD A
AKUMULÁTORU....6
NABÍJENÍ AKUMULÁTORU....6
PRIPOJENI K POCITACI....6
AKTUALIZACE FIRMWARE....7
ODBLOKOVÁNÍ A BLOKOVÁNI OBRAZOVKY....7
POUŽITÍ PRÍSTROJE....7
DOTYKOVÝ DISPLEJ....7
VZHLED OBRAZOVKY....8
PRIPOJENI K BEZDRATOVE SITI....9
TELEFONICKÉ SPOJENÍ......9
PŘIJÍMÁNÍ A ODMÍTNUTÍ HOVORU....10
SMS A MMS....10
KONFIGURACE KARTY SIM....10
OZNAMOVACÍ IKONY....10
SPECIFIKACE....11
Důležité informace
DÔLEŽITÉ INFORMÁCIE....2
BEZPEČNOSTNÉ PREDPISY....2
INFORMÁCIE O OPOTREBOVANÝCH ELEKTRONICKÝCH
ZARIADENIACH....3
ÚVOD....3
OBSAH BALENIA....3
MINIMÁLNE POŽIADAVKY NA SYSTÉM....3
PRÍPRAVA ZARIADENIA DO PRÁCE....4
VZHŁAD ZARIADENIA....4
INSTALÁCIA SIM KARTY, PAMÁTOVEJ KARTY MICRO SD A BATÉRIE. .6
NABÍJANIE BATÉRIE....6
PRIPOJENIĘ K POČÍTAČU....6
AKTUALIZACIA FIRMWARE....7
ODBLOKOVANIE A ZABLOKOVANIE OBRAZOVKY....7
PREVÁDZKA ZARIADENIA....7
DOTYKOVY DISPLEJ....7
POHLAD OBRAZOVKY....8
PRIPOJENIE K BEZDRÔTOVEI SIETI....9
TELEFÔNNE SPOJENIE....9
PRIJATIE A ODMIETNUTIE HOVORU....10
SMS-A MMS SPRÁVY....10
KONFIGURACIA SIM KARIET....10
IKONKY PRÍSPEVKOV....10
ŠPECIFIKÁCIA....11
Dôležité Informácie
- Vložte batériu.
- Nasad'te zadný kryt.
Nabijanie batérie
- Ważne informacje
- Środki ostrożności
- Spis treści
- Important information
- Safety precautions
- Information concerning waste electronic equipment
- Introduction
- Box Contents
- Minimum system requirements
- Preparation for work
- Assembling SIM card, Micro SD memory card and battery
- Battery charging
- Connecting to the computer
- NOTES:
- Firmware upgrade
- Unlocking and locking the screen
- Device operation
- Touch screen
- The screen display
- Connection to wireless network
- Phone call
- Answer or decline a call
- SMS and MMS
- Configuration of SIM cards
- Důležité informace
- Dôležité Informácie
- Nabijanie batérie
Brand : Pentagram
Model : Monster X5 Pro
Category : Smartphone