
7561 - Alarme auto GEMINI - Free user manual and instructions
Find the device manual for free 7561 GEMINI in PDF.


| Product Type | Car Alarm System |
| Brand | Gemini |
| Model | 7561 (part of 7563 series) |
| Power Supply | 12V DC (vehicle battery) |
| Remote Control Battery | CR1616 (3V) |
| TAG Transmitter Battery | CR1616 (3V) |
| Magnetic Contact Battery | CR1616 (3V) |
| Arming Method | Remote control or electronic key |
| Disarming Method | Remote control, electronic key, or PIN code |
| Protection Zones | Perimetric and volumetric (optional ultrasonic/hyperfrequency module) |
| Engine Immobilizer | Yes, electrical engine immobilizer |
| Anti-Hijacking Function | Yes, with TAG transmitter (ref. 7708) |
| Panic / Car Finder Function | Yes, programmable |
| Emergency Disarming | Yes, via 4-digit PIN code (default 1111) |
| Garage Function | Yes, disables all protections for maintenance |
| Comfort Control | Yes, automatic window closing on arming (25 sec) |
| Passive Arming | Yes, programmable (45 sec after engine off) |
| Anti-Distraction (Auto Rearming) | Yes, programmable |
| Siren Sounds | Programmable chirps and alarm cycles |
| Warranty | 24 months from installation, subject to conditions |
| Installation | Professional installation required |
Frequently Asked Questions - 7561 GEMINI
User questions about 7561 GEMINI
0 question about this device. Answer the ones you know or ask your own.
Ask a new question about this device
Download the instructions for your Alarme auto in PDF format for free! Find your manual 7561 - GEMINI and take your electronic device back in hand. On this page are published all the documents necessary for the use of your device. 7561 by GEMINI.
USER MANUAL 7561 GEMINI
The undersigned,qualified installer,attests to have personally fitted the here described Vehicle Security system following the manufacturer instructions.
CERTIFICAT D'INSTALLATION
by GEMINI Technologies S.p.A.
Via Luigi Galvani 12 - 21020 Bodio Lomnago (VA) - Italia
Tel. +39 0332 943211 - Fax +39 0332 948080
Web site: www.gemini-alarm.com - e-mail: info@gemini-alarm.com

GEMINI
ALARM SYSTEMS

CERNET
SISTEMA OR OIS/TEURNE CREDIT RICATO
Reg. n 532
UN EN ISO 2001:2001
7563
7562
7561
MANUALE D'USO
END USER MANUAL


CE
For all EU Countries
AC 2628 Rev. 01-10/04
UK
DESCRIPTION OF THE ALARM
Dear Customer, we invite you to read completely this manual, in order to understand well how the alarm works, and how to program easily the functions by remote control.
Below are described the alarm module fuctions:
- System arming and disarming by a transmitters with random rolling code.
• Passive arming function (programmable). - Blinker.
- Chirp (programmable).
• Perimetric protection. - Volumetric protection (combined with an ultrasonic or hyperfrequency module, excludable from arming).
• Control for CDL, electrical widows and sun roof.
• Electrical engine immobilizer.
• Alarm memory indicated by optic/acoustic signals.
• "PANIC" or "CAR-FINDER" function.
• Emergency disarming by means of PIN-CODE.
• Anti-hijacking function. - Garage function.
NOTE: indications included in this manual, refer to the most complete device of the 7563 alarm series.
OPERATING DESCRIPTION
COMPLETE ALARM ARMING
The alarm can be activated by pressing key 1 on the remote or by inserting the electronic key into the appropriate socket.
The operation is confirmed by an acoustic signal and a visual signal consisting of one flash of the turn indicators lasting approximately one second.
The alarm has a 45" pre-arming "neutral time"
During the first 25" of this time, it is possible to exclude the sensor, as described in the specific paragraph.
ARMING WITH SIREN SOUND EXCLUSION
This function allows the user to arm the alarm system, excluding the siren sound in case of a theft attempt.
To exclude the siren, proceed as follows:
- Turn the ignition key to "ON" position
- The status will stay on for 0,5 seconds. During this time, push the button N°2 of the transmitter.
- Go away from the vehicle and push the button N°1 of the transmitter.
- The alarm will be armed with the optical and acoustic signals, which, as previously described, will be not activated in case of a theft attempt.
NOTE: the siren sound exclusion is bound to the single arming cycle.
This function is applied close to the hospitals.
PAG. 2
ARMING WITH VOLUMETRIC PROTECTION EXCLUSION AND COMFORT FUNCTION
This function allows the user to arm the system, with volumetric protection and of the comfort function being excluded.
Push the button N°1 of the transmitter and, during the 25" of the neutral time, push the button N°2 of the transmitter.
After this procedure a single short flashing of turn signals will take place.
NOTE: the procedure described above is bound to the single arming cycle
SYSTEM ARMED
After the inhibit time (about 45 sec.), the system is armed and it is ready to detect any theft attempt.
When the system is properly armed, the LED blinks.
After disarming the system, any occurred attempt will be indicated by the alarm with visual/acoustic signalling.
ALARM, HINIBIT TIME AND ALARM CYCLES
As previously described, any occurred attempt will be indicated by the alarm with visual/acoustic signalling.
After the alarm triggering, before another alarm cause, there are 5 seconds of "neutral time", that allow to disarm the system by emergency pin-code.
The alarm signalling has 5 cycles of 30 seconds each for input and arming cycles.
The ignition key (+15/54) and the cut wire alarm signalling have no limitation.
NOTE: You can cut off the alarm cycle without deactivating the system by pressing key 2 on the remote.
ALARM DISARMING
The alarm system can be deactivated by pressing key 1 on the remote, or by inserting the electronic key into the appropriate receptacle.
Disarming is indicated by three turn signal flashes and three acoustic signals. If an alarm condition has occurred, it will be signalled by five turn signal flashes and five acoustic signals (if these functions have not been excluded in programming stage).
See next paragraph for all signalling.
EMERGECY DISARMING BY PIN-CODE
The alarm system being described here has a RELEASE PIN-CODE function which allows the user to turn off the protection device (alarm and/or engine immobilizer) if supplied remotes do not work or have been lost.
The foreseen PIN-CODE is composed of four digits, from of 1 to 9.
The manufacturer's setting is 1-1-1-1 and are the same in all the alarm system 7563.
Due to previous safety reasons, we recommend to replace this original code with another user's customized code.
Please see at the relative paragraph for pin-code programming (pag.12).
PAG. 3
ALARM MEMORY
When disarming the alarm, if five turn signal flashes and five beep signals occur (if this function have not be excluded in programming stage), it is possible to identify the cause generating the alarm condition. To do this, turning the ignition key in "ON" position and see at the vehicle installed LED.
The LED will be blink, shown the last alarm condition.
The cause of the alarm will indicate for 5 times.
This indication can be interrupted by turning the ignition key to OFF.
The possible alarm signalling are indicated in the under table.
| LED SIGNAL | CAUSE OF THE ALARM | NUMBERS OF ALARM CYCLES |
| *** | Absorptions sensor | 5 |
| *** | Positive under key (+15/54) | Infinite |
| *** | Doors switches | 5 |
| *** | Cut wires | Infinite |
| *** | Trunk, hood and volumetric sensor | 5 |
| *** | External magnetic contact | 5 |
| LED ON (400mS)LED OF | ||
GARAGE FUNCTION
This function is used when the alarm disarming is required, e.g. for maintenance, without any intervention to the previous programming. In fact, this function disarms completely the alarm, without any intervention when passive arming and against absent-mindedness arming are programmed.
To do this, proceed as follows:
- With the alarm system deactivated, turn the ignition key to "ON" position
• The status LED will turn on for approximately 0.5". - During this period, put the electronic key in the specific receptacle.
• The led is turned off to indicate the alarm de-activation. - To restore normal operating of programmed functions, arm the alarm via the radio control.
PROGRAMMABLE FUNCTIONS ACOUSTIC SIGNALS
This function allows the user to permanently exclude all acoustic signals. See the relative paragraph for programming.
PANIC ALARM OR CAR-FINDER
If enabled, the PANIC ALARM function allows the user to activate the visual and audio alarm signals deliberately by pressing key 2 on the remote.
This function works regardless of whether the alarm system is "ON" or "OFF". The alarm signal lasts up to approx. 30". However, you can silence it at any time by pressing key 2 on the remote again
While the alarm signal is emitted the LED emits a continuous light.
If during the programming phase, the PANIC function has been disabled, the CAR FINDER function will be activated.
When the alarm is activated, the CAR FINDER function allows you to obtain a short optic/acoustic signal by pressing button N°2 on the remote.
TThis function can be useful to look for the car in a parking lot or parking silo without creating useless alarm condition.
The brief optic/acoustic signal consists of a low beep and the simultaneous flashing of the turn indicators.
NOTE: the emission of the audio signals is subordinate to their being enabled when programming the accessory functions.
CURRENT ABSORPTION SENSOR
ATTENTION: before activating of the absorption sensor, it is suggested to consult the specific rules being in force in your country (noise pollution).
When the absorption sensor is activated, a signal will be sent out at any minimal tension variation in the vehicle's electrical circuit (for example lamp switching on).
ANTI-DISTRACTION FUNCTION AND DOOR LOCKING
This function determines the automatic activation of the system if this has been disarmed and no voluntary actions are performed by the user (e.g. Door opening).
The function prevents the vehicle from being left unprotected in cases where, after the arming of the system, this is turned OFF accidentally by pressing the button N°1 of the remote control.
The self rearming is confirmed by the alarm with visual/acoustic signalling (one flash by the turn signals and one acoustic signal).
The anti-distraction function activates the CDL control.
Therefore, in order to prevent involuntary activations of the system, it's MANDATORY to connect the door pin switch to the system input (BROWN/GREN wire of the alarm wiring harness).
NOTE: after disarming, a door opening will stop the function.
Together with the previously described function, the automatic door locking of the vehicle is done when running.
Being closed all the doors of the vehicle, turn the ignition key to "ON"; after 20", all doors will be locked.
By turning the ignition key to "OFF", all doors of the vehicle will be automatically unlocked.
To prevent this function from being activated accidentally, the system continuously monitors the status of the ignition key and the input line of the DOOR AND BOOT PUSHBUTTONS and therefore does not allow operation of the locks if the DOORS and BOOT are opened manually while starting the engine or during the 20" after starting it.
PASSIVE ARMING
Automatic arming allows to have the alarm system active, 45 seconds after the engine switching "OFF".
After programming, this function is obtained simply by turning the ignition key to "OFF".
The alarm will indicate the passive arming activation by a long flash of the turn signals, two flash of the status led and two acoustic signals.
When opening a vehicle's door during passive arming, the arming time count will be set to zero and the led will be permanently illuminated; when the door is closed the 45" counting will restart.
LOCKING TIME
The standard locking time of the alarm is set to 0,5".
In case the vehicle needs a locking time of 6", you can vary this parameter during the programming phase.
NOTE: When the comfort function has been activated, let the locking time set to 0.5".
In fact, if the locking time is set to 6", when the alarm is disarmed, the windows of the vehicle will open.
COMFORT CONTROL
The comfort control allows the automatic regulation of window closing, when the alarm is armed.
In fact, after this function has been activated, at any alarm arming, the window winder motor/control unit will receive a 25" command, to close the windows.
CDL DOUBLE OPENING PULSE
By enabling this function you will obtain, upon deactivation of the system, a double control pulse on the door-unlocking line (about 0.5 second each).
This allows the opening of the centralized door locks on vehicles having the diversified door opening (first pulse driver side door opening, second pulse other doors opening).
This function is active only if the opening/closing time of 0,5" is selected, while setting the opening/closing time of 6" will automatically disabled the double pulse.
PAG. 6
PROGRAMMING THE ALARM SYSTEM
Has been previously programmed with standard configuration during manufacturing procedure by Gemini, and can be modified in any moment. During the programming phases, press the radio control (rough) push-button n.1, for function activation and the (smooth) push-button n.2, for function de-activation.
ATTENTION: pay attention to not modify the functions which have been programmed during the installation.
For the programming modification proceed as follows:
- With alarm being disarmed, open and keep it open the driver side door.
- Turn the ignition key to "ON" position.
- The status led stay on for 0,5 seconds; during this time, push together the two buttons of the remote control.
- Starting of programming procedure is indicated by two acoustic signals, one with high tone and one with loud tones, furthermore the led is permanently illuminated.
- To able and disable the functions, follow the below table, take into consideration that every time the push button of transmitter is pressed, the system goes to the following function.
| FUNCTION | STATE | BUTTON |
| Acoustic signals | Enabled | Button N°1- Enable ButtonN°2- Disable |
| Panic alarm or “car finder” | Enabled panic alarm | Button N°1- Enable panic Button N°2- Enable |
| Current absorption sensor | Disabled | Button Enable Button N°2-able |
| Anti-distraction, automatic door locking function | Disabled | Button N°1- Enable Button N°2- Disable |
| Passive arming | Disabled | Button Enable Button N°2-able |
| Setting of centralized lock times (0,5 - 6 sec) | 0,5" selected | Button N°1- Enable 6" Button N°2- Enable 0,5" |
| 25 seconds comfort closure command | Disabled | Button N°1- Enable Button N°2- Disable |
| Double impulse in opening | Disabled | Button N°1- Abilita Button N°2- Disable |
NOTE: by turning the ignition key toOFF", in any moment of the programming procedure, the latter will stop and successive functions will remain unchanged.
- Once the last function has been programmed, the alarm will confirm that the programming has been disabled with two acoustic signals with low tone, one acoustic signal with high tone, furthermore the led will be turned off.
- Turn the ignition key to "OFF" position.
PAG. 7
ANTI-HIJACKING FUNCTION
We suggest to keep the TAG separately from the remote control (usually kept with the vehicle key) for safety reasons and to enable the anti-hijacking function to control the vehicle speed.
NOTE: activation of the anti-hijacking function does not mean the vehicle immobilization but the starting of the reception procedure and authentication of the radio code.
The system ref.7629 is equipped with the anti-aggression function.
This function is able to immobilize the engine in case of an aggression against the vehicle's owner.
The anti-aggression function is based on the use of an automatic transmitter, (called TAG, ref. 7708), the which code is memorized in the system.
When the vehicle is running or in any case when positive under key is present, not receiving the signal sent out from the TAG, the module will be activated with the anti-robber function, immobilizing the vehicle as described in next chapters.
In order to avoid involuntary activation of the anti-robber system and consequently the vehicle's immobilizing, you must pay attention to its state, when you are close to the vehicle.
ATTENTION: for a correct work of the anti hijacking function, it is necessary the connection of the BROWN/GREEN wire to the doors switch.
DEVICE POWER ON
The power-on of the transmitter is obtained by pressing the button located on the TAG for at least 3 seconds: the Led of the TAG will be lighted until the button will be released.
The status ON of the TAG is signalled by a short flash, (every 3"), of the TAG's Led.
The coded data from the TAG are transmitted to the system periodically and, when the system receives the signal, the status led blinking.
DEVICE POWER OFF
The power-off of the transmitter is obtained by pressing the button located on the TAG until the Led will be lighted.
The status OFF of the TAG is signalled by 3 short flashes of the Tag's Led
VEHICLE'S STARTING
Start the vehicle by turning in "ON" position the ignition key.
The system ref.7629 will wait a transmission from the TAG for a time of 2 minutes: if one transmission will be detected, the anti-aggression function will be enabled.
If no transmission are received, the anti-aggression function is not enabled.
This automatic procedure allows to use the vehicle in security mode if the use forget the TAG or if the TAG is not properly working, (e.g. fault or battery discharged).
PAG. 8
VEHICLE RUNNING: USER AGGRESSION AND CAR HIJACKING
ATTENTION: For the correct work of the anti-aggression function, the user must hold the transmitter when the vehicle will be stolen.
If the driver's door will be opened during the vehicle running and the vehicle will be stolen, the radio contact between the TAG transmitter and the alarm will be lost.
Sixteen seconds after the opening of the driver's door the system's status Led will be lighted in order to signal the activation of the anti-aggression count-down.
In this situation, for safety reasons, the car's running is not interrupted.
After one minute from the opening of the driver's door the system will enable the vehicle's immobilization, as described in next paragraphs (in addition to the sirene sound for 2 minutes)
INSTALLATION WITH CONNECTION OF THE ODOMETER SIGNAL
The vehicle will be immobilized when the vehicle is running and its speed will be near to 0 km/h.
The immobilization of the vehicle will be signalled by the flashing of the direction lights, (for about 3 hours).
NOTE: the odometer sensor, ref.7667, must be connected to the alarm system, ref.7563.
INSTALLATION WITHOUT CONNECTION OF THE ODOMETER SIGNAL
The vehicle will be immobilized when the engine will be turned OFF for the first time. It will not be possible to start again the vehicle's engine.
The immobilization of the vehicle will be signalled by the flashing of the direction lights, (for about 3 hours).
SYSTEM DISARMING WITH TAG CARD
In order to disarm the engine's immobilization (and to start again the vehicle), it's mandatory to approach to the vehicle with the TAG transmitter, (switched "ON").
When the module received again the TAG codified signal, it deactive the anti-hijacking function and stop turn signals flashes.
SYSTEM DISARMING WITHOUT TAG CARD
This procedure can be used if there are some problems with the TAG card or with the anti-hijacking function (ex. Damage or battery discharge of the TAG card with enabled anti-hijacking function and vehicle running).
It's possible to disarm the engine's immobilization with the following procedure:
- Push the button located on the status Led or insert the electronic key into the receptacle, after at least 2 minutes from the start of the engine's immobilization.
- Push, within 2 seconds, the button N°2 of the remote control and then press, within 2 seconds, the button N°1 of the remote control.
PAG. 9
LEARNING OF NEW CONTROL DEVICES
ATTENTION: in order to carry out successfully the operation, it is necessary to make the required electrical connections (door switch, bonnet switch and positive under key).
The alarm can save to memory a maximum number of 12 control devices, either radio controlled, or electronic keys, TAG cards or magnetic contact (the later as a protection device).
Proceed as follows:
- With the alarm being disarmed, open and keep open the bonnet and the driver side door.
- Turn the ignition key to "ON".
ATTENTION: the following operations must be carried out within four seconds, otherwise the new device memorizing procedure will be invalidated.
- Turn the ignition key to "OFF".
Re-turn the ignition key to "ON" for three consecutive times (ignition key to "ON" and "OFF"), within the maximum time of four seconds, as mentioned before.
After the third commutation, let the ignition key to "ON". - The alarm will indicate the procedure starting of new control device or magnetic contact learning, by two long turn signal flashes and two acoustic signals, one acute tone and the other loud tone.
ATTENTION: do not modify the bonnet position, otherwise instead of saving to memory new devices, deletion of existing ones in the alarm's memory will take place.
- Now the alarm is waiting for receiving the device code.
- Press the radio control push-button 1, introduce the electronic key in the specific receptacle, press the TAG card button or make the magnetic contact to transmit (bring near and then take away contact and magnet), according to the device to be saved to memory.
In all four cases, the alarm will indicate the new device learning, by one turn signal flashing and one acute tone signal.
- Repeat the procedure to save to memory other devices.
• Turn the ignition key to "OFF" - The procedure completion will be indicated by one long turn signal flashing and one loud tone signal.
DELETION OF PROGRAMMED CONTROL DEVICES
ATTENTION: in order to carry out successfully the operation, it is necessary to make the required electrical connections (door switch, bonnet switch and positive under key).
The alarm is equipped with a deletion procedure of new control devices, either radio controlled, or electronic keys, TAG cards or magnetic contact (the later as a protection device).
Proceed as follows:
- With the alarm being disarmed, open and keep open the bonnet and the driver side door.
- Turn the ignition key to "ON".
ATTENTION: the following operations must be carried out within four seconds, otherwise the new device deletion procedure will be invalidated.
- Turn the ignition key to "OFF".
- Re-turn the ignition key to "ON" for three consecutive times (ignition key to "ON" and "OFF"), within the maximum time of four seconds, as mentioned before.
After the third commutation, let the ignition key to "ON".
- The alarm will indicate the procedure starting of new control device or magnetic or magnetic contact deletion, by two long turn signal flashes and two acoustic signals, one acute tone and the other loud tone.
- Close the bonnet.
• The led will be illuminated constantly. - Keep the bonnet close till the moment, the complete deletion of devices via radio, will take place (after about four seconds).
NOTE: keeping the bonnet close for less than four seconds, the device deletion via radio will be unsuccessful.
- The procedure completion will be indicated by led's turning off, by one long turn signal flashing and one loud tone signal.
- Turn the ignition key to "OFF".
NOTE: the control device deletion does not imply any modification of programmed functions.
PROGRAMMING NEW PIN-CODE
The procedure to program pin-code is specified here below. It is better to personalize the code as customer has required. In this example, supposing that the pin-code is 5-4-6-7.
- With the alarm being disarmed, open the driver side door and keep it open.
- Turn the ignition key in "On" position.
The status Led will be turned on for 0,5 seconds.; during this period, press simultaneously the two buttons of the transmitter.
After this procedure, two acoustic signals will be sent out: one with acute tone and the other with loud tone. - Close and keep closed the driver side door.
- Press simultaneously the two radio control buttons; the led will be turned off.
- Turn the ignition key in "OFF" position.
- After a four second pause, state led will start with the first sequence of flashes.
At the fifth LED flashing (corresponding at Number 5, first digit of the pin-code) push the button on the LED or turn the ignition key in "ON" position for one second.
Turn the ignition key in "OFF" position.
- After a four second pause, state led will start with a new sequence of flashes.
At the fourth LED flashing (corresponding at Number 4, second digit of the pin-code) push the button on the LED or turn the ignition key in "ON" position for one second.
Turn the ignition key in "OFF" position.
- After a four second pause, state led will start with a new sequence of flashes.
At the sixth LED flashing (corresponding at Number 6, third digit of the pin-code) push the button on the LED or turn the ignition key in "ON" position for one second.
Turn the ignition key in "OFF" position.
- After a four second pause, state led will start with a new sequence of flashes.
At the seventh LED flashing (corresponding at Number 7, fourth digit of the pin-code) push the button on the LED or turn the ignition key in "ON" position for one second.
Turn the ignition key in "OFF" position.
- The alarm system will indicate the end of the PIN-CODE personalizing procedure by two acoustic signal with low tone and one with high tone.
ATTENTION: If during one of four "nine flashing" sequences, no number is confirmed (value "0"), at the end of 9th flash, the PIN-CODE procedure will stop automatically.
PAG. 12
EMERGENCY DISARMING BY PIN-CODE
The procedure for emergency disarming by pin-code is the following. Kindly note that the standard pin-code programmed is 1-1-1-1.
The same number used for pin-code programmation (5-4-6-7) has been used also for emergency disarming example.
- Cause an alarm condition.
- Leave the alarm triggering for the standard timing (about 30 seconds) and wait for the "inhibit time between two alarm signalling"
- During the inhibit time the LED remain steadily ON for about 5 seconds; Turn the ignition key in "ON" position.
NOTE: do not keep the ignition key turned to 'ON" for more than 3", otherwise the alarm will interpret the situation as a theft attempt.
- LED switch "OFF" showing "the emergency procedure" entry
- Turn the ignition key in "OFF" position.
• After about 4 seconds the first 9 flashing sequence starts.
At the fifth LED flashing (corresponding at Number 5, first digit of the pin-code) turn the ignition key in "ON" position (then turn in "OFF" position) or push the button on the LED. - The LED will be switch OFF for about 4 seconds than a new 9 flash sequence will start.
At the fourth LED flashing (corresponding at Number 4, second digit of the pin-code) turn the ignition key in "ON" position (then turn in "OFF" position) or push the button on the LED. - The LED will be switch OFF for about 4 seconds than a new 9 flash sequence will start.
At the sixth LED flashing (corresponding at Number 6, third digit of the pin-code) turn the ignition key in "ON" position (then turn in "OFF" position) or push the button on the LED. - The LED will be switch OFF for about 4 seconds than a new 9 flash sequence will start.
At the seventh LED flashing (corresponding at Number 7, fourth digit of the pin-code) turn the ignition key in "ON" position (then turn in "OFF" position) or push the button on the LED.
If the code is right, the end of the emergency disarming by pin-code will be indicated by the alarm with visual/acoustic signalling.
Vice versa, if the inserted numbers are wrong, the alarm will start triggering again.
In this case, repeat all procedure.
REPLACEMENT OF DEVICE BATTERIES
The use of batteries which are different from the suggested one, could provoke irremediable damage to the device. Do not waste the environment with exhausted batteries, but use for their disposal the specific waste containers.
MAGNETIC CONTACT
The led's light intensity indicates the battery charge state of the magnetic contact;
• Intermittent light or low intensity of the led: uncharged battery.
• Permanent light or high intensity of the led: charged battery.
To replace the batteries, proceed as follows:
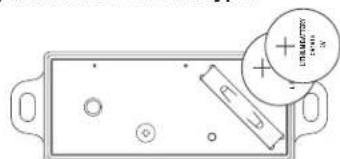
- With the alarm being disarmed, open the cover of the magnetic contact.
- Remove the exhausted batteries and replace with new, being careful to not invert the polarity.
- Put back the cover of the magnetic contact.
ATTENTION: use only batteries of CR1616 type.
natural_image
Technical diagram of a rectangular electronic component with mounting flanges and a circular inset showing polarity (no text or symbols)BATTERY REPLACEMENT
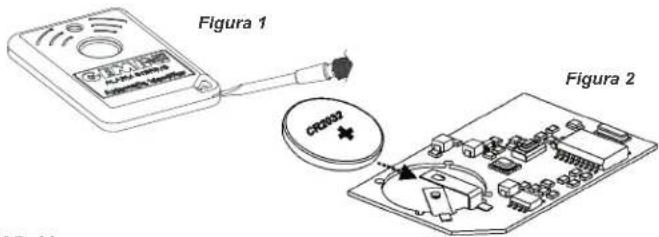
Open the TAG's plastic, making level with a screwdriver on the hole close to the slot. (Figure 1)
Remove the circuit and pull out the uncharged battery; position the charged battery, keeping the negative pole upwards. (Figure 2)
Remount all components, being sure that closure is correct and efficient. :Note: in order to achieve longer life of the battery, it is suggested to turn off the device, when it is not used.
PAG. 14
TRANSMITTER
The radio control is equipped with a device which indicates the battery charge status.
During normal operating of the radio control, when pushing the control button, the green led will be permanently illuminated.
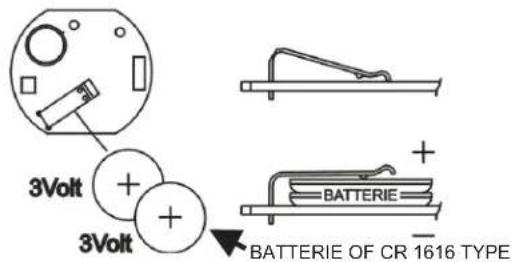
If the battery charge status is under the level required for good operating, when pushing the system arming/disarming button, the green led will be flashing in order to warn the user that battery replacement is needed. In this case, open the radio control with a light pressure between the two shells and then replace the batteries.
ATTENTION: use only batteries of CR1616 type.
WARRANTY CONDITIONS
This apparatus is guaranteed against all defects of fabrications for a period of 24 month from the installation date shown on this warranty coupon, taking into consideration the 1999/44/CE.
Therefore, you are kindly requested to fill entirely the guarantee certificate included in this booklet and to NOT REMOVE the guarantee label from the device. Missing or tearing of this label, missing of one part of guarantee certificate or missing of the enclosed sale document, will invalidate the guarantee. The guarantee is valid exclusively to Gemini Technologies S.p.A. Authorized Service Centers.
The manufacturer will decline any responsibility for any eventual malfunctions of the device, or electrical plant damages of the vehicle, due to improper installation, use or tampering.
This alarm has exclusively a deterrent function against eventual thefts.
- CERTIFICAT D'INSTALLATION
- by GEMINI Technologies S.p.A.
- GEMINI
- MANUALE D'USO
- END USER MANUAL
- UK
- DESCRIPTION OF THE ALARM
- OPERATING DESCRIPTION
- COMPLETE ALARM ARMING
- ARMING WITH SIREN SOUND EXCLUSION
- ARMING WITH VOLUMETRIC PROTECTION EXCLUSION AND COMFORT FUNCTION
- SYSTEM ARMED
- ALARM, HINIBIT TIME AND ALARM CYCLES
- ALARM DISARMING
- EMERGECY DISARMING BY PIN-CODE
- ALARM MEMORY
- GARAGE FUNCTION
- PROGRAMMABLE FUNCTIONS ACOUSTIC SIGNALS
- PANIC ALARM OR CAR-FINDER
- CURRENT ABSORPTION SENSOR
- ANTI-DISTRACTION FUNCTION AND DOOR LOCKING
- PASSIVE ARMING
- LOCKING TIME
- COMFORT CONTROL
- CDL DOUBLE OPENING PULSE
- PROGRAMMING THE ALARM SYSTEM
- ANTI-HIJACKING FUNCTION
- DEVICE POWER ON
- DEVICE POWER OFF
- VEHICLE'S STARTING
- VEHICLE RUNNING: USER AGGRESSION AND CAR HIJACKING
- INSTALLATION WITH CONNECTION OF THE ODOMETER SIGNAL
- INSTALLATION WITHOUT CONNECTION OF THE ODOMETER SIGNAL
- SYSTEM DISARMING WITH TAG CARD
- SYSTEM DISARMING WITHOUT TAG CARD
- LEARNING OF NEW CONTROL DEVICES
- DELETION OF PROGRAMMED CONTROL DEVICES
- PROGRAMMING NEW PIN-CODE
- EMERGENCY DISARMING BY PIN-CODE
- REPLACEMENT OF DEVICE BATTERIES
- MAGNETIC CONTACT
- BATTERY REPLACEMENT
- TRANSMITTER
- WARRANTY CONDITIONS
Brand : GEMINI
Model : 7561
Category : Alarme auto