809-031 - Sewing machine Menuett - Free user manual and instructions
Find the device manual for free 809-031 Menuett in PDF.


| Product Type | Sewing Machine |
| Brand | Menuett |
| Model | 809-031 |
| Power Supply | 230 VAC, 50 Hz |
| Power Consumption | 85 Watts (total) |
| Working Light | 15 Watts, pear-shaped bulb, E14 socket |
| Max. Sewing Speed | 800 stitches/minute |
| Stitch Types | Utility stitches (straight, zigzag, three-step zigzag, blind, scallop, Greek) and elastic stitches (triple straight, triple zigzag, waffle, pullover, overlock, stretch overlock, closed overlock) |
| Buttonhole Type | Four-step manual buttonhole with thread inlay option |
| Needle Positions | Center and left for straight stitch |
| Free Arm | Yes, removable sewing table |
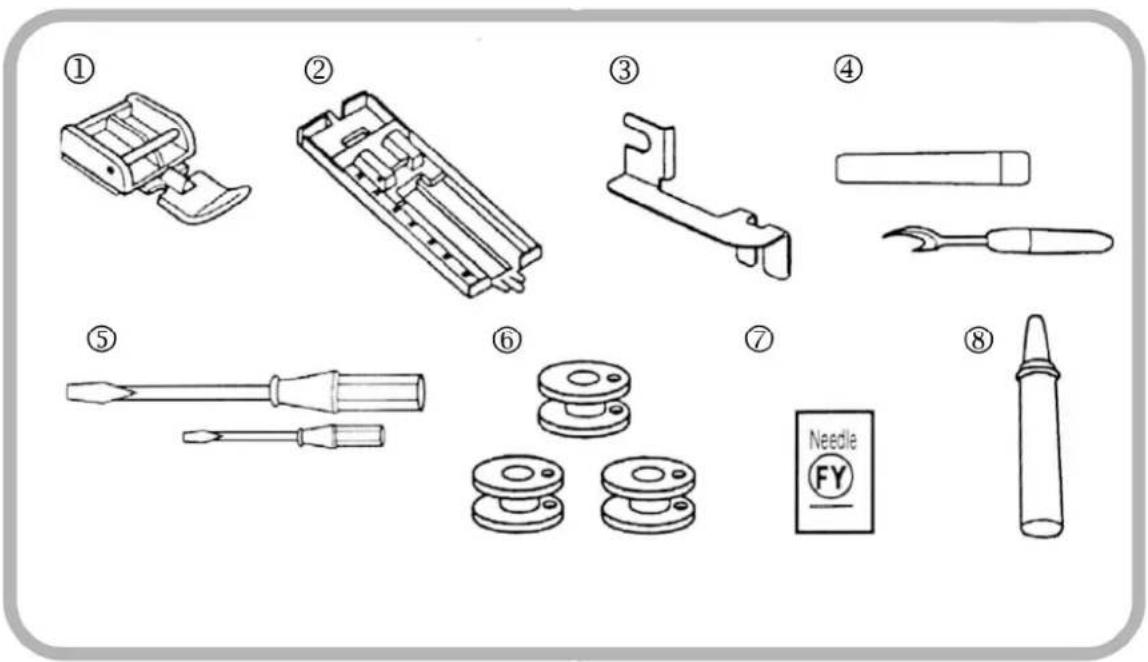
| Accessories Included | Zip foot, buttonhole foot, guide ruler, seam ripper, screwdriver, 3 bobbins, needles, oil, accessory tray |
| Safety Features | Automatic disconnection when removing covers; keep fingers away from moving parts; use correct stitch plate; do not pull fabric while sewing |
| Maintenance | Clean gripper and feed dog; oil every 2-3 months; use high quality sewing machine oil |
| Dimensions | Not specified |
| Weight | Not specified |
Frequently Asked Questions - 809-031 Menuett
User questions about 809-031 Menuett
0 question about this device. Answer the ones you know or ask your own.
Ask a new question about this device
Download the instructions for your Sewing machine in PDF format for free! Find your manual 809-031 - Menuett and take your electronic device back in hand. On this page are published all the documents necessary for the use of your device. 809-031 by Menuett.
USER MANUAL 809-031 Menuett
Operating Instructions for Sewing Machine
809-031
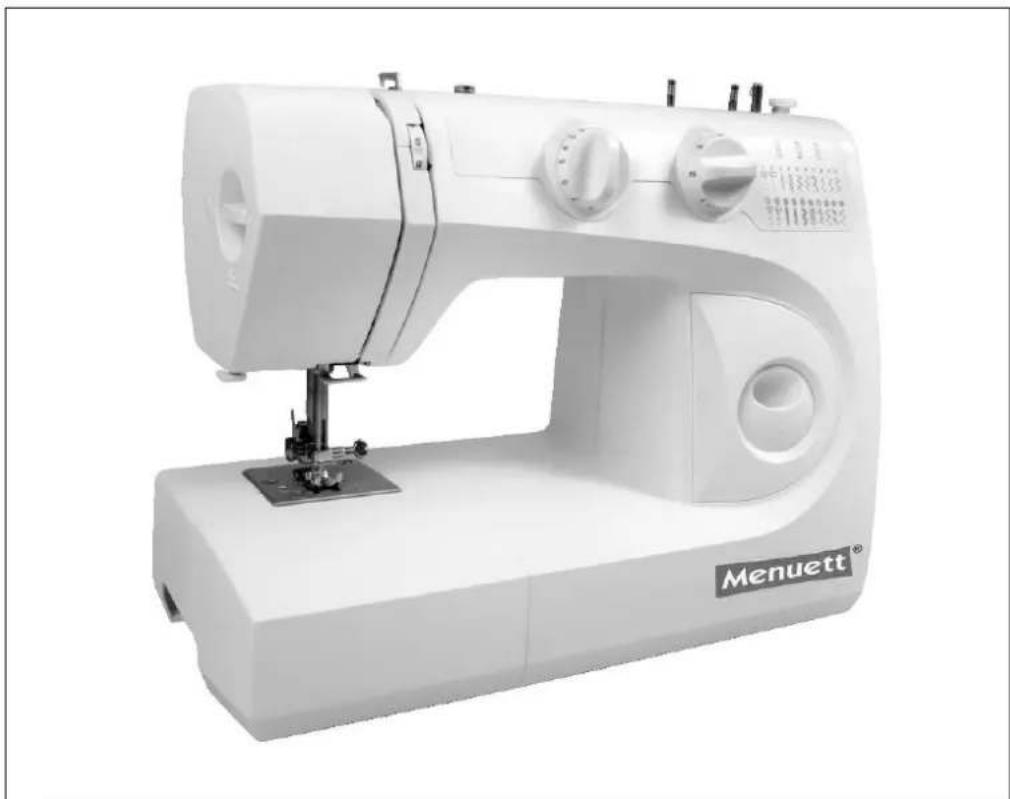
natural_image
White sewing machine with control knobs and a brand logo (Menuett) on the side, shown in studio setting (no visible text beyond branding)SV Bruksanvisning i original
NO Bruksanvisning i original
EN Operating instructions in original
SVENSKA
SÄKERHETSANVISNINGAR 7
TEKNISKA DATA 7
BESKRIVNING 8
Tillbehör 8
SAFETY INSTRUCTIONS....127
TECHNICAL DATA 127
DESCRIPTION 128
Accessories....128
Power supply 129
Foot control 129
OPERATION....130
PREPARATION....130
Pull-out sewing table....130
Remove the sewing table 130
Replace the sewing table....130
Free arm 131
Lighting 131
Remove the bulb....131
Insert the bulb 131
Replace presser foot.... 132
Remove....132
Replace 132
Replace the needle....133
Needle and thread table 133
Thread holder.... 134
Remove the bobbin case and insert the bobbin 135
Bobbin....136
Insert the bobbin in the bobbin case.... 137
Thread the sewing machine.... 138
Take up the bottom thread.... 139
Adjust the top thread tension 139
Top thread tension for zigzag stitching 140
Stitch selection control.... 141
Switch to elastic stitches....141
Stitch length control 142
Backstitch control....142
Presser foot control.... 143
Lower the feed dog 143
START SEWING....144
Simple sewing....144
Change direction of the seam....145
Use the stitch plate's markings.... 145
Sewing corners 146
SEAMS....146
Utility stitches 146
Stitch table 146
Straight stitch 147
Zigzag stitch....148
Three-step zigzag 149
Blind stitch....149
Scallop stitch....150
Greek stitch....151
OTHER FUNCTIONS....152
Elastic stitches 152
Stitch table 152
Triple straight stitch....153
TRIPLE ZIGZAG 154
Waffle stitch 155
Pullover stitch....155
Overlock stitch 156
Stretch overlock (open).... 157
Closed overlock 157
SEWING TECHNIQUES 158
Sewing buttons 158
Sewing buttonholes....160
Buttonhole with thread inlay 162
Sewing in zips 163
MAINTENANCE 164
Clean the gripper 164
Clean the feed dog....164
Oil the machine 165
Oil the parts under the front casing....165
Oil the gripper 165
TROUBLESHOOTING 165
SÄKERHETSANVISNINGAR

natural_image
Line drawing of a sewing machine needle stitching a car body, with no text or symbols presentnatural_image
Illustration of a foot pressing down on a computer mouse (no text or symbols present)Fotreglage
natural_image
Line drawing of a sewing machine needle stitching a cylindrical component (no text or symbols)Ta bort sybordet
natural_image
Line drawing of a sewing machine needle stitching fabric (no text or symbols)Friarm
Ta loss
natural_image
Technical diagram showing two mechanical components: a pump mechanism and a screwdriver with rotating head (no text or symbols)natural_image
Illustration of a sewing machine needle being adjusted, showing hand positioning and fabric shift (no text or symbols)


natural_image
Line drawing of a sewing machine with mechanical components and motion arrows (no text or symbols)natural_image
Line drawing of a mechanical clamp or clip with zigzag grooves (no text or symbols)natural_image
Hand pointing to a circular diagram with an arrow, no text or symbols presentnatural_image
Line drawing of a sewing machine on a cutting board (no text or symbols)Sömval: 3, 4 eller 5
Stygnlängd: 1–4
Pressarfot: standardpressarfot
Trådspänning: 2–6
natural_image
Line drawing of a sewing machine with motion lines indicating movement (no text or symbols)Sömval: 6
Stygnlängd: 1–2
Pressarfot: standardpressarfot
Trådspänning: 4–6

natural_image
Technical line drawing of a sewing machine with no visible text or symbolsSömval: 7 eller 8
Stygnlängd: 1–3
Pressarfot: standardpressarfot med fällinjal
Trådspänning: 4–6
Sömval: 9
Stygnlängd: 2
Pressarfot: standardpressarfot
Trådspänning: 6–8
natural_image
Technical line drawing of a mechanical device with no visible text or symbolsSömval: 10
Stygnlängd: 1–2
Pressarfot: standardpressarfot
Trådspänning: 4–6
natural_image
Line drawing of a sewing machine needle and foot (no text or symbols)natural_image
Line drawing of a sewing machine needle and foot (no text or symbols)natural_image
Line drawing of a sewing machine needle and foot (no text or symbols)Sömval: 6
Stygnlängd: ①-⑩
Pressarfot: standardpressarfot
Trådspänning: 2–6

Sömval: 7
Stygnlängd: ①-⑩
Pressarfot: standardpressarfot
Trådspänning: 2–6

natural_image
Technical line drawing of a mechanical device with stairs and lever mechanism (no text or symbols)Sömval: 8
Stygnlängd: ①-⑩
Pressarfot: standardpressarfot
Trådspänning: 2–6

natural_image
Line drawing of a sewing machine needle and foot (no text or symbols)Sömval: 9
Stygnlängd: ①-⑩
Pressarfot: standardpressarfot
Trådspänning: 2–6

natural_image
Line drawing of a sewing machine needle stitching fabric (no text or symbols)Sömval: 10
Stygnlängd: ①-⑩
Pressarfot: standardpressarfot
Trådspänning: 4–6

Sömval: 3, 4 eller 5
natural_image
Line drawing of a mechanical component with a lever and base (no text or symbols)natural_image
Two mechanical components with threaded fasteners, shown from different angles (no text or symbols)Sömval:
Stygnlängd:
Pressarfot: knapphälsfot
Trådspänning: 3-5
natural_image
Illustration of a hand holding two different types of scissors or clips, with one being cut (no text or symbols present)Sömval: 1
Stygnlängd: 1,5–4
natural_image
Two technical line drawings of a sewing machine and a vertical support structure (no text or symbols)natural_image
Two technical line drawings showing a hand operating a sewing machine and a clamping tool on a workbench (no text or symbols)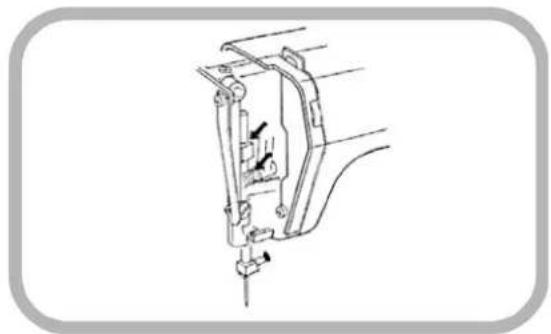
natural_image
Technical line drawing of a mechanical component with no visible text or symbolsnatural_image
Technical diagram of a mechanical assembly with labeled parts (no text or symbols present)Olja griparen
natural_image
Line drawing of a sewing machine needle stitching a car body, with no text or symbols presentnatural_image
Illustration of a foot pressing down on a foot with a cable, showing a downward arrow (no text or symbols)Fotpedal
Symaskinens hastighet styrer du med pedalen (6). Jo mer du trykker ned pedalen, desto raskere syr maskinen.
BRUK
FORBEREDELSE
Uttrekkbart sybord
natural_image
Line drawing of a sewing machine needle stitching a cylindrical component (no text or symbols)Ta av sybordet
natural_image
Line drawing of a sewing machine needle stitching fabric (no text or symbols)Friarm
Symaskinlampen er plassert under frontdekselet. Ta av frontdekselet hvis du skal skifte lyspære. Ta av skruehetten og skru ut skruen på siden av frontdekselet med en skrutrekker.
Løsne trykkfoten
natural_image
Technical diagram showing two mechanical components: a pump assembly and a screwdriver with rotating head (no text or symbols)Trådrullene settes på trådholderne. Løft opp trådholderne fra symaskinen før du begynner å sy. Trykk dem tilbake i symaskinen när du setter bort maskinen.
natural_image
Illustration of a sewing machine needle being adjusted, showing hand positioning and fabric shift (no text or symbols)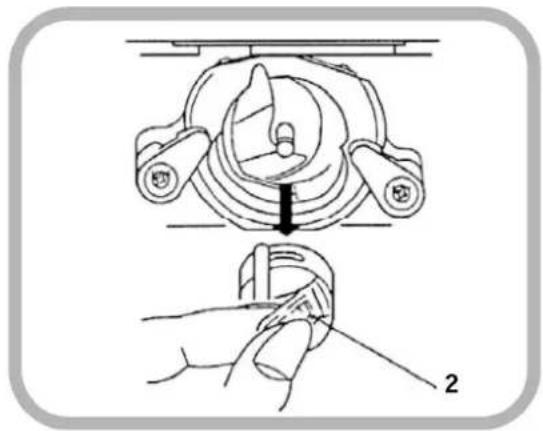


natural_image
Line drawing of a sewing machine with mechanical components and motion arrows (no text or symbols)natural_image
Line drawing of a mechanical clamp or clip with zigzag grooves (no text or symbols)natural_image
Simple line drawing of a hand pointing to a circular object with an arrow, no text or symbols present- Linjemarkeringer
- Hjørnemarkeringer
- Stingplate
- Hull i stingplaten
natural_image
Line drawing of a sewing machine on a cutting board (no text or symbols)natural_image
Line drawing of a sewing machine with motion lines indicating movement (no text or symbols)Sømvalg: 6
Stinglengde: 1–2
natural_image
Technical line drawing of a sewing machine with no visible text or symbolsSømvalg: 7 eller 8
Stinglengde: 1–3
Sømvalg: 9
Stinglengde: 2
natural_image
Technical line drawing of a mechanical device with no visible text or symbolsSømvalg: 10
Stinglengde: 1–2
natural_image
Line drawing of a sewing machine needle and foot (no text or symbols)Sømvalg: 1 eller 2
Stinglengde: ①-⑩
natural_image
Line drawing of a sewing machine needle and foot (no text or symbols)natural_image
Line drawing of a sewing machine needle and foot (no text or symbols)Sømvalg: 6
Stinglengde: ①-⑩
Sømvalg: 7
Stinglengde: ①-⑩
natural_image
Line drawing of a sewing machine with no text or symbolsSømvalg: 8
Stinglengde: ①-⑩
natural_image
Line drawing of a sewing machine on a slatted base (no text or symbols)Sømvalg: 9
Stinglengde: ①-⑩
natural_image
Line drawing of a sewing machine needle stitching fabric (no text or symbols)Sømvalg: 10
Stinglengde: ①-⑩
natural_image
Line drawing of a mechanical component with a lever and base (no text or symbols)natural_image
Two identical diagrams showing a screw being inserted into a surface, with no text or symbols present.Sømvalg:
Stinglengde:
Trykkfot: knapphullsfot
Trådspenning: 3-5


natural_image
Illustration of a hand holding two different types of scissors, one being cut with a string and the other being held (no text or symbols present)Sømvalg: 1
Stinglengde: 1,5–4
natural_image
Two technical line drawings of mechanical components, one showing a stepped platform and the other a vertical support structure (no text or symbols)natural_image
Two technical line drawings showing a hand operating a sewing machine and a clamping tool on a workbench (no text or symbols)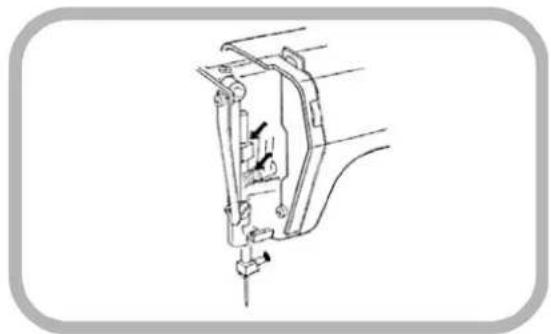
natural_image
Technical line drawing of a mechanical component with no visible text or symbolsOlje delene under frontdekselet
natural_image
Technical line drawing of a mechanical device with labeled parts (no text or symbols)Olje griperen
Åpne griperluken (4) og olje griperen som vist med pilen på bildet.
FEILS∅KING

natural_image
Line drawing of a sewing machine needle stitching a car body, with no text or symbols presentnatural_image
Illustration of a foot pressing down on a foot with a cable, showing a downward arrow (no text or symbols)Pedal nożny
natural_image
Illustration of hands operating a sewing machine with a mechanical component (no text or symbols visible)natural_image
Line drawing of a sewing machine needle stitching fabric (no text or symbols)Wolne ramię
Zdejmowanie
natural_image
Technical diagram showing two mechanical components: a pump mechanism and a screwdriver with rotating head (no text or symbols)natural_image
Illustration of a sewing machine needle being adjusted, showing hand positioning and fabric movement (no text or symbols)

natural_image
Line drawing of a sewing machine with mechanical components and motion arrows (no text or symbols)natural_image
Line drawing of a mechanical clamp or clip with zigzag grooves and a central spring (no text or symbols)natural_image
Simple line drawing of a hand pointing to a circular object with an arrow, no text or symbols presentnatural_image
Line drawing of a sewing machine on a cutting board (no text or symbols)natural_image
Line drawing of a sewing machine with motion lines indicating movement (no text or symbols)Wybór ściegu: 6
Długość ściegu: 1–2
natural_image
Technical line drawing of a mechanical device with springs and adjustment knobs (no text or symbols)Wybór ściegu: 9
Długość ściegu: 2
natural_image
Technical line drawing of a mechanical device with no visible text or symbolsWybór ściegu: 10
Długość ściegu: 1–2
natural_image
Line drawing of a sewing machine needle and foot (no text or symbols)natural_image
Line drawing of a sewing machine needle and foot (no text or symbols)natural_image
Line drawing of a sewing machine with a sewing machine foot and base, showing mechanical components without any text or symbols.Wybór ściegu: 6
Długość ściegu: ①-⑩
Wybór ściegu: 7
Długość ściegu: ①-⑩
natural_image
Line drawing of a sewing machine with stairs and base (no text or symbols)Wybór ściegu: 8
Długość ściegu: ①-⑩
natural_image
Line drawing of a sewing machine on a slatted base (no text or symbols)Wybór ściegu: 9
Długość ściegu: ①-⑩
natural_image
Line drawing of a sewing machine needle stitching fabric (no text or symbols)Wybór ściegu: 10
Długość ściegu: ①-⑩
natural_image
Line drawing of a mechanical device with a lever and base (no text or symbols)natural_image
Two mechanical components with threaded fasteners, shown from different angles (no text or symbols)Wybór ściegu:
Długość ściegu:

natural_image
Illustration of two hands holding scissors and a spring-like object, with an arrow indicating motion (no text or symbols)Wybór ściegu: 1
natural_image
Line drawing of a sewing machine needle stitching fabric (no text or symbols)
natural_image
Pure architectural line drawing of a tower structure without any text, numbers, or symbolsnatural_image
Two technical diagrams showing a hand operating a sewing machine and a clamping tool on a workbench (no text or symbols present)
natural_image
Technical line drawing of a mechanical device with no visible text or symbolsnatural_image
Technical diagram of a mechanical assembly with labeled parts (no text or symbols present)Oliwienie chwytacza
Read the Operating Instructions carefully before use
Always follow the basic safety instructions when using the sewing machine.
DANGER Protect against the risk of electric shock.
- Never leave the machine unattended when the power cord is plugged in. Always disconnect the plug immediately after use and before cleaning.
• Always disconnect the plug from the machine before replacing the bulb. Replace with a bulb of the same type (15 Watts).
WARNING Follow the instructions below to reduce the risk of burns, fire, electric shock or personal injury.
- The machine must not be used as a toy. Keep an eye on children when using the machine.
- This machine must only be used for its intended purpose as specified in these instructions. Only use accessories recommended by the manufacturer in accordance with these Operating Instructions.
- Do not use the machine if the power cord or plug are damaged, if the appliance has been exposed to water or is not working normally, or if the appliance has been damaged in some other way. Take the machine to an authorised dealer or service centre for inspection, repair or adjustment of the mechanism.
- Do not use the machine if the ventilation openings are blocked. Keep the ventilation openings free from fluff, dust and loose fabric.
- Do not insert any objects into the openings in the machine.
- Do not use the machine outdoors.
- Do not use the machine if aerosol products or oxygen are being used in the vicinity.
- Turn off with the power switch and disconnect the plug.
- Do not pull the power cord to disconnect the plug from the mains socket. Hold the actual plug to pull it out.
- Keep your fingers away from all moving parts. Take particular care in the vicinity of the sewing machine's needle.
• Always use the correct stitch plate. If you use the wrong stitch plate, the needle can break off. - Never use the machine with a bent needle.
- Do not pull the fabric while you are sewing. The needle can be bent and break off.
• Always disconnect the plug when carrying out adjustments in the vicinity of the needle, such as threading the needle, replacing the needle, threading the bobbin or replacing the presser foot.
• Always disconnect the plug from the wall socket when removing the casing and covers, lubricating or servicing the machine in accordance with the instructions in the Operating Instructions.
NOTE. Save these instructions for future reference.
The machine is designed for household use only.
TECHNICAL DATA
Voltage 230 VAC, 50 Hz
Power consumption 85 Watts (total)
Working light 15 Watts (pear-shaped bulb, E 14 socket,
max. 15 Watts)
Sewing speed Max. 800 stitches/minute
DESCRIPTION

- Reverse stitch control
- Stitch selection control
- Stitch length control
- Bobbin stop
- Bobbin pin
- Thread holder
- Bottom thread tensioner
- Thread guide
- Thread takeover lever
- Thread tensioner
- Front casing
- Presser foot control

- Thread cutter
- Presser foot
- Stitch plate
- Pull-out sewing table (accessory tray)
- Handle
- Handwheel
- Switch for illumination
- Socket for foot control cord
- Needle screw
- Free arm
- Presser foot lever
Accessories

natural_image
Line drawing of a sewing machine needle stitching a car body, with no text or symbols present- Zip foot
- Buttonhole foot
- Guide ruler
- Seam ripper
- Screwdriver
- Bobbins (x 3)
- Needles
- Oil
- Accessory tray
Power supply

IMPORTANT: Check that the machine's rated voltage and rated frequency correspond to the voltage and the frequency at the wall socket to which the machine is connected.
Switch (2) is not a switch for the actual machine, but only for the light. You must therefore always disconnect the machine by removing the plug from the wall socket before performing maintenance and service.
- Connect the plug (5) to the socket (4) on the machine.
- Connect the mains plug (1) to a wall socket (3).
- Turn the switch (2) to position 1 to turn on the sewing machine's lighting.
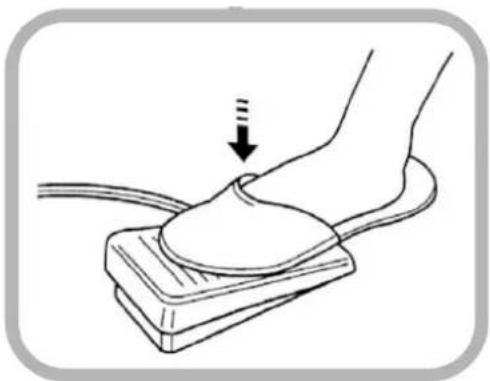
natural_image
Illustration of a foot pressing down on a computer mouse foot (no text or symbols)Foot control
The sewing machine's speed is governed with the foot control (6). The more you press the pedal, the faster the machine will sew.
OPERATION
PREPARATION
Pull-out sewing table
The pull-out sewing table extends the work surface when you are sewing. You can also remove it easily to use the free arm. When you use the free arm, you can sew in places that are otherwise difficult to reach.

natural_image
Line drawing of a sewing machine needle stitching a cylindrical component (no text or symbols)Remove the sewing table
Remove the pull-out sewing table by pulling it to the left as illustrated above.
Replace the sewing table
Press the sewing table back onto the sewing machine from the left until it snaps into place.

natural_image
Line drawing of a sewing machine needle stitching fabric (no text or symbols)Free arm
If you are sewing with the free arm, some of the fabric does not collect in front of the needle when sewing pockets or hemming sleeves, for example. You can also easily repair damaged knees, elbows and children's clothes.
Lighting
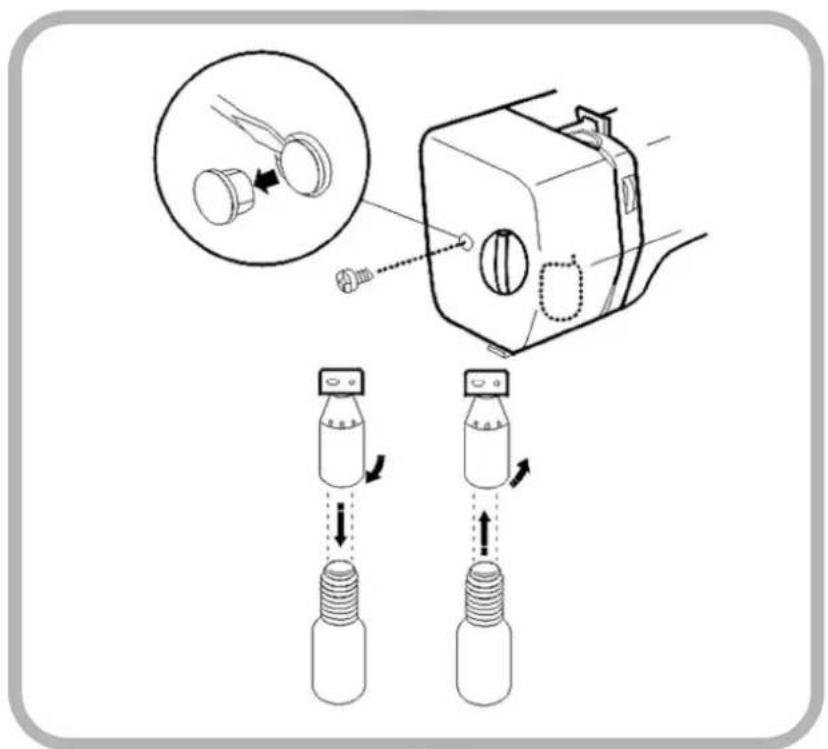
The sewing machine's lamp is located under the front casing. Remove the front casing if you need to replace the bulb. Remove the screw cover and undo the screw on the side of the front casing with a screwdriver.
IMPORTANT: Always turn off the current and disconnect the plug before replacing the bulb.
Remove the bulb
Twist the bulb clockwise and remove it.
Insert the bulb
Insert the bulb into the holder and screw it in anti-clockwise.
Replace presser foot

Remove
Turn the handwheel towards you until the needle is in the highest position. Lift the presser foot with the presser foot lever (1). Pull the small lever (2) on the rear of the presser foot holder towards you to undo the presser foot.
Replace
Position the presser foot on the stitch plate so that the pin (3) is directly below the presser foot holder's cut-out (4). Lower the presser foot lever again and check that the pin is located in the cut-out. Move the small lever on the rear of the presser foot towards you again. The presser foot now snaps automatically into place.
Replace the needle

natural_image
Technical diagram showing two mechanical components: a pump assembly and a screwdriver with rotating head (no text or symbols)Turn the handwheel towards you until the needle is in the highest position. Lower the presser foot and undo the needle screw anti-clockwise. Remove the old needle and insert a new one with the flat side at the back. The needle must be pressed in as far as possible. Tighten the needle screw with a screwdriver.
NOTE. Check regularly that the needle is not bent or blunt. Skipped stitches or knots in embroidered material or silk are often caused by damaged needles.
Needle and thread table
| Needle size Material Cotton/polyester Silk thread | |||
| #7 thin silk -- 100–140 | |||
| #10 crêpe 50 -- | |||
| #12 poplin, natural silk 50–60 80–100 | |||
| #12–14 | woollen material, cotton | 40–50 60–70 | |
| #14–16 | wool | 30–40 50–60 | |
| #14–18 | denim | 30–50 -- | |
| Fabric #10 | tricot 50 (polyester) | -- | |
Thread holder

The reels of thread are placed on the thread holders. Pull the thread holders out from the sewing machine before you begin sewing. Press them back into the sewing machine when you put the machine away.
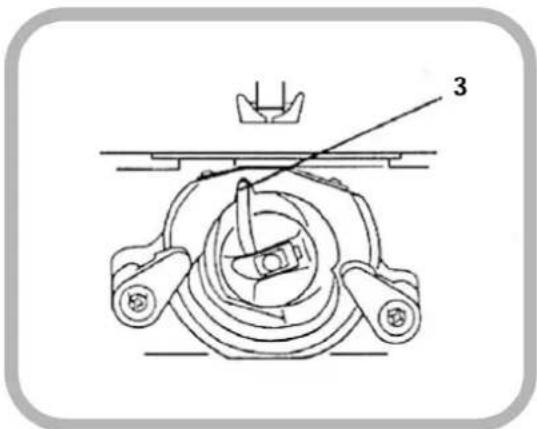
NOTE. If the thread becomes tangled or if knots occur in the thread holder, pull the top thread (2) through the hole (3) in the thread holder. Ensure that the hole is facing directly towards the reel of thread.
Remove the bobbin case and insert the bobbin

natural_image
Illustration of a sewing machine needle being adjusted, showing hand positioning and fabric movement (no text or symbols)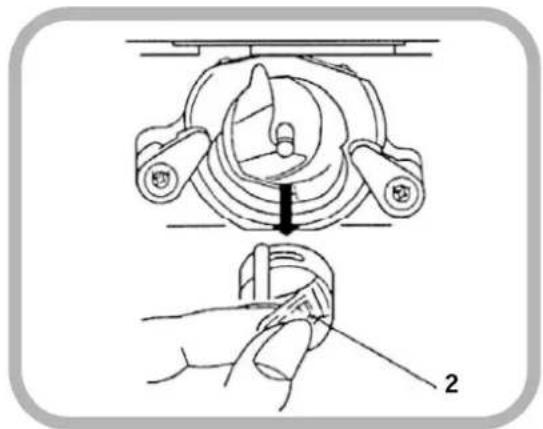
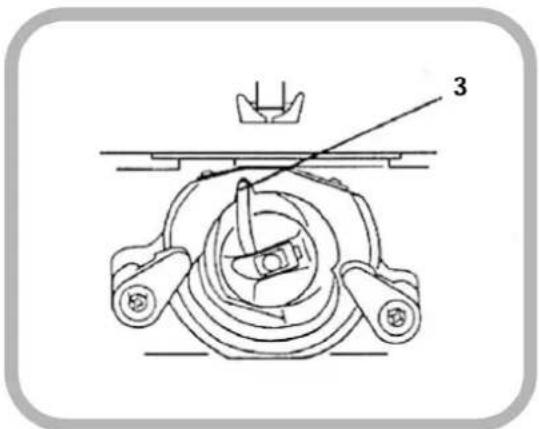
- Open the gripper flap (1).
- Turn the handwheel towards you until the needle is in the highest position. Hold the bobbin case in the clip (2) and pull it straight out.
- When the bobbin case is replaced, the pin (3) will snap into place at the top of the bobbin housing.
Bobbin
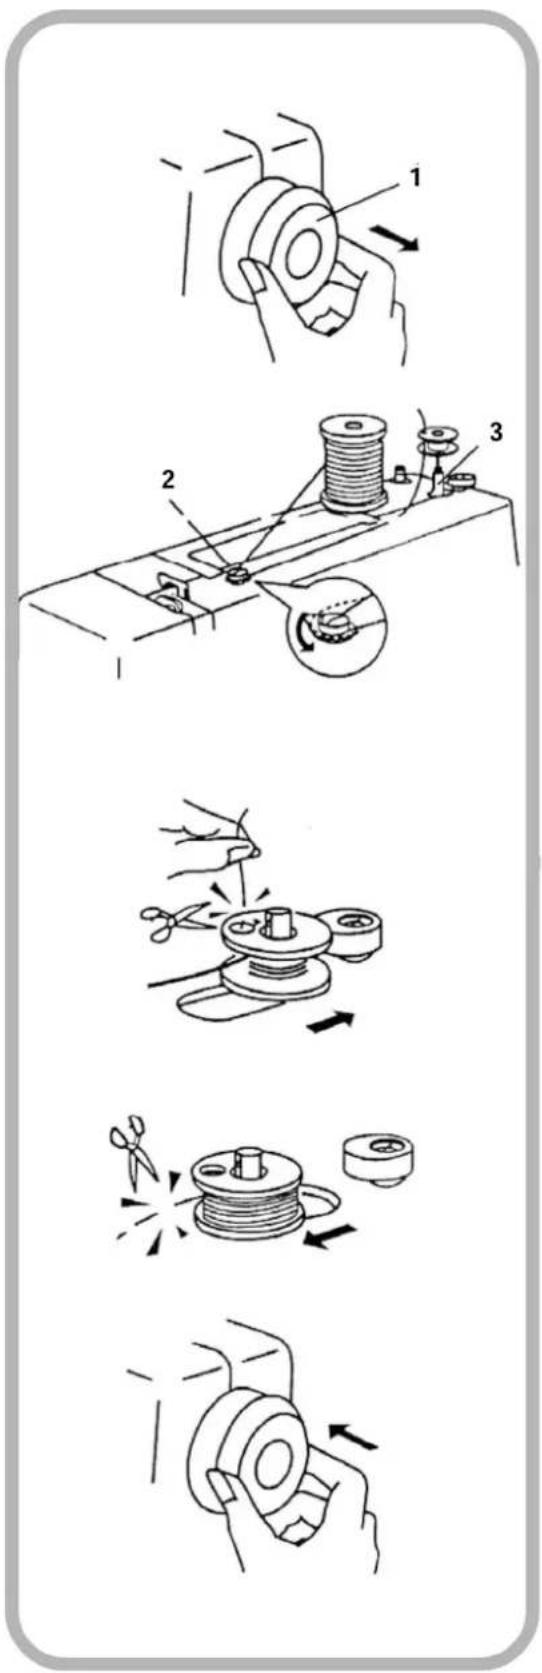
- Pull out the handwheel (1) to the right to release it.
- Pull the thread from the reel of thread through the thread tensioner (2).
- Pull the end of the thread through the hole in the bobbin from the inside upwards. Place the bobbin on the bobbin pin (3).
- Press the bobbin pin (3) to the right.
- Hold the end of the thread and press the foot control. When the thread has been wound a few turns onto the bobbin, you can release the end. Cut off the loose thread end close to the bobbin.
- Press the foot control again. Wind until the bobbin is fully wound and then stop the sewing machine. Press the bobbin pin back to the left and cut off the thread.
- When you have finished winding, press in the handwheel again to the original position.
Insert the bobbin in the bobbin case
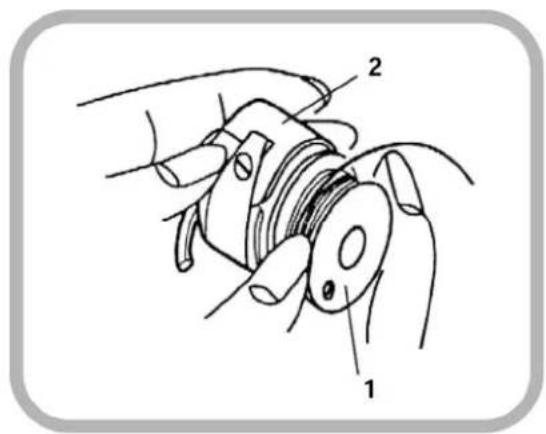


- Insert the bobbin (1) in the bobbin case (2). Check that the thread is running clockwise.
- Pull the thread through the slot (3) in the bobbin case.
- Pull the thread out through the spring (4) in the cut-out (5).
NOTE. Pull approx. 10 cm of thread out of the bobbin.
Thread the sewing machine

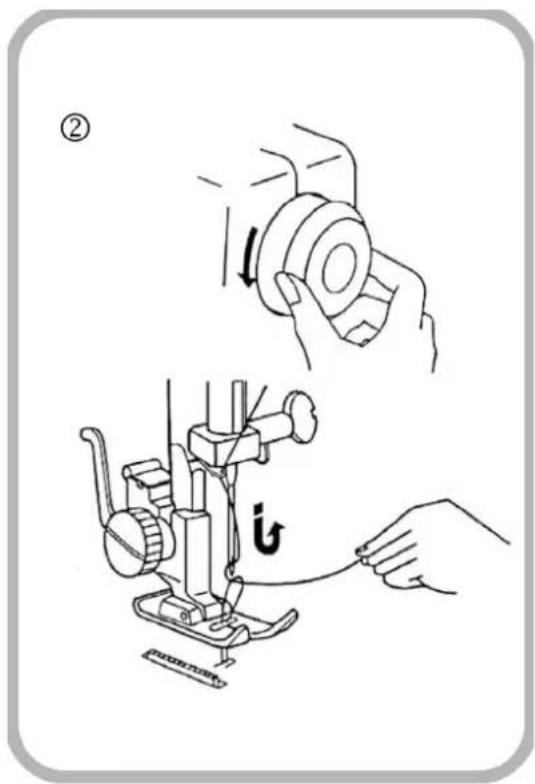
- Lift the presser foot and turn the handwheel towards you so that the thread takeover lever (3) is in the uppermost position. Place the reel of thread on the thread holder so that the thread is pulled out from the rear of the reel.
- Run the thread through the thread guide (1). Then run the thread down through the threading slot to the right, around the lug (2) and up again through the threading slot to the left.
- Tension the thread and thread it through the thread takeover lever (3).
- Run the thread down and thread it through the thread guide (4).
- Pull the thread down again and thread it through the thread guide (5).
- Thread the needle (6) from in front.
NOTE. Cut off the thread with sharp scissors before threading the needle, to make this process easier.
Take up the bottom thread


natural_image
Line drawing of a sewing machine with mechanical components and directional arrows (no text or symbols)- Lift the presser foot and gently hold the top thread with your left hand.
- Turn the handwheel towards you until the thread takeover lever is in the highest position. Pull the top thread, and the bottom thread will accompany it.
- Pull out approx. 5 cm of both threads and lay them backwards under the presser foot.
Adjust the top thread tension
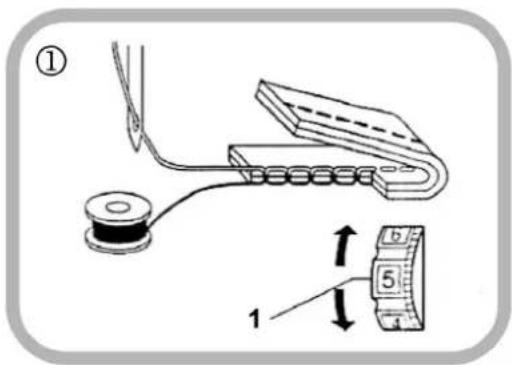
When you sew, the top and bottom threads grip each other between the two layers of fabric. It is important to have the correct thread tension for both the top and bottom threads to ensure the quality of the stitching.

If the top thread is too tight, the top and bottom threads will grip each other on the face of the material. Adjust the tension by setting the thread tensioner (1) to a lower value.

If the top thread is too loose, the top and bottom threads will grip each other on the reverse of the material. Adjust the tension by setting the thread tensioner (1) to a higher value.
The thread tensioner (1) is set to 5 in the factory, which produces attractive stitching in most materials.

natural_image
Line drawing of a mechanical clamp or spring component (no text or symbols)Top thread tension for zigzag stitching
To ensure perfect results when producing zigzag seams, the top thread tension should be lower than for straight seams. The top thread must be visible from the reverse of the fabric.
Stitch selection control

You can select different stitches with the stitch selection control. Set the number that corresponds to the desired stitch according to the panel.
The sewing machine has two different types of stitch: utility stitches (the upper row on the panel) and elastic stitches (the lower row on the panel).
Switch to elastic stitches
Adjust the stitch length control to ①-⑩ to switch to elastic stitches. Then select the desired elastic stitch with the stitch selection control. All available elastic stitches are shown on the lower row of the stitch diagram on the front of the sewing machine.
IMPORTANT: Always lift the needle out of the fabric before you switch to a different stitch. Otherwise the needle can break off.
Stitch length control
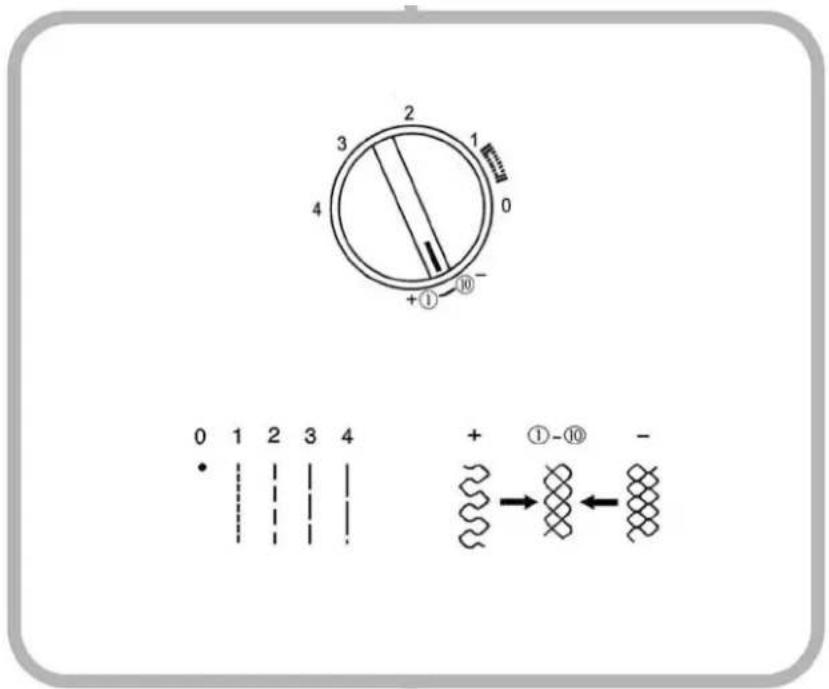
Depending on which stitch you have selected, you may need to change the stitch length to achieve a perfect result when sewing. This is done using the stitch length control.
NOTE.
• The higher the value, the longer the stitches.
• The area between 0 and 1 is suitable for buttonhole stitches.
• The area between 0.5 and 4 is suitable for zigzag stitches.
- If you want to sew elastic stitches, set the stitch length control to ①-⑩ and then select the desired stitch using the stitch selection control. If the basic setting for elastic stitches does not produce a good result, you can fine-tune the stitch length by turning the stitch length control clockwise until you have selected the desired stitch. The closer to 0 the control is turned, the closer together the elastic stitches.
IMPORTANT: Always lift the needle out of the fabric before you switch to a different stitch. Otherwise the needle can break off.
Backstitch control

natural_image
Simple line drawing of a hand pointing to a circular object with an arrow, no text or symbols presentPress and hold the backstitch control to sew backwards. The machine sews backwards until you release the backstitch control.
Presser foot control
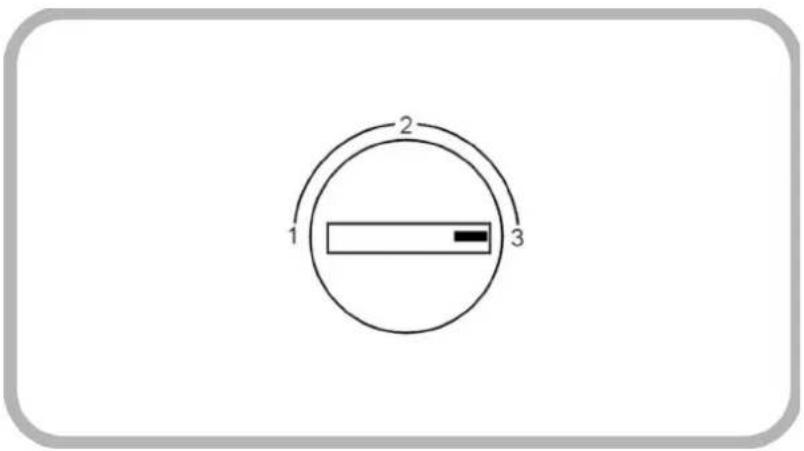
The presser foot control is preset to 3. This works well for all normal fabrics and stitches. However, you may need to alter the setting. For example, when you are sewing on applications or sewing mesh fabric, you can set the control to 2. Also use this setting for chiffon, lace and other thin materials. For cotton flannel and stretch material, the presser foot control should be set to position 1.
Lower the feed dog

- Open the gripper flap (1).
- Lower the feed dog by pulling the feed lever (2) downwards and moving it in the direction of the arrow (A).
- Raise the feed dog by pulling the feed lever (2) downwards and moving it in the direction of the arrow (B).
NOTE. The feed dog must be raised again for normal stitching in order to feed the fabric forwards.
START SEWING
Simple sewing

-
Lift the presser foot and raise the needle to the highest position by turning the handwheel towards you.
-
Align the fabric with the lines on the stitch plate.
-
Lower the presser foot and ensure that the threads are lying backwards.
-
Turn the handwheel towards you and lower the needle so that it passes down into the fabric.
-
Slowly press the foot control. Guide the fabric carefully with your hands. You do not need to pull the fabric, as it is fed forwards automatically by the feed dog.
-
Press the backstitch control and sew a few stitches backwards to secure the seam.
-
Raise the presser foot and the needle, remove the fabric and lay the threads backwards. Cut off both threads with scissors. Leave sufficiently long thread ends so that you can continue sewing.
Change direction of the seam

Sew up to the point where you want to change the direction of the seam. Stop the sewing machine and turn the handwheel towards you to lower the needle down into the fabric. Lift the presser foot. Turn the fabric to change the direction of the seam. The needle remains in the fabric at all times. Lower the presser foot and continue sewing in the new direction.
Use the stitch plate's markings

- Line markings
- Corner markings
- Stitch plate
- Hole in stitch plate
The stitch plate's line markings are a useful aid for maintaining an even distance between the seam and the edge of the fabric.
The figures at the front of the stitch plate correspond to the metric system, and the figures at the back are in inches. The following table shows the link between the figures on the stitch plate and the seam allowance in cm.
| Number on the stitch plate Seam allowance | |
| 10 1 cm | |
| 15 1.5 cm | |
| 20 2 cm | |
| 3/8 0.9 cm | |
| 4/8 1.3 cm | |
| 5/8 1.6 cm | |
| 6/8 1.9 cm |
Sewing corners

Ensure that you maintain an even distance between the needle and the edge of the fabric when sewing corners. The corner markings on the stitch plate help you to sew corners more easily. Use a seam allowance of 1.6 cm and sew until the front edge of the fabric is in line with the corner marking (2). Stop the sewing machine and turn the handwheel towards you to lower the needle down into the fabric. Raise the presser foot and turn the fabric around the needle until the edge of the fabric is aligned with the 5/8 line marking. Lower the presser foot and continue sewing in the new direction.
SEAMS
Utility stitches
Utility stitches are used for normal sewing. They are ideal for embroidery, for overcasting fabric edges so that they do not fray, as well as for hems. They are also used to sew in zips, sew on buttons and sew buttonholes.
If you have never sewed before, it is best to begin sewing with straight seams. Try to feed the fabric evenly and keep the seam parallel with the edge of the fabric. If you have succeeded in producing a parallel, attractive seam, then you have managed to feed the fabric forwards evenly.
Stitch table
| Symbol Name | |
 | Straight stitchNeedle position middle |
 | Straight stitchNeedle position left |
| [box] | Zigzag stitch (narrow) |
| [box] | Zigzag stitch (medium) |
| [04Y5] | Zigzag stitch (wide) |
 | Three-step zigzag |
| [TT10] | Elastic blind stitch |
 | Blind stitch |
 | Scallop stitch |
| [6478] | Greek stitch |
Straight stitch
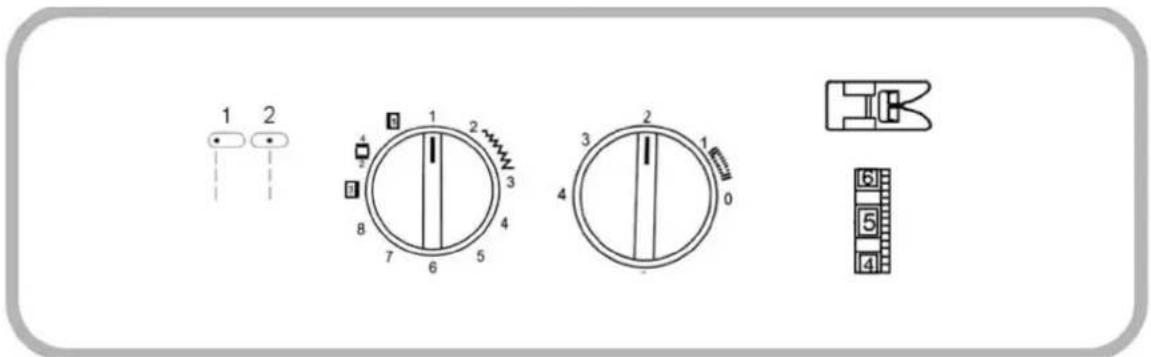
Stitch selection: 1 or 2
Stitch length: 1.5–4
Presser foot: Standard presser foot
Thread tension: 2–6

natural_image
Line drawing of a sewing machine on a cutting board (no text or symbols)The straight stitch is the most common stitch. There are two possible needle positions, in the middle and to the left.
Zigzag stitch

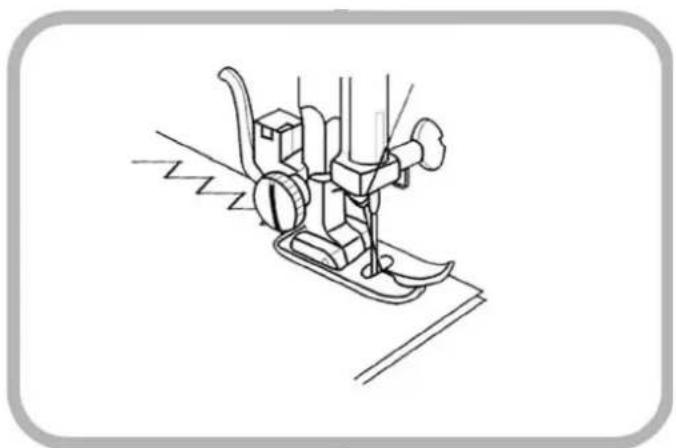
Stitch selection: 3, 4 or 5
Stitch length: 1–4
Presser foot: Standard presser foot
Thread tension: 2–6

natural_image
Line drawing of a sewing machine with motion lines indicating movement (no text or symbols)Simple zigzag stitches are often used to make buttonholes and to sew stretch fabrics. Their most important area of use, however, is overcasting fabric edges so that they do not fray.
Three-step zigzag

Stitch selection: 6
Stitch length: 1–2
Presser foot: Standard presser foot
Thread tension: 4–6

natural_image
Technical line drawing of a sewing machine mechanism with no visible text or symbolsThis stitch is suitable for synthetic material and other fabrics that easily become wrinkled. It can also be used for overcasting edges so that the fabric does not fray. You can also use this stitch to sew in elastic and to darn damaged clothes.
Use a seam allowance of approx. 1.5 cm. Cut the seam allowance with scissors when you have finished sewing.
Blind stitch
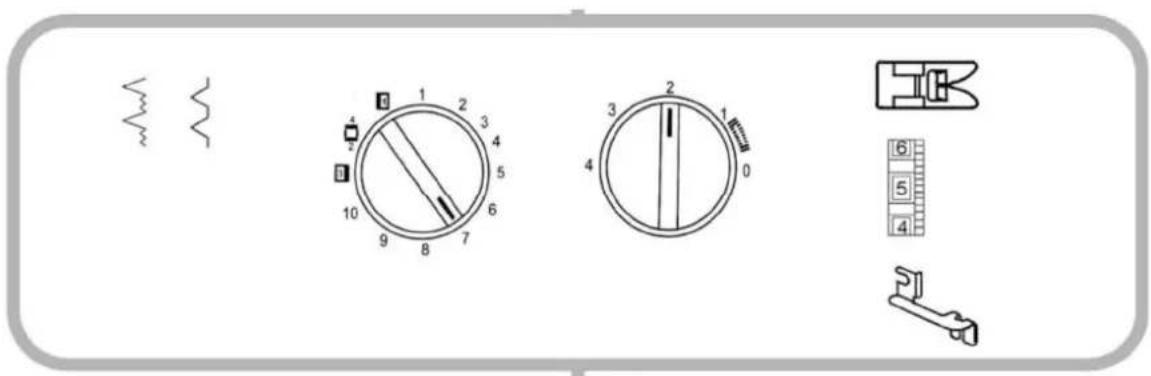
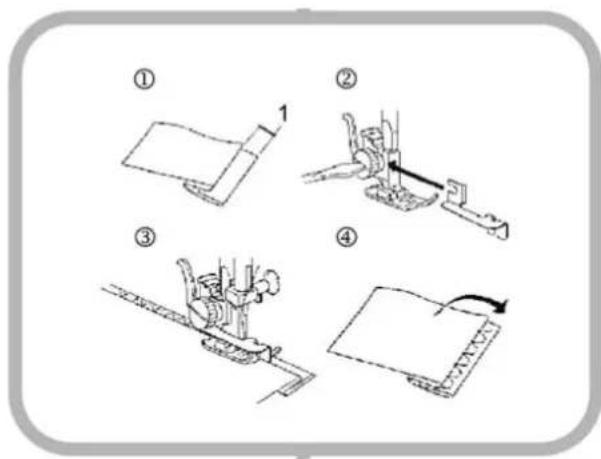
Stitch selection: 7 or 8
Stitch length: 1–3
Presser foot: Standard presser foot with hem ruler
Thread tension: 4–6
-
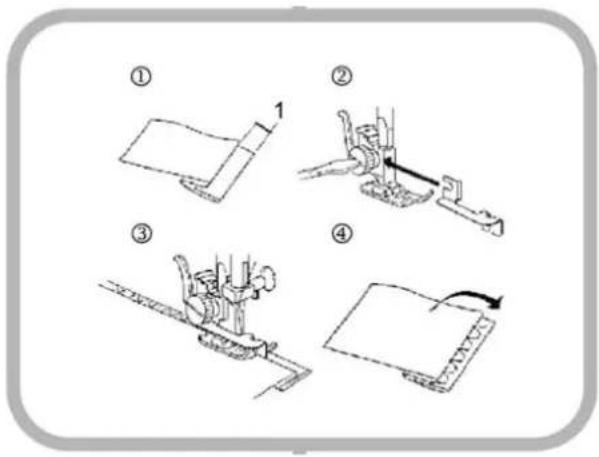
Fold the hem to the desired fabric width. Now fold back the hem and leave an edge of approx. 5 mm (1) on the right-hand side.
-
Lower the presser foot and undo the presser foot screw. Position the hem ruler between the screw and the presser foot holder. Tighten the presser foot screw again and make sure that the hem ruler is centred in relation to the presser foot.
-
Raise the presser foot and place the fabric beneath it. Hold the folded edge along the hem ruler. Lower the presser foot and sew slowly in order to check that the stitching is being performed correctly. In the left zigzag position, the needle must be lowered precisely into the fold. Ensure that the seam continuously follows the hem ruler when sewing concealed hems.
-
When the face of the fabric has been ironed, the stitches should be barely visible.
Scallop stitch

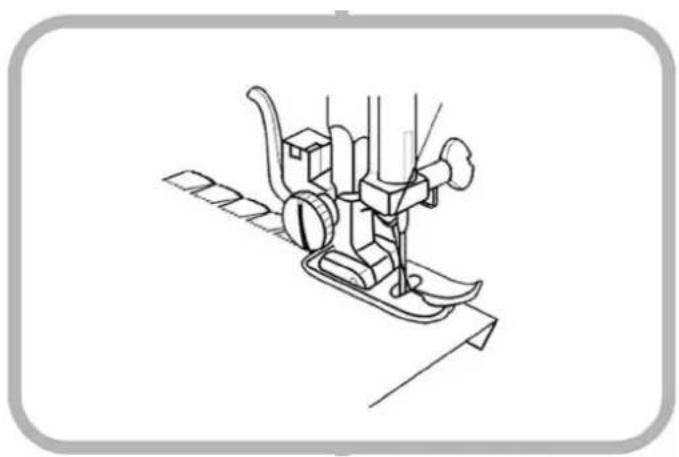
Stitch selection: 9
Stitch length: 2
Presser foot: Standard presser foot
Thread tension: 6–8

natural_image
Technical line drawing of a mechanical device with no visible text or symbolsThe scallop stitch is suitable for sewing and overcasting soft, lightweight fabrics in a single operation. Lay the fabric face-to-face under the presser foot. Check that the zigzag edge is directly above the fabric's cut edges.
This stitch is also perfect for embroidery with scallop stitches. Fold a hem of approx. 12 mm. Ensure that the zigzag stitch runs immediately above the edge of the fabric. The fabric attains a stable, very fine scallop edge.
Greek stitch
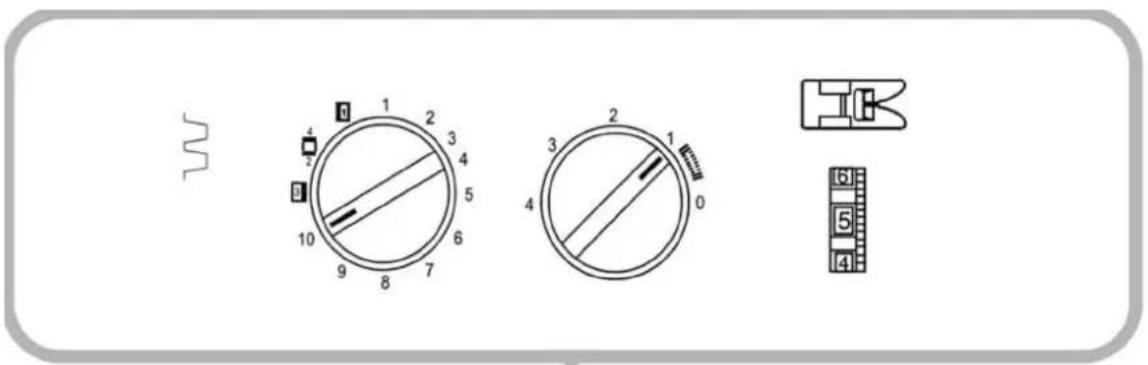
Stitch selection: 10
Stitch length: 1–2
Presser foot: Standard presser foot
Thread tension: 4–6

natural_image
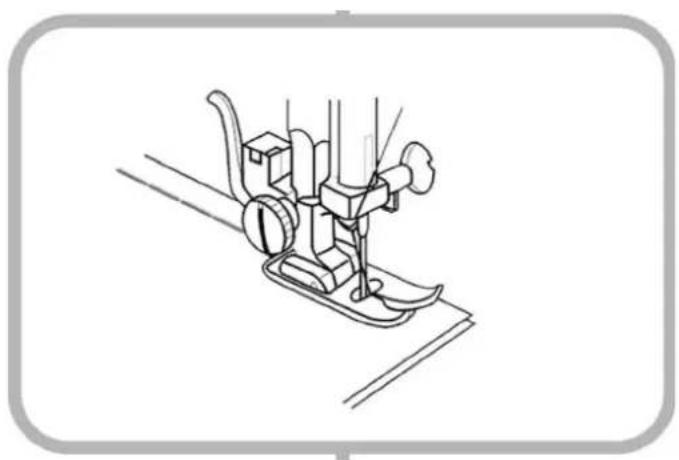
Line drawing of a sewing machine needle and foot (no text or symbols)This stitch is ideal for sewing in elastic that is wider than xxx cm, for example in the sleeves of children's clothes. Don't forget to secure the elastic when you have sewn it into place.
The stitch is also suitable for flat overlapping seams in almost all fabrics. Overlap the two pieces of fabric slightly and sew them together.
OTHER FUNCTIONS
Elastic stitches
As the name suggests, elastic stitches are very elastic and are therefore suitable when sewing stretch material. The results are perfect when you use elastic stitches to sew bathing costumes made of Lycra etc. Elastic stitches are also suitable as edge stitches on belts or for decorative stitches.
Set the stitch length control to ①-⑩ to start sewing elastic stitches (shown in the lower line of the stitch panel on the sewing machine). Then select the desired elastic stitch with the stitch selection control.
You can set the stitch length according to your own preference for all elastic stitches. Turn the stitch length control clockwise when you have selected the desired elastic stitch. The closer to zero, the closer together the stitches.
Stitch table
| Symbol Symbol | |
 | Triple straight stitch with centred needle |
 | Triple straight stitch with needle to the left |
 | Triple zigzag (narrow) |
 | Triple zigzag (medium) |
| [6Y70] | Triple zigzag (wide) |
| [7SW0] | Waffle stitch |
 | Pullover stitch |
 | Overlock stitch |
| [XWBD] | Stretch overlock (open) |
 | Double overlock stitch |
Triple straight stitch

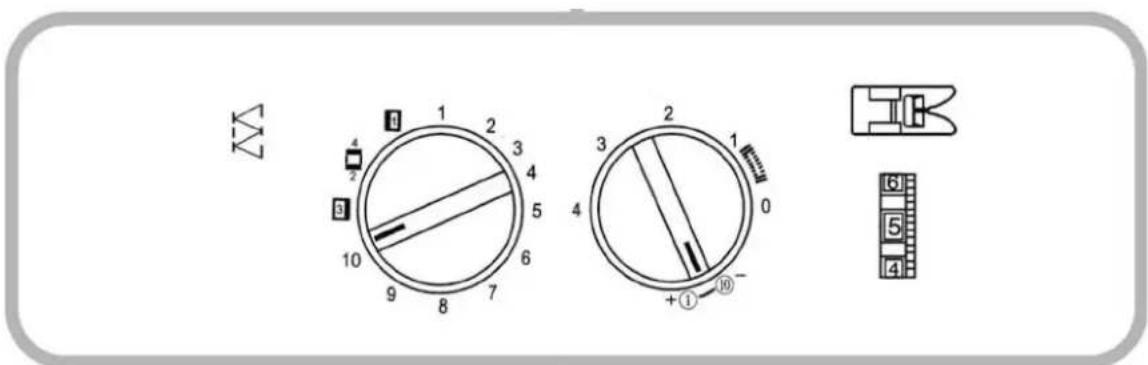
Stitch selection: 1 or 2
Stitch length: ①-⑩
Presser foot: Standard presser foot
Thread tension: 4–6
natural_image
Line drawing of a sewing machine needle and foot (no text or symbols)This is a very stable stitch. The needle sews two stitches forwards and then one stitch backwards. Triple straight stitches are best suited to sewing robust fabrics, for example for sports cloths and trouser crotches. It can also be used for sewing stretch material.
TRIPLE ZIGZAG

Stitch selection: 3, 4 or 5
Stitch length: ①-⑩
Presser foot: Standard presser foot
Thread tension: 2–6

natural_image
Line drawing of a sewing machine needle and foot (no text or symbols)Triple zigzag is an attractive alternative for edges on neckbands, cuffs and hems. This stitch is suitable for overcasting unhemmed edges when you also want an attractive decorative stitch.
Waffle stitch

Stitch selection: 6
Stitch length: ①-⑩
Presser foot: Standard presser foot
Thread tension: 2–6

Sew several rows of straight stitches at 1 cm intervals. Use stitch length 4, as a lower top thread tension makes it easier to make the pleats. Tie the top and bottom threads together at one end of the fabric. Pull the bottom thread from the other end of the fabric to create even pleats. When you have made the pleats, secure the thread ends at the other end of the fabric. You can now sew decorative patterns with waffle stitches over the pleats. Finally pull out the straight stitch threads on one side.
Pullover stitch

Stitch selection: 7
Stitch length: ①-⑩
Presser foot: Standard presser foot
Thread tension: 2–6

natural_image
Line drawing of a sewing machine with no text or symbolsUse the pullover stitch instead of the normal overlock stitch if you are sewing stretch material or embroidered material, to produce an elastic yet at the same time strong seam.
Overlock stitch

Stitch selection: 8
Stitch length: ①-⑩
Presser foot: Standard presser foot
Thread tension: 2–6

natural_image
Line drawing of a sewing machine on a slatted base (no text or symbols)A normal overlock stitch is used to sew together stretch material and at the same time achieve an overcast edge. This stitch is often used for sports clothes, as it is very elastic.
Overlock can also be used to repair worn edges on clothes.
Stretch overlock (open)

Stitch selection: 9
Stitch length: ①-⑩
Presser foot: Standard presser foot
Thread tension: 2–6

natural_image
Line drawing of a sewing machine needle stitching fabric (no text or symbols)Stretch overlock is used to sew and overcast stretch material at the same time. The stitch is narrow and elastic. It is perfectly suited for bathing costumes, sports clothes, tricot, t-shirts and terry cloth.
Closed overlock
Stitch selection: 10
Stitch length: ①-⑩
Presser foot: Standard presser foot
Thread tension: 4–6

Using closed overlock, you can simultaneously sew together and overcast stretch material.
You can also sew two pieces of fabric together, edge to edge. For this, fold the edges of the two pieces of fabric approx. 1.5 cm. Press and secure the pieces of fabric onto a lining made of unwoven textile, approximately 0.3 cm apart, with the folded edge facing down. Sew slowly and ensure that the needle passes through the folded edges at each stitch.
SEWING TECHNIQUES
Sewing buttons

Stitch selection: 3, 4 or 5
depending on the space between the button's holes
Stitch length: 0
Presser foot: Standard presser foot
Thread tension: 1–3

natural_image
Line drawing of a mechanical component with a base and lever mechanism (no text or symbols)- Lift the presser foot and raise the needle to the uppermost position. Place the button on the fabric where you want it to be located.
- Select the stitch width for zigzag stitches that exactly corresponds to the distance between the two holes in the button. The stitches must be sufficiently wide that the needle passes exactly through the button's holes.
- Position the left hole immediately below the tip of the needle and lower the presser foot.
- Sew the first stitches using the handwheel to ensure that the needle is not damaged.
NOTE. Position a needle on the button between the presser foot's "toes" so that you can wind the thread around more easily when you have sewn on the button.

natural_image
Two identical diagrams showing a mechanical component being inserted into a surface, with no text or symbols present.- Sew approximately five stitches and then raise the needle. Leave approximately 20 cm of thread if you want to attach the button more securely.
- Pass the top thread through one of the button's holes. Wind the thread several times around the threads between the button and the fabric to ensure the button is securely attached.
- Pull the top thread through to the reverse of the fabric and tie a knot.
NOTE. Make sure that you raise the feed dog when you have sewed all the buttons, before continuing with normal sewing.
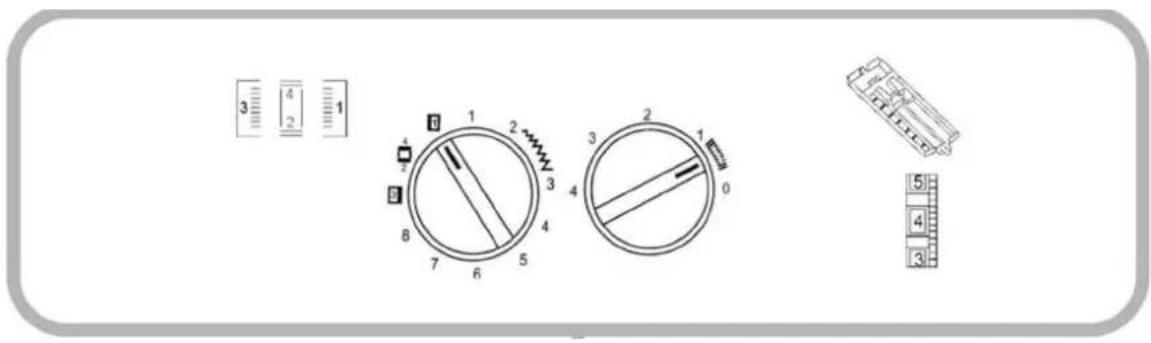
Sewing buttonholes

Stitch selection:
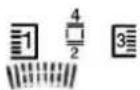
Stitch length:
Presser foot: Buttonhole foot
Thread tension: 3-5
Select the desired stitch length within the range with the stitch length control.
Set the stitch length control in the lower part of the range for closer stitches. These stitches are suitable for sewing buttonholes in lightweight material.

Set the stitch length control in the upper part of the range for more widely spaced stitches. More widely spaced stitches are suitable when sewing buttonholes in more robust material.
NOTE. For perfect results, you can practise sewing one or more buttonholes on a test piece of the fabric you are going to use.

- Lift the presser foot and replace the standard presser foot with the buttonhole foot. Mark out the buttonhole on the fabric. Push forward the slide (A) and align mark (C) with the mark (B) on the fabric. Lower the presser foot.
NOTE. There is a gap of 0.5 cm between the marks on the slide.
-
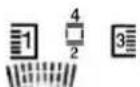
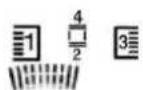
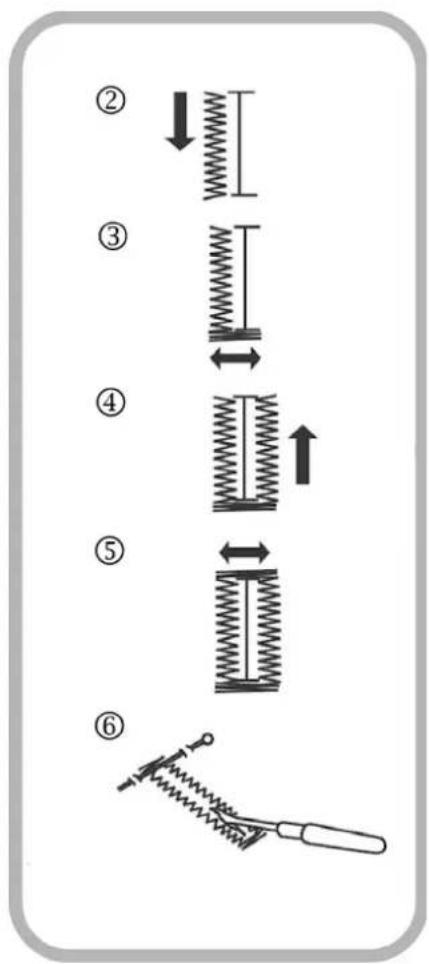
Turn the stitch selection control to. Continue sewing forwards until you reach the front edge of the mark on the fabric. Stop sewing when the needle is in the uppermost position to the left.
-
Turn the stitch selection control to . Sew 4-6 stitches. Stop sewing when the needle is in the uppermost position to the right.
-
Turn the stitch selection control to. Continue sewing backwards until you reach the other end of the buttonhole. Stop sewing when the needle is in the uppermost position to the right.
-
Turn the stitch selection control to . Sew 4-6 stitches. Stop sewing when the needle is in the uppermost position to the left.
-
Remove the fabric and insert a button needle across the buttonhole columns (see illustration), so that you do not accidentally cut the braids. Carefully cut the buttonhole with the seam ripper.
Buttonhole with thread inlay
Stitch selection:
Stitch length:
Presser foot: Buttonhole foot
Thread tension: 3-5

natural_image
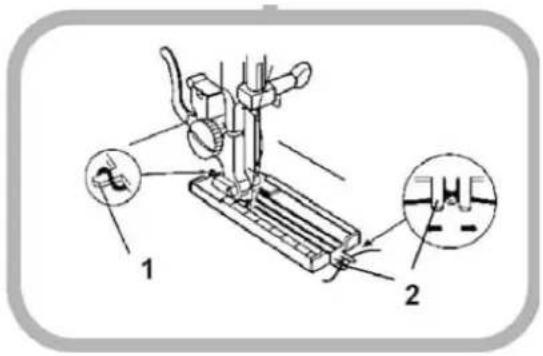
Illustration of a hand holding a spring-loaded tool with scissors, showing a step to cut the tool (no text or symbols present)- Raise the buttonhole foot and lay the thread inlay around the rear hook at (1).
- Advance the thread ends under the buttonhole foot. Ensure that they are located in the middle.
- Hold the thread ends and cross them over the fork (2) at the very front of the buttonhole foot.
-
Lower the needle into the fabric and lower the presser foot before you begin sewing.
-
Carefully press down the foot control and sew the buttonholes so that you are sewing over the thread inlay with the top thread.
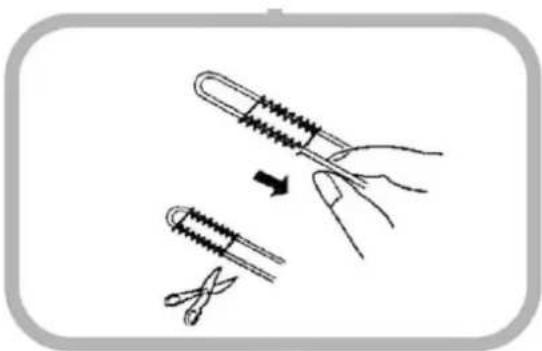
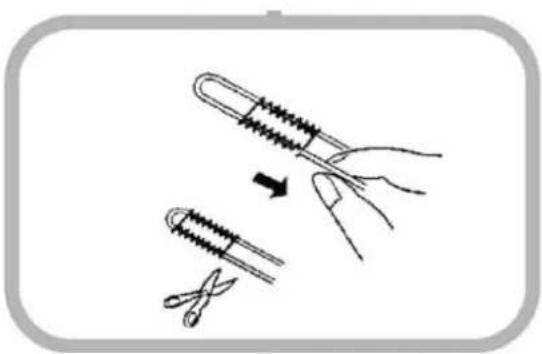
- Remove the fabric and cut off the sewing thread with a pair of scissors.
- Pull the thread inlay from left to right at the same time as securely holding the fabric.
- Use a needle and pass the ends of the thread inlay through to the reverse of the fabric, then cut them off with scissors.
NOTE. Pages 45 and 46 contain general information about how to sew buttonholes.
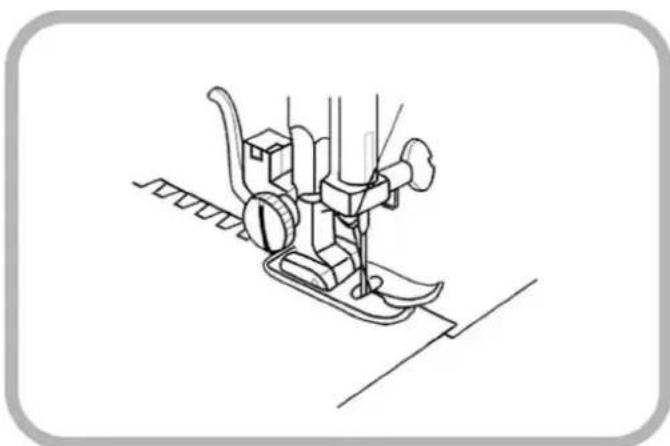
Sewing in zips

Stitch selection: 1
Stitch length: 1.5–4
Presser foot: Zip foot
Thread tension: 4–6

natural_image
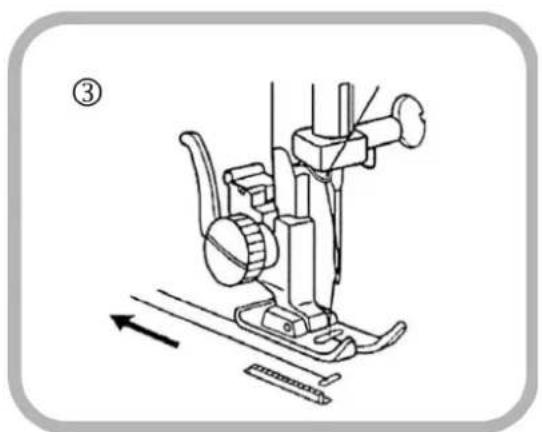
Two technical line drawings of mechanical components, one showing a stepped platform and the other a vertical support structure (no text or symbols)Tack the zip in place in the fabric. Secure the zip foot so that it snaps into place in the correct position on the pin. The needle must be able to pass through the slot on right-hand side of the presser foot. Then sew the left-hand side of the zip from the bottom to the opening at the top. Keep the needle as close to the zip's teeth as possible for the best results, and sew together the fabric and the zip. Reinforce the lower part of the zip opening by sewing backwards. Raise the zip foot and position it on the left-hand side so that you can sew the right side of the zip from the bottom up. Finally remove the tack seam.
MAINTENANCE
Clean the gripper

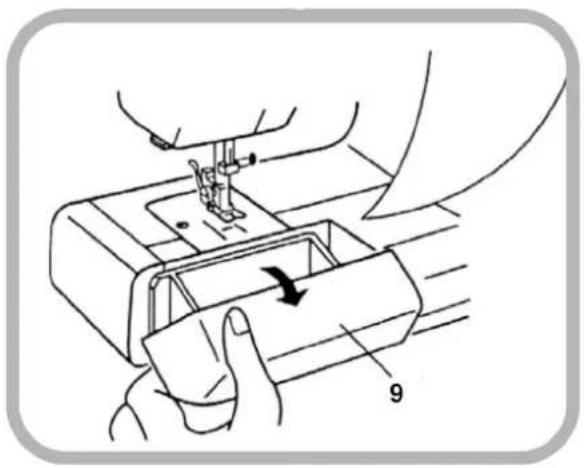
IMPORTANT: Turn off the sewing machine and disconnect the plug from the wall socket before starting to clean the gripper.
- Raise the needle to the uppermost position and remove the pull-out sewing table. Open the gripper flap.
- Take out the bobbin case (1).
- Turn out the levers (2) and take out the gripper ring (3).
- Take off the gripper (4) by holding it by the pin in the middle of the gripper.
- Remove dirt and dust from the gripper track (5), the gripper (4) and the gripper ring (3) using a small brush.
- Apply a couple of drops of oil into the gripper track (5).
- Reassemble all the parts in reverse order.
NOTE. Check that the pin (6) fits in the gripper ring's cut-out (7) in the gripper track when the gripper ring is replaced the gripper track.
Clean the feed dog
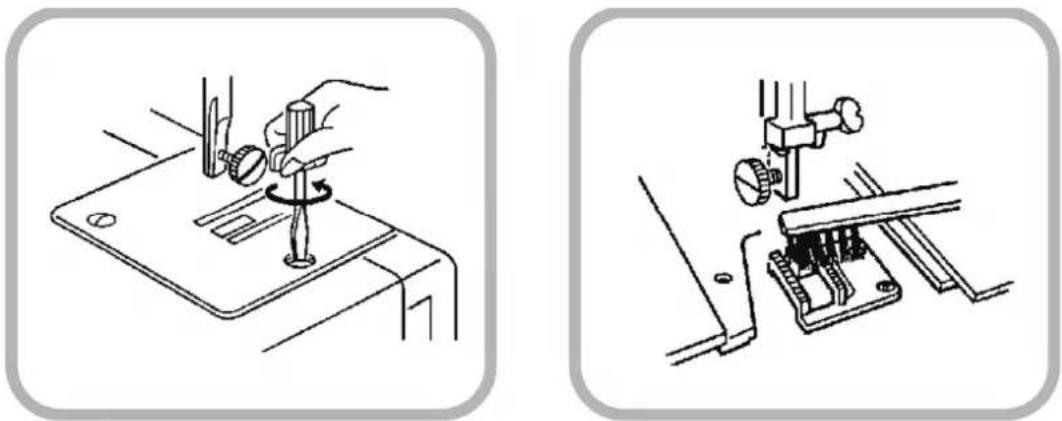
natural_image
Two technical diagrams showing a hand operating a sewing machine and a clamping device (no text or symbols present)IMPORTANT: Turn off the sewing machine and disconnect the plug from the wall socket before starting to clean the feed dog.
- Remove the presser foot and the needle.
- Undo the stitch plate's screws and remove the stitch plate.
- Use a small brush to remove dust and fluff from the feed dog.
- Replace the stitch plate and tighten the screws.
- Replace the presser foot and the needle. The machine is now ready to use.
NOTE. It is important to always keep the feed dog clean in order for the machine to work properly. If you use the machine frequently, it should be cleaned every two or three months.
Oil the machine
You should oil the sewing machine every two or three months to keep it in good condition. Only use high quality sewing machine oil. Do not apply more than 1 or 2 drops at the points that are to be oiled to ensure that oil does not splash onto the fabric. If the machine is not working well after not having been used for an extended period, you can apply a few drops of oil before using it. The machine will then work perfectly again.


natural_image
Technical line drawing of a mechanical device with no visible text or symbolsOil the parts under the front casing
- Remove the screw cover (1), undo the screw (2) with a screwdriver and remove the front casing (3).
- Clean the machine at the points indicated with the arrows in the illustration above.
- Apply 1–2 drops of high quality sewing machine oil at the points indicated with the arrows.
- Secure the front casing, tighten the screw and replace the screw cover.

natural_image
Technical diagram of a mechanical assembly with labeled parts (no text or symbols present)Oil the gripper
Open the gripper flap (4) and oil the gripper according to the arrow in the diagram.
TROUBLESHOOTING
| Problem Cause Action Page | |||
| The top thread breaks off | The top thread is incorrectly threaded | Rethread the top thread 18 | |
| The top thread is too tight Reduce the thread tension 20 | |||
| The needle is bent or blunt Replace the needle 12 | |||
| The needle is not correctly inserted Insert the needle correctly | 12 | ||
| The thread is too thick or too thin Select the correct thread according to the needle and thread table | 13 | ||
| The bottom thread breaks off | Incorrect bottom thread tension Bottom thread incorrectly threaded 17 | ||
| The bobbin case and/or the gripper are full of fluff | Clean the bobbin case and/or the gripper | 49 | |
| The bobbin case is damaged or not working properly | Replace the bobbin case 15 | ||
| The needle breaks off | The needle is not correctly inserted Insert the needle correctly 12 | ||
| The needle is bent or blunt Replace the needle 12 | |||
| The needle screw is loose Tighten the needle screw 12 | |||
| The top thread is too tight Reduce the thread tension 20 | |||
| The needle is too thin for the fabric | Use a suitable needle | 12, 13 | |
| Skipped stitches | The needle is not correctly inserted Insert the needle correctly 12 | ||
| The needle is bent or blunt Replace the needle 12 | |||
| Neither the needle nor the thread are suitable for the fabric | Use the correct needle and thread for the fabric | 13 | |
| The top thread is incorrectly threaded | Rethread the top thread | 18 | |
| The fabric creases | The top thread is too tight Reduce the thread tension 20 | ||
| Incorrectly threaded sewing machine | Rethread the machine | 18 | |
| The needle is too thick for the fabric | Select the correct needle according to the needle and thread table | 13 | |
| The stitches are too long for the fabric | Reduce the stitch length | 22 | |
| Very thin material: No unwoven lining has been used | Use unwoven lining | ||
| The stitches form loops | The top thread tension is insufficient | Increase the thread tension | 20 |
| Incorrect needle and thread for the fabric (too thick or too thin) | Use the correct needle and thread size according to the needle and thread table | 13 | |
| The fabric is not fed forwards as it should be | The feed dog is full of fluff | Clean the feed dog | 50 |
| The feed dog has dropped Raise the feed dog 24 | |||
| The stitches are too short | Increase the stitch length 22 | ||
| The sewing machine does not sew | Incorrect connection | Connect the machine correctly | 8 |
| The thread becomes tangled in the bobbin case pin | Clean the bobbin case and the gripper | 49 | |
| The handwheel is set for spool winding | Return the handwheel to its original position | 16 | |
| The sewing machine is running slowly and noisily | The thread becomes tangled in the bobbin case pin | Clean the gripper | 49 |
| The feed dog is full of fluff | Clean the feed dog | 50 | |
| The machine needs to be lubricated | Oil the machine | 51 | |
Jula reserves the right to make changes. In the event of problems, please contact our service department.
www.jula.com

Care for the environment!
Must not be discarded with household waste! This product contains electrical or electronic components that should be recycled. Leave the product for recycling at the designated station e.g. the local authority's recycling station.
- Operating Instructions for Sewing Machine
- SVENSKA
- SÄKERHETSANVISNINGAR
- Fotreglage
- Ta bort sybordet
- Friarm
- Ta loss
- Olja griparen
- Fotpedal
- BRUK
- FORBEREDELSE
- Uttrekkbart sybord
- Ta av sybordet
- Løsne trykkfoten
- Olje delene under frontdekselet
- Olje griperen
- Pedal nożny
- Wolne ramię
- Zdejmowanie
- Oliwienie chwytacza
- Read the Operating Instructions carefully before use
- DANGER Protect against the risk of electric shock.
- TECHNICAL DATA
- DESCRIPTION
- Accessories
- Power supply
- Foot control
- OPERATION
- PREPARATION
- Pull-out sewing table
- Remove the sewing table
- Replace the sewing table
- Free arm
- Lighting
- Remove the bulb
- Insert the bulb
- Replace presser foot
- Remove
- Replace
- Replace the needle
- Needle and thread table
- Thread holder
- Remove the bobbin case and insert the bobbin
- Bobbin
- Insert the bobbin in the bobbin case
- Thread the sewing machine
- Take up the bottom thread
- Adjust the top thread tension
- Top thread tension for zigzag stitching
- Stitch selection control
- Switch to elastic stitches
- Stitch length control
- NOTE.
- Backstitch control
- Presser foot control
- Lower the feed dog
- START SEWING
- Simple sewing
- Change direction of the seam
- Use the stitch plate's markings
- Sewing corners
- SEAMS
- Utility stitches
- Stitch table
- Straight stitch
- Three-step zigzag
- Blind stitch
- Scallop stitch
- Greek stitch
- OTHER FUNCTIONS
- Elastic stitches
- Triple straight stitch
- Waffle stitch
- Pullover stitch
- Overlock stitch
- Stretch overlock (open)
- Closed overlock
- SEWING TECHNIQUES
- Sewing buttons
- Sewing buttonholes
- Buttonhole with thread inlay
- Sewing in zips
- MAINTENANCE
- Clean the gripper
- Clean the feed dog
- Oil the machine
- Oil the parts under the front casing
- Oil the gripper
- Care for the environment!
Brand : Menuett
Model : 809-031
Category : Sewing machine