A006C-12C - Air-conditioner Stirling - Free user manual and instructions
Find the device manual for free A006C-12C Stirling in PDF.


User questions about A006C-12C Stirling
0 question about this device. Answer the ones you know or ask your own.
Ask a new question about this device
Download the instructions for your Air-conditioner in PDF format for free! Find your manual A006C-12C - Stirling and take your electronic device back in hand. On this page are published all the documents necessary for the use of your device. A006C-12C by Stirling.
USER MANUAL A006C-12C Stirling
natural_image
White portable air purifier with digital display and control panel, displayed against a blue abstract background (no text or symbols visible)Portable Air Conditioner
Model Number A006C-12C
INSTRUCTION MANUAL
Welcome
Congratulations on choosing to buy a STIRLING ^® product.
All products brought to you by STIRLING® are manufactured to the highest standards of performance and safety and, as part of our philosophy of customer service and satisfaction, are backed by our comprehensive 3 Year Warranty. We hope you will enjoy using your purchase for many years to come.
Contents
02 Welcome
04 Warranty Details
05 General Safety Instructions
08 Product Overview
10 Installation
13 Getting Started
15 Instructions
17 FAQs & Troubleshooting Guide
18 Other Useful Information
23 Repair and Refurbished Goods or Parts Notice

text_image
ALDISTIRLING®
Portable Air Conditioner
Warranty Details
The product is guaranteed to be free from defects in workmanship and parts for a period of 36 months from the date of purchase. Defects that occur within this warranty period, under normal use and care, will be repaired, replaced or refunded at our discretion, solely at our option with no charge for parts and labour. The benefits conferred by this warranty are in addition to all rights and remedies in respect of the product that the consumer has under the Competition and Consumer Act 2010 and similar state and territory laws.
Our goods come with guarantees that cannot be excluded under the Australian Consumer Law. You are entitled to a replacement or refund for a major failure and to compensation for any other reasonably foreseeable loss or damage. You are also entitled to have the goods repaired or replaced if the goods fail to be of acceptable quality and the failure does not amount to a major failure.
General Safety Instructions
IMPORTANT SAFETY INSTRUCTIONS READ CAREFULLY AND KEEP FOR FUTURE REFERENCE
Read this manual thoroughly before first use, even if you are familiar with this type of product. The safety precautions enclosed herein reduce the risk of fire, electric shock and injury when correctly adhered to. Make sure you understand all instructions and warnings. Keep the manual in a safe place for future reference, along with the completed warranty card and purchase receipt. If you sell or transfer ownership of this product, pass on these instructions to the new owner.
Always follow basic safety precautions and accident prevention measures when using an electrical appliance, including the following:
Electrical safety and cord handling
- Voltage: Before turning on the air conditioner, ensure the electrical voltage and circuit frequency correspond to those indicated on the appliance.
- Socket: Ensure your electrical outlet is properly installed and earthed.
- Moisture: To reduce the risk of electrocution, never operate the appliance with wet hands; never submerge it in water or spill liquids into it. Do not use it in a bathroom or laundry, or where it can be splashed with water.
- Power supply cord: Do not kink or damage the cord. Do not pull the cord or place it near a heat source. Always unwind the cord completely to avoid overheating. Run the cord in such a way so that no one will trip over it.
- Extension cord/adaptor: Do not use this appliance with an extension cord or power adaptor.
- Damage: If the supply cord is damaged, it must be replaced by the manufacturer or its service agent or a similarly qualified person in order to avoid a hazard.
- On/off switch: Do not use the mains plug to start and stop the unit; always use the on/off switch on the control panel to start and stop the unit.
- When not in use: Switch the air conditioner off and unplug it when it is not in use, but do not unplug it when it is in operation, as this could create a spark and cause a fire.
- Disconnect: Turn off the unit first and then unplug it when it is not in use and before maintenance or cleaning. Grip by the plug, do not pull by the cord when disconnecting.
- RCD: The installation of a residual current device (safety switch) is recommended to provide additional safety protection when using electrical appliances. It is advisable that a safety switch with a rated residual operating current not exceeding 30mA be installed in the electrical circuit supplying the appliance. See your electrician for professional advice.
General Safety Instructions (Cont.)
Installation
- Proper installation: Install the appliance according to the instructions in this manual. Improper installation may result in the risk of fire, electric shock and/or injury. We assume no responsibility for any eventual damages caused by improper installation or faulty use.
- Upright position: Place the unit on a flat surface to reduce the risk of it tipping over. Do not tilt the unit, always keep it upright. If the unit has not been kept upright (such as during storage), wait for at least 24 hours before operation.
- Obstructions: Do not locate the air conditioner where furniture or other objects can obstruct the airflow.
- Do not cover: Do not cover the air conditioner or obstruct any air inlet or outlet grilles. Obstructing these openings causes a fire hazard, reduces the operating efficiency and may lead to malfunction or damage.
- Chemicals: Do not install the air conditioner in environments where the air could contain gas, oil or sulphur. Do not let chemical substances come into contact with the unit. Do not use the unit in the presence of flammable substances or vapour such as alcohol, insecticides, petrol etc.
- Heat: Do not install the air conditioner near sources of heat, or exposed to direct sunlight.
- Room size: The unit is designed for use in a room of 18 - 28m^2 size.
- Clearances: Always keep a clearance of at least 30cm from walls, furniture and curtains.
Usage conditions and restrictions
- Intended use: This appliance is intended for air conditioning domestic environments. It is not suitable for commercial or industrial use. Do not use it for any other purpose (such as drying clothes, cooling food etc.), and only use it as described in this manual.
- Common sense: These instructions are not intended to cover every possible condition and situation. As with any electrical appliance, common sense and caution are therefore always recommended when installing, operating and maintaining the unit.
- No outdoor use: Do not use the unit outdoors.
- Usage restriction: The appliance is not intended for use by persons (including children) with reduced physical, sensory or mental capabilities, or lack of experience and knowledge, unless they have been given supervision or instruction concerning use of the appliance by a person responsible for their safety.
General Safety Instructions (Cont.)
- Children: Supervise children to ensure they do not play with the appliance. Close supervision is necessary when any appliance is used by or near children.
- Startup settings: Set the unit to maximum cooling and high speed ventilation for the initial startup, then adjust the unit down to a more comfortable setting as required.
- Cold air exposure: Never remain directly exposed to the flow of cold air for a long time, as direct and prolonged exposure to cold air from the air conditioner could be dangerous for your health. Take particular care in rooms where there are children, old, or sick people.
- Air outlets: Do not insert any objects, or your fingers, into the air outlet, and make sure to warn children of the dangers.
- Airflow direction: Do not direct the airflow onto plants or animals, as long and direct exposure to cold air from the air conditioner could adversely affect them.
- Cooling efficiency: To help cooling efficiency, keep blinds and curtains closed during the sunniest part of the day. Close off any fireplace damper, floor and/or wall register so cool air does not escape through the chimney or duct work.
- Moving the appliance: When moving the air conditioner, always turn off and disconnect the power supply, and move it slowly.
Cleaning and maintenance
- Disconnect: Make sure the appliance is disconnected from the power supply when it will not be used for a long time and before carrying out any cleaning or maintenance.
- Air filter: Keep the air filter clean. Do not use the unit without the air filters fitted. Using it without air filters could cause an excessive accumulation of dust or waste on the inner parts of the device with possible subsequent failures.
- Service and repair: The air conditioner has no user-serviceable parts contained inside. Do not attempt to disassemble, modify or conduct repairs on this unit. It has been built in accordance with relevant safety and performance standards. An electrical specialist must carry out all repairs. Contact our after sales support line for advice on service.
Product Overview
Scope of delivery
A Parts list
1 Cold air outlet
2 LED screen
3 Control panel
(see page 13 for details)
4 Castor wheels
5 Rear cover
6 Front cover
7 Air inlet grilles
8 Exhaust outlet grille
9 Power cord
10 Condensation water drainage outlet with stopper
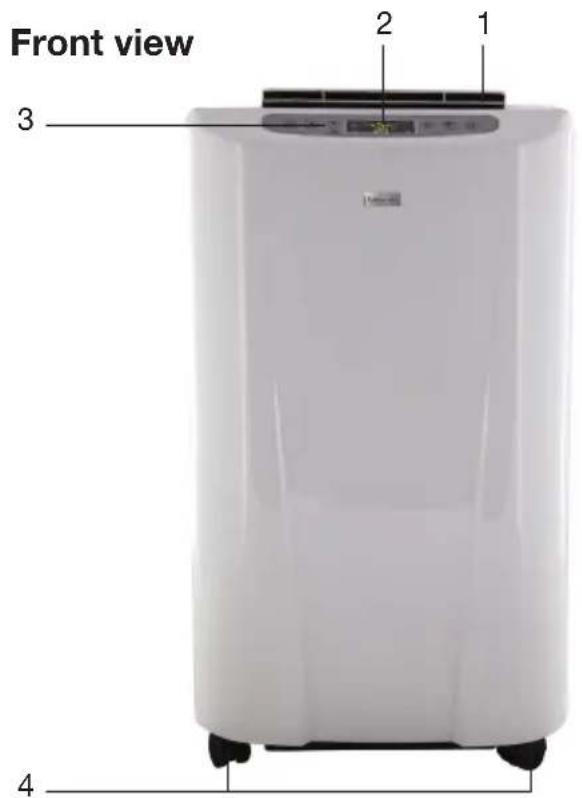
text_image
Front view 2 1 3 4Side view
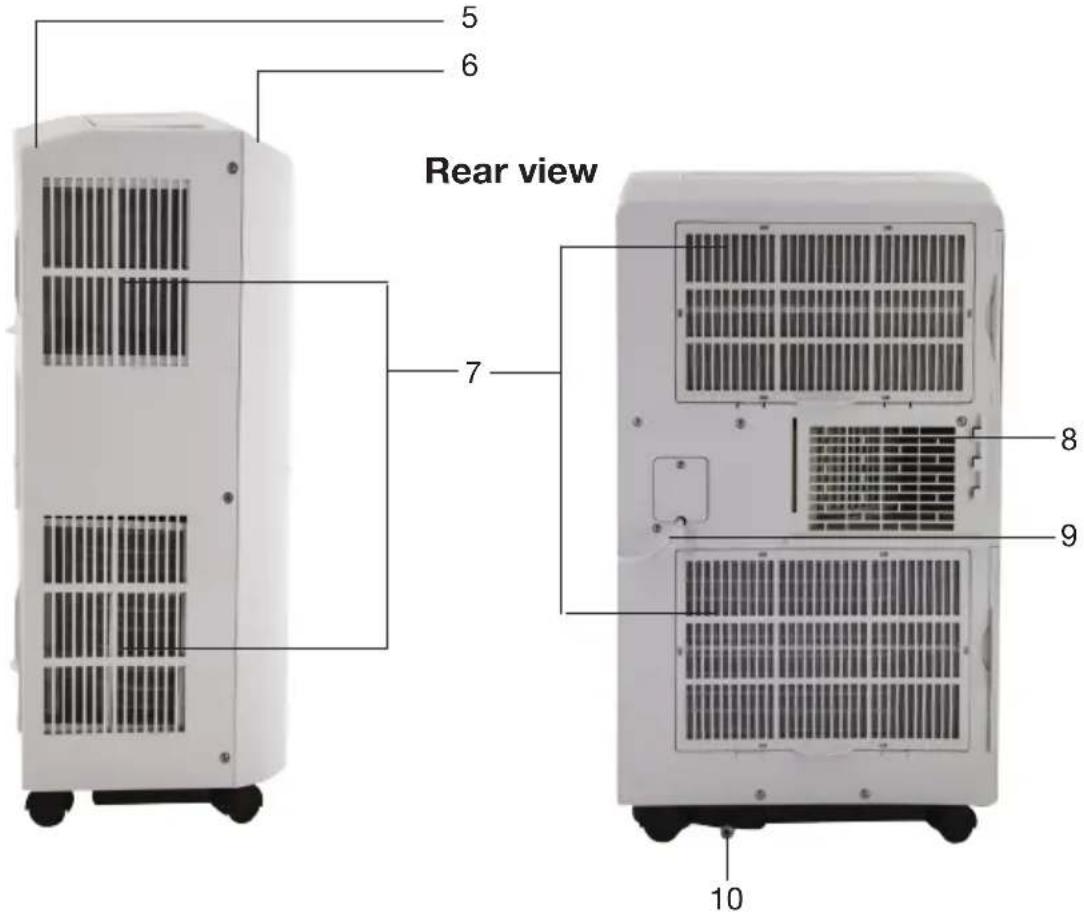
text_image
5 6 Rear view 7 8 9 10Product Overview (Cont.)
B Window installation kit
11 Flexible exhaust hose
12 Rectangular hose connector
13 Oval hose connector
14 Adjustable window slider (67.5cm to 123cm)
C Accessories
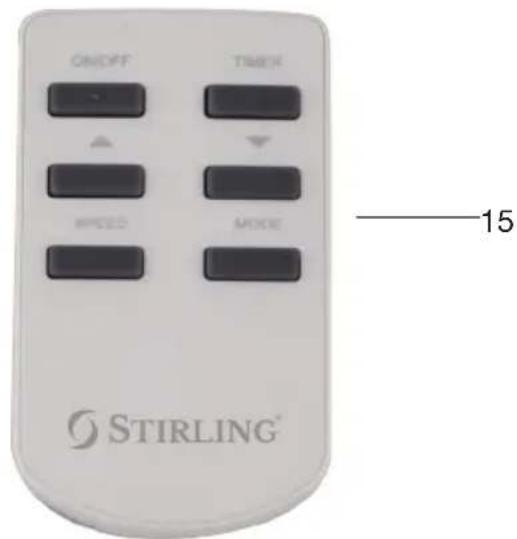
15 Remote control (see page 14 for details)
16 3V Lithium button cell for the remote control (not shown, supplied in a double sealed plastic bag)
D Documentation
Instruction manual (not shown) Quick start guide (not shown) Warranty certificate (not shown)
Window installation kit
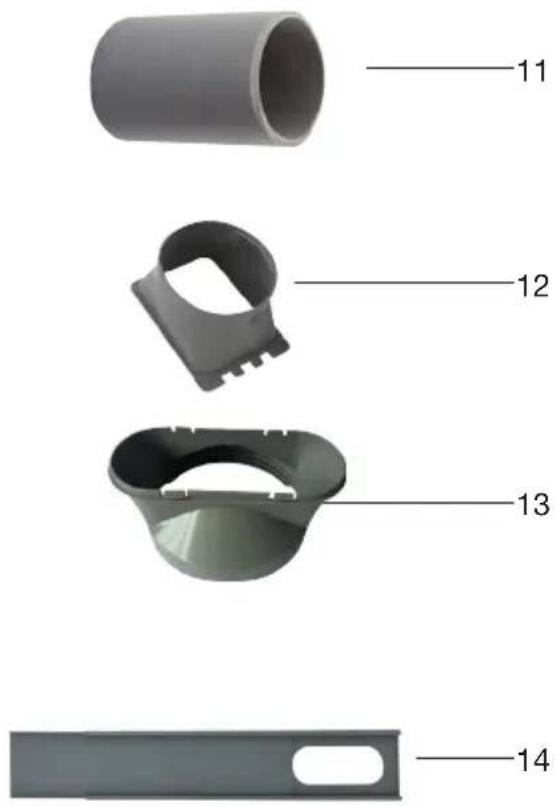
text_image
11 12 13 14WARNING!
text_image
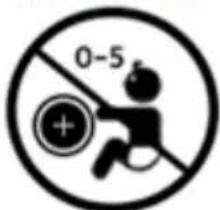
0-5DANGER if swallowed
Keep batteries out of reach of children. Swallowing may lead to serious injury or death in as little as 2 hours due to internal burns.
If swallowed, go straight to a hospital emergency room. Dispose of used batteries immediately.
Remote control
text_image
ON/OFF TIME MPEED MODE STIRLING® 15Installation
Unpacking
- This product has been packaged to protect it against transportation damage. Unpack the appliance and keep the original packaging carton and materials in a safe place. It will help prevent any damage if the product needs to be transported in the future, and you can use it to store the appliance when it is not in use. In the event the carton is to be disposed of, please recycle all packaging materials where possible.
- Plastic wrapping can be a suffocation hazard for babies and young children, so ensure all packaging materials are kept out of their reach and disposed of safely.
- Unwind the cord fully and inspect it for damage. Do not use if any part is damaged. In case of damage, contact our after sales support line for advice.
- Read the manual to familiarise yourself with all parts and operating principles. Pay particular attention to the safety instructions on the previous pages.
Electric shock hazard!
Before installation or servicing, ensure the unit is switched off and disconnected from the power outlet to prevent possible injury.
Installation: the location
When deciding on an installation place, keep the following points in mind:
- The area must be flat and the air outlets must not be covered up.
- There must be a properly earthed AC 220\~240V 50Hz power point nearby.
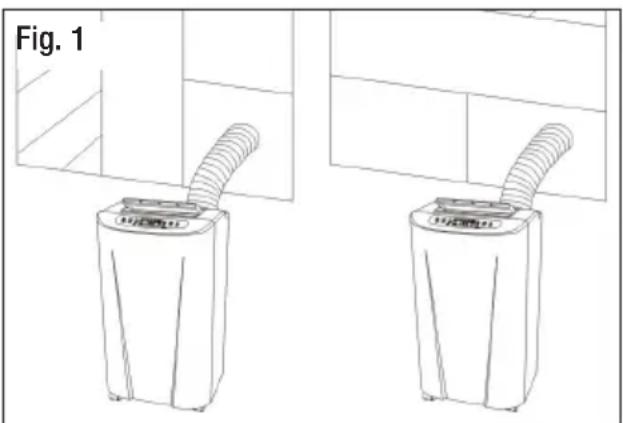
- The air exhaust can be installed in a vertical or horizontal sliding window (Fig. 1). Window installation instructions follow on the next pages.
- There must be a clearance of at least 30cm between the appliance and the wall or any other obstacles (Fig. 2). Maintaining this 30cm clearance is essential; failure to keep that distance can result in the unit malfunctioning or causing injury.
NOTE: Do not install this appliance at a dry cleaner's premises.
text_image
Fig. 1 4.5mm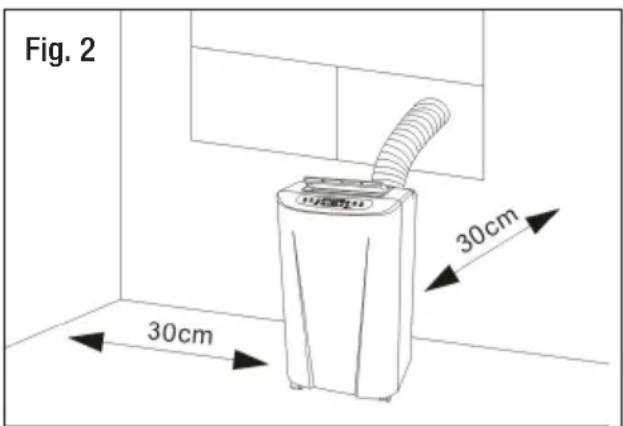
text_image
Fig. 2 30cm 30cmInstallation (Cont.)
Installing the air exhaust duct
The portable air conditioner window kit comes with the following parts:
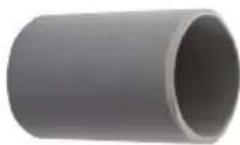
Flexible exhaust hose
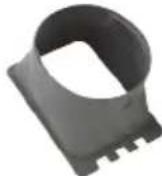
Rectangular hose connector

natural_image
Exterior view of a gray plastic bucket with handle and side plate (no text or symbols)Oval hose connector

Adjustable window slider 67.5cm to 123cm
Installing the exhaust hose
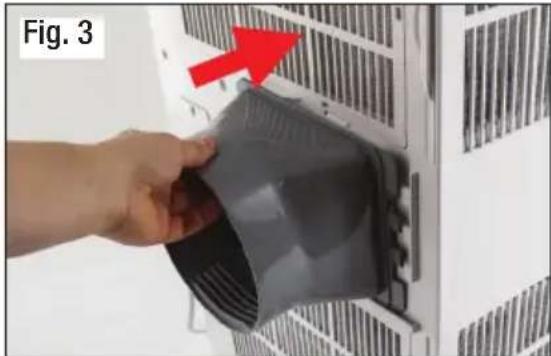
- Fit the rectangular exhaust hose connector to the exhaust outlet grille at the back of the air conditioner (Fig. 3).
- Insert one end of the flexible exhaust hose into the opening and twist to fix it in place (Fig. 4).
- Extend the flexible hose. Then insert the other end of the hose into the round opening of the oval hose connector and twist to fix in place (Fig. 5).
Temporary installation
- For temporary operation (in fan mode only), lead the oval (discharge) end of the hose connector out of an open window. NOTE: Ambient air will still be able to enter the room this way. To cool the room effectively, the window kit must be properly installed.
Installing the window kit
Your window kit has been designed to fit most standard ‘horizontal’ and ‘vertical’ window applications, but for certain types of windows it may be necessary for you to improvise/modify some aspects of the installation procedure.
IMPORTANT!
Keep the length of the air exhaust hose to the minimum length necessary during operation.
natural_image
Hand holding a fan blade inside a rack, with a red arrow pointing to the blade (no text or symbols visible)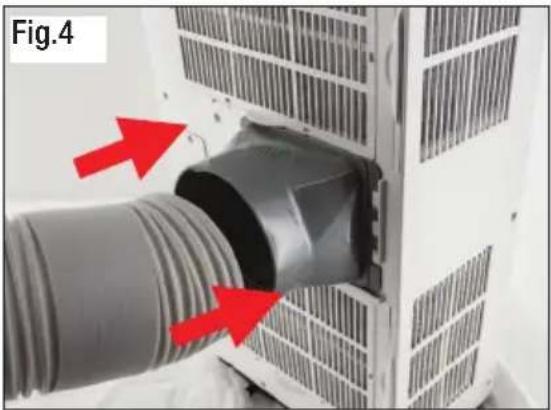
natural_image
Close-up of a large industrial air duct component with red arrows pointing to the pipe (no text or symbols visible)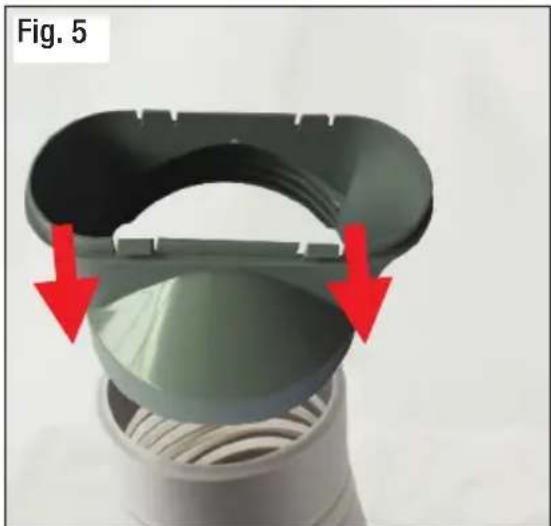
natural_image
Close-up of a mechanical component with red arrows indicating direction, no visible text or symbolsInstallation (Cont.)
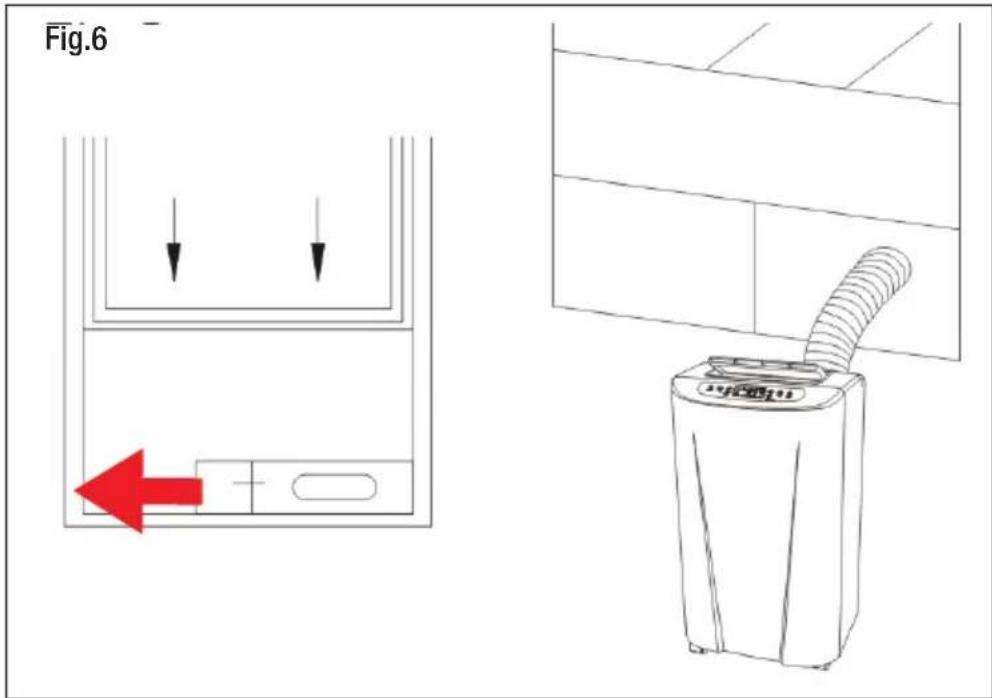
Horizontally opening window (Fig. 6)
- Adjust the window slider to the length of a horizontally opening window.
- Fit the slider to the bottom of the window sill, then close the window.
- Fit the oval exhaust hose connector through the opening to the outside.
text_image
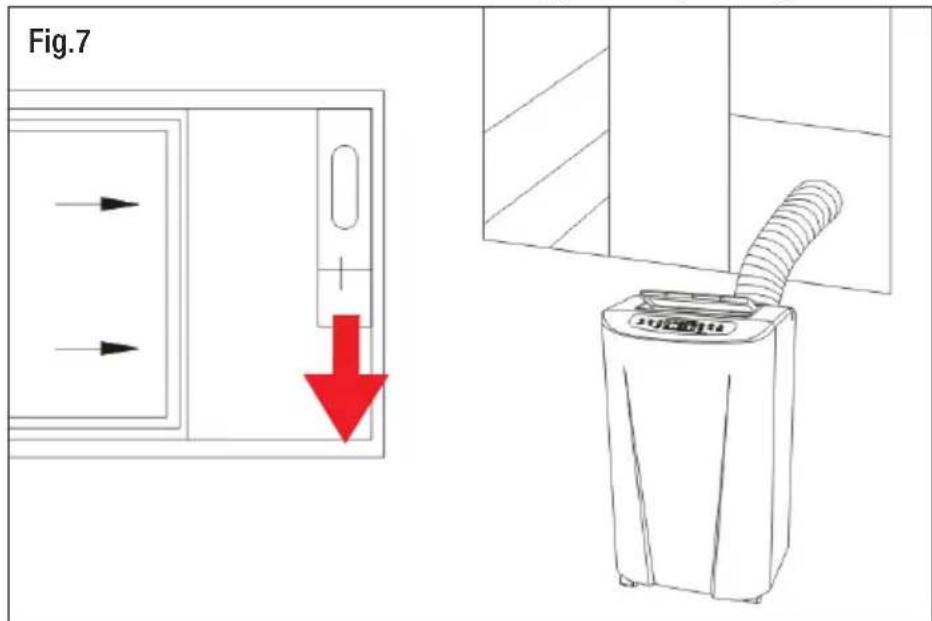
Fig.6 -Vertically opening window (Fig. 7)
- Adjust the window slider to the height of a vertically opening window.
- Fit the slider to the side of the window, then close the window.
- Fit the oval exhaust hose connector through the opening to the outside.
text_image
Fig.7 JUCO14Getting Started
Control panel
text_image
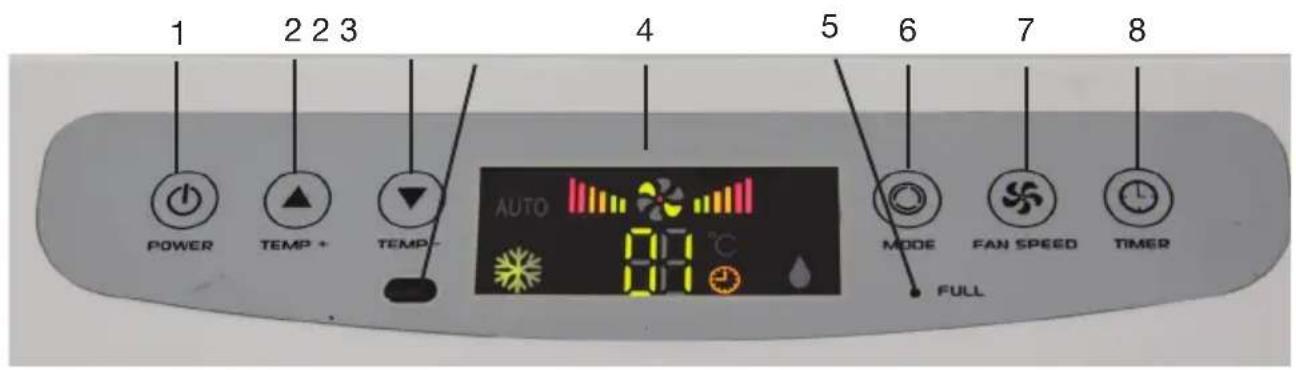
1 2 2 3 4 5 6 7 8 POWER TEMP + TEMP- AUTO MODE FAN SPEED TIMER FULL1 Power on/off button: Press to turn the unit on or off.
2 Temperature + ▲ / - ▼ buttons: Press to set the desired room temperature. With each press of the [ + ] or [ - ] button, the temperature setting will be increased or decreased by 1°C.
These buttons can also be used to set the timer, in hours.
3 Signal receiver: Aim the remote control at this sensor.
4 Display screen: See below for a detailed view.
5 Full indicator light: Indicates when the drip tray is full of condensation water (see page 19 for drainage methods).
6 Mode button: Press repeatedly to select the desired mode of operation (auto, cooling or dehumidifying).
7 Fan speed button: Press, repeatedly, to choose a fan speed.
8 Timer On/Off button: Press to set the time period (in hours) for automatic switch-on/switch-off, or to delete the timer setting.
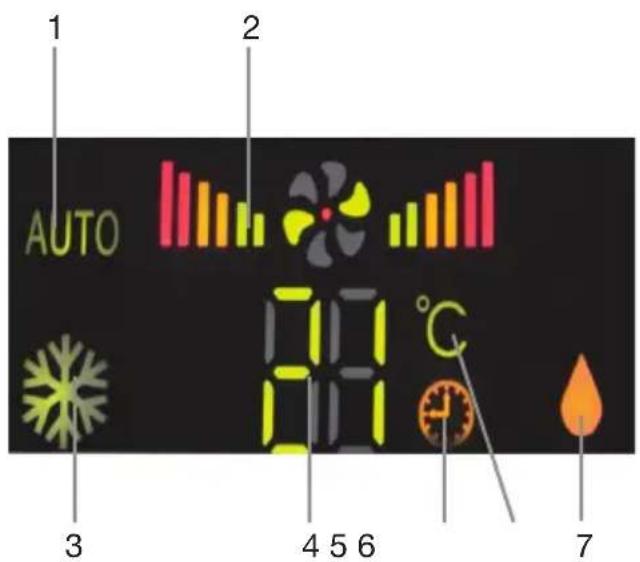
Display screen
1 Auto mode icon
2 Fan speed icon
3 Cooling mode icon
4 Temperature and Timer setting
5 Timer icon
6 Temperature scale (°C)
7 Dehumidifying mode icon
text_image
AUTO 001 °C 3 4 5 6 7Getting Started (Cont.)
text_image
ON/OFF TIMER 1 2 SPEED MODE 3 4 5 6 STIRLING® mote control 7WARNING!
text_image
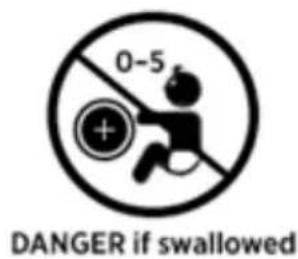
0-5 DANGER if swallowedKeep batteries out of reach of children.
Swallowing may lead to serious injury or death in as little as 2 hours due to internal burns.
If swallowed, go straight to a hospital emergency room.
Dispose of used batteries immediately.
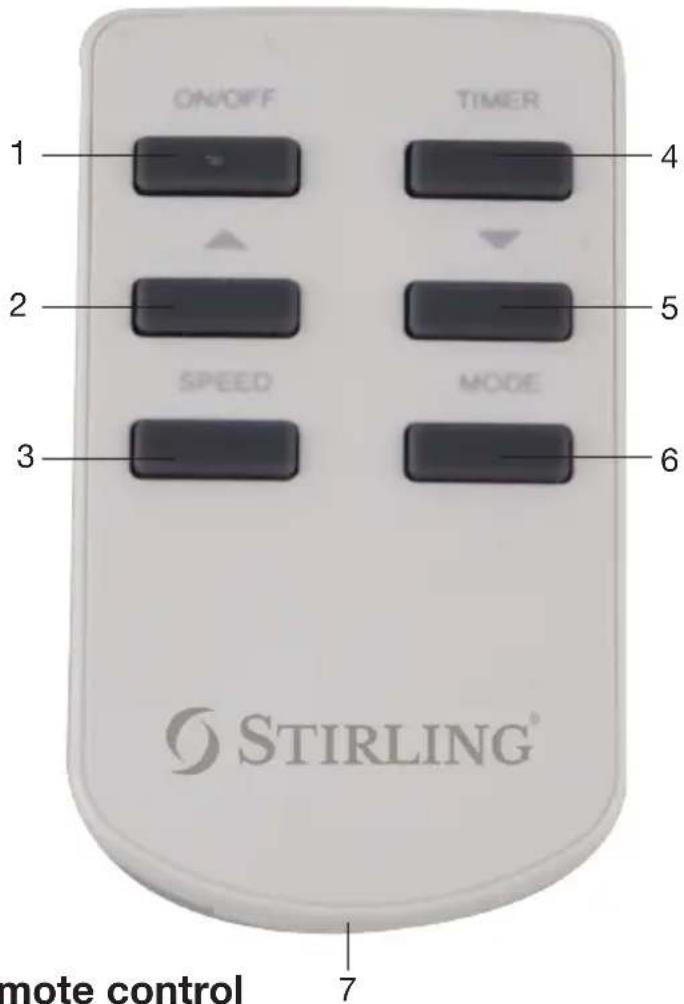
Remote control
1 Power on/off button: Press to turn the unit on or off.
2 Temperature + ▲ button: Press to set the desired room temperature. With each press of the ▲ button, the temperature setting will be increased by 1°C. (This button can also be used to set the timer, in hours.)
3 Speed button: Press to choose high, middle or low fan speed.
4 Timer button: Press to set the time period (in hours) for automatic switch-on/switch-off, or to delete the timer setting.
5 Temperature - ▼ button: Press to set the desired room temperature. With each press of the ▼ button, the temperature setting will be decreased by 1°C. (This buttons can also be used to set the timer, in hours.)
6 Mode: Press repeatedly to select the desired mode of operation (auto, cooling or dehumidifying).
7 Battery holder: A CR2025 3V lithium button cell is supplied to power the remote control. To insert it, push in the tab and pull out the battery holder. Insert the battery with the (+) marking facing upwards, then push the holder with the battery securely back into the unit.
Instructions
- Before switching the unit on for the first time, make sure you have properly installed the exhaust hose (see pages 11-12) and inserted the battery into the remote control (see page 14).
- Plug the portable air conditioner into a properly earthed 220\~240V AC 50Hz mains socket and switch on power to the outlet.
NOTE: Do not connect it to a multiple socket outlet that is also being used for other electrical appliances. Do not connect it to an extension cord. - Upon connection, the unit will emit one short beep. Press the ON/OFF button and the unit will start operation.
IMPORTANT!
- Allow 30 seconds for cool airflow through the louvres. When turned on, the cooling compressor requires up to 30 seconds to complete its startup procedure, after which cool air will be produced (check for cool air by placing your hand near the louvres).
- Avoid starting the air conditioner soon after switching off, and avoid switching it off immediately after switching on. Allow at least five minutes in between switching the unit on and then off, or vice versa. This allows the compressor time to prepare for the next cycle. If the air conditioner is turned off and then back on soon after (not recommended), the compressor will require a few extra minutes before producing cool air.
- When using functions in Cooling and Dehumidifying mode, keep an interval of at least three minutes between each ON and OFF.
Cooling mode
IMPORTANT: When using the portable air conditioner in cooling or auto mode, the flexible exhaust hose must be vented through an open window to exhaust warm air from the room.
- Press the MODE button until the cooling mode ison appears.
- Press the TEMP- (▼ or TEMP+ ( ) ▲ button repeatedly to set the desired room temperature between 16°C and 31°C.
- Press the FAN SPEED button to select the fan speed: high, middle or low.
NOTE: For best cooling efficiency, make sure that:
* Curtains/blinds are closed if your room is directly exposed to the sun.
* The air conditioner is located away from any heat source.
Instructions (Cont.)
Dehumidifying mode
IMPORTANT: For best efficiency in dehumidifying mode, make sure that windows and doors are kept closed.
- Press the MODE button until the dehumidifying mode icon appears. The unit will automatically maintain the room temperature at 2°C lower than the current room temperature (within the 16°C to 31°C range).
Auto mode
In this mode, the air conditioner will automatically decide on the most suitable mode: cooling, dehumidifying or fan, as illustrated in the table below:
| Room Temperature Mode Set Temperature | ||
| < 23°C Fan --- | ||
| ≥ 23°C — <26°C Dehumidify 23°C | ||
| ≥ 26°C Cooling | 25°C | |
Timer operation
The air conditioner has a 24 hour timer you can set to start the unit at a later time, or to switch off the unit automatically.
On-Timer setting
- With the unit switched off (but power supplied), press the TIMER button once to activate the timer: the display screen will show and "01" will be flashing.
- Press the ( ) or ( ) button repeatedly to set the number of hours after which you want the unit to start operation. For example, to start the unit in three hours, select ( 3 ).
- Press the TIMER button again to confirm the set time.
- To cancel the set time, press the TIMER button a third time.
Off-Timer setting
Use the same procedure as above, but while the unit is switched on, to set an auto off time.
FAQs & Troubleshooting Guide
If you experience problems with your portable air conditioner, or it appears not to be operating correctly, check the information below for solutions to common problems. If none of the solutions offered help you solve your problem, please contact our after sales support centre for advice.
Do not attempt to repair the appliance yourself!
| Problem Possible Cause Solution | ||
| Unit does not start when pressing the on/off button. | The water full indicator lamp blinks, indicating that the drip tray is full. | Drain the condensation water manually (see page 19). |
| The room temperature is lower than the set temperature. | Reset the temperature. | |
| Low cooling performance | Doors or windows to the room are open. | Make sure all windows and doors to the room are closed. |
| There are heat sources inside the room. | Remove the heat sources, if possible. | |
| The exhaust air hose is not connected, or blocked. | Connect or clean the exhaust air hose. | |
| The temperature setting is too high. | Reset the temperature. | |
| The air inlet is blocked. Clean the air inlet. | ||
| Noisy | The ground is not level or not flat enough. | Make sure to place the unit on a flat, level ground. |
| The sound comes from the refrigerant flowing inside the air conditioner. | This is normal and no cause for concern. | |
| E0 Code | The room temperature sensor failed. | Call for service to replace the room temperature sensor (the unit can also work without replacement). |
| E2 Code Water | full. Drain the water manually | |
Other Useful Information
Care and cleaning
Electric shock hazard!
Before cleaning and servicing, ensure the unit is switched off and disconnected from the power outlet to prevent possible injury.
If the housing surface needs cleaning, wipe it with a damp cloth, then dry with a soft, dry cloth.
CAUTION: Do not wash the unit directly. Do not use any solvent or alcohol-based cleaning agent on any surface. Using such harsh cleansers will scratch or damage the surface, or can even lead to deformation of the housing.
Cleaning the air filters
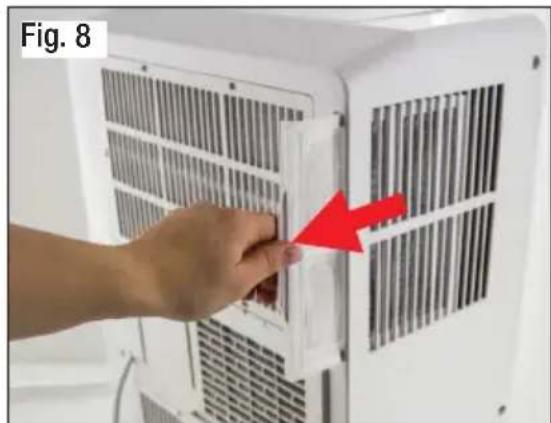
If the air filters clog up with dust, the airflow volume will be reduced. Clean the filters once every two weeks.
- Pull the air filters at the side of the air conditioner out by the handle (Fig. 8).
- Push the handles of the air filters at the back of the air conditioner slightly upwards and then remove the air filters for cleaning (Fig. 9).
- Clean the air filters with a mild detergent in warm water (max. 40°C), rinse and let dry thoroughly in the shade before reinstallation.
natural_image
Hand inserting a red arrow into a white air conditioner unit panel (no text or symbols visible)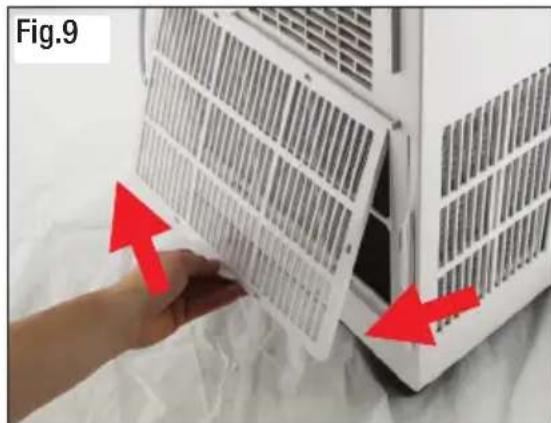
natural_image
Close-up of a hand holding a white panel with red arrows pointing to a component, no visible text or symbols.Other Useful Information (Cont.)
Before storage
At the end of the summer season, follow the simple steps below before disconnecting and storing the portable air conditioner. The ambient temperature should be below 23°C.
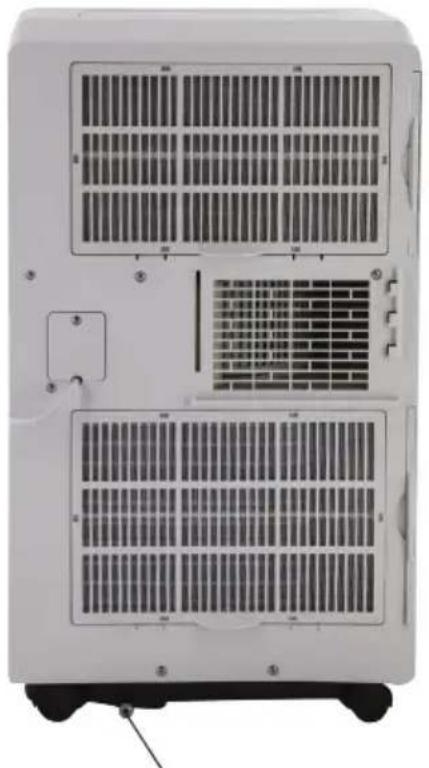
- Place a pan under the water drainage outlet at the back and remove the stopper (Fig. 10). Any condensation water that has accumulated will drain into the pan.
- Operate the unit in auto mode for a few hours to let the drainage pipe dry.
- Switch off the unit and disconnect the plug from the power supply.
- Tie the cable with a string.
- Store the appliance in its original carton, or wrap it with a plastic bag, and keep it in a dry, cool place.
Fig.10
natural_image
Front view of a white industrial air conditioner unit with multiple ventilation grilles and mounting brackets (no visible text or labels)Condensation water drainage outlet with stopper
Condensation water drainage methods
- Condensation water that forms during cooling will drop into an in-built drip tray and will be evaporated automatically.
- If too much condensation water accumulates that cannot be evaporated automatically, or if the water pump is damaged, the FULL indicator will illuminate and you will have to drain the water manually via the drain outlet at the rear of the unit in order for the air conditioner to continue cooling. See “Before storage”, above, for manual drainage instructions.
Other Useful Information (Cont.)
Service and repair
If you look after your portable air conditioner it should give you years of good service. Should you experience problems with the appliance that you cannot solve yourself using the advice given on page 17, please contact our after sales support centre for advice.
Do not attempt to repair the appliance yourself!
Spare parts
Our after sales support centre stocks the following spare parts for the A006C-12C STIRLING Portable Air Conditioner. To purchase a part, call the centre on 1300 886 649 or email us at info@tempo.org
• Air inlet grilles (large and small, for rear of housing)
- Castor wheel
- Compressor capacitor
• Control panel/main PCB
- Display PCB
- Dust screen, small, with frame
- Exhaust adaptor
- Flexible exhaust hose
- Flexible exhaust hose connector
- Motor capacitor
- Power PCB
- Pump wheel
- Remote control
- Stopper
- Transformer
• Under-fan wheel, large and small
- Under motor
- Drip tray
- Window installation (ventilation assembly) kit
Other Useful Information (Cont.)
Technical specifications
Cooling capacity: 3.5kW / 12000 BTU
Rated voltage: 220-240VAC
Rated frequency: 50Hz
Rated current: 6.0A (Cooling)
Rated input: 1340W (Cooling)
Cooling area: 18–28m ^2
Timer: 24 hour timer
Mode of operation: Control panel with LED screen and remote control
Remote control battery: 3V Lithium button cell
Fan speeds: 3 (low/medium/high)
Operation modes: 3 (cooling/auto/dehumidifying)
Refrigerant: R410A, 570g
Design pressure: 1.2(Lo)/3.8(Hi)MPa
Max. operating
pressure for exchanger: 3.3MPa
Moisture removal: 1.5L/h
Temperature range: 16-31°C (cooling mode only)
Resistance class: IP20
Weight: 25.2kg
Dimensions: 415mm (W) x 291mm (D) x 721mm (H)
Window kit inclusions: Flexible exhaust hose
Rectangular hose connector
Oval hose connector
Window slider for horizontally or vertically opening
windows (adjustable from 67.5cm to 123cm)
Compliance
This appliance has been fully tested and meets all requirements as set out by standards AS/NZS 60335.1 and AS/NZS 60335.2.40.
Other Useful Information (Cont.)
Responsible disposal
At the end of its working life, do not throw this appliance out with your household rubbish. Electrical and electronic products contain substances that can have a detrimental effect on the environment and human health if disposed of inappropriately. Observe any local regulations regarding the disposal of electrical consumer goods and dispose of it appropriately for recycling and recovery of the refrigerant. Contact your local authorities for advice on recycling facilities in your area.

text_image
ALDISTIRLING®
Portable Air Conditioner
Repair and Refurbished Goods or Parts Notice
Unfortunately, from time to time, faulty products are manufactured which need to be returned to the supplier for repair.
Please be aware that if your product is capable of retaining user-generated data (such as files stored on a computer hard drive, telephone numbers stored on a mobile telephone, songs stored on a portable media player, games saved on a games console or files stored on a USB memory stick) during the process of repair, some or all of your stored data may be lost. We recommend you save this data elsewhere prior to sending the product for repair.
You should also be aware that rather than repairing goods, we may replace them with refurbished goods of the same type or use refurbished parts in the repair process.
Please be assured though, refurbished parts or replacements are only used where they meet ALDI's stringent quality specifications.
If at any time you feel your repair is being handled unsatisfactorily, you may escalate your complaint. Please telephone us on 1300 886 649 or write to us at:
Tempo (Aust) Pty Ltd ABN 70 106 100 252
PO BOX 6056 Frenchs Forest, Sydney, Australia NSW 2086
Telephone: 1300 886 649 (Aust) - Fax: (02) 9975 2688
Tempo Help Desk: 1300 886 649 (Aust)
(Operating Hours: Mon-Fri 08:30am to 06:00pm EST)
Email: info@tempo.org

text_image
3 YEAR WARRANTY
text_image
STOP BEFORE RETURNING TO STORE Read the manual. It will help you get the best out of your product. Still have questions? Call After Sales Support 1300 886 649 Or visit www.tempo.orgWarranty returns
Should you for any reason need to return this product for a warranty claim, make sure to include all accessories with the product.
Product does not work?
If you encounter problems with this product, or if it fails to perform to your expectations, make sure to contact our After Sales Support Centre on 1300 886 649 before returning it to the store for a refund.
For an electronic copy of this manual, go to www.stirlingappliances.com.au and download a copy.
Instruction Manual Revision Index
Version No Issue Date Description
V1.0 13 February 2015 Original release
V1.1 20 March 2015 Minor amendments (pages 3, 12)
V1.2 27 April 2015 Compliance updates (pages 3, 10, 17, 21)
V1.3 13 July 2015 Minor update (page 13)
V2.0 08 June 2016 Second release