
SW-750 - Waffle Maker Stirling - Free user manual and instructions
Find the device manual for free SW-750 Stirling in PDF.


| Product Type | Waffle Maker |
| Brand | Stirling |
| Model | SW-750 |
| Dimensions (approx.) | 25 x 20 x 10 cm |
| Weight (approx.) | 1.5 kg |
| Power Supply | 220-240 V, 50/60 Hz |
| Power Consumption | 800-1000 W |
| Plate Material | Non-stick coated |
| Number of Waffles | One large round waffle |
| Indicator Lights | Power and ready lights |
| Temperature Control | Adjustable browning control |
| Main Functions | Bakes waffles, non-stick cooking, easy release |
| Safety Features | Cool-touch handle, automatic shut-off after 30 minutes |
| Cleaning | Wipe non-stick plates with damp cloth; do not immerse in water |
| Storage | Cord wrap for compact storage |
| Spare Parts Availability | Replacement non-stick plates available from manufacturer |
| Repair Information | Refer to authorized service center for repairs |
| Manual Languages | English (original), other languages available on request |
Frequently Asked Questions - SW-750 Stirling
User questions about SW-750 Stirling
0 question about this device. Answer the ones you know or ask your own.
Ask a new question about this device
Download the instructions for your Waffle Maker in PDF format for free! Find your manual SW-750 - Stirling and take your electronic device back in hand. On this page are published all the documents necessary for the use of your device. SW-750 by Stirling.
USER MANUAL SW-750 Stirling
natural_image
Abstract black and white spiral pattern enclosed in a circle (no text or symbols)STIRLING®
natural_image
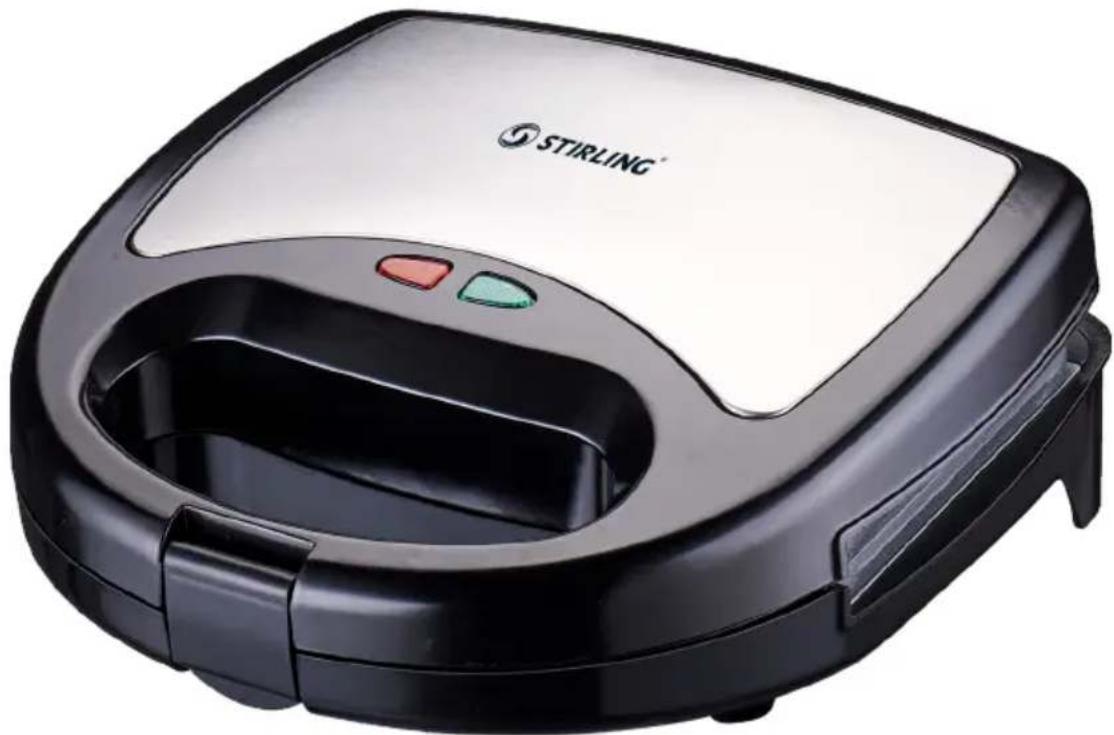
Black and white Stirling grater with two side buttons (red and green) on the side, no visible text or symbols on the appliance itself.Multi Snack Maker
Model Number: SW-750
INSTRUCTION MANUAL
Welcome
Congratulations on choosing to buy a STIRLING ® product.
All products brought to you by STIRLING ® are manufactured to the highest standards of performance and safety and, as part of our philosophy of customer service and satisfaction, are backed by our comprehensive warranty. We hope you will enjoy using your purchase for many years to come.
Contents
02 Welcome
04 Warranty Details
05 General Safety Instructions
08 Product Overview
09 Getting Started
10 Instructions
12 FAQs and Troubleshooting Guide
13 Other Useful Information
15 Repair and Refurbished Goods or Parts Notice

STIRLING®
Multi Snack Maker
Warranty Details
REGISTER YOUR PURCHASE AT www.aldi.com.au/en/about-aldi/product-registration/ TO KEEP UP-TO-DATE WITH IMPORTANT PRODUCT INFORMATION
The product is guaranteed to be free from defects in workmanship and parts for a period of 12 months from the date of purchase. Defects that occur within this warranty period, under normal use and care, will be repaired, replaced or refunded at our discretion. The benefits conferred by this warranty are in addition to all rights and remedies in respect of the product that the consumer has under the Competition and Consumer Act 2010 and similar state and territory laws.
Our goods come with guarantees that cannot be excluded under the Australian Consumer Law. You are entitled to a replacement or refund for a major failure and to compensation for any other reasonably foreseeable loss or damage. You are also entitled to have the goods repaired or replaced if the goods fail to be of acceptable quality and the failure does not amount to a major failure.
1
YEAR WARRANTY
General Safety Instructions
IMPORTANT SAFETY INSTRUCTIONS READ CAREFULLY AND KEEP FOR FUTURE REFERENCE
Read this manual thoroughly before first use, even if you are familiar with this type of product. The safety precautions enclosed herein reduce the risk of fire, electric shock and injury when correctly adhered to. Keep the manual in a safe place for future reference, along with the completed warranty card, purchase receipt and carton. If applicable, pass these instructions on to the next owner of the appliance.
Always follow basic safety precautions and accident prevention measures when using an electrical appliance, including the following:
Electrical safety and cord handling
- Voltage: Make sure your outlet voltage and circuit frequency correspond to the voltage stated on the appliance rating label and your outlet socket is properly earthed. If this is not the case, do not use the snack maker. - Water: To protect against fire and electric shock, do not immerse the cord, plug or any non-removable parts of this snack maker in water or other liquid, or expose the electrical connections to water. Ensure your hands are dry before handling the plug or switching on the appliance.
WARNING: If the snack maker falls or accidentally becomes immersed in water, unplug it from the wall outlet immediately. Do not reach into the water!
- Damage: Check the power cord regularly for visible damage. If the cord is damaged, it must be replaced by the manufacturer, service agent or appropriately qualified personnel in order to avoid any hazards.
WARNING: Do not pick up or operate the appliance if the cord, plug or housing is damaged, or after it malfunctions or has been dropped or damaged in any way. In case of damage, contact the after sales support line for advice.
- Power cord: Do not kink, bend, strain or damage the power cord and protect it from sharp edges and heat. Do not let it touch hot surfaces. Do not let the cord hang over the edge of a table or benchtop.
- No extension cord, no timer: Do not use this snack maker with an extension cord, plug adaptor, external timer or separate remote control system.
- Disconnect: Unplug the snack maker from the outlet when it is not in use and before cleaning. Grip the plug when disconnecting, do not pull the cord.
- RCD: Unless your home is already fitted with a residual current device (safety switch), we recommend installing an RCD with a rated residual operating current not exceeding 30 mA to provide additional safety protection when using electrical appliances. See your electrician for professional advice.
- Winding the cord: If winding the power cord, avoid tight bends as this could damage the cord.
General Safety Instructions (Cont.)
Usage conditions and restrictions
- Domestic use only: This appliance is intended for indoor household use only. It is NOT suitable for commercial, industrial or trade use.
• No outdoor use: Do not use the appliance outdoors. - Intended use: The appliance is only suitable for making snack foods. Do not use it for anything other than its intended purpose, and only use it as described in this manual.
- Attachments: The use of accessory attachments not recommended in this manual may cause electric shock, fire or personal injuries.
- Usage restriction: The appliance is not intended for use by persons (including children) with reduced physical, sensory or mental capabilities, or lack of experience and knowledge, unless they have been given supervision or instruction concerning use of the appliance by a person responsible for their safety.
- Children: Supervise children to ensure they do not play with the appliance. Close supervision is necessary when any appliance is used by or near children. Cleaning and user maintenance shall not be made by children unless they are older than 8 years and supervised.
- Liability: We accept no liability for any eventual damages or personal injury caused by misuse of the product and/or failure to follow these instructions.
Safe usage
- Before first use: Make sure you know how to use the snack maker before first use.
- Clearances: When using the snack maker, make sure there is adequate air space above and on all sides for air circulation.
- Work surface: Place the snack maker on a dry, stable, flat, heat-resistant surface.
- WARNING: DO NOT use the snack maker under the following conditions:
* On or near a gas or electric hob, in a heated oven or near an open flame.
* On a soft surface (such as carpet) or where it may tip over during use.
* Outdoors or in areas of high humidity.
* Near or below materials that can ignite easily (such as curtains, drapes, wall hangings, tea towels) or underneath wall cabinets, as bread may burn and cause a fire if it is cooked for too long.
* In confined spaces or under overhanging furniture/structures.
- Do not cover: Do not cover the snack maker or place anything on top during use.
- Do not insert any objects into the appliance.
- Smoke or fire: Immediately unplug the appliance if fire or smoke is emitted.
General Safety Instructions (Cont.)
- Unattended: Do not leave the snack maker unattended when it is switched on. Disconnect it from the power supply when you are finished with it or when leaving the room.
- Malfunction: If this appliance begins to malfunction during use, or if fire or smoke is emitted, immediately unplug the cord. Do not use or attempt to repair a malfunctioning appliance. Contact our after sales support centre for advice.
- Cleaning: Maintain the snack maker in accordance with the instructions to ensure it functions properly. Disconnect the appliance before moving and cleaning it. Allow it to cool completely before cleaning and storing.
- Storage: When not in use, store your appliance and its instruction manual in a safe and dry place.
CAUTION: HOT SURFACES!
- The snack maker heats up and can cause burns. The temperature of accessible surfaces, especially the metal parts, can become very hot when the appliance is operating. Do not touch hot surfaces during or immediately after use. Use handles or knobs.
- Always use oven mitts when handling hot material and allow metal parts to cool before cleaning.

WARNING: ELECTRIC SHOCK HAZARD!
- Never attempt to dislodge food from inside the snack maker when it is plugged into an electrical outlet. Always unplug it and let it cool first.
This appliance is intended to be used in household and similar applications such as: - staff kitchen areas in shops, offices and other working environments;
- farm houses;
- by clients in hotels, motels and other residential type environments;
• bed and breakfast type environments.
Product Overview
Scope of delivery

Multi Snack Maker
1 Closing latch
2 Handle
3 Body
4 Power indicator lights
5 Ready indicator light
6 Base for upright storage
7 Cooking plates (concealed - Includes Sandwich, Mini Donuts, Waffles, Russian Nut & Panini plates)
8 Anti-slip feet (x2)
Documentation (not shown):
Recipe Booklet
Quick Start Guide
Instruction Manual
Warranty Certificate
NOTE: Due to continued product improvement, images and illustrations in this manual may vary slightly from the product purchased. All images in this manual are for reference purposes only. Parts are not necessarily pictured to scale.
Getting Started
Before first use
- Unpack: This product has been packaged to protect it against transportation damage. Unpack the appliance and keep the original packaging materials in a safe place. It will help prevent any damage if the product needs to be transported in the future, and you can use it to store the appliance when it is not in use. In the event that the packaging is to be disposed of, please recycle it where possible. Plastic wrapping can be a suffocation hazard for babies and young children, so ensure all packaging materials are out of their reach. Dispose of any plastic wrapping safely.
- Documentation: Make sure you have read and understood all instructions and warnings in this manual. Refer to the Product Overview, opposite, to familiarise yourself with the product and identify all parts. Pay particular attention to the safety instructions on the previous pages.
- Cord: Unwind the power supply cord to its full length and inspect the cord and plug for damage. Inspect all other parts of the appliance for visual damage. Do not use the appliance if anything appears to be damaged or not working properly. In case of damage, contact our after sales support centre using the details at the bottom of the page.
- Clean: Remove any adhesive labels and wipe the outside of the appliance with a damp cloth. Clean the plates in warm soapy water. Make sure there is no packaging material remaining in the slots.
- Season: Before first use, season the non-stick cooking plates for long-term protection. Plug in the power plug and turn on the power. When the plates are preheated, unplug the appliance and carefully smear a small amount of cooking fat (oil, butter or margarine) onto the preheated plates with a paper towel or silicone brush. Exercise care, as the cooking plates will be hot. Leave the coating on the plates but wipe off any excess.
NOTE: Do not use aerosol cooking spray as the chemicals these sprays contain can build up on non-stick surfaces and reduce their efficiency.
- First use: When first switched on, the unit may emit a little smoke or odour, but this is no cause for concern; it is due to the element and components being new. Ensure good ventilation.
Instructions
Using your snack maker
Preparation
- Place the snack maker on a level and stable, heat and flameproof work surface, with enough room for ventilation all around it.
- Select the plates that are suitable for your cooking. To change the plates, push the plate release button (fig. 1) to release the existing plates then replace with your selected plate.
NOTE: Plates may be hot. Avoid the risk of burns by change the plates before use. If changing the plates during use, ensure that mitts or other similar protection are used.

natural_image
Close-up of a mechanical component with circular holes and a red arrow pointing to a small feature (no text or symbols visible)- Prepare the ingredients for your sandwich fillings or your other snacks. Two sandwiches can be toasted at the same time, six mini donuts, two waffles, 12 russian nuts or two paninis.
Preheating
- Ensure that the lid is closed. Unwind the power cord, insert the plug into the mains power supply and switch on power at the outlet. The red and green indicator lights will illuminate during heat up, once the appliance reaches the cooking temperature, the green light will turn off.
- After about 3-5 minutes, when the green 'Ready' indicator shuts off, the sandwich maker is ready to use. It will cycle off and on as the thermostat in the unit maintains the correct operating temperature.
Handle lock
The handle lock (Fig. 2) locks the upper and lower cooking plates together when the lid is closed. It must be closed when using the appliance, and for storage or carrying it by the handle.
To open the lock, push the top and bottom handles together then slightly pull out the latch on the handle lock and open the lid.

natural_image
Close-up of a black robotic device with a handle and control buttons (no visible text or symbols)To close the lock, close the lid and push the lock to engage to keep the upper and lower cooking plates together.
Instructions (Cont.)
Cooking
- For toasted sandwiches or paninis, spread a little butter or margarine on the slices of bread; this will ensure a golden brown result. (You may omit this step for a lower-fat version.)
- Open the lid and place the slices of bread, buttered side down, onto the lower cooking plates. Follow with your filling and top with the remaining slices of bread, buttered side up so the buttered sides are in contact with the cooking plates.
- For waffles, mini donuts and russian nuts, prepare your mixture, then fill the bottom plate - ensure you don't overfill.
- Close the lid carefully.
- During use the green 'Ready' light will turn on and off while the thermostat keeps the snack maker at the correct temperature.
- Carefully check your cooking progress by unlatching and checking for a consistent, light brown shade or as per your liking.
- When finished, carefully open the lid fully and remove the food using non-metallic utensils. Do not use a knife or any other sharp object as this will damage the non-stick surface.
- Switch off the power at the outlet, unplug the sandwich maker and let it cool down before cleaning and storage.
FAQs and Troubleshooting Guide
| Problem Solution | |
| The snack maker is not working. | Check the power connection and ensure the plug is properly inserted in the outlet.Make sure power to your electrical outlet is switched on. |
| The cooking plate has fallen out. | With the appliance off and cooled down,first put the plate latch in to the guide, then push the plate firmly until a click is heard and both sides of the plate are latched in place. Never cook on plates that are not secured in place by the latches. |
| The cooking is too dark or too light. | Closely monitor the cooking by opening the latch and viewing during the cooking process. |
| The appliance emits smoke and/or a burning smell. | It's normal for some smoke and smell to omit during the first use. Ensure the room is well ventilated and allow the unit to burn off.If the snack maker continues to omit smells and smoke, turn off the appliance and ensure the plates and body are clean and free of debris that may continue burning. |
Other Useful Information
Care and cleaning
CAUTION!
- Ensure the snack maker is disconnected from the mains supply and has cooled down fully before cleaning or storing.
- Never immerse the appliance, power cord or plug in water or any other liquid. Never wash it in a dishwasher.
-
Do not use harsh abrasive cleaners or cleaning materials (such as steel wool, scouring pads or oven cleaners) on any part of the appliance. They will damage the non-stick coating of the cooking plates and affect the finish of the appliance housing.
-
Switch off and unplug the snack maker from the mains supply before cleaning. It is easier to clean when slightly warm, but allow the appliance to cool to a safe temperature before cleaning.
- Wipe the cooking plates and external surfaces of the snack maker clean using a soft, damp cloth, making sure that no moisture or oil enters the appliance.
- For baked-on food residues, squeeze some warm water mixed with a little detergent over the spillage, then clean with a non-abrasive plastic scouring pad, or place a wet kitchen paper towel over the spillage to moisten it. Do not use metal utensils or anything abrasive that can scratch or damage the non-stick coating.
- Before reusing or storing, ensure all areas of the sandwich maker are completely dry.
Storage
- Ensure the sandwich maker has completely cooled and is clean and completely dry.
- Close the lid and ensure the handle lock is engaged for safe storage.
- For compact storage, store the appliance upright on its back, or place it in its original packaging carton and store in a clean, dry place, out of children's reach.
Other Useful Information (Cont.)
Technical Specifications
| Model SW-750 | |
| Rated Voltage/Frequency 220-240 V~ 50-60 Hz | |
| Rated Power 750 W | |
| Cooking Plates 5 Sets | |
| Dimensions (approx.) 240(W) x 235(D) x | 100(H) mm |
| Weight (approx.) 1.24 kg (excluding plates) | |
Compliance
This appliance has been fully tested and meets all requirements as set out by standards AS/NZS 60335.1 and AS/NZS 60335.2.9.

The RCM Mark (Regulatory Compliance Mark) indicates that the product complies with the relevant guidelines of the ACMA as well as corresponding government requirements for the safety of electrical devices.
Responsible disposal


Packaging materials are recyclable. Please dispose of them responsibly for recycling.
At the end of its working life, do not throw this appliance out with your household waste. Electrical and electronic products contain substances that can have a detrimental effect on the environment and human health if disposed of inappropriately. Observe any local regulations regarding the disposal of electrical consumer goods and dispose of it appropriately for recycling.
Contact your local authorities for advice on recycling facilities in your area. Or find recycling scheme services listed on Planet Ark's website at www.recyclingnearyou.com.au, or call Planet Ark on 1300 733 712.


STIRLING®
Multi Snack Maker
Repair and Refurbished Goods or Parts Notice
Unfortunately, from time to time, faulty products are manufactured which need to be returned to the supplier for repair.
Please be aware that if your product is capable of retaining user-generated data (such as files stored on a computer hard drive, telephone numbers stored on a mobile telephone, songs stored on a portable media player, games saved on a games console or files stored on a USB memory stick) during the process of repair, some or all of your stored data may be lost. We recommend you save this data elsewhere prior to sending the product for repair.
You should also be aware that rather than repairing goods, we may replace them with refurbished goods of the same type or use refurbished parts in the repair process.
Please be assured though, refurbished parts or replacements are only used where they meet ALDI's stringent quality specifications.
If at any time you feel your repair is being handled unsatisfactorily, you may escalate your complaint. Please telephone us on 1300 112 534 or write to us at:
Tempo (Aust) Pty Ltd (ABN 70 106 100 252)
PO BOX 6097, North Sydney 2059, NSW Australia
Web Support: tempo.org/support
Tempo Help Desk: 1300 112 534 (Aust)
(Operating Hours: Mon-Sat 09:00 am to 06:00 pm AEST)

natural_image
Icon showing a person reading a book with an exclamation mark symbol (no text or numbers present)Please read the manual
It will help you get the best out of your product.
Still have questions?
Call after sales support 1300 112 534
Or visit www.tempo.org
Warranty returns
Should you for any reason need to return this product for a warranty claim, make sure to include all accessories with the product.
Product does not work?
If you encounter problems with this product, or if it fails to perform to your expectations, make sure to contact our After Sales Support Centre on 1300 112 534 for advice.
For an electronic copy of this manual, go to www.stirlingappliances.com.au and download a copy, or contact our after sales support centre.
Instruction Manual Revision Index
Version No Date Description
V1.0 10 May 2023 Original Release
V2.0 23 January 2024 Second Release
- STIRLING®
- Welcome
- Contents
- Warranty Details
- General Safety Instructions
- IMPORTANT SAFETY INSTRUCTIONS READ CAREFULLY AND KEEP FOR FUTURE REFERENCE
- Electrical safety and cord handling
- General Safety Instructions (Cont.)
- Usage conditions and restrictions
- Safe usage
- CAUTION: HOT SURFACES!
- WARNING: ELECTRIC SHOCK HAZARD!
- Product Overview
- Multi Snack Maker
- Documentation (not shown):
- Getting Started
- Before first use
- Instructions
- Using your snack maker
- Preparation
- Preheating
- Handle lock
- Instructions (Cont.)
- Cooking
- FAQs and Troubleshooting Guide
- Other Useful Information
- Care and cleaning
- CAUTION!
- Storage
- Other Useful Information (Cont.)
- Compliance
- Responsible disposal
- Repair and Refurbished Goods or Parts Notice
- Warranty returns
- Product does not work?
Brand : Stirling
Model : SW-750
Category : Waffle Maker